


ΕΠΙΓ ΕΙ ΟΣ ΨΗ ΦΙ ΑΚΟΣ ΔΕ ΚΤΗΣ DV B- T2 H. 26 5 HEVC
DIGITAL RECEIVER DVB-T2 H2.65 HEVC
USB
Διαβάστε αυτό τ ο εγ χε ιρ ίδ ιο π ρι ν τη χ ρή ση τ ου δ έκ τη .
Ελλ ηνικά


ΠΕΡΙΕΧΟ ΜΕΝΑ
ΣΗΜ ΑΝΤΙΚ ΕΣ ΟΔΗΓΙ ΕΣ ΑΣΦΑΛ ΕΙΑΣ
ΕΙΣ ΑΓΩΓΗ
Μπρ οστιν ή Όψη ... ..... ..... ..... ..... ..... ..... ..... ..... ..... ..... ..... ..... ..... ..... ..... ..... ..... ..... ..... .... 1
Πίσ ω Όψη ... ..... ..... ..... ..... ..... ..... ..... ..... ..... ..... ..... ..... ..... ..... ..... ..... ..... ..... ..... ..... ... ..... 1
Πλά για Όψη . ..... ..... ..... ..... ..... ..... ... ..... ..... ..... ..... ..... ..... ..... ..... ..... ..... ..... ..... ..... ..... ..... 1
Τηλεχ ειρισ τήριο Ε κμάθη σης ... ..... ..... ..... ..... ..... ..... ..... ..... ..... ..... ..... ..... ..... ..... ..... ..... ... 2
ΣΥΝ ΔΕΣΗ ΤΟΥ ΔΕ ΚΤΗ ΣΤΗ Ν ΤΗΛΕΟ ΡΑΣΗ... .... ... ... ... ... ... ... ... ... ... ... .... ... ... ... ... ... ... ... ... ... ... ... ... .3
ΞΕΚ ΙΝΩΝΤΑΣ -ΛΕΙΤ ΟΥΡΓΙ Α
Γρή γορη Εγ κατάσ τασ η ..... ..... ..... ..... ..... ..... ..... ..... ..... ..... ..... ..... ..... ... ..... ..... ..... ..... .... 4
Λίσ τα Κανα λιώ ν ..... ..... ..... ..... ..... ..... ..... ..... ..... ..... ..... ..... ..... ..... ..... ..... ..... ..... ..... ..... .. 4
EPG ( Ηλεκτ ρονικ ός Οδηγ ός Προγ ράμμα τος ... ... ..... ..... ..... ..... ..... ..... ..... ..... ..... ..... ..... .. 4
ΕΠΕ ΞΕΡΓΑΣΙ Α ΚΑΝΑΛ ΙΟΥ ... ... ..... ..... ..... ..... ..... ..... ..... ..... ..... ..... ..... ..... ..... ..... ..... ..... ... 5
ΕΓΚ ΑΤΑΣΤΑ ΣΗ
Αυτ όματη Αν ίχνευ ση .... ..... ..... ..... ... ..... ..... ..... ..... ..... ..... ..... ..... ..... ..... ..... ..... ..... ..... .... 6
Χει ροκίν ητη Ανίχ νευση . ..... ..... ..... ... ..... ..... ..... ..... ..... ..... ..... ..... ..... ..... ..... ..... ..... ..... .... 6
LCN . ..... ..... ..... ..... ..... ..... ..... ..... ..... ..... ..... ..... ..... ..... ..... ..... ..... ..... ..... ..... ..... ... ..... ..... . 6
ΡΥΘΜ ΙΣΕΙΣ Σ ΥΣΤΗΜ ΑΤΟΣ
Γλώ σσα ... ..... ..... ..... ..... ..... ... ..... ..... ..... ..... ..... ..... ..... ..... ..... ..... ..... ..... ..... ..... ..... ..... ... 7
Σύσ τημα TV . ..... ..... ..... ..... ..... ..... ..... ..... ..... ..... ..... ..... ..... ..... ..... ..... ..... ..... ..... ..... ... .... 7
Ρύθ μιση Ώρ ας .... ..... ..... ..... ..... ..... ..... ..... ..... ..... ..... ..... ..... ..... ..... ..... ..... ..... ..... ..... ... ... 7
Ρυθ μίσει ς Χρονο διακό πτη . ..... ..... ..... ..... ..... ..... ..... ..... ..... ..... ..... ..... ..... ..... ..... ..... ..... ... 8
Γον ικό Κλε ίδωμα . ..... ..... ..... ..... ..... ..... ..... ..... ... ..... ..... ..... ..... ..... ..... ..... ..... ..... ..... ..... .. 8
Ρυθ μίσει ς OSD ... ..... ..... ..... ..... ..... ..... ..... ..... ..... ..... ..... ..... ..... ..... ..... ..... ..... ..... ..... ... ... 8
Αγαπ ημένα . ..... ..... ..... ... ..... ..... ..... ..... ..... ..... ..... ..... ..... ..... ..... ..... ..... ..... ..... ..... ..... ..... 9
Ρύθ μιση Πε ριγρα φής Ήχο υ ... ..... ..... ..... ..... ..... ..... ..... ..... ..... ..... ..... ..... ..... ..... ..... ..... .... 9
Άλλ ο ..... ..... ..... ..... ..... ... ..... ..... ..... ..... ..... ..... ..... ..... ..... ..... ..... ..... ..... ..... ..... ..... ..... ..... . 9
ΕΡΓΑΛ ΕΙΑ
Πλη ροφορ ίες Συσ τήματ ος .... ..... ..... ..... ..... ..... ... ..... ..... ..... ..... ..... ..... ..... ..... ..... ..... ..... . 10
Εργ οστασ ιακές Ρ υθμίσ εις ... ..... ..... ..... ..... ..... ..... ... ..... ..... ..... ..... ..... ..... ..... ..... ..... ..... .. 10
Ανα βάθμι ση λογι σμι κού μέσ ω OTA ... ..... ..... ..... ..... ..... ..... ..... ..... ..... ..... ..... ..... ..... ..... ... 10
Ανα βάθμι ση μέσω U SB .... ..... ..... ..... ... ..... ..... ..... ..... ..... ..... ..... ..... ..... ..... ..... ..... ..... ..... 1 0
Σώσ ιμο/Φ όρτωσ η Καν αλιών σ ε/από U SB .... ..... ..... ..... ..... ..... ..... ..... ..... ..... ..... ..... ..... ... 11
Bac kup Λογ ισμικ ού .... ..... ..... ..... ..... ..... ..... ..... ..... ... ..... ..... ..... ..... ..... ..... ..... ..... ..... ..... . 11
Ασφα λής αφα ίρεση τ ης συσκ ευής US B ..... ..... ..... ..... ..... ..... ..... ..... ..... ..... ..... ..... ..... ..... . 11
MED IA PLAYER
Med ia Play er .... ..... ..... ..... ..... ..... ..... ..... ..... ..... ..... ..... ..... ..... ..... ..... ..... ..... ..... ..... ..... ... 1 2
Πλη ροφορ ίες Αποθ ήκευσ ης PVR .. ..... ..... ..... ..... ..... ..... ... ..... ..... ..... ..... ..... ..... ..... ..... .... 13
Ρύθ μιση PV R ..... ..... ..... ..... ..... ..... ..... ..... ..... ..... ..... ..... ..... ..... ..... ..... ..... ..... ..... ..... ... .... 13
TIM ESHIF T/ΕΓΓ ΡΑΦΗ
Time shift . ..... ..... ..... ..... ..... ..... ..... ..... ..... ..... ..... ..... ..... ..... ..... ..... ..... ..... ..... ..... ... ..... .... 14
Εγγ ραφή .. ..... ..... ..... ..... ..... ..... ..... ..... ..... ..... ..... ..... ..... ..... ..... ..... ..... ..... ..... ... ..... ..... ... 14
ΑΝΤ ΙΜΕΤΩΠ ΙΣΗ ΠΡΟ ΒΛΗΜΑΤ ΩΝ..... ... ... ... ... ... ... .... ... ... ... ... ... ... ... ... ... .... ... ... ... ... ... ... ... ... ... ... ....1 5
ΧΑΡΑ ΚΤΗΡΙΣ ΤΙΚΑ.. ... ... ... ... ... ... ... ... .... ... ... ... ... ... ... ... ... ... ... .... ... ... ... ... ... ... ... ... ... ... .... ... ... ... ... ... .16

INTRODUCTION
ΕΙΣΑΓΩΓΗ
Μπρο στ ινή Όψη
1 2 3 4 5
DIGITAL RECEIVER DVB-T2 H2.65 HEVC
Πίσω Ό ψη
1 2 3 4
ANT OUT
ANT IN
HDMI SCART
Πλάγια Ό ψη
1
5V 2A
Sta ndby
1
Καν άλι Πάν ω/Κάτω
2
Δέκ της Υπε ρύθρω ν
3
Ενδ εικτι κή λυχν ία
USB
4
Θύρ α USB
5
ANT I N
1
2
ANT O UT
Έξο δος H DMI
3
Έξο δος S cart
4
Είσ οδος τρ οφοδο σίας DC
1
1
1
Ελλ ηνικά

ΤΗΛΕ ΧΕΙ ΡΙΣ ΤΗΡ ΙΟ ΕΚ ΜΑΘΗΣ ΗΣ
1
TV CO NTROL : Πλήκτ ρα λειτ ουργί ας εκμά θησης
2
Προ ηγούμ ενο
3
Μετ ακίνη ση πίσω
4
Ανα παραγ ωγή
5
Παύ ση
6
Κόκ κινο πλ ήκτρο : Εναλλ αγή T V και Rad io
Πρά σινο πλ ήκτρο : Υπότι τλοι ON /OF F
Κίτ ρινο πλ ήκτρο : TELET EXT
Μπλ ε πλήκτ ρο: Λειτ ουργί α Ήχου
7
EPG
8
Πλή κτρο OK : Επιβε βαίωσ η επιλο γής
9
Βελ άκια: Π λήκτρ α πλοήγ ηση ς
10
MEN U
11
VOL +/- :Αύ ξηση/ Μείωσ η Έντασ ης
12
MUT E: Ενερ γοποί ηση / Απε νεργοπ οίηση ή χου
13
Αρι θμητι κά πλήκ τρα
14
FAV: Εμ φάνισ η της Λίστ ας Αγα πημέν ων
15
Πλή κτρο St andby ( Κόκκι νο πλήκ τρο): S tandb y ON/OF F
16
Επό μενο
17
Μετ ακίνη ση μπρο στά
18
REC : Εγγρα φή προγ ράμμα τος
19
STO P: Διακ οπή α ναπαρ αγω γής ή εγγ ραφής
INF O: Πληρ οφορί ες τρέχ οντ ος κανα λιο ύ
20
21
EXI T: Έξοδ ος απ ό Μενού /Υπομ ενού
22
USB : Είσοδ ος στο Me dia Pla yer
23
CH+ /- : Κανά λι Πάνω κ αι Κά τω
24
REC ALL: Αλ λαγή στ ο προ ηγούμ ενο καν άλι
Πλήκτρα Λειτουργίας Εκμάθησης
Το τηλεχειριστήριο του δέκτη έχει 4 προγραμματιζόμενα πλήκτρα. Σε κάθε πλήκτρο μπορούν να αντιγραφούν
κάποιες από τις λειτουργίες του τηλεχειριστηρίου της τηλεόρασης.
1. Τοποθετείστε το τηλεχειριστήριο της τηλεόρασης αντικριστά με το τηλεχειριστήριο του δέκτη σε απόσταση
περίπου 3 εκατοστά.
2. LEGENT παρατεταμένα, μέχρι να ανάψειΠιέστε το πλήκτρο SET του τηλεχειριστηρίου του
έντονα και σταθερά το κόκκινο led. Αφήνοντας το πληκτρο SET, το κόκκινο led θα συνεχίσει να
είναι αναμμένο .
3. στηρίου του δέκτη μέχρι το κόκκινο ledΠιέστε το πλήκτρο POWER (Μπλε κουμπί) του τηλεχειρι
να αρχίσει να αναβοσβήνει.
4. του τηλεχειριστηρίου της τηλεόρασης,Μέσα σε 3 δευτερόλεπτα, πιέστε το πλήκτρο POWER
μέχρι το κόκκινο led να αναβοσβήσει 2 φορές και στη συνέχεια να μείνει σταθερά αναμμένο.
5. Επαναλάβετε τα βήματα 3 & 4 για τα υπόλοιπα πλήκτρα.
6. Πιέστε το πλήκτρο SET για αποθήκευση των κωδικών στο τηλεχειριστήριο.
1
2
Ελλ ηνικά
1
2
3
4
5
6
7
8
9
10
11
12
13
14
TV CON TROL
AV/TV VOL- VOL+ SET
SUBTITLE
TV/RADIO
EPG INFO
VOL
-
MENU
TTX
CH+
OK
CH-
USB
VOL CH
MUTE
1
2
5
4
7 8
FAV
RECALL
0
REC
AUDIO
VOL
+
EXIT
3
6
9
DF00
15
16
17
18
19
20
21
22
23
24

ΣΥΝΔΕΣΗ ΤΟΥ ΔΕΚΤΗ ΣΤΗΝ ΤΗΛΕΟΡΑΣΗ
Οι πι ο συνηθ ισμέν οι τρόπ οι σύ νδεση ς του δέκ τη με την τ ηλεόρ αση, πα ρου σιάζον ται στι ς παρακά τω
εικ όνες.
TV
Κερ αία
Καλ ώδι ο RF
ANT IN
ANT OUT
Καλ ώδι ο HDMI
HDMI SCART
Καλ ώδι ο Scart
Τρο φοδοτ ικό
ΣΗΜΕΙΩΣΗ:
NOT E:
1. Μη ν συνδέ ετε/α ποσυν δέ ετ ε το κα λώ διο H DMI ότα ν ο δέ κτη ς είναι ε νεργο ποιημ έν ος .
2. Ότ αν ο δ έκ τη ς είν αι ενερ γοποι ημ ένο ς, η ενδε ικτικ ή λυχνί α εί να ι πρά σινη. Ό ταν
η ενδ εικτι κή λυχν ία ε ίνα ι κόκκι νη, ο δέκ της είν αι σε κατ άσ τασ η αναμο νής.
Ελλ ηνικά
1
3
5V
2A

ΞΕΚΙΝΩΝ ΤΑΣ-ΛΕΙΤΟΥΡΓΙΑ
Γρήγ ορ η Εγκα τά στασ η
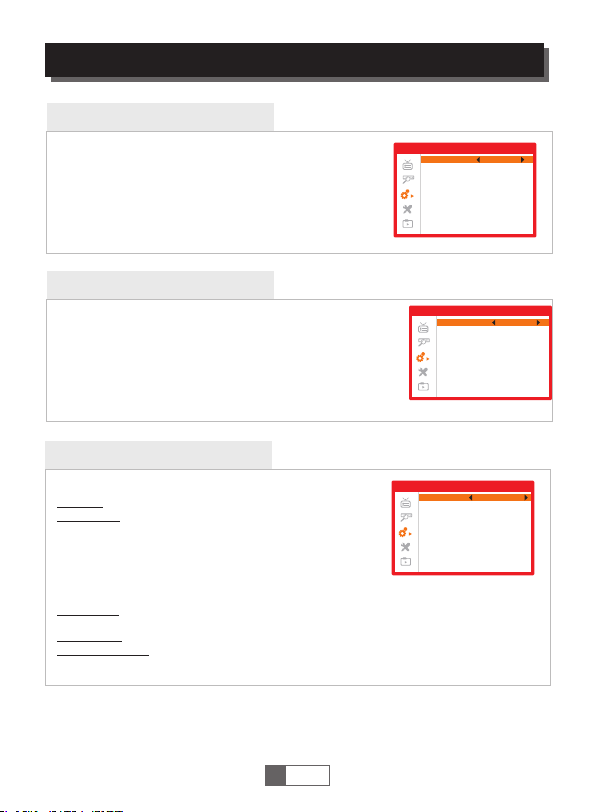
Αν χρησιμοποιείτε το δέκτη για πρώτη φορά, θα εμφανιστεί στην οθόνη σας
το παράθυρο “Καλωσήρθατε”. Πιέστε ΟΚ για αυτόματη αναζήτηση
καναλιών.
Περιοχή: Επιλέξτε τη χώρα.
Γλώσσα: Επιλέξτε τη γλώσσα.
Λειτουργία Προβολής: Επιλέξτε την ανάλυση οθόνης.
Διαστάσεις Εικόνας: Επιλέξτε τις διαστάσεις της οθόνης.
OK: Πιέστε ΟΚ για αυτόματη αναζήτηση καναλιών.
Λίστα Καν αλι ών
Μπο ρείτε ν α εμφαν ίσετε τ η Λίστ α Καναλ ιών πιέ ζοντ ας το πλή κτρο "O K".
Πιέ στε τα πλ ήκτρα π λοήγη σης γ ια να επι λέξετ ε το κανά λι πο υ επιθυ μείτε .
Ηλεκ τρ ονικός Οδηγ ός Π ρογ ρά μματος (EPG )
EPG ό λων των κα ναλιώ ν:
1
Πιέ στε το πλ ήκτρο " EPG" γι α να εισέ λθετε σ το μενο ύ του E PG.
Προ επισκ όπηση το υ τρέχο ντος καν αλιού θ α εμφαν ίζετα ι
πάν ω δεξιά σ την οθό νη.
Πιέ στε το πλ ήκτρο " Πάνω" ή " Κάτω" γι α να επιλ έξετε
2
το κα νάλ ι που επι θυμεί τε.
Πιέ στε το πλ ήκτρο " Αριστ ερά" ή "Δ εξιά" γ ια να επι λέξετ ε το
συμ βάν που ε πιθυμ είτε.
3
Πιε στε το "Π ράσιν ο" πλήκ τρο για ν α ορίσε τε το χρο νοδ ιακόπ τη
στο σ υμβάν .
Πιέ στε το "Κ όκκ ινο" πλ ήκτρο γ ια εμφά νιση το υ μενού " Time bar ". Μπορ είτε να ε πιλέξ ετε τον τ ρόπο
εμφ άνιση ς και μετ ακί νησης τ ου χρόν ου πιέζο ντας το πλ ήκτρο Ο Κ.
4
Πιέ στε το πλ ήκτρο " OK" για ε μφάνι ση των πλ ηρο φοριώ ν του επι λεγμέ νου συμ βάντο ς.
5
Πιέ στε το πλ ήκτρο " EXIT" γ ια επισ τροφή σ το προη γού μενο με νού ή έξο δο.
Μεν ού "Time b ar":
Έξο δος α πό το “Ti me bar” .
Επι στροφ ή στην τρ έχουσ α ώρα .
Μετ ακίνη ση χρόν ου μπρο στά ή πίσ ω ανά 3 0 λεπτά .
Μετ ακίνη ση χρόν ου μπρο στά ή πίσ ω ανά 2 ώ ρες.
Μετ ακίνη ση χρόν ου μπρο στά ή πίσ ω ανά 2 4 ώρες.
Καλω σήρθα τε
Περιο χή
Γλώσσ α
Λειτο υργία Π ροβολ ής
Διαστ άσεις Ε ικόνα ς
Ηλεκτ ρονικ ός
OK
01:39 8 /2
Ελλάδ α
Ελλην ικά
1080i @50HZ
Αυτόμ ατο
Ώρα
Χρονο
1
4
Ελλ ηνικά

ΕΠΕΞΕΡΓΑΣΙΑ ΚΑΝΑΛΙΟΥ
TV Όλα
Αγαπη
Κλείδω
0001 No N ame
0002 YooP lay Ga
0003 E4 +1
0004 UK TV Hist or
0005 SK Y THREE
0006 Sk y Spts Ne
0007 Sk y News
Λίστα Κ αναλι ων TV
Μετακί
Επεξε
Παράλ
DVBT
YooPlay Ga
498167KH Z/8K/ 64QAM
PID:203/ 303/2 03
GI:1/32 FE C:3/4
1
5
Ελλ ηνικά

ΕΠΕΞΕΡΓΑΣΙΑ ΚΑΝΑΛΙΟΥ - ΕΓΚΑΤΑΣΤΑΣΗ
Μετονομασία
ΕΓΚΑΤΑΣΤΑΣΗ
Αυτόματη Ανίχνευση
Αυτόματη ανίχνευση και αποθήκευση όλων των διαθέσιμων καναλιών.
Χειροκίνητη Ανίχ νευση
Μπορείτε να ανιχνεύσετε τα καναλια Βάσει Καναλιού ή Βάσει Συχνότητας.
Αφου επιλέξτε τις επιθυμητές τιμές, πιέστε “Ανίχνευση”.
LCN
Αν το LCN εί ναι ενε ργοποι ημένο, δεν μπορ είτε να αλλάξε τε το λογι κό αριθμό των καν αλιών πο υ
ανιχν εύθηκα ν. Η σειρά αλλάζ ει αλλά ο α ριθμό ς μένει ο ί διος. Η προεπι λεγμένη τιμή ε ίναι “Ανενεργ ό”.
Ελλ ηνικά
1
6
ΡΥΘΜΙΣΕΙΣ ΣΥΣΤΗΜΑΤΟΣ
Γλώσσα
Γλώσσ α
Γλώσσ α
Αυτ ό το μενο ύ σας επι τρέπε ι να ορίσ ετε τη Γλ ώσσ α Συστή ματος ,
Γλώ σσα Πρώ του Ή χου, Γλώ σσα Δεύτ ερου Ήχ ου, Γ λώσσα Υ ποτ ίτλ ων,
Telet ext, κα θώς και ν α ενε ργοπο ιήσετ ε/απε νεργοπ οιήσε τε τη
λει τουργ ία των υπο τίτλω ν.
Πρώτο ς Ήχος
Δεύτε ρος Ήχο ς
Γλώσσ α Υποτι τλων
Teletex t
Υπότι τλοι
Σύστ ημ α TV
Ανάλ υση Βίν τεο: Υπ άρχ ουν π ολλές ε πιλ ογές αν άλυση ς βίν τεο.
Η προ επιλε γμένη τ ιμή για τ η σύνδε ση με καλ ώδι ο HDMI εί ναι
1 , ενώ για τ η σύνδε ση με καλ ωδιο Sc art είν αι 576i .080 i@50H Z
Δια στάσε ις Ει κόνας : Διαθ έσιμε ς επιλο γές: Αυτ όματο /4: 3PS/4 :3LB/ 16:9.
Η προ επιλε γμένη τ ιμή είν αι Αυτόμ ατο.
Ψηφ ιακή Έξ οδος Ήχο υ: Διαθέ σιμες ε πιλογ ές: BS Ou t/LPC M Out.
Η προ επιλε γμένη τ ιμή είν αι LPCM O ut.
Ρύθμ ισ η Ώρας
Περ ιοχή: Επ ιλέξτ ε τη χώρα σ ας.
Χρή ση GMT: Στην ε πιλογ ή “Βάσε ι Περιοχ ής”, γί νεται χ ρήση το υ GMT
και η ώ ρα ρυθμ ίζετα ι αυτ όματα σ ύμφων α με τη χώρα π ου έχετ ε
επι λέξει .
Στην ε πιλογ ή “Καθο ρισμό ς Χρήστ η”, η ρύθ μιση τη ς Ζώνης Ώ ρας
γίν εται απ ο το χρ ήστη χε ιροκί νητα.
Στην ε πιλογ ή “Ανεν εργ ό”, ο χρή στης ρυ θμίζε ι χειρο κίνητ α την ώρα κ αι την ημ ερομη νία.
Η προ επιλε γμένη τ ιμή είν αι “Βάσ ει Περι οχής” .
GMT O ffset : Ρύθμι ση της Ζώ νης Ώρα ς (μόνο ό ταν η επι λογ ή “Χρήσ η GMT” εί ναι ρυθ μισμέ νη σε
“Κα θορισ μός Χρή στη”.
Θερ ινή Ώρα : Η προεπ ιλεγμ ένη τιμ ή είναι “ Ενεργ ό”.
Ημε ρομην ία/Ώρ α: Ρύθμ ιση Ώρα ς και Ημε ρομην ίας (μό νο όταν η επ ιλογή “ Χρήση G MT” είν αι
ρυθ μισμέ νη σε “Αν ενεργ ό”).
Περιο χή
Χρήση G MT
GMT Off set
Θεριν ή Ώρα
Ημερο μηνία
Ώρα
Johan nesbu rg, Har are, So fia, Ath ens, Tal linn,
Helsi nki, Bu chare st, Min sk, Ist anbul , Kyiv, Ode sa,
Cairo , Khart oum, Ank ara, Je rusal em, Bei rut, Amm an
Ανάλυσ η Βίντε ο
Διαστά σεις Ει κόνας
Ψηφιακ ή Έξοδο ς Ήχο
Ρύθμι ση Ώρας
Σύστη μα TV
Βάσει Π εριοχ ής
GMT+0 2:00
xx/xx /xxxx
Ελλην ικά
Ελλην ικά
Ελλην ικά
Ελλην ικά
Ελλην ικά
Ανενε ργό
Ελλάδ α
Ενεργ ό
xx:xx
1080i@ 50HZ
Αυτόμα το
LPCM Out
1
7
Ελλ ηνικά

ΡΥΘΜ ΙΣΕΙΣ Σ ΥΣΤΗΜ ΑΤΟΣ
Ρυθμ ίσ εις Χρο νο δια κόπ τη
Πιέστε το πλήκτρο ΟΚ σε όποιο Χρονοδιακόπτη θέλετε να ενεργοποιήσετε.
Ρυθμιστε τη Λειτουργία Χρονοδιακόπτη σε “Μία φορά”, “Καθημερινά”,
“Εβδομαδιαία”, “Μηνιαία” ή “Ανενεργό”. Η προεπιλεγμένη τιμή είναι “Ανενεργό”.
Υπηρεσία Χρονοδιακόπτη: Επιλέξτε τη λειτουργία που θέλετε για το Χρονοδιακόπτη. Στην επιλογή “Κανάλι”, ο δέκτης μεταβαίνει στο κανάλι που έχετε ορίσει
στις παρακάτω παραμέτρους.
Στην επιλογή “Εγγραφή”, ο δέκτης μεταβαίνει στο κανάλι που έχετε ορίσει και
κάνει εγγραφή του προγράμματος στην επιλεγμένη ώρα και διάρκεια.
Προΰπόθεση της λειτουργίας εγγραφής, είναι να έχει εισαχθεί στο δέκτη
κάποιος εξωτερικός δίσκος αποθήκευσης (USB).
Κανάλι Αφύπνισης: Ορίστε το κανάλι που επιθυμείτε, για εγγραφή ή για θέαση.
Ημερομηνία Αφύπνισης: Ορίστε την ημερομηνία που επιθυμείτε για εγγραφή ή για θέαση.
Εγκαίρως: Ορίστε την ώρα που επιθυμείτε, για εγγραφή ή για θέαση.
Διάρκεια: Ορίστε τη διάρκεια που θα έχει η εγγραφή ή θέαση του καναλιού που έχετε ορίσει παραπάνω.
Μπορείτε επίσης να ρυθμίσετε το Χρονοδιακόπτη από το EPG.ΣΗΜΕΙΩΣΗ:
Ρυθμί σεις Χρ ονοδι ακόπτ η
1 Off
01/05/ 2008
7:25
2 Off
Λειτου ργία Χρ ονο
3 Off
Υπηρεσ ία Χρον οδι
4 Off
Κανάλι Α φύπνι ση
5 Off
Ημερομ ηνία Αφ υπ
6 Off
Εγκαίρ ως
7 Off
Διάρκε ια
8 Off
Αποθήκευ
Ακύρωση
Ανενερ γό
Κανάλι
BBC FOUR
xx/xx/ xxxx
xx:xx
xx:xx
Γονι κό Κλε ίδ ωμα(Κά ποιες ε κδό σει ς λογισ μικού πι θανόν ν α μην υπο στηρί ζουν
αυτ ήν τη λει τουργ ία)
Πιέστε το πλήκτρο ΟΚ. Θα σας ζητηθεί να εισάγετε έναν 4ψήφιο κωδικό.
Ο προεπιλεγμένος κωδικός είναι 0000.
Κλε ίδωμα Μ ενού: Ό ταν είν αι ενερ γό, η πρό σβαση σ τα υπομε νού γίν εται μό νο με την ε ισαγω γή
του κ ωδι κού. Η πρ οεπιλ εγμέν η τιμή εί ναι “Αν ενε ργό”.
Κλε ίδωμα Τα ξινόμ ησης: Ο ρίσ τε την ηλ ικία. Η π ροεπι λεγμέ νη τιμή ε ίναι “Α νενερ γό”.
Νέο ς Κωδικό ς: Εισά γετε νέ ο κωδικ ό.
Επι βεβαί ωση Κωδ ικο ύ: Επ ιβεβα ιώστε τ ο νέο κωδ ικό που έχ ετε εισ άγει στ ην παρα πάνω επ ιλο γή.
ΣΗΜΕΙΩΣΗ: Ο προεπιλεγμένος κωδικός είναι 0000. Υπάρχει επίσης ένας κωδικός, ο οποίος ονομάζεται
Power PIN, και χρησιμοποιείται στην περίπτωση που ξεχάσουμε τον κωδικό που έχουμε ορίσει. Αυτός ο
κωδικός Power PIN είναι 1006.
Γονικ ό Κλείδ ωμα
Κλείδ ωμα Μεν ού
Κλείδ ωμα Ταξ ινομη σ
Νέος Κω δικός
Επιβε βαίωσ η Κωδικ ο
Ανενε ργό
Ανενε ργό
----
----
Ρυθμ ίσ εις OSD
Αυτό το με νού σας επιτρέ πει να ορίσετε τ η διάρκεια του O SD Timeou t,
καθώς κα ι τη διαφ άνεια του OSD.
OSD Ti meout :
Δια φάνει α OSD:
Η προ επιλε γμένη τ ιμή είν αι 5.
Off /10%/ 20%/3 0%/40 %. Η προε πιλεγ μένη
τιμ ή είναι O ff.
Ρυθμί σεις OS D
OSD Time out
Διαφά νεια OS D
5
Off
1
8
Ελλ ηνικά

ΡΥΘΜ ΙΣΕΙΣ Σ ΥΣΤΗΜ ΑΤΟΣ
Αγα πη μέν α
Αυτό το με νού σας επιτρέ πει να μετονομ άσετε τ ις ομάδ ες Αγαπημ ένων.
Πιέζοντα ς το πλήκτ ρο ΟΚ σε μια ομάδα Αγα πημέν ων, μπορείτε να
μετονο μάσετε τη συγκ εκριμένη Λίστα Αγαπ ημένων.
1
Αγαπη μένο 1
2
Αγαπη μένο 2
3
Αγαπη μένο 3
Αγαπη μένο 4
4
Αγαπη μένο 5
5
Αγαπη μένο 6
6
Αγαπη μένο 7
7
Αγαπη μένο 8
8
Αγαπη μένα
Αγαπη μένο 1
A
G
M
S
Y
4
Μετον ομασί α
B C D E F
N
O
U
T
0
Z
5
6
SP
?
CAPS
P
V
1
7
<-
Del
Άλλο
Άλλο
Ισχύς Κεραίας
Ισχύς Κεραίας: Ορίστε την Ισχύ Κεραίας σε “Ενεργό”, όταν χρησιμοποιείτε
ενεργή κεραία χωρίς τροφοδοτικό. Ορίστε σε “Ανενεργό”, όταν χρησιμοποιείτε
παθητική κεραία με τροφοδοτικό. Η προεπιλεγμένη τιμή είναι “Ανενεργό”.
Αυτόματη Αναμονή: Ορίστε το χρόνο μετά από τον οποίο ο δέκτης θα μεταβεί
σε λειτουργία Αυτόματης Αναμονής. Η προεπιλεγμένη τιμή είναι “3 Ώρες”.
After Power Stop: Σας επιτρέπει να επιλέξετε την ενέργεια που θα κάνει ο δέκτης σε περίπτωση διακοπής
ρεύματος. Η προεπιλεγμένη τιμή είναι “Restart to Last Channel”.
Αυτόματη Αναμονή
After Power Stop
Ανενεργό
3 Ώρες
Restart to Last Channel
K LHJI
Q
R
W
X
3
2
8
9
OK
OK
1
9
Ελλ ηνικά

ΕΡΓΑΛΕΙΑ
Πληρ οφ ορίες Σ υσ τήμ ατος
Εμφαν ίζονται Πλ ηροφορίες σχ ετικά με το Μοντέ λο του δέκτη, την
κωδικοπ οίηση το υ βίντεο, την έκ δοση λογισμικ ού και την ημερο μηνία
του λογι σμικού .
Εργο στασ ια κές Ρ υθ μίσει ς
Αν επιλέξετε αυτήν την επιλογή, τότε γίνεται επαναφορά στις Εργοστασιακές
Ρυθμίσεις του δέκτη. Επίσης όλες οι λίστες των καναλιών, καθώς και οι
ρυθμίσεις, θα διαγραφούν.
Πληρο φορίε ς Συστή ματος
xxx
Model N ame:
xxxxx
Video De coder :
xxxxx
Firmw are Vers ion:
xx-xx -xxxx
Date of F irmwa re:
Εργοσ τασια κές Ρυθ μίσει ς
Αυτή η λειτουργία θα φορτώσει τις προεπιλογές
και θα διαγράψει όλα τα κανάλια, θέλετε να
συνεχίσετε?
Ναι Όχι
Αναβάθμιση μέσωUSB
Ο δέκτης - αποκωδικοποιητής είναι συνδεμένος με την TV, αλλά κλειστός
από το stand-by. Αντιγράφουμε το λογισμικό σε ένα USB STICK , (δεν του
αλλάζουμε το όνομα και δεν το βάζουμε μέσα σε κάποιο φάκελο),
εισάγουμε το USB stick στον αποκωδικοποιητή στη θύρα USB και τον
ανοίγουμε από το stand by. Αφού έχει ανοίξει ο δέκτης, τότε σε λίγα
δευτερόλεπτα, εμφανίζεται μήνυμα στην οθόνη της τηλεόρασης :
"Συνδέθηκε συσκευή USB". Πατάμε με το τηλεχειριστήριο Menu - Εργαλεία
- Αναβάθμιση μέσω USB. Εμφανίζεται ένα νέο παράθυρο και
εκεί επιλέγουμε “Αναβάθμιση” : “Αναβάθμιση Λογισμικού”. Από κάτω, “Αρχείο Αναβάθμισης”, επιλέγουμε
το αρχείο λογισμικού που έχουμε αντιγράψει στο USB stick και από κάτω πατάμε “Έναρξη”. Τότε ξεκινάει
η διαδικασία αναβάθμισης. Σε λίγα δευτερόλεπτα η διαδικασία ολοκληρώνεται και ο δέκτης κάνει
αυτόματα επανεκκίνηση. (Εάν δεν ξεκινάει η αναβάθμιση, τότε χρησιμοποιούμε USB sτο οποίο πρέπει να
είναι διαμορφωμένο σε FAT32). Μετά την αναβάθμιση ελέγχουμε πατώντας Menu - Εργαλεία –
Πληροφορίες Συστήματος, εάν αναγράφεται η ημερομηνία έκδοσης του νέου λογισμικού.
Ελλ ηνικά
1
10
Αναβά θμιση μ έσω USB
Αναβάθμι ση
Αναβάθμι ση Λογι σμικο ύ
Αρχείο Ανα βάθμι σ
Έναρξη
xxxxxxxx x.abs
0%

ΕΡΓΑΛ ΕΙΑ
Σώσιμο/Φόρτωση Καναλιών σε/από USB
Ανιχνεύουμε τα κανάλια και τα τακτοποιούμε με το τηλεχειριστήριο στη σειρά που θέλουμε.
Εισάγουμε ένα USB stick στο δέκτη. Πάμε Menu - Εργαλεία - Αναβάθμιση μέσω USB. Στο παράθυρο
που εμφανίζεται, επιλέγουμε “Αναβάθμιση” : “Σώσιμο καναλιών σε USB” και από κάτω βλέπουμε
οτι σχηματίστηκε αυτόματα ένα νέο αρχείο “ChannelsDateTime.udf” και από κάτω πατάμε “Έναρξη”.
Εάν για κάποιο λόγο κάνουμε Εργοστασιακές Ρυθμίσεις και χαθούν τα κανάλια, τότε πλέον μπορούμε
να τα επαναφέρουμε μέσω του USB Stick, πατώντας : Menu - Εργαλεία - Αναβάθμιση μέσω USB και
στο παράθυρο που εμφανίζεται επιλέγουμε “Αναβάθμιση” : “Φόρτωση καναλιών από USB”.
Από κάτω επιλέγουμε το αρχείο καναλιών .udf και πατάμε “Έναρξη”. Η λίστα καναλιών περνιέται
στο δέκτη με την ίδια σειρά.
Backup Λογισμικού
Εάν θέλουμε να κάνουμε ένα Γενικό Backup στο δέκτη, σε μορφή λογισμικού Backup.abs, το οποίο θα
περιλαμβάνει το τρέχων λογισμικό, τα κανάλια που έχουμε κατεβάσει και τακτοποιήσει σε επιθυμητή σειρά
και ρυθμίσεις που έχουμε επιλέξει, τότε ακολουθούμε την εξής διαδικασία: Πατάμε Menu - Εργαλεία Αναβάθμιση μέσω USB. Στο παράθυρο που εμφανίζεται, επιλέγουμε “Αναβάθμιση” :
“Backup Λογισμικού”. Από κάτω βλέπουμε ότι σχηματίζεται αυτόματα ένα αρχείο BackupDateTime.abs.
Από κάτω πατάμε “Έναρξη”. Σε λίγα δευτερόλεπτα τελειώνει και έτσι έχουμε δημιουργήσει ένα
αντίγραφο του λογισμικού, των καναλιών και των ρυθμίσεων, όλα μαζί σε ένα αρχείο λογισμικού
Backup.abs , το οποίο μπορούμε να το φορτώσουμε σε άλλους LEGENT HEV1 και να τους κάνουμε
ίδιους με το δικό μας.
Ασφα λή ς αφαίρ εσ η της σ υσ κευής U SB
Αυτή η επιλογή σας επιτρέπει να αφαιρέσετε με ασφάλεια τη συσκευή USB
που χρησιμοποιείτε. Πατώντας Οκ σε αυτήν την επιλογή θα εμφανιστεί
το μήνυμα “Αποσυνδέθηκε η συσκευή USB”. Τώρα μπορείτε να αφαιρέσετε
τη συσκευή USB.
Remov e
Disk Re move
OK
USB Dis k A-3 GB
Ακύρωσ η
1
11
Ελλ ηνικά

MEDIAPLAYER
MediaPlayer
Αυτ ή η λειτο υργία σ ας επιτ ρέπει ν α αναπα ράγ ετε τα αρ χεία απ ό
μία σ υσκευ ή USB.
Στο με νού του " Media p layer ", μπορε ίτε να κά νετε εν αλλαγ ή μεταξ ύ
"PV R", "Βί ντεο" , "Μουσ ική" ή "Ε ικόνα " πιέζον τας τ ο πλήκτ ρο 1 του
τηλ εχειρ ιστηρ ίου.
Πιέ στε το πλ ήκτρο " OK" για ν α εισέλ θετε στ ο μεν ού του Me dia Pla yer.
Πιέ στε τα πλ ήκτρα " Πάνω" ή " Κάτω" γι α να επιλ έξετε τ ο επιθυ μητό
αρχ είο και π ιέστε “ OK” για α ναπαρ αγω γή.
Πιέ στε το πλ ήκτρο " EXIT" γ ια έξοδο α πό το μεν ού.
Μουσική:
"Κό κκινο " πλήκτ ρο:
"Πρ άσινο " πλήκτ ρο:
"Κί τρινο " πλήκτ ρο:
"Μπ λε" πλή κτρο:
Πλή κτρο "1 ":
Πλή κτρο "2 ":
Πλή κτρο "I NFO":
Πλή κτρο "E XIT":
Εικόνα:
"Κό κκινο " πλήκτ ρο:
"Πρ άσινο " πλήκτ ρο:
"Κί τρινο " πλήκτ ρο:
"Μπ λέ" πλή κτρο:
Πλή κτρο "1 ":
Πλή κτρο "2 ":
Πλή κτρο "I NFO":
Πλή κτρο "3 ":
Πλή κτρο "E XIT":
Βίντεο:
"Μπ λέ" πλή κτρο:
Πλή κτρο "1 ":
Πλή κτρο "2 ":
Πλή κτρο "I NFO":
Πλή κτρο "E XIT":
Πιέ στε για ε μφάνι ση και επ εξεργ ασία τη ς Λίστ ας Αναπα ραγ ωγής.
Πιέ στε για π ροσθή κη του επ ιλεγμ ένου αρ χείου σ τη Λίστα Αγα πημέν ων.
Πιέ στε ξαν ά για α κύρωσ η και δια γραφή α πό τη Λίστ α Αγαπ ημένω ν και τη
Λίσ τα Αναπαρ αγωγή ς.
Πιέ στε για π ροσθή κη όλων τω ν αρχεί ων του τρ έχοντο ς φακέλ ου στη Λίσ τα
Αγα πημέν ων.
Πιέ στε ξαν ά για α κύρωσ η της προ σθήκη ς και δια γραφή ό λων τ ων αρ χείων τ ου
τρέ χοντος φ ακέλο υ από τη Λίσ τα Αγαπημ ένων.
Πιέ στε για ν α εισέλ θετε στ ο υπομε νού τ ης επεξ εργασ ίας του ε πιλεγ μένου α ρχείο υ.
Πιέ στε για ε ναλλα γή ανάμ εσα σε Μο υσική / Ε ικόνα / Β ίντ εο / PVR.
Πιέ στε για τ αξινό μηση τω ν αρχ είων το υ τρέχον τος φακ έλου αν ά Όνομα / Ώ ρα /
Μέγ εθος.
Πιέ στε για ν α ορίσε τε τη λει τουργ ία επαν άλη ψης ανα παραγ ωγής (Α υτόμα τη
Ανα παραγ ωγή ε πόμεν ου αρχε ίου / Τυχαί α Αναπ αραγω γή / Αν απαρα γωγή
του ί διου αρ χείου ε παναλα μβανό μενα) .
Επι στροφ ή σε προη γούμε νο φάκε λο.
Πιέ στε για ε μφάνι ση και επ εξεργ ασία τη ς Λίστ ας Αναπα ραγ ωγής.
Πιέ στε για π ροσθή κη του επ ιλεγμ ένου αρ χείου σ τη Λίστα Αγα πημέν ων.
Πιέ στε ξαν ά για α κύρωσ η και δια γραφή α πό τη Λίστ α Αγαπ ημένω ν και τη
Λίσ τα Αναπαρ αγωγή ς.
Πιέ στε για π ροσθή κη όλων τω ν αρχεί ων του τρ έχοντο ς φακέλ ου στη Λίσ τα
Αγα πημέν ων.
Πιέ στε ξαν ά για α κύρωσ η της προ σθήκη ς και δια γραφή ό λων τ ων αρ χείων τ ου
τρέ χοντος φ ακέλο υ από τη Λίσ τα Αγαπη μέν ων.
Πιέ στε για ν α εισέλ θετε στ ο υπομε νού τ ης επεξ εργασ ίας του ε πιλεγ μένου α ρχείο υ.
Πιέ στε για ε ναλλα γή ανάμ εσα σε Μο υσική / Ε ικόνα / Β ίντ εο / PVR.
Πιέ στε για τ αξινό μηση τω ν αρχ είων το υ τρέχον τος φακ έλου αν ά Όνομα / Ώ ρα /
Μέγ εθος / Αγα πημέν α.
Πιέ στε για ν α ορίσε τε την επ ιλογή τ ου Sl ide Sho w.
Πιέ στε για ε μφάνι ση της ει κόνας σ ε λειτο υργ ία Mult i View.
Επι στροφ ή σε προη γούμε νο φάκε λο.
Πιέ στε για ν α εισέλ θετε στ ο υπομε νού τ ης επεξ εργασ ίας του ε πιλεγ μένου α ρχείο υ.
Πιέ στε για ε ναλλα γή ανάμ εσα σε Μο υσική / Ε ικόνα / Β ίντ εο / PVR.
Πιέ στε για τ αξινό μηση τω ν αρχ είων το υ τρέχον τος φακ έλου αν ά Όνομα / Ώ ρα /
Μέγ εθος.
Πιέ στε για ν α ορίσε τε τη λει τουργ ία επαν άλη ψης ανα παραγ ωγής (Α υτόμα τη
Ανα παραγ ωγή ε πόμεν ου αρχε ίου / Αναπ αρα γωγή το υ ίδιου α ρχείο υ
επα ναλαμ βαν όμενα ).
Επι στροφ ή σε προη γούμε νο φάκε λο.
Ελλ ηνικά
1
12
1
2
3
4
5
6
7
1
Μουσική
/..
MPG
MP3
MP3
MP3
MP3
JPG
JPG
Λίστα Ανα
Αλλαγή
Εικόνα Βίντεο PVR
USB 1
840.m pg
I swear. mp3
Why.mp3
Lonel y.mp3
Becau se.mp 3
Rose. jpg
Fly.jpg
Αγαπ Όλα τα Αγ Επεξεργα
2
INFO
Επαναλ
Ταξιν
I swear. mp3
3319K B
00:03 :32
00:03 :15 00: 03:32
EXIT
Έξοδος

Medi aPla yer
PVR :
«Κό κκινο " πλήκτ ρο:
"Πρ άσινο " πλήκτ ρο:
"Κί τρινο " πλήκτ ρο:
Πλή κτρο "1 ":
Πλή κτρο "E XIT":
Πιέ στε για Μ ετονο μασία τ ης επιλ εγμέν ης εγγρ αφής.
Πιέ στε για Κ λείδω μα της επ ιλεγμ ένης εγ γραφή ς.(Ο κω δικός ε ίνα ι απαρα ίτητο ς
για α υτήν τη ν ενέργ εια)
Πιέ στε ξαν ά για ξ εκλεί δωμα τη ς επιλε γμένη ς εγγρα φής.
Πιέ στε για Δι αγραφ ή της επι λεγμέ νης εγγ ραφής .
Πιέ στε για ε ναλλα γή ανάμ εσα σε Μο υσική / Ε ικόνα / Β ίντ εο / PVR.
Επι στροφ ή σε προη γούμε νο φάκε λο.
Πληρ οφ ορίες Αποθ ήκευσ ης P VR
Εμφάνιση πληροφοριών για τη συσκευή USB.
"Κί τρινο " πλήκτ ρο:
"Μπ λε" πλή κτρο:
Disk Mo de DVR Type
Πιέ στε για ν α ορίσε τε τη μορ φή (FAT/N TFS).
Πιέ στε για ν α ρυθμί σετε το ν Τύπο DV R
(RE C & TMS / Rec ord / Time shift ).
Forma t
FAT
OK
Ακύρωσ η
OK
DVR Set
REC & TMS
Ακύρωσ η
Πληρο φορίε ς Αποθή κευση ς PVR
USB Dis k A: xxxG by tes
Έντασ η
Συνολ ικό Μέγ εθος :
Ελεύθ ερο Μέγ εθος:
Μέγεθ ος Εγγρ αφής:
Μέγεθ ος TMS:
Σύστη μα Αρχε ίων:
Μορφή
Ρύθμι ση DVR
xxxx
xxxx
xxxx
xxxx
xxxx
xxx
Ρύθμ ισ η PVR
Χρο νική Με τατόπι ση: Η προ επιλε γμένη τ ιμή είν αι “Ανε νερ γό”.
Υπε ρπήδη ση: Ε πιλέξ τε ανάμ εσα σε 30 s ec/1 mi n/5 min /10 min /30 min .
Η προ επιλε γμένη τ ιμή είν αι 30 sec .
Χρο νική Με τατόπι ση για εγ γραφή : Η προεπ ιλεγμ ένη τιμ ή είναι O FF.
Μετ ά την ε γγραφ ή: Επιλ έξτε τη ν ενέργ εια του δ έκτη με τά την εγ γρα φή.
Η προ επιλε γμένη τ ιμή είν αι “Πήγ αινε στ ην Αυτόμ ατη Αναμ ονή”.
Τοποθ ετώ ντας μί α εξω τερικ ή συσκε υή αποθ ήκευσ ης USB στ η θύρα US B του δέκτ η, σας δί νει
πρό σβαση σ τη λειτ ουργί α Time Shi ft και στ ην Εγγρ αφή ενό ς προγρ άμματ ος.
Πιέ στε παύ ση σε ένα π ρόγρα μμα και πα ρακολ ουθ είστε τ ο αργότ ερα ( Time Sh ift ) .
Κάν ετε εγγ ραφή σε έ να πρόγ ραμμα .
Ότα ν ο διαθέ σιμος χώ ρος της σ υσκευ ής αποθ ήκευσ ης τελε ιώσει , η εγγρα φή του πρ ογράμ ματος
θα δι ακοπε ί.
ΣΗΜ ΕΙΩΣΗ
Προ τείνε ται η χρή ση δί σκου US B με έκδο ση 2.0. Γι α τις λει τουργ ίες t imesh ift και ε γγραφ ής,
χρε ιάζετ αι μεγα λύτερο μ έγεθο ς USB sti ck ή HDD (> 2GB).
Ελλ ηνικά
1
13
Ρύθμι ση PVR
Timeshift
Υπερπήδηση
Timeshift to Record
Μετά την εγγραφή
Ανενε ργό
30sec
OFF
Πήγαι νε σε Sta ndBy

TIMESHI FT/ΕΓΓ ΡΑΦ Η
Tim esh if t
(Κάποιες εκδόσεις λογισμικού πιθανόν να μην υποστηρίζουν αυτήν τη λειτουργία)
Ένα ρξη
Η Χρο νική Με τατόπ ιση ( Times hif t) μπορ εί να ενε ργοποι ηθεί
στη ν παρακ ολο ύθη ση κάπο ιου προ γράμμ ατος πιέ ζοντας τ ο
πλή κτρο "PA USE".
Πιέ στε τα πλ ήκτρα " Δεξιά " ή "Αρισ τερά" γ ια μετα κίν ηση στο ν
επι θυμητ ό χρόνο . Πιέστ ε το πλήκ τρο "OK " για επι βεβαί ωση.
Tric kmode s
Κατ ά τη δι άρκει α του pla yback , μπορε ίτε ν α εκτελ έσετε τ ις ακόλο υθες εν έργει ες:
Πιέ στε το πλ ήκτρο " PAUS E" για πα ύση του p lay back.
Πιέ στε το πλ ήκτρο " FORWAR D", ή το δε ξί βέ λος, γι α γρήγο ρη χρον ική μετ ακί νηση μπ ροστά
στο p layba ck.
Πιέ στε το πλ ήκτρο " BACKWA RD", ή το α ριστε ρό βέλο ς, γι α γρήγο ρη χρον ική μετ ακίνη ση πίσω
στο p layba ck.
BBC F OUR
step 00:02:3 7
03/1 9
179 150 94 TS
Δια κοπή του T ime S hift
Πιέ στε το πλ ήκτρο " STOP" γι α διακο πή του Tim eShif t.
Εγγρ αφ ή
Σιγουρευτείτε ότι έχετε συνδέσει μία συσκευή USB στο δέκτη. Καθώς παρακολουθείτε ένα πρόγραμμα,
πιέστε το πλήκτρο REC για να αρχίσει η εγγραφή (Πιέστε 2 φορές το πλήκτρο REC για να αλλάξετε τον
προεπιλεγμένο χρόνο εγγραφής).
Για να σταματήσει η εγγραφή, πιέστε το πλήκτρο STOP. Θα εμφανιστεί ένα παράθυρο επιβεβαίωσης.
Πιέστε ΟΚ για να σταματήσει η εγγραφή, ή την επιλογή Όχι, για τη συνέχιση της εγγραφής.
Οι εγγραφές αποθηκεύονται στη συσκευή USB και είναι διαθέσιμες στο υπομενού Media Player - PVR.
ΣΗΜ ΕΙΩΣΗ
Μπορείτε να χρησιμοποιήσετε τη λειτουργία του Χρονοδιακόπτη ή το EPG
για να προγραμματίσετε μία εγγραφή.
00:07:12
01:3 6
100
1
14
Ελλ ηνικά

ΑΝΤΙΜΕΤΩΠΙΣΗ ΠΡΟΒΛΗΜΑΤΩΝ
Δεν είναι συνδεδεμένο το καλώδιο
Δεν υπάρχει εικόνα
Δεν υπάρχει σήμα
Δεν υπάρχει ήχος
Υπάρχει ήχος αλλά όχι
εικόνα
Έχει χαθεί ο 4ψήφιος
κωδικός
Ο δέκτης δεν ανταποκρίνεται
στις εντολές του
τηλεχειριστηρίου
Η εικόνα “σπάει” Το σήμα είναι αδύναμο Ελέγξτε το κεραιοσύστημά σας
HDMI ή SCART.
Ο δέκτης είναι απενεργοποιημένος Ενεργοποιήστε το δέκτη
Δεν είναι συνδεδεμένο το καλώδιο κεραίας Συνδέστε το καλώδιο κεραίας
Πρόβλημα κεραίας Βελτιώστε την κεραία
Δεν έχει συνδεθεί σωστά το καλώδιο Ελέγξτε το καλώδιο HDMI ή SCART
HDMI ή SCART
Είναι ενεργοποιημένη η σίγαση (Mute) Απενεργοποιήστε τη σίγαση (Mute)
Δεν έχει συνδεθεί σωστά το καλώδιo
HDMI ή SCART
Οι μπαταρίες έχουν εξαντληθεί Αντικαταστήστε τις μπαταρίες
Η απόσταση του δέκτη με το τηλεχειριστήριο είναι μεγάλη
Συνδέστε το καλώδιο HDMI ή SCART.
Ελέγξτε τη σύνδεση του καλωδίου
HDMI ή SCART
Χρησιμοποιήστε τον κωδικό
Power PIN 1006
Πλησιάστε το τηλεχειριστήριο
σε κοντινότερη απόσταση
με το δέκτη
Βρίσκεστε σε περιοχή με χαμηλή
εκπομπή ψηφιακού σήματος
1
15
Ελλ ηνικά

ΧΑΡΑΚΤΗΡΙΣΤΙΚΑ
TUN ER & ΚΑΝΑ ΛΙ
ΑΠΟ ΚΩΔΙΚ ΟΠ ΟΙΗ ΣΗ
Απο κω δικ οποίη ση Β ίντ εο
Απο κω δικ οποίη ση Ή χου
INP UT RATE
ΜΕΓ ΕΘΟΣ ΕΙ ΚΟΝΑΣ
ΕΞΟ ΔΟΣ Β ΙΝΤΕΟ
ΔΙΑ ΜΟΡΦΩ ΣΗ
ΣΥΝ ΔΕΣΕΙ Σ
TUN ER
ΘΥΡΑ ΔΕΔΟ ΜΕ ΝΩ Ν
SCA RT ΣΤΗ Ν TV x1
HDM I ΕΞΟ ΔΟΣ H DMI x1
ΤΡΟ ΦΟΔΟΣ ΙΑ
ΕΙΣ ΟΔΟΣ DC
ΣΗΜ ΕΙΩΣΗ
Ο Σχε διασμ ός και τα Χ αρ ακτ ηριστ ικά μπο ρο ύν ν α αλλ άξουν χω ρίς προ ειδοπ οίη ση.
MAX . 48Mbi t/s
ΔΥΝΑΤΟΤ ΗΤΑ ΕΝΑ ΛΛΑΓΗ Σ 4:3,1 6:9, AUT O
ΒΥΣ ΜΑ ΕΙΣΟΔ ΟΥ RF x1
(IE C-TYP E, IEC1 69-2, Θ ΥΛΗΚ Ο)
ΒΥΣ ΜΑ ΕΞΟΔΟΥ R F x1
(IE C-TYP E, IEC1 69-2, Α ΡΣ.(L OOPTH ROUGH ))
ΕΥΡ ΟΣ ΣΥΧΝ ΟΤΗΤΩ Ν:
470 MHz ~86 2MHz (U HF)
ΕΠΙ ΠΕΔΟ ΣΗ ΜΑΤΟ Σ:
-15 ~ - 70 dbm
MPE G-2 MP@ HL, H.2 65/HE VC,
AVC/ H. 26 4 HP @L 4. 1, M PE G-4 AS P SUP PORTE D
MPE G-1 Lay er 1,2/ PCM/H E-AAC V 1.0
ICE 958 SPD IF
HDM I, CVBS
QPS K,16Q AM,64 QAM, 25 6QAM
ΕΙΣ ΟΔΟΣ ΚΕ ΡΑΙΑ Σ x1 , ΕΞ ΟΔΟ Σ LO OP x1
ΘΥΡΑ USB
5V 2A
1
16
Ελλ ηνικά

directives :2014/53/EU,107/2009/EC
, 201 4/35/ EU
Ελλ ηνικά
1
17

Digital R eceiver DVB-T2 H.265 HEVC
USERMANUAL
DIGITAL RECEIVER DVB-T2 H2.65 HEVC
USB
Read t hi s man ua l befor e in sta ll at ion a nd u se.
Eng lish

SAFETYINFORMATION
Read a nd Foll ow Inst ructi ons- All t he safe ty and op erati on inst ructi ons
1.
shou ld be rea d befor e the pro duct is o perat ed. Fol low all o perat ing
inst ructi ons.
Reta in Inst ructi ons- The s afety a nd oper ating i nstru ction s shoul d be
2.
reta ined fo r futur e refer ence.
Heed a ll Warni ngs-C omply w ith all w arnin gs on the p roduc t and
3.
oper ating i nstru ction s.
Powe r - This pro duct is s uppli ed with a D C power. To pr event
4.
elec tric sh ock, en sure th e adapt or is ins erted c orrec tly int o the pow er
outl et.
Powe r Sourc es- This p roduc t shoul d only be o perat ed with t he
5.
rati ng spec ified o n the lab el on the b ack pan el of the p roduc t.
If you a re not su re of the t ype of po wer sup ply to yo ur home o r office ,
plea se cons ult you r produ ct deal er or ele ctric ian. Fo r produ cts
inte nded to o perat e from ba ttery p ower, or o ther so urces , refer t o the
oper ating i nstru ction s.
Over loadi ng- Do no t overl oad wal l outle ts or ext ensio n cords a s this ca n
6.
resu lt in a ris k of fire o r elect ric sho ck. Ove rload ed AC outl ets, ex tensi on
cord s, fray ed powe r cords , damag ed or cra cked wi re insu latio n, and
brok en plug s are dan gerou s, They ma y resul t in a shoc k or fire h azard .
Peri odica lly exa mine th e cord, a nd if its a ppear ance in dicat e damag e or
dete riora ted ins ulati on, hav e it repl aced by y our ser vice te chnic ian.
Powe r-Cor d Prote ction - Power -supp ly cord s shoul d be rout ed so tha t
7.
they a re not li kely to b e walke d on or dam aged by i tems pl aced up on or
agai nst the m, payi ng part icula r atten tion to t he poin t where t hey exi t
from t he prod uct.
Venti latio n- Slot s and ope nings i n the cas e are pro vided f or vent ilati on
8.
to ens ure rel iable o perat ion of th e produ ct and to p rotec t it from
over heati ng. Thes e openi ngs mus t not be bl ocked o r cover ed. The
open ings sh ould ne ver be bl ocked b y placi ng the pr oduct o n a
bed, s ofa, ru g, or hea t regis ter. This p roduc t shoul d not be pl aced in a
buil t-in in stall ation s uch as a bo ok case o r rack, u nless p roper v entil ation
is pro vided o r the pro duct ma nufac turer 's inst ructi ons hav e been
foll owed.
Atta chmen ts- Do no t use att achme nts unl ess rec ommen ded by th e
9.
prod uct man ufact urer as t hey may c ause ha zards .
10.
The ap parat us shal l not be ex posed t o dripp ing or sp lashi ng and no
obje cts fil led wit h liqui ds ,suc h as vase s shall b e place d on the ap parat us.
Caut ion: Ma intai n elect rical s afety. Po werli ne oper ated eq uipme nt or
acce ssori es conn ected t o this un it shou ld bear s afety c ertif icati on mark o n
the ac cesso ry itse lf and sh ould no t be modi fied so a s to comp romis e the
safe ty feat ures. Th is will h elp avo id any po tenti al haza rd from e lectr ical
shoc k or fire . If in dou bt, con tact a qu alifi ed serv ice per sonne l.
11.
Acce ssori es- Do no t place t his pro duct on a n unsta ble car t, stan d,
trip od, bra cket, o r table . The prod uct may f all, ca using s eriou s injur y
to a chi ld or adu lt as wel l as seri ous dam age to th e produ ct. Use t his
prod uct onl y with a ca rt, sta nd, tri pod, br acket , or tabl e recom mende d
by the m anufa cture r's or so ld with t he prod uct. Any m ounti ng of the
prod uct sho uld fol low the m anufa cture r's ins truct ions an d use of a
moun ting ac cesso ry reco mmend ed by the m anufa cture r.
11a.
A produc t and car t combi natio n shoul d be move d with ca re. Qui ck
stop s, exce ssive f orce, a nd unev en surf aces ma y cause d amage t o the
prod uct.
12.
Outd oor Ante nna Gro undin g- If an ou tside a ntenn a or cabl e syste m is
conn ected t o the pro duct, b e sure th e anten na or cab le syst em is
grou nded so a s to prov ide som e prote ction a gains t volta ge surg es and
buil t-up st atic ch arges . Secti on 810 of t he Nati onal El ectri cal Cod e,
ANSI /NFPA No.7 0-198 4 (Sect ion 54 of C anadi an Elec trica l Code, P art1)
prov ides in forma tion wi th resp ect to pr oper gr oundi ng of the m ast and
supp ortin g struc ture, g round ing of th e lead- in wire t o an ante nna-d ischa rge
unit , conne ction t o groun ding el ectro des, an d requi remen ts for th e
grou nding e lectr ode.
13.
Powe r Lines -An out side an tenna s ystem s hould n ot be loc ated in t he vici nity of
over head po wer lin es, oth er elec tric li ght or po wer cir cuits , or wher e it can fa ll into
such p ower li nes or ci rcuit s. When i nstal ling an o utsid e anten na syst em, ext reme
care s hould b e taken t o keep fr om touc hing or a pproa ching s uch pow er line s or
circ uits, a s conta ct with t hem mig ht be fat al. Ins talli ng an out door an tenna c an be
haza rdous a nd shou ld be lef t to a prof essio nal ant enna in stall er.
Use
14.
Clea ning- U nplug t he prod uct fro m the wal l outle t befor e clean ing.
Do not u se liqu id clea ners or a eroso l clean ers. Us e a damp cl oth for c leani ng.
15.
Obje cts tha t may tou ch dang erous v oltag e point s or "sho rt-ou t" part s could r esult i n
a fire o r elect ric sho ck. Nev er spil l liqui d of any ki nd on the p roduc t.
16.
Ligh tning -For ad ded pro tecti on for th is prod uct dur ing a lig htnin g storm , or
when i t is left u natte nded an d unuse d for lon g perio ds of tim e, unpl ug it fro m the
wall o utlet a nd disc onnec t the ant enna or c able sy stem. Th is wil l preve nt dama ge to
the pr oduct d ue to lig htnin g and pow er line s urges .
Serv ice
17.
Serv icing -Do not a ttemp t to serv ice thi s produ ct your self, a s openi ng or
remo ving co vers ma y expos e you to da ngero us volt age or ot her haz ards. R efer al l
serv icing t o quali fied se rvice p erson nel.
18.
Cond ition s Requi ring Se rvice -Unpl ug the pr oduct f rom the w all out let and
refe r servi cing to q ualif ied ser vice pe rsonn el unde r the fol lowin g condi tions :
A. When t he DC pow er adap tor or co nnect ing pow er cord i s damag ed.
B. If liq uid has b een spi lled, o r objec ts have f allen i nto the p roduc t.
C. If the p roduc t has bee n expos ed to rai n or wate r.
D. If the v ideo do es not op erate n ormal ly by fol lowin g the ope ratin g
inst ructi ons.
Adjust o nly tho se cont rols th at are co vered b y opera ting in struc tions .
Impro per adj ustme nt of oth er cont rols ma y resul t in dama ge and wi ll ofte n
requ ire ext ensiv e work by a q ualif ied tec hnici an to res tore th e produ ct
to its no rmal op erati on.
E. If the p roduc t has bee n dropp ed or cab inet ha s been da maged .
F. When the p roduc t exhib its a dis tinct c hange i n perfo rmanc e-thi s
indi cates a n eed for s ervic e.
19.
Repl aceme nt Part s-Whe n repla cemen t parts a re requ ired, h ave the s ervic e
tech nicia n verif y that th e repla cemen ts he use s have th e same sa fety ch aract erist ics
as the o rigin al part s. Use of r eplac ement s speci fied by t he prod uct man ufact urer
can pr event f ire, el ectri c shock , or othe r hazar ds.
20.
Safe ty Chec k-Upo n compl etion o f any ser vice or r epair s to this p roduc t, ask
the se rvice t echni cian to p erfor m safet y check s recom mende d by the ma nufac turer
to det ermin e that th e produ ct is in sa fe oper ating c ondit ion.
21.
Wall or C eilin g Mount ing- Th e produ ct shou ld be mou nted to a w all or ce iling o nly
as rec ommen ded by th e manuf actur er.
22.
Heat -The pr oduct s hould b e situa ted awa y from he at sour ces suc h as radi ators ,
heat r egist ers, st oves, o r other p roduc ts (inc ludin g ampli fiers ) that pr oduce h eat.

CONTENTS
SAF ETY INF ORMAT ION
INT RODUC TION
Fro nt pane l ..... ..... ..... ..... ..... ..... ..... ..... ..... ..... ..... ..... ..... ..... ..... ..... ..... ..... ..... ..... ... ..... . 1
Rea r panel . ..... ..... ..... ..... ..... ..... ..... ..... ..... ..... ..... ..... ..... ..... ..... ..... ..... ..... ..... ..... ..... ... . 1
Sid e panel . ..... ..... ..... ..... ..... ..... ..... ..... ..... ..... ..... ..... ..... ..... ..... ..... ..... ..... ..... ..... ..... ... . 1
Rem ote con trol .. ..... ..... ..... ..... ..... ..... ..... ..... ..... ..... ..... ..... ..... ..... ..... ..... ..... ..... ..... ..... . 2
SYS TEM CON NECTI ON..... ... ... ... ... ... ... .... ... ... ... ... ... ... ... ... ... ... .... ... ... ... ... ... ... ... ... ... .... ... ... ... ... .3
GET TING STA RTED -OPE RATI ON
Qui ck Inst allat ion ... ..... ..... ..... ..... ..... ..... ..... ..... ..... ..... ..... ..... ..... ..... ..... ..... ..... ..... ..... .. 4
Cha nnel Li st Menu . ..... ..... ..... ..... ..... ..... ..... ..... ..... ..... ..... ..... ..... ..... ..... ..... ..... ..... ..... .. 4
Ele ctron ic Prog ramme G uide .. ..... ..... ..... ..... ..... ..... ..... ..... ..... ..... ..... ..... ..... ..... ..... ..... . 4
EDI T CHANN EL
TV Ch annel L ist/R adio Ch annel L ist ... ..... ..... ..... ..... ..... ..... ..... ..... ..... ..... ..... ..... ..... ..... 5
Del ete All .. ..... ..... ..... ..... ..... ..... ..... ..... ..... ..... ..... ..... ..... ..... ..... ..... ..,.. ..... ..... ..... ..... ... . 5
INST ALL ATIO N
Auto S can ... ..... ..... ..... ..... ..... ..... ..... ..... ..... ..... ..... ..... ..... ..... ..... ..... ..... ..... ..... ..... ..... ... 6
Cha nnel Sc an .... ..... ..... ..... ..... ..... ..... ..... ..... ..... ..... ..... ..... ..... ..... ..... ..... ..... ..... ..... ..... .. 6
LCN . ..... ..... ..... ..... ..... ..... ..... ..... ..... ..... ..... ..... ..... ..... ..... ..... ..... ..... ..... ..... ... ..... ..... ..... . 6
SYS TEM SET UP
Lan guage . ..... ..... ..... ..... ..... ..... ..... ..... ..... ..... ..... ..... ..... ..... ..... ..... ..... ..... ..... ..... ..... ... . 7
TV Sy stem .. ..... ..... ... ..... ..... ..... ..... ..... ..... ..... ..... ..... ..... ..... ..... ..... ..... ..... ..... ..... ..... .... 7
Loc al Time Se tting . ..... ..... ..... ..... ..... ..... ..... ..... ..... ..... ..... ..... ..... ..... ..... ..... ..... ..... ..... .. 8
Time r Setti ng .... ..... ..... ..... ..... ..... ..... ..... ..... ..... ..... ..... ..... ..... ..... ..... ..... ..... ..... ..... ..... .. 8
Par ental L ock ... ..... ..... ..... ..... ..... ..... ..... ..... ..... ..... ..... ..... ..... ..... ..... ..... ..... ..... ..... ..... .. 8
OSD S ettin g ..... ..... ..... ..... ..... ..... ..... ..... ..... ..... ..... ..... ..... ..... ..... ..... ..... ..... ..... ..... ... .... 9
Fav orite . ..... ..... ..... ..... ..... ..... ..... ..... ..... ..... ..... ..... ..... ..... ..... ..... ..... ..... ..... ..... ... ..... .... 9
Audi o Descr iptio n Setti ng .... ..... ..... ..... ..... ..... ..... ..... ..... ..... ..... ..... ..... ..... ..... ..... ..... .... 9
Oth er .... ..... ..... ..... ..... ..... ..... ..... ..... ..... ..... ..... ..... ..... ..... ..... ..... ..... ..... ..... ... ..... ..... ..... 9
TOO LS
Inf ormat ion ... ..... ..... ..... ..... ..... ..... ..... ..... ..... ..... ..... ..... ..... ..... ..... ..... ..... ..... ..... ..... ... .. 10
Fac tory Se tting . ..... ..... ..... ..... ..... ..... ..... ..... ..... ..... ..... ..... ..... ..... ..... ..... ..... ..... ..... ..... .. 10
S/W U pgrad e by OTA .... ..... ... ..... ..... ..... ..... ..... ..... ..... ..... ..... ..... ..... ..... ..... ..... ..... ..... ... 11
Upg rade by U SB .... ..... ..... ..... ..... ..... ..... ..... ..... ..... ..... ..... ..... ..... ..... ..... ..... ..... ..... ..... .. 11
Sav e/Loa d Chann els to/ from US B ..... ..... ..... ..... ..... ..... ..... ..... ..... ..... ..... ..... ..... ..... ..... . 11
Bac kup Fir mware . ..... ..... ..... ..... ..... ..... ..... ..... ..... ..... ..... ..... ..... ..... ..... ..... ..... ..... ..... ... 12
Rem ove USB d evice s afely . ..... ..... ..... ..... ..... ..... ..... ..... ..... ..... ..... ..... ..... ..... ..... ..... .... 12
MEDI APLA YER
Med ia Play er .... ..... ..... ..... ..... ..... ..... ..... ..... ..... ..... ..... ..... ..... ..... ..... ..... ..... ..... ..... ..... .. 13
PVR s torag e Infor matio n ..... ..... ..... ..... ..... ..... ..... ..... ..... ..... ..... ..... ..... ..... ..... ..... ..... ..... 1 4
PVR S ettin g ..... ..... ..... ..... ..... ..... ..... ..... ..... ..... ..... ..... ..... ..... ..... ..... ..... ..... ..... ..... ... ..... 1 4
TIM ESHIF T/REC ORD
Time shift . ..... ..... ..... ..... ..... ..... ..... ..... ..... ..... ..... ..... ..... ..... ..... ..... ..... ..... ..... ..... ... ..... .... 15
Rec ord ... ..... ..... ..... ..... ..... ..... ..... ..... ..... ..... ..... ..... ..... ..... ..... ..... ..... ..... ..... ..... ... ..... ..... 1 5
TRO UBLES HOOTI NG..... ... ... ... ... ... ... .... ... ... ... ... ... ... ... ... ... .... ... ... ... ... ... ... ... ... ... ... .... ... ... ... ... ... .16
SPE CIFIC ATIONS. .... ... ... ... ... ... ... ... ... ... ... .... ... ... ... ... ... ... ... ... ... .... ... ... ... ... ... ... ... ... ... ... .... ... ... ... .17

INTRODUCTION
INTRODUCTION
Frontpane l
1 2 3 4 5
DIGITAL RECEIVER DVB-T2 H2.65 HEVC
Rearpanel
1 2 3 4
ANT OUT
ANT IN
HDMI SCART
Sidepanel
1
5V 2A
Sta ndby
1
Cha nnel Up /Down
2
Rem ote sen sor
3
Ind icato r
USB
4
USB p ort
5
ANT I N
1
2
ANT O UT
HDM I Outpu t
3
TV Sc art
4
DC In put
1
1
1
Eng lish

LEARNINGFUN CIONREMOTEC ONTROL
1
TV CO NTROL : Learn ing Fun ction b utton s
2
Pre vious
3
Sea rch bac kward
4
PLAY
5
PAUS E: Paus e/Act ive Tim eshif t funct ion
6
Red b utton : Switc h betwe en TV and R adio
Gre en butt on: Sub title O N/OFF
Yel low but ton: TE LETEX T
Blu e butto n: AUDI O mode
7
EPG
8
OK bu tton: C onfir ms a sele ction
9
Cur sor: Na vigat ion but tons us ed to nav igate
men u's ite ms
10
MEN U
11
VOL +/- : Volu me Up and D own
12
MUT E: Turns O N/OFF t he soun d
13
Num eric bu ttons ( Numbe rs)
14
FAV: Op ens the F avori te List
15
Sta ndby bu tton (R ed butt on): Po wer ON/ OFF
16
Nex t
17
Sea rch for ward
18
REC : Recor ds the TV p rogra m
19
STO P: Stop s Progr am Play back or R ecord ing
INF O: Curr ent cha nnel in forma tion
20
21
EXI T: Exit s from me nu/su bmenu s
22
USB : Enter s to Medi a Playe r
23
CH+ /- : Chan nel Up an d Down
24
REC ALL: Sw itche s to prev ious ch annel
Learning Function buttons
The remote control of the receiver has 4 learning function buttons. In every button can be copied
the function of some buttons of the TV’s remote control.
1. Place the TV’s remote control facing the receiver’s remote control approximately 3cm.
2. Press the SET button until the red led will light intensely. Leaving the SET button the red led will
be steadily light.
3. Press the POWER button (Blue button) on the receiver’s remote control until the red led will start
to blink.
4. Press the POWER button on the TV’s remote control, within 3 sec, and the red led will blink 2 times.
Then, the red led will be steadily light.
5. Repeat steps 3 & 4 for the other buttons.
6. Press the SET button to save the codes.
1
2
3
4
5
6
7
8
9
10
11
12
13
14
TV CON TROL
AV/TV VOL- VOL+ SET
SUBTITLE
TV/RADIO
EPG INFO
VOL
-
MENU
TTX
CH+
OK
CH-
USB
VOL CH
MUTE
1
2
5
4
7 8
FAV
RECALL
0
REC
AUDIO
VOL
EXIT
3
6
9
DF00
15
16
17
18
19
20
+
21
22
23
24
1
2
Eng lish

SYSTEMCONNECTION
The re are ma ny diff erent t ypes of TV a nd othe r equip ment th at you ca n conne ct to the r eceiv er. In th is
man ual you w ill see s ome of th e most co mmon wa ys to con nect yo ur equi pment .
TV
Ant enna
NOT E:
NOTE:
HDM I cable
RF ca ble
ANT OUT
ANT IN
DC po wer
1. Do n ot plug /unpl ug HDMI c onnec tor whi le the re ceive r is powe red on.
2. Po wer ind icato r will tu rn gree n when th e recei ver is po wered o n, and
tur n red whe n the rec eiver i s in Stan dby mod e.
HDMI SCART
Eng lish
1
3
Sca rt cabl e
5V
2A

GETTINGSTARTED-OPERATION
QuickInstal lation
If you are using the receiver for the first time, the Welcome Screen
will appear on your TV screen. Press OK to start scanning channels.
Region: Select a Country.
Language: Select a Language.
Display Mode: Select a screen resolution. The default value is 1080i@50HZ.
Aspect Mode: Select dimensions of the screen. The default value is Auto.
OK: Press OK to start scanning channels automatically.
ChannelList
You can a ccess t he Chan nel lis t by pres sing "O K" butt on.
Pre ss the cu rsor bu ttons t o selec t the cha nnel yo u want to v iew.
ElectronicPro gramGuide(EPG )
EPG o f all cha nnels :
1
Pre ss the "E PG" but ton to en ter the E PG menu . A
pre view of y our cur rent ch annel w ill be di splay ed in
the t op righ t corne r of the sc reen.
Pre ss "UP" o r "DOWN " butto n to sele ct the de sired c hanne l.
2
Pre ss "LEF T" or "RI GHT" bu tton to s elect t he desi red
pro gramm e.
3
Pre ss "GRE EN" but ton to se t the tim er to the p rogra mme.
Pre ss "RED " butto n to show t he "Time b ar" men u. You ca n
sel ect the w ay show ing tim e and mov e time by p ressi ng
"OK " butto n.
4
Pre ss the "O K" butt on to dis play th e infor matio n about
the s elect ed prog ramme .
Pre ss "EXI T" butt on to bac k to the pr eviou s menu.
5
In "Ti me bar" m enu:
Exi t time ba r.
Bac k to the cu rrent t ime.
Jum ps time f orwar d or back ward ev ery hal f an hour.
Jum ps time f orwar d or back ward ev ery 2 hou rs.
Jum ps time f orwar d or back ward ev ery 24 ho urs.
Regio n
Langu age
Displ ay Mode
Aspec t Mode
Welc ome
01:39 8 /2EPG
Unite d Kingd om
1080i @50HZ
OK
Time
Engli sh
Auto
Timer
1
4
Eng lish

EDITCHANNEL
EditChannelM enu
1
Pres s the "MEN U" but ton to ent er to t he Mai n Menu.
Pres s "UP" or "D OWN " bu tton to hi ghl ight " Edit Cha nnel " and pres s
2
"OK" b utton to e nter t o the Edit C han nel me nu.
3
Pres s "UP" or "D OWN" b utton to h igh ligh t the desi red it em
and pr ess "OK" b utto n to enter t o the s ub-m enu .
4
Pres s "EXIT" b utto n to exit.
TVChannelLis t/RadioCha nnelList
Use t his men u to set up F avour ite, Lo ck, Ski p, Move , Sort, D elete
and R ename f or the se lecte d TV/Ra dio cha nnels .
In th e Edit Ch annel m enu, se lect "T V Chann el List " or "Rad io
1
cha nnel Li st". Pr ess "OK " butto n to ente r to the TV C hanne l List/
Rad io Chan nel Lis t menu.
2
Pre ss "UP" o r "DOWN " butto n to high light t he desi red cha nnel
and p ress th e "OK" bu tton. A p revie w of the ch annel w ill be
dis playe d in the to p right c orner o f the scr een.
Pre ss "FAV" bu tton an d then pr ess "OK " butto n to set th e FAV cha nnels .
Pre ss "Red " butto n to acti vate "L ock" fu nctio n and the n press " OK"
but ton. Yo u will be a sked to i nput th e passw ord(T he defa ult
pas sword i s "0000 " ). Then t he sele cted Ch annel w ill be lo cked.
but ton to sk ip the de sired c hanne l.
des ired ch annel a nd pres s "OK" bu tton to c onfir m. Pres s "UP" or
"DO WN" but ton to se lect th e new pos ition a nd pres s "OK"
but ton. Th e chann el will b e moved t o the new p ositi on.
Pre ss "OK" b utton a gain to c ancel t he corr espon ding fu nctio n.
Pre ss colo ur butt ons aga in to exi t the cor respo nding f uncti on.
Pre ss "Exi t" butt on to sav e and to go b ack to "E dit Cha nnel" m enu.
3
NOTE:
Bas icall y, the o perat ion of "R adio Ch annel L ist" is t he same a s "TV Cha nnel Li st",
but t here is o ne poin t diffe re nt : In "R adio Ch annel L ist" mo de, the re is no vi deo
inf ormat ion, so i t will al ways di splay a l ogo in th e right s ide pre view wi ndow.
Pre ss "Gre en" but ton to ac tivat e "Skip " funct ion. Pr ess "OK "
Pre ss "Yello w" butt on to act ivate " Move" f uncti on. Hig hligh t the
Edit Ch annel
TV Chan nel Lis t
Radio C hanne l List
Delet e All
TV Chan nel Lis t
All TV
Lock
Move
Edit
FAV
Skip
0001 No N ame
0002 YooP lay Ga
0003 E4 +1
0004 UK TV Hist or
0005 SK Y THREE
0006 Sk y Spts Ne
0007 Sk y News
Sort
0001 No N ame
0002 YooP lay Ga
0003 E4 +1
0004 UK TV Hist or
0005 SK Y THREE
0006 Sk y Spts Ne
0007 Sk y News
Pre ss "Blu e"but ton to en ter to th e Edit Ch annel s ub menu .
All TV
Rename
Edit Ch annel
Delete
DVBT
YooPlay Ga
498167KH Z/8K/ 64QAM
PID:203/ 303/2 03
GI:1/32 FE C:3/4
DVBT
YooPlay Ga
498167KH Z/8K/ 64QAM
PID:203/ 303/2 03
GI:1/32 FE C:3/4
DeleteAll
1
In th e Edit Ch annel m enu, se lect "D elete Al l" and pr ess "OK " butto n.
You wil l be aske d to inpu t the pas sword (the de fault p asswo rd is
"00 00").
2
A warn ing win dow app ears.
Sel ect "Yes" t o delet e all cha nnels .
Sel ect "No " to canc el dele ting.
Eng lish
1
5
Warni ng! Do yo u reall y want to d elete
all ch annel s?
Yes
No

INSTALLATION
InstallationMenu
"Inst allat ion" me nu allows you to s et up channel se arch and LCN
optio n.
AutoScan
"Auto S can" me nu allo ws you to set up aut omatic chann el scan.
1
Selec t the "Auto Sc an" and press "OK" bu tton to enter to the
Auto Sca n menu.
Press cu rsor but ton to set "FTA Only" or " T2 Signal Only ".
2
3
Highl ight "Se arch" and press th e "OK" butt on to scan the channe ls
autom atica lly.
Auto Sc an
FTA Only
T2 Sign al Only
Searc h
No
No
ChannelScan
"Chan nel Sca n" menu allows y ou to set up manua l channel scan .
1
Selec t "Chan nel Scan" and pr ess the "OK" but ton to enter to th e
Chann el Scan m enu.
2
Press c ursor b utton to set "Sc an mode ", "Scan Band" , "Channel No. ",
"Freq uency ", " Bandwidth " and "Network s earch" .
3
Highl ight "S earch" and pre ss "OK" button t o scan the chann els manually.
Chann el Scan
Scan Mo de
Scan Ba nd
Chann el No.
Frequ ency
BandW idth
Netwo rk Sear ch
Searc h
LCN
If LCN (L ogica l Channel Numb er) function i s activated, y ou can't chang e the original n umber of
TV chan nels by s canning .
This me nu allo ws you to activa te/disacti vate the LCN fun ction. The def aul val ue is “Off”.
Eng lish
1
6
By Channe l
UHF
CH37(66 6000KHz )
666000K Hz
8MHz
No

SYSTEMSETUP
SystemSetupM enu
1
Pre ss the "M ENU" bu tton to e nter th e Main Me nu.
Pre ss "UP" o r "DOWN " butto n to high light " Syste m Setup " and
2
pre ss "OK" b utton t o enter t o the Sys tem Set up menu .
Pre ss "UP" o r "DOWN " butto n to high light t he desi red
3
ite m and pre ss "OK" b utton t o enter t o the sub -menu .
4
Pre ss "EXI T" butt on to exi t.
Language
Thi s menu al lows yo u to set th e Langu age of Sy stem, Au dio, Su btitl e
and Tel etext . Also y ou can se t the Sub title f uncti on.
TVSystem
Vid eo Reso lutio n:
Asp ect Mod e:
Dig ital Aud io Out:
Set u p Variou s video r esolu tions . If you ar e using
HDM I outpu t conne ction , the def ault va lue is
108 0i@50 HZ. If yo u are usi ng SCAR T out put
con necti on, the d efaul t value i s 576i.
Aut o/4:3 PS/4: 3LB/1 6:9. Th e defau lt valu e is Auto.
BS Ou t/LPC M Out. Th e defau lt valu e is LPCM O ut.
Syste m Setup
Langu age
TV Syst em
Local Ti me Sett ing
Timer Se tting
Paren tal Loc k
OSD Set ting
Favor ite
Audio D escri ption S ettin g
Other
Langu age
Langu age
First Au dio
Secon d Audio
Subti tle Lan guage
Teletex t
Subti tle
TV Syst em
Video Re solut ion
Aspec t Mode
Digit al Audio O ut
Engli sh
Engli sh
Greek
Engli sh
Engli sh
On
1080i @50HZ
Auto
LPCM Ou t
1
7
Eng lish

SYST EMSE TUP
LocalTimeSetting
Thi s menu al lows yo u to set th e regio n and the l ocal ti me.
Reg ion: Us e this me nu to cha nge the c ountr y.
GMT U sage: U se this m enu to op en the us age of GM T by
Reg ion or by U ser Def ine. Al so, to cl ose the
usa ge of GMT.
GMT O ffset : This me nu is val id only w hen is se lecte d "User
Def ine" in G MT Usag e menu .
The G MT offse t range i s "-11:3 0 ~ +12:0 0",
inc reasi ng ever y half ho ur prog ressi vely.
Sum mer Tim e: On/O ff the Sum mer Time . The def ault va lue is On .
Dat e/Tim e: "Dat e" and "Ti me" men us are va lid onl y when se lecte d "Off" i n GMT Usag e menu.
Pre ss nume ric but tons to s et the Da te/Ti me.
Local T ime Set ting
Regio n
GMT Usa ge
GMT Off set
Summe r Time
Date
Time
Johan nesbu rg, Har are, So fia, Ath ens, Tal linn,
Helsi nki, Bu chare st, Min sk, Ist anbul , Kyiv, Ode sa,
Cairo , Khart oum, Ank ara, Je rusal em, Bei rut, Amm an
TimerSetting
Timer Mode: Set the time interval: Once, Daily, Weekly, Monthly or Off. The default value is Off.
Timer Service: When is set to Record, the receiver will switch to the preset channel,
at preset date and time, and start recording the programme.When is set to Channel,
the receiver will switch to the preset channel at preset date and tme.
Wake up channel: Set the channel.
Wake up date: Set the date.
On Time: Set the start time.
Duration: Set the duration of displaying or recording a channel.
NOTE :
It is also possible to set the Timer from EPG menu (see EPG section).
Timer S ettin g
1 Off
01/05/ 2008
7:25
2 Off
Timer Mod e
3 Off
Timer Ser vice
4 Off
Wakeup Ch annel
5 Off
Wakeup Da te
6 Off
On Time
7 Off
Durati on
8 Off
BBC FOUR
xx/xx/ xxxx
ParentalLock(Som efir mwa reve rsi onsd onots upp ortt hisf unc tion )
This me nu allo ws you to lock the m enu and the chan nels. Also you can
set Rat ing Loc k and change the P assword.
1
In "Sys tem Set up" men u, select "Par ental Lock" an d press "OK" but ton.
You wil l be aske d to input the pas sword (the def ault passwor d is
"0000 ").
2
After i nputt ing the c orrect passw ord by pressin g numeric butt ons,
the par ental l ock menu appea rs.
Men u Lock:
Rat ing Loc k:
New P asswo rd:
Con firm Pa sswor d:
To lock t he Edit c hanne l/ Inst allat ion men u. You can se t menu lo ck to On/ Off.
The d efaul t value i s Off.
Off / AGE 4~ AGE18 . The def ault va lue is Of f.
To chan ge the pa sswor d.
To conf irm the n ew pass word.
Paren tal Loc k
Menu Lo ck
Ratin g Lock
New Pas sword
Confi rm Pass word
Greec e
By Regi on
GMT+0 2:00
On
xx/xx /xxxx
xx:xx
Off
Channe l
xx:xx
xx:xx
Off
Off
----
----
NOTE:
1
8
Eng lish

SYST EMSE TUP
OSDSetting
This me nu allo ws you to set the ti me of OSD Timeout an d OSD
Transpa rency .
OSD Ti meout :
OSD Tr anspa rency :
The d efaul t value i s 5.
The re are th e optio ns: Off /10%/ 20%/3 0%/40 %.
The d efaul t value i s Off.
OSD Set ting
OSD Time out
OSD Tran spare ncy
5
Off
Favorite
This me nu allo ws you to rename t he favorite gr oup.
1
In "Sys tem Set up" men u, select "Fav orite" and pre ss "OK" button t o
enter t o the Fav orite m enu.
2
Selec t the fav ourit e group you want t o change and pre ss "OK" button
to open t he keyp ad. Inp ut letter and nu meric, one by on e, by
press ing the c ursor b uttons and pre ss "OK" button t o select. At the
end, pr ess the B lue but ton to save the ch anges.
3
Press " EXIT" b utton t o quit the favor ite group rena me menu.
1
2
3
4
5
6
7
8
Favor ite 1
Favor ite 2
Favor ite 3
Favor ite 4
Favor ite 5
Favor ite 6
Favor ite 7
Favor ite 8
Favor ite
Renam e
Favor ite 1
A
B C D E F
G
M
N
S
T
Y
Z
5
4
SP
CAPS
K LHJI
Q
P
R
O
U
V
W
X
3
0
1
2
7
6
8
9
<-
OK
?
Del
OK
Other
This menu allows you to set Antenna Power, Channel Play Type,
Auto Standby and After Power Stop.
Antenna Power: Set to On and the receiver will provide 5V power to antenna.
Set to Off and the receiver will not provide 5V power to antenna).
The default value is Off.
Auto Standby: Set what time the receiver will automatically enter in
Standby Mode. The default value is 3 Hours.
After Power Stop: Allows you to choose the action of the receiver at a sudden power stop. The default value is
“Restart to Last Channel”.
Antenna Power
Auto Standby
After Power Stop
Other
Restart to Last Channel
Off
Off
1
9
Eng lish

TOOLS
Toolsma inmenu
1
Press t he "MEN U" butt on to enter Main M enu.
Press " UP" or " DO WN " butt on to highligh t "Tools" and p ress "OK"
2
butto n to ente r the Tools menu .
3
Press " UP" or "D OWN" bu tton to highli ght the desire d item
and pre ss "OK" b utton t o enter the sub- menu.
4
Press " EXIT" b utton t o exit.
Information
Displ ays Inf ormat ion about the Mo del Name, Video D ecoder, Firmw are
Version a nd the Da te of Firmware .
1
In "Tools" me nu, sel ect "Informa tion" a nd press "OK" bu tton to open
infor matio n windo w.
2
Press " EXIT" b utton t o exit "Inform ation" menu.
FactorySetting
This me nu allo ws you to reset th e recei ver back to the fa ctory settin gs
and cle ar all ex isted channe ls.
1
In the "Tools " menu, s elect " Factory Sett ing" and press " OK" button.
You will be ask ed to input the pa ssword(the d efault passw ord
is "000 0").
A confirm ation w indow is displ ayed.
2
Selec t "Yes" to res et back t o facto ry settings an d clear all chan nels.
Selec t "No" to c ancel f actory setti ngs.
Press " EXIT" b utton t o exit "Factor y Setting" men u.
3
Tools
Infor matio n
Facto ry Sett ing
S/W Upg rade by O TA
Upgra de By USB
Remov e USB dev ice saf ely
Infor matio n
xxx
Model N ame:
xxxxx
Video De coder :
xxxxx
Firmw are Vers ion:
xx-xx -xxxx
Date of F irmwa re:
Facto ry Sett ing
This operation will load default and erase all
the channels that user added, continue?
Yes No
10
1
Eng lish

TOOL S
UpgradeByUSB
The receiver is connected with the TV, but in Standby Mode. Copy
the latest firmware into a USB stick. Do not rename the file of
firmware and do not put the file into a folder. Insert the USB stick
to the USB port of the receiver and press the Standby button on the
remote control. The message “USB device connected” will appear
on the TV screen. Press Menu - Tools - Upgrade by USB and press OK.
In this window set the option “Upgrade Mode” : “All Code”.
At the option below “ Upgrade File”, choose the latest firmware that
is copied to the USB stick. Below there is the option “Start”. Press OK and the upgrade process will start.
In a few seconds, the process will be completed and the receiver will restart automatically. After the
upgrade, confirm the date of the new firmware by pressing: Menu - Tools - Information.
NOTE:
If the upgrade process does not start, then use USB stick in FAT32 format.
Upgra de By USB
Upgra de Mode
Upgra de File
Start
Save/LoadChannelsto/fromUSB
This option allows you to save/load your Channel List to/from USB. Scan the
channels and sort them, with the remote control, on your desired position. Insert a
USB stick in the USB port of the receiver. Then, press Menu – Tools – Upgrade By
USB and press OK.
In this window select “Upgrade Mode” : “Save Channels to USB”. Below, you can
see that is created automatically, a new file : “Channels(DateTime).udf”. Press the
below option : “Start” and the channels will be saved into the USB stick.
If, for any reason, restore to Factory Setti
load the channels from the USB stick. Press Menu – Tools – Upgrade By USB and
press OK. In this window select “Upgrade Mode” : “Load Channels from USB”.
At the below option, choose the channel file .udf. Then, at the below option
“Start”, press OK. Your saved Channel List is now loaded.
ngs and lost the channels, then , you can
All Cod e
No File
0%
11
1
Eng lish

BackupFirmware
If you want to Backup the current firmware, the channels in the desired position
and the setti
ngs that you have chosen, then follow the below process:
Press Menu – Tools – Upgrade By USB and press OK. In this window select
“Upgrade Mode” : “Backup Software to USB”. Below is created automatically a file
“BackupDateTime.abs”. At the below option “Start”, press OK. The process will
finish in a few seconds, so, now we have created a Backup Firmware, which
includes the desired Channel List and settings.
This file “Backup.abs” can be
load also to other receivers LEGENT HEV1.
RemoveUSBdevicesafel y
This me nu allo ws you to remove t he exte rnal USB devic e safely.
In "Too ls" men u, sele ct "Rem ove USB d evice s afely ".
1
2
Pre ss "OK" b utton t o confi rm. The n a windo w is disp layed .
Sel ect "OK " butto n to remo ve the US B devic e.
Sel ect "Ca ncel" b utton t o cance l the ope ratio n.
Remov e
TOOL S
Disk Re move
OK
USB Dis k A-3 GB
Cance l
12
1
Eng lish

MEDIAPLAYER
MediaPlayermainmenu
Ens ure to in sert an e xtern al Mass S torag e Devic e on the US B port.
1
Pre ss the "M ENU" bu tton to e nter Ma in Menu .
2
Pre ss "UP" o r "DOWN " butto n to high light " Media P layer " and
pre ss "OK" b utton t o enter t he Medi a Playe r menu.
3
Pre ss "UP" o r "DOWN " butto n to high light t he desi red ite m
and p ress "O K" butt on to ent er the su b-men u.
4
Pre ss "EXI T" butt on to exi t.
MediaPlayer
Thi s funct ion all ows you t o play th e media f iles fr om an ext ernal
USB d evice .
1
In "M edia pl ayer" m enu, sw itch be tween " PVR", " Video ", "Mus ic"
or "I mage" b y press ing num ber 1 on th e remot e contr ol.
2
Pre ss "OK" b utton t o enter M edia Pl ayer me nu.
3
Pre ss "UP" o r "DOWN " butto n to sele ct a desi red med ia file ,
and p ress "O K" butt on to pla y the fil es.
4
Pre ss "EXI T" butt on to exi t.
Music:
"RE D" butt on:
"GR EEN" bu tton:
"YE LLOW" b utton :
"BL UE" but ton:
"1" b utton :
"2" b utton :
"IN FO" but ton:
"EX IT" but ton:
Image:
"RE D" butt on:
"GR EEN" bu tton:
"YE LLOW" b utton :
"BL UE" but ton:
"1" b utton :
"2" b utton :
"IN FO" but ton:
"3" b utton :
"EX IT" but ton:
Pre ss to sho w and edi t the Pla y List.
Pre ss to set t he sele cted fi le to Fav ourit e list.
Pre ss agai n to canc el favo urite a nd dele te the fi le from p lay lis t.
Pre ss to set a ll the fi les of cu rrent d irect ory to Fa vouri te list .
Pre ss agai n to canc el favo urite a nd dele te all fi le of cur rent di recto ry from t he
pla y list.
Pre ss to ent er to edi t sub-m enu for t he sele cted fi le.
Pre ss to swi tch TAB bet ween Mu sic / Ima ge / Vide o / PVR.
Pre ss to sor t the fil es of the c urren t direc tory by N ame / Time / S ize / Fav orite .
Pre ss to set r epeat m ode (Re peat Fo lder / Ra ndom Fo lder / Re peat On e).
Ret urn to th e upper d irect ory.
Pre ss to sho w and edi t the Pla y List.
Pre ss to set t he sele cted fi le to Fav ourit e list.
Pre ss agai n to canc el favo urite a nd dele te the fi le from p lay lis t.
Pre ss to set a ll the fi les of cu rrent d irect ory to Fa vouri te list .
Pre ss agai n to canc el favo urite a nd dele te all fi le of cur rent di recto ry from t he
pla y list.
Pre ss to ent er to the E dit sub -menu f or the se lecte d file.
Pre ss to swi tch TAB bet ween Mu sic / Ima ge / Vide o / PVR.
Pre ss to sor t the fil es of the c urren t direc tory by N ame / Time / S ize / Fav orite .
Pre ss to set s lide sh ow opti on.
Pre ss to vie w image i n multi v iew mod e
Ret urn to th e upper d irect ory.
PVR
Video
Music
Image
PVR Sto rage In forma tion
PVR Set ting
Music
/..
MPG
1
840.m pg
2
I swear. mp3
MP3
MP3
3
Why.mp3
MP3
Lonel y.mp3
4
MP3
Becau se.mp 3
5
JPG
Rose. jpg
6
JPG
Fly.jpg
7
Play List
1
Switch
Media P layer
Image Video PVR
USB 1
FAV FAV All Edit
2
INFO
Repeat
Sort
I swear. mp3
3319K B
00:03 :32
00:03 :15 00: 03:32
EXIT
Exit
13
1
Eng lish

Medi aPla yer
Video:
"BL UE" but ton:
"1" b utton :
"2" b utton :
"IN FO" but ton:
"EX IT" but ton:
Pre ss to ent er to the E dit sub -menu f or the se lecte d file.
Pre ss to swi tch TAB bet ween Mu sic / Ima ge / Vide o / PVR.
Pre ss to sor t the fil es of the c urren t direc tory by N ame / Time / S ize.
Pre ss to set r epeat m ode (Re peat Fo lder / Re peat On e).
Ret urn to th e upper d irect ory.
PVR :
"RE D" butt on:
"GR EEN" bu tton:
"YE LLOW" b utton :
"1" b utton :
"EX IT" but ton:
Pre ss to Ren ame the s elect ed reco rding f ile.
Pre ss to Loc k the sel ected r ecord ing fil e.(Th e passw ord is ne cessa ry for th e
ope ratio n)
Pre ss agai n to unlo ck the re cordi ng file .
Pre ss to del ete the s elect ed reco rding f ile.
Pre ss to swi tch TAB bet ween Mu sic/I mage/ Video /PVR.
Ret urn to th e upper d irect ory.
PVRStorageInformati on
Thi s menu ca n displ ay some p arame ters of t he exte rnal US B devic e.
1
In "M edia Pl ayer" m enu, se lect "P VR Stor age Inf ormat ion" an d
pre ss "OK" b utton t o open th e infor matio n windo w.
2
Pre ss "EXI T" butt on to exi t.
"YE LLOW" b utton :
"BL UE" but ton:
Pre ss to set f ormat o ption ( FAT/NTF S).
The d efaul t value i s FAT.
Pre ss to set D VR Type
(RE C & TMS / Rec ord / Time shift ). The de fault
val ue is REC & T MS.
Forma t
Disk Mo de
FAT
OK
Cance l
PVRSetting
Thi s menu al lows yo u to set th e PVR Set tings .
1
In "M edia Pl ayer" m enu, se lect "P VR Sett ing" an d
pre ss "OK" b utton t o enter " PVR Set ting" menu.
2
Pre ss "UP" o r "DOWN " butto n to high light t he desi red
ite m and pre ss "OK" butto n to ente r the sub -menu .
3
Pre ss "EXI T" butt on to exi t.
Time shift :
Jum p:
Time shift t o Recor d:
Aft er Reco rding :
The d efaul t value i s Off.
Sel ect bet ween 30 s ec/1 mi n/5 min /10 min /30 min . The def ault va lue is 30 s ec.
The d efaul t value i s OFF.
Sel ect the a ction o f the rec eiver a fter th e recor ding. T he defa ult val ue is
“Go to Stan dby”.
PVR Sto rage In forma tion
USB Dis k A: xxxG by tes
Volume
Total Siz e:
Free Si ze:
Rec Siz e:
TMS Siz e:
File Sy stem:
Forma t DVR Set
DVR Type
OK
PVR Set ting
Timeshift
Jump
Timeshift to Record
After Recording
DVR Set
REC & TMS
Cance l
Goto St andby
30sec
xxxx
xxxx
xxxx
xxxx
xxxx
xxx
Off
OFF
14
1
Eng lish

TIMESHIFT/RECORD
Plu gging a n exter nal Mas s Stora ge Devi ce on the U SB port , gives y ou acce ss to Time S hift / Re cord
a pro gramm e.
Pau se a prog ramme a nd cont inue wa tchin g it late r (Time Sh ift )
Rec ord a pro gramm e.
Whe n the ava ilabl e space o n the Mas s Stora ge Devi ce runs o ut, the r ecord ing of th e progr amme
wil l stop.
NOTE:
Ple ase use U SB 2.0 di sk when r ecord ing or ti meshi ft.
For t imesh ift and r ecord ing fea ture, y ou need t ake big ger siz e USB dri ver or HD D (>2GB ).
Timeshift(S omef irm war evers ion sdono tsup por tthi sfun cti on)
Ini tiate
Time S hift ca n be done i n viewi ng mode b y press ing the
"PAU SE" but ton.
Pre ss "RIG HT" or "L EFT" bu tton to m ove the c ursor t o
the t ime you d esire d to view. P ress "O K" butt on to con firm.
BBC F OUR
step 00:02:3 7
Tric kmode s
Dur ing the p layba ck, it is p ossib le to per form th e follo wing ac tions :
Pre ss "PAUS E" butt on to pau se the pl aybac k
Pre ss "FOR WARD" bu tton to f ast for ward th e playb ack
Pre ss "BAC KWARD" b utton t o rewin d the pla yback
Sto p the Time S hift
Pre ss "STO P" butt on to sto p Time Shift .
Record
Ins tant re cord
In vi ewing m ode, pr ess "RE C" butt on to sta rt an ins tant re cord on t he curr ent cha nnel.
Pre ss "REC " butto n again t o input t he dura tion of t he reco rding .
Pre ss "STO P" butt on to sto p recor ding. T hen a con firma tion wi ndow ap pears .
Sel ect "Yes" t o stop re cordi ng. Sel ect "No " to cont inue re cordi ng.
01:3 6
03/1 9
00:07:12
179 150 94 TS
100
15
1
Eng lish

TROUBLESHOOTING
Prob le m
Fro nt pane l indic ator no t
lig ht.
No vi deo sig nal fou nd or
vid eo/pi cture i s broke n.
No pi cture o r sound .
No re spons e to remo te
con trol.
For gotte n chann el lock
cha nnel.
For gotte n menu lo ck
cod e.
Poss ib le c au se What t o do
Pow er cord u nplug ged.
The r eceiv er is def ected .
Ant enna is d iscon necte d.
Ant enna is d amage d/mis align ed.
Out o f digit al sign al area .
Sca rt or HDM I cable
is no t conne cted on y our TV.
Rem ote con trol ba tteri es exha usted .
Rem ote con trol is n ot aim co rrect ly.
Che ck the po wer cor d.
Ask t he deal er for se rvice .
Con nect th e anten na.
Che ck the an tenna .
Che ck with c hanne l provi der.
Con nect th e Scart o r HDMI ca ble.
Rep lace re mote co ntrol b atter ies.
Aim t he remo te cont rol at fr ont
pan el of the r eceiv er.
Use t he Powe r PIN (10 06).
Use t he Powe r PIN (10 06).
16
1
Eng lish
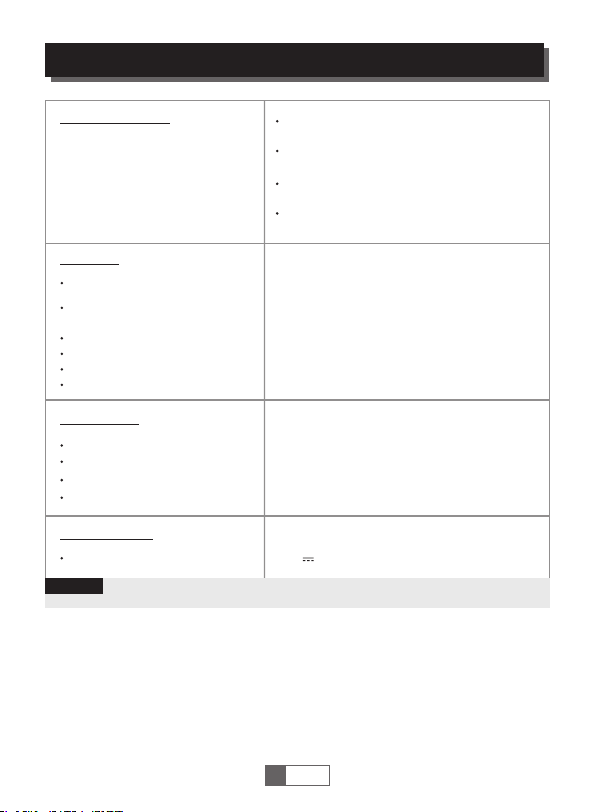
SPECIFICATIONS
TUN ER & CHAN NEL
DEC ODER
Vid eo d ec ode r
Aud io deco der
INP UT RATE
VID EO FORM ATS
VID EO OUTP UT
MOD ULATIO N
CON NECTI ON
TUN ER
DATA PORT
SCA RT TO TV x 1
HDM I HDM I OUTPU T x1
POW ER SUPP LY
DC IN PUT
NOTE:
Des ign and S pecif icati ons are s ubjec t to chan ge with out not ice.
MAX . 48Mbi t/s
4:3 /,16: 9 SWITC HABLE
RF IN PUT CON NE CTO R x1
(IE C-TYP E, IEC1 69-2, F EMALE )
RF OU TPUT CO NN EC TOR x 1
(IE C-TYP E, IEC1 69-2, M ALE (LO OPTHR OUGH) )
FRE QUENC Y RAN GE:
470 MHz ~86 2MHz (U HF)
SIG NAL LEV EL:
-15 ~ - 70 dbm
MPE G-2 MP@ HL, H.2 65/HE VC,
AVC/ H. 26 4 HP @L 4. 1, M PE G-4 AS P SUP PORTE D
MPE G-1 Lay er 1,2/ PCM/H E-AAC V 1.0
ICE 958 SPD IF
HDM I, CVBS
QPS K,16Q AM,64 QAM, 25 6QAM
ANT ENNA INP UTx1, L OOP OUT PUT x1
USB s lot
5V 2A
17
1
Eng lish

SPECIFICATIONS
directives :2014/53/EU,107/2009/EC
, 2014/35/EU
Eng lish
1
18

 Loading...