

Page 1
Page 2
CONTENTS
CONTENTS
• Safety Instructions 1
• Features 2
• Appearance 4
• Remote Control Unit 7
• How to Fix the Hard Disk Drive on the Receiver 12
• How to Format the Hard Disk Drive 14
• Receiver Connections 15
• Quick Setup Guide 17
• Search Channels 18
• Menu Map 22
• Menu Guide 23
• Channel List 36
• PVR 39
• Photo Album 56
• MP3 62
• Troubleshooting 69
• Specifications 70
Trade Mark of the DVB Digital Video Broadcasting Project
Page 3

SAFETY INSTRUCTIONS
SAFETY INSTRUCTIONS
WARNING
WARNING
!
!
Failing to heed the instructions provided on this page could result in serious damage
to your health or damage equipment or other such property.
• Always follow these instructions to avoid the risk of injury to yourself or damage to your
equipment.
• Unplug the power cord from the AC power outlet before cleaning. Use only a damp
cloth for cleaning the exterior of the receiver.
• Do not use accessories or attachments not recommended by the manufacturer, as they may
damage the equipment and said damage is not covered by the warranty.
• Do not operate the receiver in high-humidity areas, or expose it to water or moisture.
• Do not place the receiver on an unstable cart, stand, tripod, bracket, or table.
The receiver may fall, causing serious personal injury and damage to the receiver.
• Do not block or cover slots and openings in the receiver. These are provided for ventilation
and protection from overheating. Never place the receiver near or over a radiator or heat
register. Do not place the receiver in an enclosure such as a cabinet without proper
ventilation.
• Do not stack the receiver on top of or below other electronic devices. They should be at least
10 cm apart.
• Operate the receiver using only the type of power source indicated on the marking label.
Unplug the receiver power cord by gripping the plug, not the cord.
• Route power supply cords so that they will not be pinched by items placed on or against
them. Connect the power cord in the power outlets securely. Unplug the cord by grasping the
plug, not the cord.
• Use an outlet that contains surge suppression or ground fault protection. For added protection
during a lightning storm, or when the receiver is left unattended and unused for long periods
of time, unplug it from the wall outlet and di sconnect the lines between the receiver and the
antenna.
• Do not attempt to service the receiver yourself, as opening or removing covers may expose
you to dangerous voltage, and will void the warranty. Refer all servicing to authorized
service personnel.
• Unplug the receiver from the wall outlet carefully and refer servicing to authorized service
personnel whenever the following occurs:
The power cord is damaged;
Liquid has been spilled, or objects have fallen into the receiver;
The receiver has been exposed to rain or water;
The receiver has been dropped or the chassis has been damaged;
The receiver exhibits a distinct change in performance.
1
Page 4

FEATURES
FEATURES
Set --
Set
• MPEG-II Video(MP@ML)
• MPEG-I Audio Layer 1, Layer 2
• MPEG-II Digital & Fully DVB Compliant
• LD Quality Video, CD Quality Aud io
• European DVB-T standard
• Twin Tuner : one channel watching while one channel recording
• On-Screen Graphics menu with 256 Colors Full-Resolution
• User friendly OSG menu with full function
• Plug & Play Installation
• 4-digit 7-segment LED on the front panel displays channel information
• Displays local time on front panel, when it is on stand-by mode
• RS-232C port for additional information service and update of the receiver control software
• 64-Steps Volume control
• Favorite channel function
• IR remote control
• Last channel memory function
• Variable aspect ratio
• Maturity Rating control / Installation lock / Receiver lock
• EPG for on screen channel information
• Teletext supported by OSD & TV set
• Subtitle supported
• Total 2,000 channels programmable
• Dolby AC3 digital audio bitstream out supported t hr ough S/PDIF ou tpu t (Coax i al / Opti cal )
top box Part
top box Part
2
Page 5

FEATURES
FEATURES
PVR Part
PVR Part
• PVR ready – Recommend 40/80/120G Hard Disk Drive named by Seagate, Maxtor, WDC
• Instant recording, Reserved recording Function
• PVR function with variety trick mode : FF, REW, Slow, Frame by Frame, Repeat, Jump, Index
• Time shifting function (PAUSE function for live signal)
• Random Access function while playback or time shifting
• Last play Function
• Play function while recording
• Permanent storing function of the time shifted files
• Time-shifting and Recording simultaneously.
• File management (Rename, Delete, Lock, Sort)
• MP3 function/ Photo Album.
Accessories
1. Remote Control Unit
2. Batteries
3. USB Cable
4. Loopthrough Cable
5. User Manual
3
Page 6
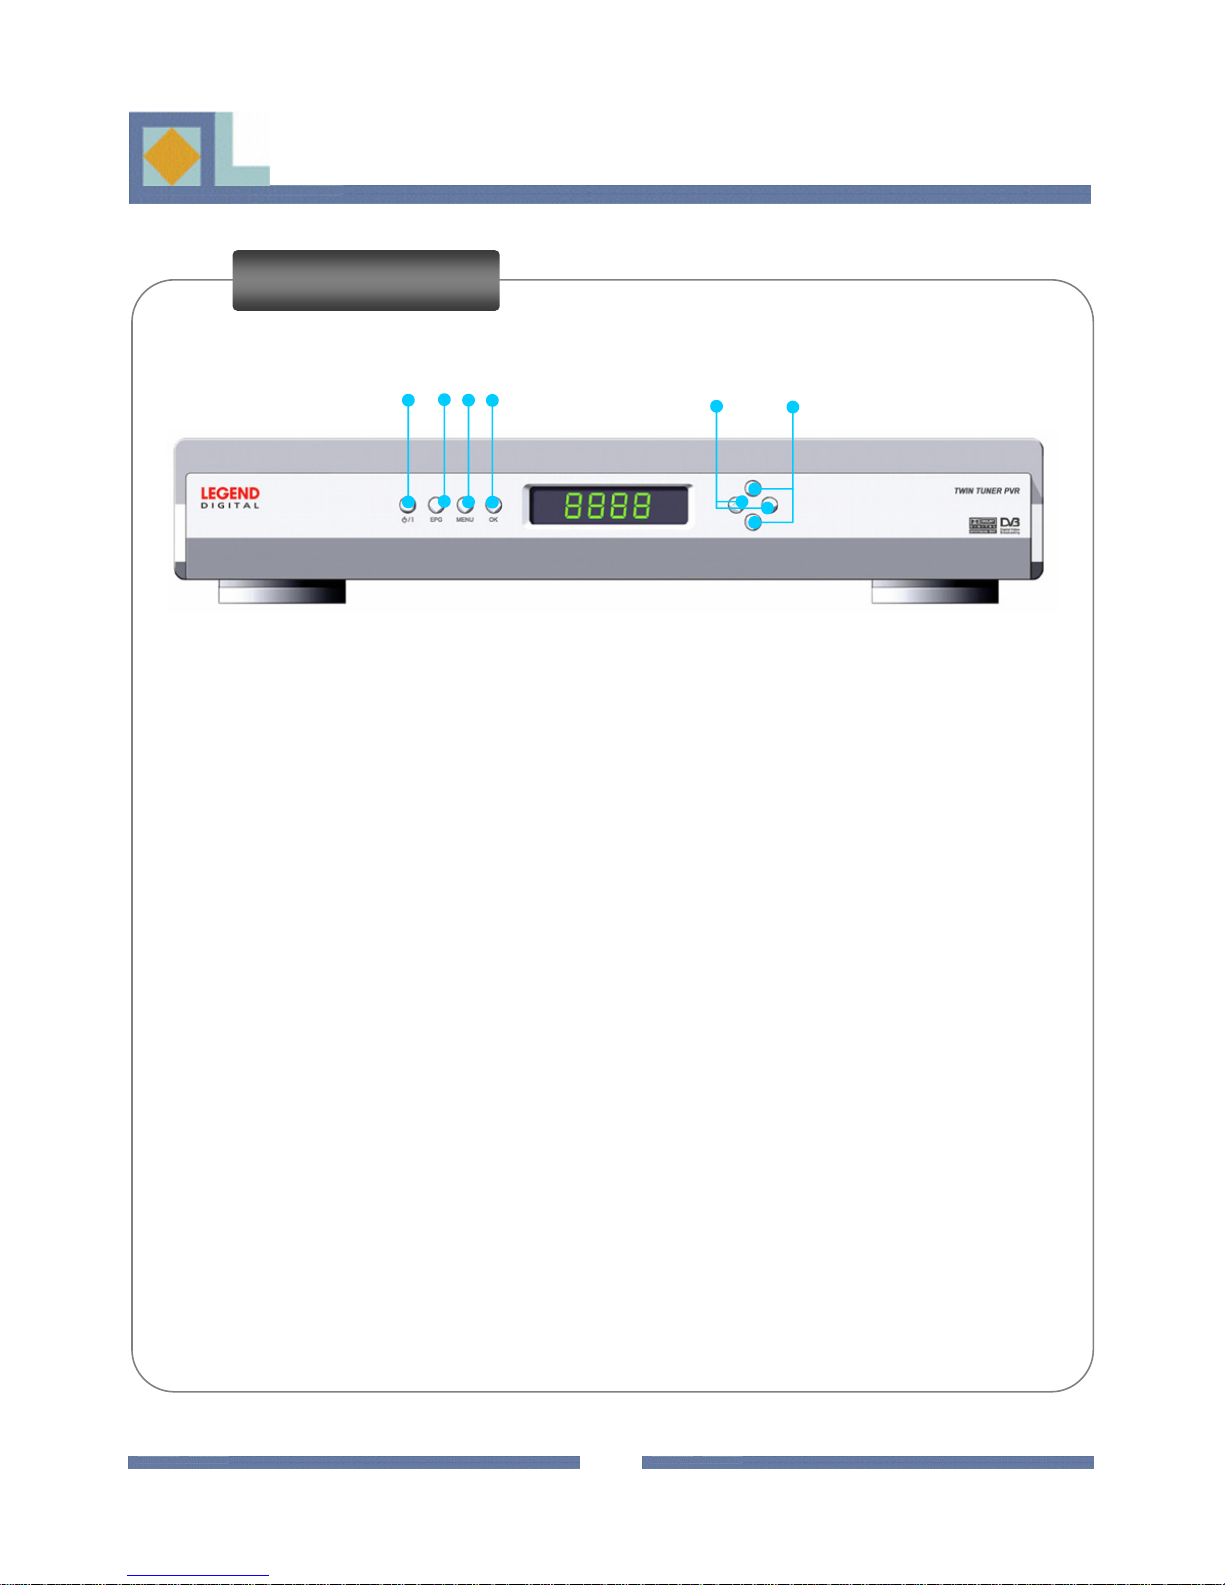
Front View
1 2 3 4 5 6
1. On/ Stand-By
: Switch the receiver to On or Stand-by.
APPEARANCE
APPEARANCE
2. EPG
: Go to the EPG menu.
3. MENU
: Get access to the installation menu..
4. OK
: Give a confirmation or selection.
5. Left/ Right or Volume Up/Down
: Navigate Left/ Right through the selectable options or Volume Up/ Down.
6. Up/ Down or Channel Up/ Down
: Navigate Up/ Down through the selectable options or Channel Up/ Down.
4
Page 7
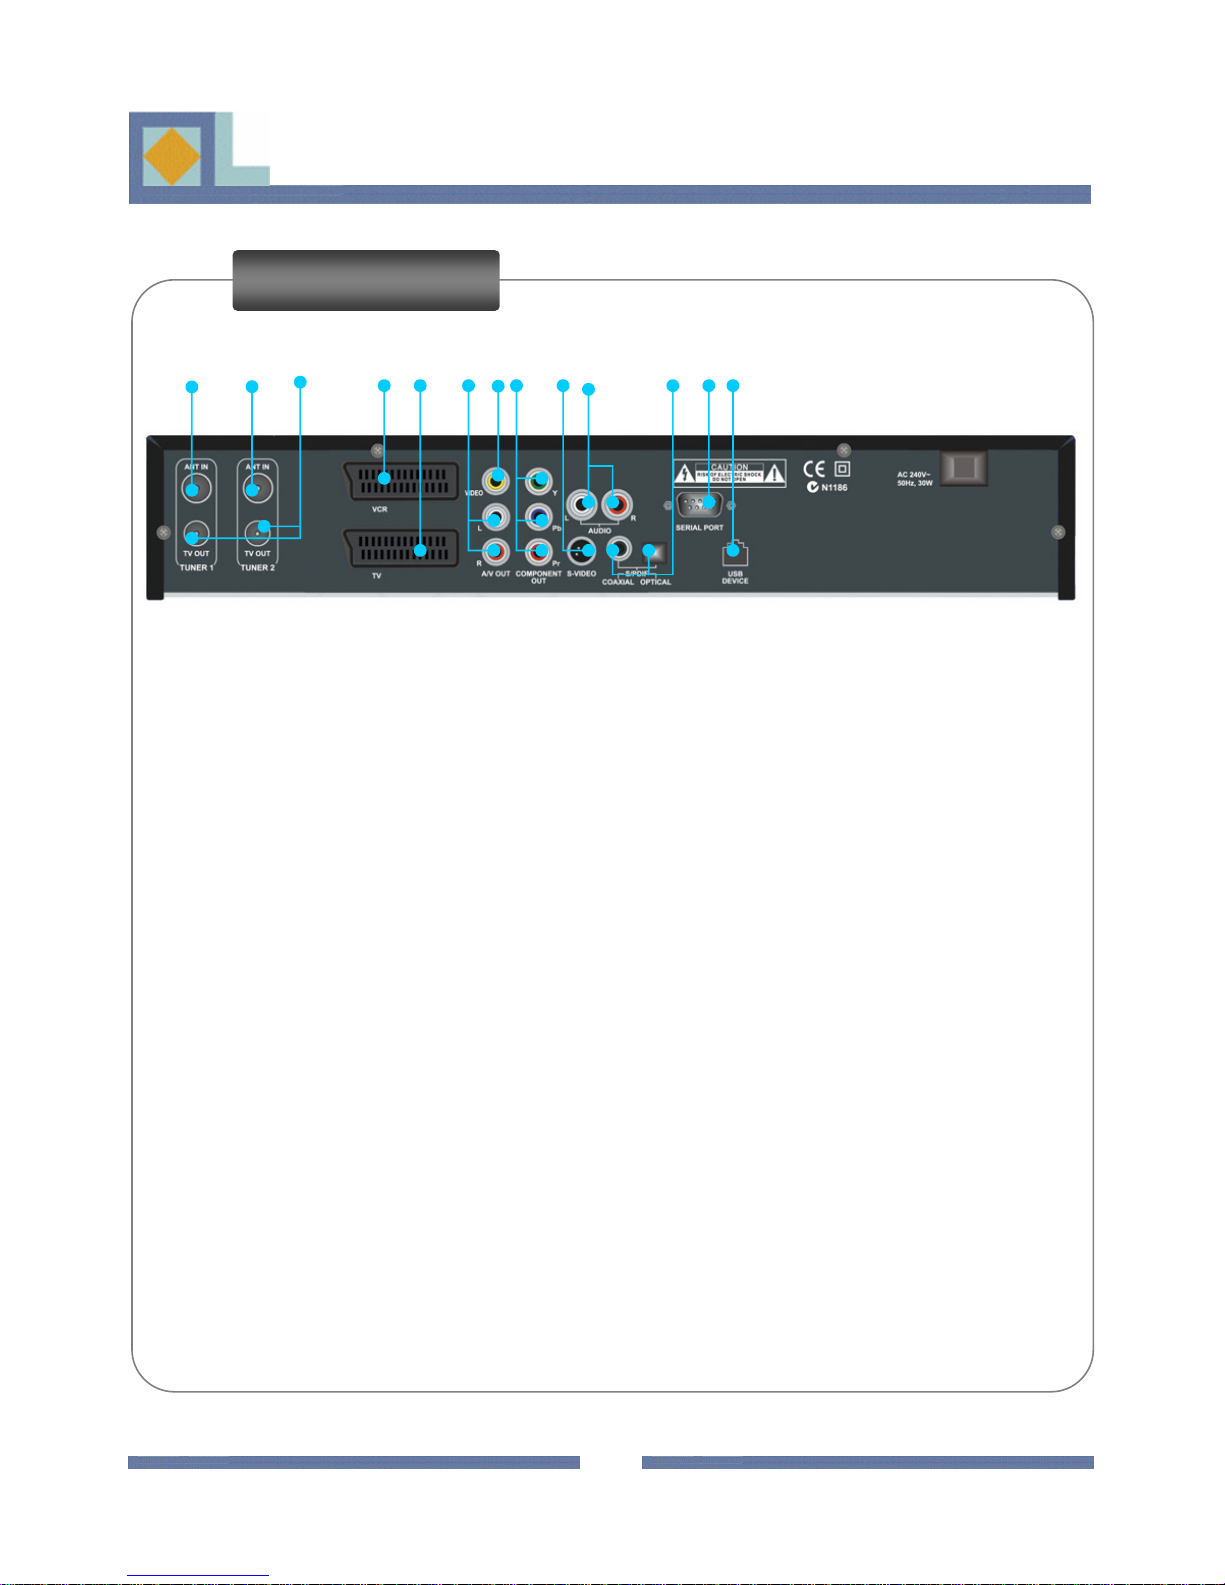
Rear View
1 2 3 4 5 6 7 8 9 10 11 12 13
1. ANT IN (TUNER 1)
: Connect to a terrestrial antenna to receive the digital broadcasts.
In case of the loopthrough connection between the two tuners;
APPEARANCE
APPEARANCE
Tuner 1 should be the master tuner to receive the signal from the antenna.
2. ANT IN (TUNER 2)
: Use for the Loop-through cable.
3. TV OUT
: Use for the Loop-through cable.
4. VCR SCART
: Connect to a connector of the VCR through out the fully-featured SCART cable.
5. TV SCART
: Connect this to a connector of the TV through out the fully-featured SCART cable.
6. AUDIO RCA
: Connect to a Left/right stereo output sockets for television.
5
Page 8

APPEARANCE
APPEARANCE
Rear View
1 2 3 4 5 6 7 8 9 10 11 12 13
7. VIDEO RCA
: Connect to a video signal output socket for television or AV receiver.
8. Component VIDEO OUT
: Connect to the component video sockets for television.
9. S-VIDEO
:Connects to a video signal output socket for Super-Video interface.
10. AUDIO RCA
: Connect to a Left/right stereo output sockets for the hi-fi system.
11. S/PDIF
: Connect to an audio output socket for Dolby digital audio signal for digital multi-channel
amplifier.his to Dolby Digital compatible audio equipment through coaxial S/PDIF cable.
12. SERIAL PORT
: Connect to a serial communication port of a PC for software upgrade (if required).
13. USB PORT
: Connect this to the USB port of a PC for Music and Software download.
6
Page 9
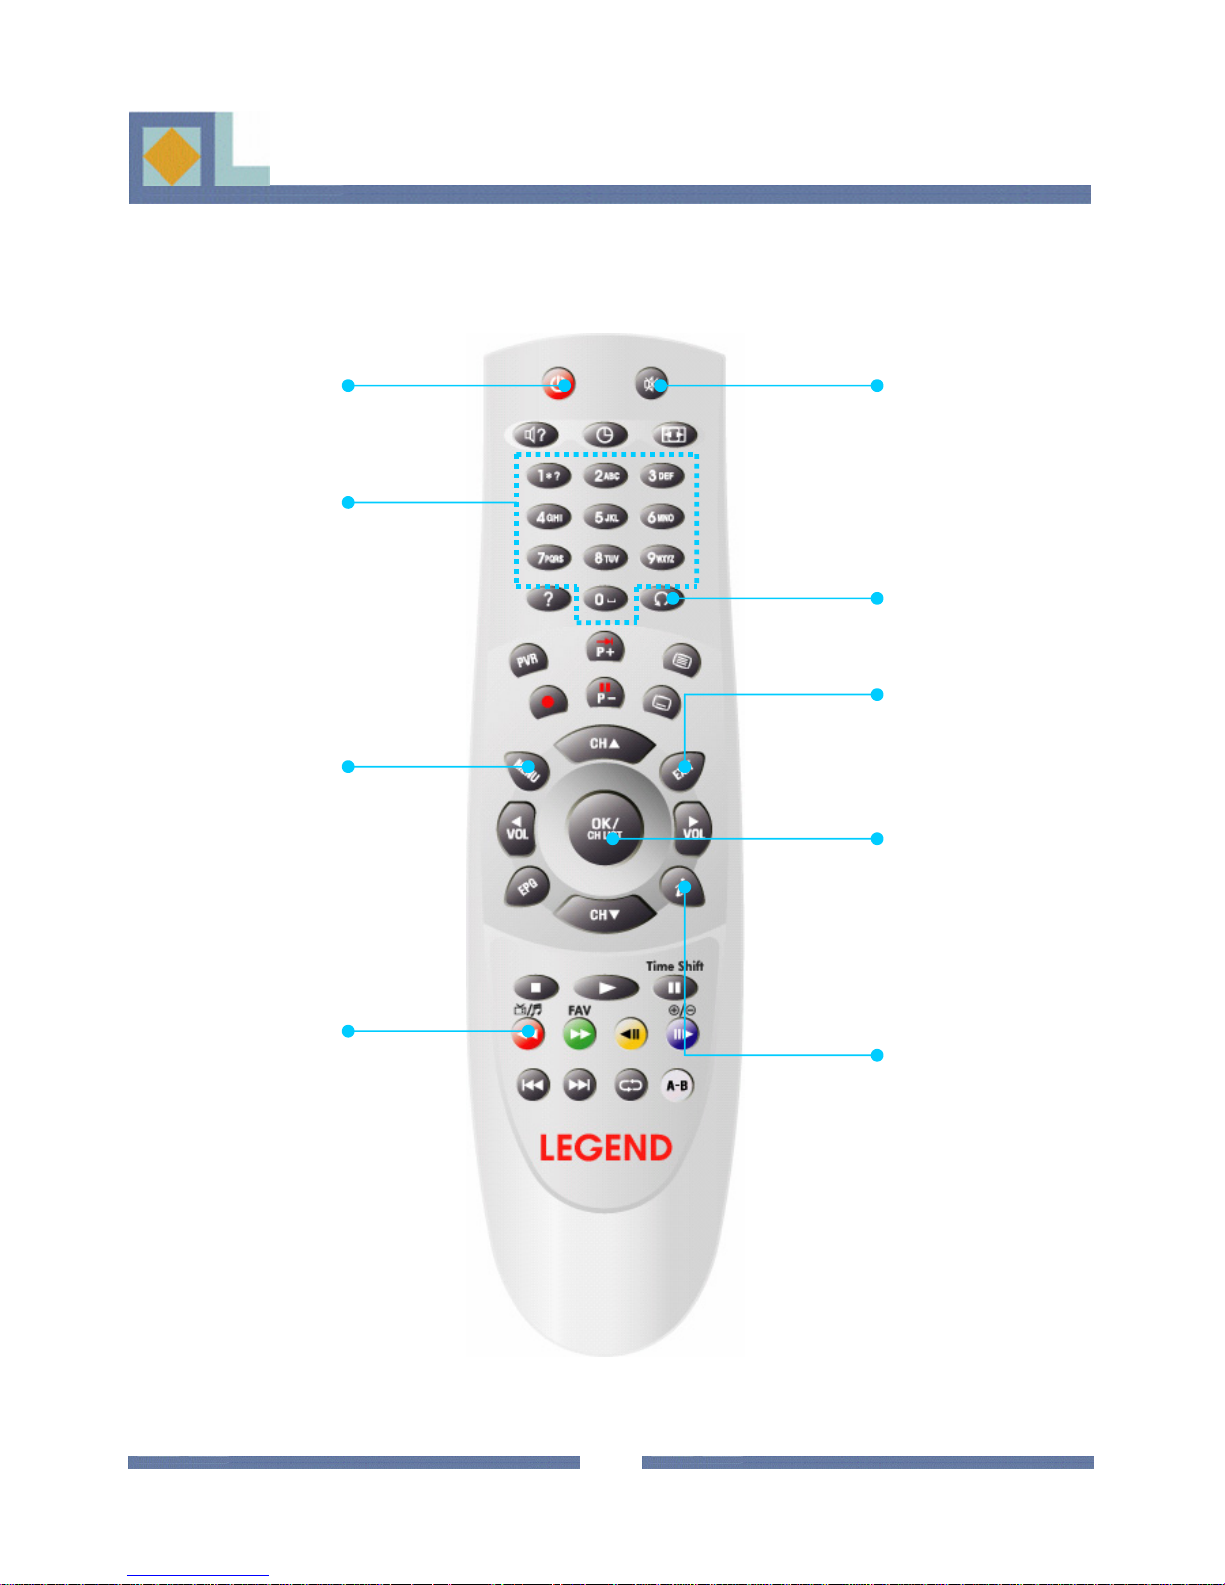
I. TV MODE --11
I. TV MODE
REMOTE CONTROL UNIT
REMOTE CONTROL UNIT
ON/STAND-BY
NUMBER/
ALPHABET
Direct choice of TV /
Radio channel and input
a character by
alphabetical keys.
.
MENU
Displays the main
menu or return to
the previous menu.
MUTE
Switches the sound
ON/OFF.
RECALL
Return to the previously
viewed channel.
EXIT
Returns to the current
channel watching at any
time or exit out of the
submenu
OK/ CH LIST
It is used to select an
item in the menu.
Displays the channel
list on live signal
status.
TV / RADIO
Switches between
TV and Radio mode.
INFORMATION
Press Once: Information
Banner
Press Twice: More
information on the current
and next program.
7
Page 10
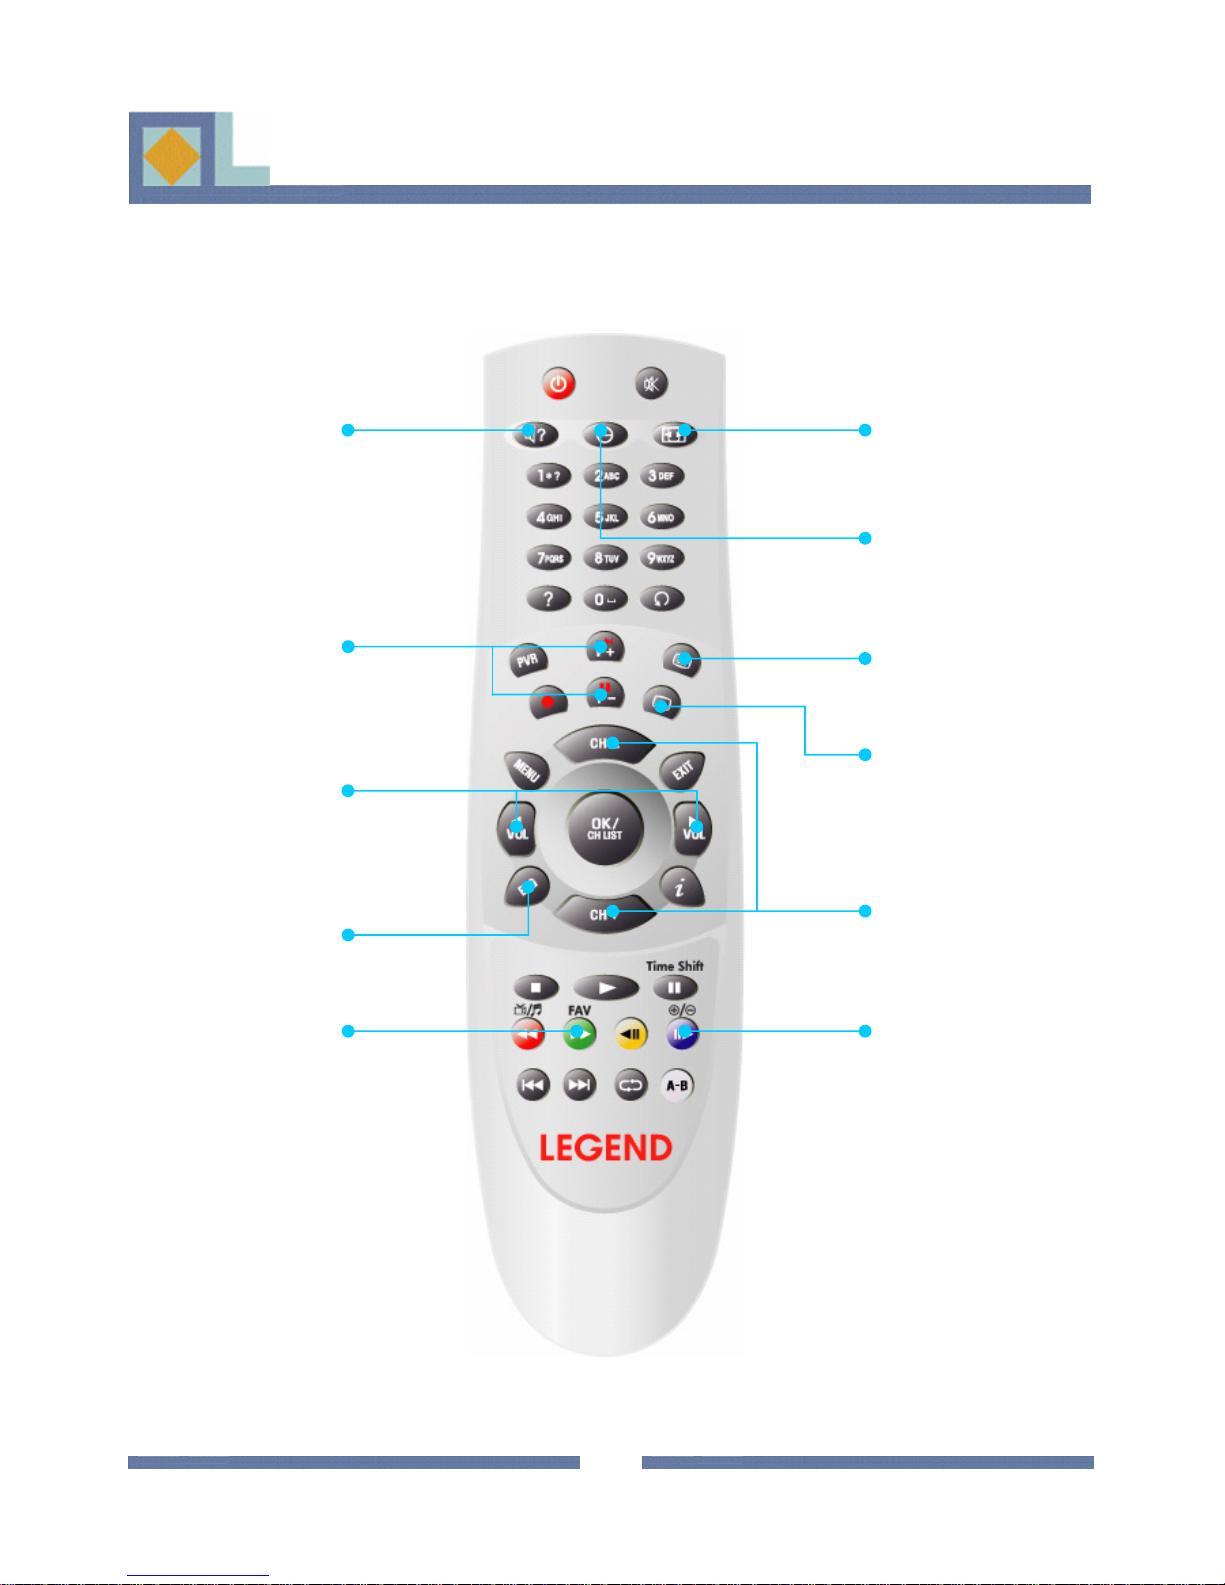
I. TV MODE --22
I. TV MODE
REMOTE CONTROL UNIT
REMOTE CONTROL UNIT
ALT AUDIO
Select the audio
language
PAGE UP/ DOWN
It is used to move
up/down a page in a
list.
VOL
Adjusting Volume or
Move the Cursor Left/
Right.
EPG
Opens information on
program.
ASPECT RATIO
Choose the Aspect
Ratio for the TV
screen.
SLEEP TIMER
Set the sleep timer between
15min and 180min with
15min interval.
TELETEXT
Shows a teletext.
SUBTITLE
Shows Subtitle menu to
select the subtitle
language.
CH
Switching Channels or
Move the Cursor Up/
down.
FAV
Move to the FAV
channel list.
GROUP (blue)
Move to the Group
mode in the channel list.
8
Page 11

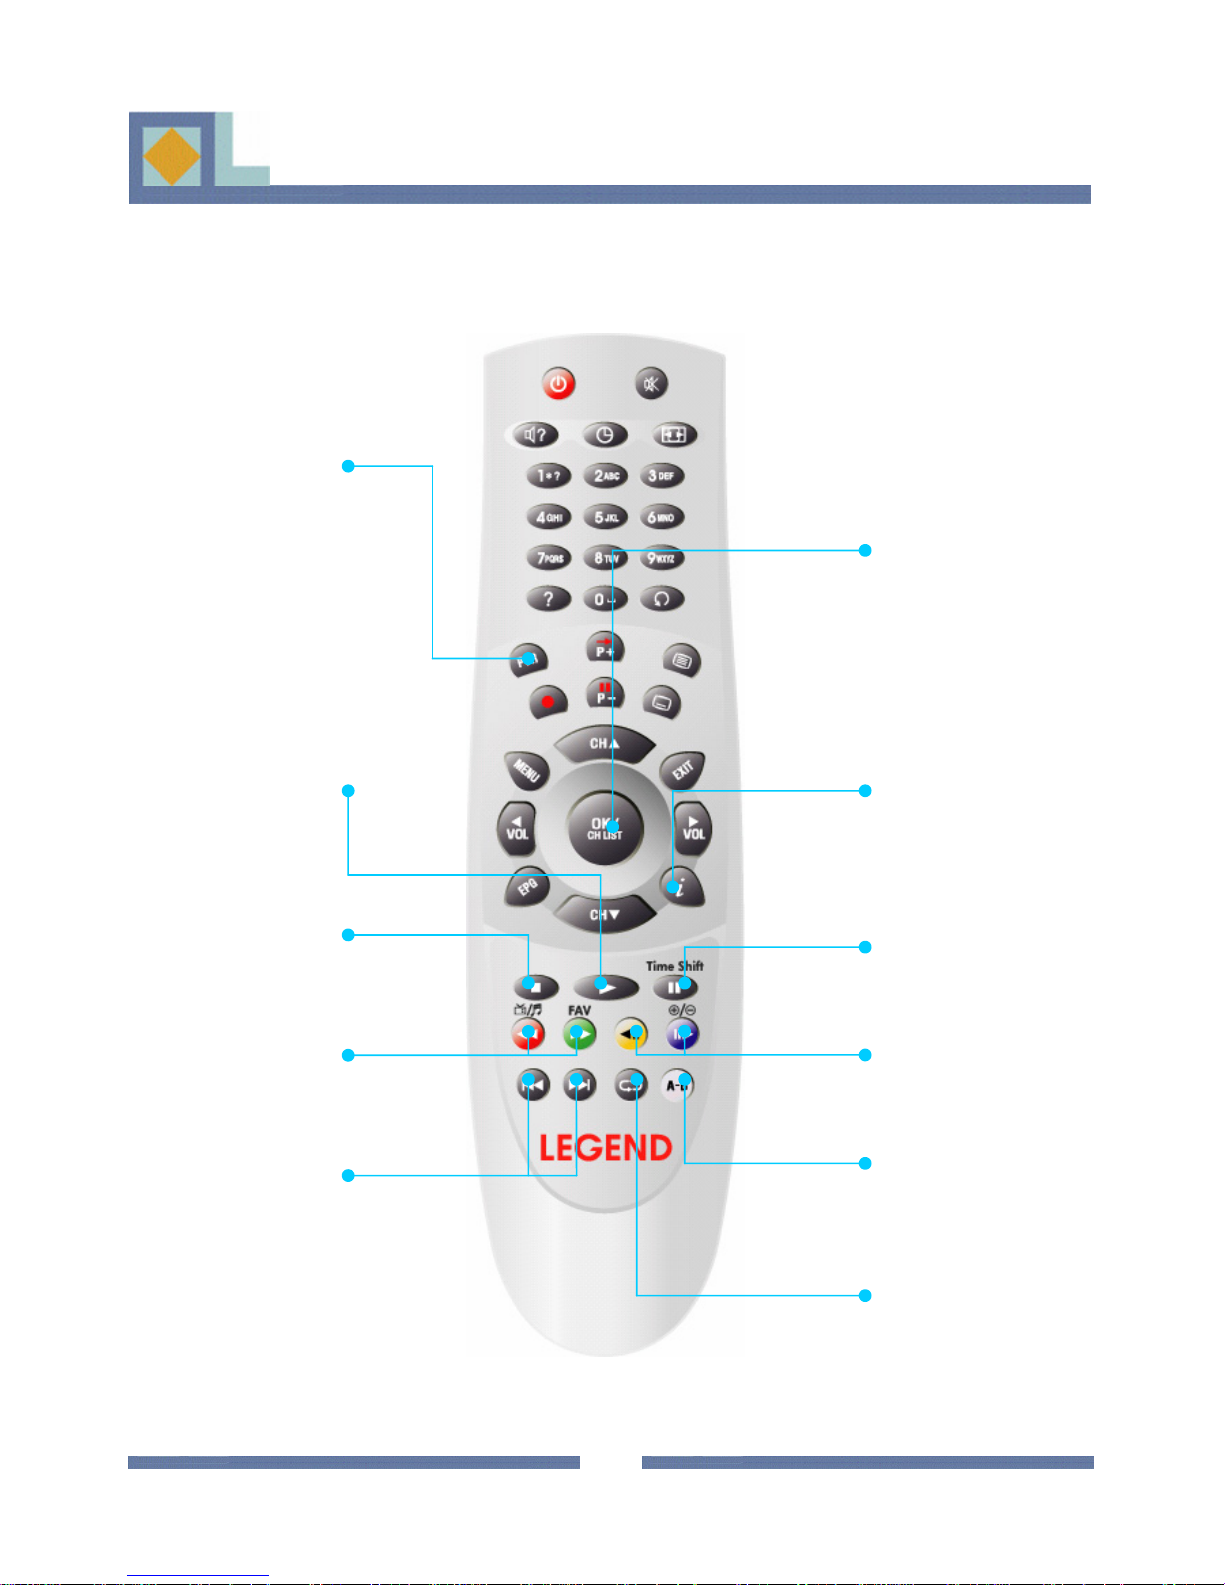
II. PVR MODE
II. PVR MODE
REMOTE CONTROL UNIT
REMOTE CONTROL UNIT
MARKER LIST
Shows the Index List
in a play mode.
PVR
Move to the PVR list. Use
RED button to switch the
satus of the PVR list (Photo
Album, MP3 list, Saved
Programs).
RECORD
Enable the
recording to start.
PLAY
Start to play a
recorded file.
STOP
Return to the live
signal.
MARKER
Use for the marker
function in a
recording or replaying
mode.
RECORDING PAUSE
Stop the recording
temporarily in a playback mode.
INFO/ HELP MENU
- Press Once : Display
the information banner.
- Press Twice : Display
the Help menu.
1. TIME SHIFT
Make the time shifting
record to start.
2. PAUSE
Make the picture freeze
temporarily in a play
mode.
FAST FORWARD
FAST REVERSE
2 - 8 skip rate.
JUMP FORWARD
JUMP REVERSE
Short press: Jump 15
secs forward or reverse
to replay.
Long Press: Move to
desired location.
SLOW FORWARD
SLOW REVERSE
Enable a recorded file to
play with slow motion.
REPEAT A-B
Repeat the selected
selection of the recorded
file between A and B.
REPEAT
Repeat the selected
file.
9
Page 12

III. PHOTO ALBUM
III. PHOTO ALBUM
PVR
Move to the PVR list.
Use RED button to
switch the satus of the
PVR list (Photo
Album, MP3 list,
Saved Programs).
DIRECTION
Use for the direction
key (Left/Right/Up/
Down) in Zoom In
mode.
STOP
Return to the live signal.
REMOTE CONTROL UNIT
REMOTE CONTROL UNIT
OK/CH LIST
Display the Photo
Album list when the
selected photo is
displayed. Show the
selected photo in the
Photo Album list.
INFO/ HELP MENU
- Press Once : Display
the information banner.
- Press Twice : Display
the Help menu.
PLAY
Start the Slide Show
when the photo is
displayed.
ZOOM IN/ OUT
Make the current photo
zoom in/ out.
PAUSE
Stop Slide Show.
PREVIOUS
NEXT
Show the previous
photo or next photo.
10
Page 13
IV. MP3 MODE
IV. MP3 MODE
PVR
Move to the PVR list.
Use RED button to
switch the satus of the
PVR list (Photo
Album, MP3 list,
Saved Programs).
REMOTE CONTROL UNIT
REMOTE CONTROL UNIT
OK/CH LIST
Plays the selected
MP3 file from the
list. Displays the
MP3 list.
PLAY
Play the selected file.
STOP
Return to the live signal.
FAST FORWARD/
REVERSE
Move to a selected
position forward/back.
PREVIOUS/NEXT
Play the previous file
or next file.
HELP MENU
Display the Help menu.
PAUSE
Makes the replay stop
temporarily.
JUMP FORWARD
JUMP REVERSE
Jump 10 secs. forward
or reverse to replay.
REPEAT A-B
Repeat the selected
selection of the music
file between A and B.
REPEAT
Repeat the selected
file.
11
Page 14
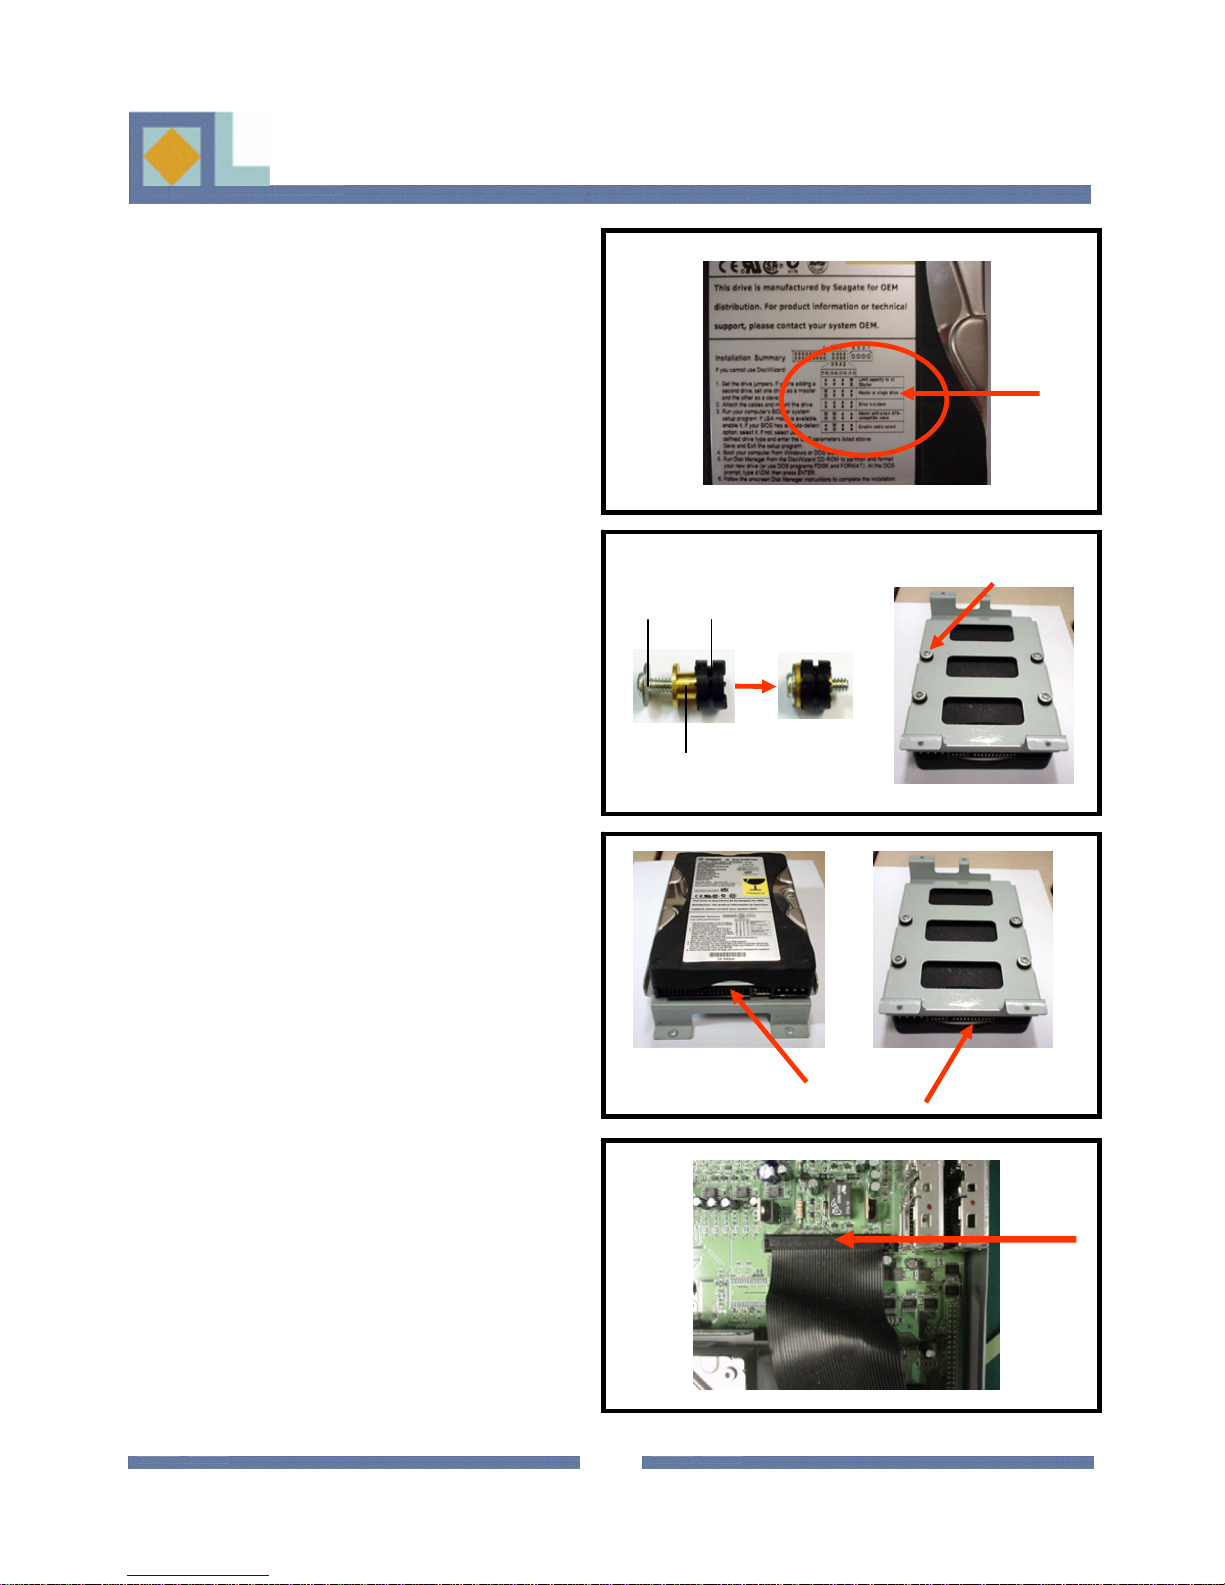
HOW TO FIX THE HARD DISK
1. Set your HDD as a master. Please refer to
the instructions of setting m e thod on HDD.
DRIVE ON THE RECEIVER
2. Tighten 4 screws combined with spacer
and cushion on the bottom of the HDD
bracket.
3. Make sure that the HDD location on the
bracket is as right picture.
Screw
Spacer
Cushion
Tighten 4 screws.
1
3
Connection Port
2
4
4. Connect the cable on the Main PCB.
12
Page 15
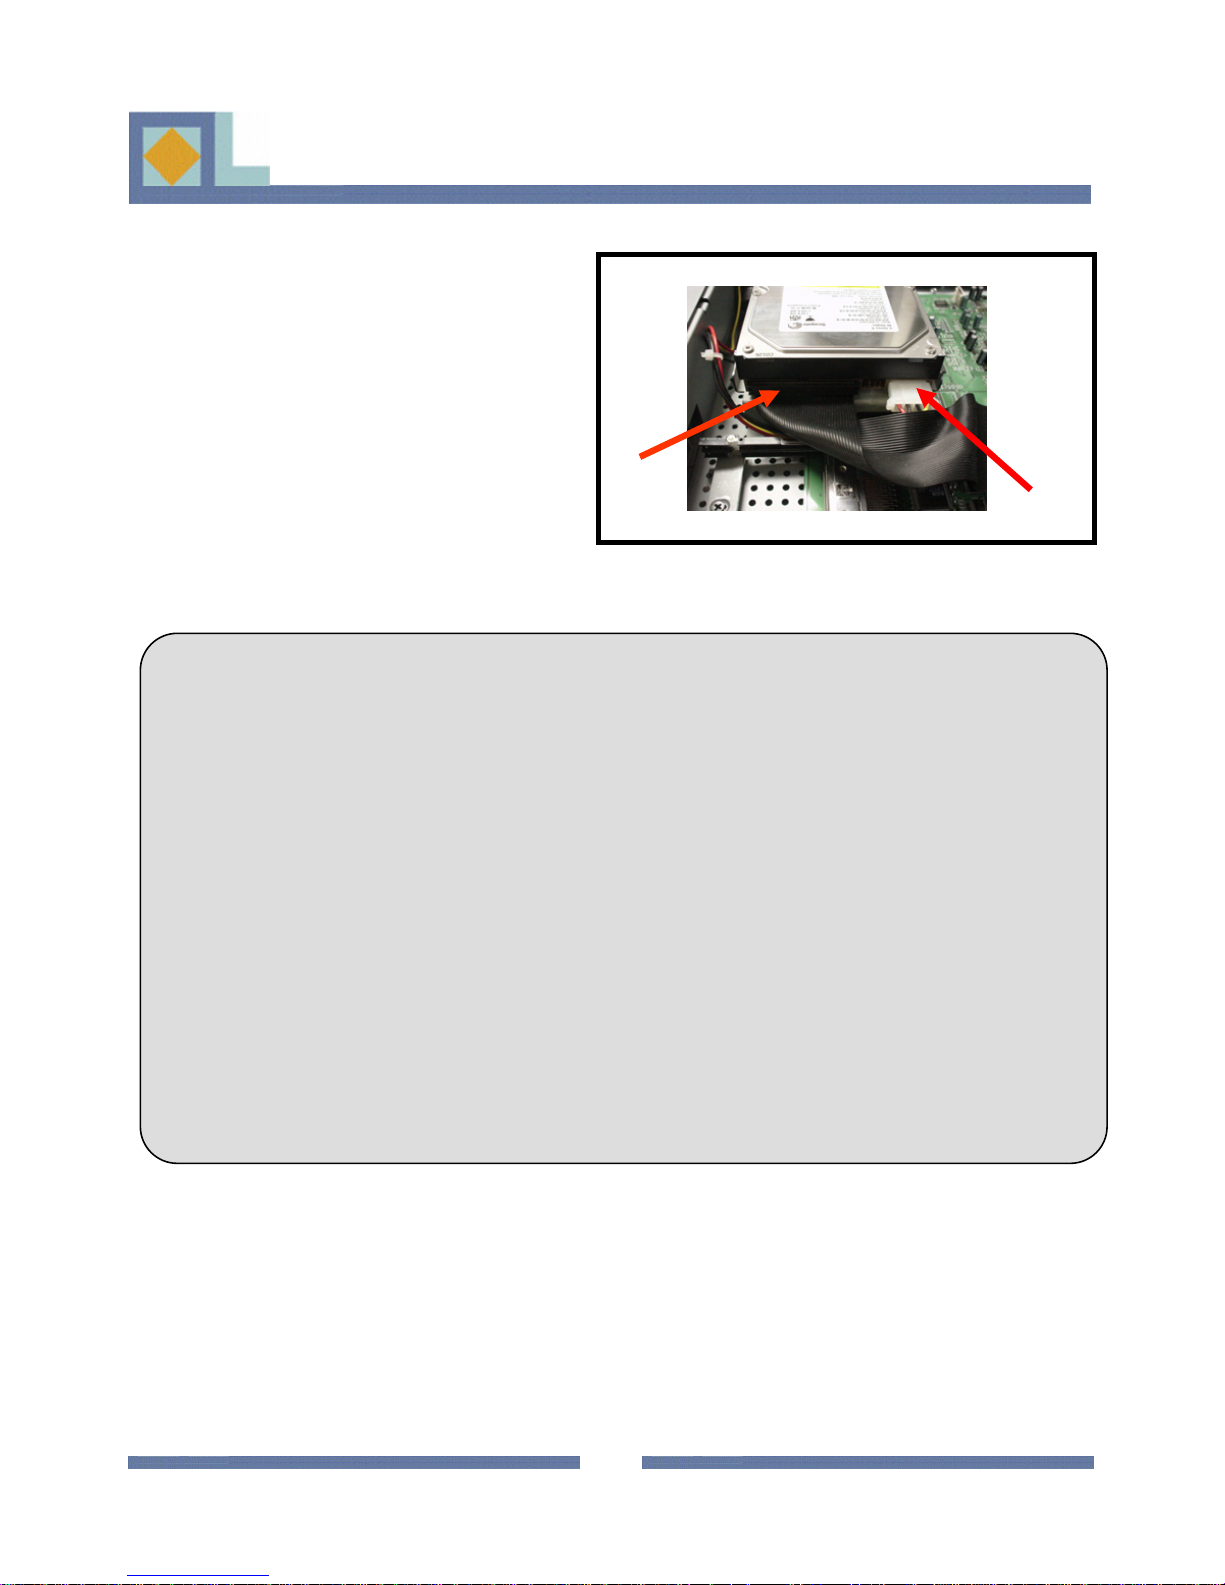
HOW TO FIX THE HARD DISK
DRIVE ON THE RECEIVER
5. Tighten 4 screws to connect the HDD
bracket with the bottom chassis.
6. Connect the cable from Main PCB to the
HDD. And Connect the cable from SMPS to
the HDD.
This PVR ready receiver needs careful attention to the following cautions.
• Recommended to use Hard disk Drive (80/120G) by Hitachi.
• Set the Hard Disk Drive as a Master, when you connect the HDD to the receiver.
• Before use the new HDD initially, you should format the HDD first. In case of that you
format the HDD in the menu of the receiver, it may occur to lose any data in the HDD.
• The HDD is not in a good performance for use, the PVR function of the receiver may not
operate properly.
• Pay attention not to make any electric interference between this receiver and other appliances
such as PC.
• All management for the warranty or the upgrade of the HDD shall be treated by the dealer from
whom you purchased.
13
Page 16
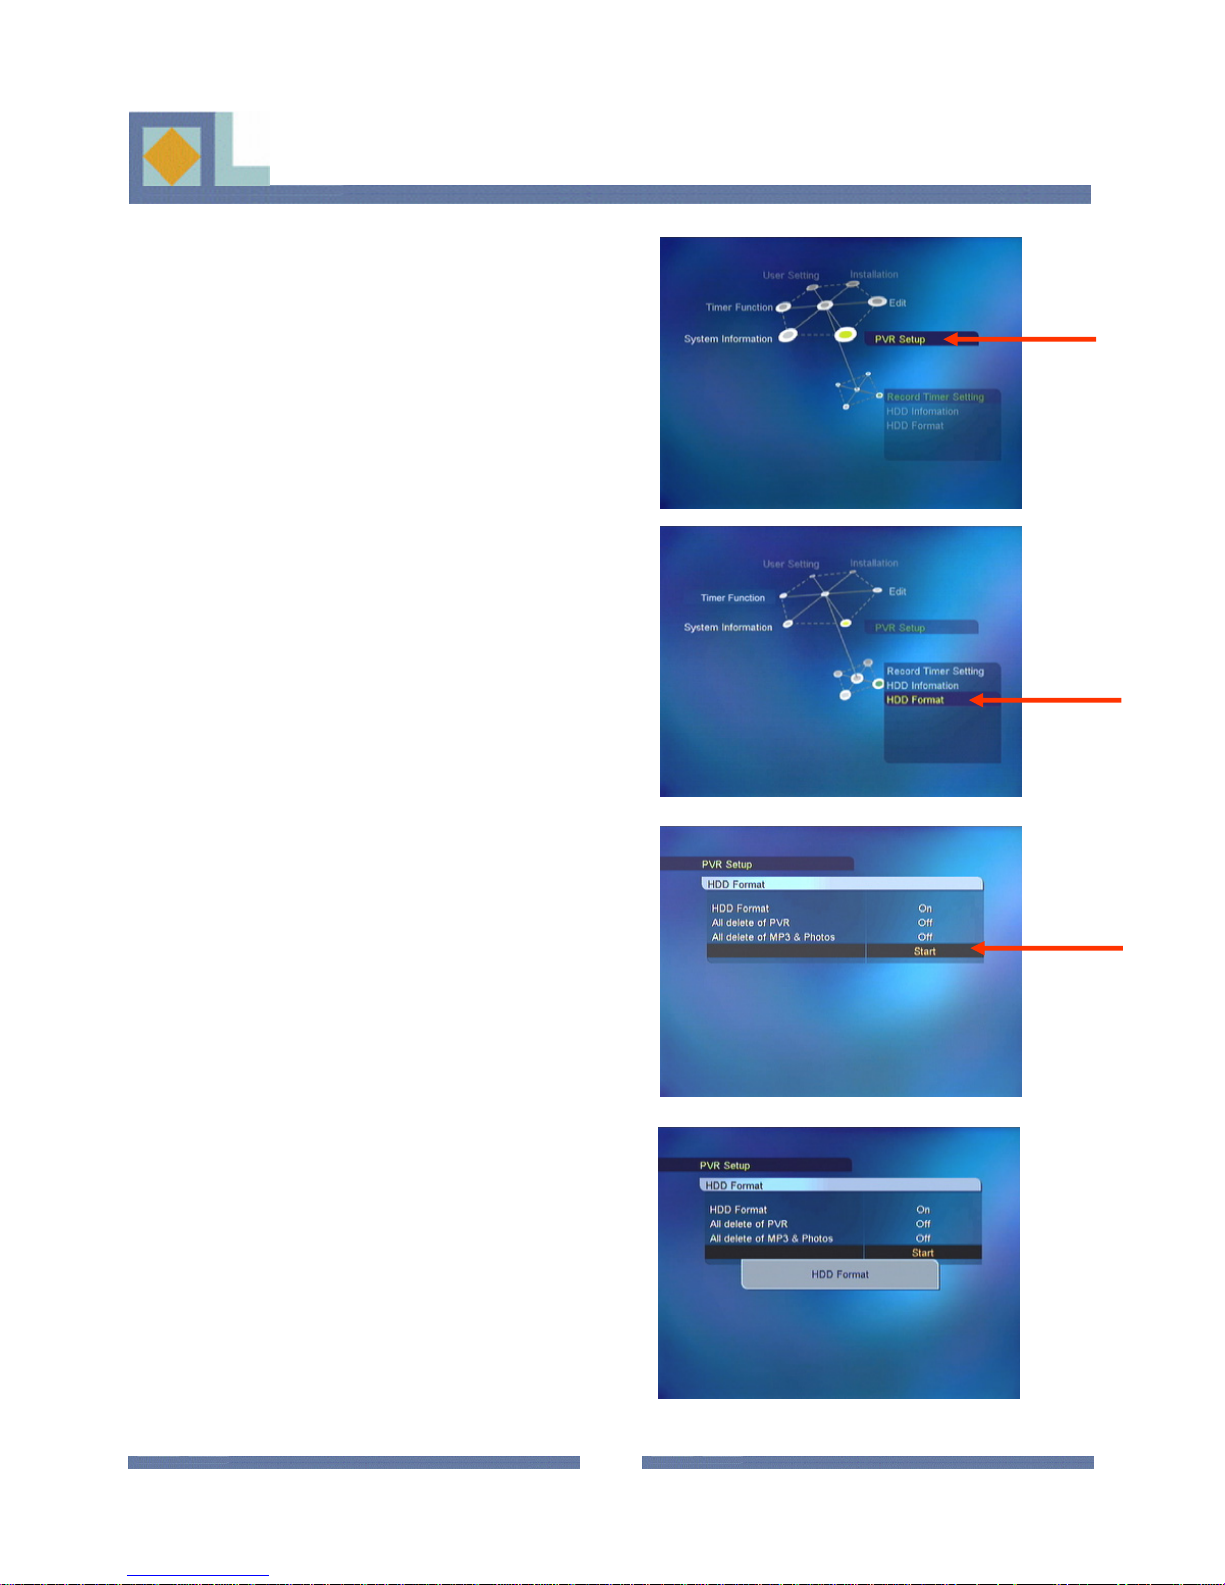
1. Press the OK key on [PVR Setup].
2. Press the OK key on [HDD Format].
HOW TO FORMAT
THE HARD DISK DRIVE
3. Select [ON] on [HDD Format].
If you want to delete all files of PVR/ MP3/
Photo Album, select [ON] on a each parameter.
Press the OK key on [Start].
4. Select [Yes] to confirm the HDD formation.
14
Page 17
RECEIVER CONNECTIONS
RECEIVER CONNECTIONS
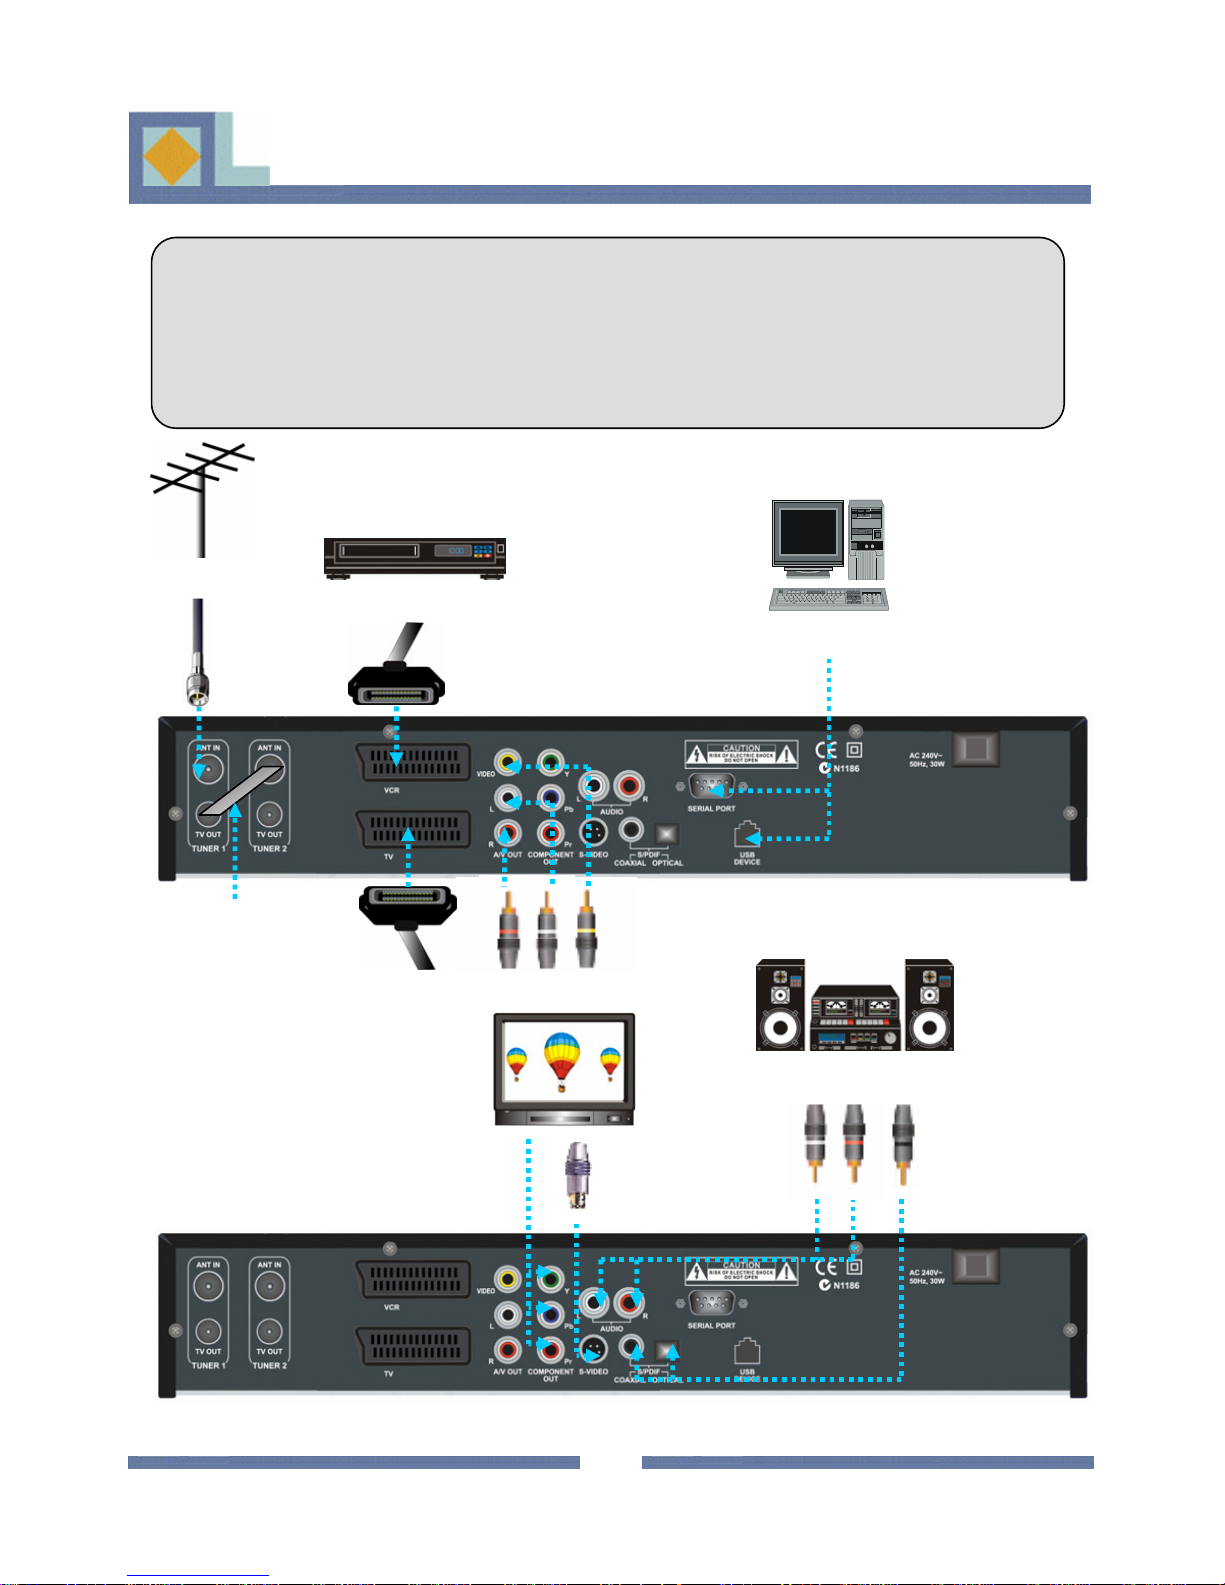
◆ It is possible to make different connections with the use of the SCART and RCA
cables. Before making a connections with the cables, you should connect the ANT IN
connector of the receiver to the cables from the terrestrial antenna.
◆ DO NOT PLUG the receiver into the Main Power Outlet, until you complete all
connections to the receiver.
Off Air ANT
Connection 2 – VCR SCART
Connection 7 - USB/ SERIAL
LOOPTHROUGH
Connection 1
- TV SCART
Connection 5
- Component Video
Connection 3 - RCA
Connection 6 – Hifi-system
Connection 4
-S-VIDEO
15
Page 18

RECEIVER CONNECTIONS
RECEIVER CONNECTIONS
1. Connecting the television
- Plug the Euro-AV (Scart) cable supplied into the TV socket on the receiver and the corresponding
Euro-AV socket (e.g. EURO-AV, SCART) on the television.
2. Connecting the VCR
- Plug a standard Euro-AV (Scart) cable into the VCR socket on the appliance and the Euro-AV
socket (e.g. EURO-AV, LINE IN/OUT, EXT.1) on the video recorder.
3. Connecting an AV receiver
- Plug a standard cinch cable into the VIDEO and L R AUDIO sockets (left/right) on the receiver
and the corresponding input sockets on the AV receiver.
4. Connecting a Super-Video interface
- Plug a Super-Video cable into the S-Video socket on the receiver and the corresponding S-Video
socket on the television.
5. Connecting a Component Video of television
- Plug a Component Video cables into the component video sockets on the receiver and the
corresponding component video sockets on the television.
6. Connecting a digital multi-channel amplifier
- Plug a standard S/PDIF cable into the S/PDIF socket (Coaxial / Optical) on the receiver and the
corresponding socket on the digital multi-channel amplifier.
- Make sure the S/PDIF type which your amplifier supports between the Coaxial type and the
Optical type before connecting the S/PDIF cable.
7. Connecting a data download port(USB/ SERIAL)
- Plug a data download cable into the data download port (USB / SERIAL) on the receiver and the
corresponding download port on the PC.
16
Page 19

QUICK SETUP GUIDE
QUICK SETUP GUIDE
1. Connect your television antenna to the TUNER 1 ANT IN input
on the set top box.
2. Using the small Loopthrough cable provided, connect the
TUNER 1 (TV OUT) to the TUNER2 (ANT IN).
3. Connect your set top box to your television using the RCA
plugs provided (Yellow, Red, White).
4. Power on your set top box .
5. Select your Language settings & press the EXIT key.
6. Select the aspect ratio corresponding to your television
(widescreen 16:9 or 4:3) & press the EXIT key.
7. Select your local time & press the EXIT key.
8. Make sure the search type is set to AUTO, scroll down to
START.
9. Search & press the OK key . (Auto Search may take several
minutes).
10. When the Auto Search is completed, press the OK key when
prompted, then press the EXIT key to start viewing broadcasts.
17
Page 20

SEARCH CHANNELS
SEARCH CHANNELS
When you start the receiver, it will switch to a guided introduction. Go through this
introduction for the receiver according to the instructions supplied below.
• Move the menu’s cursor using the arrow buttons (◀, ▶, ▲ and ▼).
• Select or confirm the changes by pressing OK.
• Press MENU to go to the next setup menu.
Language Settings
You can select the desired language for the Audio,
Closed Caption and Teletext language.
1. Press the ◀,▶ keys to move to the desired language
and press OK or use OK to open the language bar and
use OK to select the language you would like.
2.Use the ▲,▼ keys to move to the next language
settings.
Main Audio
It is used to select the main audio language for
channels that have multiple audio languages.
Second Audio
It is used to select the second audio language for
channels that have multiple audio languages. The
second audio language is automatically selected by the
receiver if the selected main audio language is not
available.
Main Closed Caption
It is used to select the main closed caption language for
channels that have multiple closed caption languages.
Second Subtitle
It is used to select the second closed caption language
for channels that have multiple closed caption
languages. The second closed caption language is
automatically selected by the receiver if the selected
main closed caption language is not available.
Teletext
It is used to select the OSG language of the teletext.
18
Page 21

SEARCH CHANNELS
SEARCH CHANNELS
TV Output
Aspect Ratio
Here you can select the aspect ratio of the TV screen.
1. Use the ◀,▶ keys or select OK from the pull-down
menu.
1) 4 : 3 for normal screen TVs
[Center] [Letter Box]
2) 16: 9 for wide screen TVs
Contrast
You can adjust the screen brightness. The default
value is 5.
0 : Darkest
10 : Brightest
Dolby Digital
In order to enjoy Dolby Digital sound, select this
feature by setting the parameter to [On]. Dolby Digital
sound is not broadcast on all channels.
Note:
To enjoy Dolby Digital sound, you should first
connect the optic cable from the S/PDIF connector to
the amplifier on your home entertainment system.
Video Output
You can select the video output out of RGB
(recommended) and Component.
19
Page 22

SEARCH CHANNELS
SEARCH CHANNELS
Local Time Setup
Here you can set the time according to location (time
zone). The clock automatically resets itself to
correspond to daylight savings time.
Select your time zone with the ◀,▶ keys or OK in the
pull down menu.
20
Page 23

SEARCH CHANNELS
SEARCH CHANNELS
Search Channels
You can search channels automatically or manually.
- Choose either Auto or Manual on the Search Type.
-If you want to provide power for the antenna, select
the Active Antenna [ON].
- Press the Start Search.
When the Channel Search is completed, a message box,
‘Saving the Information’, is displayed. Press the OK
key if a message, ‘Press the OK key to complete the
search’, is displayed.
While searching channels, you can find the status of
the channel search and also channel name of TV or
Radio.
21
Page 24

Main Menu
MENU MAP
MENU MAP
User Setting
Installation
Edit
Language Setting
Parental Lock
User Profile
TV Output
Search Channels
FAV Selection
Skip Channel
Delete All Channels
Maturity Rating
Install Lock
Set Lock
Change PIN Code
Banner Time out
Aspect Ratio
Contrast
Dolby Digital
Video Output
PVR Setup
System Information
Timer Function
Record Timer Setting
HDD Information
HDD Format
Factory Reset
About Company
Local Time Setup
Timer Setup
22
Page 25

MENU GUIDE
MENU GUIDE
• Use the ◀,▶ keys (left, right) to move the cursor in the main menu.
• Use the ▲,▼ keys (up, down) to move in the submenu.
• Press OK to select or confirm the changes.
• Press MENU or EXIT to go to the upper level menu.
The main menu consists of 6 submenus.
- User Setting
- Installation
-Edit
-PVR Setup
- System Information
- Timer Function
User Setting
User Setting
Language Setting
You can select the desired language for the Audio,
Closed Caption and Teletext language.
1. Press the ◀,▶ keys to move to the desired
language and press OK or use OK from the pull down
menu by pressing OK on the language bar which you
want to set.
2. Use the ▲,▼ keys to move to the next language
setting.
23
Page 26

MENU GUIDE
MENU GUIDE
Main Audio
It is used to select the main audio language for
channels that have multiple audio languages.
Second Audio
It is used to select the second audio language for
channels that have multiple audio languages. The
second audio language is automatically selected by the
receiver if the selected main audio language is not
available.
Main Closed Caption
It is used to select the main closed caption language
for channels that have multiple closed caption
languages.
Second Closed Caption
It is used to select the second closed caption language
for channels that have multiple closed caption
languages. The second closed caption language is
automatically selected by the receiver if the selected
main closed caption language is not available.
Teletext
It is used to select the OSG language of the teletext.
24
Page 27

MENU GUIDE
MENU GUIDE
Parental Lock
With Parental Lock you can prevent watching TV
channels you choose, listening a Radio channel, or an
unauthorized change in the installation from being
performed or the receiver setting from being changed.
To enter the Parental Lock menu, you have to enter
the PIN code first.
The PIN code is set to [0000] at the factory.
The PIN code for the Parental Lock menu is the same
as that of the program card’s. See p. 33 to learn how to
change your PIN code.
Maturity Rating
You can activate the receiver so that it requests a PIN
code if the program is not suitable for viewers
younger than the age limit you have set.
- Use the ◀,▶ keys to select the age.
Install Lock
If the Installation Lock is set to [Yes], you have to enter
the PIN code whenever you enter the Main menu.
- Use the ◀,▶ keys to select [Yes] or [No].
Set Lock
If the Set Lock is set to [Yes], the receiver will request
that you enter your PIN code every time you start the
receiver.
- Use the ◀,▶ keys to select [Yes] or [No].
Change PIN Code
You can change the current PIN code to the new one.
(PIN – Personal Identification Number)
- Enter the current PIN code.
- Enter the new PIN code.
- Enter the new PIN code one more for verification.
25
Page 28

MENU GUIDE
MENU GUIDE
User Profile
You can select the length of the timeout for the
information banner (1-10 seconds).
1. Use the ◀,▶ keys or press OK in the pull down
menu to select the banner timeout.
TV Output
Aspect Ratio
You can select the aspect ratio of the TV screen.
1. Use the ◀,▶ keys or press OK in the pull-down
menu to select the aspect ratio.
1) 4 : 3 for normal screen TVs
[Center] [Letter Box]
2) 16: 9 for wide screen TVs
26
Page 29

MENU GUIDE
MENU GUIDE
Contrast
You can adjust the screen brightness. The default
value is 5.
0 : Darkest
10 : Brightest
Dolby Digital
In order to listen Dolby Digital sound, select this
feature by setting the parameter to [On]. Dolby Digital
sound is not broadcast on all channels.
Note:
To listen Dolby Digital sound, you should first
connect the optic cable from the S/PDIF connector to
the amplifier on your home entertainment system.
Video Output
You can select the video output out of RGB
(recommended) and Component.
27
Page 30

MENU GUIDE
MENU GUIDE
Installation
Installation
Search Channels
You can search channels automatically or manually.
- Choose either Auto or Manual on the Search Type.
-If you want to provide power for the antenna, select
the Active Antenna [ON].
- Press the Start Search.
When the Channel Search is completed, a message box,
‘Saving the Information’, is displayed. Press the OK
key if a message, ‘Press the OK key to complete the
search’, is displayed.
While searching channels, you can find the status of
the channel search and also channel name of TV or
Radio.
28
Page 31

MENU GUIDE
MENU GUIDE
Edit
Edit
FAV Selection
If you choose the FAV selection mode, you can find
the 8 options per each channel as left picture.
The left to right order of the 8 options means the FAV
1 to FAV 8 order.
- Press the OK key on the desired position(out of the 8
options) of the selected channel, then the selected
position is the FAV group no.of the selected channel.
For example, if you want to make a DWtv as a FAV 6
group, press the OK key on the 6
DWtv channel.
- Press the WHITE key to exit the FAV selection
mode.
th
position of the
Skip Channel
You can skip channel.
- Press the OK key on the channel you want to skip.
- For example, if you want to skip a DWtv, press the
OK key on the DWtv channel.
- Press the WHITE key to exit the mode.
29
Page 32

MENU GUIDE
MENU GUIDE
Delete All Channels
Here you can delete all of the channels in the Channel
List. When you delete all the channels, the receiver’s
settings will stay the same and only the searched
channels will be removed.
- Select On/Off with the ◀,▶ keys.
- Select [Start] and press OK.
Note> If you do the software upgrade of the receiver
after having edited the Channel List or the Edit menu,
the edited information can be initialized.
30
Page 33

MENU GUIDE
MENU GUIDE
PVR Setup
PVR Setup
Record Timer Setting
You can see the record list that has been set.
You can also edit, add and delete the set recordings.
The receiver’s tuners (TUNER 1 and TUNER 2)
should be connected with a loop-through so that the
programs can be recorded.
Edit
1.Use the ▲,▼ keys to select the desired timer.
2.Press the GREEN key to display the timer
information.
3.Use the number and ▲,▼ keys to edit the timer
information.
4.Select [Store] and press OK
Add
You can add up to 20 Timers.
1.Press the YELLOW key to reserve a new timer.
2.Select the channe l with the ◀,▶ keys.
3.Select the Start Date with the calendar.
4.Set the Start Time with the numeric keys.
5.Set the Duration with the ◀,▶ keys.
6.Select the type with the ◀,▶ keys.
7.Set the file lock with the ◀,▶ keys.
8.If you want to edit the file name, press OK for the
file name. Edit the name using the number and color
keys.
9. Select [Store] and press OK.
31
Page 34

MENU GUIDE
MENU GUIDE
Delete
1.Press the BLUE key.
2.Use the ◀,▶ keys to move to the timer that you
would like to delete and press OK. A blue mark will
be displayed for the selected channel.
3.Once you have selected the timers to be deleted,
press EXIT. Confirm the deletion by selecting [Yes]
and pressing OK.
32
Page 35

MENU GUIDE
MENU GUIDE
HDD Information
Here you can find the HDD (Hard Disk Drive)
information.
• Model number
• Total Capacity
• System reserved
• PVR Spacey
• Remaining Time
• MP3 and photo capacity
HDD Format
If you want to format the HDD (Hard Disk Drive),
select [On] on the HDD format parameter.
1. If you want to delete all recorded files, select [On]
on the All delete of PVR.
2. If you want to delete all MP3 and Photo albums,
select [On] on the All delete of MP3 & Photos.
3. After setting each parameter, press OK on [Start].
33
Page 36

MENU GUIDE
MENU GUIDE
System Information
System Information
Factory Reset
Here you can reset the receiver to its original settings.
All changes made to the settings will be removed.
1.If you want to reset the receiver, select Yes and
press OK under [Start].
Upgrading the receiver software may also reset the
channel list settings to their default values.
About Company
You can find the detailed information of the company
and receiver version.
34
Page 37

MENU GUIDE
MENU GUIDE
Timer Function
Timer Function
Local Time Setup
Here you can set the time according to location (time
zone). The clock automatically resets itself to
correspond to daylight savings time.
Select your time zone with the ◀,▶ keys or OK in
the pull down menu.
Timer Setup
Here you can you can set the [Turn ON] or [Turn OFF]
time for the timer.
In addition, you can set the [Sleep timer] on this menu.
1. Select ON/OFF with the ◀,▶ keys.
2. Set the time with the numeric keys.
3. Use the ◀,▶ keys to set the Sleep timer (15-180
minutes).
35
Page 38

CHANNEL LIST
CHANNEL LIST
Press the OK key to display the channel list
while you are watching a channel.
In this channel list, you can have several possibilities
to format the present channel list according to your
choice.
The formation is done by using the color keys on the
RCU.
1) Mode Switch (RED key)
: TV / Radio
2) Favorite Group (GREEN key)
: FAV 1 Group ~ FAV 8 Group
Also you can move to a channel directly in this
channel list menu.
When a color key is pressed, the pull down menu is
shown with appropriate selections.
Note >
If you want to see the channel list directly while
watching the channel, press the OK key on the RCU.
1) Mode Switch
- Press the RED key and select one mode out of TV/
Radio.
2) Favorite Group
Press the GREEN key and select one FAV group out
of FAV 1 ~ FAV 8.
36
Page 39

CHANNEL LIST
CHANNEL LIST
EPG
EPG
Additional information for each channel that has been
provided by the suppliers can be read in the Electronic
Program Guide (EPG).
If you want to see the EPG, press EPG on your remote
control.
The channel list is displayed on the left side of the screen.
The EPG window in the middle of the screen will show
the programs of the channels as text banners. The bottom
of the screen will show the date and time of each
program.
- Use the ▲,▼ keys to switch the channel.
- Use the ◀,▶ keys to move within the channel.
Press INFO to view the start and end time, title and
synopsis of the selected program. You can preview
channels by pressing OK.
You can switch from the TV program guide to the Radio
program guide by pressing the RED key on your remote
control.
You can set the timer for the selected program. Select the
program using the arrow keys and press REC. Verify the
information and save the timer setting by selecting
[Save] and press OK.
You can change the date and time interval of the EPG
display with the color keys on the remote control:
GREEN: changes the date of the EPG display from the
current to the previous day.
YELLOW: changes the date of the EPG display from
current to the next day.
BLUE: switches the time interval of the EPG display to
from 1.5 to 3 hours in 30-minute or 60-minute intervals.
RECALL: returns to the program being currently
displayed in the EPG display.
37
Page 40

CHANNEL LIST
CHANNEL LIST
Teletext
Teletext
When you press the key on the RCU, the teletext
information will be displayed.
- Use the ▲,▼ keys to move to the teletext which you
want to see and press the OK key.
- When the teletext has sub pages, use the ,
keys to move to the sub pages.
: moves to the previous page
: moves to the next page
38
Page 41

The recording functions of the receiver:
Normal recording
Timed recording
Time shifting
Watching another channel while recording/time shifting
Simultaneous recording and time-shifting
Playing back a recorded program while recording/time shifting
Use of the Photo Album and MP3 mode while recording
PVR LIST
Press PVR to obtain a list of the recordings.
There are 3 modes in the PVR list: PVR (recorded
programs), MP3 mode (MP3 files) and Photo Album
(saved/recorded pictures).
To select a mode in the PVR list, press the RED key
and select that mode.
PVR
PVR
HELP MENU
The functions available in different modes (PVR,
MP3 and Photo Album) are listed in the Help
Menu.
If you would like to view the Help Menu, press
INFO in the info banner mode.
39
Page 42

PVR
PVR
HOW TO RECORD
HOW TO RECORD
Live Signal mode
Live Signal mode
1.If you want to record a current viewing channel,
press the RECORD key on the RCU.
2.Then, the record banner is displayed on the left top.
The record banner shows the file name/ duration and
recording time.
(The default duration time is set as 60min.)
3. After the record banner disappears, the diamond
banner is displayed on the right top.
The diamond banner shows the information of
current mode.
If you press the EXIT key, the diamond banner will
disappear.
4. Once the recording has started, the upper left-hand
corner will have the recording information displayed
in it for approximately 5 seconds. If necessary, you
can change the recording information (e.g., length
and name) by pressing REC.
Once the recording information has left the screen,
the diamond symbol that is visible in the upper ri gh thand corner (3 seconds) shows the receiver’s mode.
5. To stop recording, press STOP.
40
Page 43

PVR
PVR
Channel List mode
Channel List mode
Recordings can also be started directly from the channel
list.
- Press OK to display the channel list.
- Select a channel and press RECORD.
The default length of the recording is 16 hours. If
necessary, you can adjust the length of the recording in
the menu that opens when you press REC.
- Press STOP to stop the recording.
Record Timer Setting
Record Timer Setting
You can reserve 20 Timers for recording. Select PVR
Set-up | Record Timer Setting from the main menu.
Press the YELLOW key (more) to set the time for a new
recording.
You can reserve a record of channel in the Record Timer
Setting of PVR setup menu.
1.Go to the Record Timer Setting of PVR setup menu.
- Select the Channel with the the ◀,▶ keys.
2.Press the YELLOW key to reserve a new channel.
- Set the Start Date with the calendar.
- Set the Start Time with the numeric keys.
- Select the duration with the the ◀,▶ keys.
41
Page 44

PVR
PVR
When you select the length of the recording, the Stop
Time will be automatically set.
- Select the Type of the recording: Once/Daily/Weekly.
The recording will repeat according to this type.
- If you want to rename the file name, select [Recording
Name] and press OK. Edit the name using the alphabet
and color keys.
- Once each parameter has been set, select [Store] and
press OK.
EPG mode
EPG mode
You can set the time for recordings straight from the
EPG. You can set a maximum of 20 timing settings.
Open the EPG by pressing EPG.
You can reserve up to 20 Timers.
- Select a channel with the ◀,▶ keys
- Select a program to be recorded from the channel with
the ▲,▼ keys.
- Press REC
- If you cancel the recording reservation, Press REC
once again.
42
Page 45

The information will be automatically determined
according to the program information.
NOTE! The programs may start or end later than
expected. If necessary, adjust the length of the recording
to ensure that the entire program is recorded.
If you want edit timer settings that have been set at a
later date, go to the Reserved Record List in the PVR
Setup menu (see p. 43).
The functions of the recording mode:
Index
PVR
PVR
It is possible to set bookmarks in a recorded
file while it is being recorded.
- Press INDEX to set the bookmark while
recording.
Interrupting a recording
It is possible to temporarily interrupt a
recording.
- Press PAUSE while recording, then press
PAUSE again to continue the recording.
43
Page 46

Current Record Setup menu
If you press RECORD while a recording is in
progress, you can view the its information.
In the menu that is displayed, you can edit the
length and name of the recording.
PVR
PVR
44
Page 47

PVR
PVR
TIME SHIFTING
TIME SHIFTING
Time shifting enables you to pause the live signal and
then continue watching the live signal from where the
program was paused.
- If you want to time-shift a program, press TIME
SHIFTING while watching the live signal.
The receiver displays the frozen picture and starts
recording the live signal on the HDD.
The live signal can be time-shifted for up to 90 or so
minutes.
- When you would like to continue watching the
program, press PAUSE or PLAY.
The program will continue to be recorded to the HDD
until the 90-minute block is full or time -sh i fting has
been stopped. If you would like to stop time-shifting the
program, press STOP. A message will be displayed on
the screen requesting that you confirm your selection.
- If you want to save the time-shifted program as a file,
select [Save].
- If you do not want to save the program, select
[Discard].
- If you do not want to stop time-shifting, select
[Cancel].
45
Page 48

PVR
PVR
You can watch the program that has been saved during
time-shifting from any point dur ing the pro gram you
would like.
While time-shifting, the followin g functions are
available:
-Play
- Slow Forward/ Slow Reverse
-FF/ REW
- Pause
Start time of the
recording
Current timepoint
- Jump Forward/ Jump Reverse (15-second intervals)
End time of the
recording
Clock
It is possible to simultaneously use time-shifting and
normal recording.
46
Page 49

PVR
PVR
HOW TO PLAY RECORDINGS
HOW TO PLAY RECORDINGS
Select a file from the PVR list
Select a file from the PVR list
- Press PVR to open the recorded file list.
- Select the recorded file you want to play and press
OK. When it starts to play, the PVR info banner will
be displayed on the screen.
- If you do not want the recording to play anymore,
press STOP.
- If you want to play some other file, press OK to
display the PVR list. Select the file that you would
like to play.
Fast Forward & Fast Reverse
Fast Forward & Fast Reverse
While you are watching the recorded file, you can fast
forward at various speeds (2x, 4x, 6x, 8x). Press FAST
FORWARD or FAST REVERSE as follows:
Press once – 2 times the playback speed
Press twice – 4 times the playback speed
Press third – 6 times the playback speed
Press fourth – 8 times the playback speed
47
Page 50

PVR
PVR
Jump Forward and Jump Reverse
Jump Forward and Jump Reverse
Within a recorded program, you can jump
approximately 15 seconds forward and back (reverse).
1. Press JUMP FORWARD to go forward by 15
seconds.
2. Press JUMP REVERSE to go reverse by 15
seconds.
Direct access
Direct access
It is possible to go directly to the scene which you
would like to play.
- Press and hold JUMP FORWARD/REVERSE and
keep an eye on the movement of the cursor in the time
bar. Let go of the key once you have reached the
scene you would like to play. The recording will start
to play from this scene.
48
Page 51

PVR
PVR
Repeat
Repeat
A recorded program can be reset to replay from the
beginning once the program is over.
- Press REPEAT while playing the recorded file. The
arrow symbol on the PVR info bar indicates that the
repeat mode has been activated.
- Press REPEAT again to deactivate the repeat mode.
Repeat A--BB
Repeat A
If you want to repeat the current playing recorded file
between A and B section, use this function.
- Press REPEAT A-B while playing the recorded file
to set “A”, the start point of the loop.
- Press REPEAT A-B again to set “B”, the end point
of the loop. The receiver will play the section of the
recording between “A” and “B”.
- Press REPEAT A-B a third time to deacti vate this
mode. The “A” and “B” symbols will be removed
from the time bar.
49
Page 52

PVR
PVR
NOTE> You can edit the recorded file in the
REPEAT A-B mode.
If you press the OK key after selecting the repeating
section, a message will be displayed on the screen
requesting that you confirm your selection.
-If you want to save the selected section as another file
name, select [Save].
-If you want to delete the selected section from the
recorded file, select [Cut].
-If you do not want to edit the recorded file, select
[Cancel].
Slow Motion
Slow Motion
You can play the recorded file in slow motion.
- Press SLOW FORWARD while playing the
recording. The recording can be viewed at 1/2x, 1/4x,
1/6x and 1/8x slower than the normal speed.
- Press SLOW REVERSE to play the recorded
program in slow motion in reverse. The recording can
be viewed at 1/2x, 1/4x, 1/6x and 1/8x slower than the
normal speed.
50
Page 53

PVR
PVR
Marker
Marker
It is possible to set bookmarks in a recorded file while
it is being recorded. The bookmarks can be used to
find the scene you would like to watch from the
recording. The bookmarks can be set while recording
the program as well as while watching it. Ten
bookmarks can be set.
- Press MARKER to set the bookmark while
recording or watching the program.
- If you want to see the marker info submenu while
you are watching a recorded file, press MARKER
LIST.
- Use the arrow keys to select the bookmark and press
OK.
- Press the RED key to delete the selected bookmark.
Confirm your selection and leave the menu by
pressing EXIT.
51
Page 54

PVR
PVR
Frame by Frame
Frame by Frame
It is possible to watch a recorded program one frame
at a time.
- Press PAUSE while playing the recording.
- Press PAUSE again to display the next frame. Every
time you press PAUSE again, a new frame will be
displayed.
- Press PLAY to be able to watch the recording in
normal mode.
52
Page 55

PVR
PVR
Playback while Recording
Playback while Recording
It is possible to playback a file being recorded while it
is being recorded or a file that has already been
recorded.
Playing a program while it is being recorded.
- Press PVR to display the PVR list on the screen.
- Select the program from the list that is currently
being recorded (the name of the program is written in
red) and press PLAY.
Playing a program that has already been recorded.
- Press PVR to display the PVR list on the screen.
- Select the program from the list and press OK or
PLAY.
- If you want to stop playing the recording, press
STOP once.
- If you want to stop an on-going recording, press
STOP once more time. Confirm this by selecting
[Yes] and pressing OK.
53
Page 56

PVR LIST
PVR LIST
PVR List
PVR List
Delete
You can Delete the sort the selected recording.
1. Press the GREEN key to delete the selected
recording.
Sort (A to Z/ Date/Size)
You can sort the PVR list according to A to Z, Date
and Size.
1. Press the YELLOW key and select the sort mode.
54
Page 57

PVR LIST
PVR LIST
Edit (Delete/Rename/Lock)
1. Press the BLUE key to select the edit mode.
1) Delete (removing recordings)
-Press OK for all selected recordings which you want
to delete and then press EXIT to confirm.
2) Rename (changing the name of a recording)
-Press OK for a selected recording. You can rename
the recording using the number and alphabet keys in
the menu that is displayed.
3) Lock (locking recordings)
- Select the program to be locked and then press OK.
Press EXIT to confirm the locking.
Last Play
You can continue watching the recorded program from
the scene that you stopped watching it at. Press the
WHITE key to start replaying it.
55
Page 58

PHOTO ALBUM
PHOTO ALBUM
Photo Album
Photo Album
Photo files are downloaded from your computer to the receiver via the USB port. First,
connect the USB cable from your computer to the receiver and then install the USB driver
and transfer program. Follow the instructions that are displayed on the screen of your
computer.
You can find the download driver and program on the Legend website.
(www.legenddigital.com)
To enter Photo album mode,
1. Press PVR.
2. Press the RED key and select Photos.
Note!
4,000 photos (3 GB shared with the photo album) can
be stored in the photo album. Up to 500 photos can be
stored in one FAV list. When you are viewing photos,
press INFO to obtain the menu functions.
Press STOP to exit the photo album.
Play Photo Album
Display a selected Photo
- Use the arrow keys to select a photo from the list and
press OK. Once you have viewed the photo, you can
reinsert it in the list by pressing OK.
56
Page 59

PHOTO ALBUM
PHOTO ALBUM
You can see the next photo by pressing NEXT.
-You can see the previous photo by pressing PREVIOUS.
Start a slide show
It is possible to view the photos that have been saved on
the HDD as a slide show. The photos on the screen
change every three seconds.
-Select the first photo on the list and press OK. Press
PLAY to start the show. To return to the list after the
show, press OK.
- To interrupt the slide show, press PAUSE. Restart the
show by pressing PLAY.
57
Page 60

PHOTO ALBUM
PHOTO ALBUM
Zoom IN/OUT
1. Press ZOOM IN to enlarge the selected picture.
Use the arrow keys to move in the enlarged photo.
Reduce the photo by pressing ZOOM OUT for a selected
picture.
58
Page 61

PHOTO ALBUM
PHOTO ALBUM
Favorite lists, sorting and editing
Favorite lists (FAV lists)
You can divide your photos up into favorite lists, of
which there can be 8.
- To select your favorite list, press the GREEN key
and select the list you would like using the arrow keys.
Confirm the selection by pressing OK.
It is possible to rename FAV lists.
- Press the GREEN key and select [All].
- Press the BLUE key and select [Rename].
- Move the cursor so that it is on top of the title of the
favorite list (FAV 1 - FAB 8) and press OK.
- Rename the FAV list using the number and alphabet
keys. Save the new name by pressing OK.
- To exit [Rename], press EXIT.
To move photos from one FAV list to another:
- Press the BLUE key and select [FAV Move]. Eight
options that depict the FAV lists (FAV 1 - FAB 8)
will be displayed for each photo. Use the arrow keys
to select a new FAV list for the photo and press OK.
Confirm the changes and exit by pressing EXIT.
59
Page 62

PHOTO ALBUM
PHOTO ALBUM
Sort
You can sort your photo album in alphabetical order
or by title of the photo, photographer or album.
- Press the YELLOW key and select the sort mode.
Edit
Photo albums can be edited in three ways:
- Press the BLUE key and then select the edit mode.
•Rename
•Delete
•Move FAV
Rename
The name of the photo can be changed.
- Use the arrow keys to select a photo that you would
like to rename and press OK. Rename the photo using
the number and alphabet keys and press OK to save
the changes. To exit [Rename] mode, press EXIT.
60
Page 63

PHOTO ALBUM
PHOTO ALBUM
Delete
Removal of photos from a list.
- Select the photo to be deleted using the arrow keys
and press OK. A blue symbol will appear next to the
photo.
- To remove the selected picture(s), press EXIT.
Confirm the deletion by selecting [Yes] and pressing
OK.
Move FAV
When you select the Move FAV mode, the menu
screen is switched with 8 dots on a photo list .
- Press the OK key on target FAV dot.
61
Page 64

MP3
MP3
MP3
MP3
MP3 files are downloaded from your computer to the receiver via the USB port. First,
connect the USB cable from your computer to the receiver and then install the USB driver
and transfer program. Follow the instructions that are displayed on the screen of your
computer.
You can find the download driver and program on the Legend website.
(www.legenddigital.com)
To enter MP3 mode,
1. Press PVR.
2. Press the RED key and select the MP3.
Note!
4,000 MP3s (3 GB shared with the photo album) can
be stored in the MP3 list. Up to 500 files can be stored
in one FAV list. When you are listening to a file, press
INFO to obtain the menu functions. Press STOP to
return to exit the MP3 player.
Playing MP3 Files
- Use the arrow keys to select an MP3 and press OK.
Once you are listening to the MP3, you can redisplay
the MP3 list by pressing OK.
62
Page 65

MP3
MP3
-Press JUMP FORWARD to jump 10 seconds ahead.
-Press JUMP REVERSE to jump 10 seconds back.
-To temporarily interrupt the MP3, press PAUSE.
Press PLAY to continue listening to the file.
-Press NEXT to play the next file.
63
Page 66

MP3
MP3
Press PREVIOUS to play the previous file.
Press FAST FORWARD or FAST REVERSE to
move to the point that you would like to play.
It is possible to place two time markers (A and B) in
the file to be played so that the section between A and
B will be played in a continuous loop.
-Press REPEAT A-B to set the start point of the loop.
-Press REPEAT A-B again to set “B”, the end point
of the loop.
-Press REPEAT A-B a third time to listen to the file
in normal mode.
64
Page 67

MP3
MP3
REPEAT
A recorded program can be reset to replay from the
beginning once the program is over.
-Press REPEAT while playing the recorded file. The
arrow symbol on the PVR info bar indicates that the
repeat mode has been activated.
65
Page 68

MP3
MP3
Favorite lists, sorting and editing
Favorite lists (FAV lists)
You can divide your MP3s up into favorite lists, of
which there can be 8.
- To select your favorite list, press the GREEN key
and select the list you would like using the arrow keys.
Confirm the selection by pressing OK.
It is possible to rename FAV lists.
- Press the GREEN key and select [All].
- Press the BLUE key and select [Rename].
- Move the cursor so that it is on top of the title of the
favorite list (FAV 1 - FAB 8) and press OK.
- Rename the FAV list using the number and alphabet
keys. Save the new name by pressing OK.
- To exit [Rename], press EXIT.
To move photos from one FAV list to another:
- Press the BLUE key and select [FAV Move]. Eight
options that depict the FAV lists (FAV 1 - FAB 8)
will be displayed for each file. Use the arrow keys to
select a new FAV list for the file and press OK.
Confirm the changes and exit by pressing EXIT.
66
Page 69

MP3
MP3
Sort
You can sort your MP3 list in alphabetical order or by
title of the photo, photographer or album.
- Press the YELLOW key and select the sort mode.
Edit
MP3 lists can be edited in three ways:
- Press the BLUE key and then select the edit mode.
•Rename
•Delete
•Move FAV
Rename
The name of the file can be changed.
- Use the arrow keys to select a file that you would
like to rename and press OK. Rename the file using
the number and alphabet keys and press OK to save
the changes. To exit [Rename] mode, press EXIT.
67
Page 70

MP3
MP3
Delete
Removal of MP3 files from a list.
- Select the file to be deleted using the arrow keys and
press OK. A blue symbol will appear next to the file.
- To remove the selected file(s), press EXIT. Confirm
the deletion by selecting [Yes] and pressing OK.
Move FAV
When you select the Move FAV mode, the menu
screen is switched with 8 dots on a MP3 list .
- Press the OK key on target FAV dot.
68
Page 71

TROUBLESHOOTING
TROUBLESHOOTING
Problem Possible cause Solution to the problem
You have forgotten your PIN
code.
The recording failed. The loop-through has not
been installed or the HDD is
full.
No display LED on the front
panel / No power supply
No picture on the screen. Receiver in Standby mode Set the receiver to [ON]
No Sound Audio cord connected
Power cord not plugged in
correctly.
AV Output not tightly
connected to the TV’s video
output
Incorrect input channel
selected on the TV.
incorrectly.
Volume level is 0.
Mute active.
Contact your authorized
service company or the
customer service of your
network operator.
Install the loop-through.
Remove files from the HDD.
Plug in the power cord
correctly.
Connect the connector
correctly.
Turn it to the right channel.
Check connection and correct.
Increase volume on the TV
set.
Press MUTE.
Remote Control does not
control the receiver.
Poor picture quality. Signal strength too low. Check the signal strength in
Software upgrading does not
automatically start once the
receiver has been turned on
again.
The smartcard is not working. The smartcard is not installed
Incorrect usage
Batteries dead or inserted
incorrectly.
properly.
69
Point remote control towards
the receiver.
Replace batteries or insert
them correctly.
the [Installation] menu, check
the cable signal from the
cable network.
Choose [Factory 1] in
[Software upgrade] menu and
choose [Start].
Check that the smartcard has
been correctly inserted.
Page 72

SPECIFICATIONS
SPECIFICATIONS
1. Tuner & Channel
RF Input Connector IEC type, Female x 2
RF Output Connector IEC type, male x 2
Input Frequency Range VHF : 174~230MHz
UHF : 470 ~ 860MHz
Input Signal Level -78dBm ~ -15dBm
OFDM-Demod IC CX22702(produced by Conexant)
Input Impedance 75 Ohm
ANT Input Return Loss 6dB typ.
Channel Band width 7MHz typ.
Spurious Signals at Input Terminal 46dBu max. (50-950MHz)
54dBu max. (950-1750MHz)
2. MPEG transport stream A/V decoding
Transport stream MPEG-2 ISO/IEC 13818
Transport stream specification
Profile & level MPEG-2 MP @ ML
Input T/S data rate 80Mbit/S max.
Aspect ratio 4:3(Center, Letter Box), 16:9
Video resolution 720 x 576 (PAL), 720 x 480 (NTSC)
Audio decoding MPEG audio layer 1 & 2, musicam
Audio mode Stereo, dual channel, joint stereo, mono
Sampling rate 32, 44.1 and 48kHz
3. Memory
Flash memory 2M bytes (Default 2M bytes)
Program DRAM 16M bytes
EEPROM 2K bytes
4. A/V & Data in/out
S-Video out Mini DIN x 1
CVBS video out RCA x 1
S/PDIF Coaxial x 1, Optical x 1
Analog audio out RCA x 2 (L-CH x 1, R-CH x 1)
Resolution 16bit DAC
Output Level 2Vrms Max
Volume & Mute control
Data interface RS232C, Baud Rate 9600 ~ 115200, 9 Pin D-Sub
5. RF-Modulator
RF-connect 75Ohm, IEC169-2, Male/Female
Output channel CH 28 ∼ 69
TV standard PAL B/B
70
Page 73

SPECIFICATIONS
SPECIFICATIONS
5. RF-Modulator
RF-connect 75Ohm, IEC169-2, Male/Female
Output channel CH 28 ∼ 69
TV standard PAL B/B
6. Recording Options
Pause time (Time Shifting) about 60min Max.
7. USB interface
Connector Type Serial B
USB Driver Ver 1.1
Data Rate 12Mbps Max.
8. Storage
Interface IDE
Protocol ATA-5
Data Read/Write DMA mode 2
9. Key Functions
Pause Supported
Record Instant record
Fast forward/reverse Multiple rate
Slow motion forward/reverse Multiple rate
Frame by Frame Supported
Random search Supported
Instant replay Supported
10. Power Supply
Input voltage AC 240V~, 50Hz
Type SMPS
Power consumption 30W max.
(Below 7W max. for stand-by mode)
Protection Separate internal fuse and chassis
grounding and the input shall have
lighting or electric shock protec tion .
11. Physical Specifications
Size (W x H x D) 370mm x 60mm x 280mm
Weight about 3.0 Kg
12. Environment
Operating temperature +5 ℃∼+40 ℃
Storage temperature -40 ℃∼+65 ℃
71
Page 74

 Loading...