

Page 1

Assembly Instructions
& User’s Manual
Model No :CDF-WMGB28/WELLFP5010
FOR OUTDOOR USE ONLY.
KEEP THE INSTRUCTIONS FOR FUTURE REFERENCE.
If you have any question or concerns, please contact California Outdoor Design at the below resources:
Toll Free Phone: 800-305-8803 Monday-Friday , 8am-4:30pm
Email: Service @legacyheatcalifornia .com
Page 2

Table of Contents
Warnings ………….……………………………………………….2-5
Hardware and Tools............…………………..……………………6
Parts .........................................................................................7
Assembly Instructions …….………………………………………8-10
Installing Instructions.....……………………………………….......11-12
Operating Instructions ……………………………......................13
Lighting......................................................................................14
Cleaning and Care …………………………………....................15-16
Troubleshooting ….……………………………..........................17-18
Care and Maintenance.................................................................19
Warranty Information....................................................................19
Caution: Do not attempt to operate until you have read &
understand all General Safety Information in this manual and all
assembly is complete & leak checks have been performed.
Note: Before beginning assembly of product, make sure all parts
are present. Compare parts with package content list and
hardware contents. If any part is missing or damaged do not
attempt to assemble the unit. Contact customer service for
replacement parts.
Page 1 of 20
Page 3

Warnings
WARNING
FOR YOUR SAFETY:
Read these instructions before using this appliance. The appliance must be installed in accordance with the
instructions and local regulations. The use of this appliance in enclosed areas can be dangerous and is
PROHIBITED.
Do the leak test after each changing of cylinder.
Never check for leaks with a match or open flame.
Do not store or use gasonline or other flammable vapors and liquids in the vicinity of this appliance.
IF YOU SMELL GAS
Close the valve of gas cylinder or regulator.
Extinguish all naked flames, do not operate any electrical appliances.
Check for leaks as detailed in these instructions.
WARNING
FOR YOUR SAFETY:
Improper installation, adjustment, alteration, service or maintenance can cause injury or property damage.
Read the installation,operation and maintenance instructions thoroughly before installing or servicing this
eqipment. Failure to follow these instructions could result in fire or explosion, which could cause property
damage, personal injury or death.
CARBON MONOXIDE HAZARD
D DANGER
This appliance can produce carbon
monoxide which has no odor.
Using it in an enclosed space can kill, cause
injury or death.
Never use this appliance in an enclosed
space such as a camper, tent, car or home.
WARNING
FOR YOUR SAFETY:
An LP cylinder not connected for use should not be stored in the vicinity of this or any other appliance.
WARNING
FOR YOUR SAFETY:
FOR OUTDOOR USE ONLY (outside any enclosure)
FILL METAL BASE WITH SAND (12.5 KG/27.5 lbs) BEFORE USE
.
Page 2 of 20
Page 4

Warnings
DANGER
DANGER indicates an imminently
hazardous situation which, if not
avoided, will result in death or
serious injury.
CAUTION
CAUTION indicates an imminently
hazardous situation which, if not
avoided, may result in minor or
moderate personal injury or property
damage.
WARNING: For Outdoor Use Only
WARNING
Improper installation, adjustment,
alteration, service or maintenance
can cause injury or property
damage. Read the instructions
thoroughly before installing or
servicing this equipment.
WARNING
WARNING indicates an imminently
hazardous situation which, if not
avoided, could result in death or
serious injury.
DANGER
Do not store or use gasoline or
other flammable vapor and liquids
in the vicinity of this or any other
appliance.
FOR YOU SAFETY
Failure to comply with the
precautions and instructions
provided with this heater can result
in death, serious bodily injury and
property loss or damage from
hazards of fire, explosion, burn,
asphyxiation, and/or carbon
monoxide poisoning.
Only persons
and follow the instructions should
use or service this heater.
who can understand
WARNING
This product contains chemicals,
including lead, known to the
State of California to cause birth
defects or other reproductive
harm.
Wash hands after handing.
Page 3 of 20
Page 5

Warnings
DANGER
Solid fuels shall not be burned in this appliance
DANGER
The maximum inlet gas supply pressure: Max . 250PSI . Min 5PSI
DANGER
“Do not use this appliance if any part has been under water.
Immediately call a qualified service technician to inspect the appliance and to replace
any part of the control system and any gas control that has been under water.”
DANGER
CARBON MONOXIDE HAZARD
For outdoor use only. Never use inside house or other unventilated or enclosed
areas. This heater consumes air (oxygen). Do not use in unventilated or enclosed
areas to avoid endangering your life.
DANGER
EXPLOSION - FIRE HAZARD
Never store propane near high heat, open flames, pilot lights, direct sunlight, other
ignition sources or where temperatures exceed 120 degrees F (49°C). Propane vapors
are heavier than air and can accumulate in low places. If you smell gas, leave the area
immediately.
Never install or remove propane cylinder while heater is lighted, near flame, pilot lights,
other ignition sources or while heater is hot to touch.
This heater is red hot during use and can ignite flammables too close to the burner. Keep
flammables at least 48" (122cm) from sides & 48" (122cm) from top. Keep gasoline and
other flammable liquids and vapors away from heater. The
be stored outdoors in a well ventilated space. Never store propane cylinder in an
enclosed area (house, garage, etc.). If heater is to be stored indoors, disconnect the
propane cylinder for outdoor storage.
propane cylinder must always
Caution: Do not attempt to operate until you have read & understand all General
Safety Information in this manual and all assembly is complete & leak checks have
been performed.
Page 4 of 20
Page 6

Warnings
You must provide propane gas and propane cylinder. Use a standard 20 lb. propane
cylinder only.
Use this heater only with a propane vapor withdrawal supply system. See Chapter 5 of the
Standard for Storage and Handling of Liquified Petroleum Gas, ANSI/NFPA 58. Your local
library or fire department should have this book.
The minimum permissible gas supply pressure of 10 W.C. is required for purpose of input
adjustment.
The minimum hourly of 48,000 Btu is required input rating for a heater for automatic
operation at ratings less than full input rating.
The pressure regulator and hose assembly supplied with the appliance must be used.
The installation must conform with local codes, or in the absence of local codes, with
National Fuel Gas Code, ANSI Z223.1.
A dented, rusted or damaged propane cylinder may be hazardous and should be checked
by your cylinder supplier.
The cylinder used must inc lud e a collar to protect the
cylinder valve.
Never use a propane cylinder with a damaged valve connection.
Do not store a spare LP Gas cylinder under or near this
appliance.
Never fill the cylinder beyond 80 percent full.
For appliances designed to use a CGA No.791 connection:
Place the dust cap on the cylinder valve outlet whenever the
cylinder is not in use.
Only install the type of dust cap on the cylinder valve that is
provided with the cylinder valve.
Other types of caps or plugs may result in leakage o f
propane.
Note: Gas supply pressure: 25 to 250
Page 5 of 20
Page 7
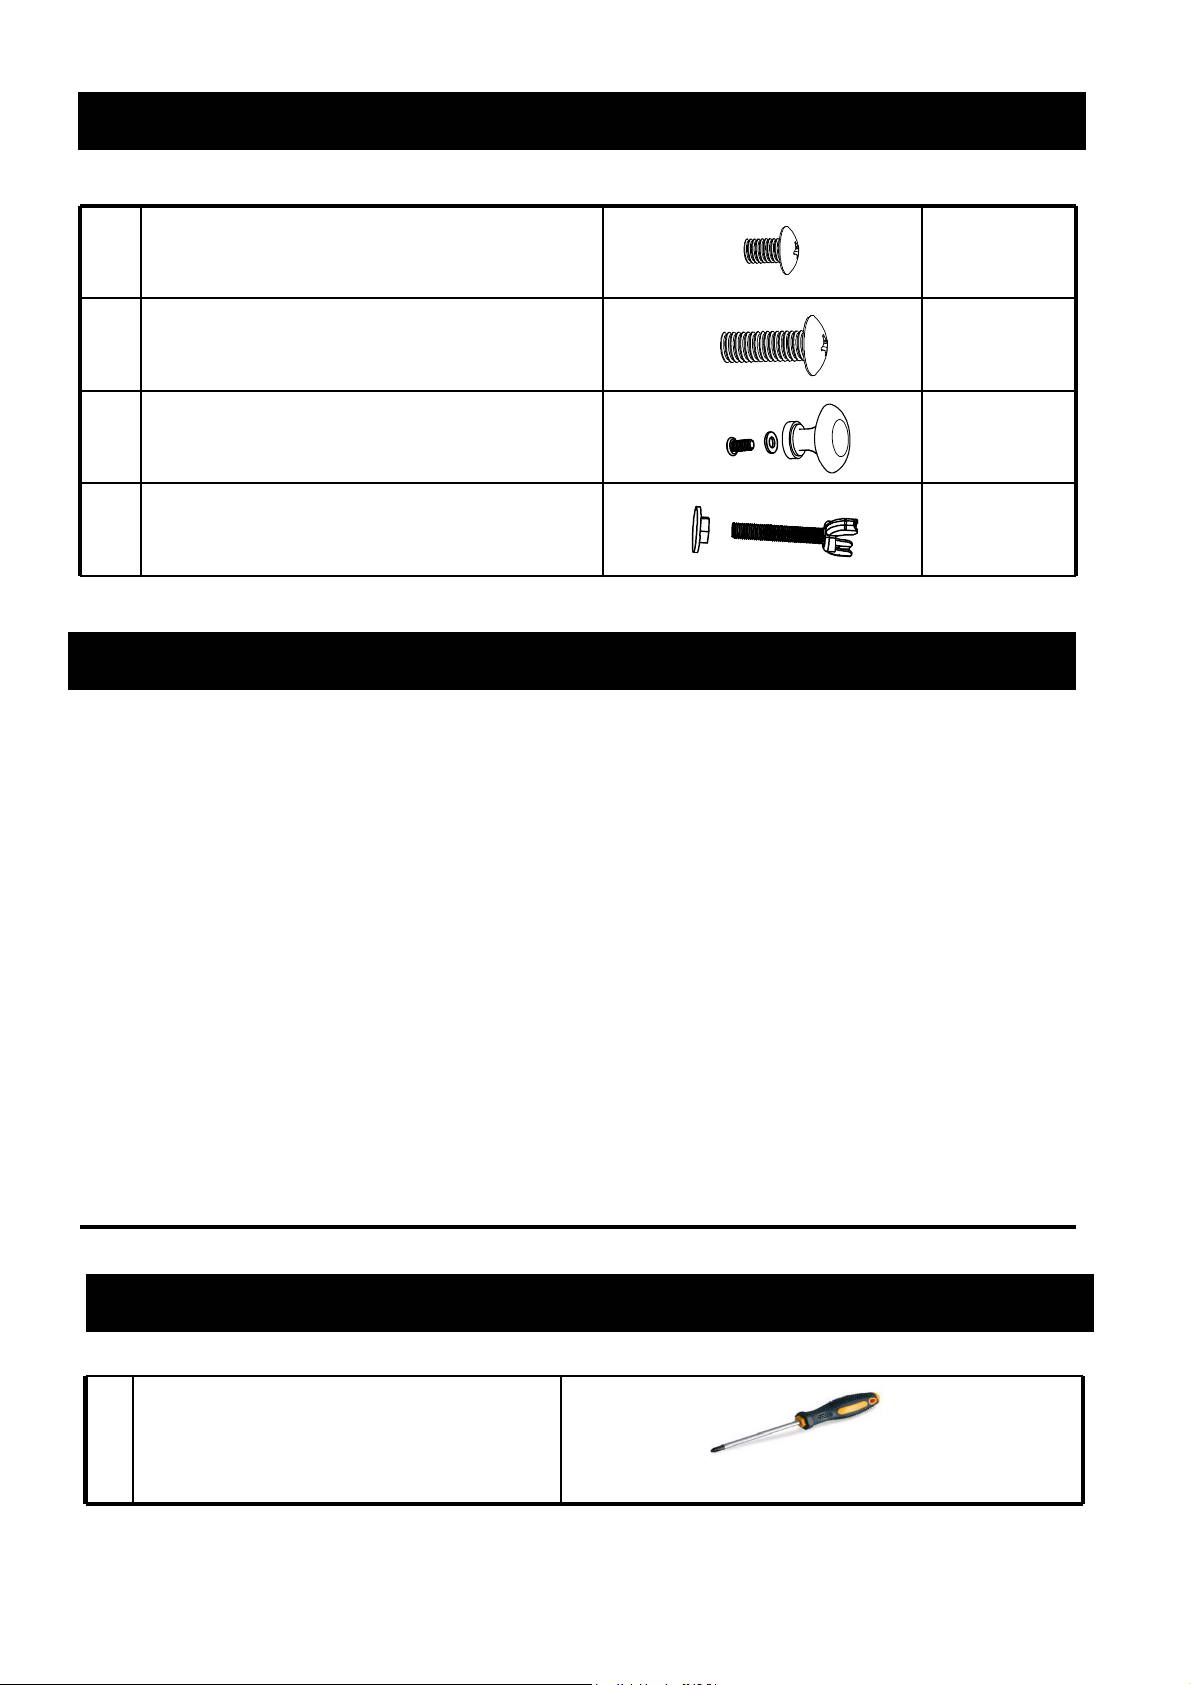
Hardware
scp 0221X6M wercSa
52X6M wercSb
c
d
Door handle
Wing nut
6
1 set
1 set
PREPARATION
--Select an area where you will assemble this product. To protect components,
choose a smooth non abr asive surf ace t hat' s free of crack s or openings.
--Spread out all parts.
--Tighten all hardware connections by hand first. Before completing each step,
go back and fully tighten all hardware. Be careful not to over- tighten, that could
damage surface or strip threads.
--For best results, complete each in the order presented.
To complete assembly you will ne
(1) Leak detection solution instruction on how to make the solution are included in the
“operating instructions” section of this manual).
ed:
scp
(2) Precision-filled LP gas grill tank with Acme Type 1 external threaded valve connection
standard grill size .
Estimated Assembly Time : 30 minutes
Tools Required
1 #2 Philips Head Screwdriver
(Not Included) 1pc
Page 6 of 20
Page 8
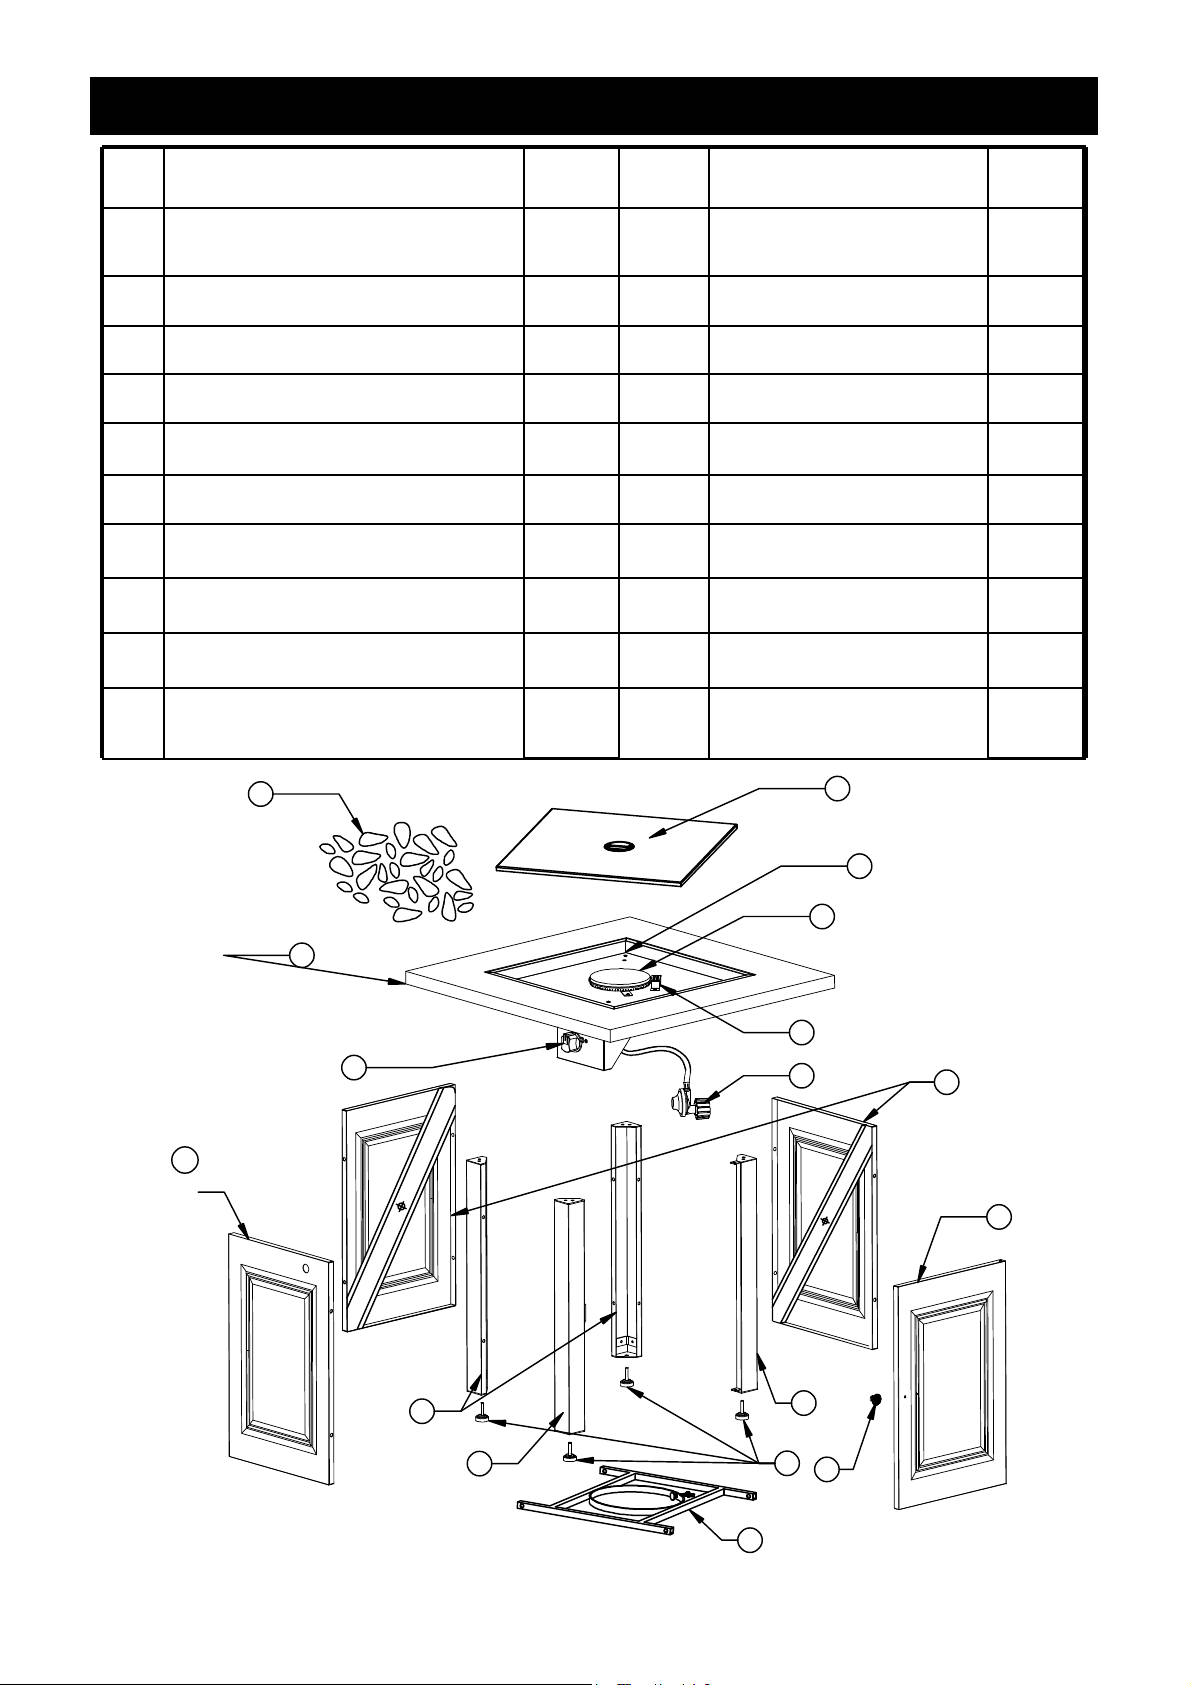
Parts List
S/N Description
Quantity
S/N Description
Leg with Tab 01kcoR avaL1 1
1
1
1
5 Igniter Housing* 14 Door Handle
1
1
7 Regulator/Hose Assembly*
8 Side Panel
geL9
1
2
2
11*htraeH2
16
17
rooD21*lwoB mottoB3
Leg with Magnet 31*renruB4
*
51bonk lortnoC6
dap tooF
Base
Lid
delbmessa-erP *
Quantity
1
lenaP ediS
1
1
1
1
4
1
1
11
1
2
6
17
3
4
5
7
8
12
16
15
10
14
9
13
Page 7 of 20
Page 9
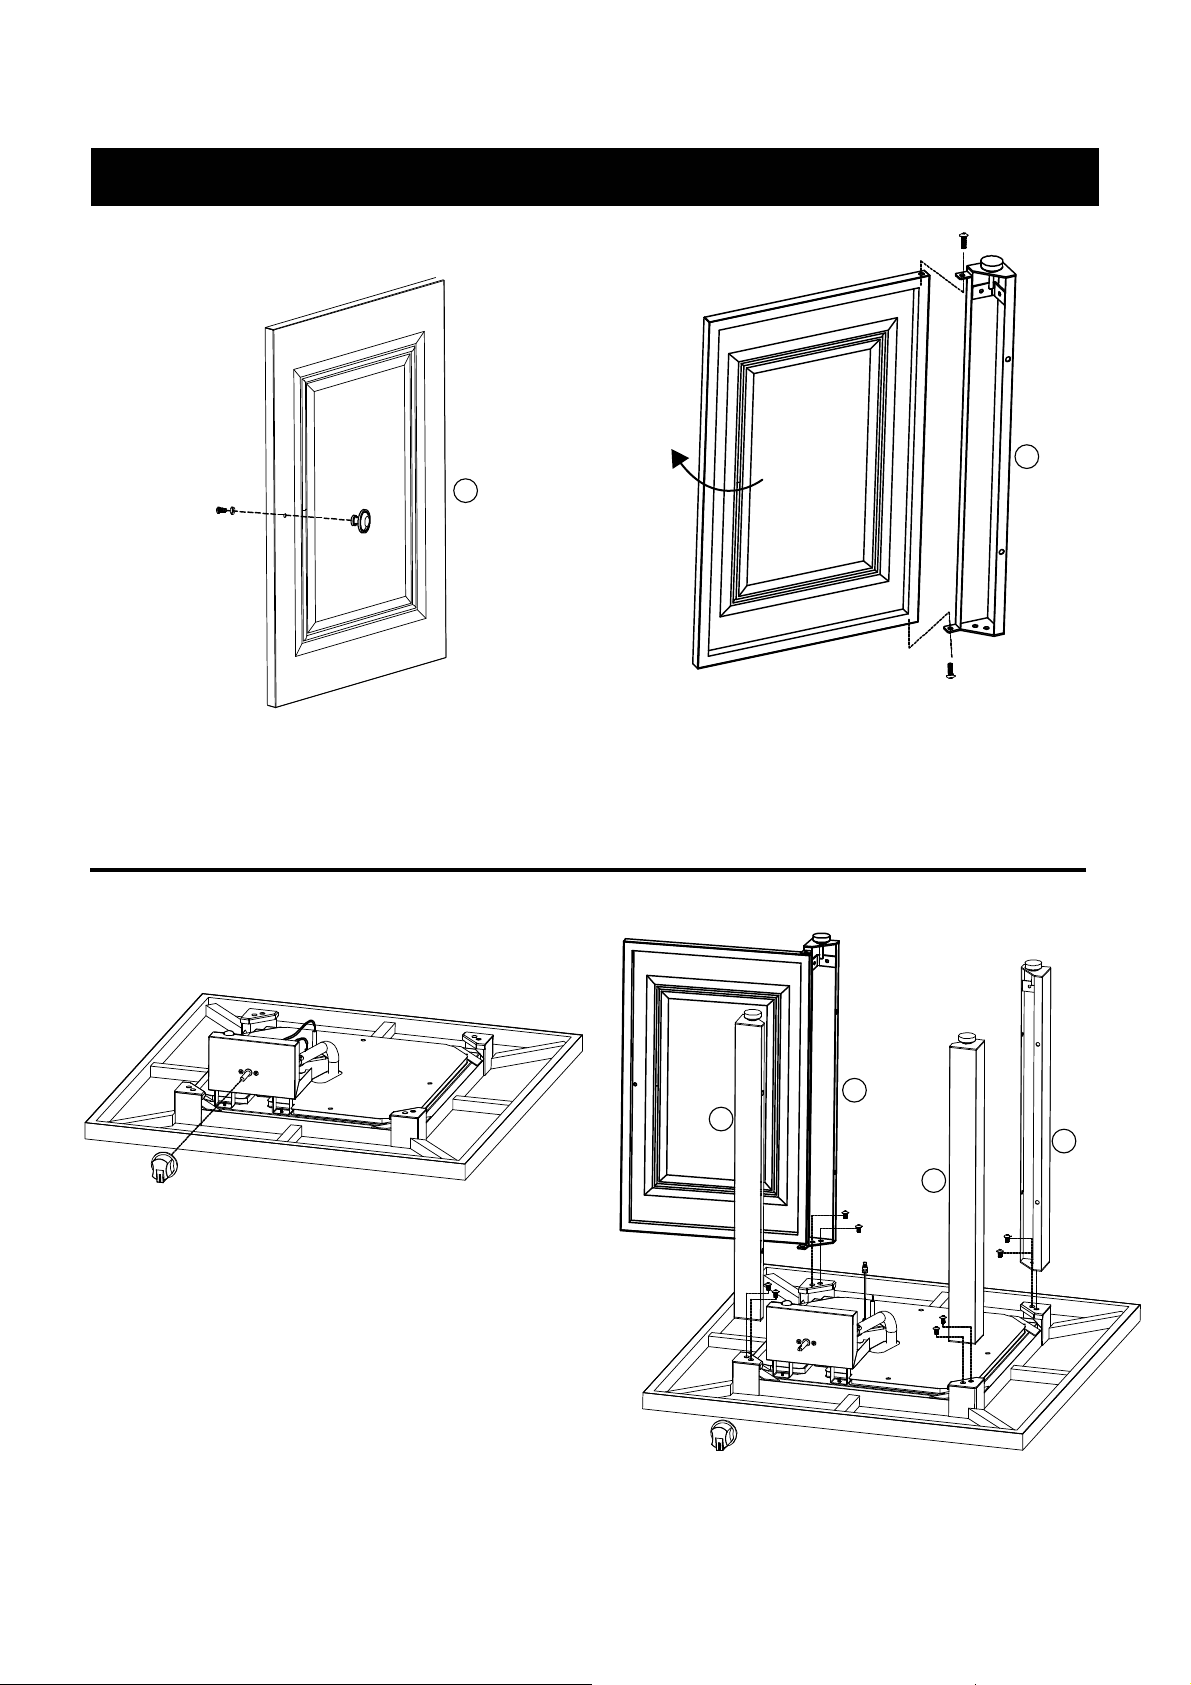
Assembly
Step 1:
door handle
10
12
Remove the screws and washer from the door handle ( c ). Attach the door handle ( c ) to
door ( 12 ), then tighten the handle.
Attach
Note: Do not tighten all screws as you will need adjust the holes to ensure proper alignment.
door (12) to leg (10) using M6X25 (b) - 2PC
Step 2:
10
13
9
R
emove control knob (6), attach legs leg (9), leg (10) and (13) with M6X12 (a) - 8 pcs.
Be mindful of the direction of the door (12).
9
Page 8 of 20
Page 10
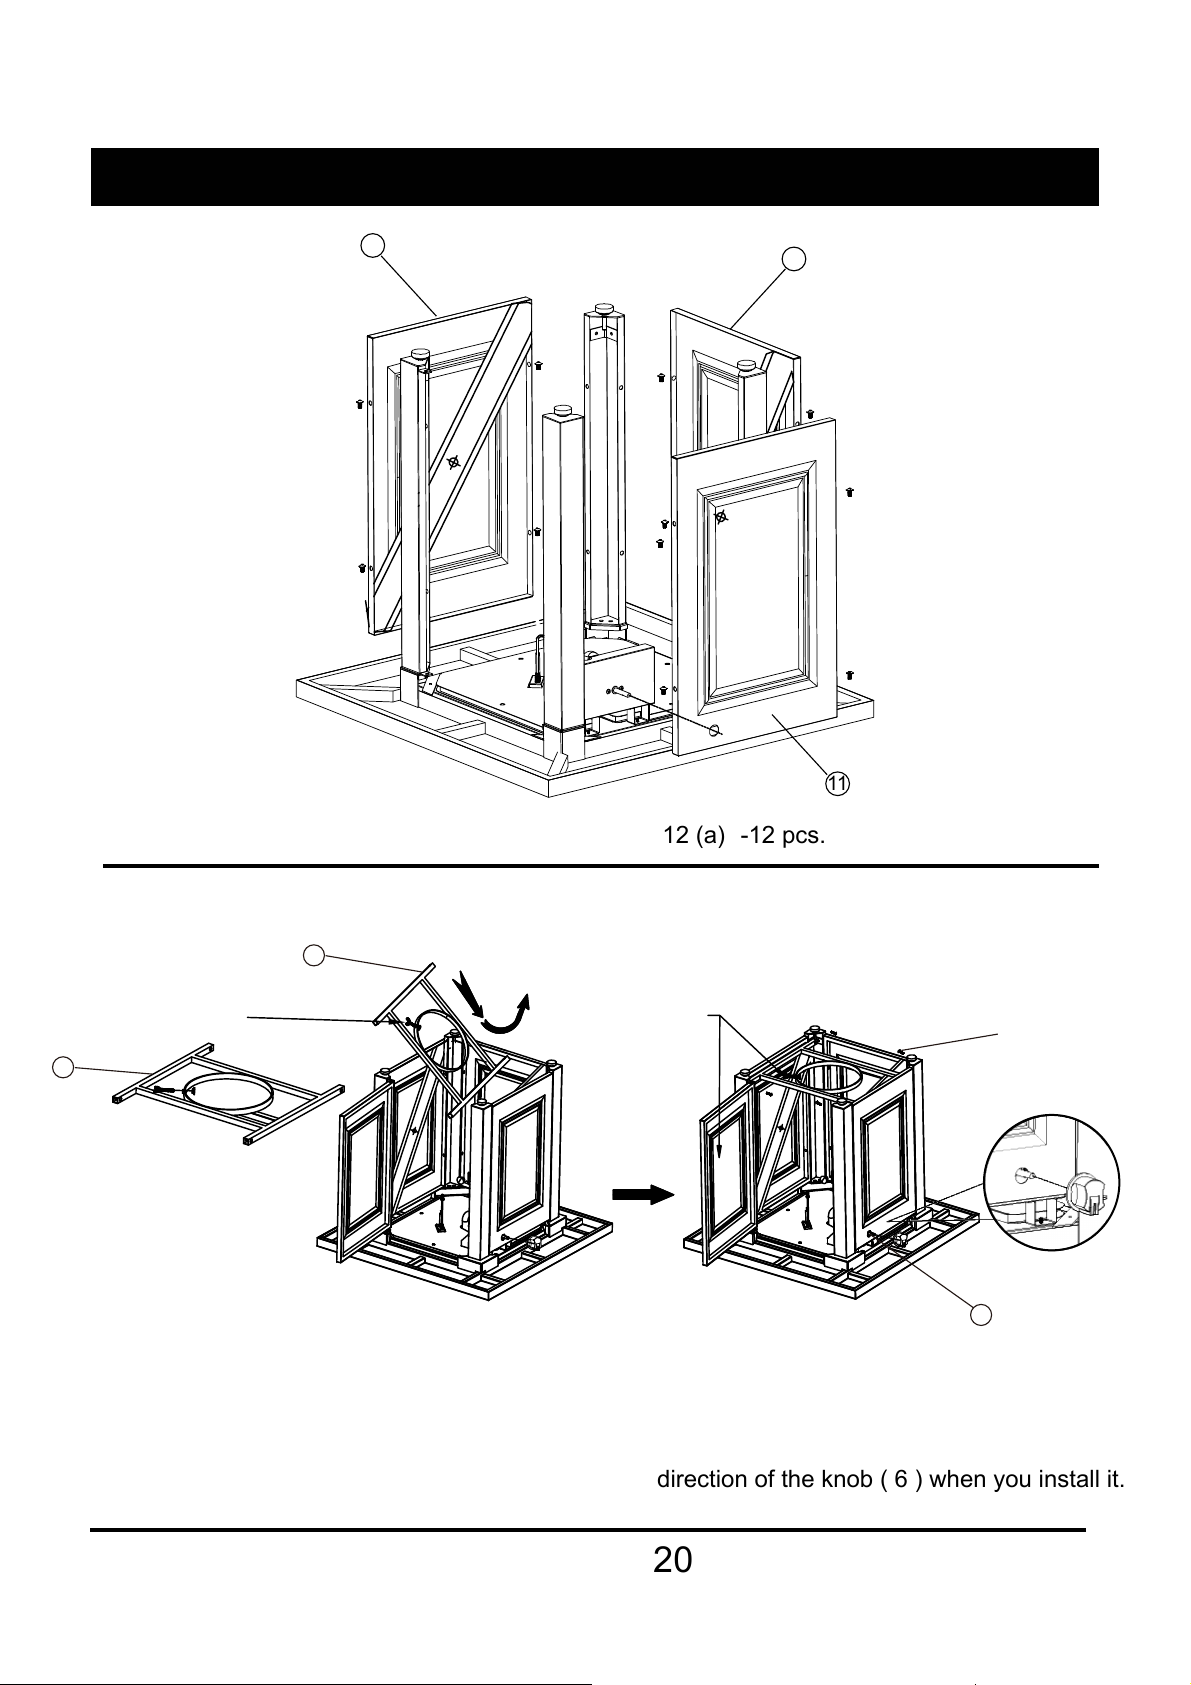
Assembly Instructions
Step 3:
8
8
11
Attach side panels (8) and 11) with M6X12 (a) -12 pcs. side panel (
Step 4:
16
Note :the base's direction
16
Note :the base's direction
b
6
Attach the wing nut ( d ) to base (16).
Attach base (16) by rotating to vertical position and lowering it into the center of the side panels.
Rotate base (16) to horizontal position and attach with M6x25 (b) screws – 4pc.
Attach the control knob (6). Please be mindful of the direction of the knob ( 6 ) when you install it.
Finally tighten all screws from step 1 to step 4 .
Page 9 of 20
Page 11
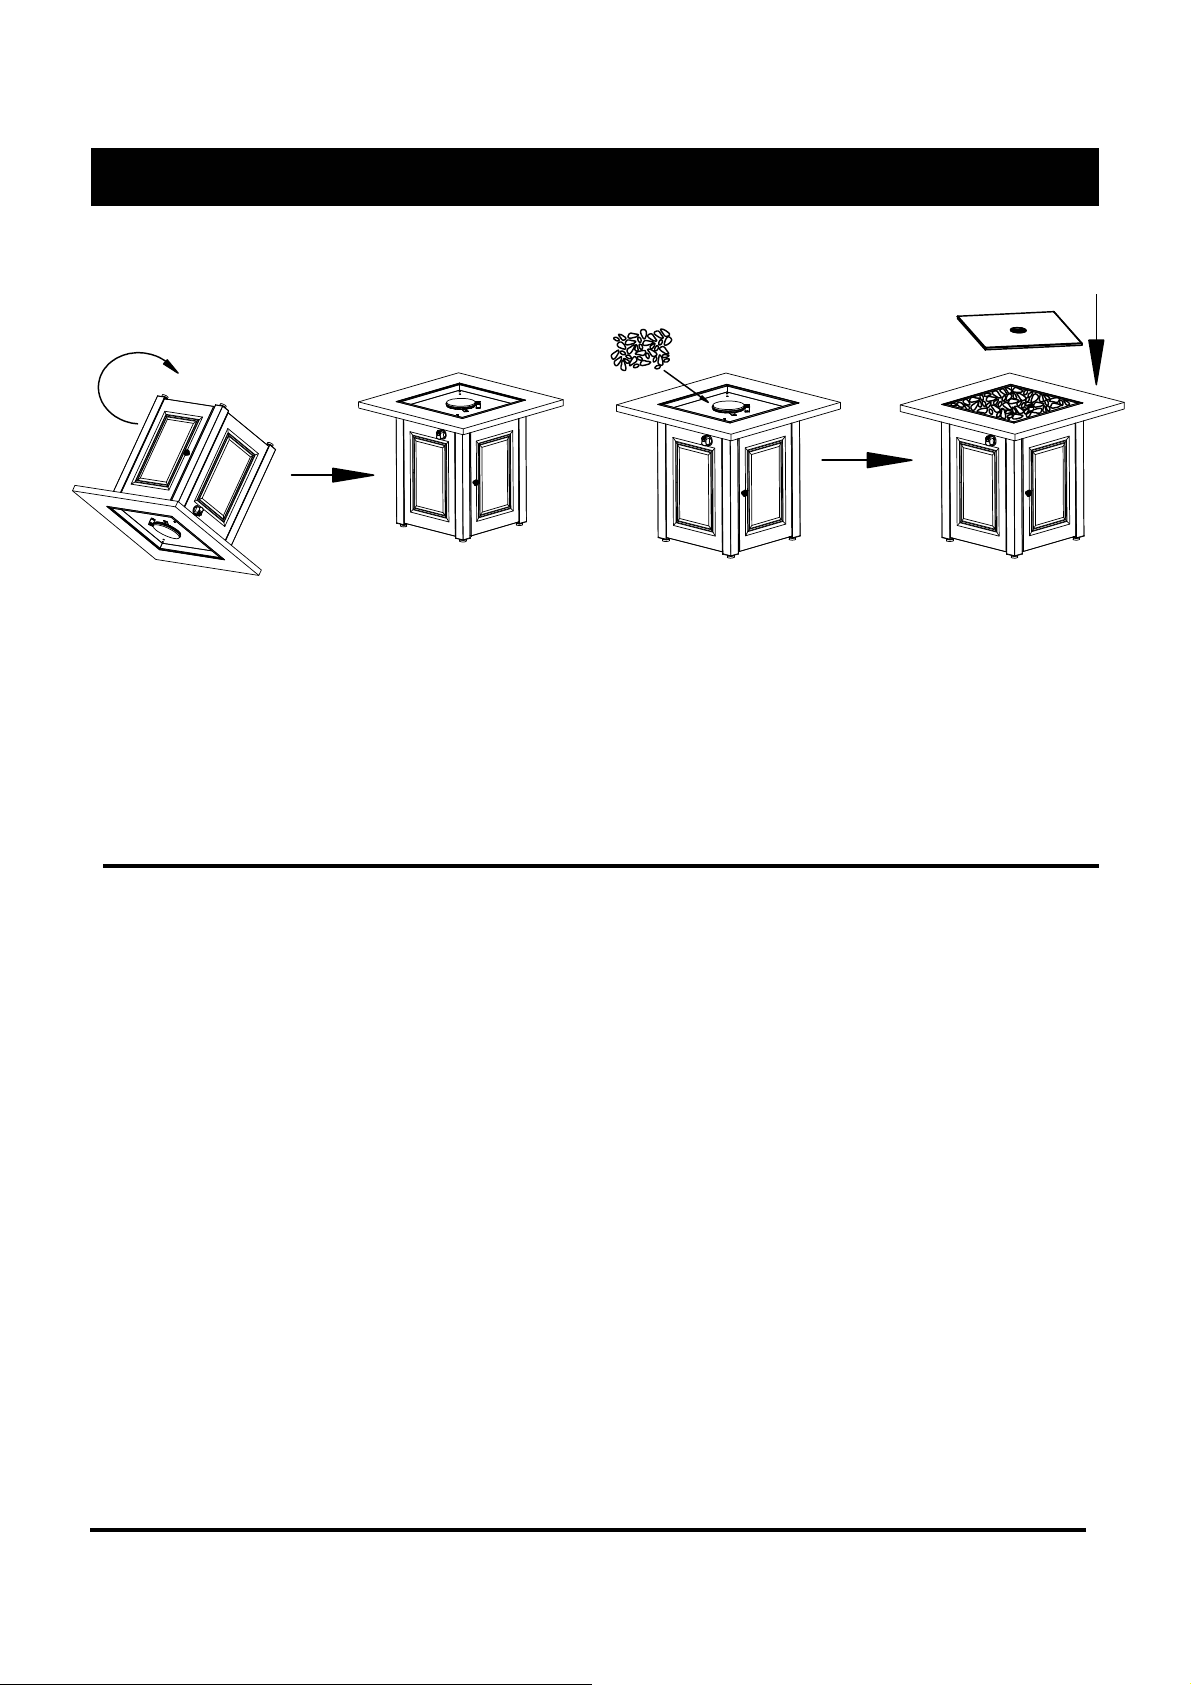
Assembly Instructions
Step 5:
Turn unit upright.
P
lace lava rocks.
CAUTION: Do Not dump lava rocks out of package. Carefully place lava rocks by hand
so that dust will not clog burner.
CAUTION: Do Not cover pilot hosing.
Note: Lava rocks should be 0.8-2.0 in. (2-5 cm long. Approx. 5.5 lbs (2.5 kg) of lava
rocks are needed (included).
Page 10 of 20
Page 12
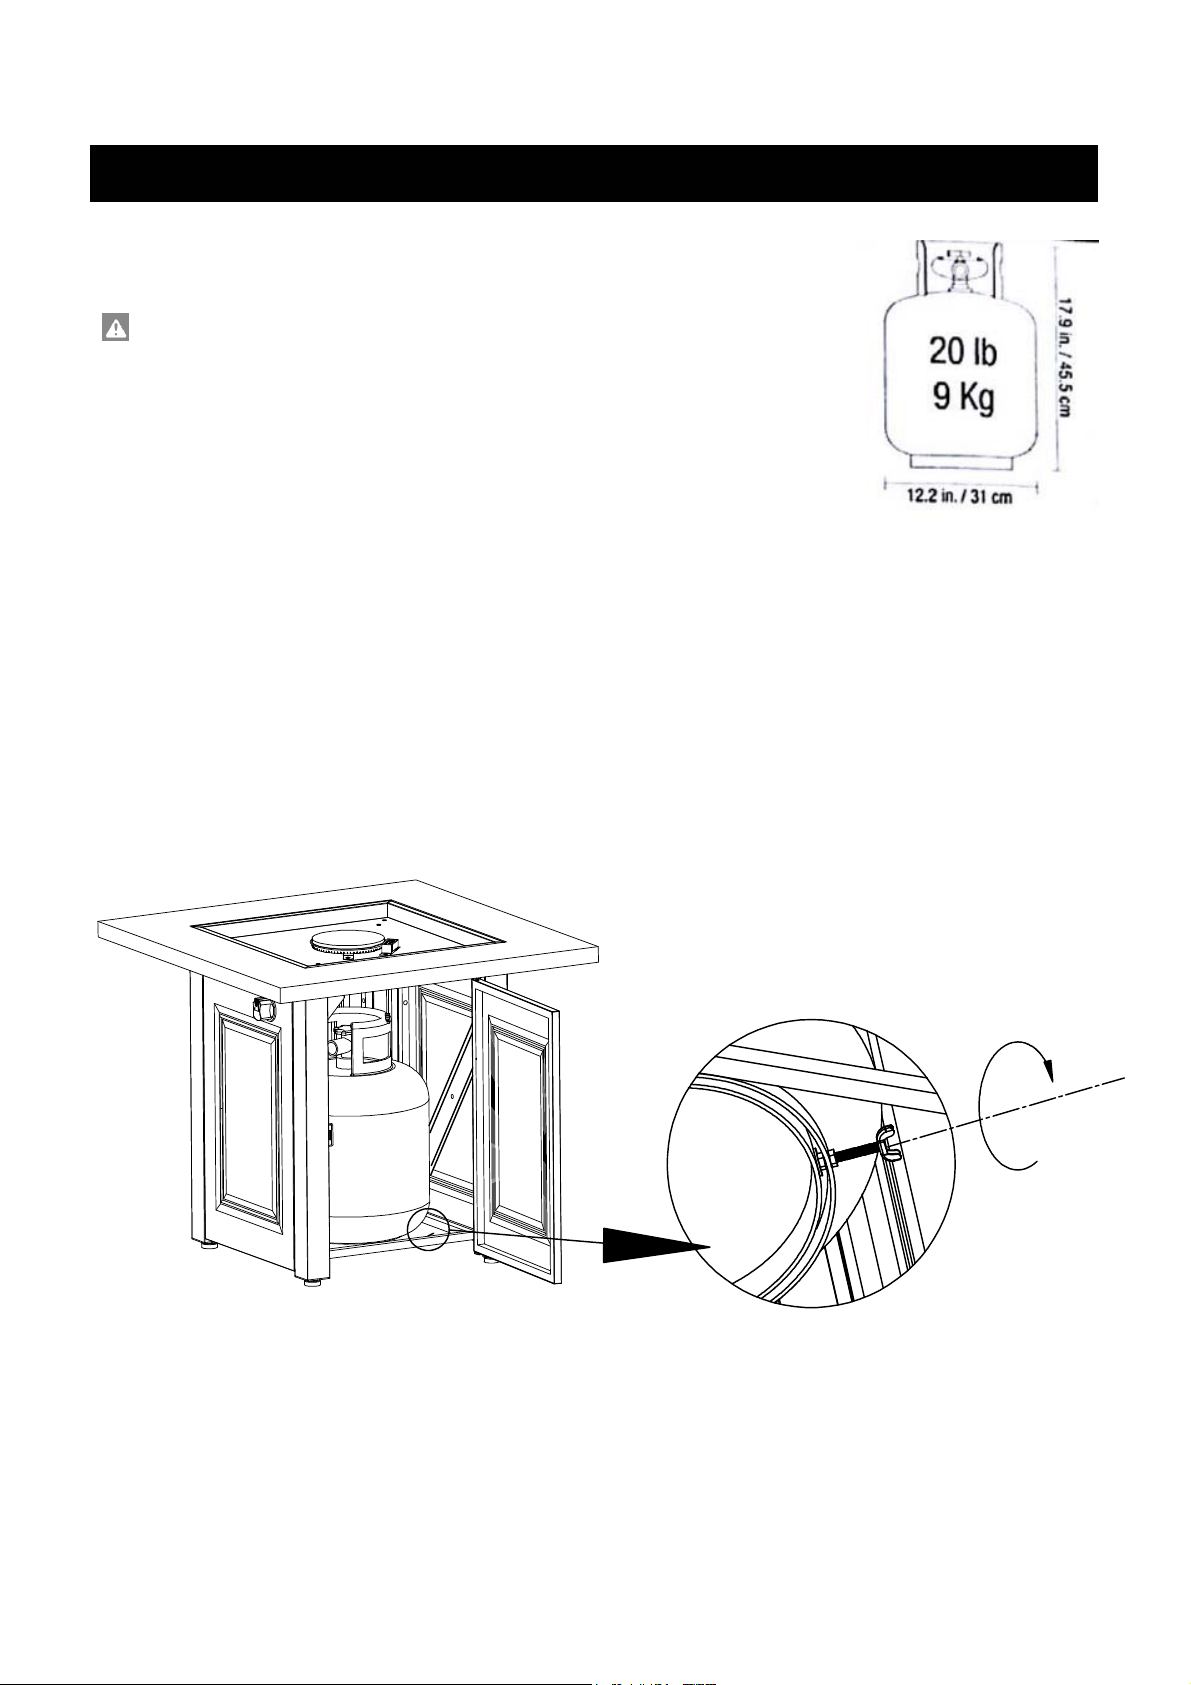
Installing LP Gas Tank
To operate, you will need one precision-filled standard LP grill
gas tank with external valve threads..
CAUTION: LP gas tank must be properly disconnected and
removed prior to moving this outdoor fireplace.
Inserting and securing LP gas tank
WARNING: Make sure LP gas tank valve is closed.
Move the wing nut as below diagrammatic sketch
Place precision-filled LP gas tank ring into hole in outdoor fireplace body so the tank
valve is facing the gas line connection.
Page 11 of 20
Page 13
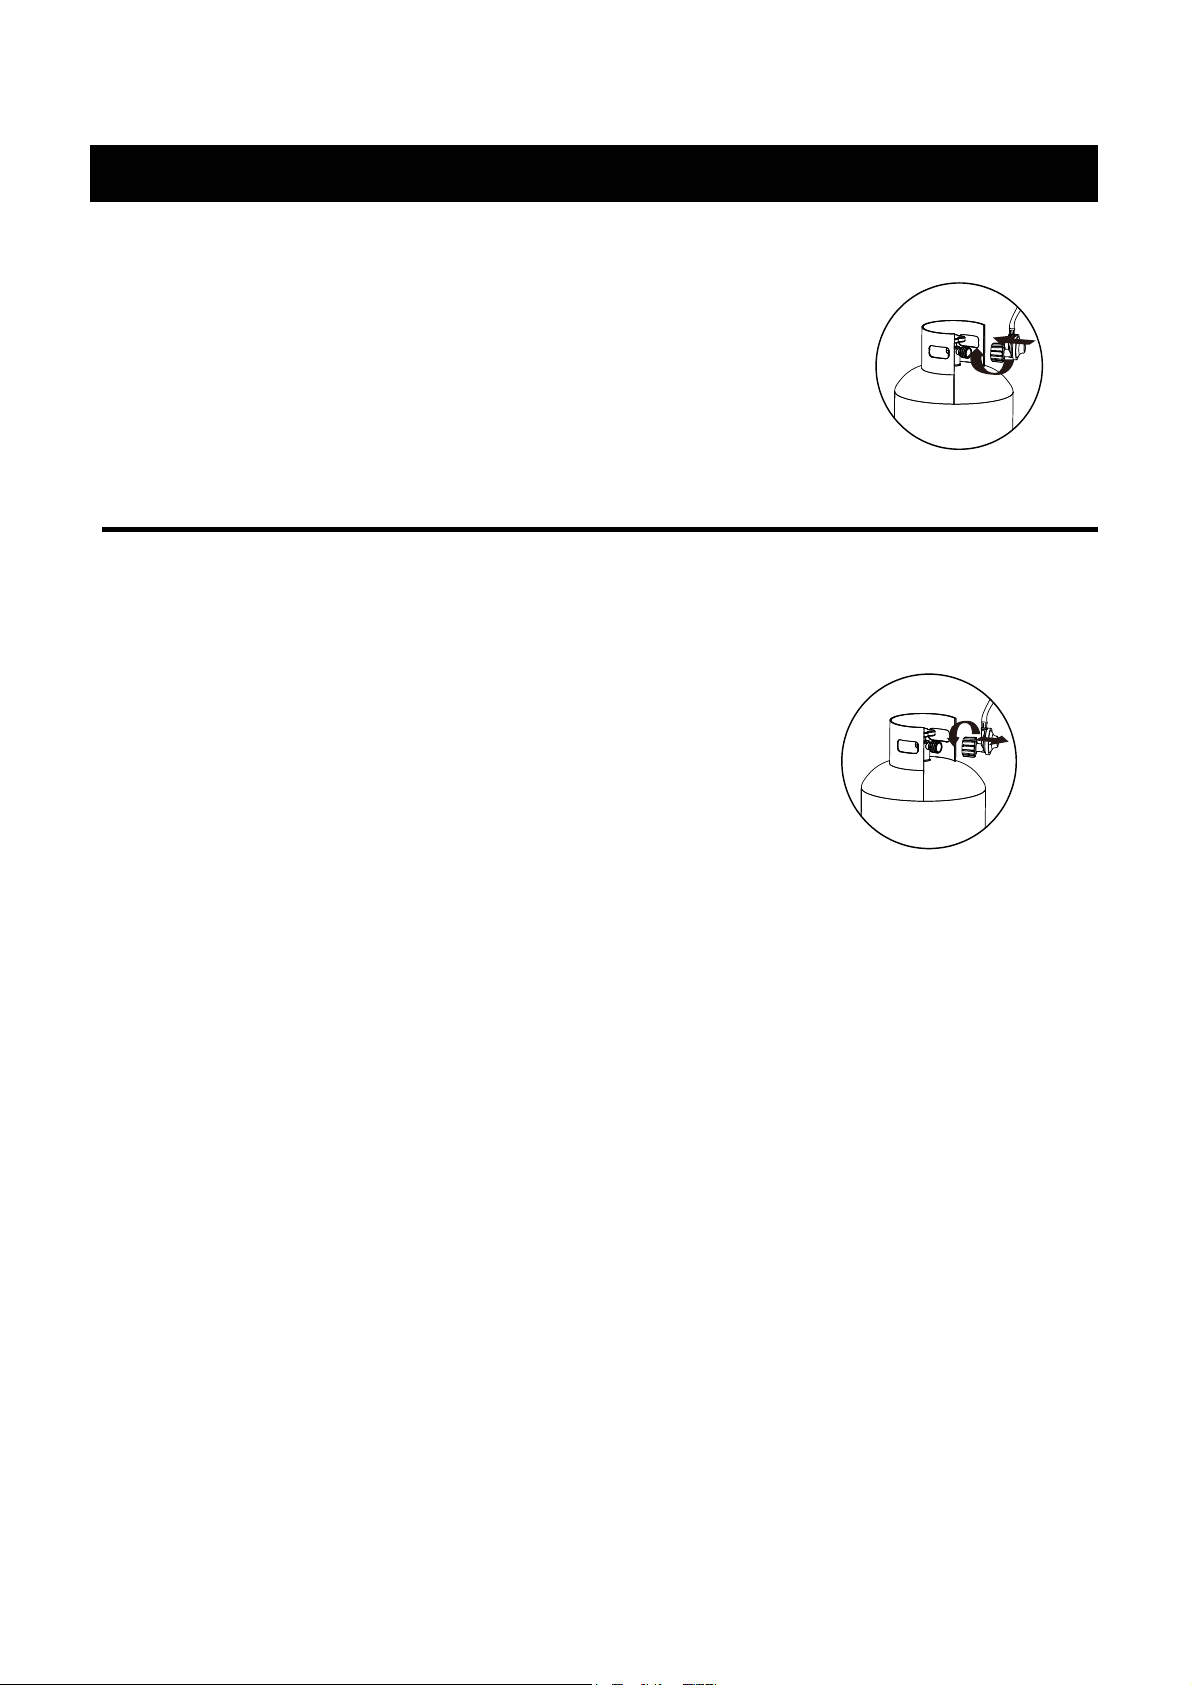
Installing LP Gas Tank
Connection LP gas tank
1. Before connecting, be sure there is no debris caught in the head
of the LP gas tank, head of the regulator valve or in the head of the
burner or burner ports.
2. Connect regulator/hose assembly to tank by turning knob clockwise
until it stops.
Disconnecting LP gas tank
1. Before disconnecting, make sure the LP gas tank valve
is OFF.
2. Disconnecting regulator/hose assembly from LP gas tank
by turning knob counterclockwise until it is loose.
CAUTION:LP gas tank must be propel disconnected and
removed prior to moving this outdoor fireplace.
3. Place the protective cap cover on the LP gas tank and
store the tank outdoors in a well-ventilated area out of
direct sunlight.
Page 12 of 20
Page 14

Operating Instructions
Checking for leaks
*WARNING: Before using this outdoor fireplace, make sure you have read , understand and
are following all information provided in the “Warnings” section. Failure to follow those
instructions can cause death, serious injury or property damage.
Burner connections
1. Make sure the regulator hose and valve connections are securely fastened to the burner
and the tank.
2. Visually check the connection between the burner/venture tube and orifice.
3. Make sure the burner/venture tube fits over the orifice.
WARNING: Failure to inspect this connection or follow these instruction which can
cause death, serious bodily injury or damage to
4. Please refer to diagrams for proper installation 。
property.
Tank/Gas line connection
1. Make 2-3 oz. of leak detection solution by mixing one part liquid dishwashing soap with
three parts water.
2. Make sure the control knob is in the "OFF” position.
3. Connect LP gas tank per “Installing LP Gas tank” section.
4. Turn LP gas tank valve to “ON”
5. Spoon several drops of solution or use a spray bottle at all connected locations .
a. If any bubbles appear, turn LP gas tank valve “OFF”, reconnect and retest.
b. If you continue to see bubbles after several attempts, turn LP gas tank valve “OFF”
and disconnect L
customer service for assistance 800-305-8803.
c. If no bubbles appear after one minute, turn LP gas tank valve “OFF”, wipe away
solution and proceed.
P Gas tank, per “Disconnecting LP gas tank” section. Contact
Page 13 of 20
Page 15

Lighting
CAUTION:Keep outdoor gas appliance area clear and free from combustible
material, gasoline and other flammable vapors and liquid.
CAUTION:Do NOT obstruct the flow of combustion and ventilation air.
CAUTION:Check and clean burner/ venturi tubes for insects and insect nests. A clogged
tube can lead to a fire.
CAUTION:Attempting to light the burner with a lid on it may cause an explosion
1. Make sure all labels, packing and protective films have been removed from the outdoor
fireplace.
2. Check for obstructions of airflow to the burner. Spiders, insects and webs can clog the
burner/venturi tube. A clogged burner tube can lead to a fire.
3. Control knob must be in the “OFF” position.
4. Clear small area of lava rocks away from the pilot housing .
5. Connect LP gas tank per “ Installing gas tank” section.
6. Turn LP gas tank valve to “ON”.
7.
Push in gas control knob & turn counter clockwise to " HIGH" .
8. Manually ignite with match or lighter.
9. Afterthe fire pit lights, release control knob. To decrease the flame, turn the control knob
ccounterclockwise to "LOW". To increase the flame, turn the control knob clockwise to
"HIGH".
Note: If burner fails to remain lit, all valves should be closed and a waiting periodof at least 5
minutes should pass before attemping to light.
CAUTION: After lighting - using a fireplace tool and heat-resistant g ves,lo carefully
move the lava rocks back to their proper position, being careful to avoid the flame.
CAUTION: If ignition does not occur in 5 seconds turn burner control knob to “OFF' ,
wait 5 minutes, fan with a newspaper or magazine, and repeat lighting procedure.
Turning Off
1. Turn LP gas tank valve “OFF” .
2. Turn control knob to the “OFF” position.
Note: A “poof” sound is normal as the last of t
he LP gas in burned.
3. Disconnect LP gas tank per “Disconnecting LP gas tank” section.
Page 14 of 20
Page 16

Cleaning and Care
CAUTION:
1. All cleaning and maintenance should be done when outdoor fireplace is
cool and with the fuel supply disconnected.
2. Do Not clean any outdoor fireplace part in a self-cleaning oven. The
extreme heat will damage the finish.
3. Do Not enlarge valve orifices or burner ports when cleaning the valves or
burners.
Notices
1. This outdoor fireplace should be thoroughly cleaned and inspected on a
regular basis.
2. Abrasive cleaners will damage this product.
3. Never use cleaner to clean any part of this outdoor fireplace.
Before each use:
1. Keep the outdoor fireplace area free from any combustible materials,
gasoline and other flammable vapors and liquids.
2. Do Not obstruct the flow of the combustion of LP gas and the ventilation of
air.
3. Keep the ventilation openings of the LP gas tank area free and clear from
debris.
4. Visually check the burner flames to make sure your outdoor fireplace is
working properly.
5. See sections below for proper cleaning instructions.
6. Check all gas connections for leaks.
7. Check components for signs of damage or rust.
8. Check for obstructions of airflow to the burner. Spiders, insects and webs
can clog the burner/venture tube. A clogged burner/venture tube can lead a
fire.
9. If damage to any components is detected, do not operate until repairs are
completed.
Page 15 of 20
Page 17

Cleaning and Care
Cleaning surface
1. Wipe surface clean with mild dishwashing detergent or baking soda mixed
with water.
2. For stubborn stains, use a citrus-based cleaner and nylon scrubbing brush.
3. Rinse clean with water.
4. Allow to air dry.
Before Storing
1. Turn LP gas tank valve “OFF” .
2. Turn control knob to the “OFF” position.
3. Disconnect LP gas tank per” Disconnecting LP gas tank” section.
4. Clean all surface.
5. Lightly coat the burner with cooking oil to prevent excess rusting.
6. Cover this outdoor fireplace with a durable vinyl cover.
7. Store in cool and dry location away from children and pets.
Page 16 of 20
Page 18
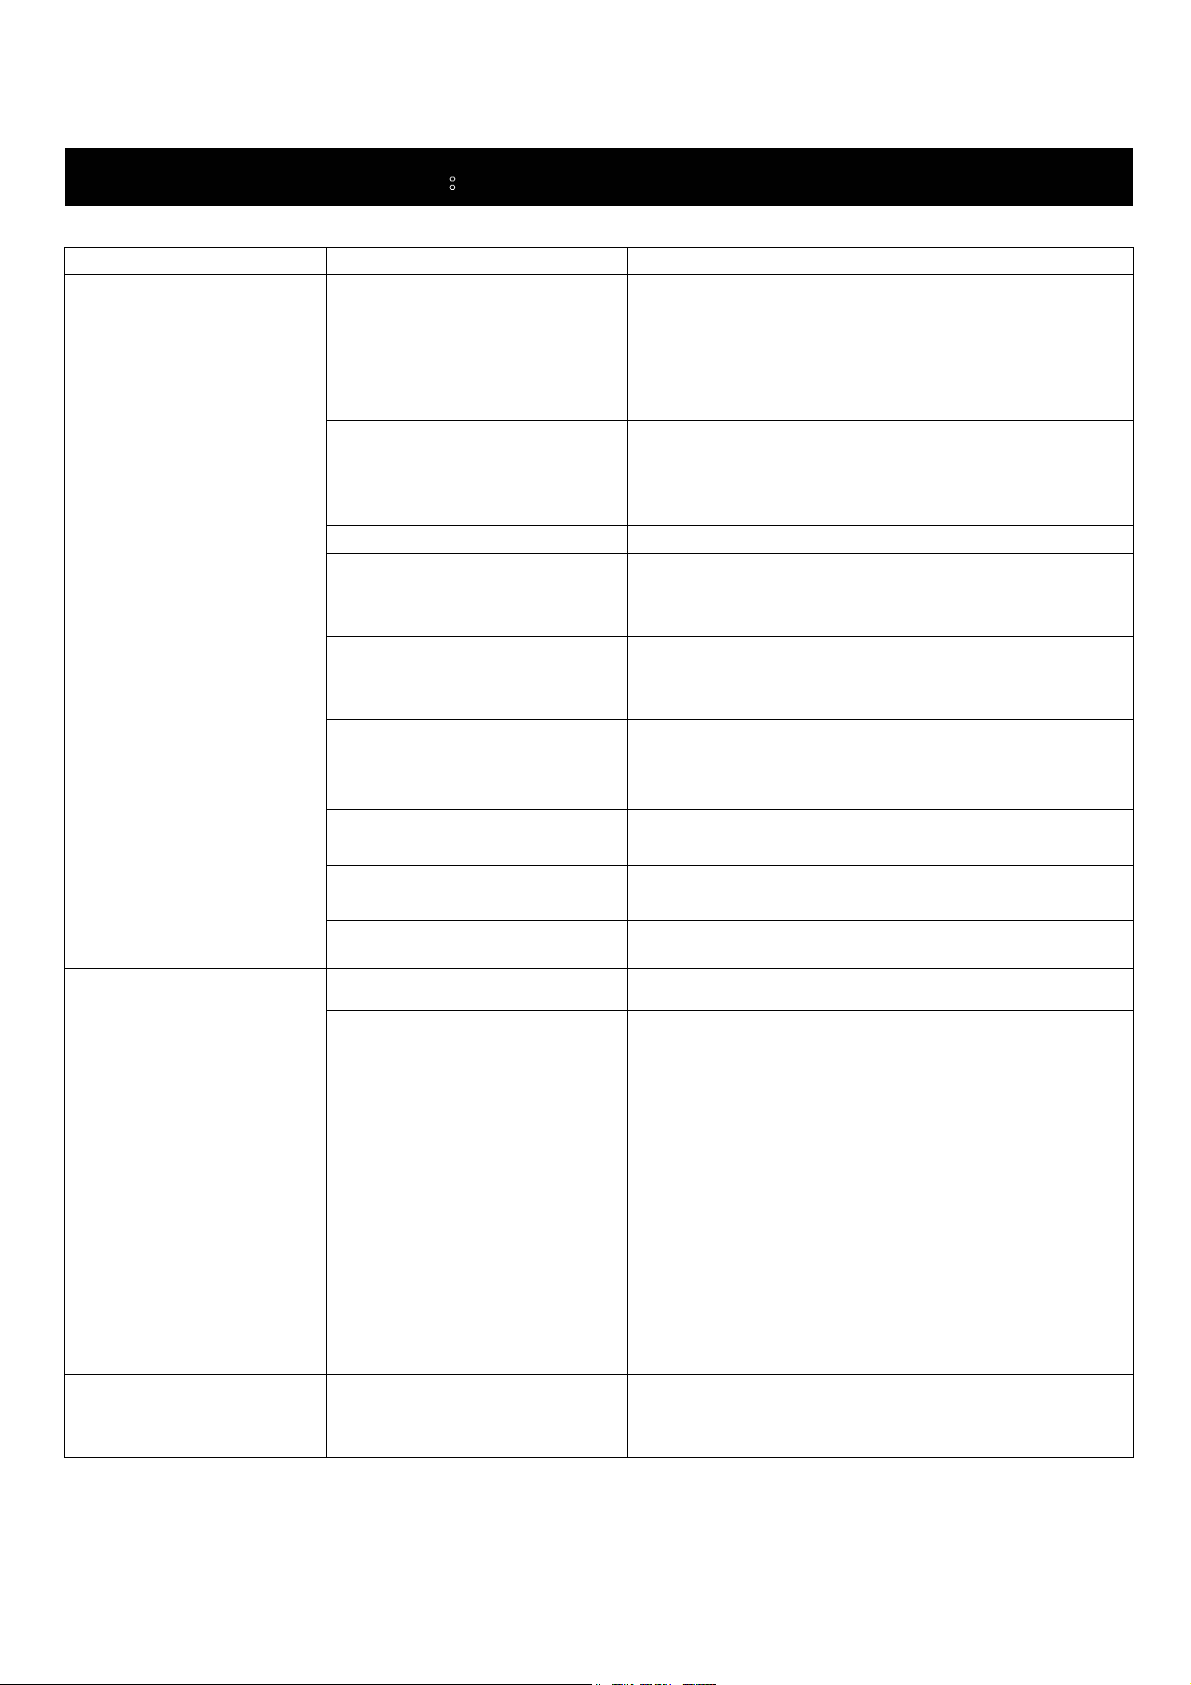
TROUBLESHOOTING:
Problem Possible Cause Prevention/Cure
LP gas tank valve is closed
No gas flow
LP gas tank is low or empty Exchange, refill or replace LP gas tank
Burner will not light with
match/lighter
LP gas leak
Coupling nut and regulator not
fully connected
Make sure regulator is securely attached to the LP gas
tank per " Installing LP Gas Tank" section, then turn LP
gas tank valve to "ON"
Check if LP gas tank is empty. A.If empty exchange,
refill or replace B.If LP gas tank is not empty, refer to
"Sudden drop in gas flow or reduced flame height"
1. Turn LP gas tank valve "OFF" .
2. Wait 5 minutes for gas to clear
3. Follow "Checking for leaks" section
Turn the coupling nut about one-half to three-quarter
additional turn until solid stop. Tighten by hand only-do
NOT use tools.
Sudden drop in gas flow
or reduced flame height
Obstruction of gas flow
Disengagement of burner to
valve
Spider webs or insect nest in
burner/venture tube
Burner ports clogged or
blocked
Out of gas Exchange, refill or replace LP gas tank
Excess flow; safely device may
have been activated
1. Clear burner/venture tube
2. Check for bent hose
Re-engage burner and valve
Clean burner/venture tube
Clean burner ports
1.Turn control knob to "OFF" .
2. Wait 30 seconds and light outdoor fireplace per
"Lighting" section.
3.If flames are too low, resettle overfilling prevention
device:
a. Turn control knob "OFF"
b. T
urn LP gas tank valve "OFF"
disconnect regulator turn control knob to "HIGH"
c. Wait one minute
.d Turn control knob to "OFF" reconnect regulator and
leak check connections, being careful not to fully open
valve
e. Light outdoor fireplace per "Lighting" section
Irregular flame pattern,
flame does not run the
full length of burner
Burner ports are clogged or
blocked
Page 17 of 20
Clean burner ports
Page 19
TROUBLESHOOTING:
Problem Possible Cause Prevention/Cure
New burner may have residual
manufacturing oils
Flame is yellow or orange
Spider webs or inset nest in
burner/venture tube
Poor alignment of valve to
burner/venture tube
High or gusting winds Do NOT use outdoor fireplace in high winds
Burn outdoor fire pit for 15 minutes and
inspect.
Clean burner/venture tube
Ensure/burner/venture tube is properly
engaged with valve
Flame goes out
Flashback (fire in burner/
venture tube(s)
Flame seems to lose heat
when burning in cold
weather temperature
below 50°F
Excess flow valve tripped
Bu
rner and /or burner/venture tube is
blocked
Ice has built up on the outside of the
LP gas tank because the
vaporization process is too slow.
knat sag PL ecalper ro llifer ,egnahcxEsag PL no woL
Refer to "Sudden drop in gas flow or
reduced flame height"
Clean burner and /or burner/venture tube
1. Turn LP gas tank valve "OFF" .
2.Turn control knob to "OFF".
3. Replace with a spare LP gas tank.
4. Reconnect LP gas tank per "Installing LP
gas tank" section.
5. Follow "Checking for leaks" section.
6. Light outdoor fire place per "Lighting"
section.
Page 18 of 20
Page 20

CARE AND MAINTAINCE
Service:
Repair gas passages and associated components should be done only by a qualified service
person.
Caution: Always allow heater to cool before attempting service.
Warranty Information
This product has a 1 year guarantee against defects in material
and/or workmanship. If you have any questions regarding the
warranty, please call our toll free number
Monday-Friday , 8am-4:30pm
Email: Service @legacyheatcalifornia .com
or
800-305-8803
Page 19 of 20
 Loading...