

Legacy Car Audio LDVD84 User Manual
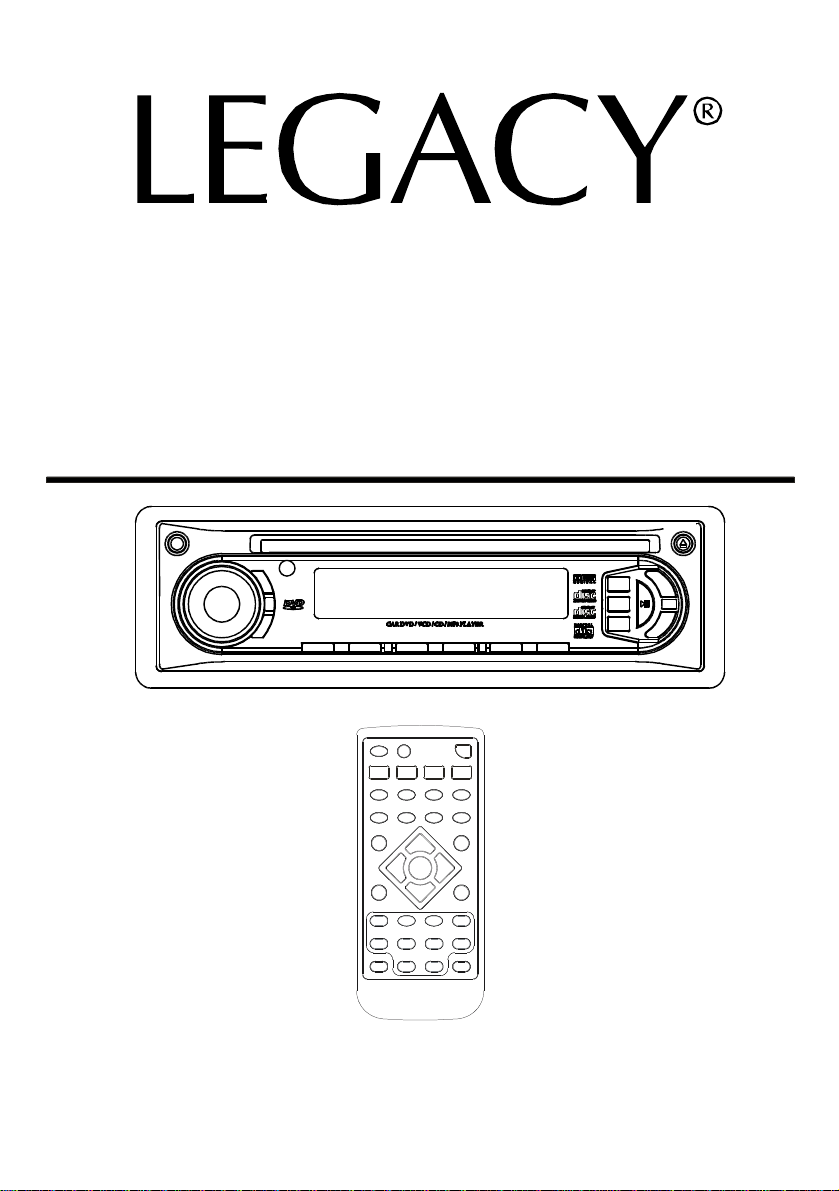
LDVD84
OWNER'sMANUAL
MobileVideoSystem
DVD/VCD/CD/MP3PLAYERWITH
MANUALLYTUNEDSYNTHESIZERSTEREORADIO
2

CAUTION:
THISDVDPLAYERISACLASSI
LASERPRODUCT.HOWEVERTHIS
DVDPLAYERUSESA
VISIBLE/INVISIBLELASERBEAM
WHICHCOULDCAUSEHAZARDOUS
RADIATIONEXPOSUREIFDIRECTED.
BESURETOOPERATETHE
DVDPLAYERCORRECTLYAS
INSTRUCTED.
USEOFCONTROLSOR
ADJUSTMENTSORPERFORMANCEOF
PROCEDURESOTHERTHANTHOSE
SPECIFIEDHEREINMAYRESULTIN
HAZARDOUSRADIATIONEXPOSURE.
DONOTOPENCOVERSAND-DONOT
REPAIRYOURSELF.REFERSERVICING
TOQUALIFIEDPERSONNEL.
WARNING:
TOREDUCETHERISKOFFIREOR
ELECTRICSHOCK,DONOTEXPOSE
THISEQUIPMENTTORAINOR
MOISTURE.
TOREDUCETHERISKOFFIREOR
ELECTRICSHOCK,ANDANNOYING
INTERFERENCE,USEONLYTHE
RECOMMENDEDACCESSORIES.
THISDEVICEISINTENDEDFOR
CONTINUOUSOPERATION.
Thisproductincorporatescopyright
protectiontechnologythatisprotected
bymethodclaimsofcertainU.S.patents
andotherintellectualpropertyrights
ownedbyMacrovisionCorporationand
otherrightsowners.Useofthis
copyrightprotectiontechnologymustbe
authorizedbyMacrovisionCorporation,
andisintendedforhomeandother
limitedviewingusesonlyunless
otherwiseauthorizedbyMacrovision
Corporation.Reverseengineeringor
disassemblyisprohibited.
RegionManagementInformation
RegionManagementInformation:
ThisDVDPlayerisdesignedand
manufacturedtorespondtotheRegion
ManagementInformationthatisrecorded
onaDVDdisc.IftheRegionnumber
describedontheDVDdiscdoesnot
correspondtotheRegionnumberofthis
DVDPlayer,thisDVDPlayercannotplay
thisdisc.
3
Discformatssupportedbythisplayer
DVD
VIDEO
12cmdisc
(Single-sideddisconly)
VideoCD
12cmdisc
CD
12cmdisc
MP3
12cmdisc
Discswhichcannotbeplayedwiththis
player
DVD-ROM
DVD-R/DVD-RAM
CDV
CD-G
HandlingandCleaning
Dirt,dust,scratchesandwarpingdisc
willcausemisoperation.
Donotplacestickersormake
scratchesondiscs.
Donotwarpdiscs.
Adiscshouldalwaysbekeptinits
casewhennotinusetopreventfrom
damaging.
Donotplacediscsinthefollowing
places:
1.Directsunlight
2.Dirty,dustyanddampareas
3.Nearcarheaters
4.Ontheseatsordashboard
Notethesescratchesarenotan
indicationofanyproblemwiththeplayer.
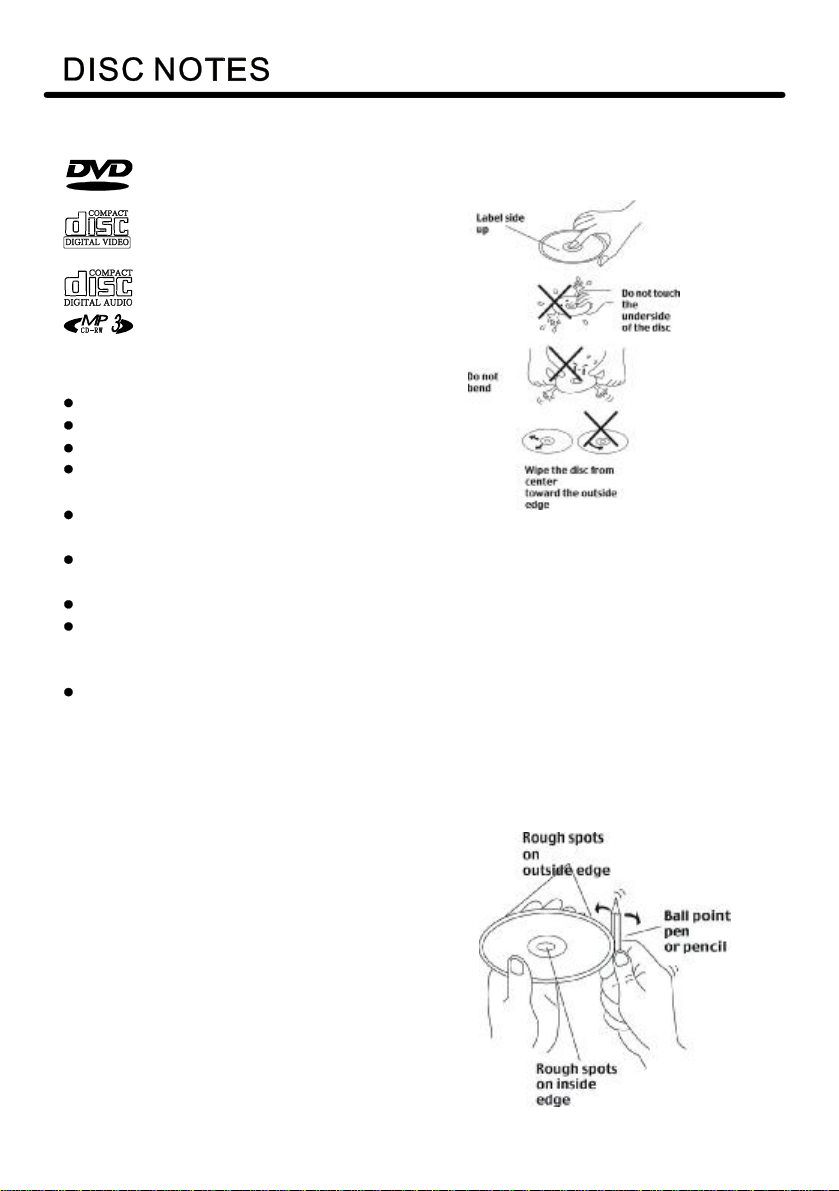
PreparingNewDiscswithRoughSpots
Anewdiscmayhaveroughedgesonits
insideandoutsideedges.Ifadiscwith
roughedgesisused,thepropersetting
willnotbeperformedandtheplayerwill
notplaythedisc.Therefore,removethe
roughedgesinadvancebyusingaball
pointpenorpencilasshownontheright.
Toremovetheroughedges,pressthe
sideofthepenorpencilagainstthe
insideandoutsideedgesofthedisc.
DiscCleaning
Useadrysoftclothtowipethesurface.
Ifthediscisquitedirty,useasoftcloth
slightlymoisturedwithisopropyl(rubbing)
alcohol.Neverusesolventssuchas
benzine,thinnerorconventionalrecord
cleanersastheymaymarthesurfaceof
thedisc.
Note:
Adiscmaybecomesomewhatscratched
(althoughnotenoughtomakeit
unusable)dependingonyourhandleit
andconditionsintheusageenvironment.
4
Choosethemountinglocationwheretheunitwillnotinterferewiththenormal
drivingfunctionofthedriver.
Beforefinallyinstallingtheunit,connectthewiringtemporarilyandmakesureitis
allconnectedupproperlyandtheunitandthesystemworkproperly.
Useonlythepartsincludedwiththeunittoensureproperinstallation.Theuseof
unauthorizedpartscancausemalfunctions.
Consultwithyournearestdealerifinstallationrequiresthedrillingofholesorother
modificationsofthevehicle.
Installtheunitwhereitdoesnotgetinthedriverswayandcannotinjurethe
passengerifthereisasuddenstop,likeanemergencystop.
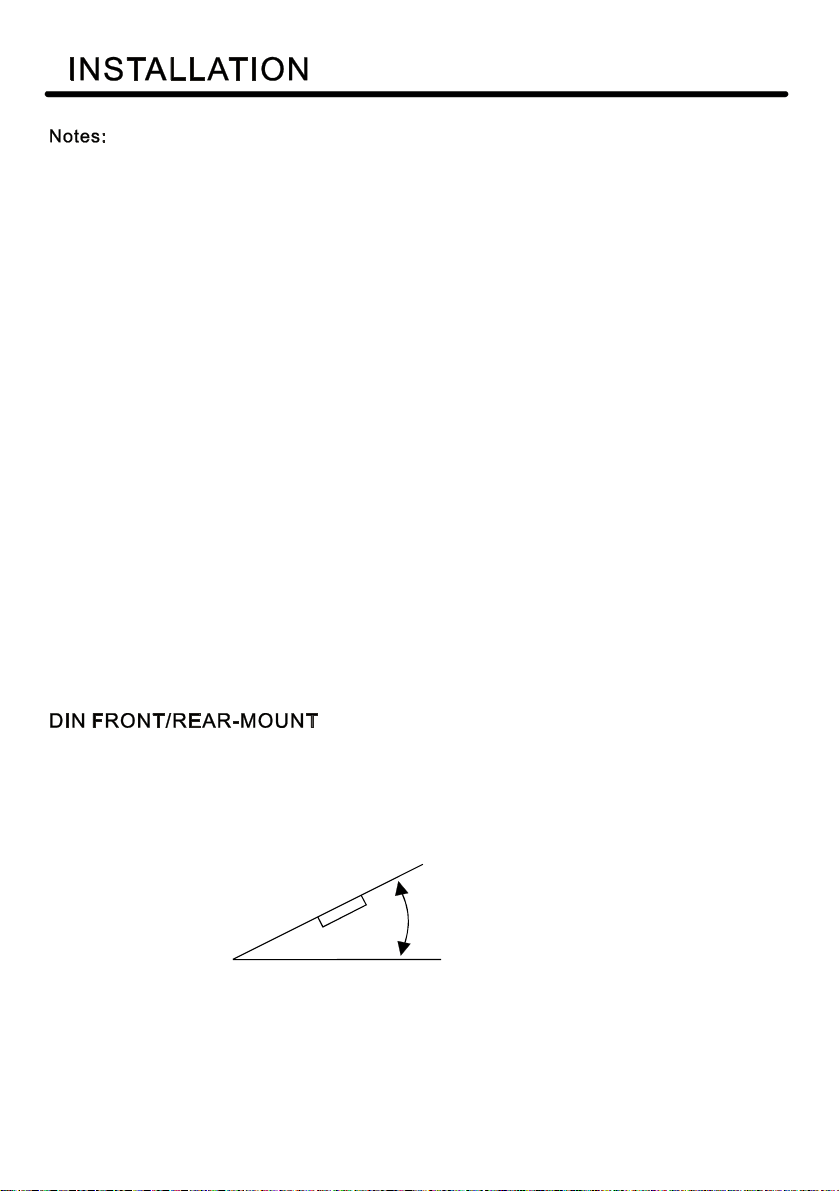
Ifinstallationangleexceeds30fromhorizontal,theunitmightnotgiveitsoptimum
performance.
Avoidinstallingtheunitwhereitwouldbesubjecttohightemperature,suchasfrom
directsunlight,orfromhotair,fromtheheater,orwhereitwouldbesubjecttodust,
dirtorexcessivevibration.
Thisunitcanbeproperlyinstalledeitherfrom"Front"(conventionalDINFront-mount)
or"Rear"(DINRear-mountinstallation,utilizingthreadedscrewholesatthesidesof
theunitchassis).Fordetails,refertothefollowingillustratedinstallationmethods.
'
30
5
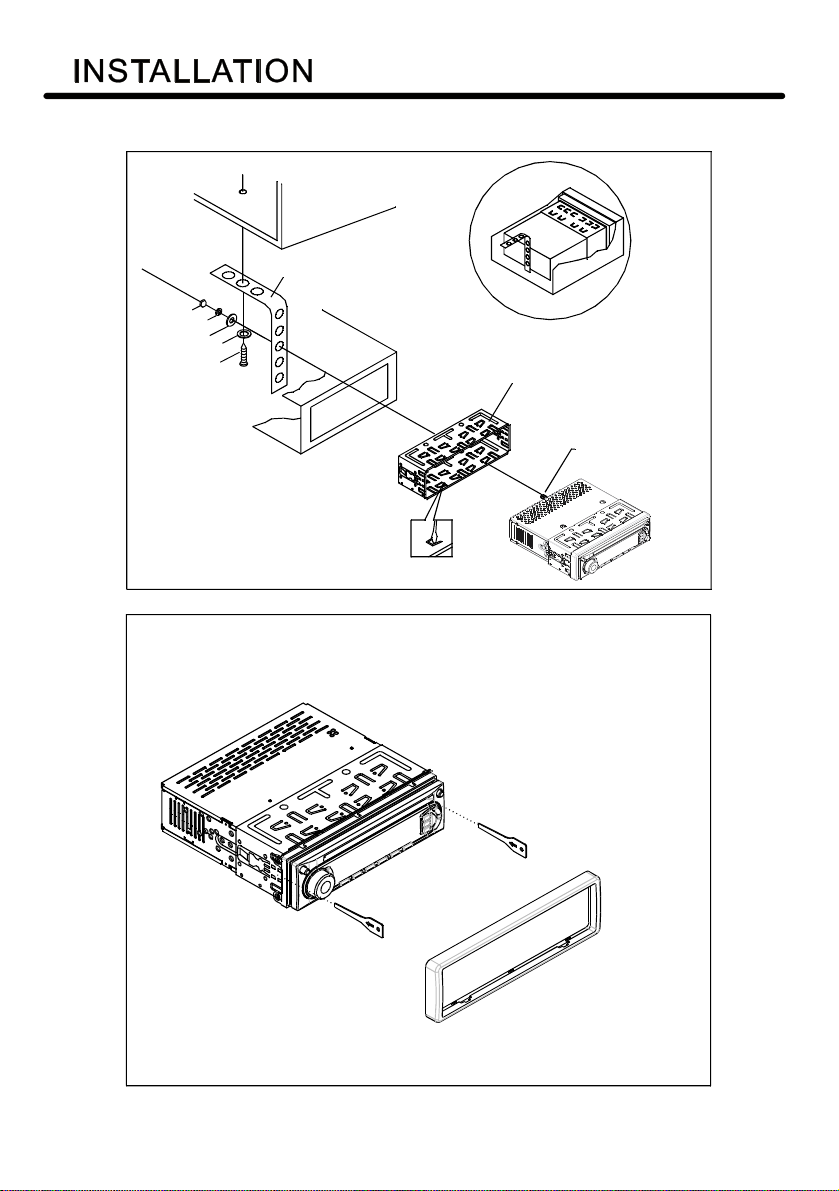
HEXNUT
SPRINGWASHER
PLAINWASHER
PLAINWASHER
TAPPINGSCREW
DASHBOARD
METALMOUNTINGSTRAP
CONSOLE
SLIDEBRACKETHOUSING
HEXBOLT
6
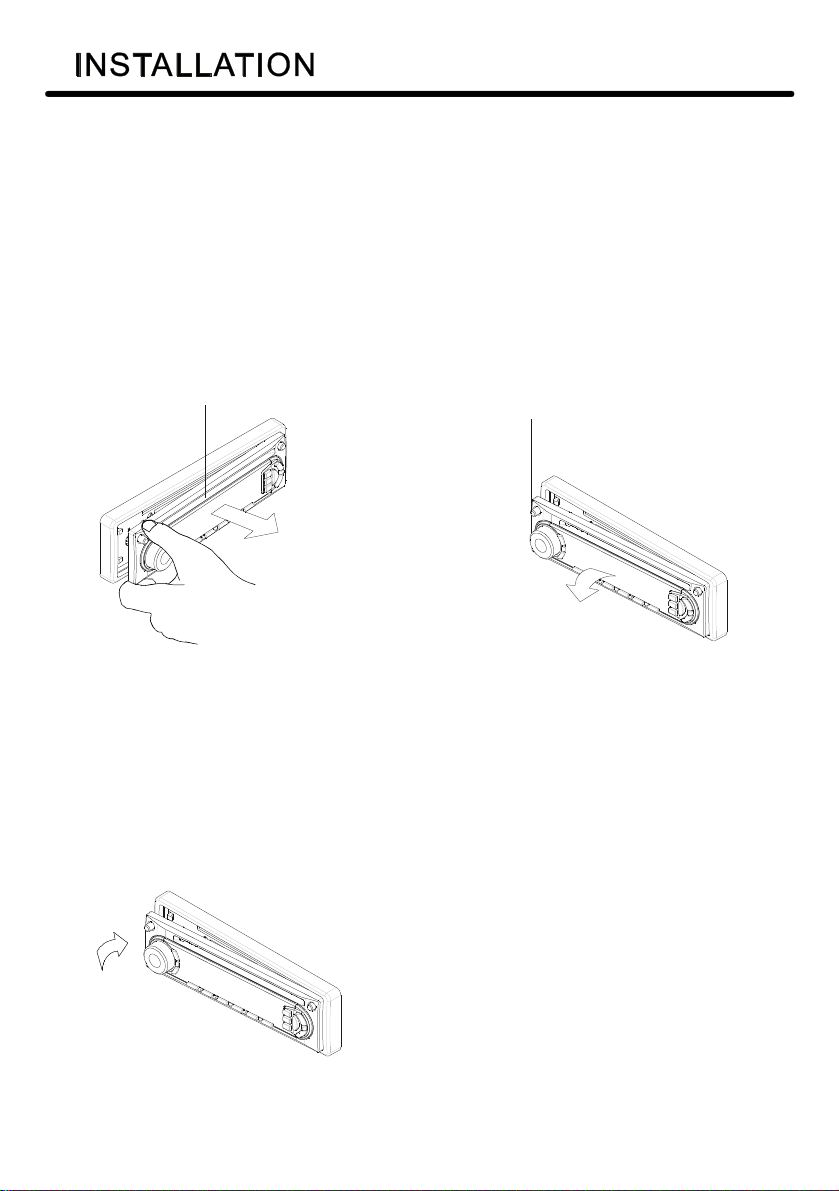
HOWTOREMOVEANDINSTALLTHEFRONTPANEL
1.Pressthereleasebuttonandpull-offthefrontpanel.
Keepfrontpanelintothecase.
2.Toinstallthefrontpanel,insertthepanelintothehousingandmakesurethepanel
isproperlyinstalled,otherwise,abnormalitiesoccursonthedisplayorsomekeyswill
notfunctionproperly.
REMOVINGTHEFRONTPANEL
FRONTPANEL
RELEASEBUTTON
INSTALLINGTHEFRONTPANEL
7
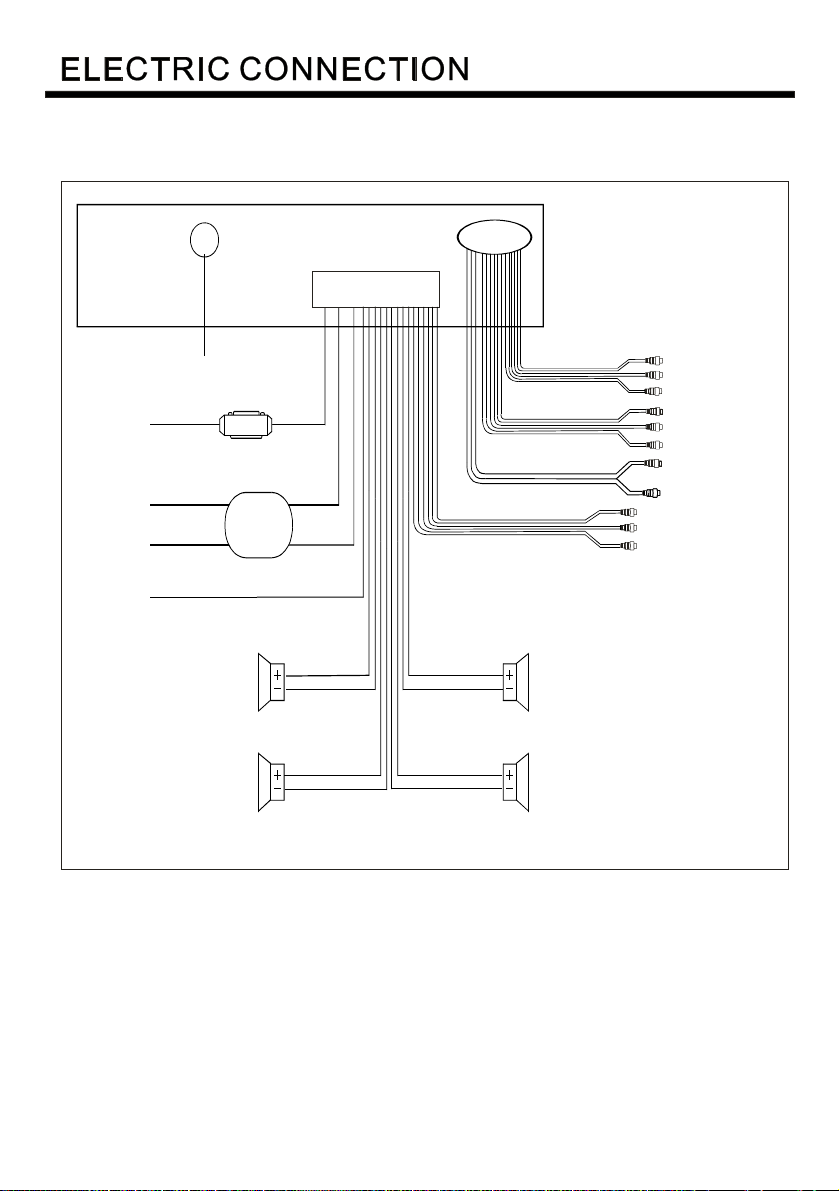
WIRING CONNECTION
FOR4x7WSYSTEM
MAIN UNIT
ANTENNACONNECTOR
IGNITION
SWITCH(B+)
(B+)
MEMORY
BACK-UP
GROUND (B-)
POWER
ANTENNA
RED
YELLOW
BLACK
0.5A
FUSEBOX
5A
BLUE
FRONT
Lch SPK.
REAR
Lch SPK.
WHITE
WHITE/BLACK
GREEN
GREEN/BLACK
AUX(optional)
RCACABLE
REARRCAOUTPUTCABLE(OPTIONAL)
FRONTRCAOUTPUTCABLE
(FOR RCA LINE OUT VERSION ONLY)
GREY
GREY/BLACK
VIOLET
VIOLET/BLACK
FRONT
RchSPK
REAR
RchSPK
VIDEOINYELLOW
RCHINRED
LCHINWHITE
GREYSUBWOOFER
VIDEOOUT2YELLOW
COAXIALOUTBROWN
RCHRED
LCHWHITE
FRONTRCARRED
VIDEOOUT1YELLOW
FRONTRCALWHITE
8
 Loading...