

Page 1

WWW.LEGACYCARAUDIO.COM
7 Inch Headrest TFT-LCD Monitor
L7HM
POWER
AV
MENU
+
-
R
L7HM
AV3
R
OPERATION MANUAL
Page 2
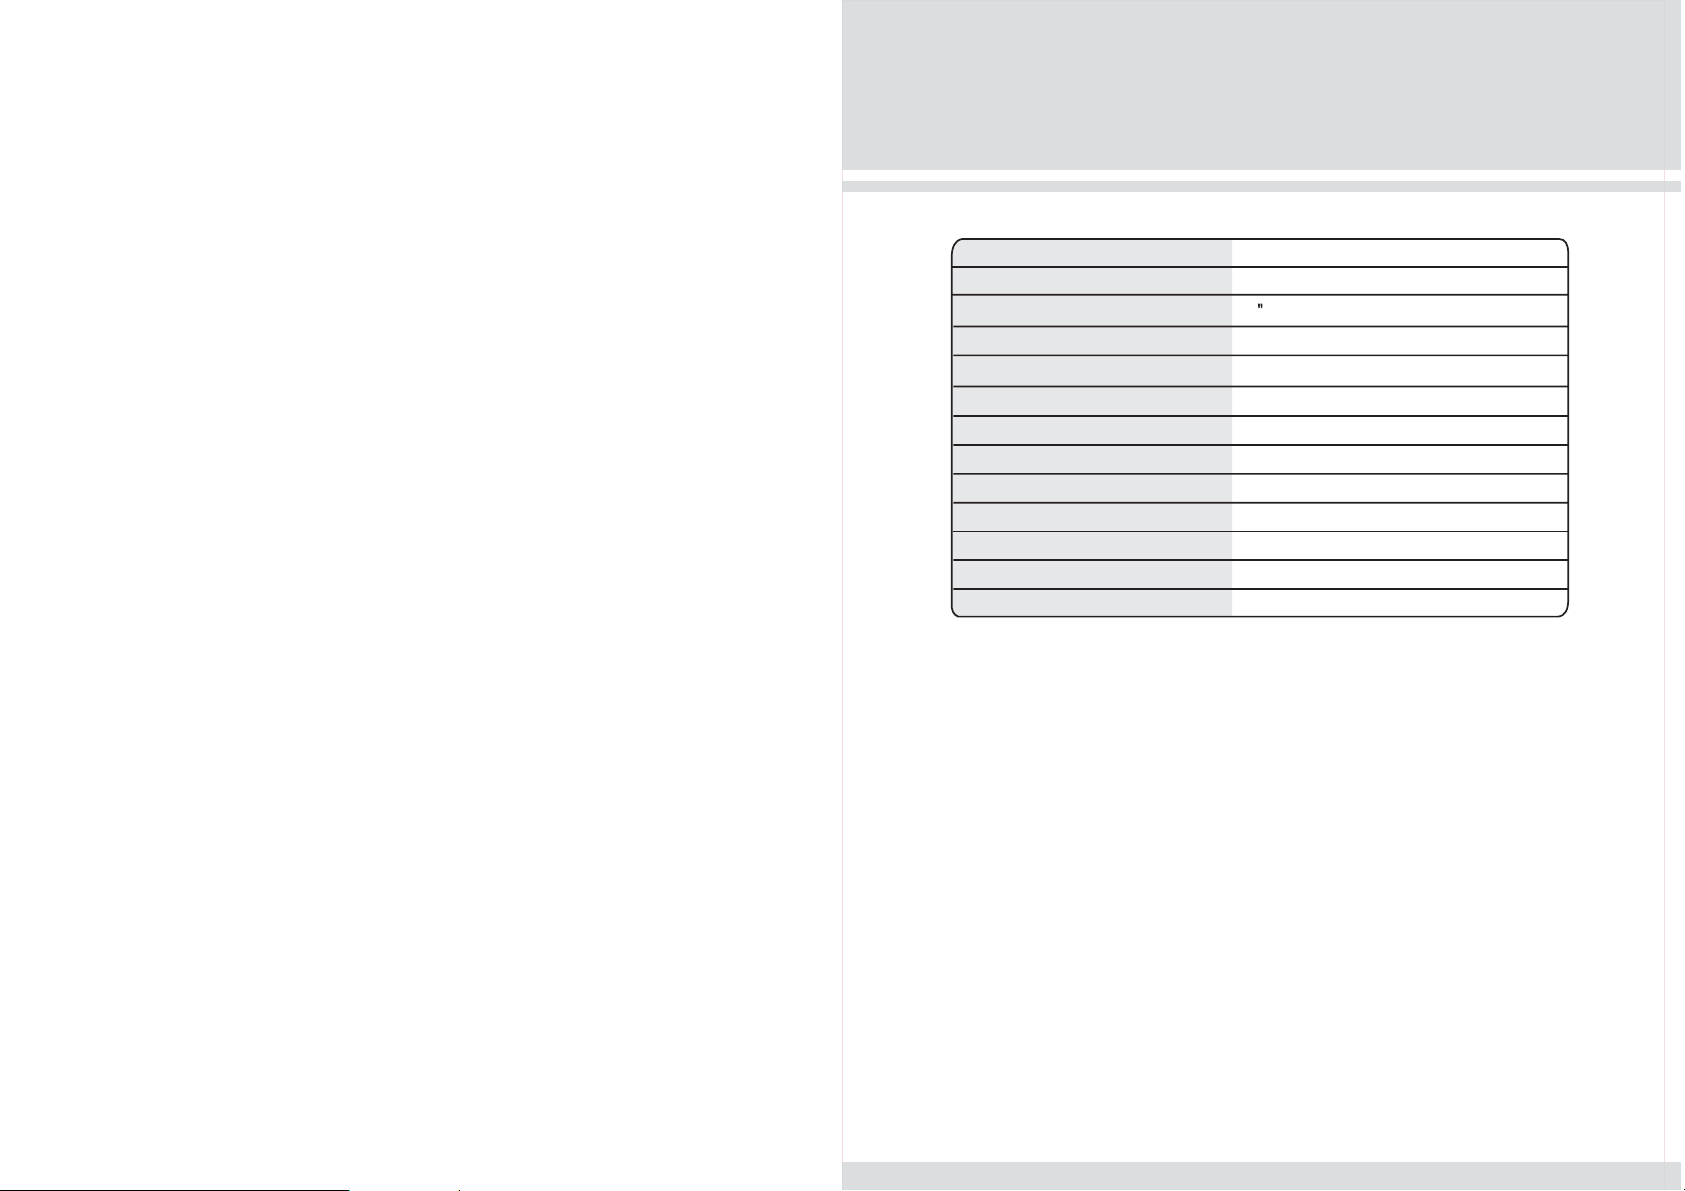
Specifications
Power Requirements
Power Consumption
Screen Size
Screen Format
Resolution Pixel
A/V Inputs
Dimensions
IR Power Requirements
IR Power Consumption
IR Transmitter Frequency A
IR Transmitter Frequency B
LCD Panel Type
Compatible video standard
Although the effective pixels for the liquid crystal panel is given as
*
DC 12~14.4V
9W
7 TFT-LCD
16 9 Wide
1440*234
Video Input 3EA
(L)7.7 ( W)5.0 ( H)0.92inch
DC 12V
3W
Right 2.8MHz Left 2.3MHz
Right 3.8MHz Left 3.2MHz
Active Matrix TFT
NTSC/PALAUTO SWITCHING
99.98% or more, 0.02% of pixels may not light or may light incorrectly.
10
Page 3

Troubleshooting check list
Please make these simple checks before calling for assistance.
*
If the TV is to be used in conjunction with any other equipment,
*
read the other product,s instruction manual.
If you choose not follow the below checklist or any problems
*
you are experiencing with this product are not solved, never
attempt to repair a defective monitor yourself. Check with your
dealer .
No picture & no sound
Power cord inserted into power source incorrectly.
*
Another product,s cord inserted into TV incorrectly.
*
Check the signal in AV mode.
*
Contents
Thank you for your purchase.
Please read this user,s Manual in detail and use the set properly.
Caution 3
Installatlon 4
Operation Function 6
Remote Function 7
Connections 8
Troubleshooting check list 9
No picture
Check the signal in AV mode.
*
Adjust the contrast and brightness settings.
*
Monitor not responding to remote control
Check whether the batteries have sufficient power. Replace if
*
necessary.
Check whether the batteries are correctly installed in the remote
*
control.
Check the remote control sensor lens on the monitor and the distance
*
and angle on the remote control(2m,30 ).
9
Specifications 10
2
Page 4

Caution Connections
Read this page in detail in order to protect people s
,
health or assets.
Driver never operates while driving.
Driver may cause car accident by watching monitor
while driving.
Do not disassemble the device.
Use proper volume while driving.
Do not watch the monitor for a long period of time without
the engine running. It will drain your battery and you will
have issues starting your car.
Do not drop or give strong impact to LCD panel.
Do not recharge, disassemble or heat the remote control
battery.
Keep remote control battery away from child.
Use only soft cloth with non-ammonia glass cleaner to clean
the panel.
Check Point
1 The range of preservation temperature for the device is from-20 to 70
Be cautious that the inside temperature of car may arise up to 100 in summer time.
2 The monitor picture may not be displayed normally when it is higher or lower than
the using temperature.
In this case,the screen will be back normal condition after minutes.
The range of using temperature for the device is from 0 to 40 .
3 You can watch the best picture condition when you are in the front side.
RED(+) BLACK(-)
DC 12V CONNECT
POWER
AV
MENU
+
-
AV3
Din Cable
VIDEO 1
AUDIO1 L
AUDIO1 R
AUDIO2 L
R
VIDEO 2
MENU
EXTERNAL DEVICE
AUDIO2 R
VIDEO
20
40
(Visual Angle)
45 45
3
8
Page 5

Remote Function
AV1 / AV2
AV1/AV2 KEY
MENU
MENU
POWER
SELECT
POWER KEY
MENU KEY
Installation
REMOTE CONTROL SENSOR
IR TRANSMITTER
POWER
AV
MENU
+
-
AV3
POWER
AV
MENU
+
-
AV3 INPUT
HEADPHONE OUTPUT
KEY
LCD MONITOR
REMOTE CONTROLUNIT
41-20-1001
POWER Power ON/OFF
AV1/AV2 Signal Select
MENU Press this button for OSD menu.
After that it is the ENTER button.
Increase current option value
Decrease current option value
7
KEY
MONITOR
HEADREST BRACKET
STEP1: Use either screws or cable straps to mount the
housing to your bracket.
STEP2: Place the monitor into the headrest bracket.
Notice: the terminal comes out from the headrest
through the special hole for it.
4
Page 6

Installation
Metal bracket
Locking knob
STEP 1 Put the locking knob into the metal bracket.
STEP 2 Adjust to the locking knob to select the desired angle.
Operation Function
POWER
AV
MENU
+
-
AV3
REMOTE CONTROL SENSOR
IR TRANSMITTER
POWER
AV
MENU
+
-
AV3 INPUT
HEADPHONE OUTPUT
STEP 3 Connect the DC terrninal and RCA terrninal to the Wiring Harness.
Please notice the true installation of the monitor holder
TRUE FALSE
Interface Switch Function
Power Power ON/OFF
AV Signal Select
Menu Press this button for OSD menu.
After that it is the ENTER button.
+ Increase current option value
Decrease current option value
65
 Loading...