

Installation & Owner's Manual
Care and Operation for Your Super Magnum Stoker
INSTALLER: Leave this manual with party responsible for use and operation.
OWNER: Retain this manual for future reference. Call your dealer for questions on Installation, Operation, or Service.
SAVE THESE INSTRUCTIONS
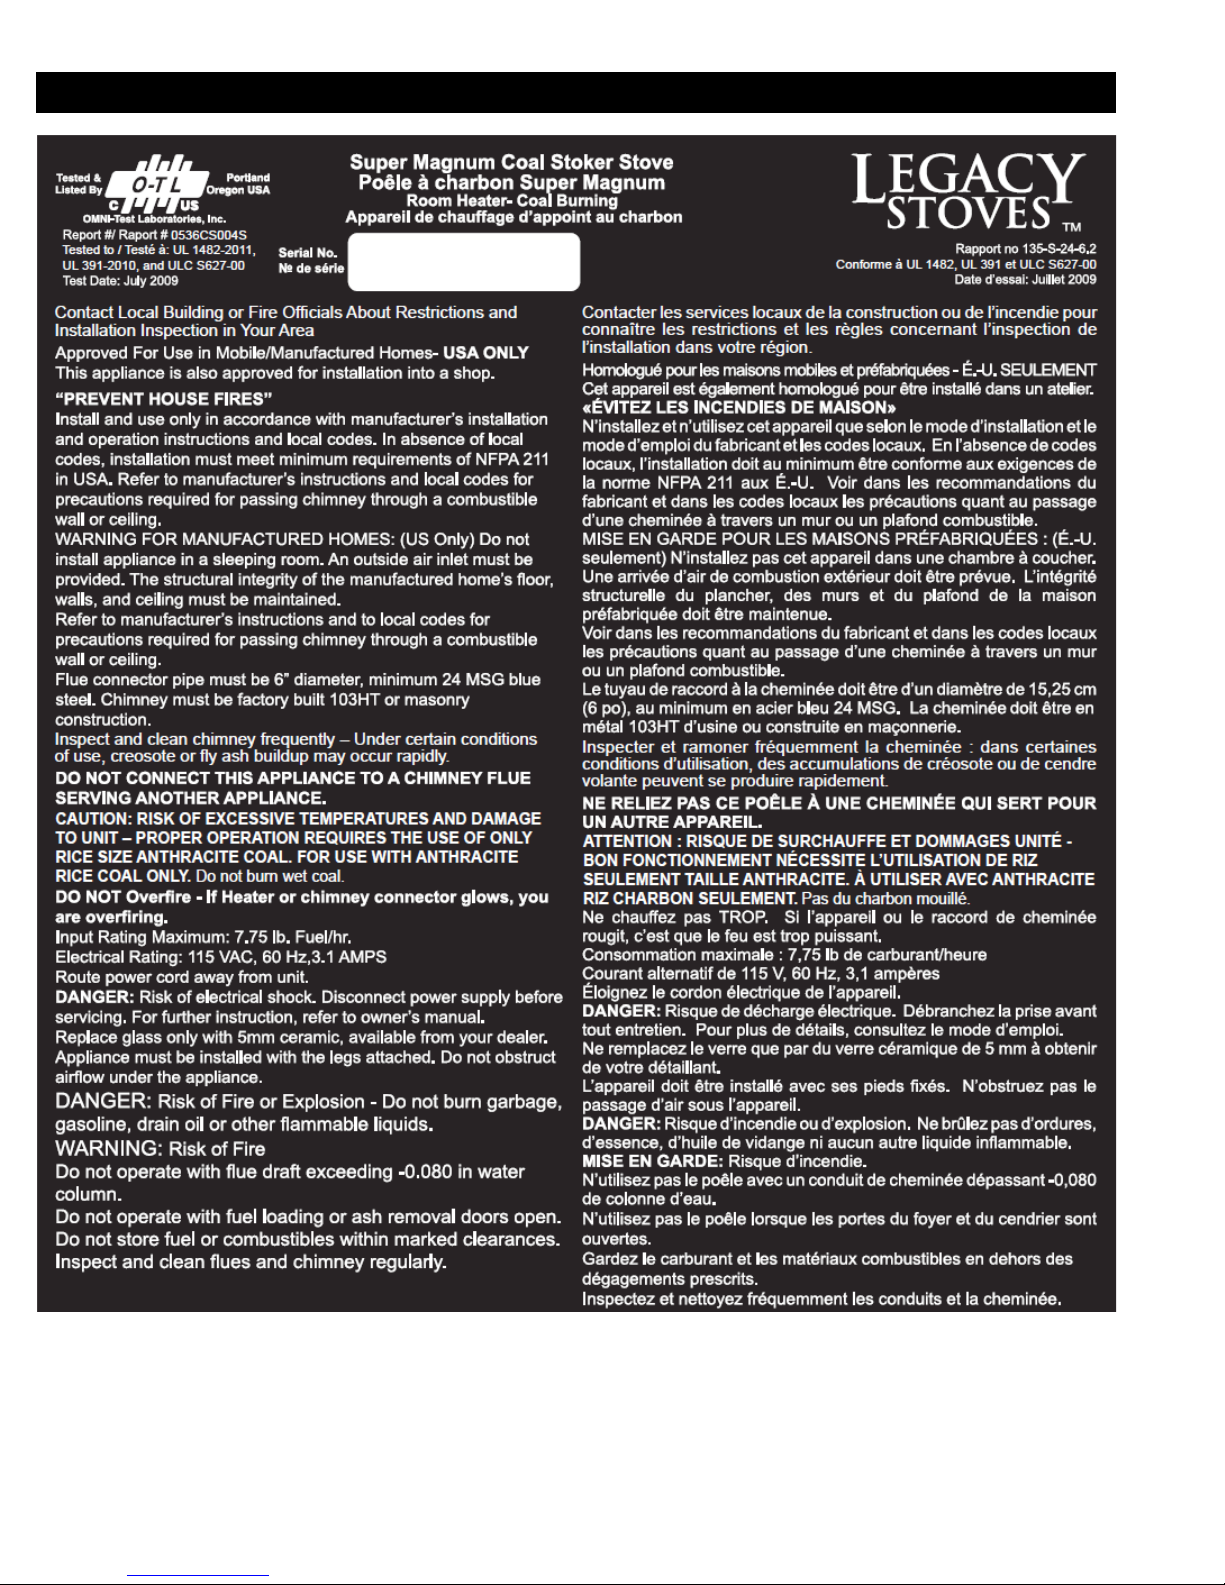
Report Number: 0536CS004S
Tested to: UL 1482-2011, UL 391-2010, ULC S627-00
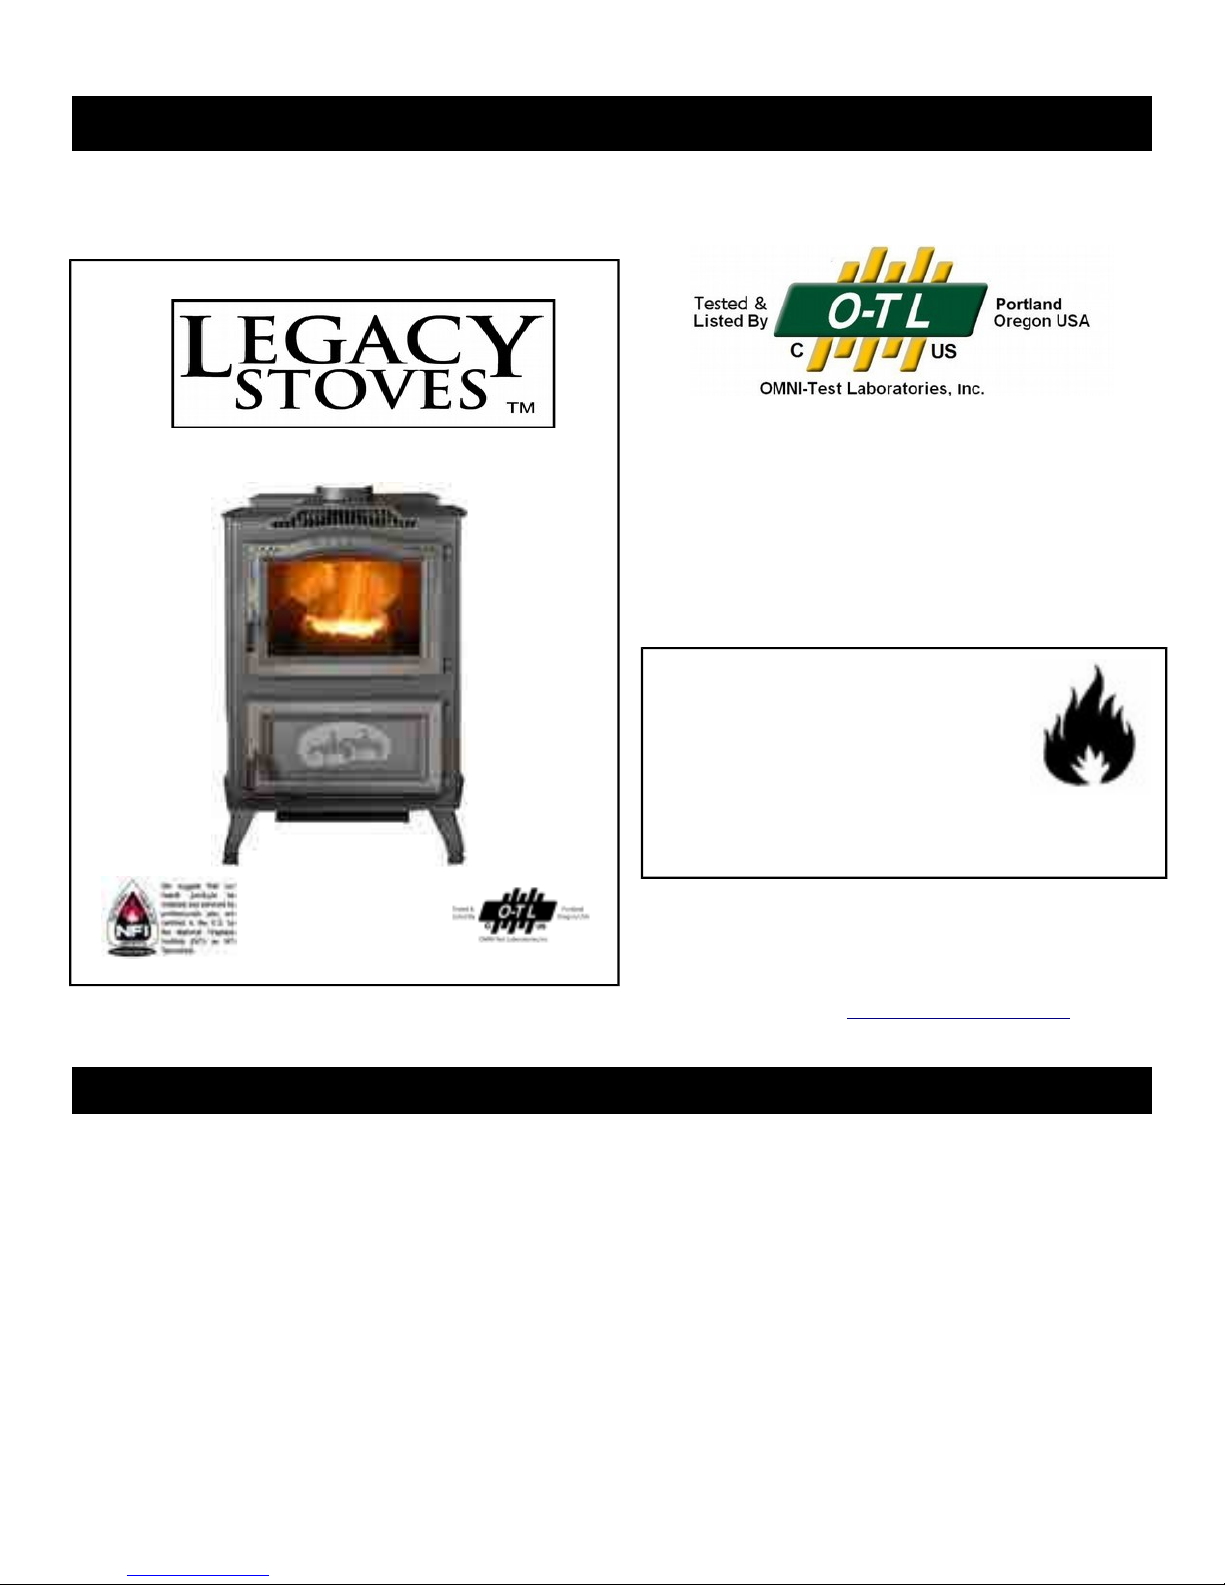
Model(s): Super Magnum Coal Stoker
Legacy Stoves, A Division of:
Alternate Heating Systems
2393 Little Egypt Rd
Harrisonville, PA 17228
WARNING!
Please read this entire manual
before installation and use of
this coal - burning room heater.
Failure to follow these
instructions could result in property
damage, bodily injury or even death.
To obtain a French tranlation of this manual, please contact your dealer or visit www.legacystoves.com
Pour obtenir une traduction française de ce manuel, s’il vous plaît contacter votre revendeur ou visitez
www.legacystoves.com
⚠CAUTIONS AND WARNINGS: RISK OF FIRE, INJURY OR DEATH
TESTED AND APPROVED FOR ANTHRACITE RICE COAL FUEL ONLY. DO NOT USE
CHEMICALS OR FLUIDS TO START FIRE. BURNING OF ANY OTHER TYPE OF FUEL VOIDS
YOUR WARRANTY.
INSTALLATION MUST COMPLY WITH LOCAL, REGIONAL, STATE AND NATIONAL CODES AND
REGULATIONS.
CONTACT LOCAL BUILDING OR FIRE OFFICIALS ABOUT RESTRICTIONS, INSTALLATION,
INSPECTION AND PERMITTING REQUIREMENTS IN YOUR AREA.
MAXIMUM ALLOWED DRAFT IS -.08 INCHES OF WATER COLUMN.
DO NOT USE ABRASIVE CLEANERS ON STOVE GLASS.
DO NOT CLEAN STOVE GLASS WHEN HOT. NEVER ALLOW CHILDREN TO TOUCH GLASS OR
TO BE IN THE ROOM WITH THE STOVE UNSUPERVISED.


Warnings and Cautions Continued
DO NOT OVERFIRE - IF ANY EXTERNAL PART STARTS TO GLOW, YOU ARE OVERFIRING.
REDUCE FEED RATE. OVERFIRING WILL VOID YOUR WARRANTY.
COMPLY WITH ALL MINIMUM CLEARANCES TO COMBUSTIBLES AS SPECIFIED. DO NOT
PLACE FUEL WITHIN INSTALL CLEARANCES. FAILURE TO COMPLY MAY CAUSE HOUSE
FIRE.
KEEP CLOTHING, FURNITURE, DRAPERIES AND OTHER FLAMMABLE MATERIALS AWAY.
HIGH TEMPERATURES MAY IGNITE CLOTHING OR OTHER FLAMMABLE MATERIALS.
ALERT ADULTS AND CHILDREN TO HAZARDS OF HIGH TEMPERATURES.
DO NOT OPERATE WITH FUEL LOADING OR ASH REMOVAL DOORS OPENED.
INSPECT AND CLEAN CHIMNEY CONNECTORS AND CHIMNEY REGULARLY. USE OF A UL
103 HT CHIMNEY REQUIRED.
DO NOT BURN GARBAGE, FLAMMABLE LIQUIDS OR ENGINE OIL.
Introduction
Thank you for purchasing a Legacy Stoves
Please read this manual before attempting to install or use your new stove. If you have questions regarding your new stove, contact
your dealer. Follow these instructions and you'll have years of warmth and comfort to enjoy your new coal stove.
If you are a coal burner for the first time, keep in mind that you will not have instant success with the maintenance of a fire. Nobody
does. Following these guidelines should help you with the basics.
Please copy your serial number label on the back of the stove to the box below.
Super Magnum Coal Stoker Stove. The Super Magnum has been designed and built to last.
TM
-3-
Super Magnum Coal Stoker Label (top, not actual size)
-4-
Super Magnum Coal Stoker Label (bottom, not actual size)
-5-

-6-

Table of Contents - Super-Magnum Coal Stoker Stove
CAUTIONS AND WARNINGS: RISK OF FIRE, INJURY OR DEATH⚠ .................................................1
Warnings and Cautions Continued.................................................................................................................3
Introduction....................................................................................................................................................3
Super Magnum Coal Stoker Label (top, not actual size)...............................................................................4
Super Magnum Coal Stoker Label (bottom, not actual size).........................................................................5
Listing and Code Approvals...........................................................................................................................9
A. Appliance Certification.........................................................................................................................9
B. Mobile Home Approved........................................................................................................................9
C. Glass Specifications..............................................................................................................................9
D. Electrical Rating...................................................................................................................................9
E. BTU & Efficiency Specifications..........................................................................................................9
Special Warnings and Notices......................................................................................................................10
1.0 Some things to keep in mind.............................................................................................................10
1.1 Carbon Monoxide.........................................................................................................................10
1.2 Wet Coal........................................................................................................................................10
1.3 Prevent Rust and Corrosion..........................................................................................................10
First Steps.....................................................................................................................................................11
2.0 Getting Started...................................................................................................................................11
2.1 Appliance Location.......................................................................................................................11
2.2 Room Sensor Location..................................................................................................................11
2.3 Fire Safety.....................................................................................................................................11
2.4 Component Locations...................................................................................................................12
2.5 Pre-Use Check List.......................................................................................................................13
2.6 Dimensions....................................................................................................................................14
2.7 Clearances.....................................................................................................................................15
2.8 Floor Protection Requirements.....................................................................................................15
Chimneys and Venting..................................................................................................................................16
3.0 Chimney Characteristics and Components........................................................................................16
3.1 Draft..............................................................................................................................................16
3.2 Chimney Connectors.....................................................................................................................16
3.3 Wall Pass-Through........................................................................................................................17
3.4 The Chimney in general................................................................................................................17
3.5 Existing Masonry Chimneys.........................................................................................................18
3.6 Venting to an Existing Masonry Fireplace Chimney....................................................................19
3.7 Installing to a Prefabricated Chimney...........................................................................................20
3.8 Draft Test – Barometric Damper Setup.........................................................................................21
Additional Setup...........................................................................................................................................22
4.0 Mobile Home Setup – USA Only......................................................................................................22
4.1 Outside Air and securing stove.....................................................................................................22
4.2 Outside Air Attachment.................................................................................................................23
4.3 Leveling the Appliance.................................................................................................................23
4.4 Optional Heat Transfer Kit............................................................................................................23
4.5 Air Filter........................................................................................................................................24
4.6 Optional Decorative Tile Kit.........................................................................................................24
4.7 Optional Door Trim Kit.................................................................................................................25
4.8 Room Sensor Installation..............................................................................................................25
Operation......................................................................................................................................................26
5.0 Operating Instructions.......................................................................................................................26
5.1 Fuel Specifications........................................................................................................................26
-7-

5.2 General Operating Information.....................................................................................................26
5.3 ESP (Exhaust Sensing Probe).......................................................................................................26
5.4 Circuit Board.................................................................................................................................27
5.4.a Circuit Board General Information.......................................................................................27
5.4.b Status Light Error Messages.................................................................................................27
5.4.c Circuit Board Dipswitches:...................................................................................................27
5.4.d Feed Rate Adjustment...........................................................................................................28
5.4.e Mode Selection......................................................................................................................28
5.4.f Temperature Dial....................................................................................................................28
5.4.g Blower Speed Adjustment.....................................................................................................28
5.5 Before Your First Fire...................................................................................................................28
5.6 Starting Your First Fire..................................................................................................................28
5.7 Fire Characteristics............................................................................................................................29
Troubleshooting............................................................................................................................................30
Service & Maintenance................................................................................................................................31
6.0 Service Life Expectations..................................................................................................................31
6.1 Shutdown Procedure.....................................................................................................................31
6.2 Quick Reference Maintenance Chart............................................................................................31
6.3 Maintenance Procedures...............................................................................................................32
6.3.a Ash Removal.........................................................................................................................32
6.3.b Heat Exchanger Chain Scraper..............................................................................................32
6.3.c Fines Tray Emptying.............................................................................................................33
6.3.d Door Glass.............................................................................................................................33
6.3.e Air Filter................................................................................................................................34
6.3.f Hopper....................................................................................................................................34
6.3.g Firebox..................................................................................................................................34
6.3.g Chimney Connector...............................................................................................................34
6.3.h Chimney................................................................................................................................34
6.4 Specific Maintenance Items..........................................................................................................35
6.4.a Feed Motor............................................................................................................................35
6.4.b Blower Motor........................................................................................................................35
6.4.c Distribution Blower...............................................................................................................36
6.4.d ESP – Exhaust Sensing Probe...............................................................................................36
6.4.e Fines Scraper – in Feeder......................................................................................................36
Reference Materials......................................................................................................................................37
7.0 Service Parts-1...................................................................................................................................38
7.0 Service Parts-2...................................................................................................................................39
7.0 Service Parts-3...................................................................................................................................40
7.0 Service Parts-4...................................................................................................................................41
7.0 Service Parts-5...................................................................................................................................42
Service and Maintenance Log......................................................................................................................45
Service and Maintenance Log......................................................................................................................46
-8-

Listing and Code Approvals
A. Appliance Certification
Model: Super Magnum Coal Stoker
Laboratory: OMNI-Test Laboratories, Inc
Report No. 0536CS004S
Type: Solid Fuel Room Heater / Coal Burning Type
Standard(s) UL 1482-2011, UL 391-2010, ULC S627-00
This appliance is also approved for installation in a shop
B. Mobile Home Approved
This appliance is approved for Installation in mobile/ manufactured homes in the US only. The structural integrity of the mobile home ?
oor, ceiling and walls must be maintained. The appliance must be properly grounded to the frame of the mobile home, and must never
be installed in a room designated for sleeping. The unit must have provisions for an outside air source when installed in a mobile home.
C. Glass Specifications
This appliance is equipped with 5mm ceramic glass. Replace glass only with 5mm ceramic glass. Please contact your dealer for
replacement glass if needed.
D. Electrical Rating
115 VAC, 60 Hz, 3.1 Amps
E. BTU & Efficiency Specifications
Particulate Emissions Rating: Not Tested
*BTU Input: 5,000 – 103,000 / hr
Heating Capacity: 2,500 sq ft or more
Hopper Capacity: 110 lbs
Fuel: Anthracite Rice Coal
Shipping Weight: 543 lbs
-9-

Special Warnings and Notices
1.0 Some things to keep in mind
1.1 CARBON MONOXIDE
Carbon monoxide, referred to as CO, is a colorless, odorless gas that is produced during combustion of coal and other fuels. CO fumes
are toxic and can be fatal.
• The Super-Magnum is a natural draft system which relies on a properly designed chimney to remove CO and other
combustion by-products from the stove.
• Even though this stove is designed to be as safe as possible, it is important that you install a CO detector. This is true for oil,
gas, or wood burning products as well.
• CO is not specifically heavier or lighter than air. Therefore, it is best to install the detector at table top level rather than on the
ceiling like a smoke detector.
• CO detectors are very sensitive and may sound an alarm for fumes other than CO or CO from sources other than the stove
such as car or lawn mower exhaust.
If the alarm sounds:
• Increase ventilation by opening windows or doors.
• Make sure the stove doors and hopper lid are closed and latched.
• Check stove for electrical power and normal operation.
• Check chimney for possible blockage or down-draft.
• Check for false alarm.
NEVER SLEEP IN THE SAME ROOM WITH ANY COAL BURNING STOVE!
1.2 WET COAL
Freshly delivered coal is often watered down to eliminate dust when loading and unloading. Wet rice coal does not flow as well as dry
coal. We do not recommend burning wet coal; however, we realize if it's the only coal you have, it is better to burn it than to be cold. If
you must burn wet coal, the feed rate will likely need increased. Doing this once or twice a year will not damage your stove as long as it
is hot and burning. Damage is caused when the hopper is left with wet coal in it while the stove is cold. This will cause rust and
corrosion and it is totally the operator’s fault. After the coal dries for three or four days, depending on conditions, it will flow and feed
properly.
1.3 PREVENT RUST AND CORROSION
Always empty the hopper when not burning for more than a week. When left standing for long periods with wet coal, the feed system
will rust and corrode, causing it to seize. If the stoker is then turned "on", damage to the pusher assembly and feed motor could result.
This will be considered neglect and will void the warranty on those parts. Always check to see that moving parts are free before using, if
the unit has not been burned for a period of time. This can best be determined by running a "Test" cycle and watching the cam block
and pusher arm inside the right rear door.
NEVER USE GASOLINE, LANTERN FUEL, KEROSENE, CHARCOAL LIGHTER FLUID, OR SIMILAR LIQUIDS TO START OR
“FRESHEN UP” A FIRE IN THIS HEATER. KEEP ALL SUCH LIQUIDS WELL AWAY FROM THE HEATER WHILE IT IS IN USE.
SPECIAL NOTE: DUE TO ASH BUILDUP, IT IS STRONGLY RECOMMENDEDTO HAVE YOUR STOVE PROFESSIONALLY
CLEANED AND SERVICED ANNUALLY. THIS INCLUDES ALL PARTS OF THE STOVE, AND THE VENTING SYSTEM.
NEVER CONNECT THIS UNIT TO A CHIMNEY FLUE SERVING ANOTHER APPLIANCE.
Installation and repair of this stove should be done by a qualified service person. We recommend that the stove be inspected before use
and at least annually by a qualified service person. Periodic cleaning is required throughout the heating season and at the end of each
winter for the stove to work efficiently.
-10-

First Steps
2.0 Getting Started
2.1 APPLIANCE LOCATION
Consideration must be given to safety, convenience, traffic flow, and the fact that the appliance will need a chimney and chimney
connector. It is a good idea to plan your installation on paper, using exact measurements for clearances and floor protection, before
actually beginning the installation.
Maintain specified vent clearance to combustible requirements listed by the vent manufacturers instructions and all clearance to
combustibles listed in this manual.
Check with your local building code agency before you begin your installation. Be sure local codes do not supersede UL specifications
and always obtain the required permit so that insurance protection benefits cannot be unexpectedly canceled. If any assistance is
required during installation, please contact your dealer.
We recommend that a qualified building inspector and your insurance company representative review your plans before and after the
installation.
2.2 ROOM SENSOR LOCATION
The room sensor's location will have some effect on the appliance's operation. When the sensor is located close to the appliance, it may
require a higher setting to keep the rest of the house comfortable. If the sensor is located in an adjacent room, or farther away from the
stove, you will notice higher temperatures near the appliance.
DO NOT OPERATE BEFORE READING AND UNDERSTANDING THE INSTRUCTIONS.
2.3 FIRE SAFETY
Maintain the designated clearances to combustibles. Insulation must not touch the chimney. You must maintain the designated air
space around the chimney. This space around a chimney is necessary to allow natural heat removal from the area. Insulation in this
space will cause a heat buildup, which may ignite wood framing.
NOTE: Clearances may only be reduced by means approved by the regulatory authority having jurisdiction.
To provide reasonable fire safety, the following should be given serious consideration:
• Install at least one smoke detector on each floor of your home. Detectors should be located away from the heating appliance
and close to sleeping areas. Follow the smoke detector manufacturer's placement and installation instructions, and be sure to
maintain regularly.
• Maintain a conveniently located Class A fire extinguisher to contend with small fires resulting from burning embers.
• Have a practiced evacuation plan, consisting of at least two escape routes.
• Form a plan to deal with a hopper fire as follows:
• In the event of a hopper fire:
✔ Evacuate the house immediately.
✔ Notify Fire Department.
-11-
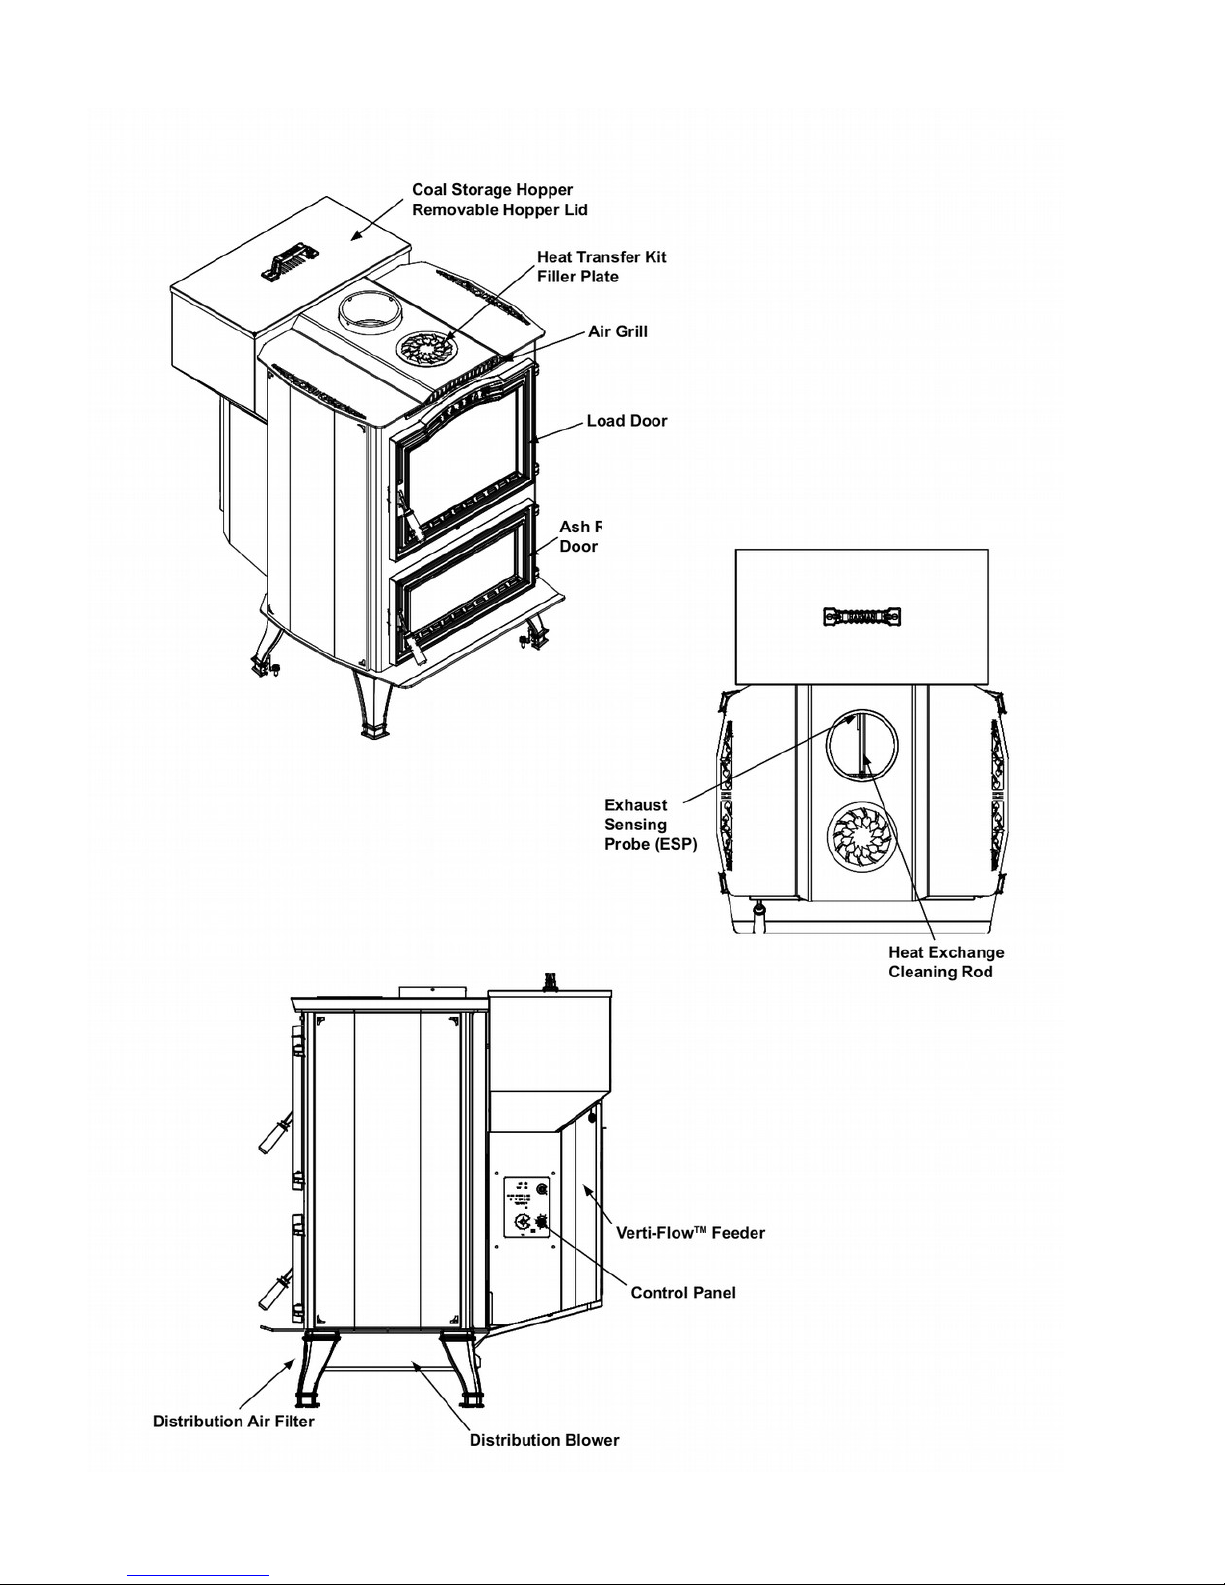
2.4 COMPONENT LOCATIONS
-12-
2.5 PRE-USE CHECK LIST
Place the appliance in a location near the final installation and
follow the procedures below:
1. Open the appliance and remove all articles packed inside.
Inspect all items for shipping damage. Notify dealer of
any missing or damaged goods.
2. All safety warnings have been read and followed
precisely.
3. This Owner's Manual has been read in its entirety.
4. Floor protection requirements have been read and
followed.
5. The flue connector has been installed in accordance with
the instructions herein.
WARNING!
Inspect appliance and
components for damage.
Damaged parts may impair safe
operation.
• Do NOT install damaged components.
• Do NOT install incomplete
components.
• Do NOT install substitute components.
• Report damaged parts to dealer.
6. The proper clearances from the appliance and chimney
connector to combustibles have been met.
7. The masonry chimney has been cleaned and inspected by
a professional.
8. The chimney meets the minimum height requirements.
9. All labels and hang tags have been removed from the
glass.
10. All plated surfaces have been wiped clean as applicable.
11. The room sensor and any additional cable has been
installed properly.
12. A properly grounded electrical receptacle is available
within reach of the unit's power cord.
WARNING!
Fire Risk: Alternate Heating
Systems disclaims any
responsibility for, and the
warranty will be voided by, the following
actions:
• Installation and use of any damaged
appliance.
• Modification of the appliance.
• Installation other than as instructed by
Alternate Heating Systems.
• Operating appliance without fully
assembling all components.
• Operating appliance without legs
attached.
• Overfiring.
• Any action that may cause a fire
hazard.
-13-

2.6 DIMENSIONS
-14-
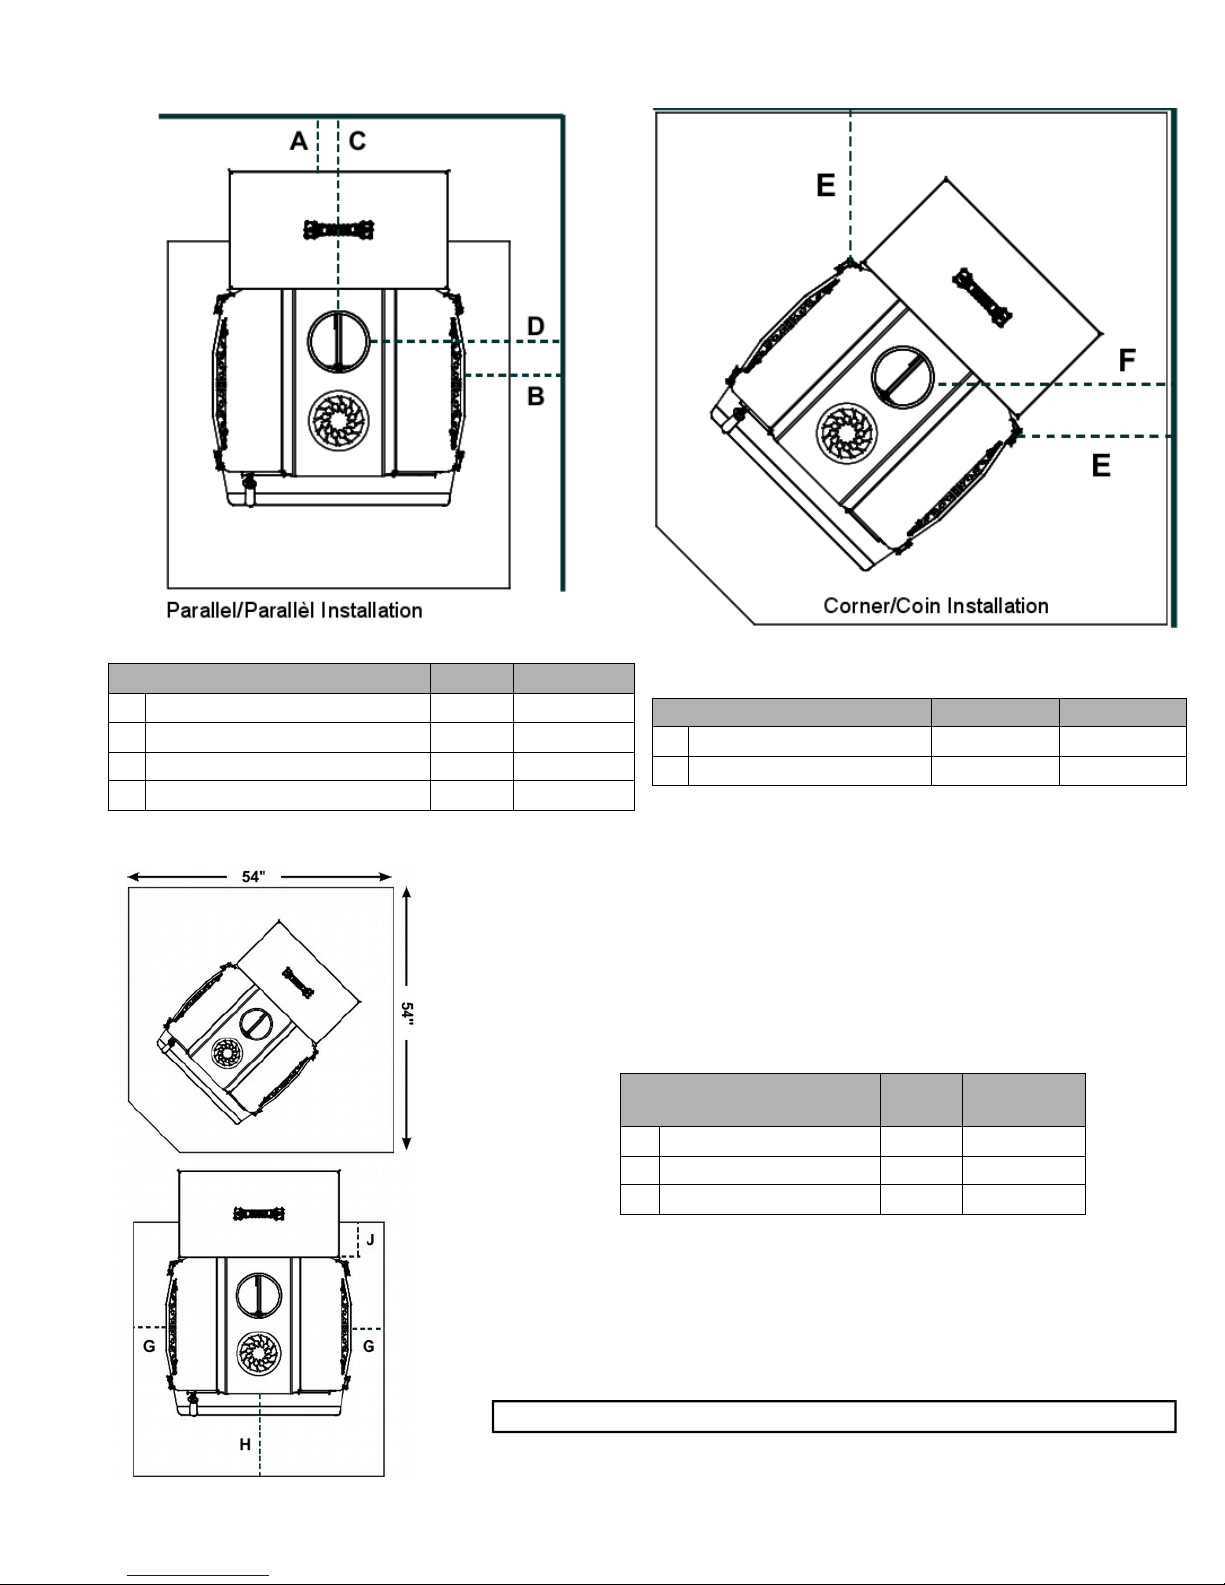
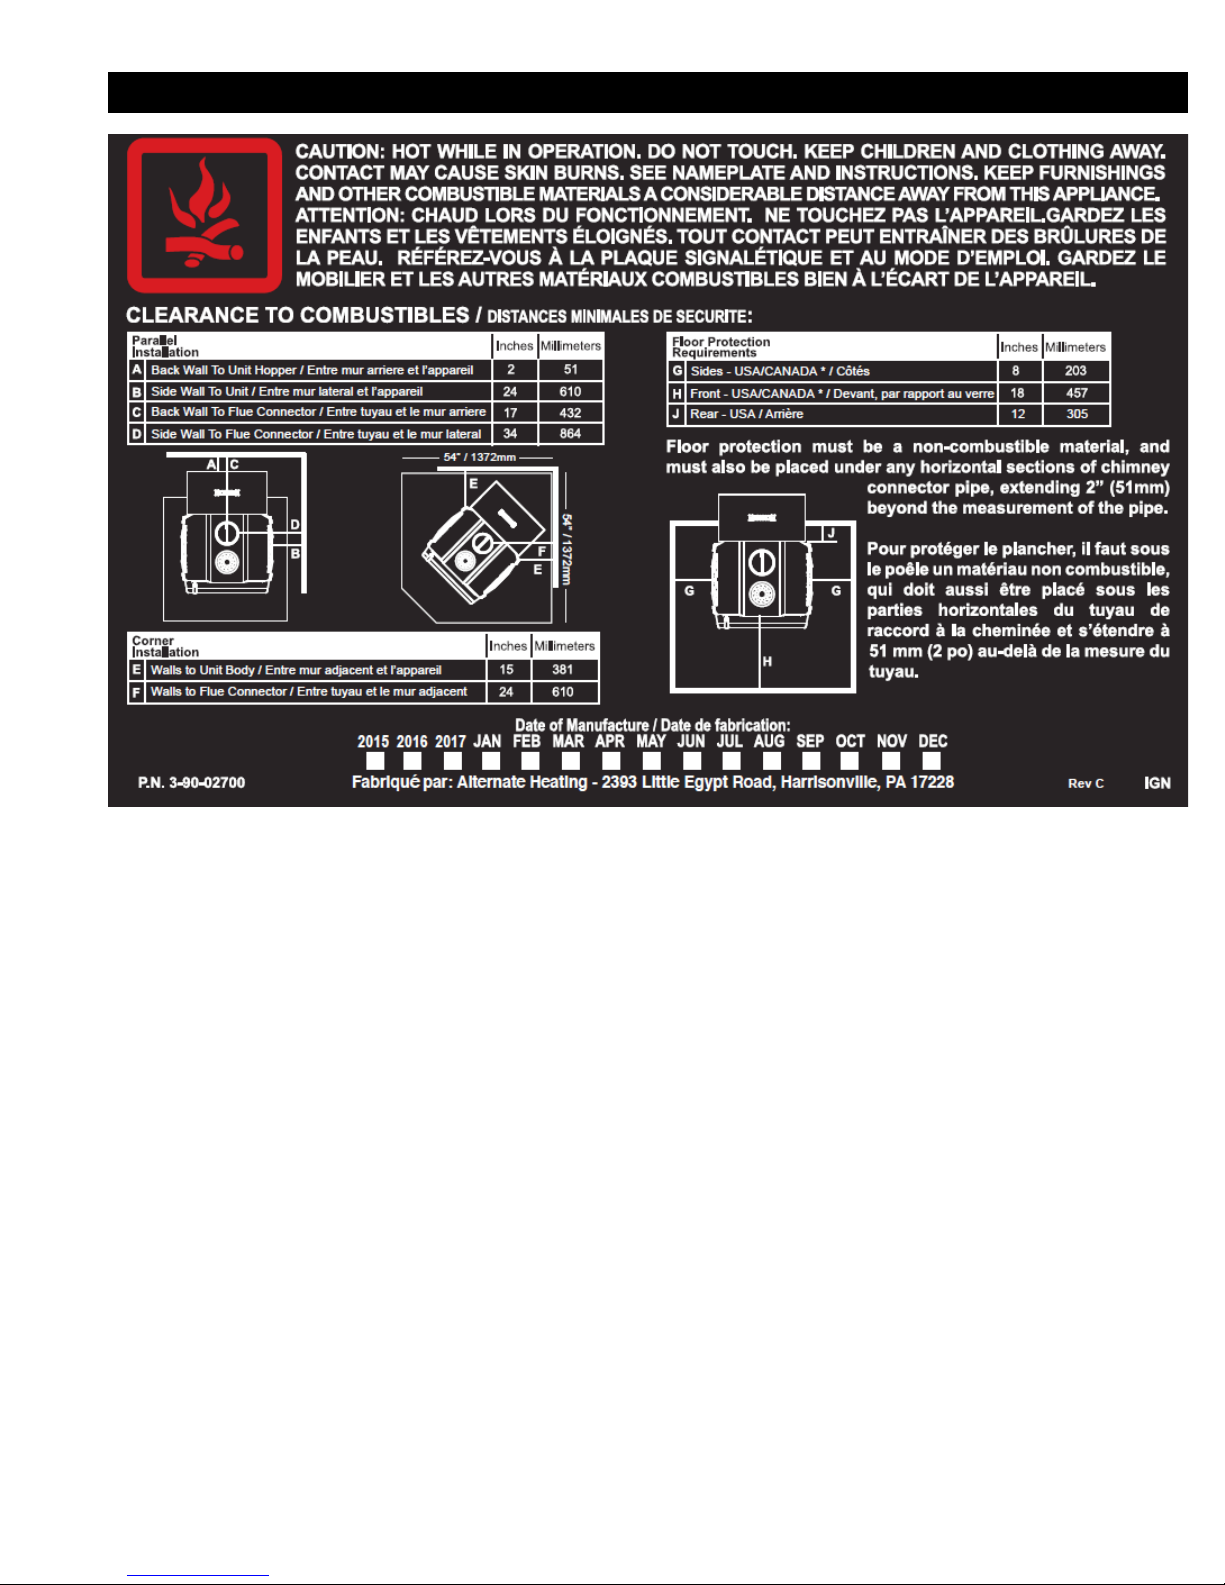
2.7 CLEARANCES
Parallel Installation
Inches Millimeters
A
Back Wall to Unit (Hopper)
2 51
B
Side Wall to unit
24 610
C
Back Wall to Flue Connector
17 432
D
Side Wall to Flue Connector
34 864
Corner Installation
Pouces Millimeters
E
Walls to Unit Body
15 381
F
Walls to Flue Connector
24 610
Inches Millimeters
G
Sides – USA/Canada*
8 203
H
Front – USA/Canada*
18 457
J
Rear – USA
12 305
Floor Protection
Requirements
2.8 FLOOR PROTECTION REQUIREMENTS
Floor protection must be of a non-combustible material. It must be located
under the appliance and extend beyond the appliance according to the
measurements below. Floor protection must also extend under any horizontal
sections of chimney connector and 2" (50.8mm) beyond each side of the
connector.
DANGER: The appliance legs may not be removed for installation.
Minimum Size floor protection is 49½" Deep By 42¾" Wide.
Alternate floor protector dimension may be used as long as they satisfy the
measurement requirements shown above.
Minimum size floor protection for a corner installation hearth pad is 54" x 54"
(USA ONLY).
CAUTION! DO NOT STORE FUEL INSIDE INSTALLATION CLEARANCES!
-15-
 Loading...