

Page 1

Wireless Cloud Camera
Quick Installation Guide
Website: www.lefunsmart.com
E-mail: [email protected]
Note: Due to the continuous updating of the product and software,
there may be a discrepancy between the operating guide and the
APP interface. All the instructions are subject to the actual
operation interface.
Page 2

Page 3

Table of Contents
Important Safeguards and Warnings
Welcome
Important Security Warning
5.1 Tab 1: Add Device Button
4.1.1 Download the MIPC
4.1.2 Sign Up an Account
4.1 Download and Sign Up the MIPC
4.2 Wi-Fi Setup on Mobile
4.3 Wired Setup on Mobile
4.4 Local Web Access Setup
3.1 Connection Guide
3.2 Installation Guide
1. Features and Specification
2. Device Overview
3. Connection & Installation
4. Camera Access Setup
5. Operation on Main Interface
1.1 Overview
1.2 Features
1
1
2
4
4
4
6
7
7
7
7
8
8
8
9
14
14
15
15
Page 4

6.1 Tab 1: Playback and Device Settings
6.1.1 Playback
6.1.2 Device Settings
6.2 Tab 2: Data Rate
6.3 Tab 3: Resolution
6.4 Tab 4: Record, Snapshot, Mic,
Speaker and Sensitivity
6.5 PTZ
5.2 Tab 2: Device List
5.3 Tab 3: Account Settings
6. Operation on Device Interface
7. Troubleshooting
8. Warranty Policy
18
18
19
21
21
21
22
16
16
17
23
25
Page 5

Welcome
Thank you for purchasing our LeFun Wireless Cloud Camera!
This user manual is designed to be a reference tool for the
installation and operation of your PT camera.
Here you can find information about the cameras features and
functions, as well as information to aid in troubleshooting.
Important Security Warning
In order to keep your LeFun W ireless Cloud Camera secure and
prevent unauthorized access, please make sure to follow the
steps below:
1
For access to the quick installation guide, go to the link:
https://bit.ly/2KJy7YD.
To get our customer support, please do one of the following:
1. Always make sure that your camera has the latest firmware as
listed on MIPC app.
2. Never use the default password for your camera. Always
ensure that your password is at least 6 characters long and
contains a combination of lowercase characters, uppercase
characters as well as numbers.
·Email LeFun Customer Support :[email protected]
·Email us via Amazon.com
1. Log in your amazon account
2. Find LeFun products on Your Orders
3. Email us
Page 6

2
2. Transportation Security
Heavy stress, violent vibrations, and excess moisture should not
occur during transportation, storage, and installation of the
device.
Handle the device with care.
Keep the device right side up.
Do not apply power to the camera before completing installation.
Do not place objects on top of the camera.
3. Installation
4. Repair Professionals
All the examination and repair work should be done by qualified
service engineers.
We are not liable for any problems caused by unauthorized
modifications or user-attempted repair.
Important Safeguards and
Warnings
All installation and operation should conform to your local
electrical safety codes. We assume no liability or responsibility
for any fires or electrical shock caused by improper handling or
installation.
1. Electrical Safety
Page 7

6. Operation and Maintenance
5. Environment
The camera should be kept in a cool, dry place away from direct
sunlight, flammable materials, explosive substances, etc.
This product should be transported, stored, and used only in the
specified environments as stated above.
Do not aim the camera at a strong light source, as it may cause
overexposure of the picture, and may affect the longevity of the
cameras sensors. Ensure that the camera is in a well ventilated
area to prevent overheating.
Do not touch the camera sensor or lens directly.
To clean dust or dirt off of the lens, use an air blower or a
microfiber cloth.
Be sure to use only the accessories recommended by
manufacturer.
Before installation, please open the package and check to
ensure that all of the components are present.
7. Accessories
Contact the seller that you purchased from if anything is broken
or missing in the package.
3
Page 8

1.Features and Specifications
1.1 Overview
The LeFun W ireless Cloud Camera is an excellent digital
surveillance product that can be useful to a wide variety of users.
The camera connects to any router launching 2.4GHz Wi-Fi, and
uses an internet connection to allow the user to access all of its
functionality from phones, tablets and computers. Its easy to
use and can be set up in a relatively small amount of time. It has
various functions such as recording, playback, and monitoring
functionality and it synchronizes audio and video by default.
1.2 Features
4
This LeFun Wireless Cloud Camera adopts RSA algorithm in
order to achieve high levels of reliability and security. It can be
configured to work locally, as well as on a network.
High Definition Resolution
HD live streaming video and playback video, having a clear view
for any angle
Pan/Tilt/Zoom Feature
Cover more ground with the feature of 350°horizontal &
100°vertical rotation
Reliable Two Way Audio
Talk and listen to your families with built-in mic and speaker
Page 9

Easy Mobile Wi-Fi Setup
Easy setup using a mobile device in 2.4G (IEEE802.11b/g/n)
Wi-Fi network
32ft Clear Night Vision
32ft clear night vision so you wont miss anything even in a dark
condition
Smart Alerts to Mobile
Receive notification to your mobile when motion is detected
Advanced Video Recording
Record and store video & photos using a mic SD card, Cloud Box
and Cloud Storage.
5
Page 10
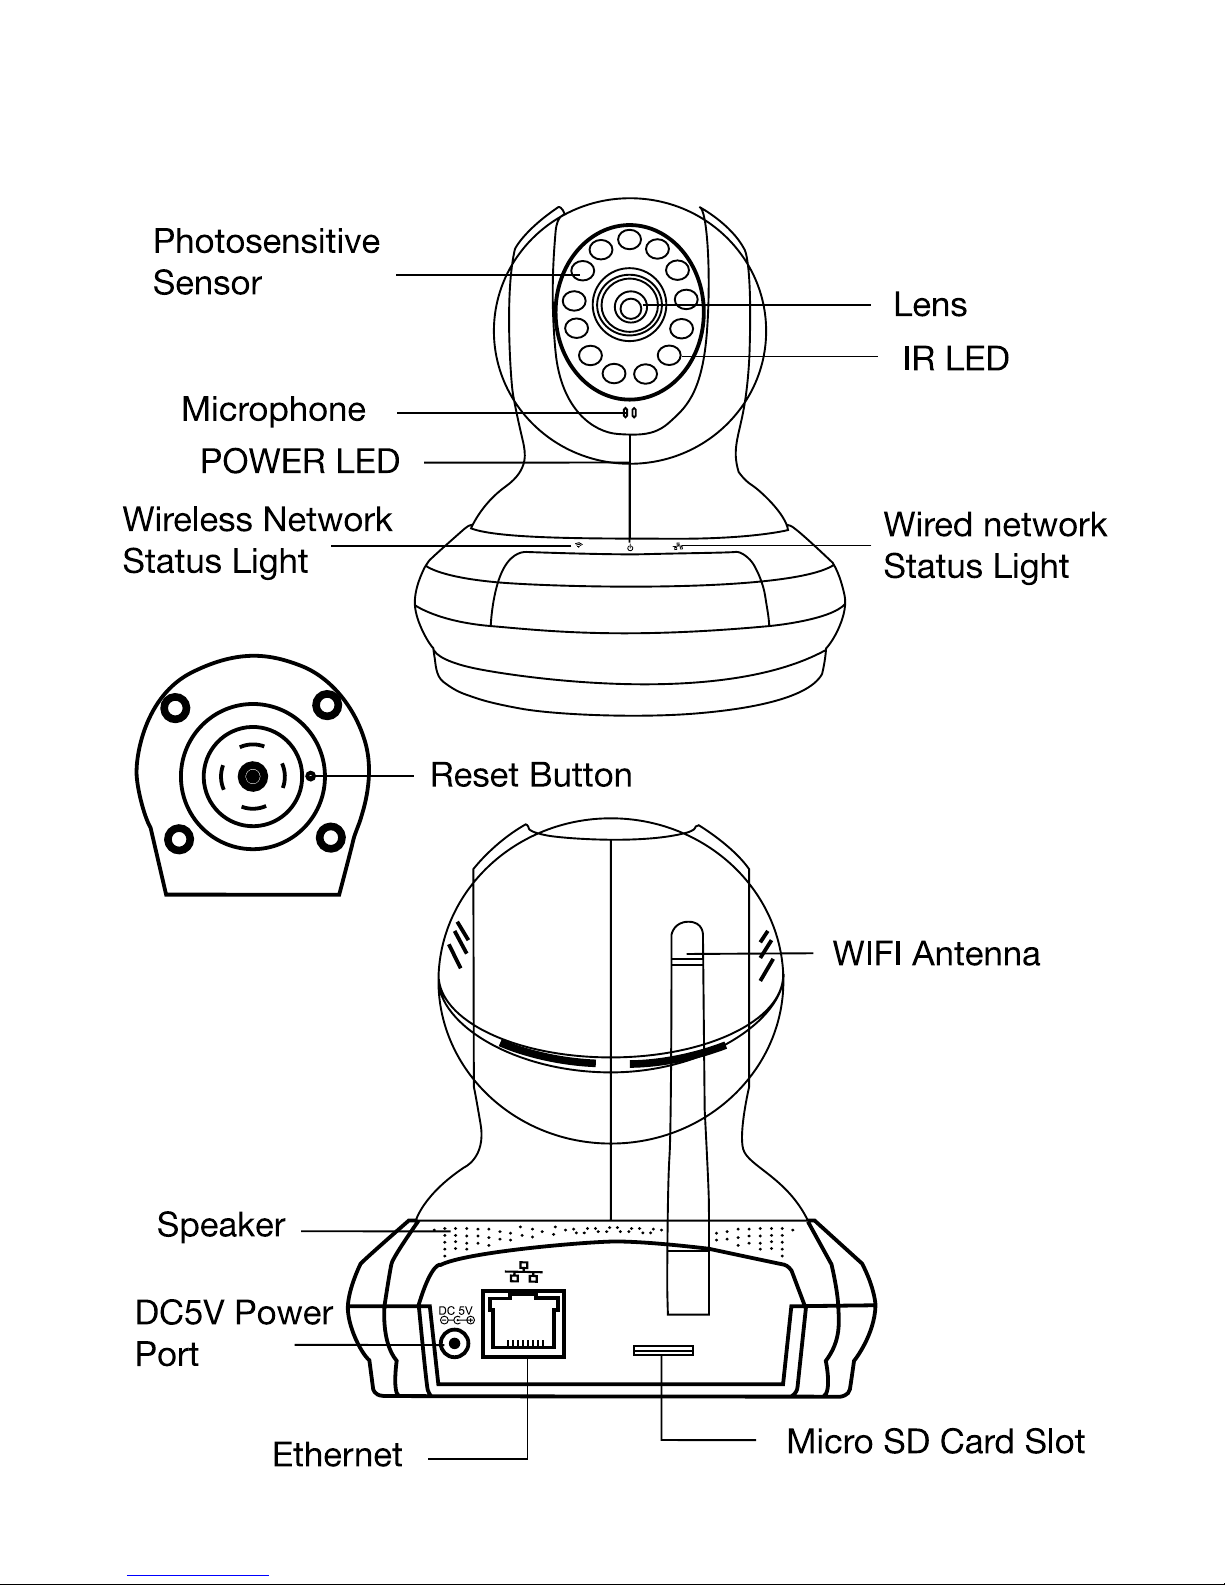
2.Device Overview
6
Page 11
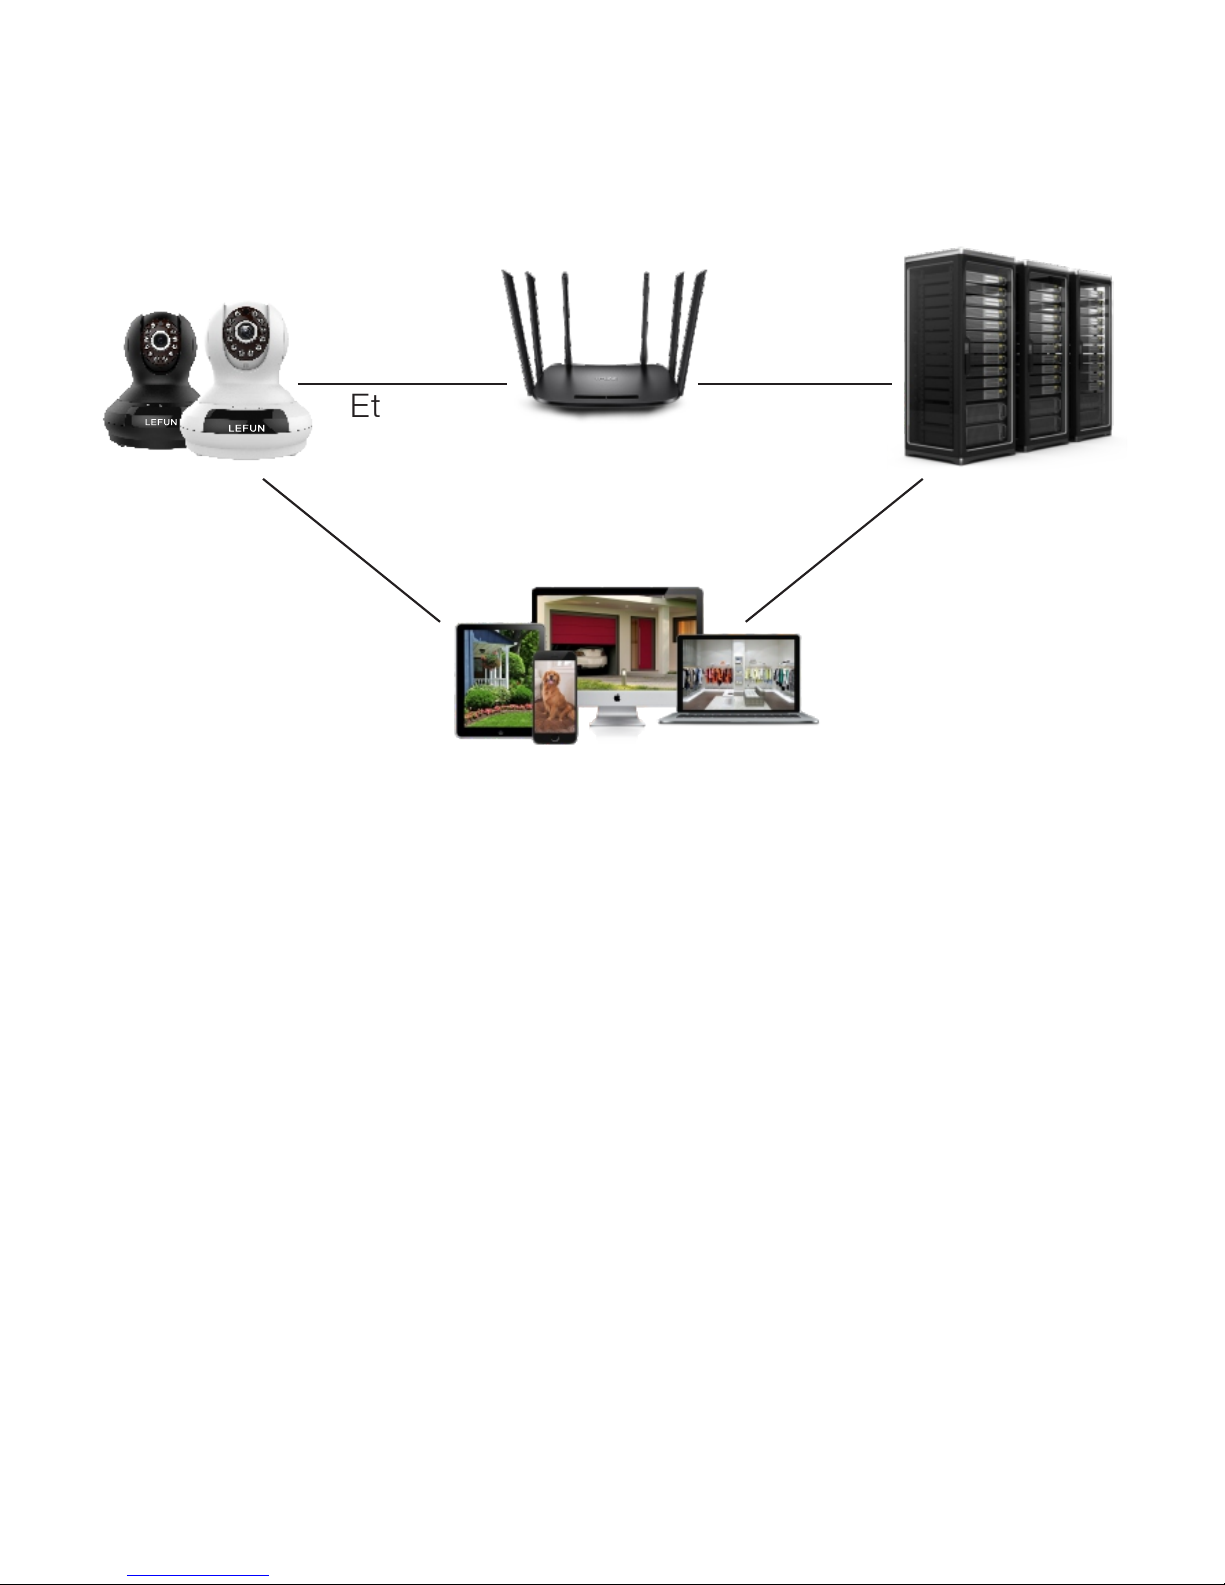
3 .Connection & Installation
3.1 Connection Guide
Camera
Router
Server(U.S.)
Wi-Fi Internet
MIPCMIPC
Phone/PC/Tablet
3.2 Installation Guide
The camera comes with a mounting bracket and two screw
packages for use in mounting the camera onto a stable surface.
4.Camera Access Setup
The section of the guide will provide the user with information on
how to setup access to the camera through any of the following
methods.
7
Note: Prior to installation ensure that the installation environment
can support at least triple weight of the camera.
Ethernet
Page 12

1. Scan the QR code with the phone to download the MIPC app.
2. Download the MIPC app from Apple App Store for iOS or
Google Play Store for Android.
4.1 .2 Sign Up an Account
For purposes of this guide, we will use iOS mobile phones.
Note: The App interface may differ slightly from the screenshots
below.
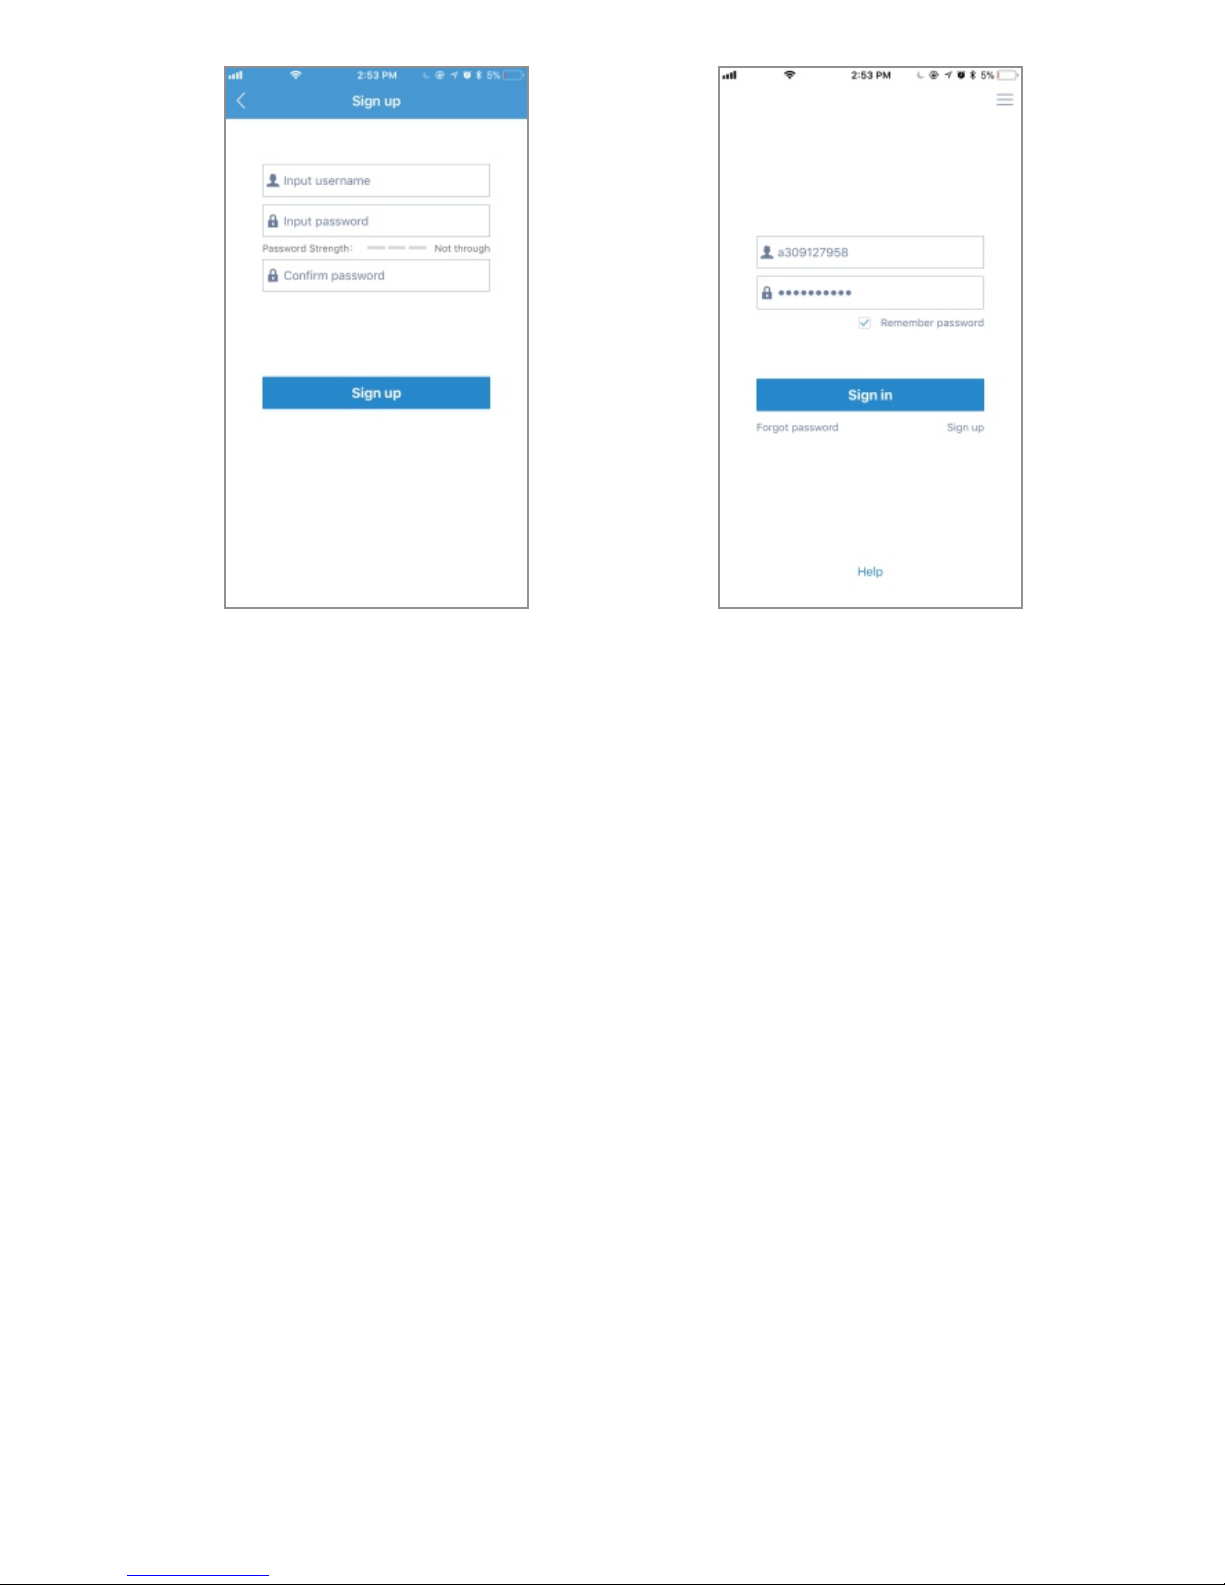
Launch the MIPC app, tap the Sign Up button at the lower right
of the landing screen to register a new account by inputting your
username and password in the sign up interface (Signup-01).
Please make sure your user name is at least 6 characters
beginning with letter.
8
4.1 Download and Sign Up the MIPC
4.1 .1 Download the MIPC
The LeFun W ireless Cloud Camera enables to access through
the use of the MIPC on iOS or Android mobile/tablets operating
systems and computer for Window operating systems.
3. PC users please download the MIPC app on the website:
www.mipcm.com.
Page 13
Signup-01 Signup-02
4.2 Wi-Fi Setup on Mobile
Before connecting to your camera, please confirm if your home
Wi-Fi network is 2.4Ghz. Meanwhile, please choose 2.4Ghz Wi-Fi
to connect your phone. Additionally, please put this camera close
to your Wi-Fi router, it will help you connect the camera with Wi-Fi
successfully.
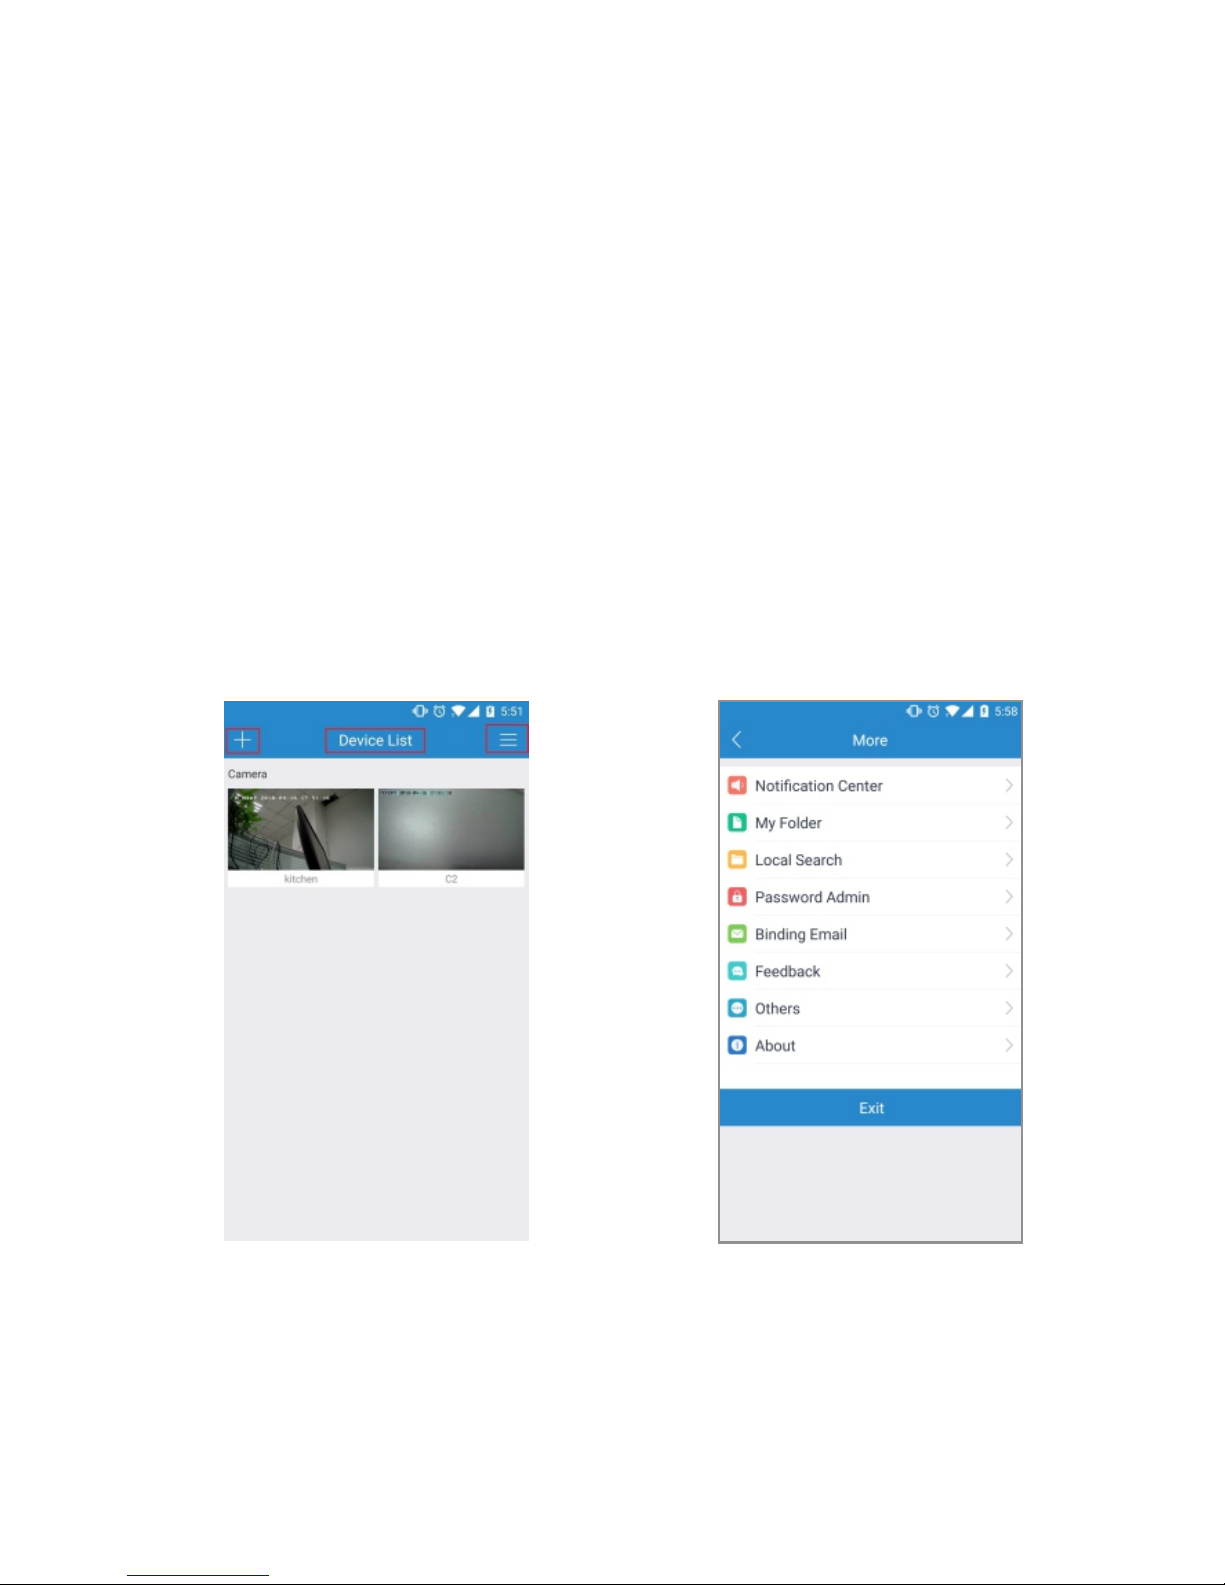
1. After logging in your MIPC account, you should be brought to
the camera list screen. You can see its initially empty because
you have not added any camera (Figure-01).
2. Select added device by clicking the plus icon at the top left
and choose the first device type PTZ Cameras(Figure-02),
which will direct you to the QR Code Scan interface.
9
Page 14
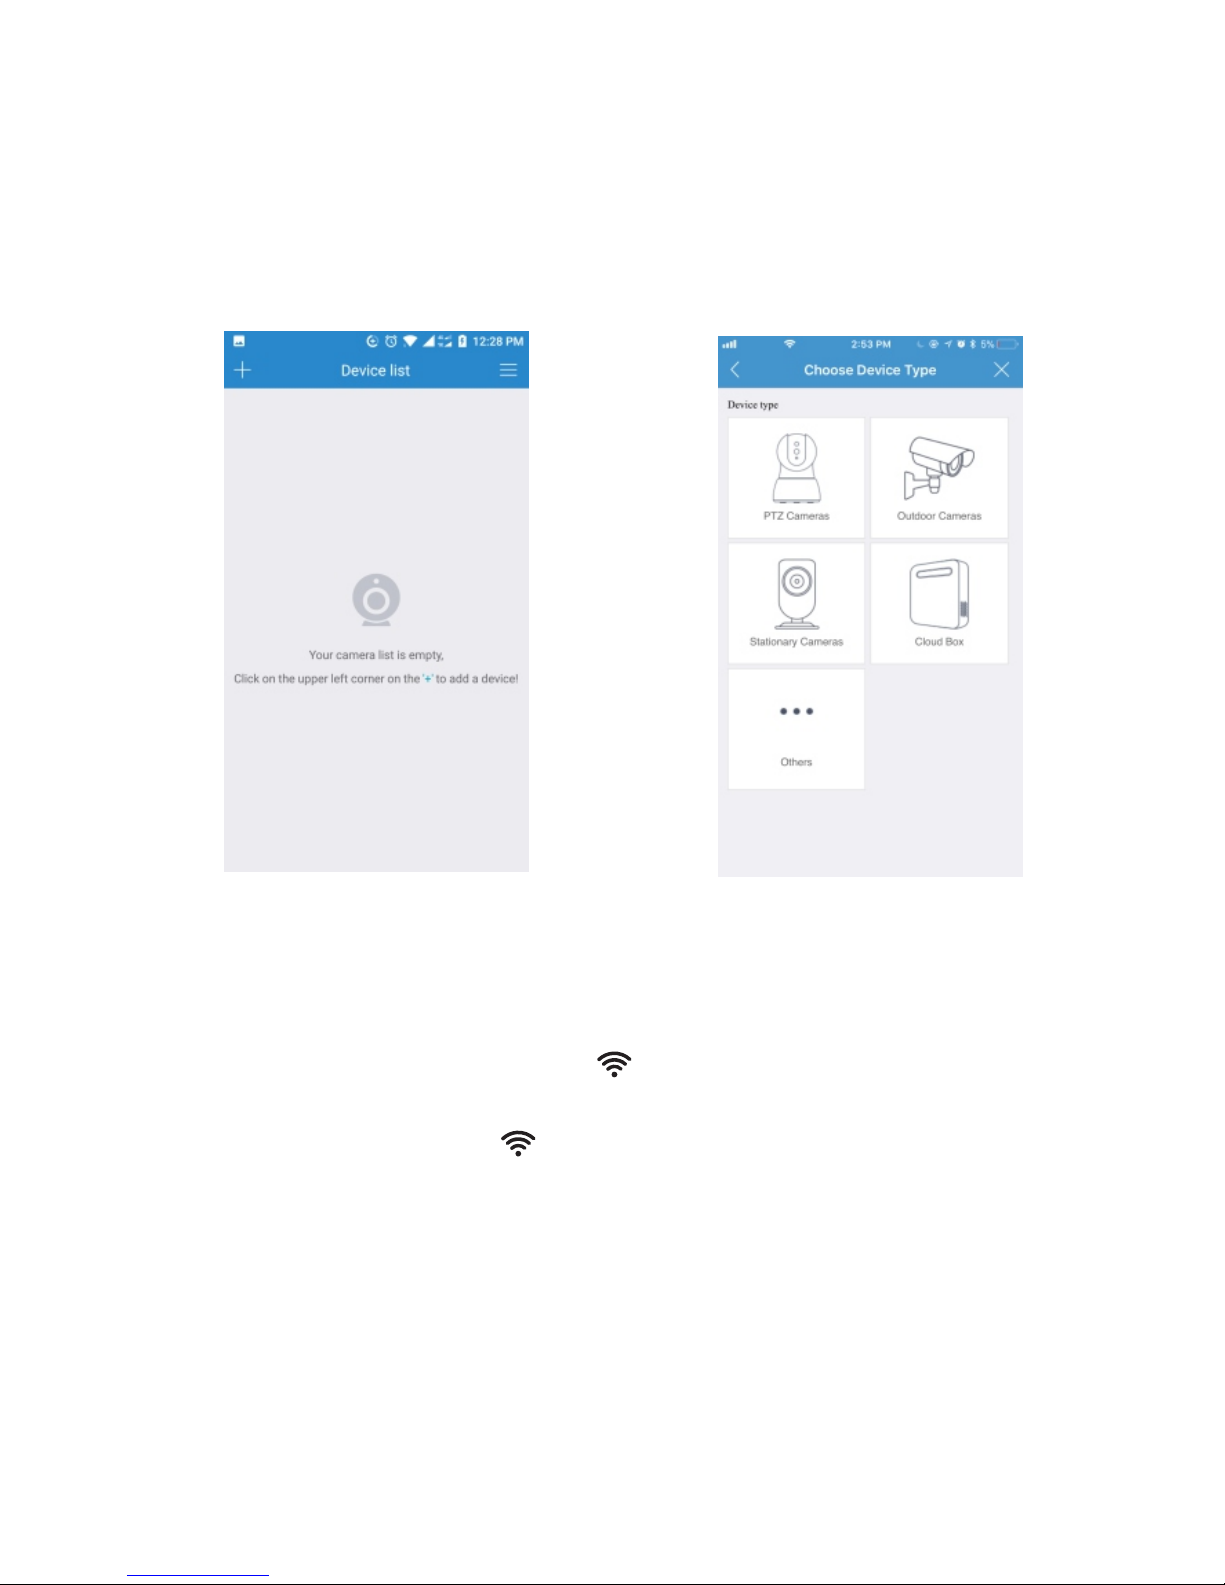
Figure-01 Figure-02
10
3. Scan the QR code at the bottom of the camera (Figure-03), a
device ID should be automatically filled in the device ID input
box (Figure-04) if it scans successfully, then tap Add. If you
got a blank screen, please add this camera on PC (4.4 Local
Web Access Setup).
5. After you choose the , you should be asked to connect
your power supply equipment (Figure-06). Plug in the power
source to power on the camera leaving the network cable
unplugged, wait for 60 seconds to allow the camera getting
ready. The camera is ready once you hear a "tick" sound after
connecting the power for 60 seconds. Then, tap Next to
enter next step.
4. Then, it will direct you to the Connection Method interface
(Figure-05). Please choose to add your camera.
Page 15
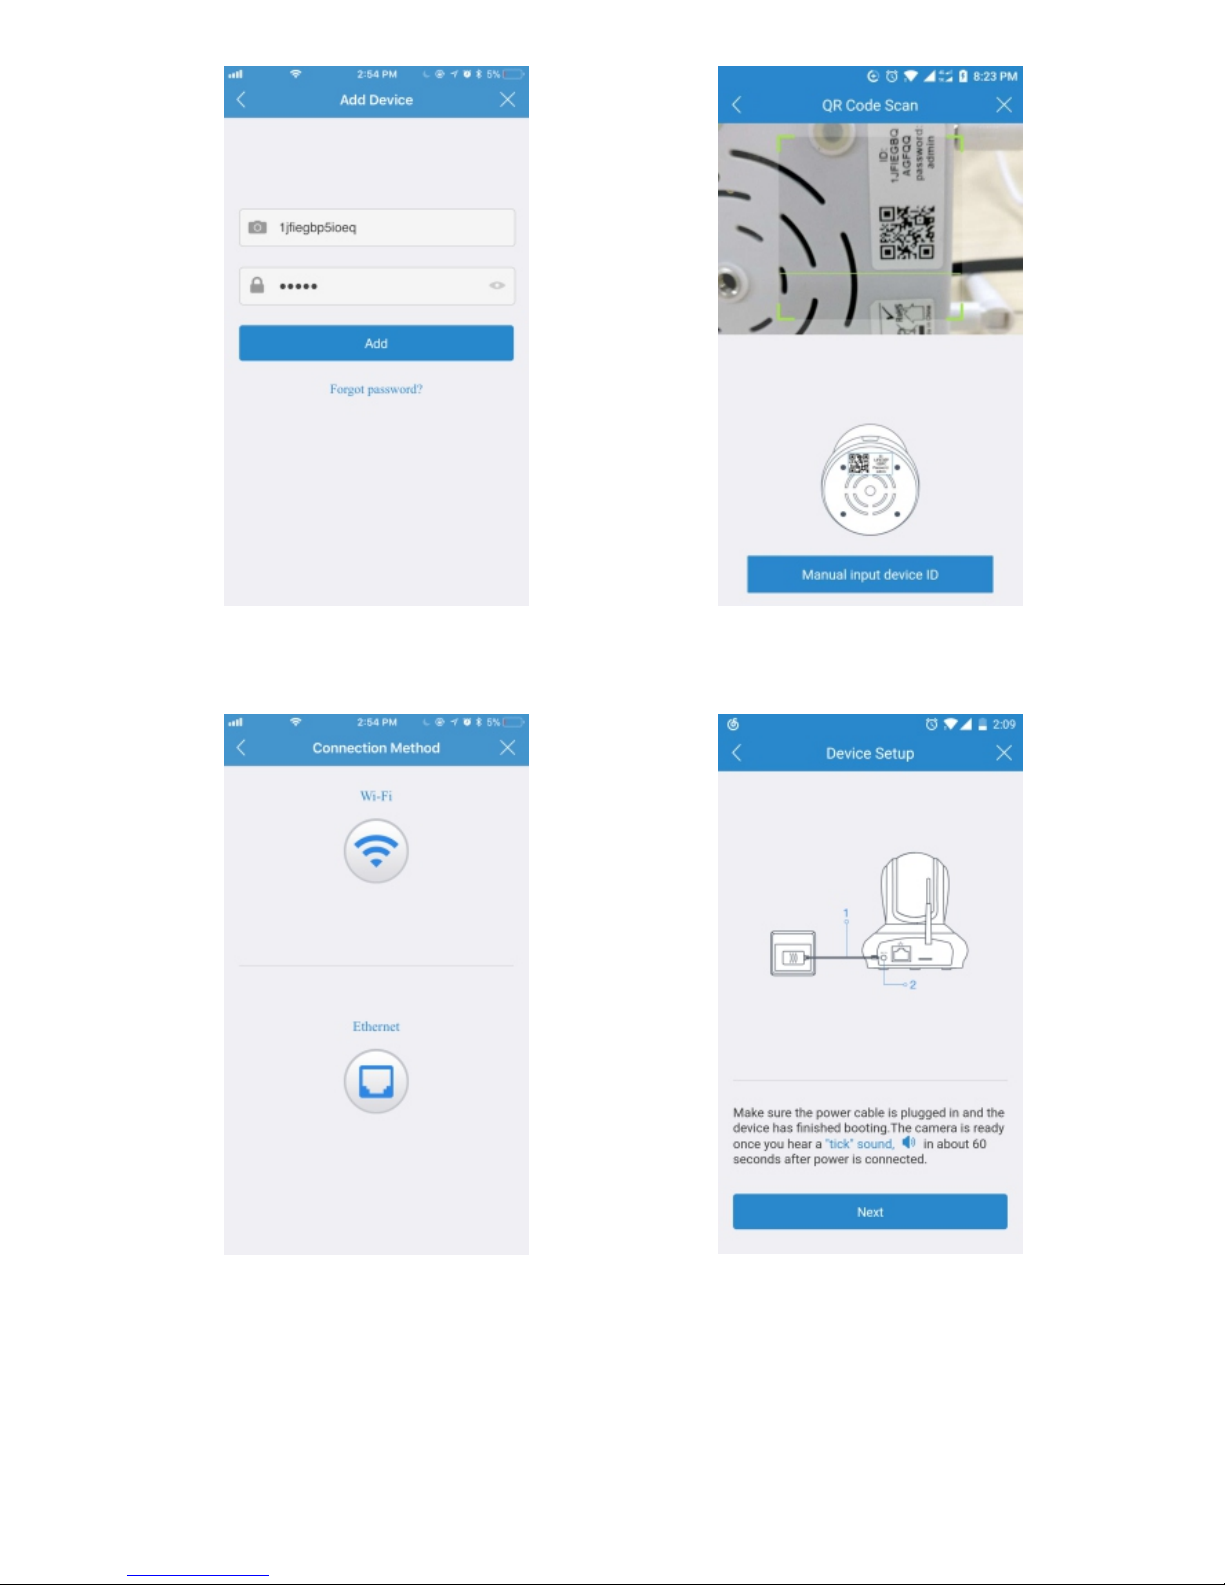
Figure-03 Figure-04
Figure-05 Figure-06
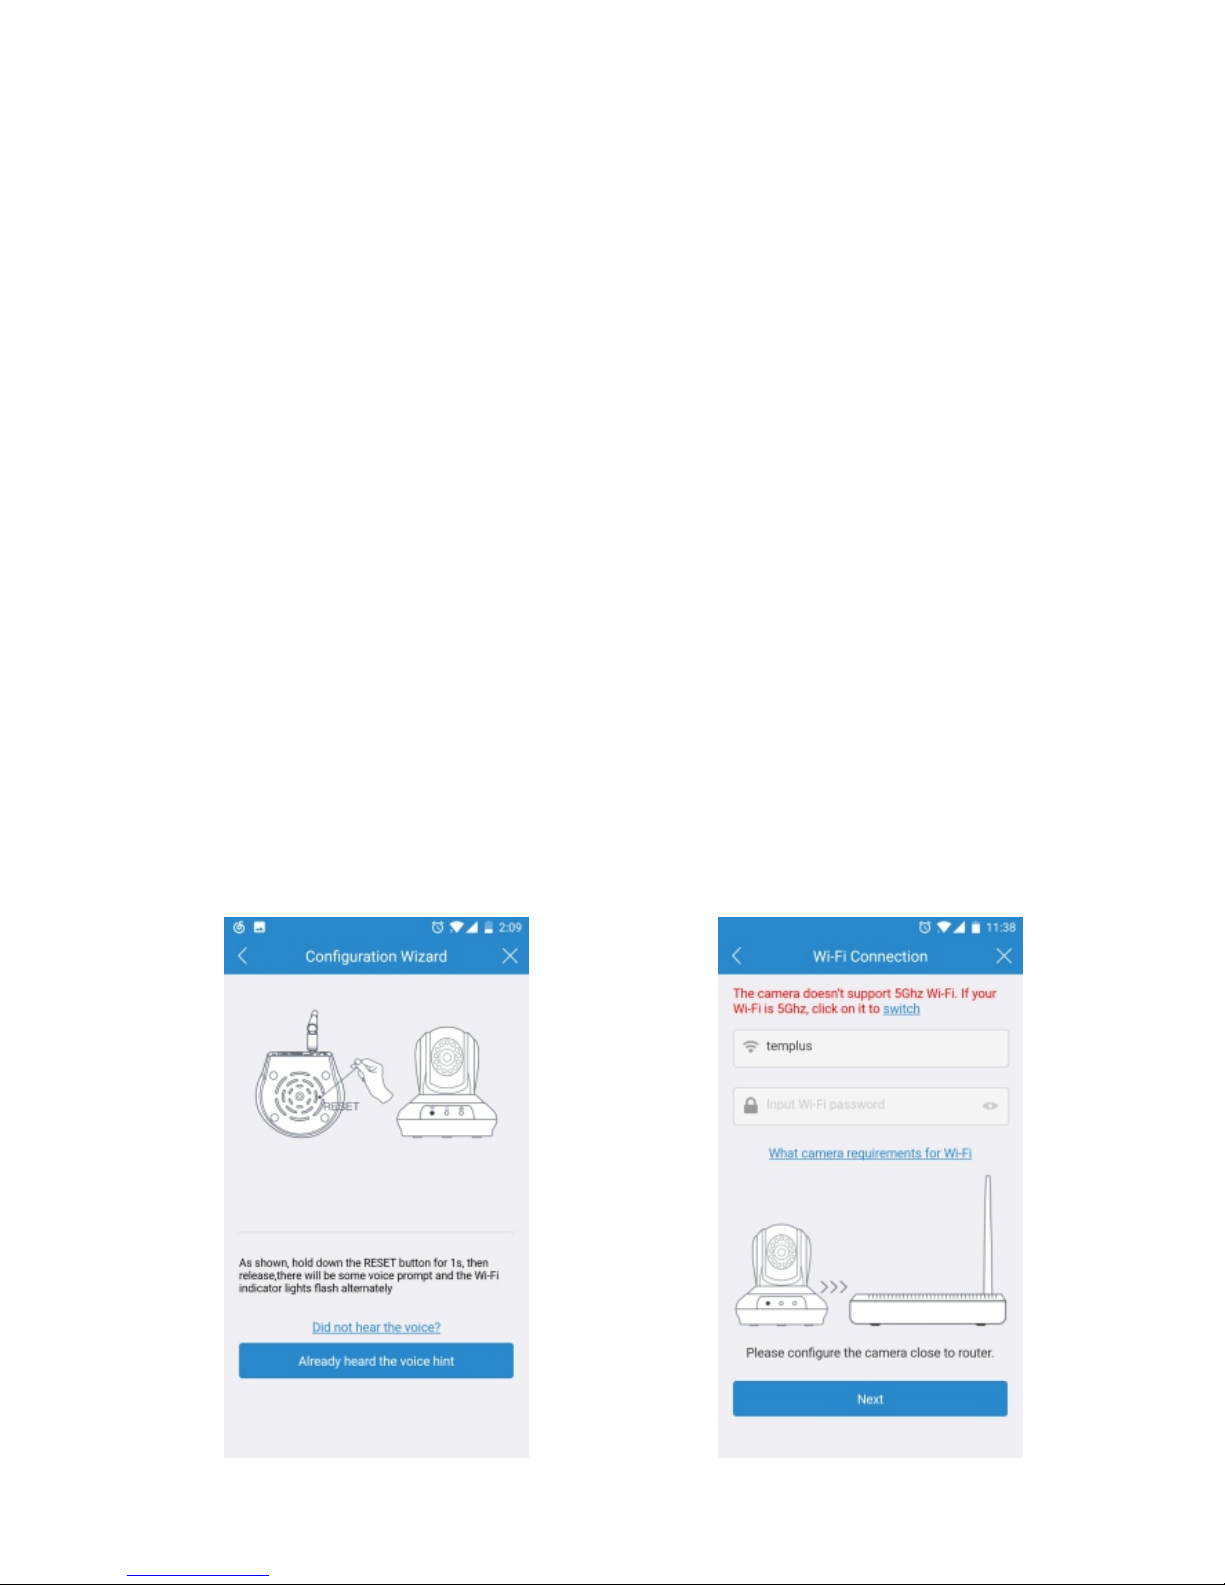
6. Please press the RESET button 1 second to release the camera.
After hearing the voice prompts (waiting for receiving wireless
configuration information), tap Next (Figure-07).
11
Page 16
8. It will direct you the connection interface (Figure-09). Please
keep your phone closer to the mic of the camera (the max
distance is 6ft).If you fail to connect Wi-Fi, please press the
RESET button 10 seconds to restore factory settings (After
pressing the reset button 10s, you would hear the voice
prompts RESTORE TO FACTORY SETTINGS
SUCCESSFULLY). Then, wait for 60s to let the camera get
ready (A tick sound will turn up after it is ready), unplug the
power adapter and follow step2-step11 to add it again.
9. After the W i-Fi connection succeeded, you should be asked to
modify your camera password (Figure-10). Please input your
new camera password and click Apply.
7. Then the W i-Fi name will automatically display. Please input
your Wi-Fi password and tap the Next (Figure-08). In order
to make the camera connect your home network successfully,
please confirm your phone has connected 2.4G Wi-Fi network
that you would like the camera to connect.
Figure-07 Figure-08
12
Page 17
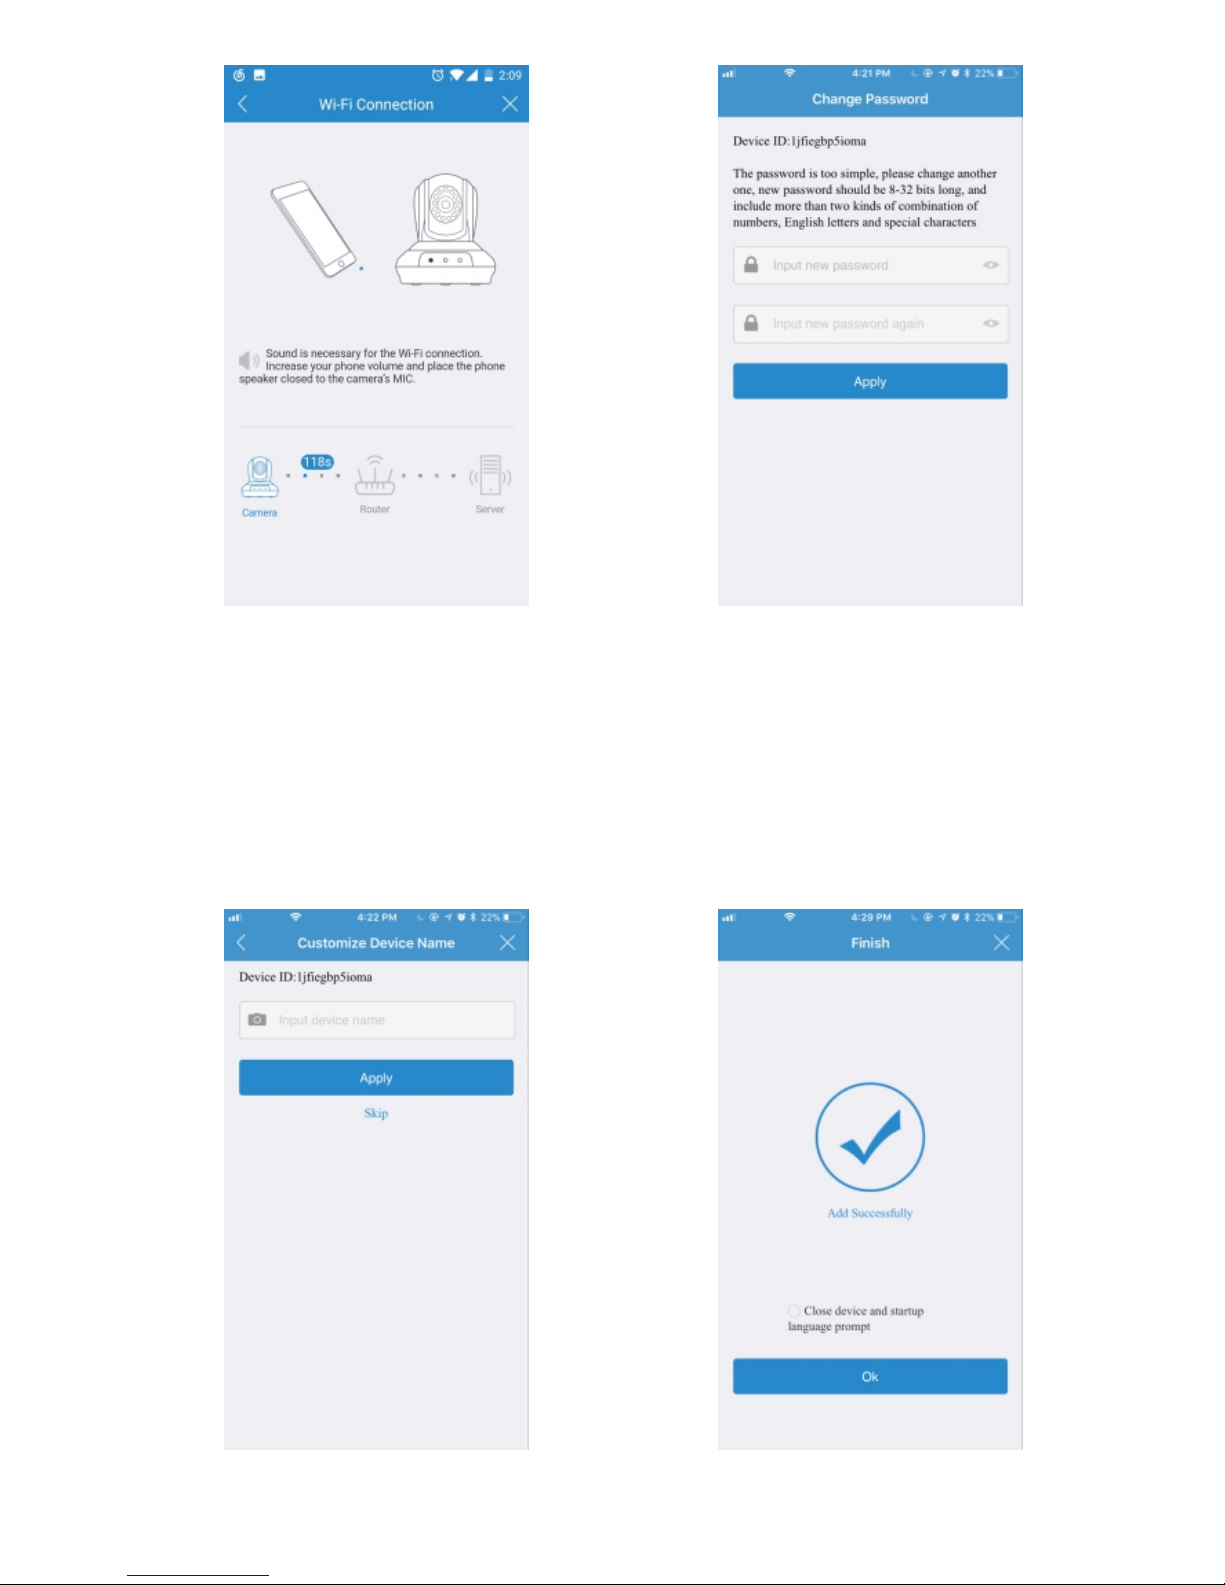
Figure-09 Figure-10
10. Please customize your camera name and choose the right
time zone (Figure 11) (you can skip this step).
11. Congratulations! You add this IP camera successfully
(Figure 12).
Figure-11 Figure-12
13
Page 18

4.3 Wired Setup on Mobile
LeFun Wireless Cloud Camera can be set up with Ethernet via
mobile devices. Using the wired access interface, the camera
can be configured.
4.4 Local Web Access Setup
14
1. Connect the camera to a power supply using the included
power adapter. Please wait for 60 seconds to allow the camera
getting ready. The camera is ready once you hear a "tick" sound.
2. Connect the camera to the internet through Ethernet
connection.
3. Using a phone, download the MIPC and install it (please refer
to 4.1.1 Download the MIPC).
4. Sign up an account (please refer to 4.1.2 Sign Up an Account),
log in and add the camera.
5. Now, the camera is successfully setup for living view and
playback. To set up Wi-Fi (optional), navigate to Settings Network-WiFi. Choose the right Wi-Fi name on Wi-Fi list, enter
your password and click the icon Apply.
LeFun Wireless Cloud Camera can be accessed via a web
browser on a PC or Mac. Using the Local Web Access interface,
the cameras advanced setting can be configured.
1. Connect the camera to a power supply using the included
power adapter. Please wait for 60 seconds to allow the camera
getting ready. The camera is ready once you hear a tick sound.
2. Connect the camera to the inter net through Ethernet
connection.
Page 19
Tab 1 Tab 2 Tab 3
Main Interface
Account Settings
5.1 Tab 1: Add Device Button
This feature allows the user to add more cameras into MIPC app
so that the user can monitor them at one app.
5.Operation on Main Interface
The Section of the manual details the apps main interface. The
Main Interface on MIPC contains 3 major tabs on the screen.
15
3. Using a PC or Mac, download the browser MIPC and install it
(www.mipcm.com).
4. Sign up an account (please refer to 4.1.2 Sign Up an Account),
log in and add the camera.
5. Now, the camera is successfully setup for living view and
playback. To set up Wi-Fi (optional), navigate to Settings Network-WiFi. Choose the right Wi-Fi name on Wi-Fi list, enter
your password and click the icon Apply.
Page 20

5.3 Tab 3: Account Settings
My Folder
This feature enables the user to store the manually
recorded video.
Notification
Center
This feature enables the user to choose the way to
notify him/her when the motion is detected. There
are two notified ways. One is sound, the other is
vibration.
Local
Search
This feature allows the user to find all cameras
connecting your Wi-Fi network when your phones,
your camera and router are in the same local area
network.
Password
Admin
This feature allows the user to reset account admin
password and set up account guest password for
his /her friends and families.
Note: If you are going to find a video recorded
manually, please find it in this function.
Note: When you could not watch live video on
camera or get a black screen even if you change
transport protocol, please search this camera on
Local Search, and check if it work normally. If not,
the camera might be somethings wrong. If yes,
there might be something wrong on external
network.
16
5.2 Tab 2: Device List
This feature enables the user to find all added camera in one app.
Note: Users can not view all live video at one screen.
Page 21
Feedback
This feature allows the user to write a feedback
about their experience after testing the app.
Others
This feature allows the user to change transport
protocol when his/her camera could not have a
picture or video.
About
This feature allows the user to check the software
version and clear cache which caused by the app.
Live View
Tab 1
Tab 2
Tab 3
Tab 4
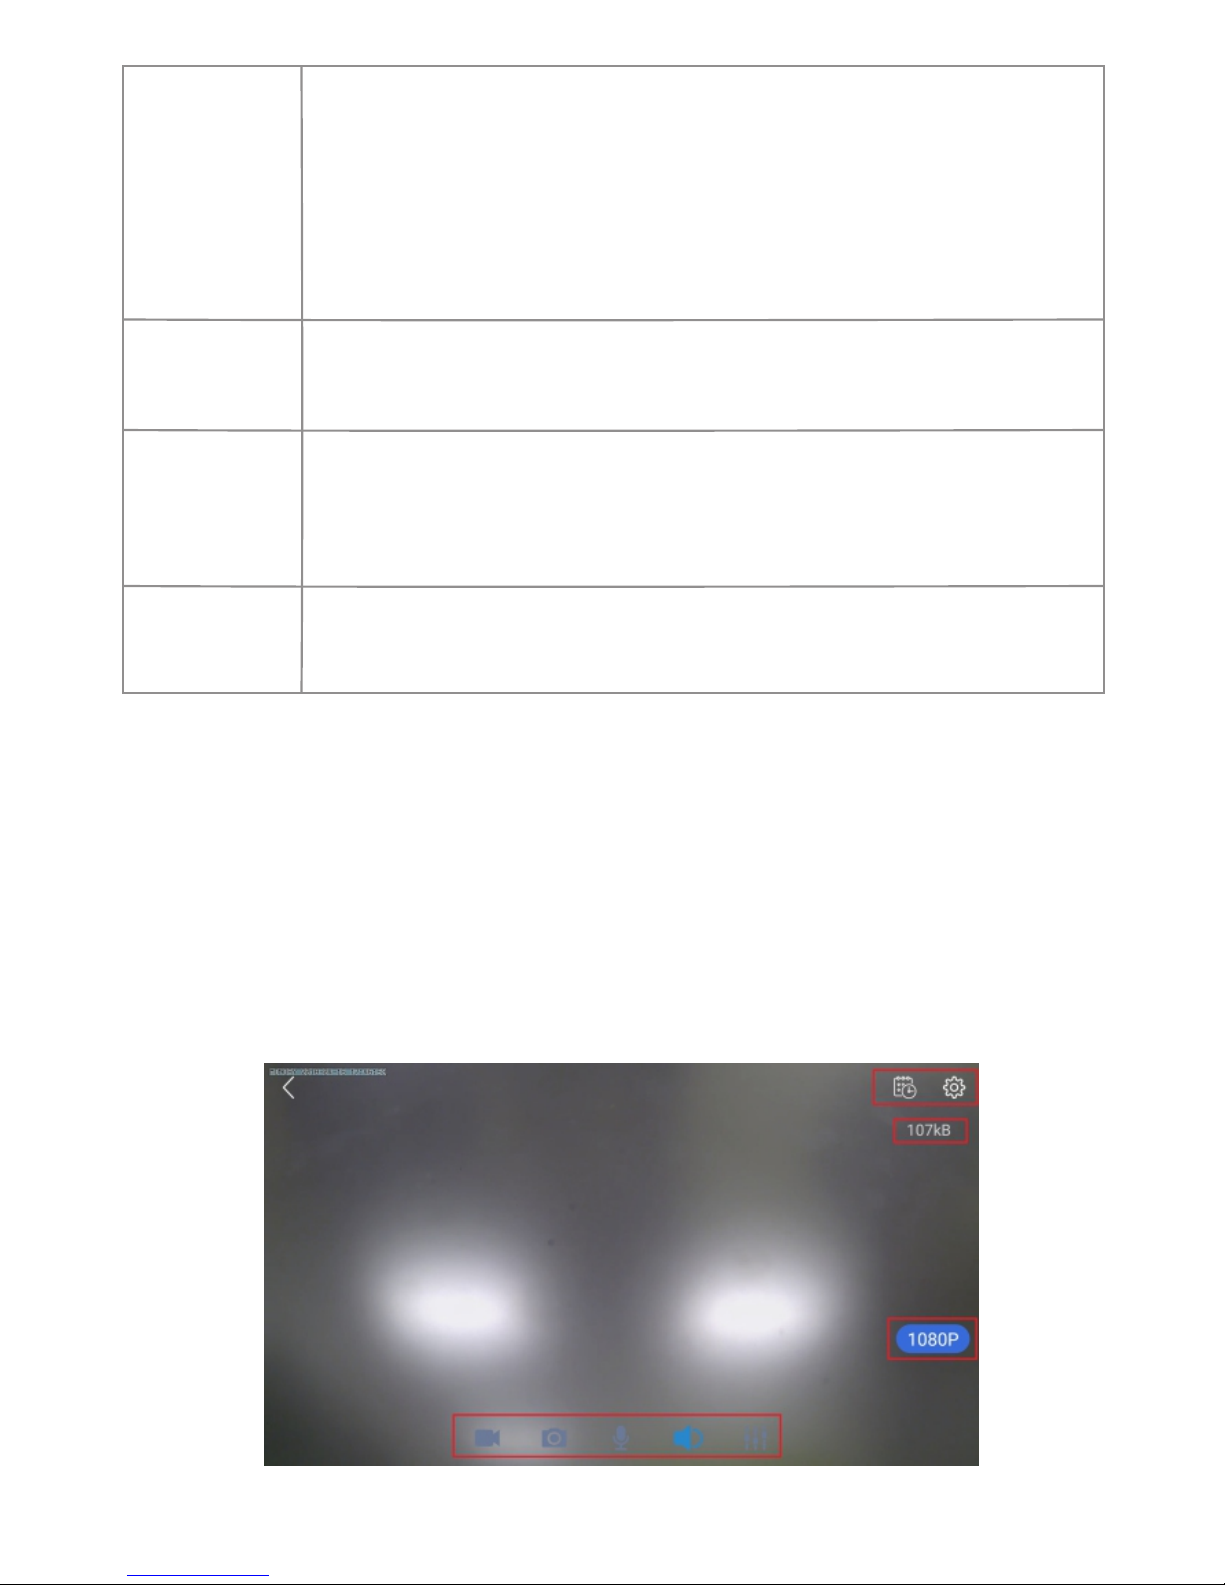
6.Operation on Device Interface
The section of the manual details the cameras interface, as well
as all of the operations the camera can perform. The Device
Interface on MIPC contains 4 major tabs on the screen.
17
Binding
Email
This feature enables the user to find back their
account password.
Note: To using this function, users must be bound
their email before forgetting their password, or they
will fail.
Page 22
6.1 Tab 1: Playback and Device Settings
6.1.1 Playback
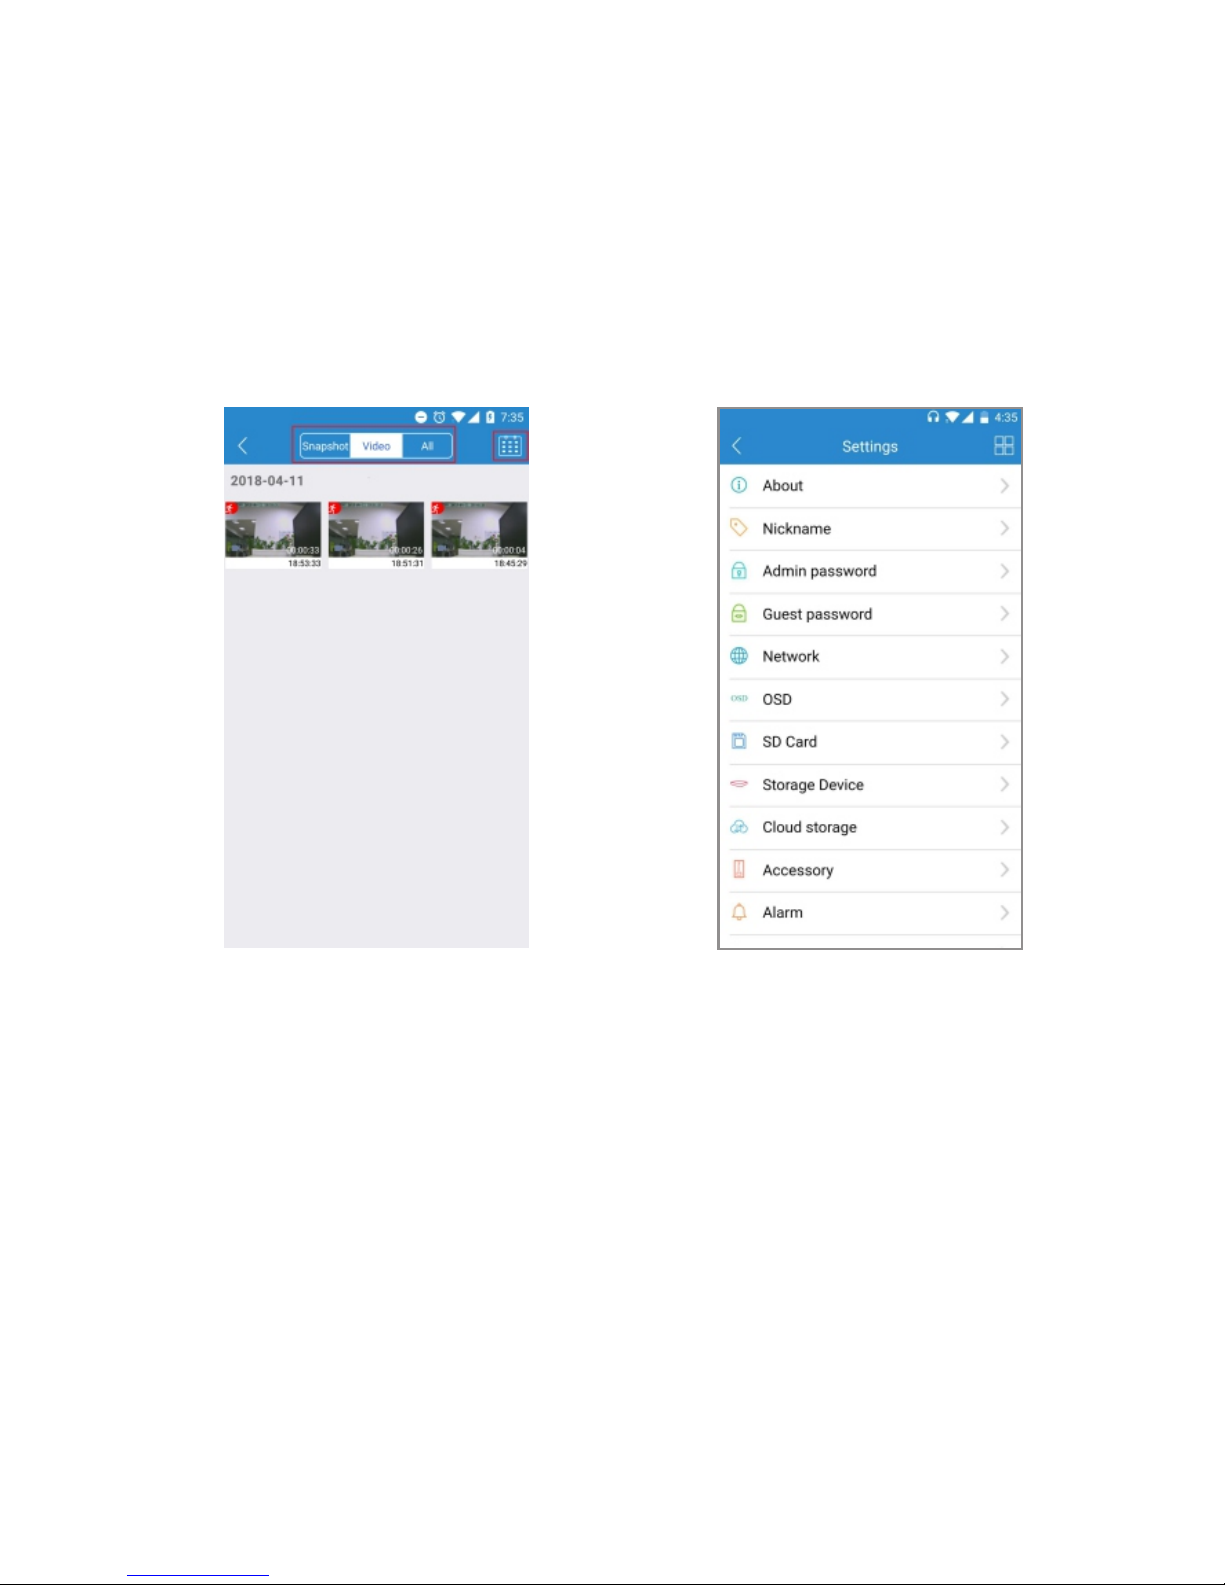
The playback tab allows the user to playback the cameras
recorded video and snapshots. Below is a screenshot of the
playback tab.
Playback Device Settings
1. Calendar: This panel allows users to pick a date that they
would like to playback video and check the snapshots.
2. Selections: This panel allows users to check all snapshots and
recorded videos.
18
Page 23

6.1.2 Device Settings
About
Nickname
Admin
Password
Guest
Password
Network
OSD
SD Card
Storage
Device
Users can find the device model, firmware version
and device id from this tab.
This feature allows users to modify cameras name
according to their preference.
This feature allows the user to change the device
admin password.
This feature allows the user to set up device guest
password for their friends and families so that they
can add the camera and monitor it.
This tab enables the user to choose the network
interface that you would like to use. In the network
interface, you can get the following information.
This feature allows the user to choose the display
text and the format of displaying date/time.
This feature enables the user to check the inserted
SD cards status, capacity, usage, valid. The user
can format the SD card on the MIPC app.
This feature allows the user to connect 1TB Cloud
Box with the camera. Once connected, it can store
videos, snapshot automatically.
1) Mac Address for Ethernet and Wi-Fi
2) IP Address 3) Gateway 4) Network Mask
5) Primary DNS 6) Secondary DNS 7) Start Address
Note: Please note that the SD card is not included in
our packages.To use SD card, please insert the SD
card into the camera when it is power off.
Note: This product is not available to purchase at
this time.
19
Page 24

20
Record
This feature enables the user to use the record
function. In this tab, users can set it to schedule
record, and event record for motion detection.
Alarm
This feature allows the users to set up the motion
detection.
Cloud
Storage
This tab enables the user to use our cloud service.
This function is being test, if you would like to be a
tester, please contact us directly to get an
Activation Code.
Accessory
This feature allows the user to set up the sensitivity
for motion detection.
Note:
1. The record function only works when the following
storage ways is available.
① SD Card
② Storage Device
③ Cloud Storage
Note: The function is unstable. If you have any
problems when you are testing, please E-mail us
directly.
E-mail: [email protected]
Note: If you would like to receive sound notifications
after detecting a moving object, please:
1. Turns on the Alarm for motion detection (Path:
mipc-device settings-alarm-motion detection).
2. Turns on the Sound on Notification Central (Path:
mipc-account settings-notification center-sound).
3. Allow the mipc to send sound notification to you
(Path: phone settings-notifications-MIPC; phone
settings all apps-MIPC-notifications).
Page 25

6.2 Tab 2: Data Rate
This tab allows the user to know the current data used by the live
video. It has an important effect on live video quality. In other
words, the live video quality will be better when the data rate is
larger.
6.3 Tab 3: Resolution
The tab 3 allows users to change the resolution of the live video
they are watching. There are four choices: 1080p/720p,
Standard, Smooth, Auto.
6.4 Tab 4: Record, Snapshot, Mic, Speaker
and Sensitivity
The tab 4 contains 5 sections: Record, Snapshot, Mic, Speaker
and Others.
21
Others
This feature allows the user to adjust the speaker
and mic on camera so that he can have a better
experience of Two Way Audio.
Day/Time
This feature allows the user to check the time and
change the time zone.
System
The feature enables the user to update the cameras
firmware version, restore to factory settings and
restart device.
2. The event record is only available for motion
detection. Once the object triggers the motion
alarm, the camera will start to record until the end
of the movement.The camera will automatically
record video and screenshot once the user sets it
up to event record.
Page 26

6.5 PTZ
The PTZ tab allows users to change the direction of the camera.
With this feature, users can control the camera to left, right, up
and down. These controls are only available as slipping your
fingers to the left, right, up and down. When you double click or
move two touching fingers to apart on the phone screen, user
can zoom in the picture. Instead, users can zoom out the picture.
Section3: Click and press the specified area to enable
bidirectional talk. This feature allows the user
broadcast audio from their mobile to the camera.
While this is active, the camera’s speaker is shut off in
order to keep audio quality high.
Note: Guest user will not have the right to use this
feature.
Section4: Click this button to enable or disable audio output from
the camera. This feature allows the user to listen in on
the audio that the camera’s microphone is picking up.
Section5: This button opens the image adjustment toolbar, which
allows the user to adjust brightness, contrast,
saturation, sharpness and camera’s mode.
22
Section2: Click the button to take a screenshot of the live feed.
The picture is saved at the path specified in Playback Snapshots.
Section1: This icon allows users to record video manually. The
video will saved at the path specified in Account
Settings-My Folder.
Page 27

7.Troubleshooting
2. If the camera network connection break off after your change
network provider or router, please reset the camera and
re-install it.
3. If you get a blank screen or black screen after you scan the QR
code to add the camera, please try the following solutions:
1. If you could not connect your camera with Wi-Fi successfully,
please confirm:
①. Your home Wi-Fi network is 2.4G. Our camera does not
support 5G Wi-Fi network. Please check your Wi-Fi
Frequency band of the Wi-Fi router, or search its brand
and model on google.
②. If your router is dual band, please choose 2.4G Wi-Fi to
connect your phone and the camera.
③. Please put this Wi-Fi camera more close to the router.
④. Please check if the Wi-Fi router is operating properly first,
then turn on the DHCP of router, and set up WAP2-PSK for
security recognized by the camera.
⑤. When you hear the voice “failed to configure wireless
information, please reset”, please reset the camera again
and connect it.
①. Try to add it on other mobile device;
②. Add this camera through “Local Web Access Setup”
23
Page 28

4. If you get a black screen after click the camera to watch live
video, please figure out the problem by following steps.
①. Please turn on the device setting page, click the button
“About” to check if there is malfunction notification of the
sensor. If there is, please turn off the camera, after several
seconds, turn it on again. If not, please check if the camera
is connecting Ethernet cable and Wi-Fi network at the
same time.
②. Please log in your account and go to the account setting
interface, choose “TCP” of Transport Protocol on Other
feature.
③. Go to the account setting page, and click the button “Local
Search” to check if the camera has a picture. If there is
a picture showing on the camera, the problem may cause
by the external internet network.
6. If the camera can’t record normally, please check your store
device.
5. If you are going to download the video recorded on SD card
and watch it, please download sdtool on www.mipcm.com
and install it on your PC.
①. Please check the SD card status on your camera. If you
have inserted it into the camera, but there is nothing
showing on SD card. Please turn off the camera and
re-inserted again.
②. E-mail us directly to get support if the camera still could not
record after solution 1.
24
Page 29

8.Warranty Policy
Dear User,
Thank you for using our products, in order to offer the perfect
aftersales services, please read the description of the product
warranty card after purchasing and preserving it properly.
I. Enjoy the free warranty in the warranty period and preferential
services outside the warranty period.
II. Products enjoy a 30-day return, 90-day replace and 1-year
warranty repaired.
III. Products within 90 days warranty with equipment
performance problems, and no scratches in appearance, can
be directly replaced with new ones. After checking and testing
by our company, faulty products which are under our warranty
will be replaced with the same type of products; Trouble-free
products will return originally.
25
7. If you could not receive sound notifications after detecting a
moving object, please confirm:
①. The Alarm for Motion Detection turns on (Path: mipc-
device settings-alarm-motion detection).
②. The Sound on Notification Center turns on (Path: mipc-
account settings-notification center-sound).
③. The right for mipc to send sound notification to your phone
(Path: phone settings-notifications-MIPC; phone
settings –all apps-MIPC-notifications).
Page 30

V. The final interpretation and modify right in the warranty card
belongs to our company.
VI. If you have any question or doubt, please contact us anytime
with your problem and order number. You can contact us via
amazon message and email to our customer support. Here is
the ways to contact us.
E-mail: [email protected]
Website: www.lefunsmart.com
· The products damage caused by the unexpected factors
or man-made mechanical damage, and severe oxidation
or rust;
· Due to the force majeure such as earthquakes, fires, floods,
lightning strikes leading to the products failure or damage;
26
IV. The following situations are in the free maintenance range, we
only provide paid services, please pay attention:
· Failure to follow the operation manual requires for
installation, application, maintenance and custody leading
to products failure or damage;
· Already out of warranty period;
· Disassemble;
· Unauthorized repair;
Page 31

Page 32

 Loading...