

Page 1
Instruction Manual
Model: ITGSH-300
Wireless Hi-Frequency Headphones
Page 2

Precautions
CAUTION
RISK OF ELECTRIC SHOCK
DO NOT OPEN
This symbol is intended to
alert user to the presence of
non-insulated “dangerous
voltage” within the
product’s enclosure that
may be of sufficient
magnitude to constitute risk
of electric shock to persons.
Danger: This is not a toy. Keep the unit & accessories out of reach from children or pets.
There will be a risk of swallow.
Warning: To reduce the risk of fire or electric shock, do not expose this appliance to rain or
moisture.
Caution: Keep the unit away from any interference appliance, such as metals and magnet.
Locations: To reduce the risk of electric shock, fire or injury:
1. Do not use the unit in places that are extremely hot, cold, dusty or humid.
2. Do not place the unit under the direct sunlight nor near any heat sources such as open
flame sources and units that produce heat.
RISKS OF ELECTRIC SHOCK
DO NOT OPEN THE COVER
(OR BACK). NO USER
SERVICEABLE PARTS INSIDE.
REFER SERVICING TO
QUALIFIED SERVICE
PERSONNEL.
This symbol is intended to
alert user to the presence of
important operating and
maintenance (servicing)
instructions in the literature
accompanying the
appliance.
3. Do not place any objects that are filled with liquids, such as vases, on the unit.
4. Keep the unit away from places where the unit may be exposed to dripping or
splashing.
5. Place the unit on a flat and stable place.
Important Safety Instructions
1. Read through the manual before operating.
2. Heed the instructions.
3. Follow all instructions in the manual.
4. Keep the manual for future reference.
5. Do not block any ventilation openings. Do not impede the ventilation openings with
newspapers, table-cloths, curtains or the like. Leave at least 5cm around the unit for
sufficient ventilations.
2
Page 3

6. Install the unit in accordance with the manufacturer’s instructions.
7. Clean the cabinet with a soft cloth slightly moistened with a mild detergent solution. Do
not use strong solvents which may cause unpredictable damage to the unit.
8. Before using the product with the approved power adapter provided, ensure the
electric power supply is compatible with the voltage rating of the provided power
adapter.
9. Use ONLY the provided power adaptor. Never use other power adaptors even if they
have the same specifications or rating.
10. Protect the power cord from being walked on or pinched, particularly at plugs,
convenience receptacles and the pointers where they exist from the unit.
11. The electric plug is used as the disconnect device. The disconnect device shall remain
readily operable.
12. Remove the power adaptor from the electric outlet if the product is not in use for a long
time.
13. If it is lightening, unplug the power adapter to prevent the unit from unnecessary
damages.
14. Never try to disassemble batteries. It will be fatal dangerous if you heat the batteries or
put batteries under the direct sunlight.
15. Refer all servicing to qualified service personnel. Servicing required when the unit does
not operate normally or has been damaged in any way such as the power adaptor is
damaged, liquids spilled into the unit, any hard object fallen on the unit, the unit has
been dropped, the unit has been exposed to rain or moisture.
16. The marking information is located at the bottom of the unit.
17. Attentions should be drawn to the environmental aspects of batteries disposal.
18. Use the unit in moderate climates.
Warnings:
* Listening to uncomfortable sound levels for prolonged periods could adversely affect
your hearing.
* If using a line input or direct plug in MUST be fully inserted into the correct socket and
the volume turned to the lowest level before turning the unit on. Failure to do so can
result in high sound levels and could adversely affect your hearing.
* Please make sure that the volume knob is in the fully OFF position. You will hear and
feel a click when the knob is in the OFF position.
3
Page 4

Battery Warnings:
* Danger if battery is heated or exposed to direct sunlight or high temperature (over 80
centidegrees).
* Do not force the battery pack into the charger or headphone. It fits easily when in the
correct orientation.
* Do not short circuit the battery.
* Never disassemble or reconstruct battery.
* Do not expose the battery to water or any liquids.
* Disposal of battery if it is broken, leaked or deformed.
* Charge the battery as per instructions.
4
Page 5
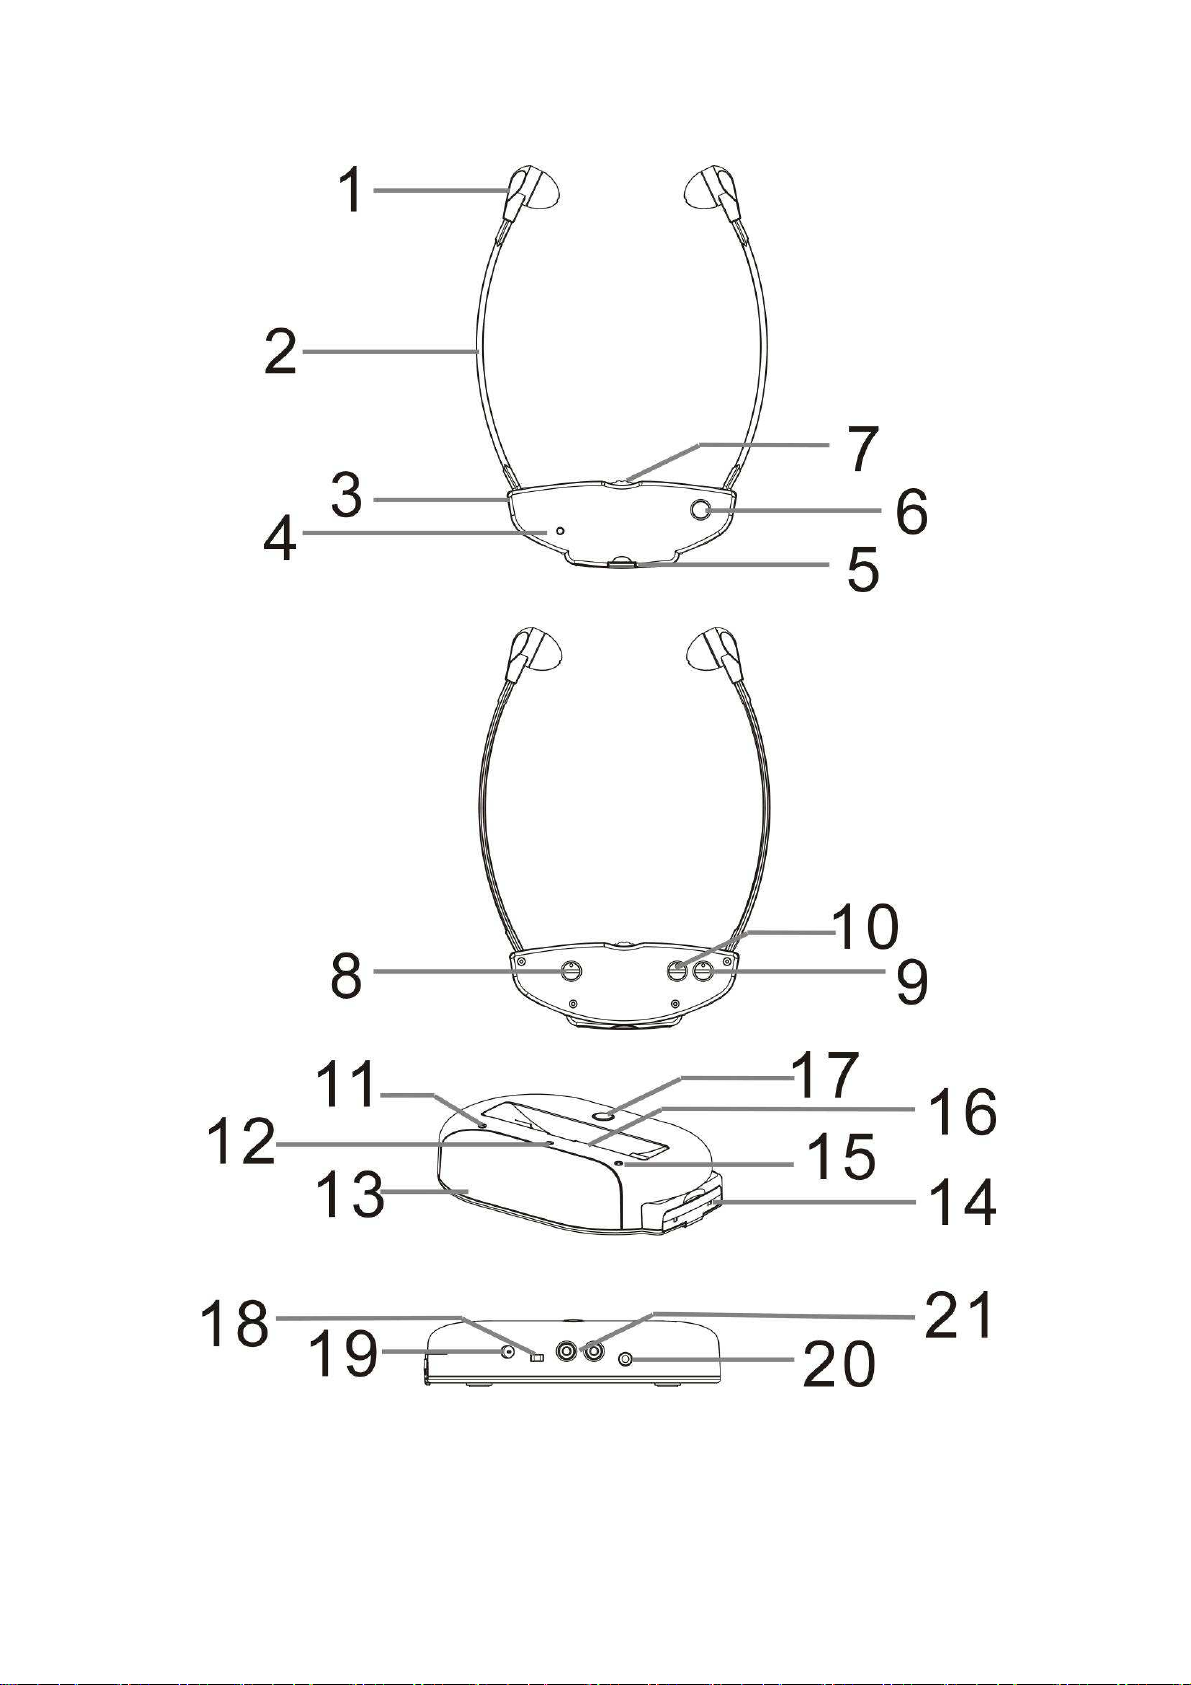
Locations and controls
5
Page 6

Headset
1. Headset plugs & earbuds
2. Headset cradles: The cradles are adjustable at a settled angle range. You can set the
headset plugs at a certain width by adjusting the angle. Do not force - it may damage
the headset.
3. Under chin headset
4. Channel indicator: Indicate the operating status of the headset. Fast flash when the
headset is searching for an idle FM frequency; Flash slowly to indicate the receiver is
going to hold an idle FM frequency. Once the desired FM frequency has been found,
the indicator will light constantly.
5. Battery pack: Take the battery pack from the packing and insert it into the bottom side
of the under chin headset.
6. Search: Press to search the signal sent from the transmitter.
7. Volume control: Turn the sound on and off and adjust the volume level.
8. Balance knob: Adjust the sound balance of left and right channel.
9. Tone Right knob: Adjust the tone of right earphone.
10. Tone Left knob: Adjust the tone of left earphone.
Transmitter
11. Channel indicator: Indicate the operating status of the transmitter. Flash when the
transmitter is searching for an idle FM frequency. Once the desired FM frequency has
been found, the indicator will light constantly.
12. Charge 2 indicator (middle): Indicate the battery pack inside the headset. Light
constantly during the charging process; light off if the battery pack is fully charged or no
battery pack inside.
13. Transmitter
14. Side battery charge slot: Dock and charge the extra battery pack.
15. Charge 1 indicator (side): Indicate the battery pack at the side of the transmitter. Light
constantly during the charging process; light off if the battery pack is fully charged or no
battery pack inside.
16. Headset dock: Charge the battery pack inside the headset during docking.
17. Search: Press to search an idle FM frequency.
18. DC IN jack: Connect the AC/DC adaptor to the jack.
19. Audio switch [MONO/STEREO]: Switch between stereo and mono operation.
20. AUDIO IN socket: Connects the 3.5mm audio input jack of the transmitter to your TV set
by using the 3.5mm plug cable.
21. AUDIO IN sockets [RCA]: Connects the RCA audio input jack of the transmitter to your
6
Page 7

TV set by using the RCA to 3.5mm plug audio cable cord supplied.
Preparations
CAUTION:
The valid operation range between the headset and
transmitter is 5m in open area.
1. Get connected. Connect the transmitter to your TV set by the provided audio cable,
make sure that the color of RCA plugs are matched the color of socket.
Tips: It is convenient to place the transmitter near your TV set.
2. Fully extend the DC cord, and keep the DC cord lie vertically (up or down), as the DC
cord acts as a signal transmission antenna.
3. Take the battery packs from the packing then insert one of the battery pack into the
headset base, with the engraved symbol side facing upward.
NOTE: The battery pack carries a little power and it is adequate for searching an idle
FM frequency. However, it is better to charge the battery pack at least 8 hours before
first use. (For detailed information of charging the battery pack, please refer to
“Charging the battery pack”.)
7
Page 8

4. Dock the headset to the transmitter and battery pack inside the headset will be charged
automatically once the transmitter is powered on.
NOTE: The Charge 2 indicates the battery level. The Charge 2 indicator will go out if
the battery of the headset is fully charged, otherwise it lights up constantly and
charging is in progress.
5. Connect the AC/DC adaptor to the DC IN jack at the back of the transmitter and to the
electric outlet. The transmitter is powered on.
Getting started
1. Turn on your TV set and adjust to a comfortable volume level. NOTE: Never mute the TV
sound as it could cause no sound on the headset.
2. Use the volume control to turn the headset on and a “click” will be heard. Turn the
volume control to set the volume level to the lowest level.
3. Put on the headset and adjust the headset cradles to a
comfortable width.
NOTE: There are 3 different sizes of earbuds provided
(one is equipped with the headset, the others are in the
packing), to fit for different user. Please refer to the
“Change the earbuds”.
4. Re-adjust the volume on the headset to a comfortable level.
5. Use a penny (not included) to set the sound to meet your preference with the balance
knob and the tone knobs (left and right) that are designed on the back of the headset.
6. If you find the sound is not clear, set the audio switch to “MONO”.
TIPS: If you find no sounds from the headset, or the Channel indicator on the headset
is flashing for a while then lights off, it indicates that re-pair will be needed. To get
detailed information please refer to “Pair the FM frequency”.
7. After use, turn off the headset with the Volume control and dock it to the transmitter.
Pair the FM frequency
The transmitter and headset are pre-paired. If you find no sounds from the headset, or the
Channel indicator on the headset is flashing for a while then lights off, it indicates that
re-pair will be needed.
• Check if you are too far away from the transmitter. The operating distance between the
headset and the transmitter is 5 meters.
SOLUTION: Move closer to the transmitter.
• The headset may not find an idle FM frequency.
8
Page 9

SOLUTION: Press the Search button on the headset to re-pair to the transmitter.
If all above solutions do not work, you may need to find another idle FM frequency as per
instructions below:
1. Always dock the headset on the transmitter.
2. Press the Search button on the transmitter.
The transmitter will search an idle FM frequency for signal transmission. Channel
indicator is flashing during searching process. Once a desired FM frequency has been
found, the indicator lights constantly and then the transmitter will send out a signal.
3. Turn the Volume control to set the headset ON.
4. Press the Search button on the headset.
The headset will search the signal that was sent from the transmitter. Channel indicator
on the headset starts to flash, indicating the searching process. Once the signal has
been found, the indicator will light constantly.
NOTE: If the Channel indicator on the headset keeps flashing for a long time, change
another idle FM frequency with steps 2, 3 & 4.
5. When the pair is complete, you can enjoy your TV.
Charging the battery pack
The battery packs carry a little power during shipping.
Charge the battery packs at least 8 hours before first use, as low battery level may lead to
unsatisfied sound such as distorted.
It is recommended to dock the headset to the transmitter after use.
• Dock the headset to the transmitter and a combination sound will be heard. The battery
pack will be charged once the transmitter is powered on.
• To charge the extra battery pack, inserts it to the
side battery charge slot with the engraved symbol
side facing downward. The battery pack will be
charged once the transmitter is powered on.
NOTE:
• Battery pack, which is already inserted to the transmitter, will be charged to full capacity
once the transmitter is on.
• The battery pack contains protection circuit to avoid overcharging and help to save
battery life. When the battery pack is inserted to the power-on transmitter, the
transmitter will detect the battery level and activate the charging function.
9
Page 10

• The Charge LEDs indicate the charging status. It lights constantly during the charging
process. If no battery pack inside or the battery pack has been fully charged, the Charge
LED will light off.
Battery Precautions: Use battery pack as recommended by the manufacturer, use battery
pack other than recommended will increase risks of danger.
Replace the drained battery pack
If you find distorted sound, the battery level may be low, dock the headset to charge the
battery pack or, if you want to use the headset continuously, you need to replace the
battery pack.
1. Take the extra battery pack out from the
transmitter.
2. Grip the edge and pull out the battery pack from
the bottom of the under chin headset. Take the
extra battery pack out if it is inserted to the side of
the transmitter.
3. Insert the extra battery pack into the under chin
headset. Make sure the battery pack is installed or
docked properly.
Change the earbuds
There are 3 sizes of earbuds included the product, small, medium and large size.
Small Medium
10
Large
Page 11

• Take off the earbuds from the headset.
• Take the earbuds from the packing and select a suitable earbud
size.
• Insert the earbuds to the headset.
Specifications
Headset power supply: 1 x Li-ion battery pack
Transmitter power supply:
Power Consumption: 3W
AC adapter: input 120V~60Hz,
output 7.5Vdc 200mA
FM Frequency Range: 88-108MHz
S/N ratio: 45dB
Operation Range: 5m in open area
Accessories: AC/DC adapter
3.5mm-to-RCA Audio cable
2 x Li-ion battery pack
3 pairs of earbuds (small, medium and large size, one is
equipped on the headset and the others are in the packing.)
11
Page 12

Troubleshooting
Problem Possible Cause Solution
Not working
and/or no sound.
No reception.
Sound is not very
clear and/or
distorted.
Connections between the Audio
sockets on the TV and the
transmitter may be loose.
You may be out of the operating
range of the transmitter.
Battery pack is low.
The DC cord of AC adapter is
coiled, or lies flat.
Some interfered appliance is
using nearby.
Poor reception.
Check all connections.
Move closer to the transmitter to
keep the distance within 5
meters.
Recharge/Replace the battery
pack.
Keep the DC cord fully extend
and lie vertically (up or down).
Turn off the interfered appliance.
Turn yourself to another
direction or set the audio switch
to Mono.
The Channel
indicator lights off
after flashing for a
while.
It is to be designated to help save
power consumption.
Press the Search button to pair
an idle FM frequency and the
indicator will light again.
12
Page 13

FCC/ICES-003 STATEMENT
Warning: Changes or modifications to this unit not expressly approved by the party responsible for
compliance could void the user authority to operate the equipment.
NOTE: This equipment has been tested and found to comply with the limits for a Class B digital device,
pursuant to Part 15 of the FCC Rules. These limits are designed to provide reasonable protection against
harmful interference in a residential installation. This equipment generates uses and can radiate radio
frequency energy and, if not installed and used in accordance with the instructions, may cause harmful
interference to radio communications. However, there is no guarantee that interference will not occur in a
particular installation. If this equipment does cause harmful interference to radio or television reception,
which can be determined by turning the equipment off and on, the user is encouraged to try to correct the
interference by one of the following measures:
- Reorient or relocate the receiving antenna.
- Increase the separation between the equipment and receiver.
- Connect the equipment into an outlet on a circuit different from that to which the receiver is connected.
- Consult the dealer or an experienced radio/TV technician for help.
This device complies with Part 15 of the FCC Rules. Operation is subject to the following two conditions: (1)
This device may not cause harmful interference, and (2) this device must accept any interference received,
including interference that may cause undesired operation.
Any changes or modifications not expressly approved by the party responsible for compliance could void
the user's authority to operate this equipment.
INDUSTRY CANADA
This device complies with Industry Canada licence-exempt RSS standard(s). Operation is subject to the
following two conditions: (1) this device may not cause interference, and (2) this device must accept any
interference, including interference that may cause undesired operation of the device.
Under Industry Canada regulations, this radio transmitter may only operate using an antenna of a type and
maximum (or lesser) gain approved for the transmitter by Industry Canada. To reduce potential radio
13
Page 14

interference to other users, the antenna type and its gain should be so chosen that the equivalent
isotropically radiated power (e.i.r.p.) is not more than that necessary for successful communication.
Conformément à la réglementation d'Industrie Canada, le présent émetteur radio peut
fonctionner avec une antenne d'un type et d'un gain maximal (ou inférieur) approuvé pour l'émetteur par
Industrie Canada. Dans le but de réduire les risques de brouillage radioélectrique à l'intention des autres
utilisateurs, il faut choisir le type d'antenne et son gain de sorte que la puissance isotrope rayonnée
équivalente (p.i.r.e.) ne dépasse pas l'intensité nécessaire à l'établissement d'une communication
satisfaisante.
Le présent appareil est conforme aux CNR d'Industrie Canada applicables aux appareils radio exempts de
licence. L'exploitation est autorisée aux deux conditions suivantes : (1) l'appareil ne doit pas produire de
brouillage, et (2) l'utilisateur de l'appareil doit accepter tout brouillage radioélectrique subi, même si le
brouillage est susceptible d'en compromettre le fonctionnement.
CALIFORNIA PROP 65 WARNING
"WARNING" This product contains a chemicals known to the State of California to cause birth defects or
other reproductive harm. For more information on these regulations and a list of chemicals, log on the
following website address :
http://www.oehha.ca.gov/prop65.html
14
Page 15

WARRANTY
Innovative Technology Electronics Corp.
Limited Warranty: 90 Days Labor, One Year Parts
Innovative Technology Electronics Corp. (IT) warrants the product to be free from “Defects” in materials under normal use for a
period of “One Year” from the date of the original purchase. The Warranty is “Not” transferable. IT agrees, within the initial
“90 Day” period, to repair or replace the product if it is determined to be defective at “No Charge”. It is further agreed that
IT will cover the cost to repair or replace damaged “Parts” only for a total period of “One Year” from the date of the original
purchase. The warranty does not cover cosmetic damage, antennas, AC cords, cabinets, headbands, ear-pads, or damage
due to line power surges, connection to improper voltage supply or settings, misuse, mishandling, accident, acts of God or
attempted repair by an unauthorized service agent.
To obtain service, the purchaser MUST present an original sales receipt / proof of purchase. Please contact us at
www.ithomeproducts.com to request an RMA (Return Material Authorization) number to return products for service or
replacement. Returns without an RMA number on the package will be refused and returned to sender. Upon receipt of
the returning item and our full inspection (IT) may issue a replacement to customer for the same item or of one that has
equivalent value and features. To return an item, supply full name, return address, phone number, item purchased, receipt
of purchase and reason for return to obtain RMA number.
All returns must be in the original packaging or reasonable substitute to prevent damage.
Customer “Must” include full name, shipping address and telephone number inside of package. No return will be shipped back
to a PO Box or APO address.
Please include your check or money order in the amount of
• USD$5.00 for items $10.00 to $39.99 (Price Paid Per Unit)
• USD$10.00 for items $40.00 to $99.99. (Price Paid Per Unit)
• USD$16.00, for items $100.00 and up. (Price Paid Per Unit)
• Shipping fees are non-refundable
to be payable to Innovative Technology Electronics Corp.(for handling and return
shipping charges) (IT) will not be responsible for delays or unprocessed claims resulting
from a purchaser’s failure to provide any / all of the necessary information.
15
Page 16

Send all inquiries or RMA request via our website www.ithomeproducts.com/support.
Innovative Technology Electronics Corp.
1 Channel Drive
Port Washington, NY 11050
Toll free: 1-877-483-2497
Website for support: www.ithomeproducts.com/support
There are no express warranties except as listed above.
REPAIR OR REPLACEMENT AS PROVIDED UNDER THIS WARRANTY IS THE EXCLUSIVE
REMEDY OF THE CUSTOMER, (IT) SHOULD NOT BE LIABLE FOR ANY INCIDENTAL OR
CONSEQUENTIAL DAMAGES FOR BREACH OF ANY EXPRESS OR IMPLIED WARRANTY ON THIS PRODUCT EXCEPT TO THE EXTENT
PROHIBITED BY APPLICABLE LAW. ANY IMPLIED WARRANTY OF MERCHANTABILITY OR FITNESS FOR A PARTICULAR PURPOSE
ON THIS PRODUCT IS LIMITED IN DURATION TO THE DURATION OF THIS WARRANTY.
Some states do not allow the exclusion or limitation of incidental or consequential damages, or limitations on how long an
implied warranty lasts, so the above exclusions or limitations may not apply to you. This warranty gives you specific legal
rights and you may also have other rights, which vary from state to state.
16
Page 17

300110800E
17
 Loading...