

Page 1

SUPER-HERO 440
KEEP THIS MANUAL FOR FUTURE NEEDS
Page 2

Contents
1. Introduction…………………………..……………………………………………………………..….03
2. General Guidelines…………….………………………………………………………………….…03
3. Safety Instructions……………………………………………………….....………………………04
4. Cleaning and Maintenance………………………………………………...……………………05
5. Technical Parameters…………………..…………………………………..………………………06
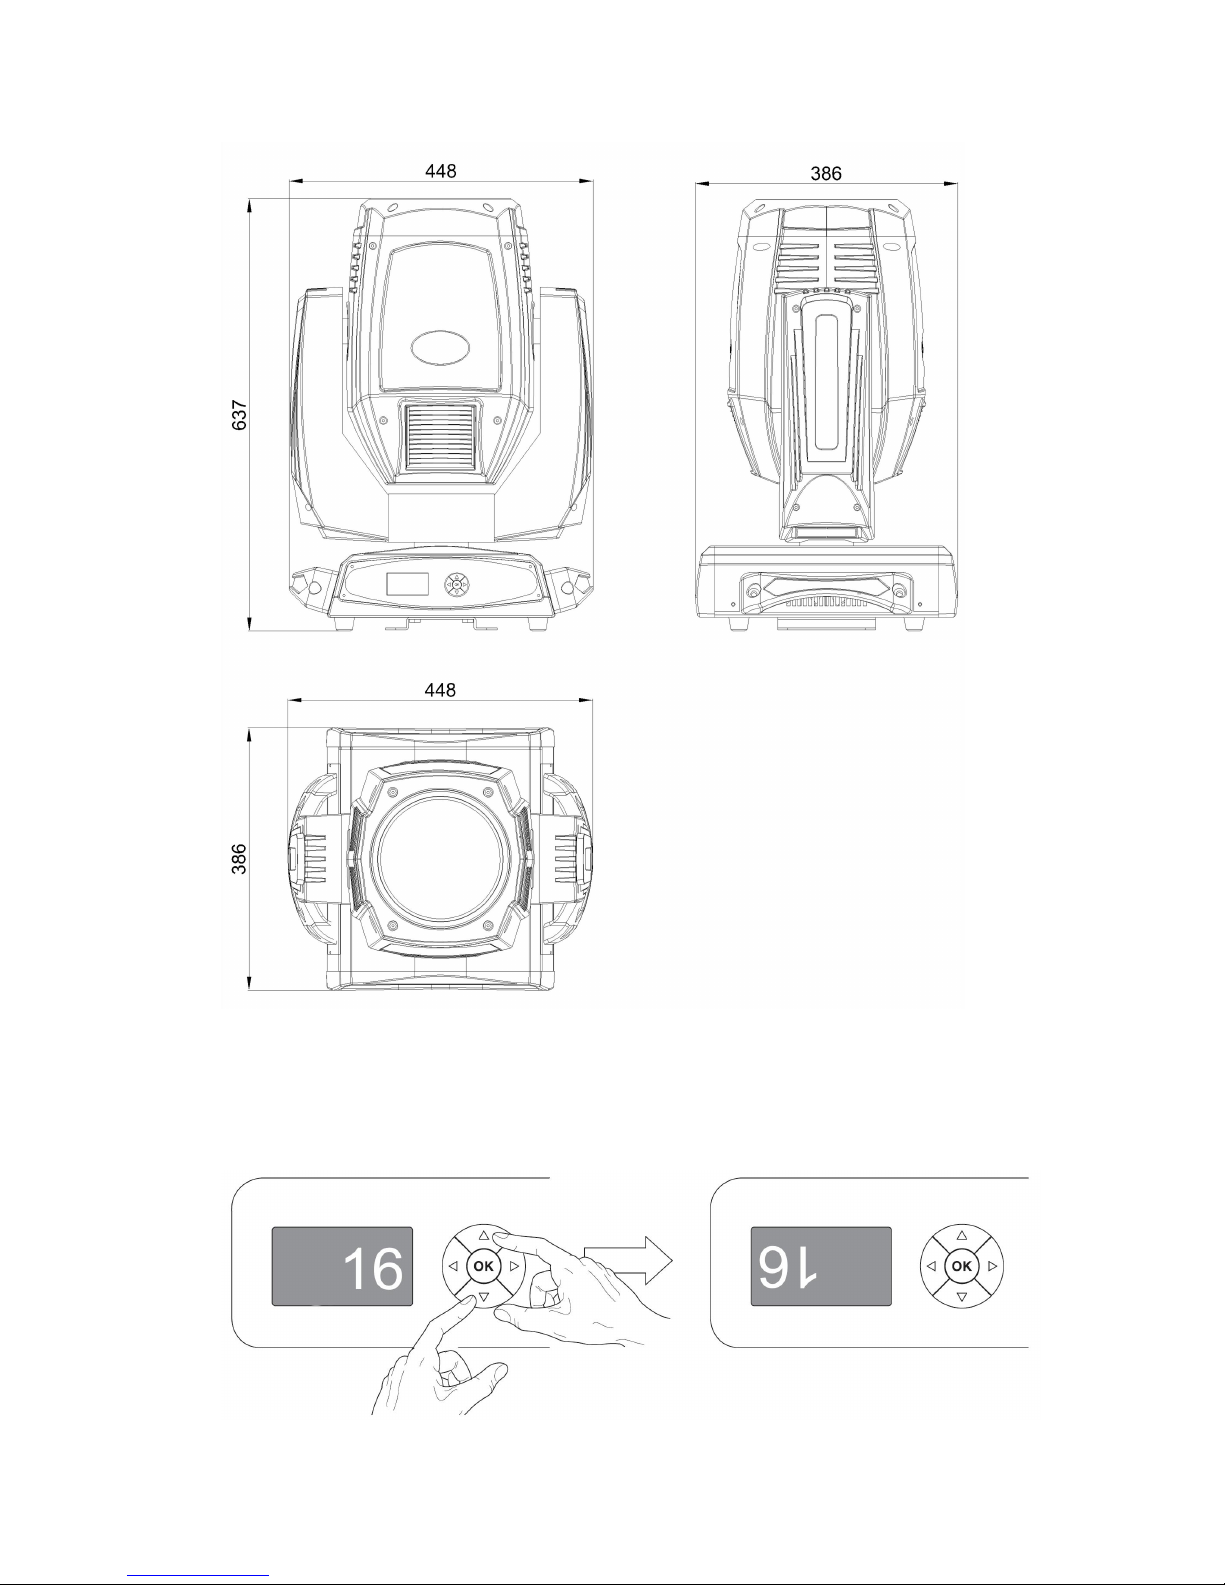
6. Fixture Size…………………..…………………………………...…………………………………….07
7. Color Wheel………………………………………………………………..…………………………...07
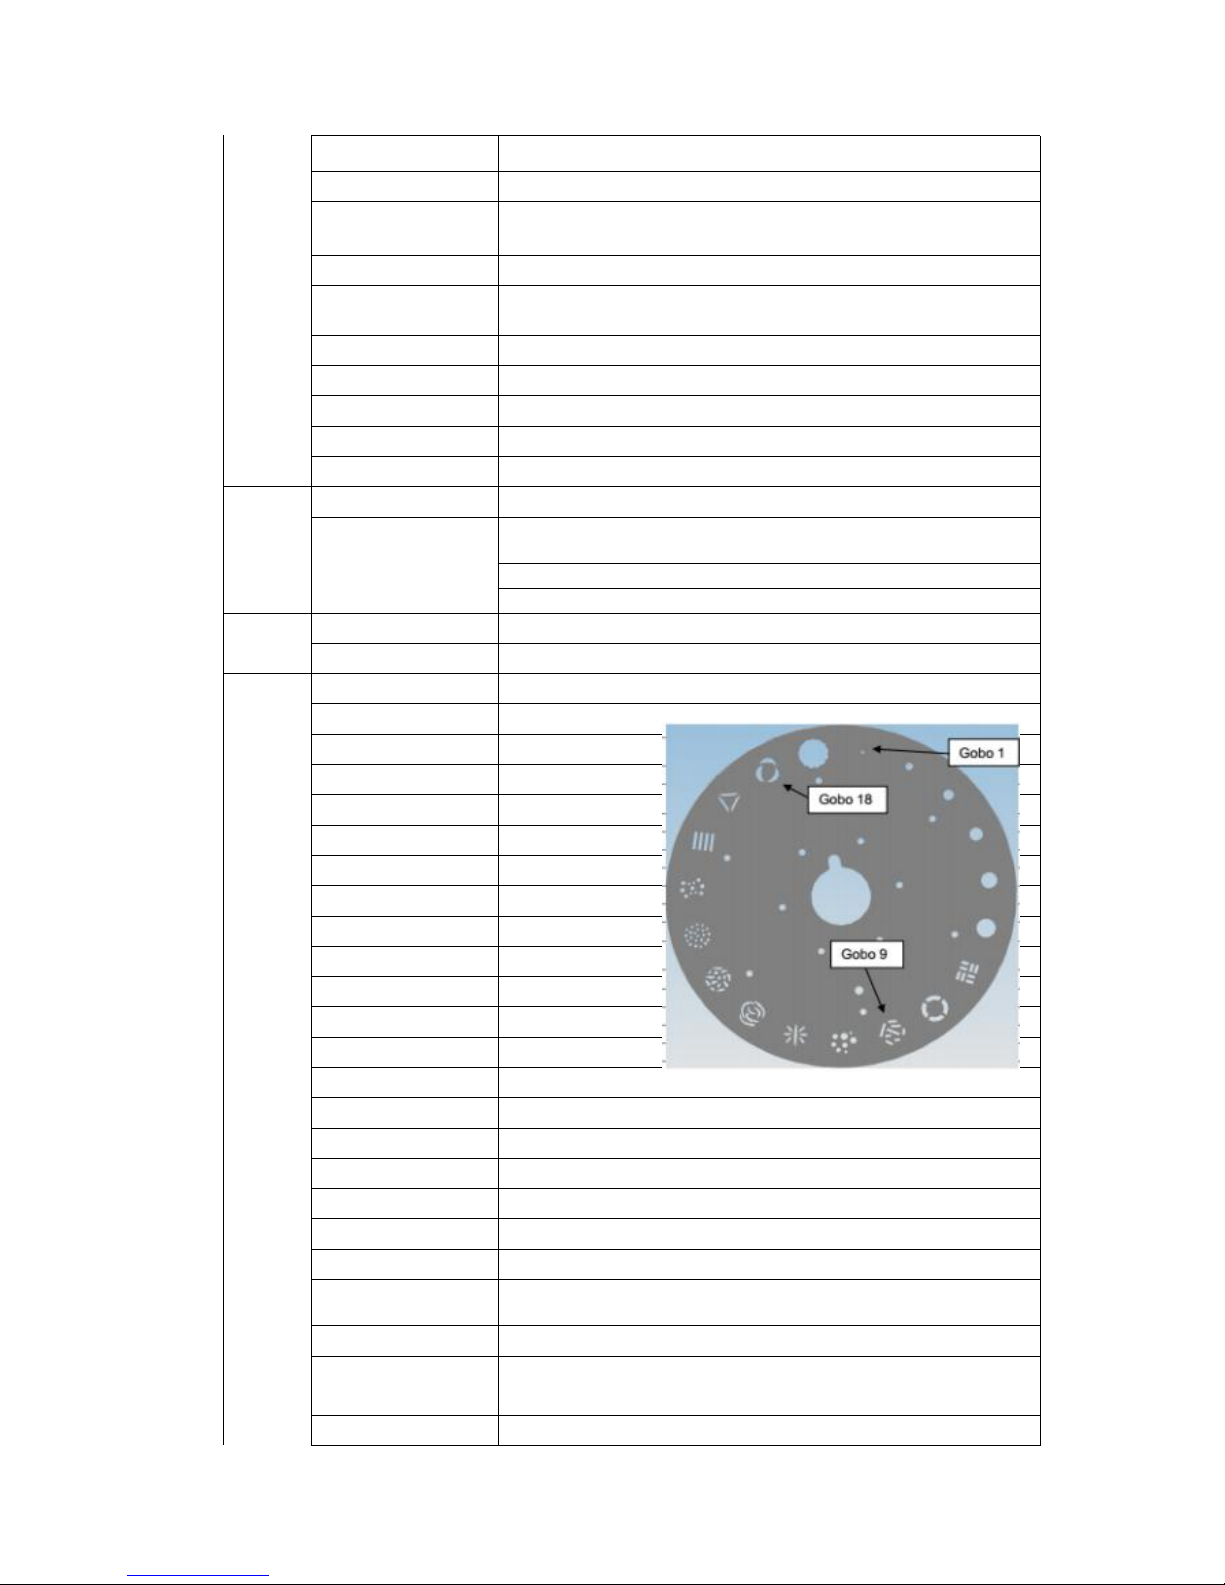
8. Gobo Wheel………………………………………………………………..……………………………07
9. Function of Buttons………………………………………………………………..…………………08
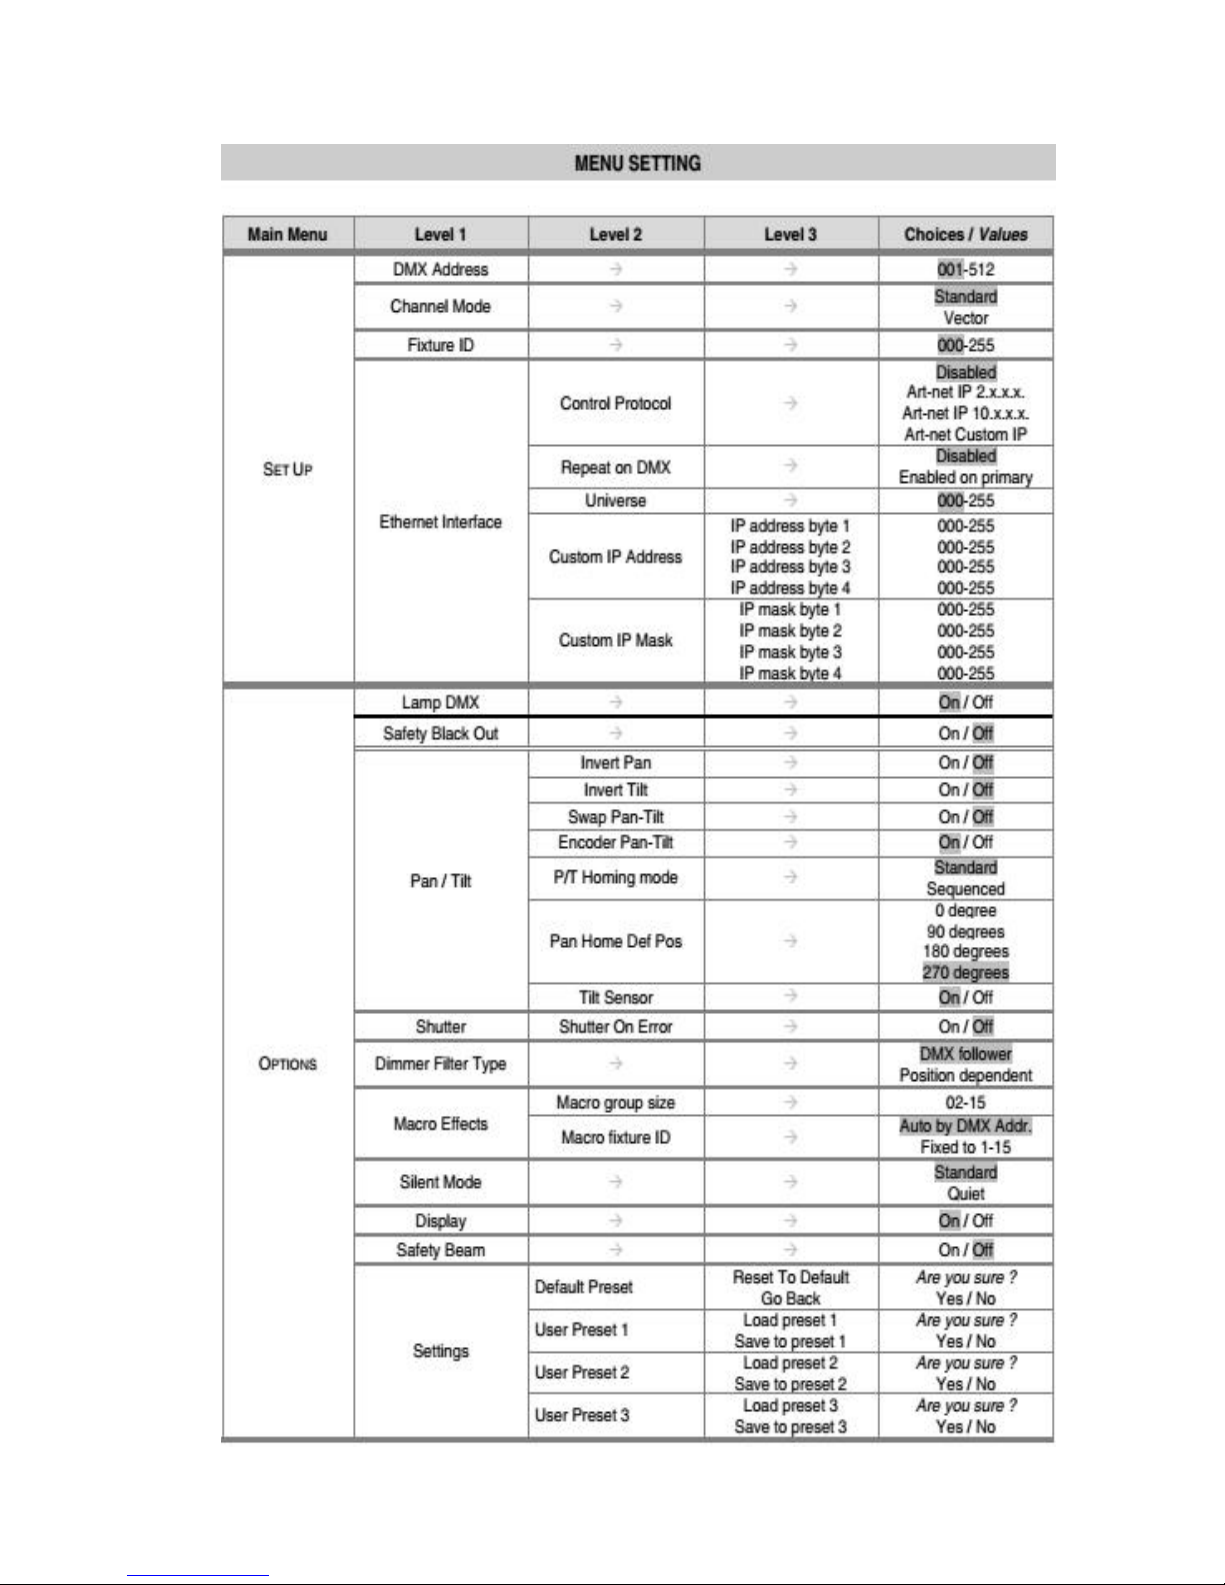
10. Menu Function………………………………………………………………..………………………..09
11. DMX Channels………………………………………………………………..…………………………10
Page 3

Thank you for your patronage!
We are confident that our excellent products and service can satisfy you.
For your own safety, please read this user manual carefully before installing the
device.
In order to install, operate, and maintain the lighting safety correctly.
We suggest that the installation and operation should be done by the verified
technician and follow the instruction strictly.
Every person involved with the installation, operation and maintenance of this device
has to:
-be qualified
-follow carefully the instructions of this manual
INTRODUCTION:
Thank you for having chosen this professional moving head.
You will see you have acquired a powerful and versatile device.
Unpack the device. Inside the carton box you should find:
1. One power in cable
2. One 3-Pin DMX cable
3. Two bracket clamps
4. One English user manual
(Flight case, Clamps are optional, please contact your dealer)
Please check carefully that there is no damage caused by transportation. Should
there be any questions, please consult your dealer and don’t install this device.
GENERAL GUIDELINES
This device is a lighting effect for a professional use on stages, TV, in discotheques,
theaters, etc.
This fixture is only allowed to be operated with the max alternating current which
stated in the technical specifications in 6thpage of this manual.
Lighting effects are not designed for permanent operation. Consistent operation
breaks may ensure that the device will serve you for a long time without defects.
Do not shake the device. Avoid brute force when installing or operating the device.
While choosing the installation-spot, please make sure that the device is not exposed
CAUTION!
Keep this device away from rain and moisture!
CAUTION!
Unplug mains lead before opening the housing!
Page 4

to extreme heat, moisture or dust. Please don’t project the beam onto combustible
substances. The minimum distance between light-output from the projector and the
illuminated surface must be more than 0,5 meter.
If you use the quick lock cam in hanging up the fixture, please make sure the quick
lock fasteners turned in the quick lock holes correctly.
Operate the device only after having familiarized with its functions. Do not permit
operation by persons not qualified for operating the device. Most damages are the
result of unprofessional operation.
Please use the original packaging if the device is to be transported.
For safety reasons, please be aware that all modifications on the device are
forbidden. If this device will be operated in any way different to the one described in
this manual, the product may suffer damages and the guarantee becomes void.
Furthermore, any other operation may lead to short-circuit, burns, electric shock,
crash, etc.
SAFETY INSTRUCTIONS
This device has left the factory in perfect condition. In order to maintain this
condition and to ensure a safe operation, it is absolutely necessary for the user to
follow the safety instructions and warning notes written in this user manual.
1. In order to guarantee the product’s life, please don’t put it in the damp places or
even the environment over 60degress.
2. Always mount this unit in safe and stable matter.
The qualified professionals are allowed to carry out the lamp installation, operation
and maintenance, but they must guarantee to operate in strict accordance with the
instructions referred to.
▲ Important:
Damages caused by the disregard of this user manual are not subject to
warranty. The dealer will not accept liability for any resulting defects or
problems.
If the device has been exposed to temperature changes due to environmental
changes, do not switch it on immediately. The arising condensation could damage
the device. Leave the device switched off until it has reached room temperatures.
This device falls under protection-classⅠ. Therefore it is essential that the device be
earthed.
The electric connection must carry out by qualified person.
Make sure the power cord is never crimped or damaged by sharp edges. If this would
be the case, replacement of the cable must be done by an authorized dealer.
CAUTION!
Be careful with your operations. With a dangerous voltage you can suffer
a dangerous electric shock when touching wires!
Page 5

Always disconnect from the mains, when the device is not in use or before cleaning it.
Only handle the power cord by the plug. Never pull out the plug by tugging the
power cord.
During initial start-up some smoke or smell may arise. This is a normal process and
does not necessarily mean that the device is defective, it should decrease gradually.
Please don’t project the beam onto combustible substances.
If the external flexible cable or cord of this luminaire is damaged, it shall be
exclusively replaced by the manufacturer or his service agent or a similar qualified
person in order to avoid a hazard.
CAUTION!
Never touch the device during operation!
The housing may heat up!
C CAUTION!
N Never look directly into the light source,
A As sensitive persons may suffer an epileptic shock.
Please be aware that damages caused by manual modifications to be the device
are not subject to warranty. Keep away from children and non-professionals.
CLEANING AND MAINTENANCE
1. To reduce the risk of electrical shock or fire, do not expose this unit to rain or
moisture.
2. Do not spill water or other liquids into or on to your unit.
3. During long periods of non-use, disconnect the unit’s main power.
4. It should be installed in a well-ventilated place, at a distance of 50 centimeters or
more with the walls. At the same time, please check if the fan and ventilation holes
are unobstructed.
The following points have to be considered during the inspection
1) All screws for installing the devices or parts of the device have to be tightly
connected and must not be corroded.
2) There must not be any deformations on the housing. Fixations and installations
spots(ceiling, suspension, trussing).
3) Mechanically moved parts must not show any traces of wearing and must not
rotate with unbalances.
4) The electric power supply cables must not show any damage, material fatigue or
sediments. Further instructions depending on the installation spot and usage
have to be adhered by a skilled installer and any safety problems have to be
removed.
CAUTION!
Disconnect from mains before starting maintenance operation!
Page 6

In order to make the lights in good condition and extend the life time, we suggest a
regular cleaning to the lights.
1) Clean the inside and outside lens each week to avoid the weakness of the lights
due to accumulation of dust.
2) Clean the fan each week.
3) A detailed electric check by approved electrical engineer each three month, make
sure that the circuit contacts are in good condition, prevent the poor contact of
circuit from overheating.
We recommend a frequent cleaning of the device. Please use a moist, lint-free cloth.
Never use alcohol or solvents.
TECHNICAL PARAMETERS
Input: AC100~240V, 50/60Hz
Power Consumption: 700W
Lamp source: Osram 20R 440W
Zoom angle: 2.5°(Beam mode)
4°- 50° electronic zoom(Spot mode)
CMY color mixing
Three color wheels with 14 color filters
2 CTO filters (3200 K and 2500 K) + 1 CTB filter
1 Wheel with 6 dichroic rotating gobos
1 Wheel with 18+1 fixed metal gobos
Animation disc
2 indexable rotating prisms (8-facet and linear 4-facet prism)
Frost filter for soft-edge projection
Electronic focusing
Auto focusing when zooming
Zooming and Auto-focusing at prism
0~100% dimmer
Speed adjustable strobe
Fast,smooth and quiet pan and tilt movements
Power will automatically decrease when light off or CMY closes
Modular design easier the repairing and maintenance
Self-charging battery, MENU edit available without main power connection
Art-Net in&out
Size: 448×386×637mm
Weight: 30kg
COLOR WHEEL:
Page 7
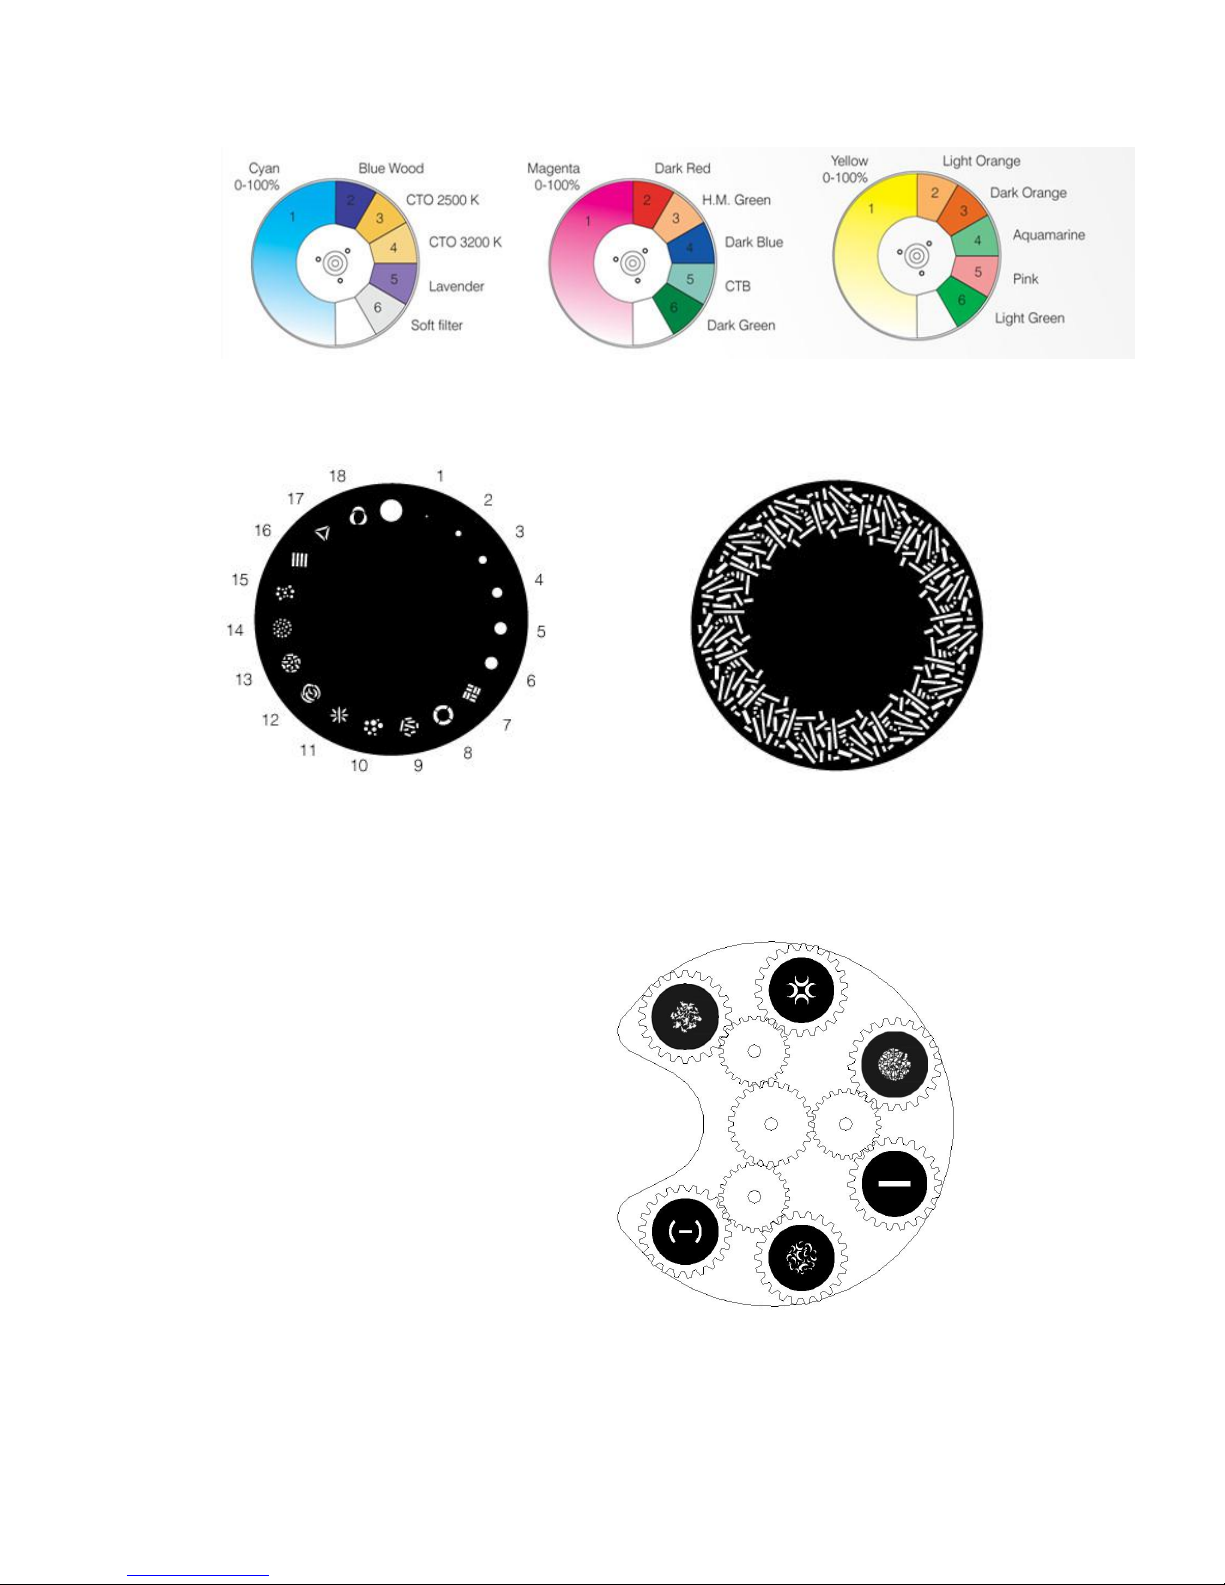
FIXED GOBO WHEEL: AMIMATION DISC
:
ROTATING GOBO WHEEL
:
25.9mm*25mm
Page 8
FUNCTIONS OF BUTTONS
Page 9
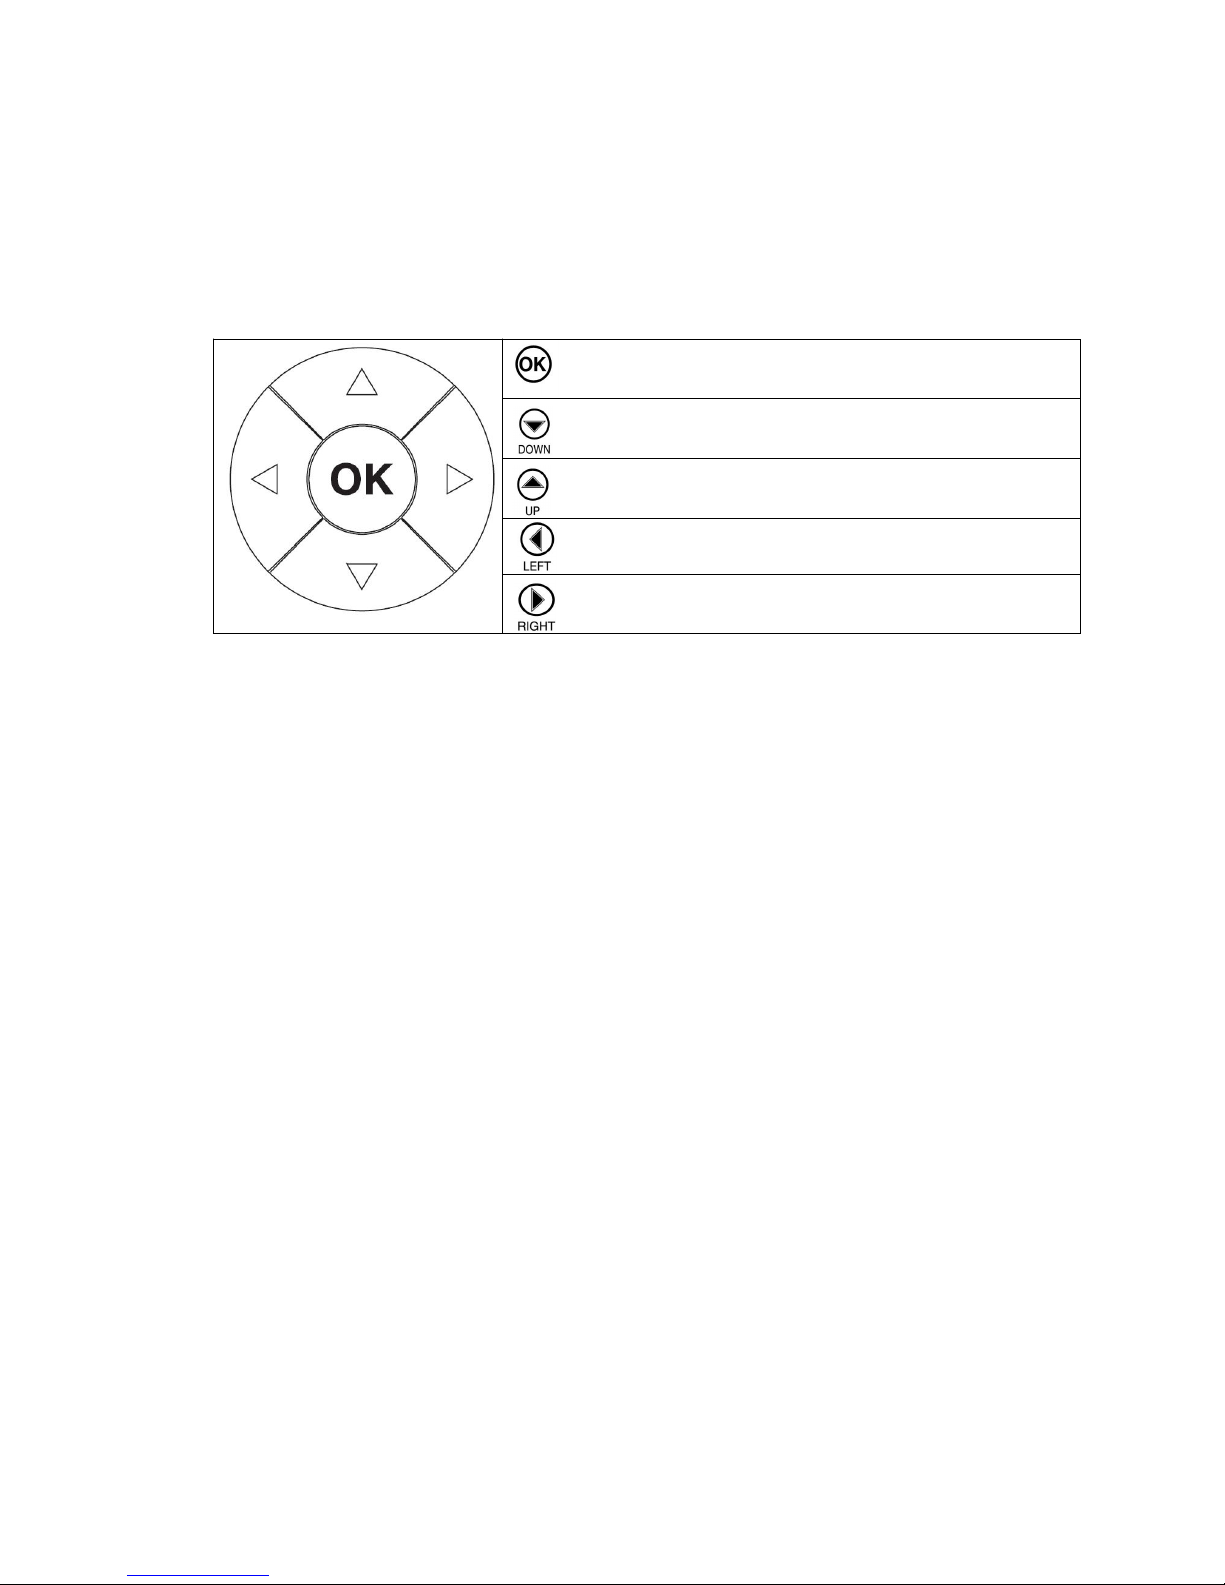
Reversal of the display
To activate this function, press UP and DOWN keys simultaneously while the display
is in the rest mode.This status will be memorised and maintained even for the next
time it will be switched on. To return to the initial state, repeat the operation all over
again.
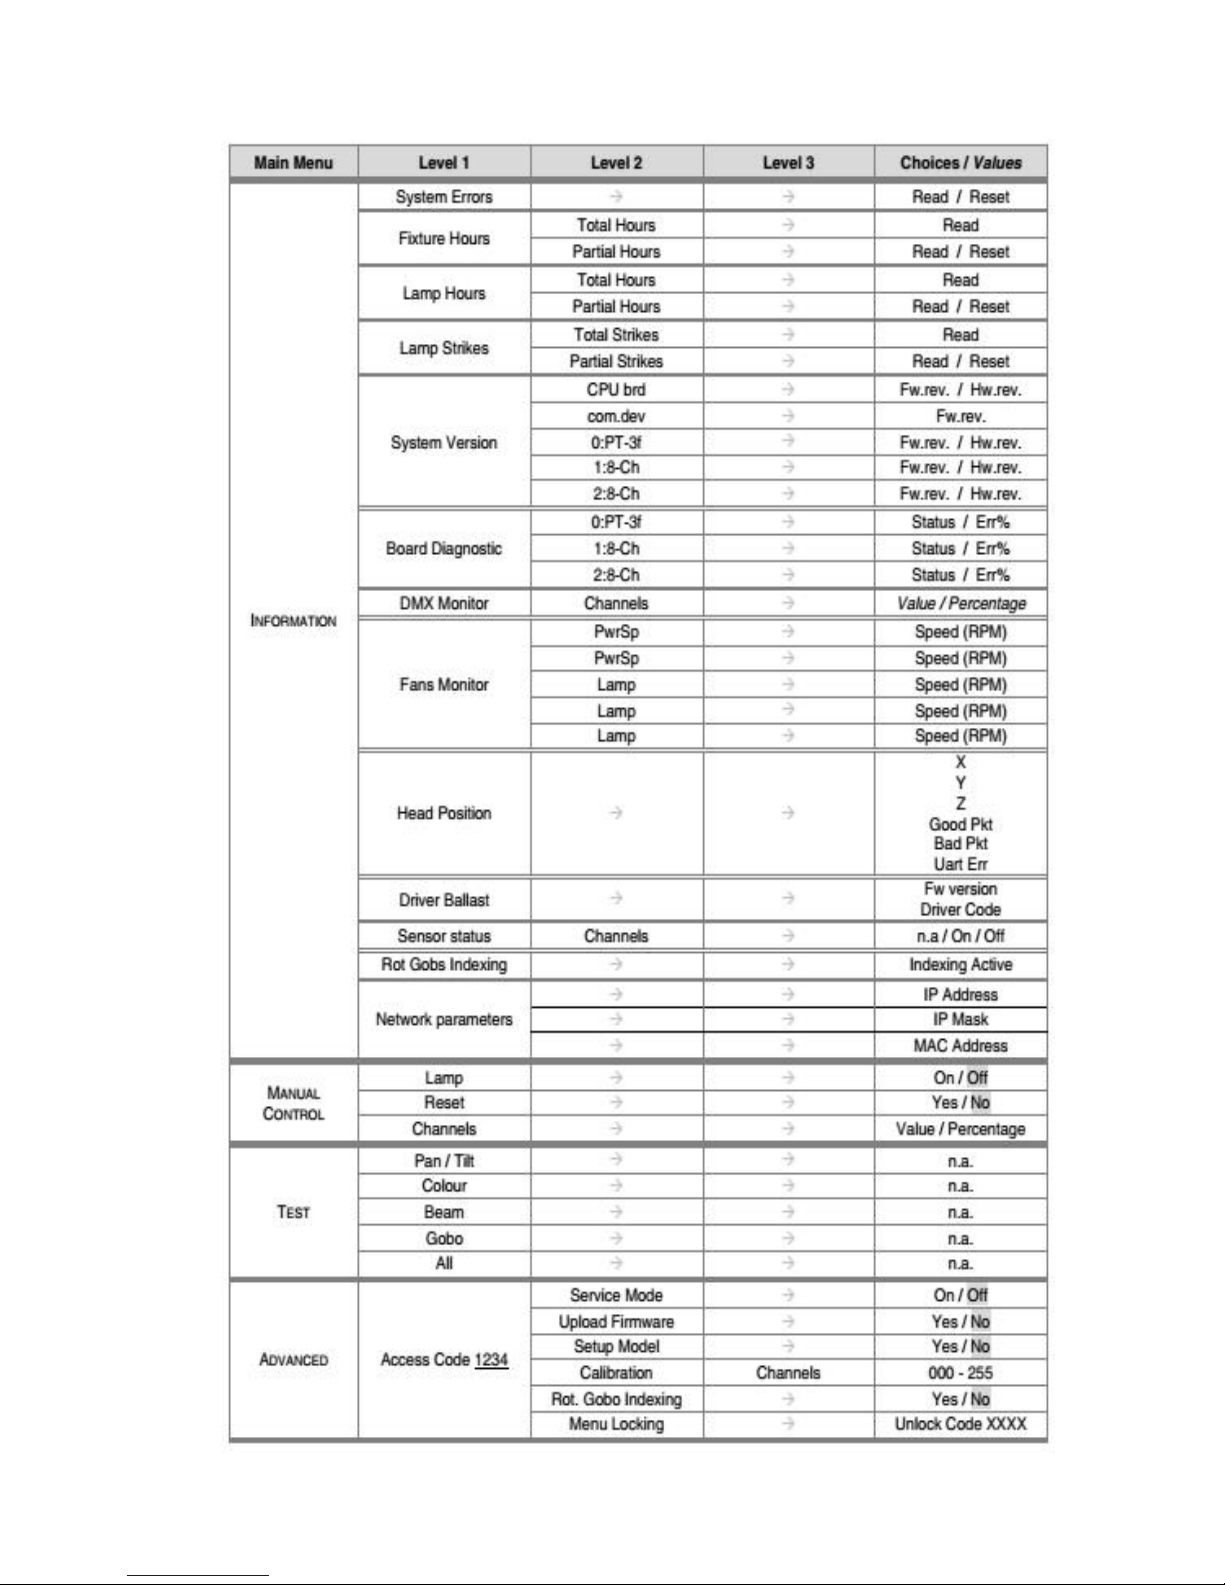
USING THE MENU:
1 ) Press “OK” once – “Main Menu” appears on the display.
2) Use the UP and DOWN keys to select the menu to be used:
• Setup (Setup Menu): To set the setting options.
• Option (Option Menu): To set the operating options
• Informations (Informations Menu): To read the counters, software version and
other information.
• Manual Control (Manual control Menu): To trigger the test and manual control
functions.
• Test (Test Menu): To check the proper functionning of effects
• Advanced (Advanced Menu): Access to the "Advanced menu" is recommended for
a trained technical personnel.
"Advanced" password:988
3) Press “OK” to display the first item in the selected menu.
4) Use the UP and DOWN keys to select the MENU items.
Confirms the displayed value, or activates the
displayed function, or enters the successive menu.
Decreases the value displayed (with auto-repetitions)
or passes to the next item in the menu.
Increases the value displayed (with auto-repetitions)
or passes to the previous item in a menu.
Return to the top level.
Commute from units, tens, hundreds, in the
"Address", "Fixture ID" and "Calibration" menu.
Page 10
Page 11
Page 12
DMX CHANNELS
CHANNEL
ST 30 CHANNEL,EXTENDED 34 CHANNEL.
1
CYAN COLOUR WHEEL
2
MAGENTA COLOUR WHEEL
3
YELLOW COLOUR WHEEL
4
COLOUR 1
5
COLOUR 2
6
COLOUR 3
7
STOPPER / STROBE
8
DIMMER
9
DIMMER FINE
10
STATIC GOBO CHANGE
11
ANIMATION DISK INSERTION
12
ANIMATION DISK ROTATION
13
ROTATING GOBO SELECT
14
GOBO ROTATION
15
FINE GOBO ROTATION
16
PRISMS INSERTION
17
PRISMS ROTATION
18
FROST
19
ZOOM
20
FOCUS
21
FOCUS FINE
22
BEAM MODE
23
PAN
24
FINE PAN
25
TILT
26
FINE TILT
27
FUNCTION
28
RESET
29
LAMP CONTROL
30
MACRO EFFECTS
31
PAN-TILT TIME
32
COLOUR TIME
33
BEAM TIME
34
GOBO TIME
Page 13
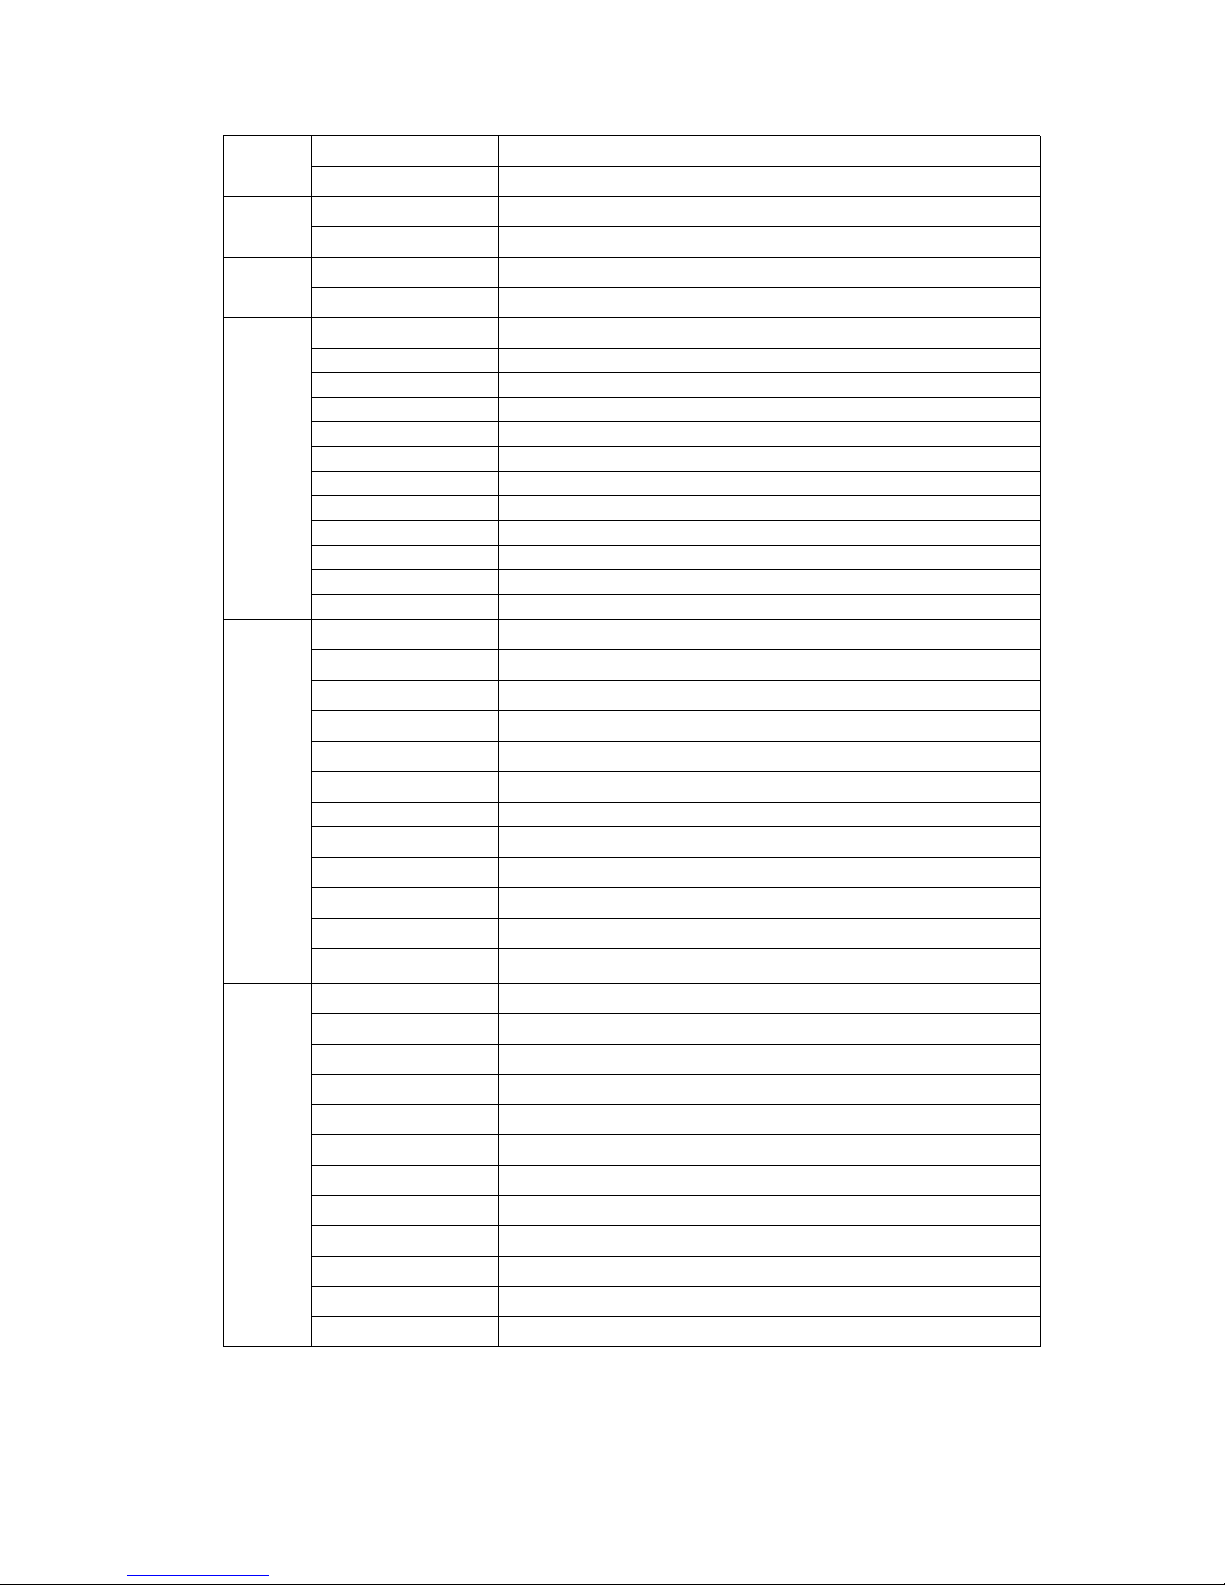
1
CYAN COLOUR WHEEL
0-255
Linear Cyan movement
2
MAGENTA COLOUR WHEEL
0-255
Linear Magenta movement
3
YELLOW COLOUR WHEEL
0-255
Linear Yellow movement
4
COLOUR 1
0
Empty position
28
Empty + Soft Filter
50
Soft Filter
80
Soft Filter + Lavender
100
Lavender
129
Lavender + CTO 3200K
150
CTO 3200K
181
CTO 3200K + CTO 2500K
204
CTO 2500K
235
CTO 2500K + Blue Wood (UV Filter)
255
Blue Wood (UV Filter)
5
COLOUR 2
0
Empty position
28
Empty + Dark Green
50
Dark Green
75
Dark Green + CTB
100
CTB
129
CTB + Dark Blue
150
Dark Blue
178
Dark Blue + H.M.Green
200
H.M.Green
235
H.M.Green + Dark Red
255
Dark Red
6
COLOUR 3
0
Empty position
28
Empty + Light Green
50
Light Green
77
Light Green + Pink
100
Pink
129
Pink + Aquamarine
150
Aquamarine
181
Aquamarine + Dark Orange
200
Dark Orange
231
Dark Orange + Light Orange
255
Light Orange
Page 14
7
STOPPER / STROBE
0-3
Light OFF
4-103
Strobe at linearly variable frequency
from low (1 flash/sec) to high (12 flashes/sec)
104-10 7
Light ON
108-20 7
Pulsation at linearly variable speed
from slow (0.5 flash/sec) to fast (12 flashes/sec)
208-21 2
Light ON
213-22 5
Random Strobe at low frequency
226-23 8
Random Strobe at medium frequency
239-25 1
Random Strobe at high frequency
252-25 5
Light ON
8
DIMMER
0 - 255
Light output linearly increase from no-light to maximum
brightness.
Dimmer blades move from totally closed to totally open in
0.02 seconds at maximum speed.
9
DIMMER FINE
0 - 255
Fine Dimmer positioning
10
STATIC GOBO CHANGE
0
Empty position
4
Gobo 1
8
Gobo 2
12
Gobo 3
16
Gobo 4
19
Gobo 5
23
Gobo 6
27
Gobo 7
31
Gobo 8
35
Gobo 9
38
Gobo 10
42
Gobo 11
46
Gobo 12
50
Gobo 13
54
Gobo 14
57
Gobo 15
61
Gobo 16
65
Gobo 17
69
Gobo 18
72 - 113
Continuous gobo wheel CCW rotation at linearly variable
speed from fast (60 rpm) to slow (5 rpm)
114 - 117
Stop rotation
118 - 159
Continuous gobo wheel CW rotation at linearly variable
speed from slow (5 rpm) to fast (60 rpm)
160 - 165
Gobo 1 shakes at variable speed from slow (24 bpm) to
Page 15
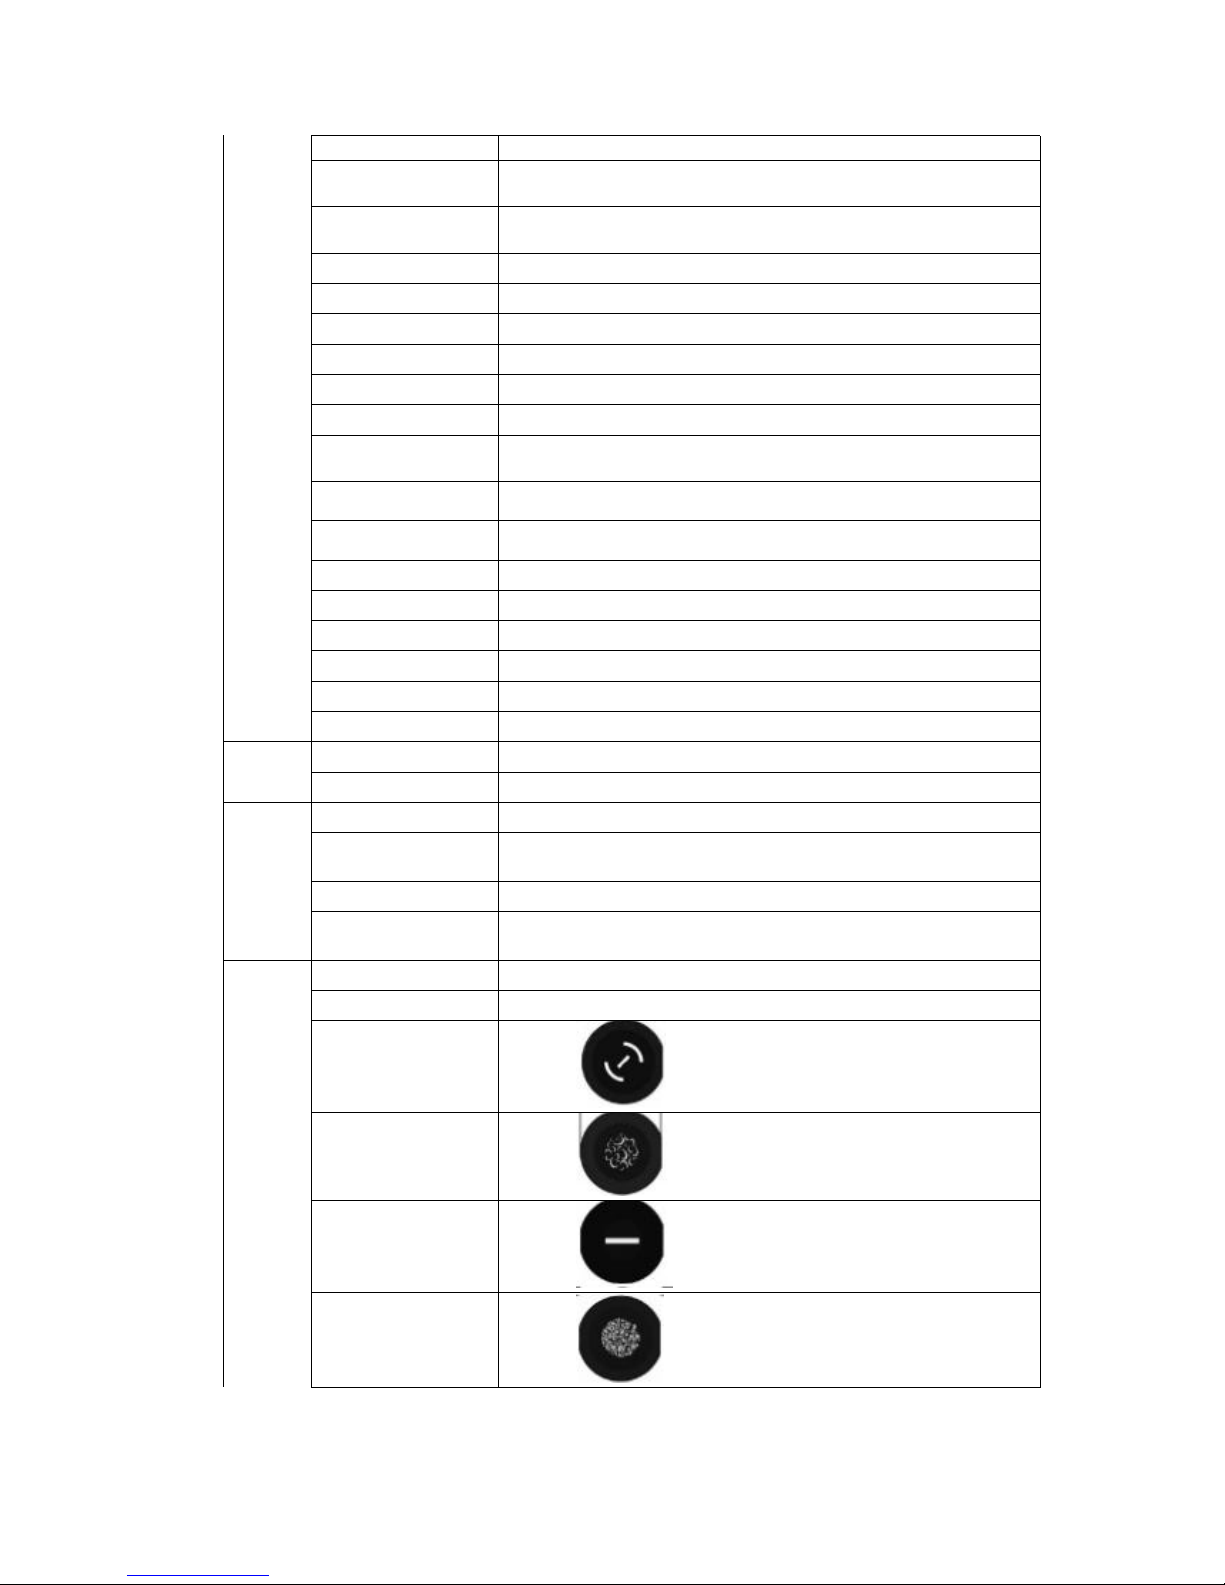
fast (600 bpm)
166 - 170
Gobo 2 shakes at variable speed from slow (24 bpm) to
fast (600 bpm)
171 - 175
Gobo 3 shakes at variable speed from slow (24 bpm) to
fast (600 bpm)
176 - 181
Gobo 4 shakes …
182 - 186
Gobo 5 shakes …
187 - 191
Gobo 6 shakes …
192 - 197
Gobo 7 shakes …
198 - 202
Gobo 8 shakes …
203 - 207
Gobo 9 shakes …
208 - 214
Gobo 10 shakes …
215 - 218
Gobo 11 shakes …
219 - 223
Gobo 12 shakes …
224 - 229
Gobo 13 shakes …
230 - 234
Gobo 14 shakes …
235 - 239
Gobo 15 shakes …
240 - 245
Gobo 16 shakes …
246 - 250
Gobo 17 shakes …
251 - 255
Gobo 18 shakes …
11
ANIMATION DISK INSERTION
0 - 255
Linear Animation Disk Insertion
12
ANIMATION DISK ROTATION
0 - 124
Continuous animation disk CW rotation at linearly
variable speed from fast (120 rpm) to slow (4.4 rph)
125 - 130
Stop rotation
131 - 255
Continuous animation disk CCW rotation at linearly
variable speed from slow (4.4 rph) to fast (120 rpm)
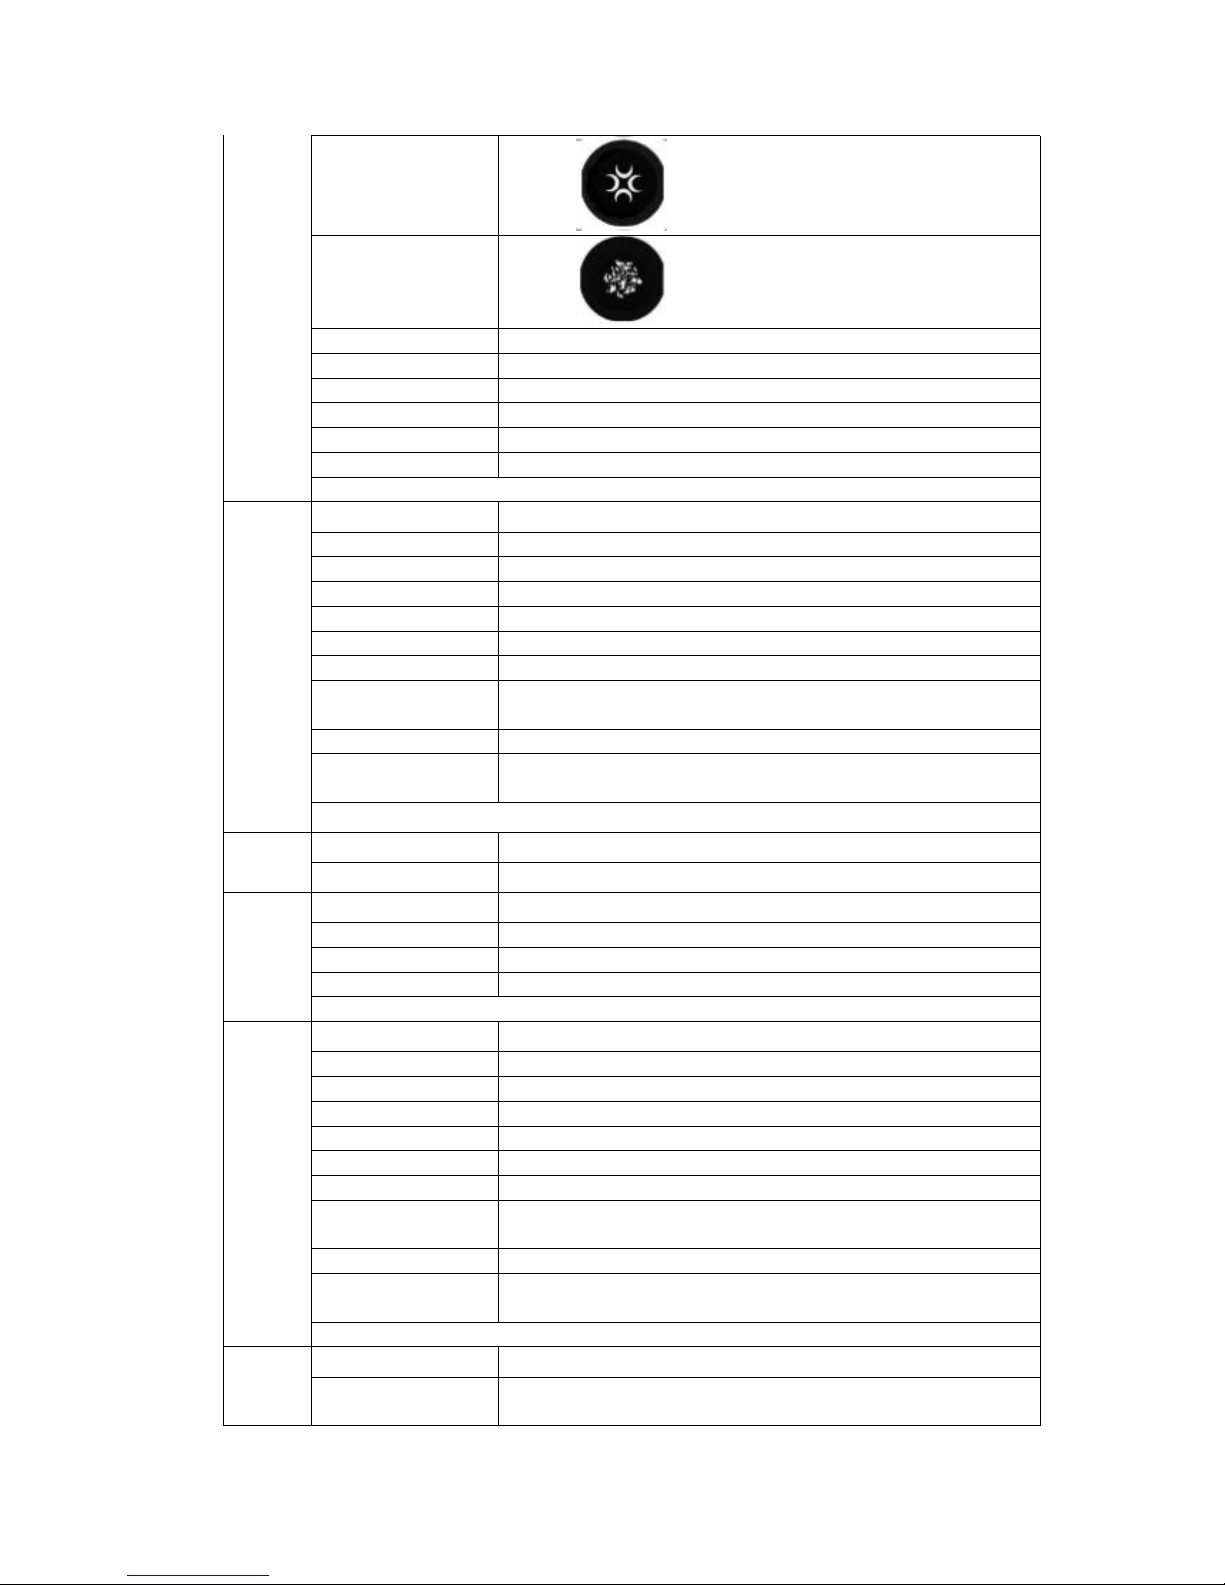
13
ROTATING GOBO SELECT
0 - 18
Empty position
19 - 37
Gobo 1
38 - 55
Gobo 2
56 - 74
Gobo 3
75 - 92
Gobo 4
Page 16
93 - 111
Gobo 5
112 - 129
Gobo 6
130 - 150
Gobo 1 shakes at variable speed from slow to fast
151 - 171
Gobo 2 shakes at variable speed from slow to fast
172 - 192
Gobo 3 shakes …
193 - 213
Gobo 4 shakes …
214 - 234
Gobo 5 shakes …
235 - 255
Gobo 6 shakes …
ROTATING GOBO effect disabled if BEAM MODE is working
14
GOBO ROTATION
0 - 21
Gobo indexing CW: 0° to 90° range
21-42
Gobo indexing CW: 90° to 180° range
42 - 63
Gobo indexing CW: 180° to 270° range
63 - 84
Gobo indexing CW: 270° to 360° range
84-105
84 - 105 Gobo indexing CW: 360° to 450° range
105-127
105 - 127 Gobo indexing CW: 450° to 540° range
128-190
Continuous gobo rotation CCW at linearly variable speed
from fast (180 rpm) to slow (2.2 rph)
191-192
Stop rotation
193-255
Continuous gobo rotation CW at linearly variable speed
from slow (2.2 rpm) to fast (180 rpm)
ROTATING GOBO effect disabled if BEAM MODE is working
15
FINE GOBO ROTATION
0-255
Open
16
PRISM INSERTION
0-10
Prism out
11-132
Prism 1 into the light beam
133-255
Prism 2 into the light beam
PRISM effect disabled if BEAM MODE is working
17
PRISMS ROTATION
0-21
Prism indexing CW: 0° to 90° range
21-42
Prism indexing CW: 90° to 180° range
42 - 63
Prism indexing CW: 180° to 270° range
63 - 84
Prism indexing CW: 270° to 360° range
84-105
Prism indexing CW: 360° to 450° range
105-127
Prism indexing CW: 450° to 540° range
128-190
Continuous prism rotation CCW at linearly variable
speed from fast (43 rpm) to slow (1.1 rph)
191-192
Stop rotation
193-255
Continuous prism rotation CW at linearly variable speed
from slow (1.1 rpm) to fast (43 rpm)
PRISM effect disabled if BEAM MODE is working
18
FROST
0-225
Frost moves linearly into the light beam
Frost blades move from no-diffusion to maximum
Page 17
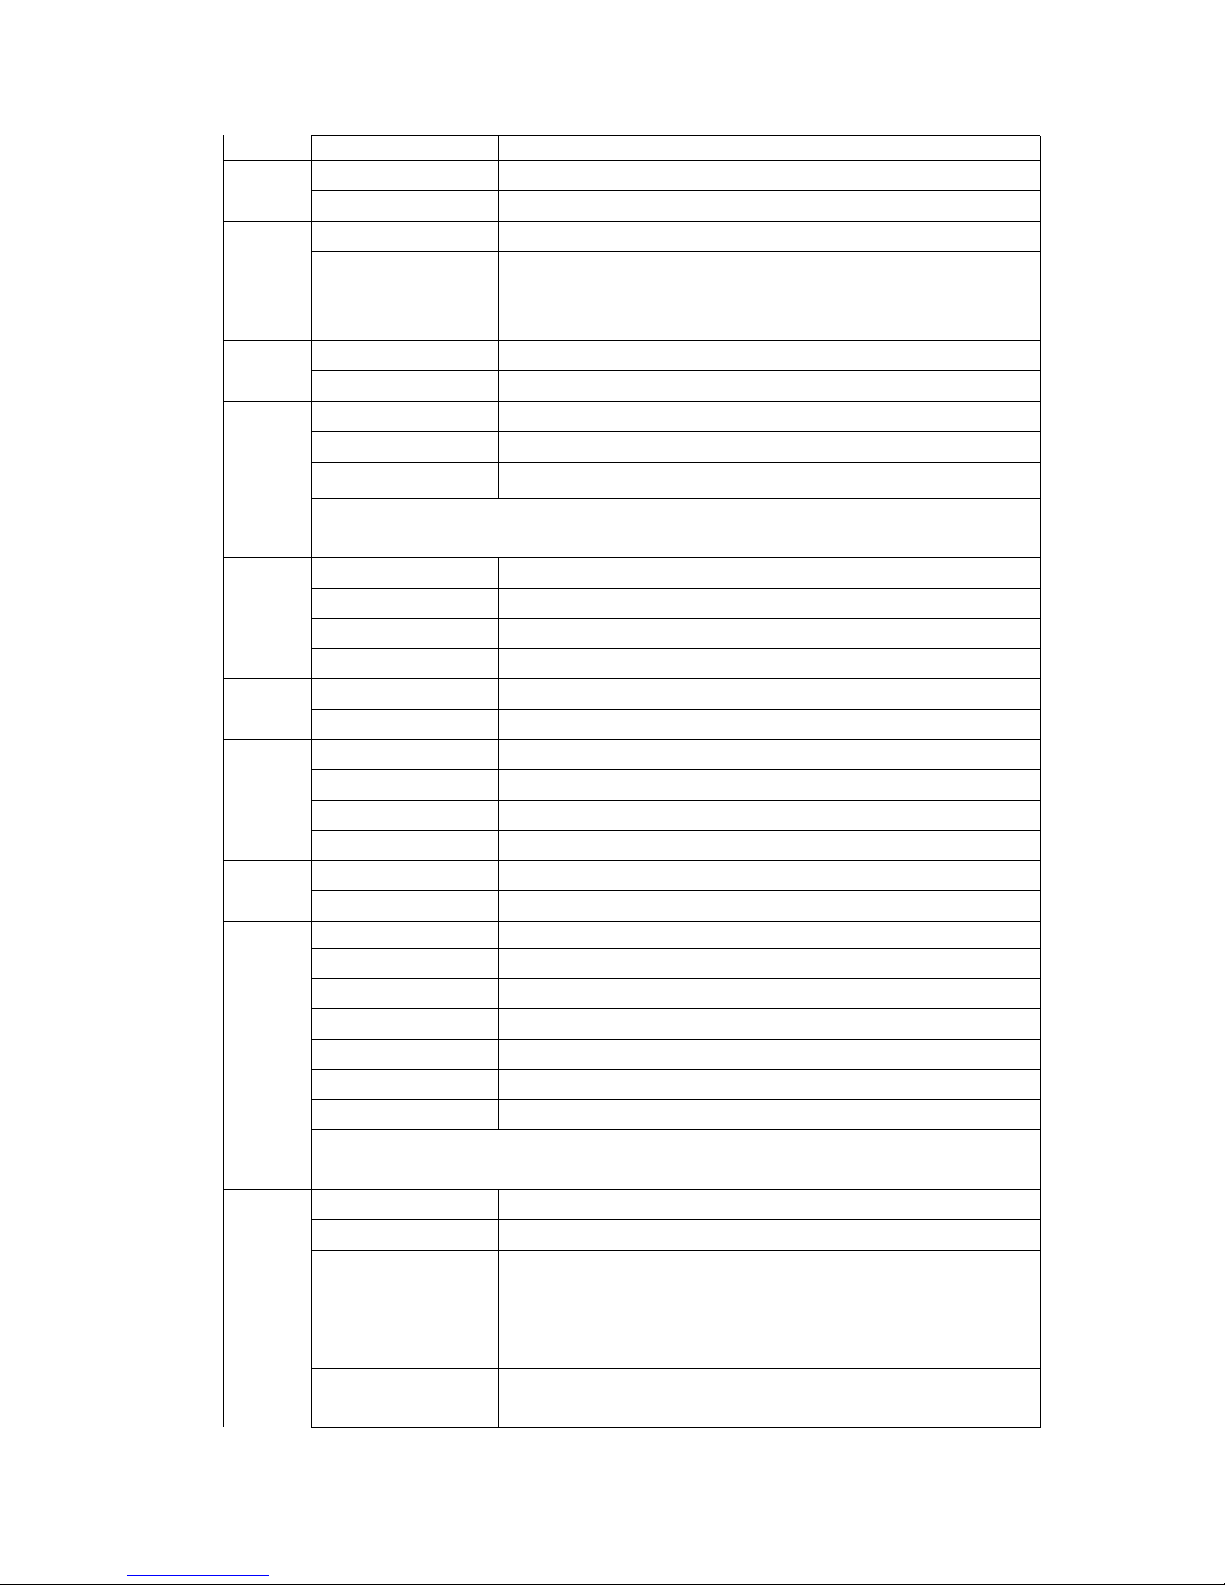
diffusion in 0.02 seconds at maximum speed.
19
ZOOM
0-225
Zoom linearly moves from narrow to wide beam
20
Frost
0-255
Focus moves linearly from far to near position.
Focus lenses move from farthest to nearest position in
1.11 seconds at maximum speed.
21
FOCUS FINE
0-255
Fine Focus positioning
22
BEAM MODE
0-127
Zoom / Autofocus mode
128-255
Beam Mode
ROTATING and CHANGE GOBO /PRISM / ZOOM effects disabled if BEAM
MODE is working
23
Pan
Pan movement/positioning CCW from 0° to 540°
0-255
Fast Speed: 3.517 sec
Normal Speed: 4.038 sec
24
FINE PAN
0-255
Fine Pan positioning CCW
25
TILT
Tilt movement/positioning from 0° to 244°
0-255
Fast Speed: 2.180 sec
Normal Speed: 2.274 sec
26
0-255
FINE TILT
Fine Tilt positioning
27
FUNCTION
0 - 11
Unused range
12 - 24
Fast Pan / Tilt speed (default)
25 - 37
Normal Pan / Tilt speed
63 - 75
CMY Full Range (default)
76 - 87
CMY Limited range
88 - 255
Free
The functions are activated/selected passing through the unused levels range
and staying in the necessary range for 5 seconds.
28
RESET
0 - 25
Unused range
26-76
Zoom Reset
Zoom Reset sequence is activated passing through the
unused levels range and staying in this range for 5
seconds
77 - 127
Pan / Tilt Reset
Pan/Tilt Reset sequence passing through the unused
Page 18
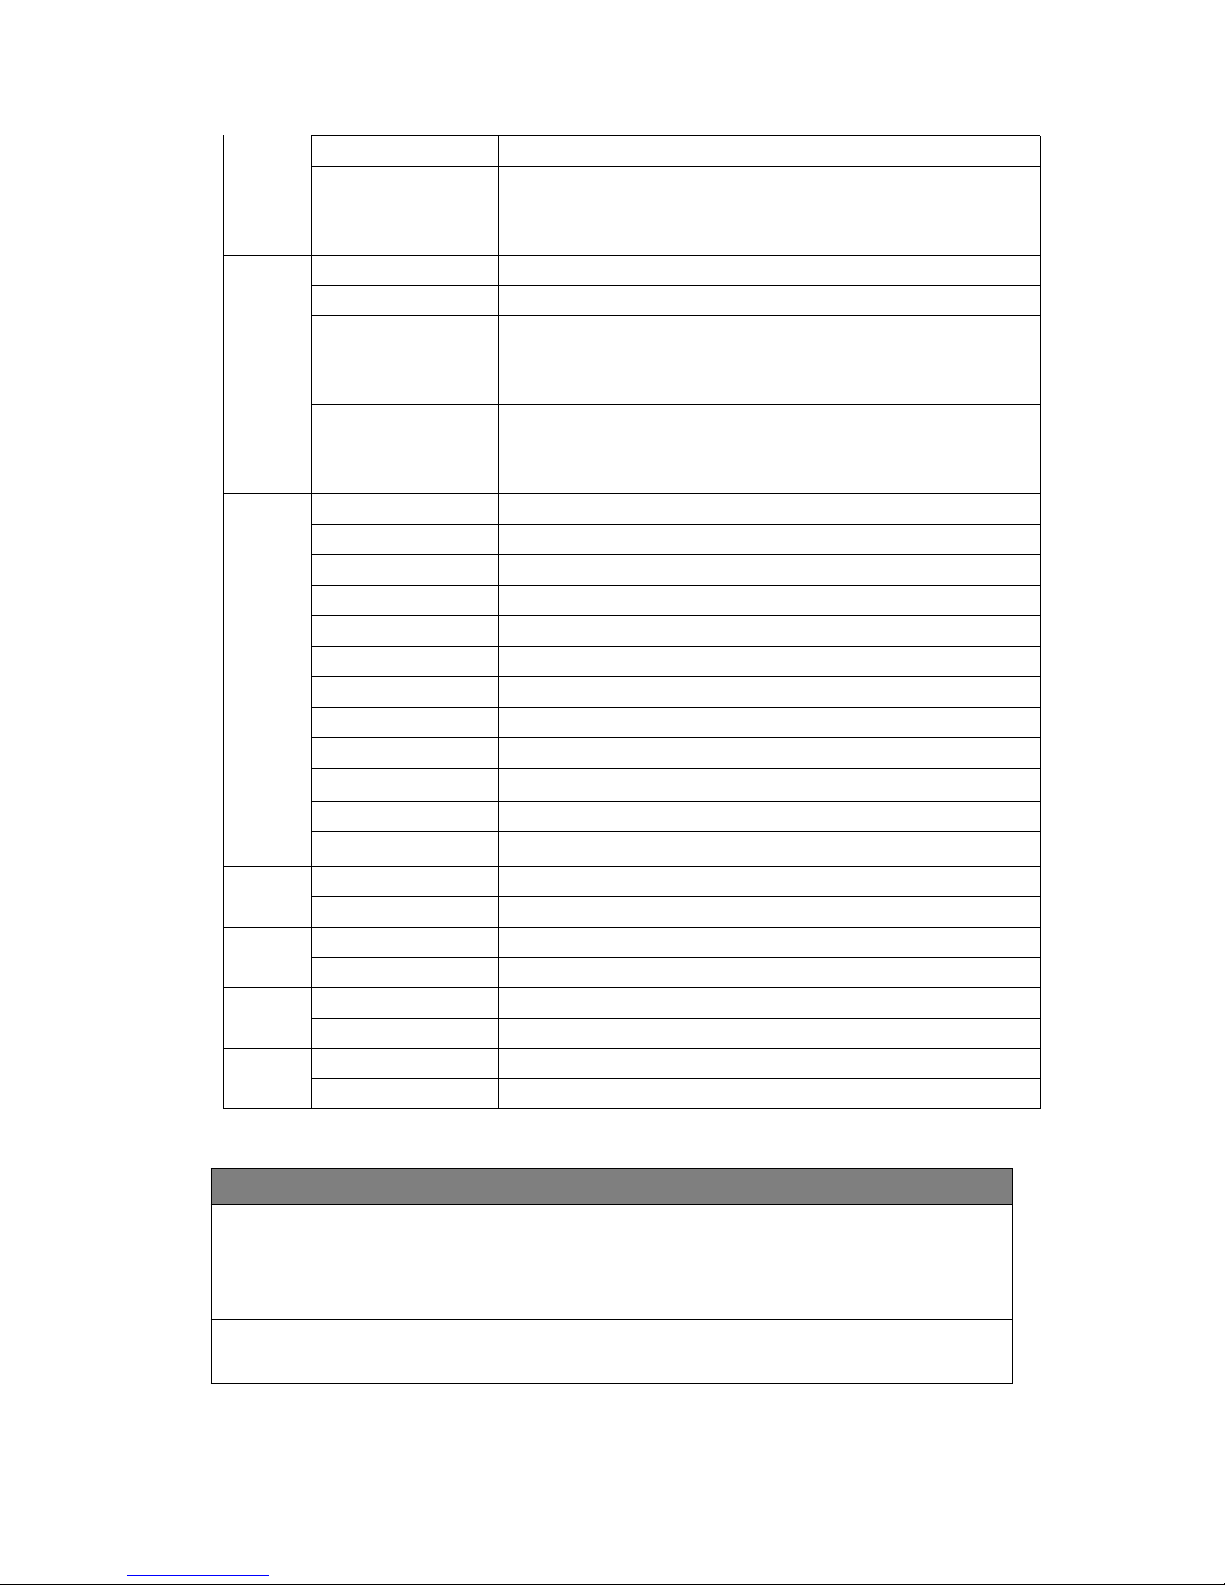
levels range and staying in this range for 5 seconds.
128-255
Complete Reset
All-effects Reset sequence passing through the unused
levels range and staying in this range for 5 seconds.
29
LAMP CONTROL
0 - 25
Unused range
26-100
Lamp OFF
Lamp switch-off passing through the unused levels range
and staying in this range for 5 seconds.
101-255
Lamp ON
Lamp switch-on passing through the unused levels range
and staying in this range for 5 seconds.
30
MACRO EFFECTS
0 – 7
Macro OFF
8 – 11
Standby
12 – 15
Standby black
16 – 45
Zoom IN Faded
46 – 75
Zoom OUT Faded
76 – 105
Zoom IN OUT
106 – 135
Standby Black 1
136 – 165
Zoom IN Faded Random
166 – 195
Zoom OUT Faded Random
196 – 225
Zoom IN OUT Random
226 - 255
Standby Black 2
31
PAN-TILT TIME
Pan - Fine Pan - Tilt - Fine Tilt
32
COLOUR TIME
Cyan - Magenta – Yellow
33
BEAM TIME
Dimmer - Frost - Prism – Focus - Zoom
34
GOBO TIME
Static Gobo – Rotating Gobo
IMPORTANT
To prevent accidental breakage of the effects, which could collide with each
others during transport, before switching the projector OFF, check that all the
fixture Channels have been excluded (DMX level = 0 bit.).
Remember to ‘’Switch-Off’’ the bulb, before to ‘’Switch-Off’’ the fixture.
Page 19
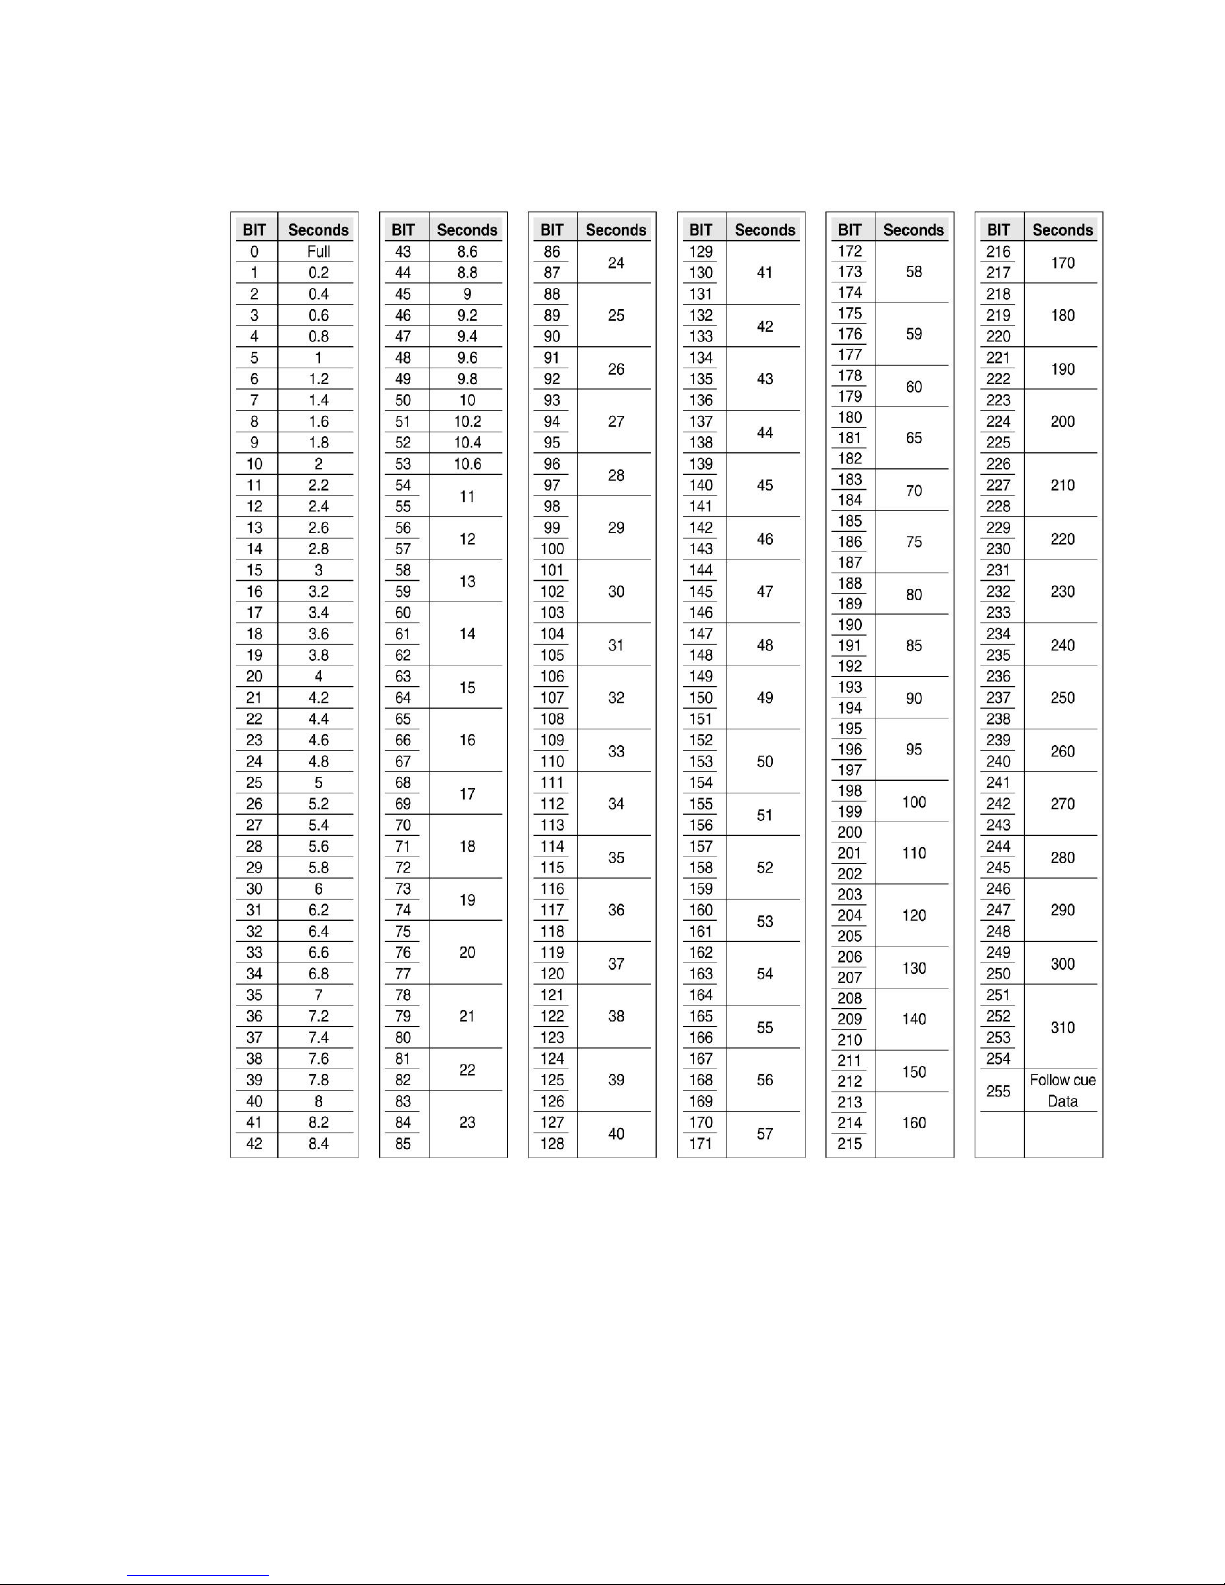
VECTOR MORE TIME TABLE
REMARK
The product has perfect performance and integrity packaging. All users should be
strictly comply with the warning and operating instructions as stated. Or we aren’t in
charge of any result by misusing.
Any damage resulting by misuse is not within the Company’s warranty.
Any fault or problem caused by neglecting the manual is also not in the charge of
dealers. Errors and omissions for every information given in this manual excepted.
All information is subject to change without prior notice.
 Loading...