

Page 1

BLE Door Window Sensor
Contents:
1. In the box………………………………………………………………………………………………………………………………………..2
2. app set up……………………………………………………………………………………………………………………………………….2
3. Product introduction……………………………………………………………………………………………………………………….3
4. Product installation………………………………………………………………………………………………………………………… 3
5. Safety information……………………………………………………………………………………………………………………………4
6. Maintenance.. ........................................................................................................................................ 6
7. FCC compliance notice……………………………………………………………………………………………………………………..7
We build your success in IoT.
Page 2
2
BLE Door window sensor
Quick Start Guide
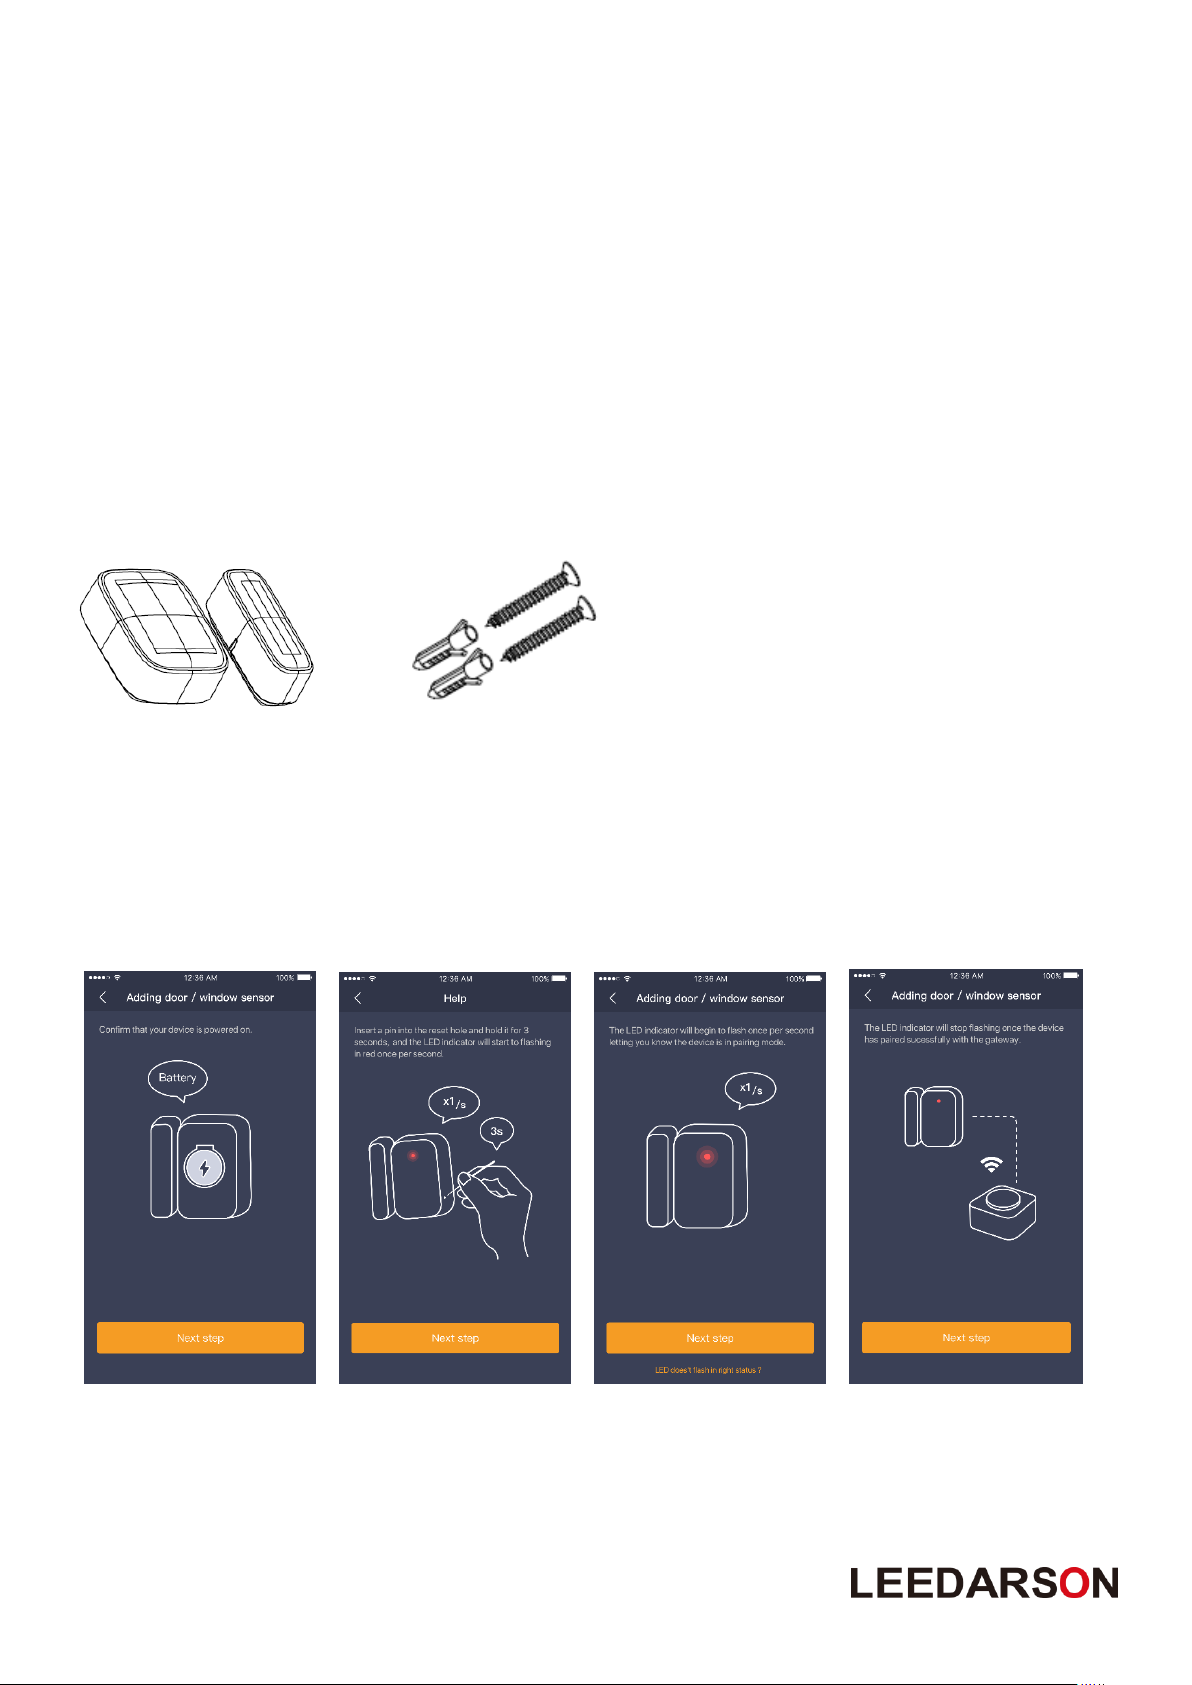
1. In the box
Door/Window sensor Screws
2. app set up
Remove the plastic sheet Reset sensor Sensor in pairing mode Sensor is connected to gateway
from battery cabinet. or mobile phone.
It’s power on now.
Page 3

3
3. Product Introduction
The Leedarson door window sensor is designed for use with scenes in home automation and security systems,
the door window sensor lets you know when door or windows is opened and can trigger different actions in
response to that open action (or close action).
Product main components and function overview:
LED indicator Reset pin hole Anti-Tamper switch
Sensor Magnet Battery Battery cover Bracket
① Reset: Use a pin to reset the pinhole switch for 3 seconds to reset the sensor. Sensor
can be found if App or gateway open to search device.
② LED indicator: if sensor has not been added to gateway, the LED will be blinking about one time per
second. The LED will turn off when joined to gateway successfully.
③ Anti-tamper:when the sensor is removed from the bracket, it can report tamper to gateway or
mobile phone.
4. Product Installation
This product can be mounted by screws or 3M adhesive tape, install it according to the following step:
① Remove the plastic sheet for isolating battery from battery cabinet.
② Use a pin to reset the pinhole switch for 3 seconds to reset the sensor. The sensor will be in pairing status.
This will cause a LED indicator to flash once per second. If sensor enrolled successfully, it will stop blinking
and stay on for 10 seconds. And then the LED will be turned off.
③ Stick the slim magnet and device onto the door/window, no further than 20 mm from the sensor, fix the
device on the door/window by screw or 3M tape.
④ The magnet and the main sensor must be less than 20 mm apart. Main sensor must be affixed to the
frame and the magnet must be affixed to the door window.
⑤ Should not be mounted on a metal frame.
Page 4

4
5. Safety Information
Battery Safety Information:
• This product contains a coin/button cell battery. If the coin/button cell battery is swallowed, it can cause severe internal
burns in just 2 hours and can lead to death. Keep away from babies and small children at all times.
• If battery is swallowed or placed inside any part of the body, immediately seek medical help.
• Risk of explosion if battery is replaced by an incorrect type.
• Dispose of used battery promptly.
Page 5

5
IMPORTANT: Do not expose to rain. Install the product at least 3 ft. from the door for optimum performance.
This alarm contains small parts and is not suitable for children. Periodically check the condition of the
batteries.
Disposal and Recycling Information:
Correct Disposal of this product. This marking indicates that this product should not be disposed with other household
wastes throughout the EU. To prevent possible harm to the environment or human health from uncontrolled waste disposal,
recycle it responsibly to promote the sustainable reuse of material resources. To return your used device, please use the
return and collection systems or contact the retailer where the product was purchased. They can take this product for
environment safe recycling.
Page 6

6
6. Maintenance
① How to reset a door/window sensor?
Keep pressing the reset key about 3 seconds, then the LED indicator will start blinking quickly. Once
release the key, the sensor will reset to factory setting and the LED indicator blinks once per second to
search a new enabled network.
② How to join a door/window sensor?
After the sensor is reset to the factory setting, the signal light blinks once per second and sensor starts
searching an enabled network. If sensor enrolled successfully, it will stop blinking and stay on for 10
seconds. If no available networks were found within 3 minutes, sensor will stop blinking and turn off.
③ If need to clean the sensor, please use a soft cloth with a little alcohol to wipe it after you cut off the
power.
④ This product is just for indoor use only.
⑤ Should be affixed indoors and away from sources of moisture.
⑥ This product has low voltage detection reminder. When the battery voltage is in low status, the
sensor will give out low battery signal to gateway.
⑦ Replace the battery timely on low battery warning to ensure the sensor works properly. Please use
battery model CR2032 only.
Remove sensor from bracket
(Fix bracket and move sensor up)
Remove screw from battery cover
Page 7

7
Open battery cover,
replace battery if battery is low power.
7. FCC compliance notice
FCC ID:2AB2Q8ASSBEH0
This device complies with Part 15 of the FCC Rules. Operation is subject to the following two conditions: (1) this device may
not cause harmful interference, and (2) this device must accept any interference received, including interference that may
cause undesired operation.
FCC Caution:
Changes or modifications not expressly approved by the part responsible for compliance could void the user's authority to
operate the equipment.
FCC Statement:
This equipment has been tested and found to comply with the limits for a Class B digital device, pursuant to part 15 of the
FCC Rules. These limits are designed to provide reasonable protection against harmful interference in a residential
installation. This equipment generates, uses and can radiate radio frequency energy and, if not installed and used in
accordance with the instructions, may cause harmful interference to radio communications. However, there is no guarantee
that interference will not occur in a particular installation. If this equipment does cause harmful interference to radio or
television reception, which can be determined by turning the equipment off and on, the user is encouraged to try to correct
the interference by one or more of the following measures:
—Reorient or relocate the receiving antenna.
—Increase the separation between the equipment and receiver.
—Connect the equipment into an outlet on a circuit different from that to which the receiver is connected.
—Consult the dealer or an experienced radio/TV technician for help.
 Loading...