

Page 1
We build your success in IoT.
LEEDARSON Motion sensor Pet immunity_Z-Wave
Page 2
Motion Sensor Pet immunity
Quick Start Guide
1. Product Introduction
The Motion Sensor lets you know when movement is detected in a certain area and can trigger different
actions in response to that movement (or lack of movement). It supports the pet immunity up to 80 lbs.
This sensor integrated Z-Wave communication module to connect with Z-Wave gateway, and this device
can be adapted to EU(868.42Mhz) or US(908.42MHz).
If you want your Motion Sensor to be a security device that use secure/encrypted message to
communicate in a Z-Wave network, then a security enabled Z-Wave controller is needed.
The motion sensor can be included and operated in any Z-Wave network with other Z-Wave certified
devices from other manufacturers and/or other applications. All non-battery operated nodes within the
network will act as repeaters regardless of vendor to increase reliability of the network.
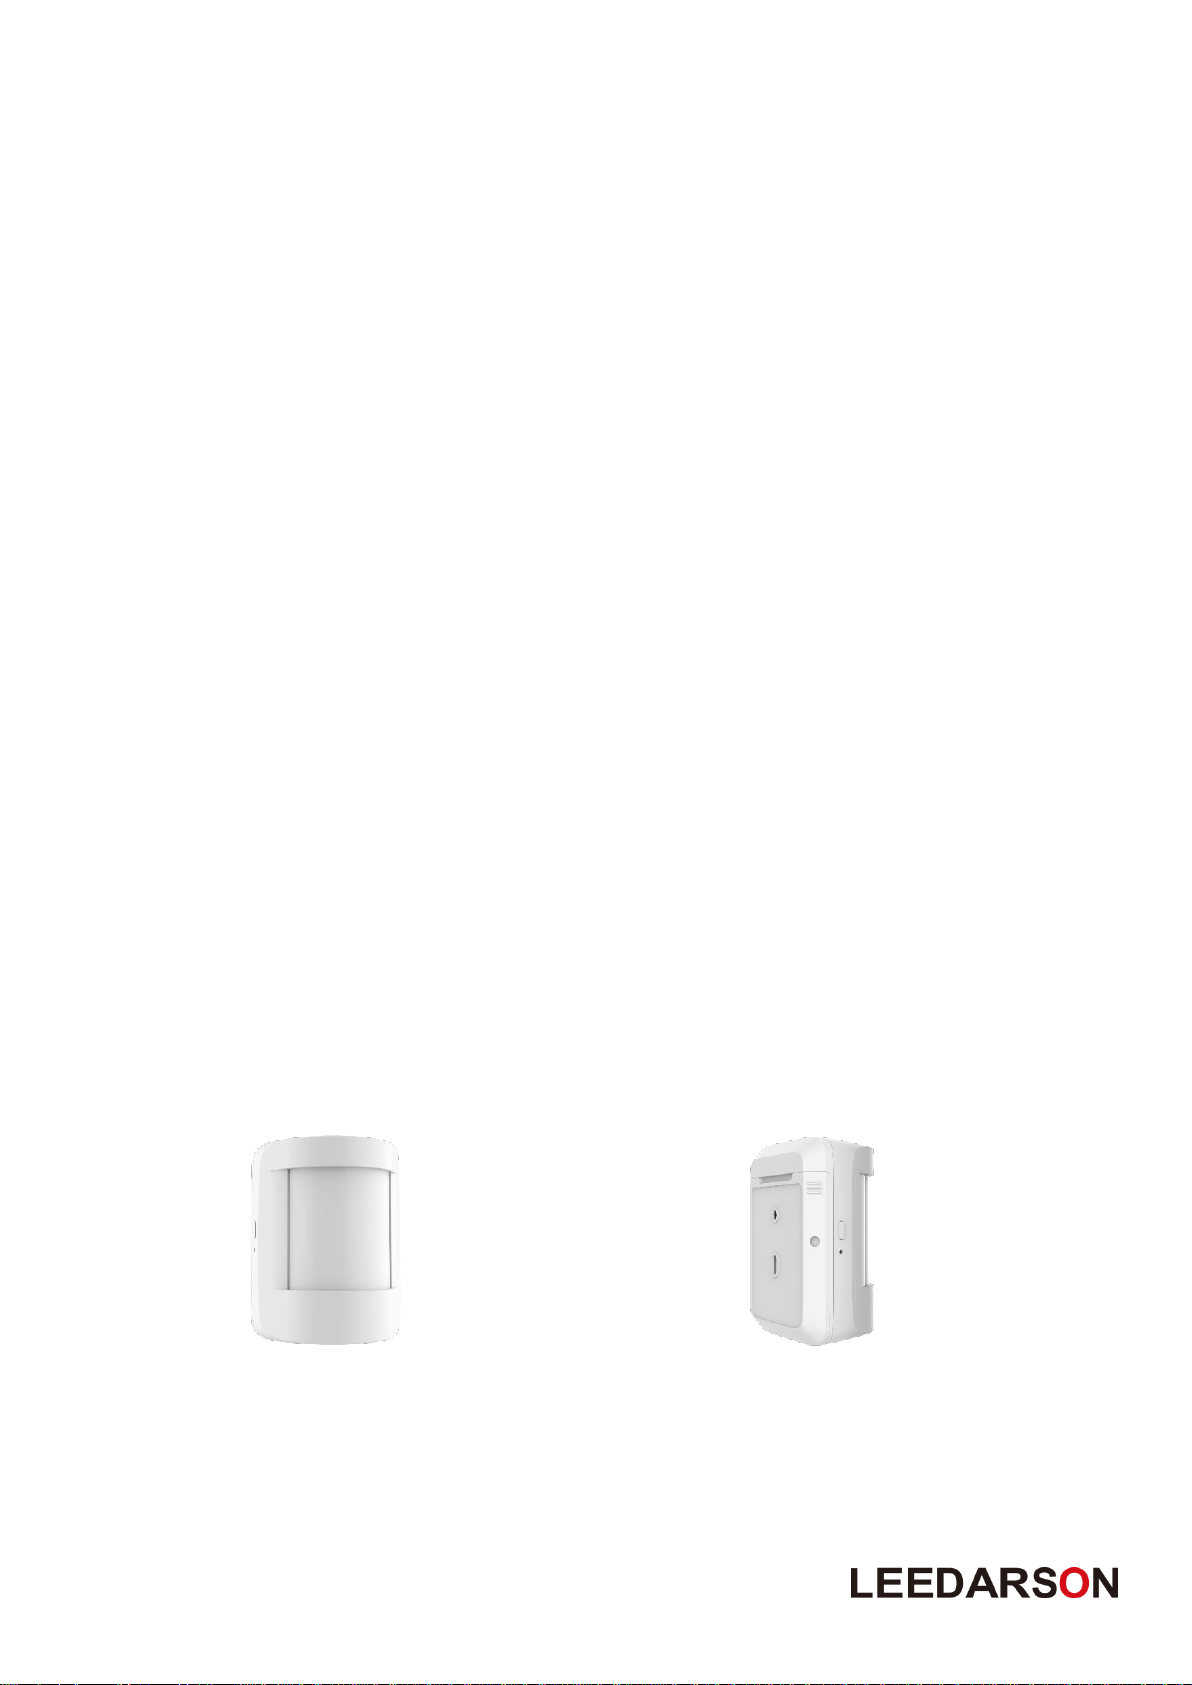
2. Product Appearance
Product appearance and function overview.
2
Page 3
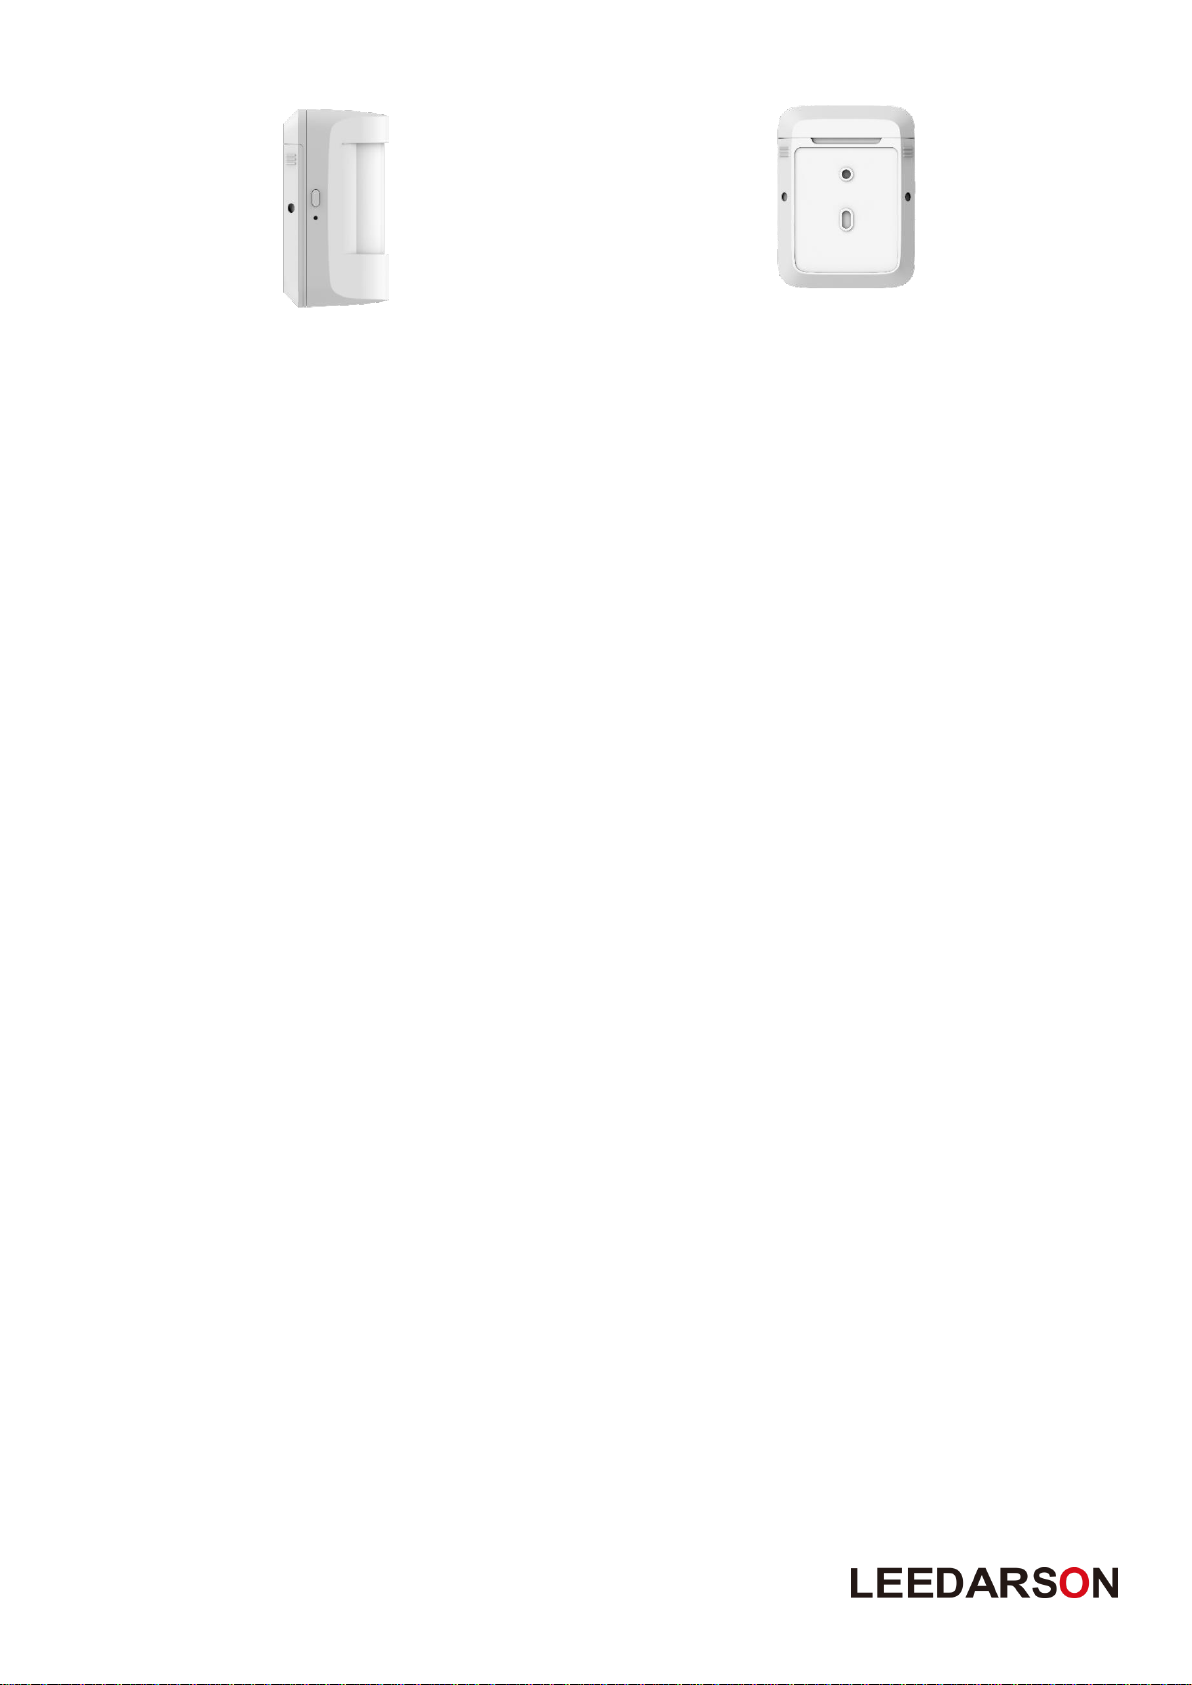
Button:
Short press reset button into learning mode, then the sensor can inclusion or exclusion from the
Z-Wave network.
Hold the key for 5s to reset the sensor, after reset, Sensor will send “Device_Reset_Locally” to the
main controller and exclude from the Z-Wave network when the Button is released, this
procedure will reset the Sensor to factory default.
Short press button for 3 times then the sensor sending wake up notification to gateway,
and LED will fast blink when sending data, send over then the LED turn off..
3
Page 4

Specification
Detection angle
80 degrees
Detection distance
8 meters / 26.25 feet
Pet immune
80 lbs (36 kgs)
Mounting height
6.23 ft. to 7.55 ft.
(1.9m to 2.3m)
Light sensor
20 lux for
day/night(bright/dark)
Protocol
Z-Wave
908.42MHz (US)
868.42MHz(EU),
868.40MHz,868.42MHz, 869.85MHz
921.42MHz (AU)
Power source
Battery-powered
Battery type
CR123A X 1
Battery life
3 years
Anti-Tamper
YES
Low power alarm
YES
Certifications
CE/FCC
4
Page 5

3. Features/Capabilities:
Supports pet immunity up to 80 lbs (36 kgs)
Use PIR & Fresnel lens technology
Easy installation with bracket
Low battery alarm
Equipped with an anti-tamper switch that reports any tampering
4. Installation Position and Notes
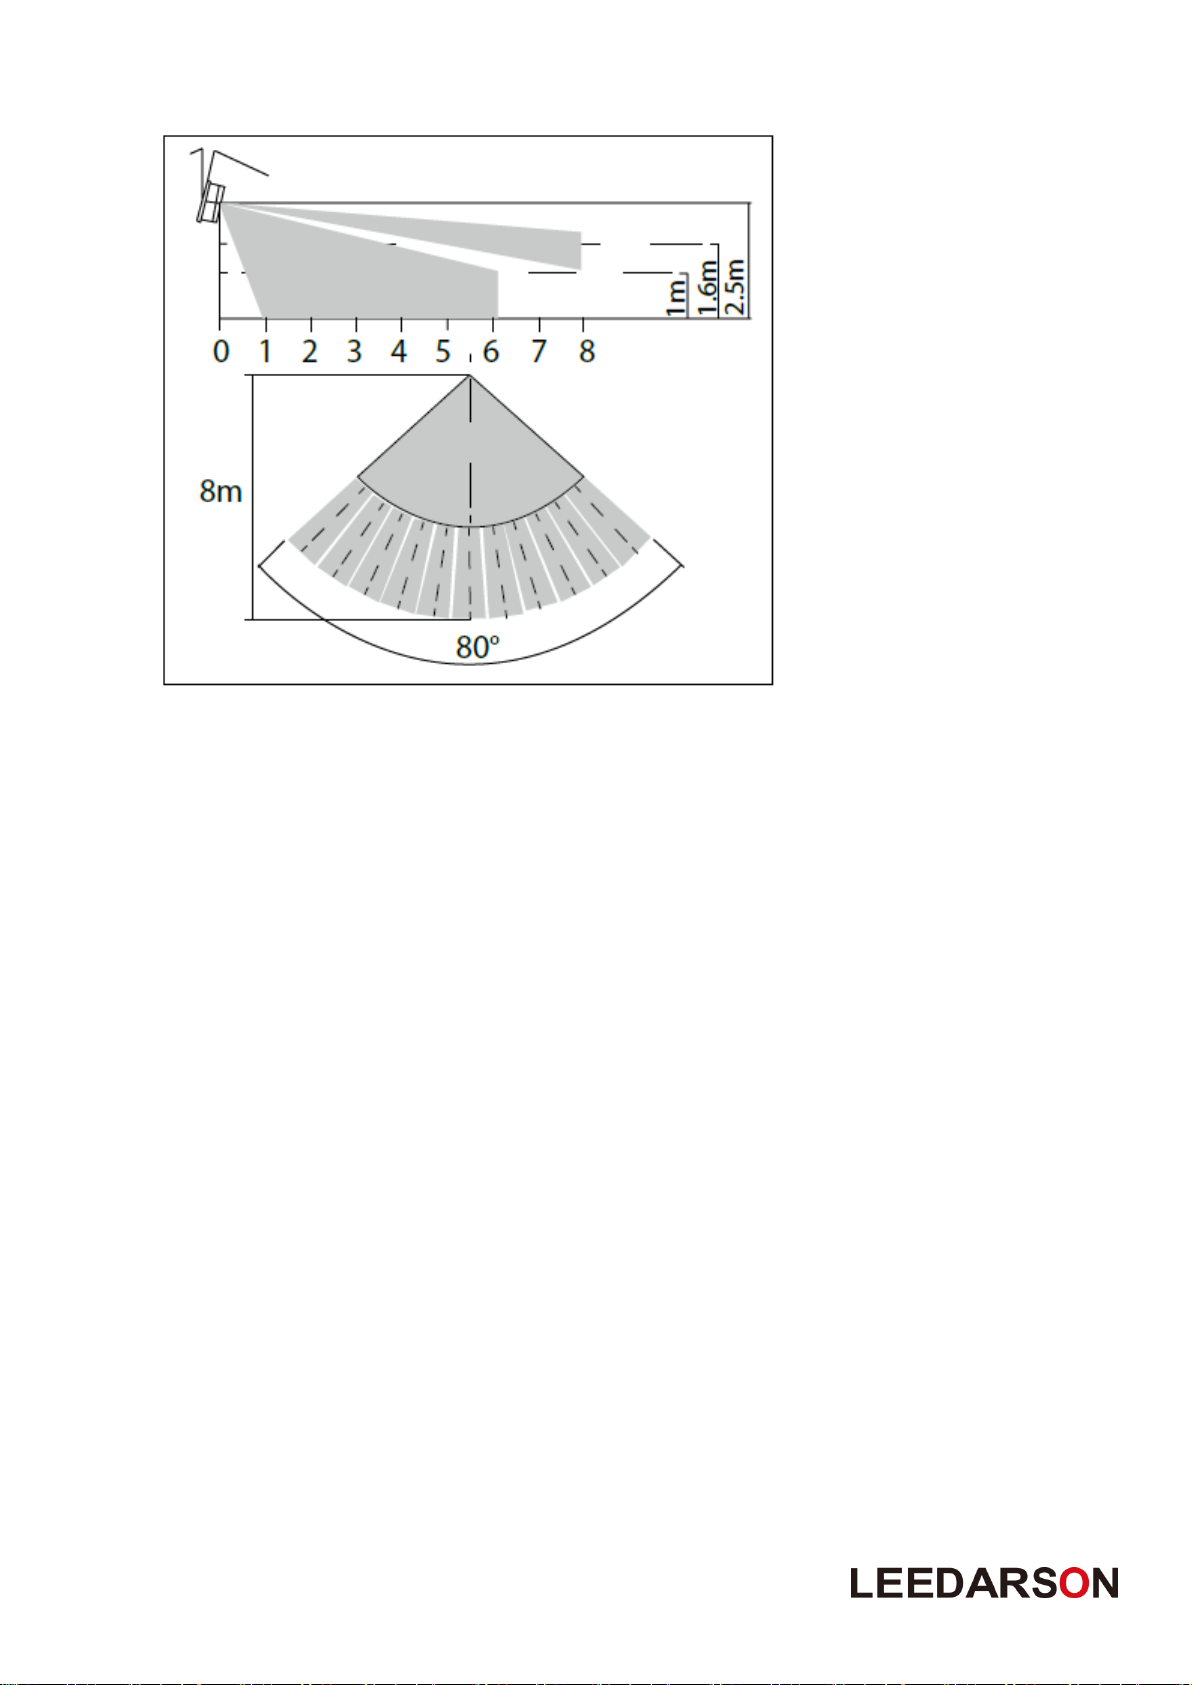
1. Installation position should be chosen at the area which the bass-by will be across, try to make the
bass-by in the detection area as below.
5
Page 6
Side view
Top view
2. Do avoid installation near air-conditioner, electric fans, refrigerators, ovens or other places where
temperature easy change.
3. In order not to affect the detecting result, there should be no object in front of the produces lens.
4. Building (such as the wall) will shorten the distance of wireless communication.
5. This device can be mounted on the wall only, it cannot be installed on the ceiling.
5. Product Installation
Adding the device as accessories, install it according to the diagram below:
① Choose the installation location on the wall, fix the bracket by screw or 3M adhesion tape on the
wall.
② Take off the bracket in the back, and draw out the battery insulation sheet, then assembly the
bracket.
③ Assembly the main body to the bracket.
6
Page 7

Trigger
Description
Power on
In the network: Send Battery report and Wake up notification, the LED
turn on within 1 second.
Not in the network: Only the LED turn on within 5 second.
Short press
button one time
Add the Motion Sensor into the Z-Wave network:
1. Power on your Motion Sensor, and let your Z-Wave controller into
add/inclusion mode.
2. Implement the button action, the Motion Sensor will send out a node
info security CC in command class list (Security inclusion), the LED
will be fast blink for 60 seconds.
3. If the inclusion is successful, the LED will be turn on within 2 seconds.
If failed, LED will be turn off forever, and please repeat the steps in
above.
Remove Motion Sensor from a Z-Wave network:
1. Power on your Motion Sensor, and let the Z-Wave primary controller
into remove mode.
2. Press the button on the Motion Sensor, the LED will be turn on for 60
seconds.
3. If Motion Sensor has been successfully removed from your Z-Wave
network, the LED will be fast blink 2 seconds. If failed, LED will be
turn off forever, and please repeat the steps in above.
Short press
button three time
In the network: Send Wake up notification, and LED will fast blink when
sending data, send over then the LED turn off.
Not In the network: NOP.
Press and hold
more than 5
seconds
Reset Motion Sensor to factory default.
NOTE:
1. Triggering this action, in 5 seconds LED will be fast blink. The LED
will be turn on within 2 second until hold time is equal to 5 seconds.
Motion Sensor will send “Device_Reset_Locally” to the main
controller and exclude from the Z-Wave network when the button is
released, this procedure will reset the sensor to factory default.
2. Please use this procedure only when the network primary controller is
missing or otherwise inoperable.
3. When not in the network, ignore this operation.
6. Product Usage
Function of Action Button:
6.1 All functions of each trigger:
Function Of Action
7
Page 8

Motion is
triggered
In the network: Send Notification report and Sensor multilevel report and
Basic set (Setup configuration parameter 0x0E to 0x01), and the LED will
be blink 0.5 second.
Not in the network: NOP.
Tamper switch is
triggered
In the network: Send Notification report, and the LED will be blink 0.5
second.
Not in the network: Only the LED will be blink 0.5 second.
Parameter
Value
Z-Wave Plus Version
0x01
Role Type
0x06
(ZWAVEPLUS_INFO_REPORT_ROLE_TYPE_SLAVE_SLEEPING_REPOR
TING)
Node Type
0x00 (ZWAVEPLUS_INFO_REPORT_NODE_TYPE_ZWAVEPLUS_NODE)
6.2 Caution:
This device complies with Part 15 of the FCC rules. Operation is subject to the following two conditions:
(1) this device may not cause harmful interference, and (2) this device must accept any interference
received, including interference that may cause undesired operation.
Changes or modifications not expressly approved by the party responsible for compliance could void the
user's authority to operate the equipment.
Hereby, Corporation declares that this device is in compliance with the essential requirements and other
relevant provisions of Directive 2014/53/EU
6.3 Low voltage alarm to remind changing battery.
This product has low voltage detection reminder, when the battery voltage is in low status, the
detector will give out low battery signal to controller.
6.4 Z-Wave command.
Special Rule Of Each Command Class
Z-Wave Plus Info Report Command Class
8
Page 9
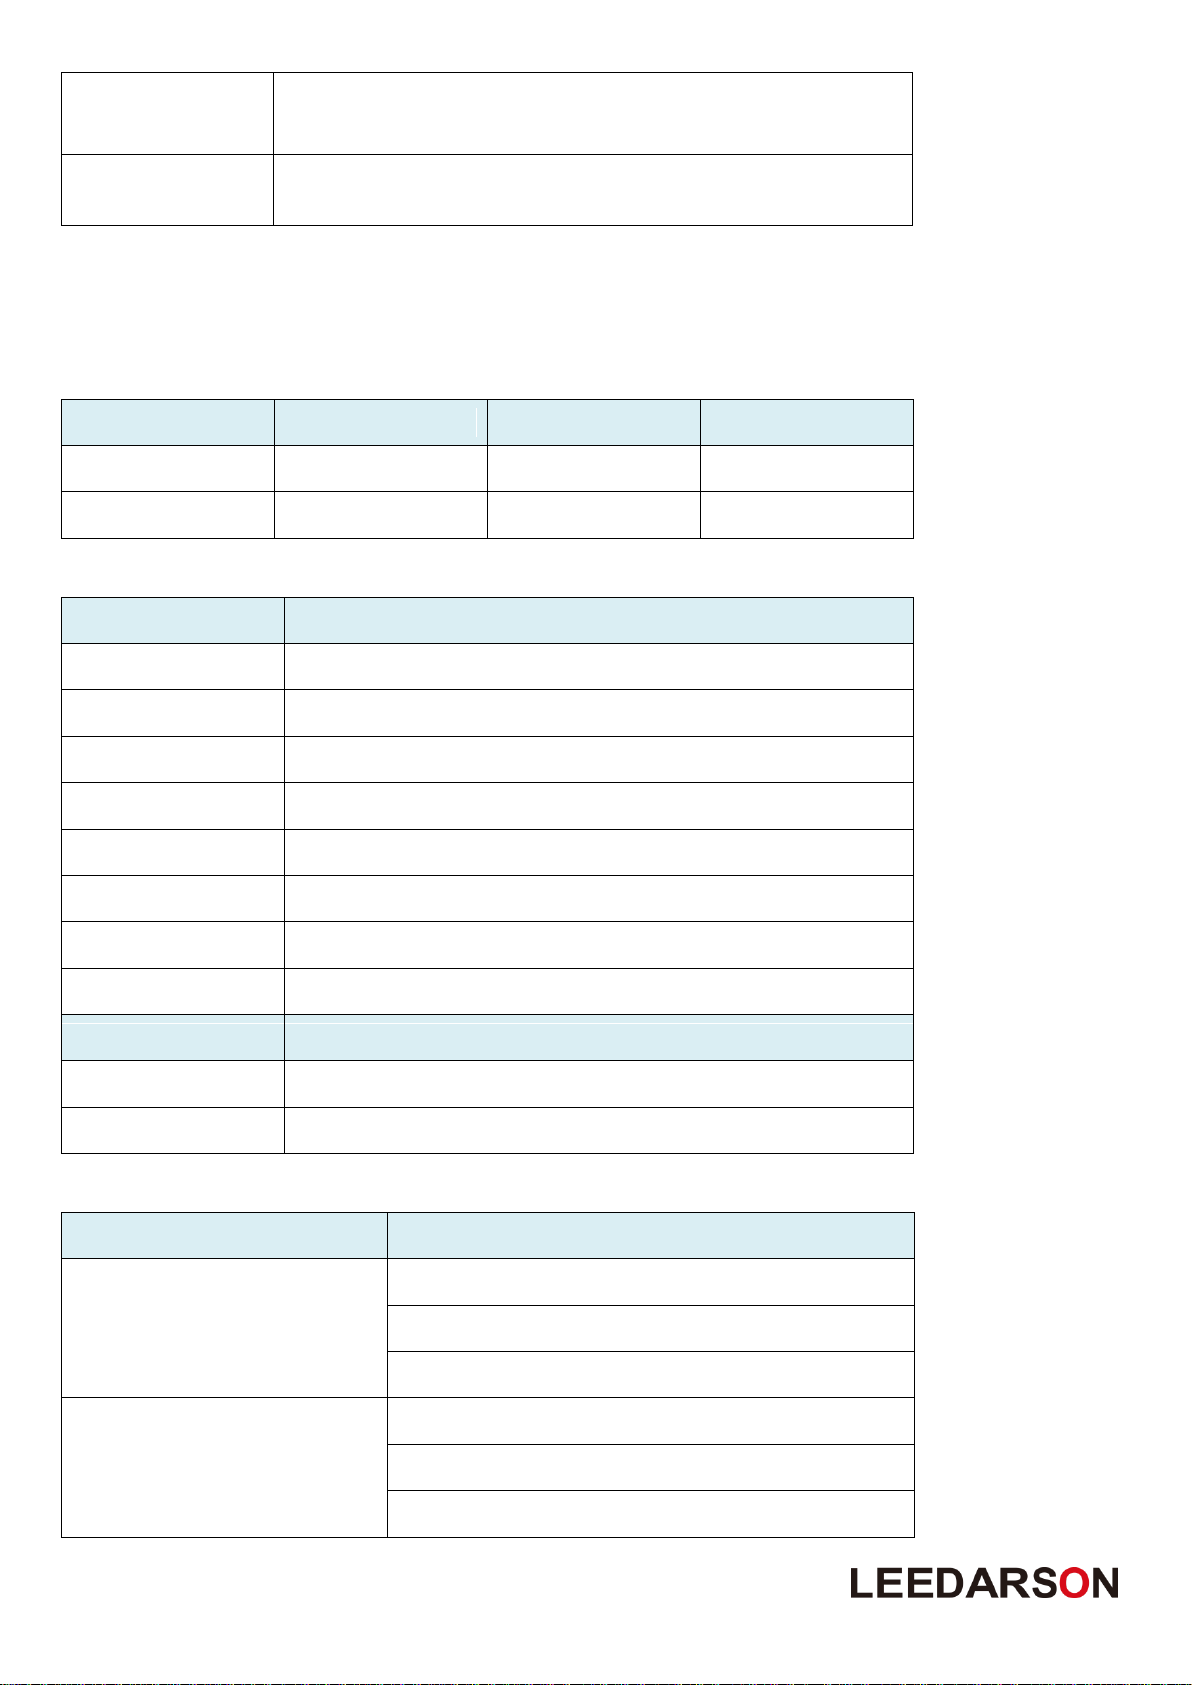
Installer Icon Type
0x0C07
(ICON_TYPE_SPECIFIC_SENSOR_NOTIFICATION_HOME_SECURITY)
User Icon Type
0x0C07
(ICON_TYPE_SPECIFIC_SENSOR_NOTIFICATION_HOME_SECURITY)
Grouping identifier
Group Name
Profile MS
Profile LS
01
Lifeline
0x00
0x01
02
On/Off control
0x71
0x07
Group 1
Command List Support
Command Class
COMMAND_CLASS_NOTIFICATION(0x71)
Command
NOTIFICATION_REPORT(0x05)
Command Class
COMMAND_CLASS_BATTERY(0x80)
Command
BATTERY_REPORT(0x03)
Command Class
COMMAND_CLASS_DEVICE_RESET_LOCALLY(0x5A)
Command
DEVICE_RESET_LOCALLY_NOTIFICATION(0x01)
Command Class
COMMAND_CLASS_SENSOR_MULTILEVEL(0x31)
Command
SENSOR_MULTILEVEL_REPORT(0x05)
Group 2
Command List Support
Command Class
COMMAND_CLASS_BASIC(0x20)
Command
BASIC_SET(0x01)
Notification Type
Notification Event
HOME_SECURITY (0x07)
(0x00) NO_EVENT
(0x03) TAMPERING_COVERING_REMOVED
(0x08) MOTION_DETECTION_UNKNOWN_LOCATION
POWER_MANAGEMENT (0x08)
(0x0A) REPLACE_BATTERY_SOON
(0x0B) REPLACE_BATTERY_NOW
(0x00) NO_EVENT
Association Command Class
Motion Sensor supports 2 association groups and max 5 nodes for each group.
Association Group Info Command Class
Association Group Info
Association Group Command List
Notification Commands
9
Page 10
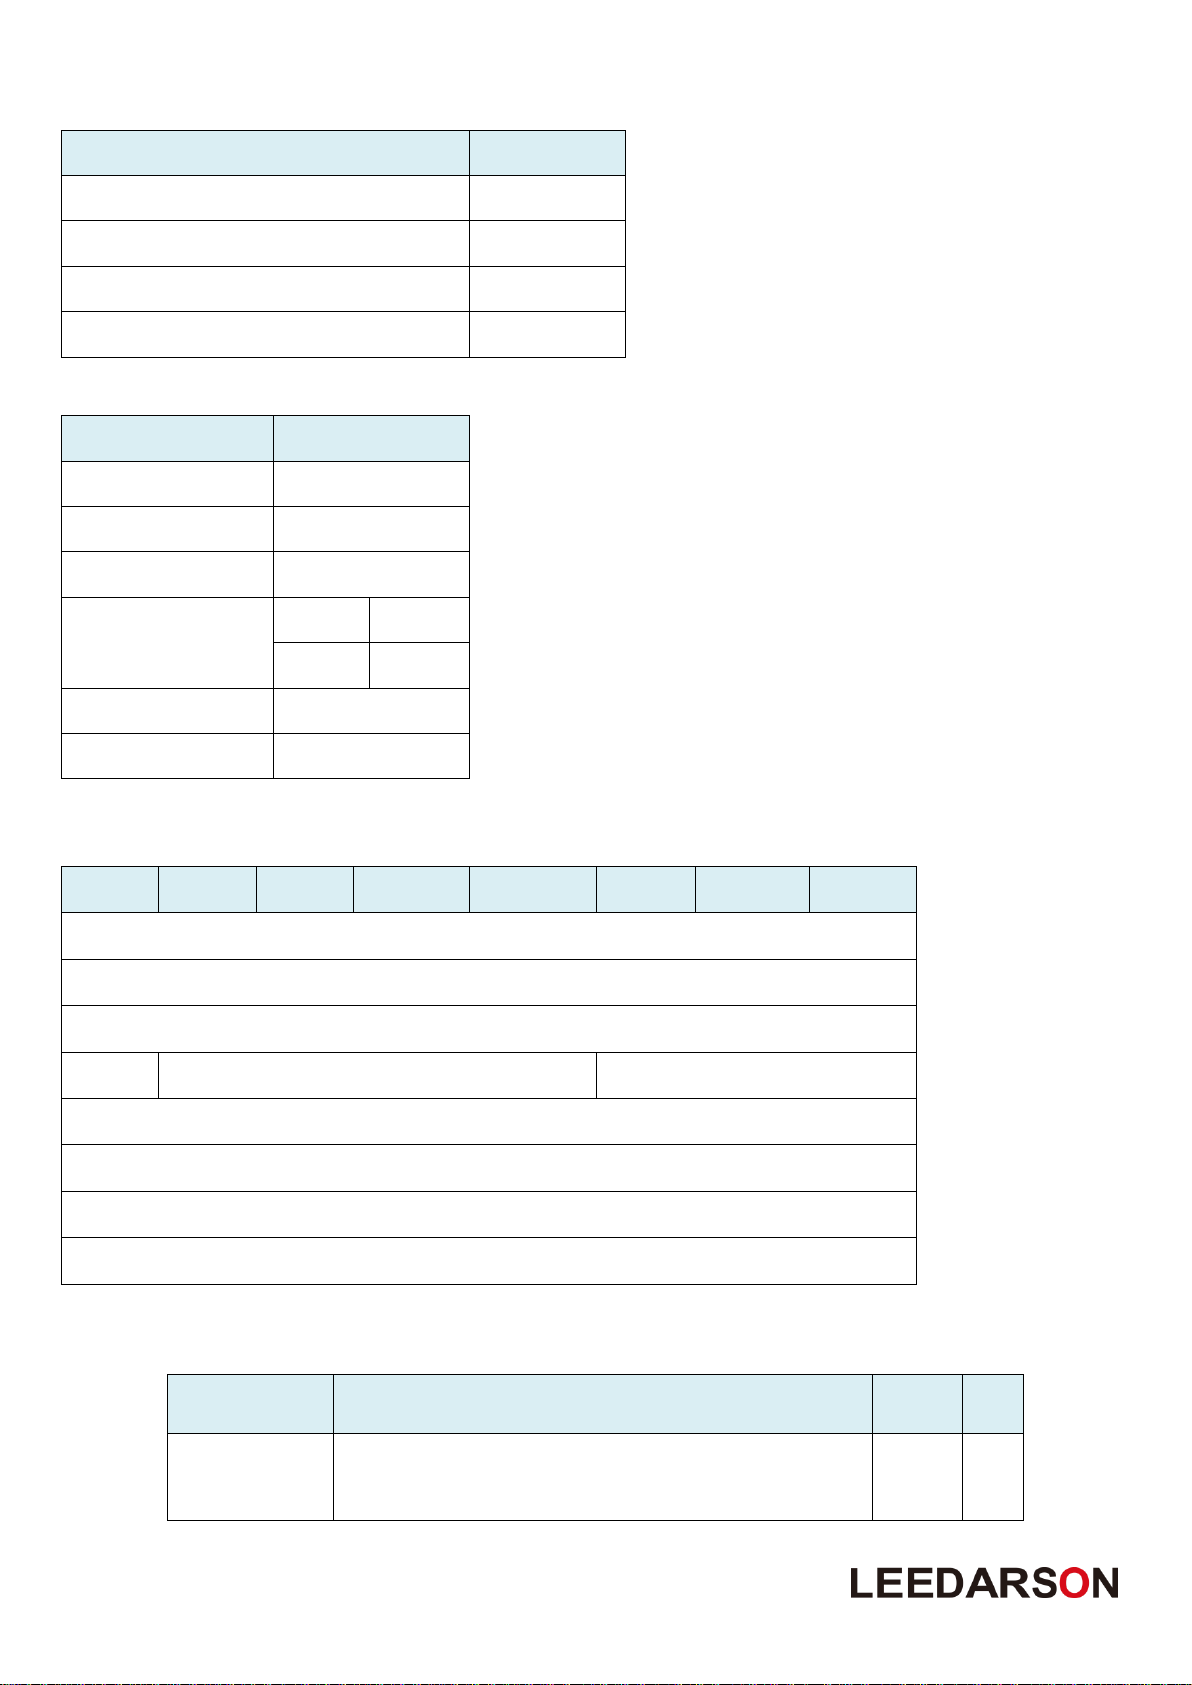
Parameter
Value
WAKEUP_PAR_DEFAULT_SLEEP_TIME
0x0E10
WAKEUP_PAR_MAX_SLEEP_TIME
0x28DE80
WAKEUP_PAR_MIN_SLEEP_TIME
0x3C
WAKEUP_PAR_SLEEP_STEP
0x3C
Parameter
Value
Manufacturer ID 1
0x03
Manufacturer ID 2
0x00
Product Type ID 1
0x03
Product Type ID 2
EU
0x00
NA
0x01
Product ID 1
0x00
Product ID 2
0x26
7 6 5 4 3 2 1
0
Command Class = COMMAND_CLASS_CONFIGURATION
Command = CONFIGURATION_SET
Parameter Number
Default
Reserved
Size
Configuration Value 1(MSB)
Configuration Value 2
……
Configuration Value n(LSB)
Parameter
Number
Description
Default
Value
Size
0x0A (10)
Low battery power level of alarm threshold values: the
value range are 0~50 for percentage, the battery low
power level can setting 0%~50%.
0x0A
1
Wake Up Interval Capabilities Report CC
Manufacturer Specific Report
Configuration Set Command Class
Command Format
Parameter Number Definitions (8 bit)
10
Page 11
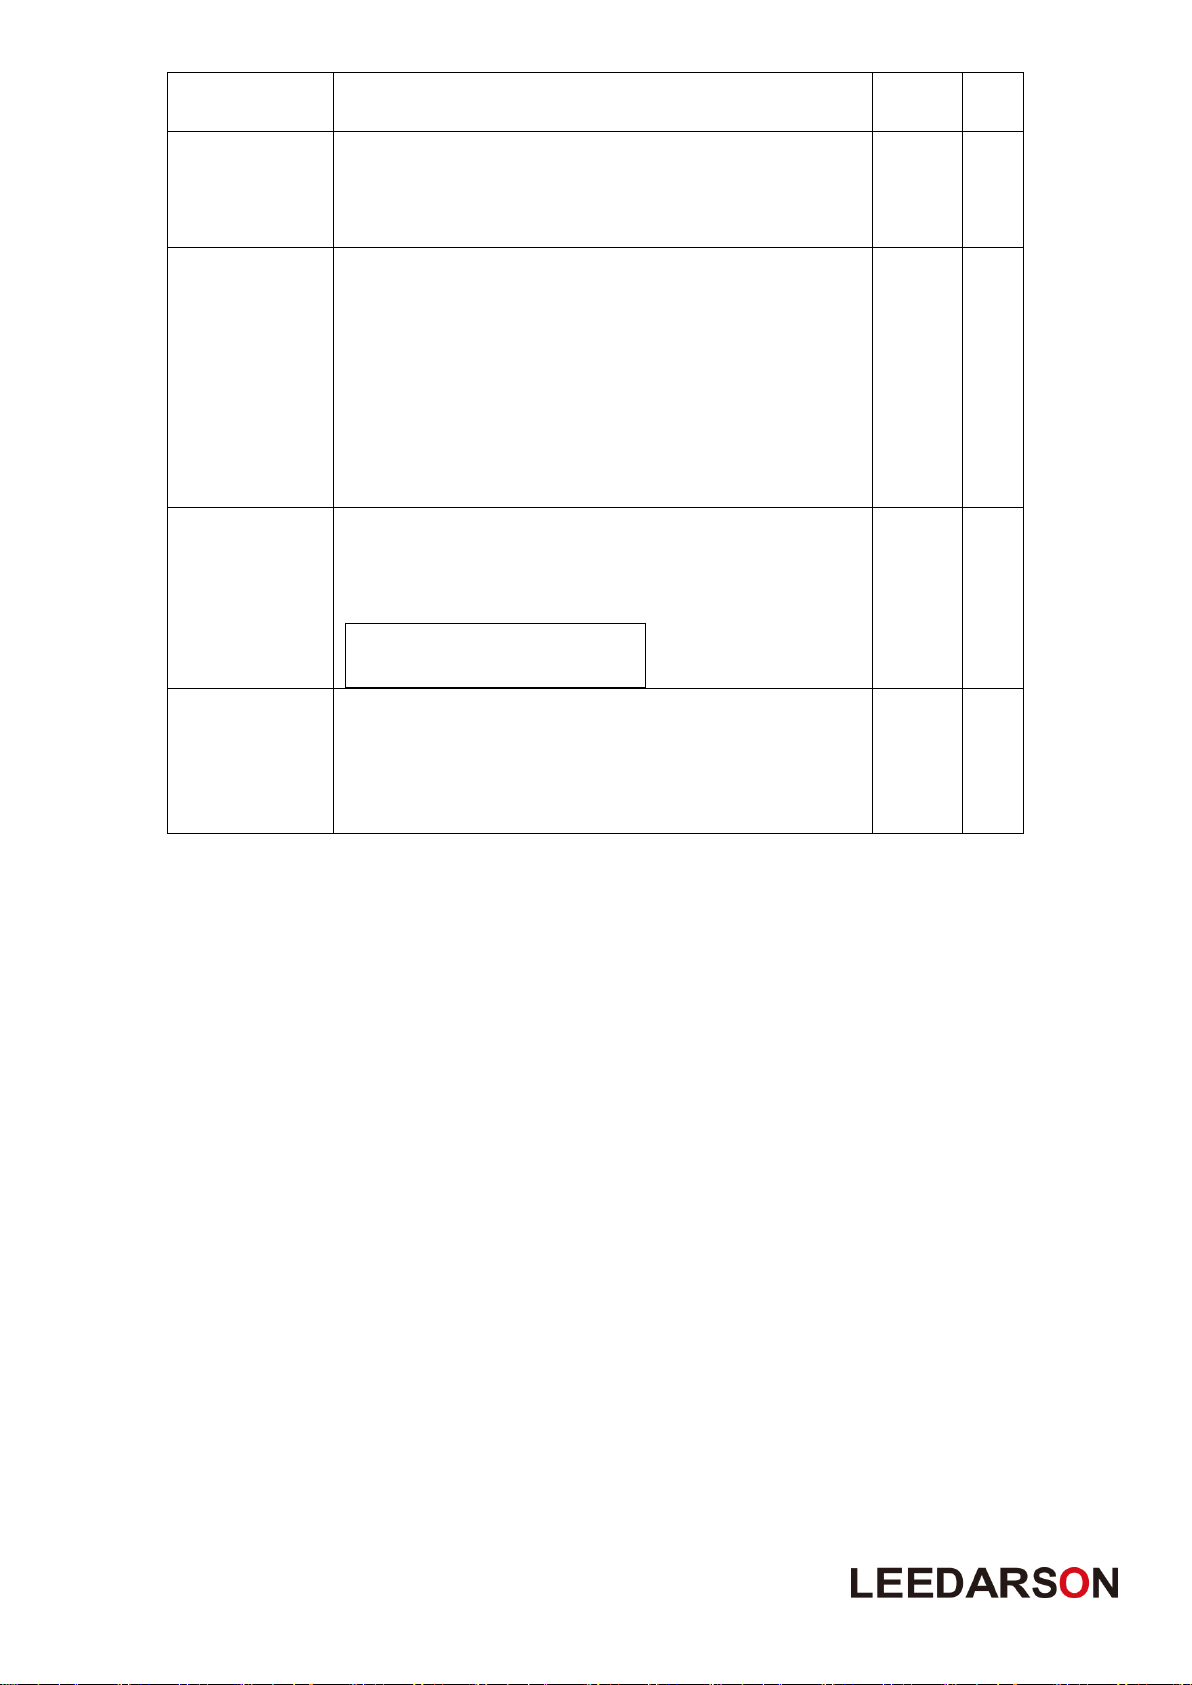
0x0D (13)
Setup the wait time of PIR for clear the motion.
Valid values: 0x05~0x3BC4
0x001E
2
0x0E (14)
When the Motion Sensor is triggered, if this parameter is
0x01 then it will send Basic set command to group 1.
0 = Don't send.
1 = Send.
0x00
1
0x0F (15)
PIR triggers the correspondence between the value of the
Basic set and the PIR state.
-If this value is 0x00 :
PIR triggers send the basic set with 0xFF, PIR alarm
release send the basic set with 0x00.
-If this value is 0x01 :
PIR triggers send the basic set with 0x00, PIR alarm
release send the basic set with 0xFF.
Only support 0x00 and 0x01 values as valid value.
0x00
1
0x10 (16)
Motion detection sensitivity level is a value between 1
and 10. This value affects the amount of motion energy
required to generate a motion event and also affects the
detection range and angle.
1 = Lowest Motion Sensitivity
10 = Highest Motion Sensitivity
0x09
1
0x11 (17)
Enable/disable pet immunity mode. This feature is lens
dependent and detection range may be reduced
when Pet Immunity is enabled.
0 = Disable the pet immunity mode
1 = Enable the pet immunity mode
0x01
1
7. Attention
1. If need to clean the sensor, please use a soft cloth with a little alcohol to wipe it after you cut off the
power.
2. This product is just for indoor use.
3. Replace the battery timely on low battery warning to ensure the detector works properly. Please
remove the battery and safe keeping, if you don’t use this product for a long time.
4. This device can be mounted on the wall only, it cannot be installed on the ceiling.
5. The reference range template of PIR detection is tested at the indoor temperature (the range is 20℃~
25℃),the target of the test is 77kg±10kg weight and 1.71m±0.3m height, the target of the test
across movement speed is 4m/s±0.15m/s.
6. In order to prevent the PIR sensor’s abnormal fault, please don’t mounting and operating sensor in the
bellow conditions,
Firstly, product mounting should prevent installed in the air flow environment such as in front of the
door, window, heater, air conditioner and so on.
11
Page 12
Secondly, the PIR detection area should not be shielded by other screen.
Thirdly, if the operating temperature range is out of the defined range of product specification may
result in some product faults, which is not in the technique commitment of manufacturer.
Fourthly, this product has mot pet immunity function, so when some animals go through in front of the
product may trigger PIR function reported.
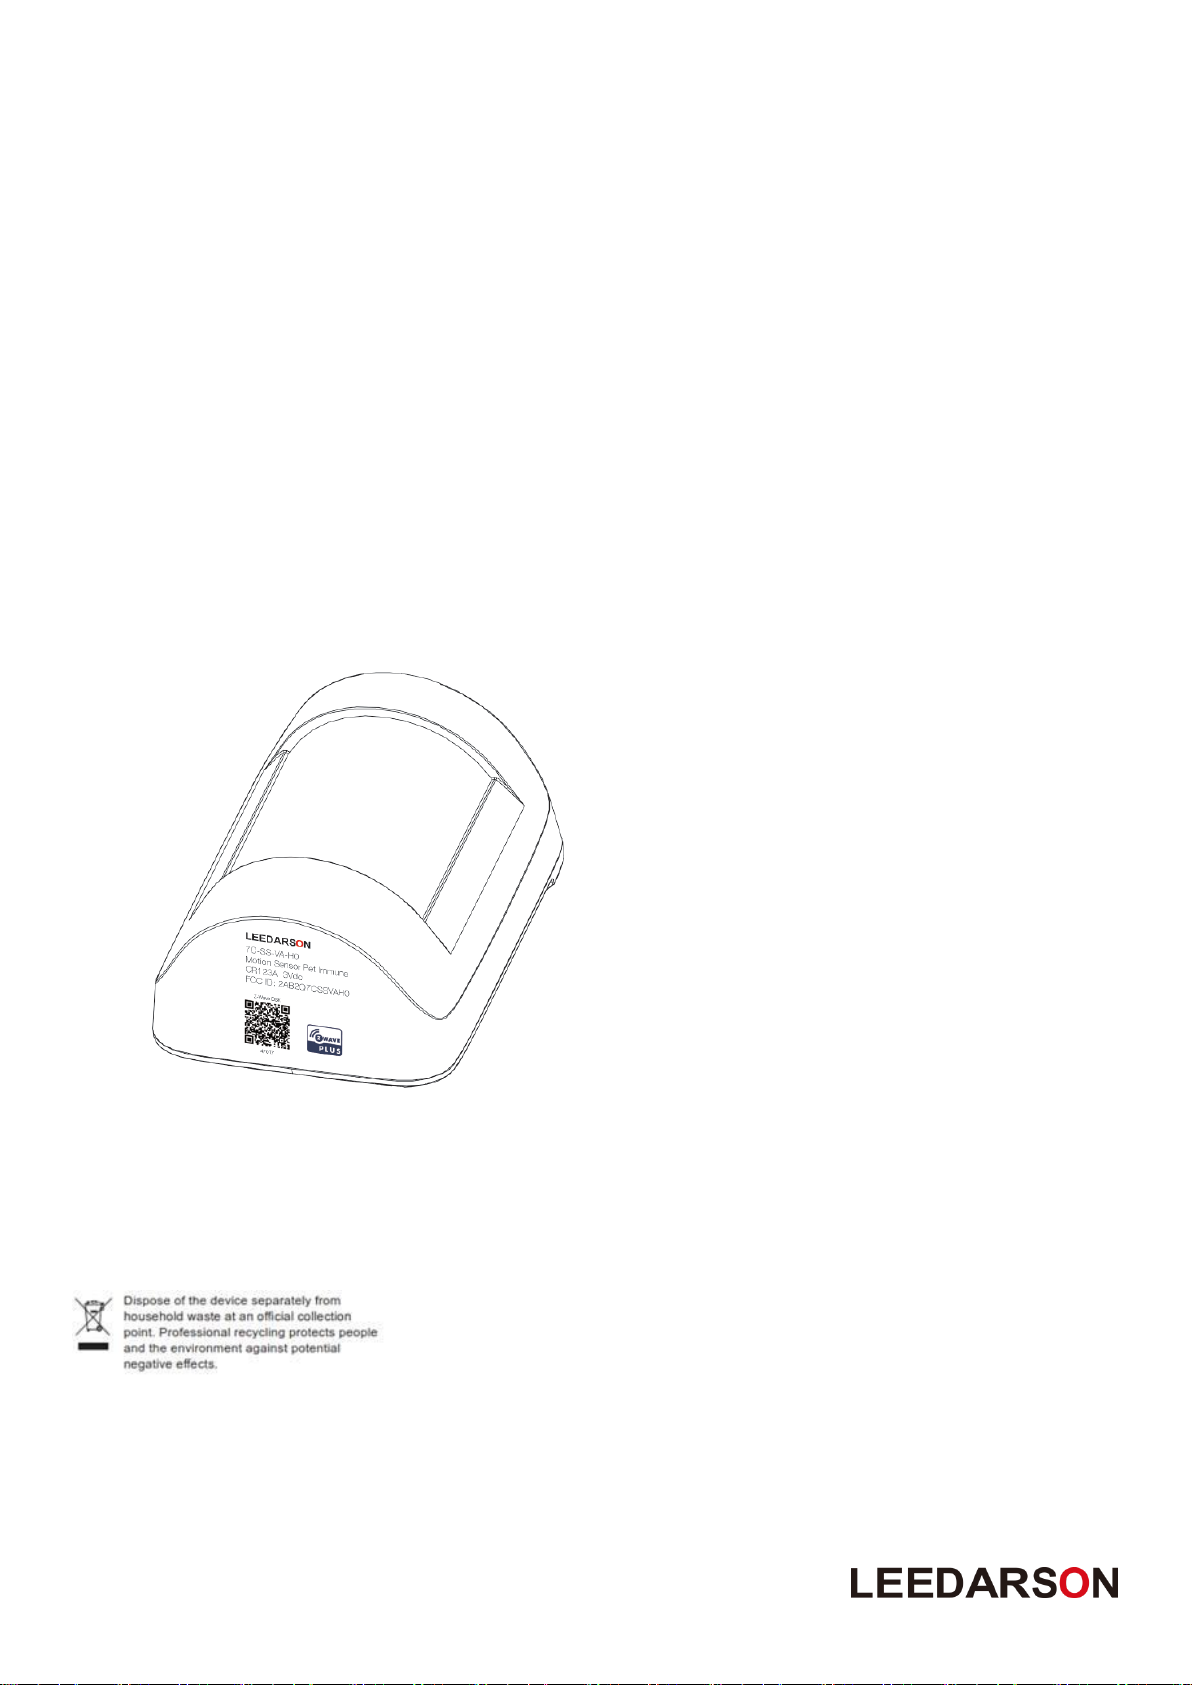
Quick Response Code (QR Code):
The first 16 bytes of the ECDH Public Key and sometimes additional information is encoded into a QR
Code graphic. When referred to in this document, ”DSK” applies to the Full DSK, the combination of
Full DSK and QR Code, or the combination of Pin Code and QR Code. Please refer to the below
diagram. The QR code can be found on the bottom of the sensor ”or” .The DSK may be located on the
back of the packaging.
RISK OF EXPLOSION IF BATTERY IS REPLACED BY AN INCORRECT TYPE. DISPOSE OF USED BATTERIES
ACCORDING TO THE INSTRUCTIONS
12
 Loading...