

Page 1
uMax85
User Manual
Page 2
Television Without Limits
The pinnacle of in-home cinema that is every sports fan and movie lover’s dream
come true and the definition of television without limits, our uMax85 ecotv immerses
you in 85 inches of life-sized entertainment that fills the senses. You won’t be able
to take your eyes o of this class-leading visual wonder.
Page 3

Table of Contents
Getting Started
Warnings
What’s Inside
Opening Instructions
Assembly Instructions
Settings
Connecting Your TV
Powering On/O
Pairing the Remote Control
Remote Control Functions
Antenna Setup
Display
Sound
Interface & eui Apps
Android TV™
Introducing eui — Ecosystem User Interface
Other
Troubleshooting
Specs
Use & Safety
Certifications
TV Standard Limited Warranty
4
5
6
7
8
10
11
12
12
13
14
15
15
16
17
18
19
20
21
22
23
25
Page 4
Getting Started
Warnings
What’s Inside
Opening Instructions
Assembly Instructions
Page 5
Warnings
CAUTION
ELECTRIC SHOCK D O NO T OPE N
The lightning flash with arrowhead symbol,
within an equilateral triangle is intended to
alert the user to the presence of uninsulated
dangerous voltage within the product’s
enclosure that may be of sucient magnitude
to constitute a risk of electric shock.
The exclamation point within an equilateral
triangle is intended to alert the user to
the presence of important operating and
maintenance (servicing) instructions in the
literature accompanying the appliance.
To reduce the risk of electric shock, do not remove
cover (or back). No user-serviceable parts inside. Refer
servicing to qualified service personnel.
Please read and follow all instructions that come with
this product. LeEco disclaims any liability for loss or
damage resulting from improper use or use contrary
to the product instructions.
To prevent fire or shock hazard, do not expose this
appliance to rain or moisture.
To prevent electric shock do not use this polarized
plug with an extension cord, receptacle or other outlet
unless the blades can be fully inserted to prevent
blade exposure.
These servicing instructions are for use by qualified
service personnel only. To reduce the risk of electric
shock, do not perform any servicing other than that
contained in the operating instructions unless you are
qualified to do so.
This device contains chemicals known to the State
of California to cause cancer, birth defects or other
reproductive harm.
Les marquages sont inscrits en arrière de l’appareil.
Les précautions d’emploi sont inscrites en arrière de
l’appareil.
Pour réduire le risque d’incendie ou de choc électrique,
ne pas exposer cet appareil sous la pluie et l’humidité.
L’appareil ne doit pas être exposé aux écoulements ou
aux éclaboussures et aucun objet ne contenant de liquide, tel qu’un vase, ne doit être placé sur l’objet.La prise
du secteur est utilisée pour déconnecter le système.
La prise du secteur ne doit pas être obstruée ou doit
être facilement accessible pendant son utilisation.
Pour être complètement déconnecté de l’alimentation
d’entrée, la prise doit être débranchée du secteur.
Les piles ne doivent pas être exposées à de forte
chaleur, tels que la lumière du soleil, au feu ou autres
choses de semblable.
Des pressions acoustiques excessives provenant
d’écouteurs ou de casques peuvent provoquer des
pertes de l’audition.
5
Page 6
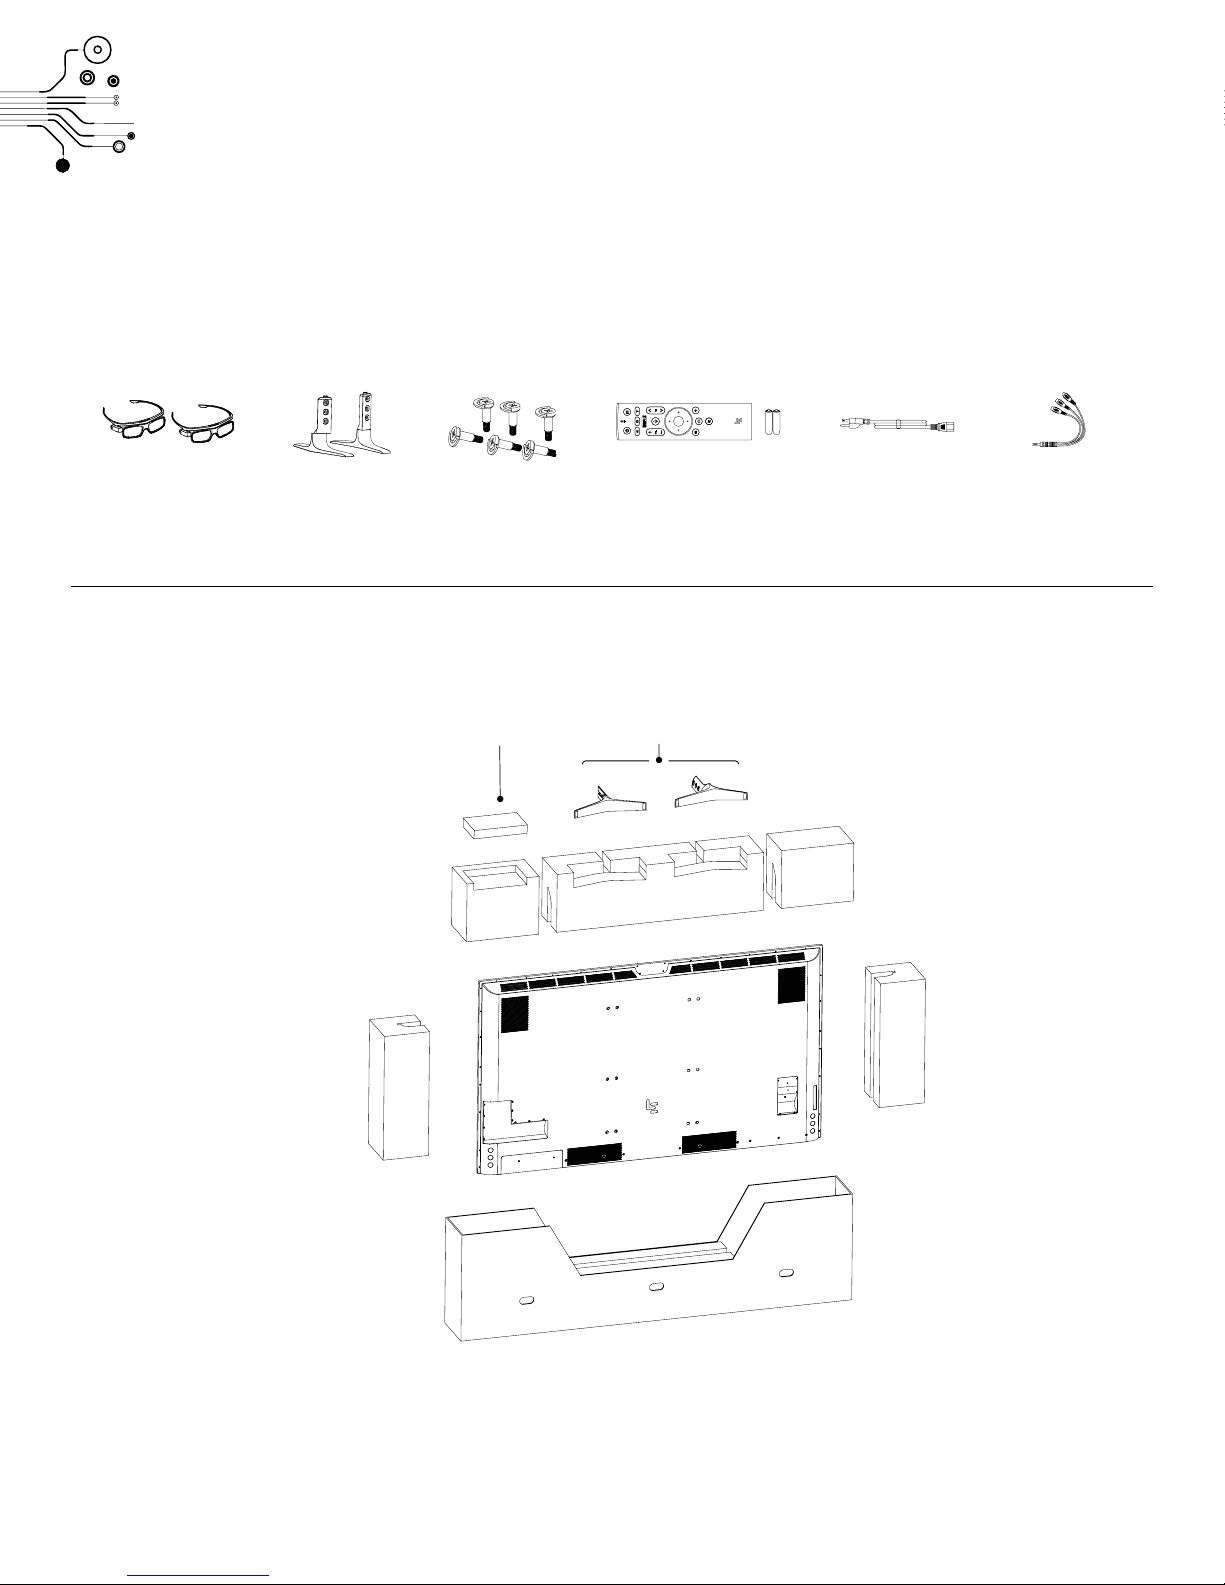
What’s Inside
2 3D Glasses
w/ Batteries*
2 Stands Power Cord6 Bolts Cable
Remote &
2 AA Batteries
StandsAccessories
* remove battery protection to activate batteries
6
Page 7
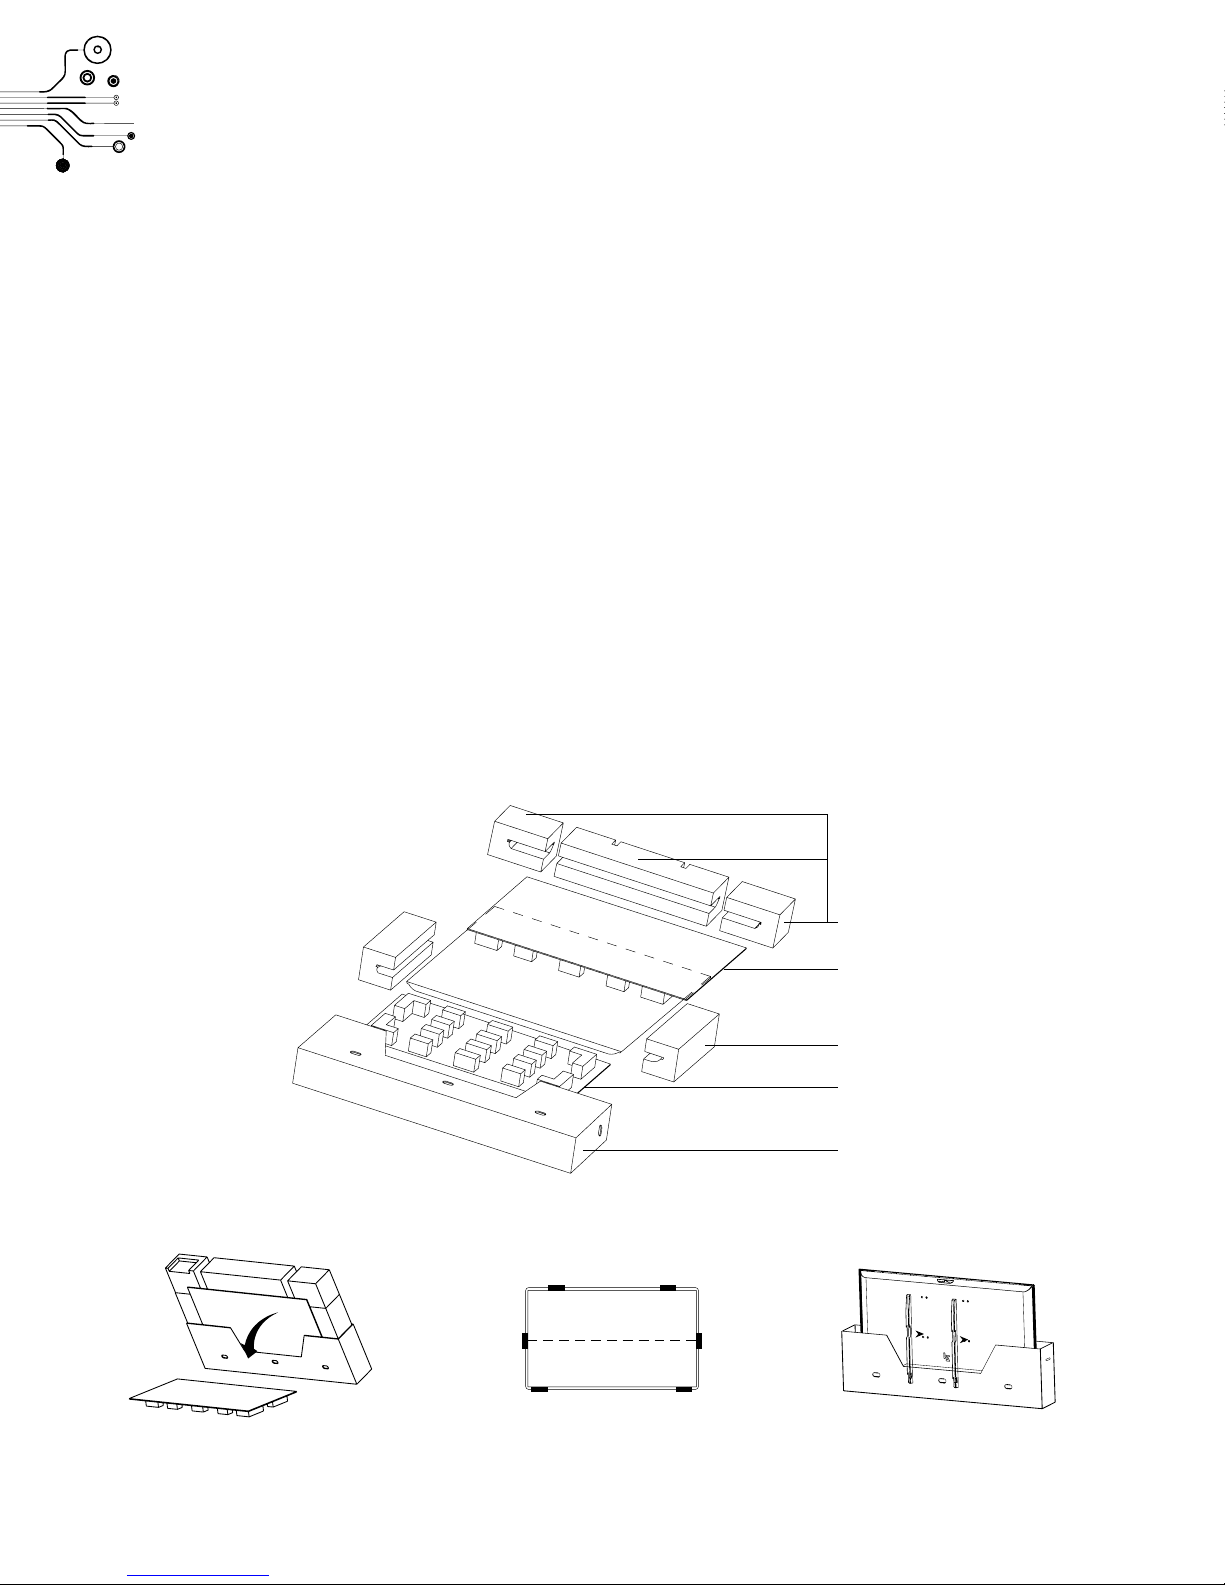
Opening Instructions
Step 1: Stand TV box upright.
Step 2: Remove lock clips (squeeze tabs inward and pull out) from (E), and lift box lid from package base.
Step 3: Pull out accessories kit and stands from foam cover (A).
Step 4: Remove front protective cover (B) from TV, and place foam side down.
Step 5: Gently tilt and lower the TV, backside down, until evenly aligned with foam cover (B).
Step 6: Remove box base (E).
Step 7: Remove the screws and covers from holes on each side at the bottom of the TV.
Step 8: Secure the stands to each side of TV using the bolts provided. Recommended: Place a soft covering
beneath stand edges where they meet the floor.
Step 9: Remove protective foam (A, C and D), and carefully lift TV upright, taking care not to press on screen.
Ensure foam covers are
evenly aligned (D) and (B)
screen facing up
Follow diagram
for hand positioning
A
B
C
D
E
Keep box base on
if installing wall mount
7
Page 8
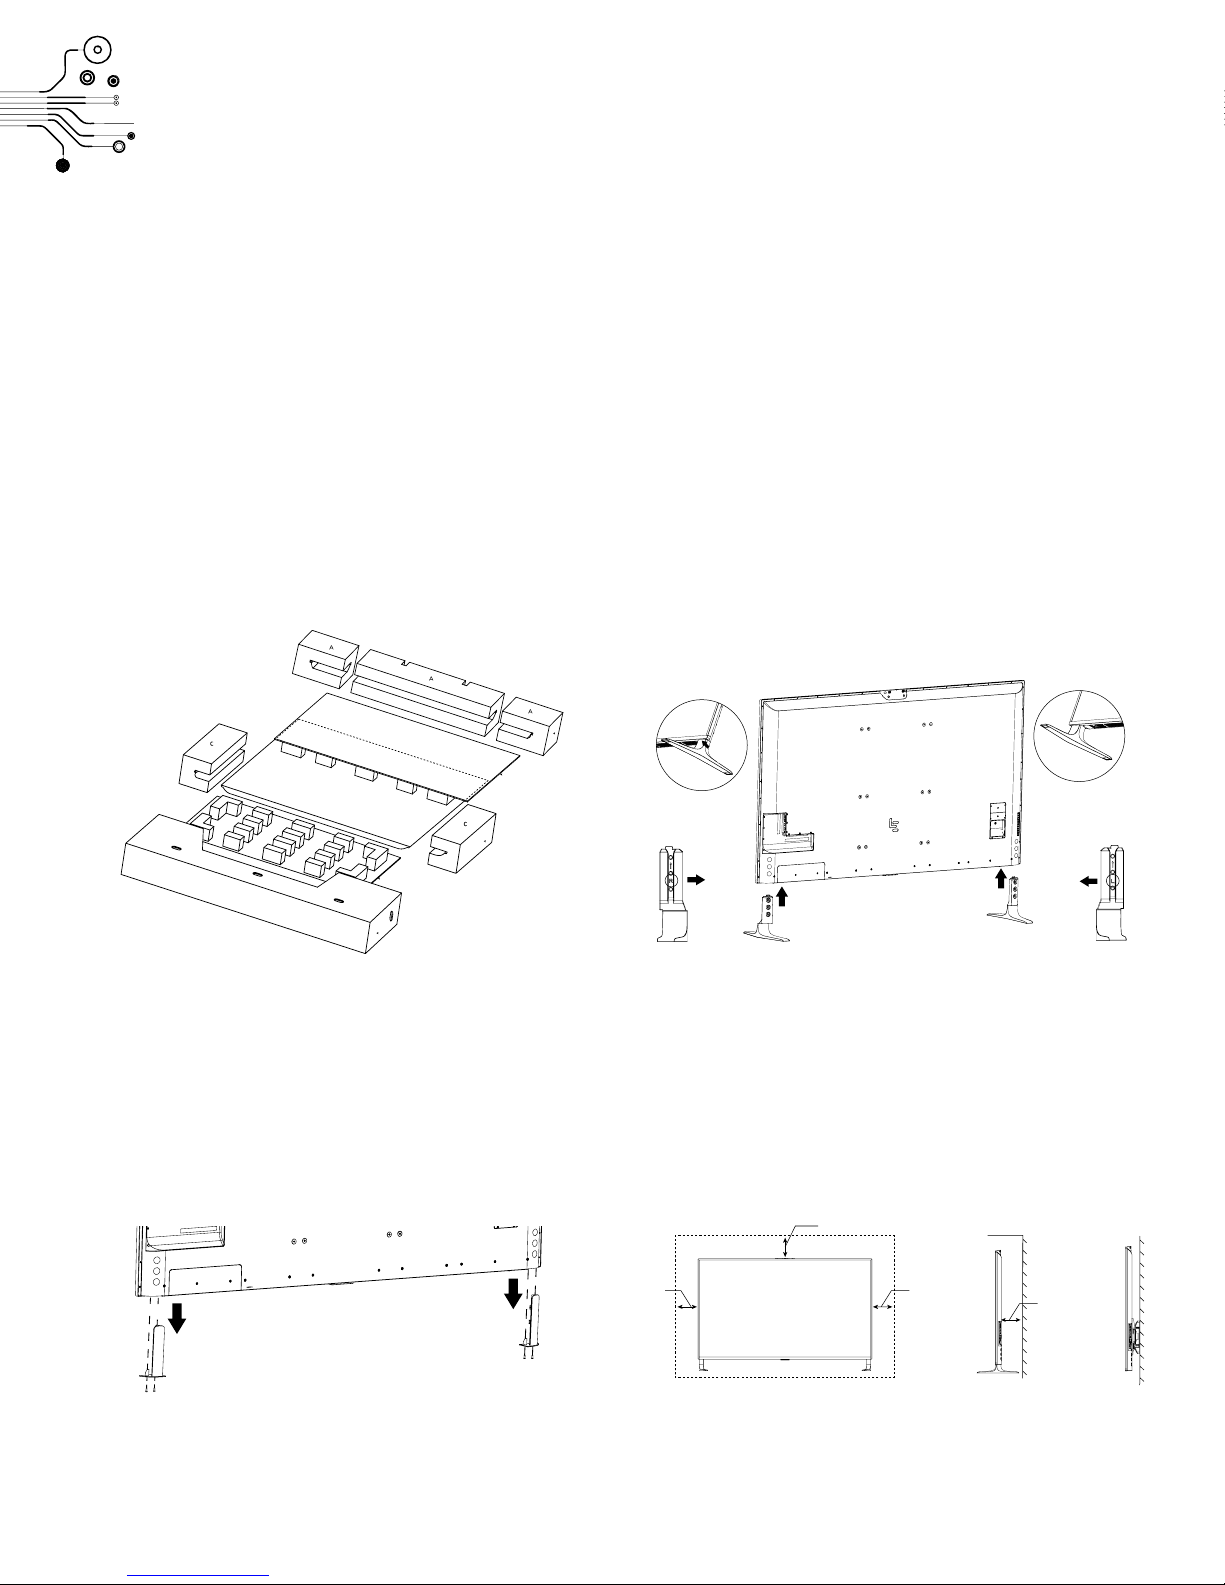
Assembly Instructions
Installing the Stand
4 people required for installation. Wear safety gloves.
Step 1: Carefully lift TV out of box. Slowly set down
with screen facing up. To avoid damaging the prod-
uct, use caution and refrain from pressing on screen.
Step 3: Secure the stands to each side of TV using the
bolts provided. Recommended: Place a soft covering
beneath stand edges where they meet the floor.
Align
R
Align
L
Step 2: Remove the screws and covers from holes on
each side at the bottom of the TV.
TV Bottom
Step 4: Make sure there is enough surrounding space
as indicated below.
12 in
4 in 4 in
5.5 in
8
Page 9
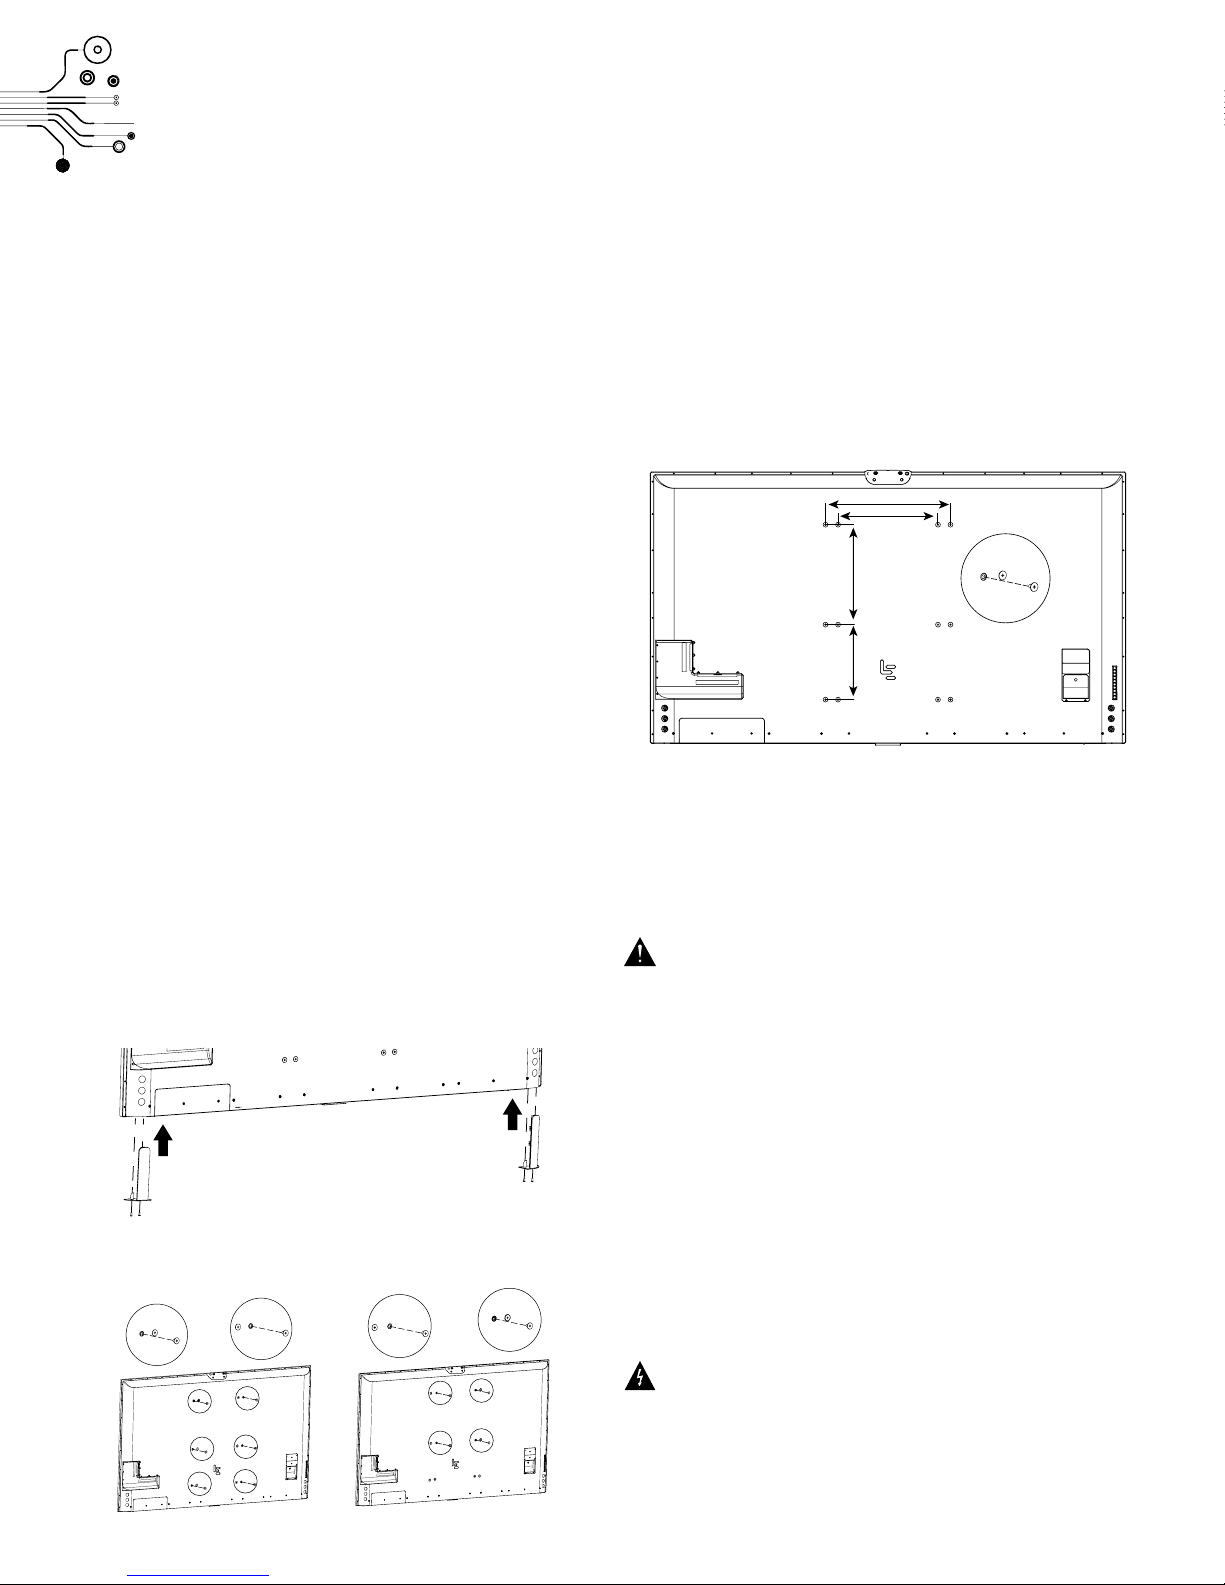
Installing a Wall Mount
It is advisable to consult a qualified professional. To avoid
electric shock, power o television prior to completing
these steps. LeEco maintains no liability for damages
or personal injury. Before installing, ensure the wall
will support the combined load of the equipment and
hardware. Consult your wall mount guide for weight
specifications and product-specific instructions.
• To ensure device stability, locate and align television
with wall studs.
• Follow diagram to ensure proper spacing around
the device.
• Four people recommended.
• Secure television to wall mount using VESA standard
wall mount screw locations:
o 400x400mm (VESA® standard)
o 500x400mm
19.69 in
15.75 in
15.75 in
11.81 in
Wall Mount Screw Locations
o 400x700mm
o 500x700mm
Do not cover ventilation hole or put any object
into enclosure, such as newspaper, curtain, etc.
Reserve adequate ventilation space around ecotv.
Do not place your ecotv in any place where there
is vibration.
Do not place ecotv close to air conditioner. Otherwise, moisture condensation may appear on interior panel of display and damage the panel.
Do not place ecotv in any area with strong electromagnetic field, or the TV may incur damage
and interference.
Contact a professional for assistance when wall
mounting your TV. We are not responsible for
any damage to the product or injuries. Do not
power on the TV when performing wall mount
installation. It may cause personal injury due
to electric shock.
9
Page 10
Settings
Connecting your ecotv
Powering On/O
Pairing the Remote Control
Remote Control Functions
Antenna Setup
Display
Sound
Page 11
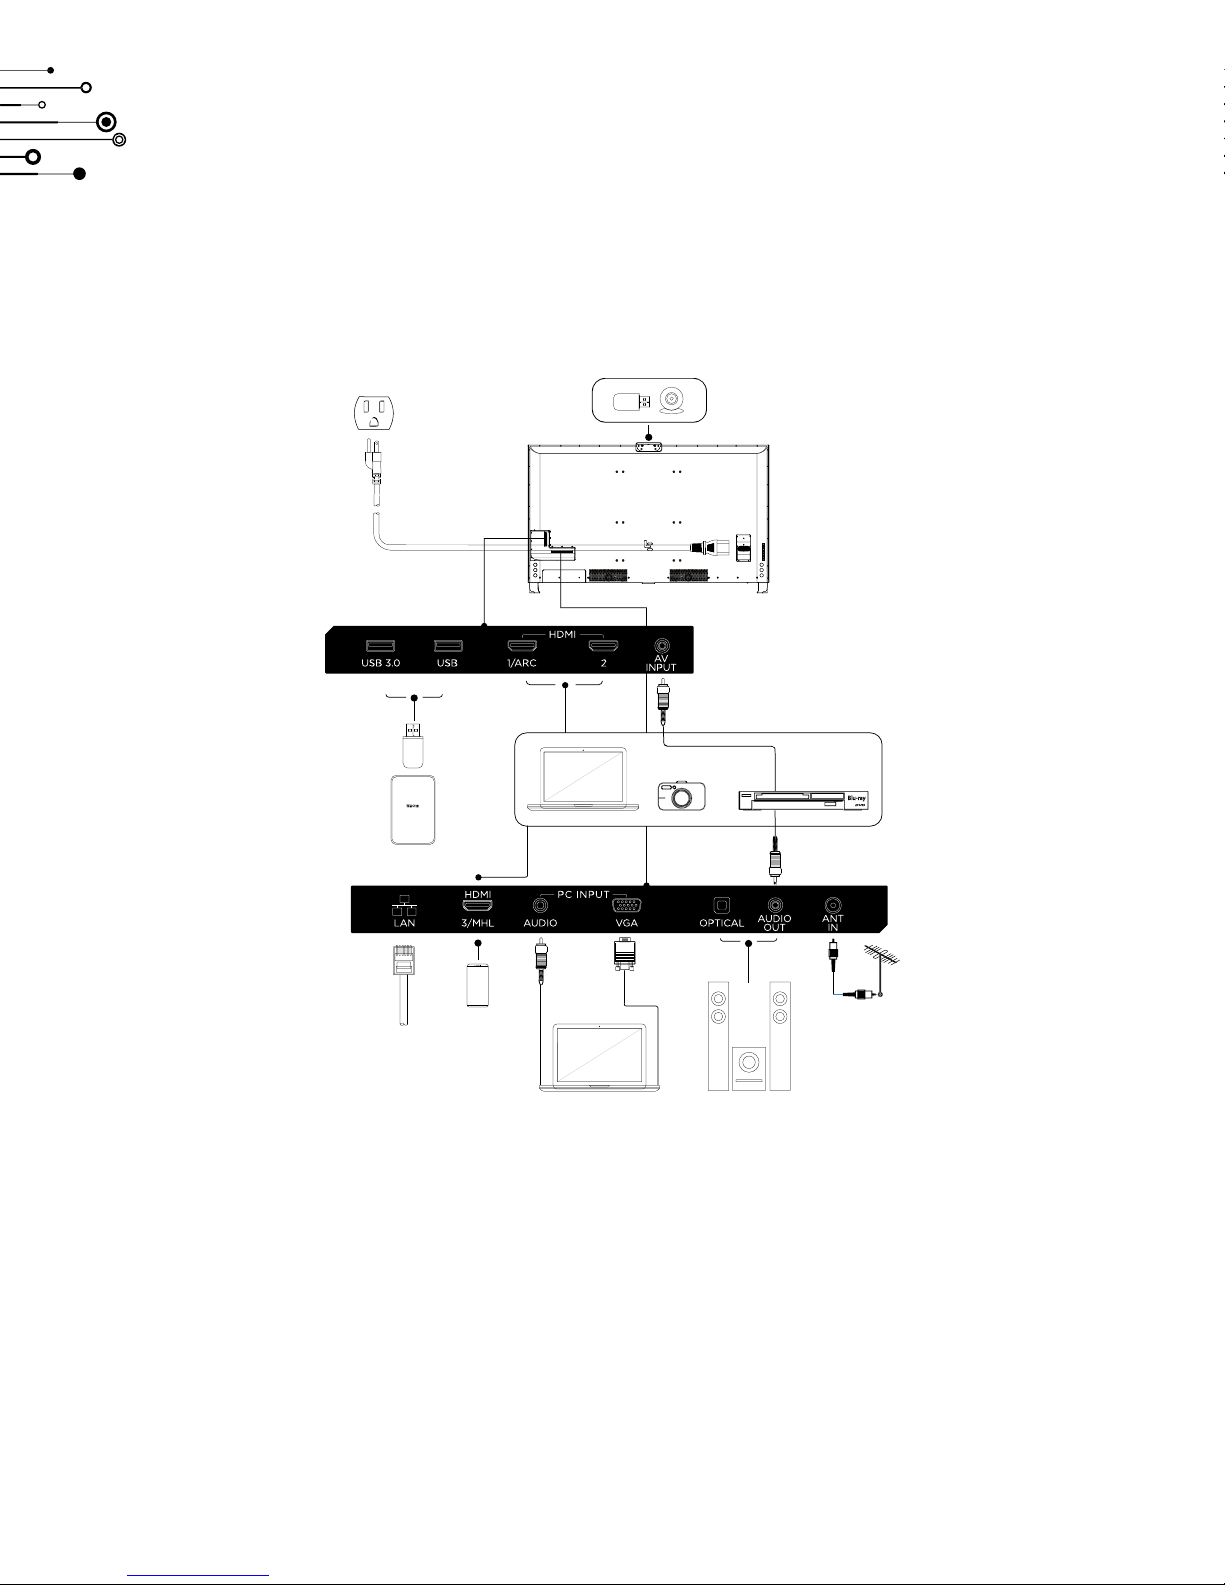
Connecting your ecotv
HDMI: Connect external components (such as Blu-ray
and game consoles) to your TV using HDMI.
ARC (Audio Return Channel): Send a digital signal to
a compatible device without the need for an additional
optical audio connection.
MHL: Use this option for mobile phones and cameras.
A/V (Composite): Connect to an older-generation
device, such as VCR, game consoles or DVD player,
using the composite cable*.
Digital Optical Audio: Connect to external sound
devices using optical audio cable.
Video Graphics Array (VGA): Use your TV as a monitor
by connecting your computer with a VGA cable**.
PC Input: Connect PC audio to TV using 3.5mm audio
cable (not included).
Antenna: Connect to antenna by plugging coaxial cable
into the ANT IN connector.
Connecting to Internet: Connect TV to the internet
using a wired (LAN) or wireless (built in Dual Band
802.11 b/g/n/ac Wi-Fi) connections.
*Male RCA cable not included. **VGA cable not included.
11
Page 12
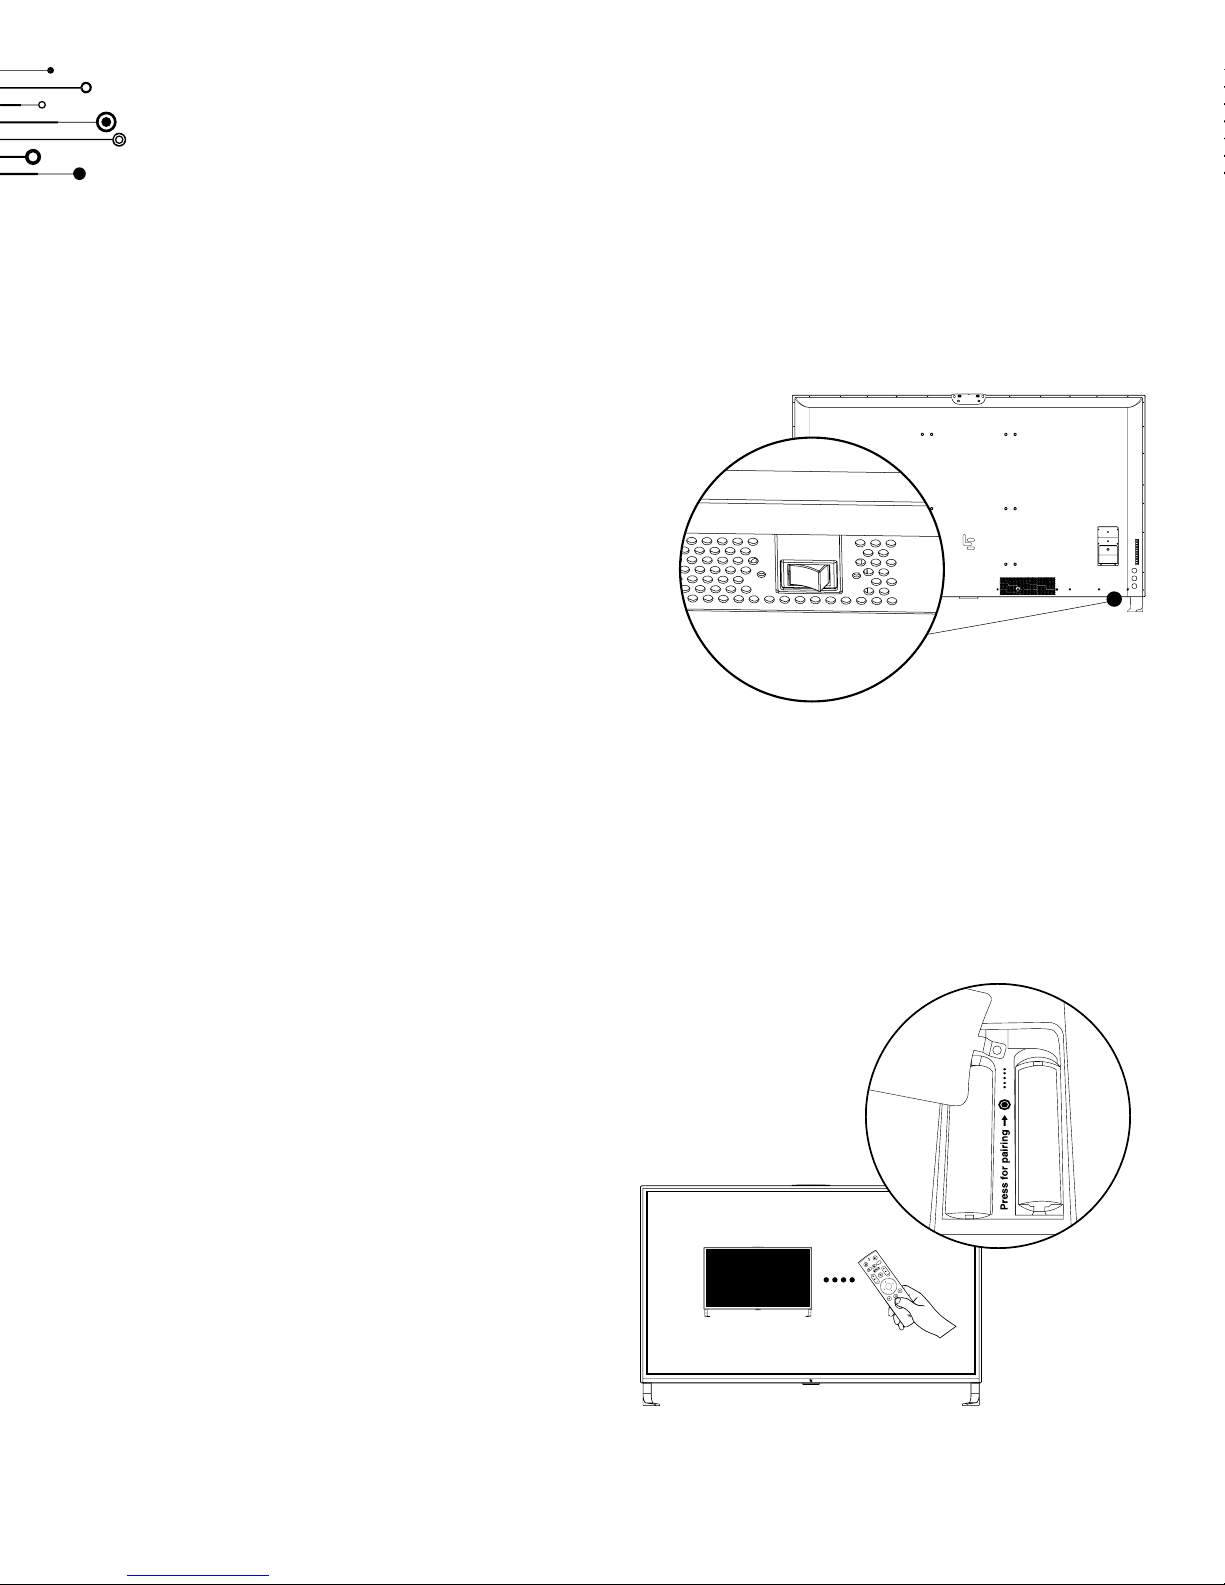
Powering On/O
Step 1: Plug TV into a power outlet.
Step 2: Turn the switch under the TV to ON mode.
Step 3: To turn on/o the TV, press power button on
your remote. Note: Wait about five seconds for TV to
fully power on.
Step 4: A light at the bottom center of your TV indicates
the power status:
Blue: TV is on
Red: TV is o
Step 5: To enter power saving mode, press and hold
the power button for two seconds.
Note: Rebooting will prompt Android TV™ setup to
relaunch, which can take up to 35 seconds.
Remote Control Pairing
Slide battery cover o of remote and locate pairing
button. Insert 2 AA batteries, press and hold button
until connection is confirmed on screen.
Note: In order to connect, remote must be less than
eight inches from lower section of TV.
PAIRING
12
Page 13
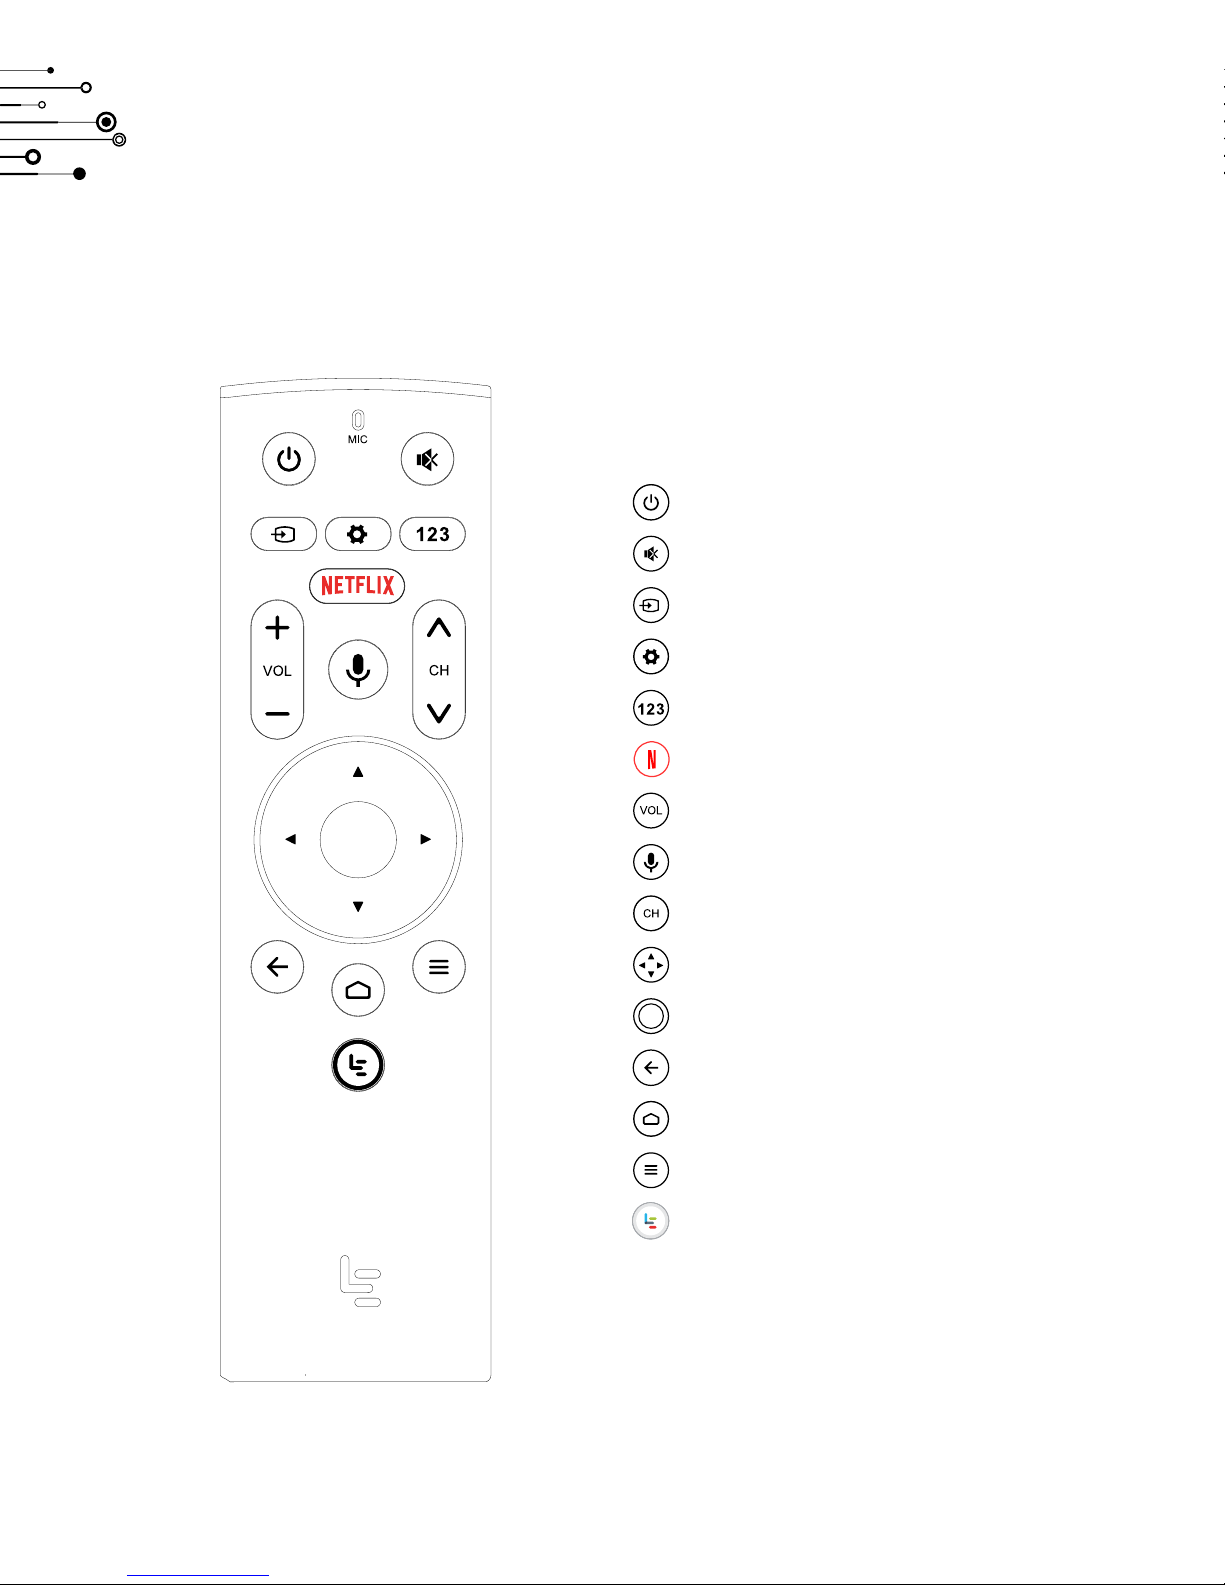
Remote Control Functions
Power television on or o
Mute sound
Display and select input sources
Display and select settings
Input desired channel number
Access Netflix
Increase or decrease volume
Activate voice commands
Channel up or down
Navigate up, down, left or right
Select/Enter
Return to previous screen
Display TV home page
Display application menu
Access Le
13
Page 14

Antenna Setup
Set up an antenna to access broadcast channels.
• Plug a coaxial cable into the ANT IN connector.
• Navigate to Inputs from the home screen, and select
Cable/Antenna. NOTE: If you have not programmed
your TV to scan for channels using the antenna,
then select Tuner from Channel Sources.
• Once in Tuner mode, select Air option.
• Follow the prompts to scan until broadcast channels
display on screen.
• Connect to antenna by plugging coaxial cable into
the ANT IN connector.
Channel programming guide and other features:
• To access the channel programming guide, press the
Menu key on your remote, and select Program Guide.
• Use additional menu options to access other features,
including Closed Captioning, Input Sources, Display
Modes, Multi-Audio, Video Description, Channel
Setup and Parental Controls.
14
Page 15

Display
By default, your TV is set to Energy Saving Mode. To
adjust, press the Settings button on your remote, and
navigate to:
Picture > Display Mode
Advanced display options, such as brightness, color
and clarity, can be found by navigating from the
home screen to:
Settings > Picture > Mode settings
Sound
Sound options, such as custom gaming presets, can
be found by navigating from the home screen to:
Settings > Sound
15
Page 16
Interface & eui Apps
Android TV™
Introducing eui — Ecosystem User Interface
Page 17
Android TV™
Launching your interface:
Select language: Once your device is powered on,
you’ll be prompted to select your preferred language.
Sync external device (optional): Transfer Google™
EcoPass membership account information from an
external device.
Configure Wi-Fi: Here, you’ll be asked to select your
network connection and enter your Wi-Fi password.
(this step will be omitted when ethernet cable is plugged
into your TV)
Login with Google (optional): Logging in with Google
allows you to instantly sync your account preferences
and information for an enhanced experience.
Review terms and conditions: Review and accept terms
and privacy disclosures.
Location services: Indicate your preferences for third
party applications that request your location.
Feedback reporting: Indicate whether to generate and
send automated reports on any technical issues.
Channel sources: Select input settings.
Google Voice Search™
Search through thousands of movies and shows with
the press of a button — just navigate to the Google
Voice Search™ icon at the top left from the home
screen. You can also use the microphone shortcut
button on your remote control. Simply press the button
and speak a command. For example, you might say the
name of your favorite actor, or “Show me action movies”
for a smart list of related entertainment. Finding what
you want to watch has never been simpler.
Cast your entertainment
Cast entertainment from smartphone to TV, instantly
switch from phone to TV using built-in Google Cast™.
To get started, download any Google Cast-enabled
app on your phone. Sync your TV and phone to the
same wireless network, and press the Cast button on
your phone. Now, select your TV from the list. Enter-
tainment will launch on your TV.
17
Page 18
Introducing eui — Ecosystem User Interface
eui is your Ecosystem User Interface connecting all
LeEco devices into a revolutionary and seamless
entertainment experience.
From ecophones to cars and everything in between:
power on, and you’re there. An unprecedented kaleidoscope of streaming movies, shows, TV channels and
more, eui features a collection of apps tailored to you.
Your ecotv is more than hardware — it’s an experience.
Creating a My LeEco account:
Enjoy top entertainment with a My LeEco account,
which gives you premier access to exclusive feature
films, international movies, shows and more. Sign up
to get started:
• When prompted, select the option to create a new
account. Note: If you already enjoy the benefits of
My LeEco, simply log in!
Optional:
• Create a new username and password; or
• Leverage an existing Google account.
Review terms and privacy disclosures.
You’re ready!
Le: Stop in. Stay a while.
Grab the popcorn and kick back with your complete
media library. Your gateway to LeEco’s full, unparalleled
library of streaming content, Le aggregates our
signature entertainment.
LIVE: Tap, and you’ve arrived.
A revolutionary TV viewing experience, LIVE serves
up a 3x3 tiled mosaic of hand-picked, simultaneouslystreaming entertainment.
Cast entertainment in an instant:
Swipe your ecophone screen during any LIVE or Le
entertainment to cast on your ecotv screen.
18
Page 19
Troubleshooting & Other
Troubleshooting
Specs
Use & Safety
Certifications
TV Standard Limited Warranty
Page 20
Troubleshooting
Issue:
My television isn’t powering on.
The remote isn’t working.
The screen seems too dark.
Solution:
• Plug TV into a power outlet.
• Confirm that power cord is securely plugged into TV.
• Make sure the switch behind the TV is turned on.
• A blue light at the bottom of your TV indicates
power is on.
• Make sure you’ve inserted two AA batteries. Slide
battery cover o of remote and locate pairing button.
• Press and hold pairing button until connection is
confirmed onscreen.
• By default, your TV is set to Energy Saving mode,
which impacts brightness. To adjust, press the
Settings button on your remote, and navigate to:
Picture > Display Mode
Are there other display settings?
I want to adjust the audio.
My game console (or other device) isn’t connecting.
I still have a question.
• Additional display options can be found by navigating
from the home screen to:
Settings > Picture > Mode settings
• From home screen, navigate to:
Settings > Sound
• There, you can adjust sound format, and volume range.
• Ensure any external components (such as Blu-ray™
and game consoles) are connected to your TV using
HDMI. Use the Input selection on the Home screen
to select the correct source.
• Contact customer support at 855-665-3326, or visit
forum.le.com
20
Page 21
Specs: uMax85
Model
Features
Connectivity
Product Model
UPC Code
Size
Resolution
Processor
OS
CPU
GPU
HDR
Flash Memory
Local Dimming
Fluid Motion
3D
USB
HDMI
Bluetooth
Wi-Fi
VGA
D85XUCNN
815493020585
85” (84.5” diag.)
4K UHD (3840x2160)
Mstar 6A938
Android TV™
Cortex A72x2 + A53x2 1.7 GHz
Multi-Core Mali-T820
Dolby Vision™ + HDR 10
64GB
Full Array (448 Local Dimming Zones)
1920
Yes
3.0x2 / 2.0x1
HDMI 2.0x3
Bluetooth® 4.1
Dual-Band 802.11 b/g/n/ac
Yes
Audio
Dimensions
Weight
Wall Mount
Audio
Speaker
with Stand (WxHxD)
without Stand (WxHxD)
with Stand
without Stand
VESA Compatible
Dolby Audio™, DTS HD™
Harman Kardon®
75.0” x 46.0” x 15.7”
75.0” x 42.8” x 2.4”
150 lbs
141.5 lbs
15.7”x7.87” (400x200mm)
21
Page 22

Use & Safety
1. Read these instructions.
2. Keep these instructions.
3. Heed all warnings.
4. Follow all instructions.
5. Do not use this apparatus near water.
6. Clean only with dry cloth.
7. Do not block any ventilation openings. Install in
accordance with the manufacturer’s instructions.
8. Do not install near any heat sources such as radiators, heat registers, stoves, or other apparatus
(including amplifiers) that produce heat.
9. Protect the power cord from being walked on or
pinched particularly at plugs, convenience receptacles, and the point where they exit from the apparatus.
10. Only use attachments/accessories specified by
the manufacturer.
11. Use only with the cart, stand, tripod, bracket, or
table specified by the manufacturer, or sold with the
apparatus. When a cart is used, use caution when
moving the cart/apparatus combination to avoid
injury from tip-over.
12. Unplug this apparatus during lightning storms or
when unused for long periods of time.
13. Refer all servicing to qualified service personnel.
Service required when the apparatus has been
damaged in any way, such as power supply cord or
plug is damaged, liquid has been spilled or objects
have fallen into the apparatus, the apparatus has
been exposed to rain or moisture, does not operate
normally, or has been dropped.
14. The remote control battery shall not be exposed
to excessive heat such as sunshine, fire or the like
15. Excessive sound pressure from earphones and
headphones can cause hearing loss.
16. Do not defeat the safety purpose of the polarized or grounding-type plug. A polarized plug
has two blades with one wider than the other. A
grounding type plug has two blades and a third
grounding prong. The wide blade or the third prong
are provided for your safety. If the provided plug
does not fit into your outlet consult an electrician
for replacement of the obsolete outlet.
17. The apparatus shall not be exposed to dripping
or splashing liquid and that no objects filled with
liquids, such as vases, shall be placed on the apparatus.
18. The MAINS power plug or appliance coupler
is used as the disconnect device, the disconnect
device shall remain readily operable.
19. Caution Marking and rating plate are located at
rear enclosure of the apparatus.
20. The MAINS power plug of the apparatus should
not be obstructed and should be easily accessed
during intended use. To be completely disconnected from the power input, the apparatus shall be
disconnected from the mains power outlet.
21. Minimum distances 10cm around the apparatus
for sucient ventilation.
22. No naked flame sources, such as lighted candles,
should be placed on the apparatus;
23. Attention should be drawn to the environmental
aspects of battery disposal;
24. The use of apparatus in moderate climates.
RECYCLING
Because your device includes electronic parts, you
must dispose of it separately from household waste
when it has reached its end of life. Please consult your
local laws and regulations for disposing of your device
properly. Also, you can contact customer support for
instructions on how to recycle your device. Please work
with us to recycle in a way that helps the environment
and protects all of us.
22
Page 23
Certifications
Dolby and the double-D symbol are registered trademarks of Dolby Laboratories. All other trademarks
remain the property of their respective owners.
Dolby® Vision™ support varies by program. Streaming
content not currently supported will be supported by
a future software upgrade.
For DTS patents, see http://patents.dts.com. Manufactured under license from DTS Licensing Limited.
DTS, the Symbol, & DTS and the Symbol together are
registered trademarks, and DTS Premium Sound is a
trademark of DTS, Inc. © DTS, Inc. All Rights Reserved.
Mobile High-Definition Link MHL and the MHL logo are
trademarks or registered trademarks or service mark of
MHL, LLC in the United States and/or other countries.
The terms HDMI and HDMI High-Definition Multime-
dia Interface, and the HDMI Logo are trademarks or
registered trademarks of HDMI Licensing, LLC in the
United States and other countries.
23
Page 24
FCC CERTIFICATION
ENERGY STAR
This equipment has been tested and found to comply
with the limits for a Class B digital device, pursuant
to Part 15 of the FCC Rules. These limits are designed
to provide reasonable protection against harmful
interference in a residential installation. This equipment
generates, uses and can radiate radio frequency energy
and, if not installed and used in accordance with the
instructions, may cause harmful interference to radio
communications. However, there is no guarantee that
interference will not occur in a particular installation.
If this equipment does cause harmful interference to
radio or television reception, which can be determined
by turning the equipment o and on, The user is
encouraged to try to correct the interference by one
of the following measures:
• Reorient or relocate the receiving antenna.
• Increase the separation between the equipment
and receiver.
• Connect the equipment into an outlet on a
circuit dierent from that to which the receiver
is connected.
• Consult the dealer or an experienced radio/TV
technician for help.
1. Picture Mode (Power Saving) is the setting in which
the product qualifies for ENERGY STAR ®.
2. Any changes to default as-shipped television
configuration and settings would change the energy
consumption. And enabling certain optional features
and functionalities may increase energy consumption
beyond the limits required for ENERGY STAR®
qualification, as applicable.
3. ENERGY STAR® is a joint program of the U.S.
Environmental Protection Agency and the U.S.
Department of Energy helping us all save money and
protect the environment through energy ecient
products and practices
4. This product has no forced menu.
5. If you want to use energy saving mode, please follow
the steps below to operate.
6. To turn o your television, press and hold the power
button for two seconds. Quickly press the power
button to shut down the screen immediately and then
enter standby mode in at most 20 minutes, depending
on TV system status.
This product meets ENERGY STAR® guidelines for
energy eciency. ENERGY STAR and the ENERGY
STAR mark are registered U.S. marks. ENERGY STAR
is a registered mark owned by the U.S. government.
24
Page 25

TV Standard Limited Warranty
Please read and follow all instructions that come with
this product. LeEco disclaims any liability for loss or
damage resulting from improper use or use contrary
to the product instructions.
LeEco warrants the LeEco product and accessories
against defects in materials and workmanship for twelve
(12) months from the date of the original retail purchase.
LeEco does not warrant against normal wear and tear,
or damage caused by accident or abuse.
This warranty is valid only in the country in which the
product is purchased.
For service, contact LeEco at 1-855-343-6688. Shipping
charges may apply. You may be required to provide
proof of purchase in submission of your warranty claim.
This Limited Warranty does not cover: (a) defects or
damage resulting from accident, abuse, misuse, improper storage, exposure to liquid, excessive moisture,
dampness, sand or dirt, neglect, or unusual physical,
electrical or electromechanical stress; (b) scus, scratches, dents and other cosmetic damage; (c) equipment
that has the serial number removed, defaced, damaged,
altered or made illegible; (d) ordinary wear and tear; (e)
defects or damage resulting from the use of product
with accessories not furnished or approved by LeEco;
(f) defects or damage resulting from improper mainte-
nance, or service not furnished or approved by LeEco,
which shall void this limited warranty; (g) defects or
damage resulting from external causes such as, but
not limited to dropping or subjecting the product to
excessive physical force; OR (h) defects or damage
resulting from viruses or other software problems
introduced into the product. If the product contains
batteries, this Limited Warranty covers batteries only
if the battery leaks and this Limited Warranty does not
cover any battery if the battery has been charged by
a battery charger not specified or approved by LeEco.
During the warranty period, provided the product is
returned in accordance with the terms of this Limited
Warranty, LeEco will repair or replace the Product, at
LeEco’s sole option, without charge. Repaired or replaced
product may be reconditioned or may contain rebuilt,
refurbished or reconditioned parts or components
Replaced products will be warranted for a period equal
to the remainder of the original Limited Warranty on
the original product or for ninety (90) days, whichever
is longer. All replaced products, parts, or components
shall become the property of LeEco.
To obtain service under this Limited Warranty, you must
return the Product to LeEco or to a LeEco authorized
service facility accompanied by the original sales receipt
or comparable proof of sale showing the original date
of purchase the serial number of the Product and the
seller’s name and address.
If LeEco determines that any product is not covered by
this Limited Warranty, you must pay LeEco for all parts,
shipping, and labor charges for the repair or return of
such product.
During repair or service, the contents of the memory
of the product may be reformatted or deleted. You
are responsible for maintaining a backup copy of any
contents of the product before sending it for warranty
or other service.
THIS LIMITED WARRANTY SETS OUT THE FULL EXTENT OF LEECO’S RESPONSIBILITIES AND THE SOLE
AND EXCLUSIVE REMEDY REGARDING THE PRODUCT
COVERED BY THIS WARRANTY. TO THE EXTENT
PERMITTED BY APPLICABLE LAW, LEECO MAKES NO
OTHER WARRANTIES OF ANY KIND, EXPRESS OR
IMPLIED, WITH RESPECT TO THE PRODUCT, INCLUDING BUT NOT LIMITED TO ANY IMPLIED WARRANTY
OF MERCHANTABILITY, FITESS FOR A PARTICULAR
PURPOSE OR AGAINST INFRIGEMENT.
25
Page 26

IN NO EVENT SHALL LEECO BE LIABLE FOR DAMAGES IN EXCESS OF THE PURCHASE PRICE OF THE
PRODUCT OR FOR, WITHOUT LIMITATION, LOSS OF
USE, DATA, OPPORTUNITY, GOODWILL, PROFITS OR
SAVINGS; OR FOR INCONVENIENCE; INCIDENTAL,
SPECIAL, CONSEQUENTIAL OR PUNITIVE DAMAGES; OR DAMAGES ARISING FROM THE USE OR
INABILITY TO USE THE PRODUCT. SOME STATES
AND JURISDICTIONS DO NOT ALLOW LIMITATIONS
ON OR DISCLAIMERS OF IMPLIED WARRANTY OR
ON HOW LONG AN IMPLIED WARRANTY LASTS, OR
THE DISCLAIMER OR LIMITATION OF INCIDENTAL OR
CONSEQUENTIAL DAMAGES, SO THE ABOVE LIMITA-
TIONS AND DISCLAIMERS MAY NOT APPLY TO YOU.
LEECO MAKES NO WARRANTIES OR REPRESEN-
TATIONS, EXPRESS OR IMPLIED, STATUTORY OR
OTHERWISE, AS TO THE QUALITY, CAPABILITIES,
OPERATIONS, PERFORMANCE OR SUITABILITY
OF ANY THIRD-PARTY EQUIPMENT, SOFTWARE
OR SERVICES USED IN CONJUNCTION WITH THE
PRODUCT, OR THE ABILITY TO INTEGRATE ANY
OF SUCH WITH THE PRODUCT. RESPONSIBILITY
FOR THE QUALITY, CAPABILITIES, OPERATION,
PERFORMANCE AND SUITABILITY OF ANY SUCH
THIRD-PARTY EQUIPMENT, SOFTWARE OR SERVICES
IS SOLELY WITH YOU AND THE DIRECT VENDOR
OR SUPPLIER OF SUCH THIRD-PARTY EQUIPMENT,
SOFTWARE OR SERVICES.
Except as provided in this Limited Warranty, nothing in
the product instructions or information accompanying
the product or supplied by a party other than LeEco
the shall be construed to create an express warranty
of any kind with respect to the products. No agent,
employee, dealer, representative or reseller is authorized to modify or extend this Limited Warranty or to
make binding representations or claims, whether in
advertising, presentations or otherwise, on behalf of
LeEco regarding the products or this Limited Warranty.
This Limited Warranty gives you specific legal rights,
and you may also have other rights that vary from state
to state. Except to any extent expressly allowed by
applicable law, transfer or assignment of this Limited
Warranty is prohibited.
26
Page 27

LeEco, ecotv and uMax85 are marks or registered trademarks of LeEco or its aliates.
Other names, trademarks or logos are the marks or registered trademarks of their respective holders.
 Loading...