

Page 1

Marquee X 480 Watt LED Flood Light
Installation Instructions
Cautions:
Do not use electric generator to test the LED
lamp.
Please install the fixture in accordance with
national, regional and local laws and regulations.
Do not install the fixture in wet condition.
The LED lamp must be installed with licensed
electricians only.
Please wear gloves during installation to avoid
injury.
This LED lamp can be installed outdoor.
Warning / Avertissement:
MIN 75°C SUPPLY CONDUCTOR
THIS PRODUCT MUST BE INSTALLED IN
ACCORDANCE WITH THE APPLICABLE
INSTALLATION CODE BY A PERSON FAMILIAR
WITH THE CONSTRUCTION AND OPERATION
OF THE PRODUCT AND THE HAZARDS
INVOLVED
LES FILS D’ALIMENTATION 75°C MIN
CE PRODUIT DOIT ETRE INSTALLE SELON LE
CODE D’INSTALLATION PERTINENT, PAR UNE PERSONNE QUI CONNAIT BIEN LE PRODUIT ET
FONCTIONNEMENT AINSI QUE LES RISQUES INHERENTS
Wiring color codes:
Line (Hot):! ! Black / Brown
Neutral (Cold):!! White / Blue
Ground (Earth):! Green / Yellow - Green
Brackets
Knuckle Bracket Straight Bracket Angle Bracket
LED Waves, Inc. 4100 1st Ave. Suite 3N Brooklyn, NY 11232 | 1-800-986-0169 | [email protected]! 1 of 4
Page 2

Marquee X 480 Watt LED Flood Light
Installation Instructions
Knuckle Bracket Mount
Note: The fixture can be installed over round poles. (Fig. 6)
1. Loosen 4 fixing screws on the mount. (Fig. 1)
2. Connect the wire of fixture to main power supply according to local electric
connection code, make sure good protection on the wire connection. (Fig. 2)
3. Put the wire into the pole, tighten 4 fixing screws. (Fig. 3)
4. Unscrew the screws of side cover, open the cover, loosen adjustable screw,
adjust angle and tighten the screw. Make sure that the screw is tightened firmly. (Fig. 4)
5. Close the side cover and tighten the screws. (Fig. 5)
Insert
Loosen
4 screws
Fig. 1
Tighten the screws
Fig. 3
Close the cover
Fig. 5 Fig. 6
Hex wrench
Fig. 2
Fig. 4
Round pole
Open the cover
Round Poles
LED Waves, Inc. 4100 1st Ave. Suite 3N Brooklyn, NY 11232 | 1-800-986-0169 | [email protected]! 2 of 4
Page 3
Marquee X 480 Watt LED Flood Light
Installation Instructions
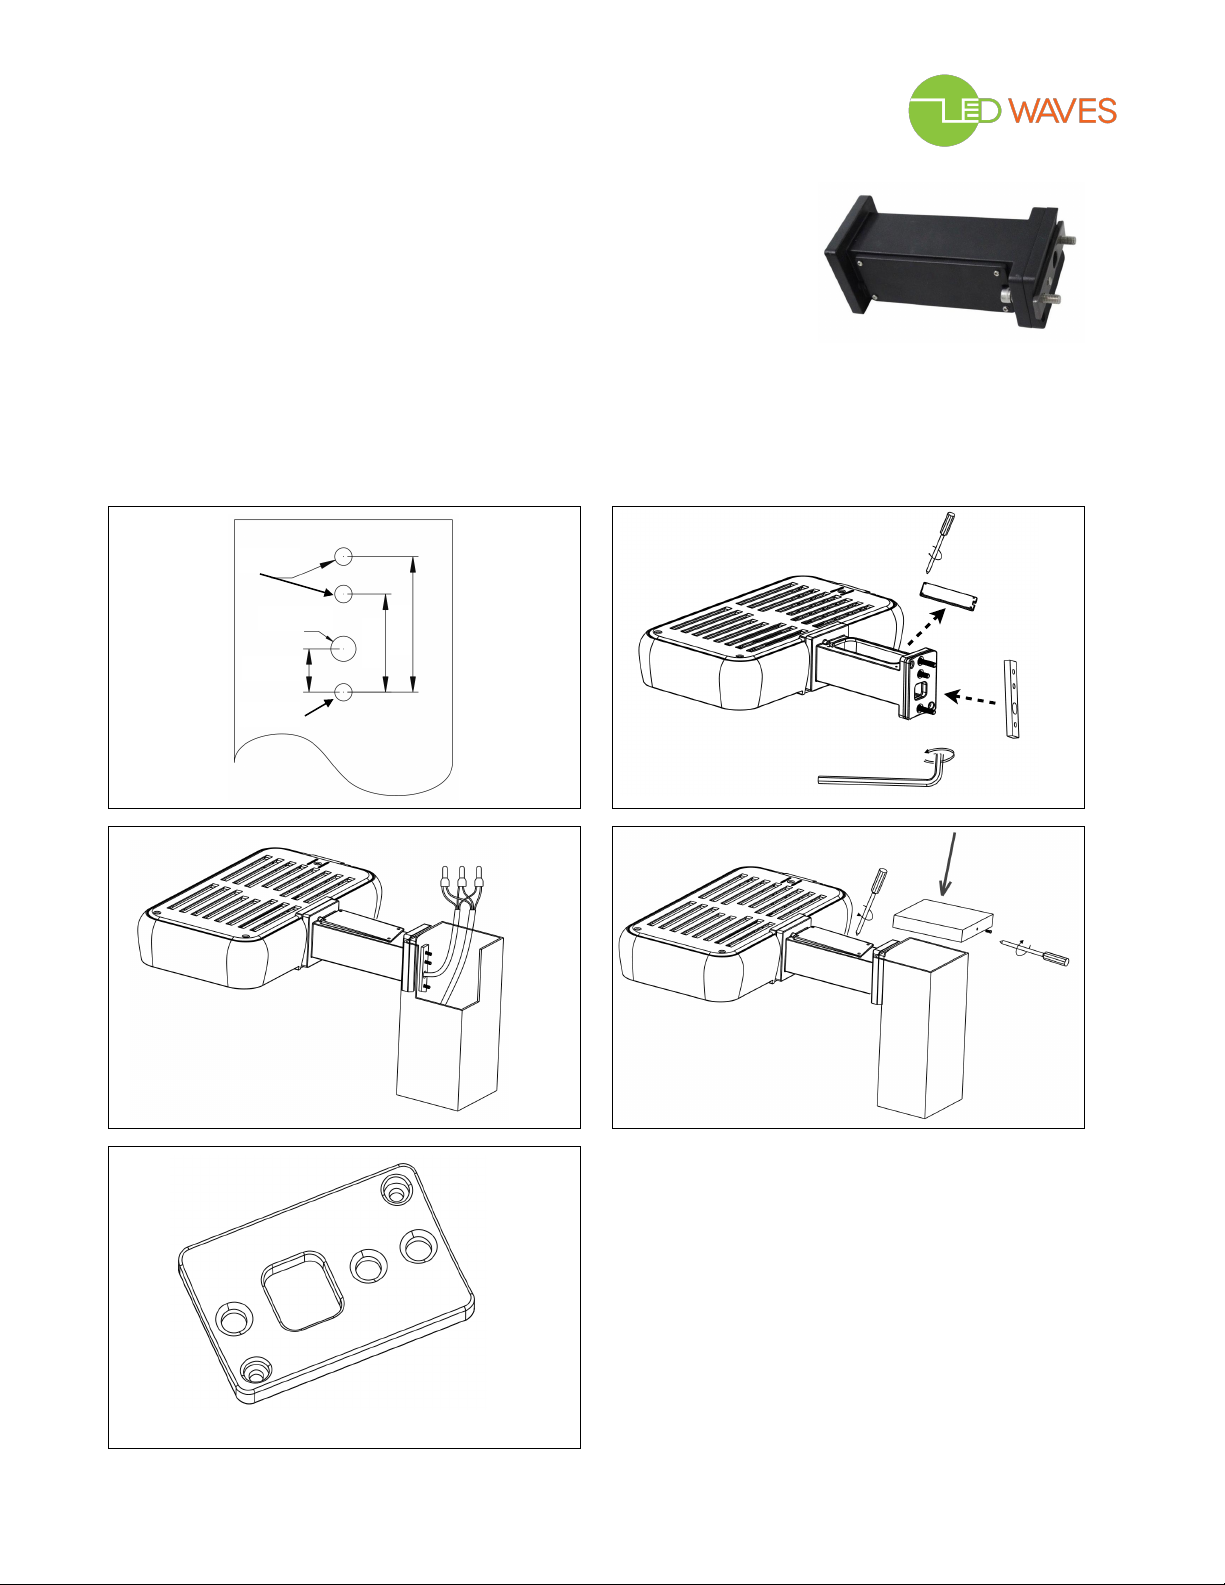
Straight Bracket Mount
Note: The bracket can be installed on both round pole and square pole. The
adapter plate should be used for round pole (It is not needed when the fixture
is installed on square pole or flat surface.) (Fig. 11)
1. Drill 4 holes (three 9mm holes and one 13mm hole) on the poles as shown.
(Fig. 7)
2. Unscrew the screw on the top of the bracket, remove the top cover, then install backing plate. (Fig. 8)
3. Open the pole cap, fix the bracket on the pole and tighten the screws firmly. connect the wires to mains.
(Fig. 9)
4. Close the pole cap, then tighten the screws on the side of the pole, and tighten the screws on the top of the
bracket. (Fig. 10)
ø9mm
ø13mm
70mm
22mm
51mm
ø9mm
Fig. 7 Fig. 8
Fig. 9 Fig. 10
Remove
top cover
Install
backing plate
Close
Adapter plate
Fig. 11
LED Waves, Inc. 4100 1st Ave. Suite 3N Brooklyn, NY 11232 | 1-800-986-0169 | [email protected]! 3 of 4
for round pole
Page 4
Marquee X 480 Watt LED Flood Light
Installation Instructions
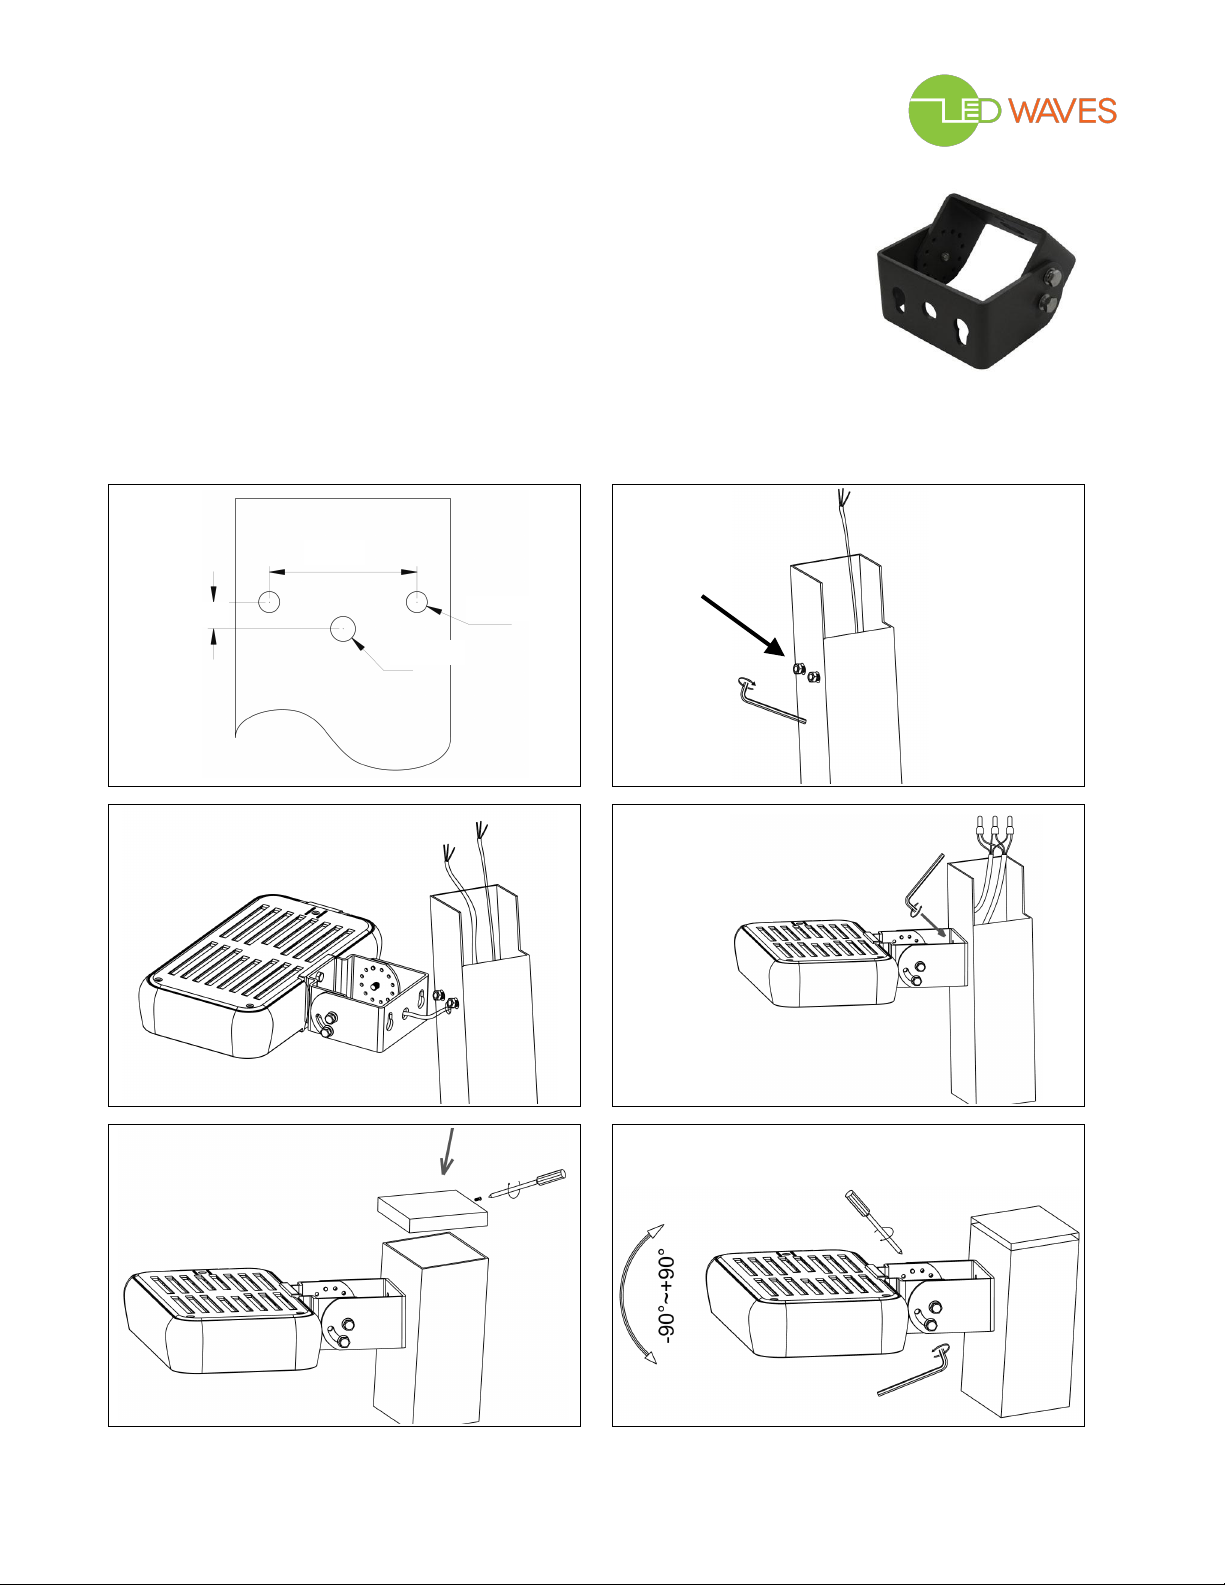
Angle Bracket Mount
Note: The fixture can be installed on square pole and wall with Angle Bracket.
1. Drill three holes on the poles for Angle Bracket as shown. (Fig. 12)
2. Fix the two M10x25 screws on the pole with nuts, leave a gap of 5mm between
screws and pole for the next step. (Fig. 13)
3. Match the screw holes on bracket to the M10x25 screws. (Fig. 13)
4. Tighten the screws to fix the bracket on the pole, connect the wires to mains,
according to local electric connection code.
5. Put the wires into the pole and close the pole cap.
6. Loosen the adjustable screw on the side, adjust viewing angle, then tighten the screw.
Mains
77mm
M10x25
14mm
ø11mm
ø13mm
screws
Fig. 12 Fig. 13
MainsFrom
fixture
Fig. 14 Fig. 15
Close the
pole cap
Connect the wires
Tighten the
screws
Tighten the
screws
Fig. 16
LED Waves, Inc. 4100 1st Ave. Suite 3N Brooklyn, NY 11232 | 1-800-986-0169 | [email protected]! 4 of 4
Fig. 17
 Loading...