

Page 1
LED LENSER®*
TT
Operating instructions | 1.0
Bedienungsanleitung
Instrucciones de uso
Mode d‘emploi
Istruzioni per l‘uso
Gebruiksaanwijzing
Руководство по эксплуатации
日本語
한국어
手册
Hersteller - Manufactured by
ZWEIBRÜDER® OPTOELECTRONICS GMBH & CO. KG
Krone nstr. 5-7 • 42699 Solingen • Ger many
Tel. +49 (0)212/5948-0 • Fax +49 (0)212/5948-200
info@zweibrueder.com • www.zweibrueder.com
* English
Thank you for choosing a LED LENSER product. To familiarize yourself with this product, please read the following
instructions.
Item
9804 LED LENSER Tac Torch
9904 LED LENSER Tac Torch (Blister)
Version: 1.0
Battery pack:
3 x AAA / LR03 / Micro (1.5 V DC)
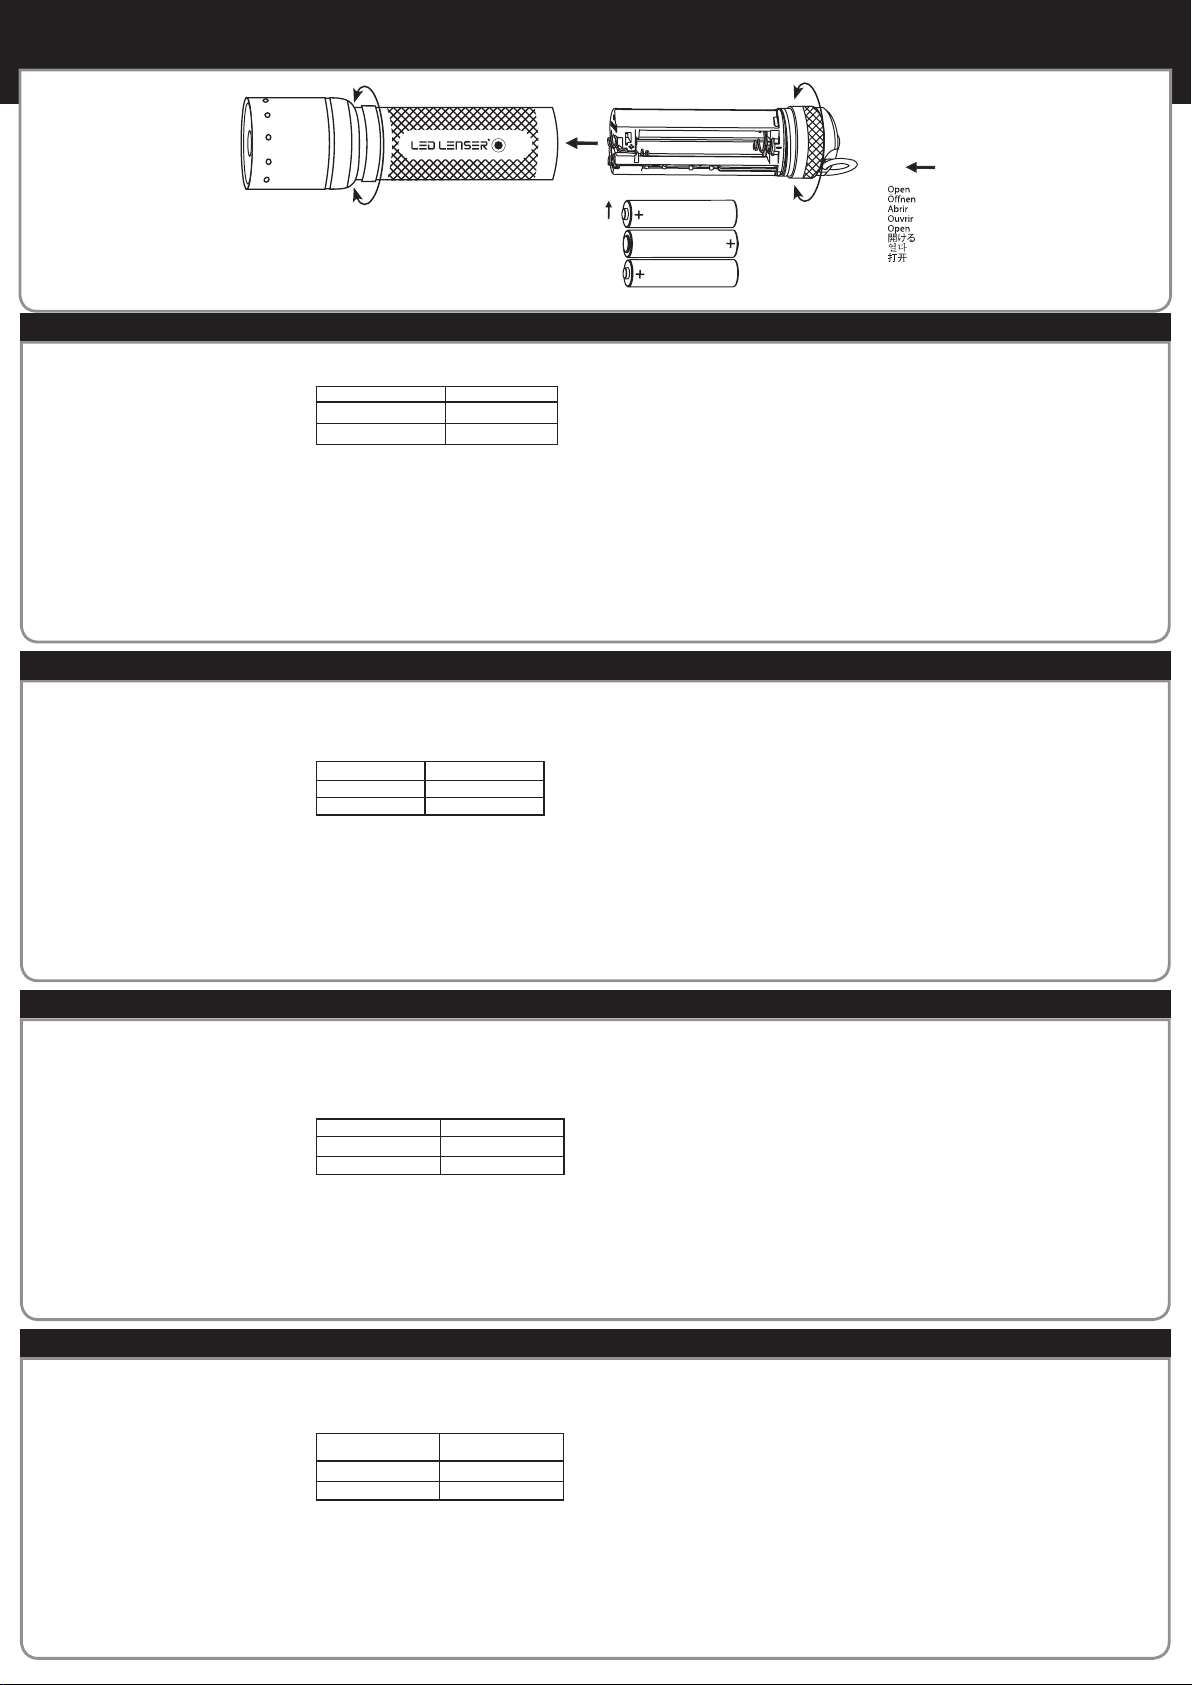
Turning the lamp on and o
The lamp is operated through the button at the end of the
flashlight tube. The button can be pressed until it locks (for
constant light output) or pressed without locking for e.g.
producing short light pulses. The button is also used to select
dierent light functions by using multiple short presses of
the button.
Focus
This flashlight is focusable. To adjust the beam width, use
one hand to hold the lamp tube and use your other hand
to turn the head of the TT; this will change the light focus
according to your needs.
Light-Functions
TT
1406000001
Focusable
Fokusierbar
Enfocable
Focalisable
Focalizzabile
The lamp oers two functions, strong light and dim light; the
light functions are selected by multiple short presses of the
rear button as shown in the following table.
Button presses Light Function
1 Strong
2 Dim
Low battery indicator
Regardless of which function you choose, the flashlight will
signal a low battery status when it is on by blinking 3 times
(3 Hz) every 15 seconds until the battery is empty. This will
indicate when the battery needs to be changed.
Changing the batteries
Before changing the batteries you must switch o the
flashlight. For changing the batteries please unscrew the cap
at the end of the flashlight.
The end cap and the battery holder is one unit. Pull out the
unit and take out the discharged batteries. Replace the
discharged batteries with new batteries according to the plus
and minus polarity marks on the holder. Insert the battery
holder back into the flashlight housing and close the lamp by
screwing the end cap back into position.
Focuseerbaar
フォーカス
포커스
调焦
-
-
-
Do not short-circuit the front springs. Take care not to touch
the front golden springs with any wet or metallic object.
Batteries
This lamp can support AAA Ni-MH batteries. Please take out
the batteries when the battery capacity is low to prevent
over-discharging of the batteries.
Never try to recharge non-rechargeable batteries or use
fresh and used batteries together. Always change all
batteries at the same time and use high quality batteries of
the same type only.
If you intend to not use this flashlight for a longer period of
time, take the batteries out to prevent damage to the lamp
by leaking batteries; discharged batteries must be also
taken out. Used batteries are hazardous waste and must be
disposed of according to the national legislation.
Accessories
Lanyard
Roll protection ring
Attention!
When inserting new batteries, follow the polarity marks on
the battery housing. Inserting batteries in the wrong way
could damage the batteries and might cause an explosion!
TT
Close
Schließen
Cerrar
Fermer
Sluiten
閉める
On/Off
닫다
An/ Aus
关闭
Encendido/Apagado
Marche/Arrêt
Aan/Uit
オン/オフ
켜짐 꺼짐
开/关
Security advice
You must not point the light beam directly at a
person’s eyes. If the light beam hits your eyes,
close your eyes and turn your head away immediately. Do not use any magnifying instruments
that would concentrate the light. When looking
directly in the the light beam, a temporary blinding eect of the eyes can occur.
In case of commercial usage, the user of the
flashlight must be instructed according to the
national regulations for health and safety and
the rules of practice.
* Deutsch
Wir freuen uns, dass Sie sich für ein Produkt aus unserem
Hause entschieden haben. Um sich mit Ihrem neuen Produkt
vertraut zu machen, finden Sie hier eine Gebrauchsanleitung.
Artikel
LED LENSER
9804 LED LENSER Tac Torch
9904 LED LENSER Tac Torch Blister
Version: 1.0
Batteriesatz:
3 x AAA / LR03 / Micro (1.5 V DC)
Ein-und Ausschalten der Lampe
Durch Betätigung des Druckschalters lässt sich die Lampe
ein- und ausschalten. Der Schalter kann komplett gedrückt
und eingerastet werden (für konstante Lichtausstrahlung)
oder nur leicht gepresst werden, z.B. für die Aussendung von
kurzen Lichtimpulsen. Der Schalter dient ausserdem dazu,
die verschiedenen Licht-Funktionen der Lampe anzuwählen;
dieses geschieht durch mehrfaches schnelles Drücken des
Schalters.
Fokus
Halten Sie die Lampe am gerielten Mittelteil mit einer Hand
fest und drehen Sie mit der anderen Hand den vorderen Objektivtubus. Hierdurch können Sie den Lichtstrahl stufenlos
* Español
Gracias por elegir uno de nuestros productos.
Para familiarizarse con este artículo, por favor lea las
siguientes instrucciones.
Artículo
LED LENSER
9804
LED LENSER Tac Torch
9904
LED LENSER Tac Torch Blister
Versión: 1.0
Baterías:
3 x AAA / LR03 / Micro (1.5 V DC)
Encendido y apagado de la linterna
La lámpara se hace funcionar a través del botón situado en
el extremo de la linterna. El botón puede ser presionado
totalmente (hasta hacer clic) para salida de luz constante,
o pulsado suavemente (sin hacer clic) para producir p.ej.
destellos de luz cortos.
El botón también se utiliza para seleccionar diferentes
funciones de luz mediante el uso de múltiples pulsados
seguidos.
Enfoque
Esta linterna es enfocable. Para ajustar el ancho del haz,
einstellen.
Licht-Funktionen
Die Lampe bietet zwei Licht-Funktionen an, Starklicht und
gedimmtes Licht. Die Licht-Funktionen werden durch mehrfaches schnelles Drücken des Schalters, wie in der folgende
Tabelle dargestellt, angewählt.
Schalter-Drücke Licht Funktion
1 Starklicht
2 Gedimmtes Licht
Batterie-Entlade-Anzeige
Unabhängig von der gewählten Licht-Funktion, wird ein
niedriger Ladezustand der Batterie durch Blinken der Lampe
angezeigt. Hierbei blinkt die Lampe -alle 15 Sekunden
wiederholt- dreimal mit 3 Hz bis die Batterie vollständig
entladen ist. Dieses zeigt an, wann die Batterie geladen
werden muss.
Wechsel der Batterien
Vor dem Wechseln der Batterien schalten Sie bitte unbedingt
die Lampe aus. Zum Wechseln der Batterien schrauben Sie
bitte die Lampe hinten auf.
Der Batteriehalter ist mit der Endkappe verbunden. Ziehen
Sie diese Einheit heraus und entnehmen Sie die verbrauch-
sujete el tubo de la linterna con una mano y use la otra
mano para girar la cabeza del TT; esto cambiará el foco de
luz de acuerdo a sus necesidades.
Funciones luz
La linterna ofrece dos funciones: luz fuerte y luz tenue; las
funciones de luz son seleccionadas por multiples pulsa
dos cortos sobre el botón trasero como se muestra en la
siguiente tabla.
Presiones del botón Función de luz
1 Fuerte
2 Tenue
Indicador de batería baja
Sea cual sea la función que se elija, la linterna señalará el
estado de la batería baja cuando está encendida parpa
deando 3 veces (con 3 Hz) cada 15 segundos hasta que la
batería está vacía. Esto indicará cuando se necesita cambiar
la batería.
Sustitución de las baterías
Antes de cambiar las baterías debe apagar la linterna. Para
cambiar las baterías, desenrosque la tapa final.
La tapa final y el soporte de baterías es una unidad. Saque
la unidad y extraiga las baterías descargadas. Reemplace
-
-
ten Batterien. Legen Sie die neuen Batterien entsprechend
der Polaritäts-Kennzeichnungen in den Batteriehalter ein.
Schieben Sie den Batteriehalter ins Lampengehäuse ein und
schrauben danach die Endkappe wieder auf.
Achten Sie darauf, die vorderen goldenen Kontakte nicht
kurzzuschließen. Halten Sie diese Kontakte beim Batteriewechsel von allen metallischen oder feuchten Gegenständen fern.
Batterien
Die Lampe unterstützt auch die Benutzung von aufladbaren
Akkumulatoren des Typs AAA Ni-MH. Bitte entnehmen Sie
diese wenn diese Entladen sind, um eine Tiefenentladung
zu vermeiden.
Nicht wieder aufladbare Batterien dürfen keinesfalls wieder
aufgeladen werden. Verwenden Sie niemals neue und gebrauchte Batterien zusammen. Verwenden Sie ausschließlich
hochwertige Batterien desselben Typs. Wechseln Sie immer
alle Batterien auf einmal.
Falls Sie die Lampe längere Zeit nicht verwenden wollen,
entnehmen Sie unbedingt die Batterien um Schäden zu vermeiden; entladene Batterien müssen ebenfalls entnommen
werden. Verbrauchte Batterien und Akkus sind Sondermüll
und müssen gemäß der nationalen Gesetzgebung entsorgt
werden.
las baterías descargadas con nuevas baterías de acuerdo
con las marcas de polaridad (+) y (-) indicadas en el sopor
te. Inserte el soporte de baterías de nuevo en la linterna y
ciérrela roscando la tapa final en su sitio.
Tenga cuidado de no tocar los muelles delanteros dorados
con cualquier objeto húmedo o metálico, podría provocar
un cortocircuito.
Baterías
Esta lámpara puede admitir pilas AA Ni-MH. Por favor,
saque las pilas cuando la capacidad de la batería es baja
para evitar la sobre-descarga de las baterías.
Nunca intente recargar las pilas que no sean recargables
o utilizar pilas nuevas y usadas juntas. Siempre cambie
todas las pilas a la vez y utilice solo pilas de alta calidad
del mismo tipo.
Si tiene la intención de no utilizar esta linterna por un
período prolongad de tiempo, saque las pilas para evitar
pérdidas que puedan dañar la linterna; las baterías descar
gadas deben ser retiradas también. Las pilas usadas son
residuos peligrosos y deben ser eliminados de acuerdo con
la legislación nacional.
Accesorios
Anillo de protección
Zubehör
5-eckiger Rollschutz-Ring
Achtung!
Beachten Sie beim Einlegen der Batterien unbedingt die
Polaritätsmarkierungen! Andernfalls besteht eventuell die
Gefahr, dass Batterien beschädigt werden und explodieren.
Sicherheitshinweis
Richten Sie niemals absichtlich den Lichtstrahl
in die Augen von Personen.Falls ein Lichtstrahl
in die Augen trit, sind die Augen bewusst zu
schließen und der Kopf aus dem Lichtstrahl zu
bewegen. Es dürfen keine optisch stark bündelnden Instrumente zur Betrachtung des Lichtstrahls verwendet werden.Wenn jemand direkt in
den Lichtstrahl blickt, kann die hohe Leuchtkraft
der Lampe zu Blenderscheinungen führen.
Bei gewerblicher Nutzung oder der Nutzung im
Bereich der öentlichen Hand ist der Benutzer
entsprechend der Vorschriften für Laserstrahlung zu unterweisen.
Atención!
Cuando vaya a introducir las pilas, siga las marcas de
polaridad indicadas en la carcasa de la batería. Insertar las
pilas en la dirección equivocada podría dañar las baterías y
podría causar una explosión!
Consejos de seguridad
No dirija la luz directamente en los ojos de alguien.
Si el haz de luz incide directamente en el ojo,
apartar la mirada de inmediato. No utilice ningún
instrumento de aumento con esta linterna que
pudiera concentrar el haz de luz. Cuando se mira
directamente en el haz de luz, se puede producir
un efecto cegador temporal.
Si se utiliza con fines comerciales, la linterna se
debe utilizar solamente de acuerdo con las leyes y
regulaciones locales. Para su uso en la carretera
por favor, siga las regulaciones estatales sobre las
-
señales de tráfico.
En caso de uso comercial, el usuario de la linterna
se debe instruir conforme a las normas nacionales
de salud y seguridad y las reglas de la práctica.
* Français
Nous sommes ravis que vous ayez acheté l‘un de nos produits. Vous trouverez ici le mode d‘emploi qui vous permettra
de vous familiariser avec votre nouveau produit.
Produit
9804 LED LENSER Tac Torch
9904 LED LENSER Tac Torch (Blister)
Version : 1.0
Jeu de piles :
3 x AAA / LR03 / Micro (1,5 V DC)
Allumer et éteindre la lampe
Actionnez le bouton-poussoir pour allumer et éteindre la
lampe. Le bouton-poussoir peut être entièrement appuyé
et encliqueté (pour un faisceau lumineux constant) ou
légèrement appuyé seulement, par ex. pour l‘émission de
courtes impulsions lumineuses. Le bouton-poussoir sert par
ailleurs à sélectionner les diérentes fonctions d‘éclairage
de la lampe ; pour cela, appuyer plusieurs fois rapidement
sur le bouton-poussoir.
Focalisation
Tenez fermement la lampe à une main sur la partie centrale
striée et tournez le barillet d‘objectif à l‘avant avec l‘autre
main. Vous pouvez ainsi régler le faisceau lumineux en
continu.
Fonctions d‘éclairage
La lampe ore deux fonctions d‘éclairage : lumière forte et
lumière atténuée. Pour sélectionner les fonctions d‘éclairage,
appuyez plusieurs fois rapidement sur le bouton-poussoir,
comme représenté dans le tableau suivant.
Appuis sur le boutonpoussoir
1 Lumière forte
Fonction
2 Lumière atténuée
Achage de pile déchargée
Indépendamment de la fonction d‘éclairage sélectionnée, un
état de charge faible de la pile est aché par le clignotement
de la lampe. La lampe clignote alors toutes les 15 secondes
en trois répétitions avec 3 Hz jusqu‘à ce que la pile soit
entièrement déchargée. Cela indique à quel moment la pile
doit être rechargée.
Remplacement des piles
Avant le remplacement des piles, veillez obligatoirement
à éteindre la lampe. Pour remplacer les piles, dévissez la
lampe à l‘arrière.
Le support à piles est relié à l‘embout de fermeture. Retirez
cette unité et les piles usées. Installez les nouvelles piles
conformément au marquage de polarité dans le support à
piles. Glissez le support à piles dans le boîtier de la lampe et
revissez l‘embout de fermeture.
Faites attention à ne pas court-circuiter les contacts dorés à
l‘avant. Lors du remplacement des piles, tenez ces contacts
éloignés de tous les objets métalliques ou humides.
Piles
La lampe prend également en charge l‘utilisation d‘accus rechargeables du type AAA Ni-MH. Une fois déchargés, retirez
ces accus afin d‘éviter une décharge profonde.
Les piles non rechargeables ne doivent en aucun cas être
rechargées. N‘utilisez jamais en même temps des piles
neuves et des piles usées. N‘utilisez que des piles de qualité,
du même type. Remplacez toujours toutes les piles en même
temps.
Si la lampe reste inutilisée pendant une longue durée, retirez
obligatoirement les piles afin d‘éviter les dommages ; les
piles déchargées doivent également être retirées. Les piles
et accus usés sont des déchets spéciaux et doivent être
éliminés conformément à la législation nationale.
Accessoires
Bague de stabilisation à 5 angles
Attention !
Lors de l‘insertion des piles, faites attention au marquage
de polarité ! Il existe autrement le risque que les piles soient
endommagées et explosent.
Consigne de sécurité
N‘orientez jamais le faisceau lumineux volontairement dans les yeux des personnes. Si le
faisceau lumineux rencontre les yeux, fermez
les yeux ou tournez la tête pour l‘éloigner du
faisceau lumineux. Ne pas utiliser des instruments à forte focalisation optique pour observer
le faisceau lumineux. Si une personne regarde
directement dans le faisceau lumineux, la forte
puissance lumineuse de la lampe peut causer
des aveuglements.
En cas d‘utilisation professionnelle ou dans le
domaine public, l‘utilisateur
doit être instruit conformément aux prescriptions concernant les faisceaux laser.
Page 2
* Netherlands
Het verheugt ons dat u gekozen heeft voor een product van LED
Lenser.
Gelieve de instructies hieronder te lezen om u vertrouwd te maken
met dit product.
Artikel
LED Lenser
9804 Tac Torch
9904 Tac Torch blister
Versie 1.0
Batterijen
3 x AAA / LR03 / Micro (1.5V DC)
AAN en UIT schakelen
Met de drukschakelaar op de achterzijde van de lamp, kan men de
lamp AAN of UIT schakelen. De schakelaar kan volledig ingedrukt
worden voor een constante lichtsterkte of enkel op gedrukt worden
(zonder in te drukken) voor korte lichtflitsen of andere functies en
kenmerken.
Deze schakelaar wordt eveneens gebruikt om verschillende licht
* Italian
Complimenti per aver acquistato uno dei nostri prodotti. Il presente
manuale comprende istruzioni per l‘uso per aiutarvi a familiarizzare
con il vostro nuovo acquisto.
Prodotto
9804 LED LENSER Tac Torch
9904 LED LENSER Tac Torch (Blister)
Versione: 1.0
Set di batterie:
3 x AAA / LR03 / Micro (1,5 V DC)
Accensione e spegnimento della torcia
La torcia si accende e spegne premendo sul pulsante. L‘interruttore si
può premere completamente e bloccare (per la luce costante) oppure
si può premere solo leggermente, ad es. per emettere brevi impulsi luminosi. Questo interruttore serve anche a selezionare le varie funzioni
di luce, premendolo ripetutamente e velocemente.
Fuoco
Tenere la torcia ben salda con una mano dalla parte centrale scanalata
e ruotare con l‘altra mano il tubo frontale dell‘obiettivo. In questo modo
si può regolare il fascio luminoso in continuo.
* Pусский
Благодарим Вас за покупку нашей продукции.
Следующие инструкции помогут Вам изучить приобретенный фонарь.
Изделие
Фонарь LED LENSER
Тактический фонарь 9804
Тактический фонарь серебристого цвета 9904
Версия: 1.0
Элементы питания
3 x AAA / LR03 / Micro (1,5 В)
Включение и выключение фонаря
Кнопка на конце ручки фонаря предназначена для управления
фонарем. Кнопку можно переключить в крайнее положение, в
котором кнопка фиксируется (чтобы выбрать непрерывный режим
работы) или нажать ее без фиксации, например, для подачи коротких
световых сигналов. Кроме того, эта кнопка используется для выбора
различных функций. Для выбора функции необходимо несколько раз
переключить кнопку в среднее положение.
Фокусировка
Вы может изменить фокусировку луча света. Для того чтобы изменить
programma’s en licht functies te gebruiken door slechts op de schakelaar te drukken. Wordt hieronder uitgelegd.
Focus
Deze lamp is focuseerbaar. Door de lampkop naar links of rechts
te draaien kan men de focuseerbare lichtstraal afstemmen op de
applicatie.
Licht functies
Deze lamp biedt u 2 licht functies: sterk licht en weinig licht. De licht
functies worden geselecteerd door op de schakelaar te drukken zoals
getoond wordt in volgende tabel.
Aantal keer drukken Licht functie
1 Sterk
2 Weinig
Batterij verwisselen
Ongeacht welke licht functie u heeft gekozen, de lamp zal low battery
aangeven door elke 15 seconden 3 keer met 3Hz te knipperen. Dit geeft
Funzioni di luce
La torcia presenta due funzioni di luce: luce intensa e luce dimmerata.
Le funzioni di luce si selezionano premendo l‘interruttore ripetutamente e velocemente, come illustrato nella seguente tabella.
Pressioni interruttore Funzione di luce
1 Luce intensa
2 Luce dimmerata
Indicatore di scarica della batteria
Indipendentemente dalla funzione di luce selezionata, il basso livello
di carica della batteria viene indicato dal lampeggio della torcia. La
torcia lampeggia - ripetutamente ogni 15 secondi - tre volte a 3 Hz fino
a quando la batteria non si scarica completamente. In questo caso è
necessario ricaricare la batteria.
Sostituzione delle batterie
Prima di sostituire le batterie occorre assolutamente spegnere la
torcia. Per sostituire le batterie si deve svitare la torcia nella parte
posteriore.
Il supporto delle batterie è collegato con il cappuccio terminale.
Estrarre questo gruppo e rimuovere le batterie scariche. Inserire le
угол расхождения светового луча, возьмите фонарь в одну руку, и
поверните головку тактического фонаря другой рукой, таким образом,
Вы сможете изменить фокусировку в зависимости от ваших нужд.
Функции фонаря
Для пользователя доступны две функции: Яркий свет и слабый свет,
для выбора функции необходимо несколько раз переключить кнопку
на ручке фонаря в среднее положение. В следующей таблице показана
очередность функций.
Кнопка нажата раз Функция
1 Яркий свет
2 Слабый свет
Индикатор разряда элементов питания
Независимо от используемой функции, фонарь подает сигнал,
указывающий на низкий уровень заряда батареек. Включенный
фонарь издает 3 короткие вспышки (с частотой 3 ГЦ) через каждые 15
секунд до тех пор, пока элементы питания полностью не разрядятся.
Этот сигнал сообщает о том, что необходимо заменить элементы
питания.
aan dat de batterijen dienen vervangen te worden.
De lamp dient uitgeschakeld te zijn om de batterijen te vervangen.
Schroef vervolgens de eindkap los.
De eindkap en de batterijhouder vormen een geheel. Neem dit deel
uit de lamp en verwijder de lege batterijen. Vervang de lege batterijen
door nieuwe en hou rekening met de (+) en (-) markeringen op de
batterijhouder. Plaats de batterijhouder terug in de lamp en schroef de
eindkap terug op haar plaats.
Veroorzaak geen kortsluiting met de voorste contactveren. Raak
de goudcontacten vooraan niet aan met vochtige of metalen
voorwerpen.
Batterijen
In deze lamp kunnen eveneens AA Ni-MH batterijen gebruikt worden.
Bij een lage batterij capaciteit dienen de batterijen verwijderd te
worden om beschadiging van de batterijen door diepontlading te
voorkomen.
Niet oplaadbare batterijen in géén geval trachten op te laden. Nieuwe
en oude batterijen nooit samen gebruiken. Vervang steeds alle batterijen tegelijk en gebruik kwaliteitsbatterijen van hetzelfde type. Indien u
batterie nuove nel supporto rispettando la corretta polarità. Introdurre
il supporto delle batterie nel corpo della torcia, quindi riavvitare il
cappuccio terminale.
Attenzione a non cortocircuitare i contatti dorati che si trovano
davanti. Durante la sostituzione delle batterie, questi contatti devono
rimanere lontani da qualsiasi oggetto metallico e umido.
Batterie
Su questa torcia si possono usare anche le batterie ricaricabili AAA
Ni-MH. Se queste batterie sono scariche, rimuoverle per evitare la
cosiddetta scarica profonda.
Batterie non ricaricabili non devono essere ricaricate. Non usare mai
insieme batterie nuove e usate. Utilizzare esclusivamente batterie di
elevata qualità e dello stesso tipo. Sostituire tutte le batterie sempre
insieme.
Se non si intende utilizzare la torcia per un lungo periodo di tempo,
è necessario prima rimuovere le batterie per evitare danni; vanno
rimosse anche le batterie scariche. Le batterie alcaline e ricaricabili
sono da considerarsi rifiuti speciali, quindi vanno smaltite secondo le
relative norme nazionali.
Accessori
Cinturino
Anello di protezione anti-rotolamento, pentagonale
Замена батареек
Перед заменой батареек необходимо выключить фонарь. Открутите
крышку на конце ручки фонаря, чтобы заменить батарейки.
Извлеките разряженные батарейки, и вставьте новые батарейки,
соблюдая полярность. Полюсы указаны на патроне. Вставьте патрон с
батарейками в фонарь, и закройте фонарь, закрутив крышку.
Не допускайте короткого замыкания между передними
пружинами. Не прикасайтесь к золотым пружинам влажными или
металлическими предметами.
Батарейки
Фонарь может работать от никель-металлогидридных аккумуляторов
размером АА. Извлеките из фонаря разряженные аккумуляторы,
чтобы предотвратить повышенный разряд аккумуляторов. Заряжать
одноразовые батарейки запрещено. При замене батареек необходимо
заменить все батарейки. Используйте качественные батарейки
одинакового типа.
Выньте батарейки из фонаря, если вы не будете использовать его
длительное время, таким образом, Вы сможете избежать повреждения
фонаря в случае утечки электролита. Выньте батарейки из фонаря,
если они разряжены. Использованные батарейки относятся к
опасным отходам и должны быть утилизированы в соответствии с
национальным законодательством.
de lamp langere tijd niet gebruikt, dient u de batterijen te verwijderen
om lekkage en beschadiging van de lamp te vermijden. Gebruikte
batterijen en accu’s zijn gevaarlijk afval en dienen dus weggeworpen te
worden volgens de lokaal geldende voorschriften.
Waarschuwing
Wanneer u de batterijen in de houder plaatst volg dan de polariteitsmarkeringen op de batterijbehuizing. Als u de batterij verkeerd plaatst
bestaat er een risico op beschadiging of explosie van de accu!
Toebehoren
Pols touwtje, rol protectie ring
Veiligheidsaanwijzing
De lichtbundel nooit opzettelijk in de ogen richten. Indien
het licht in de ogen komt, de ogen onmiddellijk wegdraaien van het licht. Er mogen geen optisch sterk bundelende instrumenten gebruikt worden om de lichtbundel
te concentreren. Bij beroepsmatig gebruik dient de
gebruiker van de lamp dit product enkel aan te wenden in
overeenstemming met de lokale wetten en
Attenzione!
Introdurre le batterie osservando sempre la corretta polarità!
Contrariamente si rischia di danneggiare le batterie e provocare
un‘esplosione.
Avvertenza di sicurezza
Non indirizzare mai il fascio luminoso intenzionalmente negli occhi delle persone. Se gli occhi vengono
colpiti dal fascio luminoso, si devono chiudere senza
esitazioni e la testa deve allontanarsi dal fascio
luminoso. Per l‘osservazione del fascio luminoso non
si devono usare strumenti che emettano fasci luminosi troppo intensi. Se si guarda il fascio luminoso
direttamente, l‘elevata intensità luminosa della torcia
può provocare fenomeni di abbagliamento.
Per quanto attiene all‘uso commerciale del prodotto da parte di enti pubblici, l‘utente deve essere
informato su tutte le leggi e normative applicabili,
pertinenti al singolo tipo di impiego.
Аксессуары
Шнурок
Граненое кольцо, препятствующее качению.
Внимание!
Соблюдайте полярность при установке новых батареек, полюсы
обозначены на патроне для батареек. При неправильной установке
батареек может быть поврежден фонарь или могут взорваться
батарейки!
Меры предосторожности
Не направляйте луч света в глаза другого человека.
Немедленно закройте глаза и поверните голову,
если вас ослепил свет фонаря. Фонарь запрещено
использовать с увеличительными приборами,
фокусирующими луч света. Свет фонаря,
направленный в глаза человека, может привести к
временному ослеплению. При использовании фонаря
в коммерческих целях пользователь должен изучить
национальные правила охраны труда и техники
безопасности, и
иные действующие правила
regelgeving.
* 日本語
* 한국어
당사 제품을 선택하여 주셔서 감사합니다.
이 제품의 사용 방법 숙지를 위해 아래의 사용설명서를 읽어주
시기 바랍니다
제품
LED LENSER
9804 Tac Torch
9904 Tac Torch Blister
Version: 1.0
건전지
AAA건전지(LR03) 3개 (1.5 V DC)
전원(꺼짐/켜짐)
램프는 손전등의 뒷부분에 있는 버튼을 통해 작동됩니다. 버튼
은 그것이 잠길 때까지 누르거나 (지속적인 빛 출력을 위해) 예를
들면 짧은 빛 점멸을 만들기 위해 잠기는 것 없이 누를 수 있습니
다. 버튼은 여러 번 짧게 누름으로써 다른 빛 기능을 선택하기 위
해서도 사용됩니다.
포커스
이 손전등은 빛을 집중시킬 수 있습니다. 한 손으로 본체의 손
* 中文
感谢您选择了一款我们的产品,为了让您熟悉我们
这款产品,请您阅读以下产品说明书。
产品
LED LENSER
9804 Tac Torch
9904 Tac Torch 泡包装
版本:1.0
电池:
3 x AAA/ LR03/ Micro (1.5V DC)
开和关
通过按动电筒尾部的开关可以控制电筒的开与关。
你可以通过锁定按钮得到稳定的光输出也可以通过
点动开关得到短暂的光输出或信号功能。操作此开
关同时也可实现不同发光模式和操作模式的转换。
调焦
잡이 부분을 잡고 다른 손으로 TT의 헤드 부분을 돌려서 빛 폭
을 조절할 수 있습니다; 이것은 필요에 따라 빛 포커스를 변경
할 것입니다.
빛 기능
램프는 두 가지 빛 기능: 강한 빛 그리고 약한 빛을 제공합니다. 빛
기능은 다음의 표에 보여지는 것과 같이 뒷부분 버튼을 여러 번
짧게 눌러 선택됩니다.
버튼 누르는 횟수 빛 기능
1 강한 빛
2 약한 빛
건전지 부족 표시
선택한 기능에 상관 없이 손전등은 건전지가 전부 소모될 때까지
매 15초마다 3번 점멸(3Hz)하는 것으로 건전지 부족을 표시할 것
입니다. 이것은 건전지가 교체될 필요가 있다는 것을 나타냅니다.
건전지 교체
건전지를 교체하기 전에 손전등의 전원을 꺼야만 합니다. 건
전지를 교체하기 위해 손전등 뒷부분의 뚜껑을 돌려서 분리해
此产品是可调焦产品,握住电筒的直管,左右旋转
电筒的头部,可以根据您的需要调整光的角度。
产品功能选择
此产品有两种功能,强光和弱光,你可以通过按动
电筒后盖的按钮来选择不同的产品功能。
锁定按钮 电筒功能
1 强光
2 弱光
产品功能顺序图
低电量提示
无论处于何种电流管理模式或发光模式,电筒在点
亮的情况下都会以每10秒3Hz闪动来警示电池电量
低直到电池没电。此时你需要对你产品进行充电或
更换电池。
주십시오.
뒷부분 뚜껑과 건전지 소켓은 하나로 되어 있습니다. 이것을 빼
내고 방전된 건전지들을 꺼냅니다. 방전된 건전지들을 건전지 소
켓에 표시된 극성(+/-)에 따라 새로운 건전지들로 교체합니다. 건
전지 소켓을 다시 손전등 본체 안에 넣고 뒷부분의 뚜껑을 돌려
서 닫습니다.
전면 스프링에 합선이 생기지 않도록 해야만 합니다. 전면 금
색 스프링에 젖은 것이나 금속 물질이 닿지 않도록 주의하여 주
십시오.
건전지
이 램프는 AA Ni-MH 건전지를 지원합니다. 건전지 용량이 낮으면
건전지의 과방전을 막기 위해 건전지를 꺼내 주십시오. 비 충전식
건전지를 충전하려고 하거나 새로운 건전지와 사용한 건전지를
함께 사용해서는 절대 안 됩니다. 모든 건전지들은 한 타입의 건
전지를 항상 동시에 교환하여 주십시오. 오랜 기간 동안 손전등을
사용하지 않을 경우, 손전등의 손상이나 건전지 액 누수로 인한
손상을 방지하기 위해서 건전지를 빼 놓으시길 바랍니다. 방전된
건전지도 제거되어야만 합니다. 사용한 건전지는 유해폐기물이므
로 반드시 정부 규정에 따라 처분되어야만 합니다.
액세서리
电池的更换
更换电池前必须关闭电筒。更换电池请扭开电筒的
后盖,后盖和电池盒是一个整体。取出这个整体并
取出须更换的电池。请同时更换所有的电池。根据
电池盒里的“+”“-”极标志放进新电池。不要引起电
池盒弹簧的短路。不要用潮湿或金属物质接触电池
盒前面的弹簧。
电池
产品支持的电池:AAA/ LR03 1.5V 碱性电池,AAA/
LR03 1.2V镍氢电池。
不要对电池充电或新旧电池一起使用,请使用更换
所有的电池并只使用高质量型号相同的电池。如果
您打算长时间不使用电筒,请取出电池以防止电池
漏液损坏电筒。必须取出没电的电池。使用过的电
池和蓄电池是危险垃圾,必须根据国家规定处置。
配件
手绳
가는 끈
롤 보호 링
주의!
새로운 건전지를 넣을 때, 건전지 소켓에 있는 극성 표시에 따라
야 합니다. 건전지가 잘못 삽입되면, 폭발을 야기시키거나 건전지
손상이 발생할 수 있는 원인이 될 수 있습니다.
안전 경고
사람의 눈에 직접적으로 빛을 비추지 마십시오. 만약
빛이 귀하의 눈에 직접적으로 비춰진 경우, 즉시 먼
곳을 바라봐 주십시오. 빛을 집중시킬 수 있는 집광
기구를 손전등과 함께 사용하지 마십시오. 빛을 직접
적으로 보았을 때, 눈에 일시적인 눈부심 효과가 발
생할 수 있습니다.
업무적 용도의 경우, 손전등의 사용자는 국가의 안
전기준에 따라 올바르게 사용하여 주십시오. 도로
에서 사용할 경우에는 도로 교통 규정에 따라 주시
기 바랍니다.
防滚圈
注意!
放进新电池时,要遵循电池盒里的“+”“-”极标志指
示。如果电池“+”“-”错误放置,将会损坏电池并有可
能引起爆炸!
安全忠告
亮着的电筒不要照射任何人的眼睛。如果您
的眼睛被照到,请闭上眼睛并转过头去。不
要使用放大工具聚焦电筒的光。直视电筒,
电筒的光能让您暂时眼花。如果用于商业用
途,电筒的使用者必须遵循国家关于健康、
安全和惯例规定的指示。在道路上使用时请
遵循国家关于道路交通灯的规定。
 Loading...