

Page 1

READ ALL PRECAUTIONS & INSTRUCTIONS CAREFULLY
BEFORE OPERATING LAMINATOR
Setup
Instruction
Operation
Lamination
Maintenance
Compass
Hot Roll Laminator
Operation
Manual
01.2009 v 3.00
Page 2

IMPORTANT: Don’t laminate one-of-a-kind documents unless you are sure of your
laminating skills and can afford to damage or ruin the document.
Don’t laminate valuable items such as stamps, baseball cards, autographs, or other
collectibles because the value of such items can be destroyed by lamination. Collectors
generally value these kinds of items only in their original state.
Remember that you cannot laminate thermal paper because it is activated by heat and
will turn black. Also, remove paper clips and staples because they can damage the
rubber rollers. Be careful about laminating anything that will be affected by heat. For
example, the colors in crayon drawings may run together or be smeared, especially if
the crayon layer is heavy. Light crayon drawings may not be affected, but test an
expendable sample of any item that may not laminate well.
IMPORTANT: Éviter de plastifier du papier thermosensible, comme le papier de
télécopieur, pusqu’ll noircira sous l’effet de la chaleur, et enlever les trombones et les
agrafes gul risquent d’endommager les rouleaux de caoutchouc. Prendre certaines
précautions avant de plastifier des articles susceptibles de réagir à la chaleur comme
les dessins au pastel dont les couleurs baver et se mélanger, surtout si la couche de
pastel est épaisse. Les pastels en couche mince peuvent ne pas réagir, mais, en cas
de doute, il est préférable de faire un essai avec un échantillon perdu.
Ne pas plastifier les documents importants dont il n’existe qu’un seul exemplaire, à
moins de bien malitriser la technique de plastification.
Ne pas plastifier non plus les articles de collection comme les trimbres, les cartes de
baseball, les autographes ou autres, qui peuvent perdre leur valeur pour les
collectionneurs s’ils ne sont plus dans leur état d’origine.
IMPORTANTE: Recuerde que no puede laminar papel térmico, tal como el papel de
fax tipico, ya que es activado por el calor y se tornará negro. Retire también cualquier
sujeta-papeles o grapa, puesto que pueden danar los rodillos de goma. Evite laminar
cosas sensibles al calor, por ejemplo, los colores de dibujos hechos en lápiz de pastel
pueden no ser afectados, pero ensaye con alguna muestra descartable, en los ìtemes
que podrían no laminarse bien.
No lamine ningún documento único, a no ser que esté muy seguro de sus habilidades
de laminador y pueda permitirse arruinar el documento.
No lamine artículos de valor, como estampillas, tarjetas de béisbol, autógrafos, u otros
coleccionables, ya que su valor puede ser destruido por la laminación. En general, las
coleccionistas valoran este tipo de artículo en su estado original.
01.2009 v 3.00
Page 3

TABLE OF CONTENTS
1 INTRODUCTION
1-1 Introduction
1-2 Features and benefits
1-3 Specifications
1-4 Principles of operation
1-5 Laminating films
1-6 Warranty
2 UNPACKING AND INVENTORY
3 PRODUCT ILLUSTRATIONS AND NAMES OF PARTS
3-1 Display
3-2 Threading diagram
3-3 Film loading procedure
4 SAFETY PRECAUTIONS
5 SETUP AND OPERATION
5-1 Setup and operation
5-2 Laminating
5-3 Recommended temperature settings
5-4 Laminating
5-5 Preventing and solving problems (hot)
6 CLEANING AND MAINTENANCE
6-1 Cleaning and maintenance
6-2 Cleaning the rubber rollers
6-3 Lubrication
01.2009 v 3.00
Page 4

1-1 INTRODUCTION
The Compass hot roll laminator is designed to provide quality lamination of a wide
range of papers and materials up to 1/8th inch / 3.2 mm thick using film up to 10 mils
thick. Common hot applications include, but are not limited to, maps, digital imaging, ink
jet prints, packaging, posters, instructional aids, signs, presentation materials,
photographs, copies (B&W or color), prints, flyers, promotional sheets, and many other
items.
To assure the best performance from your new laminator, please follow the safety,
installation, operation, and maintenance instructions in this manual. Read the manual
before using the laminator, keep the manual with the machine, and periodically review
the instructions. The manual also contains warranty and parts information.
Thank you for selecting the LEDCO Compass hot roll laminator. We are committed to
your satisfaction.
As you unpack your new laminator, please complete the following information. Always
have this information ready when calling.
Purchased From________________________________________________________
Installation Date ___________________________Serial # ______________________
WARNING: High temperatures are present, and care
should be exercised in operating the laminator.
MISE EN GARDE: La machine à plastifier produit
beaucoup de chaleur et on doit l’utiliser avec
prudence.
ADVERTENCIA: El plastificador produce
temperaturas muy altas; tenga cuidado al
utilizaro.
01.2009 v 3.00
Page 5

WARNING: The laminator should not be operated
without the plexiglass safety shield.
MISE EN GARDE: Ne pas utiliser la machine à
plastifier sans son écran protecteur en plexiglass.
ADVERTENCIA: No utilice el plastificado sin
tener el protector de plexiglass en su lugar.
LEDCO, Inc.
4265 North Main Street
Hemlock, NY 14466 USA
Phone: 1 (585) 367-2392
Fax: 1 (585) 367-2978
www.ledcoinc.com
01.2009 v 3.00
Page 6

Glossary Of Symbols Part No.
1. Hand Crush/Force from Above Lab35
2. General Danger Lab52
3. Arm Entanglement Lab51
4. Cutting of Fingers or Hand/Straight Blade Lab54
5. Hand Entanglement/Chain Drive Lab36
6. International/Hot Warning Lab100
7. Electrical Hazard Lab 43
8. CE European Electrical Lab06
9. International Ground Lab79
01.2009 v 3.00
Page 7

1-2 FEATURES AND BENEFITS
Your new laminator has several standard features that set it apart from other models.
Automatic voltage detection. Automatically detects and adapts to power supply
(100-120 v AC or 200-240 v AC)
Variable speed. The laminator operates at any speed up to 15 feet / 4.5 meters per
minute. Thicker hot films are generally applied better at mid-range to lower speeds,
while 1.5 mil hot films should be applied at mid-range to higher speeds.
Precision heat control. The programmable digital heat control prevents the
laminator from operating outside the optimum temperature for your film and provides
consistent heating of the laminating rollers throughout the entire temperature range.
Ease of cleaning. The heated silicone rubber laminating rollers and the silicone
rubber pull rollers of the laminator should be cleaned regularly. The safety shield
(see below) on the laminator removes in seconds, making it easy to clean the
laminating rollers.
Attached safety shield. The polycarbonate shield is clear so operators can see
their work and does not conduct heat so they’ll be protected from hot areas. It is
fixed to the feed tray, and the laminator will not operate if the safety shield is not in
place.
Lamination pressure. The rubber rollers are spring-loaded and preset to ensure
correct and even lamination pressure.
Film tension controls. Film tension is controlled at the idler roller instead of on the
mandrels like most laminators. It requires virtually no adjustment and makes loading
new film rolls simple.
Ease of maintenance. The Compass is made to last. However, some items on a
laminator do wear out. Even the high-quality silicone rubber used in the rollers will
lose flexibility over time. Extensive use may wear out the rollers, or an operator may
cut a roller by accident. Rollers and other key parts can be changed quickly without
disassembling the frame. Parts are available by calling the LEDCO Service
Department at 1-800-937-9293 or 1 (585) 367-2392.
Reverse. The reverse switch can be invaluable to help avoid problems or clear
misfeeds.
Right and left adjustable feed guides.
Silicone rubber laminating rollers. The rollers are flexible enough to provide a
good edge seal and firm enough to offer a good surface seal. A high silicone content
ensures a much longer average roller life.
Very strong steel cores. These prevent roller flexing and insure uniform pressure
across the width of the laminate, giving you the best quality lamination available in a
medium-duty commercial machine.
Laminate supply gauge with low film warning system. The information screen
on the laminator displays remaining film supply and flashes a warning symbol when
there is less than 10% remaining, helping to prevent out-of-film wrap-arounds.
Automatic Standby/Shutdown Mode: Automatically switches to standby after 30
minutes and automatically shuts off after 60 minutes to save energy.
Designed, assembled, and tested in the USA.
01.2009 v 3.00
Page 8

1-3 SPECIFICATIONS
Max laminating width 27” / 70 cm
Speed 15 FPM / 5 m/min
Laminating/pull roller diameter 2.25”/ 5.715 cm
Supply roll core size 1”/ 2.54 cm
Recommended film up to 10 mil, 0.25 mm
Max laminating thickness 1/8” / 3 mm
Max film roll diameter 6” / 15cm
Dimensions 38”L x 23”W x 16”D
97cm L x 58cm W x 38 cm D
Shipping dimensions 40”L x 24”W x 17”D
101cm L x 61cm W x 41 cm D
Weight/shipping weight 85 lbs / 40kg
105 lbs / 51kg
Motor 1/30 HP D/C
Electrical (single phase) 100-120 VAC 12A
200-240 VAC 6A
50/60 Hz
Electrical connector IEC-C14 (back panel)
mates with IEC C-13 cord connector
Heaters (2 X 750 watts) 1500 watts total
Maximum film capacity
with 1.5 mil 1200 ft / 365 m
with 3 mil 700 ft / 214 m
NOTE: The Compass relies on your building or facility’s electrical system circuit
breaker protection. Please ensure this system is operational to avoid damage to
your machine.
01.2009 v 3.00
Page 9

1-4 PRINCIPLES OF OPERATION
Hot roll laminators operate by pulling film with a thermally activated adhesive through a
heated set of laminating rollers. Film from the supply rolls passes over heated rolls to
activate a polyethylene adhesive layer on the film. It then passes through rubber rollers
to apply pressure and bond the film to the item being laminated. The adhesive is
pressed into the ink and fibers on the surface of the paper (see section 5-3).
The strength of the lamination bond can be checked by cutting a large “X” on the
surface of (but not through) a laminated sample with a sharp blade. Use the tip of the
blade to pry up one corner of the “X”. Grab that corner and pull up the film. Ink and/or
paper fibers coming up with the layer of film indicates a good adhesive bond.
If the film comes up too easily, with no ink or paper, the lamination was probably done
at too low a temperature. Check the instructions that may have come with your
laminating film and/or the lamination temperature chart in section 5-3.
Please note that when doing an X-test on glossy (coated) paper, a good X-test will pull
up ink only. The film should not come up easily. When laminating material that is not
glossy (uncoated), the paper is often more fibrous and a good X-test will yield ink and
paper fibers coming up with the film.
The Compass hot roll laminator is ideal for encapsulation and can accept substrates up
to 1/8 inch / 3 mm thick.
Designed for sign and graphics applications, hot roll machines are used in many
settings including schools, sign shops, photo-finishing labs, reprographics shops, and
manufacturing plants.
Using a hot roll laminator is much easier than doing the same work by hand. Fast and
versatile, it requires little instruction for you to be up and running. Film tension is
controlled with slotted wheels. The laminating roller gap is preset. Hot roll laminators will
apply most materials under a wide range of speeds and tension settings.
01.2009 v 3.00
Page 10

1-5 LAMINATING FILMS
Most thermal (hot) laminating film consists of two layers: a base of polyester and an
adhesive layer of polyethylene. The polyester layer forms the harder, outer surface of
the film and does not melt at laminating temperature. It provides rigidity and protection
for your laminated items. The greater the polyester content, the higher the level of
protection, rigidity and luster. The polyethylene layer melts at laminating temperature
and bonds the film onto the subject material under the pressure of the laminating
rollers. As an X-test demonstrates, the adhesive is pressed into the paper and fills
irregularities in the surface.
The proportion of polyester and polyethylene in a film is usually described with
numbers. For example, a “1-2” film consists of one mil of polyester and two mils of
polyethylene. The first number refers to the base layer. The second number refers to
the adhesive layer. A mil is 1/1000 of an inch.
Since polyester is the more costly of the two types of plastic generally used in
laminating film, a “3-2” film will cost more than a “2-3” film. Both are 5-mil films but the
“3-2” version will seem a little thicker on a piece of laminated material because it will be
slightly stiffer. Thermal laminating films are available in many different base/adhesive
combinations. Five mil films, for example, can be found in 1-4, 2-3, 3-2, and 4-1
combinations.
In the US laminating trade, the generally accepted practice is to describe two-sided
lamination, or encapsulation, by the thickness of one layer of film. For example, “3-mil
lamination” should refer to lamination with two layers of 3-mil film. If you are buying or
selling laminating film or lamination services, please make sure both parties understand
the film descriptions being used. There is a huge variety of thermal laminating films
available to suit many different kinds of application. Here are some of the more
commonly used “special” film types or film additives:
Film with low-melt adhesives, also known as co-polymer films. These often have
better clarity and are less likely to curl or ripple.
Matte films to eliminate glare or to accept printing or writing. Many suppliers offer a
variety of finishes including glossy, matte, satin (in between glossy and matte)
velvet, and textured (crystal) finishes.
Film with UV inhibitors to protect colors in the laminated material from fading in
sunlight. Note: All polyester films are inherently UV-protectant.
Thermal film that has a pressure-sensitive adhesive and a release liner on its outer
side. For example, a poster with this material laminated on the back could easily be
mounted without fasteners or tape by removing the release liner to expose activated
adhesive.
“Liner films” with a protective liner on the top outer surface. After a piece of material
has been laminated, trimmed, packed, and shipped, the person using the material
can remove the protective liner to reveal a surface perfectly free of dust, scratches,
or abrasion.
01.2009 v 3.00
Page 11

Opaque or colored films for the back side of a lamination. These can form a border
for a laminated piece to add visual interest or a more finished look.
Iridescent clear films for special visual effects.
Permanently waterproof films for outdoor, underwater, or special applications. The
most common thermal laminating films are made with water-based primers and will
eventually de-laminate if continually exposed to water or weather; truly waterproof
films are made with special primers.
Rolls of film may be purchased in different widths. The size of the laminator is the only
limitation on the width of the film rolls you can use. Make sure the upper and lower roll
widths are the same and are aligned with each other.
When installing film, always center the rolls of film on the supply roll mandrels.
Because it does not hold heat well,1.5-mil film can be the most difficult gauge of film to
use. A standard 1.5-mil film will run at about 250 °F / 121°C, while a 3-mil film with the
same adhesive type will run at 240 °F / 115°C. Even when applied at 250 °F/ 121°C,
the 1.5-mil film will not adhere as consistently as the 3-mil film applied at 240°F / 115°C,
or a 5-mil applied at 225°F / 107°C. For many applications, 5-mil film does a much
better job of protecting and enhancing items.
Ten-mil film is suggested for those applications that need the most protection and
rigidity. Seven-mil films are also available.
Rolls of film are sometimes spliced. Most film suppliers will mark a splice with colored
tape. This way, you can see the splice as a “dash” of color on either end of the roll. If
you spot a spliced roll in advance, you can put it on the top supply roll mandrel in order
to see the splice coming easily and avoid putting material under the splice. Or you could
put it on the bottom roll if you plan to be laminating items that will never be seen from
the back side.
01.2009 v 3.00
Page 12

1-6 WARRANTY
This laminator is guaranteed against defects in material and workmanship for a period of two
years from date of shipment. Defective parts will be replaced without cost within the warranty
period provided the laminator has not been abused, altered, or operated contrary to
instructions. LEDCO shall not be liable for any alterations or repairs except those made with its
written consent.
This obligation under warranty shall not extend to the following:
The adjustment or replacement of parts which are the normal responsibility of the owner: for
example, rubber rollers, heat shoe coatings, scratched or chipped paint, loose fasteners
(screws, nuts, etc.), fuses, or other items that show wear under normal use; i.e. “normal
wear parts” or are user serviceable items.
Normal operating adjustments to heat, speed, tension, etc.
Parts that are not manufactured by LEDCO. If the individual manufacturer warrants these
items, their warranty is, in turn, passed on to the original purchaser of the laminator.
LEDCO Inc. does not incur any obligation or liability as a result of the warranties which are
the sole responsibility of the appropriate individual manufacturer.
Any laminator that proves defective during the warranty period may be returned to LEDCO
unless LEDCO determines that the necessary repairs can be made during a service call.
Customer may be asked to assist our customer service representatives with items such as
checking and/or changing fuses and visual inspection to determine whether an onsite service
call will be needed. Notice of the defect should be submitted in writing or by phone to LEDCO
before any steps are taken to repair or return the machine.
Phone: 1-800-937-9293 or 1(585) 937-2392 Fax: 1 (585) 367-2978 Email: [email protected]
If the machine is returned, it must be accompanied by:
Customer name, address, and phone number
Written description and details regarding the malfunction
Date of installation
Serial number of the machine.
RETURNS MUST HAVE A RETURN AUTHORIZATION NUMBER
ON THE OUTSIDE OF THE SHIPPING CONTAINER.
Send all returned equipment freight PREPAID to:
LEDCO Inc. 4265 North Main Street, Hemlock, NY 14466
If your machine needs servicing after the warranty has expired, please contact your dealer.
LEDCO does offer technical support if your dealer is unable to assist.
This warranty is in lieu of all other warranties expressed or implied. This includes the warranties
of Merchantability and Fitness for use and of all other obligation or liabilities of LEDCO. LEDCO
neither assumes nor authorizes any other person to assume it for any other obligation or liability
in connection with the sale of this laminator except as provided for above.
Further, this warranty will not apply to any machine or part thereof which has been damaged as
a result of an accident or as a result of the abuse, misuse, or neglect of the machine. The
warranty is also void if the laminator has been altered or repaired by any other than an
authorized repair facility or dealer. If you have any questions about this warranty, contact us at:
Phone: 1-800-937-9293 or 1(585) 937-2392 Fax: 1 (585) 367-2978 Email: [email protected]
01.2009 v 3.00
Page 13

2 UNPACKING AND INVENTORY
The Compass arrives fully assembled. Some parts such as feed trays may be packed
off the machine to avoid shipping damage. Upon arrival, inspect the unit immediately
and thoroughly, using the packing list that accompanies the shipment. Please follow
these steps to correct any problem with your shipment. LEDCO cannot accept any
responsibility for damage or loss unless you notify us within 10 days of receipt of
shipment and follow these procedures:
BREAKAGE OR DAMAGE: It is imperative that any shipping damage is reported
and a claim is filed with the delivering carrier immediately upon receipt of
damaged shipment. The procedure for reporting damage depends on the method
of shipment. Please note damage on bill of lading. If possible, take photos of the
damage immediately.
FREIGHT, EXPRESS, or TRUCK DELIVERY: According to the contract terms and
conditions of the carrier, the responsibility of the shipper ends at the time and place of
shipment. The carrier then assumes full responsibility for the shipment.
1. Notify LEDCO IMMEDIATELY.
2. Hold damaged goods with container and packing for inspection by the examining
agent. LEDCO will arrange the inspection.
3. DO NOT RETURN ANY GOODS PRIOR TO AUTHORIZATION BY LEDCO.
4. Submit a copy of the inspector’s report to LEDCO. LEDCO will file the claim with the
carrier and replace your machine if necessary. You will be credited for the damaged
machine when the claim is processed.
SHORTAGE:
1. Check the packing list notations. The apparent shortage may have been marked as
an intentional short-shipped (back-ordered) item.
2. Re-inspect the container and packing material, particularly for smaller items.
3. Make certain that unauthorized personnel prior to complete unpacking did not
remove the item and inventory.
4. Call us and send immediate written notification of the shortage.
INCORRECT SHIPMENT:
1. If the material you receive does not correspond with your order, notify LEDCO
immediately. Include the order and item number(s).
2. Hold item(s) until return instructions are received.
RETURNS: DO NOT RETURN DAMAGED OR INCORRECT ITEMS UNTIL YOU
HAVE RECEIVED SHIPPING INSTRUCTIONS AND AN AUTHORIZATION NUMBER
FROM LEDCO.
01.2009 v 3.00
Page 14
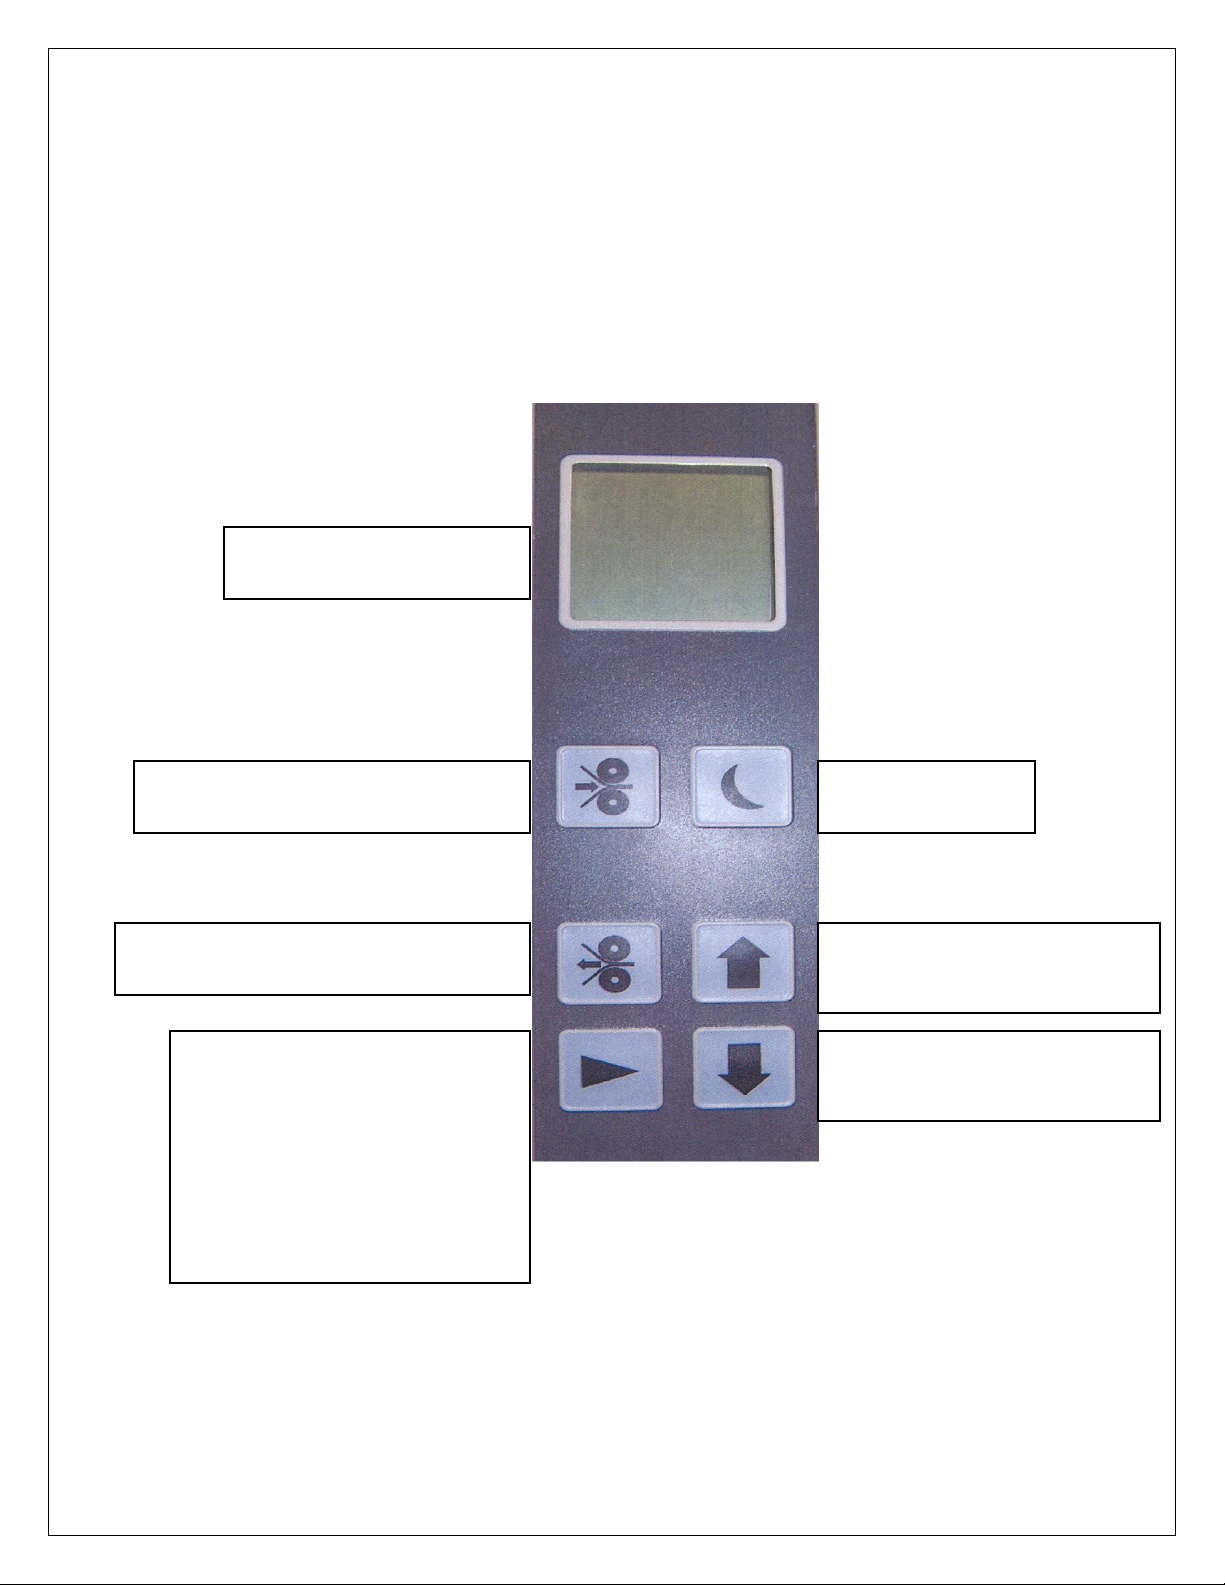
Control Display
Forward Motor Control
Sleep Mode
Reverse Motor Control
Speed/Temperature
Up
Speed/Temperature
Down
Mode Control
Current Temperature
Film Supply
Set Temperature
Set Speed
3-1 PRODUCT ILLUSTRATIONS & NAMES OF PARTS
The photo below and those on the following pages identify major components and
operating controls. Refer to them as you study the installation, operating, and
maintenance procedures described in this manual. The Compass control display,
forward and reverse motor controls, speed and temperature controls, and mode
controls are on a single integrated panel which is pictured below.
Front panel view:
01.2009 v 3.00
Page 15
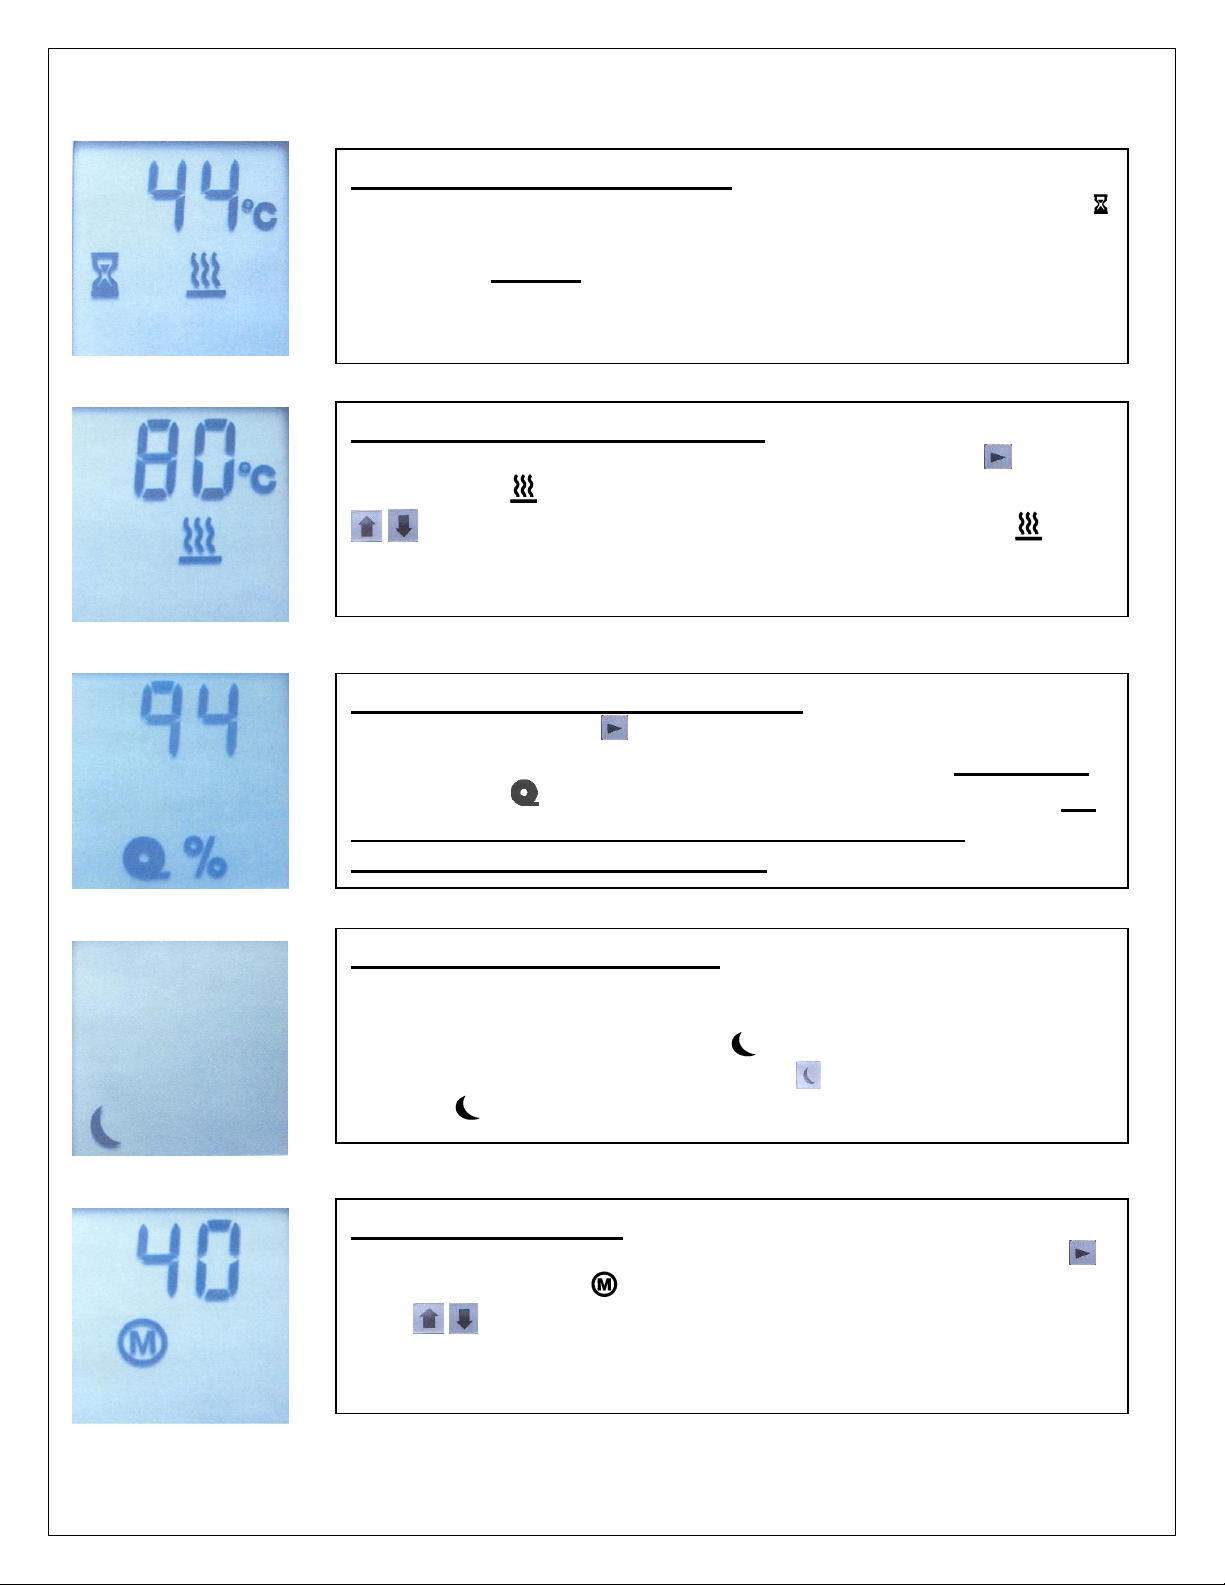
Ready/Set Temperature Screen
To set the desired temperature, push the Mode key until
heat symbol appears and flashes. Then use the arrow keys
to set desired temperature. Steady heat symbol
indicates that the machine has reached set temperature and
is ready to laminate. The rolls will now operate.
Current Temperature Screen
Reads the current temperature of the rollers. The hourglass
indicates that the machine is not at machine set temperature.
The rollers will not run until reaches the set temperature.
Sleep Modes On/Off Screen
Indicates the machine is off but is still connected to power.
Automatically goes to standby (sleep) mode after 30 minutes
and maintains 130° F (flashing ). After an additional 30
minutes or by pushing sleep button , machine turns off
(steady ).
Laminate Supply Indicator Screen
Press the mode key until the film symbol appears. The
screen displays percent of remaining film on the bottom roll.
Film symbol will flash when film supply is under 10%. Do
not allow machine to run completely out of film or
wraparound condition may occur.
Motor Speed Screen
Indicates motor speed. To change speed, press mode key
until motor symbol appears and flashes, then use arrow
keys to adjust speed. Speed can be adjusted while the
machine is running by pressing the up and down arrows. The
indicator displays the percentage of maximum motor speed.
01.2009 v 3.00
Page 16
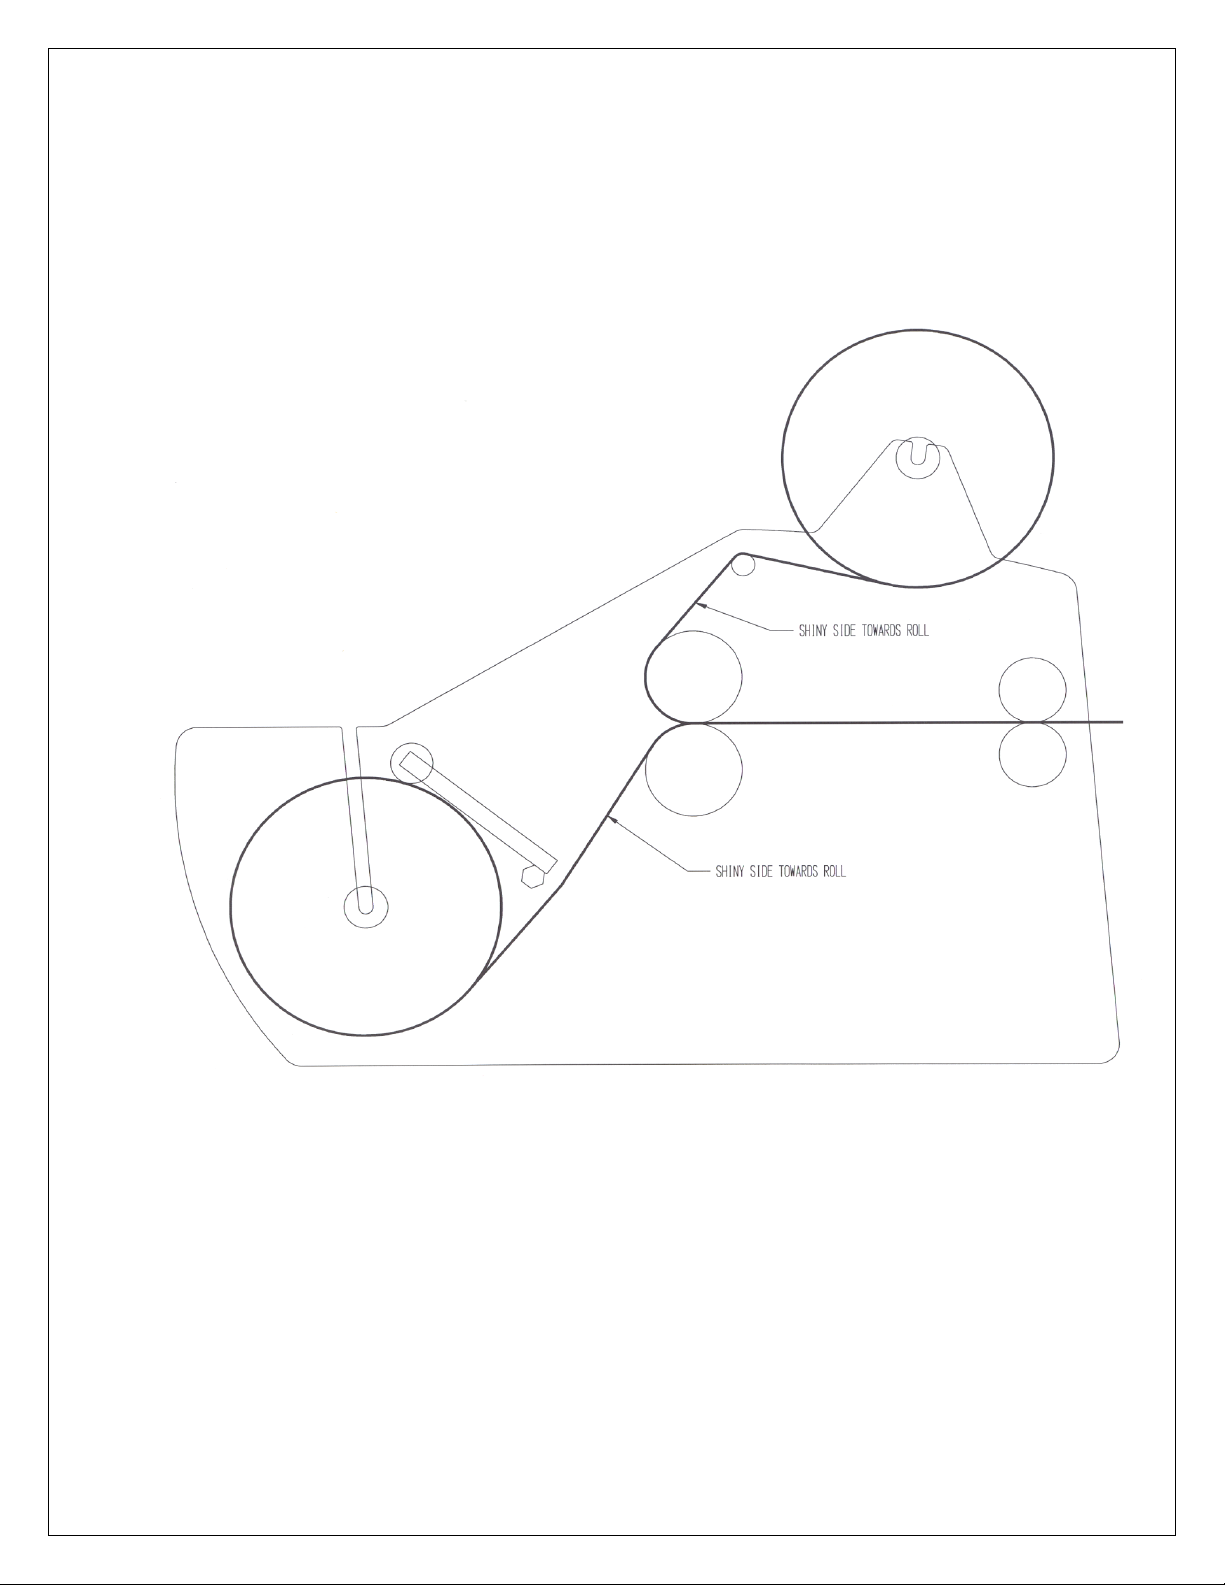
3-2 THREADING DIAGRAM
Important
Only the shiny side of the film can contact the roller. Check the film
carefully each time the film is reloaded. Failure to thread the film properly
will cause roller damage.
01.2009 v 3.00
Page 17
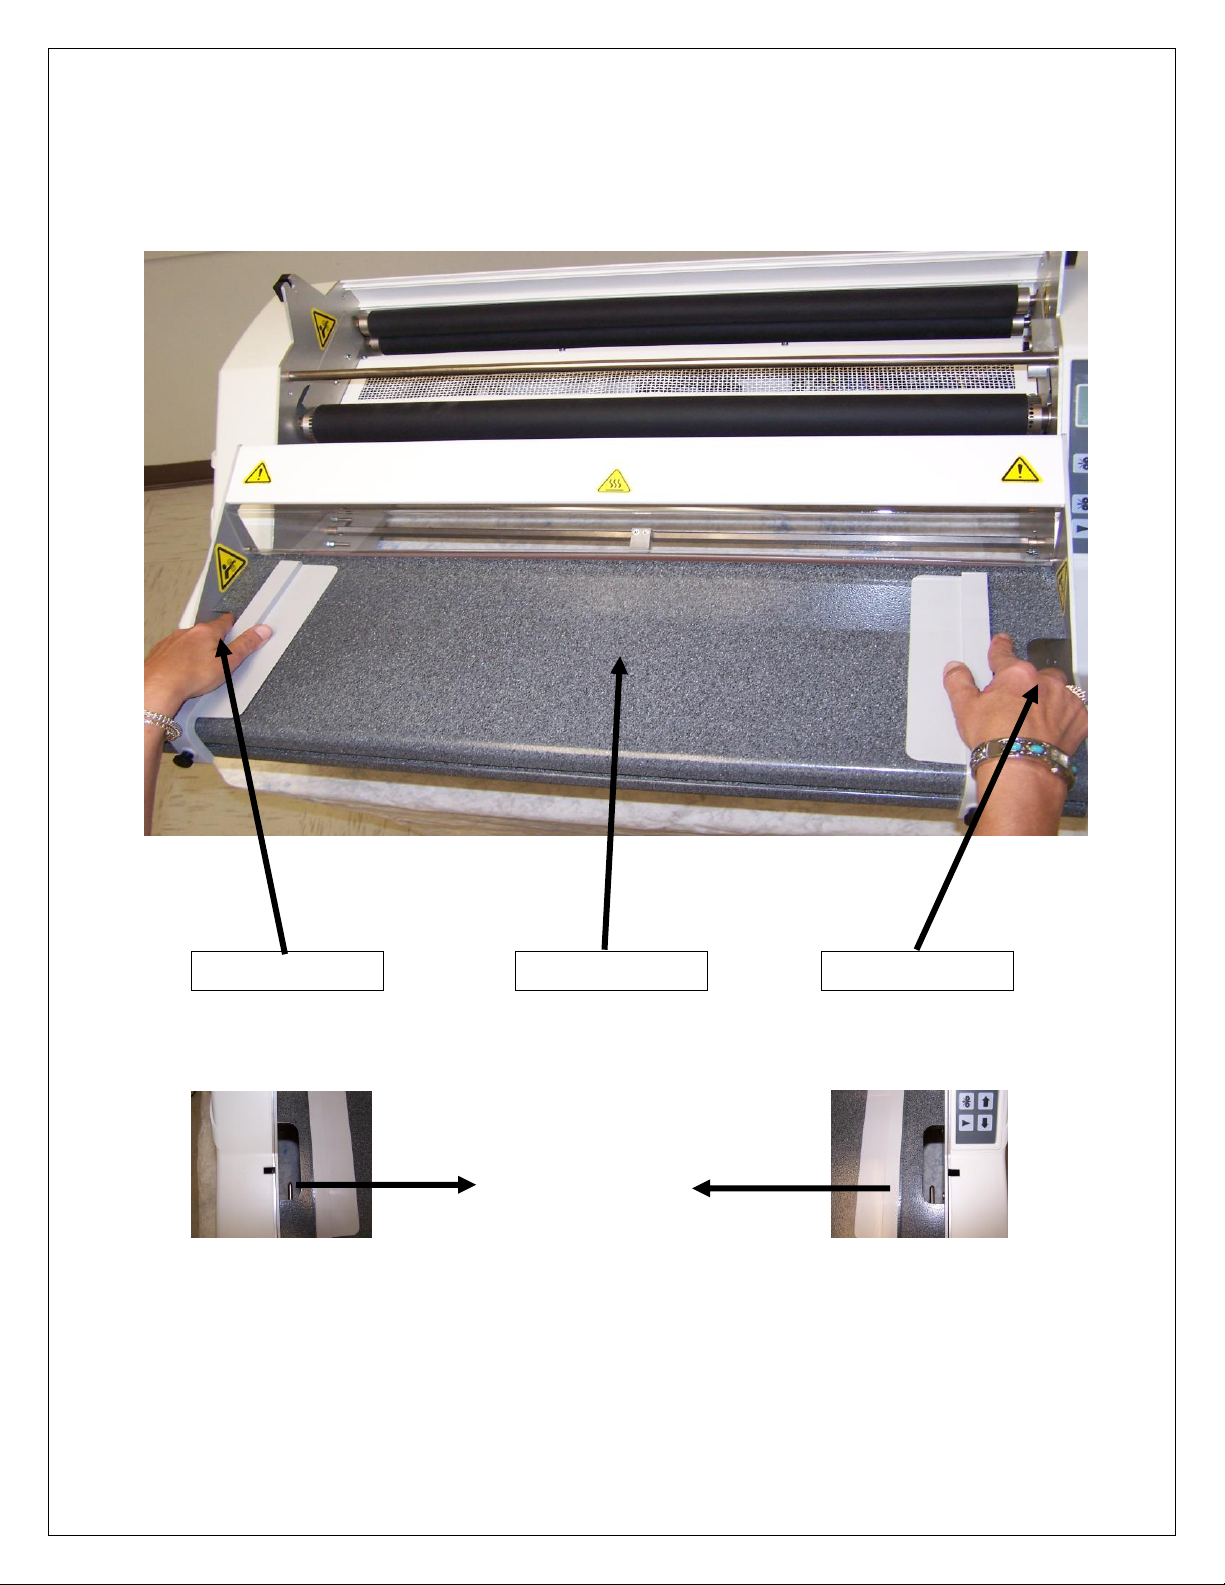
Feed table latch
Feed table latch
Feed table
3-3 LOADING FILM
Push latches to center to release tray
1. Remove feed tray by releasing latches and pulling table back and up.
01.2009 v 3.00
Page 18
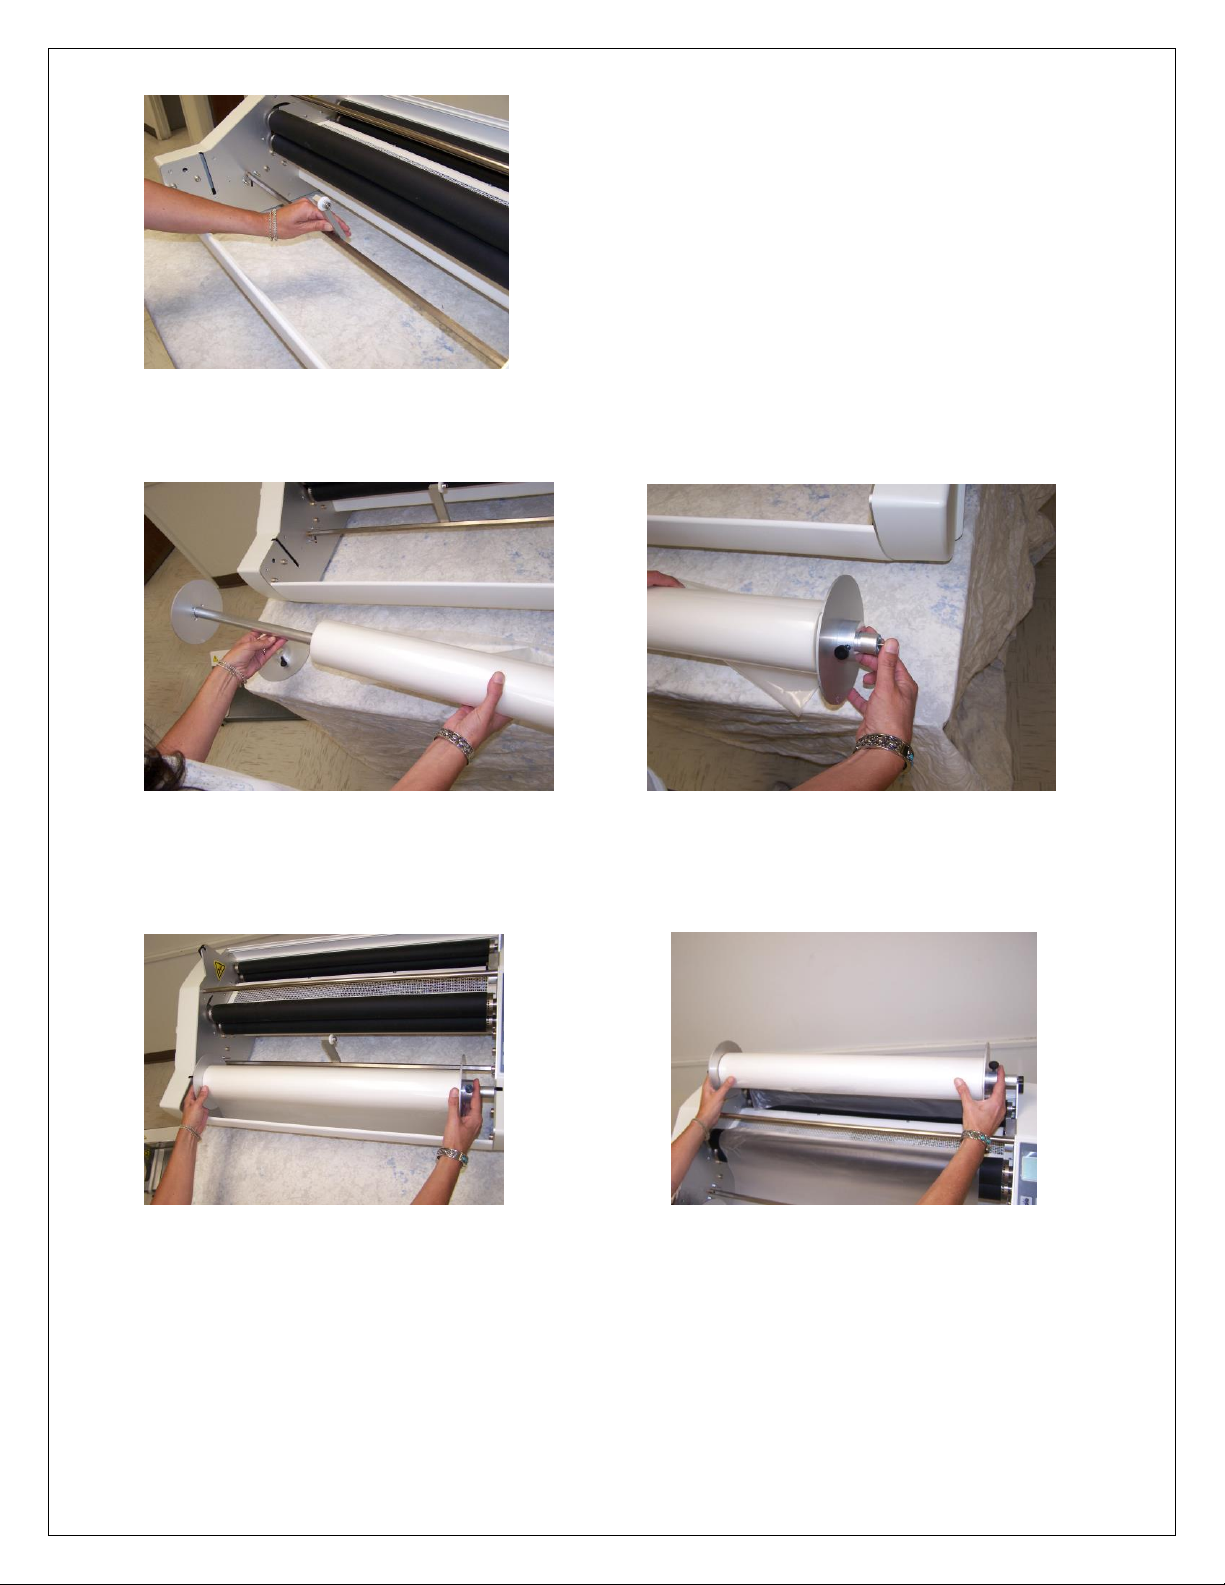
2. Lift film supply sensor to a straight up position.
3. Load film onto supply rolls. Center the film, and lock it into place using the
supply roll retainers.
4. Place the film rolls in the slots in the side panels of the machine
CAUTION: Be sure the shiny side of the film is against the rolls or damage may
occur.
01.2009 v 3.00
Page 19
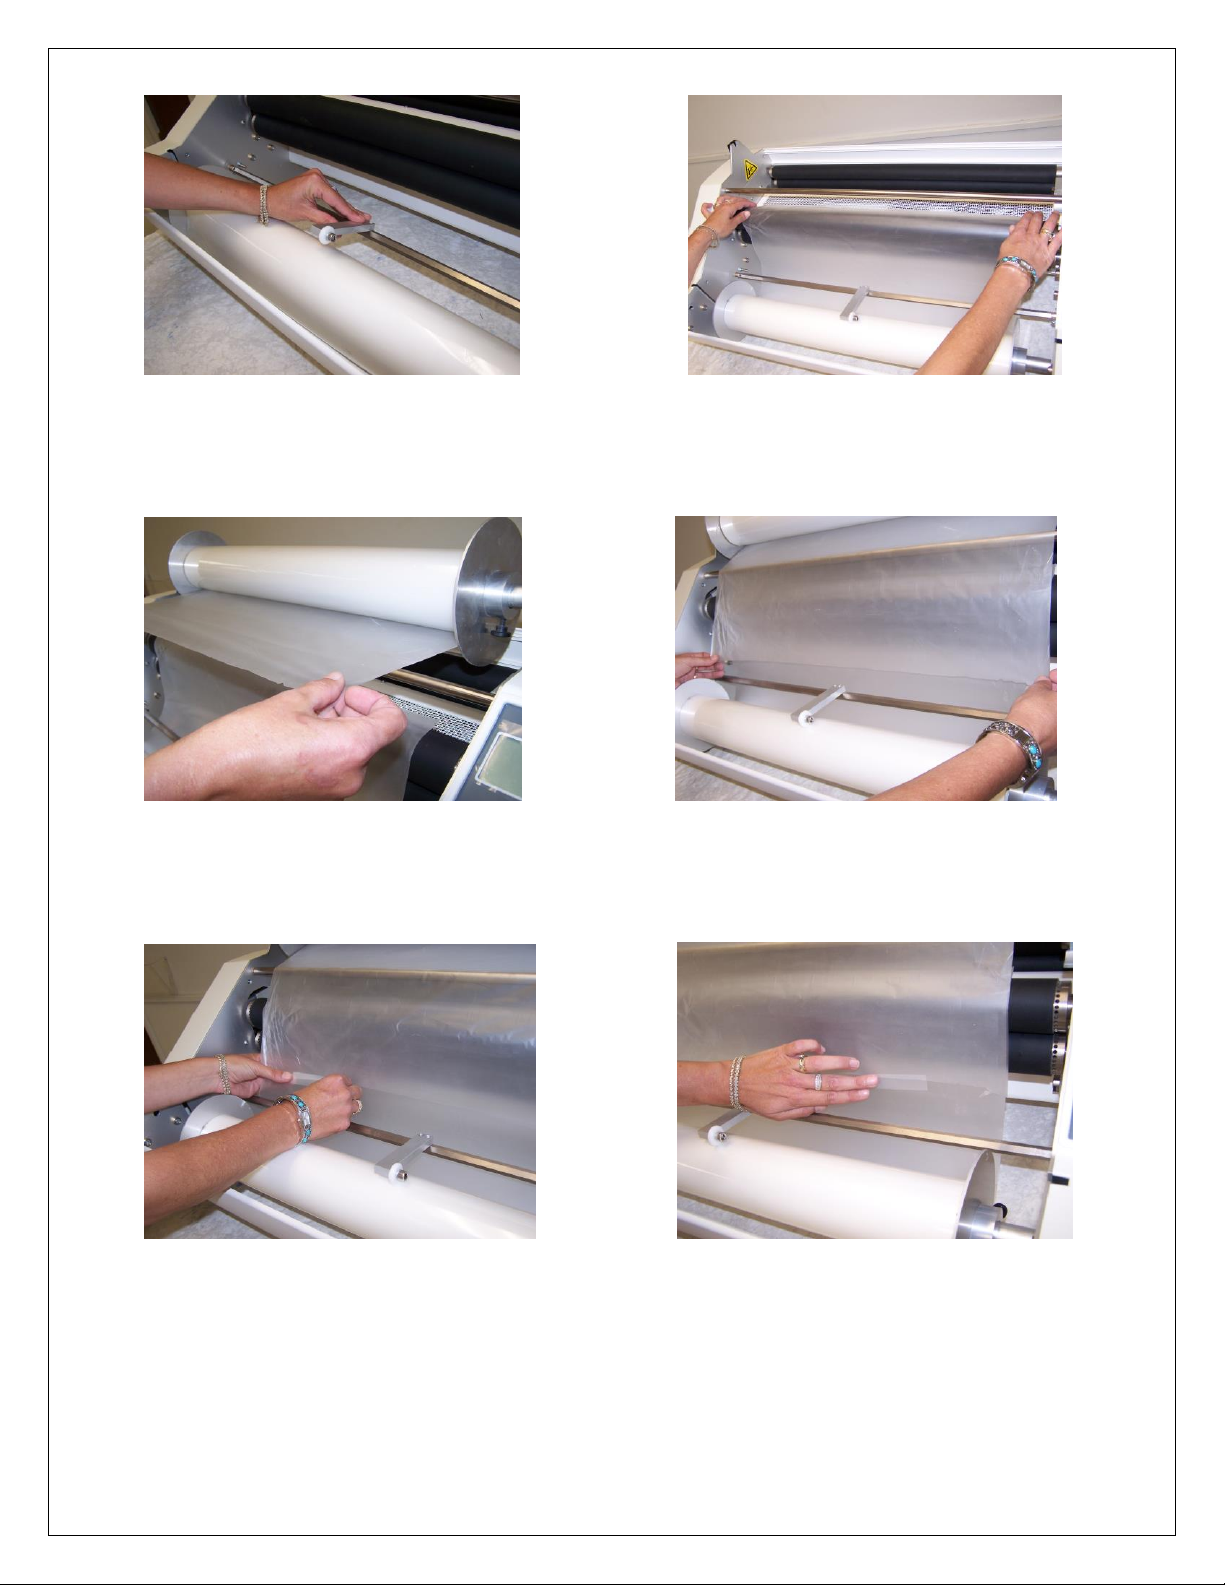
5. Rotate the film supply sensor until it touches the film roll. Pull about 18
inches of film from the bottom roll, and drape over the rollers.
6. Pull a length of film from the top roll. Drape it over the top idler bar and
across the rollers.
7. Tape the two pieces of film together with cellophane or masking tape. This is
just to hold the rolls of film together during the threading process.
01.2009 v 3.00
Page 20
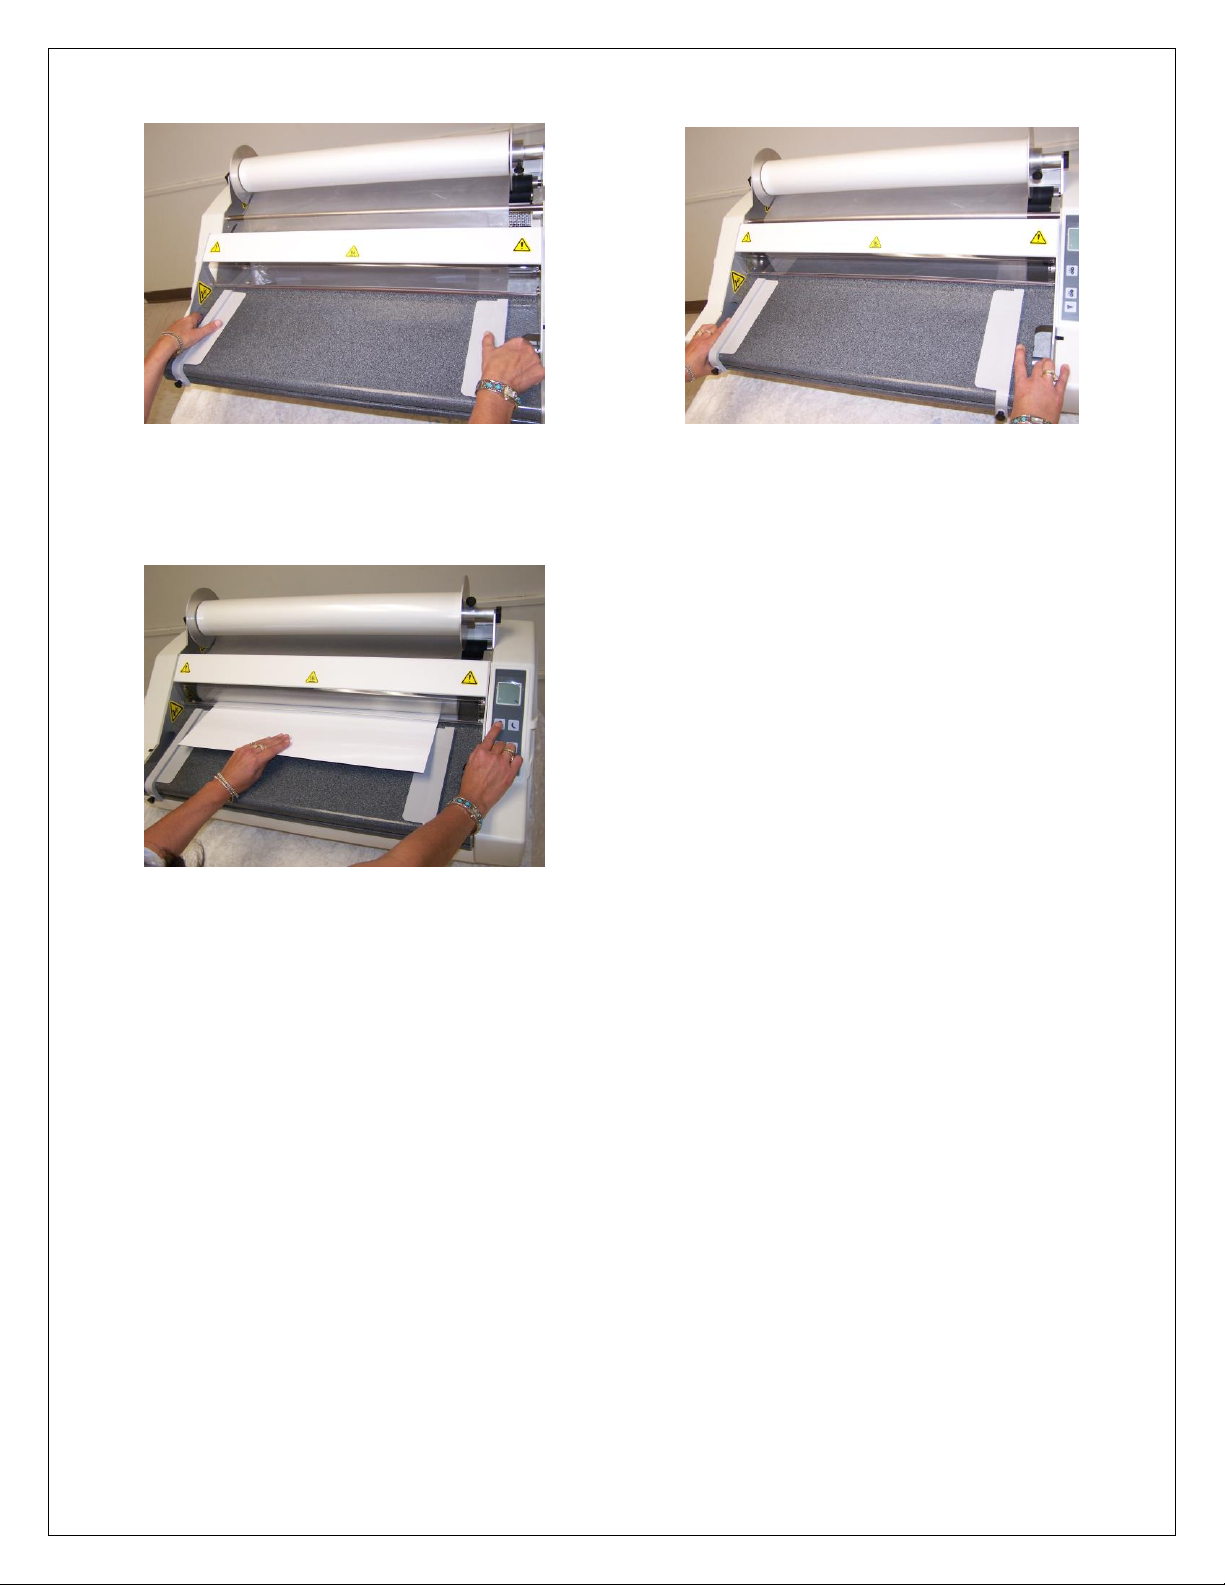
8. Depress the feed table latches and reinstall the tray. Push it in firmly until the
front edge is flush with the front of the machine. NOTE: If the tray is not fully
engaged, you will see a small wrench on the display screen.
9. Set the desired laminating temperature and allow the machine to heat up.
When the hourglass symbol goes out, the machine is ready to laminate. Place
the feed card on the feed table and push in firmly while pressing the forward
motor control button. Feed the card all the way through the machine.
NOTE: After initial threading, it will be necessary to run 2-3 feet of film
through the machine before the laminate smoothes out.
01.2009 v 3.00
Page 21

Roll pressure
knobs
Main power
on/off breaker
4 SAFETY PRECAUTIONS
DO NOT OPERATE THIS MACHINE UNTIL YOU HAVE READ AND
FULLY UNDERSTOOD THE FOLLOWING SAFETY PRECAUTIONS.
1. Never operate this machine without reminding yourself that a laminator is a powerful and
potentially dangerous tool. If misused, used carelessly, or used without observing the rules
of safe operation, very serious injury can result.
2. Never operate this machine without all guards, housings, safety shields, stop switches, or
other safety devices in place and fully operational.
3. Never operate this machine unless you have been fully trained and have received and
understood all operating instructions. Make sure you know how the machine works and
how it is controlled.
4. Never operate this machine if it is not working properly or if you notice any abnormality in its
performance.
5. Never tamper with, rewire, or bypass any control or safety device on this machine.
6. Always keep all parts of your body clear of the laminating rollers, pull rollers, and heated
surfaces of the laminator when the power is on.
7. Remember that even after the machine has been turned off for some time, the laminator’s
heated parts, and adjoining parts, can remain hot enough to burn you.
8. Never attempt to clean the heated areas, laminating rollers, or pull rollers while the power is
on.
9. Never remove the machine housing or attempt any kind of maintenance without
disconnecting power to the unit.
10. Always be sure all persons are clear of the machine before advancing or reversing the
pressure rollers, especially when multiple operators or observers are present.
11. Never wear loose clothing, ties, jewelry or any item, which could be caught in the rollers or
machinery when operating the machine. Operators with long hair must put their hair up
before running the machine.
12. The environment where the machine is operated must be dry, with adequate ventilation,
with a minimum room temperature of 50° F and a maximum room temperature of 90°F.
NOTICE TO EMPLOYER: A copy of these safety precautions should be given to everyone who
sets up, operates, maintains, or supervises use of this machine. A copy should also be hung on
the machine readily accessible and visible to the operator. Additional copies are available upon
request.
IMPORTANT: Where a language barrier or insufficient schooling would prevent a person from
reading and understanding these safety precautions, you should either translate this information
or have it read or interpreted to the person, and get assurance that it is understood.
01.2009 v 3.00
Page 22

5-1 SET-UP AND OPERATION
With the laminator on an unobstructed, level surface, perform the following:
1. Remove all packing straps, rubber bands, tape, and plastic ties from the
machine. Remove the protective paper from the safety shield.
2. Plug the machine into a proper 100-120V/15 amp or 200-240V/10 amp single
phase outlet.
01.2009 v 3.00
Page 23

5-2 LAMINATING
1. Turn on the power switch located on the back of the machine
next to the power cord.
Using the Mode control, scroll to the set temperature screen and set the desired
temperature using the up/down arrow keys. The display will indicate the set
temperature and then revert to the current temperature after 5 seconds. The
laminating rolls will not start until the laminator has reached the set temperature.
Using the Mode control, scroll to the roll speed screen and set the desired
laminating speed. The screen indicates the percentage of full speed. “50”
indicates that the laminator will run at 50% of its full speed of 15 ft per minute.
Adjust the feed table guides to the desired position.
When the laminator reaches the set temperature, the hourglass symbol will go
out, and you are ready to laminate. Place your document on the feed table,
press the forward motor control button, and feed your document into the
machine.
NOTE: The feed rollers will not operate without the feed table securely
snapped into place.
WARNING: Never permit the temperature to exceed 300 F/ 150°C while film
is threaded and the laminator is not running. The film could disintegrate and
require cleaning and rethreading of the machine.
MISE EN GARDE: Ne jamais laisser la température dépasser 310 F /
154°C lorsque le film est chargéet que la machine n’est pas utilsée, car
le film risque de fondre, auquel cas il faudrait nettoyer la machine et
procéder à nouveau au chargement du film.
ADVERTENCIA: No permite que la temperatura exceda los 310 F /
154 C mientras el plástico está cargado y el plasatificador no está en
uso. El plástico puede desintegrarse, lo que requeriria limpiar y
recargar la máquina. Si es necesario laminar a temperaturas más
elevadas que 310 F / 154°C, como cuando se lamina cartón para
carteleria, hale un exceso de pelicula del rollo de abastecimiento para
proveer huelgo, evitando que la película quede muy agretada contra
las zapatas calefactoras. Evitará asi que el plástico se derrita el
periodo de tiempo en que la pelicula no está avanzando.
2. During warm up, the actual temperature will sometimes overshoot the set
temperature by more than a few degrees. When lamination is begun, the actual
temperature may initially drop below the set temperature. Unless these
temperature swings are extreme, there is no cause for concern.
The heat controller contains an intelligent microprocessor which gauges the heat
requirements of any job being run on the laminator. The microprocessor adjusts
the power to the heated rollers to keep the actual temperature steady and close to
01.2009 v. 3.00
Page 24

the set temperature. This process of gauging and adjusting the heat takes a few
minutes. The actual temperature will become more stable as you continue to
laminate.
3. Check the idler tension per the instructions in the Adjusting Film Tension section
below. Make sure the top and bottom idler rolls have about the same tension.
4. Once the machine has reached selected temperature, you are ready to laminate.
Adjust the film speed as required. Once the film starts to move, watch as it passes
over the hot rolls. Allow any wrinkling to clear out before inserting material to be
laminated. Each time you stop the advance of film, slack will form in the web of
film. It will take a few inches of film to get the slack and the resulting wrinkles past
the hot rollers.
5. Examine the film as it exits the machine. If there are bubbles or wrinkles in the
film, it could mean there is not enough tension to draw the film tight and smooth
over the hot rolls.
6. As mentioned earlier in this operators’ guide, many users tend to use too much
film tension. Some film, such as 1.5-mil, requires very little tension. Here are
some indicators that you might have excessive film tension:
“Necking” (the web of film gets narrower as it goes around the heated roller).
Excessive “waterfalling” or wrinkling anywhere on the heated roller. The film is
not perfectly smooth and tight across the surfaces of both rollers. See the next
section on adjusting film tension. Some minor wrinkling as the film first contacts
the hot roller is normal.
Adjusting Film Tension
If the film curls up as it leaves the machine, loosen the top idler roll (turn
counterclockwise) and/or tighten the bottom idler supply roll (turn clockwise).
If the film curls down after it leaves the machine, tighten the top supply idler (turn
clockwise) and/or loosen the bottom supply idler (turn counter-clockwise). In
making these adjustments, make sure that top and bottom idler tension are kept
about equal.
“Heat wrinkles” are formed when the film has not cooled enough before coming
out the back of the machine. For the best results, the film should be cooled below
melt temperature while it is pulled tight and perfectly flat between the laminating
rollers and the pull rollers. If it gets out the back of the machine while still at or
above melt temperature, heat wrinkles can form. The major reason for fans on a
laminator is to cool the film, not to cool the machine.
7. This machine is equipped with a directional button, Forward and Reverse.
Push to the forward position to laminate or to reverse as required. To remove
anything which may become lodged between the rubber laminating or pull rollers,
remove the feed tray assembly and press reverse as required.
01.2009 v. 3.00
Page 25

8. A unique feature of the laminator is the provision for driving both top and bottom
pull rollers and laminating rollers. The laminator becomes capable of accepting
thicker materials without roll slippage because the top and bottom rollers are
driven. Driven rollers also minimize the curling effect in the finished lamination by
providing balanced power to the laminating and pull rollers.
9. The laminator is designed to operate with the operator directly facing the control
panels and feed tray assembly.
For operator safety, the upper heat roll guard, an integral component of the
feed table assembly, MUST BE IN ITS DESIGNATED POSITION when the
temperature of the heated rollers is in excess of normal room temperature or
when the drive switch is in the forward position.
01.2009 v. 3.00
Page 26
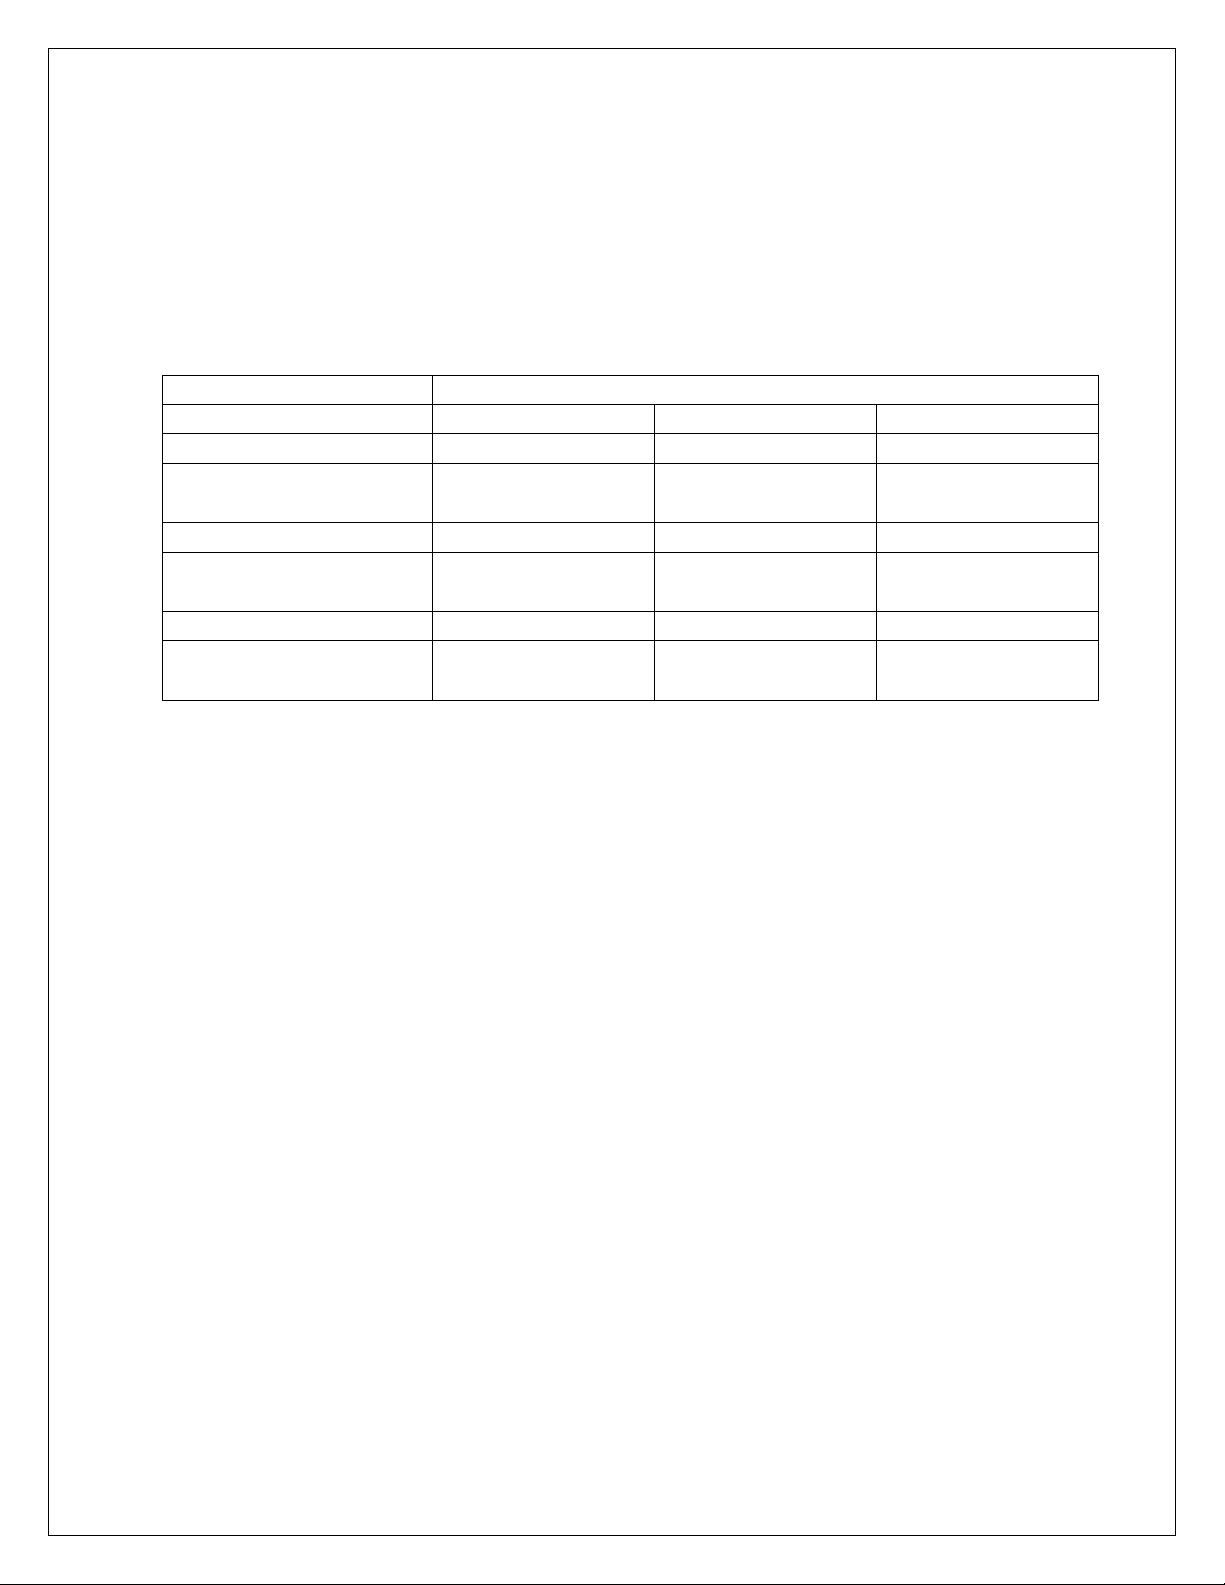
FILM MELT TEMPERATURE CHART
FILM TYPE
FILM THICKNESS
1.5 - 1.7 mil
3 mil
5-10 mil
Monopolymer
280-300F
138-149C
280-290F
138-143C
270-280F
132-138C
Low-temp (copolymer)
250-280F
121-138C
225-260F
104-127C
225-260F
107-127C
Ultra-low temperature
230-280F
110-138C
180-270F
82-132C
180-260F
82-127C
5-3 RECOMMENDED TEMPERATURE SETTINGS
Your first source of information about recommended film application temperatures
and operating characteristics should be your film suppliers. If you do not know the
source of your film, or if the supplier cannot provide the information, please use the
following table as a guide.
Several important notes about this chart:
1. Your film vendor must have the primary responsibility for providing information
about the film that you are using.
2. This chart is to serve as a general guide when better data is not available.
3. If your film vendor cannot provide this and other information about the film you
are using, it may be difficult to achieve good results.
4. When laminating heavy posters or other thick items with 1.5- to 1.8-mil films,
some additional heat may be required to get a permanent bond. Never exceed
350 F/177 C.
5. While offset printed materials may be laminated at the lower ends of the above
ranges, inkjet and other output from digital printers may require the upper end
of the range in order to get a good bond.
Cooling Fans:
The cooling fans are used during lamination to cool the laminate, not the machine.
They start automatically when the rollers are activated
NOTE: It is possible that variances from recommended temperature settings may
be necessary due to material thickness, ambient temperature, humidity, or the
quality or thickness of the material being laminated.
01.2009 v. 3.00
Page 27

Please note the wide range of temperatures listed, especially for heavier films.
This does not mean any thick film can be run anywhere within the given range.
There are “standard” (high-temperature) and “low-melt” (low-temperature) versions
of all film thickness. Some low-melt films work better at lower temperatures than
others. It is important you buy your film from a vendor who can tell you the
following additional information about any film you choose:
thickness
clarity
suggested melt-temperature range
polyester/polyethylene content
how well the adhesive will stick to the kinds of images
you’ll be protecting and enhancing
Temperatures may exceed 310º F / 154° C when laminating poster board or other
thick items with 1.5-mil film on a continuous basis; however, when the machine is
stopped, turn the heat off if the setting is more than 310º F / 154° C.
Never set the heat above 320º F / 160° C with film in the laminator.
Temperatures over 300º F / 149° C are not needed except with 1.5-mil film or
when processing heat activated mounting materials. Film that is 3 mils or
thicker is generally run at 280º F / 138° C or less.
SAFETY NOTE
This machine will not operate unless:
it is plugged into an appropriate power source;
master power switch/breaker on lower back panel is in the "ON" position;
the feed tray and the safety shield are in their proper positions.
01.2009 v. 3.00
Page 28

5-4 LAMINATING WITH THERMAL (HOT) FILM
1. If the machine is not already on and warmed up, first make sure the power cord
is plugged in. Turn on the machine, and set the temperature for whatever film is
being used.
2. The laminator will be ready to operate in about 20 minutes.
WARNING: Do not let the temperature exceed 320º F / 163° C while film is
threaded and the laminator is not running. The film could disintegrate and
require cleaning and rethreading of the machine.
3. Position the feed guides if needed for precision feeding. You will get the best
results by centering items in the web of film.
4. The film tension is preset at the factory. Should adjustment be needed, turn
the black knobs clockwise to tighten, counterclockwise to loosen.
5. The fans will come on automatically; no user intervention is required.
6. Watch the film as it passes over the heat rolls. If there is some waviness in the
film at the leading edge of both top and/or bottom heat rolls, film tension is perfect.
The leading edge is the top of the top heat roll and the bottom of the bottom heat
roll, the edges that first contact the film. If there is no waviness in the film at all,
there is too much film tension. Loosen both knobs a small amount and check
again.
If the waviness or wrinkling extends into the laminating rollers, tension needs to be
increased. Always keep the amount of tension the same on both top and bottom
film. Waviness that extends across 10 to 30 percent of the heat rolls indicates
acceptable film tension.
7. When starting the machine to begin lamination, let at least 6-8 inches of film go
through the rollers before inserting the items to be laminated. This takes out slack
in the film. This also removes any areas of film with excess adhesive that may
have pooled just beneath the rolls.
Examine the film coming out the back of the machine. If bubbles or wrinkles
appear in the film, this means there is not enough tension to draw the film tight and
smooth over the heated rollers. Turn the tension control knobs clockwise to
increase the tension.
If the film is stretching and gets narrower as it goes across the heated rollers, idler
tension is much too high. T he temperature setting may also be too high for that
film.
Film that is 1.5 mils thick requires very little tension.
REMEMBER TO TURN BOTH THE TOP AND BOTTOM TENSION CONTROL
KNOBS THE SAME AMOUNT TO KEEP TENSION THE SAME ON TOP AND
BOTTOM ROLLS.
01.2009 v. 3.00
Page 29

If the film curls up or down after it leaves the machine, review the section on film
tension, and readjust the film tension on the top and bottom film.
If the tension appears balanced but you notice waves or ripples toward the center
of the web of film as it comes out the back, the temperature may be too high or the
lamination speed may be too fast for that film. These waves in the film are called
“heat wrinkles”. Heat wrinkles are formed when the film has not cooled enough
before coming out the back of the machine. For the best results, film should be
cooled below melt temperature while it is pulled tight and perfectly flat between the
laminating rollers and the pull rollers. If the film exits the back of the machine while
still at or above melt temperature, heat wrinkles can form. The major reason for
fans on a laminator is to cool the film, not to cool the machine.
8. The laminator is designed to operate with the operator directly facing the control
panels and feed tray assembly.
01.2009 v. 3.00
Page 30

5-5 PREVENTING AND SOLVING PROBLEMS
WHEN USING HOT LAMINATES
Please read this section before you have a problem.
PROBLEM: Wrinkling of the material as it goes into the laminating rollers.
This problem usually occurs when laminating an item that has been folded, rolled,
bent or wrinkled.
SOLUTION: Make sure the leading edge of the item being laminated is lying flat
and is inserted parallel to the laminating rollers.
It is sometimes essential to smooth out an item as it passes over the feed table and
through the rollers to ensure an even lamination without wrinkles. Smooth from the
center of the item, back toward the trailing edges. Once the item starts to feed, you
may also pull back and to the sides on the corners of the trailing edge.
If material has been rolled up, take the curl out of it on a table edge before
laminating. If some curl remains, it may be helpful to insert the item with the curl
down so the leading edge is pressed against the feed tray until just before the nip.
PROBLEM: Wrinkling of the film around the material being laminated.
SOLUTION: This is normal and inevitable on any laminator, especially with thicker
material. These wrinkles will be trimmed away with the scrap, so they do not affect
appearance. Because the rollers are being held apart by the paper or cardboard,
they cannot pull equally on the plastic around the paper. This creates wrinkles that
tend to look like the bow waves of a boat, radiating out through the clear part of the
web from the sheet of material.
PROBLEM: When two pieces of material are laminated side by side, the
plastic adheres to one piece but not the other.
SOLUTION: To get maximum efficiency from the film rolls, you can feed several
items into the laminator side by side. However, wrinkling can occur if these items
are of unequal thickness, because the laminating rollers are lifted off the thinner
items by the thicker items. When laminating items side by side, it is important to
arrange them so that the thickness is the same.
PROBLEM: Wrinkling of the plastic on a laminated piece of material.
SOLUTION: Make sure you have enough film tension to take the wrinkles out of
the film before it gets past the heat rolls (see film tension, sections 5-2 and 5-4).
Make sure the film is threaded properly (see threading the laminator, section 3-2).
PROBLEM: Film gets wrapped around the pull rollers.
SOLUTION: While threading cold film, the loose ends of the unlaminated web are
particularly susceptible to “wrap-around.” To minimize this, always tape the top and
bottom films together in a couple of places to keep them attached to each other
while passing through the rollers. Pull the threading card after it emerges from the
01.2009 v. 3.00
Page 31

pull rollers until the film clears the back of the machine. Use caution when first
starting to laminate, being careful that the thin, unlaminated web does not get
caught in pull rollers or laminating rollers.
If “wrap-around” does occur while the laminator is cold, you can easily correct it by
reversing the direction of the rubber rolls, permitting the laminator to release the
film from the rolls.
PROBLEM: Film gets wrapped around the laminating rollers while the
machine is hot.
SOLUTION: Leave the heat on so that the adhesive does not harden, and take the
following steps.
WARNING: Be very careful not to touch the heated rollers
when the machine is hot.
MISE EN GARDE: Neb pas toucher les sabots chauffants
lorsque la machine est chaude.
ADVERTENCIA: No toque las zapatas calefactoras cuando
la máquina está caliente.
1. Remove the feed tray.
2. Cut the film on the top and bottom, just in front of the heated rollers.
3. Loosen the film from the rollers and grip the two loose ends, holding them
together.
4. Depress the reverse drive momentary button. Allow the laminator to back out
the film that is wrapped around the rolls. Pull the film off the roller.
WARNING: Keeping the machine in reverse may cause a reverse wraparound if the film is not getting pulled off the roller. You may need to pull on
the film with a lot of force while stopping and starting the drive.
MISE EN GARDE: Si l’on appuie trop longtemps sur l’interrupteur de marche
arriére, le film risque de s’enrouler dans l’autre sens. Appuyer par á-coups
sur l’interrupteur et vérifier le résultat chaque fois.
ADVERTENCIA: Apretar mucho tiempo el interruptor de marcha atrás puede
causar bobinado inverso. Apriételo brevemente, luego suéltelo y observe el
resultado. Apriételo nuevamente si se requiere más marcha atrás. Pare si
nota que el plástico hala hacia atrás, volviendo sobre los rodillos.
WARNING: Do not try to cut the plastic off the roller with a knife or other
sharp instrument. You will end up cutting the rubber rollers and turn an
inconvenience into a major repair bill not covered by warranty.
MISE EN GARDE: Ne jamais tenter de dégager un film enroulé en le coupant
avec une lame tranchante. Vous entaillerez le caoutchouc des rouleaux, ce
qui occasionnera des frais majeurs de reparation qui ne sont pas couverts
par la garantie.
01.2009 v. 3.00
Page 32

ADVERTENCIA: No intente separar el plástico del rodillo cortando con un
cuchillo u otro instrumento filoso. Terminará cortando los rodillos de goma y
convertirá una incomodidad en una cuenta de reparaciones mayor, que no
esta cubierta por la garantia.
If this method does not work, let the machine fully cool. Remove. Carefully cut the
wrap-around off the roller with a small pair of scissors, working the point and the
cutting edges away from the rubber to avoid damaging the roller. Then clean the
rollers, following the instructions in section 6-2.
PROBLEM: Not noticing that the rolls of film are almost used up (one roll of
film always runs out before the other.)
WARNING: If the film is run through the laminator without being matched to
an opposing film, the adhesive exposed to the rubber rollers will stick to the
laminating rollers and create a severe wraparound. This type of wraparound
is difficult to clear because the film adheres to the roller and to itself for the
entire length of the accumulated film on the roller. It’s best to clear this right
away, before the adhesive hardens. Follow the steps above to clear.
MISE EN GARDE: S’il n’y a qu’un film dans la machine, le coté adhésif, qui
se trouvera contre le rouleau de plastification, y adhérera, ce qui provoquera
un enroulement “monstre: trés difficile à défaire puisque le film adhère
d’abord au rouleau, puis à lui-meme a mesure qu’il s’enroule. Il faut agir
rapidement avant que la colle durcisse. Procéder de la facon indiquée cidessus pour régler le problème.
ADVERTENCIA: Si el plástico de uno de los rollos de abastecimiento pasa
por el plastificador sin ser igualado por una pelicula de plastico del rollo
opuesto, el adhesivo expuesto a los rodillos de goma adherirá a los rodillos
de laminación y causará un bucle monumental. Este tipo de bucle es muy
dificil de deshacer porque el plastico adhiere tanto al rodillo como a sì
mismo, a lo largo de toda la longituh de la película de plastico acumulada
sobre el rodillo. Es mejor deshacerlo inmediatamente, antes de que
endurezca el adhesivo. Siga los pasos indicados más arriba para lograrlo.
SOLUTION: To avoid this problem, stop the laminator before either roll runs out,
cut the webs of film, remove the two near-empty rolls of film, and thread new rolls.
When putting film on a laminator, always use two rolls of matched length and width.
Experienced users may leave the pieces of film remaining over the rollers to help
thread the new film. When the machine is warm, the ends of the new rolls can be
easily tacked to the already threaded pieces because the adhesive layer facing
outwards will be sticky. Be careful not to burn yourself on the heat rollers.
PROBLEM: Film is not properly adhered or starts to come off sometime after
lamination.
SOLUTION: Check the media and ink combination bond compatibility (perform “X”
test as described in section 1-4). Unless there is something wrong with the film, if
the ink and paper combination is not receptive to heat lamination, this problem
comes from film being run at too low a temperature. Check the heat setting on the
01.2009 v. 3.00
Page 33

laminator. (See recommended temperature settings, section 5-3). If the film is not
sticking to the item, it is likely that more heat is required.
If you are using 1.5-mil film, which has a very thin adhesive layer, be sure to
consult your film supplier’s suggested temperature settings. Thinner films (like a
1.5-mil or 1.7-mil) generally require around 280° F to adequately get that thin layer
of adhesive to “kick over” and adhere properly.
If you are running thicker films, you may have a problem if you try to go too fast. In
this case, the thicker film may not have enough time on the heat rollers to reach its
adhesive melt temperature. Thicker films may be run at low speeds with no
problem.
When laminating posters or other thicker material with 1.5-mil film, the paper itself
can absorb enough of the heat from the film to drop the adhesive below its melt
temperature. The film may start to come off immediately or it may start to fall off
after a few days. The solution here is to run the work at a higher temperature.
About 280° to 290°F (160-171°C) will usually do the job.
PROBLEM: A laminated item comes out with a large “oily” spot on or near
the leading edge.
SOLUTION: It’s excess adhesive, not oil, that causes this effect. When a machine
is left heated but idle for a few minutes or longer, the adhesive from the film over
the heat rollers can form droplets if material is put in immediately. This excess
adhesive saturates an area of paper, creating what looks like an oily spot. The
solution, as mentioned above, is just to let a few inches of film go through before
feeding in your work.
Anytime you are laminating unfamiliar or costly items, it is a good idea to start with
an expendable sample or test piece. Laminating a test piece first gives you an
indication of the results you’ll get and also takes care of any pooled adhesive.
PROBLEM: The laminated material seems to have a pitted or irregular
surface that does not match the texture of the paper being coated.
SOLUTION: This is usually caused by adhesive build-up or dirt on the rubber
rollers but may be caused by any matter stuck to the rollers, such as a piece of
paper. Inspect the rubber rollers; if they need cleaning, refer to section 6-2.
Cuts or other damage to the rubber rollers, especially the laminating rollers, can
also cause irregularities in the surface of the film. If the rolls have excessive cuts
or damage, they should be replaced. Replacement rolls (and all other components)
are available from LEDCO (Phone 1-800-937-9293 or 1 (585) 367-2392).
PROBLEM: The film shrinks as it passes over the heated rollers (known as
“necking” in the laminating trade).
SOLUTION: Reduce the heat and/or the film tension. The film is not shrinking so
much as it is being stretched by excess heat and tension, causing the web to get
narrower as it is pulled over the heat rollers.
01.2009 v. 3.00
Page 34

PROBLEM: No power is getting to the laminator.
SOLUTION: Make sure there is power at the electrical outlet being used, and
make sure both ends of the power cord are firmly engaged. There are fuses inside
the laminator, but dead outlets and loose power cord connections are the most
common causes of this problem.
PROBLEM: Wavy or rippled sections in the laminate, especially toward the
center of the web.
SOLUTION: These “heat wrinkles” are caused by excess temperature and/or
speed for the film being used. Slightly speed up the motor and/or use a lower
temperature appropriate for that particular film.
PROBLEM: General haziness or cloudiness in the film after lamination.
SOLUTION: Increase the temperature. Cloudiness is a function of incomplete
adhesion. On a variable speed machine loaded with thicker film, it may be that the
film is being run too fast and is not getting enough time on the heat rollers.
PROBLEM: Bubbles in the center of the web and/or film not sticking to the
center of an item.
SOLUTION: This problem can be caused by excessive laminating roll pressure.
Putting too much pressure on the laminating rollers actually decreases pressure in
the center of the web.
The other likely cause of this symptom is worn rollers. For example, if hundreds of
thousands of 18-inch / 46cm wide sheets are laminated on a 27-inch machine, the
center of the rollers can get worn down more than the ends of the rollers. In this
situation, the laminating rollers should be replaced.
For problems not listed here, contact your LEDCO dealer. If the dealer doesn’t
know the answer, please ask the dealer to contact LEDCO and get back to you.
To reduce waiting time, we recommend contacting your LEDCO dealer first, but
you are also welcome to contact us directly with any problem at 1-800-937-9293
or 1 (585) 367-2392.
01.2009 v. 3.00
Page 35

6-1 CLEANING & MAINTENANCE
DANGER: Always use extreme caution when performing maintenance on
your machine! Always make sure the machine is unplugged and there is NO
power to the machine when working on or cleaning any part of the unit.
Use extreme caution to avoid hot surfaces, which may remain hot for a period
of time even if there is no power to your machine.
Use extreme caution to avoid pinch points at the nip of rubber rollers.
NEVER have rubber rollers turning while performing maintenance to your
machine.
NEVER wear loose clothing, ties, or jewelry (which may become entangled in
gears or rubber rollers) while performing maintenance on your machine.
MISE EN GARDE: La prudence est de mise lorsque l’on effectue l’entretien
de cette machine.
S’assurer que le cordon d’alimentation est débranché et que la machine est
mise hors tension avant de toucher à des pièces internes.
Prendre garde aux surfaces chaudes. Ces surfaces demeurent chaudes
longtemps après que le courant a été coupé.
Tenir les doigts et les objets loin des roulequx de caoutchouc. Ne jamais faire
tourner les rouleaux pendant l’entretien de la machine.
Ne jamais porter de vetements amples, de cravate ou de bijoux, etc. (ces
articles peuvent etra happés par les engrenages ou les roulequx de
caoutchouc).
ADVERTENCIA: Sea extremadamente cuidadoso siempre que realice tareas
de mantenimiento en su maquina.
Aseqúrese siempre que la máquina está desenchufada y que no hay
NINGUNA energia aplicada a la misma mientras esté trabajando con partes
internas de la máquina.
Sea extremadamente cuidadoso en evitar superificies calientes, que pueden
permanecer calientes durante cierto tiempo, aún después de estar cortada la
corriente.
Tenga sumo cuidado en evitar puntos de constricción en las pasadas de los
rodillos de goma. Nunca tenga los rodillos de goma en movimiento mientras
realiza trabajos de mantenimiento en su máquina.
Nunca vista ropa suelta, corbata o joyas (que peuden ser atrapadas por
engrenajes o rodillos de goma) mientras está realizando trabajos de
mantenimiento en la máquina.
6-2 CLEANING THE RUBBER ROLLERS
01.2009 v. 3.00
Page 36

Both the laminating rollers and the pull rollers need regular cleaning. Collectively,
these are referred to as the rubber rollers.
To clean the laminating rollers:
1. Remove the film from the laminator and allow the machine to cool to room
temperature.
2. Turn off the master power switch and unplug the machine.
3. Remove the feed table.
4. Clean the rubber rollers with a mildly abrasive cleaning pad such as a white
Scotch Brite™ pad which may be purchased in the household section of your
grocery store (the green pads are too abrasive). Use Cool Clean to clean the
rollers (available through your LEDCO dealer). Rub firmly, but do not scrub the
rollers vigorously as this might mar the surface. Do not use sharp metal objects
or steel wool as these will also mar the rollers.
WARNING: Never clean the rollers while they are turning. While turning, the
rollers may catch your fingers and cause injury, or they may catch your
cleaning materials and damage the laminator. Unplug the power cord while
cleaning the rollers or performing other maintenance on the machine. Turn
the rollers by hand.
MISE EN GARDE: Ne jamais nettoyer les rouleaux pendant qu’ils tournent
afin d’éviter de se blesser et d’empecher que le produit de nettoyage
n’endommage l’intérieur de la machine. Débrancher le cordon d’alimentation
avant le nettoyage ou tout autre travail d’entretien. Nettoyer d’abord la partie
apparente des rouleaux, puis, a` l’aide de la commande de marche arriére, les
faire tourner de facon à pouvoir en nettoyer toute la surface.
AVERTENCIA: Nunca limpie los rodillos de goma mientras estén girando. Al
estar girando, los rodillos pueden atrapar sus dedos y lastimarlos, o pueden
atrapar sus artículos para limpieza y danar el plastificador. Desenchufe el
cordón eléctrico mientras está limpiando los rodillos, o realizando otras
tareas de mantenimiento en la máquina. Gire los rodillos por mano.
6-3 LUBRICATION
Drive Chain The drive chain and sprockets on all models should receive a light
coat of gear lube or heavy grease, preferably lithium grease, after each 1,000
hours of operation.
01.2009 v. 3.00
 Loading...