

Page 1
RMPM2T-1
Single Rack Mount Kit for M2T and DSQD
TECHNICAL DATA
Installing One M2T into a Single Rack
The M2T transmitter occupies a half rack space. This
kit provides the hardware needed to mount one M2T or
DSQD into a single rack space.
NOTE: Steps 1-6 will require original mounting
hardware that came with the units. Part numbers
are included in case individual items need to be
reordered.
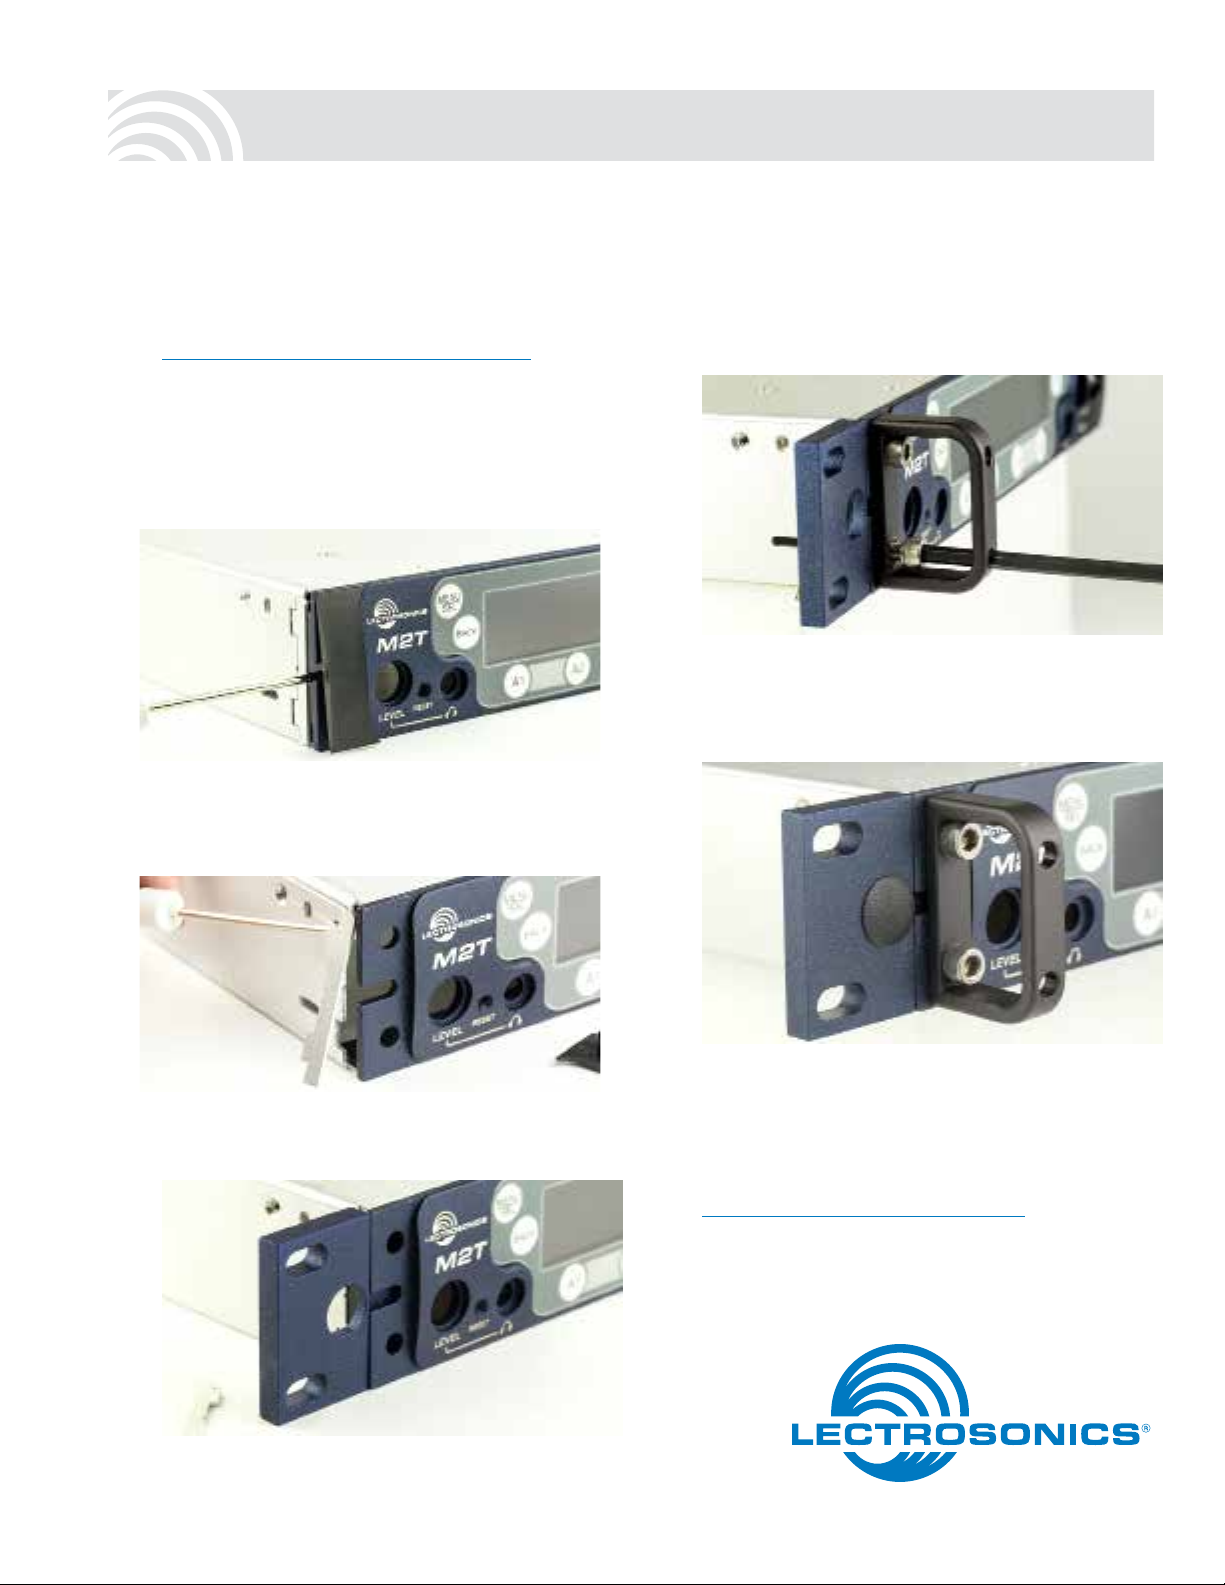
1. Remove the Trim Cap (Part #P1330) from both
sides of the front panel of the M2T unit to be
rack mounted.
2. Remove the breakaway tabs on both sides of the
Chassis Cover Panel. This requires the use of a
flat-blade screwdriver inserted into the slots and
levering the tabs away on each side of the unit.
4. Insert two (2) Cap Screws (Part #28885) through
the Rack Handle (Part #27082) holes and install
the Rack Handle onto the Flange Bracket through
the holes in the unit’s front panel. Firmly tighten
the Cap Screws using the long leg of the Hex
Wrench as shown.
5. Unless also installing a Front Mounted Antenna,
insert the Hole Plug (Part #35959) into the open
antenna hole in the Flange Bracket by aligning the
flat sides of the plug with those of the bracket hole
and pushing into place until flush.
3. Insert the Flange Bracket (Part #27076) into the
open slot in the left-front side of the Chassis
Cover Panel.
6. Install the Front Tie Bracket (Part #25991) into
the open slot in the right side of the M2T Chassis
Cover Panel with the protruding nuts facing rearward, affix with two (2) Cap Screws (Part #28885)
provided and firmly tighten with the Hex Wrench.
See next page.
NOTE: Steps 7-11 require parts from the
(RMPM2T-1) M2T Single Rack Mount Kit.
Rio Rancho, NM, USA
www.lectrosonics.com
Page 2
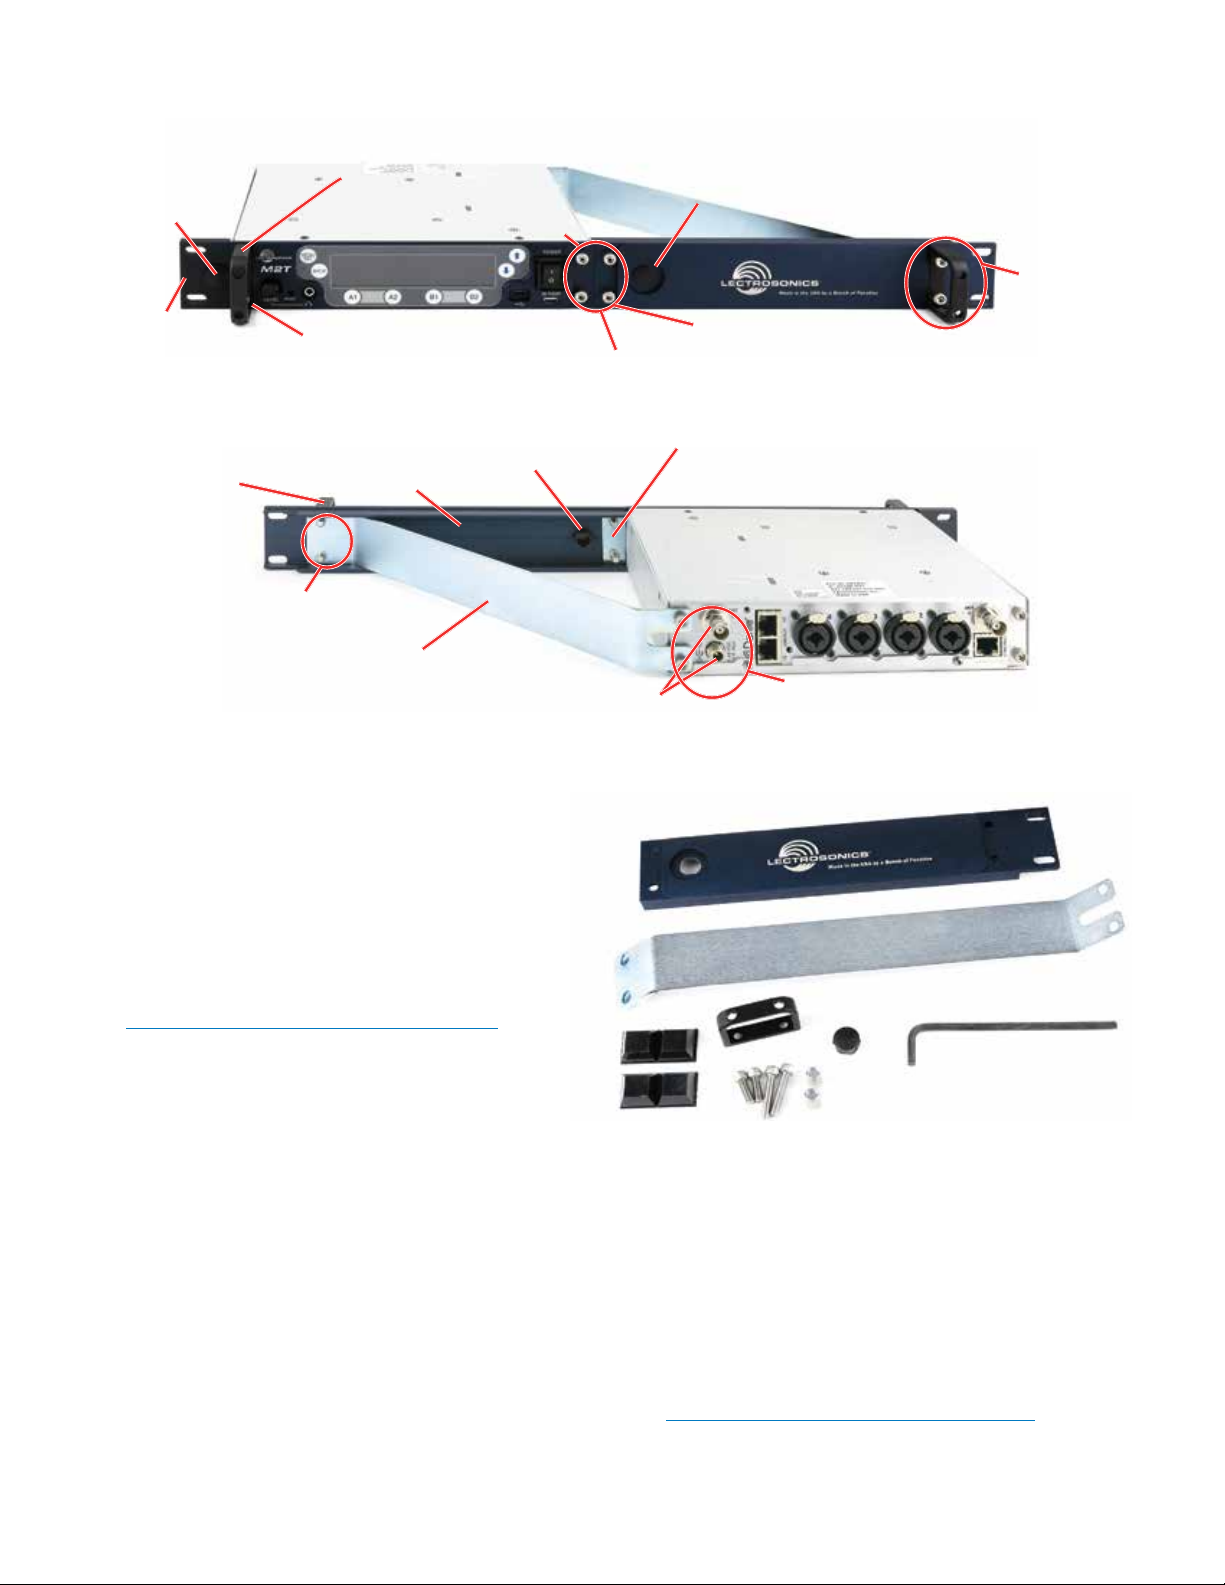
M2T Front View
Rack handle (Part #27082)
Hole plug
(Part #35959)
Rack flange
bracket
(Part # 27076)
Cap screw (Part #28885)
Front tie bracket (not shown;
located behind faceplate)
M2T Rear View
Rack Handle
(Part #27082)
STEP 9
(rear)
Front Fill Panel
(Part #27081)
Support bracket
(Part #27077)
Items Included in RMPM2T-1 Kit:
STEP 10
(rear)
(Part #28885)
STEP 10
(front)
Cap screws (Part #28885)
Front Tie Bracket
(Part #25991)
Cap screws
STEP 9
(front)
STEPS 6 and 7
STEP 8
• Technical Data Sheet
• (27077) Support Bracket
• (27081) Front Fill Panel
• (27082) Rack handle
• (28885) (4) SCR10 cap screw
• (35800) Hex L key wrench
• (35959) Hole plug
• (35664) (4) Rubber feet
• (28951) (2) Long mounting screws*
• (28950) (2) Short spacer tubes*
NOTE: Starred (*) items are needed only when
installing a DSQD, They are not needed for M2T
installation and may be set aside.
7. Use two (2) Cap Screws (Part #28885) to attach
the left side of the Front Fill Panel (Part #27081)
to the two remaining nuts on the Front Tie Bracket
(Part #25991) and firmly tighten with the
Hex Wrench.
8. Use the Hex Wrench to remove the two (2) inboard
Cap Screws from the rear of the M2T. Install the
Support Bracket (Part #27077) to the rear panel of
the M2T, reusing the two (2) Cap Screws previously removed and firmly tighten with the Hex Wrench.
(See rear view image above.)
9. Insert two (2) Cap Screws (Part #28885) through
Rack Handle (Part #27082) holes and install the
Rack Handle onto the right side Front Fill Panel
(Part #27081) through the holes in the panel,
and into the nuts on the Support Bracket (Part
#27076). Firmly tighten the Cap Screws
using the long leg of the Hex Wrench. (See rear
and front view images on front page.)
10. Unless also installing a Front Mounted Antenna,
insert the Hole Plug (Part #35959) into the open
antenna hole in the Front Fill Panel (Part #27081)
by aligning the flat sides of the plug with those of
the bracket hole and pushing into place until flush.
The M2T with Front Fill Panel is now ready for
installation into a rack.
NOTE: If supplied rubber foot/feet are installed
on under side of the M2T, it will not fit in a single
rack space.
Page 3

DSQD Rear View
Spacer Tubes
(Part #28950)
STEP 10
Rack Handle
(Part #27082)
Front Fill Panel
(Part #27081)
STEP 9
(rear)
Support bracket
(Part #27077)
(rear)
Long screws
(Part #28951)
Installing One DSQD into a Single Rack
The process to install the DSQD is the same as for the
M2T transmitter through Step 7. The DSQD looks similar
to the M2T in the frontal view. Follow the steps for the
M2T, then resume at Step 8:
8. Use the Hex Wrench to remove the two (2) inboard
Cap Screws from the rear of the DSQD. Put them
aside and save for later use or spares; you will not
need them for this installation. Install the Support
Bracket (Part #27077) to the rear panel of the
DSQD, using the two (2) long mounting screws,
threaded with Spacer Tubes, and firmly tighten
with the Hex Wrench. See rear view image and
call-out photo above. The kit is designed to handle
the M2T and the DSQD with a shorter chassis, so
the spacers are included.
9. Insert two (2) Cap Screws (Part #28885) through
the Rack Handle (Part #27082) holes and install
the Rack Handle onto the right side Front Fill
Panel (Part #27081) through the holes in the
panel, and into the nuts on the Support Bracket
(Part #27076). Firmly tighten the Cap Screws
using the long leg of the Hex Wrench.
10. Unless also installing a Front Mounted Antenna,
insert the Hole Plug (Part #35959) into the open
antenna hole in the Front Fill Panel (Part #27081)
by aligning the flat sides of the plug with those of
the bracket hole and pushing into place until flush.
Front Tie Bracket
(Part #25991)
STEP 8
The DSQD with Front Fill Panel is now ready for
installation into a rack.
NOTE: As with the M2T, if the supplied rubber
foot/feet are installed on under side of the DSQD,
it will not fit in a single rack space.
Rio Rancho, NM, USA
www.lectrosonics.com
Page 4

m
Mounting M2T To DSQD
When mounting two M2Ts or two DSQDs together, the units lie flush together as shown. This is not the case with an
M2T and a DSQD, as the DSQD housing is shorter and the spacer tubes are needed.
Two M2T units
Two DSQD units
When attaching an M2T to a DSQD unit, the preferred configuration (when viewing from the back side) is to have the
DSQD to the left and the M2T to the right. If the units are mounted the opposite way, the mounting plate will partially
block the Dante® ports on the DSQD, making it difficult to remove the cables. Having the DSQD on the left as shown
below eliminates this inconvenience.
Recommended DSQD-M2T mounting
581 Laser Road NE • Rio Rancho, NM 87124 USA • www.lectrosonics.com
(505) 892-4501 • (800) 821-1121 • fax (505) 892-6243 • sales@lectrosonics.co
3 October 2019
 Loading...