

Page 1
LE Series
Wireless Microphone System
INSTRUCTION MANUAL
Fill in for your records:
Serial Number:
Purchase Date:
Rio Rancho, NM, USA
www.lectrosonics.com
Page 2
LE Series
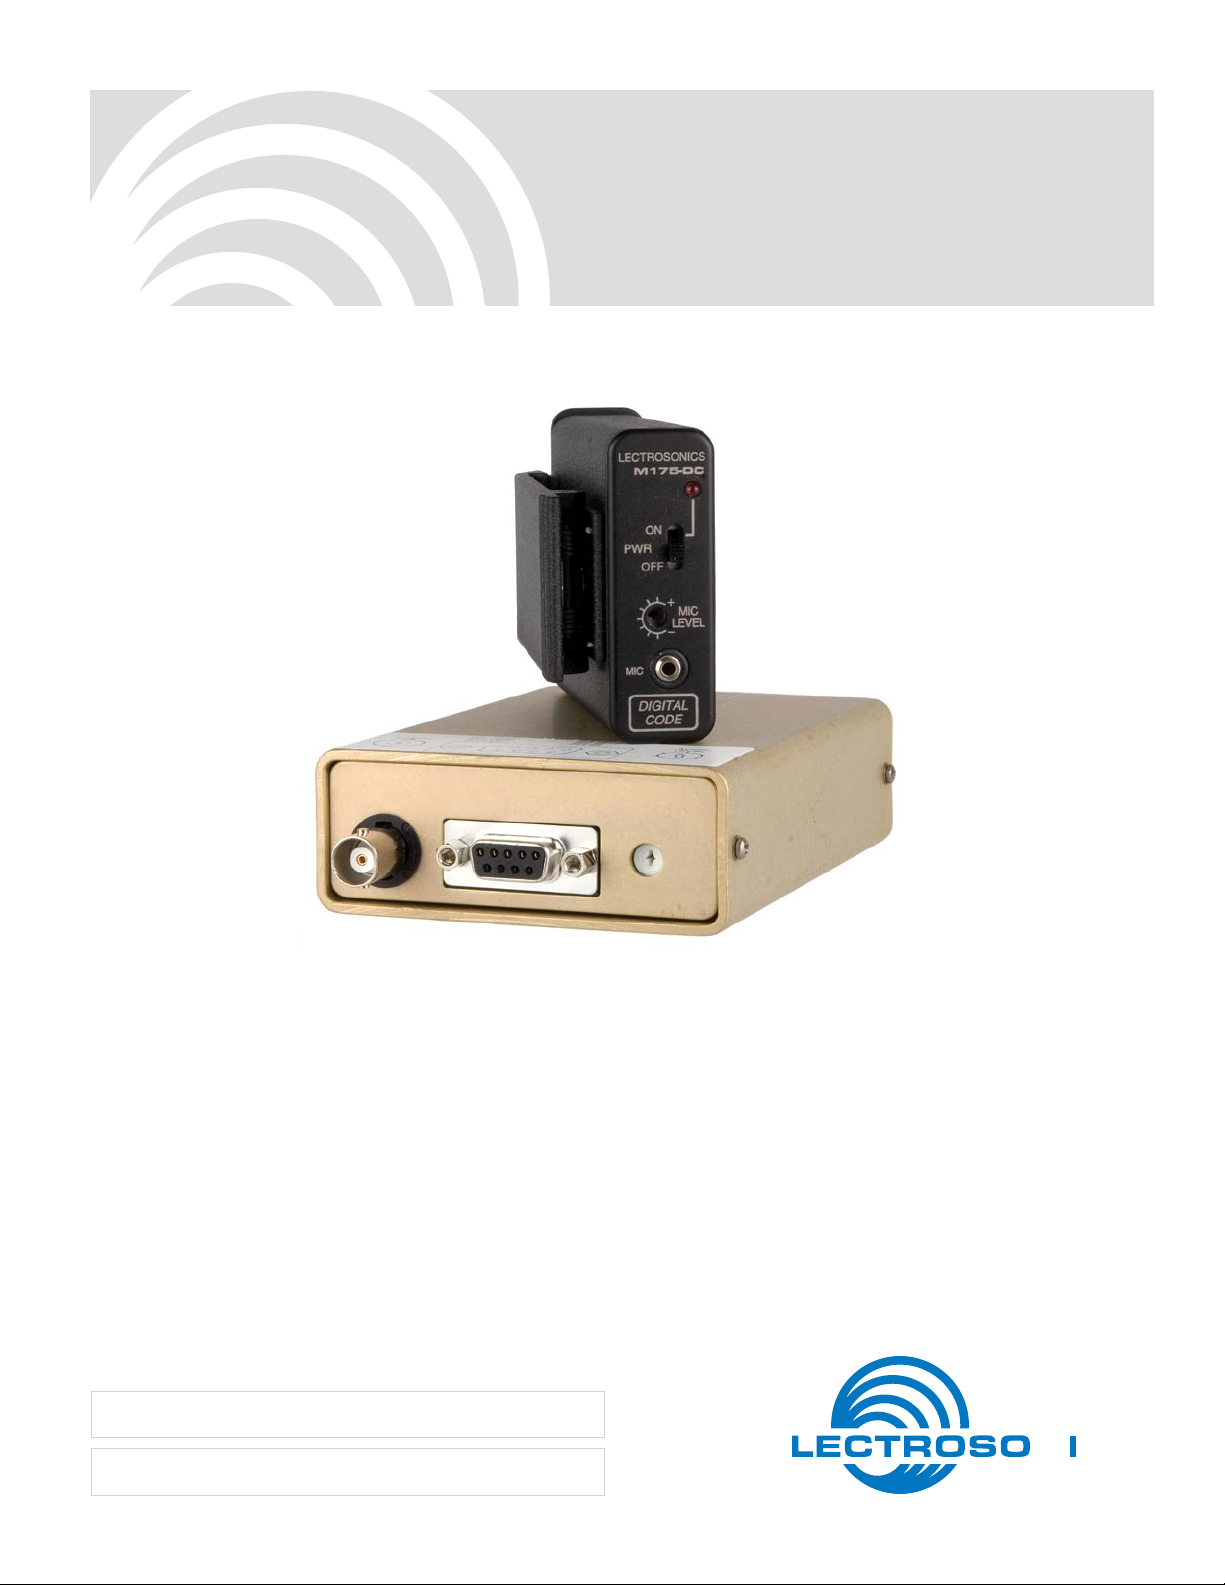
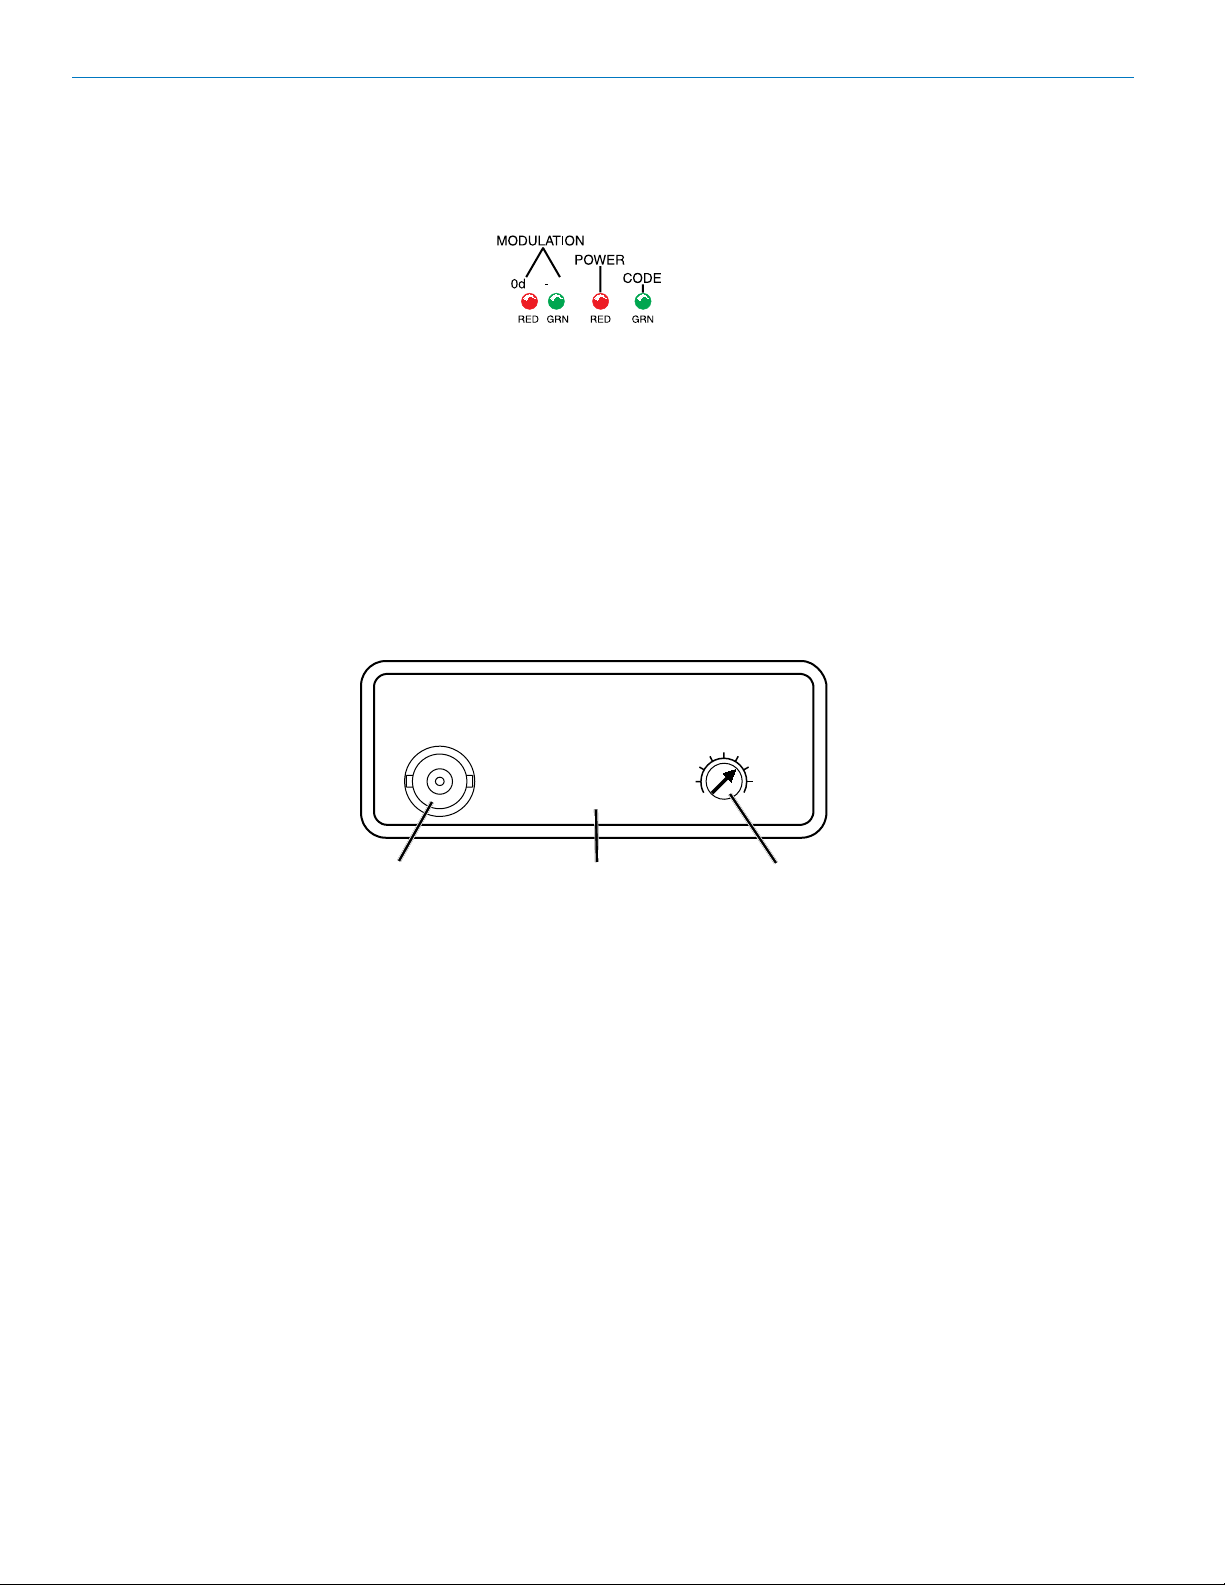
R176 Receiver Connections and Indicators
Front Panel
Front Panel Indicators
Modulation: Inidcates the modluation level of the output from the associated transmitter
-20 dB: Flickers when the transmitter gain approaches -20 dB. Glows continuously when the output from
Power: Glows red when power is applied to the receiver
Code: Glows green to indicate the DCSTM has been received and accepted
0 dB: Flickers when the transmitter gain approaches 0 dB
the transmitter is above -20 dB.
Rear Panel Connections and Controls
Rear Panel
Antenna DB9 Output Connector Audio Output
50 Ohm BNC Level Control
Antenna: 50 Ohm BNC
DB9: Connects receiver to audio recording device
Pin 1: Ground Pin 6: Ground
Pin 2: +12 VDC Pin 7: N/C
Pin 3: Ground Pin 8: N/C
Pin 4: Logic Out Pin 9: N/C
Pin 5: Audio Out
Audio Output Level Control: sets the audio level output from the receiver.
Specifications
Logic Output: +5 VDC when valid code is received, otherwise 0 VDC (10k Ohm load)
Max Current: 103 mA, All LEDs on
RF Sensitivity: -109 dBm for 20 dB SINAD
Max Audio Out: 1 V RMS no load; 0.7 V RMS 1 k Ohm load
2
LECTROSONICS, INC.
Page 3
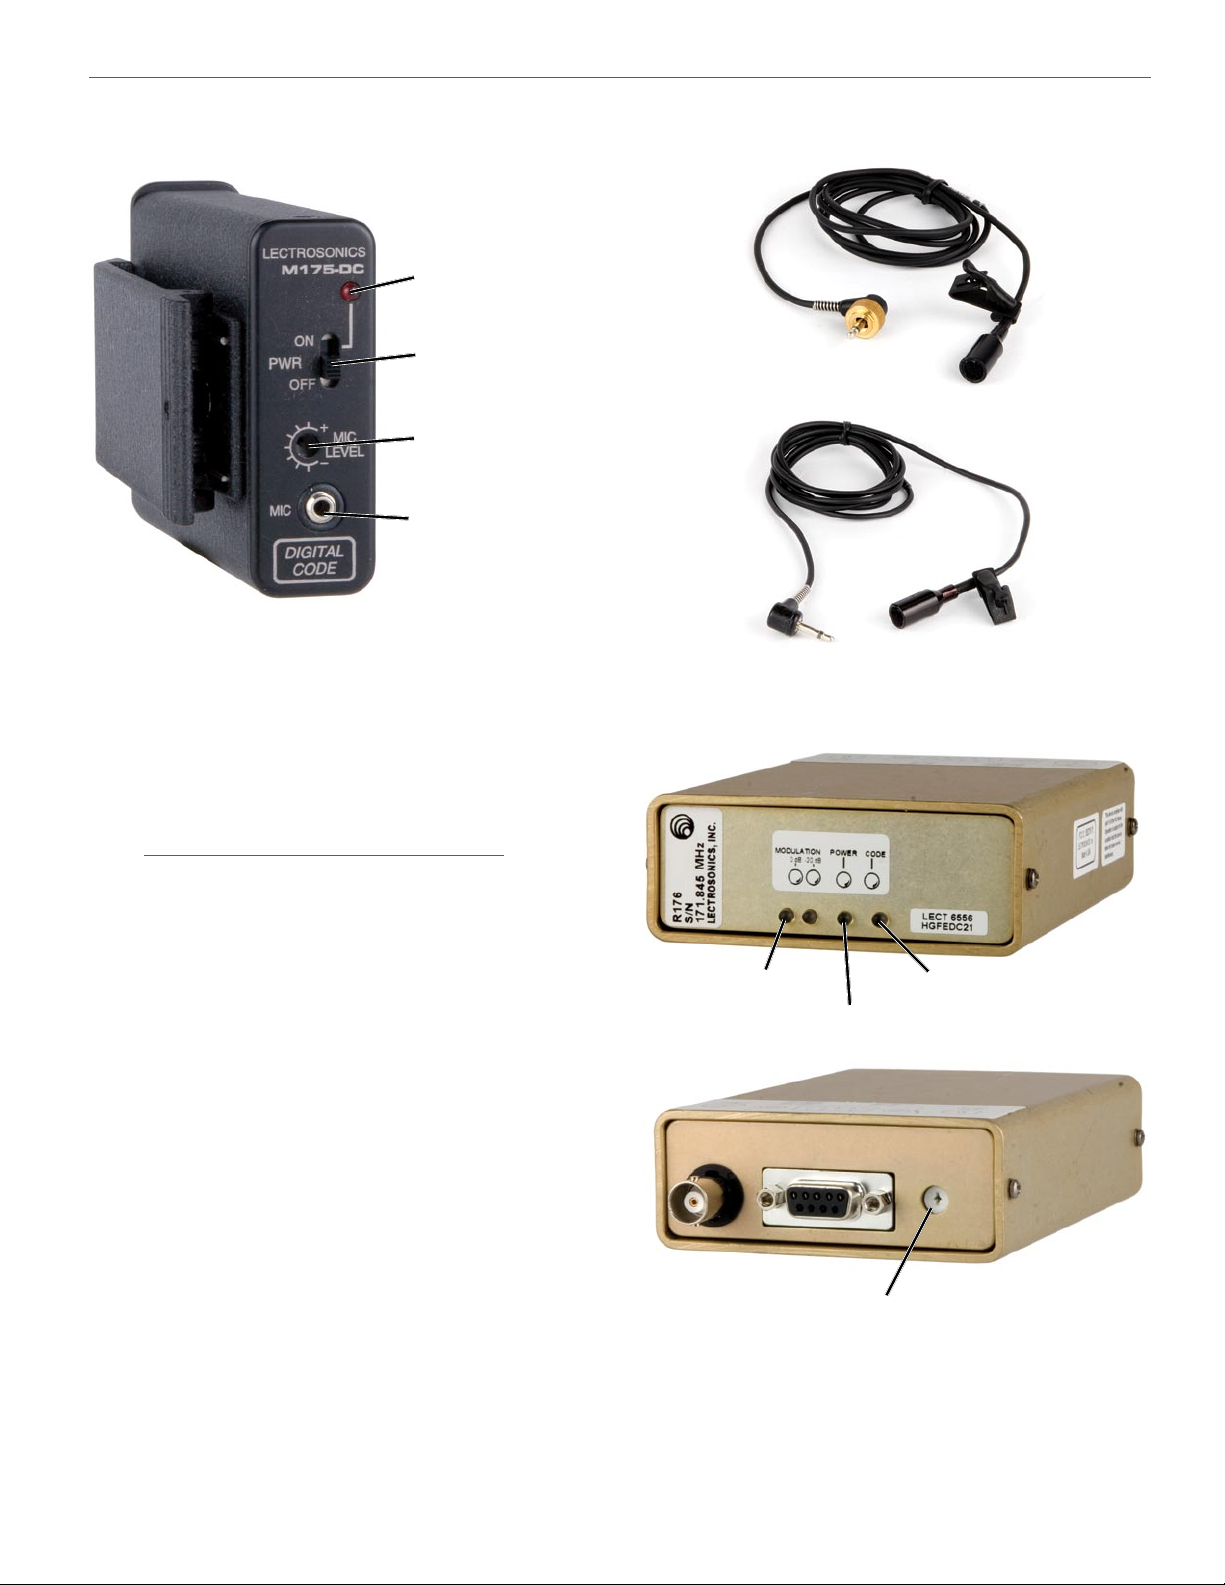
Audio Level Adjustments
Battery Indicator Lamp
Wireless Microphone System
Power ON/OFF Switch
MIC LEVEL
Adjustment
Microphone Jack
The M175DC transmitter features a wide range input
limiter to guard against overload distortion and allow
maximum signal to noise ratio. The following procedure
will adjust the wireless system to take full advantage
of the limiter action to prevent excessive output level
from the receiver from overloading the recorder. This
will also maximize the signal to noise ratio of the audio
being recorded.
Note: This procedure assumes the receiver is
connected to an antenna and output connector
in the same configuration and under the same
load conditions that will be experienced in real
operating conditions.
1. Install battery in transmitter and attach microphone
and set transmitter MIC LEVEL Adjustment to near
maximum clockwise position.
2. Turn on transmitter and place microphone near a
sound source, such as a portable radio.
3. Ensure the receiver’s Power and Code LED indicators are glowing.
4. With the sound source (your portable radio) set
between stations, adjust its volume so that the 0 dB
Modulation LED on the receiver flickers slighty.
5. Leave the portable radio running and adjust the
receiver’s Audio Output Level Control so that the
audio input to the recorder is just below the maximum that the recorder can handle.
M119RLM
with threaded locking connector
M119RA
0 dB Modulation LED
Power LED
Audio Output Level Control
Code LED
Rio Rancho, NM
3
Page 4

Service and Repair
LIMITED ONE YEAR WARRANTY
The equipment is warranted for one year from date of purchase against defects in
materials or workmanship provided it was purchased from an authorized dealer. This
warranty does not cover equipment which has been abused or damaged by careless
handling or shipping. This warranty does not apply to used or demonstrator equipment.
Should any defect develop, Lectrosonics, Inc. will, at our option, repair or replace any
defective parts without charge for either parts or labor. If Lectrosonics, Inc. cannot
correct the defect in your equipment, it will be replaced at no charge with a similar new
item. Lectrosonics, Inc. will pay for the cost of returning your equipment to you.
This warranty applies only to items returned to Lectrosonics, Inc. or an authorized
dealer, shipping costs prepaid, within one year from the date of purchase.
This Limited Warranty is governed by the laws of the State of New Mexico. It states the
entire liablility of Lectrosonics Inc. and the entire remedy of the purchaser for any
breach of warranty as outlined above. NEITHER LECTROSONICS, INC. NOR
ANYONE INVOLVED IN THE PRODUCTION OR DELIVERY OF THE EQUIPMENT
SHALL BE LIABLE FOR ANY INDIRECT, SPECIAL, PUNITIVE, CONSEQUENTIAL,
OR INCIDENTAL DAMAGES ARISING OUT OF THE USE OR INABILITY TO USE
THIS EQUIPMENT EVEN IF LECTROSONICS, INC. HAS BEEN ADVISED OF THE
POSSIBILITY OF SUCH DAMAGES. IN NO EVENT SHALL THE LIABILITY OF
LECTROSONICS, INC. EXCEED THE PURCHASE PRICE OF ANY DEFECTIVE
EQUIPMENT.
This warranty gives you specific legal rights. You may have additional legal rights which
vary from state to state.
581 Laser Road NE • Rio Rancho, NM 87124 USA • www.lectrosonics.com
(505) 892-4501 • (800) 821-1121 • fax (505) 892-6243 • sales@lectrosonics.com
If your system malfunctions, you should attempt to
correct or isolate the trouble before concluding that the
equipment needs repair. Make sure you have followed
the setup procedure and operating instructions. Check
the interconnecting cables.
We strongly recommend that you do not try to repair
the equipment yourself and do not have the local repair
shop attempt anything other than the simplest repair. If
the repair is more complicated than a broken wire or
loose connection, send the unit to the factory for repair
and service. Don’t attempt to adjust any controls inside
the units. Once set at the factory, the various controls
and trimmers do not drift with age or vibration and never
require readjustment. There are no adjustments inside
that will make a malfunctioning unit start working.
Lectrosonics’ Service Department is equipped and
staffed to quickly repair your equipment. In warranty
repairs are made at no charge in accordance with the
terms of the warranty. Out-of-warranty repairs are
charged at a modest flat rate plus parts and shipping.
Since it takes almost as much time and effort to determine what is wrong as it does to make the repair, there
is a charge for an exact quotation. We will be happy to
quote approximate charges by phone for out-of-warranty repairs.
For timely service, please follow the steps below:
A. DO NOT return equipment to the factory for repair
without first contacting us by email or by phone. We
need to know the nature of the problem, the model
number and the serial number of the equipment. We
also need a phone number where you can be reached
8 A.M. to 4 P.M. (U.S. Mountain Standard Time).
B. After receiving your request, we will issue you a
return authorization number (R.A.). This number
will help speed your repair through our receiving
and repair departments. The return authorization
number must be clearly shown on the outside of the
shipping container.
C. Pack the equipment carefully and ship to us, ship-
ping costs prepaid. If necessary, we can provide
you with the proper packing materials. UPS is
usually the best way to ship the units. Heavy units
should be “double-boxed” for safe transport.
D. We also strongly recommend that you insure the
equipment, since we cannot be responsible for
loss of or damage to equipment that you ship. Of
course, we insure the equipment when we ship it
back to you.
Returning Units for Repair
Lectrosonics USA:
Mailing address: Shipping address:
Lectrosonics, Inc. Lectrosonics, Inc.
PO Box 15900 581 Laser Rd.
Rio Rancho, NM 87174 Rio Rancho, NM 87124
USA USA
Telephone:
(505) 892-4501
(800) 821-1121 Toll-free
(505) 892-6243 Fax
Web: E-mail:
www.lectrosonics.com sales@lectrosonics.com
Lectrosonics Canada:
Mailing Address: Telephone:
49 Spadina Avenue, (416) 596-2202
Suite 303A (877) 753-2876 Toll-free
Toronto, Ontario M5V 2J1 (877-7LECTRO)
E-mail: Sales: colinb@lectrosonics.com
(416) 596-6648 Fax
Service: joeb@lectrosonics.com
January 17, 2007
 Loading...