

Page 1

Quick
Start
Guide
Fill in for your records:
Serial Number:
Purchase Date:
This guide is intended to assist with
initial setup and operation of your
Lectrosonics product.
For a detailed user manual, download the most current
version at:
www.lectrosonics.com
PDR
Portable Digital Audio Recorder
microSDHC Logo is a trademark of SD-3C, LLC
9 December 2016
Page 2
LECTROSONICS, INC.2
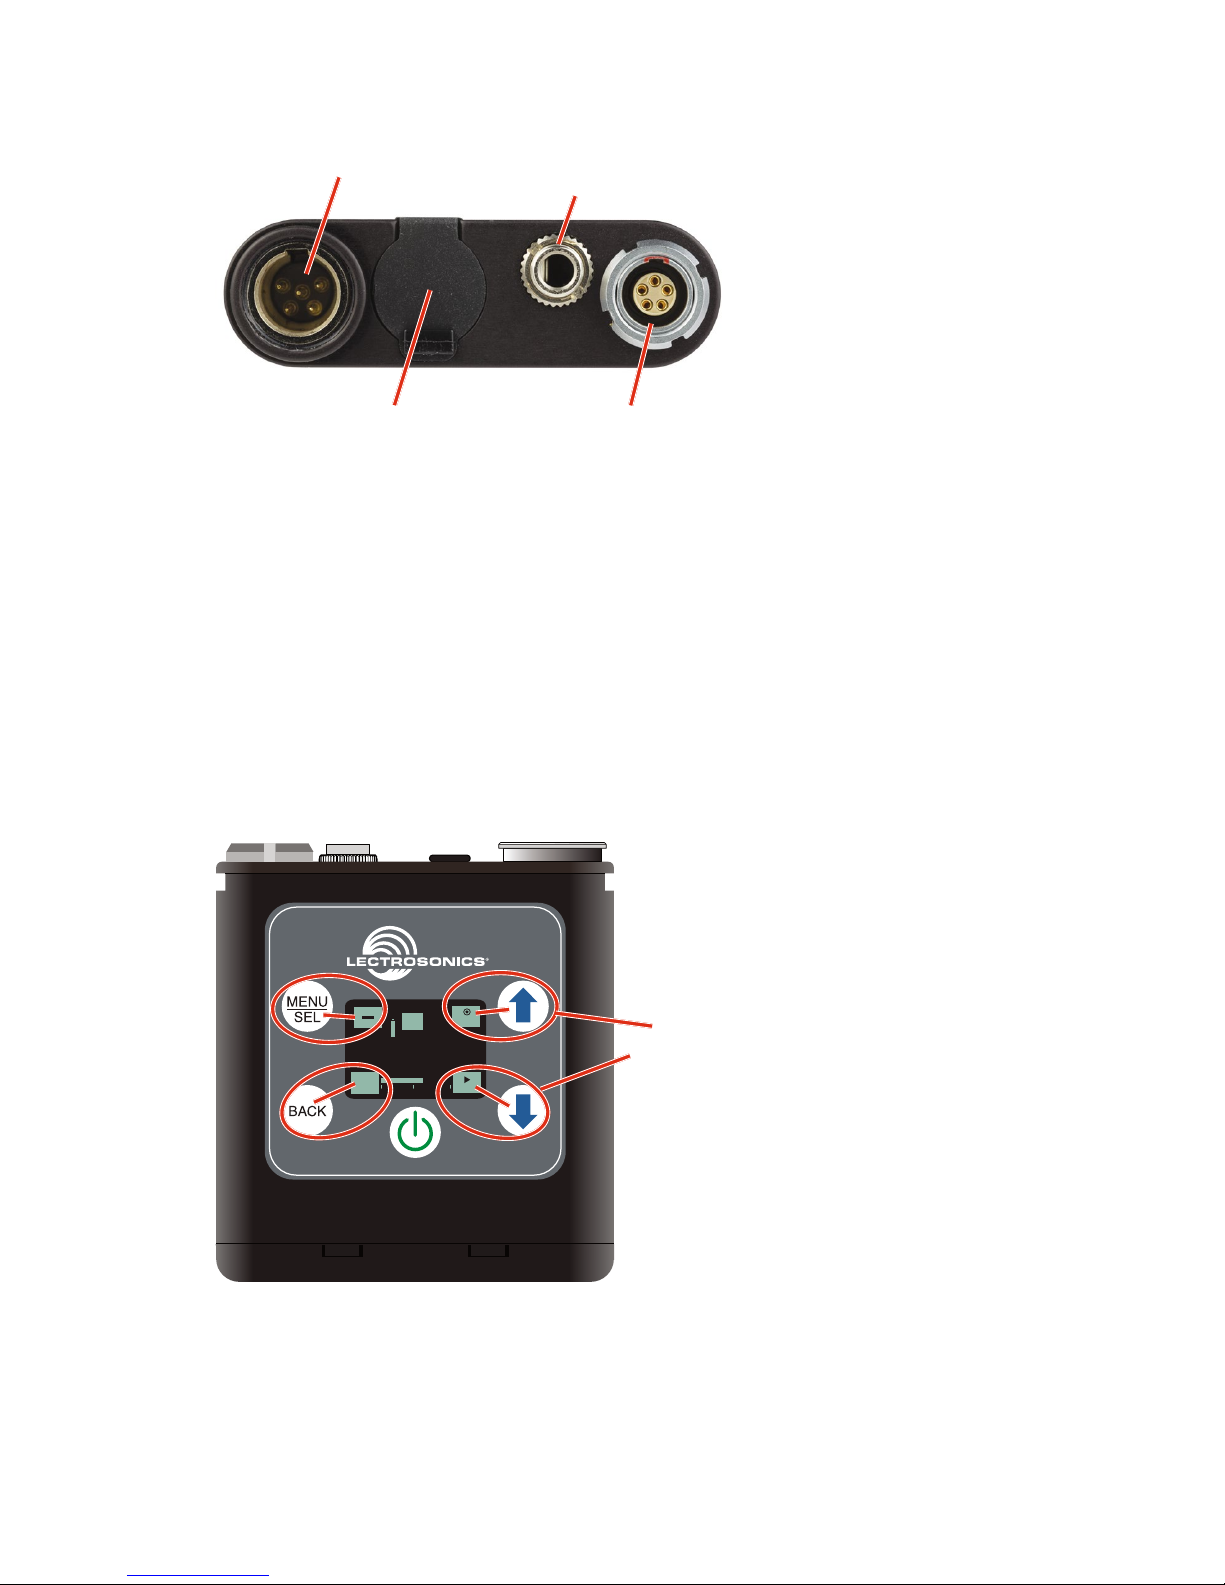
Features and Controls
Micro SD card
slot cover
Time code
sync port
Headphone/
Line output
Audio input
The audio input circuitry is the essentially the same as on Lectrosonics SM
and L Series transmitters. Any microphone wired as Lectrosonics “compatible”
or “servo bias” will work with the PDR. (See manual for details.)
If the unit is booted with an unformatted SD card, the prompt to format the
card will be the first window to appear after the boot sequence completes. Follow the screen instructions to format the card. If the card has an interrupted
recording on it, the Recovery screen will be the first screen to appear.
If there is no card or the card has good formatting, the first display that appears on the LCD after the recorder is turned on is the Main Window. Settings
are accessed by pressing MENU/SEL on the keypad, and then using the UP
and DOWN arrow buttons, and BACK button to navigate the menu items and
select functions. The buttons also provide alternate functions as labeled by
the icons on the LCD.
-40 -20 +0
REC
i
LAST
T
C
00 : 01 : 33
Functions
indicated by the
icons on the LCD
are activated
by pressing the
adjacent buttons
on the keypad
Icons in each corner of the LCD define the alternate functions of the adjacent buttons on the keypad. For example, in the Main Window shown above,
recording is started by pressing the UP arrow button on the keypad, in which
case, the display switches to the Recording Window.
Page 3
www.lectrosonics.com 3
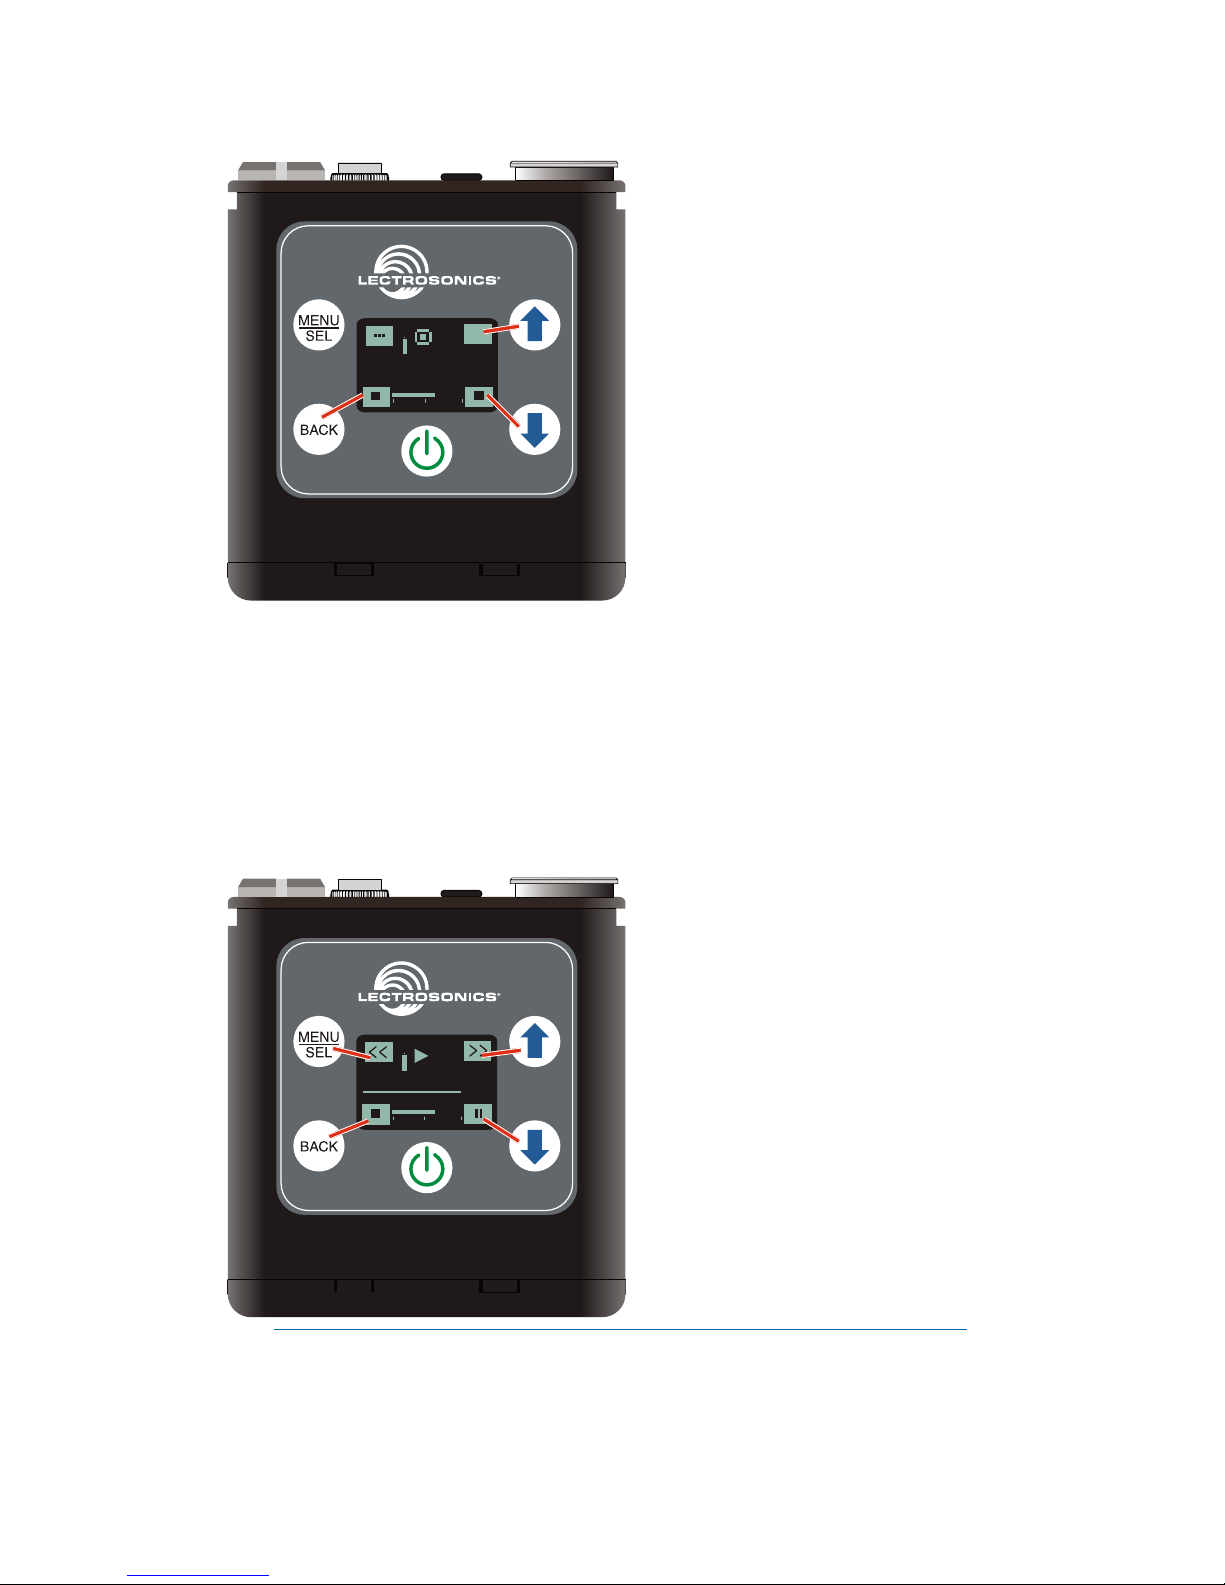
In the Recording Window, the functions of three keypad buttons change to
provide the needed operations during recording.
-40 -20 +0
T
C
00 : 01 : 33
i
REC
HOLD
HOLD
In the Playback Windows, the icons on the LCD change to provide the
functions needed during playback. There are three variants of the playback
window:
• active playback
• paused playback in the middle of the recording
• paused playback at the end of the recording
The icons in the corners of the LCD will change depending on the status of
the playback.
-40 -20 +0
T
C
00 : 01 : 33
NOTE: Refer to the Operating Instructions section for details on the
specific button functions and operations in the Main, Recording and
Playback Windows.
Page 4

LECTROSONICS, INC.4
Battery Installation
The audio recorder is powered by a single AAA lithium battery, offering over
six hours of operation.
We recommend using lithium batteries for longest life. Alkalines will offer from
2 to 3.5 hours. Zinc-carbon batteries marked “heavy-duty” or “long-lasting” are
not adequate.
The battery status indicator circuitry requires compensation for the difference
in voltage drop between alkaline and lithium batteries across their usable life,
so it’s important to select the correct battery type in the menu.
Push inward on the release catches to open the door.
Battery
polarity
marking
Press tabs to
open door
Insert the battery according to the markings inside the battery compartment
door. The (+) pos. end of the battery is oriented as shown here.
CAUTION: Danger of explosion if battery is incorrectly replaced.
Replace only with the same or equivalent type.
Page 5

www.lectrosonics.com 5
Compatible memory cards
The card should be a microSDHC memory card, speed class 10, or any
UHS speed class, 4GB to 32GB. The recorder supports the UHS-1 bus type,
marked on the memory card with an
I symbol.
An example of typical markings:
Speed class
UHS speed class
UHS bus type
Installing the card
The card slot is covered by a flexible cap. Open the cap by pulling out on the
side flush with the housing.
Pull up on this side of cap to open
Insert the card with the
label facing the keypad
side of the recorder.
Formatting the SD Card
SD cards come pre-formatted with a FAT32 file system which is optimized for
good performance. The PDR relies on this performance and will never disturb
the underlying low level formatting of the SD card. When the PDR “formats” a
card, it performs a function similar to the WIndows “Quick Format” which deletes all files and prepares the card for recording. The card can be read by any
standard computer but if any write, edit or deletions are made to the card by
the computer, the card must be re-formatted with the PDR to prepare it again
for recording. The PDR never low level formats a card and we strongly advise
against doing so with the computer.
To format the card with the PDR, select Format Card in the menu and press
MENU/SEL on the keypad.
See pages 8-10 for details on navigating the menus.
NOTE: An error message will appear if samples are lost due to a poor
performing “slow” card.
Page 6

LECTROSONICS, INC.6
Operating Instructions
Quick Start Steps
1) Install good battery and turn the power on
(see pp. 4, 6-below).
2) Insert microSD memory card and format it with the PDR (see p. 5)
3) Sync (jam) the timecode source (see pp. 8, 9).
4) Connect microphone or audio source.
5) Set input gain (see Mic Level p. 9).
6) Select record mode (see p. 10).
7) Set output level (see p. 8).
8) Begin recording (see pp. 8-10).
Powering On
Press and hold the Power Button until the Lectrosonics logo appears on the
LCD.
Powering Off
Power can be turned off by holding the Power Button in and waiting for
the countdown. The power off will not work while the unit is recording (stop
recording first before powering down) or if the front panel has been locked out
by the operator (unlock the front panel first).
If the power button is released before the countdown reaches 3, the unit will
remain turned on and the LCD will return to the same screen or menu that
was displayed previously.
Main Window
The Main Window provides a view of the battery status, current timecode and
the input audio level. Icons in the four corners of the screen provide access to
the Menu, Card Info (available recording time if SD card installed, PDR info if
no card in unit), and the REC (record start) and LAST (play last clip) functions. These functions are invoked by pressing the adjacent keypad button as
shown on page 2.
Battery status
Record Start
-40 -20 +0
REC
i
LAST
T
C
00 : 01 : 33
Play Last Clip
Card Info
Clock
Time
Menu
Audio Input Level
Press the keypad
button next to each
icon to operate the
functions indicated
by the icons
Page 7

www.lectrosonics.com 7
Recording Window
To start recording, press the REC button in the top right corner of the Main
Window. The screen will switch to the Recording Window.
-40 -20 +0
T
C
00 : 01 : 33
i
REC
HOLD
HOLD
Recording
info
Menu
Record icon
blinks
Press and Hold BACK
and DOWN arrow to
stop recording
Press the keypad
button next to each
icon to operate the
functions indicated
by the icons
Playback Window
Icons in the Playback Window provide the common button functions used
for playback on a recording device. The icons will change depending on the
status of the playback: active playback, paused in the middle, or paused at
the end.
Press the keypad
button next to each
icon to operate the
functions indicated
by the icons
-40 -20 +0
T
C
00 : 01 : 33
REW
FF
Blinking icon changes
from Play to Pause
STOP
Play/Pause
T
C
00 : 00 : 25
HOLD
0021A000 .WAV
[s-gain]
Len
11/14 17:08
00:00:36
All files created are given a time stamp.
Page 8

LECTROSONICS, INC.8
Navigating Menus
The LCD and keypad interface makes it easy to browse the menus and make
the necessary selections. The setup screens allow the selection of a value or
mode as depicted below.
Press MENU/SEL on the keypad to enter the menu structure. Use the UP
and DOWN
arrow buttons to select the menu item. Press MENU/SEL to
enter the setup screen.
TC Jam
SEL
BACK
Output
Mic Level
Lock/Unlock
Files/Play
Format Card
Record Mode
SEL
BACK
SEL
BACK
SEL
BACK
SEL
BACK
SEL
BACK
SEL
BACK
TC Jam
Plug in time code
source and sync
Output
If using
HEADPHONE,
press SEL to
select desired
adjustment step
Use arrow keys
to select desired
output
Mic Level
Use arrow keys to select
mic level
Locked?
Use arrow keys to select
lock or unlock
Use arrow keys to select
and play file
(No Files)
list
Files/Play
Use arrow keys to select
No or Yes
Format Card?
Use arrow keys to select
record mode
JAM NOW
LINE
HEADPHONE
28
-40 -20 +0
Yes
No
No
Yes
(files lost)
HD Mono
Split Gain
Record Mode
Use arrow keys to select
file naming
Use arrow keys to select
backlight on time
Backlight
Use arrow keys to return
to default settings
No
Yes
Restore
defaults?
File Naming
Backlight
Bat Type
SEL
BACK
SEL
BACK
SEL
BACK
Date & Time
Remote
Default
SEL
BACK
SEL
BACK
SEL
BACK
File Naming
Sequence
Clock Time
Always on
30 Seconds
5 Minutes
Use arrow keys to select
battery type
BatType
Alkaline
Lithium
1.46 Volts
Use arrow keys to set
date and time
Date & Time
2016/01/01
02:09
Use arrow keys to
enable remote
Remote
enabled?
Yes
No
Press SEL to
select desired
item
Bit Depth
SEL
BACK
24
32
Bit Depth
Use arrow keys to select
bit depth
Page 9

www.lectrosonics.com 9
TC Jam (jam timecode)
When TC Jam is selected, JAM NOW will flash on the LCD and the unit is
ready to be synced with the timecode source. Connect the timecode source
and the sync will take place automatically. When the sync is successful, a
message will be displayed to confirm the operation.
WARNING: Timecode uses the main audio path. Take your
headphones off when jamming timecode. DO NOT leave timecode
cable in place during recording.
Timecode defaults to zero at power up if no timecode source is used to jam
the unit. Timecode data is logged into the BWF metadata.
Output
The output can be configured as a line level output or as a headphone output.
Press MENU/SEL to highlight the selected output type and use the UP and
DOWN arrows to change the setting. Press BACK or MENU/SEL to save the
setting.
Output
Output
Output
Press MENU/SEL to
deselect HEADPHONE
(no highlight) then use the
UP and DOWN arrows to
adjust the loudness
Mic Level
There are two recording modes available in the menu, HD Mono, which
records a single audio track and Split Gain, which records two different tracks,
one at the normal level and another at -18 dB as a “safety” track that can be
used in place of the normal track in the event that overload distortion (clipping) has occurred on the normal track. In either mode, long recordings are
broken into sequential segments so most recordings will not be a single file.
-40 -20 +0
35
C or L appears here
Audio level
Gain in dB
Use the UP and DOWN arrow buttons to adjust the
input gain so loud peaks just touch full level. In the
Split Gain mode, there is no limiter in the normal
level signal path, so a C symbol will appear next to
0 on the level meter to indicate clipping. (The
limiter is engaged on the split gain safety track.) In
HD Mode, the limiter circuit in the input provides 30
dB of clean limiting, so an
L
symbol will appear at
the onset of limiting.
Page 10

LECTROSONICS, INC.10
Lock/Unlock
The LOCKED mode protects the recorder from accidental changes to its settings. When locked, pressing either arrow button or the power button will result
in a “LOCKED can use menu to unlock” message on the LCD screen. The
unit can be unlocked using the Lock/Unlock setup screen. Locked mode only
affects the keypad. The “dweedle tone” remote control will still work.
Files/Play
Use the UP and DOWN arrow buttons to navigate and MENU/SEL to open
the playback window. Date, time, recording mode, length and timecode will
be displayed. The icon in the lower right corner of the display is the prompt to
press the DOWN arrow button on the keypad to begin playback.
Format Card
This item erases the recorded files on the card and prepares the card for
recording.
Record Mode
Selects HD Mono or Split Gain Mode. (See Mic Level.)
Bit Depth
PDR defaults to 24-bit format recording, which is a more effecient space saving format as well as making the recording more conducive to other types of
SD cards. 32-bit is available if your software is older and won’t accept 24-bit.
(32-bit is actually 24-bit padded with zeros, so more space is taken up on the
card.)
File Naming
Filenames of the recordings can be set as a progressive sequence of numbers or as the time of the internal clock at the beginning of the recording.
Backlight
The recorder backlight can be set to turn off after either 5 minutes or 30 seconds, or stay on continuously.
Bat Type
Choose either Alkaline or Lithium battery type. The voltage of the installed
battery will be shown at the bottom of the display.
Date & Time
Set the date and time by using the MENU/SEL button to toggle through the
options and the UP and DOWN arrow buttons to choose the appropriate number. Date and time are preserved during battery changes and independent of
the timecode. Date and time are preserved in the file attributes, timecode is
written inside the file. The Main Window will indicate the time elapsed since
the last power up or the timecode if it has been “jammed.” If, however, the unit
has been left without power for more than 90 minutes, the time and date will
need to be reset.
Page 11

www.lectrosonics.com 11
Remote
The recorder can be configured to respond to “dweedle tone” signals from the
Lectro RM remote control or to ignore them. Use the arrow buttons to toggle
between “yes” (remote control on) and “no” (remote control off). The default
setting is “no.”
Default
To return the recorder to its factory default settings, use the UP and DOWN
arrow buttons to choose Yes .
Available Recording Time
Using a microSDHC memory card, the available recording times are as follows. The actual time may vary slightly from the values listed in the tables.
HD mono mode
Size Hrs:Min
8GB 11:12
16GB 23:00
32GB 46:07
Split gain mode
Size Hrs:Min
8GB 5:36
16GB 11:30
32GB 23:03
This device complies with part 15 of the FCC Rules. Operation is
subject to the following two conditions: (1) This device may not cause
harmful interference, and (2) this device must accept any interference
received, including interference that may cause undesired operation.
NOTE: This equipment has been tested and found to comply with
the limits for a Class B digital device, pursuant to part 15 of the FCC
Rules. These limits are designed to provide reasonable protection
against harmful interference in a residential installation. This equipment
generates, uses and can radiate radio frequency energy and, if not
installed and used in accordance with the instructions, may cause
harmful interference to radio communications. However, there is no
guarantee that interference will not occur in a particular installation. If
this equipment does cause harmful interference to radio or television
reception, which can be determined by turning the equipment off and
on, the user is encouraged to try to correct the interference by one or
more of the following measures:
—Reorient or relocate the receiving antenna.
—Increase the separation between the equipment
and receiver.
—Connect the equipment into an outlet on a circuit different
from that to which the receiver is connected.
—Consult the dealer or an experienced radio/TV technician
for help.
Page 12

LIMITED ONE YEAR WARRANTY
The equipment is warranted for one year from date of purchase against defects in
materials or workmanship provided it was purchased from an authorized dealer. This
warranty does not cover equipment which has been abused or damaged by careless
handling or shipping. This warranty does not apply to used or demonstrator equipment.
Should any defect develop, Lectrosonics, Inc. will, at our option, repair or replace any
defective parts without charge for either parts or labor. If Lectrosonics, Inc. cannot
correct the defect in your equipment, it will be replaced at no charge with a similar new
item. Lectrosonics, Inc. will pay for the cost of returning your equipment to you.
This warranty applies only to items returned to Lectrosonics, Inc. or an authorized
dealer, shipping costs prepaid, within one year from the date of purchase.
This Limited Warranty is governed by the laws of the State of New Mexico. It states the
entire liablility of Lectrosonics Inc. and the entire remedy of the purchaser for any
breach of warranty as outlined above. NEITHER LECTROSONICS, INC. NOR
ANYONE INVOLVED IN THE PRODUCTION OR DELIVERY OF THE EQUIPMENT
SHALL BE LIABLE FOR ANY INDIRECT, SPECIAL, PUNITIVE, CONSEQUENTIAL,
OR INCIDENTAL DAMAGES ARISING OUT OF THE USE OR INABILITY TO USE
THIS EQUIPMENT EVEN IF LECTROSONICS, INC. HAS BEEN ADVISED OF THE
POSSIBILITY OF SUCH DAMAGES. IN NO EVENT SHALL THE LIABILITY OF
LECTROSONICS, INC. EXCEED THE PURCHASE PRICE OF ANY DEFECTIVE
EQUIPMENT.
This warranty gives you specific legal rights. You may have additional legal rights which
vary from state to state.
 Loading...