

Page 1

Read the manual before mounting.
Important! Producer suggests the mounting to be performed in an authorized service
point.
Set includes:
• control unit
• remote controls
• G-sensor
• alarm siren
• LED lamp
• cables
Specication:
A. Control unit:
• Operating voltage: DC 12 V +/- 3 V
• Quiescent current: < 20 mA
• Siren volume level: 105-125 dB
• Operating frequency: 315/433,92 MHz (+/- 0,5 MHz)
• Operating temperature: -40°C ~ +85°C
B. Remote control
• Operating voltage: DC 6-12 V
• Quiescent current: <2 μA
• Transmission current: 5-10 mA
• Operating frequency: 315/433,92 MHz (+/-0,3 MHz)
FUNCTIONS:
1. Alarm status: acousto-optical
Press the
signal, the doors will be locked and the windows will be closed. After 5 or 30 seconds (depending
on settings) the alarm will be active, LED indicator will blink slowly, and after 25 seconds the
engine will be locked. When the alarm gets activated in case of opening the door, pressing the
brake, switching on the ignition etc. the siren will be on, the lights will start to ash and the
engine will be locked. If the alarm gets activated with a G-sensor, the siren and the lights will
be on and the engine will be locked for 30 seconds. After that time, the alarm will automatically
enter standby mode.
2. Alarm status: mute
Press the
be closed. After 5 or 30 seconds (depending on settings) the alarm will be active, LED indicator
will blink slowly, and after 25 seconds the engine will be locked. If the alarm gets activated with
a G-sensor, the alarm siren will not be on, and the lights will ash for 30 seconds. After that
time, the alarm will automatically enter standby mode. When the alarm gets activated in case
of opening the door, pressing the brake, switching on the ignition etc. the siren will be on, the
lights will start to ash and the engine will be locked.
button, the lights will ash once or twice, the device will issue a short sound
button, the lights will ash once, the doors will be locked and the windows will
Page 2

3. Alarm status: o
10. Not fully closed door warning
Press the
short sound signals (if the alarm is muted, the siren will not be activated). Alarm will be o.
4. Car localization via remote control
Press the
re-enter standby mode. Function helps to localize the car in dark or on a spacious parking lot.
5. SOS function via remote control
Press and hold the
sound signal and the lights will be on for 30 seconds. The alarm can be stopped at any moment
with any remote button.
6. Trunk release via remote control
Press and hold the
button, the doors will be open the lights will ash twice, the device will issue two
button, the siren and the lights will be on for 15 seconds. After that the alarm will
button for 2 seconds during driving. The device will be issuing constant
button for 2 seconds, the alarm will be o and trunk will be opened.
If the alarm is switched on and the doors are not fully closed, after 10 seconds the warning
signal will be on and the lights will blink 3 times. User should turn o the alarm, then close the
doors properly (otherwise, the alarm will go on).
11. Automatic locking/unlocking the doors
15 seconds after turning on the ignition and pressing on the brake, the doors will automatically
locked. After turning o the ignition and removing the keys from the ignition switch, the doors
will be automatically unlocked. During driving, press the
12. Active memory indicator
If the alarm is activated when the car is on anti-theft alarming status and when the door is
button to lock or to unlock.
7. Emergency alarm and anti-theft
Emergency alarm: if during driving, the driver encounters a situation which requires attracting
attention of others on the road e.g. fainting, theft attempt etc. press and hold the
for 2 seconds; when the lights will start to blink fast, press the
for 30 seconds, followed by 8 second pause and on again. The lights will blink and the engine
will be locked. Press the
8. Alarm reminder
When the car is stopped, the keys are retrieved from the ignition switch and the doors are
closed, after 10 seconds the alarm siren will issue a sound (3 short signals), and then the lights
will start to blink in order to remind to turn on the alarm. If the user won’t perform any action
within 1 minute, the alarm will be on in mute mode, but the doors will not be locked.
button to turn o the emergency alarm.
button, the siren will be on
button
opened after the anti-theft alarming is removed, a short signal will be heard and the LED will
blink to remind the driver to check the vehicle. After switching the ignition switch to ACC,
warning blinking LED will be o and the alarm memory will be cleared.
13. Power cut
If the alarm is cut from the power supply, after 5 seconds from re-connecting it to power supply
it will be back to its previous mode.
14. Emergency turning o the alarm
In case of losing or damaging remote control, and the alarming status needs to be removed, the
driver can open the door with the key. Then the speaker will sound, the turning lights will ash
and the engine will be locked. The driver has to turn key into ACC ON, press emergent-removing
9. Automatic system activation
If after 30 seconds after turning o the alarm system, doors will not be opened, the system will
consider this as a mistake and will be turned on again.
button for three times to removing alarming with foot on the brake, then the alarming can be
removed. (The driver shall ask installer the place of installing emergent-removing button).
15. Remote controls programming
If the remote control gets damaged or lost, user can purchase a new remote and program
Page 3

it as instructed: use a thin object to press the programming button on the alarm casing for
G-sensor sensitivity level settings
1 second. Press any button on the rst remote (one sound signal will be heard), then press
any button on the next remote (one sound signal will be heard), which means proper remote
programming. The remote are ready to use.
During learning, if within 8 seconds no eective remote control signal has been received after
one remote controller has nished learning, the system will quit from learning status. If further
learning is needed, please repeat the process above.
JUMPER SETTINGS
CN2 - prompt sound (no prompt sound)
CN4 - launching (no launching)
CN3 - pneumatic locking (electronic locking)
CN10 - automatic switch after 30 seconds to anti-theft mode (automatic switch after 5 seconds
to anti-theft mode)
There is a LED indicator on the casing which informs about sensor activity. To adjust sensor
sensitivity settings, use a little screwdriver to rotate knob (rotate to right to increase, rotate to
left to decrease). During settings do not tap the sensor, as it may damage the device. In order
for the sensor to work properly, it needs to be rmly xed as close to the vehicle’s body as
possible.
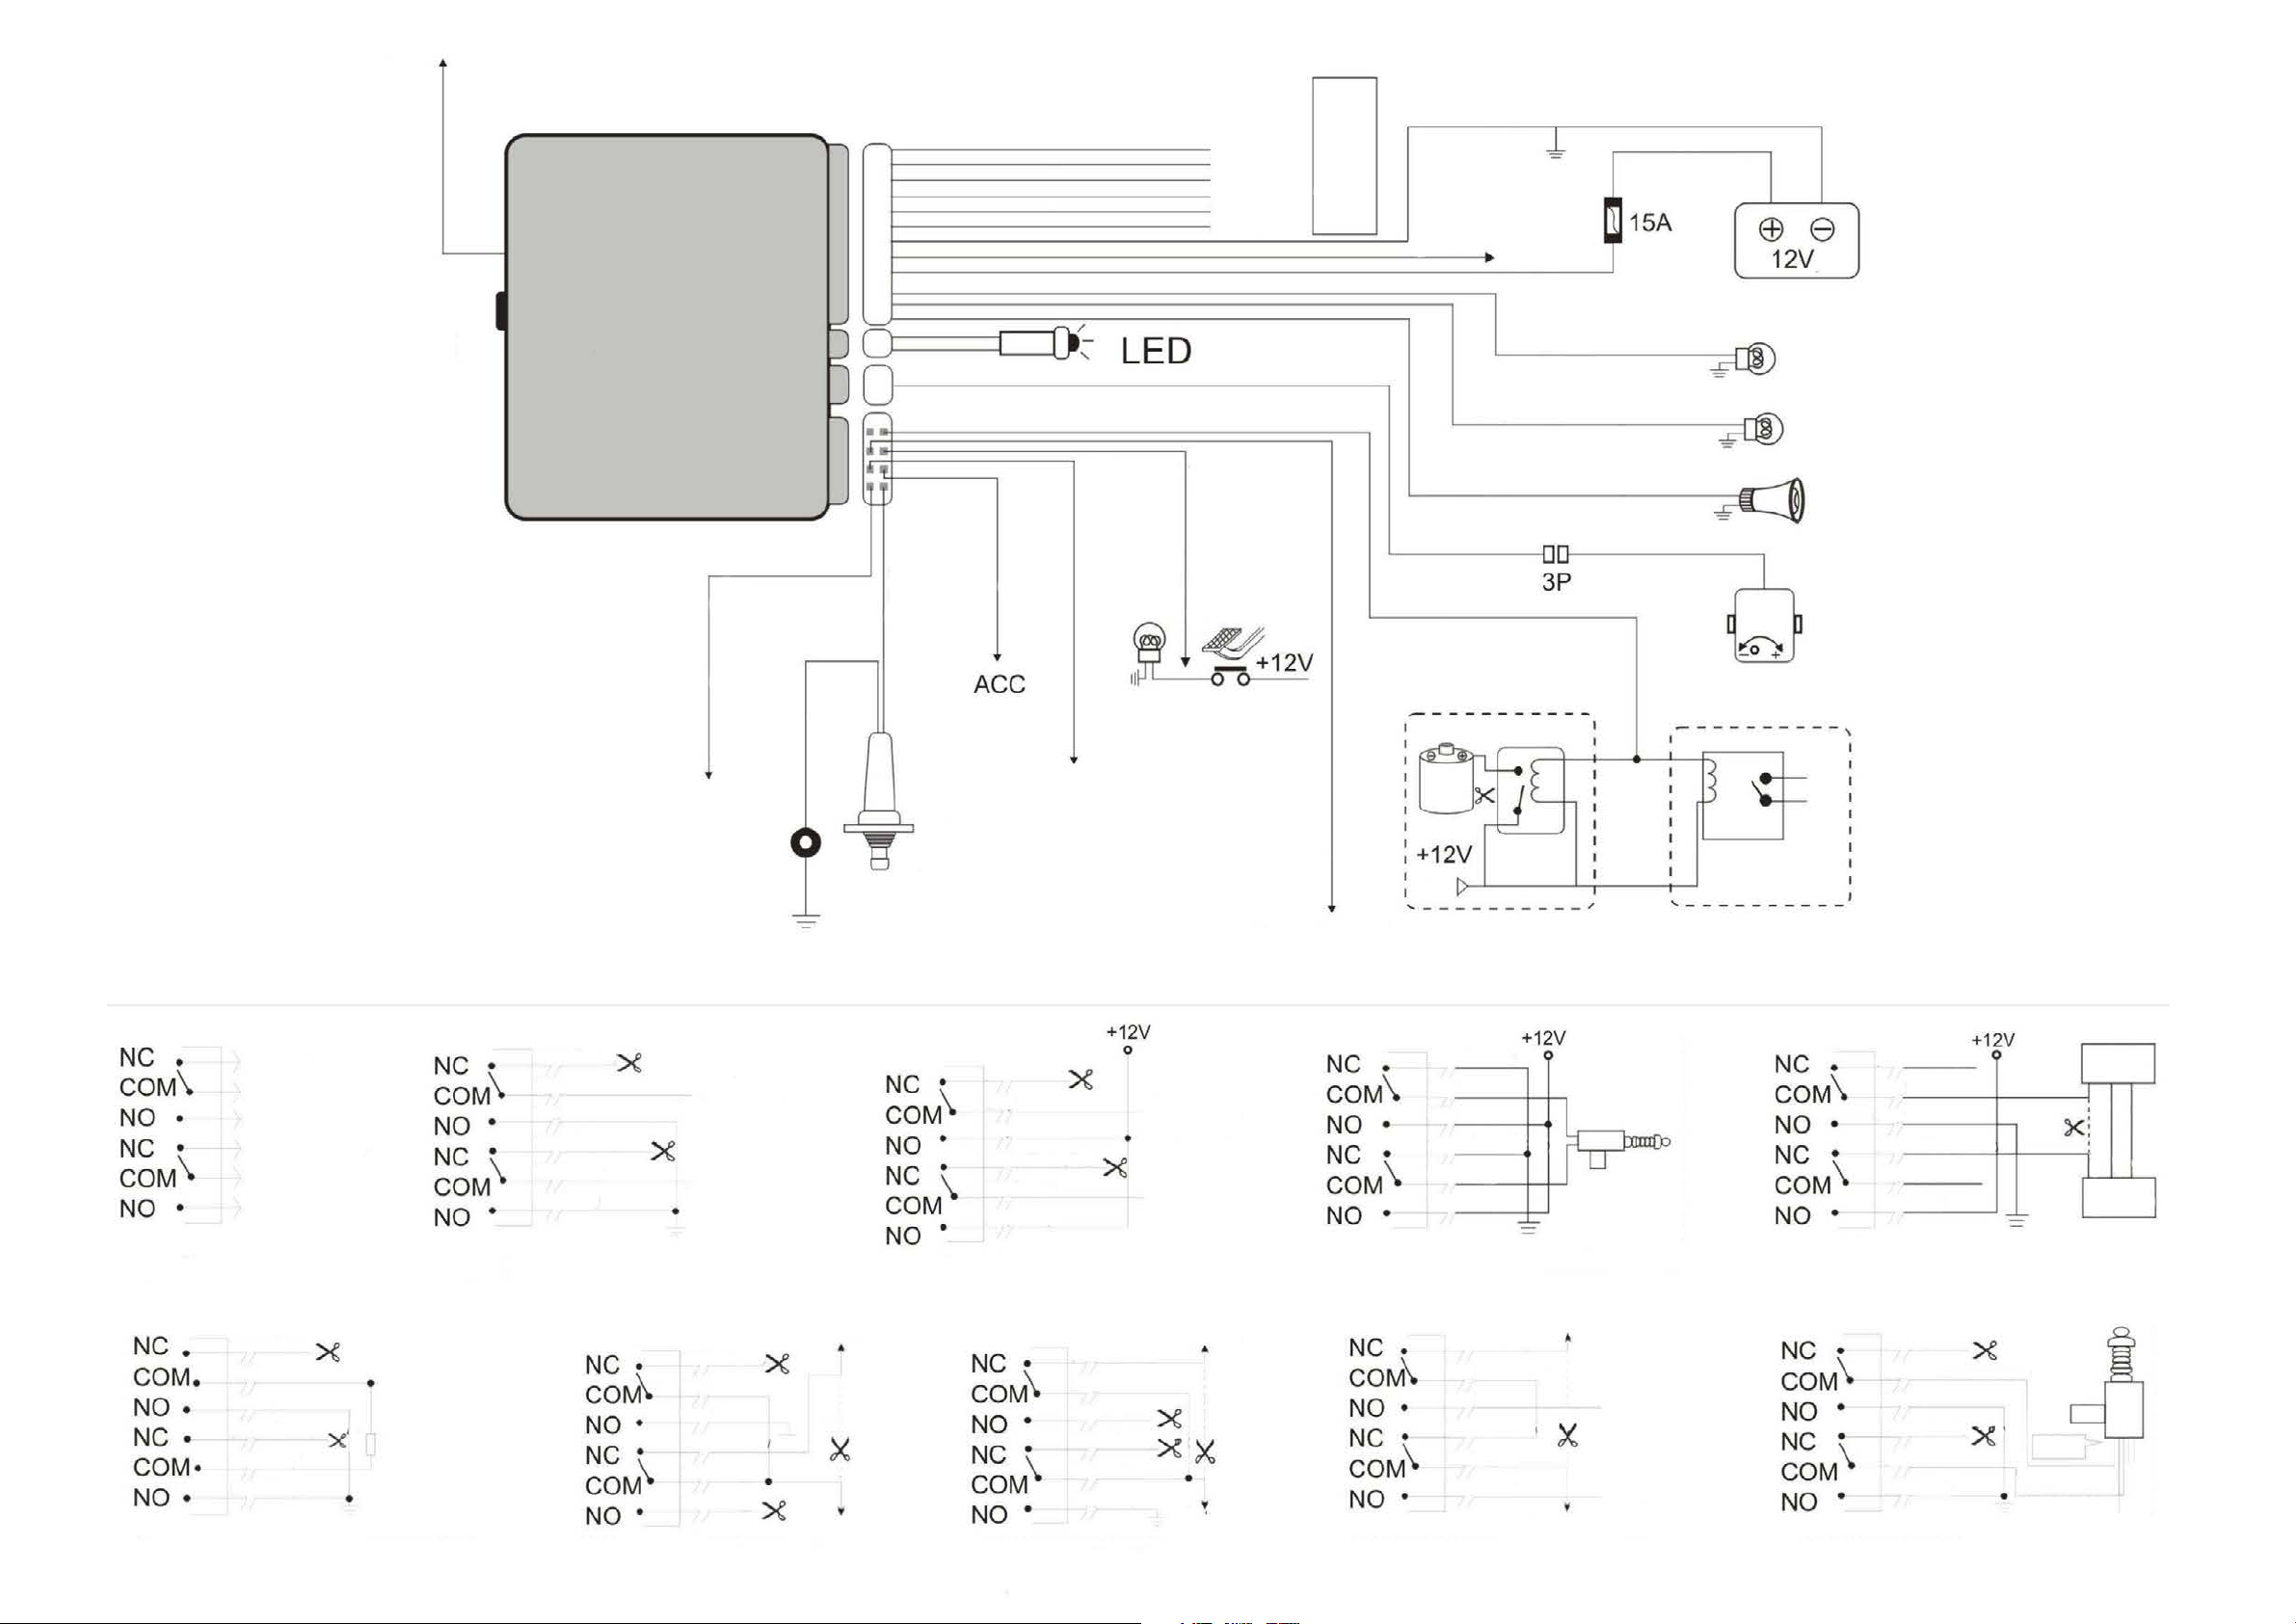
CENTRAL LOCK SYSTEM INSTALLATION
There are numerous dierent central lock systems as well as many connection methods. In
most cases, use of the diagrams below.
1. The car door has no driven lock - It is advised that a central locking shall be installed for
coordination with burglar alarm. Please refer to installation drawings: negative activation.
2. A central locking has already equipped on the car, but there is only one switch on the
door closed to driving set is used to activate the locks on the other three doors. An engine
Remark: please open the control box to adjust the settings.
CONTROL UNIT INSTALLATION
The alarm requires 12 V DC power supply and grounding (-).
Prior to installation read the instruction manual carefully. Study the cables connection diagram
carefully. Contact an authorized service point in case of doubts or questions.
The control unit should be installed in a concealed and hard-to-reach place, i.e. under the
dashboard. Once the mounting spot is set, locate the cables necessary for alarm connecting, i.e.
ACC, turn lights, stop lights. Pay attention to perform electrical connection in a proper manner.
The cables should be connected to appropriate sockets in below order: 2P to white, 7P to white,
3P to black, 12P according to diagram. After connecting the cables, user should perform an
alarm check-up test. If the system works properly, you can hide the control unit.
shall be added at the driving seat to drive pull bar and locks for bolt. (Refer to installation
drawings: positive and negative activation).
G-SENSOR INSTALLATION
G-sensor needs to be rmly mounted on the vehicle’s body. Then, check its sensitivity, whether
it is on the proper level and use a knob to tune if necessary (note: the sensitivity level is factory
set. Do not change the settings if not necessary).
Page 4
antenna
Central
lock
switch
learning
CONTROL UNIT
red/black
black
gray
orange
white
yellow
orange/black
white/black
yellow/black
black
green
red
trunk
release
brown
brown
white
blue
orange
pink
turn lights
alarm siren
stop
lights
yellow
G-sensor
positive activation
from foot brake
orange
white
yellow
orange/black
white/black
yellow/black
g. 1 Internal theory
orange
white
yellow
orange/black
white/black
yellow/black
negative activation with dual potentials
(Polo, Bora, Passat)
g. 2. negative activation
to yellow and blue
centralized control
line equipped on the car
resistance 600-1200
positive activation
for side doors
orange
white
yellow
orange/black
white/black
yellow/black
negative activation with single-lined
serial connection (Santana 2000)
close signal
open signal
orange
white
yellow
orange/black
white/black
yellow/black
emergency status
removing button
g. 3 positive activation g. 4 positive/negative activation g. 5 pneumatic lock (Audi, Benz)
to engine
pink
to control box originally
equipped in the car
negative activation
for side doors
negative activation output
of electronic window
orange
white
yellow
orange/black
white/black
yellow/black
orange
white
yellow
orange/black
white/black
yellow/black
negative activation with single-lined
serial connection (FreecaAT Jetta Cix)
close signal
open signal
to left door
front engine
Jetta Cix thin red cable
to control box originally
equipped in the car
purple
engine power
failure loop
orange
white
yellow
orange/black
white/black
yellow/black
to engine
orange
white
yellow
orange/black
white/black
yellow/black
Serial switch connection (Lingshuai, Century Star) (-) trigger (China)
black
brown closing cable
(Lingshuai car)
brown opening cable
to control box originally
equipped in the car
oil pump
control loop
orange
white
yellow
orange/black
white/black
yellow/black
orange
white
yellow
orange/black
white/black
yellow/black
close signal
air lock base unit
inside the car
green/blue
red/blue
brown
signal
+
-
door lock switch
blue
green
white
black
brown
brown engine cable
white engine cable
to control box originally
equipped in the car
Page 5
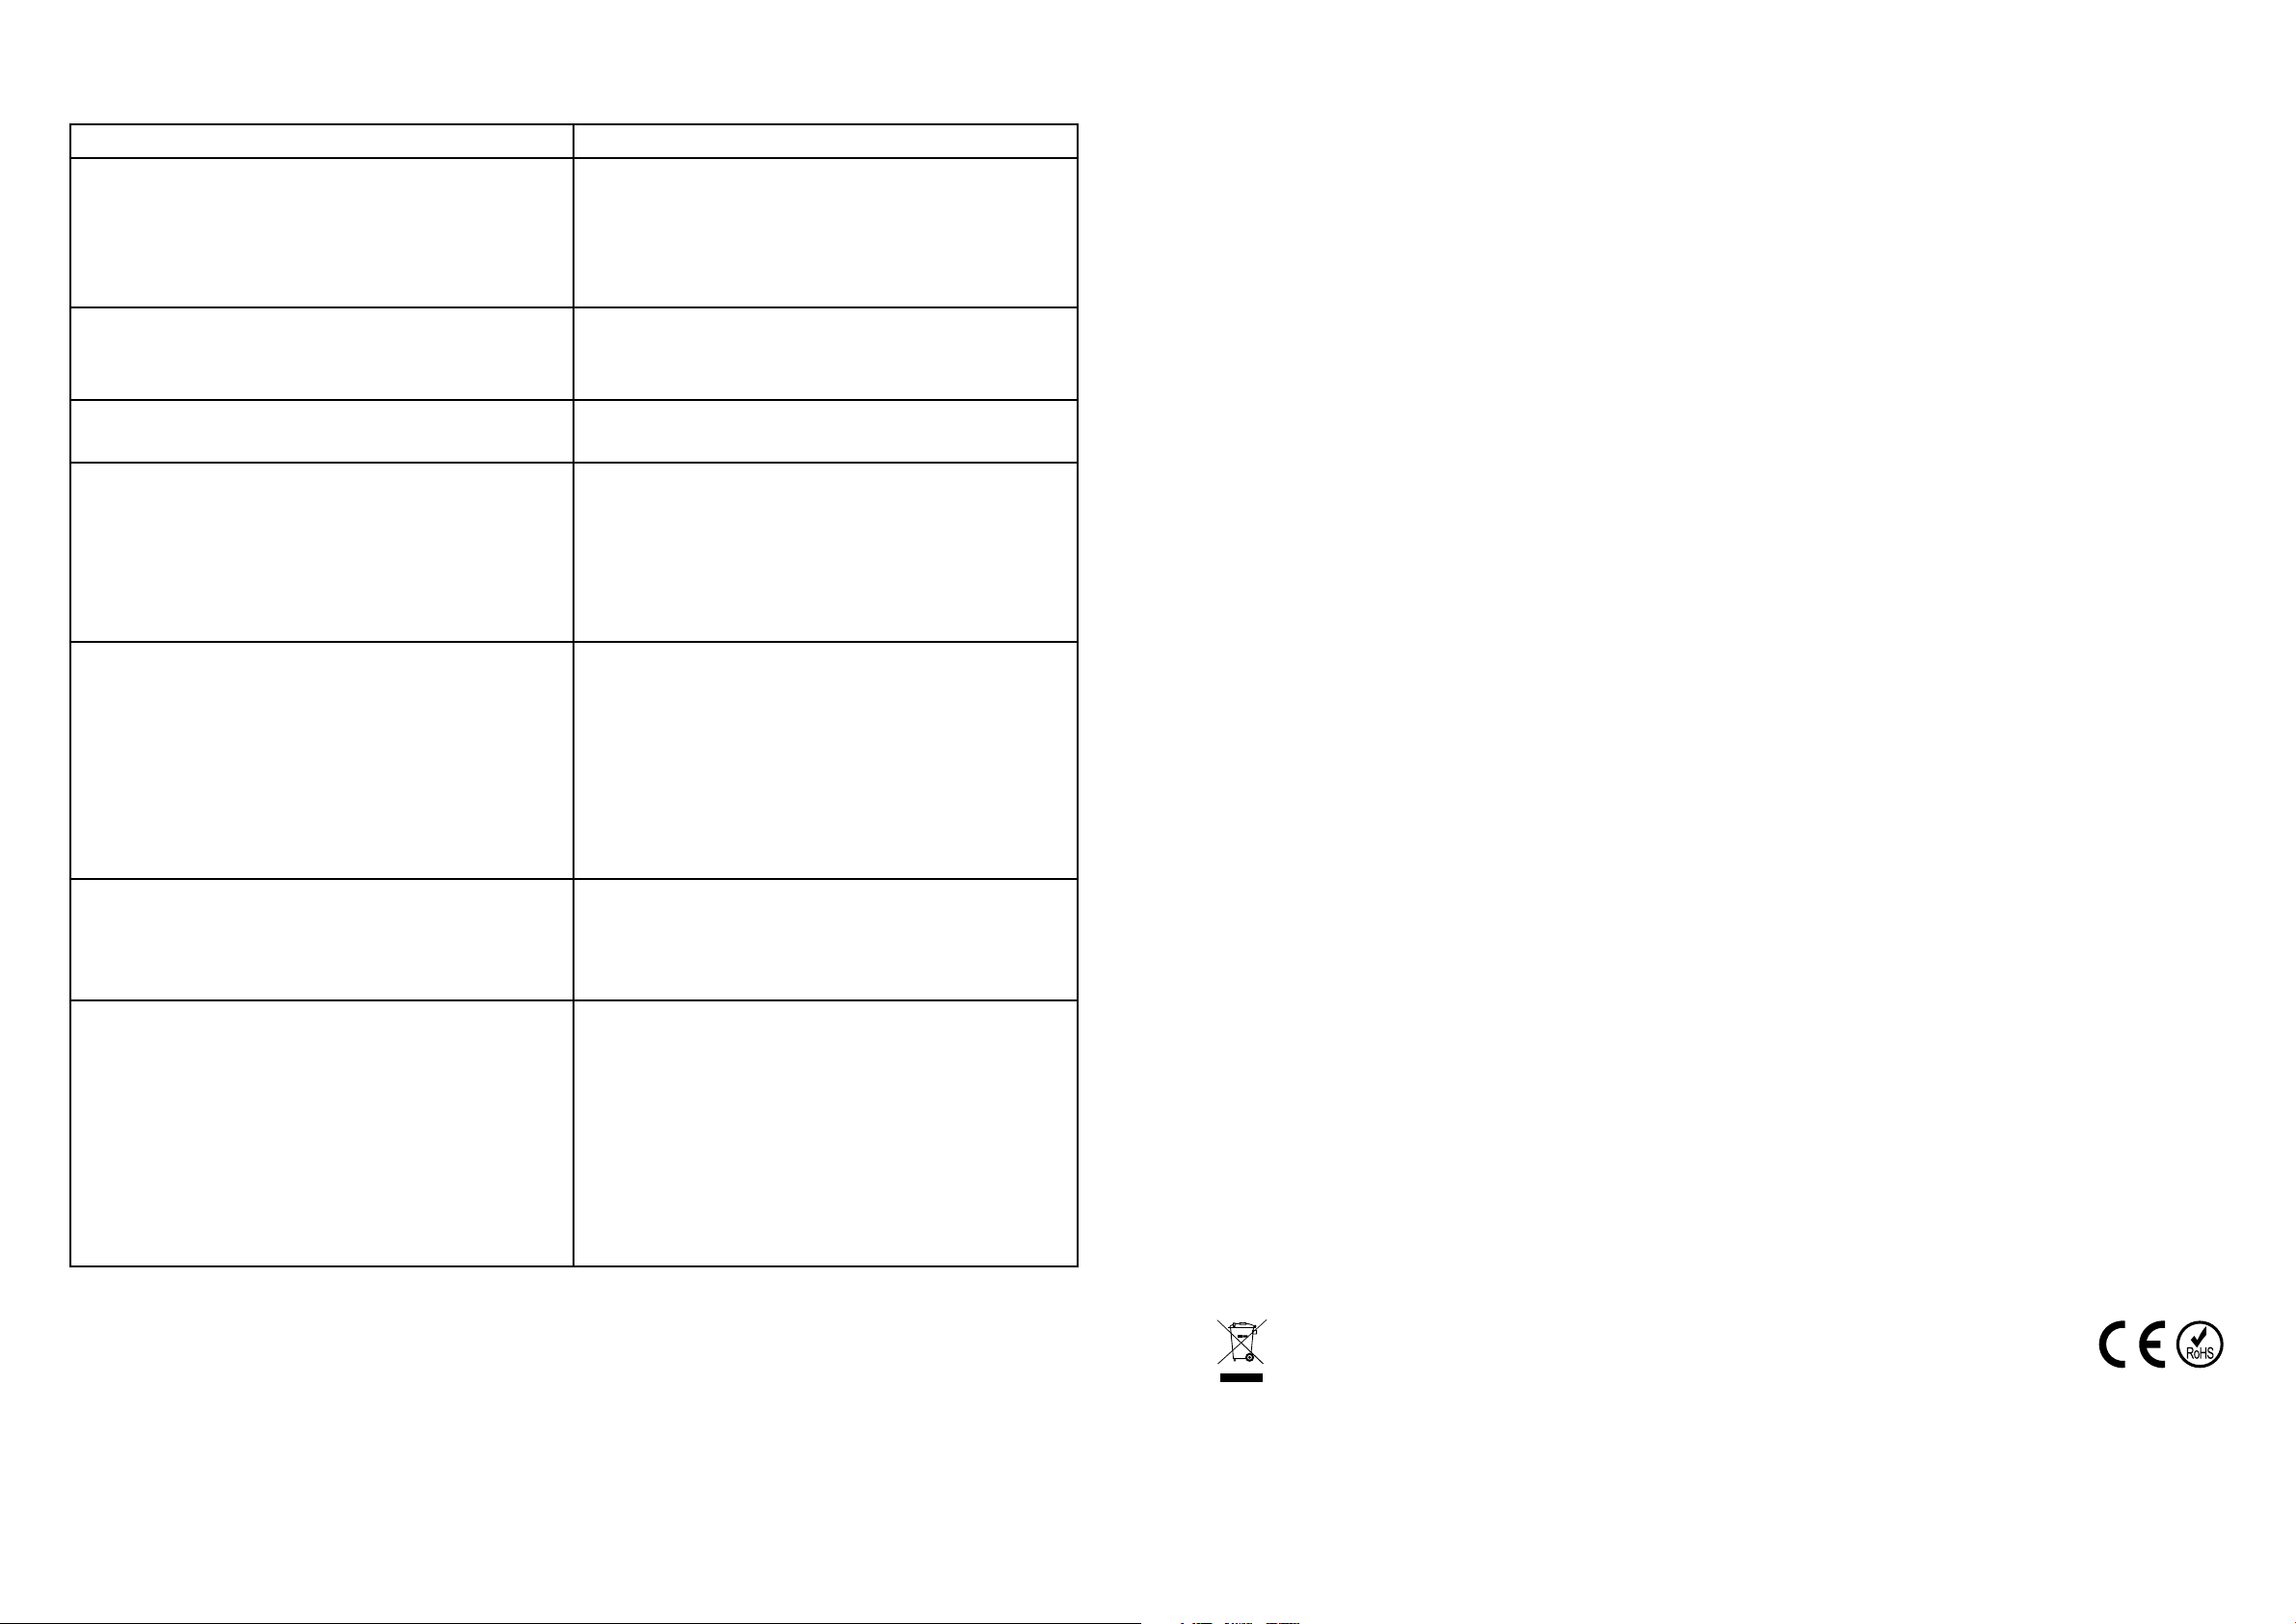
TROUBLESHOOTING
Problem Suggested solution
After installing control unit, the alarm siren
issues a sound and it cannot be turned o
with the remote
When vehicle is parked in with anti-theft mode
on, the alarm goes on whenever a big vehicle
drives nearby
The siren does not sound when the alarm is
active
The alarm does not respond after pressing
the button, the LED lamp does not turn on
After setting the anti-theft mode, the alarm
siren sounds for 10 seconds. After turning the
alarm o and on, the process is repeated.
• Check all connections
• Check whether the fuse works properly
and it matches remote control code
• Check whether the jumpers are in proper
positions
Check if the G-sensor sensitivity setting is
not too high. Observe what happens after
changing its settings.
Check if the speaker is not damaged and if it is
properly connected to control unit
• Check if the battery is not damaged
• Check whether the battery is not discharged
(make sure to replace battery once a year)
• Check whether the battery is not rusted
• Make sure the remote control has not
been soaked or damaged
• Make sure the G-sensor works properly
• Check G-sensor’s indicator
• Check the connections (especially the stop
lights)
• Check all connections in the doors
• Check whether the door are fully closed
• Check whether closed door sensor cable is
connected properly
The remote controlled central lock does not
work
Alarm does not respond after pressing the
button, LED lamp is on
• Check whether actuator works properly
• Check cables and fuses. Burned fuses
suggest installation fault. Check cables and
central lock installation.
• Check if the battery is not damaged
• Check whether alarm frequency has not
been changed
• Make sure the remote control has not
been soaked or damaged
• Check whether the alarm will work with a
dierent remote. If not, check the control
unit, cables and power supply. Do not
disassemble the remote control nor alarm
English
Correct Disposal of This Product
(Waste Electrical & Electronic Equipment)
(Applicable in the European Union and other European countries with separate collection systems) This marking shown on the product or its
literature, indicates that it should not be disposed with other household wastes at the end of its working life. To prevent possible harm to the
environment or human health from uncontrolled waste disposal, please separate this from other types of wastes and recycle it responsibly to
promote the sustainable reuse of material resources. Household users should contact either the retailer where they purchased this product,
or their local government oce, for details of where and how they can take this item for environmentally safe recycling. Business users should
contact their supplier and check the terms and conditions of the purchase contract. This product should not be mixed with other commercial
wastes for disposal.
Made in China for LECHPOL ELECTRONICS Sp. z o.o. Sp.k., ul. Garwolińska 1, 08-400 Miętne.
 Loading...