

Page 1

Page 2

LC Easyjet-16W/18S User Manual V13GZ.1
2
Important Notice
Copyright © Zhengzhou LECAI Science And Technology Co., Ltd.
LECAI and LOCOR is trademark of Zhengzhou LECAI Science And Technology Co., Ltd.
No Part of this manual may be copied or distributed, transmitted, transcribed, stored in a retrieval system,
or translated in any human computing language, in any form or by any means, electronic, mechanical,
magnetic or otherwise, or disclose to a third party without the express written permission of Zhengzhou
LECAI Science And Technology Co., Ltd.
If any uncertainties or misprints are found in this publication, please inform LECAI by any means.
LACAI Shall not be liable for any damages or troubles resulting from improper use of this equipment or
this manual.
The Product and the contents of this publication may be changed without prior notification.
Page 3

LC Easyjet-16W/18S User Manual V13GZ.1
3
Content
Important Notice .................................................................................................................................................................. 2
1. Foreword ...................................................................................................................................................................... 5
1.1 Power Safety ................................................................................................................................................ 5
1.2 Operation Notes ........................................................................................................................................... 6
1.3 Installation location and Using Environment Note ...................................................................................... 6
1.4 Disposal of Cartridge and Cautions ............................................................................................................ 6
2 Installation ................................................................................................................................................................... 7
2.1 Overview ...................................................................................................................................................... 7
2.2 Installation ................................................................................................................................................... 9
2.2.1 Unpack the Package............................................................................................................................. 9
2.2.2 Assemble the Stand ............................................................................................................................. 12
2.2.3 Assemble the Printer .......................................................................................................................... 12
2.2.4 Load the Cartridge ............................................................................................................................. 13
2.2.5 Install the Carriage ............................................................................................................................ 14
2.2.5.1 Structure of Carriage ................................................................................................................. 14
2.2.5.2 Load the Print Head .................................................................................................................. 15
2.2.5.3 Fix the Damper .......................................................................................................................... 16
2.2.6 Maintenance Station........................................................................................................................... 18
2.2.7 Media Loading ................................................................................................................................... 19
2.2.8 Fill Ink ( 3.1.7.2.1) ...................................................................................................................... 19
3 Operation Panel ......................................................................................................................................................... 19
3.1 Panel Menu Set up ..................................................................................................................................... 20
3.1.1 Main Menu Overview ......................................................................................................................... 20
3.1.2 Start POS Menu ................................................................................................................................. 20
3.1.3 Media Menu ....................................................................................................................................... 21
3.1.4 Print Menu ......................................................................................................................................... 22
3.1.5 Option Menu ...................................................................................................................................... 22
3.1.5.1 Dir Menu .................................................................................................................................... 23
3.1.5.2 Start POS Mune ( 3.1.2) ..................................................................................................... 24
3.1.5.3 Fant Mune .................................................................................................................................. 24
3.1.5.4 Fant Menu (Default) .................................................................................................................. 24
3.1.5.5 Spurt Menu ................................................................................................................................. 24
3.1.6 Clean Menu ........................................................................................................................................ 25
3.1.7 Function Menu ................................................................................................................................... 26
3.1.7.1 Print Menu ( 3.1.4) ............................................................................................................. 26
3.1.7.2 Clean Menu ................................................................................................................................ 26
3.1.7.3 About Menu ................................................................................................................................ 29
Page 4

LC Easyjet-16W/18S User Manual V13GZ.1
4
3.1.7.4 Reset Menu ................................................................................................................................. 30
4 Computer IP Address Setup ....................................................................................................................................... 30
5 Maintop Installation & Setup ..................................................................................................................................... 33
5.1 Maintop Software Installation .................................................................................................................... 33
5.2 Printer Set Up ............................................................................................................................................ 36
5.3 Maintop Application .................................................................................................................................. 42
5.4 Printer Calibration .................................................................................................................................... 53
6 Daily Maintenance ..................................................................................................................................................... 58
7 Trouble Shooting ........................................................................................................................................................ 59
Page 5

LC Easyjet-16W/18S User Manual V13GZ.1
5
1. Foreword
Thanks for purchasing this printer of Zhengzhou LECAI Science And Technology Co., Ltd. We write
this specification for your convenience of using this machine. Installed steps and system operation are
mentioned here. In order to maximize the effect of this specification, you may be under the directory to
search related topic. Please place this specification that is easy to get.
Operators must seriously- read and keep-well this specification for your reference. Inkjet printer is a
Mechanical and Electrical Equipment, combining the fine machine construction and complicated electronic
circuit. Print heads in the machines should be taken good care of, avoiding from collision or shaking, and
dust in the air. The CPU and EMS memory such sensitive electronic parts can not resist from the static, so
they should avoid osculating the dank air. Thus, the operation and basic maintenance are factors decided
whether the printer can work well and permanent use. If the maintenance and operation are not noticed, the
printer always appears so many malfunctions, like seeping inks, can’t spray inks or something else. In this
way, it wastes the valuable ink and print media, Therefore, we should intensify the safeguard and
maintenance of the printer, besides, we need to familiar with every kind diagnose and treatment of the
diseases, in case of the hurry-scurry situation at the moment of truth.
1.1 Power Safety
A. Power: One-way exchange of 50Hz 220V AC(±10%)/ 60Hz 110V AC(±10%).
B. Only use the power which can identify the printer's label. According to different countries and regions
may use 110V AC or 220V AC power.
C. Voltage instability regions please use UPS, that would be better for the printer.
D. All the devices connected to a properly grounded socket, in case, socket used on and off with those who
frequently switch between devices (such as photocopiers, air-conditioning systems) in the same loop.
E. Avoid using the wall switch or Automatic timer-controlled socket.
F. Apart your computer system from the potential sources of electromagnetic, such as speaker or landless
phones.
G. Do not use damaged or broken power cable.
H. If you use the attached power cable, make sure the power cable into the additional equipment the total
amperage should not exceed the rated amperage of the power addition, make sure all the equipment
Page 6

LC Easyjet-16W/18S User Manual V13GZ.1
6
into a wall should not exceed the total amperage rating of the wall socket.
I. Don’t try to repair the printer, if you encounter some problems, please seek for the maintenance
technicians.
J. For the safety of people and machines, please make sure take the earth lead and the maintenance
technicians would tell you the requirement.
1.2 Operation Notes
A. Always use the power switch to turn off the printer. Please don’t pluck the printer plug or other relevant
data lines before cutting off the power.
B. Please don’t put the machine tools or other items on the printing platform, so that the machine can’t
running for having not cleaned up immediately, and cause unnecessary losses.
1.3 Installation location and Using Environment Note
A. Please be placed the printer on level, stable and bigger surface. If the printer is tilted, the machine may
not work normally.
B. Set aside enough space around the printer to ensure the normal ventilation.
C. The printer should be placed near the wall for the convenience of the plug’s taking out and put in.
D. Avoid the place that temperature and humidity may be easy to change greatly. And prevent the printer
from the direct reflection of sun, strong light or hot fountain.
E. Operating temperature:18℃-35℃;
F. Humidity: 35%-65%
G. To enable the machine to run in the best state, please set air conditioning and hygrometer indoors.
H. Strong interference sources must be away from the machine.
1.4 Disposal of Cartridge and Cautions
Please don’t put the ink bottles in the places that the children can touch, in case they will drink or touch it.
If skins get the ink, please wash by soap and water. If ink spatters to eyes, please wash by water.
Do not shake the ink bottle, otherwise the ink will leak out.
After a period (usually 3 months), ink Cartridge should cleanout and be dried out promptly. Changing a new
ink Cartridge should notice the cleaning, that can ensure printing quality.
Page 7

LC Easyjet-16W/18S User Manual V13GZ.1
7
Ink should be stored cool store, avoid direct sunlight.
2 Installation
This section refers to the printer structure and assembly.
2.1 Overview
Front View
No.
Name
No.
Name
1
Upper Cover
17
Left Media Feeding Unit
2
Back Cover
18
Take up Unit Loading Bracket Holder
3
Front Cover
19
Take up Unit Loading Bracket
4
Front PC Cover
20
Horizontal Stand
5
Right Side Shell
21
Caster
6
Operation Panel
22
Right Media Take up Unit(with motor)
Page 8

LC Easyjet-16W/18S User Manual V13GZ.1
8
7
Right Decorating Part
23
Beam
8
Temperature Controller Bracket
24
Left Media Take up Unit
9
Right Front Cover
25
Left Stand
10
Metal Gasket
26
Feeding Unit Left Loading Bracket
11
Right Media Feeding Unit
27
Left Front Shell
12
Slide Bar
28
Left Decorating Part
13
Right Stand
29
Left Side Shell
14
Waste-ink Bottle Holder
30
Left Front Cover
15
Waste-ink Bottle
31
Left Back Cover
16
Feeding Unit Right Loading Bracket
Back View
Side View
Page 9

LC Easyjet-16W/18S User Manual V13GZ.1
9
Left Right
No.
Name
No.
Name
1
Power Interface & Switch
4
Temperature Controller
2
Heater Switch
5
Network Cable Interface
3
Bail Assembly
6
Ink Cartridge Assembly
2.2 Installation
2.2.1 Unpack the Package
1) Please check the package before opening, ensuring no damage, break, or any theft
spoiling.
Page 10

LC Easyjet-16W/18S User Manual V13GZ.1
10
2) Please check the contents according the packing list attached in the package, make
sure all the items are inside.
Page 11

LC Easyjet-16W/18S User Manual V13GZ.1
11
Notice:
After open the carton, quickly move the packaging materials (cartons, vinyl bags,
foam styrene, etc.) out of the reach of children or dispose of them appropriately.
3) Check the accessories and keep in a safe place to avoid damage or getting lost.
No.
Parts Name
Qty
No.
Parts Name
Qty 1 Maintop(with dongle)
1 set
11
Screw M4*10
8 pcs 2 Ink Damper
4 pcs
12
Screw M5*16
52 pcs 3 Maintenance Capper
1 pc
13
Screwdriver
1 pc 4 Ink Cartridge
4 sets
14
Hexagonal Wrench 5mm
1 pc 5 Plastic Injector(50ml)
2 pcs
15
Hexagonal Wrench 4mm
1 pc
6
Funnel
4 pcs
16
Hexagonal Wrench 3mm
1 pc 7 Network Cable(3m)
1 pc
17
Driver and User Manual
1 pc 8 10A Power Cable
1 pc
18
Ink Tube (150mm)
16 pcs
9
Screw M6*20
8 pcs
19
Silicone Tube (2*4*150mm)
1 pc
10
Screw M4*8
3 pcs
20
Page 12

LC Easyjet-16W/18S User Manual V13GZ.1
12
2.2.2 Assemble the Stand
Assemble the Stand based on the following illustration.
No.
Name
No.
Name
1
Metal Gasket
8
Vertical Stand
2
Feeling Unit Right Loading Bracket
9
Screws
3
Waste-ink Bottle Holder
10
Feeding Unit Slide Bar
4
Horizontal Stand
11
Feeling Unit Left Loading Bracket
5
Caster(Unlockable)
12
Take up Unit Slide Bar
6
Caster (Lockable)
13
Take up Unit Loading Bracket Holder
7
Beam
14
Take up Unit Loading Bracket
2.2.3 Assemble the Printer
Notice:
For safety, at least 4 people are needed for
assembling the printer.
When taking the main printing unit out of the
package, please be careful so as to avoid your
hands being scratched.
a. Take out the main printing unit out from the
package.
Page 13

LC Easyjet-16W/18S User Manual V13GZ.1
13
b.Lay down printer body on stands and remove membranes.
c.Install the printer body to the stands and fix by four screws at each side.
d.Confirm that each component is fastened firmly by gently shaking the stands.
The printer main units installation is completed.
2.2.4 Load the Cartridge
a. Load the ink cartridges into the corresponding slots, and push the cartridge to
the end of the slot and make sure they are well connected.
b. Fill the cartridge with corresponding color ink (C/M/Y/K).
c. Optimum volume of ink filling for each cartridge is 350 ml to 400 ml.
Page 14

LC Easyjet-16W/18S User Manual V13GZ.1
14
2.2.5 Install the Carriage
2.2.5.1 Structure of Carriage
No.
Name
No.
Name
A
Carriage Board
F
Print Head Cover
B
Connection Assembly
G
Epson DX5 Print Head
C
Carriage Regulator
H
Carriage Pedestal
D
Damper Holder
I
Carriage Pedestal Holder
E
Ink Damper
Page 15

LC Easyjet-16W/18S User Manual V13GZ.1
15
2.2.5.2 Load the Print Head
a. Dismantle the fixer for driving carriage.
b. Connect the power cable to LECAI printer, turn on the printer and then the driving carriage
starts to self-checking and moves back to the service station automatically.
c. Turn off the printer, push-off the carriage to be under the left front cover of the printer and
then remove the left front cover.
d. Remove the carriage cover, disassemble the damper holder and dismantle the ink dampers,
and remove the print head cover. Dismantle the three screws in the head bracket. Unpack
the protected adhesive tapes of the data wires.
e. Take out the print head, and connect the data wires to the connectors in print head.
Notice: Please pay attention to the order of the data wires when connect to the print head
and operate gently. Disorder or overexerting may cause permanent damage to data wires
Page 16

LC Easyjet-16W/18S User Manual V13GZ.1
16
and the print head, the correct connection is illustrated as below:
f. When make sure the data wires are well connected, please fix the print head to the bracket
by the three screws dismantled before and then fix the print head cover.
2.2.5.3 Fix the Damper
Connect the corresponding dampers to the print head based on the following illustration.
Page 17

LC Easyjet-16W/18S User Manual V13GZ.1
17
Notice:
Connect the ink dampers to the corresponding connectors of print head.
Do not overexert to avoid damage to the print head.
Make sure the ink dampers are well connected to the print head without air leakage.
Page 18

LC Easyjet-16W/18S User Manual V13GZ.1
18
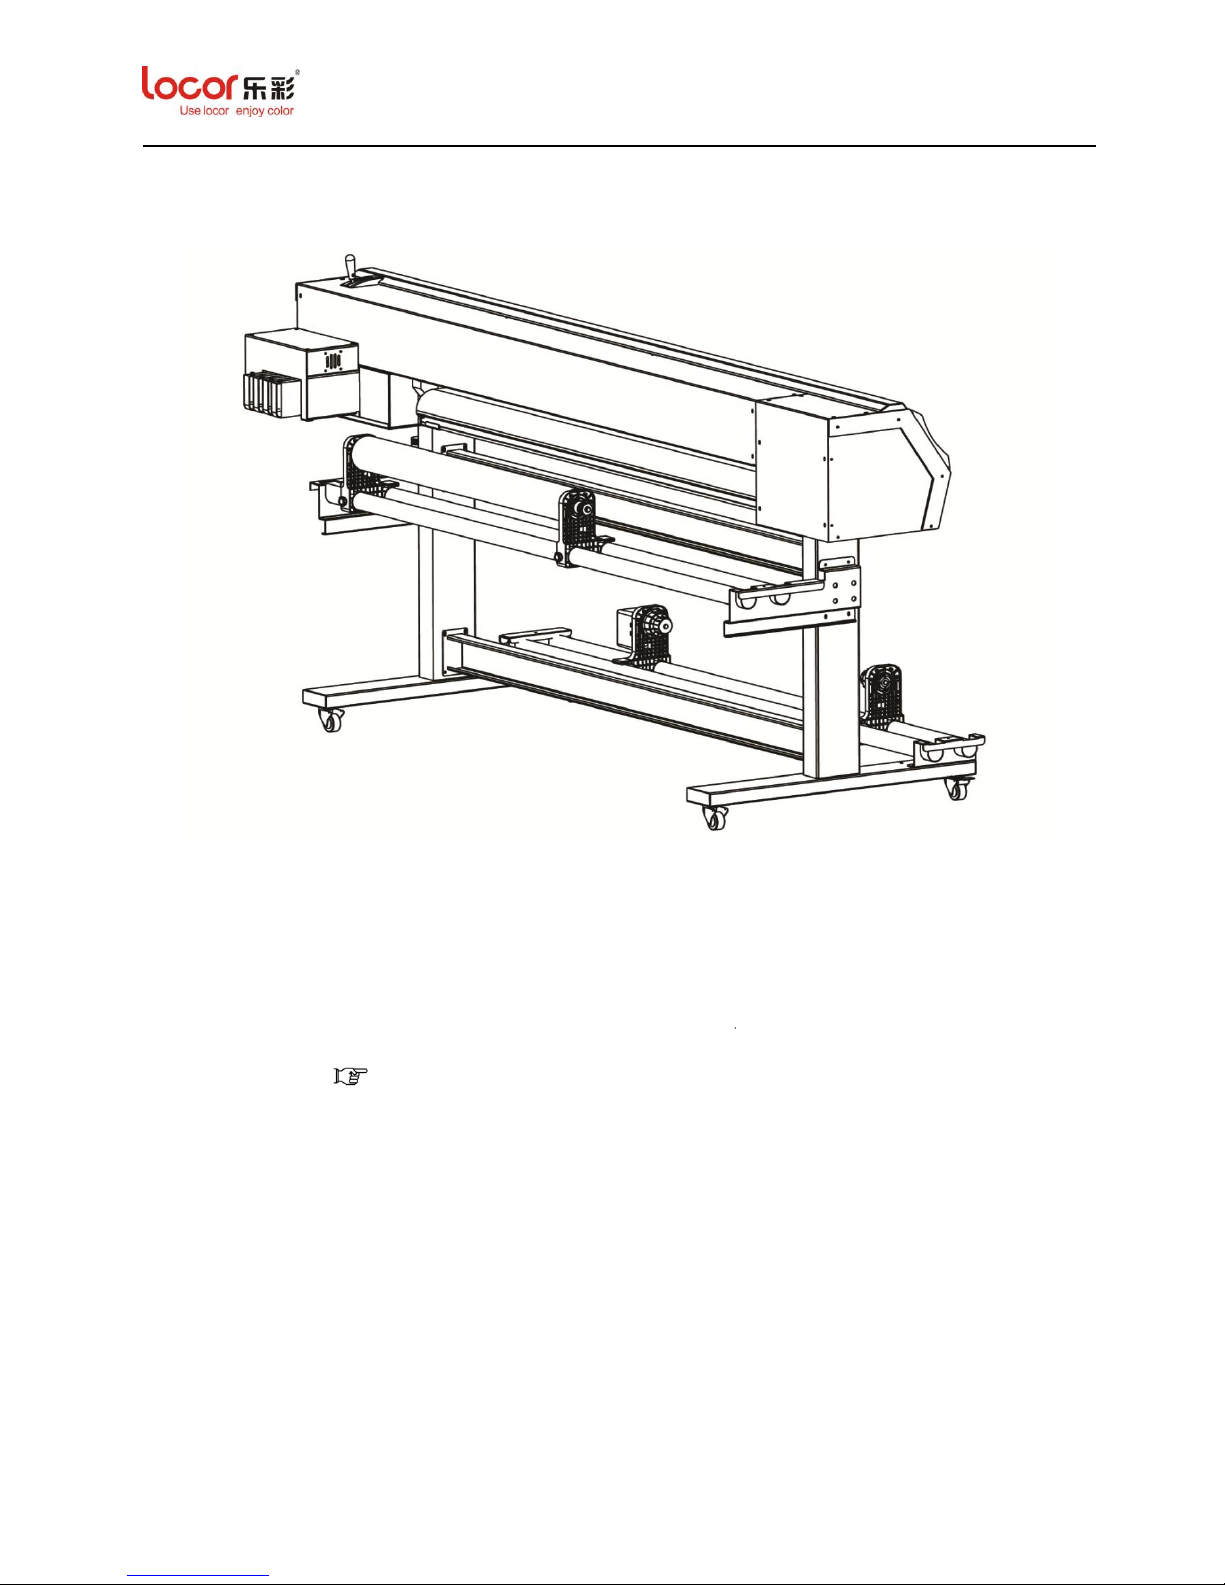
2.2.6 Maintenance Station
No.
Name
No.
Name
A
Flush Box Cover
H
Draw Spring
B
Flush Box Sponge
I
Inner Housing
C
Flush Box
J
Middle Housing
D
Wiper
K
Outer Housing
E
Wiper Solenoid Valve
L
Return Spring
F
Wiper Holder
M
Maintenance Station Sponge
G
Maintenance Capper
N
Maintenance Station Box
Page 19
LC Easyjet-16W/18S User Manual V13GZ.1
19
2.2.7 Media Loading
a. Firstly Install the scroller of the media into left media pay-off device and fix it and then
connect the scroller to right part in the same way.
b. Lift up the media fixer handle and turn the scroller by hand and wind up several turns of roll
media.
c. When inserting the media from the rear, be careful not to be injured by the pinch roller.
2.2.8 Fill Ink ( 3.1.7.2.1)
3 Operation Panel
This section explains all the functions of operation panel.
Page 20
LC Easyjet-16W/18S User Manual V13GZ.1
20
3.1 Panel Menu Set up
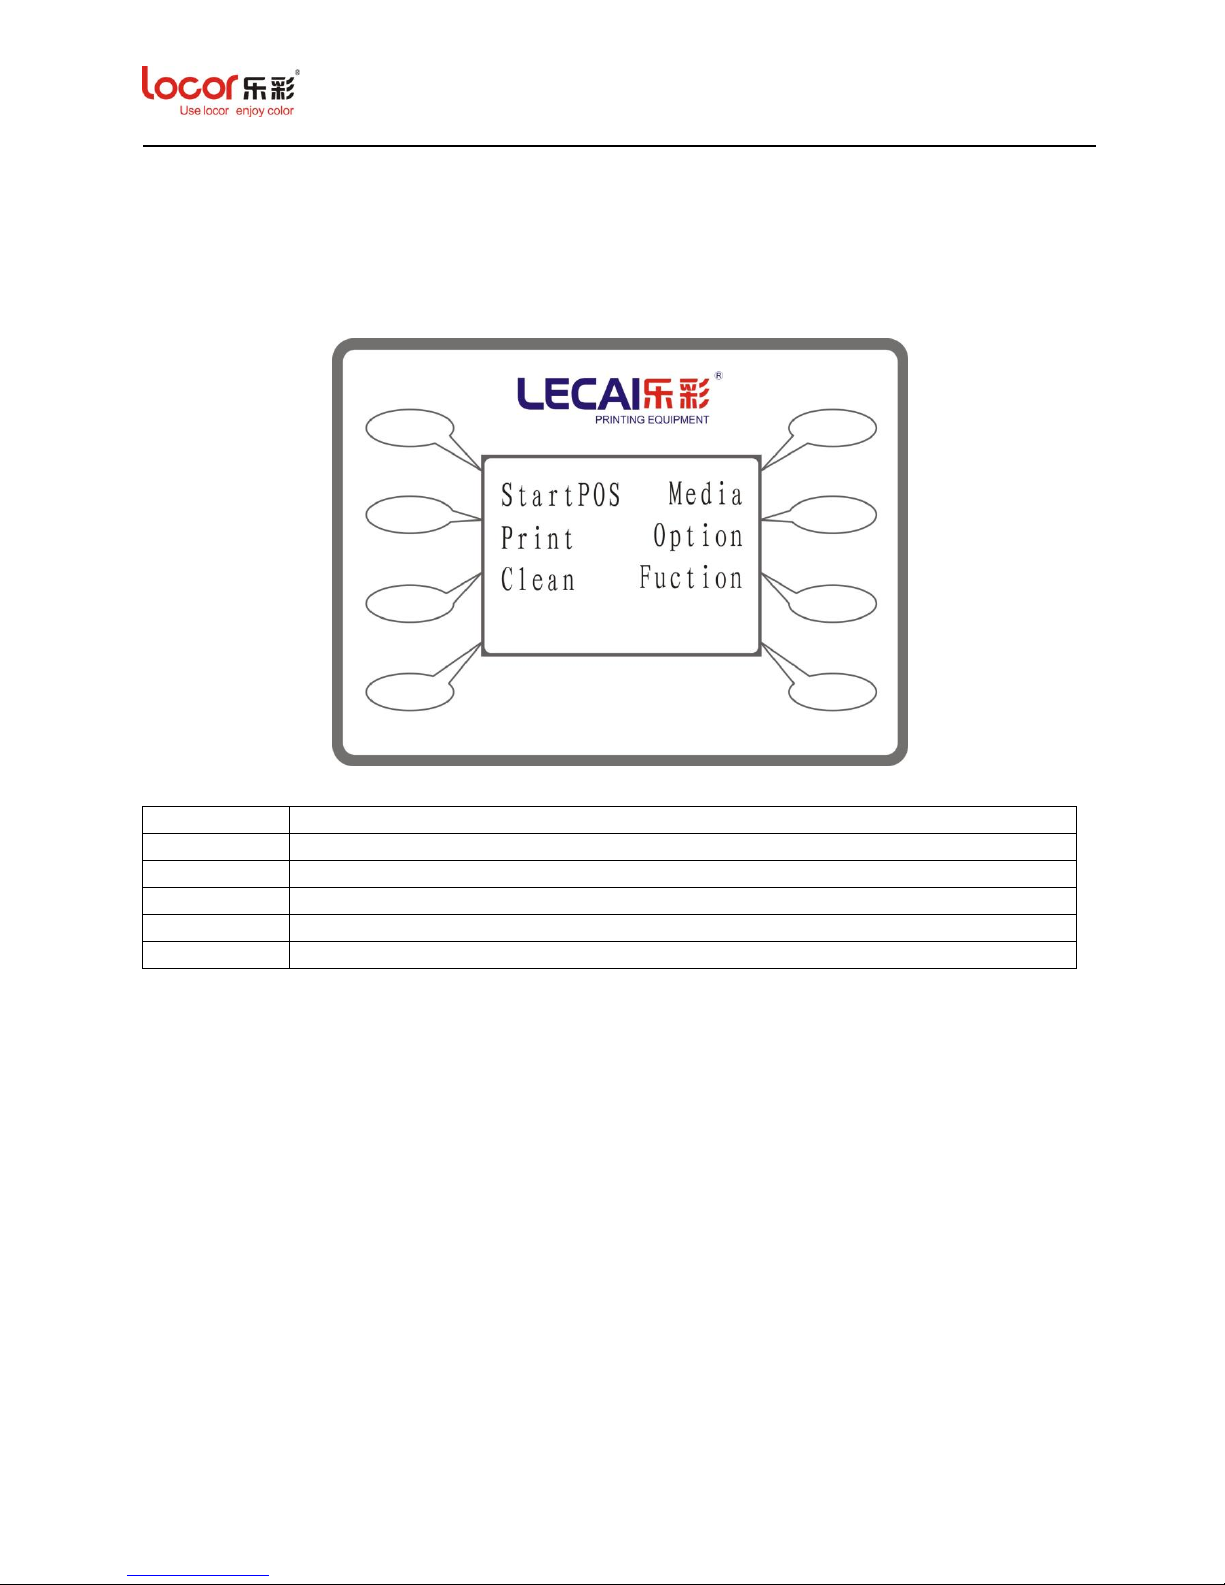
3.1.1 Main Menu Overview
Start POS
Print begin position setup.
Media
Media Feeding.
Print
Nozzle status test.
Option
Direction, Start POS, Fant, Address, Spurt.
Clean
Clean and maintain the print head automatically.
Function
Print, Clean, About, Reset.
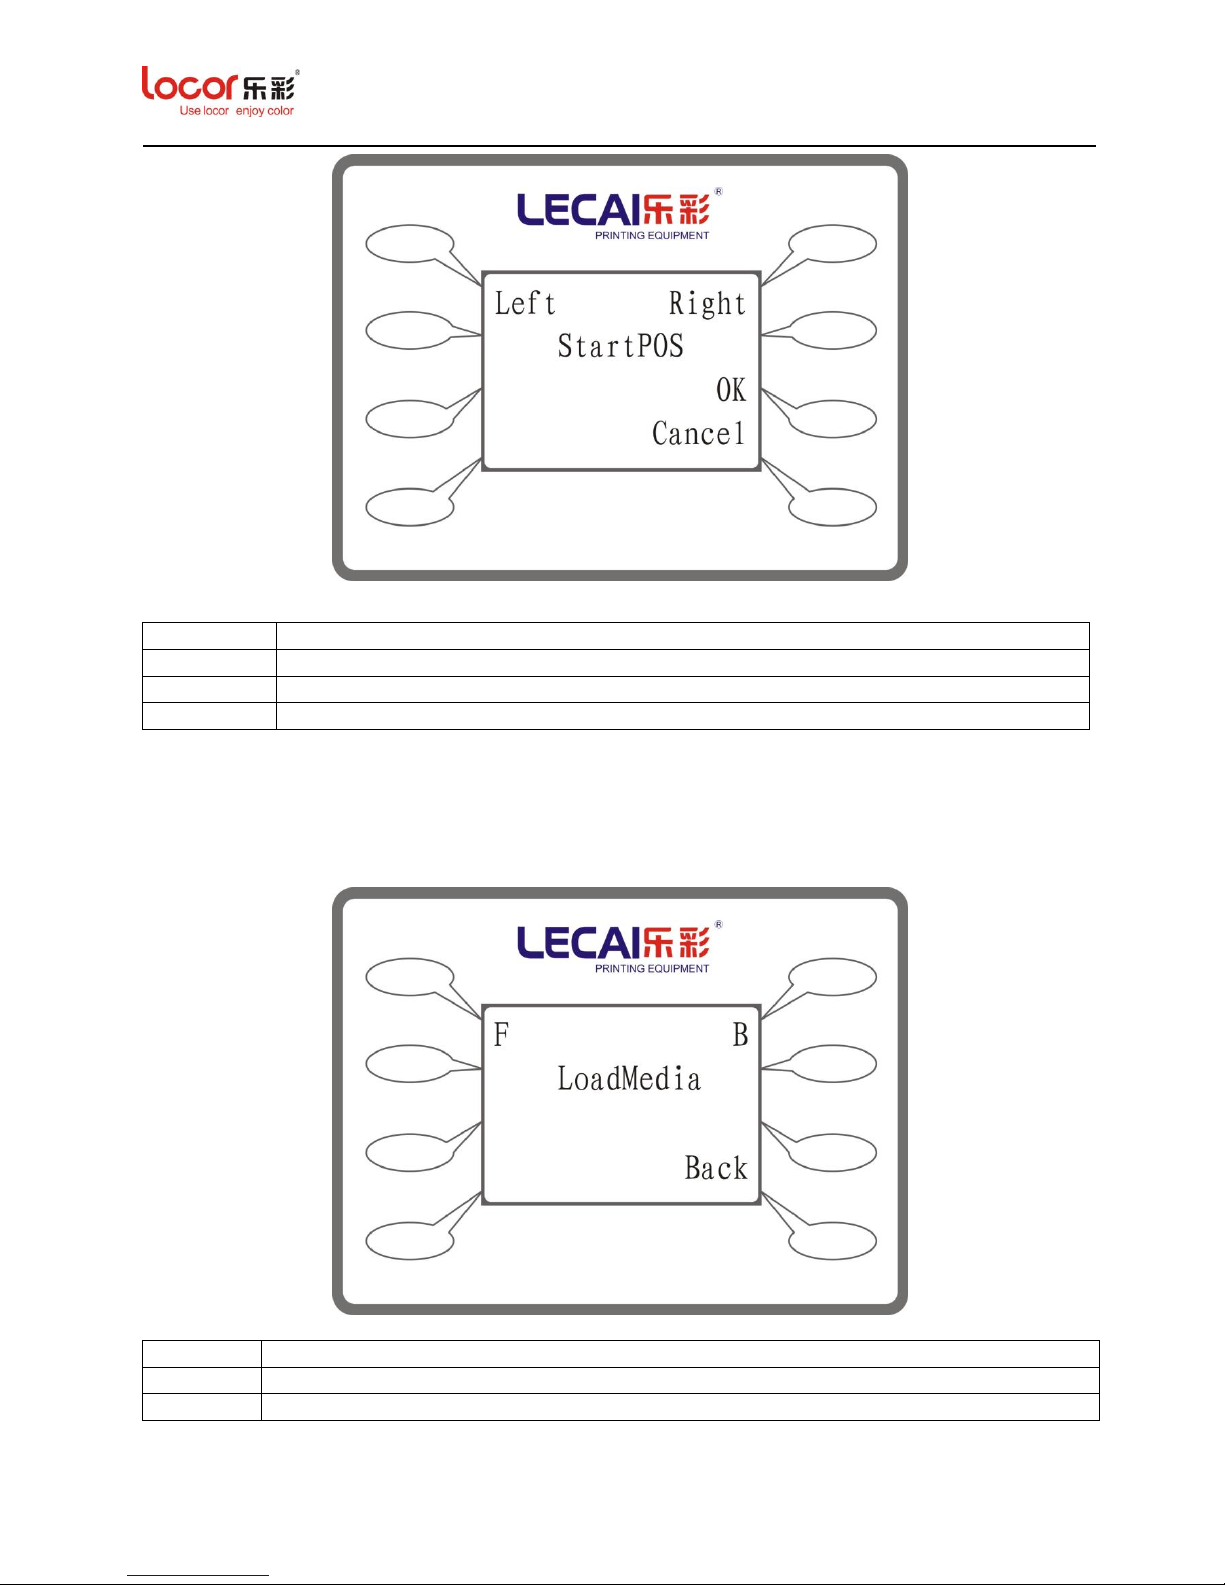
3.1.2 Start POS Menu
Press “Start POS” to enter its submenu, as below:
Page 21
LC Easyjet-16W/18S User Manual V13GZ.1
21
Left
Long press “Left” to make the carriage move to the left.
Right
Long press “Right” to make the carriage move to the right.
OK
Press “OK” to save your setting.
Cancel
Press “Cancel” to cancel your setting and return to Set Menu.
3.1.3 Media Menu
Press “Media” to enter its submenu, as below:
F
Media move forward.
B
Media move backward.
Back
Back to Main menu.
Page 22
LC Easyjet-16W/18S User Manual V13GZ.1
22
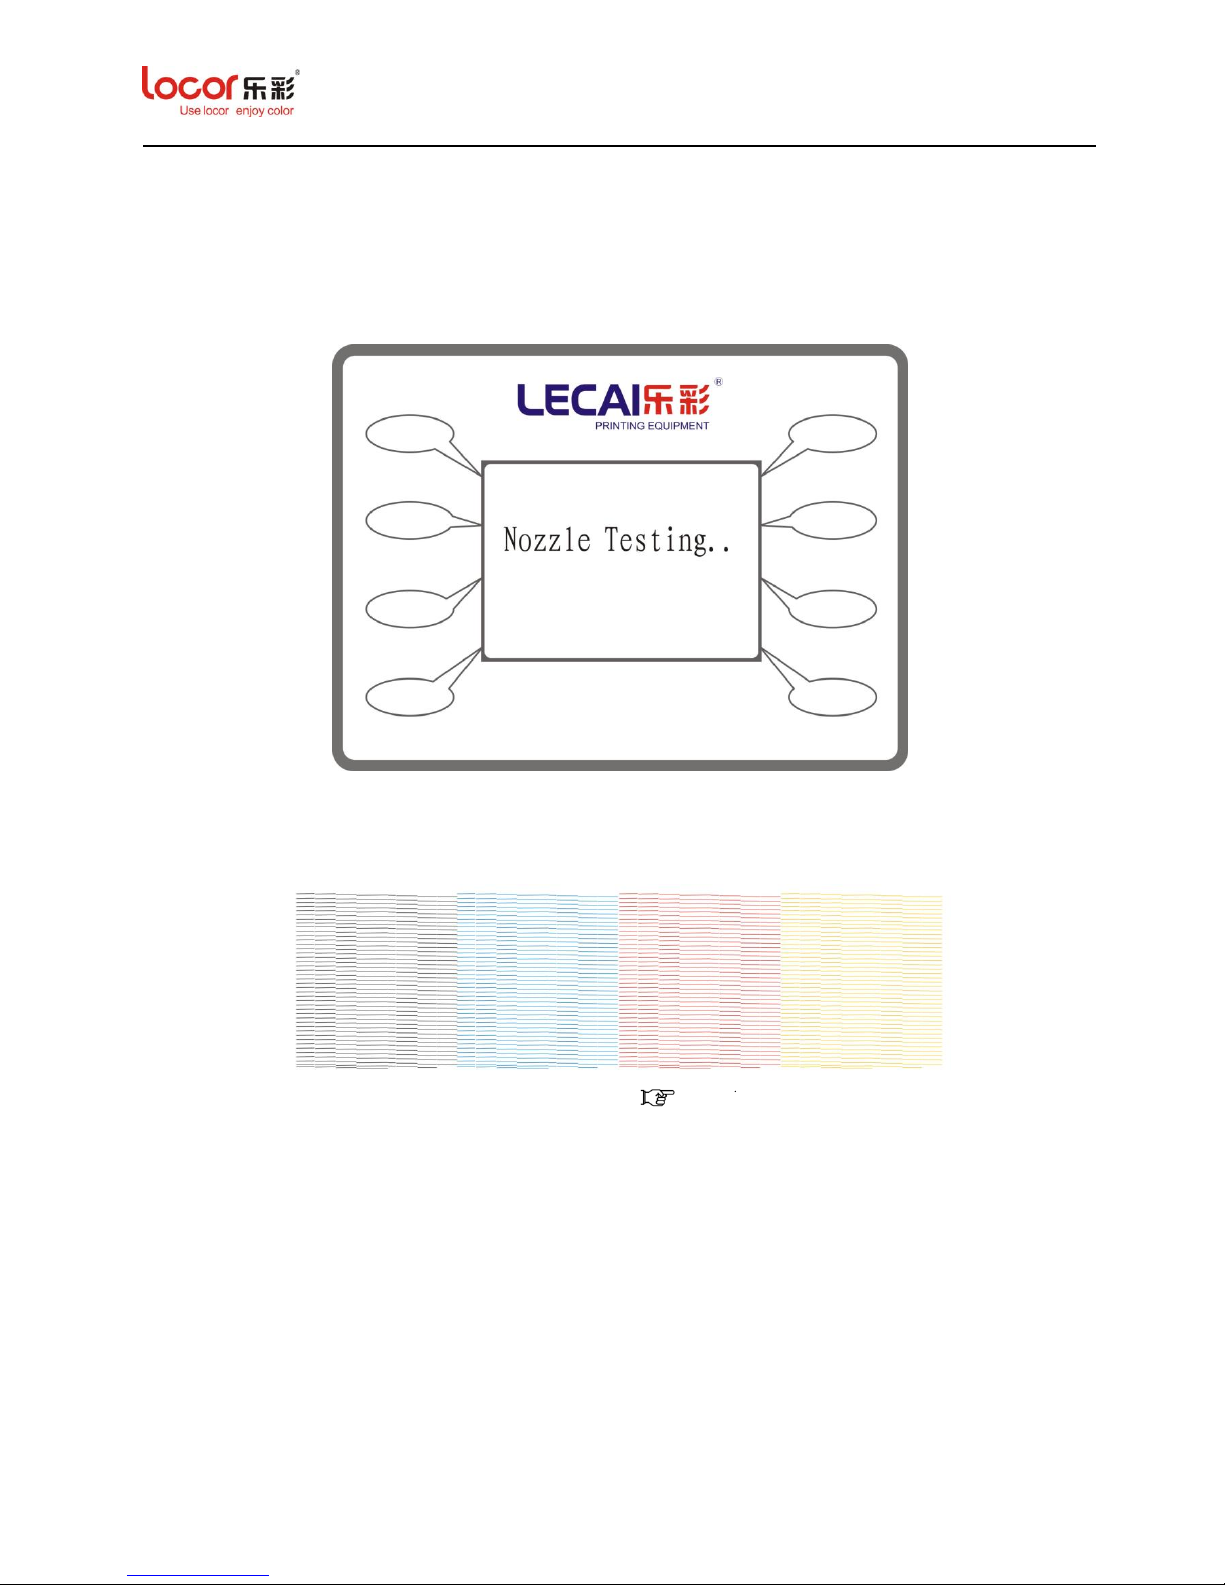
3.1.4 Print Menu
Press “Print ” in Main Menu to print a nozzle testing pattern, as below:
Notice: After testing, it will print out 4 groups of lines (C/M/Y/K) in the media, for checking the
status of nozzles, as below:
Notice: If the status not very well, please clean it ( 3.1.7.2.1)and then test again.
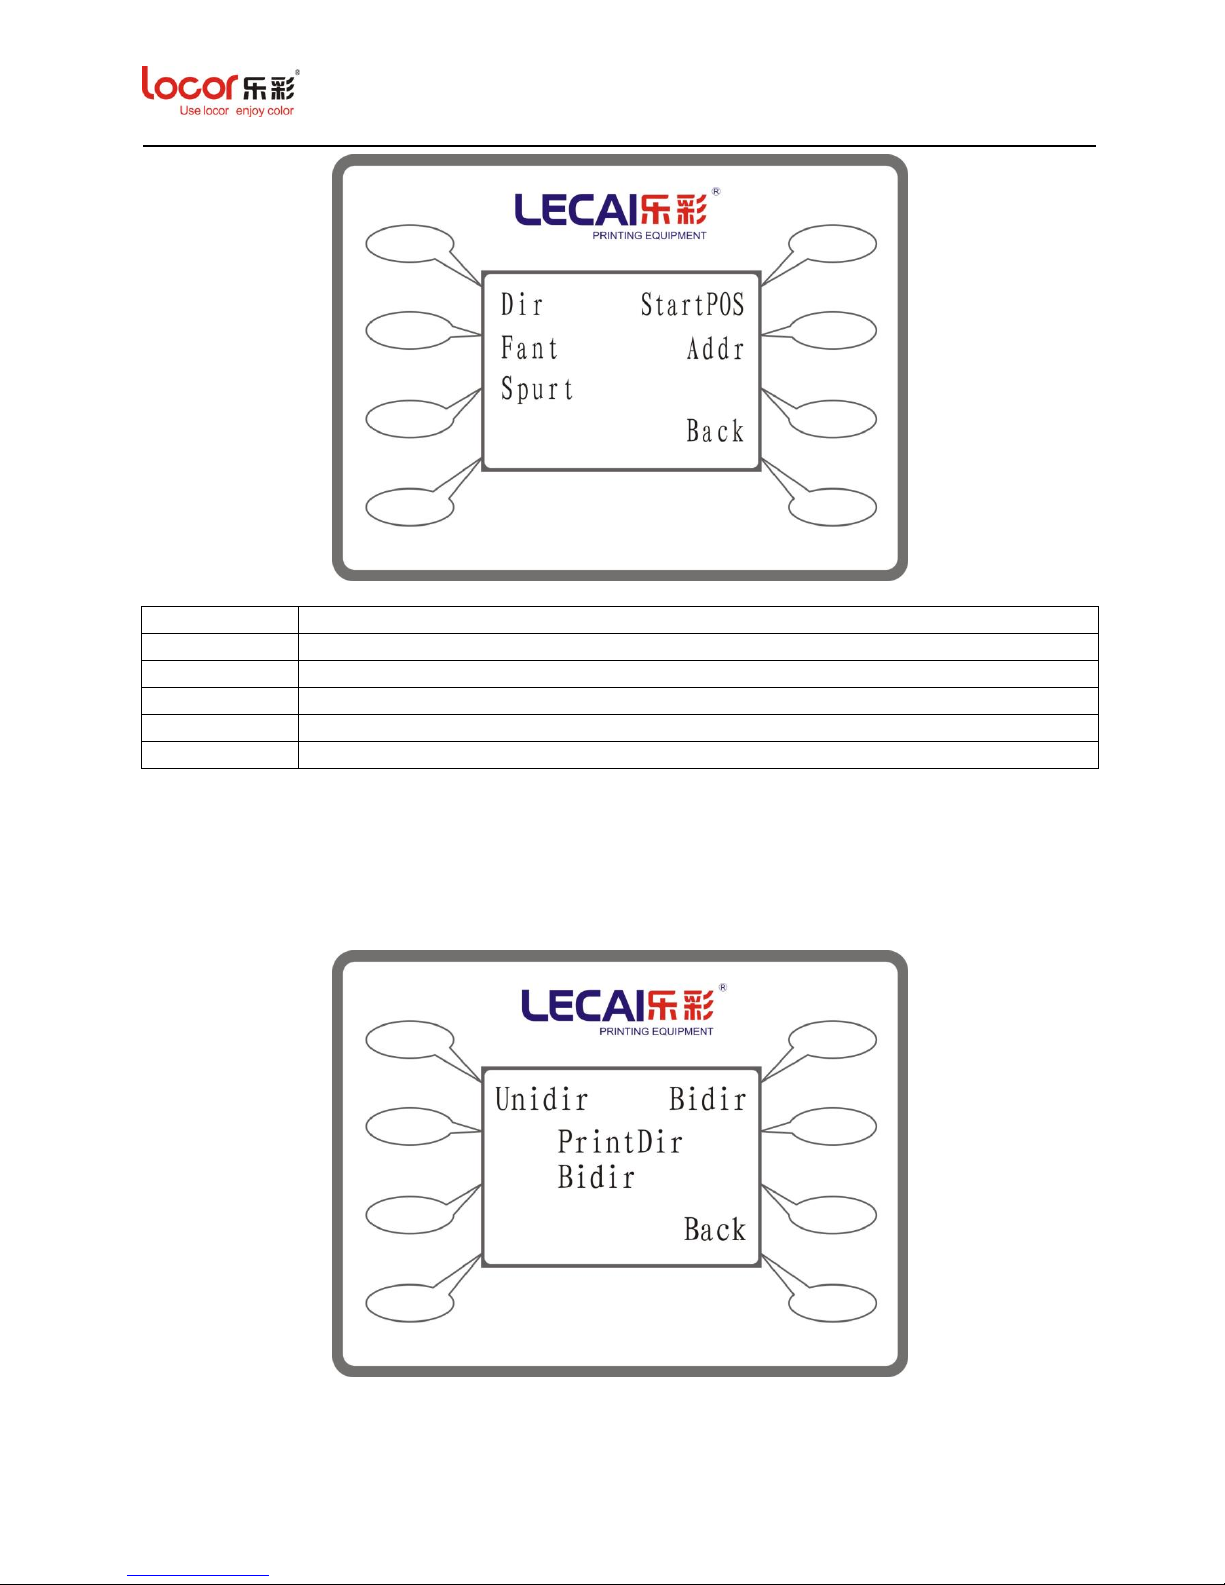
3.1.5 Option Menu
Press “Option” to enter its submenu, as below:
Page 23
LC Easyjet-16W/18S User Manual V13GZ.1
23
3.1.5.1 Dir Menu
Press “Dir ” in Main Menu to enter its submenu, as below:
Dir
Print direction.
Start POS
Print begin position setup.
Fant
Print table suction fan.
Addr
Address (Default).
Spurt
Printhead spurt.
Back
Back to Main menu.
Page 24
LC Easyjet-16W/18S User Manual V13GZ.1
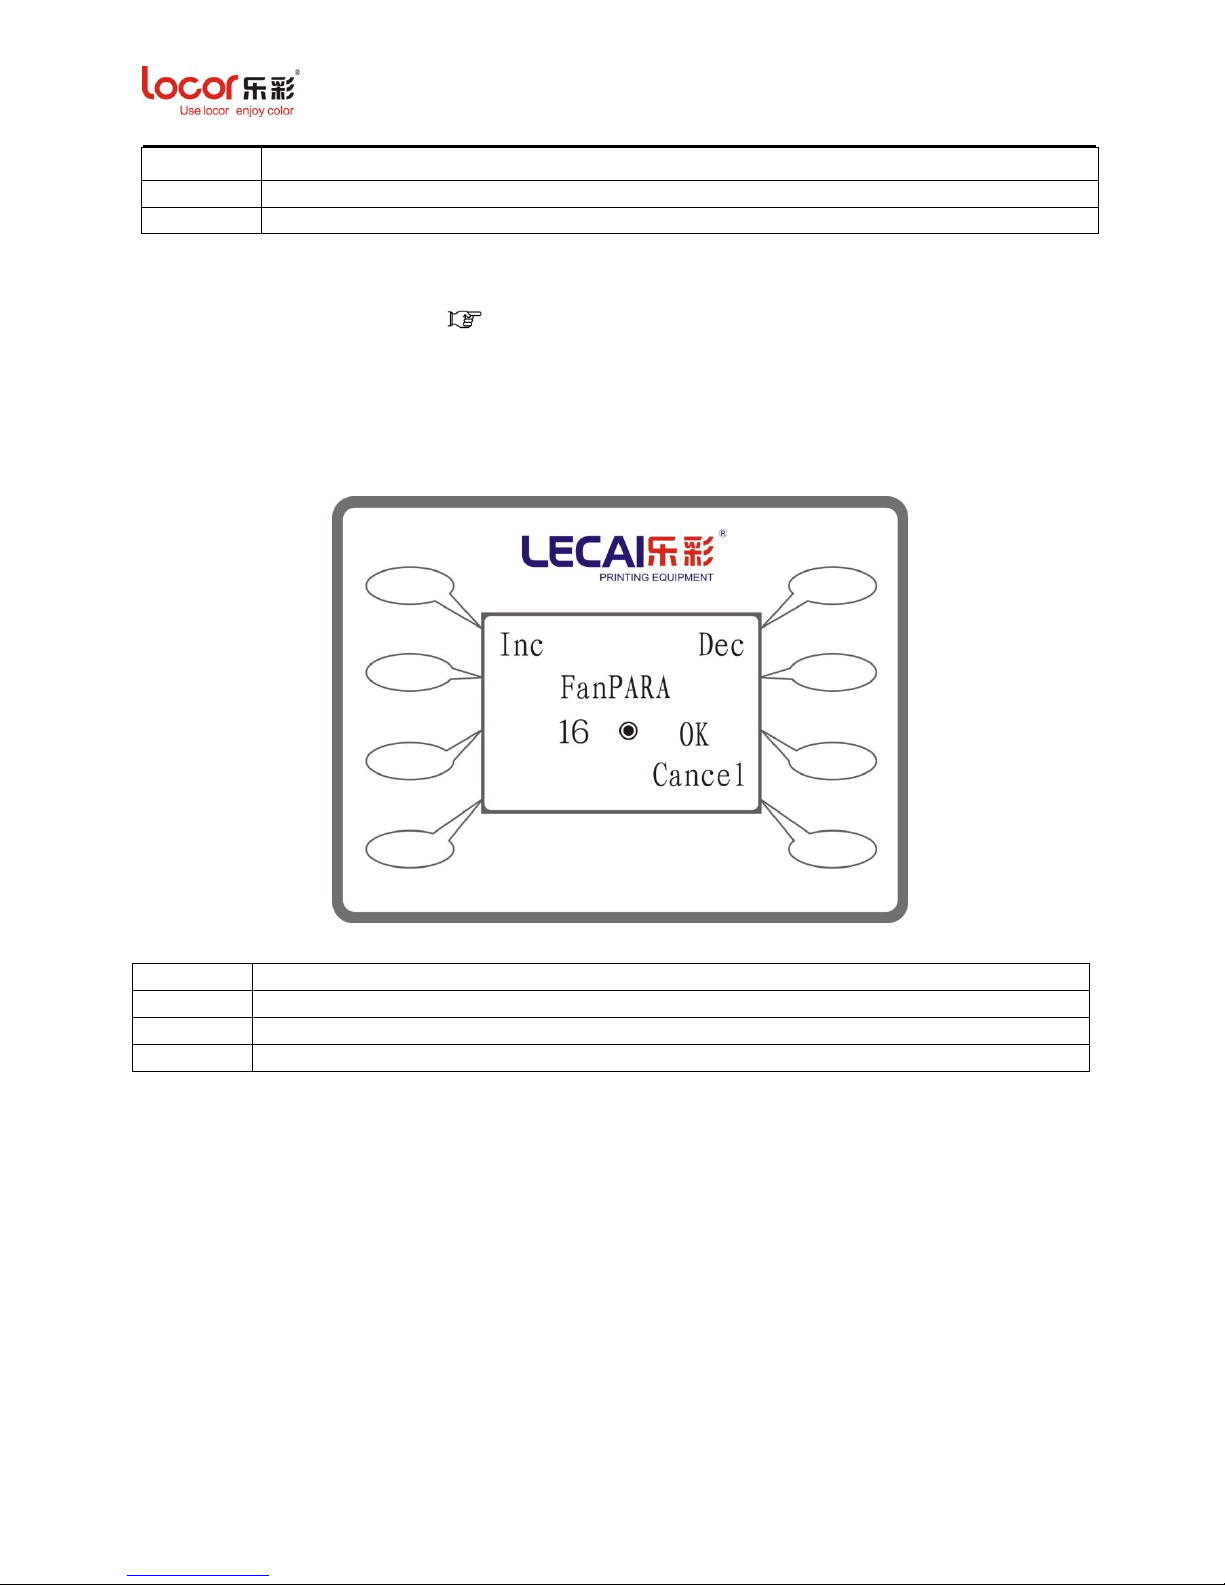
24
Unidir
Press “Unidir” for select the print direction to unidirection.
Bidir
Press “Bidir” for select the print direction to bidirection.
Back
Back to Option Menu
3.1.5.2 Start POS Mune ( 3.1.2)
3.1.5.3 Fant Mune
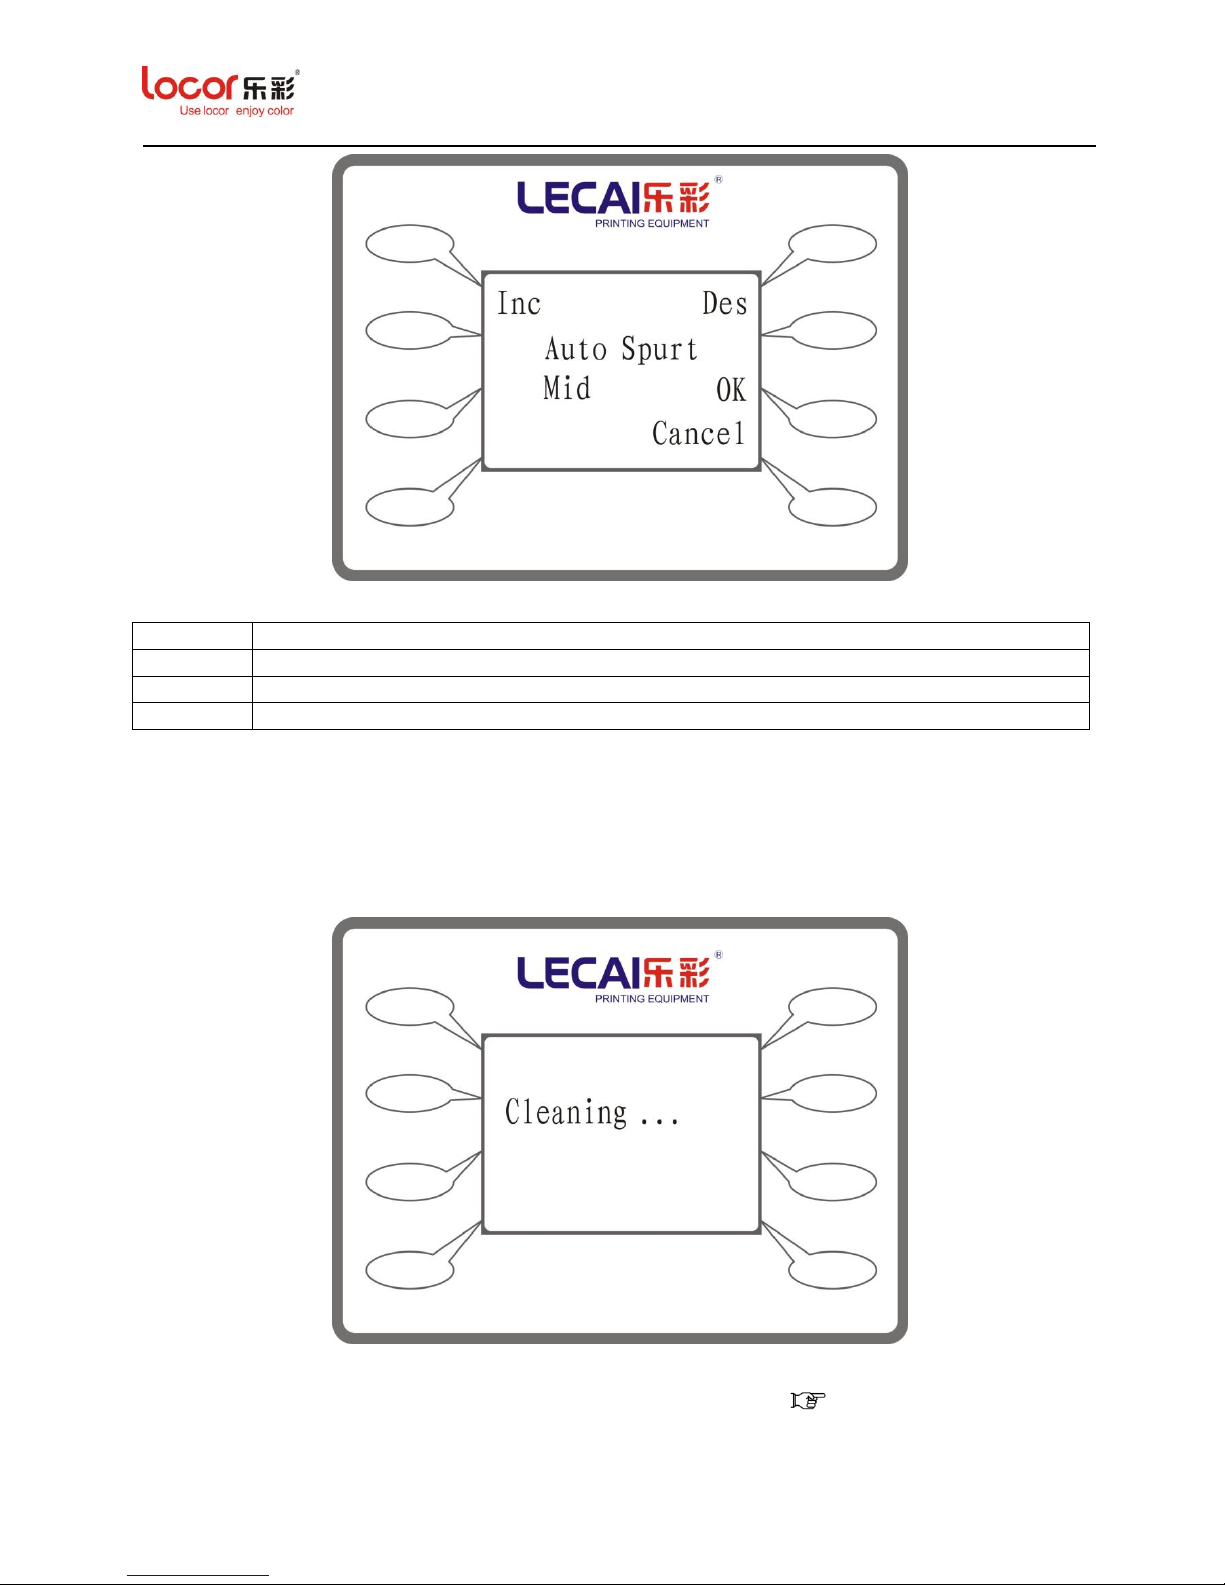
Press “Fant” to enter its submenu, as below:
Inc
Press “Inc” to increase the suction strength.
Dec
Press “Dec” to decrease the suction strength.
OK
Press “OK” to save your setting.
Cancel
Press “Cancel” to cancel your setting and return to Option Menu.
3.1.5.4 Fant Menu (Default)
3.1.5.5 Spurt Menu
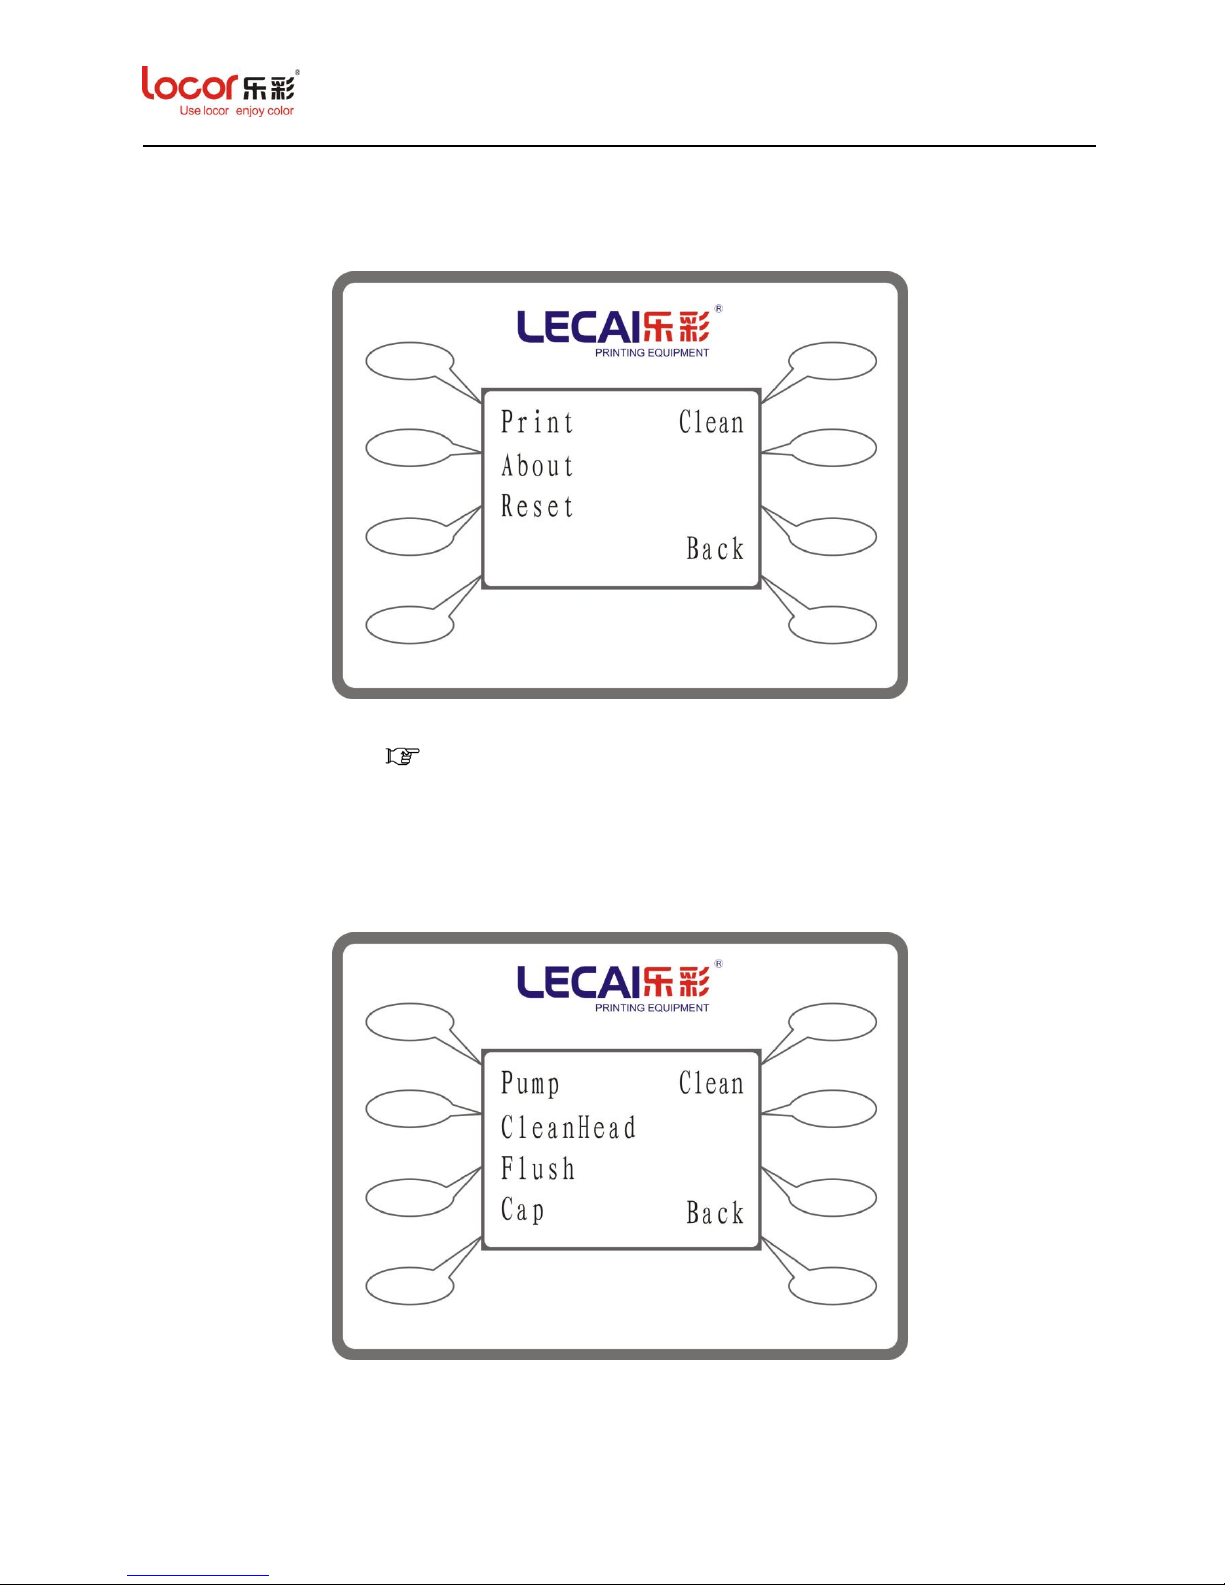
Press “Spurt” to enter its submenu, as below:
Page 25
LC Easyjet-16W/18S User Manual V13GZ.1
25
Inc
Press “Inc” to increase or close the spurt strength.
Dec
Press “Dec” to decrease or close the spurt strength.
OK
Press “OK” to save your setting.
Cancel
Press “Cancel” to cancel your setting and return to Option Menu.
3.1.6 Clean Menu
Press “Clean” to enter its submenu, as below:
Notice: When press “Clean” the maintenance station will clean and maintain the print head
automatically. After cleaning, please check the status of nozzle. ( 3.1.4)
Page 26
LC Easyjet-16W/18S User Manual V13GZ.1
26
3.1.7 Function Menu
Press “Function” to enter its submenu, as below:
3.1.7.1 Print Menu ( 3.1.4)
3.1.7.2 Clean Menu
Press “Clean” to enter its submenu, as below:
Page 27
LC Easyjet-16W/18S User Manual V13GZ.1
27
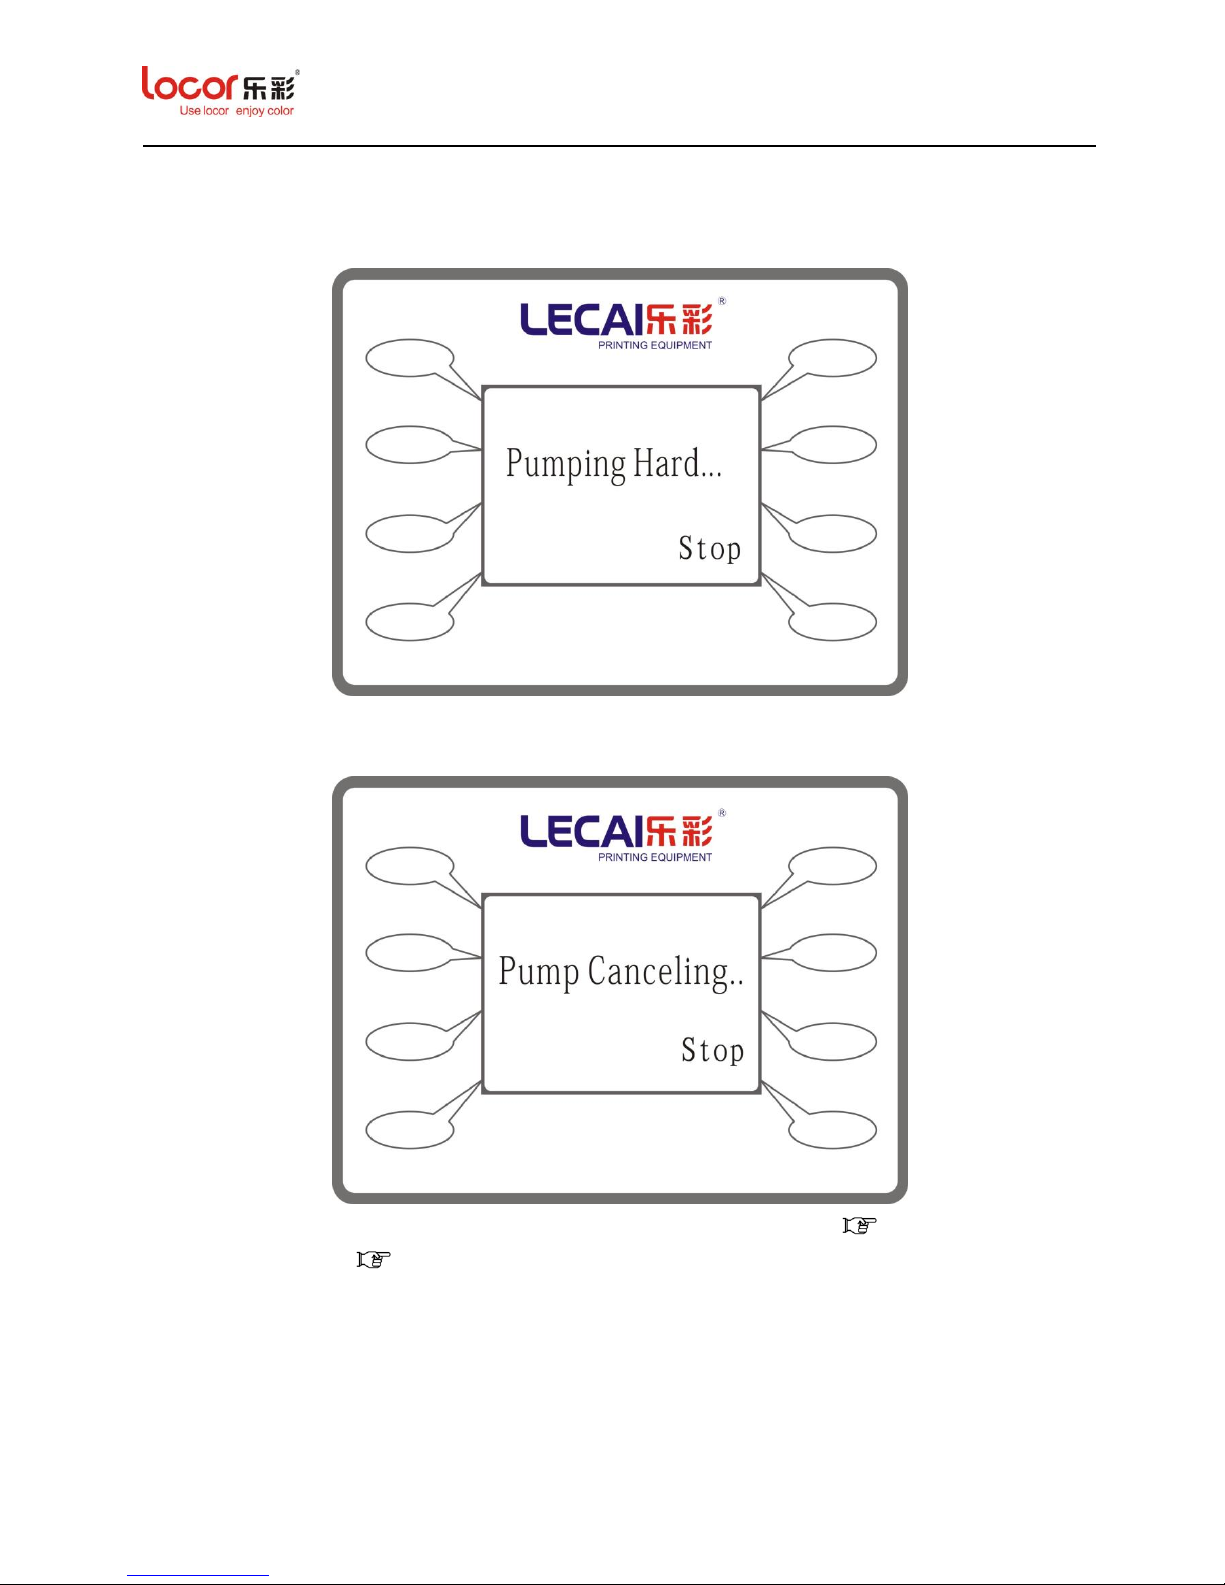
3.1.7.2.1 Pump Menu
Press “Pump” to enter its submenu, as below:
Notice: After press the “Pump”, the pump will work and fill ink until you press the “Stop”.
When first time do the ink-filling can use this function to fill ink. Press “Stop” will show below:
Notice: After Pump finish, press “Clean Head” to clean the print head( 3.1.6), then check
the status of nozzles( 3.1.4).
Page 28
LC Easyjet-16W/18S User Manual V13GZ.1
28
3.1.7.2.2 Clean Menu (Disable)
3.1.7.2.3 CleanHead Menu ( 3.1.6)
3.1.7.2.4 Flush Menu
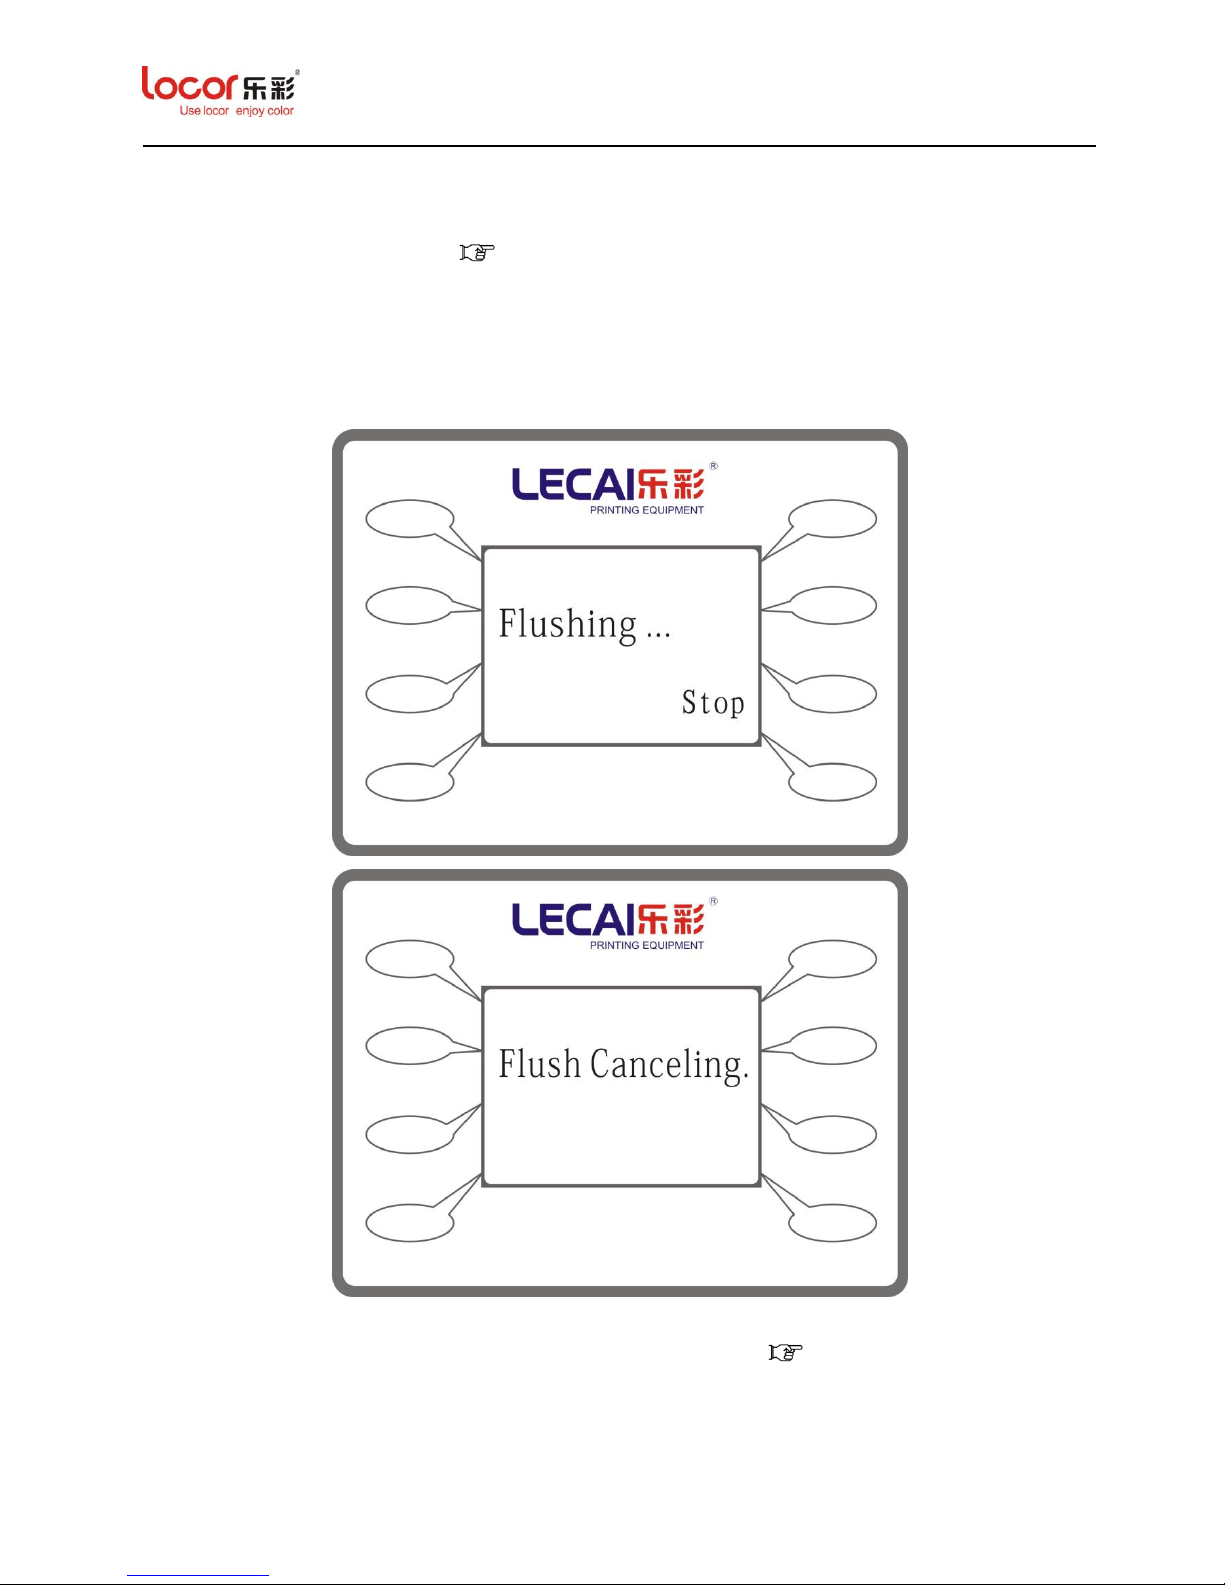
Press “Flush” to enter its submenu, as below:
Notice: After press “Flush” the carriage will go to the flush box spit ink from the nozzle until you
press the “Stop”, after stop please check the status of nozzle. ( 3.1.4)
Page 29
LC Easyjet-16W/18S User Manual V13GZ.1
29
3.1.7.2.5 Cap Menu
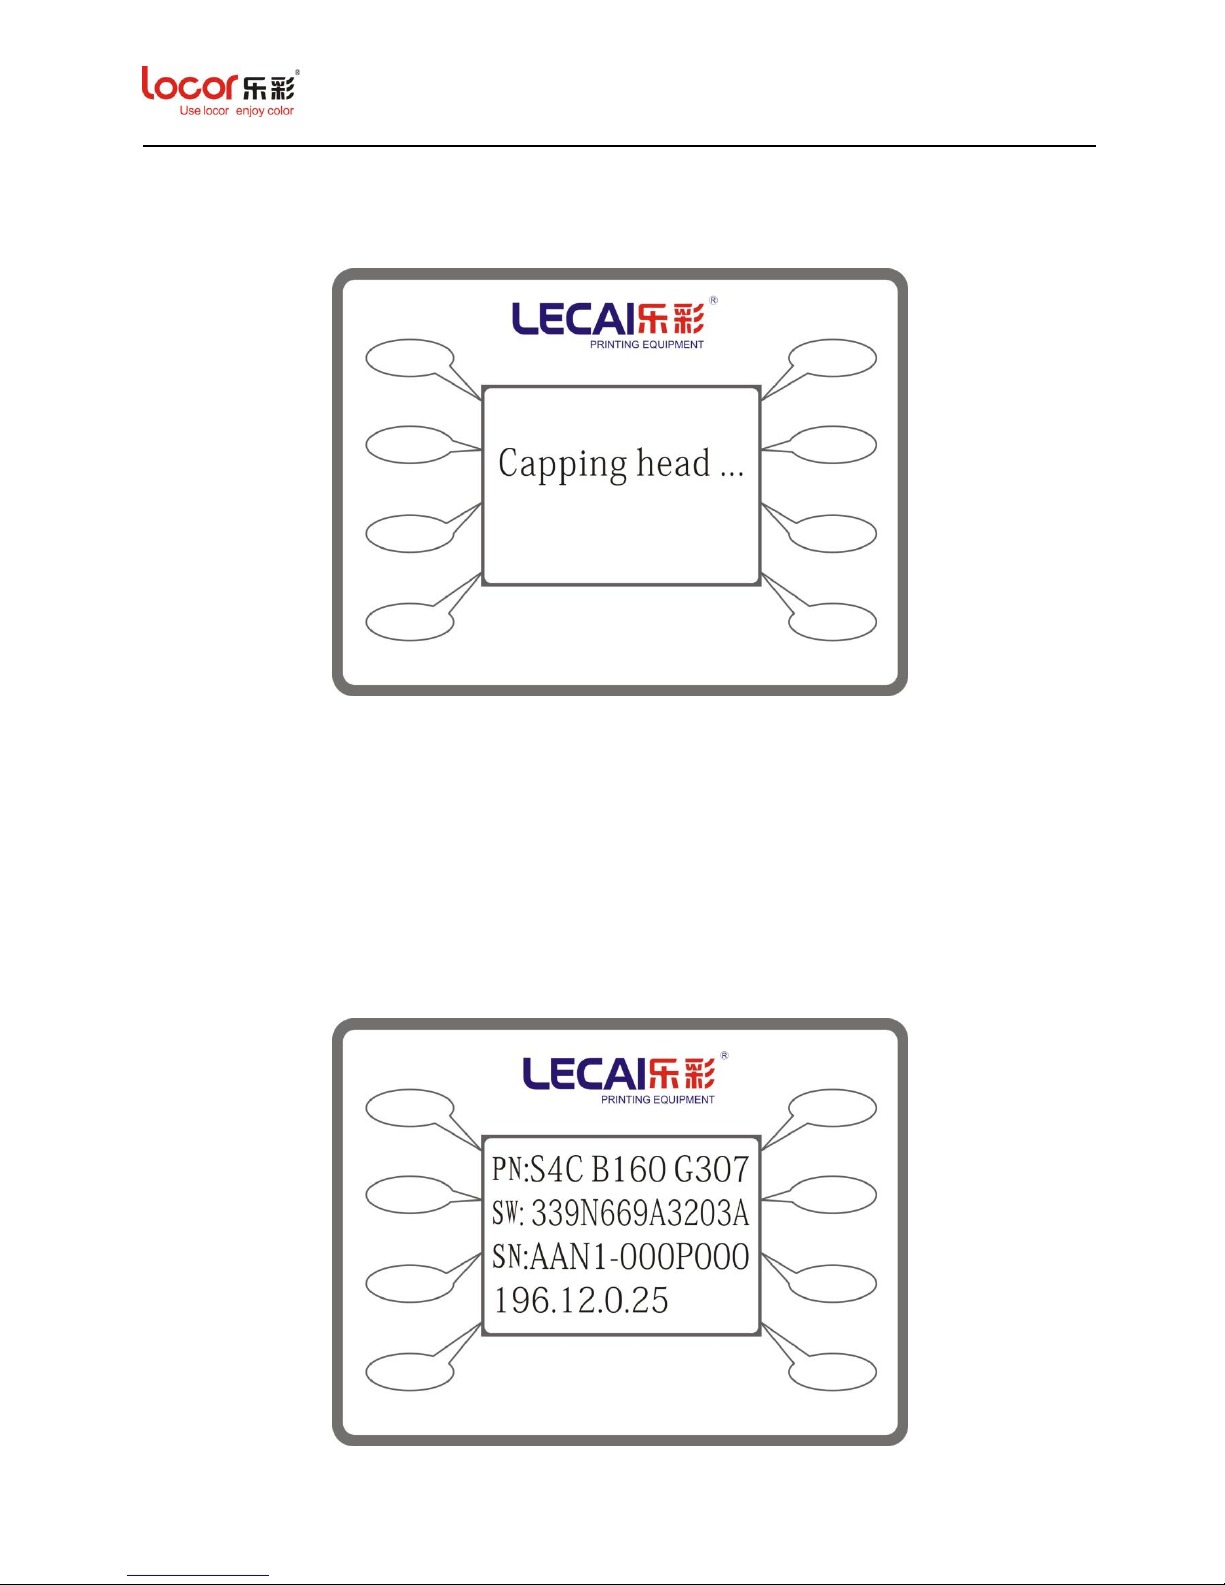
Press “Cap” to enter its submenu, as below:
Notice: After press “Cap”, the carriage will back to maintenance station.
After printing job, please check and make sure the carriage already back to the
maintenance station, and make sure the maintenance cap completely close the nozzle.
If not, maybe jam or damage may happen to the print head.
3.1.7.3 About Menu
Press “About” to enter its submenu, as below:
Page 30
LC Easyjet-16W/18S User Manual V13GZ.1
30
Notice: This is the machine version information.
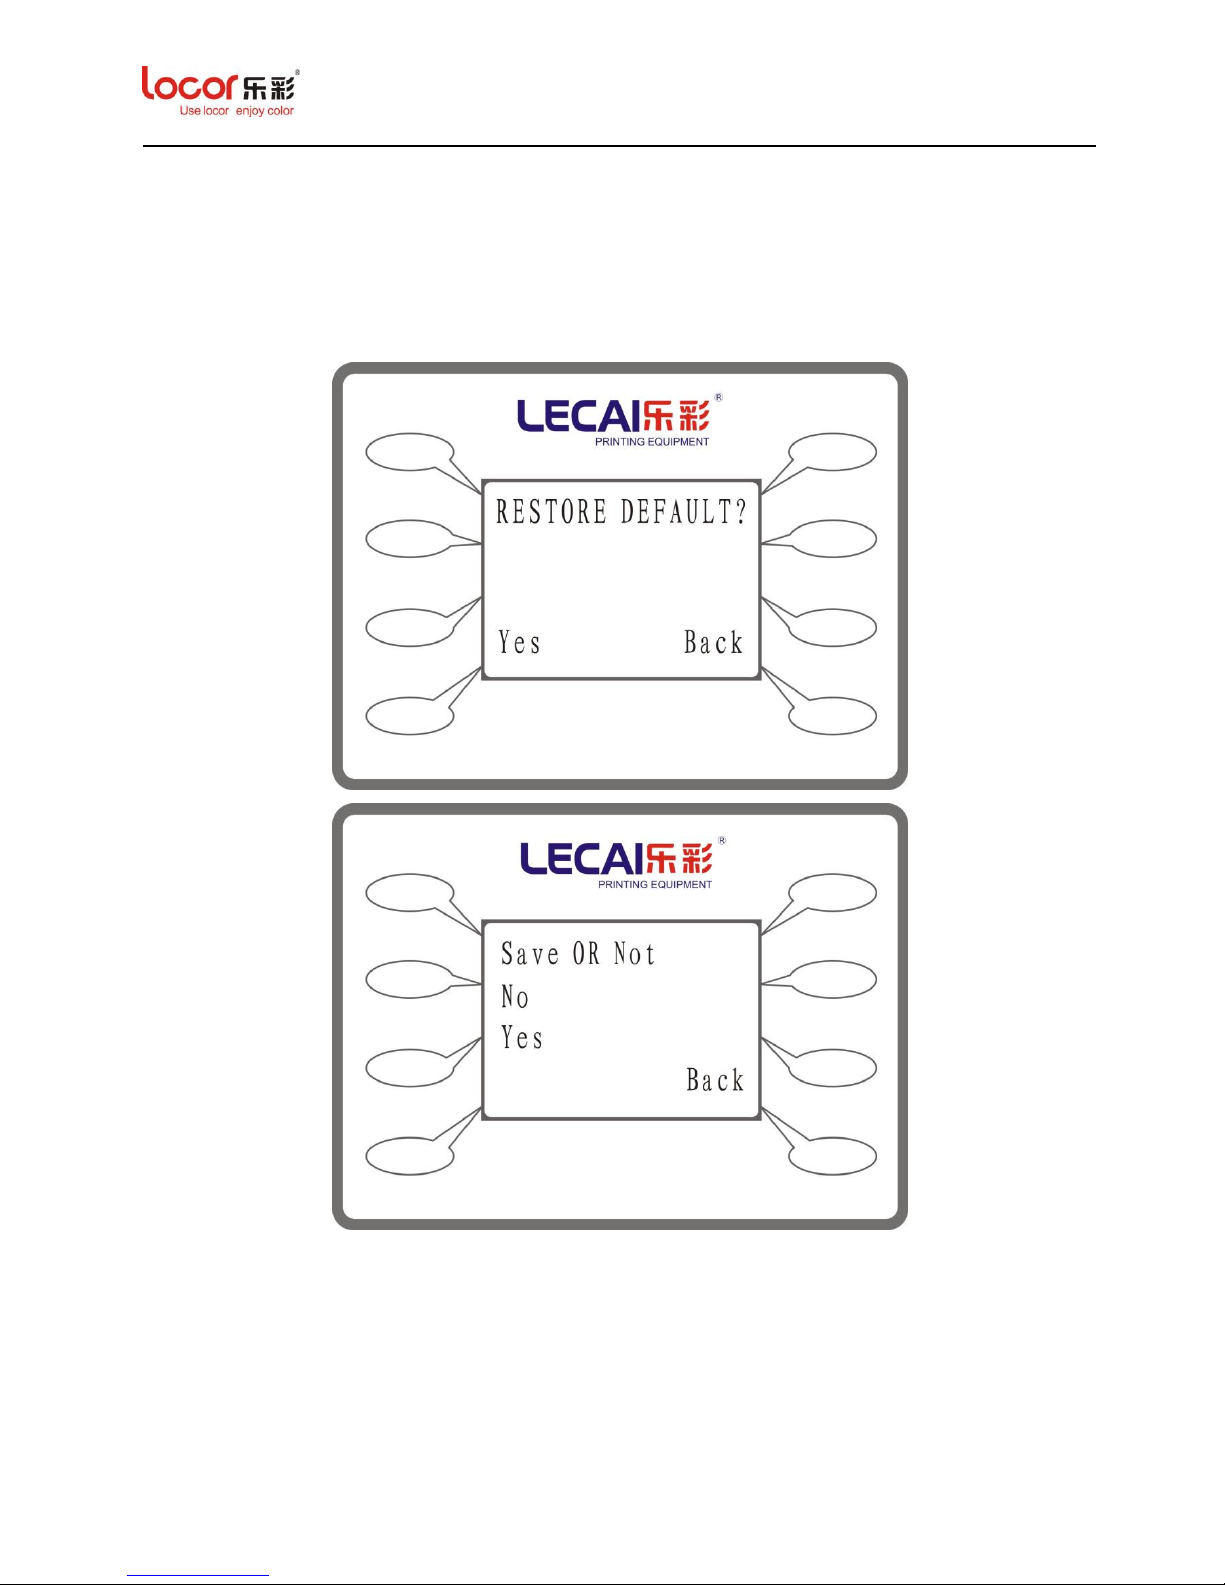
3.1.7.4 Reset Menu
Press “Reset” to enter its submenu, as below:
Notice: Users are not recommend to reset printer.
4 Computer IP Address Setup
This section explains how to setup the computer IP address.
Page 31
LC Easyjet-16W/18S User Manual V13GZ.1
31
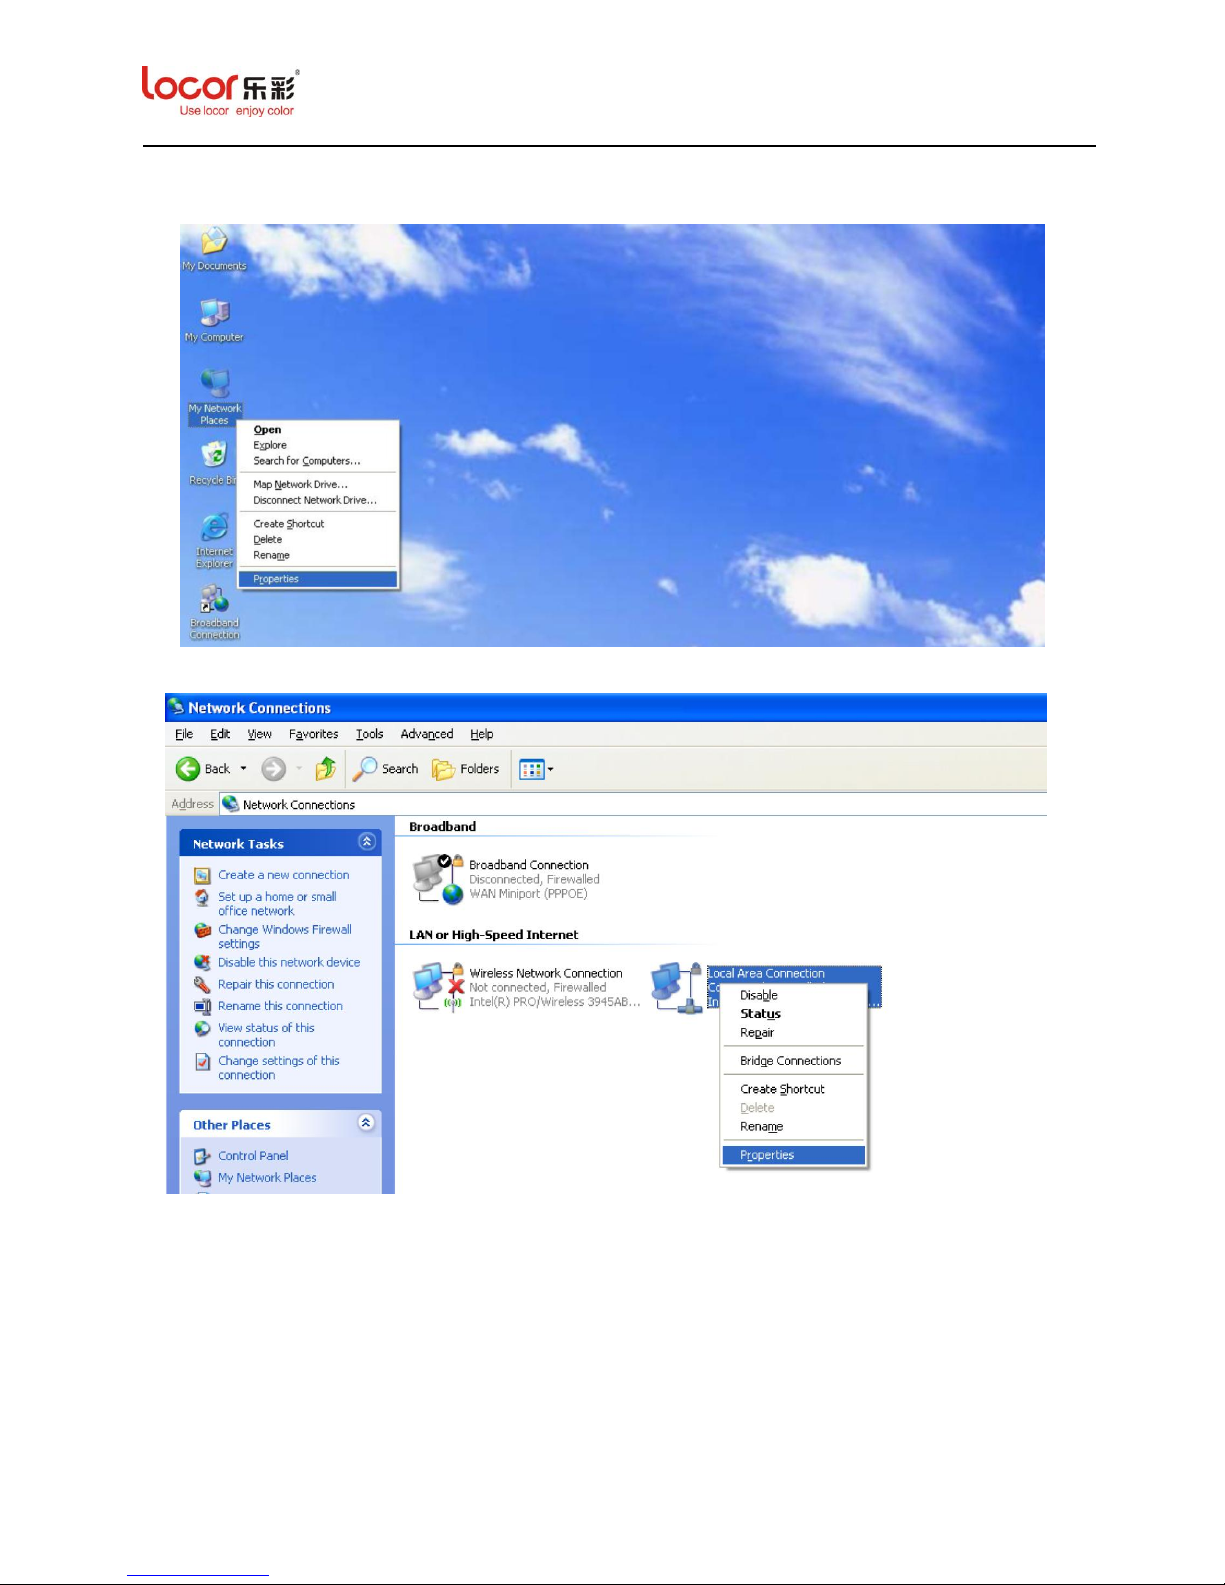
1. Right click “My Network Places” icon and then select Properties, the screen below is
displayed:
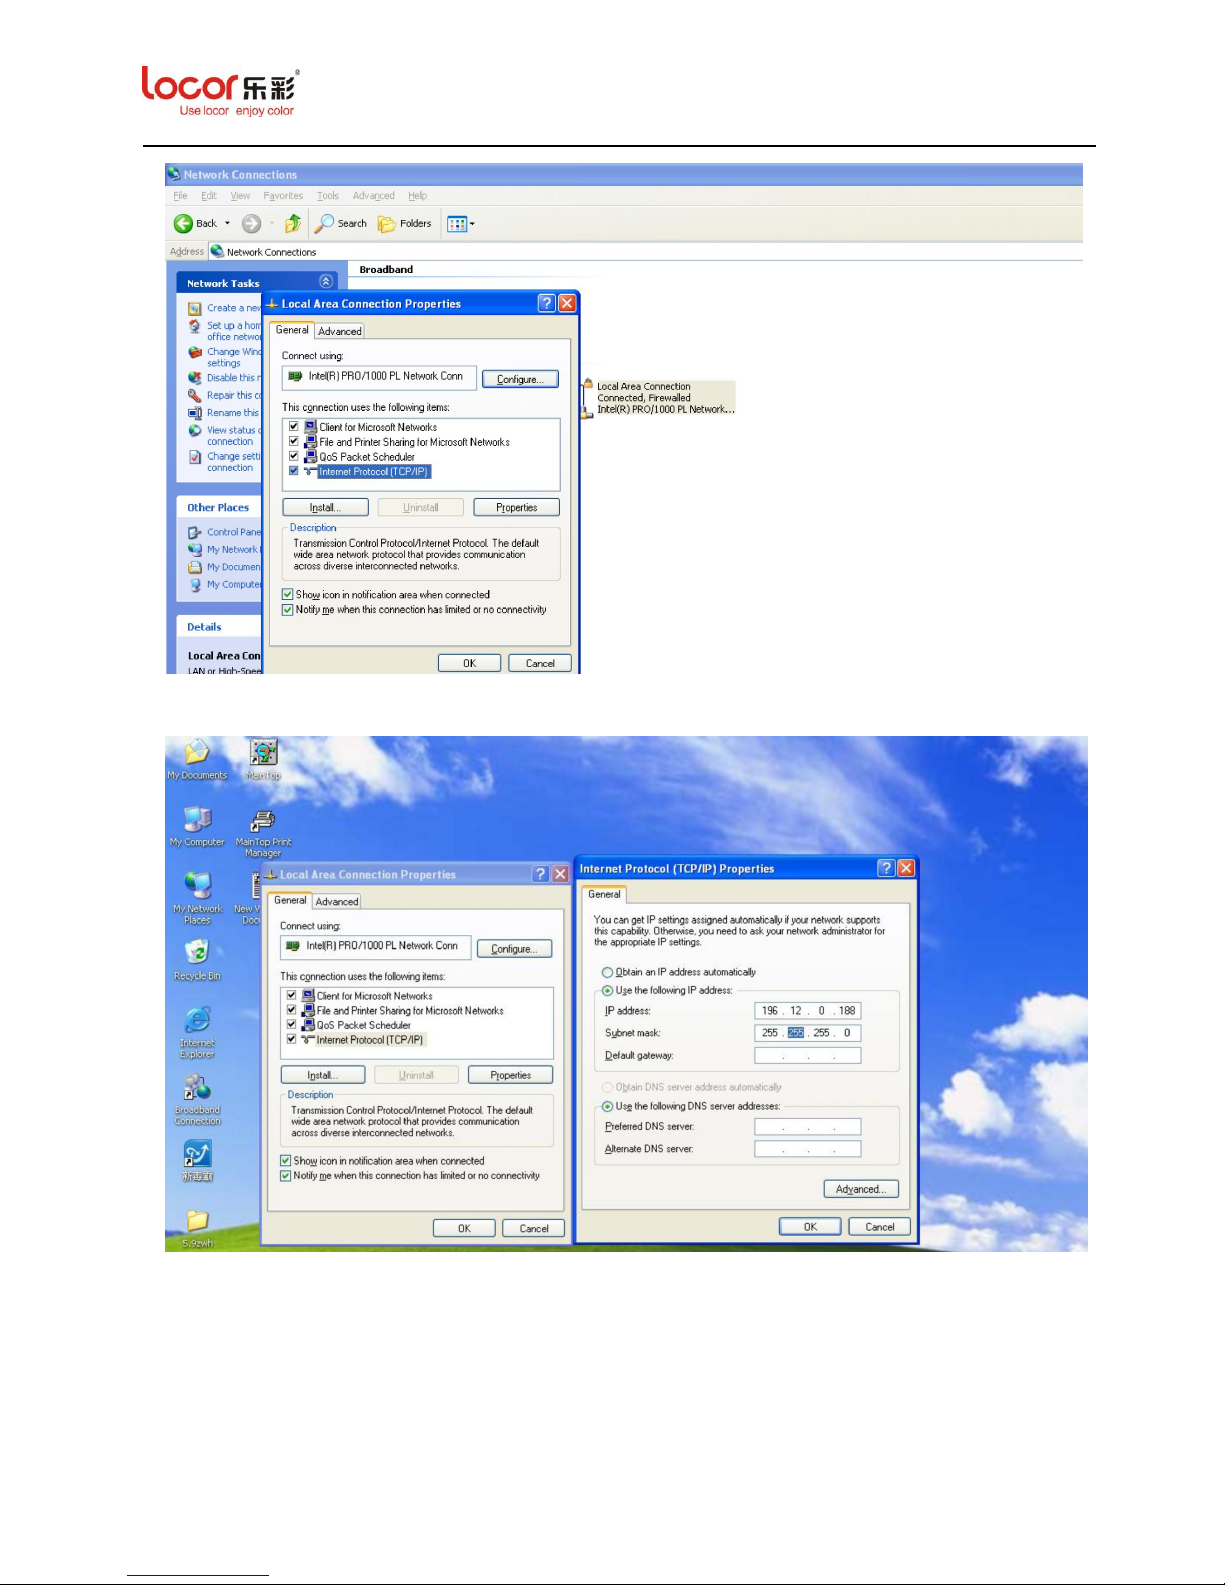
2. Right click “Local Area Connection” and then select Properties, the screen below is displayed:
3. Double Click “Internet Protocol (TCP/IP)”option, the screen below is displayed:
Page 32
LC Easyjet-16W/18S User Manual V13GZ.1
32
4. Input IP address 196.12.0.188, and then click Subnet mask.
5. After click “OK”, the IP address setup procedure is completed.
Page 33
LC Easyjet-16W/18S User Manual V13GZ.1
33
5 Maintop Installation & Setup
This section explains how to install Maintop software, how to set up maintop printer and related
parameters.
Maintop is compatible with Win 7, Windows XP, Window 2000, Win98 etc.
5.1 Maintop Software Installation
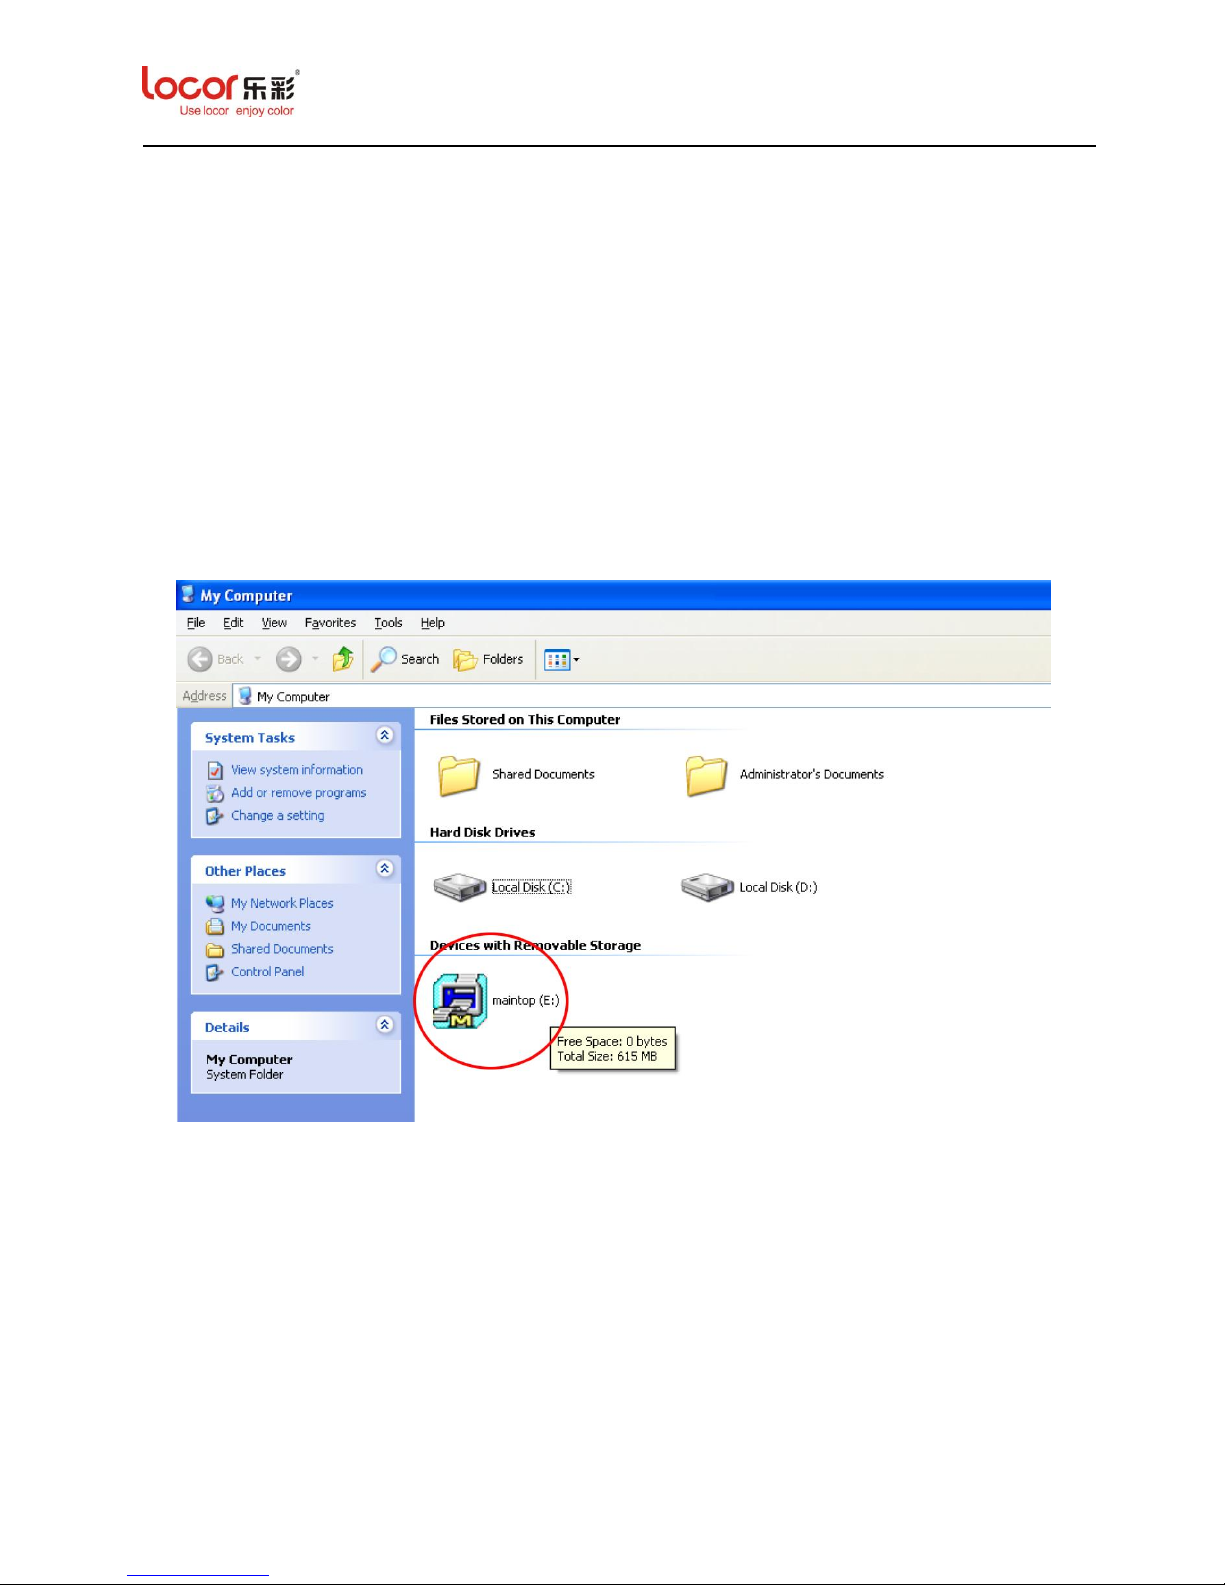
1. Make sure the computer starts normally and insert the DVD RW, the screen below is
displayed.
2. Double click “maintop (E:)” to enter the following screen.
Page 34
LC Easyjet-16W/18S User Manual V13GZ.1
34
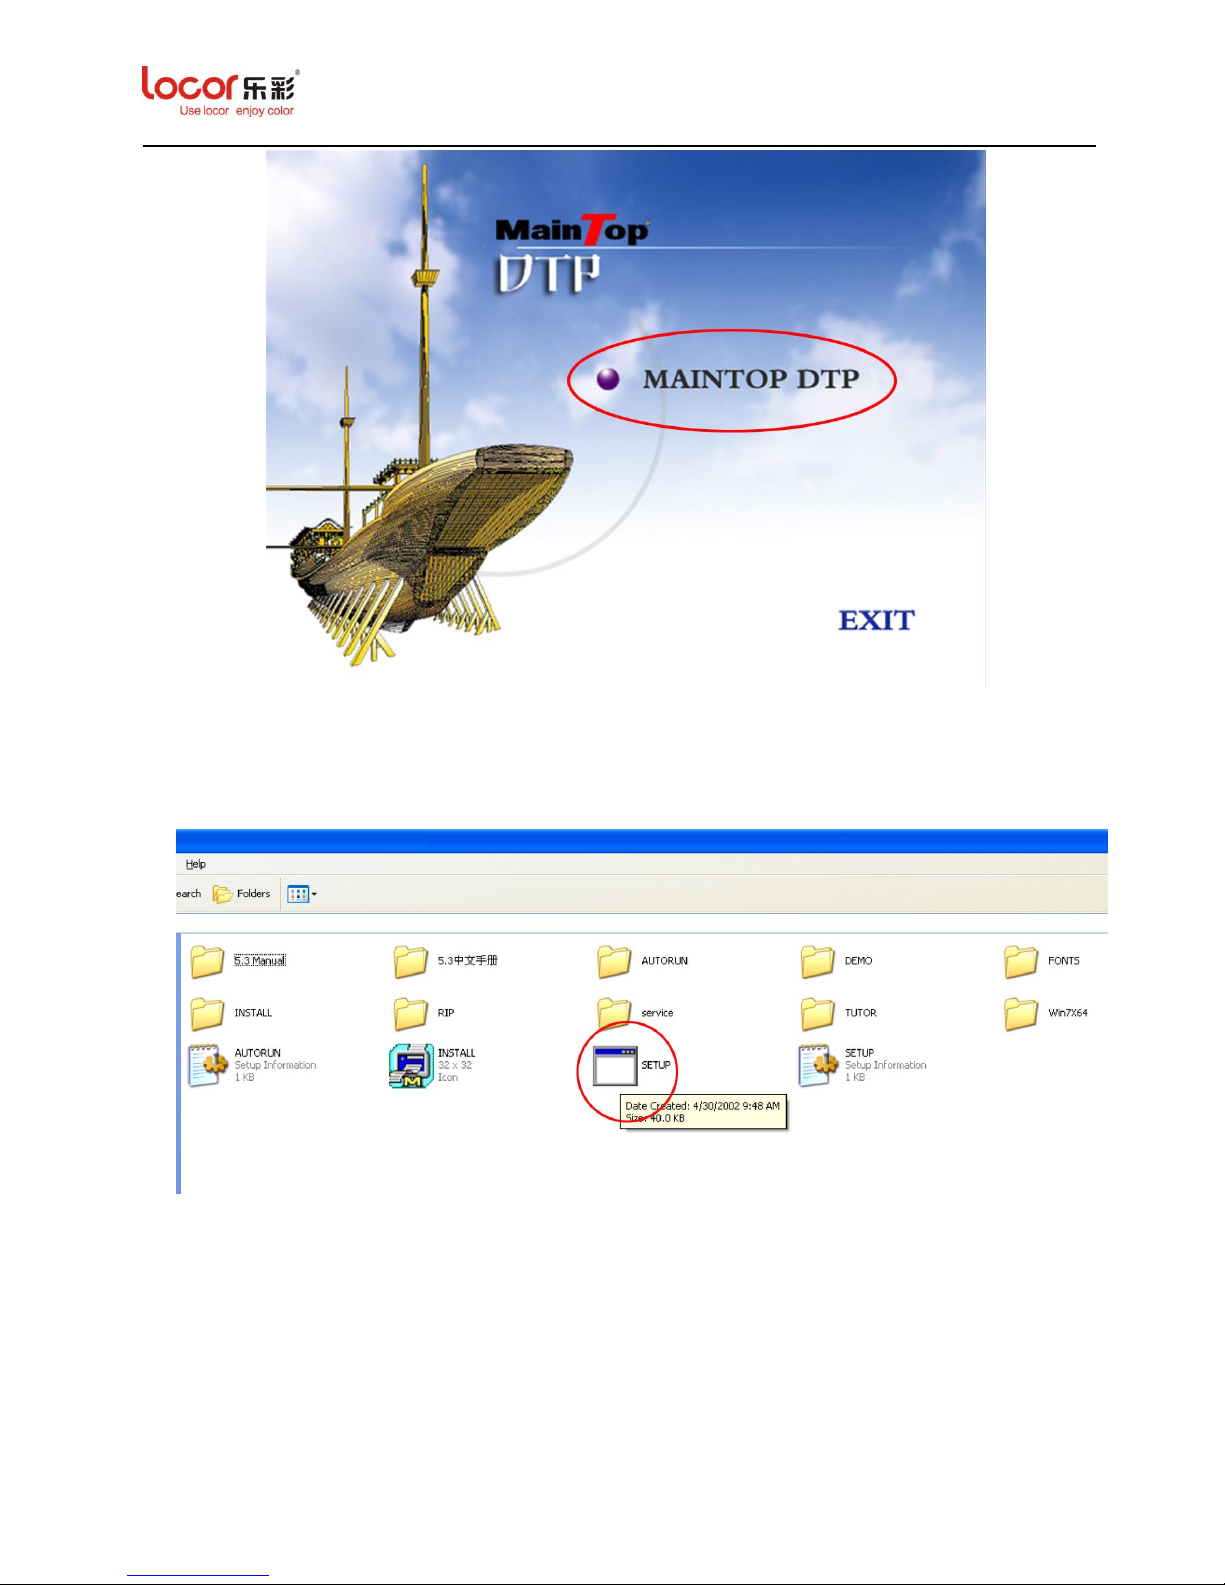
Notice: If the screen above is not displayed, please open the “maintop (E:)”, and then
double click the “SETUP” in the screen below to enter the “MAINTOP DTP” screen.
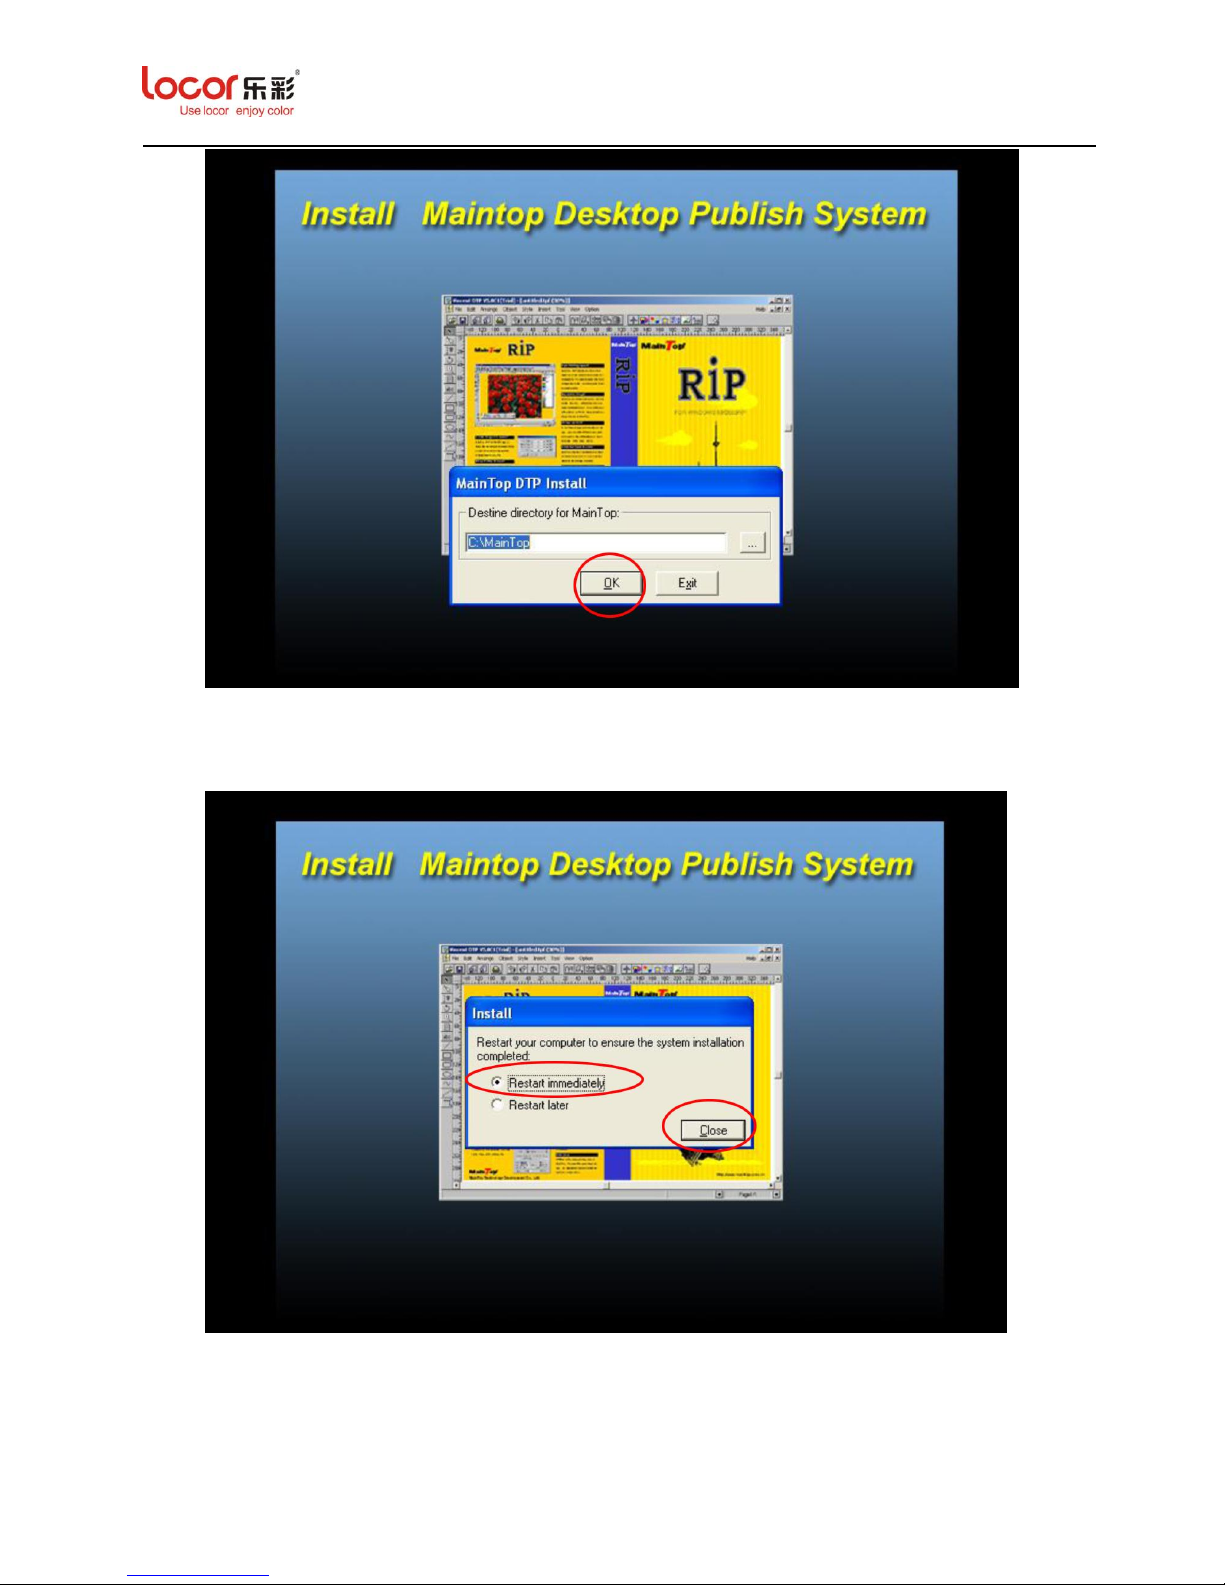
3. Click “MAINTOP DTP”, the screen below is displayed. Then click “OK”.
Notice: the maintop is recommended to be installed in C:\.
Page 35
LC Easyjet-16W/18S User Manual V13GZ.1
35
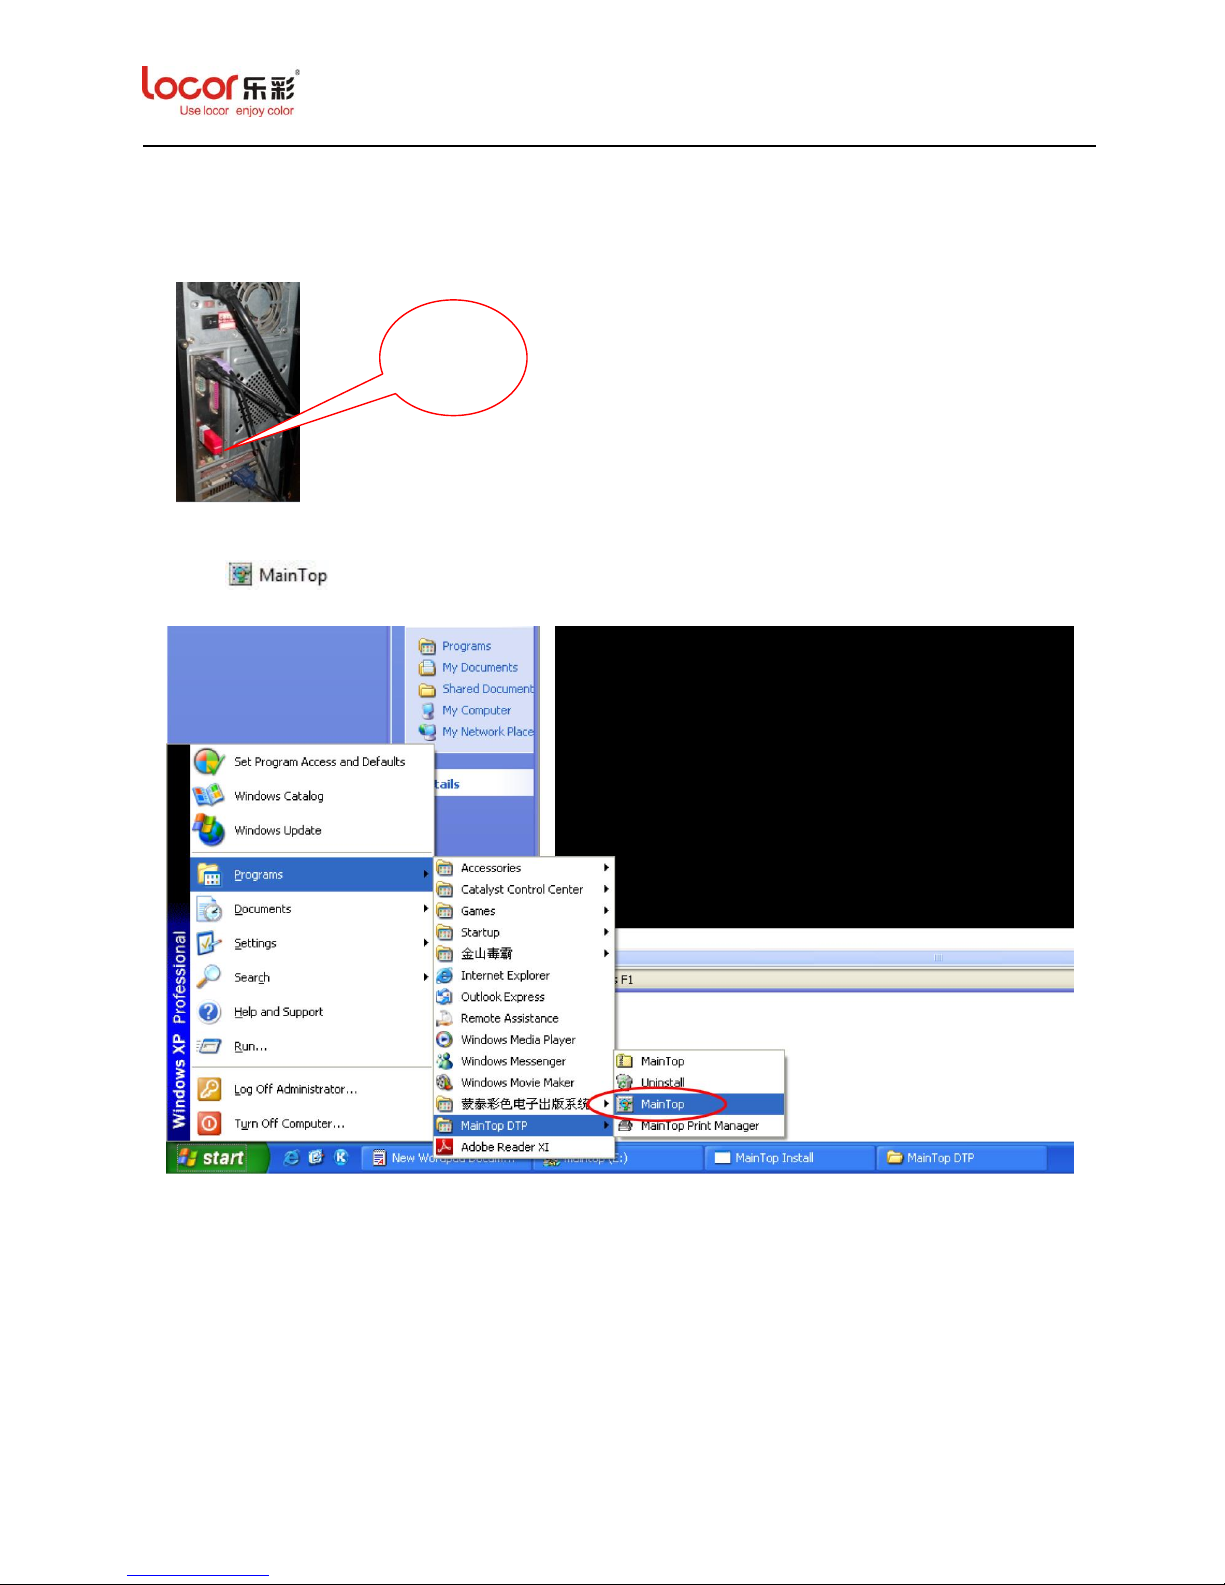
4. Choose “Restart immediately” and then click “Close”.
After restart your PC, the maintop software installation is completed.
Page 36
LC Easyjet-16W/18S User Manual V13GZ.1
36
5.2 Printer Set Up
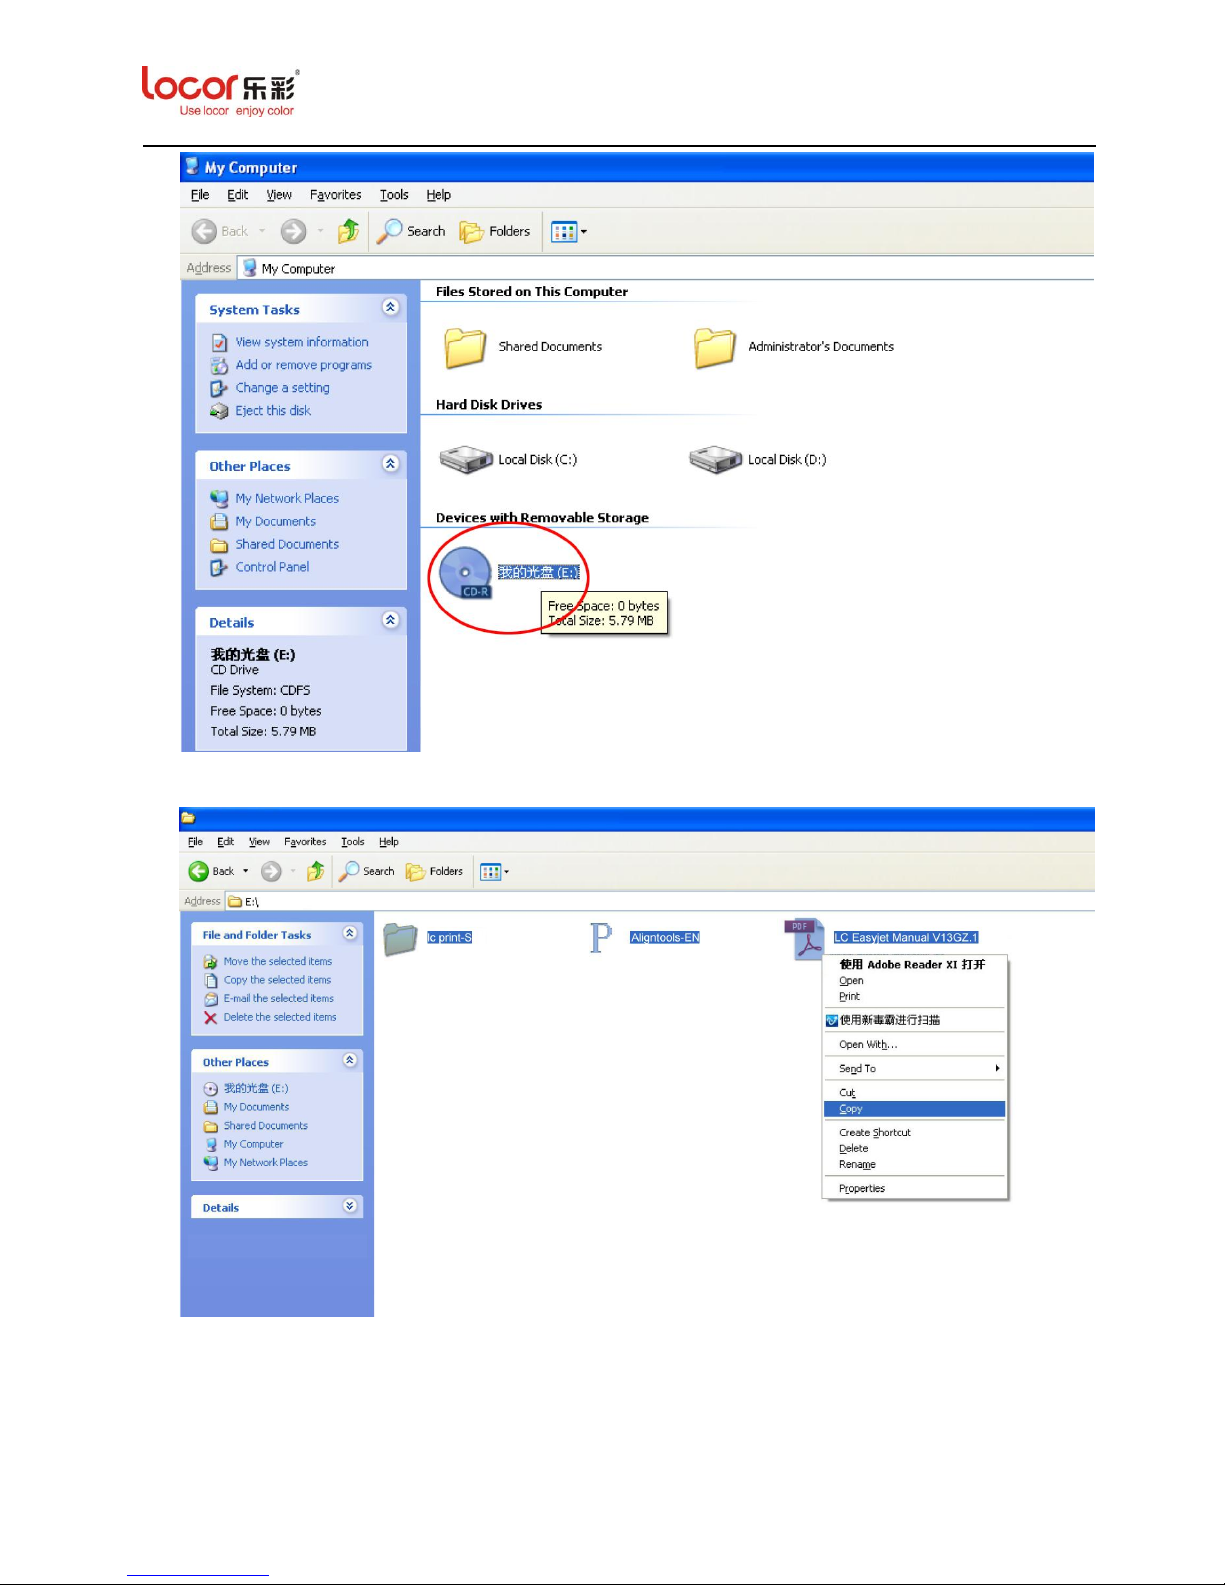
1. Plug maintop dongle into the USB connector of your PC.
2. Click in “Start→Programs→MainTop” to enter the maintop software.
3. Put the Driver CD to the DVD RW.
Maintop
Dongle
Page 37
LC Easyjet-16W/18S User Manual V13GZ.1
37
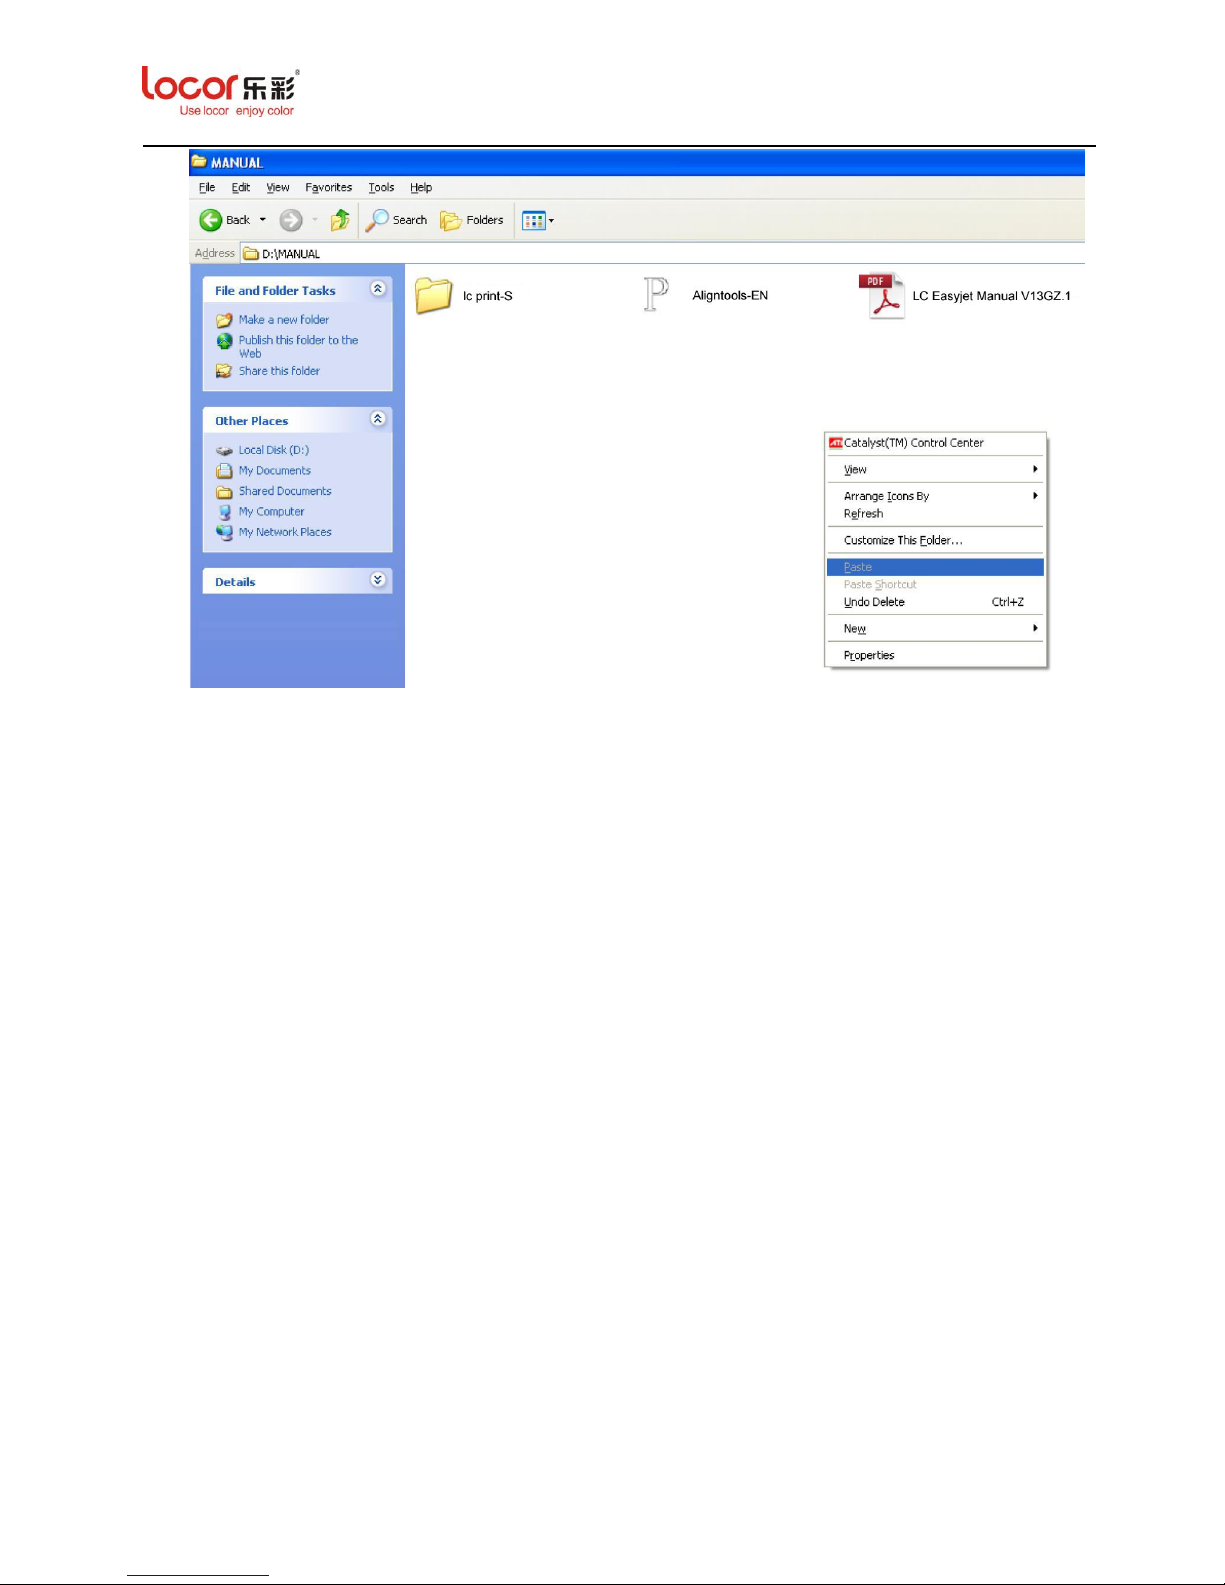
4. Copy all the files as below:
5. Paste all the file to the PC desktop or hard disk.
Page 38
LC Easyjet-16W/18S User Manual V13GZ.1
38
Page 39
LC Easyjet-16W/18S User Manual V13GZ.1
39
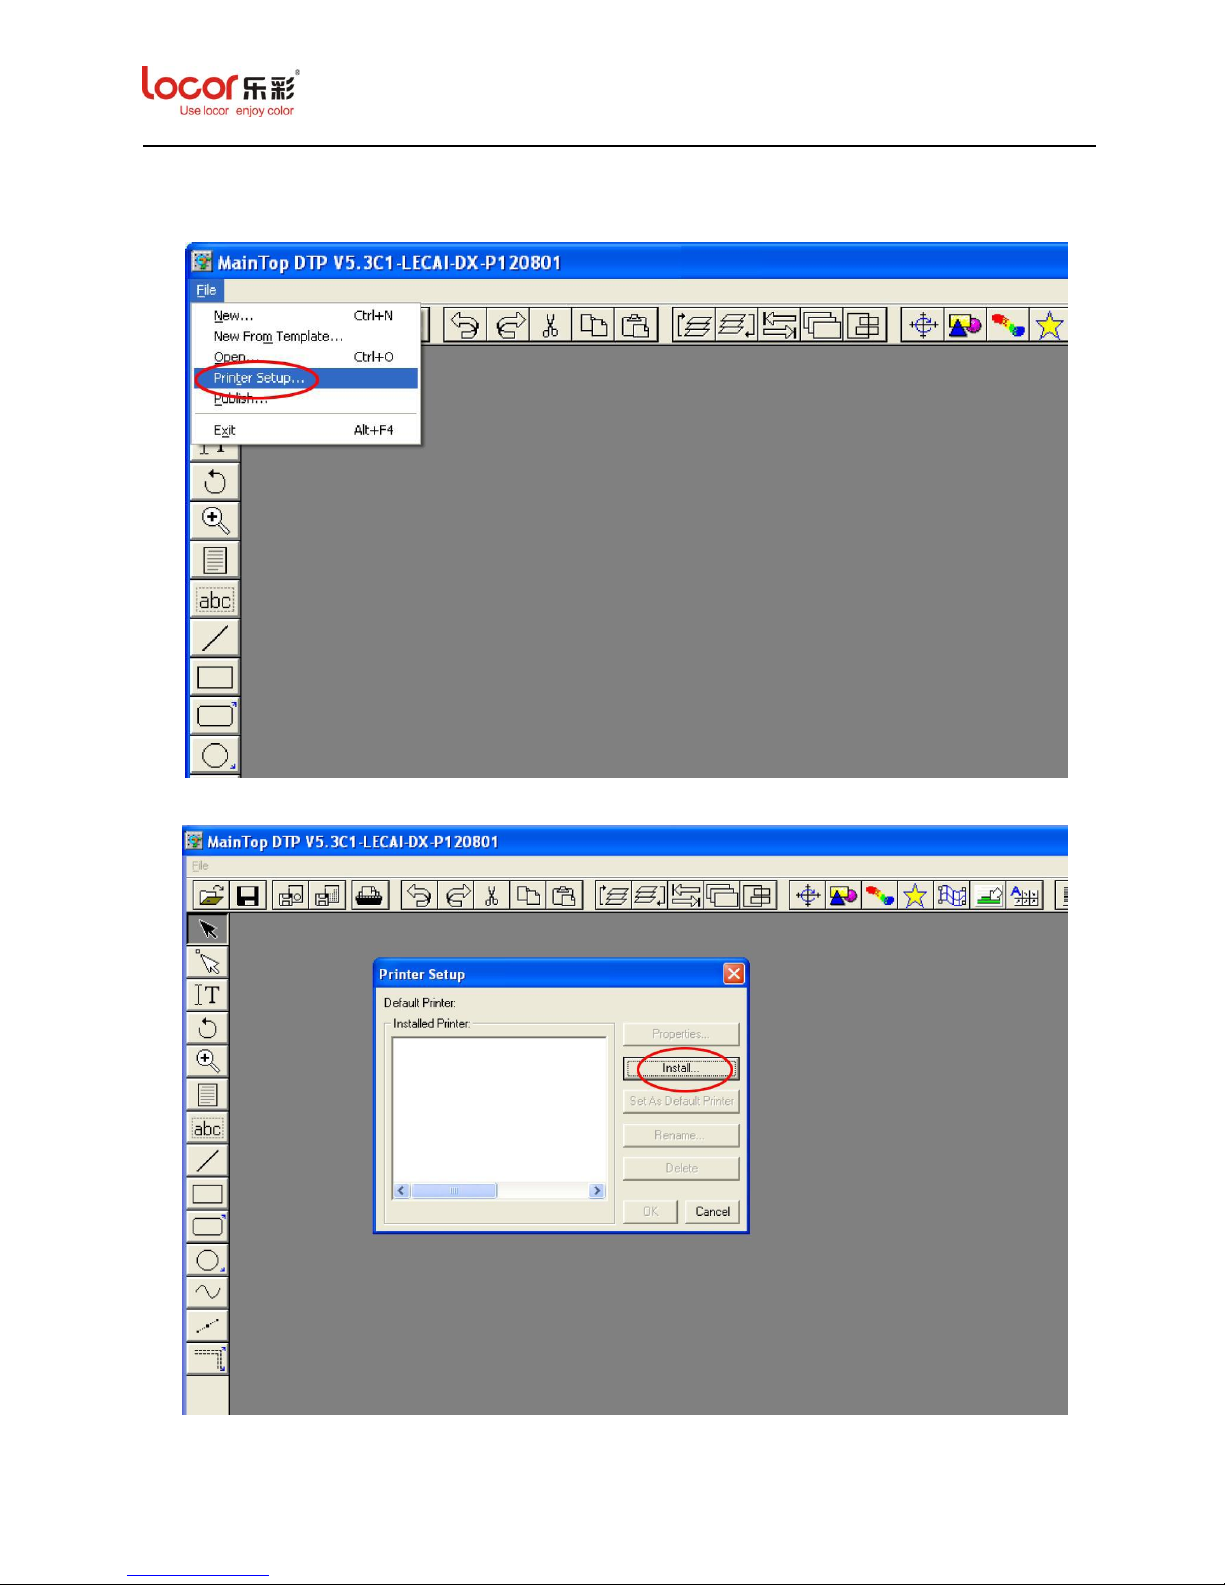
6. Click “File→Printer Setup” in the screen below.
7. Click “Install” option in the following screen.
Page 40
LC Easyjet-16W/18S User Manual V13GZ.1
40
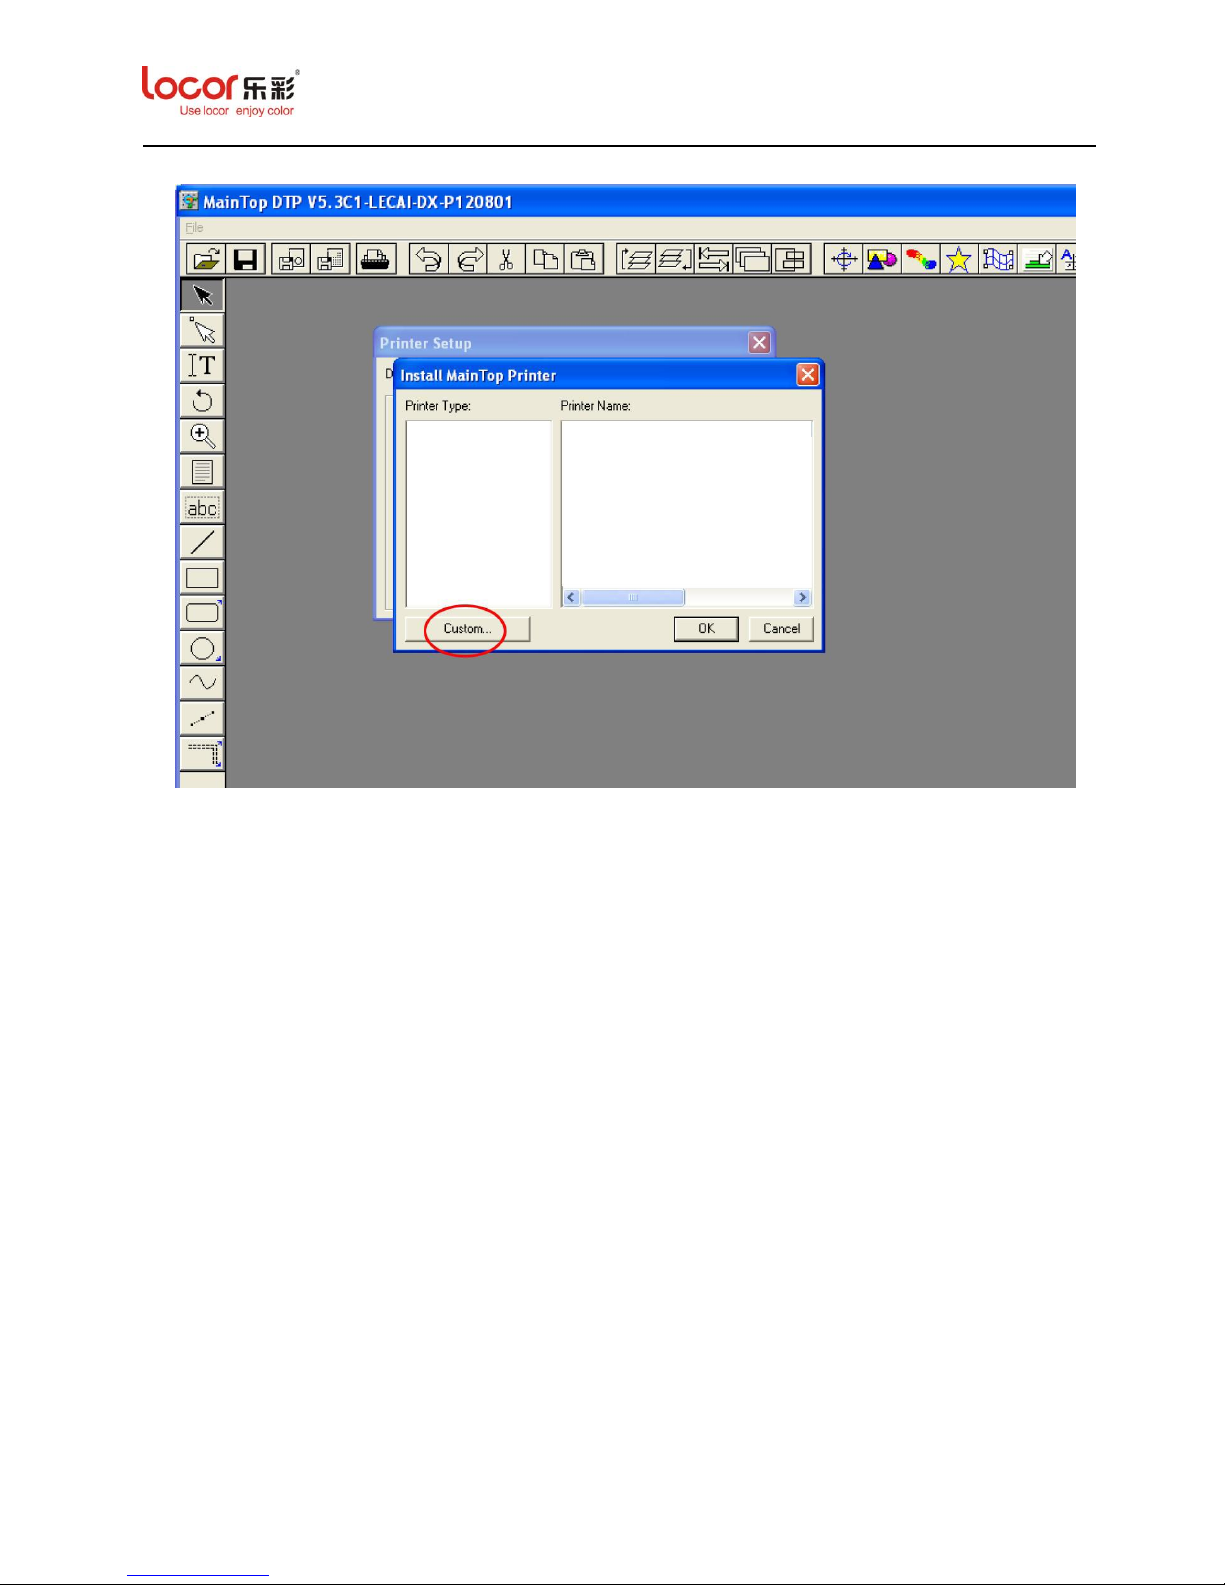
8. Click “Custom” option in the following screen.
Page 41
LC Easyjet-16W/18S User Manual V13GZ.1
41
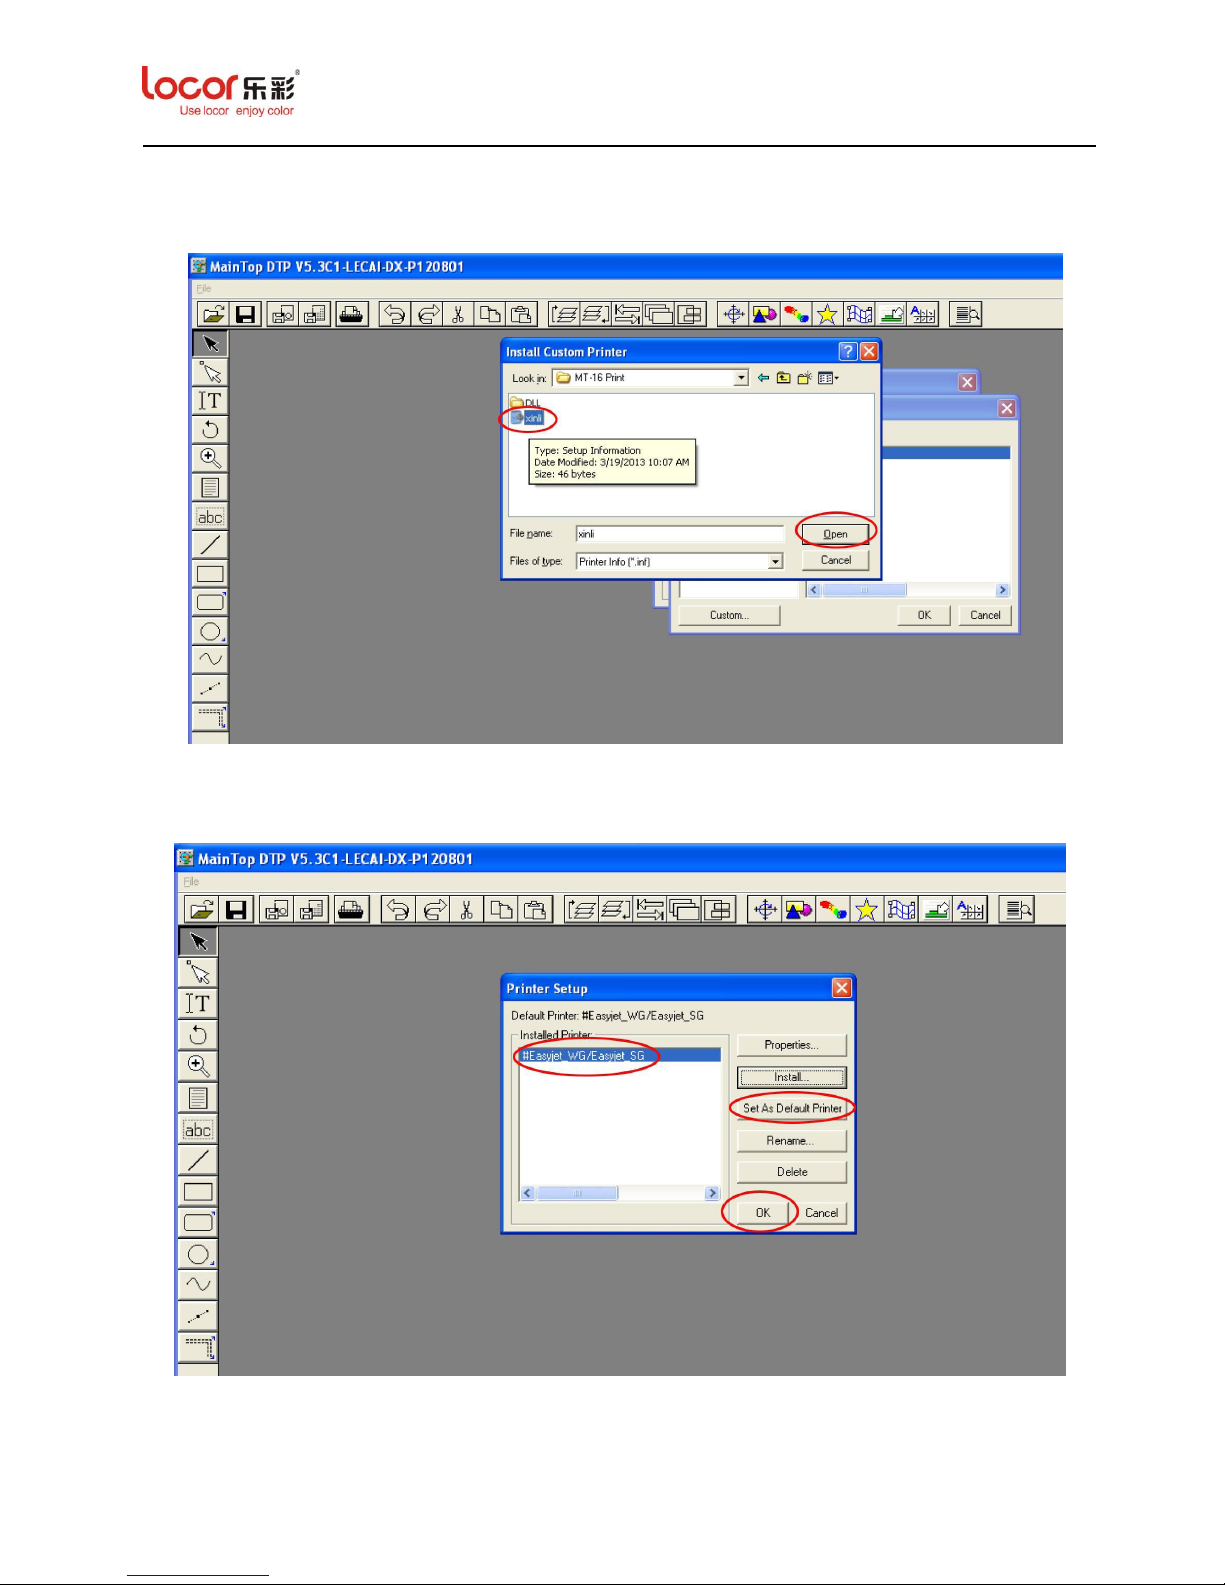
9. Find the Maintop Driver location where you pasted before and select the “xinli.inf” file and
then click “Open”.
10. The screen returns to the “Printer Setup”. Click “Set As Default Printer” to set the printer
model you selected as the default printer and then click “OK”.
11. After click “OK”, the procedure of printer setup is completed.
Page 42
LC Easyjet-16W/18S User Manual V13GZ.1
42
5.3 Maintop Application
This section explains how to use the Maintop software and how to set up the related
parameters before printing the image.
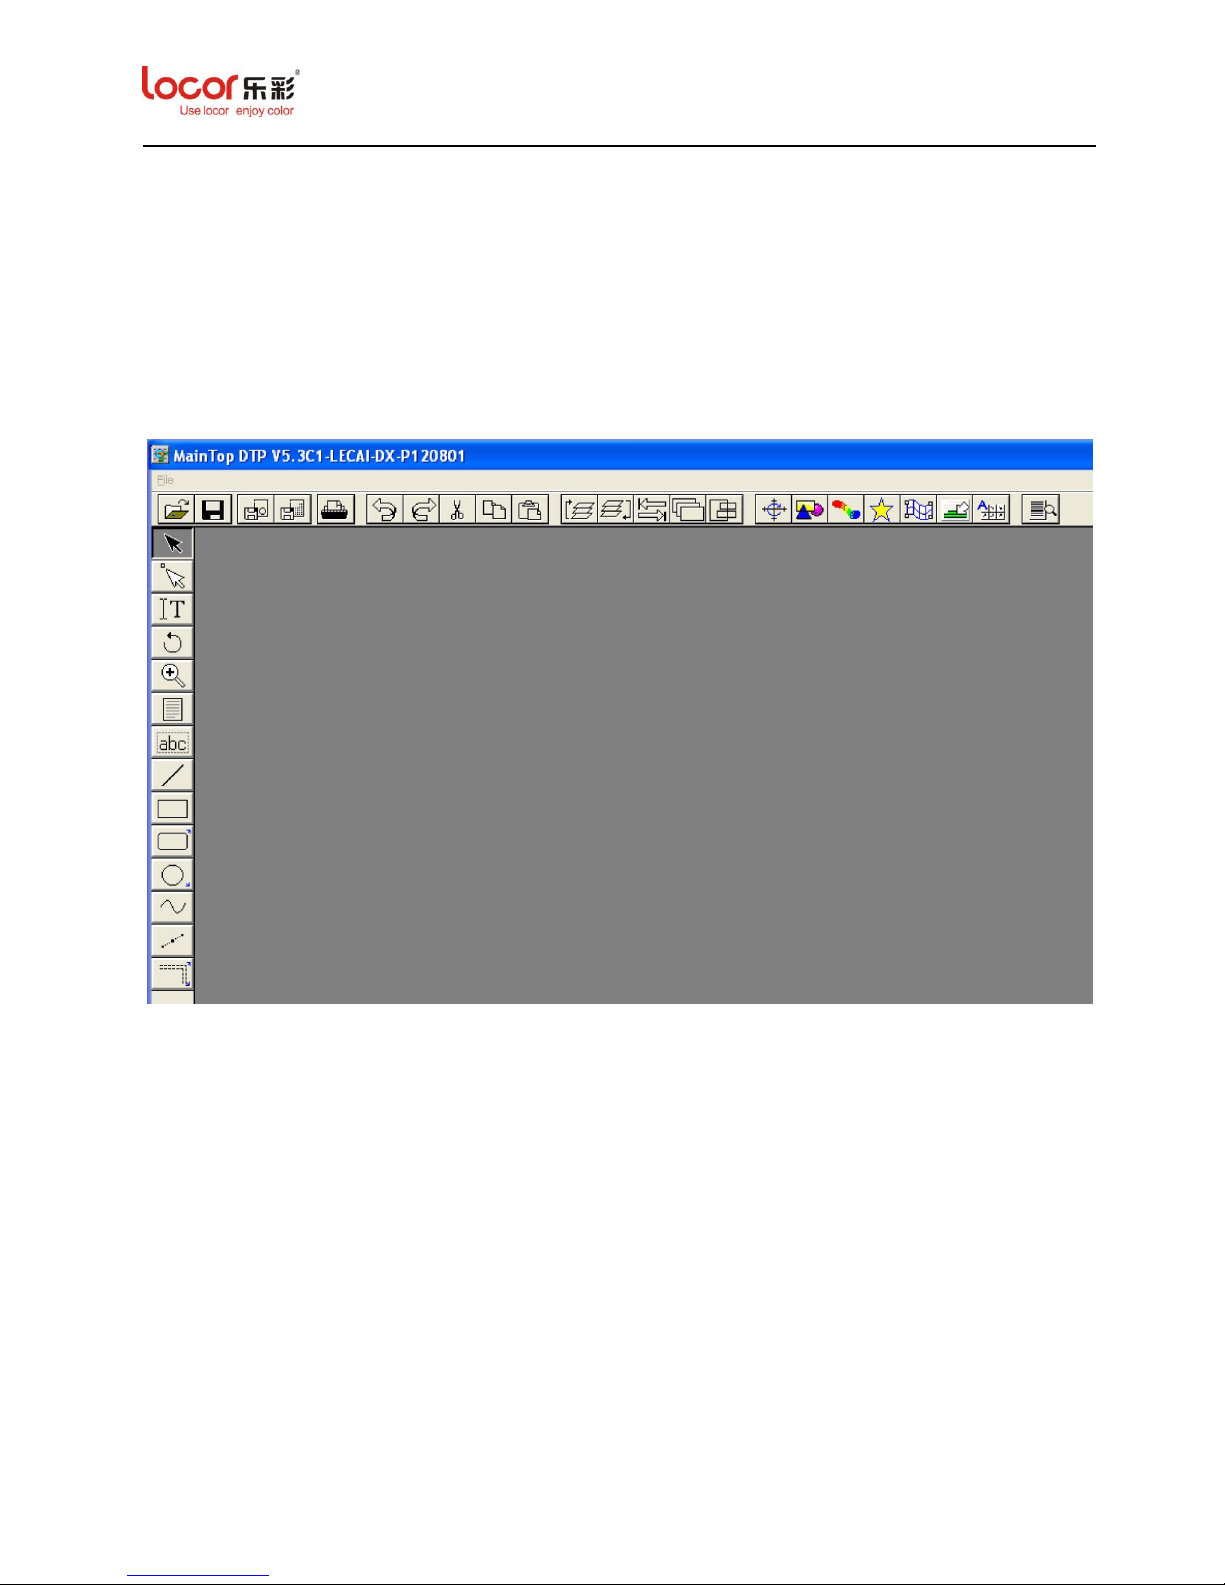
1. The screen returns to “MainTop DTP V5.3C1-LECAI” as below.
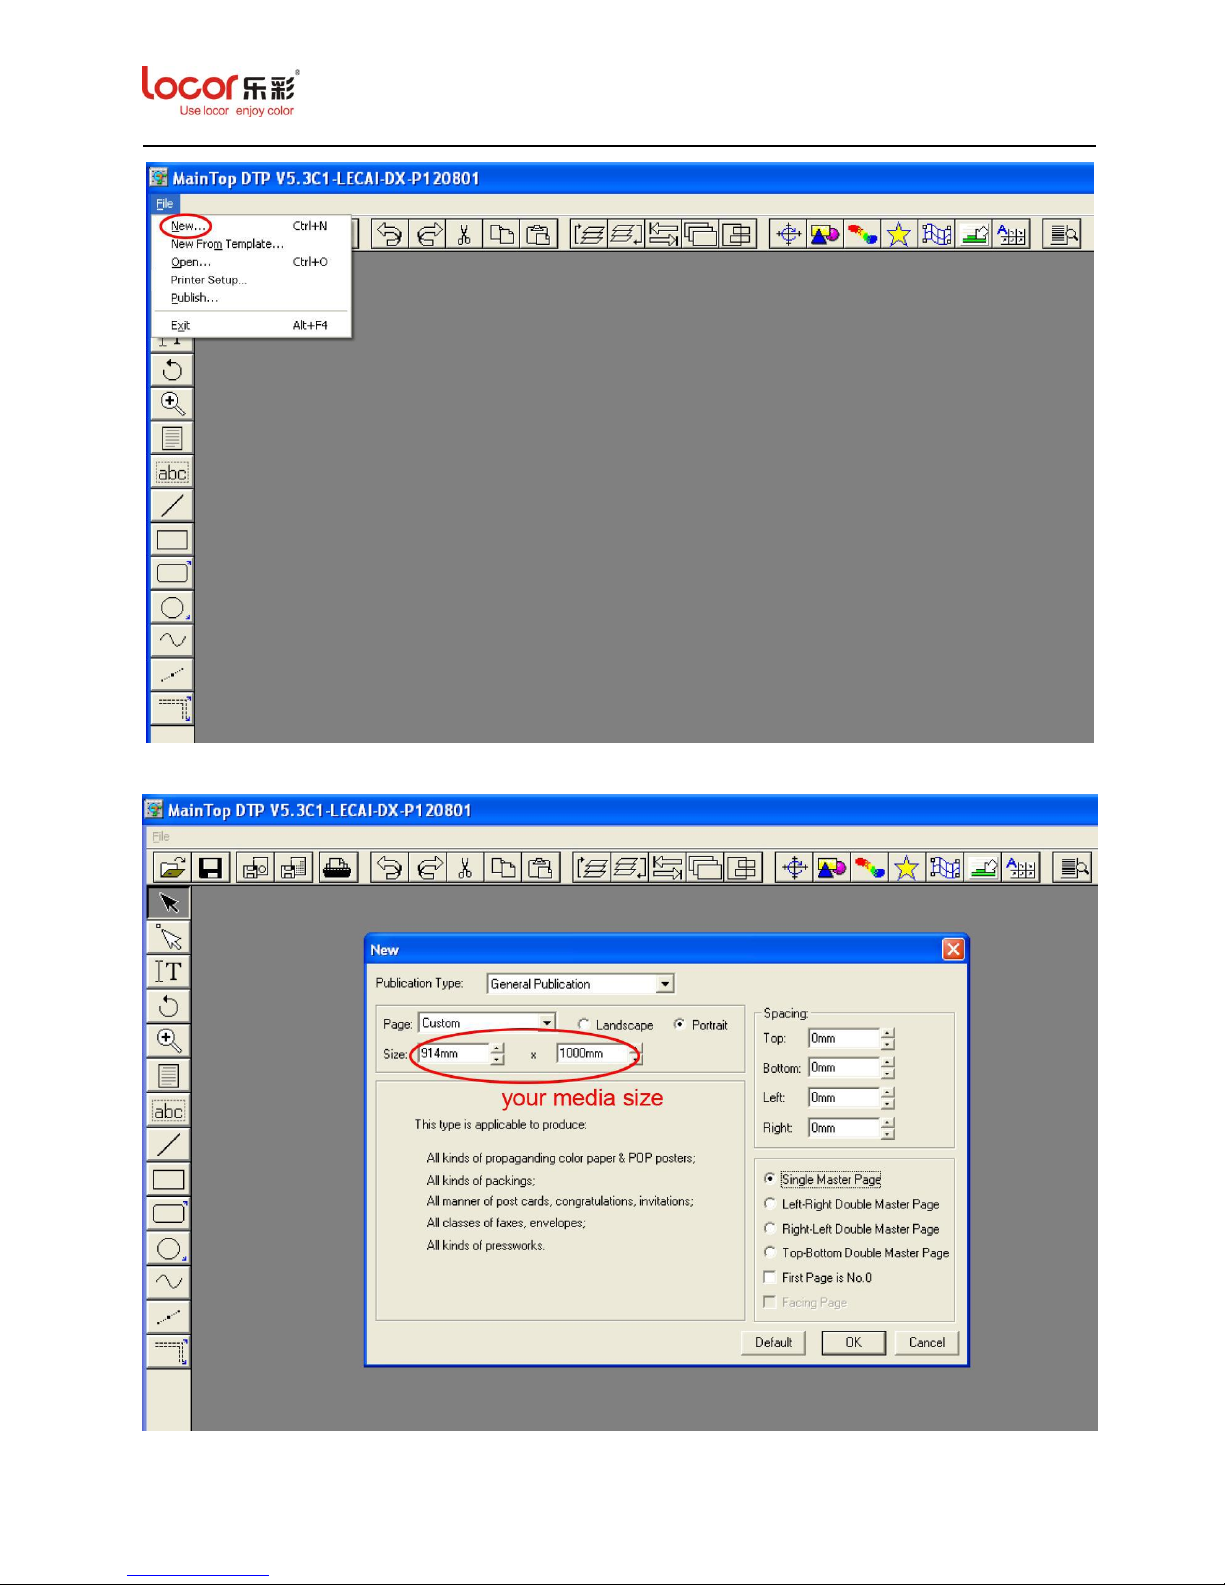
2. Click “File→New” in the screen below.
Page 43
LC Easyjet-16W/18S User Manual V13GZ.1
43
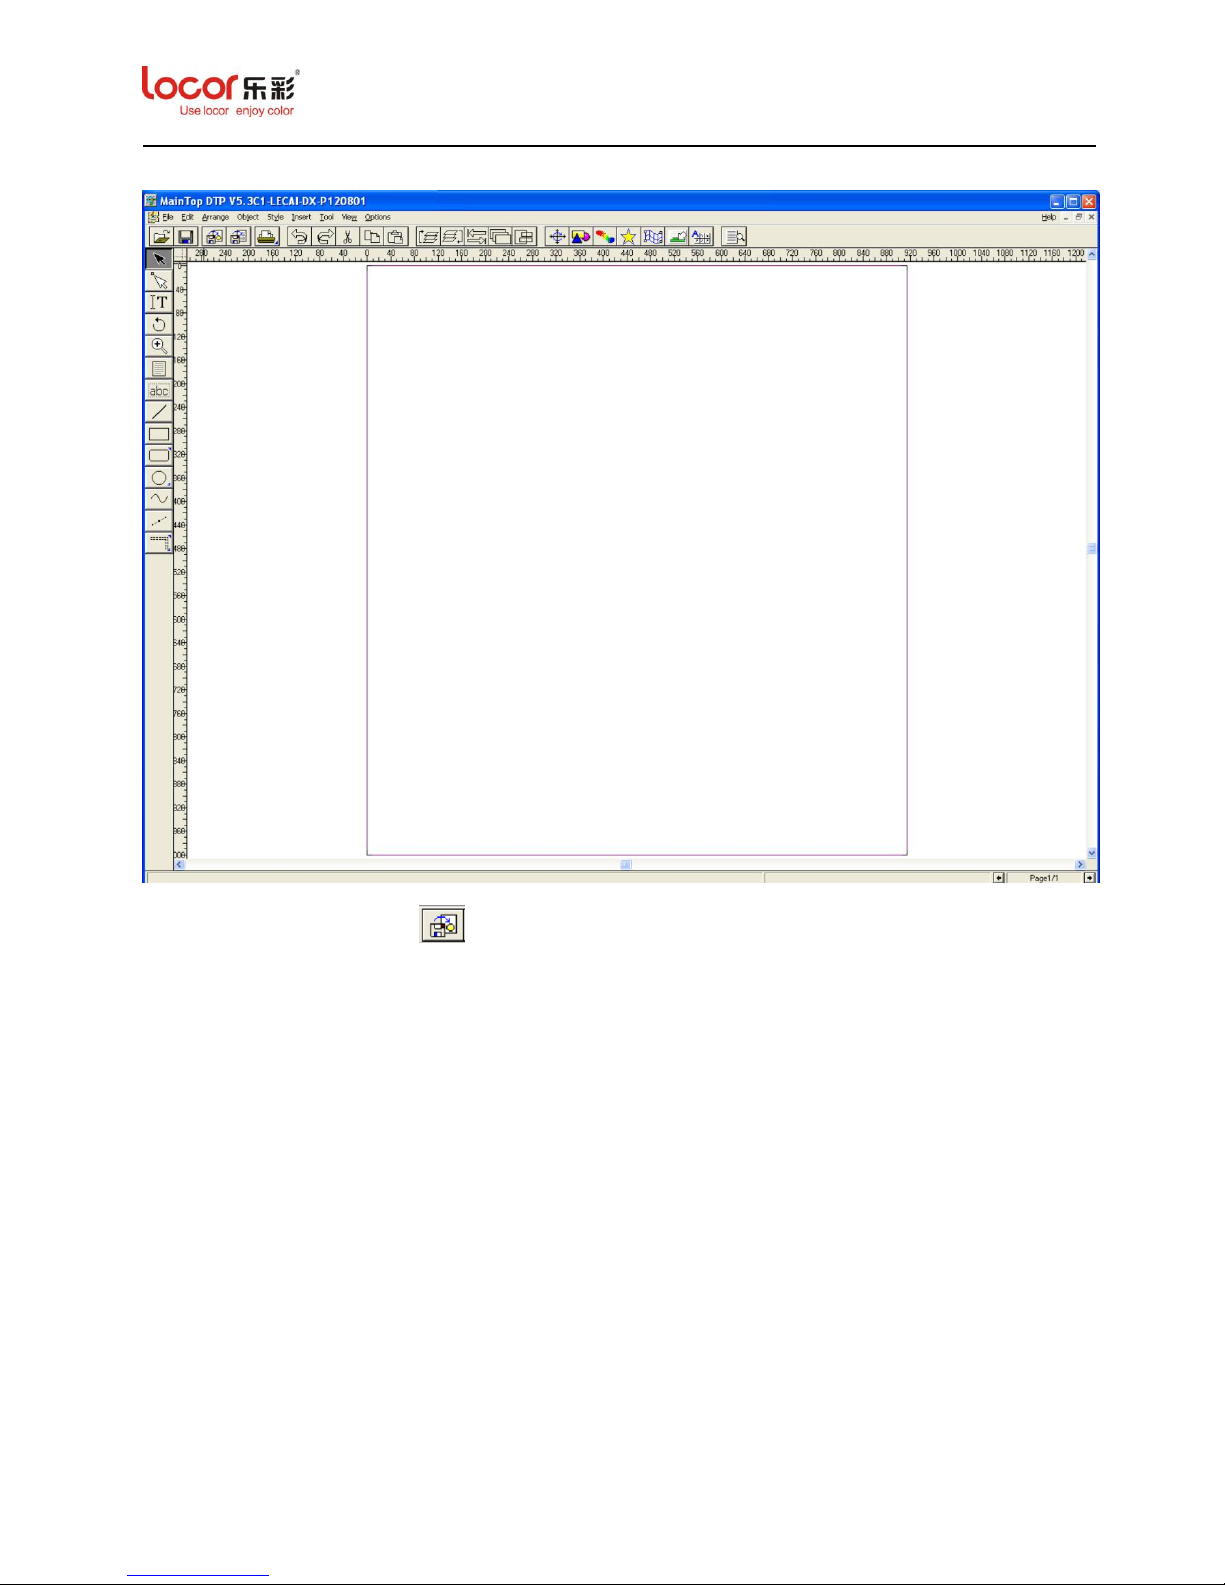
3. The following screen is displayed.
Page 44
LC Easyjet-16W/18S User Manual V13GZ.1
44
4. Click “OK”, the screen below is displayed.
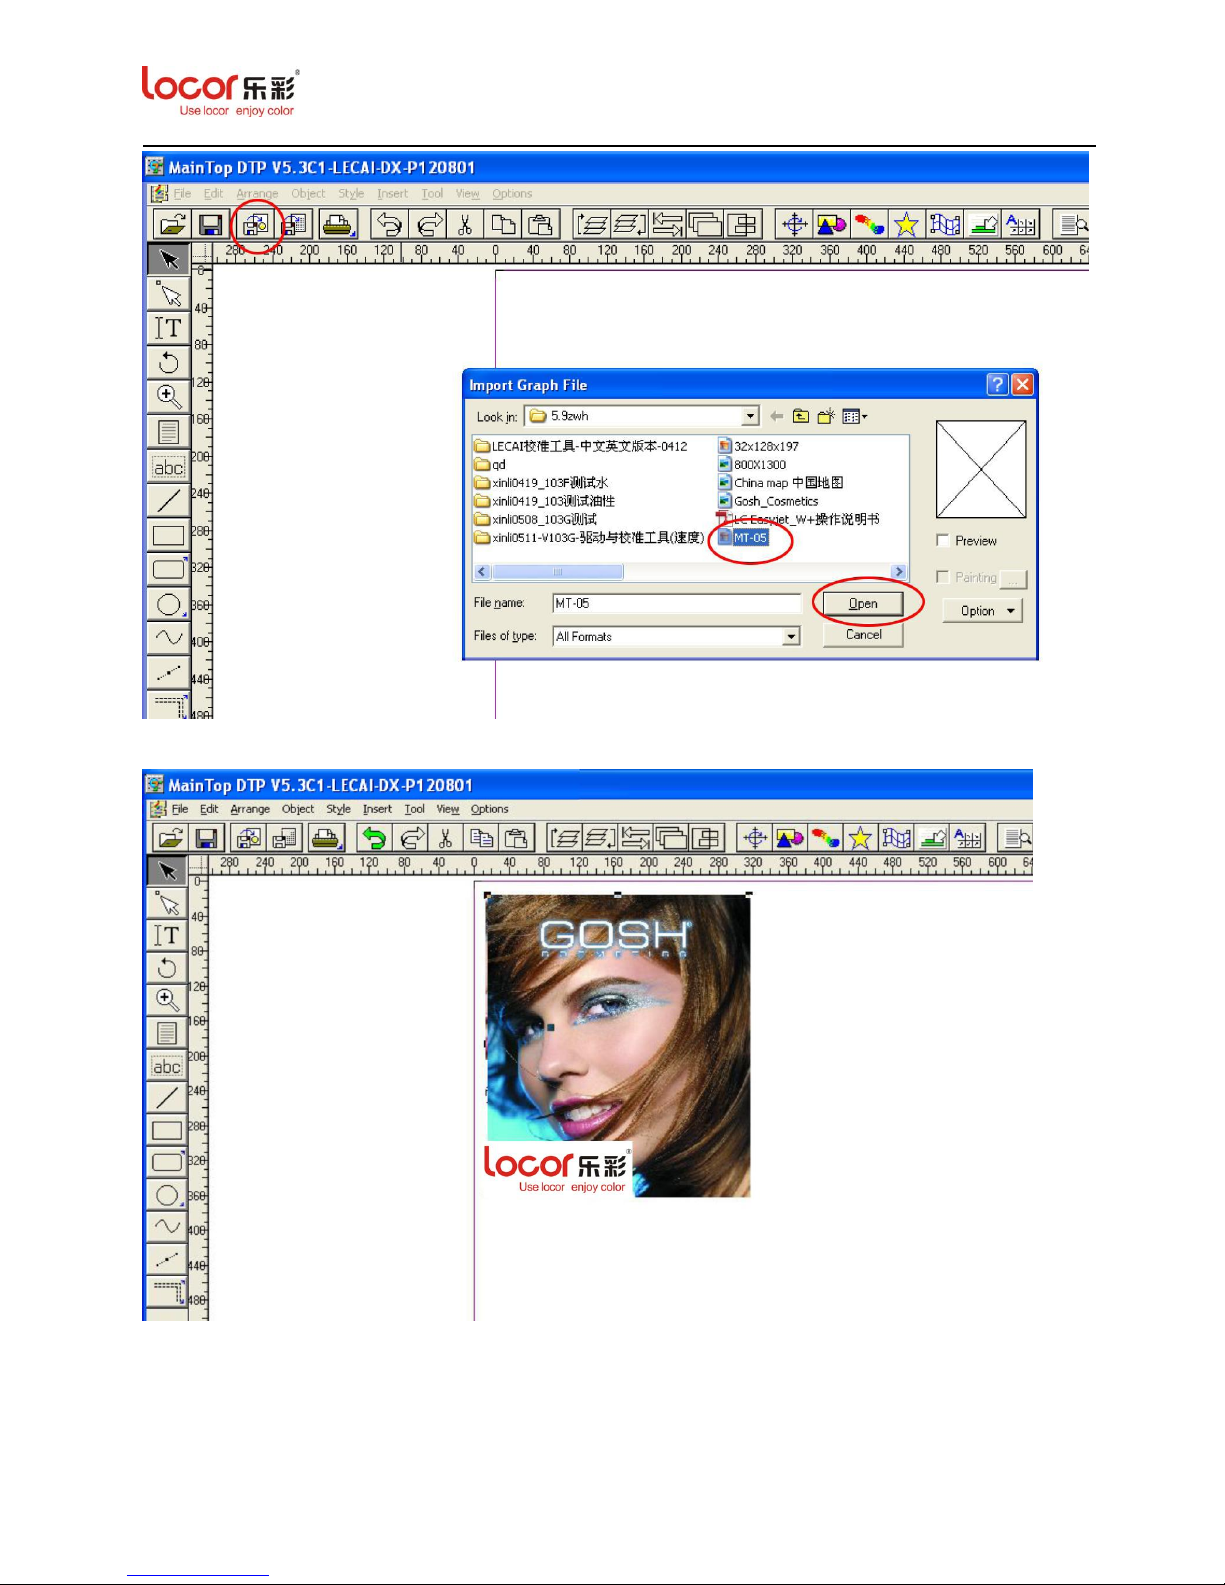
5. Click import image icon to select your job, the screen below is displayed:
Page 45
LC Easyjet-16W/18S User Manual V13GZ.1
45
6. Click “Open”, the screen below is displayed.
Page 46
LC Easyjet-16W/18S User Manual V13GZ.1
46
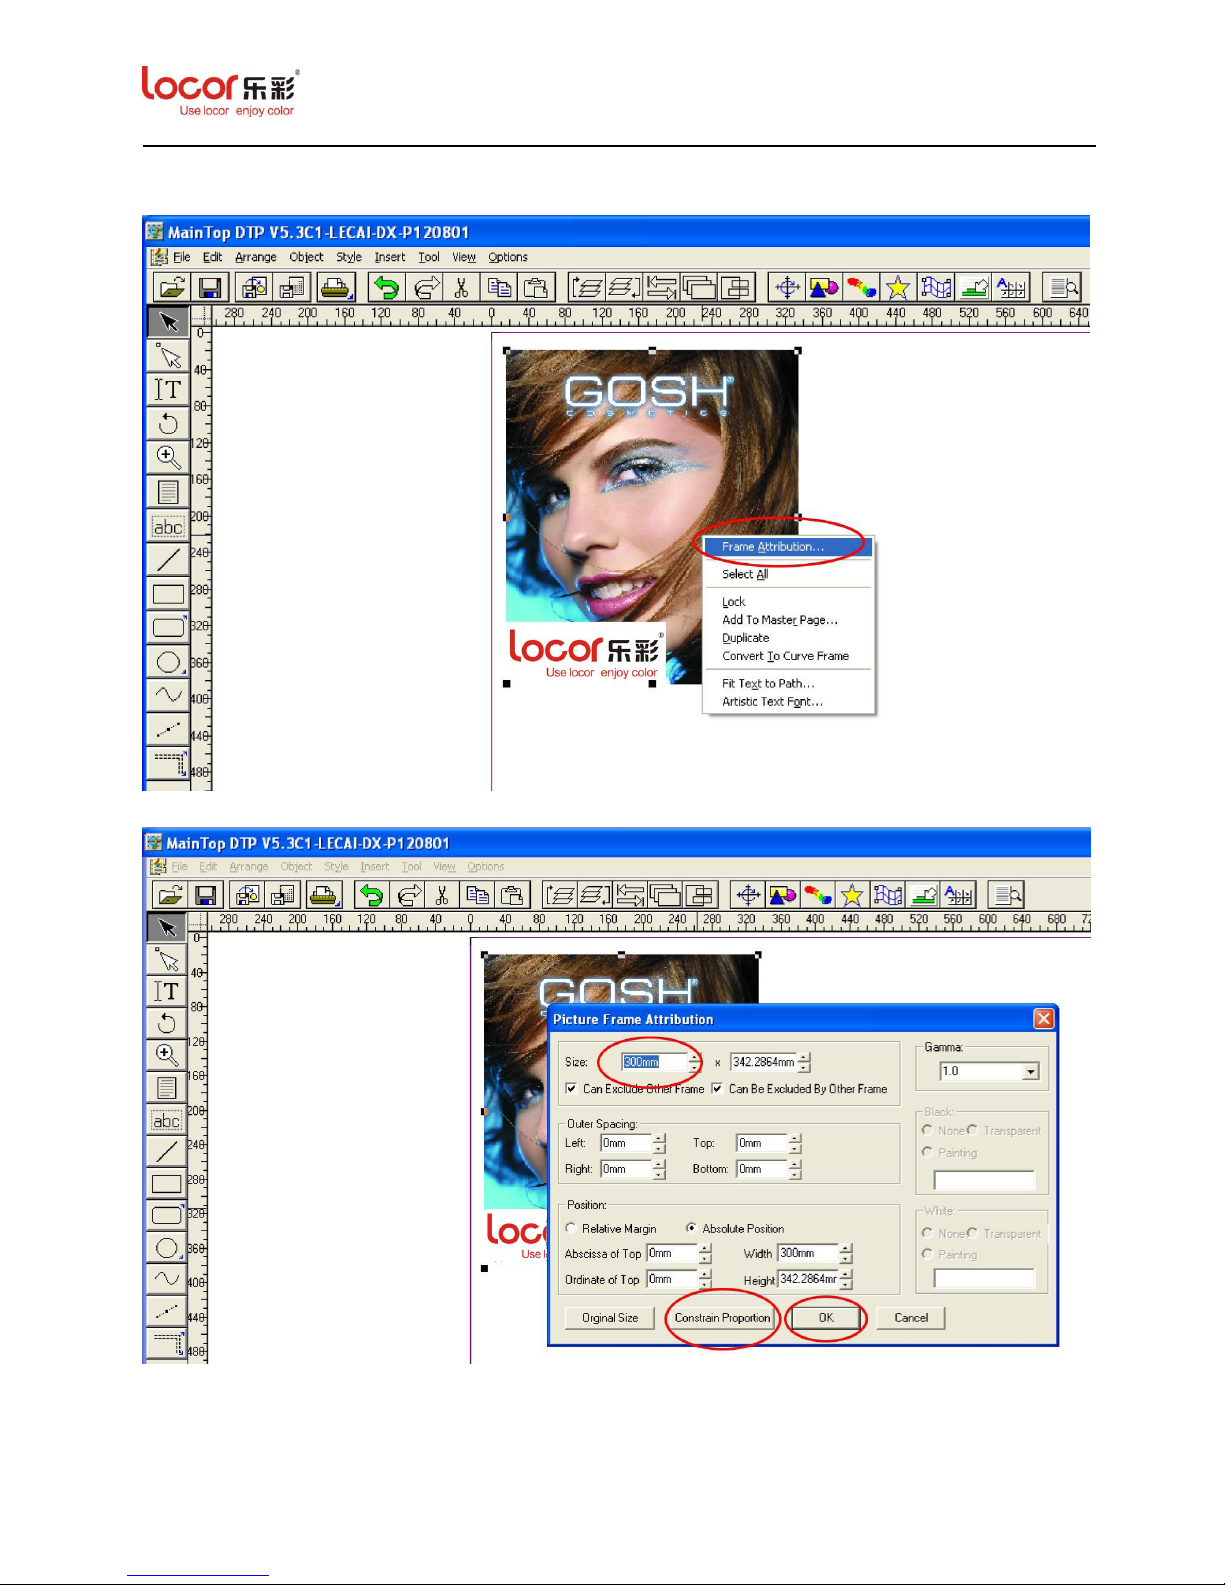
7. Right click the image and select “Frame Attribution” option to set up the image size, the
screen below is displayed.
8. After input your size, must click the “Constrain Proportion” option, and then click “OK”:
Page 47
LC Easyjet-16W/18S User Manual V13GZ.1
47
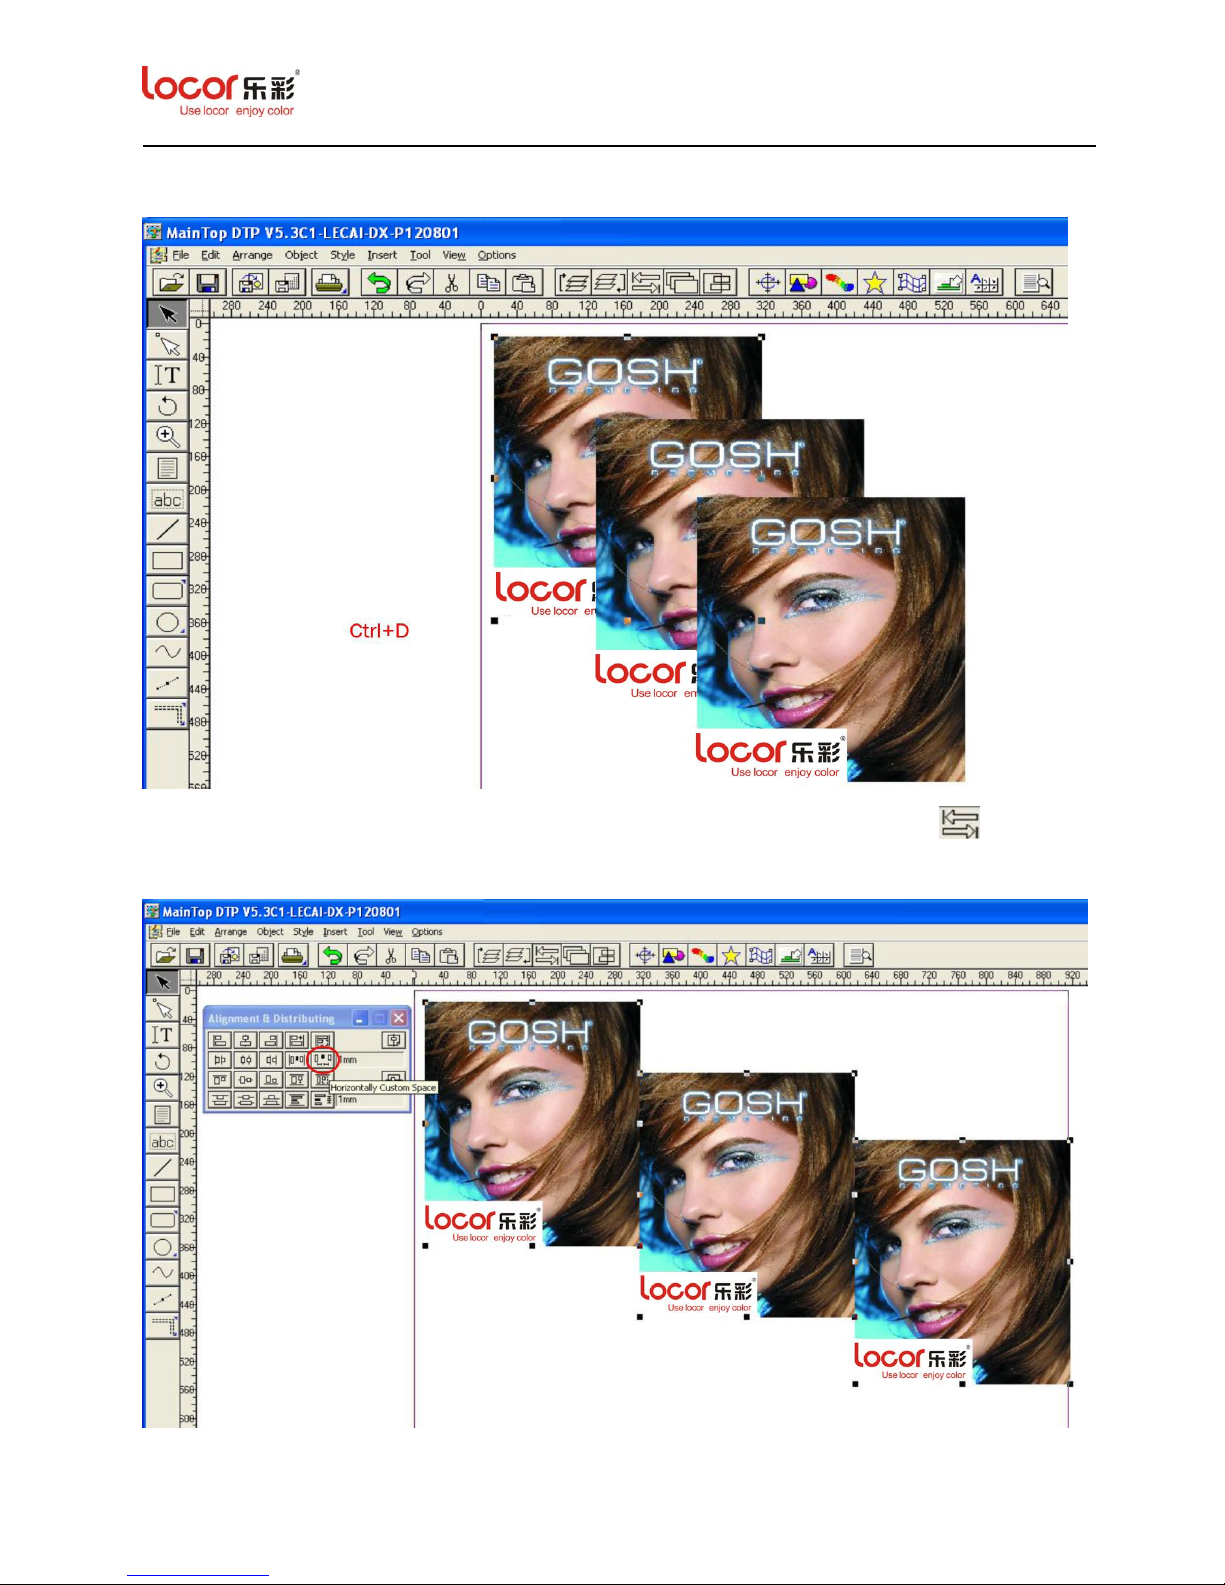
9. Press “Ctrl+D” can copy and paste the image at the same time, the screen below is
displayed.
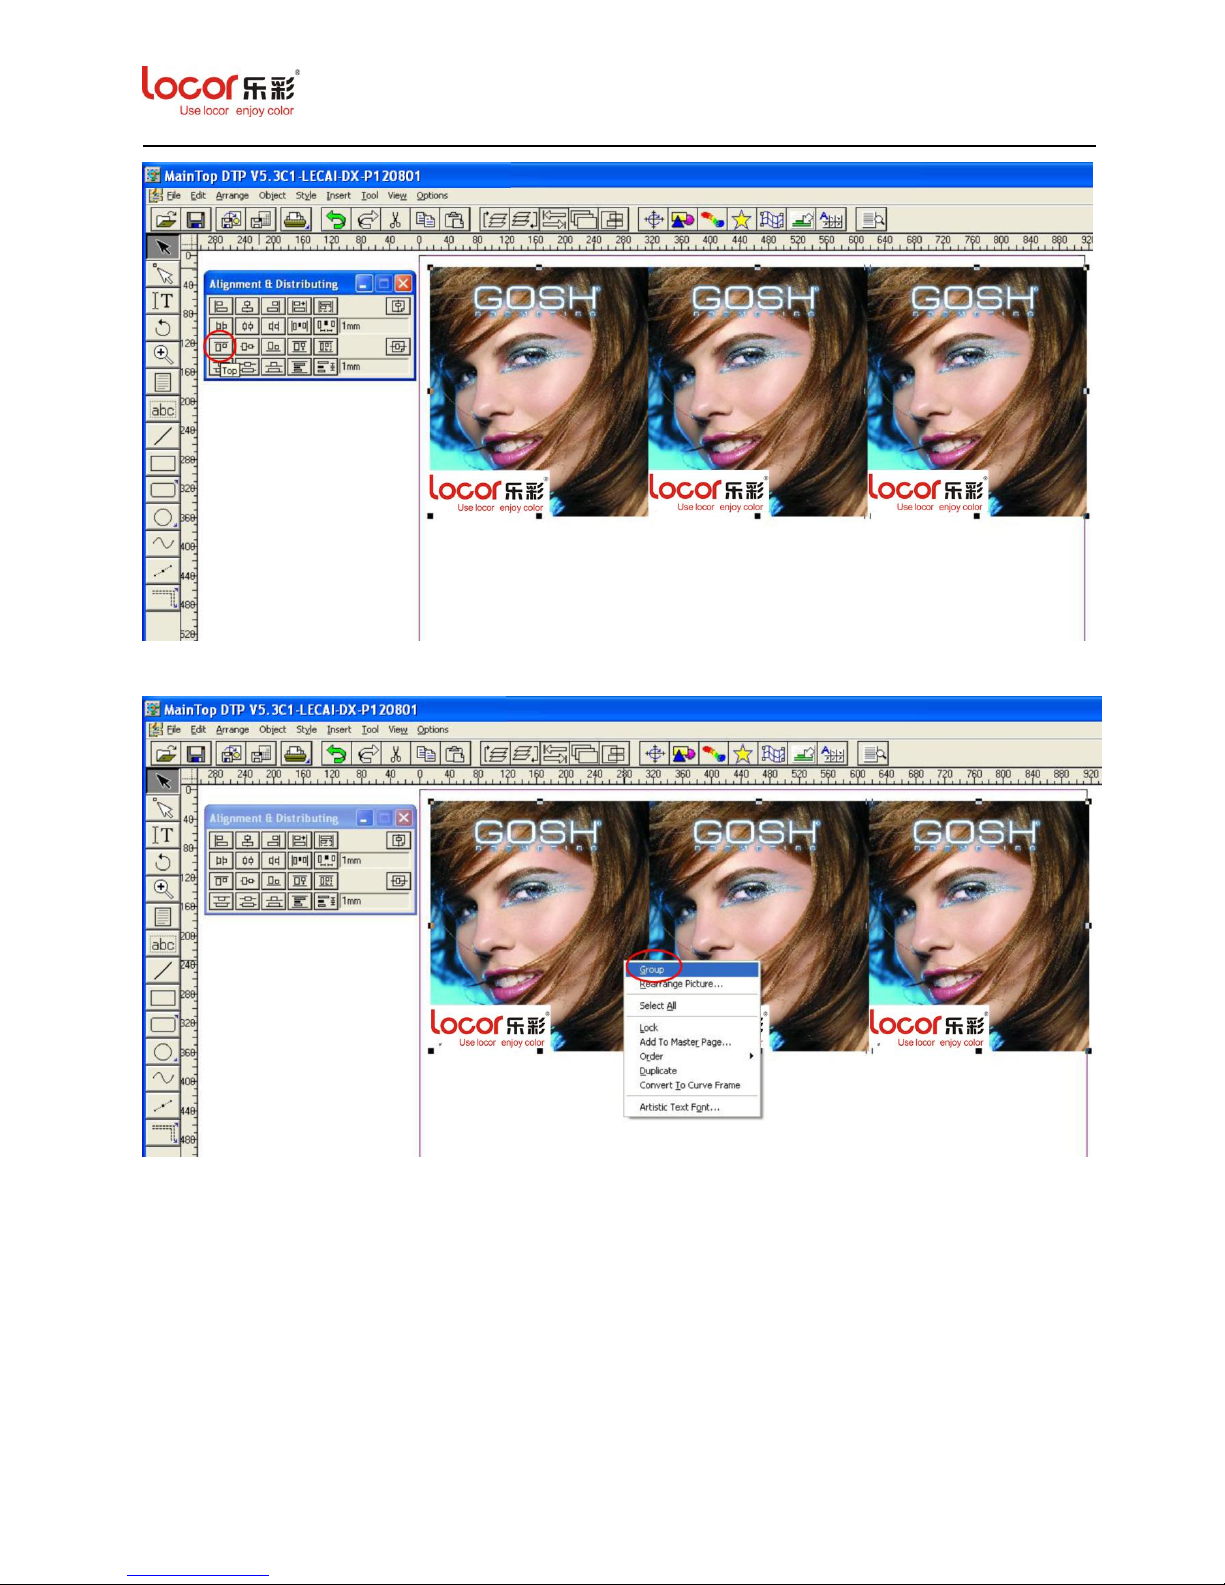
10. Select all images and then click “Show Alignment & Distributing Panel” icon to align the
image, the screen below is displayed:
Page 48
LC Easyjet-16W/18S User Manual V13GZ.1
48
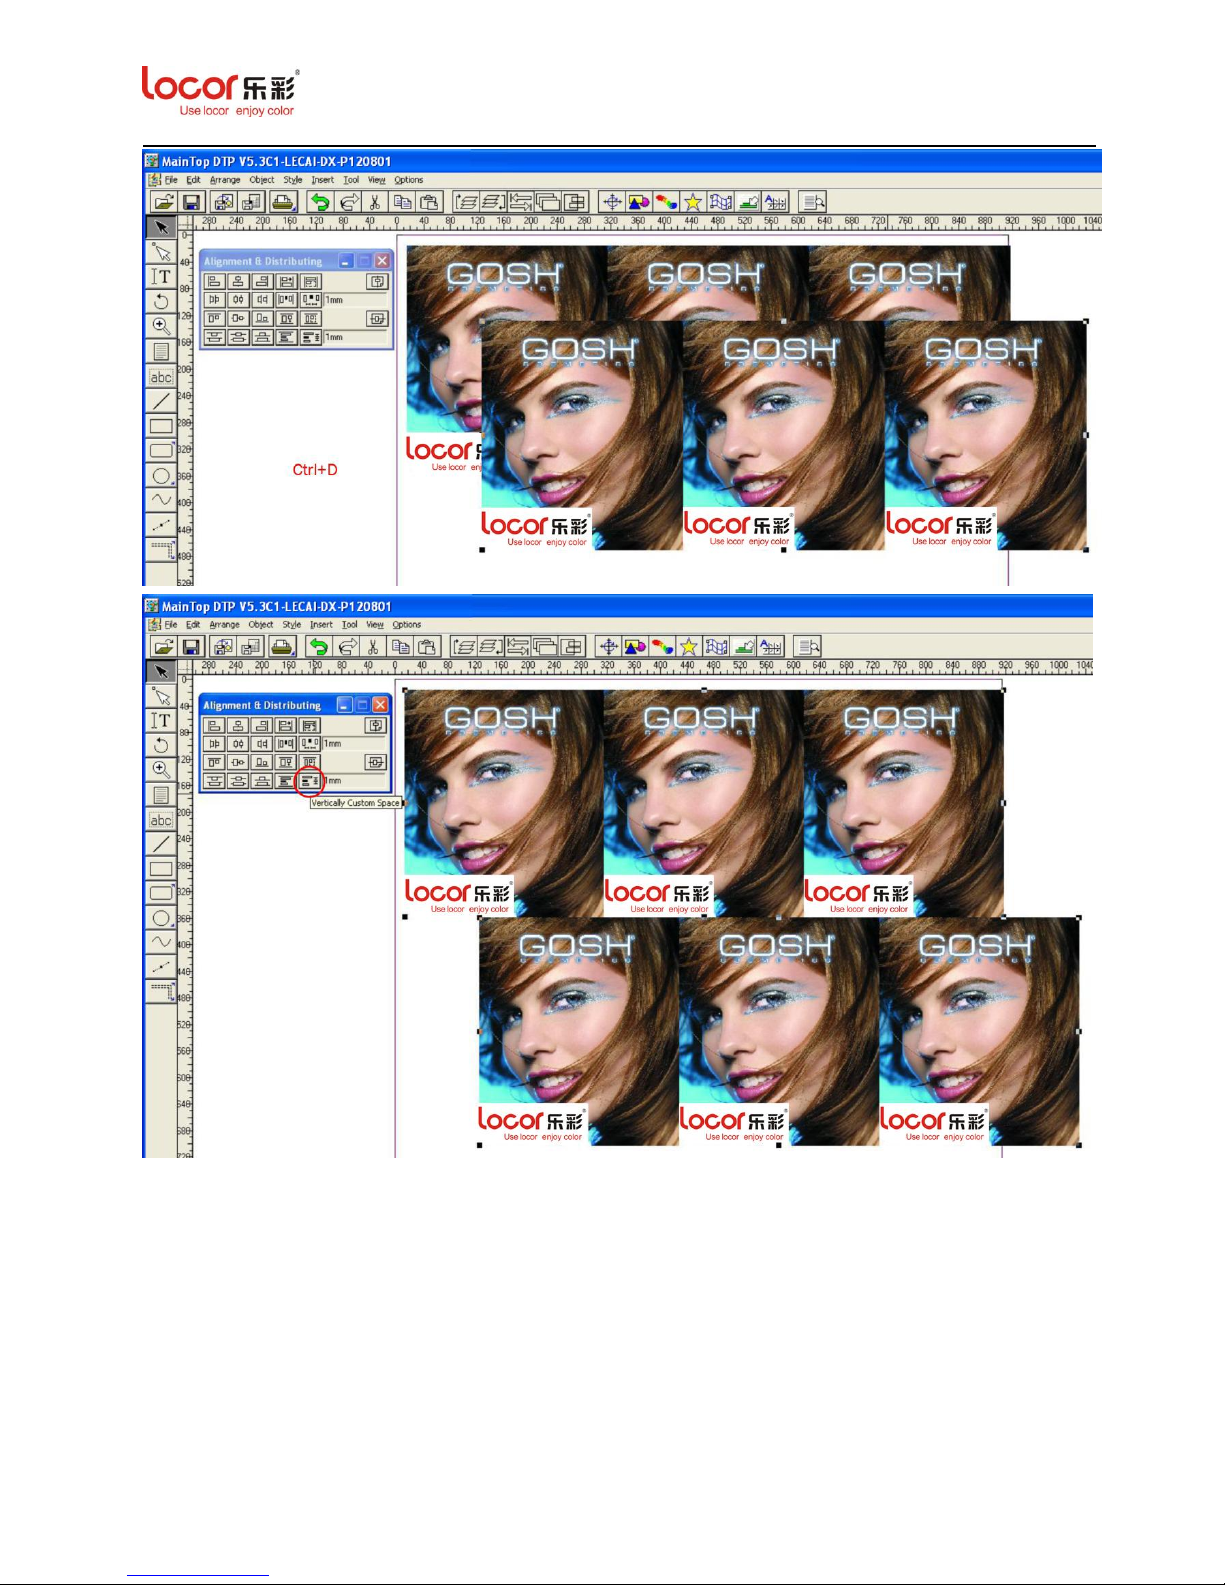
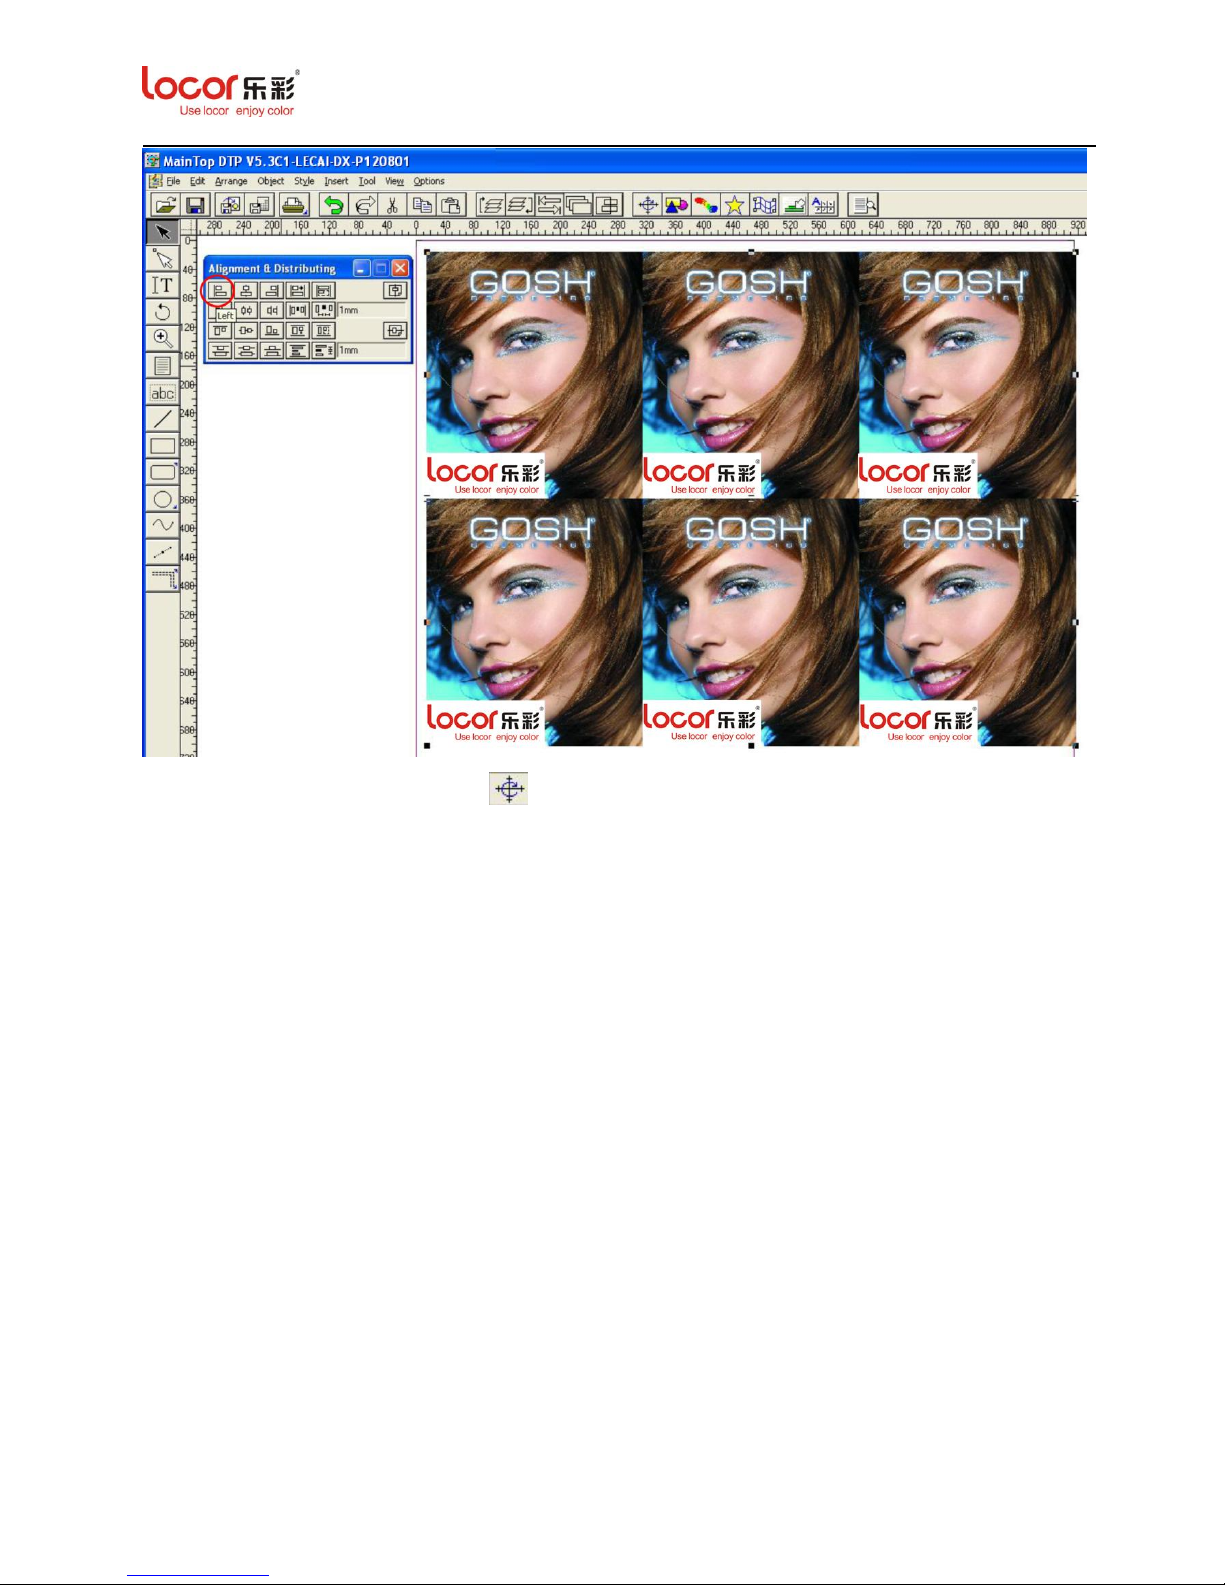
Select all the image and then right click Group, Ctrl + D can copy and paste this group.
Page 49
LC Easyjet-16W/18S User Manual V13GZ.1
49
Page 50
LC Easyjet-16W/18S User Manual V13GZ.1
50
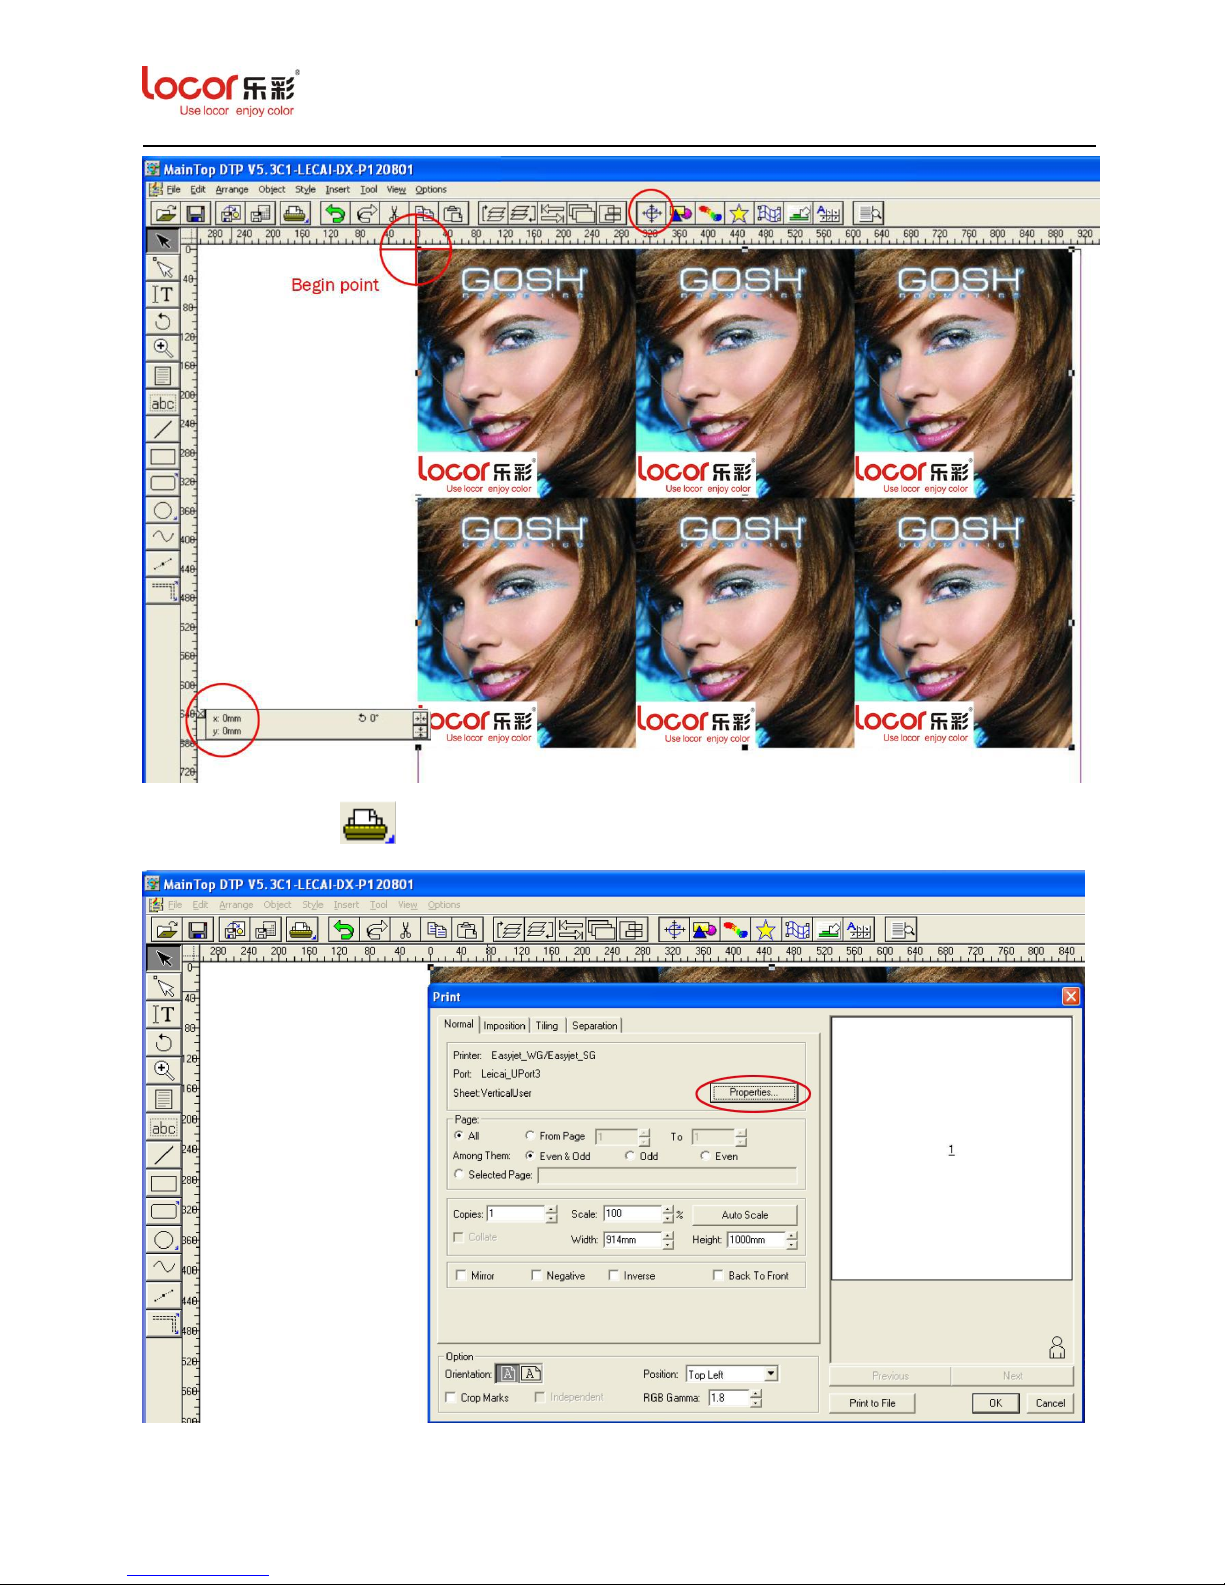
11. Click “Show Metric Panel” icon to setup the image position, the screen below is
displayed:
Page 51
LC Easyjet-16W/18S User Manual V13GZ.1
51
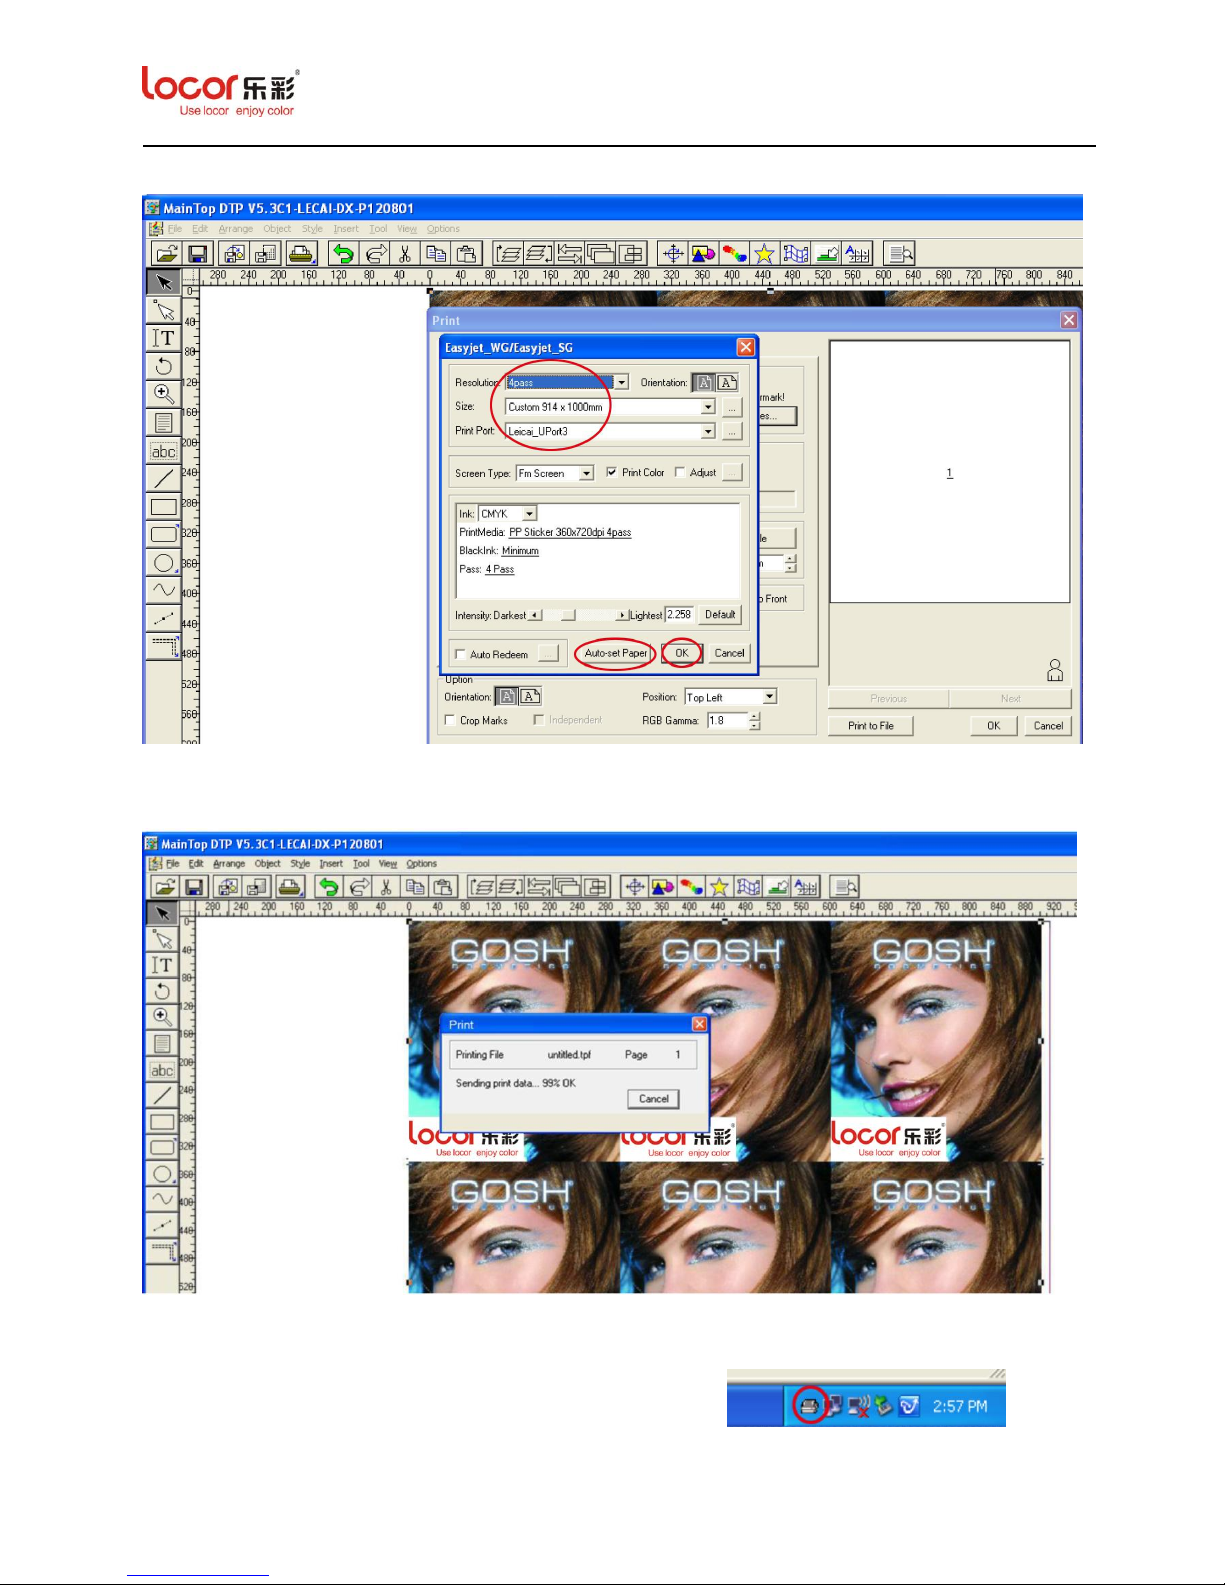
12. Click “Print” icon , the screen below is displayed:
Page 52
LC Easyjet-16W/18S User Manual V13GZ.1
52
13. Click “Properties”, the following screen appears:
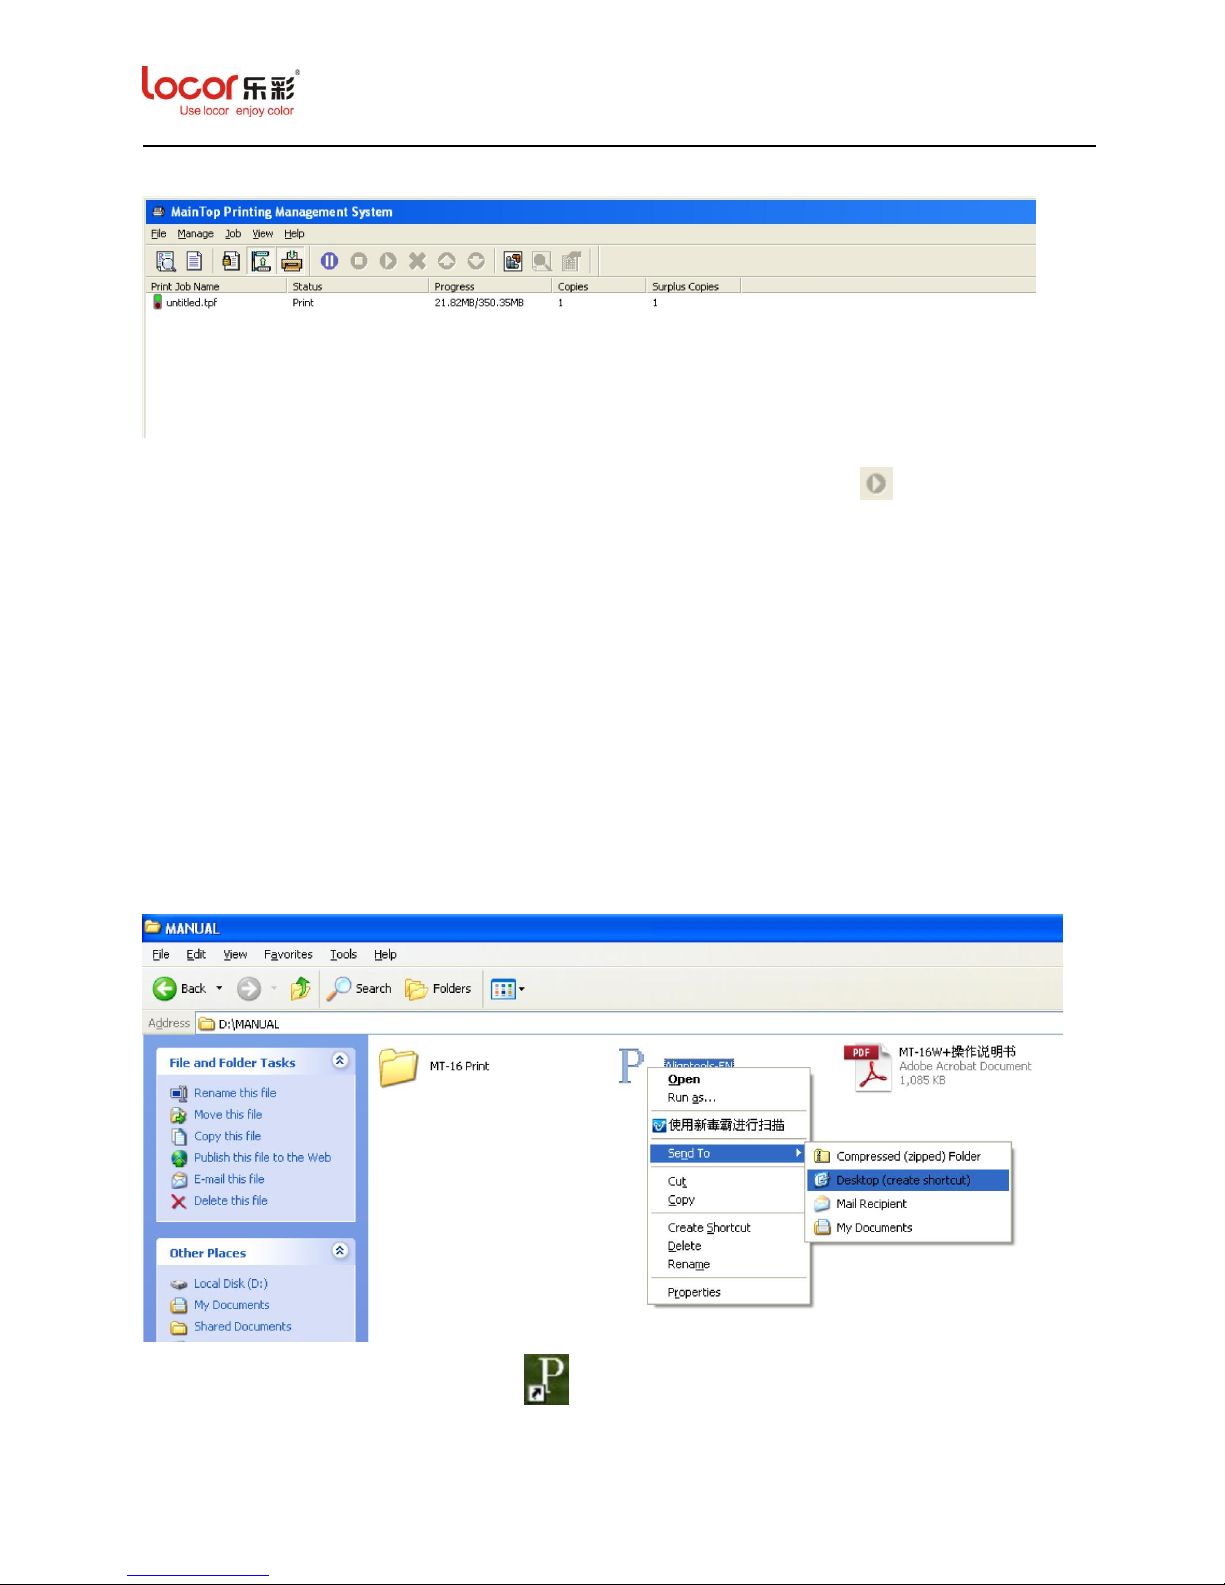
14. Click “OK”, the following screen appears:
15. Click the “Maintop Printing Management System” icon , the
Page 53
LC Easyjet-16W/18S User Manual V13GZ.1
53
following screen appears.
Notice: If it does not print, please select “untitled.tpf” and then click icon to start printing
work.
The whole procedure of Maintop application has been explained above.
5.4 Printer Calibration
This section explains how to use the calibration software.
Before run the calibration software, please confirm the network cable is well connected.
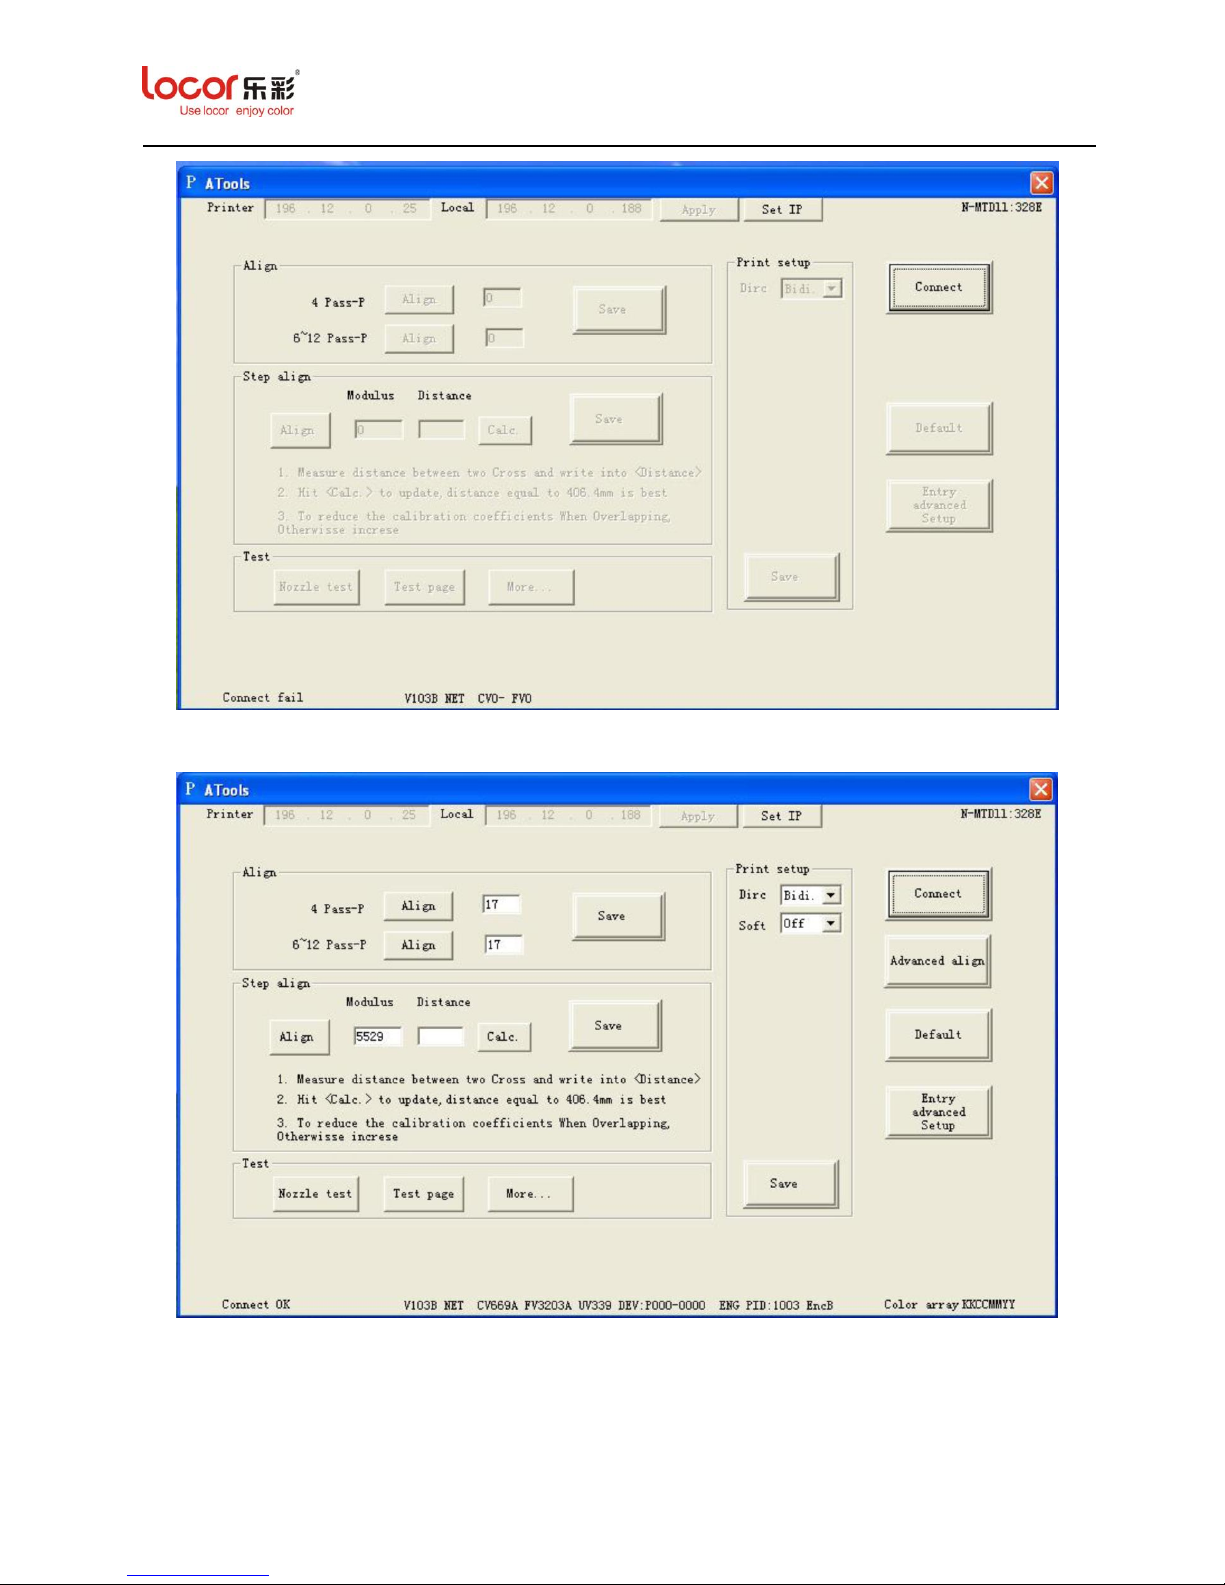
1. Send the “Alignttools-EN” to desktop, create shortcut, the following screen appears:
2. Double click “Alignttools-EN” icon “ ” , the following screen appears:
Page 54
LC Easyjet-16W/18S User Manual V13GZ.1
54
3. Click “Connect” to enable the tool interface, the following screen appears:
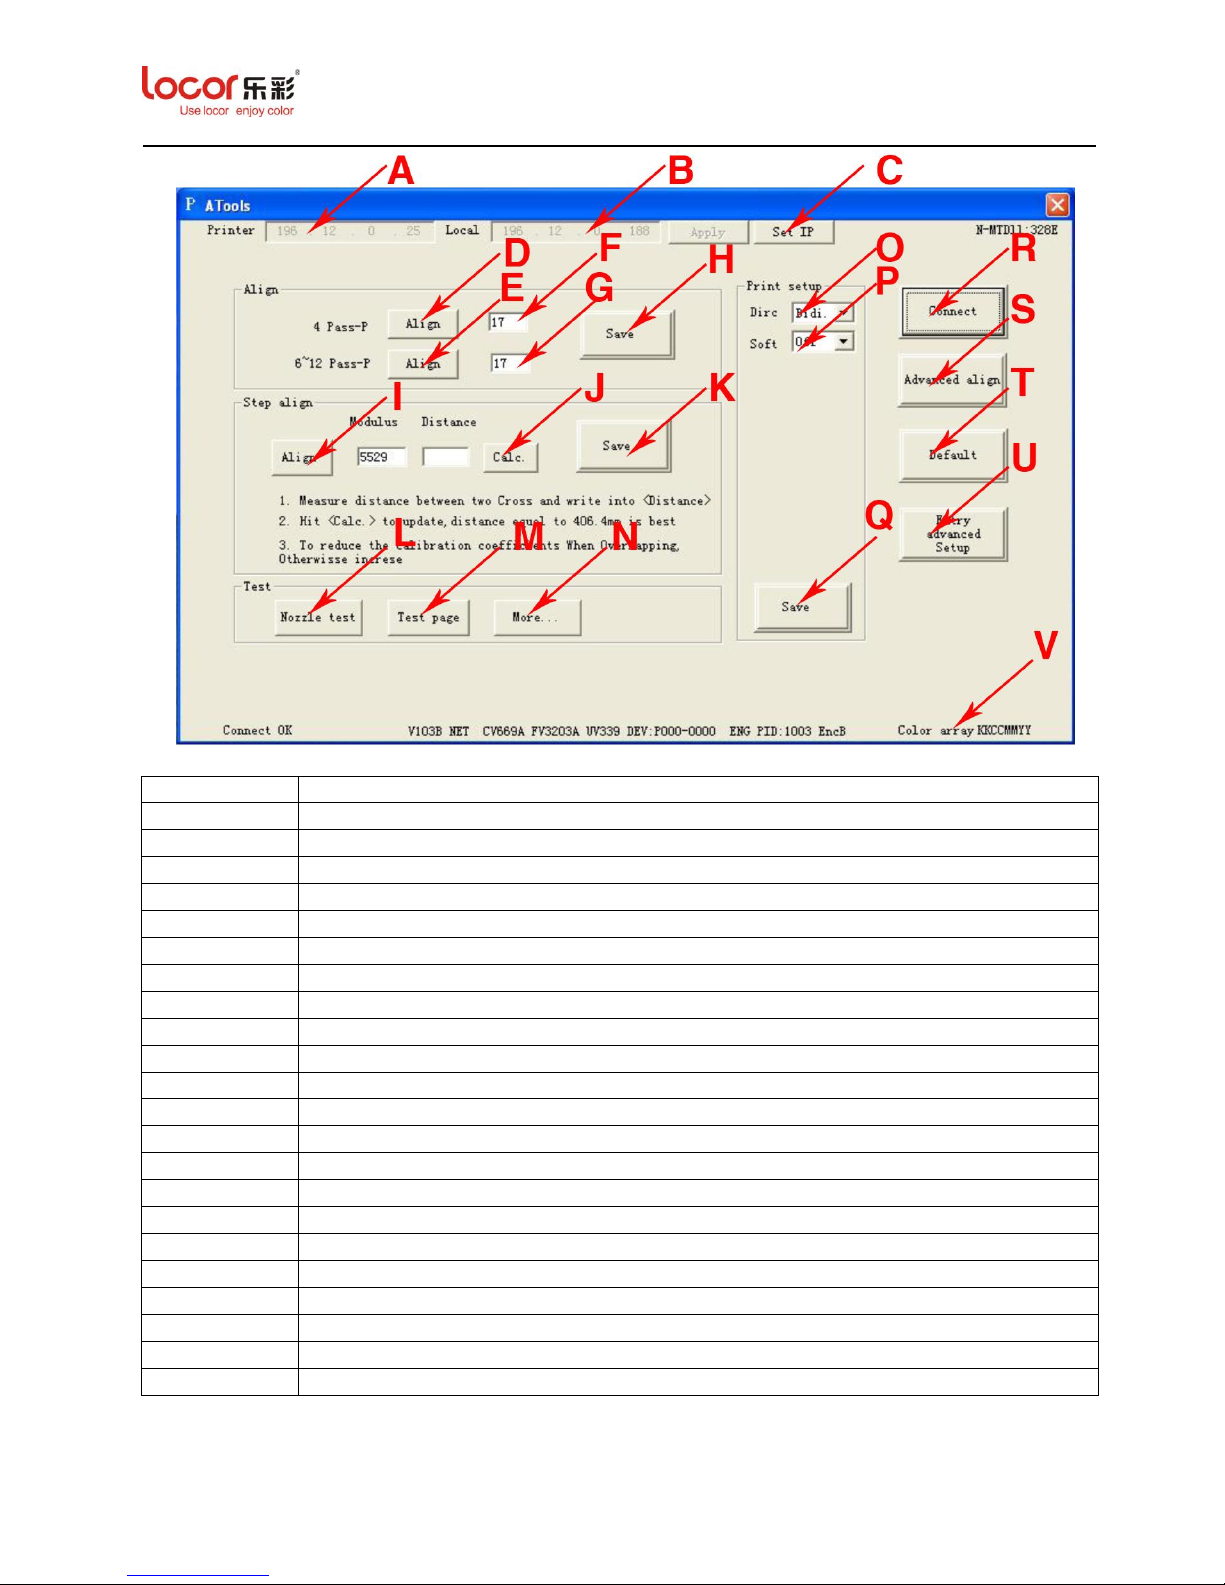
About the Tool interface function, refer to the following illustration:
Page 55
LC Easyjet-16W/18S User Manual V13GZ.1
55
NO.
FUNCTION
A
Printer IP Address 196.12.0.25
B
PC IP Address 196.12.0.188
C
IP Address Set up
D
4 Pass Bidirection Calibration
E
6-12 Pass Bidirection Calibration
F
4 Pass Bidirection Calibration Parameter
G
6-12 Pass Bidirection Calibration Parameter
H
Bidirection Calibration Save
I
Step Calibration
J
Actual Length Calculate
K
Step Calibration Save
L
Nozzle Status Test
M
File Test
N
More Test Menu
O
Print Direction Setup
P
Print Eclosion Setup
Q
Print Setup Save
R
Connect With Printer
S
More Calibration Function
T
Reset to Factory Default
U
Advanced Setup(For Color Array & Printhead Voltage)
V
Printer Default Color Array
Page 56
LC Easyjet-16W/18S User Manual V13GZ.1
56
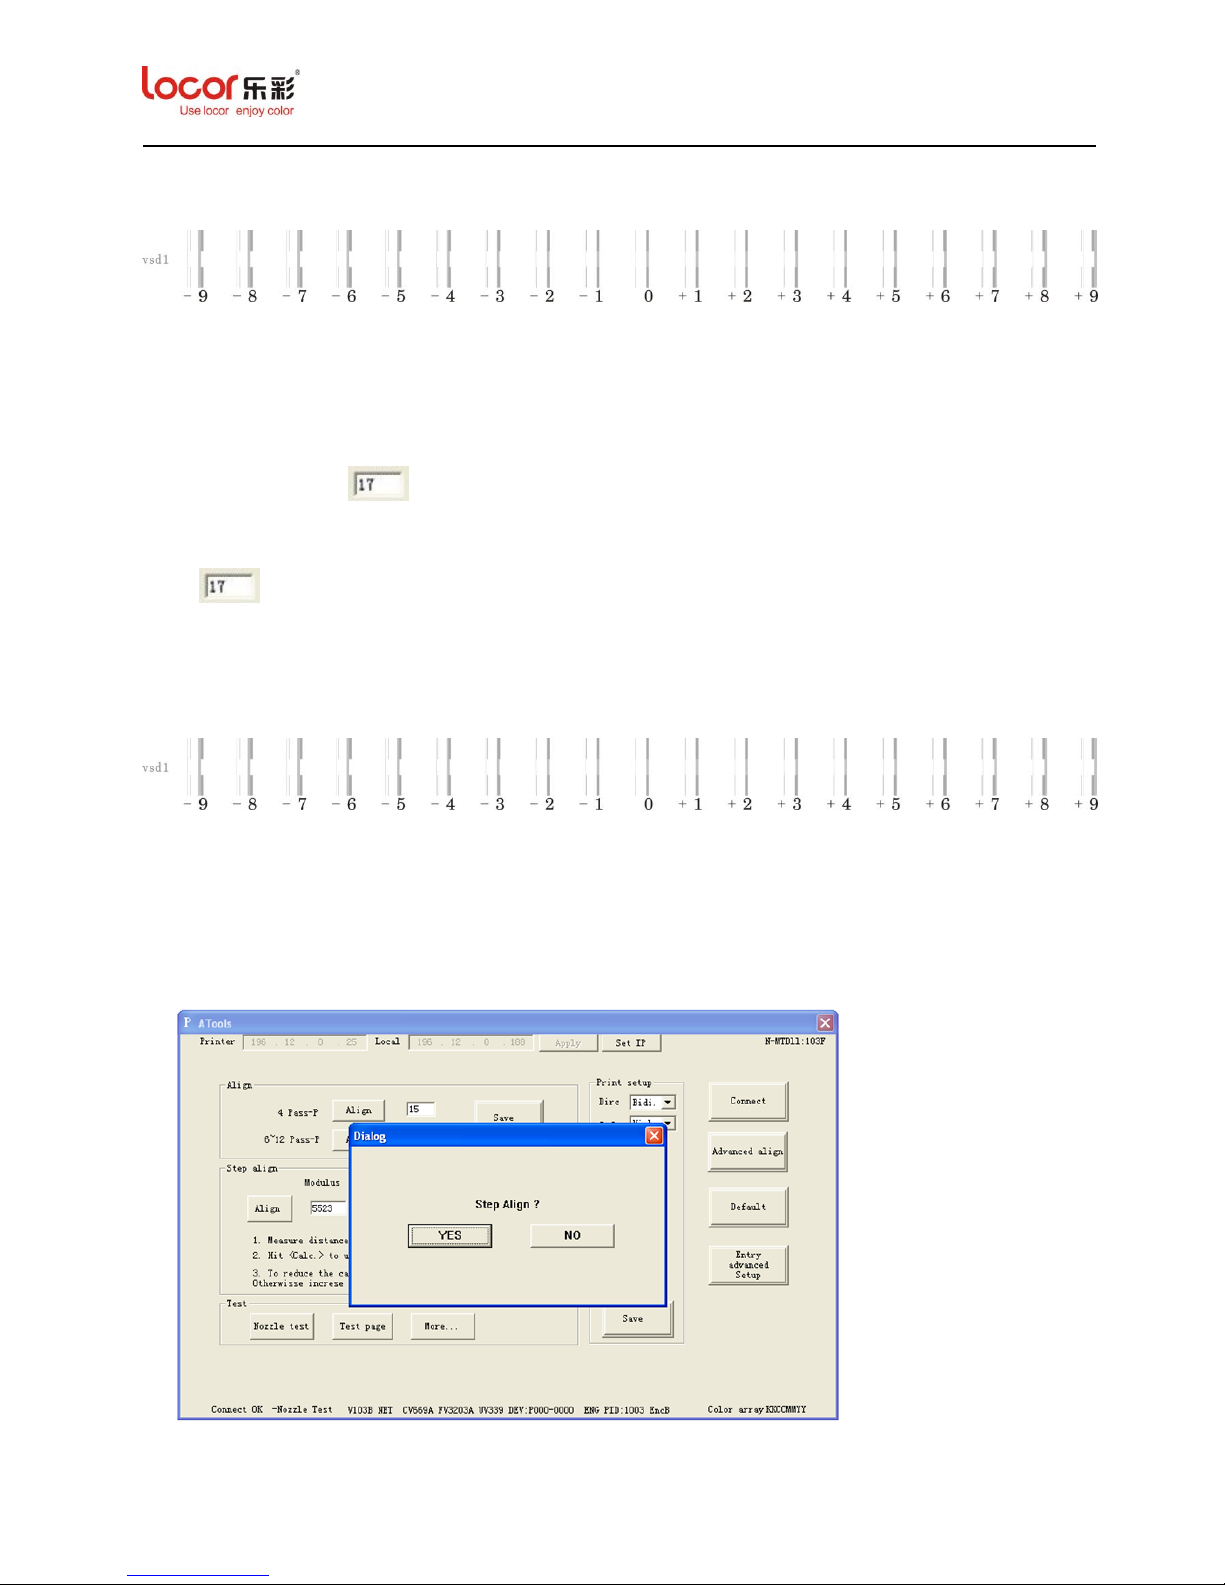
4. Bidirection Calibration
a) Click 4 pass “Align”, the printer will print some lines, as below:
The lines at “0” are the straightest ones, if not, users are suggested to make bid calibration
to ensure that the lines at “0” are the straightest ones.
For example, if you find the most straight lines are at number -4, then you need to use -4
plus the figure in , namely,-4+17=13, replace 17 with 13;
If you find the most straight lines are at number 4, then you need to use 4 plus the figure in
C , namely, 4+17=21, and then replace17 with 21.
After click “Save”, the 4 pass “Align” is completed.
b) Click 6-12 pass “Align”, the printer will print some lines, as below:
The adjust method same as last step.
After click “Save”, the Bidirection Calibration is completed.
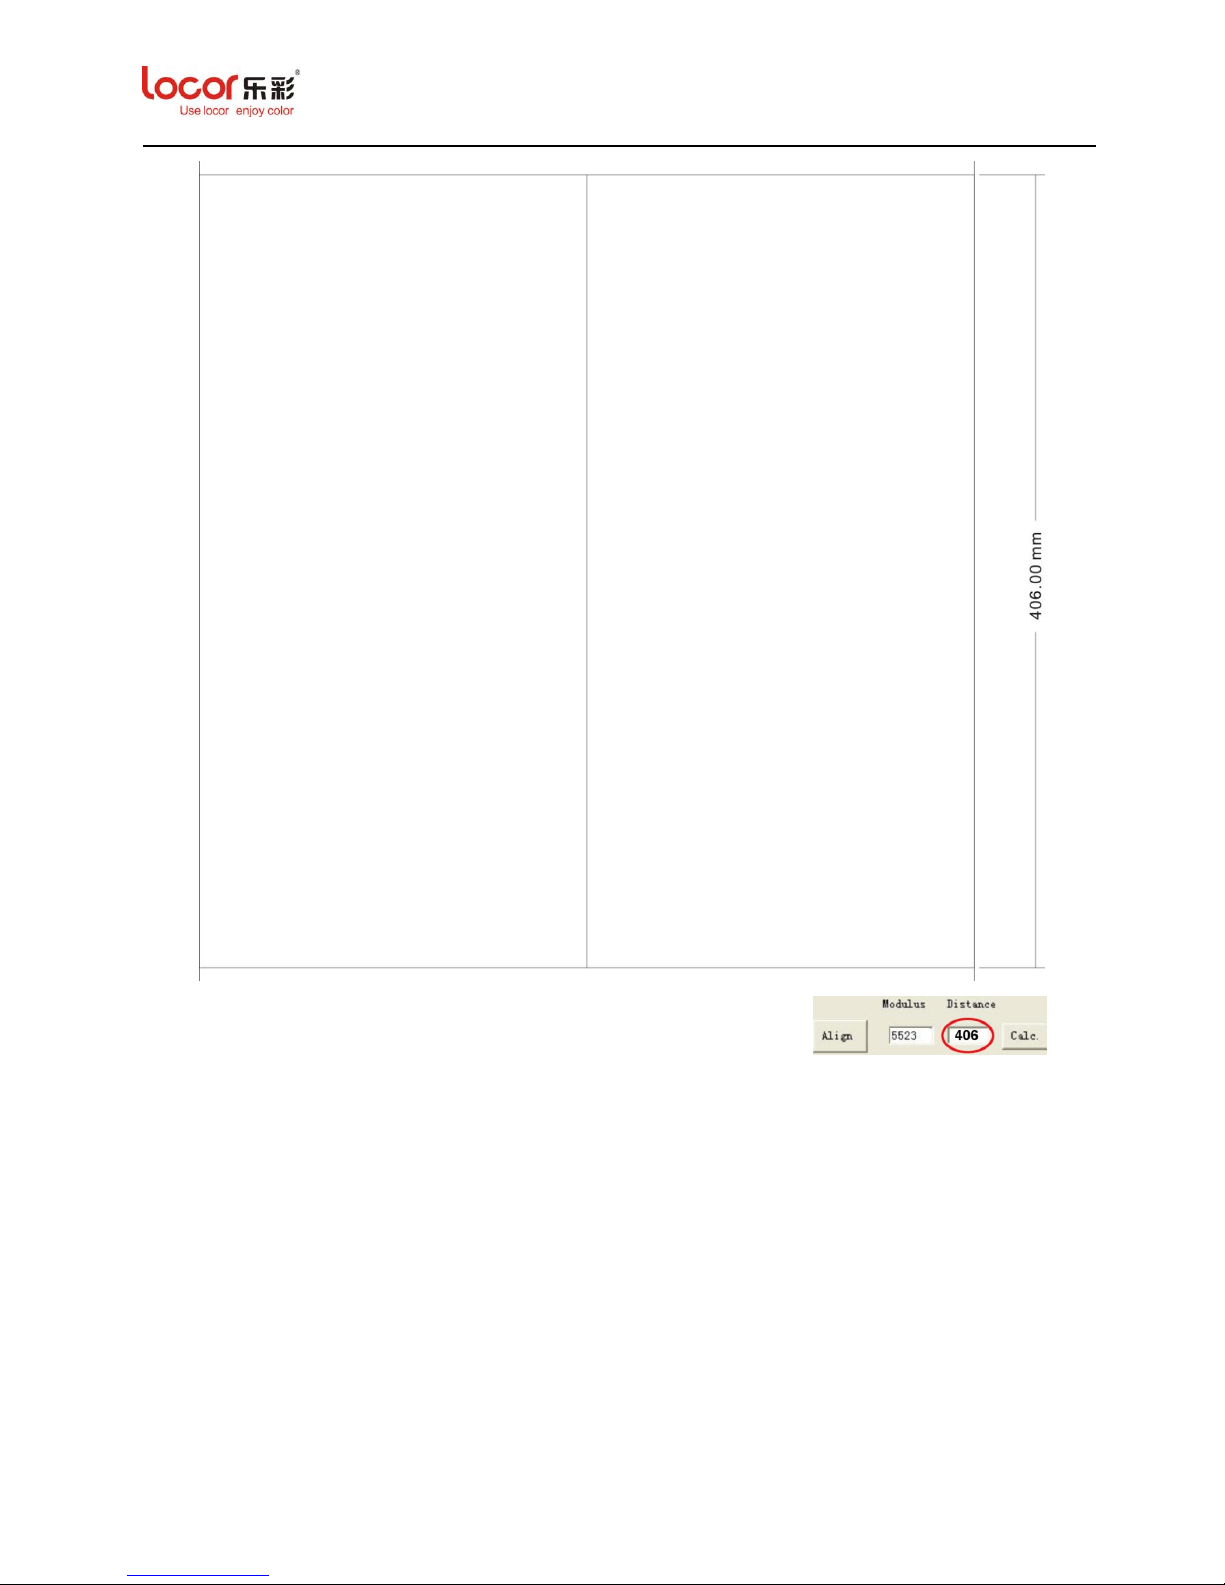
5. Step Calibration
Click Step “Align” and then click “YES”, the printer will print a frame, as below:
Page 57
LC Easyjet-16W/18S User Manual V13GZ.1
57
After finish printing, please measure the frame length and input , and
then click “Calc” to calculate actual length and Save.
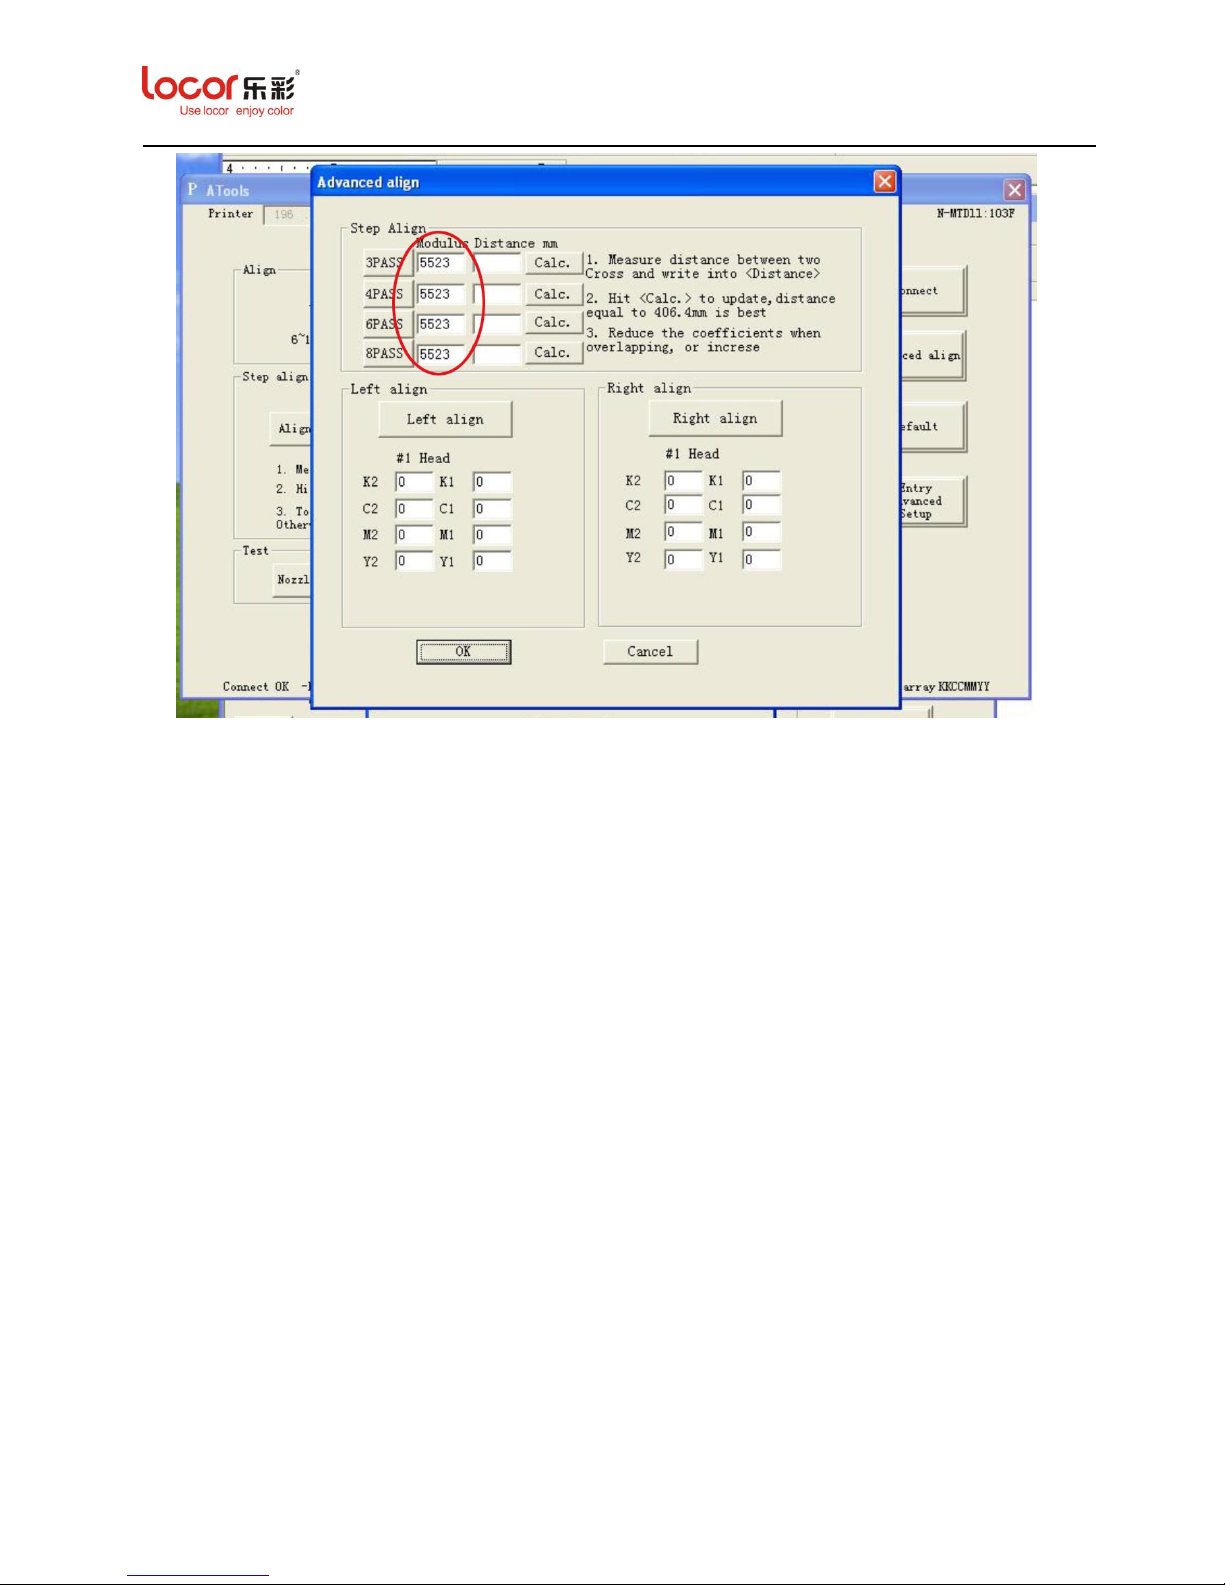
Notice: After input the figure in “Distance”, please click “Advanced Align” to check all the
modulus, as below:
Page 58
LC Easyjet-16W/18S User Manual V13GZ.1
58
After click “OK”, the Step Calibration is completed.
6 Daily Maintenance
Daily maintenance is very important for printer, in order to obtain good performance of printer,
please follow the tips listed below:
1. Check the nozzle status every day before starting the printing job. Clean the nozzles once
nozzle clog is found.
2. Clean the Rail Guide twice a week and maintain it with lubricating oil.
3. Clean the raster with medicinal alcohol weekly.
4. Periodically clean the waste-ink bottle, flush box and pinch roller to make sure the printer in
good condition.
5. Periodically check the ink volume in the cartridge. Refill ink timely when the volume is less
than 150ml (the optimum ink volume is 350-400ml).
6. Check the status of maintenance cap, and clean or replace it periodically.
7. Timely clean the wiper and replace it to avoid the head being damaged by the worn-out wiper.
Note:
Cleanse the print head with special wipe cloth and wipe stick to avoid potential damage to
Page 59
LC Easyjet-16W/18S User Manual V13GZ.1
59
print head.
If the printer is not operated less than 4 days, please fill the maintenance capper with
cleaning solution and move the print head to stay on the maintenance capper to make sure
the head keep being moist, refer to the 3.1.7.2.5.
If the printer is not operated over 4 days, please dismantle the print head and clean it with
cleaning solution. After clean all the ink left in the head, then cover the head with a piece of
special wipe cloth (with cleaning solution) and then cover it with plastic film.
The spare parts and consumables from LECAI are recommended, LECAI will not be liable
for the damage of printer caused by using the spare parts and consumables from other
suppliers.
7 Trouble Shooting
Problems
Reason
Resolution
Turn on but the
LCD can’t
show
1.Power cable.
2 .LCD cable.
3. Mainboard fuse.
4.Power board.
5.Mainboard
6.LCD
1. Change the power cable.
2. Re-plug in the LCD cable.
3. Test by multimeter whether there is voltage.
4. Change the mainboard fuse.
5. Check whether the transformer has voltage.
6. Check the mainboard power cable.
7. Change the mainboard.
8. Change the LCD.
Turn on but
Carriage can’t
move
1. Motor cable.
2. Operation panel cable
3. Mainboard fuse
4. Mainboard
5. .Motor
1. Re-plug in the motor cable
2. Re-plug in the Operation panel cable.
3. Change the mainboard fuse.
4. Change the mainboard.
5. Change the Motor.
Output form
Maintop but
printer no
response
1.IP address
2.Network cable
3.Maintop software
4.Computer
5.Mainboard
1. Set up the PC IP address 196.12.0.188
2. Change the network cable.
3. Setup Maintop printer.
4. Click Maintop Manager “Start” icon to start print.
5. Re-install the Maintop software.
6. Use another computer .
7. Change the mainboard.
carriage rushes
out from the
station and
rushes back
1.Raster sensor
2.Raster
1. Check the raster sensor position.
2. Change the raster sensor.
3. Clean the raster.
4. Change the raster.
Print misting
1. Static.
2. Media.
3. Voltage
4. Print head height
5. Working Environment
6. Speed
1. Connect the earth lead and test by multimeter.
2. Use other media to try.
3. Use UPS.
4. Adjust the print head about 1.5mm.
5. Temperature:18°- 35°Humidity:35RH - 65RH.
Page 60
LC Easyjet-16W/18S User Manual V13GZ.1
60
7. Raster
8. Ink
6. Reduce carriage speed.
7. Clean the raster.
8. Please use LECAI original Ink.
Print pass line
1.Calibration
2.Feeding system
3.Printhead status
4.X motor belt
1. Step calibration.
2. Feeding unit too tight, media can’t feeding automatic.
3. Clean the print head.
4. Adjust the X motor belt tensioning.
5. Open “Eclosion” function.
Print size not
correct
1.Calibration
2.Image size
3.Maintop software
4.Raster
5.X motor belt
6.Feeding system
1. Calibration the printer.
2. Check the Image size.
3. Re-install the Maintop software.
4. Clean the Raster.
5. Adjust the X motor belt tensioning.
6. Feeding unit too tight, media can’t feeding automatic.
Print ink-break
1.Print head
2.Working Environment
3.Voltage
4.Ink tube
5.ink Cartridge
6.Damper
7.Ink
8.Carriage board
1. Clean Print head.
2.Temperature:18°- 35°Humidity:35RH - 65RH.
3. Use UPS.
4. Check whether the ink tube air leakage or folded.
5. Check whether the air hole of ink cartridge blocking.
6. Suck the ink to the damper or change the damper.
7. Please use LECAI original Ink.
8. Change the Carriage board.
Printing but
print nothing
(not ink come
out)
1.Printhead cable
2.Carriage board
3.Printhead
1. Make sure the printhead cable correct connection
2. Change the printhead cable.
3. Change the carriage board.
4. Change the printhead.
Heating but no
response
1.Heater switch
2.Heater cable
3. Temperature controller
4. Heater
1. Check whether the heater switch damage.
2. Check whether the heater cable looser.
3. Increase temperature from temperature controller.
4. Change the temperature controller.
5. Change the heater.
Media skew
during printing
1. Feeding unit
2. Media
3. Pinch roller
1. Check whether the feeding unit is smoothly.
2. Loading the media again and set the correct position.
3. Check whether all the pinch roller grip the media.
Zhengzhou LECAI Science And Technology Co., Ltd.
Hotline:400-717-6789
Tel: 86-371-67896626
Fax:86-371-67897386
E-mail:[email protected]
Website:http://www.locor.com.cn/
Factory Address:B9, 2 Nanshan Industrial Zone, Yantian, Fenggang, Dongguan, Guangdong, China
Address:B1101, Torch Building, No. 8, Guohuai Street, High-Tech Zone, Zhengzhou, Henan, China
 Loading...