

Page 1
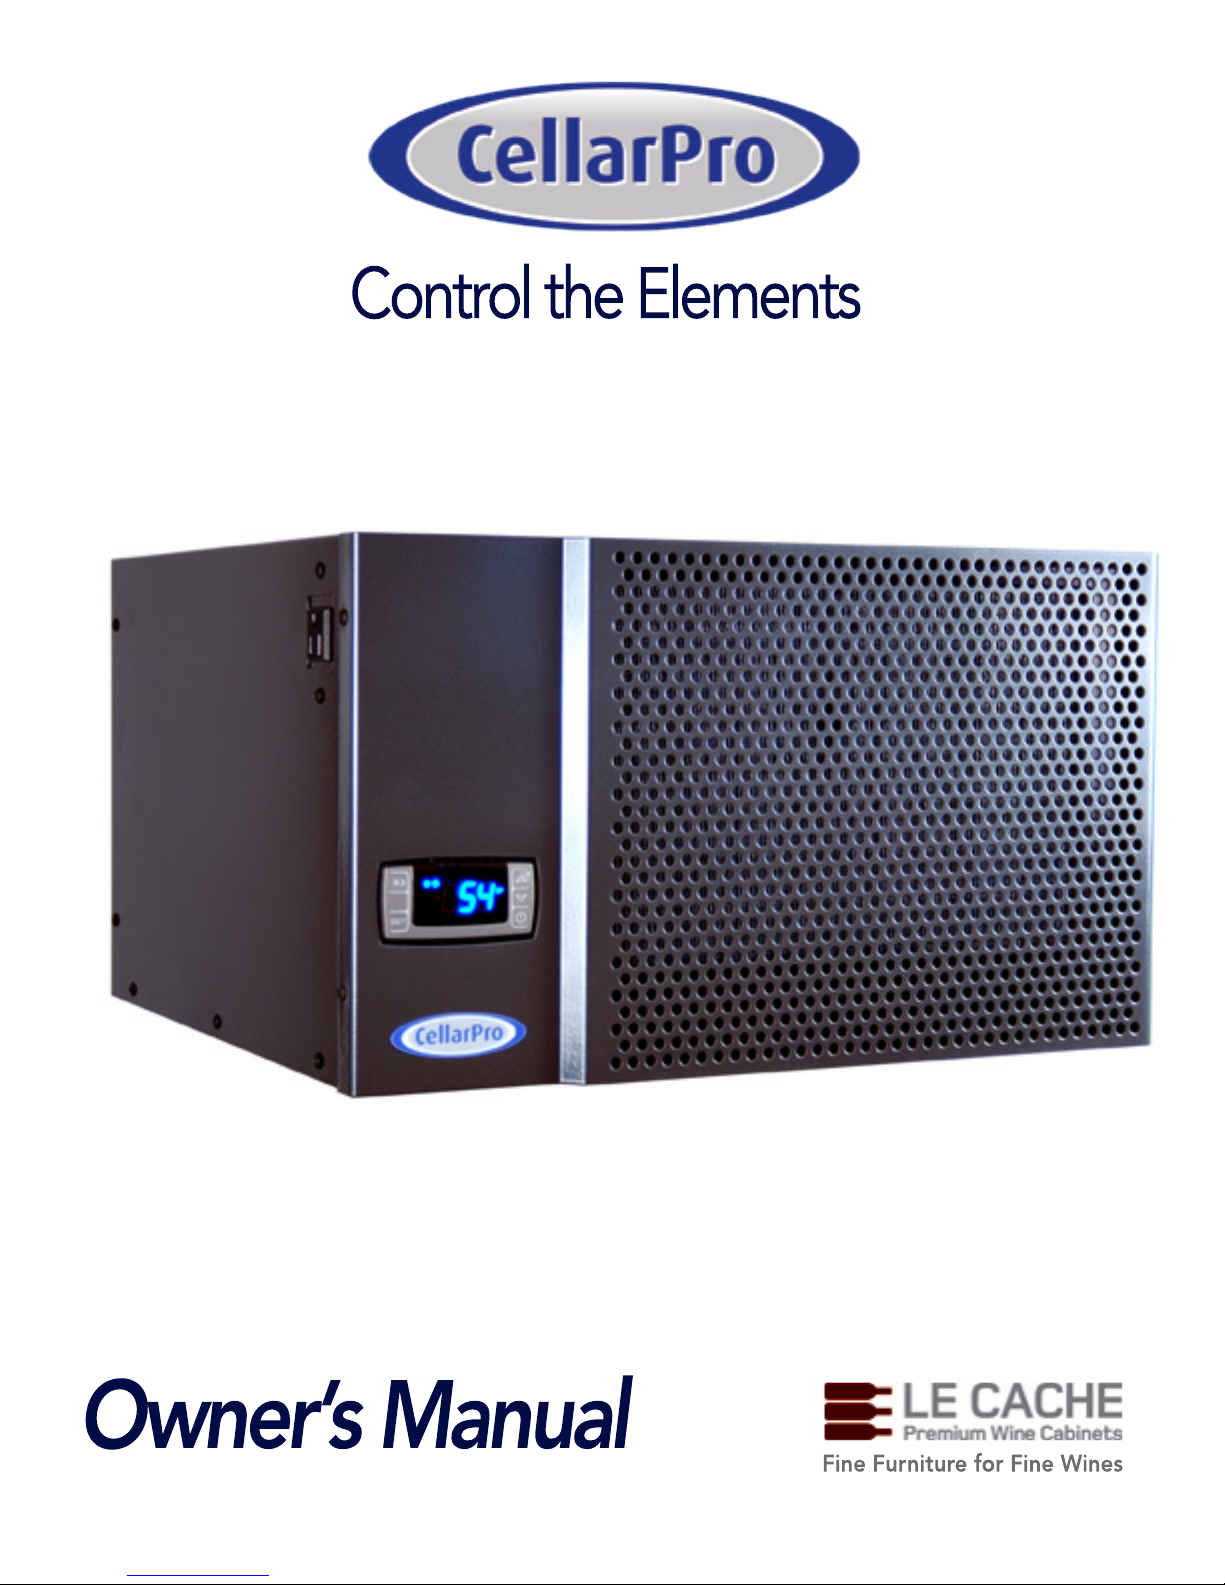
Control the Elements
Owner’s Manual
Fine Furniture for Fine Wines
Page 2
1
C O N G R A T U L A T I O N S !
Thank you for purchasing a new CellarPro cooling system.
Please take a minute to read through this Owner’s Manual before you unpack, install and
turn on your Cooling Unit.
If you have any questions about your new cooling unit, it is likely that you will find the
answers in this Owner’s Manual. We also have more information on our website,
including the latest version of the Owner’s Manual, at www.cellarpro.com/customer-
service .
If you still have questions, please don’t hesitate to contact your dealer or CellarPro
directly. We can be reached during normal business hours at 1.877.726.8496. You also
may contact us anytime via email at [email protected].
Contact Information:
CellarPro Cooling Systems
531 Mercantile Drive
Cotati, CA 94931
877.726.8496
Email: [email protected]
Website: www.CellarProCoolingSystems.com
*We recommend that you take a minute to fill-in your CellarPro serial number above. The
serial number has seven-digits and can be found on the printed label on the left side of
your cooling unit.
Don’t forget to register your cooling unit warranty at www.cellarpro.com/register
Serial Number*: ____________________
Page 3
2
[This page left blank]
Page 4
3
T a b l e o f C o n t e n t s
I. Prior to Installation 4
II. Overview 5
III. Installation Instructions – Wine Cellars 8
IV. Replacement Instructions – Wine Cabinets 14
V. Operating Instructions 20
VI. Troubleshooting 27
VII. Limited Warranty 30
Page 5
4
I. P r i o r to I n st a l l a t i o n
Wait 24 hours before operating your CellarPro cooling unit.
Test the unit before installing it.
1. Remove the unit from the box. SAVE THE BOX AND PACKING MATERIALS.
2. Remove any materials that have been packed inside the exhaust cavity
3. Plug in the power cord and let the unit run on a hard, flat surface
4. Check to make sure that both fans (one at the top and one at the bottom of
the cooling unit) are spinning.
5. Check that the cooling unit is discharging cold air from the bottom (it should
be approximately 10°F colder than the temperature on the digital display)
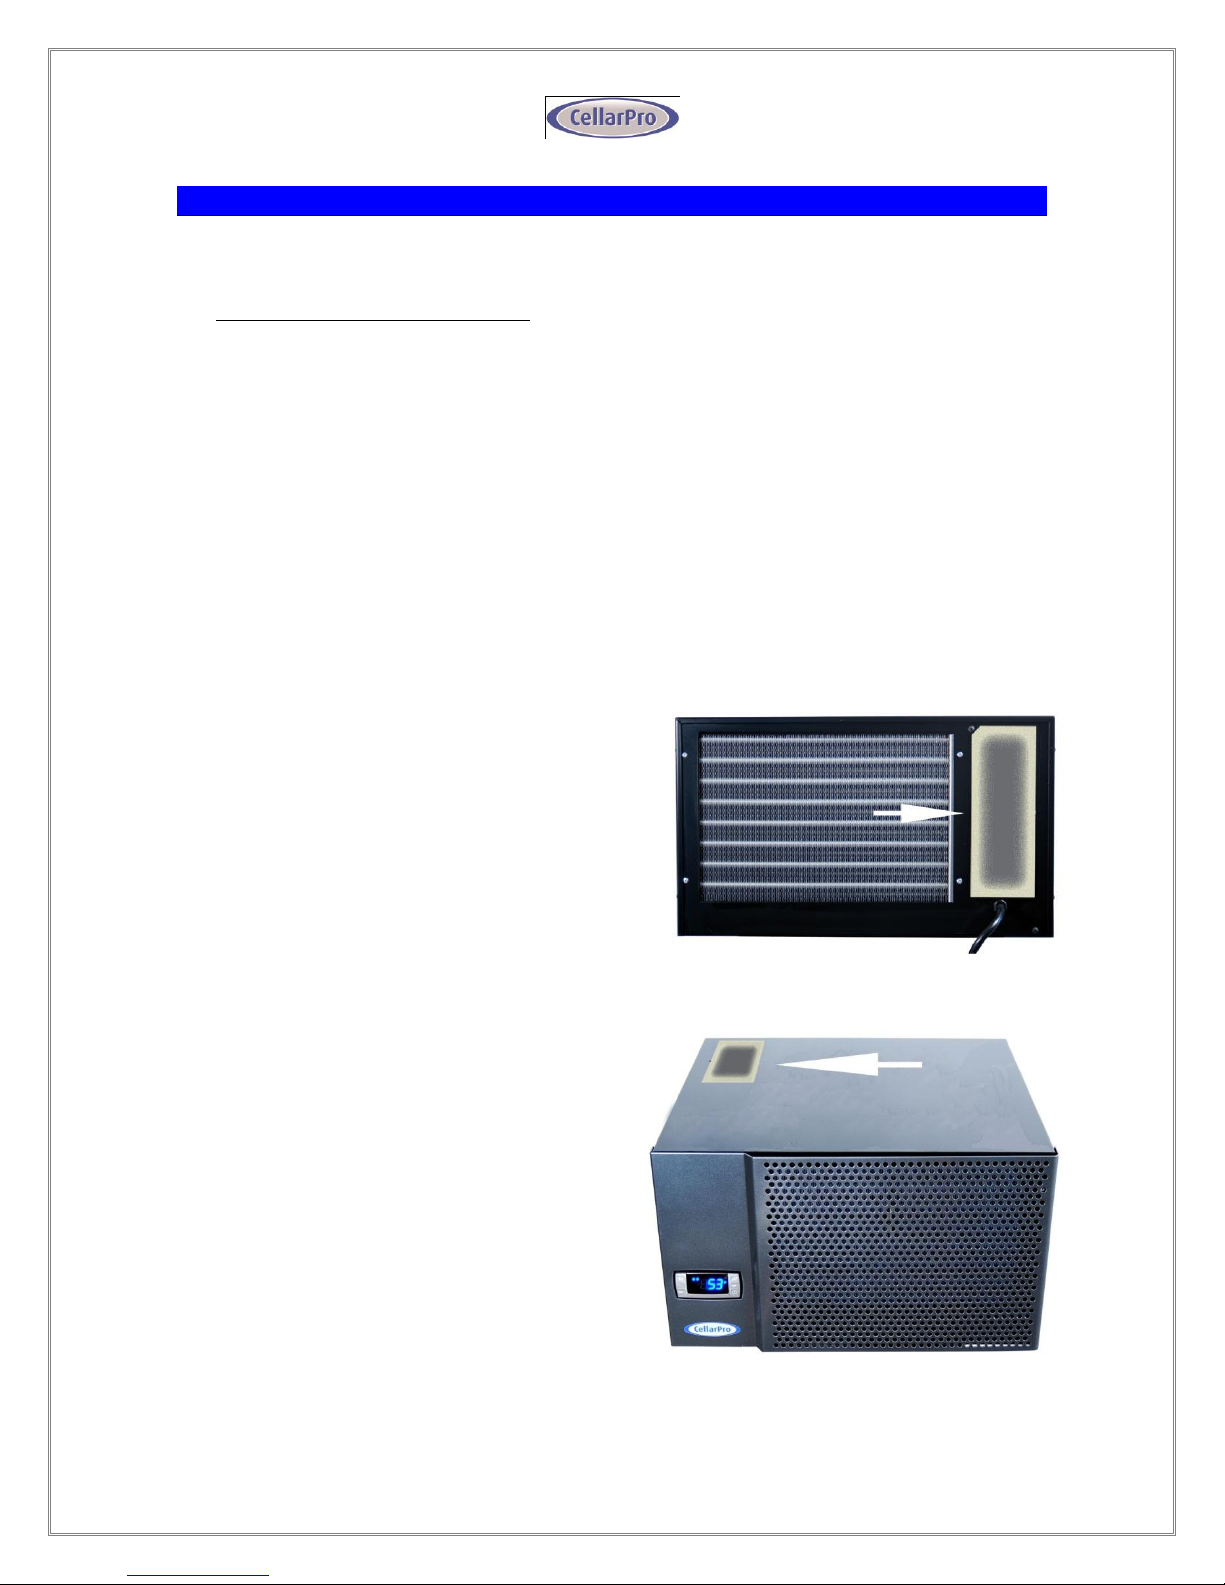
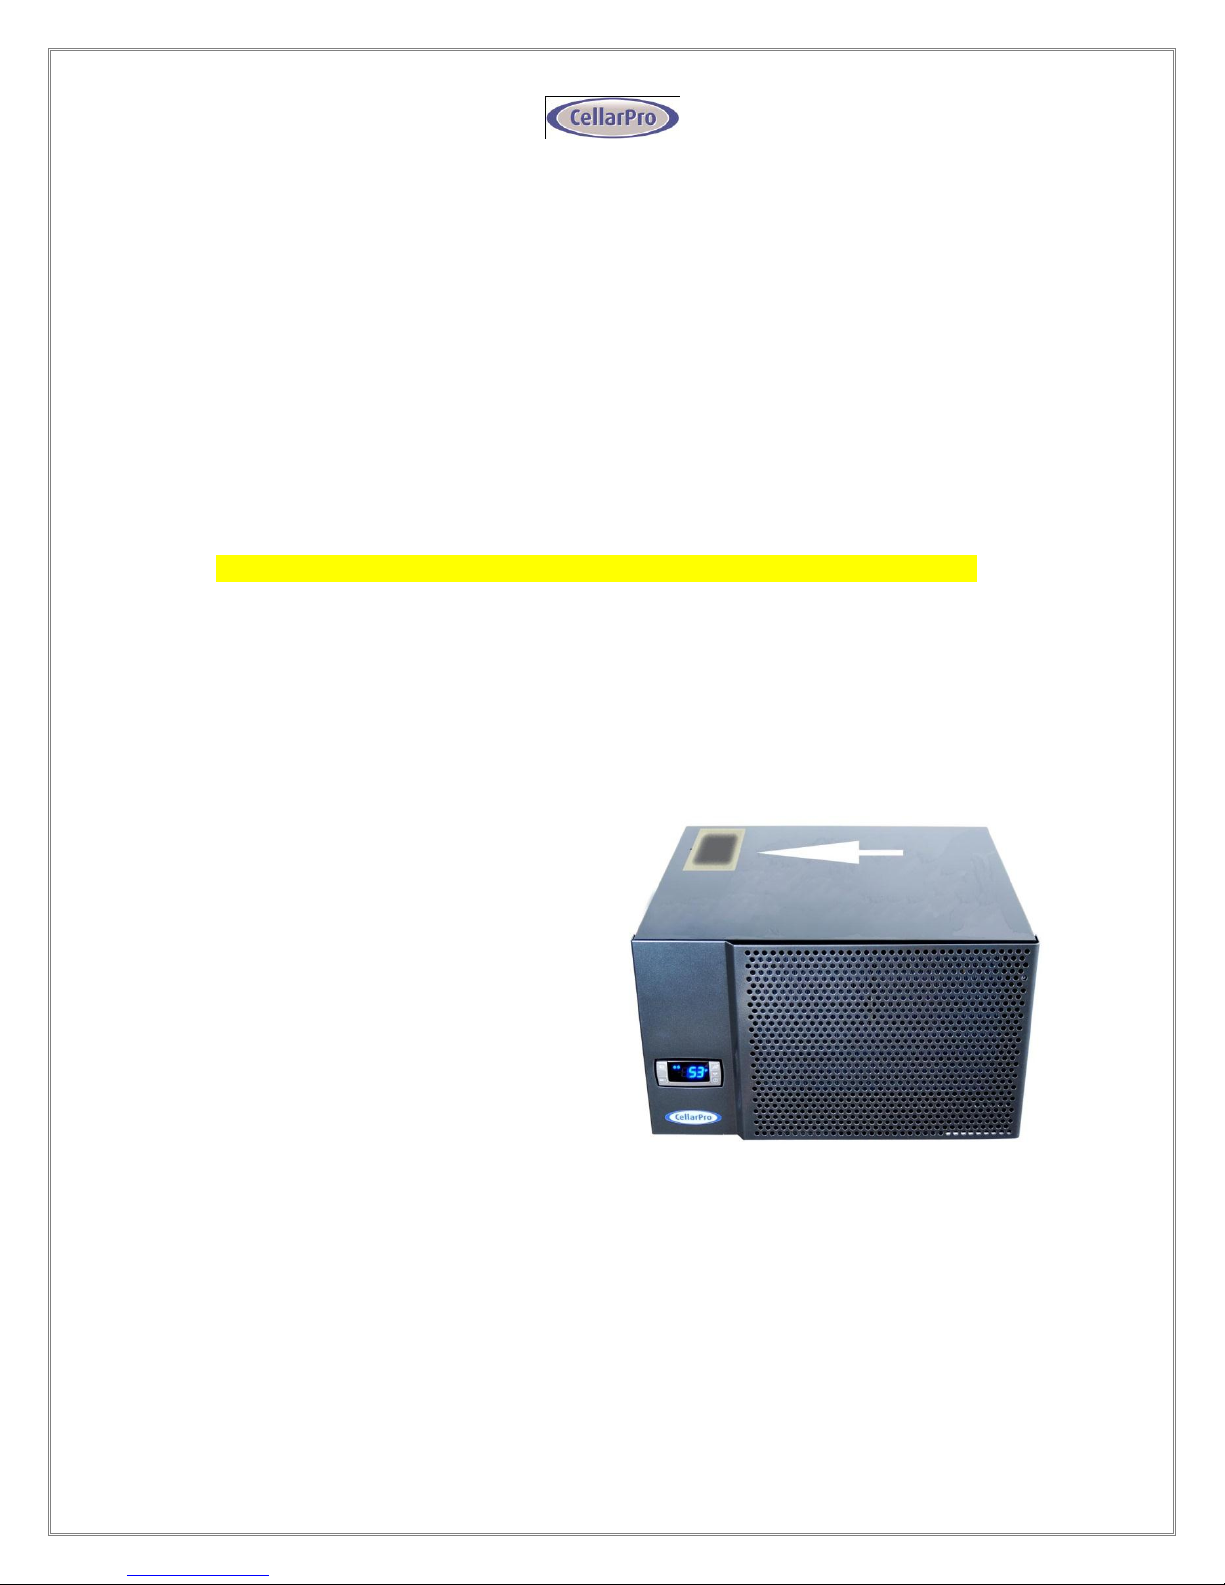
Make sure that the exhaust panel is installed in the correct position – it should
cover either the TOP or the REAR exhaust vent:
o TOP VENT CONFIGURATION:
If the hot air will be discharged
through the TOP of the cellar,
install the exhaust panel on the
BACK of the cooling unit (as
shown in the Picture A). In this
configuration, the cavity on TOP
of the cooling unit is OPEN.
Picture A
Top Vent Configuration
o REAR VENT CONFIGURATION:
If the hot air will be discharged
through the REAR of the cellar,
use the exhaust panel to seal
the TOP of the cooling unit (as
shown in the Picture B). In this
configuration, the cavity at the
REAR of the CellarPro is OPEN.
Picture B
Rear Vent Configuration
Page 6
5
Cellar Temp
55 Degrees
60 Degrees
BTUH
1800QTL
1065
1154
BTUH
1800QT
1380
1479
BTUH
1800XT
1456
1558
BTUH
1800XTS / XTSx
1886
2031
Cellar Insulation –
Walls, ceiling & floor*:
R-12
R-19
R-12
R-19
Cellar Size
Ambient Temp
75 Degrees
1068
979
940
862
100 Cu Ft.
85 Degrees
1180
1046
1038
920 95 Degrees
1291
1114
1136
980
75 Degrees
1380
1253
1214
1103
200 Cu Ft.
85 Degrees
1538
1349
1353
1187 95 Degrees
1699
1446
1495
1272
75 Degrees
1700
1542
1496
1357
300 Cu Ft.
85 Degrees
X
1562
1672
1463
95 Degrees
X
1909
2003
1558
75 Degrees
X
1744
1690
1535
400 Cu Ft.
85 Degrees
X
1879
1888
1654
95 Degrees
X
X
X
1773
II. O v e r vi e w
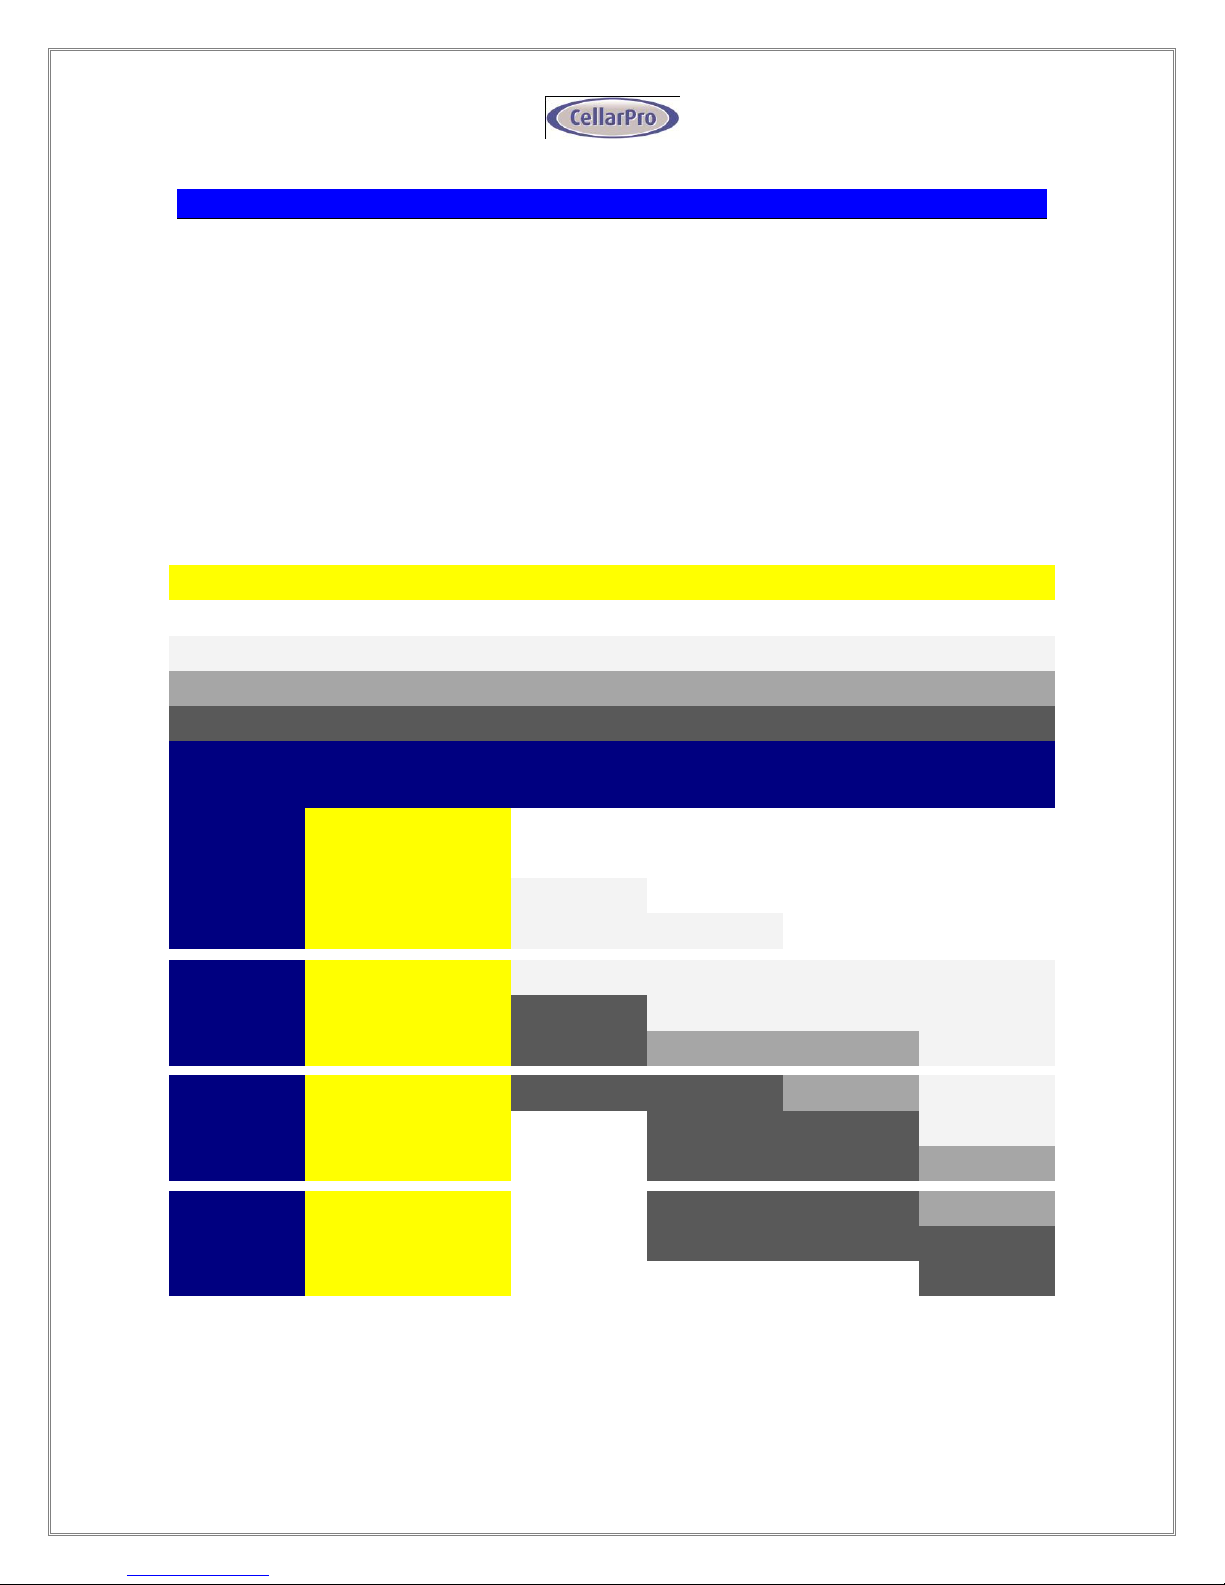
CellarPro Cooling Capacity*
Estimated thermal loads for various size cellars, with various insulations, various
ambient temperatures and various cellar temperatures, are shown in the table below.
To figure out whether a CellarPro unit will work in your space, make sure that the
cooling unit’s BTUH for a given cellar temperature (at the top of the table) is equal or
greater than the thermal load shown in the body of the table. The non-bold,
unshaded numbers are within the capacity of all units. The unbold, lightly shaded
numbers are within all units except the 1800QTL. The bold numbers are beyond the
capacity of the 1800QTL and 1800QT. The italicized numbers are appropriate only
for the 1800XTS / XTSx. “X” indicates conditions beyond the capacity of all units.
*Please note: Glass panels, windows and doors have much lower insulation (at most
R-3) and therefore heat loads will increase dramatically when glass is used in cellars.
Page 7
6
Model
Dimensions (inches)
W x D x H
Weight
(lbs)
Operating
Amps
1800 QTL/QT/XT/XTS
18 x 16.5 x 10.5
60
3
1800 XTSx
18.1 x 22 x 10.6
70
3
Specifications
Ambient Environment
CellarPro cooling units are designed to operate in ambient temperatures between
45°F and 95°F. Except for the 1800XTSX cooling unit, they are designed for internal
use only, and are not designed for exposure to the exterior.
CellarPro cooling units do not have heating elements, so if temperatures inside the or
outside the cellar drop below proper wine storage temperatures, the cooling unit
cannot create heat inside the cellar.
Proper temperatures are maintained by transferring heat from inside wine cellars
and exhausting heat through the top (top-vent) or rear (rear-vent) of the cooling units.
Insulation
CellarPro cooling units are designed to be installed inside wine cellars that have
proper insulation, moisture barriers and an airtight seal from the environment
outside the cellar.
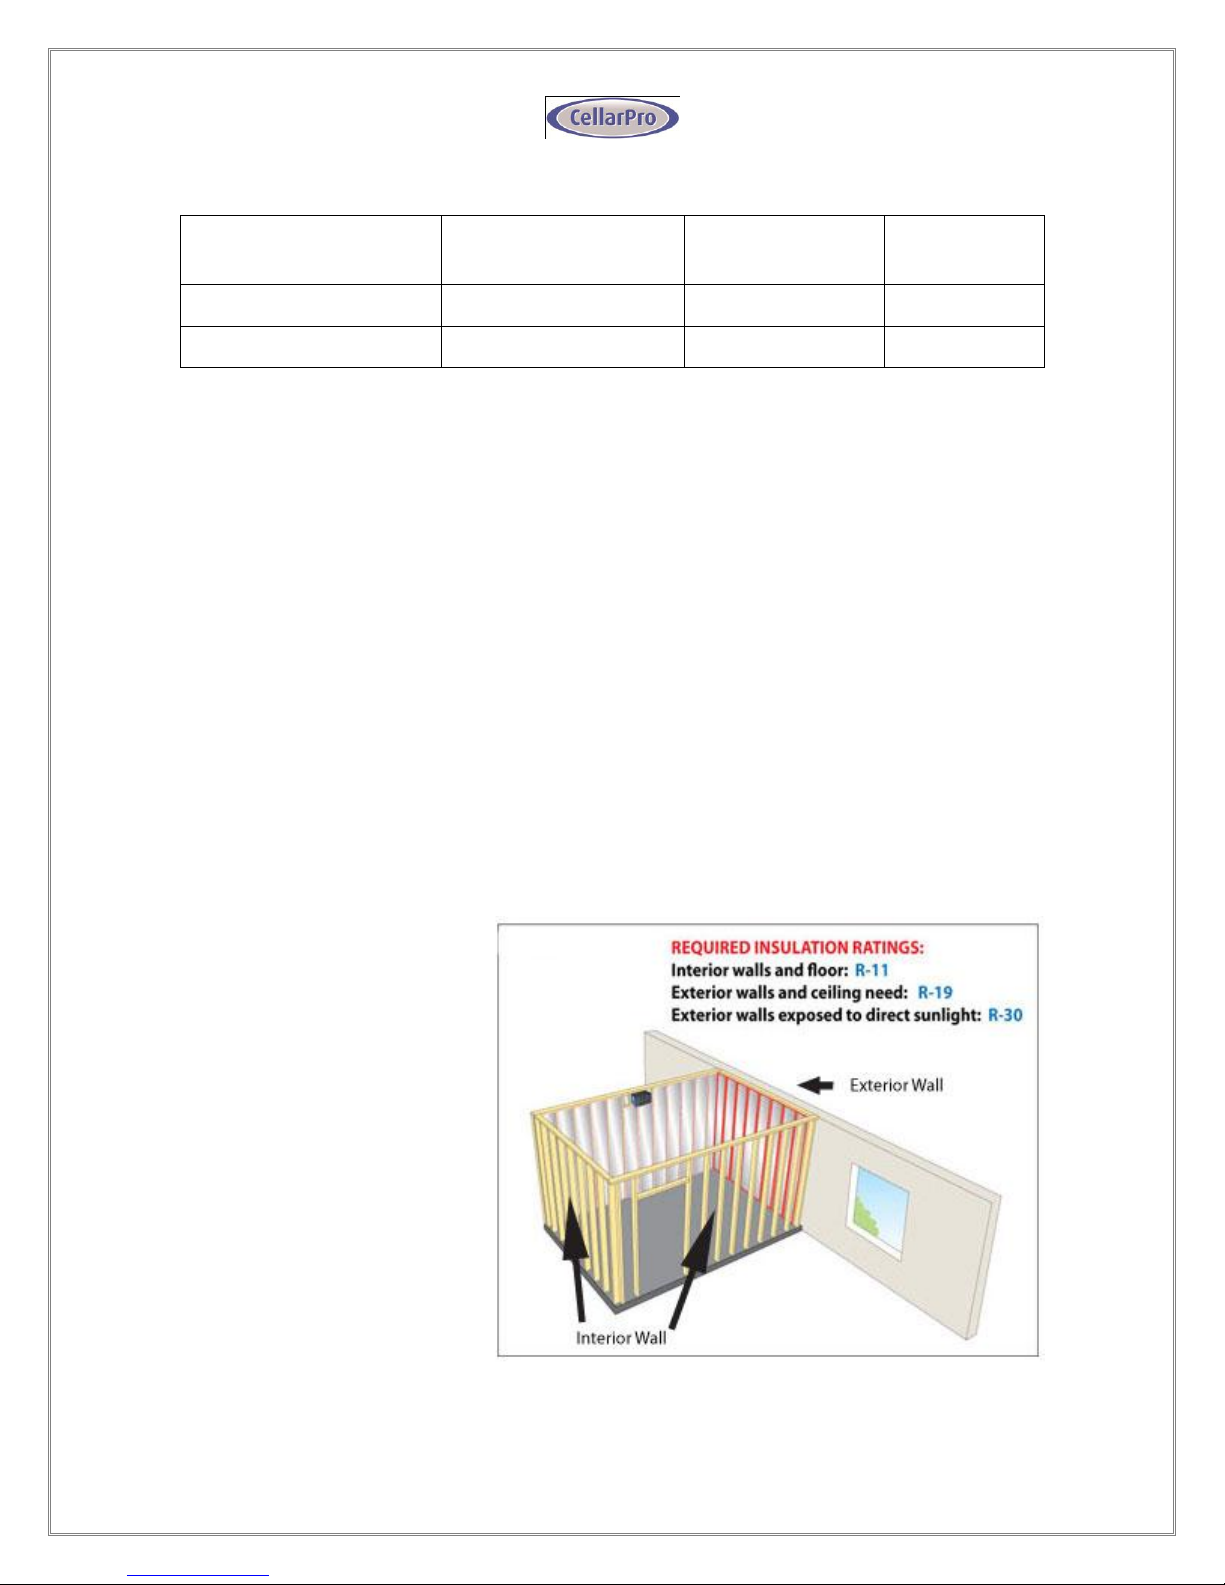
Interior walls and floor
should have a minimum of
R-11 insulation, and a vapor
barrier on the warm side of
the insulation. The ceiling
should have a minimum of
R-19 insulation and a vapor
barrier on the warm side of
the insulation. Doors also
should be insulated and
tightly sealed with weather
stripping around the
perimeter of the door.
Surface-mounted fixtures
are recommended over
recessed lighting, which can
allow air to leak into the
Page 8
7
cellar. Please note: The R-values above are the MINIMUM recommended amounts
of insulation. It is advisable to use as much insulation as possible inside your walls,
ceiling and floor.
It is critical that all walls, joints, doors and windows, electrical outlets and/or
switches, pipes, vents and light fixtures be sealed to prevent air and moisture from
entering the cellar. If there is a leak in the cellar, the cooling unit will build up excess
condensation that eventually may damage the internal components and shorten the
life of the cooling unit, and may cause water to leak from the cooling unit.
We offer a Wine Cellar Modification for cooling
units that will be installed in wine cellars (as
opposed to wine cabinets.) The Wine Cellar
Modification provides a fitting and condensate
tube at the back of the cooling unit to relieve
excess moisture that may condense inside the
cooling unit. For installations in warm
environments and/or cellars without airtight
seals, we strongly recommend this
modification. However, the modification does
not replace the requirement for a cellar to have proper insulation, moisture barriers
and airtight seals from the environment outside the cellar.
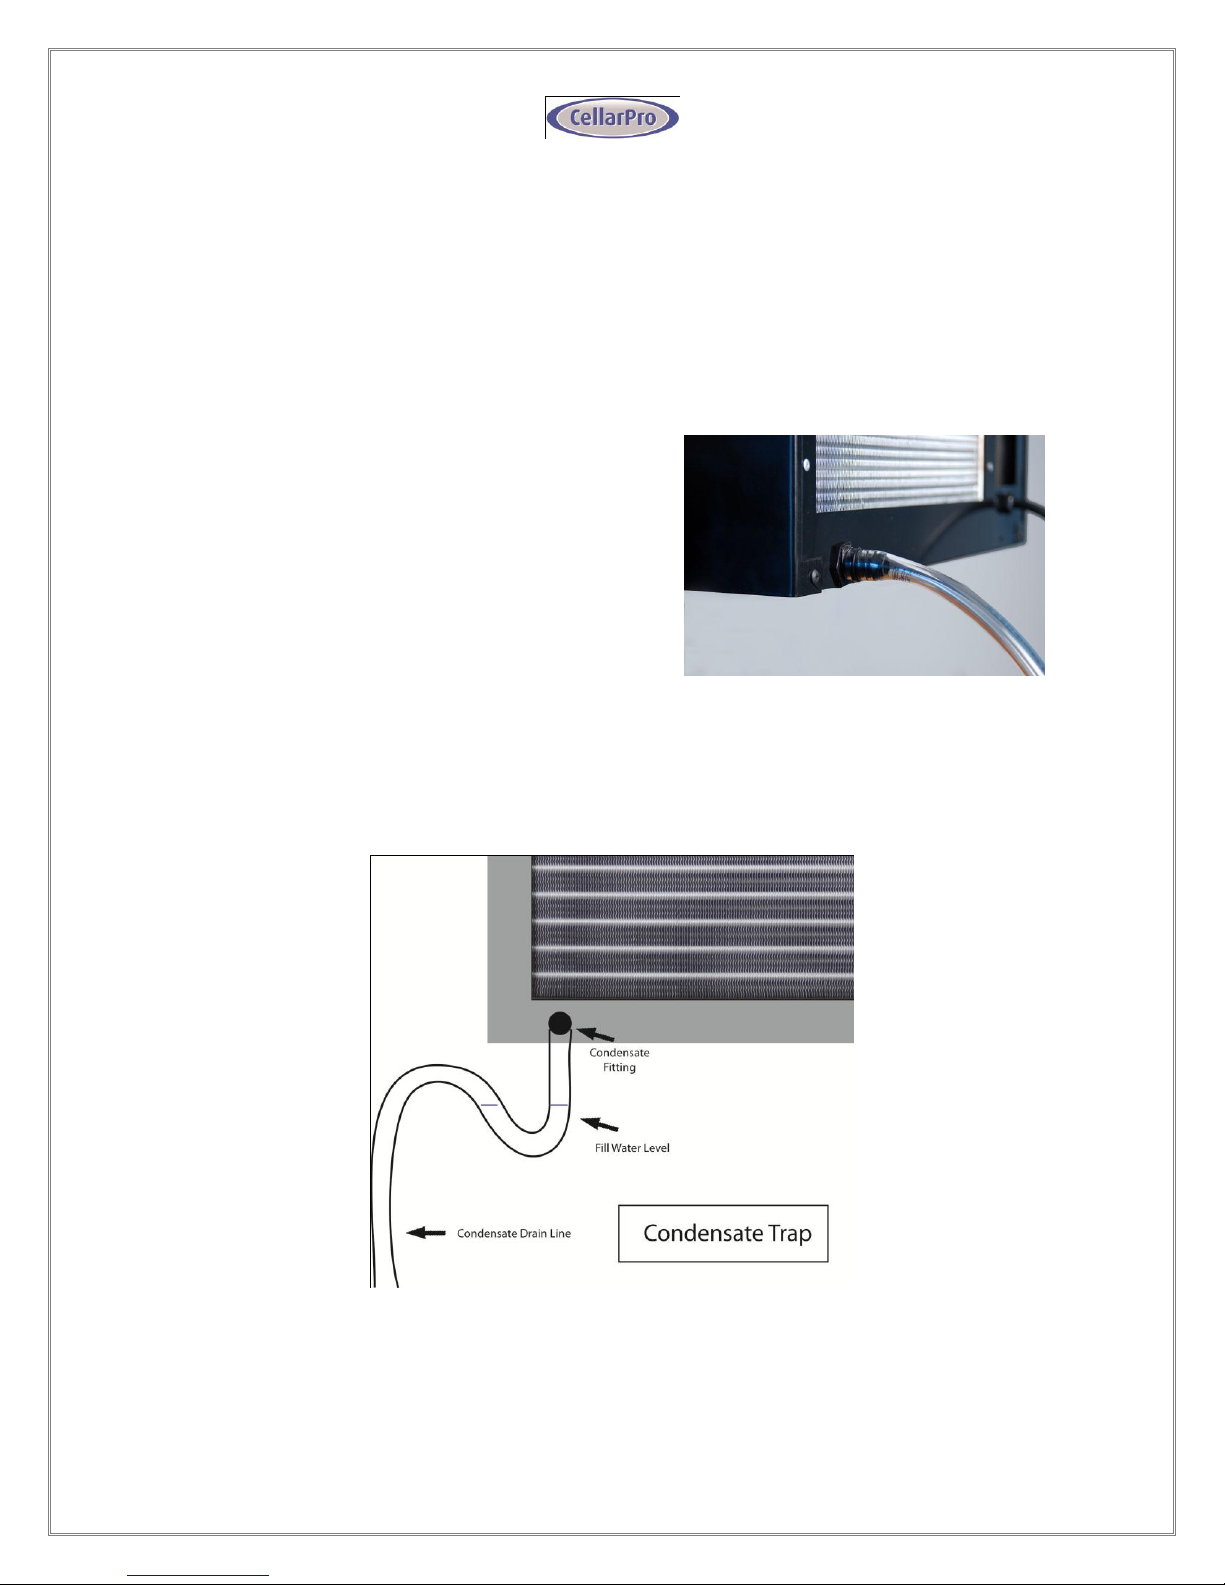
If your cooling unit has the wine cellar modification, please make sure that the tube
has a condensate trap that is slightly filled with water, as follows:
As shown above, the drain line should drop, then rise (but stay below the height of
the fitting), and then drop again into a drain or bucket. Then, fill the trap with water.
The condensate trap will allow any excess moisture inside the cooling unit to
Page 9
8
overcome the static pressure and flow out of the drain line. Please note: If you do
not use a trap, you will see little – if any – condensation, for the same reason that
water stays inside a straw when one end is sealed.
I I I . I n st a l l a t io n I n s t r uc t i o n s – W i ne C e ll a r s
CellarPro cooling units are designed to be installed THROUGH THE WALL. A hole
should be cut 1/4 inch larger than the dimensions (W x H) of the cooling unit.
Horizontal 2 x 4 inch braces should be installed between the studs below and above
the cooling unit. If the studs in the wall must be cut to accommodate the width of the
cooling unit, vertical braces also should be installed on either side of the cooling unit.
CellarPro cooling units must always be mounted in the upright position and located
as close to the ceiling as possible inside the cellar. As warm air rises to the top of the
cellar, the cooling unit pulls the warm air through the evaporator coils and removes
the heat from the warm air. Once cooled, the cold air is discharged from the bottom
of the cooling unit and circulates downward through the cellar.
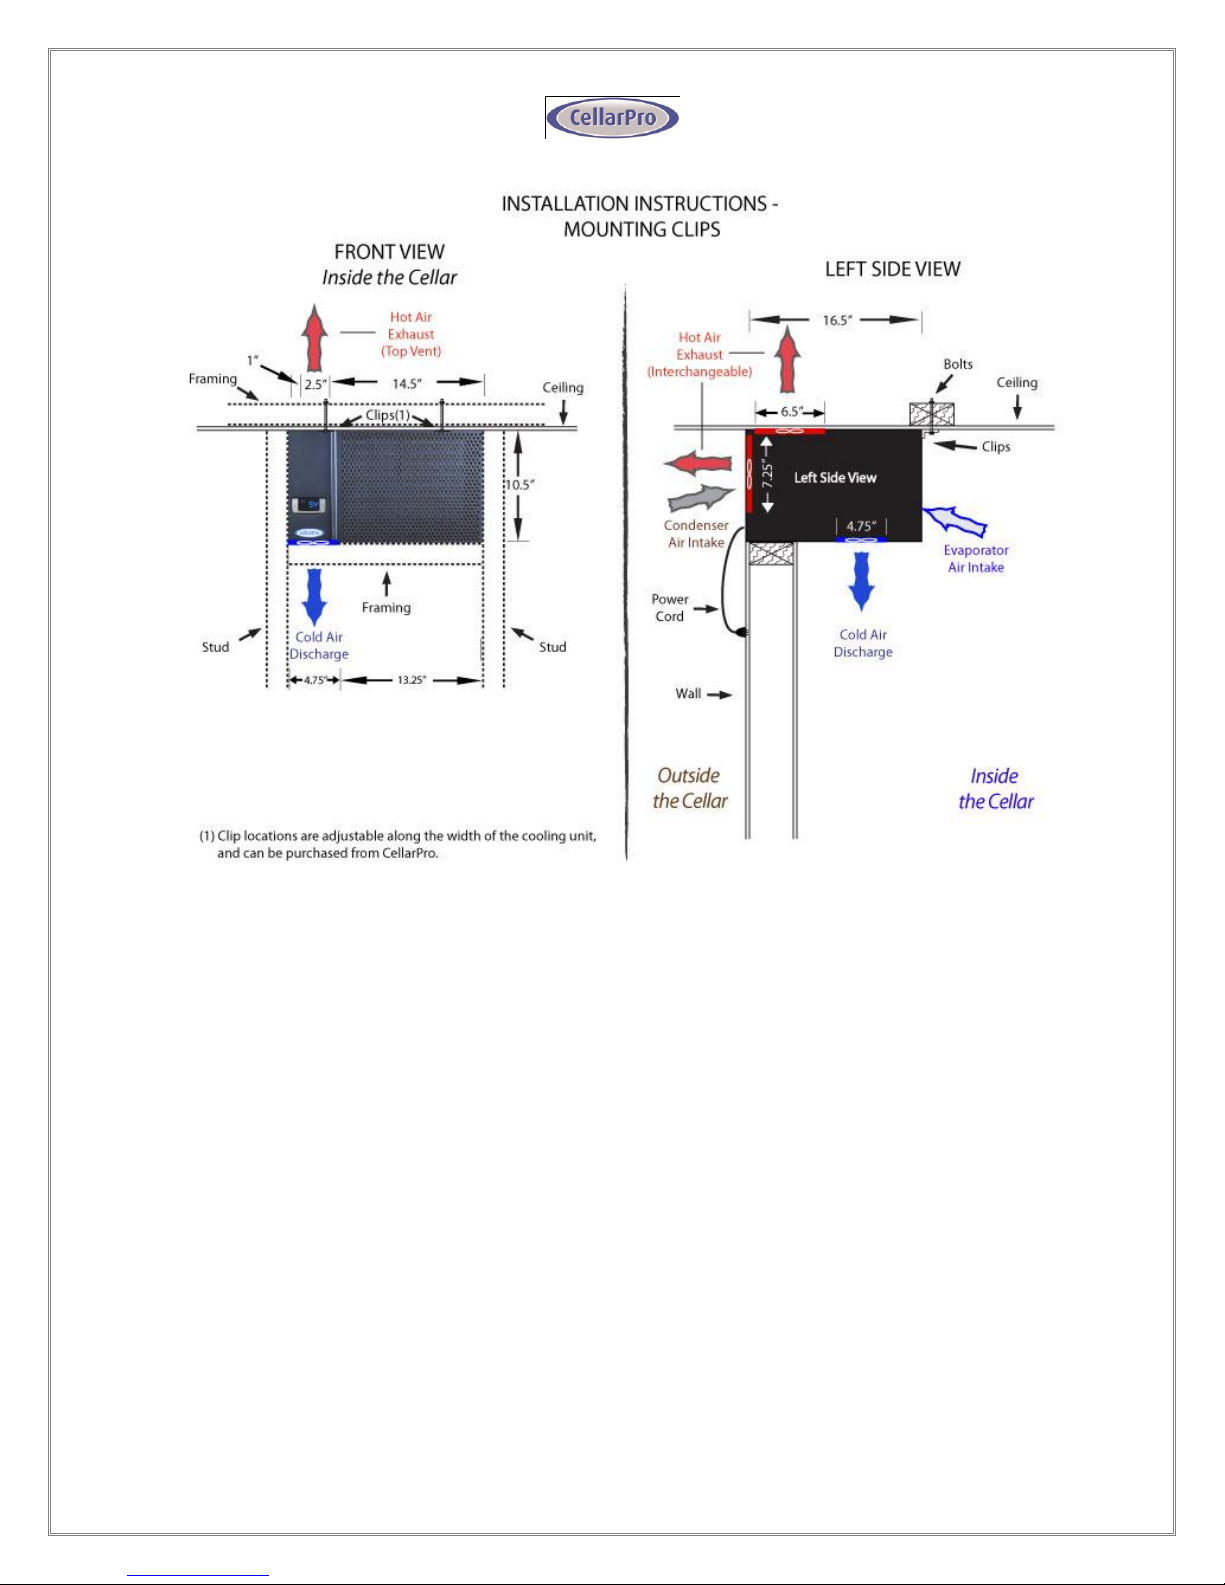
The rear of the cooling unit should be slightly lower than the front of the cooling unit
(ie the cooling unit should be tilted backwards slightly), so that excess condensation
won’t drip through the evaporator fan cavity. The rear of the cooling unit should be
supported by the wall through which it is installed, and should be flush with the wall.
Assuming 4 1/2 inch interior wall thickness, the front 12 inches will be inside the
cellar. The front of the cooling unit can be mounted using optional mounting clips
(available for purchase from CellarPro), as follows:
Page 10
9
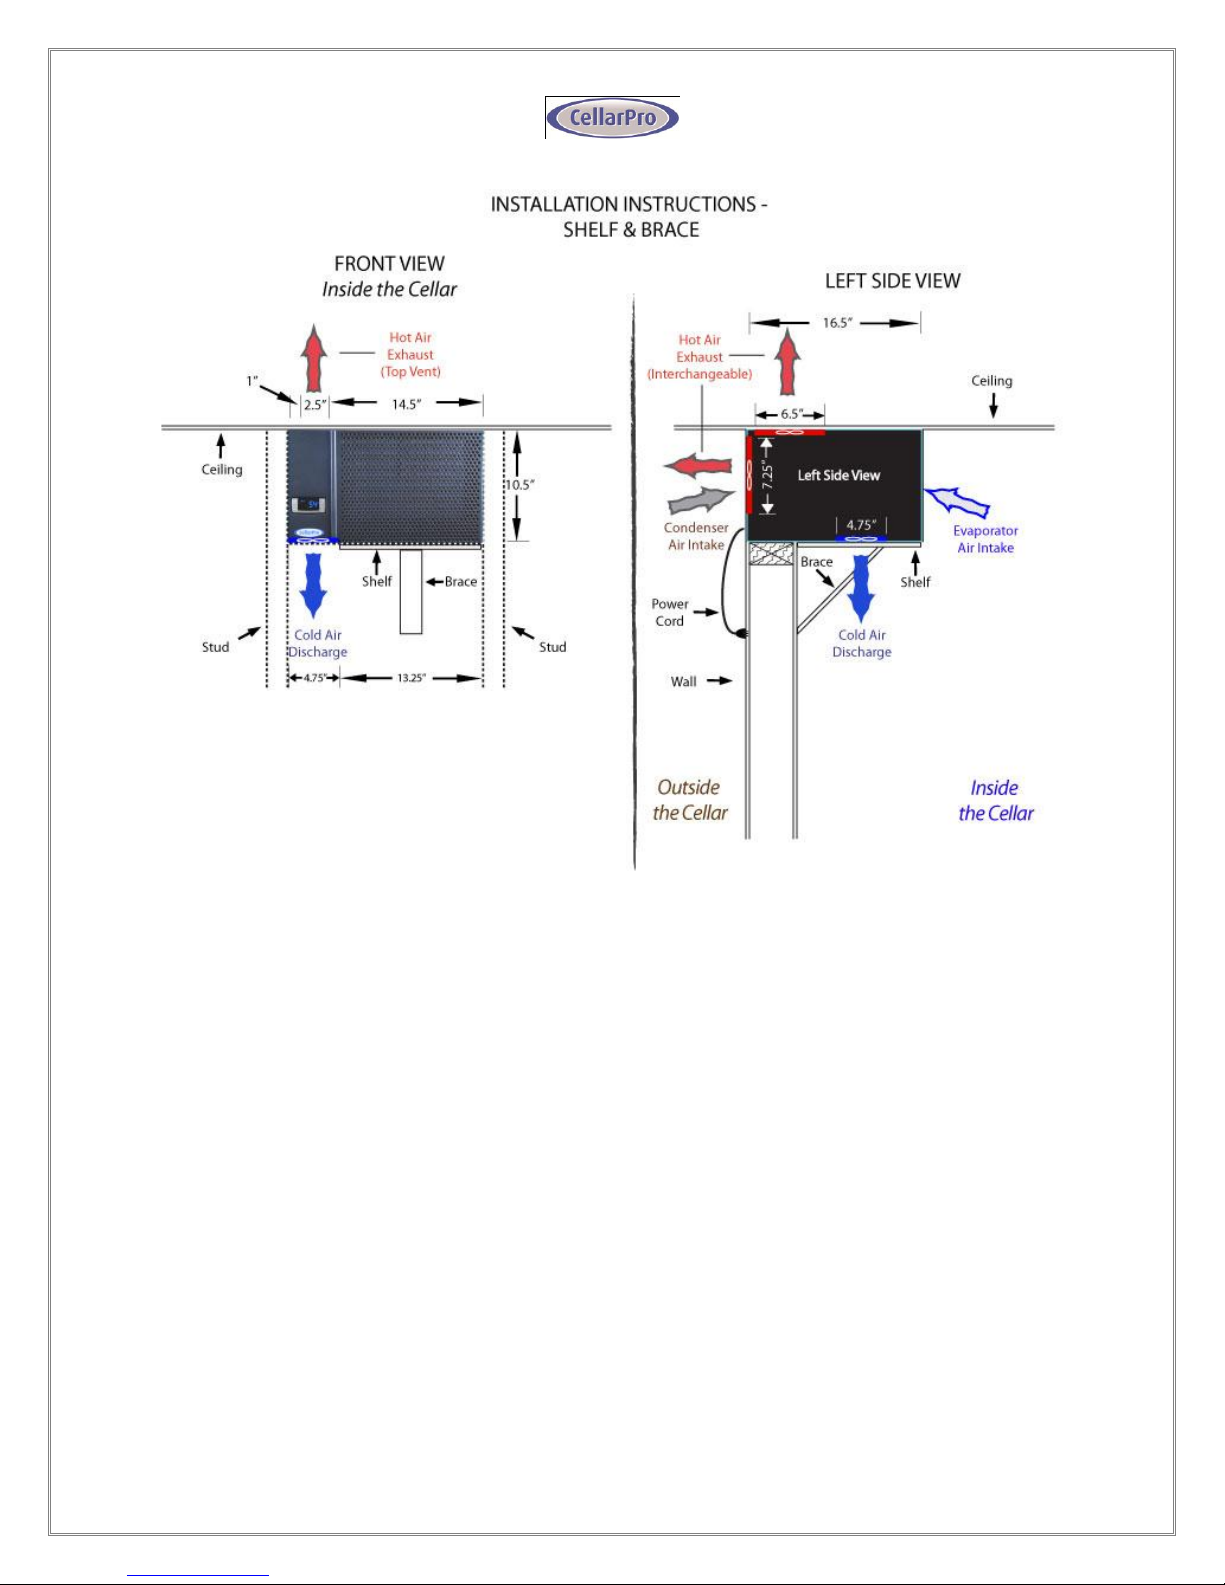
Alternatively, the front of the cooling unit can be supported by a shelf and a diagonal
brace. The shelf can be up to 13.25” inches wide, and should be positioned on the
right side of the cooling unit so that it doesn’t restrict the exhaust vent below the
cooling unit, as follows:
Page 11
10
Once the cooling unit is installed, all cracks and gaps between the cooling unit and
the cellar should be sealed. We provide butyl tape (shipped in the cavity of the
exhaust vent) for sealing these gaps. The butyl tape becomes pliable by rolling it in
your hands. Pay particular attention to the seams on the back of the cellar (top and
rear vent configurations) and the seams at the top of the cellar (top-vent
configuration).
Ventilation
WITHOUT DUCTING
Proper ventilation is critically important for the proper operation of your CellarPro
cooling unit. The CellarPro cooling unit blows a significant amount of hot air through
the top or the rear of the cooling unit, and the hot air must be exhausted into a space
that is at least as large as the wine cellar in order for the heat to properly dissipate.
If the space is too small or constrained, the heat will not dissipate and the cooling
unit will recirculate its own hot air, which will impair the cooling unit’s ability to create
cold air inside the cellar.
Page 12
11
1. Condenser Air Intake (Rear). The condenser coils are located at the rear of the
cooling unit. These coils require access to cool air in order for the cooling unit to
produce cool air. In general, the cooling unit will be able to produce cold air that is
30°F below the temperature of the condenser air intake. The cooling unit must be
installed so that, after its installation, there is access to the condenser coils at the
rear of the cooling unit for periodic cleaning of the coils.
2. Condenser Air Exhaust (Rear or Top). Condenser air can be exhausted either
through the top or the rear of the cooling unit. CellarPro units have interchangeable
vent panels that can be swapped between the top and the rear of the cooling unit to
match the configuration of your cellar and exhaust space.
Rear vent configuration (most common): in this configuration, the panel is
attached to the top of the cooling unit and hot air is freely exhausted from the
rear of the cooling unit into the exhaust space, which should have the same
space capacity as the wine cellar. (eg, if the cellar is 300 cubic feet, the
exhaust space also should be 300 cubic feet.)In addition, this configuration
should have 4-6” of unobstructed clearance directly behind the cellar.
Top-vent configuration (less common): in this configuration, the panel is
attached to the rear of the cooling unit and hot air is freely exhausted from the
top of the cooling unit into the exhaust space. If the exhaust space is shared
with the rear of the cooling unit, it should have the same space capacity as
the wine cellar (eg, if the cellar is 300 cubic feet, the exhaust space also
should be 300 cubic feet.).
WITH DUCTING
We offer a duct kit that is designed to work with all CellarPro 1800 cooling units. The
kit includes:
A duct hood that fits over the rear of the cooling unit and is designed to
connect to two 6” ducts (one for intake and one for exhaust), with a
removable slot for changing air filters;
A 6” inline fan, plus wiring from the cooling unit that provides switched power
to the fan (the cooling unit cannot be ducted without an inline fan). When
connecting the fan to our switched power line, please follow local building
codes, which may require the use of conduit for the wiring and junction boxes
for any wire connections. The fan can be installed anywhere in the ducting –
either on the intake side or the exhaust side, and either at the beginning or
the end of the ducting.
50’ (2 x 25’) of insulated 6” ducting.
Page 13
12
With our duct kit, CellarPro 1800 cooling units can be ducted up to 50 equivalent
feet per duct. When calculating equivalent feet, each 90 degree turn in the ducting
approximately equals 8’ of ducting. Be sure to use gradual turns to avoid restricting
airflow inside the ducting. Consult your HVAC professional for further information.
INSIDE THE CELLAR
CellarPro cooling units are designed to turn on when the temperature near the ceiling
inside the cellar exceeds the Minimum Set Point plus the Temperature Differential,
and turn off when the temperature inside the cellar drops below the Minimum Set
Point. The Minimum Set Point and Temperature Differential can be set according to
instructions in the following Chapter. For example, if the Minimum Set Point is 58°F
and the Temperature Differential is 4°F, the cooling unit will turn on when the
temperature inside the cellar rises above 62°F, and turn off when the temperature
falls below 58°F. In this example, the cellar temperature will average 60°F.
1. Evaporator Air Intake. The evaporator coils are located on the face of the cooling
unit behind the grill. CellarPro cooling units are designed to be mounted at the
highest point inside wine cellars, so that warm air – which rises – will be the first to
pass over the evaporator coils, which will remove the heat from the air. To ensure
proper airflow, a minimum of 3” clearance is required in front of the cooling unit.
2. Evaporator Air Exhaust. Cold air is exhausted through the bottom of the cooling
unit. Because CellarPro cooling units are located at the highest point inside wine
cellars, the cold air will fall to the bottom of the cellar. To ensure proper airflow and
reduce temperature stratification inside the cellar, the space below the cold air
discharge should be clear of any obstructions, including wine bottles, wine racks, etc.
Power Requirement
CellarPro cooling systems should be plugged into an outlet connected to a 15-amp
circuit. The cooling unit uses approximately 3 amps during its “on” cycle. The cooling
unit also offers a grounded 115V AC outlet, which is rated for 3 amps.
A number of variables, including the minimum set point, the temperature in the
ambient environment, the insulation of the cellar, and the thermal mass inside the
cellar, will affect the cooling unit’s runtime. It is normal for the cooling unit to run up
to 75 percent of the time in order to maintain proper conditions inside the cellar.
Page 14
13
Summary
Keep in mind the following guidelines before purchasing a wine cooling unit from
CellarPro:
If the cellar it too large for the cooling unit, and/or if the cellar does not have
adequate insulation, the cooling unit will be unable to maintain proper
temperatures throughout the cellar.
Without a moisture barrier and an airtight environment inside the cellar, the
cooling unit effectively will become a de-humidifier and may produce buckets of
water.
The cooling unit needs to have access to fresh, cool air at the rear of the cooling
unit. Without fresh, cool air, either because of improper ventilation or
environments that are too hot, the cooling unit will be unable to maintain proper
temperatures inside the cellar and the HA2 alarm will be triggered.
Under these conditions, the unit’s internal components may become damaged, the
expected useful life of the wine cooling unit may be adversely affected, and the
product’s warranty may become null and void.
Page 15
14
I V . R e p l a c e m e nt I n s t r u c t i o n s
A. Replacement Instructions – Top Vent Units
TOOLS NEEDED:
Phillips screwdriver
7/16" open end wrench or socket
Needlenose pliers
REQUIRED PARTS
Replacement Cooling Unit
Butyl Sealant Tape
REMOVAL OF OLD COOLING UNIT:
1. Unplug the cooling unit from the wall.
FROM THE TOP OF THE CELLAR
2. If your cellar comes with a grill(s), remove and discard the grill(s) on top of the
cellar. You do not need a grill with the CellarPro cooling unit.
3. Pull the power cord through the back of the cellar.
FROM THE FRONT OF THE CELLAR
4. Open cabinet door and remove all bottles from the top of the rack.
5. Place a heavy towel or blanket on top of the wine rack for protection.
6. IF YOU HAVE A LE CACHE MODEL 2400 WITH A CENTER POST: Remove the
center post by unscrewing the screws (two at the top and two at the bottom)
that attach the post to the wine cabinet.
7. Unplug the light from the cooling unit inside the cellar, and also unplug the
cord from the light fixture.
8. Remove the light fixture as follows:
- Slide the light left or right, and then unscrew and remove one of the two
mounting brackets that attach the light fixture to the ceiling of the cellar.
- Slide the light fixture off the second mounting bracket.
Page 16
15
9. With 7/16 socket wrench, remove the two hex head bolts that attach the
cooling unit to the ceiling of the cellar. Save these bolts! Leave mounting
brackets attached to the cooling unit so that the proper location can be
duplicated with the replacement cooling unit.
PLEASE NOTE: If the nut in the ceiling becomes loose, you will need to use pliers from
the top of the cabinet to hold the nut and keep it from spinning with the bolt.
10. The cooling unit is now free to remove. Drop front end down, and move side to
side to free from cabinet opening.
CAUTION: Two people may be required to remove the cooling unit, which weighs 48
pounds. Do not let the cooling unit drop on unprotected bottle racks.
TO INSTALL NEW COOLING UNIT
1. Wait 24 hours before plugging in and operating your CellarPro cooling unit.
2. Carefully remove the new cooling unit from the packaging. You may reuse this
packaging for shipping or storing the old cooling unit
3. Remove any materials that have been packed inside the exhaust cavity.
4. Before installing the cooling unit, make sure it works by plugging it in and
letting it run on a hard, flat surface. Check that cold air is being produced by
the unit.
5. NEVER turn the cooling unit on its side or upside down
6. The cooling unit should be plugged into an outlet with a 15-amp circuit
7. Before installing the cooling unit,
make sure that the exhaust panel
is installed in the correct position.
For top-vented cellars, the
exhaust panel MUST cover the
REAR exhaust vent (see picture at
right). In this configuration, the
cavity on TOP of the cooling unit is
OPEN.
Top Vent Configuration
Panel should be installed on the REAR
Page 17
16
8. Attach the mounting clips to the FRONT of the cooling unit so that the short side
slides under the sheet metal fold near the top of the cooling unit. You may need
to remove the front grill (attached with two screws on each side of the cooling unit)
in order to slide the mounting clips under the sheet metal, then replace the front
grill after the clips are in place.
9. Some cellars have three pieces of foam located on the bottom and on each side
of the bracket that supports the back of the cooling unit. These foam pieces
should be placed in their original locations
10. Follow the removal instructions described above in reverse.
11. After installing the cooling unit, It is not necessary to replace the grill
12. A complete and proper seal must be made between the cellar and the cooling unit
to ensure that outside air does not enter the cellar. Use the butyl tape to seal the
perimeter where the cooling unit touches the cellar by rolling the tape with your
fingers into a thin (pencil diameter) "rope", then press the tape into the cracks
where the cooling unit touches the cellar.
13. Check the seal by having a helper stand in front of the cabinet while you shine a
flashlight around the cooling unit edges to discover any gaps in sealant.
RETURNING THE ORIGINAL COOLING UNIT:
If the original cooling unit is under warranty and you are returning it, please follow the
instructions below:
1. Use the original packaging to repack the cooling unit.
2. Make sure that the cooling unit is upright in the box
3. The exterior of the box should be prominently marked with “This Side Up” and
“Fragile” for the freight carrier
Page 18
17
B. Replacement Instructions – Rear Vent Units
TOOLS NEEDED:
Phillips screwdriver
7/16" open end wrench or socket
Needlenose pliers
REQUIRED PARTS
Replacement Cooling Unit
Butyl Sealant Tape
REMOVAL OF OLD COOLING UNIT:
1. Unplug the cooling unit from the wall.
FROM THE REAR OF THE CELLAR
2. If your cellar comes with a grill(s), remove and discard the grill(s) behind the
cellar. You do not need a grill with the CellarPro cooling unit.
3. Roll up cord and place in fan cavity at rear of cooling unit. If your cellar came with
a hard-wired light, separate the lamp cord from black and white leads at the back
of the cooling unit.
FROM THE FRONT OF THE CELLAR
4. Open cellar door and remove all bottles from the top of the rack.
5. Place a heavy towel or blanket on top of the wine rack for protection.
6. Remove the light fixture as follows:
- Slide the light left or right, and then unscrew and remove one of the two
mounting brackets that attach the light fixture to the ceiling of the cellar.
- Slide the light fixture off the second mounting bracket.
7. With 7/16 socket wrench, remove the two hex head bolts that attach the
cooling unit to the ceiling of the cellar. Save these bolts! Leave mounting
brackets attached to the cooling unit so that the proper location can be
duplicated with the replacement cooling unit.
PLEASE NOTE: If the nut in the ceiling becomes loose, you will need to use pliers from
the top of the cabinet to hold the nut and keep it from spinning with the bolt.
Page 19
18
8. The cooling unit is now free to remove. Drop front end down, and move side to
side to free from cabinet opening.
CAUTION: Two people may be required to remove the cooling unit, which weighs 45
pounds. Do not let the cooling unit drop on unprotected bottle racks.
TO INSTALL NEW COOLING UNIT
1. Wait 24 hours before plugging in and operating your CellarPro cooling unit.
2. Carefully remove the new cooling unit from the packaging. You may reuse this
packaging for shipping or storing the old cooling unit
3. Remove any materials that have been packed inside the exhaust cavity.
4. Before installing the cooling unit, make sure it works by plugging it in and
letting it run on a hard, flat surface. Check that cold air is being produced by
the unit.
5. NEVER turn the cooling unit on its side or upside down
6. The cooling unit should be plugged into an outlet with a 15-amp circuit
7. Before installing the cooling unit,
make sure that the exhaust panel
is installed in the correct position.
For rear-vented cellars, the
exhaust panel MUST cover the
TOP exhaust vent (see picture at
right). In this configuration, the
cavity at the REAR of the cooling
unit is OPEN.
Rear Vent Configuration
Panel should be installed on the TOP
8. Attach the mounting clips to the FRONT of the cooling unit so that the short side
slides under the sheet metal fold near the top of the cooling unit. You may need
to remove the front grill (attached with two screws on each side of the cooling unit)
in order to slide the mounting clips under the sheet metal, then replace the front
grill after the clips are in place.
Page 20
19
9. Some cellars have three pieces of foam located on the bottom and on each side
of the bracket that supports the back of the cooling unit. These foam pieces
should be placed in their original locations
10. Follow the removal instructions described above in reverse.
11. After installing the cooling unit, It is not necessary to replace the grill
12. A complete and proper seal must be made between the cellar and the cooling unit
to ensure that outside air does not enter the cellar. Use the butyl tape to seal the
perimeter where the cooling unit touches the cellar at the rear of the cellar by
rolling the tape with your fingers into a thin (pencil diameter) "rope", then press the
tape into the cracks where the cooling unit touches the cellar.
13. Check the seal by having a helper stand in front of the cabinet while you shine a
flashlight around the cooling unit edges to discover any gaps in sealant.
RETURNING THE ORIGINAL COOLING UNIT:
If the original cooling unit is under warranty and you are returning it, please follow the
instructions below:
1. Use the original packaging to repack the cooling unit.
2. Make sure that the cooling unit is upright in the box
3. The exterior of the box should be prominently marked with “This Side Up” and
“Fragile” for the freight carrier
Page 21
20
V . O p e r a t i n g I n s t r u c t i o n s
Overview
Please follow the instructions in Chapter I prior to turning on your CellarPro cooling
unit.
CellarPro cooling units are designed to maintain optimal conditions for wine storage
and aging. These conditions include steady, cool temperatures, high humidity,
minimal vibration and light, and clean air.
The settings on your CellarPro cooling unit have been preset and optimized by the
factory. Before changing any settings below, we recommend waiting 14 days to allow
the cooling unit to “break in.”
The cooling unit is designed to cool the cellar gently without stripping moisture out of
the cellar environment. Therefore, it is not uncommon for the cooling unit to run
nonstop for up to a week initially, depending on the temperature inside the cellar, the
size of the cellar, and the temperature of the ambient environment. Once the cellar
has reached equilibrium, it is normal for the cooling unit to run as much as 75
percent of the time.
CellarPro cooling units are designed to maintain optimal temperatures for storing and
aging fine wine. CellarPro cooling units are not designed to maintain temperatures
for serving wine, which tend to be much colder than storage temperatures, especially
serving temperatures for white and sparkling wines.
CellarPro cooling units must be used, stored, moved and/or shipped in the upright
position. Be careful when turning the unit on its side. The unit NEVER should be
turned upside down.
Page 22
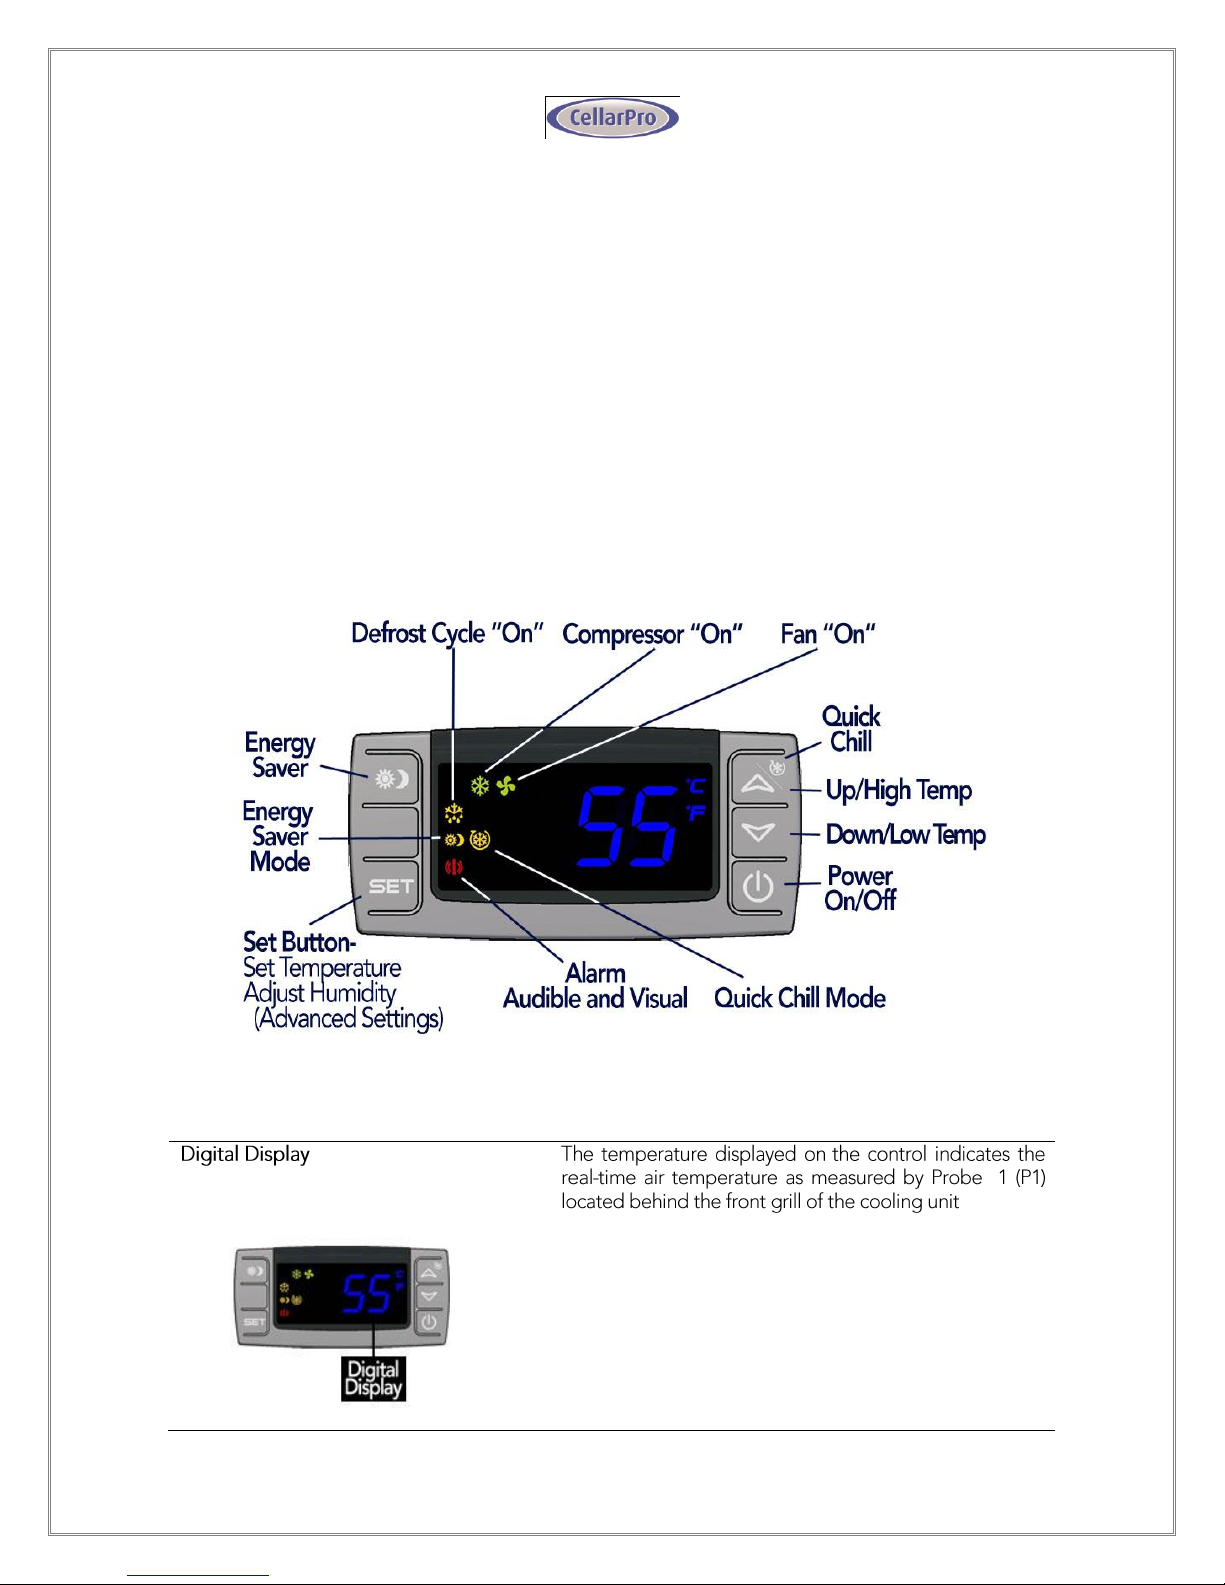
21
Basic Operation
The temperature inside the cellar can be increased or decreased by changing the
Minimum Set Point as described later in this chapter. If the cooling unit runs too
much, you can raise the Minimum Set Point to reduce the cycle “on” time. Most wine
collectors store their wine in the range of 55 - 60°F.
CellarPro cooling units are designed to maintain appropriate levels of humidity,
ranging from 50 to 70 percent, inside wine cellars. In order to increase or decrease
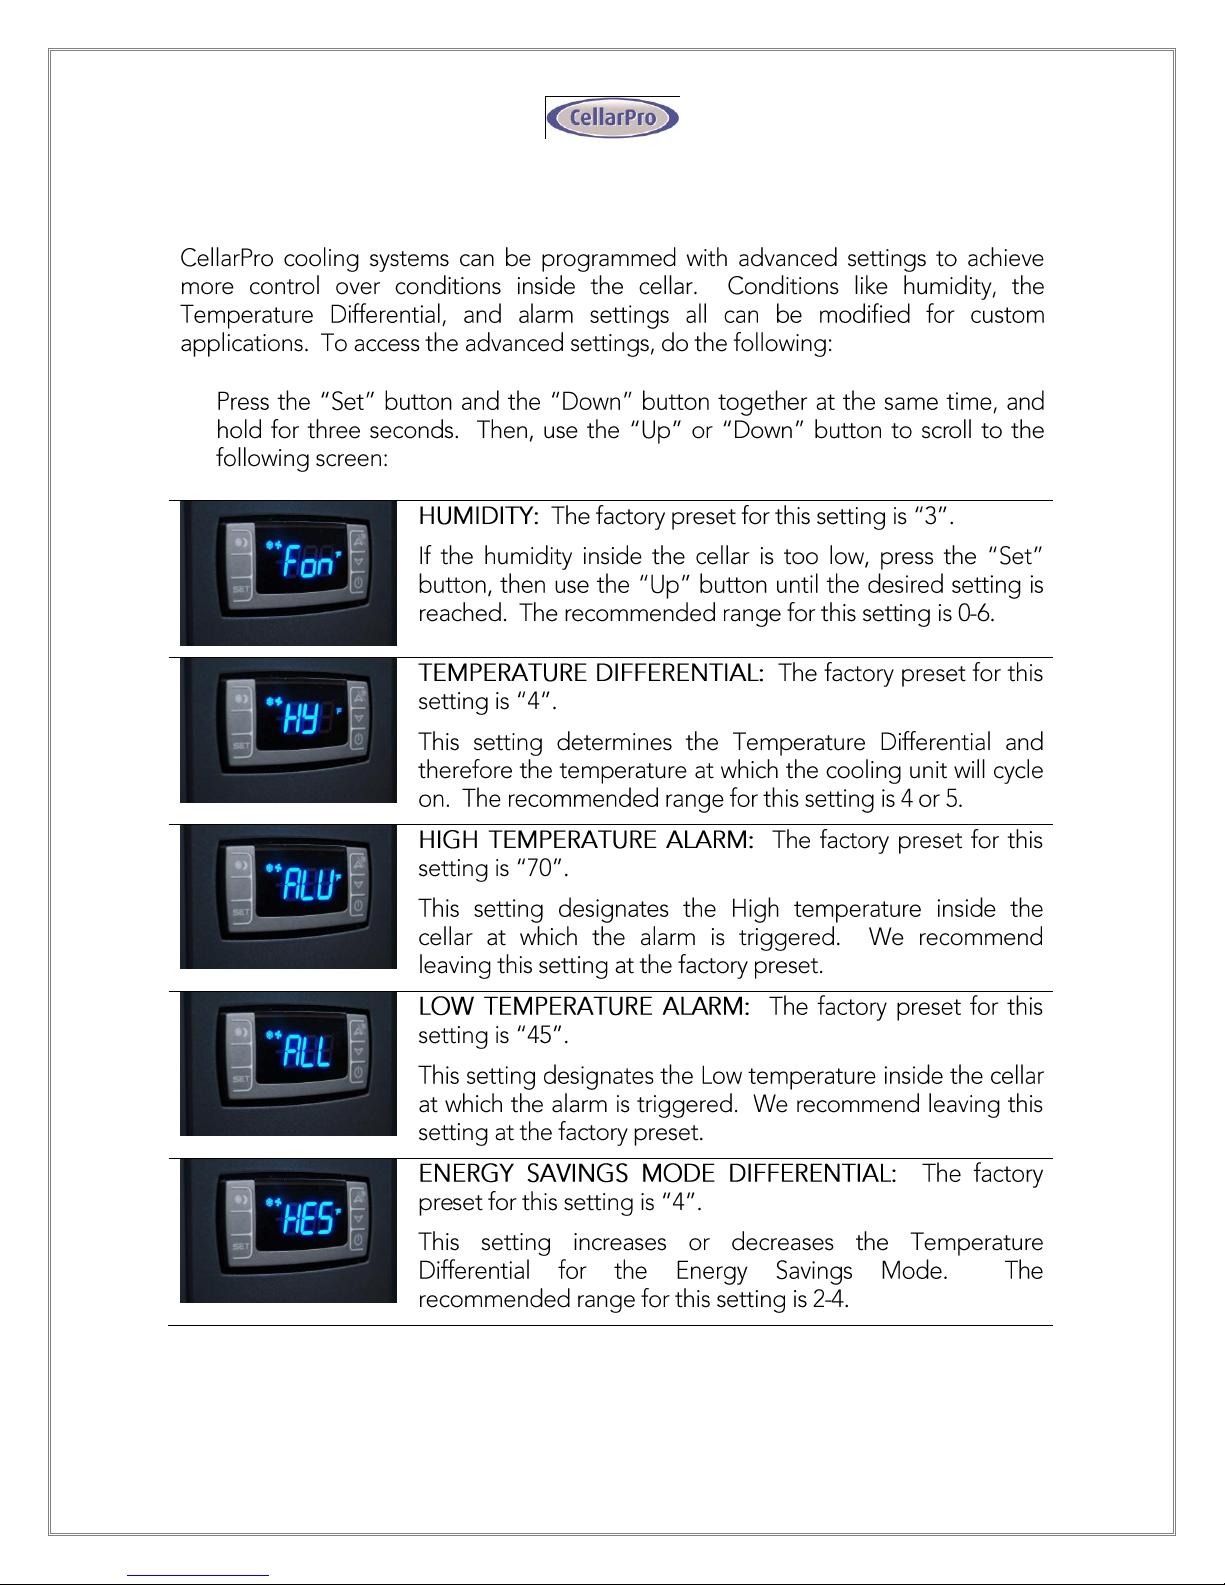
humidity inside the cellar, the Fon setting can be changed as described in the
“Advanced Operation” section later in this chapter.
Page 23
22
Page 24
23
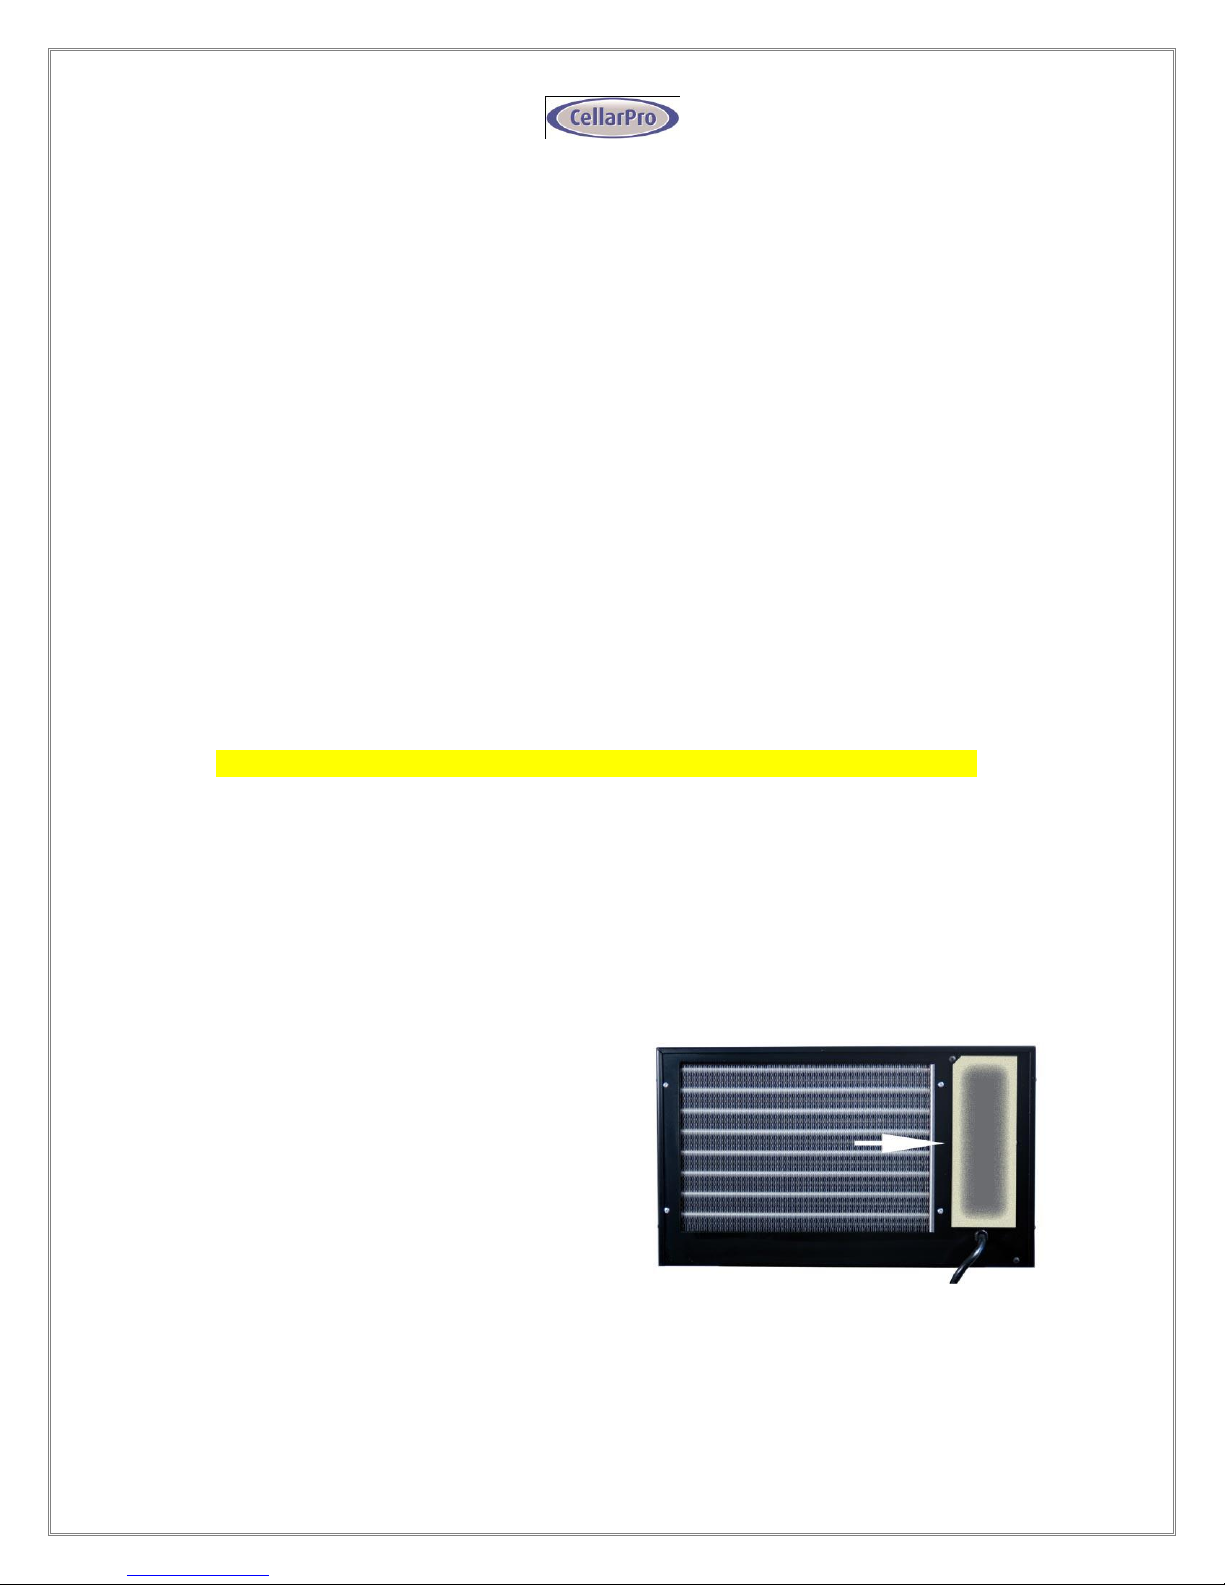
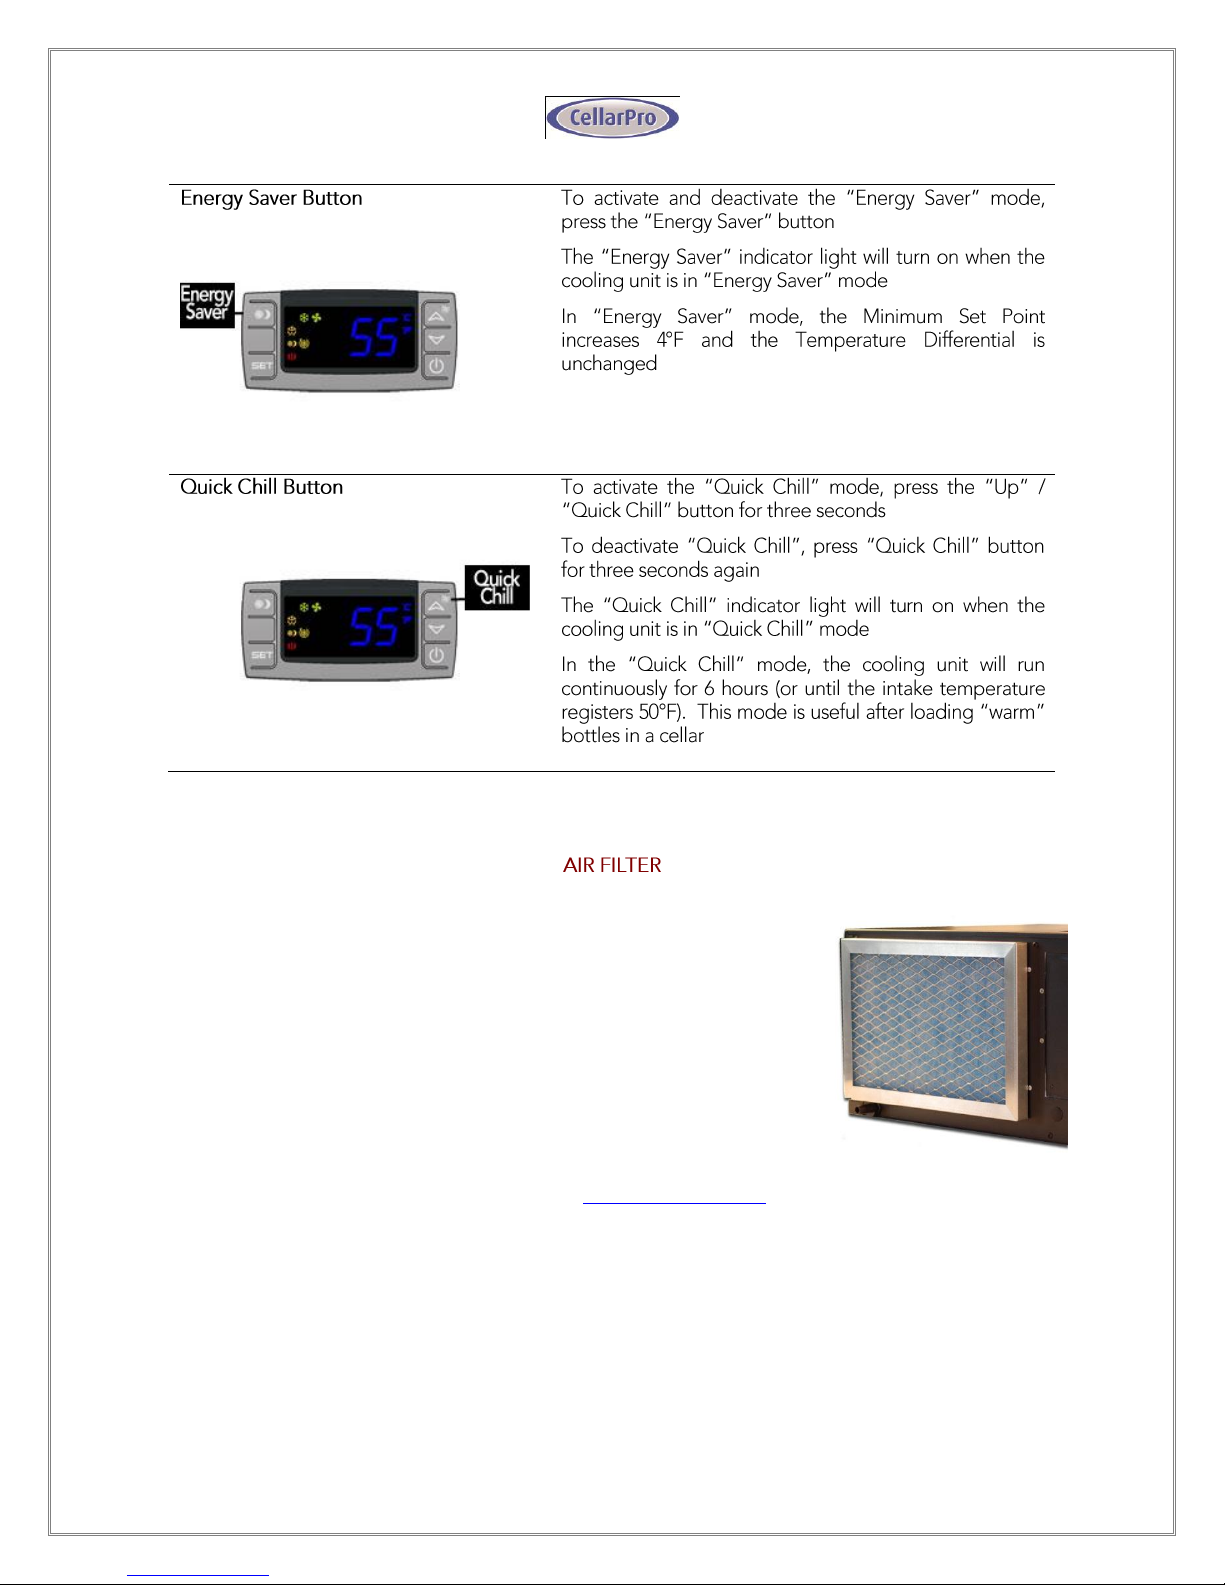
We offer an optional air filter that magnetically attaches to the
rear of the cooling unit. To replace the filter, remove the filter
frame from the cooling unit (see the image at right), and replace
the filter when it becomes dirty (anywhere from 3 to 9 months
depending on the conditions in your location.
When replacing the filter, the blue fibers should face the cooling
unit, and the white fibers should face away from the cooling unit.
Replacement filters may be purchased at www.cellarpro.com.
Page 25
24
Advanced Operation
Page 26
25
Standard Protection Mechanisms
The cooling unit is programmed to shut down certain components to protect those
components, as well as the wine inside the cellar, under the following circumstances:
Scenario
What it means
What happens
P1 Alarm
Probe 1, which senses
the temperature inside
the cellar and controls
the on/off cycles of the
cooling unit, has failed
The cooling unit enters a timed
auto-cycle mode until Probe 1 is
repaired or replaced. In this mode,
the cooling unit will turn for 12
minutes and off for 8 minutes.
Optional Protection Mechanisms
CellarPro cooling systems can be programmed to turn off the compressor and
condenser fan in the event of an HA2 alarm, as described below. If you’d like to turn
on this protection mechanism, please call us toll-free at 877.726.8496
P3 > 132°F for more
than 2 hours
The condenser probe
is measuring
temperatures that are
too hot
The compressor and condenser
fan will turn off until the condenser
temperature falls below 120°F
Maintenance
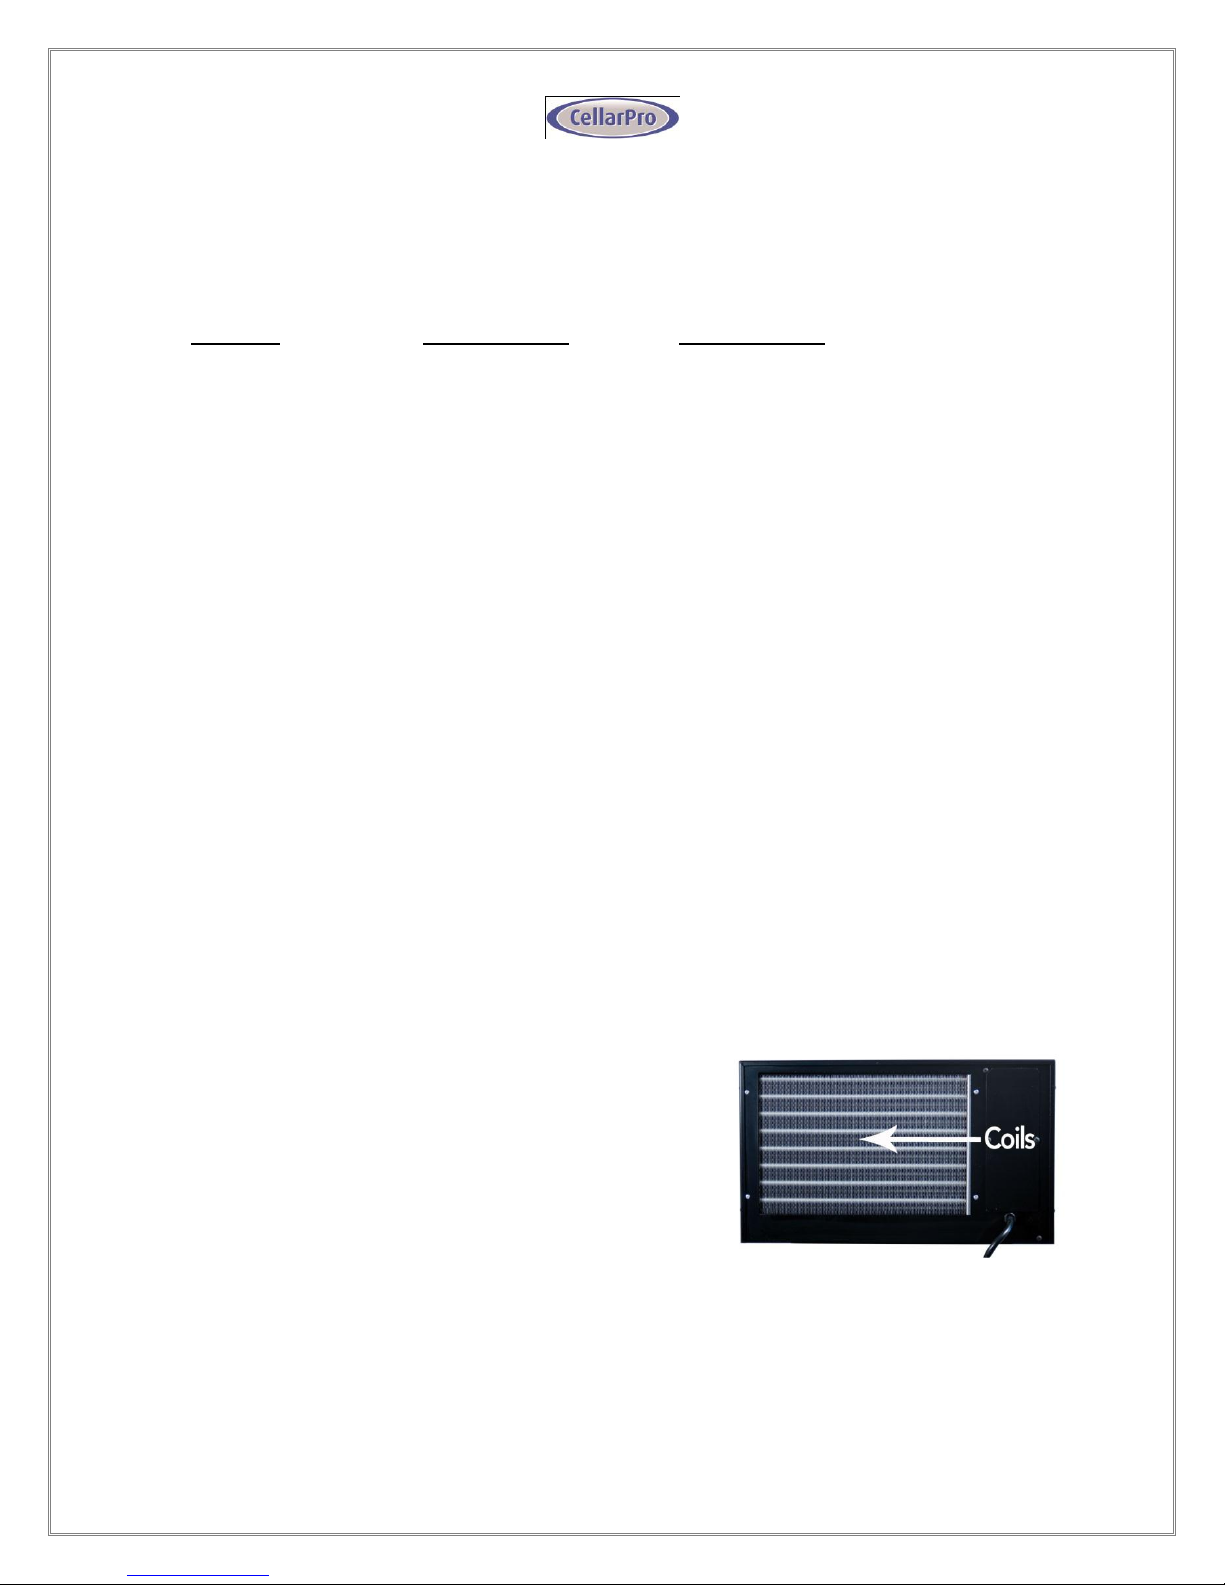
The condenser coils at the back of the cooling unit
will collect dust, dirt and lint over time. It is
critically important to clean the coils periodically.
If the condenser coils become clogged, the
cooling unit will not have proper airflow and its
performance and longevity will be compromised.
To clean the coils, simply vacuum or brush the
coils until all dust and lint have been removed. Do
not use compressed air to clean the coils because it may force dirt particles into the
cooling system and cause serious damage to its internal components.
Page 27
26
Alarm Code
What it means
What to do
P1, P3
Probe Failure
Call CellarPro at 877.726.8496
HA
The temperature inside
the cellar is too warm
(above 70°F for more
than 1 hour)
Check seals;
Check if door was left open;
Lower the ambient temperatures
HA2
The condenser
temperature is too high
(above 125°F for 2
hours)
Check for appropriate installation,
ventilation, ambient conditions and
cooling capacity (Chapter II)
Clean the condenser coils (see
“Maintenance” in Chapter IV);
Check for obstructions to the intake
and/or exhaust vents;
Check that the condenser fan is
operating
LA
The temperature inside
the cellar is too cold
(below 45°F)
Raise the ambient temperature;
Raise the “Minimum Set Point”
LA2
The temperature at the
condenser coils
(outside the cabinet)
has dropped below the
alarm temperature
setting
Lower the alarm temperature
setting as follows:
1. Depress the “Set” and “Down”
button for three seconds until
the display reads “HY”
2. Depress the “Set” and “Down”
button for seven seconds until
“PR2” flashes on the display
3. Using the “Down” button, scroll
until the display reads “AL2”
4. Depress the “Set” button and
lower the alarm temperature
setting to your desired setting
Alarms
The cooling unit has both an audible notification and a visual alarm indicator (shown
in “red” on the control panel) that are activated when an alarm is triggered. Please
note: the temperature alarms (HA, HA2, LA and LA2) are disabled during the first 23
hours of operation after the cooling unit is plugged in and/or turned on.
The control panel also will flash a code for each alarm, as follows:
Page 28
27
V I . Tr o u b l e s h o o ti n g
The Cooling Unit Runs Constantly
The cooling capacity of the cooling unit depends on the thermal load on the wine
cellar, and the resulting BTU that is required to cool and maintain the cellar at the
desired temperature. The cooling capacities of both units are shown on page 2. If the
thermal load exceeds the capacity of the cooling unit, you will need to add insulation
and/or raise the setpoint on the cooling unit.
The cooling unit is designed to turn on when the air temperature in the cellar rises
ABOVE the Minimum Set Point + Temperature Differential, and turn off when the air
temperature falls below the Minimum Set Point. For example, if the Minimum Set
Point is 58°F and the Temperature Differential is 4°F, the cooling unit will turn above
62°F and turn off below 58°F. In this example, the average temperature inside the
cellar will be 60°F.
When bottles are first loaded in the cellar, the cooling unit will run continuously (even
up to a week) until the temperature inside the cellar falls below the Set Point. After
the temperatures inside the wine cellar reach equilibrium, the cooling unit will run
anywhere from 30 to 50 minutes in a given hour, depending on the thermal load and
the setpoint.
Hot weather conditions, insufficient insulation, inadequate ventilation, missized cellar
capacity and/or dirty condenser coils can all cause the cooling unit to run
continuously.
If your CellarPro wine cooling unit runs constantly, try the following:
Make sure that both fans are spinning
Clean the condenser coils
Make sure that the cooling unit is NOT in Energy-Saver Mode
Check that the thermal load in Chapter II isn’t overwhelming the cooling unit
Increase the supply of cool air to the space outside the condenser coils, using
a fan, ducting or an exhaust system to remove heat from the space.
Raise the Minimum Set Point on the cooling unit
If you continue to have problems, please complete our Cooling Unit Troubleshooting
Inquiry Form ((found online) and we'll respond by the next business day.
Page 29
28
The Cooling Unit Is Dripping
The cooling unit is designed to remove excess moisture from inside the cellar, which
collects in the drip pan of the cooling unit.
Excess moisture can occur when the cooling unit runs constantly, when the Minimum
Set Point is too low and/or when the cellar doesn’t have a good seal from the outside
environment. To eliminate overflow in the drip pan, do the following:
1. Raise the Minimum Set Point of the cooling unit to 58 degrees or above.
2. Make sure the cellar has good seals, especially at the door(s), and repair any
leaks immediately.
3. If your wine cooling unit came with a condensate fitting and drain line, make
sure you properly setup the condensate trap (Chapter II).
If the cooling unit continues to drip, contact us at 1.877.726.8496 for further
assistance.
The HA2 Alarm has been triggered
The cooling unit is designed to measure the temperature of the condenser coils and,
if the temperature exceeds 125°F for more than 2 hours, the HA2 alarm will display
on the control panel.
If this alarm happens when you first receive and start operating your CellarPro
cooling unit, check for appropriate installation and ventilation (Chapter II). Also,
make sure that there aren’t any obstructions to the intake and/or exhaust vents. If
your wine cabinet has a grill, remove the grill and/or any other obstructions above
(top vent) or behind (back vent) the cellar.
If the alarm happens in conjunction with hot ambient conditions, we recommend
doing the following:
1. Raise the Minimum Set Point to 60°F until temperatures cool down
2. Increase the Fon setting
If the cooling has been operating for several months without any problems and the
alarm happens “out of the blue”, check the condenser coils and clean if necessary.
If the HA2 alarm continues to be triggered, contact us at 1.877.726.8496 for further
assistance.
Page 30
29
The LA2 Alarm has been triggered
As noted above, the cooling unit is designed to measure the temperature of the
condenser coils and, if the temperature drops below a certain point, the LA2 alarm
will display on the control panel. To reduce the alarm temperature setting, do the
following:
1. Depress the “Set” and “Down” button for three seconds until the display
reads “HY”
2. Depress the “Set” and “Down” button (again) for seven seconds until “PR2”
flashes on the display
3. Using the “Down” button, scroll until the display reads “AL2”
4. Depress the “Set” button and lower the alarm temperature setting to your
desired temperature
Page 31
30
V I I . L i m i te d W a r r a n t y
1800 QTL / QT / XT / XTS: For five years from the date of original delivery, your
CellarPro warranty covers all parts and labor to repair or replace any components
that prove to be defective in materials or workmanship in the cooling unit.
1800XTSx: For five years from the date of original delivery, your CellarPro warranty
covers the internal compressor if it proves to be defective in materials or
workmanship. In addition, for two years from the date of purchase, your CellarPro
warranty covers all parts and labor to repair or replace any components that prove to
be defective in materials or workmanship in the cooling unit.
Under the terms of this warranty, CellarPro will repair or replace the original cooling
unit with a new or refurbished cooling unit and, once replaced, the original cooling
unit must be returned to CellarPro.
All service provided by CellarPro under the above warranty must be performed by a
designated repair center, unless otherwise specified by CellarPro. Purchaser is
responsible for shipping the cooling unit to and from CellarPro or to and from a
designated repair facility, and for removing and reinstalling the cooling unit from the
wine cellar.
The limited warranty applies only to cooling units purchased from the factory or an
authorized dealer. Damage caused by others or by any cause beyond the control of
CellarPro, shall not be considered defects in material or workmanship and is not
covered by the warranty. The limited warranty does not cover any parts or labor to
correct any defect caused by negligence, commercial use, accident, or improper use,
maintenance, installation, service or repair.
THE REMEDIES DESCRIBED ABOVE FOR EACH WARRANTY ARE THE ONLY ONES,
WHICH CELLARPRO WILL PROVIDE, EITHER UNDER THESE WARRANTIES OR UNDER
ANY WARRANTY ARISING BY OPERATION OF LAW. CELLARPRO WILL NOT BE
RESPONSIBLE FOR ANY CONSEQUENTIAL OR INCIDENTAL DAMAGES ARISING FROM
THE BREACH OF THESE WARRANTIES OR ANY OTHER WARRANTIES, WHETHER
EXPRESS, IMPLIED OR STATUTORY.
Some states do not allow the exclusion or limitation of incidental or consequential
damages, so the above limitation or exclusion may not apply to you. This warranty
gives you specific legal rights and you may also have other legal rights, which vary
from state to state.
To receive parts and/or service and the name of a CellarPro designated repair facility
nearest you, contact your CellarPro dealer. You may also contact CellarPro directly by
calling us at 1.877.726.8496.
 Loading...