

Page 1
Page 2
C O N G R A T U L A T I O N S !
Thank you for choosing Le Cache Premium Wine Cabinets.
Your handcrafted wine cabinet has been constructed from the finest
materials and is designed to protect and preserve your valuable wine
collection for many years.
Please take a minute to read Chapters II through IV in this Owner’s
Manual. If you have any questions regarding the delivery and
inspection, placement and/or set-up of your wine cabinet, please
contact your dealer, or call Le Cache if you purchased your cabinet
directly from the factory.
You can reach us during normal business at 1.877.532.2243, or online
anytime at www.LECACHE.com
.
Cheers!
Le Cache Premium Wine Cabinets
Special Note –
In this package, we’ve included a level, just in case the delivery team forgets to
bring their level when they setup your wine cabinet!
We’ve also included a one-page questionnaire and a self-addressed, stamped
envelope. If you have a free moment, let us know how we’re doing. Your feedback
is important to us!
Page 3
L E C A C H E P R E M I U M W I N E C A B I N E T S
T A B L E O F C O N T E N T S
I. Important Notes…………………………………………………. 3
II. Delivery Overview……..…………………………………………. 4
III. Inspection Procedure……………………………………………. 5
IV. Placement of Your Wine Cabinet………………………………. 6
V. Set-Up Instructions………………………………………………. 9
VI. Operating Instructions…………………………………………... 14
VII. Bottle Storage Tips…………………………………...…………. 21
VIII. Maintenance Instructions……………………………………….. 22
IX. Troubleshooting Guide…………………………………………. 23
X. Limited Warranty…………………………………………………. 26
XI. Contact Information……………………………………………… 27
W E W A N T Y O U R P I C T U R E !
Please email a picture of you and your cabinet (or, if you’re
shy, just your cabinet!) and accompanying text (optional) to
us at [email protected], which we’ll post on our website at
www.lecache.com. The picture should be 4x6 if possible,
and the accompanying email should include your first and
last name. Cheers!
DON’T FORGET TO REGISTER YOUR WARRANTY AT:
www.lecachewinecabinets.com/register
-2-
Page 4
L E C A C H E P R E M I U M W I N E C A B I N E T S
I. I M P O R T A N T N O T E S
• WHEN TAKING DELIVERY OF YOUR WINE CABINET, FOLLOW THE INSPECTION
PROCEDURES DESCRIBED IN CHAPTER III.
• WAIT 24 HOURS BEFORE PLUGGING IN AND OPERATING YOUR CELLARPRO
COOLING UNIT.
• THE COOLING UNIT SHOULD BE PLUGGED INTO AN OUTLET CONNECTED TO
A 15-AMP CIRCUIT
• IF THE WALL OUTLET IS DIRECTLY BEHIND THE WINE CABINET, USE AN
EXTENSION CORD (GROUNDED; 14 GAUGE OR THICKER) AND COIL THE
EXCESS AT THE TOP OF THE CABINET SO THAT YOU WON’T NEED TO MOVE
THE WINE CABINET IN THE EVENT THAT THE COOLING UNIT NEEDS TO BE
REPLACED.
• WE RECOMMEND PLUGGING THE COOLING UNIT INTO A SURGE PROTECTOR
(MINIMUM OF 15-AMPS) TO PROTECT THE ELECTRICAL COMPONENTS FROM
POWER SURGES OR SPIKES.
P L E A S E N O T E!
UNTIL YOU’VE LOADED BOTTLES INTO YOUR WINE CABINET, DO NOT OPEN
BOTH DOORS AT THE SAME TIME. THE DOORS ARE EXTREMELY HEAVY AND
WHEN BOTH DOORS ARE OPENED, THE CABINET CAN TIP FORWARD IF THE
CABINET IS EMPTY.
-3-
Page 5
L E C A C H E P R E M I U M W I N E C A B I N E T S
II. D E L I V E R Y O V E R V I E W
DELIVERY
If you purchased direct from Le Cache:
Standard delivery fees include 2 men (3 men for the Model 3800 and 5200), lift gateequipped truck, inside delivery to 1st floor or any floor accessible to an elevator (within 100
feet of truck), unpacking, debris removal, installation of the crown and base moldings
(shipped in a separate box – Euro and Mission Series cabinets) and door alignment with a
total site time not to exceed half an hour. Additional delivery fees may be required if you
are located outside a regular delivery service area, if additional men are required to safely
perform delivery services to your location, or if extra site time is required to provide these
services. Extraordinary delivery conditions – such as stairs, distance to truck greater than
100 feet, or difficult access – may also require additional delivery fees.
The specialized carrier has been instructed to perform the following tasks upon delivery of
your wine cabinet in your presence:
• Unpack the wine cabinet;
• Place the wine cabinet in your home in the desired location;
• Align the doors;
• Install crown and base moldings (European Country and Mission Series); and
• Dispose of the packaging materials if you desire
If you purchased from a dealer:
Shipping costs, freight carrier and class of service are determined by the dealer unless
otherwise specified.
Please note: the carrier is NOT required to install the door handles on your cabinet. The
handles are shipped in an envelope inside the wine cabinet or screwed to the back side of
the doors, and are easily installed with a screwdriver into predrilled holes.
-4-
Page 6
L E C A C H E P R E M I U M W I N E C A B I N E T S
III. I N S P E C T I O N P R O C E D U R E
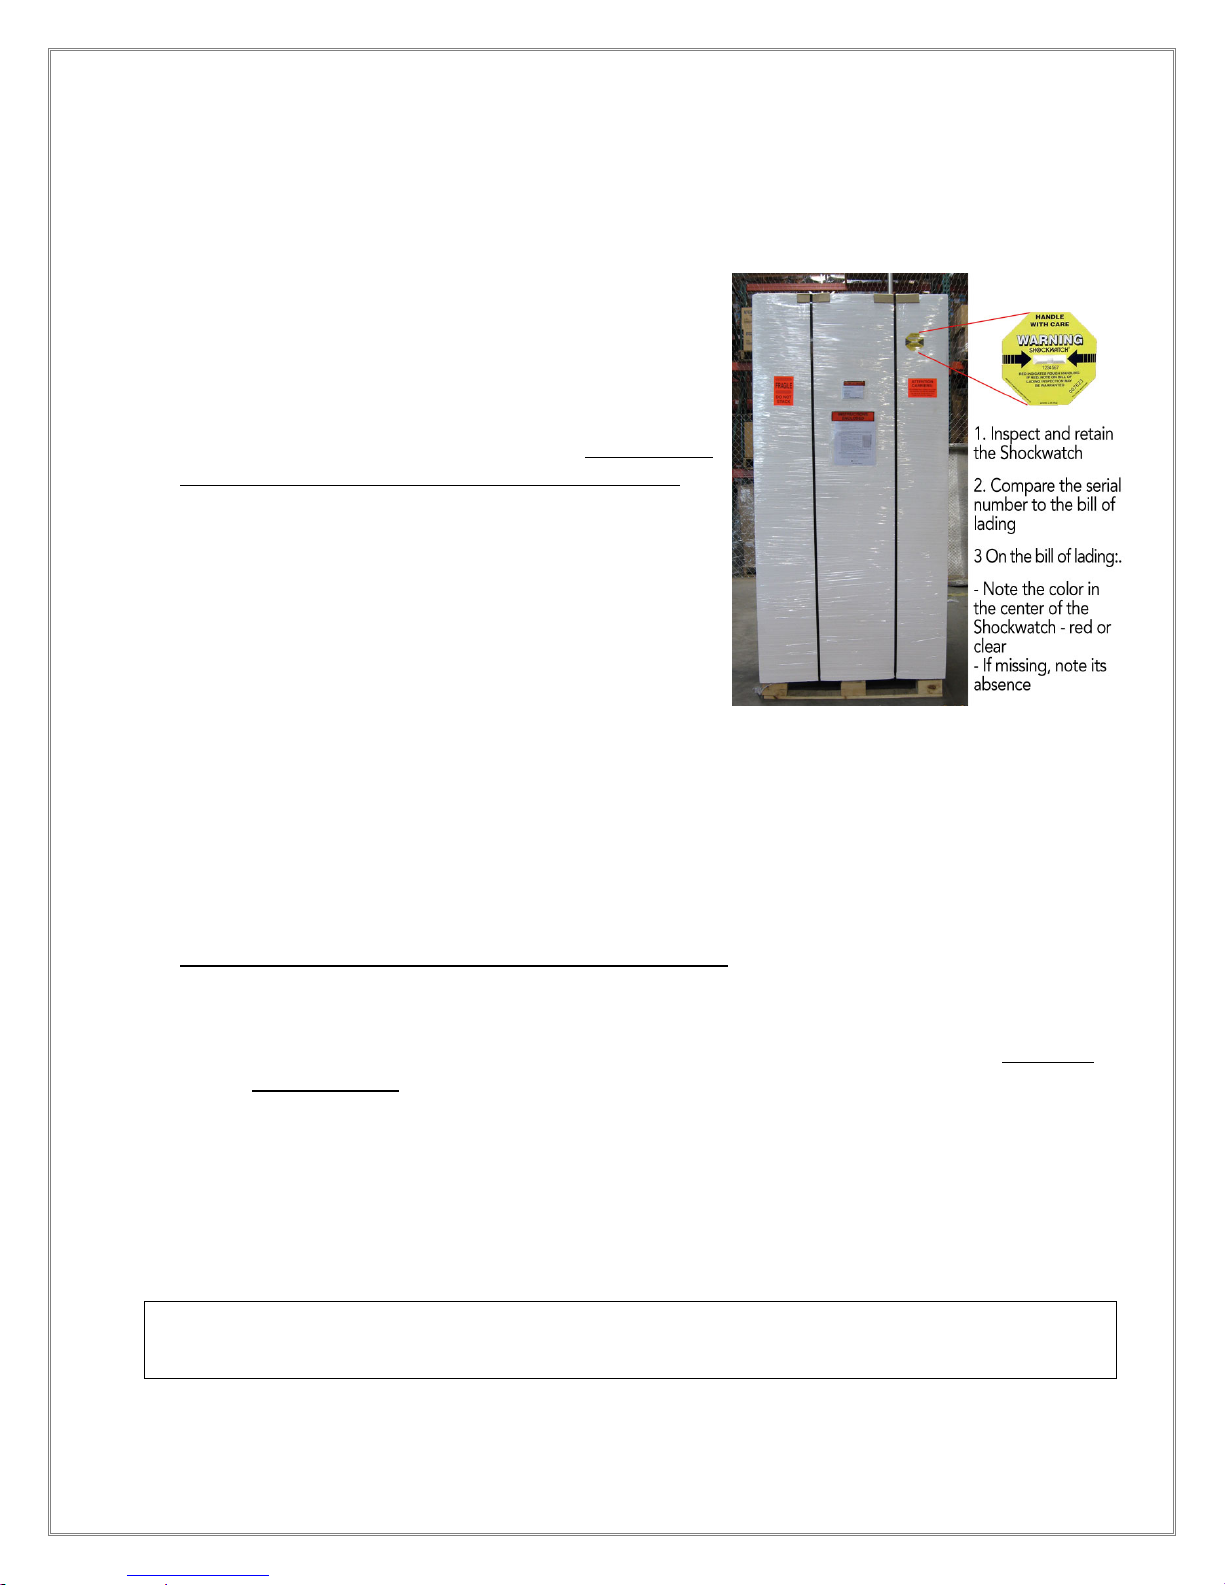
1. REMOVE AND RETAIN THE SHOCKWATCH
INDICATOR. Located on the exterior of the
packaging (but underneath the shrink-wrap so it
won’t fall off,) the SHOCKWATCH INDICATOR
has a unique serial number that should match the
bill of lading. If there is no shockwatch indicator
or if the shockwatch indicator is red, please note
its absence or its red color on the bill of lading.
2. INSPECT THE PACKAGING BEFORE IT IS
REMOVED FROM THE CABINET.
a. The cabinet should arrive strapped to the
pallet.
b. The wine cabinet should always be
shipped in the upright position. (Please
note - it is OK to tip the cabinet in order to enter into a room.)
c. The packaging shouldn’t have any tears, holes, marks or other damage.
d. Note any discrepancies on the bill of lading.
3. ONCE THE PACKAGING HAS BEEN REMOVED, INSPECT THE INSIDE AND
OUTSIDE OF THE WINE CABINET FOR DAMAGE.
4. IF YOU FIND DAMAGE TO THE WINE CABINET:
a. Describe the damage on the bill of lading. Be detailed and descriptive.
b. DO NOT SIGN the paperwork if the delivery men write that there was HIDDEN
CONCEALED damage.
c. Call Le Cache at 1.877.532.2243 or your dealer immediately before the delivery
men leave.
d. Save a copy of all freight documents, including the Shockwatch, making sure that
everything is legible
FAILURE TO FOLLOW THESE INSTRUCTIONS MAY RESULT IN A DENIED INSURANCE
CLAIM AND/OR BILLING(S) FOR REPAIRS OR RETURNED MERCHANDISE.
or
-5-
Page 7
L E C A C H E P R E M I U M W I N E C A B I N E T S
IV. P L A C E M E N T O F Y O U R W I N E C A B I N E T
VENTILATION REQUIREMENTS –
UPRIGHT CABINETS WITH STANDARD CONFIGURATIONS
The heat generated by the cooling unit is ventilated through the top of the cabinet (except
credenzas). Consequently, the wine cabinet must have sufficient clearance above the
cabinet for the hot air to dissipate. If the hot air generated from the cooling unit cannot be
dissipated, the cooling unit will be unable to maintain cold temperatures inside the wine
cabinet and/or will run all the time.
The space above, to the front and to the sides of the wine cabinet must be open and
unobstructed. In addition, the wine cabinet must be placed in a space that is properly
ventilated. The cabinet cannot be placed in an alcove, closet or built-in space unless an
exhaust system is installed to evacuate the hot air generated by the cooling unit. In
addition, access to the top of the cabinet is necessary for periodic cleaning of the coils.
If you don’t have enough clearance above the cabinet, we can modify the cabinet’s intake
(rear vent modification) so that only 8-9” are required above the cabinet, but 3-4” of space
will be required behind the cabinet.
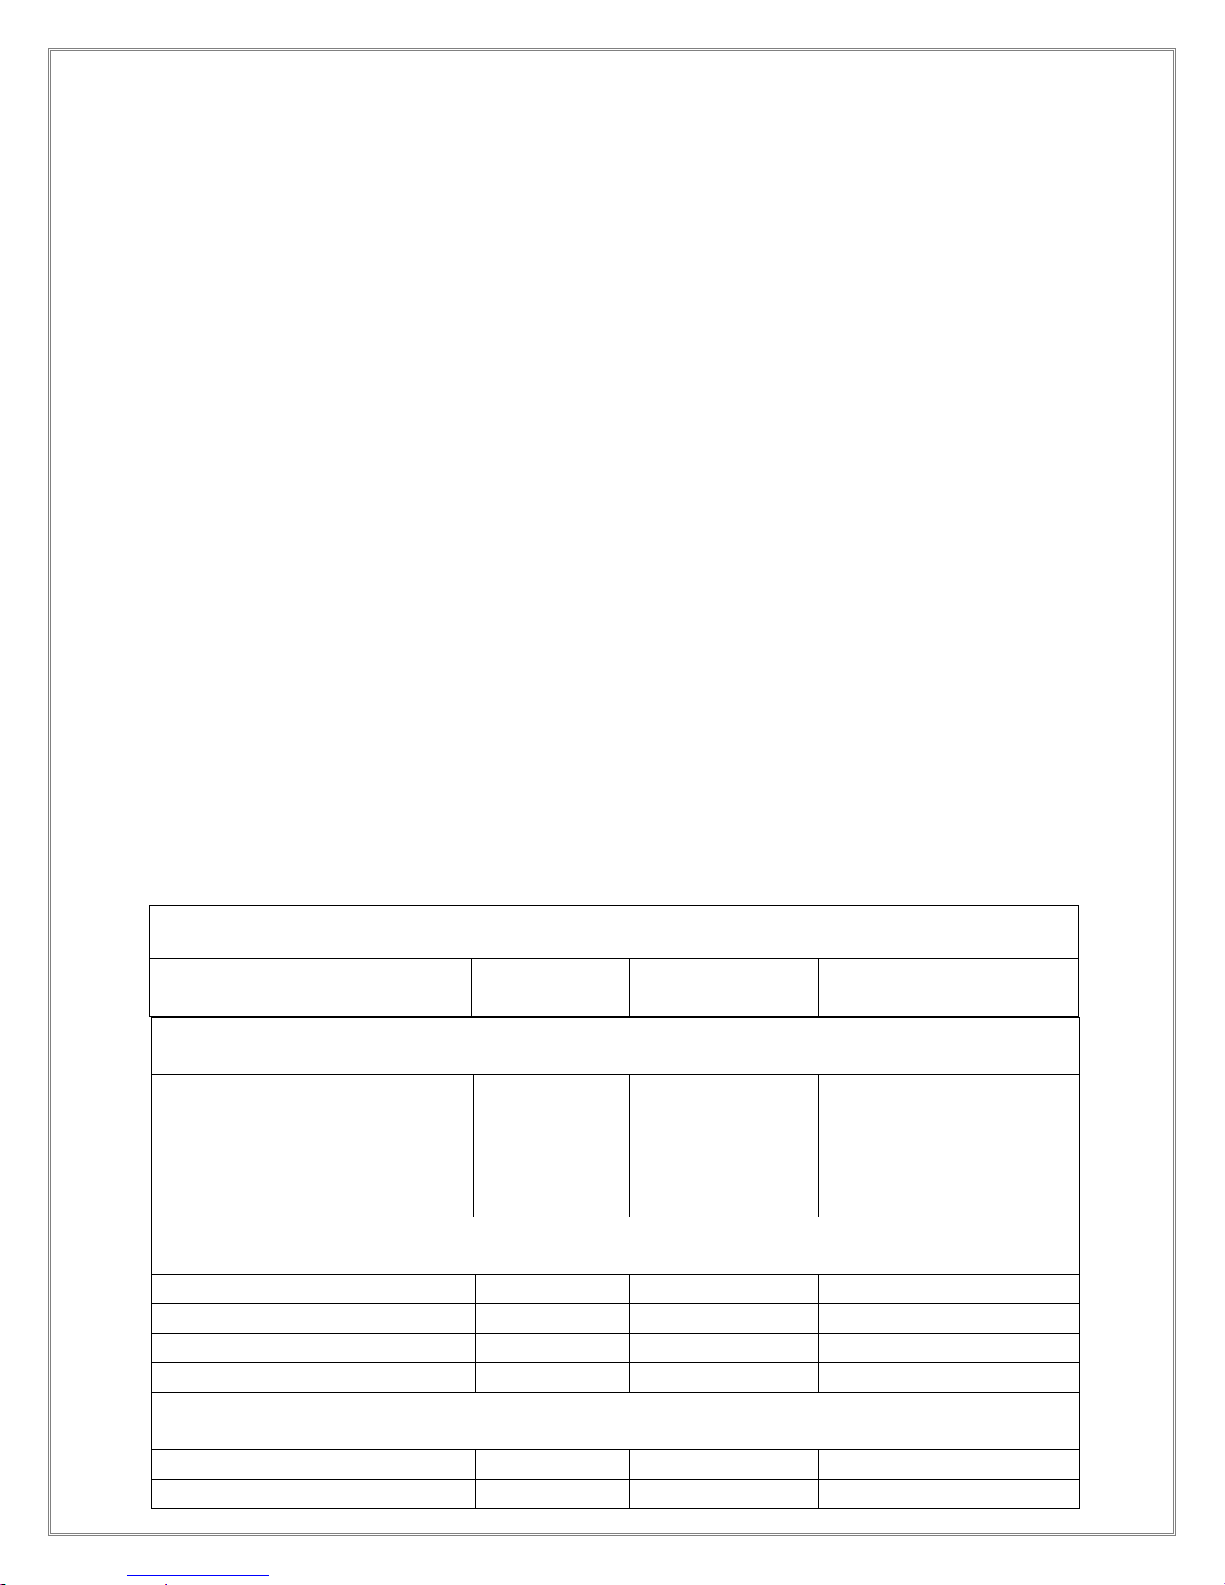
Refer to the following table for guidance regarding the required clearance above the
cabinet for upright cabinets without Rear Vent Modifications.
Required Clearance Above the Wine Cabinet
Model #
Contemporary, Loft and Wine Vault Series
1400 72 18 90 (7’ 6”)
2400 82 18 100 (8’ 4”)
3100 83 18 101 (8’ 5”)
3800 86 18 104 (8’ 8”)
5200 86 18 104 (8’ 8”)
European Country Series
1400 78 12 90 (7’ 6”)
2400 88 12 100 (8’ 4”)
3800 91 12 103 (8’ 7”)
5200 91 12 103 (8’ 7”)
Mission Series
1400 75 15 90 (7’ 6”)
2400 85 15 100 (8’ 4”)
Height (in.)
Minimum
Clearance (in.)
Minimum Ceiling
Height
-6-
Page 8
L E C A C H E P R E M I U M W I N E C A B I N E T S
VENTILATION REQUIREMENTS –
CREDENZAS AND UPRIGHT CABINETS WITH REAR VENT MODIFICATIONS
Credenzas and upright wine cabinets with rear-vent modifications need AT LEAST 3-4
inches of clearance between the cabinet and the wall behind it so that the cooling unit isn’t
forced to intake its own hot air. You’ll also need 8-9” above the cabinet to allow access for
periodic maintenance (ie cleaning the condenser coils).
If you received an air diverter with your credenza, use the magnets to place the diverter on
the back of the cooling unit (at the back of the credenza) so that the hot air exhaust is
directed to the left (when facing the credenza)
TEMPERATURE ENVIRONMENT
The CellarPro cooling units inside Le Cache wine cabinets are designed to maintain optimal
temperatures for storing and aging wine, and most wine collectors store their wine in the
range of 55 - 60°F. CellarPro cooling units can cool 30°F below the ambient temperature at
the top of the wine cabinet, but they are not designed to add heat inside wine cabinets that
are placed in cold environments. Therefore, placement of our wine cabinets in
environments that regularly exceed 90°F or drop below 55°F is not recommended.
FLOOR SURFACE
Because of the significant weight of your wine cabinet, it is important that it be placed on a
hard surface, otherwise the cabinet may become skewed if the doors settle unevenly over
time. If you will be placing your cabinet on thick carpeting, consider placing a carpet board
underneath the wine cabinet. You can purchase a carpet board from Le Cache, or you can
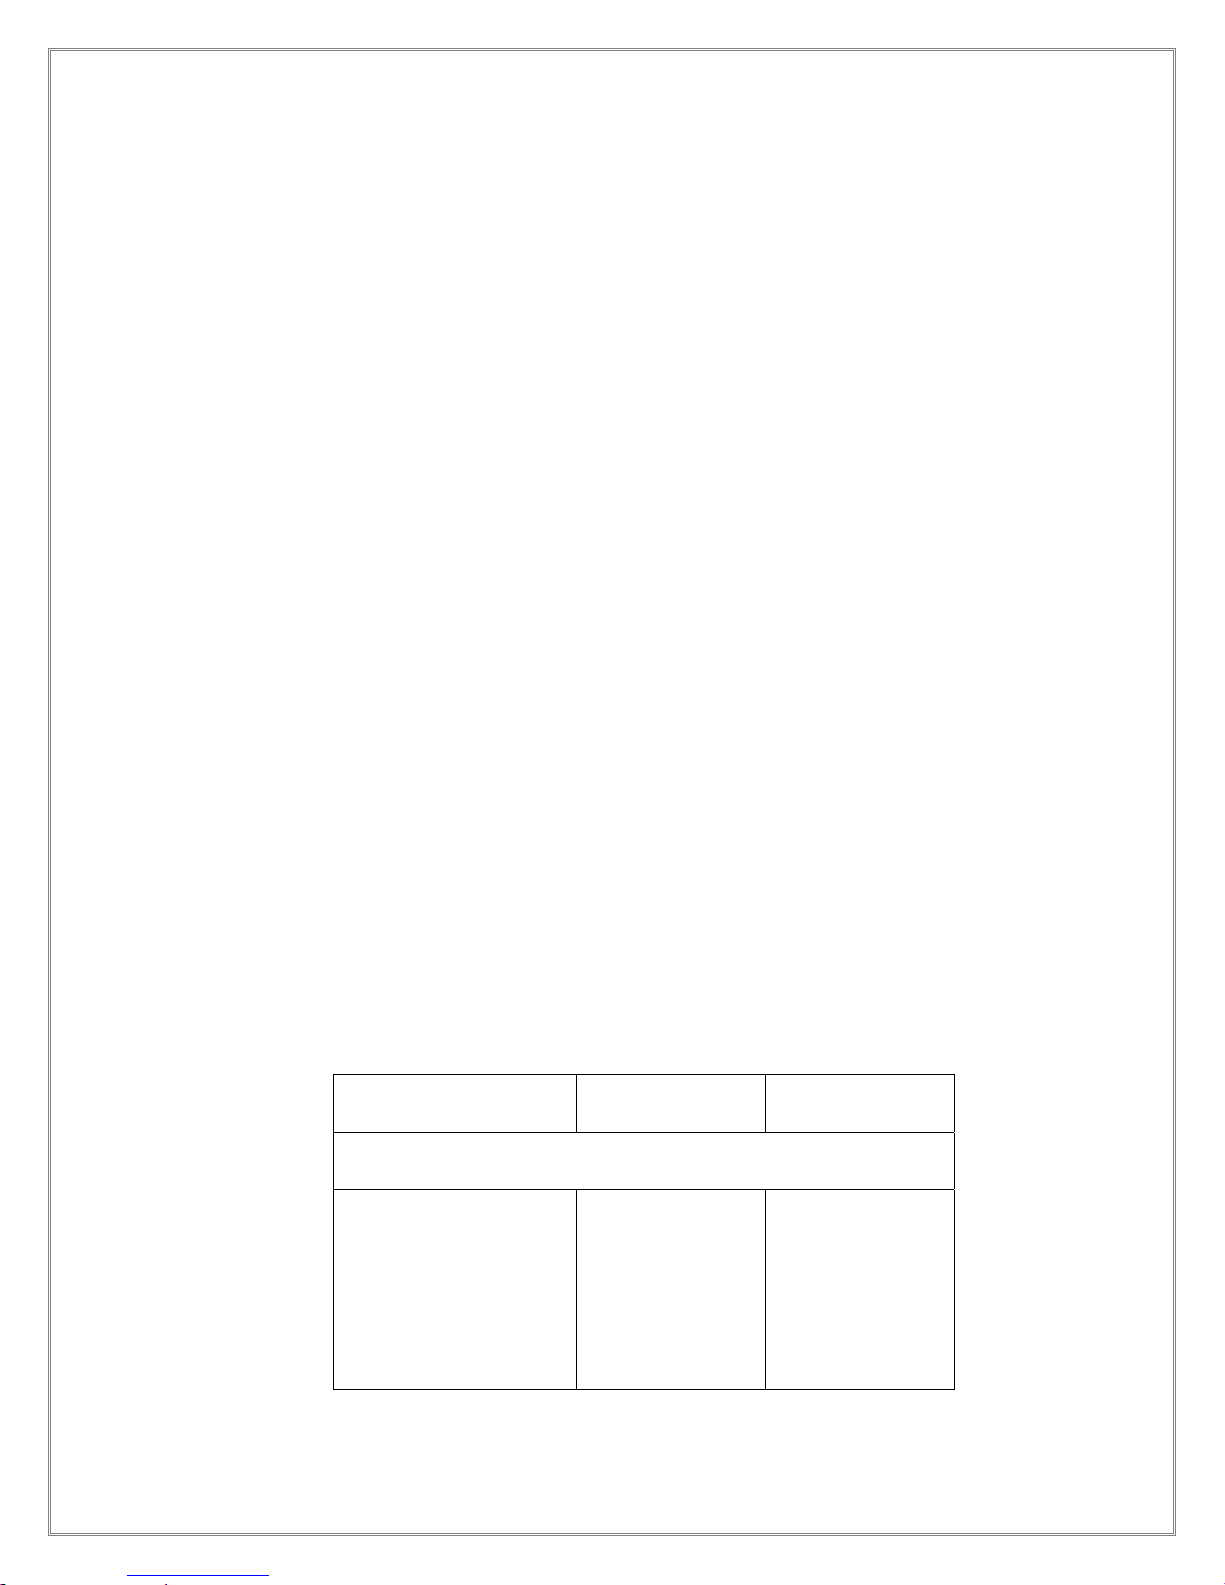
have your local hardware store cut a 3/4 inch plywood board to the following dimensions
(inches):
Model #
Carpet Board Dimensions – All Series
1400 26.5 25
2400 35 25
3100 45 25
3800 54 25
5200 69.5 25
Euro Credenza 63 25
Contemp Credenza 61 17
Length
Width
-7-
Page 9
L E C A C H E P R E M I U M W I N E C A B I N E T S
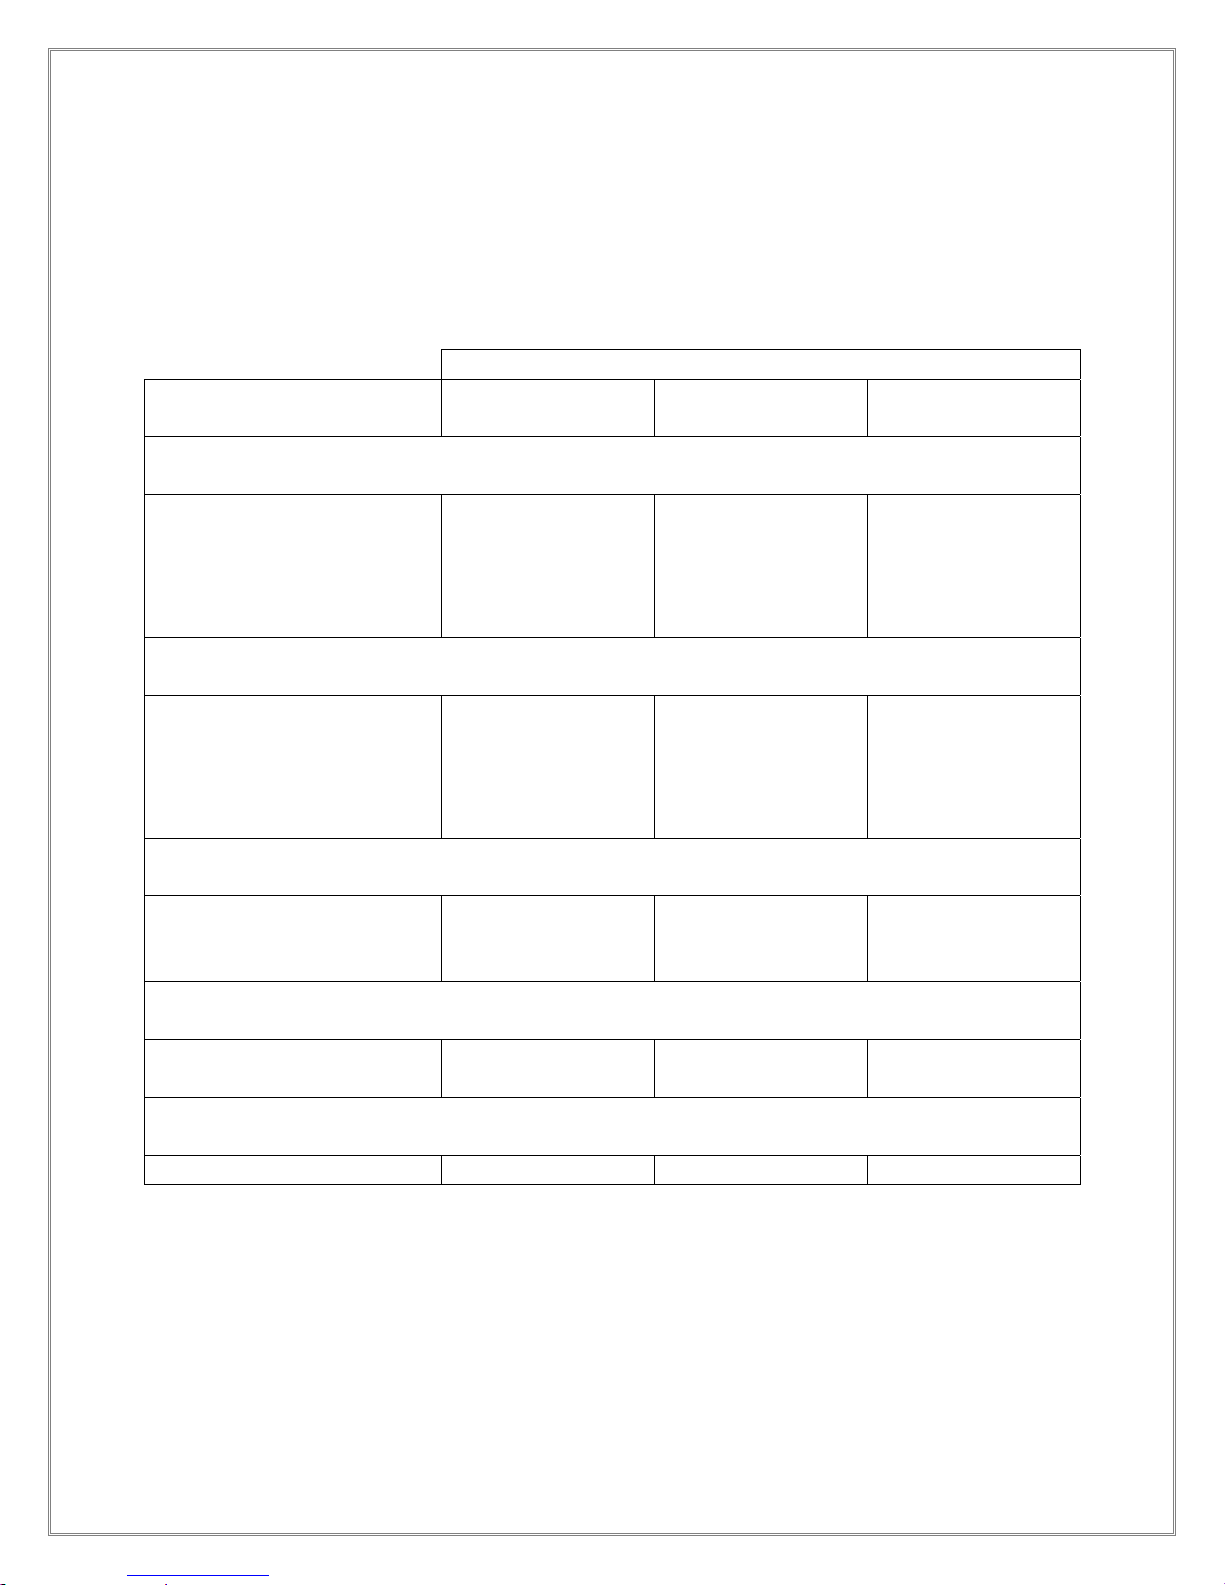
WEIGHT LOAD FACTOR
After loading your wine cabinet with wine bottles, it will be extremely heavy. When
selecting a location for your cabinet, make sure that the floor underneath is strong enough
to support the weight of the cabinet.
Approximate Weight (lbs)
Model #
Contemporary Series
1400 320 516 836
2400 385 858 1,243
3800 475 1,374 1,849
5200 510 1,866 2,375
Credenza 300 345 645
Euro Series
1400 345 516 861
2400 415 858 1,273
3800 510 1,374 1,884
5200 550 1,866 2,416
Credenza 350 540 890
Mission Series
1400 330 516 846
2400 395 858 1,253
Credenza 350 540 890
Loft Series
1400 320 516 836
2400 385 858 1,243
Wine Vault Series
3100 385 1,104 1,489
Empty
Cabinet
Bottles
Total –
Full Cabinet
The cooling unit plugs into a standard wall outlet. The components of the cooling unit draw
3 amps, and the electric outlet on the side of the cooling unit also is rated for 3 amps. The
cord extends 6 ½ feet from the back of the cabinet. If an extension cord is used, it should be
14-gauge wire or thicker, grounded, and as short as possible. We recommend using a surge
protector rated at 15 amps or more.
POWER REQUIREMENT
-8-
Page 10
L E C A C H E P R E M I U M W I N E C A B I N E T S
V. S E T – U P I N S T R U C T I O N S
OPENING THE DOORS
When cabinets are shipped in hot or cold weather, the rubber gaskets can become tacky
and stick to the cabinet. NEVER USE FORCE TO OPEN THE DOORS
the gaskets off the doors. Instead, starting at one corner, use your fingers or a ruler to ply
away the gasket from the cabinet.
MOVING THE CABINET
It is OK to tip the wine cabinet forward, backwards or on its side in order to get it through a
doorway. However, you should NEVER
If you need to remove the door(s) to get the cabinet through a doorway, simply remove the
top hinge at the top corner(s) of the cabinet (three screws) and lift the door straight up until
it slides out of the bottom hinge. When setting the door down on the floor, be careful to
avoid damaging the hinge pin on the bottom of the door. IMPORTANT NOTE: Look for
and save any shim washers on the lower hinge brass bushing (used to equalize door
heights). To reinstall the doors, follow these instructions in reverse.
PUSH, PULL OR LIFT the cabinet by its doors.
, because it will rip
LEVELING INSTRUCTIONS
The first step in setting up your wine cabinet is to make sure that it is level, with all the
leveling feet squarely on the floor and with the doors properly sealed against the cabinet.
The wine cabinet can be leveled by turning the leveling feet underneath the cabinet. You
can extend the feet of the cabinet by turning the feet CLOCKWISE (assuming you are
looking down from the top of the cabinet.)
• Begin with corner feet touching the floor and center feet (if any) raised.
• If the cabinet is resting on plush carpet, place a carpet board under the cabinet so
that all the leveling feet will remain on the same plane over time.
• Side to Side – Place a level on the top of the cabinet (not the door) parallel to the
door. Raise or lower either side of the cabinet by rotating the feet by hand. On larger
cabinets with six leveling feet, use the four corner feet only for leveling purposes.
After leveling, lower the center leveling feet to the floor.
• Front to Back – place a level on top of the cabinet (not the door) perpendicular to the
door, and follow the same procedure.
-9-
Page 11
L E C A C H E P R E M I U M W I N E C A B I N E T S
• If cabinet is level, the lock should work freely without force. Also, the door(s) should
be even (within 1/4 inch) with the top edge of the cabinet. Additionally, there should
be no gaps between the rubber gasket on the door, and the face of the cabinet.
DOOR ALIGNMENT INSTRUCTIONS
After leveling the cabinet, the doors must be aligned so that they are even with each other,
square with the cabinet and create an airtight seal inside the cabinet. Air leaks caused by
improper door alignment will compromise the environment inside the cabinet, and may
create condensation which, left untreated, will cause warping of the door. Follow the
instructions below to properly align your door(s).
• If your cabinet has only one door, the plane of the top of the door should be parallel
to the plane of the cabinet. If the non-hinge (i.e. left) corner of the door is higher
than the cabinet, go to the BACK RIGHT CORNER of the cabinet and turn the
leveling foot once CLOCKWISE, which will raise the right/back of the cabinet and
lower corner of the front door. If the non-hinge corner is lower than the cabinet, go
to the BACK LEFT CORNER of the cabinet and turn the leveling foot once
CLOCKWISE, which will raise the left/back of the cabinet so that it is even with the
corner of the front door. After adjusting the feet, open and shut the door, and check
again to see if the door is aligned.
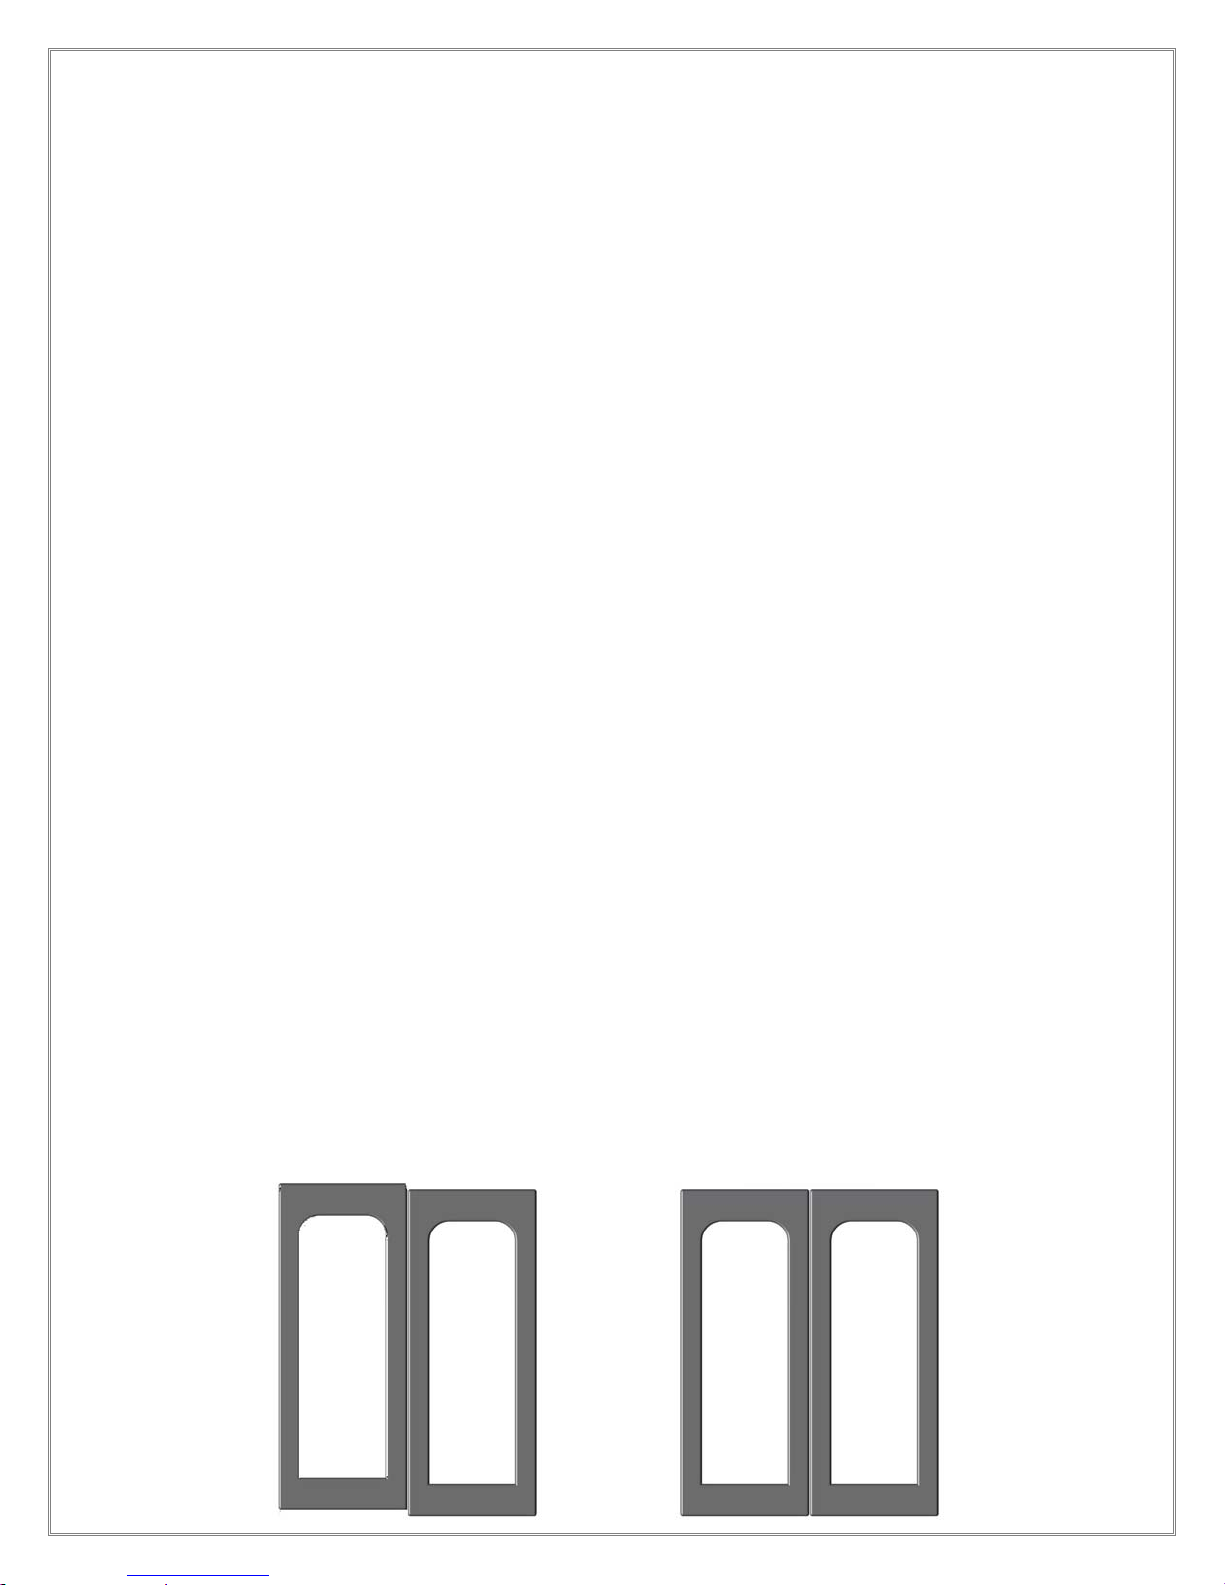
• If both doors are not on the same plane (i.e. one door is higher than the other), use
the leveling feet to adjust the doors. Start with the door that is too high (in the
illustration at right, the left door is too high), and go to the BACK CORNER
LEVELING FOOT on the SAME SIDE as the door that’s too high (in the illustration at
right, go to the back foot on the left side of the cabinet.) Turn the leveling foot once
CLOCKWISE, which will raise the left/back of the cabinet and lower the front left
door. After adjusting the feet, open and shut the doors. Repeat the process until
the left door is level with the right door. It shouldn’t take more than one or two
clockwise turns to get both doors aligned.
Inside corner of Left Door is Too High
Unaligned Doors:
Aligned Doors:
Both Doors are on the Same Plane
-10-
Page 12
L E C A C H E P R E M I U M W I N E C A B I N E T S
• If the top corner of a door is sticking out more than 1/8 inch, you have "top torque".
If the bottom corner of a door is sticking out more than 1/8 inch, you have "bottom
torque". To fix torque, if your cabinet has six leveling feet, start by raising the two
center leveling feet so that those feet aren’t touching the floor. For top torque, go
to the BACK CORNER LEVELING FOOT on the OPPOSITE SIDE of the torqued door
and turn CLOCKWISE. For bottom torque, go to the BACK CORNER LEVELING
FOOT on the SAME SIDE as the torqued door and turn CLOCKWISE. When the
torque has been fixed (tolerances up to 1/8 inch are acceptable), lower the center
leveling feet until they touch the floor.
• IMPORTANT NOTE: If your wine cabinet has six leveling feet, make sure that all six
leveling feet are firmly touching the floor before loading wine into the cabinet. The
center leveling foot in the rear can be hard to reach, so make sure that the delivery
team doesn’t forget to adjust all six feet.
• IF YOU ARE PLACING YOUR WINE CABINET ON CARPET: Much of the weight
of an EMPTY wine cabinet resides in the doors. If your wine cabinet is tilting forward
when first placed on the carpet or a carpet board, DO NOT over-compensate by
extending the front leveling feet. Instead, load some bottles into the back of the
wine cabinet until the weight is more evenly distributed, and adjust the leveling feet
so that the wine cabinet is level front-to-back. The cabinet no longer should be
leaning forward at this point. Over time, additional adjustments may be required to
align the doors as the increasing weight of the wine cabinet causes the carpet and
pad to compress.
-11-
Page 13
L E C A C H E P R E M I U M W I N E C A B I N E T S
UPRIGHT WINE CABINETS –
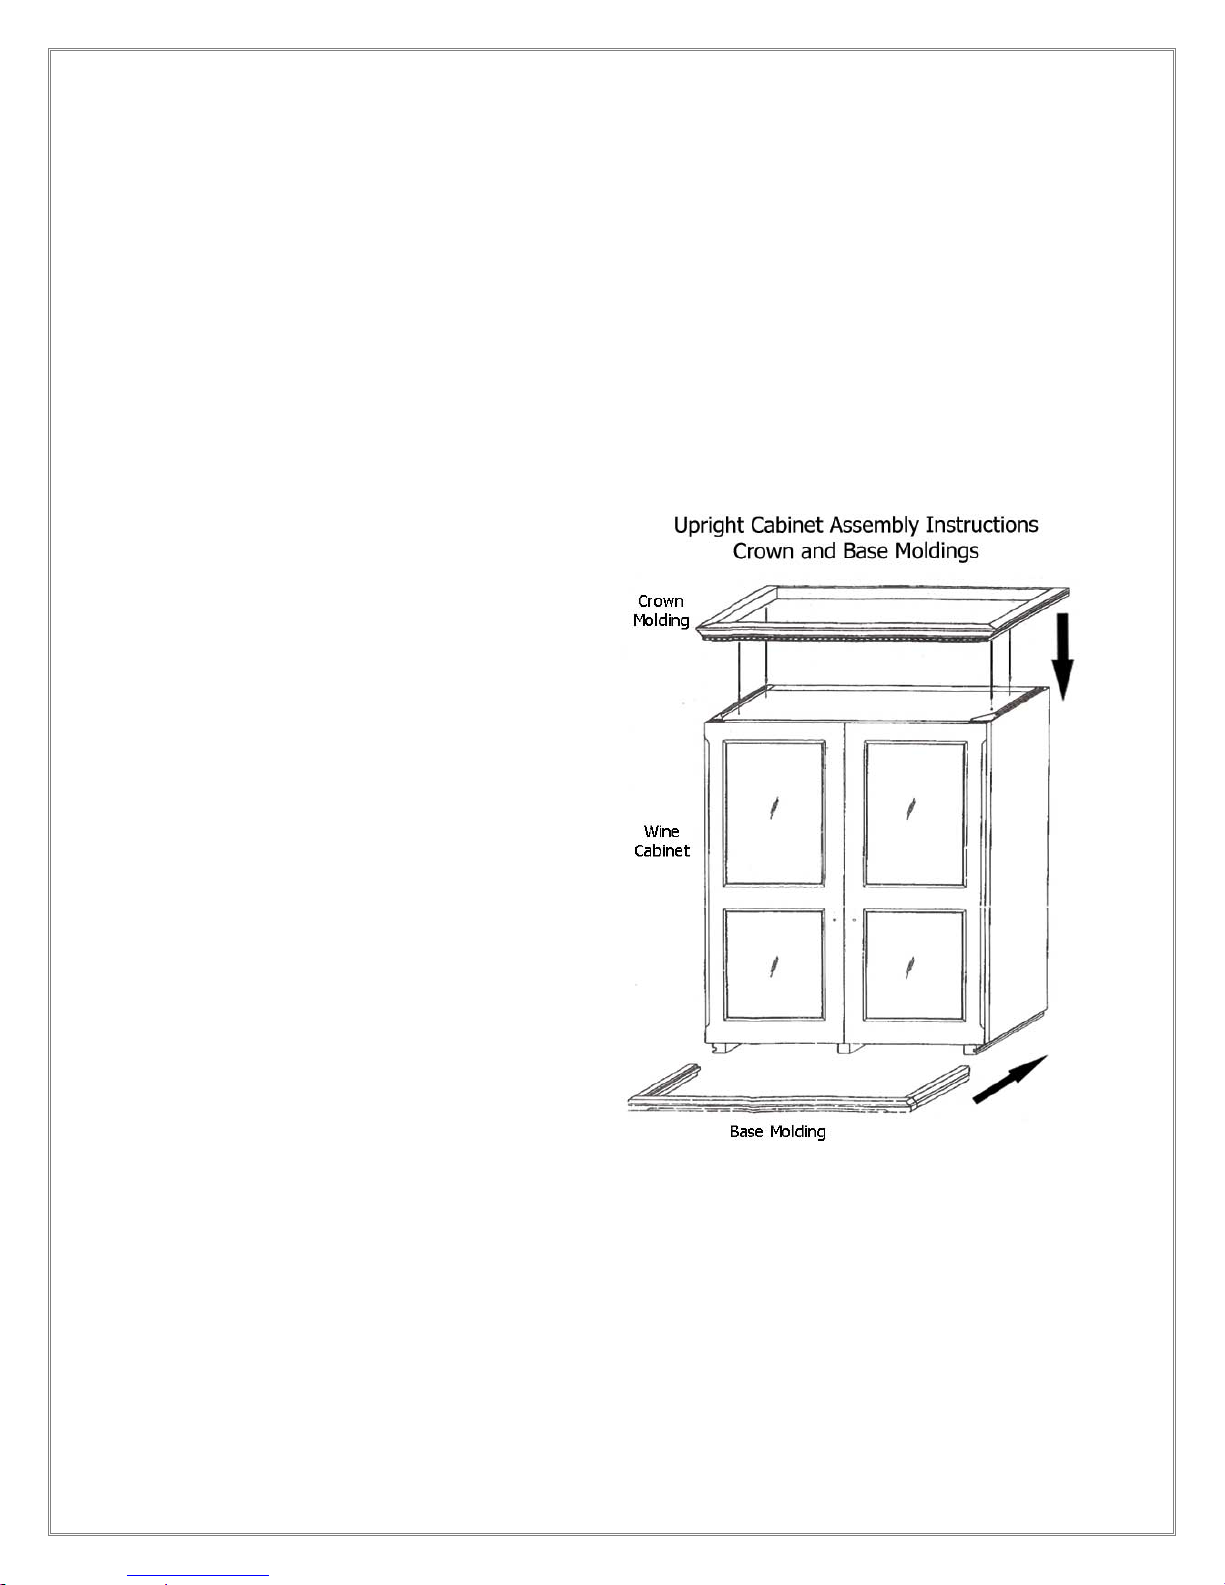
CROWN AND BASE MOLDINGS
For European Country wine cabinets, the crown and base moldings are shipped in a
separate box. For Mission wine cabinets, the crown molding is shipped in a separate box.
To assemble the moldings, do the following:
- Adjust the leveling feet below the cabinet until the doors are aligned
- Place the base molding (3-sided) on
the floor in front of the cabinet
- Align the sides of the base molding
with the tracks on the bottom of the
wine cabinet, and gently slide the
molding back until it comes to a
stop.
o It may be necessary to tilt up
the front of the wine cabinet
in order to install the base
molding..
o If the base molding won’t
slide into place, you may
need to extend all the
leveling feet an equal
amount to raise the wine
cabinet while maintaining the
alignment of the doors.
- Place the crown molding on top of
the wine cabinet. The hinges
should seat in the slots underneath
the molding.
- Some wine cabinets come with screws (included in the envelope hanging inside the
wine cabinet) that can be used to attach the brackets on the crown molding to the
top of the cabinet.
-12-
Page 14
L E C A C H E P R E M I U M W I N E C A B I N E T S
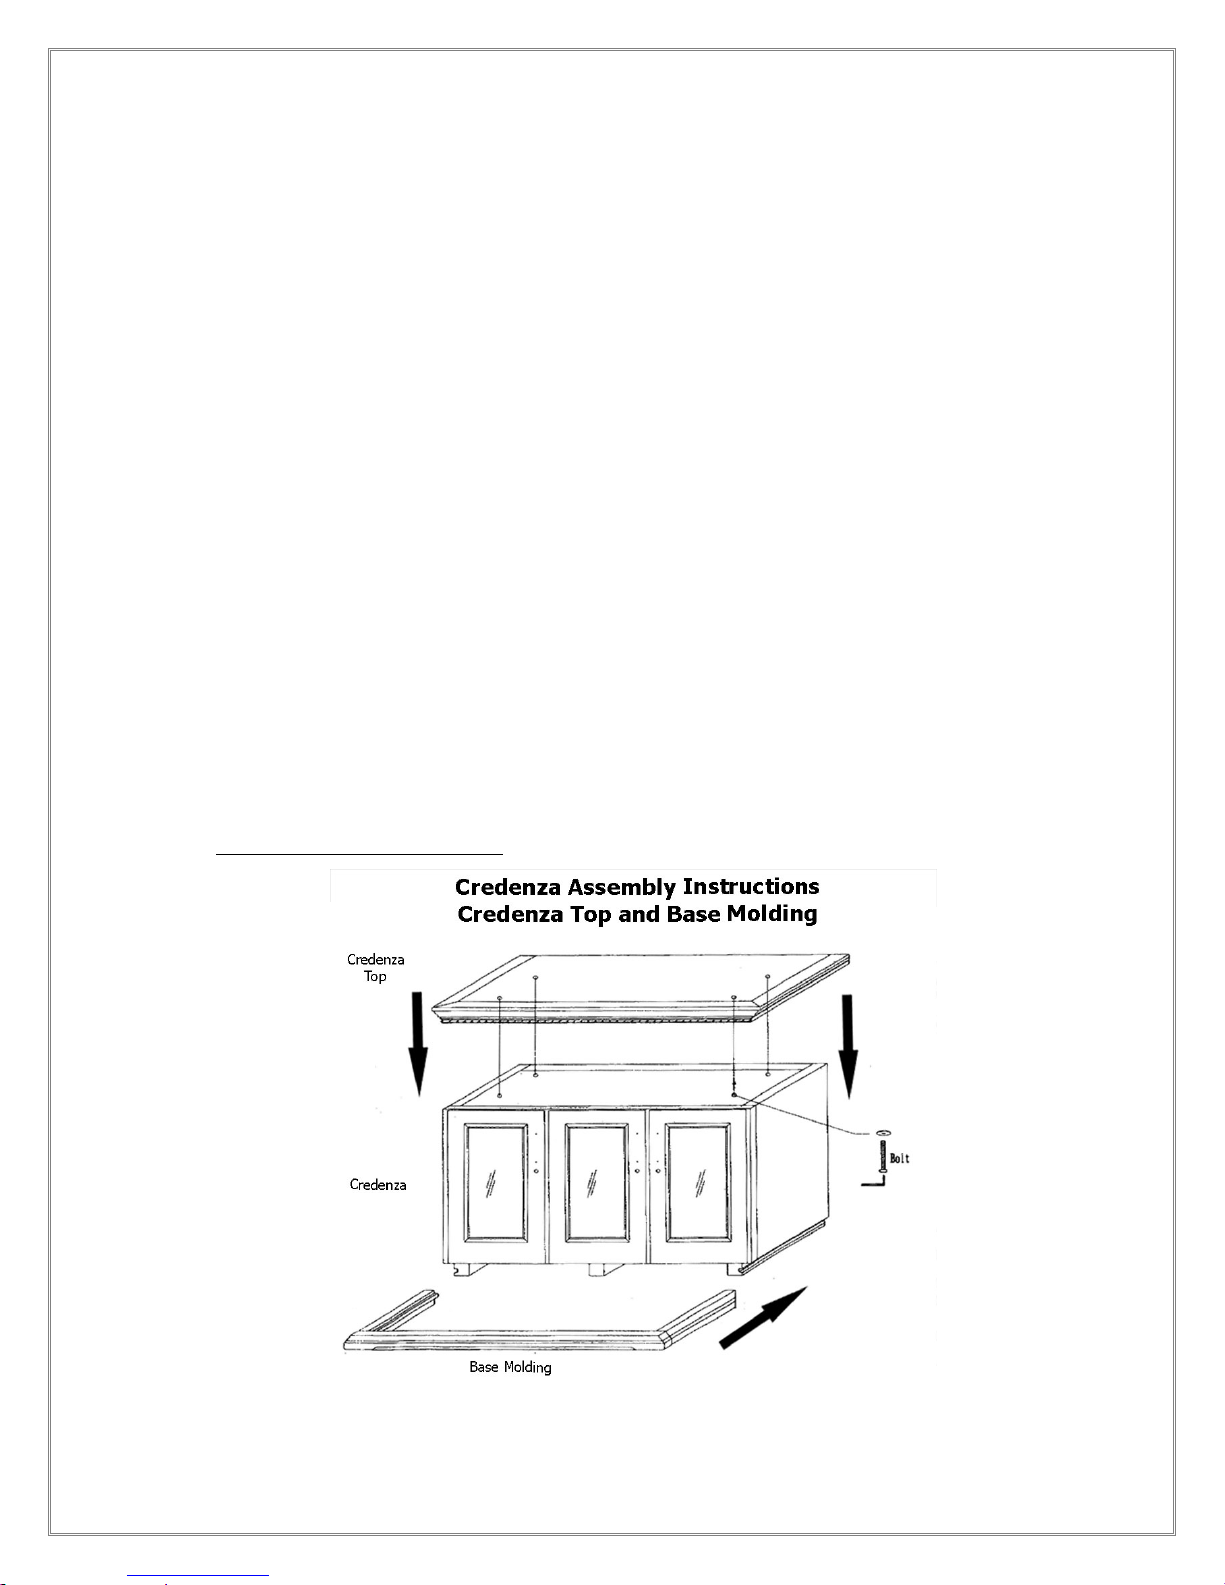
CREDENZA WINE CABINETS –
CREDENZA TOP AND BASE MOLDINGS
For European Country and Mission credenzas, the moldings are shipped in a separate box.
To attach the moldings, do the following:
- Adjust the leveling feet below the credenza until the doors are aligned
- Align the sides of the base molding with the tracks on the bottom of the wine
cabinet, and gently slide the molding back until it comes to a stop.
o It may be necessary to tilt up the front of the wine cabinet in order to install
the base molding.
o If the base molding won’t slide into place, you may need to extend all the
leveling feet an equal amount to raise the wine cabinet while maintaining the
alignment of the doors.
- Remove the credenza top and place it on the top of the credenza. The holes in the
top should be aligned with the holes in the credenza
- Place a washer on each bolt, and from inside the credenza, insert the bolts through
the holes in the ceiling of the credenza, and fasten the bolts to the credenza top.
DO NOT OVERTIGHTEN.
-13-
Page 15
L E C A C H E P R E M I U M W I N E C A B I N E T S
VI. O P E R A T I N G I N S T R U C T I O N S
CELLARPRO COOLING UNIT
• Factory Settings
The settings on your CellarPro cooling unit have been preset and optimized by the factory,
and it is not necessary to change these settings initially.
If you find that you want to change one or more of the settings, we strongly recommend
that you allow the cooling unit to operate for 14 days before making any changes.
• Temperature
Proper temperatures are maintained by transferring heat from inside wine cellars and
exhausting the heat through the top (top-vent) or rear (rear-vent) of the cooling units.
CellarPro cooling units are designed to turn on when the temperature inside the cellar
exceeds the Minimum Set Point plus the Temperature Differential, and turn off when the
temperature inside the cellar drops below the Minimum Set Point. For example, if the
Minimum Set Point is 58°F and the Temperature Differential is 4°F, the cooling unit will turn
on when the temperature inside the cellar rises above 62°F, and turn off when the
temperature falls below 58°F.
A number of variables, including the temperatures of the ambient environment, the
insulation of the cellar and the thermal mass inside the cellar, will affect the speed with
which the temperature inside the cellar rises during the cooling unit’s “off” cycle.
CellarPro cooling units are designed to maintain optimal temperatures for storage and
aging of wine. Most wine collectors store their wine in the range of 55 - 60°F. If the cooling
unit runs too much, you should raise the Minimum Set Point to reduce the cycle “on” time.
It is normal for the cooling unit to run up to 75 percent of the time in order to maintain
proper conditions inside the cellar.
CellarPro cooling units are designed to cool up to 30°F below the ambient temperature in
the space outside the condenser coils.
CellarPro cooling units are not designed to maintain cellars at much colder serving
temperatures.
-14-
Page 16
L E C A C H E P R E M I U M W I N E C A B I N E T S
• Humidity
CellarPro cooling units are designed to maintain appropriate levels of humidity, ranging
from 50 to 70 percent, inside your wine cellar. Relative humidity conditions depend on
several factors, including:
o Ambient humidity: The higher the ambient humidity, the higher the humidity will
be inside the cellar
o Fon Setting: By increasing the Fon setting, humidity can be increased inside the
cellar. The recommended range for the Fon setting is 0-6.
In order to increase or decrease humidity inside the cellar, the Fon setting can be changed
as described in the “Advanced Settings” section above.
• Ambient Environment
CellarPro cooling units are designed to operate in ambient temperatures between 50°F and
85°F.
CellarPro cooling units cannot maintain temperatures inside the cellar that are more than
30°F below the ambient temperature in the space outside the condenser coils. (The
condenser coils are located on the back of the cooling unit, which is attached to the top of
the wine cabinet.) For example, if the ambient temperature in the space outside the
condenser coils is 85°F, the cooling unit should be able to maintain temperatures of 55°F
inside the cellar.
-15-
Page 17
L E C A C H E P R E M I U M W I N E C A B I N E T S
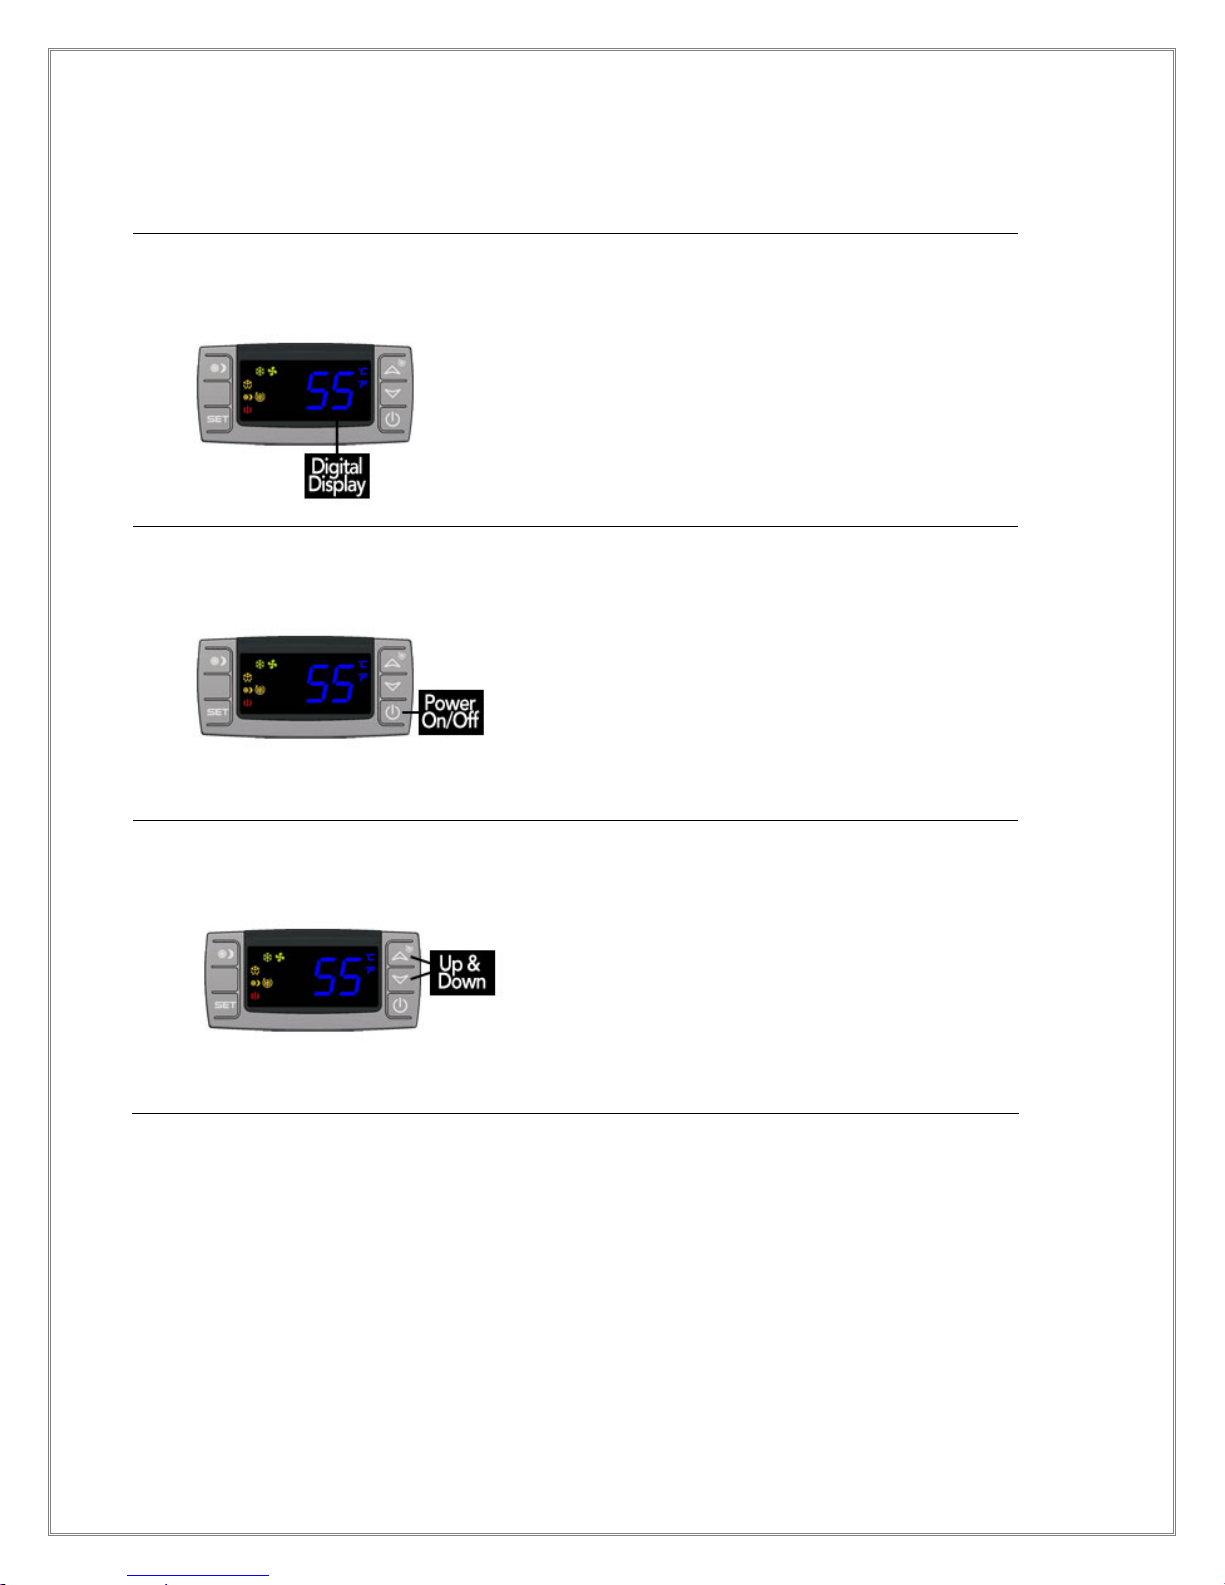
Basic Operation
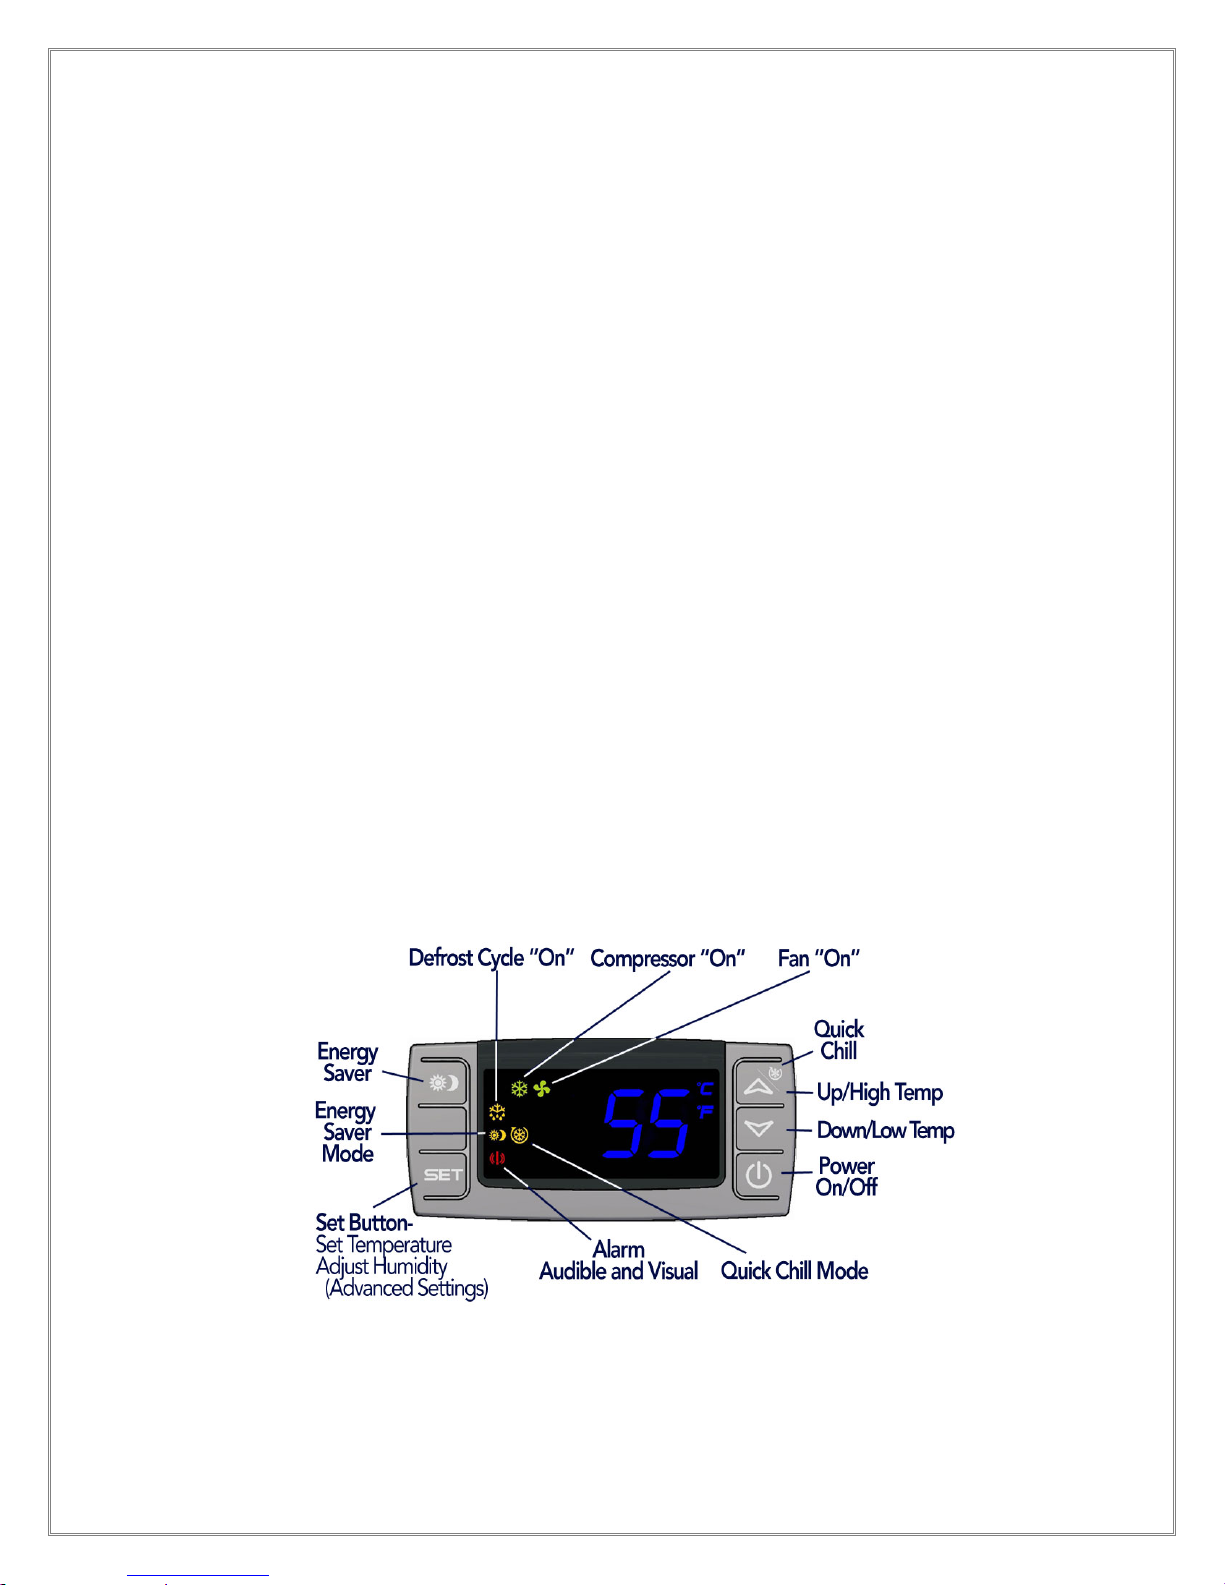
Digital Display The temperature displayed on the control
indicates the real-time air temperature as
measured by Probe 1 (P1) located behind
the front grill of the cooling unit
Power On/Off Button Press “Power On/Off” to turn the unit on and
off
When the “Compressor On” indicator light is
on, the Compressor is running. When the
“Fan On” indicator light is on, the Fan is
running
Up and Down Buttons To view the “High Temp” recorded by the
cooling unit, press the “Up” button once.
To view the “Low Temp” recorded by the
cooling unit, press the “Down” button once
To reset the “High Temp” or “Low Temp”,
press the “Set” button for three seconds
while “Hi” or “Lo” is displayed. “RST” will
blink three times to indicate confirmation.
-16-
Page 18
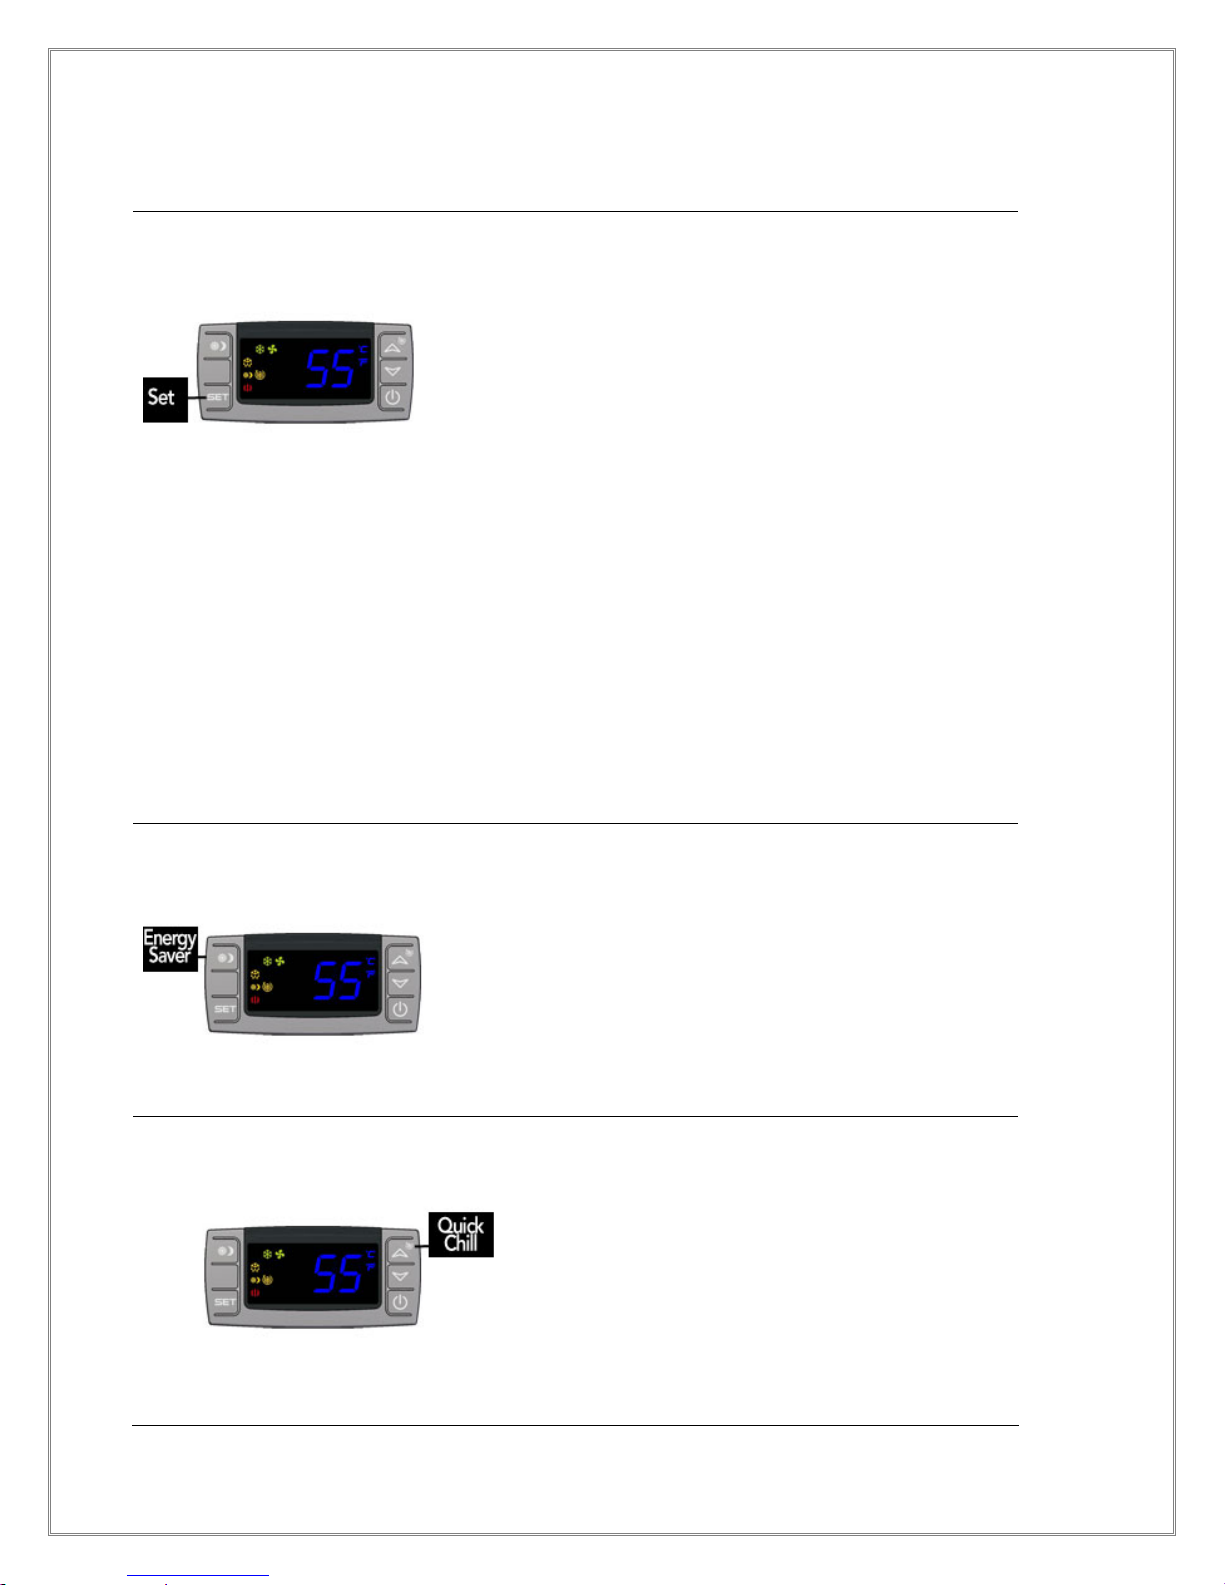
Set Button
L E C A C H E P R E M I U M W I N E C A B I N E T S
The cooling unit is factory preset with a
Minimum Set Point of 58°F and a
Temperature Differential of 4°F. This means
that the cooling unit will turn on when the
display rises above 62°F (58°F + 4°F), and
turn off when the display falls below 58°F.
To view the Minimum Set Point, press the
“Set” button for one second.
To change the Minimum Set Point,
Energy Saver Button To activate and deactivate the “Energy
1. Press the “Set” button for three seconds
until “°F” blinks
2. Press the “Up” or “Down” button
3. Press the “Set” button to confirm
The “Set” temperature will blink three times
to indicate confirmation.
The recommended Minimum Set Point range
is 53 - 60°F. To change the Temperature
Differential, see “Advanced Operation” later
in this chapter.
Saver” mode, press the “Energy Saver”
button
The “Energy Saver” indicator light will turn
on when the cooling unit is in “Energy Saver”
mode
In “Energy Saver” mode, the Minimum Set
Point increases 4°F and the Temperature
Differential is unchanged
Quick Chill Button To activate the “Quick Chill” mode, press
the “Up” / “Quick Chill” button for three
seconds. To deactivate “Quick Chill”, press
“Quick Chill” button for three seconds again
The “Quick Chill” indicator light will turn on
when the unit is in “Quick Chill” mode.
In the “Quick Chill” mode, the unit will run
continuously for 6 hours (or until the intake
temperature registers 50°F). This mode is
useful after loading “warm” bottles in a cellar
-17-
Page 19
L E C A C H E P R E M I U M W I N E C A B I N E T S
Advanced Operation
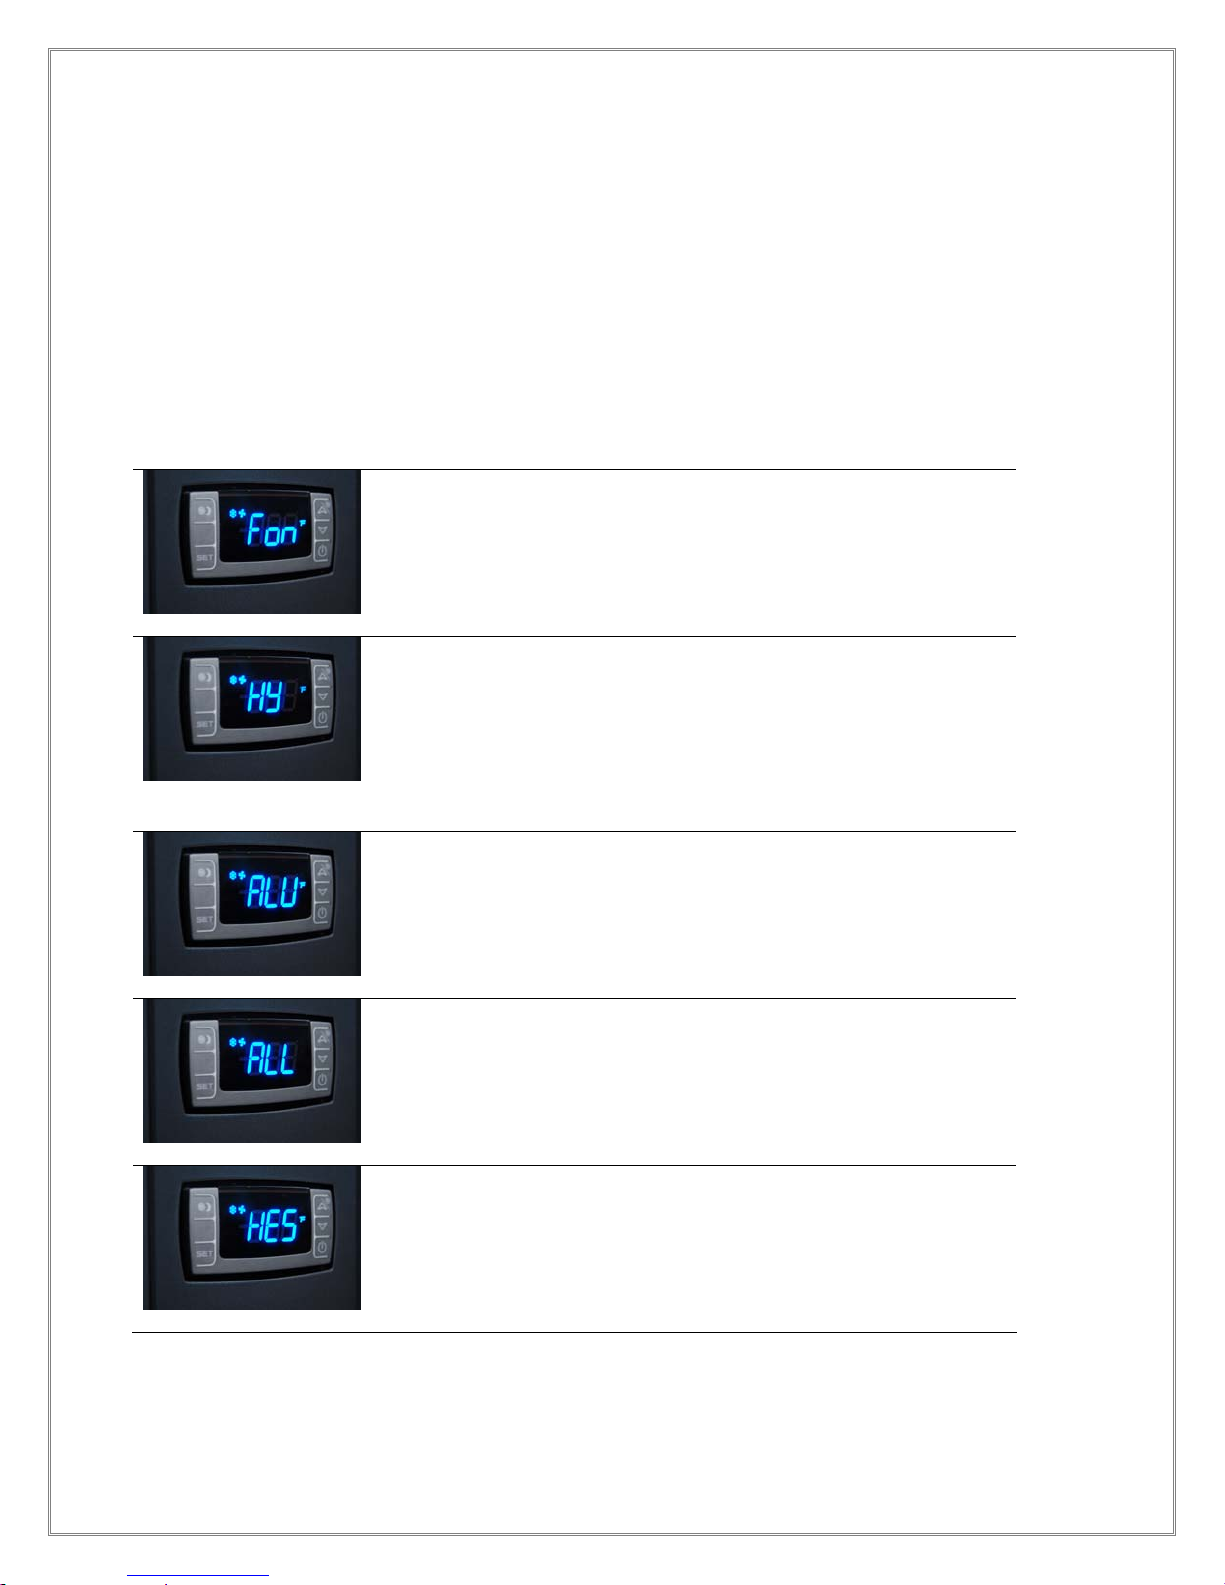
CellarPro cooling systems can be programmed with advanced settings to achieve more
control over conditions inside the cellar. Conditions like humidity, the Temperature
Differential, and alarm settings all can be modified for custom applications. To access the
advanced settings, do the following:
• Press the “Set” button and the “Down” button together at the same time, and hold for
three seconds. Then, use the “Up” or “Down” button to scroll to the following screen:
HUMIDITY: The factory preset for this setting is “0”.
If the humidity inside the cellar is too low, press the “Set”
button, then use the “Up” button until the desired setting
is reached. The recommended range for this setting is 0-
6.
TEMPERATURE DIFFERENTIAL: The factory preset for
this setting is “4”.
This setting determines the Temperature Differential and
therefore the temperature at which the cooling unit will
cycle on. The recommended range for this setting is 4 or
5.
HIGH TEMPERATURE ALARM: The factory preset for
this setting is “70”.
This setting designates the High temperature inside the
cellar at which the alarm is triggered. We recommend
leaving this setting at the factory preset.
LOW TEMPERATURE ALARM: The factory preset for this
setting is “45”.
This setting designates the Low temperature inside the
cellar at which the alarm is triggered. We recommend
leaving this setting at the factory preset.
ENERGY SAVINGS MODE DIFFERENTIAL: The factory
preset for this setting is “4”.
This setting increases or decreases the Temperature
Differential for the Energy Savings Mode. The
recommended range for this setting is 2-4.
-18-
Page 20
L E C A C H E P R E M I U M W I N E C A B I N E T S
Alarms
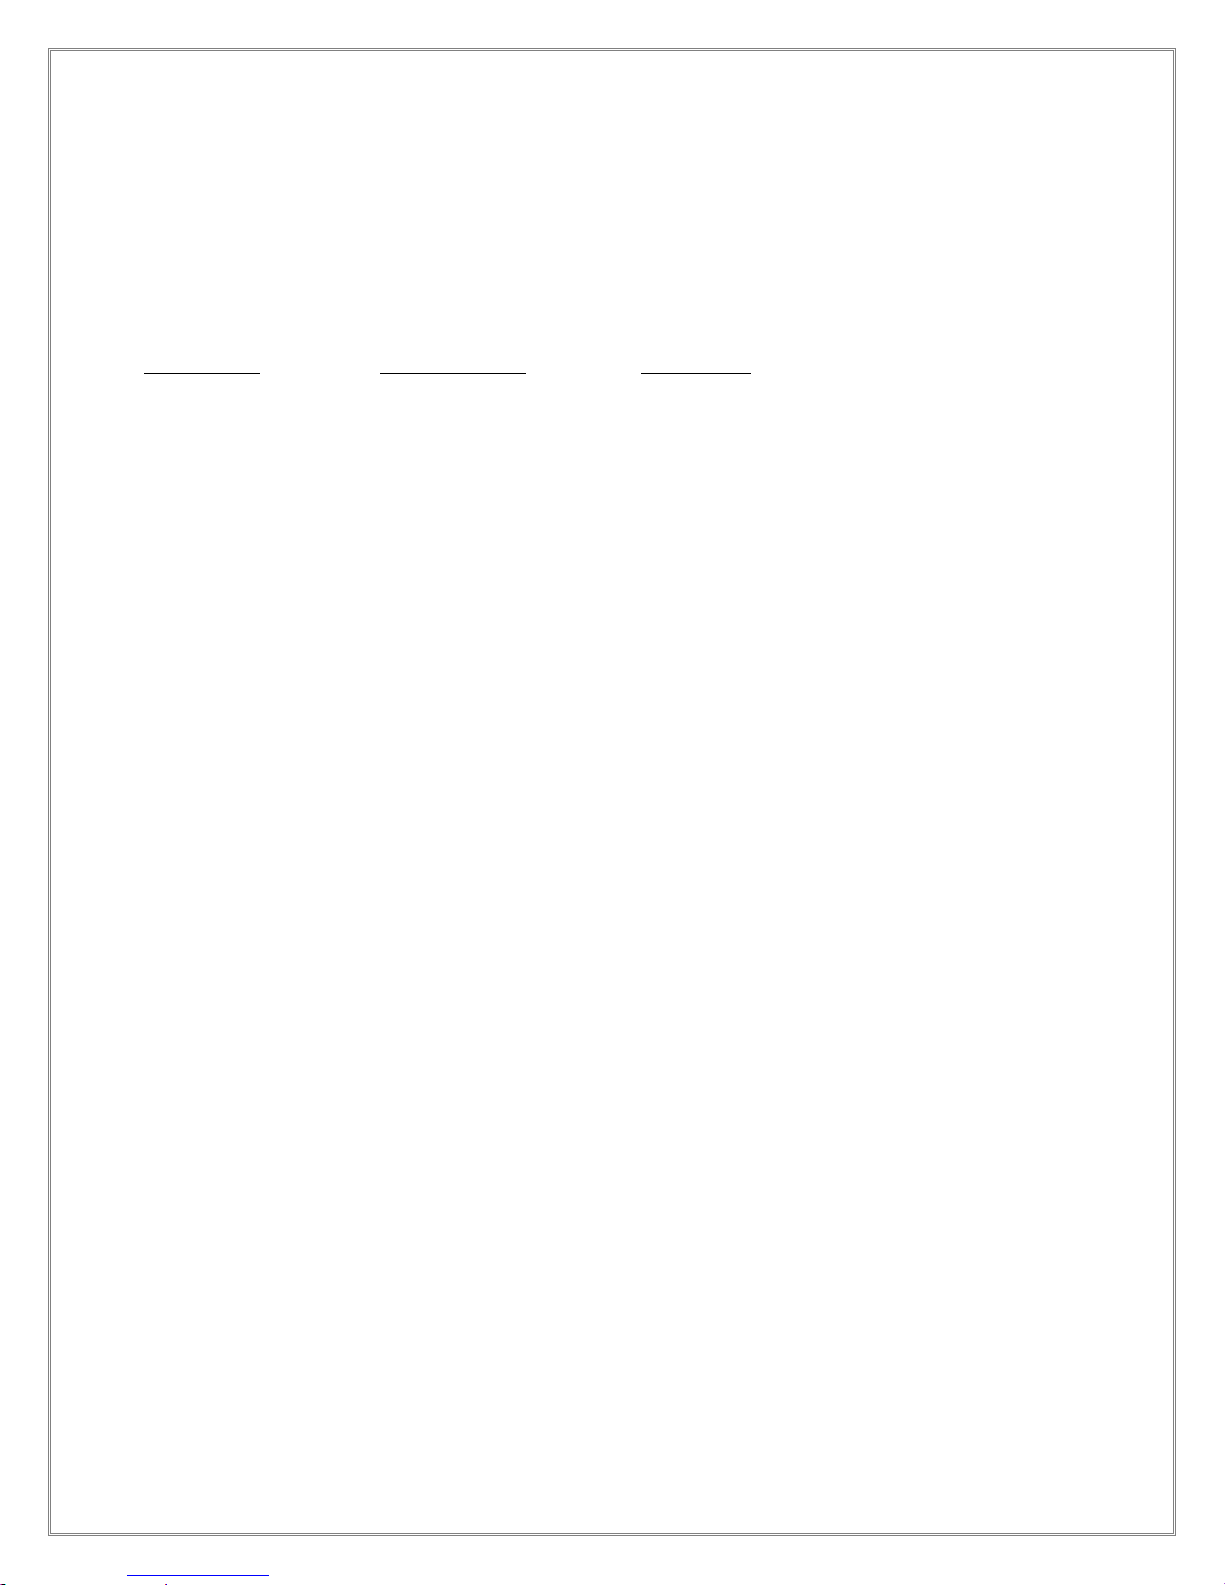
Alarm Indicators* The control panel has an audible buzzer and an alarm
indicator light (Row 4) that turns on when an alarm is
triggered. In addition, the control panel will flash the following
codes when an alarm is triggered:
Alarm Code What it means What to do
P1, P2, P3 Probe Failure Call CellarPro at 877.726.8496
HA The temperature inside
the cellar is too warm
(above 70°F for more
than 1 hour)
HA2 The condenser
temperature is too high
(above 125°F for 2
hours)
Check seals;
Check if door was left open;
Lower the ambient temperatures
Check for appropriate installation,
ventilation, ambient conditions and
cooling capacity (Chapter II)
Clean the condenser coils (see
“Maintenance” in Chapter IV);
Check for obstructions to the intake
and/or exhaust vents;
Check that the condenser fan is
operating
LA The temperature inside
the cellar is too cold
Raise the ambient temperature;
Raise the “Minimum Set Point”
(below 45°F)
LA2 The temperature at the
condenser coils
(outside the cabinet)
has dropped below the
alarm temperature
setting
Lower the alarm temperature
setting as follows:
1. Depress the “Set” and “Down”
button for three seconds until
the display reads “HY”
2. Depress the “Set” and “Down”
button for seven seconds until
“PR2” flashes on the display
* Please note: the temperature alarms (HA, HA2, LA and LA2) are disabled during the first 23
hours of operation after the cooling unit is plugged in and/or turned on.
3. Using the “Down” button, scroll
until the display reads “AL2”
4. Depress the “Set” button and
lower the alarm temperature
setting to your desired setting
-19-
Page 21
L E C A C H E P R E M I U M W I N E C A B I N E T S
Protection Mechanisms
Protection
Mechanisms
Scenario What it means What happens
To protect the components in the cooling unit as well as
the wine inside the cellar, the cooling unit is programmed
to shut down certain components under certain
circumstances, as follows:
P2 > 70°F for more
than 1 hour
P3 > 125°F for more
than 2 hours
Optional Protection
Mechanisms
P3 > 125°F for more
than 2 hours
The evaporator probe
is measuring
temperatures that are
too warm
The condenser probe
is measuring
temperatures that are
too hot
CellarPro cooling systems can be programmed to turn off
the compressor and condenser fan in the event of an HA2
alarm, as described below. If you’d like to turn on this
protection mechanism, please call us toll-free at
877.726.8496
The condenser probe
is measuring
temperatures that are
too hot
The evaporator fan will turn off
until the evaporator temperature
falls below 70°F
The compressor and condenser
fan will turn off until the
condenser temperature falls
below 120°F
The compressor and condenser
fan will turn off until the condenser
temperature falls below 120°F
-20-
Page 22
L E C A C H E P R E M I U M W I N E C A B I N E T S
VII . B O T T L E S T O R A G E T I P S
To achieve the best results with your Le Cache wine cabinet, follow the recommendations
below when loading and storing bottles:
• Start storing bottles in the center of the cabinet, and enlarge the "circle" as you add
bottles to the cabinet. This will minimize temperature fluctuations by creating a
thermal mass of bottles in the center of the cabinet, and will reduce the number of
cooling cycles required by the cooling system.
• Once the cabinet is loaded, turn on the cooling unit. The settings on the CellarPro
cooling unit have been preset and optimized by the factory, and we recommend that
you wait two weeks before changing any of the settings.
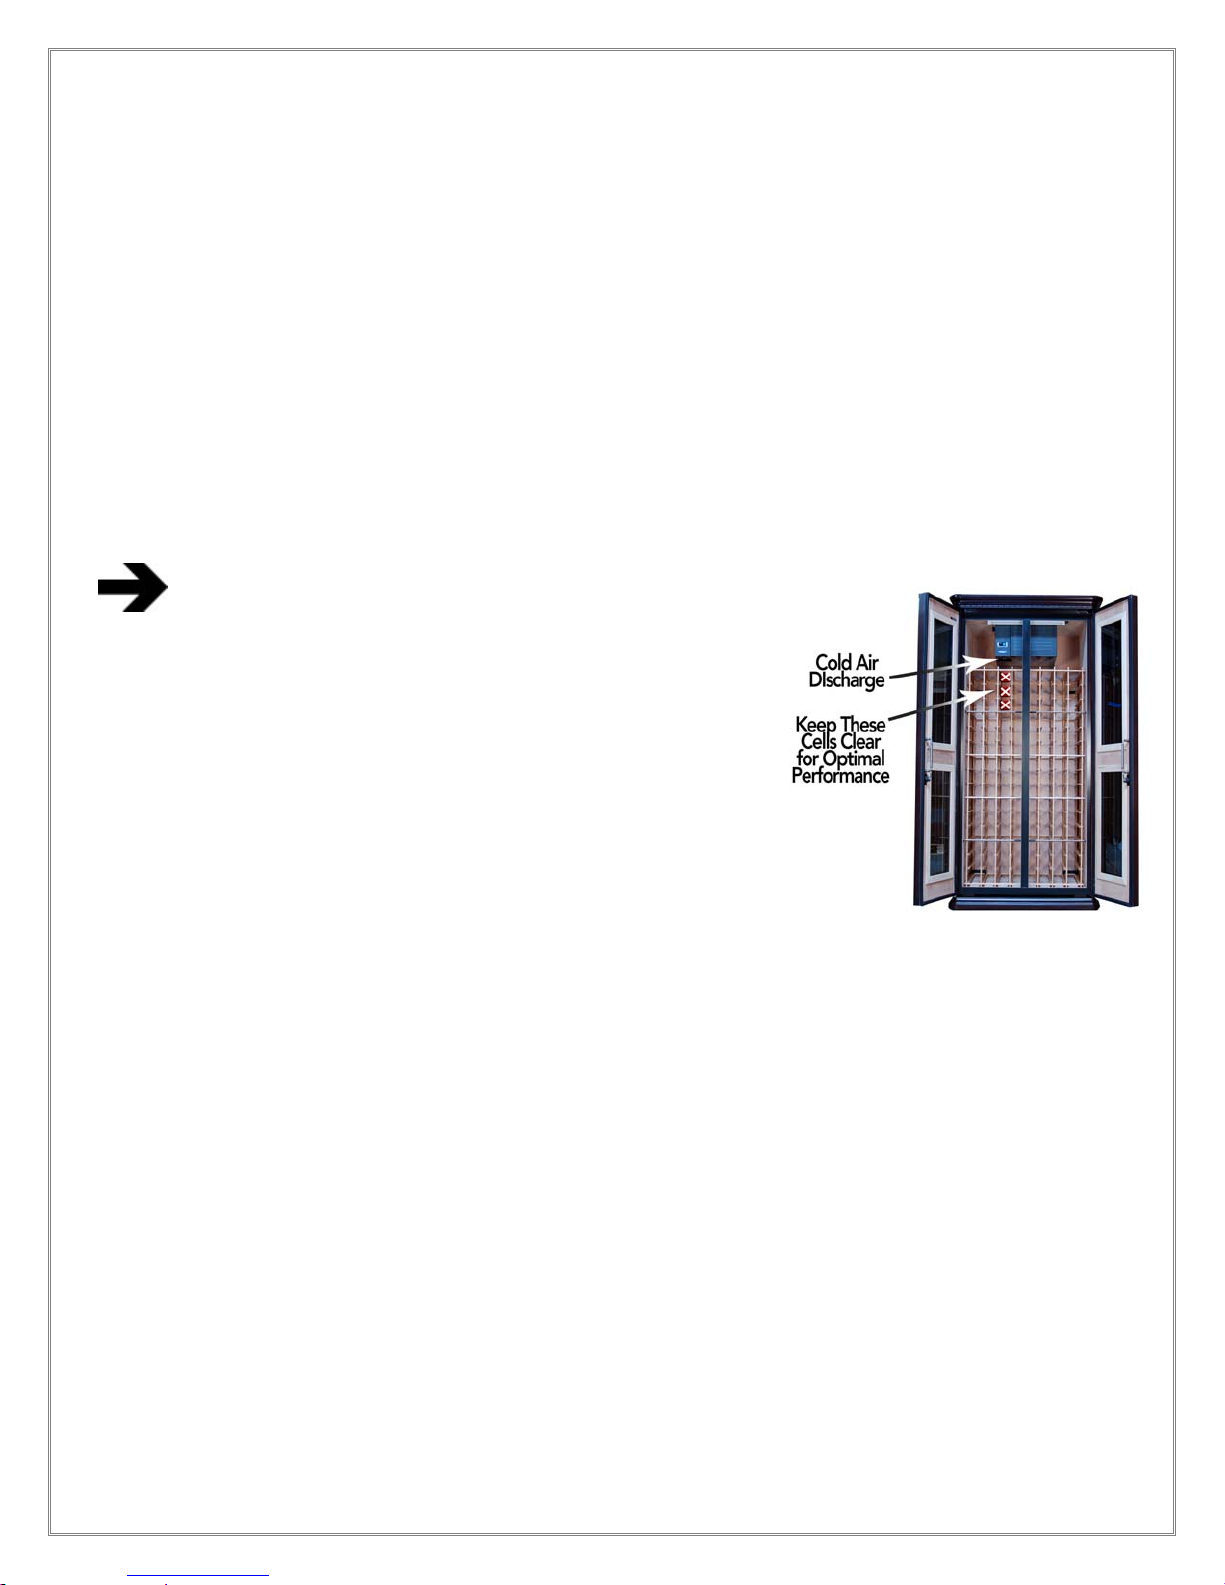
• Create an "airflow path" by keeping the top 3-4
cells directly below the cold-air discharge empty of
bottles (see picture at right). The cold air discharge
is located on the left side underneath the cooling
system. By keeping these cells free of bottles, the
cold air produced by the cooling unit will be able
to circulate freely inside the cabinet, resulting in
less stratification and more efficient operation.
• Most of our wine racks are designed to hold
bottles “double-deep.” Generally, both bottles
should be loaded with the cork facing the door.
Most collectors load the same wines together in a
slot, so that they know which wines are in the back.
• Some wine bottles (e.g. German Rieslings) are extra-long and won’t fit double-deep
in our racks. When storing long bottles, they should be loaded with shorter bottles
so that the door can close properly.
• Split bottles (375ml) are thin and can slip through the racks without additional
support. To store split bottles, we recommend storing them on the bottom row
and/or using postal tubes in the racks where the splits will be placed.
• Most large-format bottles should fit inside our wine cabinet racks. However, some
bottles are too big and will need to be stored in the bulk storage area at the top of
the racks. Our racks have been designed so that bottles can be stacked on top of
each other in the bulk storage area.
• Temperature fluctuations inside the wine cabinet vary the LEAST in the bottom two-
thirds of the cabinet, and temperatures in the back of the cabinet fluctuate less than
in front of the cabinet. Therefore, it is advisable to store the most expensive wine
bottles in the back / bottom two-thirds of the wine cabinet.
-21-
Page 23
L E C A C H E P R E M I U M W I N E C A B I N E T S
VIII. M A I N T E N A N C E I N S T R U C T I O N S
FURNITURE FINISH
The finish on your wine cabinet is protected by two coats of high-grade lacquer. To prevent
drying and maintain the finish on your cabinet, use a soft rag and high-quality furniture
polish periodically to polish the finish of the wine cabinet.
DOOR INSTRUCTIONS
We recommend keeping the doors locked when the cabinet is not in use. By keeping the
doors locked, you will ensure that you have a tight seal between the cabinet doors and the
cabinet itself, and will help prevent the possibility of the door becoming warped over time.
COOLING UNIT
IT IS IMPORTANT TO CLEAN THE
CONDENSER COILS 3-4 TIMES A YEAR.
CLEAN MORE OFTEN IN HI-TRAFFIC OR
DUSTY AREAS, OR IF YOU HAVE PETS.
If the condenser coils become clogged, the
cooling unit will not have proper airflow, and
its performance and longevity will be
impaired.
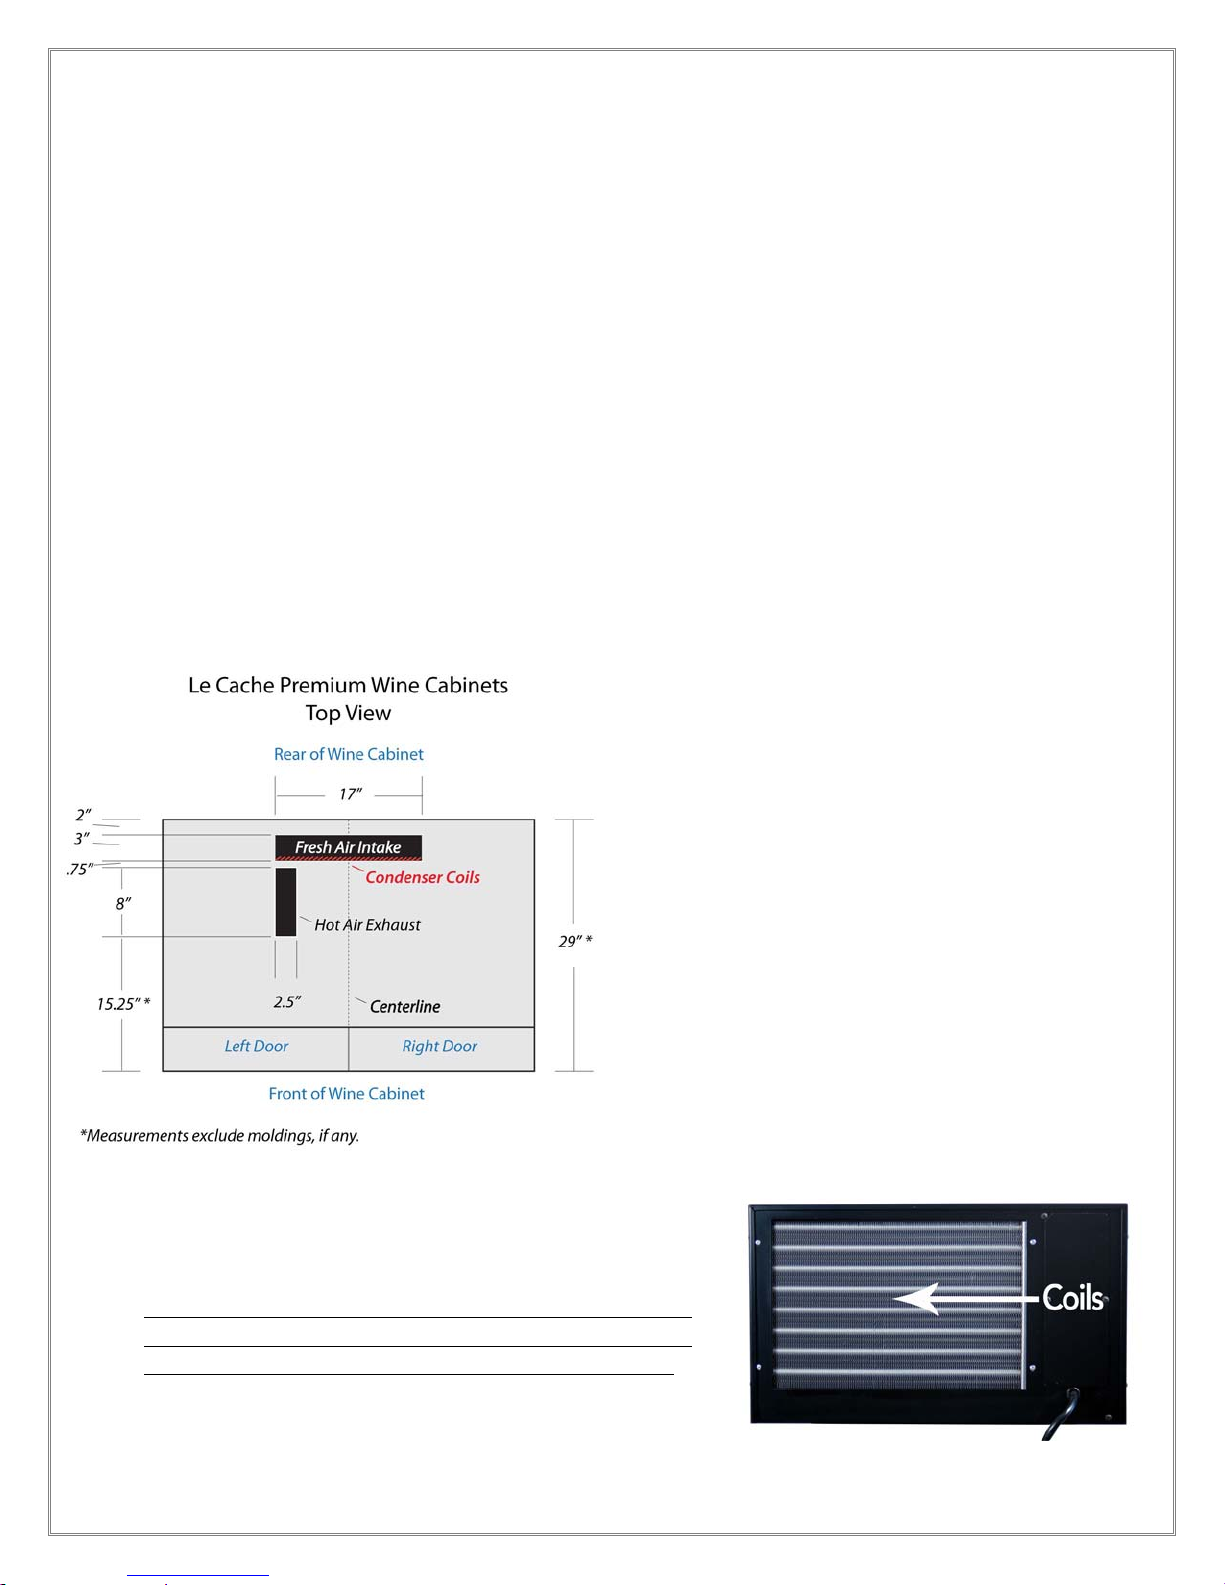
The Condenser Coils can be accessed from
the top (upright, top-venting wine cabinets)
or rear (credenzas) of the wine cabinet. The
diagram at left shows the top of our upright
wine cabinets, including the location of the
Fresh Air Intake and the condenser coils.
For best results, use a vacuum or brush to remove
built up lint and dust on the coils. If you need to lie
across the top of the cabinet, the wine cabinet will
support your weight.
Be careful about using compressed air to clean the
coils because it may force dirt particles into the
cooling unit and damage its internal components.
-22-
Page 24
L E C A C H E P R E M I U M W I N E C A B I N E T S
IX. T R O U B L E S H O O T I N G G U I D E
My wine cabinet is leaning forward.
When the wine cabinet is empty, the door(s) of the wine cabinet represent a
disproportionate share of the wine cabinet weight. Thus, when an empty wine cabinet is
first placed on carpet, it may lean forward even though the wine cabinet is placed on a
carpet board.
DO NOT over-compensate by extending the front leveling feet. Instead, load some
bottles into the back of the wine cabinet until the weight is more evenly distributed. The
cabinet should no longer be leaning forward at this point. Additional adjustments may be
required to level the wine cabinet front to back as the cabinet board compresses the carpet
underneath over time.
My wine cabinet has been delivered, but I can’t open the door(s).
The gaskets on the doors can become tacky during transit, causing the doors to stick to the
cabinet.
Do not use force to open the doors, because it will rip the gaskets off the doors. Instead,
starting at one corner, use your fingers or a ruler to slowly separate the gasket from the
wine cabinet.
The cabinet was recently delivered, and the door(s) are not aligned and/or the
corner(s) are torqued out.
1. Make sure the cabinet is level and the doors are properly aligned (refer to Chapter V).
2. Check to see that the hinges aren't bent or loose. The hinge pins (attached to the top
and bottom of each door) should be perfectly upright, and the hinge plates (attached to
the top and the bottom of the wine cabinet) should be attached tightly to the cabinet
and perfectly parallel to the floor.
3. Check to see if the door(s) are bowed using a long straight-edged object (e.g. a
yardstick).
-23-
Page 25
L E C A C H E P R E M I U M W I N E C A B I N E T S
I’ve had the cabinet for some time, and the cabinet door(s) are no longer sealing
properly against the cabinet.
You can check the door seals by placing a flashlight inside the cabinet and aiming it at the
door. Then, close the door. If there are any gaps and the light shines through, the door is
not sealing properly.
Another way to check the seals is by closing each door on a dollar bill around the perimeter
of each door. It should be difficult to slide the bill along the edge of the door without
pulling out the bill.
If the door(s) aren’t sealing properly against the cabinet, do the following:
1. Make sure the cabinet is level and the doors are aligned (refer to Chapter V)
2. If there is a kink in the rubber gasket on the door, use a hair dryer for several minutes
and stretch the gasket into the proper shape. Then, close the doors for several hours to
allow the gasket to regain its proper shape.
The cooling unit runs constantly.
The cooling unit is designed to turn on when the air temperature in the cellar rises ABOVE
the Minimum Set Point + Temperature Differential, and turn off when the air temperature
falls below the Minimum Set Point. For example, if the Minimum Set Point is 58°F and the
Temperature Differential is 4°F, the cooling unit will turn above 62°F and turn off below
58°F.
When bottles are first loaded in the wine cabinet, the cooling unit will run continuously
(even up to a week) until the temperature inside the cellar falls below the Minimum Set
Point.
The cooling unit will cool a maximum of 30°F below the ambient temperature in the space
outside the condenser coils. In other words, when the ambient temperature in the space
outside the condenser coils is 90°F, the cooling unit can't cool below 60°F inside the cellar.
Hot weather conditions, insufficient ventilation and/or dirty condenser coils can all cause the
cooling unit to run continuously. To reduce cycle times,
1. Clean the condenser coils
2. Check the ambient temperature in the space outside the condenser coils while the
cooling unit is running, making sure that the difference between this temperature and
the Minimum Set Point is no more than 30°F.
-24-
Page 26
L E C A C H E P R E M I U M W I N E C A B I N E T S
3. Increase the supply of cool air to the space outside the condenser coils, using a fan,
ducting or an exhaust system to remove heat from the space.
4. Raise the Minimum Set Point on the cooling unit
The cooling unit is dripping.
The cooling unit is designed to remove excess moisture from inside the cellar, which
collects in the drip pan of the cooling unit.
Excess moisture can occur when the cooling unit runs constantly, when the Minimum Set
Point is too low and/or when the cellar doesn’t have a good seal from the outside
environment. To eliminate overflow in the drip pan, do the following:
1. Raise the Minimum Set Point of the cooling unit.
2. Make sure the cellar has good seals, especially at the door(s), and repair any leaks
immediately.
I can't insert my key into the lock because the notches aren't lined up.
If the inner and outer notches in the lock become misaligned, you'll need to file off the tab
on the key. Once the tab is filed off, you'll be able to insert the key into the lock.
My wine cabinet is having condensation on the glass.
Condensation usually occurs in warm, humid locales, especially when the cooling unit is
running a high percentage of the time. However, condensation on the glass may indicate a
break in the seal that should be addressed.
In the event of condensation on the glass, do
the following:
1. Raise the temperature minimum set-point to 58 degrees or above.
2. Keep the first 3-4 rows clear in the column directly below the cold-air discharge (front
column only). This will stop the cold air from "splashing" against the center post.
3. Check the seals between the door(s) and the cabinet to ensure there aren't any leaks
in the seals.
-25-
Page 27
L E C A C H E P R E M I U M W I N E C A B I N E T S
X. L I M I T E D W A R R A N T Y
FIVE YEAR COOLING UNIT LIMITED WARRANTY
For five years from the date of original delivery, your Le Cache warranty covers all parts and labor to repair or
replace any components that prove to be defective in materials or workmanship in the cooling unit. Under the
terms of this warranty, Le Cache will repair or replace the original cooling unit with a new or refurbished cooling
unit and, once replaced, the original cooling unit must be returned to Le Cache. The cooling unit is self-enclosed
and is located inside the wine cabinet and is mounted to the top of the cabinet.
TWO YEAR LIMITED WARRANTY
For two years from the date of original delivery, your Le Cache warranty covers all parts and labor to repair or
replace any part of the product which proves to be defective in materials or workmanship.
TERMS APPLICABLE TO EACH WARRANTY
All service provided by Le Cache under the above warranty must be performed by a designated repair center,
unless otherwise specified by Le Cache. Purchaser is responsible for removing and reinstalling the cooling unit
from the wine cabinet, and for shipping to and from Le Cache or to and from a designated repair facility.
The limited warranty applies only to wine cabinets purchased from the factory or an authorized dealer. For wine
cabinets delivered to Hawaii and locations outside the United States, the District of Columbia or Canada, the
limited warranty applies only to the cooling unit, but it does not apply to the wine cabinet. The limited warranty
does not cover any parts or labor to correct any defect caused by negligence, commercial use, accident, or
improper use, maintenance, installation, service or repair. The limited warranty also does not cover any parts or
labor to correct any damage caused by severe temperature variations, direct sunlight, extremely dry conditions
or great humidity changes.
THE REMEDIES DESCRIBED ABOVE FOR EACH WARRANTY ARE THE ONLY ONES, WHICH LE CACHE
WILL PROVIDE, EITHER UNDER THESE WARRANTIES OR UNDER ANY WARRANTY ARISING BY
OPERATION OF LAW. LE CACHE WILL NOT BE RESPONSIBLE FOR ANY CONSEQUENTIAL OR
INCIDENTAL DAMAGES ARISING FROM THE BREACH OF THESE WARRANTIES OR ANY OTHER
WARRANTIES, WHETHER EXPRESS, IMPLIED OR STATUTORY.
Some states do not allow the exclusion or limitation of incidental or consequential damages, so the above
limitation or exclusion may not apply to you. This warranty gives you specific legal rights and you may also have
other legal rights, which vary from state to state.
To receive parts and/or service and the name of a Le Cache designated repair facility nearest you, contact your
Le Cache dealer. You may also contact Le Cache Premium Wine Cabinets directly by calling our toll-free
number at 1.877.532.2243.
-26-
Page 28
L E C A C H E P R E M I U M W I N E C A B I N E T S
XI. C O N T A C T I N F O R M A T I O N
Le Cache Premium Wine Cabinets
531 Mercantile Drive
Cotati, CA 94931
Toll Free: 1.877.532.2243
Direct: 1.707.794.8000
Email: [email protected]
www.lecache.com
# # # #
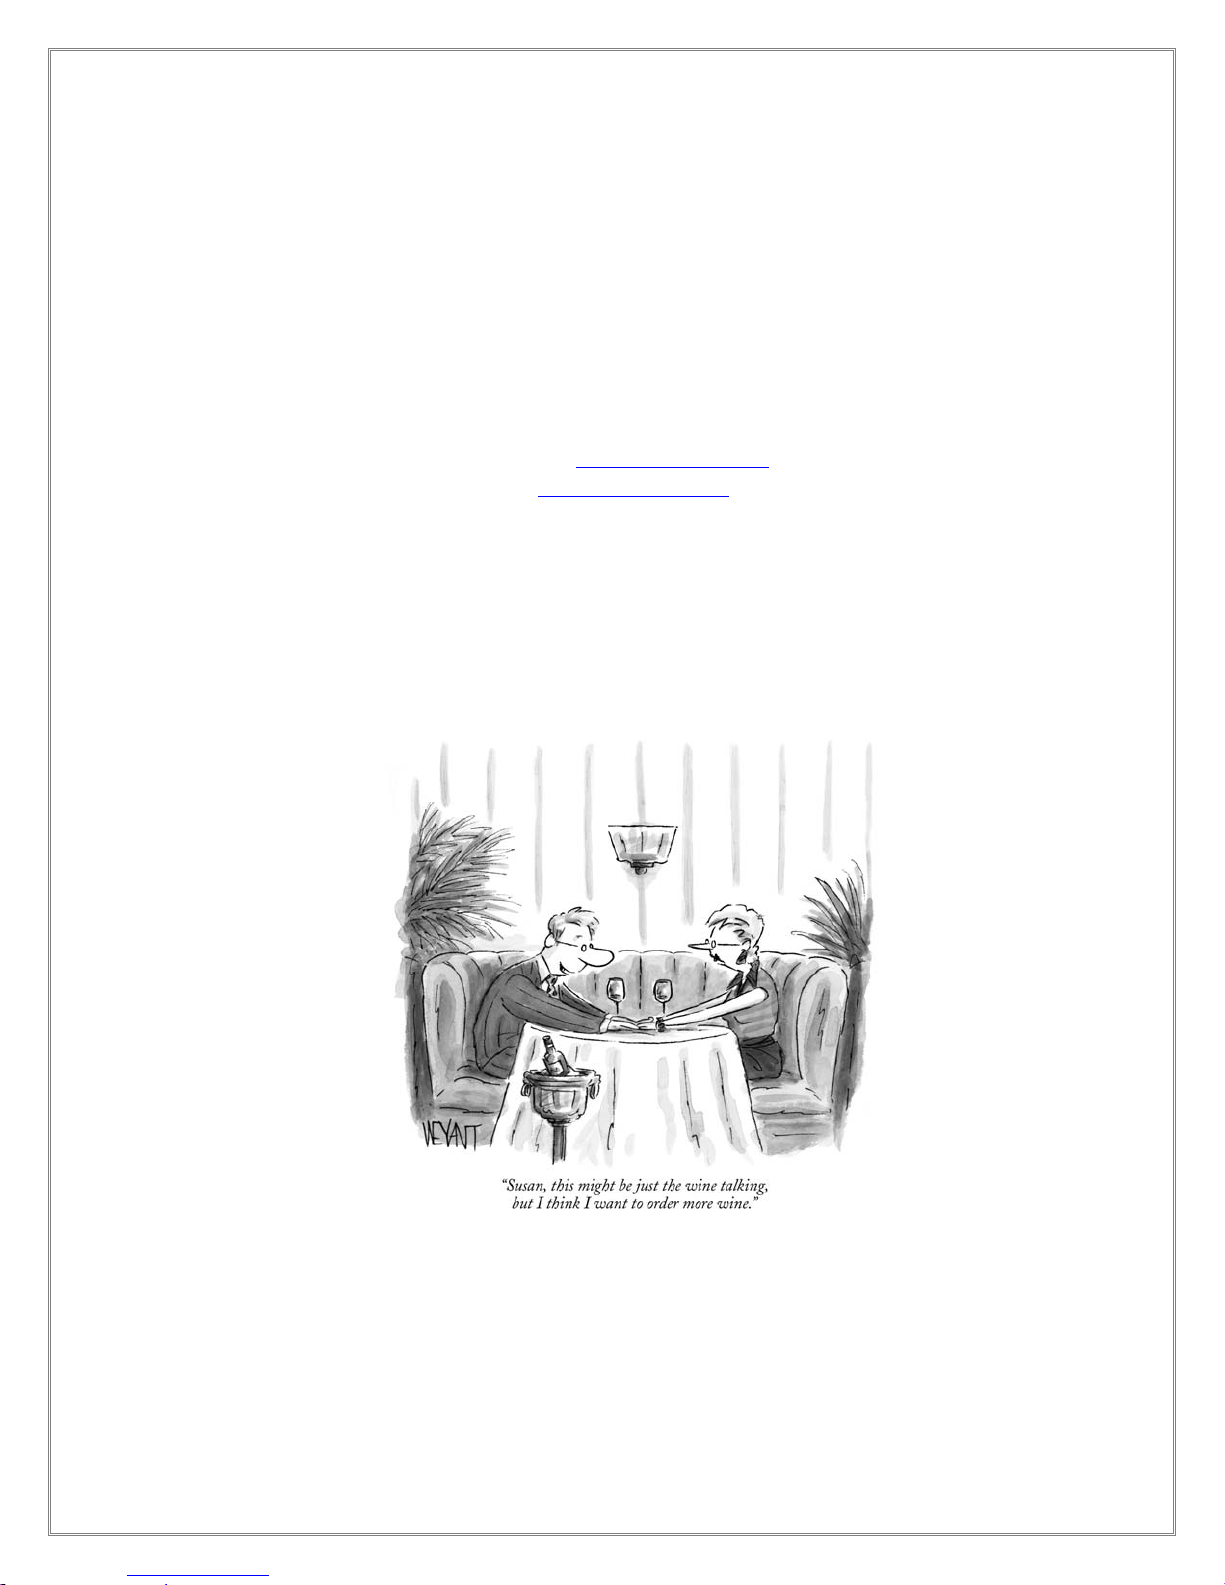
© The New Yorker Collection 2003 Christopher Weyant from cartoonbank.com. All Rights
Reserved.
-27-
 Loading...