

Lebensstil Kollektion Bread Maker Pro, LKBM-2102SS Instruction Manual
1

2
CONTENTS
TITLE
PAGE NO.
GENERAL SAFETY PRECAUTION
3
PARTS IDENTIFICATION
4
INTRODUCTION OF CONTROL PANEL
5
SPECIFICATIONS, FOR THE FIRST USE, HOW TO USE
YOUR BREAD MAKER
6-11
CLEANING AND MAINTENANCE
12
INTRODUCTION OF BREAD INGREDIENTS
13-14
INGREDIENTS MEASUREMENT
RECIPES
14-15
15-19
TROUBLESHOOTING GUIDE
20-23
Thank you for choosing LEBENSSTIL KOLLEKTION Bread Maker.

3
GENERAL SAFETY PRECAUTIONS
Please read these instructions carefully before use and keep them for future reference.
Check your local main voltage whether it is the same as stated on the rating label.
Do not operate any appliance with a damaged cord or plug or after the appliance
malfunctions, or is dropped or damaged in any manner. Return appliance to
manufacturer or the nearest authorized service agent for examination, repair or
electrical or mechanical adjustment.
Do not touch hot surfaces. Use handles or knobs.
To protect against electric shock do not immerse cord, plugs, or housing in water or
other liquid.
Unplug from outlet when not in use, before putting on or taking off parts, and before
cleaning.
Do not let cord hang over edge of table or hot surface.
The use of accessory attachments not recommended by the appliance manufacturer
may cause injuries.
This appliance is not intended for use by persons (including children) with reduced
physical, sensory or mental capabilities, or lack of experience and knowledge, unless
they have been given supervision or instruction concerning use of the appliances by a
person responsible for their safety.
Do not place on or near a hot gas or electric burner, or in a heated oven.
Extreme caution must be used when moving an appliance containing hot oil or other
hot liquids.
Do not touch any moving or spinning parts of the machine when baking.
Never switch on the appliance without properly placing bread pan filled with
ingredients.
Never beat the bread pan on the top or edge to remove the bread as this may
damage the bread pan.
Metal foils or other materials must not be inserted into the bread maker as this can
give rise to the risk of a fire or short circuit.
Never cover the oven with a towel or any other material, heat and steam must be
able to escape freely. A fire can be caused if it is covered by, or comes into contact
with combustible material.
Always attach plug to appliance first, then plug cord into the wall outlet. To
disconnect, turn any control to OFF, then remove plug from wall outlet.
Do not operate the appliance for other than its intended use.
Do not use outdoors.
4
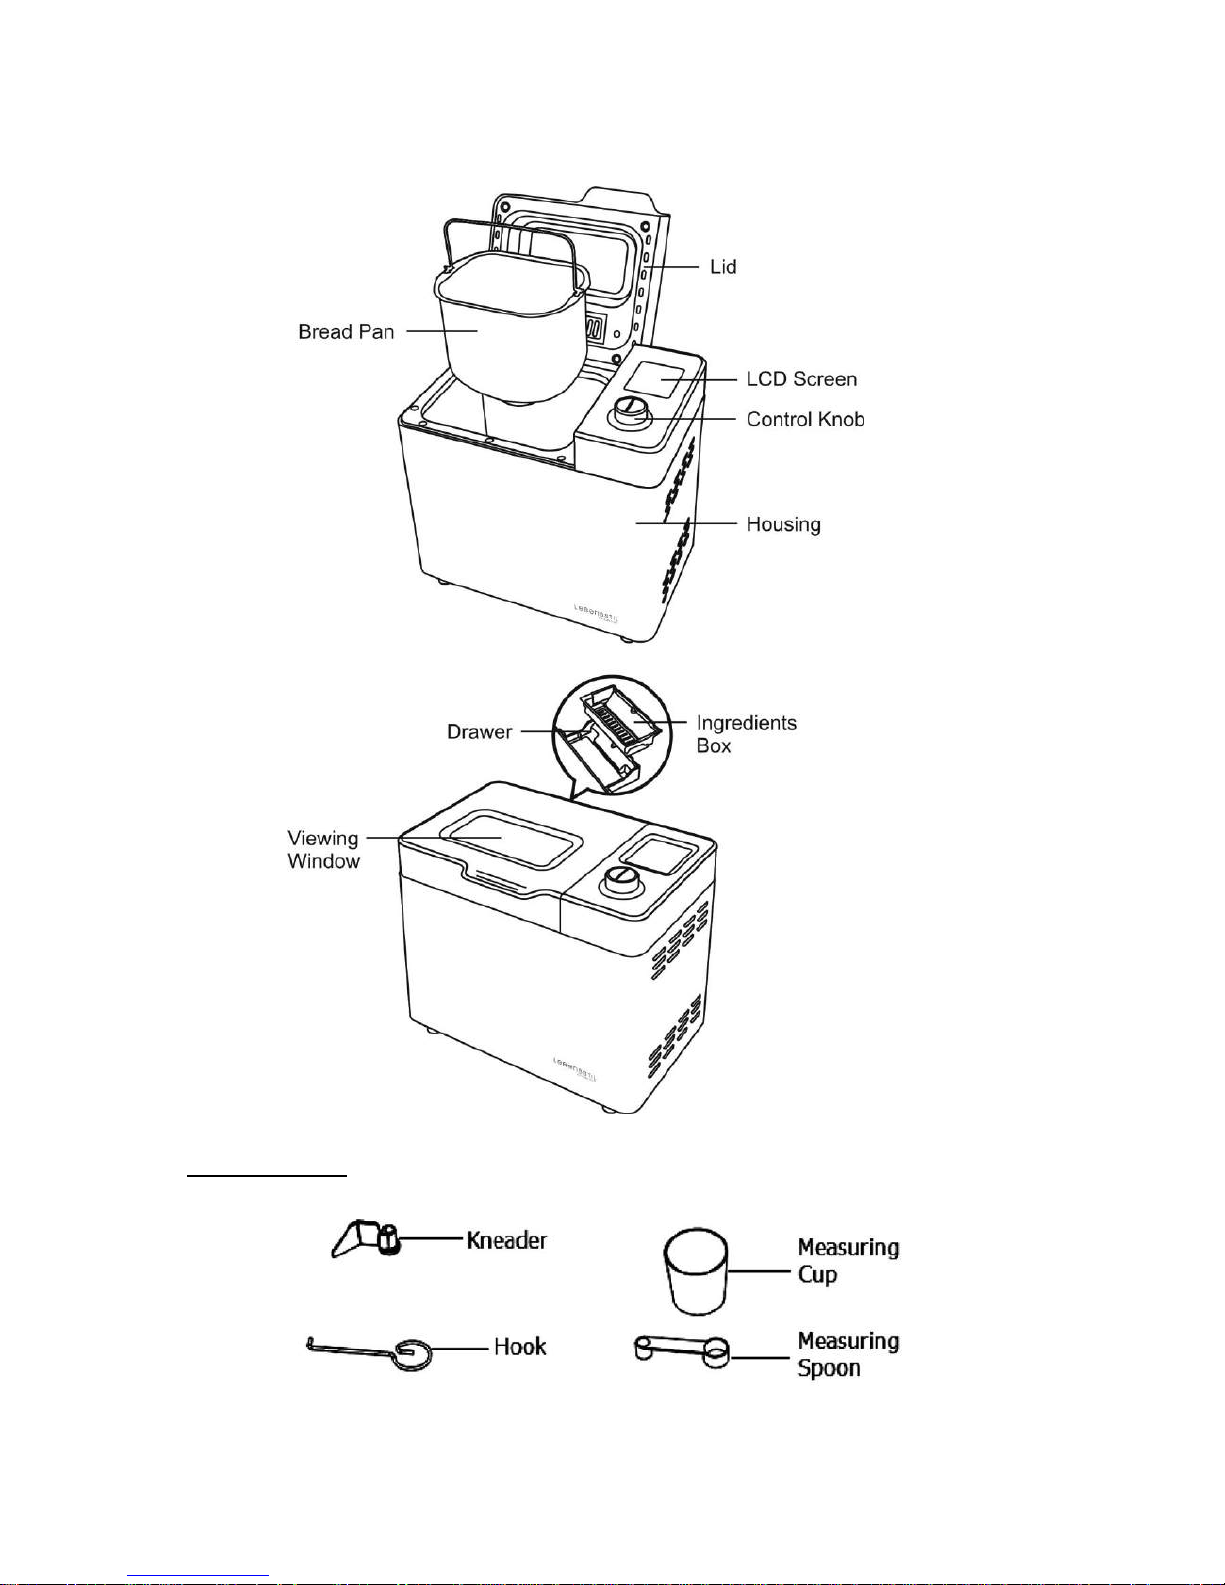
PARTS IDENTIFICATION
ACCESSORIES
5
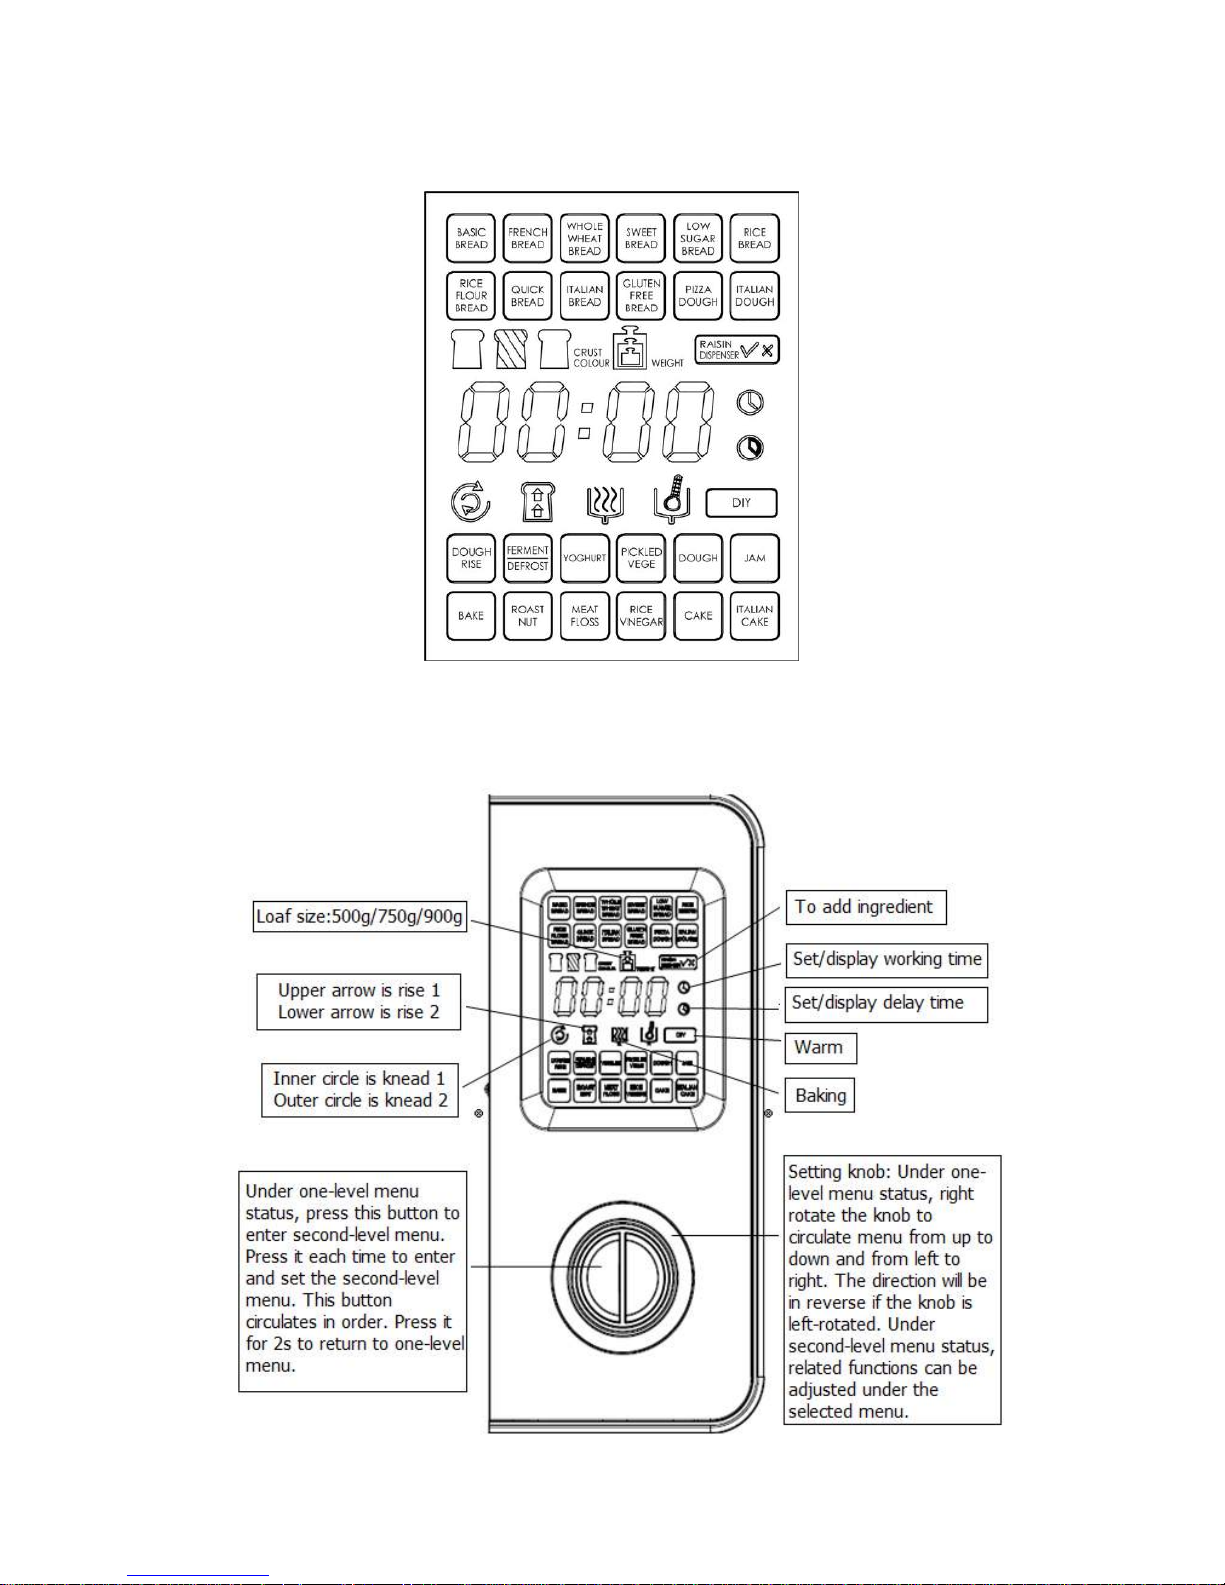
CONTROL PANEL
INTRODUCTION OF CONTROL PANEL
6
SPECIFICATIONS
Model
LKBM-2102SS
Voltage
220 – 240V~
Wattage
550W
Frequency
50Hz
FOR THE FIRST USE
The appliance may emit a little smoke and a characteristic smell when turning it on for
the first time. This is normal and will soon stop. Make sure the appliance has sufficient
ventilation.
1. Please check if all parts and accessories are “complete and free of damage”.
2. Clean all the parts according to the latter section “Cleaning and Maintenance”.
3. Set the bread maker in baking mode and bake empty for about 10 minutes. After
cooling it down, clean once more.
4. Dry all parts thoroughly and reassemble them, the appliance is ready for use.
HOW TO USE YOUR BREAD MAKER
1. Lay the appliance on a firm and even surface.
2. Before making bread, weigh the ingredients you need respectively.
3. Place the pan in position, turn it clockwise until it clicks in correct position. Fix the
kneading blade onto the drive shafts. It is recommended to fill holes with heatresisting margarine prior to placing the kneaders, this prevents the dough from
sticking below the kneaders and the kneaders could be removed from bread easily.
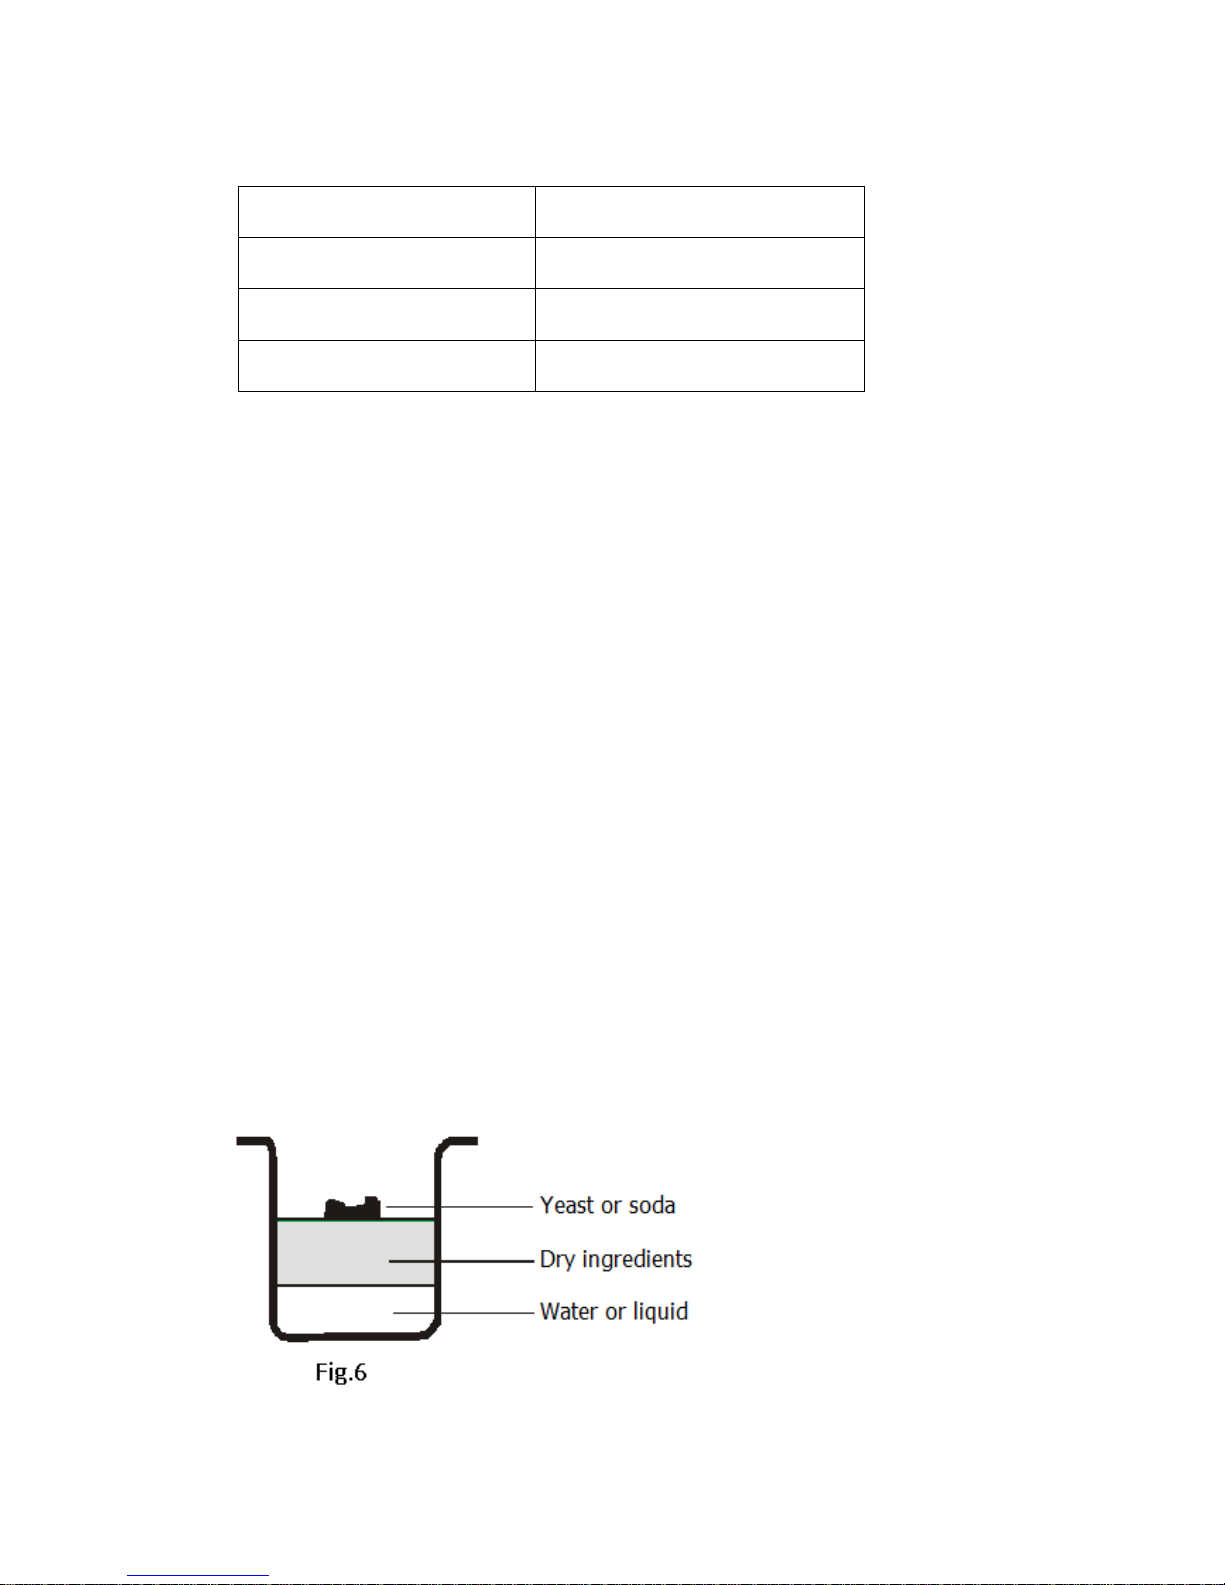
4. Place ingredients into the bread pan. Usually the water or liquid substance should
be placed first, then add sugar, salt and flour. Always add yeast or baking powder
as the last ingredient. (See fig.6)
Note: The maximum quantity of flour and yeast is 600g and 7g.

7
5. With a finger make a small indentation on one side of the flour. Add yeast to
indentation; ensure it does not come into contact with the liquid ingredients or salt.
Close the lid gently.
6. Plug the power cord into a wall outlet.
7. Rotate the Setting knob until your desired program is selected.
8. Rotate the Setting knob to select the desired crust color.
9. Rotate the Setting knob to select the desired size (500g, 750g or 900g).
10. Rotate the Setting knob to icon and press “OK” button, then set the delay time.
This step may be skipped if you want the bread maker to start working immediately.
11. Touch the START/STOP button to start working.
12. For the programs of BASIC, FRENCH, WHOLE WHEAT, SWEET, LOW SUGAR BREAD,
RICE BREAD, RICE FLOUR BREAD, QUICK, ITALIAN BREAD, GLUTEN FREE BREAD
and DO IT YOURSELF, put the ingredients into the ingredient box and then closes
the pan drawer.
NOTE: During operation, the ingredients in the ingredient box will be automatically
poured into the bread pan.
13. Once the process has been completed 10 beeps sound will be heard. Touch
START/STOP button for approximately. 3 seconds to stop the process and take
out the bread. Open the lid wearing oven mitts and firmly grasp the bread pan
handle. Turn the pan anti-clockwise and gently pull the pan straight up and out of
the machine.
NOTE: Before replacing the bread pan, allow it to cool down completely.
14. Use non-stick spatula to gently loosen the sides of the bread from the pan.
CAUTION: The bread pan and bread may be very hot! Always handle with care and
use oven mitts.
15. Turn bread pan upside down onto a rack on a clean countertop and gently shake
until bread falls out onto rack.
16. Let bread cool for about 20 minutes before slicing.
17. If leaving the room without touching the START/STOP button at the end of
operation, the bread will be kept warm automatically for one hour.
18. When not in use or after completing operation, unplug the power cord.
CAUTION: Before slicing the loaf, use the hook to remove the kneading blade
hidden on the bottom of loaf. Never use hand to remove the kneading blade as the
loaf is hot.
NOTE: If bread has not been completely eaten up, it is advisable to store the
remaining bread in a sealed plastic bag or vessel. Bread can be stored for about
three days in room temperature. If stored for more days, pack it with a sealed
plastic bag or vessel and then place it in the refrigerator for a maximum of ten days.
As homemade bread is made without adding preservatives, the storage time is
generally no longer than that for bread purchased in the market.

8
SPECIAL INTRODUCTION
For Quick program
With Quick program, the bread maker can finish making a loaf within a shorter period
with baking powder or soda in place of yeast. To obtain perfect quick bread, it is
suggested that all liquid ingredients shall be placed at the bottom of the bread pan and
dry ingredients on the top, but during the initial kneading, some dry ingredients may
collect in the corners of the pan, so in order to avoid flour clumps, you may use a
rubber spatula to help to knead dough.
AFTER POWER-UP
As soon as the bread maker is plugged into the power supply, LCD will be illuminated
while a beep will be heard. If there’s no operation, LCD will disappear after 20s. The
default setting is 900g; MEDIUM “BASIC” is displayed on LCD.
START / STOP
For starting and stopping the selected baking program
To start a program, touch the “START/STOP” button once. The program starts. Enter
working status (if delay function is used, the time starts to count down. The appliance
will start to work when the remaining time is equal to finish time set for this menu).
When unit starts, only the selected one-level, second-level menu will appear, other
menus won’t be displayed. The time begins to count down. During operation, unit will
pause by pressing “START/STOP” button once, and continue by pressing it again. If
“START/STOP” button is pressed more than 2s, the program will be reset, a beep will be
heard, and program returns to standby status, with the default display to select the onelevel menu.
To stop the program, touch the “START/STOP” button for approximately 3 seconds until
a beep confirms that the program has been switched off.
PAUSE
After procedure starts up, touch “START/STOP” button once to interrupt at any time,
the operation will be paused but the setting will be memorized, the working time will be
flashed on the LCD. Touch “START/STOP” button again or within 10 minutes without
touching any button, the program will continue.
MENU
Use setting knob to set different programs. The functions of 25 menus will be explained
below.
1. BASIC BREAD: Kneading, rising and baking normal bread. You may also add
ingredients to add flavor.
2. FRENCH BREAD: Kneading, rising and baking with a longer rise time. The bread
baked in this menu usually will have a crisper crust and light texture.
 Loading...