

Page 1
LER 6909
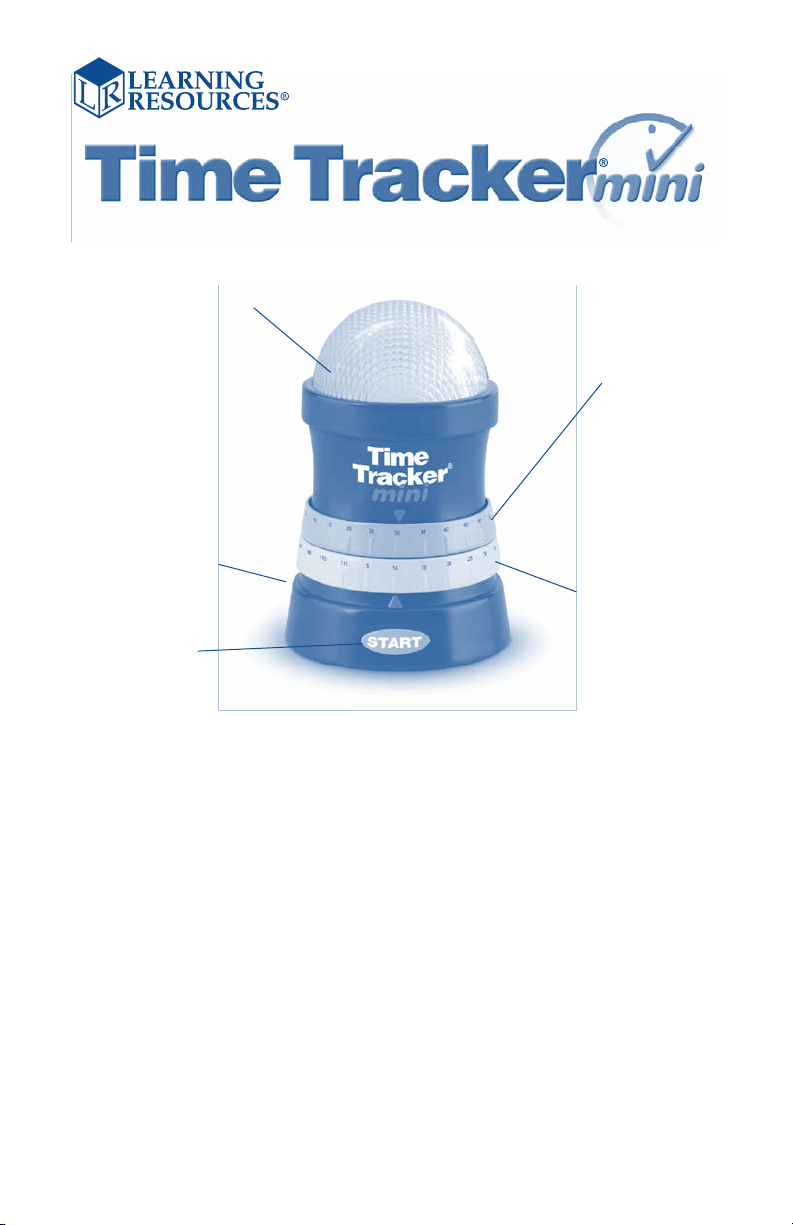
Light dome
Luz de la cúpula
Dôme lumineux
Lichtkuppel
Power/volume dial
Selector de volumen/encendido
Cadran de sélection de mise en
marche / volume
Einstellrad zum Einschalten/
Anpassen der Lautstärke
Start
Einstellrad für die Zeitmessung
Timer dial
Selector del temporizador
Cadran de la minuterie
Warning dial
Selector de advertencia
Cadran de signal
d’avertissement
Warnscheibe
Time Tracker® Mini, the simple-to-use visual timer, is great for school, home or
the workplace. Operating it is as easy as 1, 2, 3, but be sure to read this guide
first for full operating instructions.
How To Operate:
1. Turn the power/volume dial to the ON position. This dial also adjusts the
volume of the alarm. To mute the sound, simply keep this at the lowest setting.
2. Twist the green timer dial to choose the desired duration from 5 minutes to
120 minutes, in 5-minute increments.
3. Twist the yellow warning dial to set a time for the warning alert. For example,
to set a warning at 25 minutes, twist the yellow warning dial to 25.
4. Press the start button. The light dome will turn green and the timer will begin
to count down the time.
5. If you selected a “warning” time, the light dome will turn yellow and a short
tone will play at that time.
6. When the time has expired, the light dome will turn red and an alarm will
sound, indicating that time is up.
Battery Information
Installing or Replacing Batteries
WARNING! To avoid battery leakage, please follow these instructions carefully.
Failure to follow these instructions can result in battery-acid leakage that may
cause burns, personal injury, and property damage.
Page 2

Requires: 3 x 1.5V AAA batteries and a Phillips screwdriver
• Batteries should be installed or replaced by an adult.
• Time Tracker® Mini requires three (3) AAA batteries.
• The battery compartment is located on the base of the unit.
• To install batteries, first undo the screw with a Phillips screwdriver and
remove the battery compartment door. Install batteries as indicated
inside the compartment.
• Replace compartment door and secure with screw.
Battery Care and Maintenance Tips
• Use three (3) AAA batteries.
• Be sure to insert batteries correctly (with adult supervision) and always follow
the toy and battery manufacturer’s instructions.
• Do not mix alkaline, standard (carbon-zinc), or rechargeable
(nickel-cadmium) batteries.
• Do not mix new and used batteries.
• Insert batteries with the correct polarity. Positive (+) and negative (-) ends must
be inserted in the correct directions as indicated inside the battery compartment.
• Do not recharge non-rechargeable batteries.
• Only charge rechargeable batteries under adult supervision.
• Remove rechargeable batteries from the toy before charging.
• Only use batteries of the same or equivalent type.
• Do not short-circuit the supply terminals.
• Always remove weak or dead batteries from the product.
• Remove batteries if product will be stored for an extended period of time.
• Store at room temperature.
• To clean, wipe the surface of the unit with a dry cloth.
• Please retain these instructions for future reference.
Time Tracker® Mini, el temporizador visual fácil de usar, es ideal para el colegio,
para casa o para el trabajo. Su funcionamiento es muy fácil pero asegúrese de
leer primero esta guía para conocer todas las instrucciones de funcionamiento.
Funcionamiento:
1. Gire el selector de encendido/volumen a la posición ENCENDIDO. Este selector
también ajusta el volumen de su alarma. Para quitar el sonido, simplemente
manténgalo en el ajuste más bajo.
2. Gire el selector verde del temporizador para elegir la duración que desee
(desde 5 a 120 minutos, con intervalos de 5 minutos).
3. El selector de advertencia amarillo tiene un sonido de alerta de «advertencia».
Gire el selector para seleccionar el tiempo para que la luz de advertencia
se encienda.
4.Pulse el botón de inicio. La luz de la cúpula se pondrá en verde y el temporiza
dor comenzará con la cuenta atrás del tiempo.
5. Si selecciona un tiempo de «advertencia» (paso 3), la luz de la cúpula se pondrá
amarilla cuando se llegue a ese tiempo. Sonará un tono corto para indicar el
tiempo de advertencia.
6. Cuando se haya agotado el tiempo, la luz de la cúpula se pondrá en rojo y
sonará una alarma indicando que se ha acabado el tiempo.
Consejos para el mantenimiento y cuidado de las pilas
• Time Tracker® Mini necesita (3) tres pilas AAA.
• El compartimento de las pilas está ubicado en la base de la unidad.
• Asegúrate que un adulto introduzca las pilas correctamente siguiendo las
instrucciones del fabricante del juguete y de las pilas.
Page 3

• No mezcles pilas alcalinas, normales (carbono-zinc) o recargables (níkel-cadmio).
• Introduce las pilas correctamente respetando los signos de polaridad.
• No recargues pilas que no sean recargables.
• Recarga sólo las pilas recargables bajo la supervisión de un adulto.
• Saca las pilas recargables del juguete antes de ponerlas a recargar.
• Usa sólo pilas que sean iguales o parecidas.
• No provoques un cortocircuito en los terminales de alimentación.
• Quita siempre las pilas semicargadas o completamente descargadas del producto.
• Quita las pilas si no vas a usar el producto o vas a tenerlo guardado durante
mucho tiempo.
• Almacénalas a temperatura ambiente.
• No mezcles pilas nuevas y usadas.
• Por favor, guarda estas instrucciones porque podrías necesitarlas más adelante.
Time Tracker® Mini, la minuterie visuelle simple d’utilisation, idéale pour l’école,
le domicile ou le lieu de travail. Bien que son fonctionnement soit un jeu
d’enfant, il est tout de même recommandé de lire le présent guide afin de vous
familiariser avec les instructions de manipulation dans leur totalité.
Fonctionnement :
1. Sélectionnez la position ON (Marche) sur le cadran de sélection de mise en
marche / volume. Il vous est également possible de régler le volume via à ce
cadran. Pour supprimer le son, sélectionnez tout simplement le réglage le plus bas.
2. Tournez le cadran vert de la minuterie afin de sélectionner la durée souhaitée
(de 5 à 120 minutes, avec progressions de 5 minutes minimum).
3. Le cadran jaune permet de commander un signal d’”avertissement”.
Tournez le cadran afin de sélectionner un intervalle de temps qui déclenchera
le signal lumineux.
4. Appuyez sur le bouton Start (Marche). Le dôme lumineux prend une couleur
verte et la minuterie commence alors son compte à rebours.
5. Si vous sélectionnez un temps d’alerte (étape 3), le dôme lumineux s’illuminera
d’une couleur jaune lorsque ce temps est atteint. Un faible signal sonore vous
avertira également.
6. Lorsque le temps arrive à échéance, le dôme lumineux prend une couleur
rouge et une alarme sonore se déclenche.
Conseils d’entretien et de maintenance des piles
• Time Tracker® Mini requiert (3) trois piles AAA.
• Le compartiment à piles se situe dans la base de l’unité.
• S’assurer qu’un adulte met les piles en place correctement conformément aux
instructions du fabricant du jouet et des piles.
• Ne pas mélanger les piles alcalines, standard (carbone-zinc),
ou rechargeables (nickelcadmium).
• Introduire les piles selon leur polarité.
• Ne pas recharger les piles non rechargeables.
• Charger les piles rechargeables uniquement sous la surveillance d’un adulte.
• Enlever les piles rechargeables du jouet avant de les charger.
• Utiliser uniquement des piles du même type ou de type équivalent.
• Ne pas court-circuiter les bornes d’alimentation.
• Il faut toujours enlever les piles épuisées de ce produit.
• Il faut enlever les piles si le produit va être rangé pour une longue durée.
• Ranger à température ambiante.
• Ne pas mélanger les piles neuves et les piles usées.
• Garder ces instructions pour référence.
Page 4

Time Tracker® Mini, der einfach zu bedienende visuelle Timer, eignet sich
hervorragend für den Einsatz in der Schule, zu Hause oder am Arbeitsplatz.
Die Bedienung ist so einfach wie das Zählen bis 3. Trotzdem sollten Sie für die
vollständigen Bedienungsanweisungen zunächst diese Anleitung durchlesen.
Bedienung:
1. Stellen Sie das Einstellrad Einschalten/Lautstärke auf die Position ON (EIN).
Über dieses Einstellrad können Sie auch die Lautstärke Ihres Alarms anpassen.
Um den Ton auszustellen, lassen Sie das Einstellrad einfach auf der niedrigsten
Stufe stehen.
2. Drehen Sie am grünen Einstellrad für die Zeitmessung, um die gewünschte
Dauer einzustellen (von 5 Minuten bis 120 Minuten, in 5-Minuten-Schritten).
3. Die gelbe Warnscheibe gibt einen „Warnton“ aus. Drehen Sie an der Scheibe,
um eine Uhrzeit auszuwählen, zu der das Warnlicht aufleuchtet.
4. Drücken Sie auf den Startknopf. Die Lichtkuppel wird grün, und der Timer
beginnt mit dem Zurückzählen der Zeit.
5. Wenn Sie eine „Warnzeit“ auswählen (Schritt 3), leuchtet die Lichtkuppel gelb
auf, sobald diese Zeit erreicht ist. Zur Anzeige der Warnzeit ertönt ein
kurzes Geräusch.
6. Wenn die Zeit abgelaufen ist, wird die Lichtkuppel rot und es ertönt ein Alarm,
der anzeigt, dass die Zeit abgelaufen ist.
Wichtige Hinweise zur Pflege und Wartung der Batterien
• Für den Time Tracker® Mini sind (3) drei AAA-Batterien erforderlich.
• Das Batteriefach befindet sich im Sockel der Einheit.
• Stellen Sie sicher, dass ein Erwachsener die Batterien entsprechend den
Anweisungen des Spielzeug- und Batterieherstellers einsetzt.
• Niemals Alkali-, Standard- (Zink-Kohle-Batterien) oder wiederaufladbare
Batterien (Nickel-Cadmium) miteinander kombinieren.
• Beim Einsetzen der Batterien auf die korrekte Polarität achten.
• Nicht wiederaufladbare Batterien dürfen nicht wiederaufgeladen werden.
• Wiederaufladbare Batterien müssen unter Aufsicht eines Erwachsenen
geladen werden.
• Vor dem Laden müssen wiederaufladbare Batterien aus dem Gerät
genommen werden.
• Verwenden Sie nur Batterien, die vom gleichen Typ oder gleichwertig sind.
• Die Versorgungsklemmen nicht kurzschließen.
• Schwache oder erschöpfte Batterien immer aus dem Produkt entfernen.
• Die Batterien entfernen, wenn das Produkt über einen längeren Zeitraum nicht
benutzt wird.
• Bei Zimmertemperatur aufbewahren.
• Niemals neue und alte Batterien miteinander kombinieren.
• Bitte bewahren Sie die Anweisungen für zukünftige Verwendung auf.
Like
us on
© Learning Resources, Inc., Vernon Hills, IL, US
Learning Resources Ltd., Bergen Way,
King’s Lynn, Norfolk, PE30 2JG, UK
Please retain our address for future reference.
Made in China. LPK6909-GUD
Hecho en China. Conservar estos datos.
Fabriqué en Chine. Informations à conserver.
Hergestellt in China. Bitte bewahren Sie unsere
Adresse für spätere
Nachfragen auf.
 Loading...