

Page 1

Activity Guide
Guía de Actividades
Time Tracker
®
Visual Timer and Clock
Monitor de tiempo • Minuteur • Zeitampel
LER 6900
6900 Time Tracker 2.0 GUD NBR.indd 2 9/5/17 12:56 PM
Page 2

2
TIME TRACKER® VISUAL TIMER
The Time Tracker Visual Timer® helps manage time in a new
way. Lighted color sections give visual cues as to the amount
of time remaining to complete a task. Each section represents
a portion of time. You can program exactly how long each of
the sections remains lit, or you can select the automatic setting
and the Time Tracker will divide the time for you. Use the
Time Tracker to time tests, practice sessions, study sessions,
experiments, phone calls, speeches, or any timed activity.
INSERT BATTERIES
You will need:
4 AAA batteries
Phillips screwdriver
1. Turn the Time Tracker
®
over. Use the Phillips screwdriver to
turn the screw on the battery door in a counterclockwise
direction to loosen the screw.
2. Remove the screw and open the door.
3. Pull the clear tab sticking out of the backup battery
compartment to activate backup batteries.
4. Insert the four AAA batteries, being careful to match the +
and – ends of the batteries to the diagram inside the battery
compartment.
5. Replace the battery compartment door and insert the screw.
Tighten the screw by using the Phillips screwdriver to turn
the screw in a clockwise direction until secure. Do not overtighten the screw.
6900 Time Tracker 2.0 GUD NBR.indd 2 9/5/17 12:56 PM
Page 3
3
GETTING STARTED
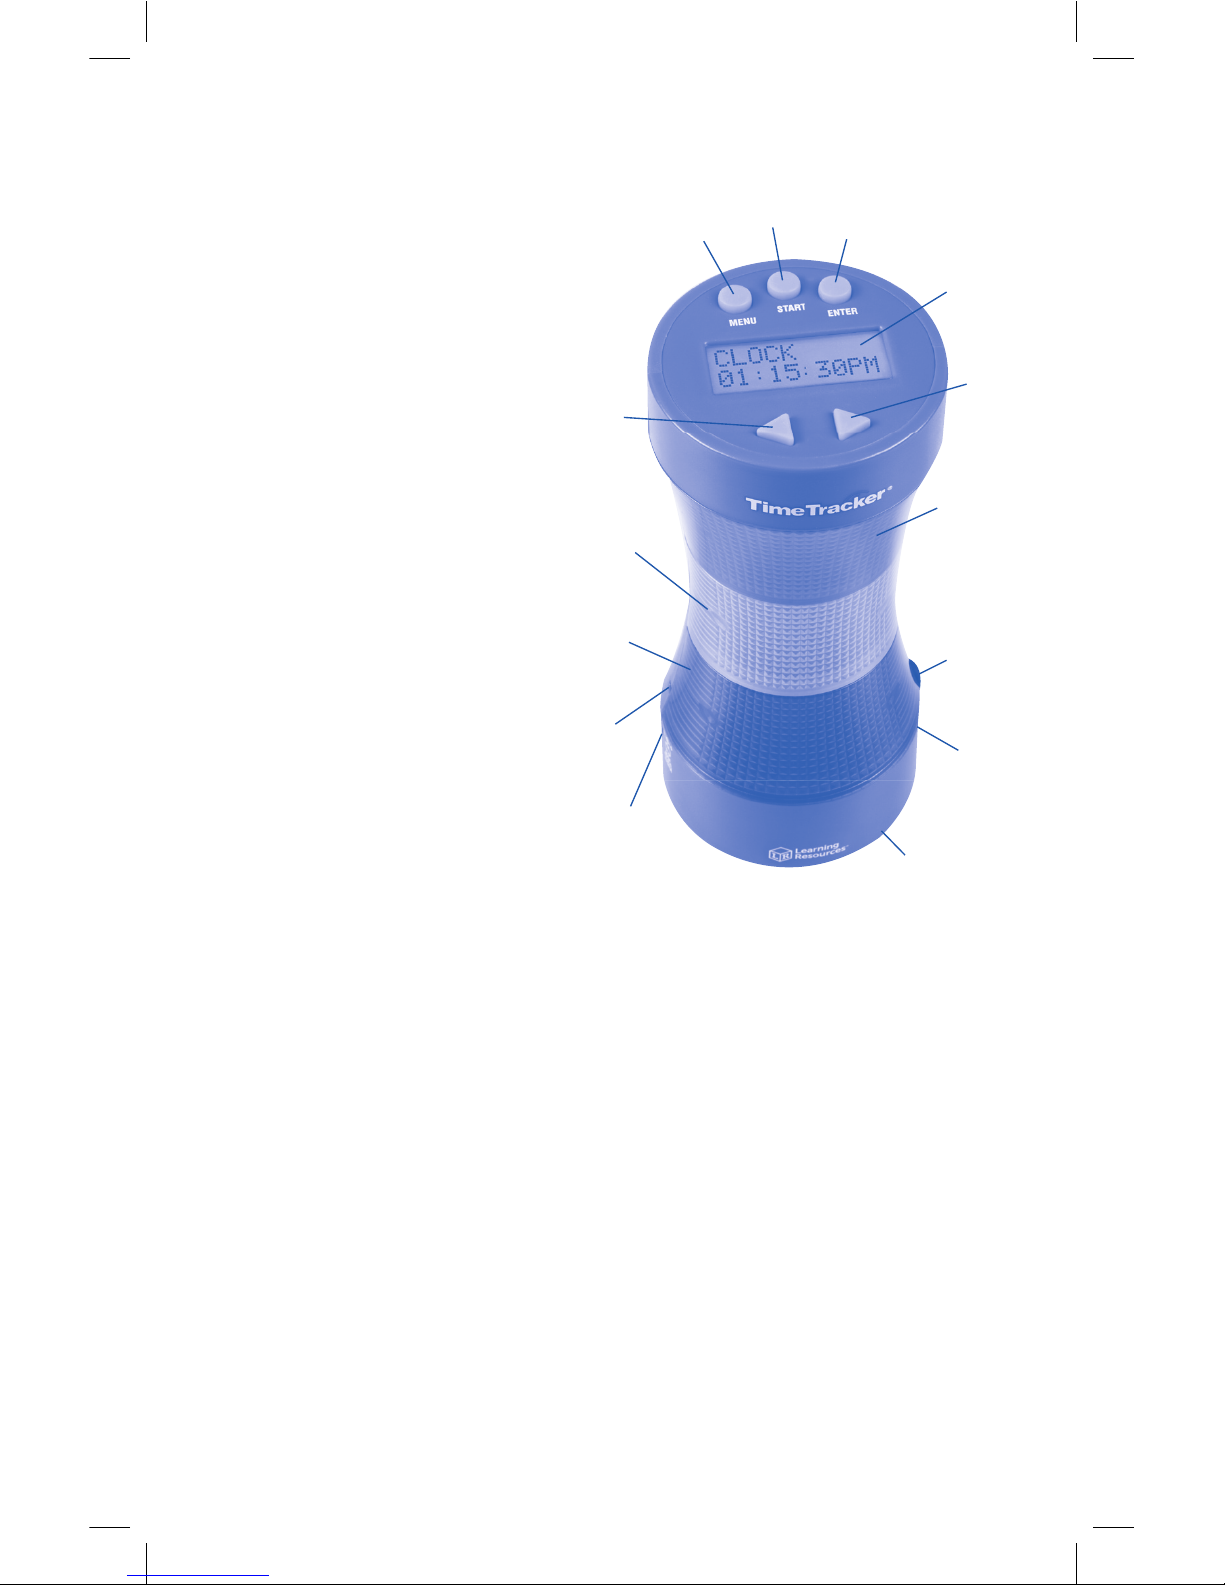
The Time Tracker has 3 modes:
CLOCK – Standard digital
clock.
TIMER – Program exactly
how long you want each
color section to stay lit.
AUTO TIMER –
Program the total
amount of time. The
color sections will
automatically divide
into 80% green, 15%
yellow, and 5% red.
For example, if you
program 10 minutes
as your total time, the
green section will stay
lit for 8 minutes, the
yellow section for 1
minute 30 seconds,
and the red section for
30 seconds.
Before setting the time, please note:
1. If you do not press a button within 30 seconds, you will exit
the programming mode.
2. Press MENU at any time to go back to the previous step.
3. Once you have set the TIMER and/or Auto timer, those
times will remain programmed in the unit until you change
them. Once programmed, you can go directly to STARTING
the TIMER.
4. There are audio alerts when the timer switches from green
to yellow to red. Turn the volume all the way down to mute
the sound.
Red
Section
Yellow
Section
Green
Section
Display
Screen
Volume
Control
Speaker
(behind)
Adapter
Outlet
Reset
Left
Arrow
Right
Arrow
Menu
Start
Enter
Battery
Compartment
(underneath)
6900 Time Tracker 2.0 GUD NBR.indd 3 9/5/17 12:56 PM
Page 4

4
CLOCK
To set the CLOCK:
1. Press MENU to scroll through: CLOCK, TIMER,
AUTO TIMER.
2. When CLOCK appears on screen, press ENTER.
3. Use the ARROW
◄►
buttons to choose 12 (standard) or 24
(military) time, then press ENTER.
4. Use the ARROW
◄►
buttons to set the hours, then press
ENTER. (Note: continue pressing the
◄►
buttons to change
from AM to PM.)
5. Use the ARROW
◄►
buttons to set the minutes, then press
ENTER to confirm. The clock will start running.
TIMER
(input the exact amount of time you want each color section to
light up)
To set the TIMER:
1. Press MENU to scroll through: CLOCK, TIMER, AUTO TIMER.
2. When TIMER appears on screen, press ENTER to set or
change the time. (Note: if you already set the timer and you
just want to start it, press START).
3. Screen shows: GREEN and the green section will
light up.
• To input the amount of time you want the GREEN light to
be lit up: press ENTER to scroll forward to hours, minutes,
or seconds (press MENU to go backward).
• Use the ARROW buttons to input the hours, minutes, and
seconds. Press ENTER when you are done.
4. Repeat the above steps for yellow and red lights.
5. Screen will show TIMER with the total amount of time you
input.
6. Press START to start the timer OR press MENU to return to
digital clock mode.
7. To STOP timer, press and hold the MENU button.
6900 Time Tracker 2.0 GUD NBR.indd 4 9/5/17 12:56 PM
Page 5

5
AUTO TIMER
(Input the total amount of time and the green light will
automatically be on for 80% of that time, the yellow light for
15%, and the red light for 5%.)
To set AUTO TIMER:
1. Press MENU to scroll through: CLOCK, TIMER, AUTO TIMER.
2. When AUTO TIMER appears on screen, press ENTER to set or
change the time. (Note: if you already set the auto timer and
you just want to start it, press START.)
3. Screen shows: TOTAL TIME.
• To input the total amount of time: press ENTER to scroll
forward to hours, minutes, or seconds (press MENU to go
backward).
• Use the ARROW
◄►
buttons to input the amount of
hours, minutes, and seconds. Press ENTER when you
are done.
4. Screen will show AUTO TIMER with the amount of time you
input.
5. Press START to start the timer OR press MENU to return to
digital clock mode.
6. To STOP the timer, press and hold the MENU button.
STARTING THE TIMER
1. Once you have set the timer, press MENU until TIMER or
AUTO TIMER appears on screen.
2. Press the START button to start the timer.
3. To stop the timer at any point, press and hold the MENU
button.
4. While the timer is running, you can press START to display
how much time is remaining in the lit section. Press START
again to return to total time remaining.
USING AN ADAPTER
Important note: When using an adapter (LER 6989, sold
separately at LearningResources.com), unplug the adapter from
the Time Tracker
®
first, before unplugging the adapter from the
wall. Unplugging the adapter from the wall first will reset the
unit and your programming will be lost.
6900 Time Tracker 2.0 GUD NBR.indd 5 9/5/17 12:56 PM
Page 6

6
Use and Care Instructions
3
Do not submerge in water.
3
To clean, wipe gently with a damp, soft cloth.
RESET BUTTON
If the Time Tracker® isn’t working correctly, use the end of
a paper clip or similar small object to push the reset button,
located in the small hole above the adapter jack.
Replacing Batteries
Change the batteries when the sound becomes garbled or slows
down, or when pressing a button does not trigger a response
from the unit.
You will also need to replace the 2 “LR44” back-up batteries
from time to time. These batteries maintain your clock and time
settings should the regular batteries lose power and/or when
you are replacing the regular batteries.
To replace back-up batteries:
The back-up battery compartment is located inside the
battery compartment (under the AAA batteries). Use a small
Phillips screwdriver to turn the screw on the battery door in a
counterclockwise direction to loosen screw. Remove the screw
and open the door. Remove the 2 LR44 batteries. Insert two
new LR44 batteries, being careful to match the + and – ends
of the batteries to the diagram inside the battery compartment.
Replace the battery compartment door and insert the screw.
Tighten the screw by using a small Phillips screwdriver to turn
the screw in a clockwise direction until secure. Do not over
tighten the screw.
IMPORTANT BATTERY INFORMATION
Please read and understand these additional battery usage
instructions.
To ensure proper function:
• Battery installation and replacement should be done by an
adult only.
• Do not mix old and new batteries.
• Do not mix alkaline, standard, or rechargeable batteries.
6900 Time Tracker 2.0 GUD NBR.indd 6 9/5/17 12:56 PM
Page 7

7
• Do not recharge non-rechargeable batteries.
• Remove rechargeable batteries from the product before
charging (if removable).
• Only charge rechargeable batteries under adult supervision (if
removable).
• Only use batteries of the same or equivalent type, as
recommended.
• Insert batteries with the correct polarity.
• Remove exhausted batteries from the product.
• Remove batteries if product is to be inactive for long periods
of time, to avoid leakage.
• Do not short-circuit the supply terminals.
• Replace batteries at the first signs of erratic operation.
WARNING: DO NOT DISPOSE OF BATTERIES IN FIRE.
BATTERIES MAY EXPLODE OR LEAK.
IMPORTANT INFORMATION :
• The toy is not intended for children under 3 years old.
• The toy must only be used with the recommended transformer.
• The toy transformer is not a toy.
• Disconnect toy from transformer before cleaning the toy with liquid.
• Transfomers used with the toy are to be regularly examined for damage
to the chord, plug, enclosure and other parts, and that, in the event of such
damage, the toys must not be used with this transformer until the damage
has been repaired.
MAX. 6V D.C. 300mA
This device complies with Part 15 of the FCC Rules.
Operation is subject to the following two conditions:
(1) This device may not cause harmful interference,
and (2) this device must accept any intereference
received, including intereference that may cause
undesired operation.
6900 Time Tracker 2.0 GUD NBR.indd 7 9/5/17 1:01 PM
Page 8

8
ES
MONITOR DE TIEMPO
®
El monitor de tiempo te ayuda a gestionar el tiempo de una
forma nueva. Se compone de secciones de colores que se
iluminan para dar pistas visuales de cuánto tiempo queda para
completar una tarea. Cada sección representa una cantidad de
tiempo. Puedes programar exactamente cuánto tiempo quieres
que permanezca iluminada cada sección o bien seleccionar
la configuración automática y dejar que el monitor de tiempo
divida el tiempo por ti. Utiliza el monitor de tiempo para
cronometrar pruebas, sesiones prácticas, sesiones de estudio,
experimentos, llamadas de teléfono, discursos o cualquier otra
actividad programada.
INSERTAR LAS PILAS
Necesitarás:
4 pilas AAA
Destornillador de estrella
1. Dale la vuelta al monitor de tiempo. Con un destornillador de
estrella, desatornilla el tornillo de la tapa de las pilas hacia la
izquierda.
2. Quita el tornillo y abre la puerta.
3. Estira de la lengüeta de plástico que sobresale del
compartimento de las pilas de repuesto para activarlas.
4. Inserta cuatro pilas AAA, teniendo cuidado de que coincidan
los extremos + y - de las pilas con el diagrama dentro del
compartimento de las pilas.
5. Cierra la tapa del compartimento y coloca el tornillo.
Atorníllalo con el destornillador de estrella girándolo a la
derecha hasta que se quede fijo. No los aprietes demasiado.
6900 Time Tracker 2.0 GUD NBR.indd 8 9/5/17 1:01 PM
Page 9

9
PRIMEROS PASOS
El monitor de tiempo tiene 3
modos:
RELOJ - Reloj digital
estándar
TEMPORIZADOR Programa
exactamente cuánto
tiempo quieres que
permanezca iluminada
cada sección de color.
TEMPORIZADOR
AUTOMÁTICO -
Programa la cantidad
de tiempo total. Las
secciones de colores
dividirán el tiempo
automáticamente:
la luz verde se
encenderá durante
el 80% del tiempo, la
luz amarilla durante
el 15% y la luz roja
durante el 5%. Por ejemplo, si el tiempo total que se programa es
de 10 minutos, la sección verde permanecerá iluminada durante
8 minutos, la sección amarilla durante 1 minuto y medio, y la
sección roja durante 30 segundos.
Antes de especificar el tiempo, ten en cuenta lo siguiente:
1. Si no pulsas ningún botón durante 30 segundos, el monitor de
tiempo saldrá del modo de programación.
2. Pulsa MENU (Menú) en cualquier momento para volver al paso
anterior.
3. Cuando se programa el monitor de forma manual o con
el temporizador automático, los tiempos se quedarán
programados en la unidad hasta que se modifiquen. Una vez
programado el monitor, se puede ir directamente a START
TIMER (Iniciar temporizador).
4. El monitor emite señales acústicas cuando cambia del verde al
amarillo y al rojo. Baja totalmente el volumen para suprimir el
sonido.
Sección
roja
Sección
amarilla
Sección
verde
Pantalla
Control de
volumen
Altavoz
(parte
trasera)
Adaptador
Flecha
izquierda
Flecha
derecha
Menú
Iniciar
Entrar
Compartimento
de pilas
(parte inferior)
Tecla
Restablecer
(Reset)
6900 Time Tracker 2.0 GUD NBR.indd 9 9/5/17 1:01 PM
Page 10

10
RELOJ
Para poner el RELOJ en hora:
1. Pulsa MENU (Menú) para desplazarte por: CLOCK (Reloj),
TIMER (Temporizador), AUTO TIMER (Temporizador
automático).
2. Cuando CLOCK (Reloj) aparezca en pantalla, pulsa ENTER
(Entrar).
3. Utilice los botones en forma de FLECHA
◄►
para elegir
entre el horario de 12 horas (estándar) y el de 24 horas
(militar); a continuación, pulse ENTER (Entrar).
4. Utilice las FLECHAS
◄►
para ajustar las horas y pulse
ENTER (Entrar).
5. Utiliza las FLECHAS
◄►
para ajustar los minutos y pulsa
ENTER (Entrar). El reloj se pondrá en marcha..
TEMPORIZADOR
Define la cantidad de tiempo exacta que quieres que se ilumine
cada sección.
Para programar el TEMPORIZADOR:
1. Pulsa MENU (Menú) para desplazarte por: CLOCK (Reloj),
TIMER (Temporizador), AUTO TIMER (Temporizador
automático).
2. Cuando TIMER (Temporizador) aparezca en pantalla, pulsa
ENTER (Entrar) para ajustar o modificar el tiempo. (Nota: si
ya has programado el temporizador y solo quieres activarlo,
pulsa START (Iniciar)).
3. En la pantalla se lee: GREEN y la sección verde se iluminará.
• Para indicar la cantidad de tiempo que quieres que se
ilumine la luz verde, pulsa ENTER (Entrar) para desplazarte
por las horas, minutos y segundos (pulsa MENU (Menú) para
ir hacia atrás).
• Utiliza las FLECHAS para especificar las horas, minutos y
segundos. Cuando hayas acabado, pulsa ENTER (Entrar).
4. Repite los pasos para la luz amarilla y la luz roja.
5. En la pantalla se verá TIMER (Temporizador) (con la cantidad
de tiempo que has indicado).
6. Pulsa START (Iniciar) para activar el temporizador O pulsa
MENU (Menú) para volver al modo de reloj digital.
6900 Time Tracker 2.0 GUD NBR.indd 10 9/5/17 1:01 PM
Page 11

11
7. Para DETENER el temporizador, mantén pulsado el botón
MENU (Menú).
TEMPORIZADOR AUTOMÁTICO
Define la cantidad de tiempo total y la luz verde se encenderá
automáticamente durante el 80% de ese tiempo, la luz amarilla
durante el 15% y la luz roja durante el 5%.
Para programar el TEMPORIZADOR
AUTOMÁTICO:
1. Pulsa MENU (Menú); la pantalla se desplaza por las opciones
CLOCK (Reloj), TIMER (Temporizador) y AUTO TIMER
(Temporizador automático).
2. Cuando AUTO TIMER (Temporizador automático) aparezca
en pantalla, pulsa ENTER (Entrar) para ajustar o modificar
el tiempo. (Nota: si ya has programado el temporizador
automático y solo quieres activarlo, pulsa START (Iniciar)).
3. En la pantalla se lee: TOTAL TIME.
• Para definir la cantidad de tiempo total, pulsa ENTER
(Entrar) para desplazarte por las horas, minutos o segundos
(pulsa MENU (Menú) para ir hacia atrás).
• Utiliza las FLECHAS
◄►
para especificar la cantidad de
horas, minutos y segundos. Cuando hayas acabado, pulsa
ENTER (Entrar).
4. En la pantalla se verá AUTO TIMER (Temporizador
automático) con la cantidad de tiempo que has indicado.
5. Pulsa START (Iniciar) para activar el temporizador O pulsa
MENU (Menú) para volver al modo de reloj digital.
6. Para DETENER el temporizador, mantén pulsado el botón
MENU (Menú).
INICIAR EL TEMPORIZADOR
1. Una vez hayas programado el temporizador, pulsa MENU
(Menú) hasta que aparezca en pantalla TIMER (Temporizador)
o AUTO TIMER (Temporizador automático).
2. Pulsa el botón START (Iniciar) para iniciar el temporizador.
3. Para detener el temporizador en cualquier momento, mantén
pulsado el botón MENU (Menú).
4. Mientras el temporizador esté en marcha, puedes pulsar
START (Iniciar) para ver cuánto tiempo queda en la sección
6900 Time Tracker 2.0 GUD NBR.indd 11 9/5/17 1:01 PM
Page 12

12
iluminada. Vuelve a pulsar START (Iniciar) para ver el tiempo
total que queda.
BOTÓN RESET (RESTABLECER)
Si el monitor de tiempo no funciona correctamente, utiliza el
extremo de un clip o un objeto similar para presionar el botón
Reset, situado en un pequeño agujero por encima del conector
adaptador.
USAR UN ADAPTADOR
Observación importante: Al utilizar un adaptador (LER
6989, que se vende por separado en LearningResources.
com), desenchufa el adaptador del monitor de tiempo antes
de desenchufar el adaptador de la pared. Si se desenchufa
primero el adaptador de la pared, la unidad se restablecerá y se
perderán los datos programados.
Instrucciones de uso y cuidado
3 No lo sumerjas en agua.
3 Para limpiar el producto, pasa con cuidado un paño suave y
húmedo.
Sustituir las pilas
Cambia las pilas cuando el sonido se distorsione o ralentice o
cuando la unidad no responda al pulsar un botón.
También hay que sustituir las 2 pilas de repuesto “LR44” de
vez en cuando. Estas pilas mantienen la configuración del reloj
y la hora en caso de que las pilas normales pierdan carga o
mientras las estés sustituyendo.
Para sustituir las pilas de repuesto:
El compartimento de las pilas de repuesto se encuentra dentro
del compartimento de pilas (debajo de las pilas AAA). Con un
destornillador de estrella, desatornilla el tornillo de la tapa de
las pilas hacia la izquierda. Quita el tornillo y abre la puerta.
Quita las 2 pilas LR44. Inserta dos nuevas pilas LR44, teniendo
cuidado de que coincidan los extremos + y - de las pilas con
el diagrama dentro del compartimento de las pilas. Cierra la
tapa del compartimento y coloca el tornillo. Atorníllalo con el
destornillador de estrella girándolo a la derecha hasta que se
quede fijo. No lo aprietes demasiado.
6900 Time Tracker 2.0 GUD NBR.indd 12 9/5/17 1:01 PM
Page 13

13
INFORMACIÓN IMPORTANTE SOBRE LAS
PILAS
Lee detenidamente las siguientes instrucciones adicionales
sobre el uso de las pilas:
Para garantizar su correcto funcionamiento:
• Las pilas las debe colocar y sustituir solamente un adulto.
• No mezcles pilas viejas y nuevas.
• No mezcles pilas alcalinas, estándar o recargables.
• No recargues pilas no recargables.
• Retira las pilas recargables del producto antes de recargarlas
(si se pueden retirar).
• Carga las pilas recargables solo bajo la supervisión de un
adulto (si se pueden retirar).
• Usa solo pilas de la misma clase o equivalentes que las que se
recomiendan.
• Inserta las pilas con la polaridad correcta.
• Retira las pilas gastadas del producto.
• Quita las pilas si no vas a utilizar el producto durante un
tiempo para evitar que pierdan líquido.
• No cortocircuites los terminales de corriente.
• Sustituye las pilas ante las primeras señales de funcionamiento
errático.
INFORMACIÓN IMPORTANTE :
MÁX 6V D.C. 300mA
Este dispositivo cumple con el Apartado 15 de las
Normas FCC. Su funcionamiento está sujeto a las
dos condiciones siguientes: (1) Este dispositivo
no provocará interferencias nocivas, y (2) Este
dispositivo deberá tolerar cualquier interferencia
recibida, incluidas aquellas que pudiesen
provocar un funcionamiento indeseado.
• El juguete no está destinado a niños menores de 3 años.
• El juguete debe utilizarse solamente con el transformador recomendado.
• El transformador de la unidad no es un juguete.
• Desconecta el juguete del transformador antes de limpiar la unidad con líquido.
• Los transformadores que se utilizan con el juguete deben examinarse
periódicamente para detectar posibles daños en el cable, enchufe, caja y demás
partes y, si esto ocurriera, el juguete no debe usarse con este transformador hasta
que los daños se hayan reparado.
6900 Time Tracker 2.0 GUD NBR.indd 13 9/5/17 1:01 PM
Page 14

14
FR
MINUTEUR
Le minuteur aide à gérer le temps d’une nouvelle manière.
Les parties illuminées de couleur différente fournissent
une indication visuelle du temps restant pour terminer une
tâche. Chaque partie représente une portion de temps. Vous
pouvez programmer la durée exacte d’illumination de chaque
partie ou sélectionner le paramètre automatique pour que le
minuteur divise la durée pour vous. Ce minuteur peut servir à
chronométrer les examens, les séances de mise en pratique, les
séances d’étude, les expériences, les appels téléphoniques, les
discours ou toute autre activité chronométrée.
Insérer les piles.
Se munir de :
4 piles AAA
1 tournevis cruciforme
1. Retourner le minuteur. À l’aide du tournevis cruciforme,
tourner la vis du compartiment à piles dans le sens antihoraire pour la dévisser.
2. Retirer la vis et ouvrir le compartiment.
3. Retirer la languette en plastique du compartiment des piles
pour activer les piles de secours.
4. Insérer quatre piles AAA en faisant attention au sens
d’orientation de chaque pile, tel qu’indiqué par le schéma à
l’intérieur du compartiment.
5. Refermer le compartiment des piles et resserrer la vis. À l’aide
du tournevis cruciforme, tourner la vis dans le sens horaire
jusqu’à ce qu’elle soit bien serrée. Ne pas trop serrer la vis.
6900 Time Tracker 2.0 GUD NBR.indd 14 9/5/17 1:01 PM
Page 15

15
POUR COMMENCER
Le minuteur comprend 3
modes :
HORLOGE – Horloge
numérique standard.
MINUTEUR –
Programmez la durée
exacte d’illumination
de chaque partie
colorée.
MINUTEUR AUTO
– Programmez la
durée totale. Les
parties de différente
couleur diviseront
automatiquement
le temps (80 % en
vert, 15 % en jaune
et 5 % en rouge).
Par exemple, si
vous programmez
une durée totale
de 10 minutes, la partie verte s’allumera pendant 8 minutes, la
partie jaune pendant 1 minute 30 et la partie rouge pendant 30
secondes.
Avant de régler la durée, veuillez noter :
1. Si vous n’appuyez pas sur un bouton dans les 30 secondes,
vous quitterez le mode de programmation.
2. Appuyez sur MENU à tout moment pour revenir à l’étape
précédente.
3. Une fois que vous avez réglé le minuteur manuel et/ou
automatique, ces durées resteront programmées dans
l’unité jusqu’à ce que vous les modifiiez. Une fois la durée
programmée, vous pouvez passer directement à START
TIMER (Démarrer le minuteur).
4. Des alertes sonores retentissent lorsque le minuteur passe du
vert au jaune, puis au rouge. Baissez complètement le volume
pour désactiver le son.
Partie
rouge
Partie
jaune
Partie
verte
Écran
Réglage du
volume
Hautparleur (à
l’arrière)
Prise
adaptateur
Flèche de
gauche
Flèche
de droite
Menu
Démarrer
Entrée
Compartiment
des piles
(dessous)
Clé de
réinitialisation
6900 Time Tracker 2.0 GUD NBR.indd 15 9/5/17 1:01 PM
Page 16

16
HORLOGE
Réglage de l’horloge :
1. Appuyez sur MENU pour faire défiler les modes suivants
: CLOCK (HORLOGE), TIMER (MINUTEUR), AUTO TIMER
(MINUTEUR AUTO)
2. Lorsque CLOCK (HORLOGE) apparaît à l’écran, appuyez sur
ENTER (ENTRÉE).
3. Utilisez les FLÈCHES
◄►
pour sélectionner le format 12 h
(standard) ou 24 h (militaire) et appuyez sur ENTER (ENTRÉE).
4. Utilisez les FLÈCHES
◄►
pour régler les heures et appuyez
sur ENTER (ENTRÉE).
5. Utilisez les FLÈCHES
◄►
pour régler les minutes et appuyez
sur ENTER (ENTRÉE). L’horloge se met en marche.
MINUTEUR
(Saisissez la durée exacte pendant laquelle vous voulez que
chaque section de couleur s’allume.)
RÉGLAGE DU MINUTEUR :
1. Appuyez sur MENU pour faire défiler les modes suivants
: CLOCK (HORLOGE), TIMER (MINUTEUR), AUTO TIMER
(MINUTEUR AUTO)
2. Lorsque TIMER (Minuteur) apparaît à l’écran, appuyez sur
ENTER (ENTRÉE) pour régler ou changer la durée. (Remarque
: si vous avez déjà réglé le minuteur et voulez simplement le
démarrer, appuyez sur START (Démarrer)).
3. L’écran affiche : GREEN (VERT) et la partie verte s’allume.
• Pour saisir la durée de votre choix, la partie VERTE doit être
allumée. Appuyez sur ENTER (ENTRÉE) pour faire défiler les
heures, les minutes ou les secondes (appuyez sur MENU pour
revenir en arrière).
• Utilisez les FLÈCHES pour saisir les heures, les minutes et les
secondes. Appuyez sur ENTER (ENTRÉE) lorsque vous avez
terminé.
4. Répétez les étapes ci-dessus pour les lumières jaune et rouge.
5. L’écran affichera TIMER (Minuteur) avec la durée totale saisie.
6. Appuyez sur START (DÉMARRER) pour démarrer le minuteur ou
sur MENU pour revenir au mode horloge numérique.
7. Pour arrêter (STOP) le minuteur, appuyez sur MENU pendant
quelques secondes.
6900 Time Tracker 2.0 GUD NBR.indd 16 9/5/17 1:01 PM
Page 17

17
MINUTEUR AUTO
(Saisissez la durée totale pour que la lumière verte s’allume
automatiquement pendant 80 %, la lumière jaune pendant 15 %
et la lumière rouge pendant 5 % de la durée totale.)
RÉGLAGE DU MINUTEUR AUTO :
1. Appuyez sur MENU, l’écran fait défiler les modes suivants
: CLOCK (HORLOGE), TIMER (MINUTEUR), AUTO TIMER
(MINUTEUR AUTO).
2. Lorsque AUTO TIMER (Minuteur auto) apparaît à l’écran,
appuyez sur ENTER (ENTRÉE) pour régler ou changer la
durée. (Remarque : si vous avez déjà réglé le minuteur
automatique et voulez simplement le démarrer, appuyez sur
START (Démarrer)).
3. L’écran affiche : TOTAL TIME (DURÉE TOTALE).
• Pour saisir la durée totale, appuyez sur ENTER (ENTRÉE)
pour faire défiler les heures, les minutes ou les secondes
(appuyez sur MENU pour revenir en arrière).
• Utilisez les FLÈCHES
◄►
pour saisir le nombre d’heures,
de minutes et de secondes. Appuyez sur ENTER (ENTRÉE)
lorsque vous avez terminé.
4. L’écran affichera AUTO TIMER (MINUTEUR AUTO) avec la
durée saisie.
5. Appuyez sur START (DÉMARRER) pour démarrer le minuteur
ou sur MENU pour revenir au mode horloge numérique.
6. Pour arrêter (STOP) le minuteur, appuyez sur MENU pendant
quelques secondes.
DÉMARRAGE DU MINUTEUR
1. Une fois le minuteur programmé, appuyez sur MENU jusqu’à
ce que TIMER (Minuteur) ou AUTO TIMER (Minuteur auto)
s’affiche à l’écran.
2. Appuyez sur START (Démarrer) pour démarrer le minuteur.
3. Pour arrêter le minuteur à tout moment, appuyez sur MENU
pendant quelques secondes.
4. Lorsque le minuteur est en marche, vous pouvez appuyer
sur START (Démarrer) pour afficher le temps restant dans la
partie allumée. Appuyez à nouveau sur START (Démarrer)
pour retourner à la durée totale restante.
6900 Time Tracker 2.0 GUD NBR.indd 17 9/5/17 1:01 PM
Page 18

18
BOUTON DE RÉINITIALISATION
Si le minuteur ne fonctionne pas correctement, utilisez
l’extrémité d’un trombone ou d’un petit objet similaire pour
appuyer sur le bouton de réinitialisation qui se trouve dans un
petit trou au-dessus de la prise de l’adaptateur.
UTILISATION D’UN ADAPTATEUR
Remarque importante : Lorsque vous utilisez un adaptateur
(LER 6989, vendu séparément sur LearningResources.com),
débranchez l’adaptateur du minuteur avant de débrancher la
prise de l’adaptateur de la prise murale. Le fait de débrancher
l’adaptateur de la prise murale en premier lieu aura pour
effet de réinitialiser le minuteur et de supprimer votre
programmation.
MODE D’EMPLOI ET D’ENTRETIEN
3 Ne pas immerger dans l’eau.
3 Nettoyer délicatement à l’aide d’un chiffon doux humide.
REMPLACEMENT DES PILES
Changez les piles lorsque les alertes sonores sont déformées
ou ralentissent ou lorsque vous n’obtenez pas de réponse de
l’appareil lorsque vous appuyez sur un bouton.
Vous devrez aussi régulièrement remplacer les deux piles de
secours LR44. Ces piles permettent de conserver les réglages
de l’horloge et du minuteur en cas de perte de puissance et/ou
du changement des piles principales.
Remplacement des piles de secours
Le compartiment des piles de secours se trouve à l’intérieur du
compartiment des piles (sous les piles AAA). À l’aide d’un petit
tournevis cruciforme, tourner la vis du compartiment des piles
dans le sens anti-horaire pour la dévisser. Retirer la vis et ouvrir
le compartiment. Retirer les deux piles LR44. Insérer deux
piles LR44 neuves en faisant attention au sens d’orientation
de chaque pile, tel qu’indiqué par le schéma à l’intérieur du
compartiment. Refermer le compartiment des piles et resserrer
la vis. À l’aide d’un petit tournevis cruciforme, tourner la vis
dans le sens horaire jusqu’à ce qu’elle soit bien serrée. Ne pas
trop serrer la vis.
6900 Time Tracker 2.0 GUD NBR.indd 18 9/5/17 1:01 PM
Page 19

19
INFORMATIONS IMPORTANTES SUR LES PILES
Veuillez lire et comprendre les instructions supplémentaires
suivantes concernant les piles.
Afin de garantir le bon fonctionnement de l’appareil :
• L’installation et le remplacement des piles doivent être réalisés
par un adulte.
• Ne pas mélanger les piles neuves et usagées.
• Ne pas mélanger les piles alcalines, standard ou rechargeables.
• Ne pas recharger les piles non rechargeables.
• Retirer les piles rechargeables du produit avant de les charger
(le cas échéant).
• Charger uniquement les piles rechargeables sous la
supervision d’un adulte (le cas échéant).
• Utiliser uniquement des piles du même type, ou de type
équivalent, recommandé.
• Insérer les piles en respectant la polarité.
• Retirer les piles usagées de l’appareil.
• Retirer les piles si l’appareil ne doit pas être utilisé pendant de
longues périodes de temps afin d’éviter toute fuite.
• Ne pas court-circuiter les bornes d’alimentation.
• Remplacer les piles aux premiers signes de
dysfonctionnement.
AVERTISSEMENT : NE PAS EXPOSER LES PILES AU FEU. LES
PILES PEUVENT EXPLOSER OU FUIR.
« Ce dispositif est conforme aux règlements FCC
Partie 15. Le fonctionnement est soumis aux deux
conditions suivantes : (1) ce dispositif ne devra
pas donner lieu à une interférence nuisible, et
(2) ce dispositif devra accepter toute interférence
reçue y compris toute interférence qui pourrait
donner lieu à un fonctionnement non voulu »
IMPORT
ANTES INFORMATIONS :
MAX. 6V D.C. 300mA
• Ce jouet n’est pas conçu pour les enfants de moins de 3 ans.
• Ce jouet doit uniquement être utilisé avec le transformateur recommandé.
• Le transformateur n’est pas un jouet.
• Débrancher le jouet du transformateur avant de le nettoyer avec un liquide.
• Les transformateurs utilisés avec le jouet doivent être régulièrement examinés an
de détecter tout dégât du cordon, de la prise, du boîtier et d’autres parties. En cas
de présence de composants endommagés, le jouet ne doit pas être utilisé avec le
transformateur en question tant que les dégâts n’ont pas été réparés.
6900 Time Tracker 2.0 GUD NBR.indd 19 9/5/17 1:02 PM
Page 20

20
DE
ZEITAMPEL
®
Mit der Zeitampel können Sie die Zeit jetzt auf ganz neue Weise
planen Die beleuchteten, bunten Abschnitte zeigen visuell an,
wie viel Zeit für eine Aufgabe noch verbleibt. Jeder Abschnitt
stellt einen Zeitraum dar. Sie können präzise programmieren, wie
lange jeder Abschnitt beleuchtet bleiben soll. Oder Sie wählen
die Automatik-Einstellung aus, und die Zeitampel teilt die Zeit
automatisch für Sie ein. Verwenden Sie die Zeitampel, um die Zeit
für einen Test, eine Übung, einen Lernabschnitt, für Experimente,
einen Telefonanruf, eine Ansprache oder andere zeitlich
begrenzte Aktivitäten zu stoppen.
BATTERIEN EINSETZEN
Was Sie benötigen:
4 AAA-Batterien
Kreuzschlitzschraubendreher
1.
Stellen Sie die Zeitampel auf den Kopf. Verwenden Sie den
Kreuzschlitzschraubendreher, um das Batteriefach zu öffnen. Die
Schraube muss gegen den Uhrzeigersinn herausgedreht werden.
2.
Nehmen Sie die lockere Schraube heraus und öffnen Sie das
Batteriefach.
3.
Ziehen Sie die transparente Lasche heraus, die aus dem
Pufferbatterie-Fach herausschaut. Damit machen Sie die
Pufferbatterien einsatzbereit.
4.
Geben Sie die vier AAA-Batterien in das Batteriefach. Achten
Sie darauf, dass die Batterien richtig eingelegt werden („+“ und
„-“ auf den Batterien müssen mit der Abbildung im Batteriefach
übereinstimmen).
5.
Setzen Sie die Abdeckung wieder auf das Batteriefach und
legen Sie die Schraube ein. Schrauben Sie die Schraube mit dem
Kreuzschlitzschraubendreher im Uhrzeigersinn zu, bis sie wieder
fest sitzt. Ziehen Sie die Schraube nicht zu stark an.
6900 Time Tracker 2.0 GUD NBR.indd 20 9/5/17 1:02 PM
Page 21

21
ERSTE SCHRITTE
Die Zeitampel verfügt
über 3 Modi:
UHR
Herkömmliche Digitaluhr
TIMER
Hier programmieren
Sie die genaue
Dauer, die jeder
bunte Abschnitt
leuchten soll
AUTO TIMER
AUTOTIMER
Programmieren Sie
die Gesamtdauer.
Sie wird dann
automatisch wie
folgt auf die bunten
Abschnitte verteilt:
80 % Grün, 15 %
Gelb und 5 %
Rot. Wenn Sie
beispielsweise
Ihre Gesamtdauer mit 10 Minuten eingeben, bleibt der grüne
Abschnitt 8 Minuten lang, der gelbe Abschnitt 1 Minute und
30 Sekunden lang und der rote Abschnitt 30 Sekunden lang
beleuchtet.
Bitte vor Einstellung einer Dauer Folgendes beachten:
1. Wird eine Taste nicht innerhalb von 30 Sekunden betätigt,
verlassen Sie automatisch den Programmiermodus.
2. Um einen Schritt zurückzugehen, drücken Sie in einem
beliebigen Modus auf MENU (Menü).
3. Nach der Einstellung von Manual (manuell) und/oder Auto
timer (Auto-Timer) bleibt die Programmierung so lange
gespeichert, bis Sie eine Änderung vornehmen. Nach der
Programmierung können Sie direkt START TIMER (Timer
starten) anwählen.
4. Beim Wechseln des Timers von Grün nach Gelb und
dann nach Rot ertönt jeweils ein akustisches Signal. Zum
Stummstellen die Lautstärke ganz herunterdrehen.
Roter
Abschnitt
Gelber
Abschnitt
Grüner
Abschnitt
Display
Anzeige
Lautstärkeregler
Lautsprecher
(rückseitig)
Adapterstecker
Pfeil
links
Pfeil
rechts
Menü
Start
Eingabe
Rückstelltaste
Batteriefach
(am Boden)
6900 Time Tracker 2.0 GUD NBR.indd 21 9/5/17 1:02 PM
Page 22

22
UHR
DIE UHR EINSTELLEN:
1. MENU (Menü) drücken und blättern: CLOCK (Uhr), TIMER,
AUTO TIMER (Auto-Timer)
2. Wenn am Bildschirm CLOCK (Uhr) erscheint, drücken Sie
ENTER (Eingabe).
3. Mit den PFEIL-Tasten
◄►
zwischen 12 (Standard) oder
24 hin- und herwechseln, dann ENTER (Eingabe) drücken
4. Mit den PFEIL-Tasten
◄►
die Stunden einstellen, dann
ENTER (Eingabe) drücken.
5. Mit den PFEIL-Tasten
◄►
die Minuten einstellen, dann
ENTER (Eingabe) drücken. Die Uhr läuft.
TIMER
(Geben Sie die genaue Zeitdauer ein, zu der die einzelnen
bunten Abschnitte leuchten sollen.)
DEN TIMER EINSTELLEN:
1. MENU (Menü) drücken und blättern: CLOCK (Uhr), TIMER,
AUTO TIMER (Auto-Timer).
2. Wenn am Bildschirm TIMER erscheint, drücken Sie ENTER
(Eingabe), um die Dauer einzustellen oder zu ändern.
(Hinweis: Falls Sie den Timer bereits eingestellt haben und
ihn nur starten wollen, drücken Sie START.)
3. Der Bildschirm zeigt an: GREEN (Grün), und der grüne
Abschnitt leuchtet auf.
• Zur Eingabe der Dauer, die GRÜN leuchten soll, gehen Sie
wie folgt vor: Drücken Sie ENTER (Eingabe) und blättern Sie
zu den Stunden, Minuten oder Sekunden vor (MENU (Menü)
drücken, um einen Schritt zurückzugehen).
• Mit den PFEIL-Tasten die Stunden, Minuten und Sekunden
eingeben. ENTER (Eingabe) drücken, wenn Sie fertig sind.
4. Die obigen Schritte für das gelbe (YELLOW) und rote (RED)
Lämpchen wiederholen.
5. Der Bildschirm zeigt TIMER mit der von Ihnen eingegebenen
Gesamtdauer an.
6. START drücken, um den Timer zu starten. ODER auf MENU
(Menü) drücken, um zum Digitaluhr-Modus zurückzukehren.
7. Timer STOPPEN: MENU (Menü)-Taste gedrückt halten.
6900 Time Tracker 2.0 GUD NBR.indd 22 9/5/17 1:02 PM
Page 23

23
AUTO TIMER AUTOTIMER
Geben Sie die Gesamtdauer ein. Das grüne Lämpchen leuchtet
dann automatisch für 80 %, das gelbe Lämpchen für 15 % und
das rote Lämpchen für 5 % dieser Dauer.
AUTO TIMER AUTOTIMER EINSTELLEN:
1. MENU (Menü) drücken: Auf dem Bildschirm durch CLOCK
(Uhr), TIMER, AUTO TIMER (Auto-Timer) blättern
2. Wenn am Bildschirm AUTO TIMER (Auto-Timer) erscheint,
drücken Sie ENTER (Eingabe), um die Dauer einzustellen oder
zu ändern. (Hinweis: Falls Sie den Auto timer (Auto-Timer)
bereits eingestellt haben und ihn nur starten wollen, drücken
Sie START.)
3. Der Bildschirm zeigt an: TOTAL TIME (Gesamtdauer)
• Für die Eingabe der Gesamtdauer ENTER (Eingabe) drücken,
um zu Stunden, Minuten oder Sekunden vorwärts zu
blättern (zum Rückwärtsblättern auf MENU (Menü) drücken).
• Mit den PFEIL-Tasten
◄►
die Dauer der Stunden, Minuten
und Sekunden eingeben. ENTER (Eingabe) drücken, wenn
Sie fertig sind.
4. Der Bildschirm zeigt AUTO TIMER (Auto-Timer) mit der von
Ihnen eingegebenen Dauer an.
5. START drücken, um den Timer zu starten. ODER auf MENU
(Menü) drücken, um zum Digitaluhr-Modus zurückzukehren.
6. Timer STOPPEN: MENU (Menü)-Taste gedrückt halten.
TIMER STARTEN
1. Sobald Sie den Timer eingestellt haben, drücken Sie MENU
(Menü), bis auf dem Bildschirm TIMER oder AUTO TIMER
(Auto-Timer) erscheint.
2. Drücken Sie die START-Taste, um den Timer zu starten.
3. Den Timer stoppen Sie zu einem beliebigen Zeitpunkt, indem
Sie die MENU (Menü)-Taste gedrückt halten.
4. Solange der Timer läuft, können Sie START drücken, um
zu sehen, wie viel Zeit im beleuchteten Abschnitt verbleibt.
Wenn Sie START erneut drücken, sehen Sie die verbleibende
Gesamtdauer.
6900 Time Tracker 2.0 GUD NBR.indd 23 9/5/17 1:02 PM
Page 24

24
RÜCKSTELLTASTE
Falls die Zeitampel nicht ordnungsgemäß funktioniert,
verwenden Sie das Ende einer Büroklammer oder einen ähnlich
kleinen Gegenstand, um die Rückstelltaste zu drücken, die
sich in einer kleinen Vertiefung oberhalb des Adaptersteckers
befindet.
VERWENDUNG EINES ADAPTERS:
Wichtiger Hinweis: Wenn Sie einen Adapter verwenden (LER
6989, separat erhältlich auf LearningResources.com), ziehen
Sie zuerst den Adapter aus der Zeitampel und anschließend
erst aus Steckdose heraus. Wird der Adapter zuerst aus der
Steckdose gezogen, setzen Sie das Gerät zurück und löschen
Ihre Programmmiereingaben.
Anleitung zur Verwendung und Pflege:
3 Nicht in Wasser tauchen.
3 Zum Reinigen das Gerät mit einem angefeuchteten, weichen
Tuch leicht abwischen.
Batterien wechseln:
Wechseln Sie die Batterien, sobald das akustische Signal
verschwommen klingt oder leiert, oder wenn das Gerät auf
Tastendruck nicht reagiert.
Sie müssen ab und zu zusätzlich die beiden „LR44“Pufferbatterien wechseln. Diese Batterien speichern Ihre Uhrund Zeitdauereinstellungen, falls die Hauptbatterien leer bzw.
während sie gewechselt werden.
Pufferbatterien wechseln:
Das Pufferbatterien-Fach befindet sich innerhalb des
Batteriefachs (unter den AAA-Batterien). Verwenden Sie einen
kleinen Kreuzschlitzschraubendreher, um das Batteriefach
zu öffnen. Die Schraube muss gegen den Uhrzeigersinn
herausgedreht werden. Nehmen Sie die lockere Schraube
heraus und öffnen Sie das Batteriefach. Beide 2 LR44-Batterien
herausnehmen. Legen Sie zwei neue LR44-Batterien in das
Batteriefach ein. Achten Sie darauf, dass die Batterien richtig
eingelegt werden („+“ und „-“ auf den Batterien müssen mit
der Abbildung im Batteriefach übereinstimmen). Setzen Sie
6900 Time Tracker 2.0 GUD NBR.indd 24 9/5/17 1:02 PM
Page 25

25
die Abdeckung wieder auf das Batteriefach und legen Sie die
Schraube ein. Schrauben Sie die Schraube mit einem kleinen
Kreuzschlitzschraubendreher im Uhrzeigersinn ein, bis sie
wieder festsitzt. Ziehen Sie die Schraube nicht zu stark an.
WICHTIGE BATTERIEINFORMATIONEN
Lesen Sie sich bitte diese zusätzlichen Hinweise zur
Verwendung von Batterien gut durch.
Um eine ordnungsgemäße Funktion zu gewährleisten, sollten Sie
Folgendes beachten:
• Das Einlegen und Wechseln von Batterien sollte ausschließlich
von einem Erwachsenen vorgenommen werden.
• Nicht alte und neue Batterien zusammen verwenden.
• Nicht Alkaline-, herkömmliche und wiederaufladbare Batterien
zusammen verwenden.
• Nicht versuchen, nichtaufladbare Batterien aufzuladen.
• Wiederaufladbare Batterien vor dem Aufladen aus dem Produkt
entnehmen (falls herausnehmbar).
• Wiederaufladbare Batterien nur unter Aufsicht Erwachsener
aufladen (falls herausnehmbar).
• Nur Batterien desselben oder eines geeigneten Typs verwenden.
• Beim Einsetzen der Batterien auf die richtige Ausrichtung der
Pole achten.
• Verbrauchte Batterien aus dem Produkt entfernen.
• Falls das Gerät für längere Zeit nicht im Gebrauch sein wird,
sollten die Batterien entfernt werden, um ein Auslaufen zu
vermeiden.
• Anschlüsse nicht kurzschließen.
• Batterien wechseln, sobald erste Anzeichen einer
unregelmäßigen Funktion auftreten.
WARNHINWEIS: BATTERIEN ZUM ENTSORGEN NICHT VERBRENNEN.
DIE BATTERIEN KÖNNTEN EXPLODIEREN ODER AUSLAUFEN.
6900 Time Tracker 2.0 GUD NBR.indd 25 9/5/17 1:02 PM
Page 26

26
WICHTIGE INFORMATIONEN :
MAX. 6V D.C. 300mA
Das Produkt entspricht dem Teil 15 der FCC-
Richtlinien. Der Betrieb erfolgt vorbehaltlich der
folgenden Bedingungen: (1) Dieses Gerät darf
keine gefährliche Interferenz verursachen und
(2) dieses Gerät muss jede empfangene Interferenz
akzeptieren, auch Interferenzen, die gegebenenfalls
unerwünschten Betrieb verursachen können.
• Dieses Spielzeug ist nicht geeignet für Kinder unter 3 Jahren.
• Das Spielzeug darf nur zusammen mit dem empfohlenen Transformator verwendet
werden.
• Der Transformator für dieses Spielzeug ist kein Spielzeug.
• Trennen Sie das Spielzeug vor der Reinigung mit Flüssigkeiten vom Transformator.
• Alle mit dem Spielzeug in Gebrauch bendlichen Transformatoren müssen
regelmäßig auf Beschädigungen an Kabel, Stecker, Gehäuse und sonstigen
Bauteilen überprüft werden. Im Falle einer solchen Beschädigung darf das
Spielzeug bis zum Beheben dieses Schadens nicht mehr mit diesem Transformator
verwendet werden.
6900 Time Tracker 2.0 GUD NBR.indd 26 9/5/17 1:02 PM
Page 27

6900 Time Tracker 2.0 GUD NBR.indd 27 9/5/17 1:02 PM
Page 28

© Learning Resources, Inc., Vernon Hills, IL, US
Learning Resources Ltd., Bergen Way,
King’s Lynn, Norfolk, PE30 2JG, UK
Please retain the package for future reference.
Made in China. LRM6900-GUD
Hecho en China. Conserva el envase para
futuras consultas.
Fabriqué en Chine. Veuillez conserver
l’emballage.
Hergestellt in China. Bitte Verpackung gut
aufbewahren.
Time Tracker
Visual Timer and Clock
Monitor de tiempo • Minuteur • Zeitampel
Learn more about our products
at LearningResources.com
6900 Time Tracker 2.0 GUD NBR.indd 1 9/5/17 12:56 PM
 Loading...