

Page 1
LER 9199
™
Instructions / Mode d’emploi / Anleitung / Instrucciones
LER 9199 — Dizzy Fun Land
!
WARNING:
CHOKING HAZARD -
Not for children under 3 years.
Small parts.
DANGER DE SUFFOCATION.
pièces. Pas pour les enfants en dessous de 3 ans.
ERSTICKUNGSGEFAHR.
Nicht geeignet für Kinder unter 3 Jahren.
PELIGRO DE AHOGO.
No recomendado para niños menores de 3 años.
RISCHIO DI SOFFOCAMENTO.
pezzi piccoli. Non adatto ai bambini di età inferiore ai 3 anni.
Petites
Kleine Teile.
Partes pequeñas.
Contiene
© Learning Resources, Inc., Vernon Hills, IL (U.S.A.)
Learning Resources, Ltd., King’s Lynn, Norfolk (U.K.)
Please retain our address for future reference.
Made in Korea
© Learning Resources, Inc., Vernon Hills, IL 60061 (USA)
Page 2
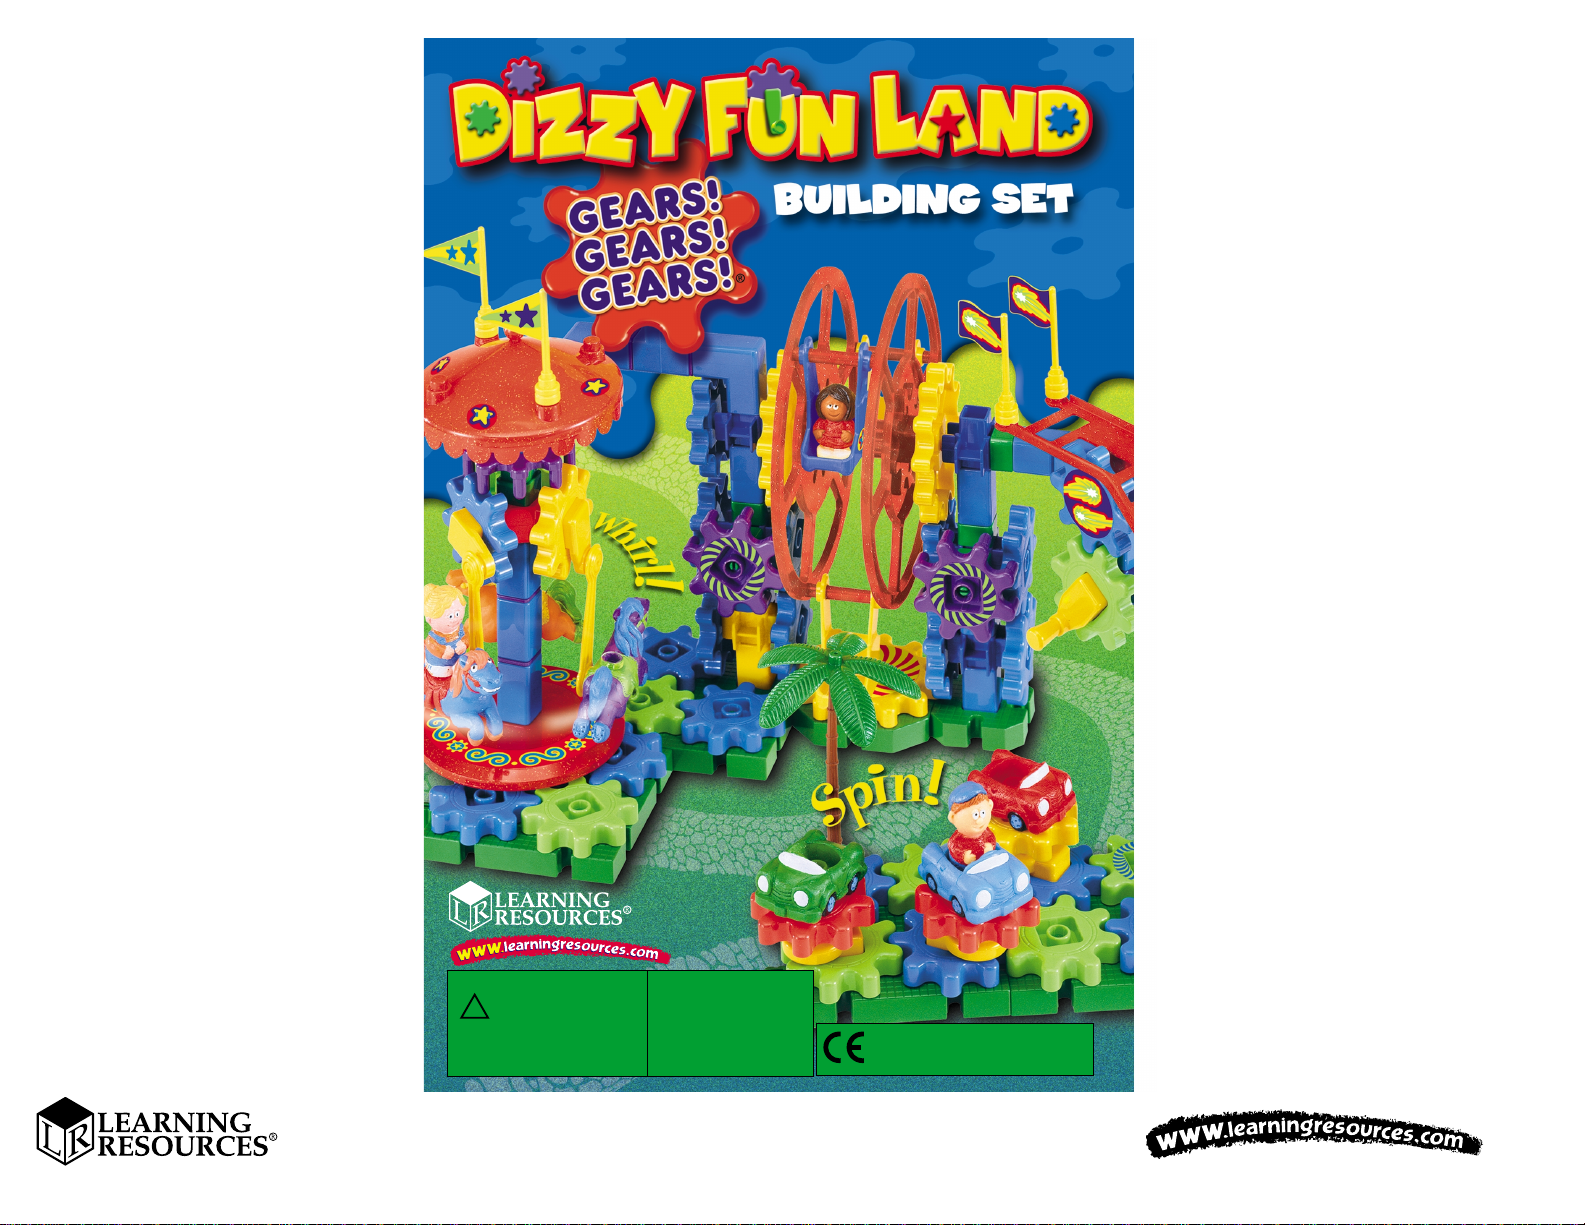
There’s no waiting in lines at this amusement park! Build the rides
shown in this guide or make your own custom creations! There is no
wrong way to build. Just follow these instructions to help you get
star te d.
Note: Before you begin, make sure you have 2 new "AA" batteries in
the motor’s re d hand control. See the last page in this guide for more
information on proper battery ca re.
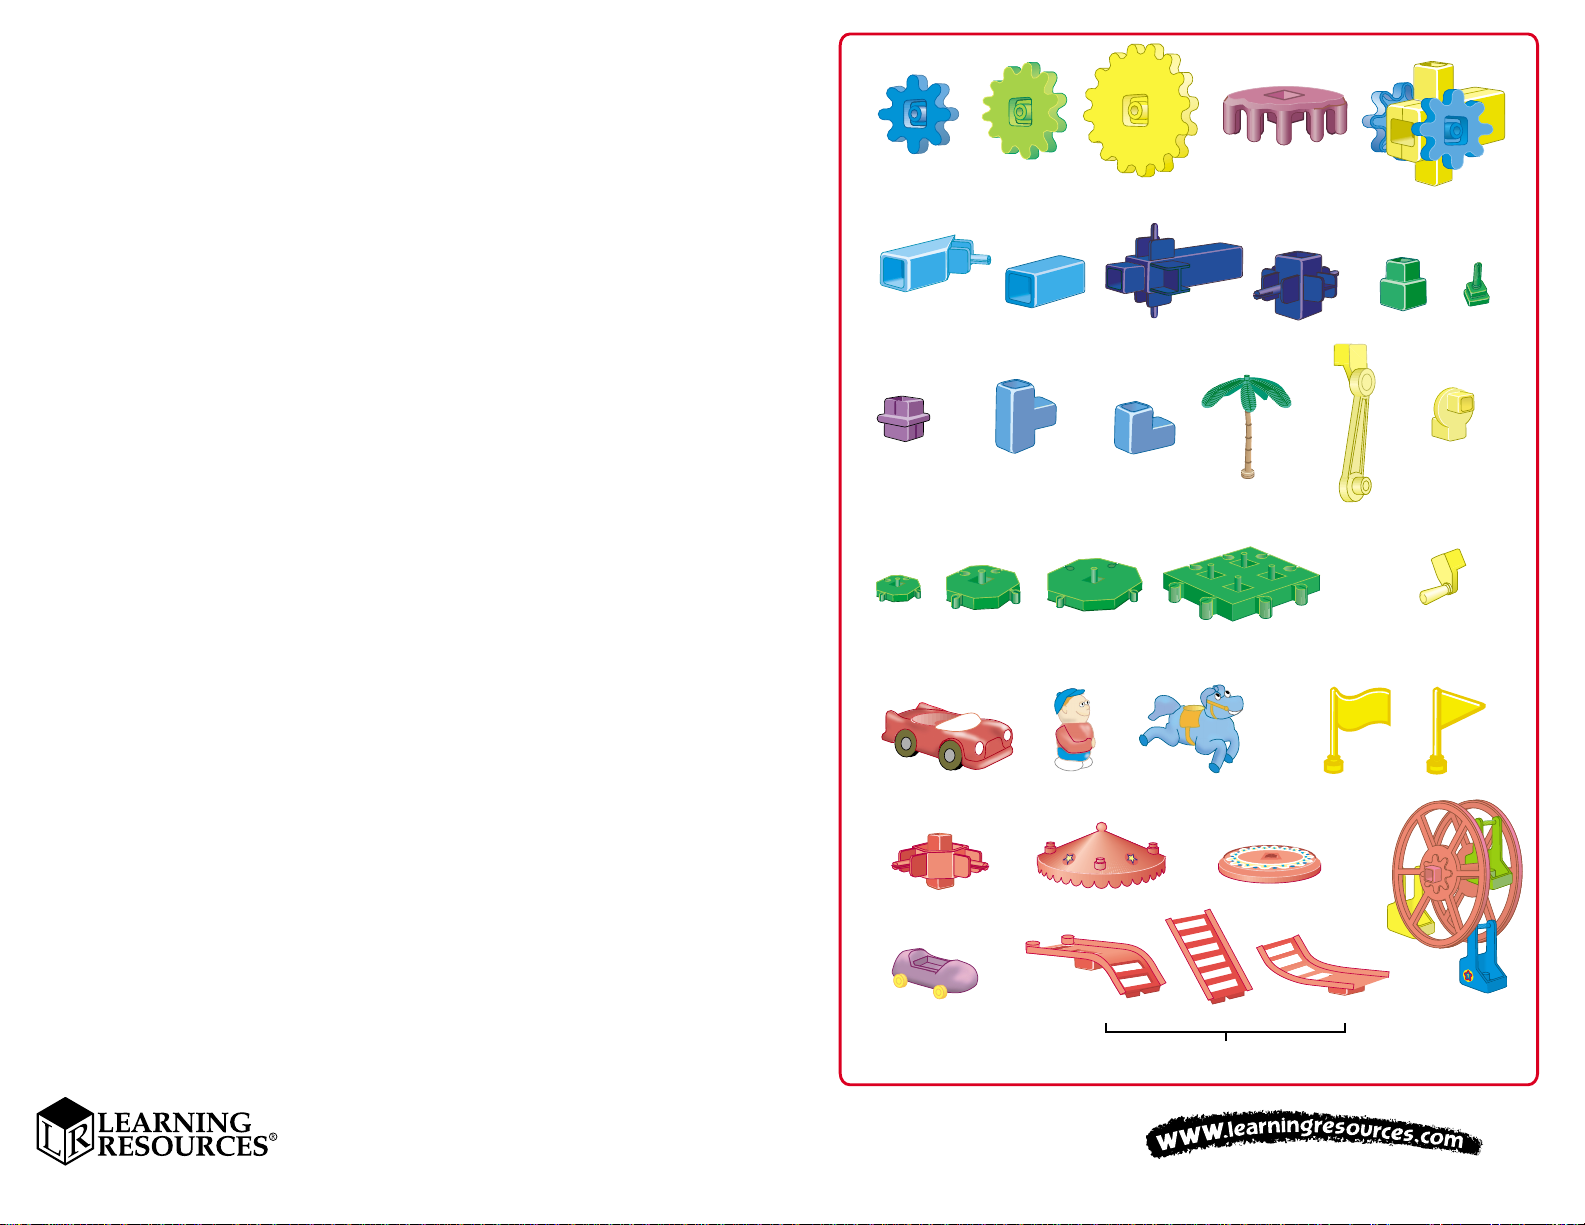
*Small Gear (24)
*Medium Gear (2)
Large Gear (3)
Crown Gear (1)
Motor (1)
¡No hay que espera r en colas en este parque de diversiones! ¡Construya
los recor r idos que aparecen en esta guía o haga sus propias creaciones
especiales! No hay ningún modo de crear que sea incorrecto. Sólo
tendrá que seguir estas instrucciones como ayuda para ponerse en
marcha.
Nota: Antes de comenzar, asegúr ese de que tiene dos baterías "AA"
nuevas en el control de mano derecha del motor. Vea la última página
de esta guía para obtener más información sobre el cuidado adecuado
de las baterías.
Kein Warten in langen Schlangen bei diesem Vergnügungspark! Bauen
Sie die in dieser Anleitung gezeigten Bahnen o der entwerfen Sie Ihre
eigenen Kreationen! Es gibt keine falschen Aufbauideen. Befolgen Sie
als Starthilfe einfach die Anleitungen.
Hinweis: Bevor Sie anfangen, vergewissern Sie sich, dass zwei neue
„AA" Batterien in der roten Handsteuerung des Motors eingebaut sind.
Auf der letzten Seite dieser Anleitungen finden Sie zusätzliche
Informationen zur Batteriepflege.
Aucun besoin de faire la queue pour ce parc d'attractions. Construis les
manèges présentés dans ce guide ou tes propres créations ! Il n'y a pas
de mauvaise façon de construir e le manège. Tu n'as qu'à suivre ces
instructions pour t'aider au début.
34° Angle Pillar (1)
Pillar
Connector (8)
Small
Base (4)
Bumper Cars (3)
5 Way Axle (1)
Pillar (5)
T-Connector (2)
Medium
Base (1)
Pillar Axle (7)
L-Connector (2)
Large
Base (1)
Kids (4)
*Merry-Go-Round top (1)
Carousel
Horses (3)
6 Way Axle (1)
Palm T ree (2)
Large Square Base (3)
*Merry-Go-Round base (1)
Arm Crank (3)
1
/2 Pillar (14)
(2)
*Flags
Peg (6)
Bumper Car
Holder (3)
Crank Handle (1)
(2)
Note : Avant de commencer, assure-toi d'avoir 2 nouvelles piles ‘AA’
dans le contrôle manuel rouge du moteur. Consulte la dernière page du
guide pour plus d'information sur l'entretien des piles.
*Roller Coaster Car (1)
1 Sheet of Stickers * Stickers are applied to these pieces. See front of box for placement.
Top (1)
Middle (1)
Roller Coaster Track
Bottom (1)
*Ferris Wheel (1)
LER 9199 — Dizzy Fun Land © Learning Resources, Inc., Vernon Hills, IL 60061 (USA)
Page 3
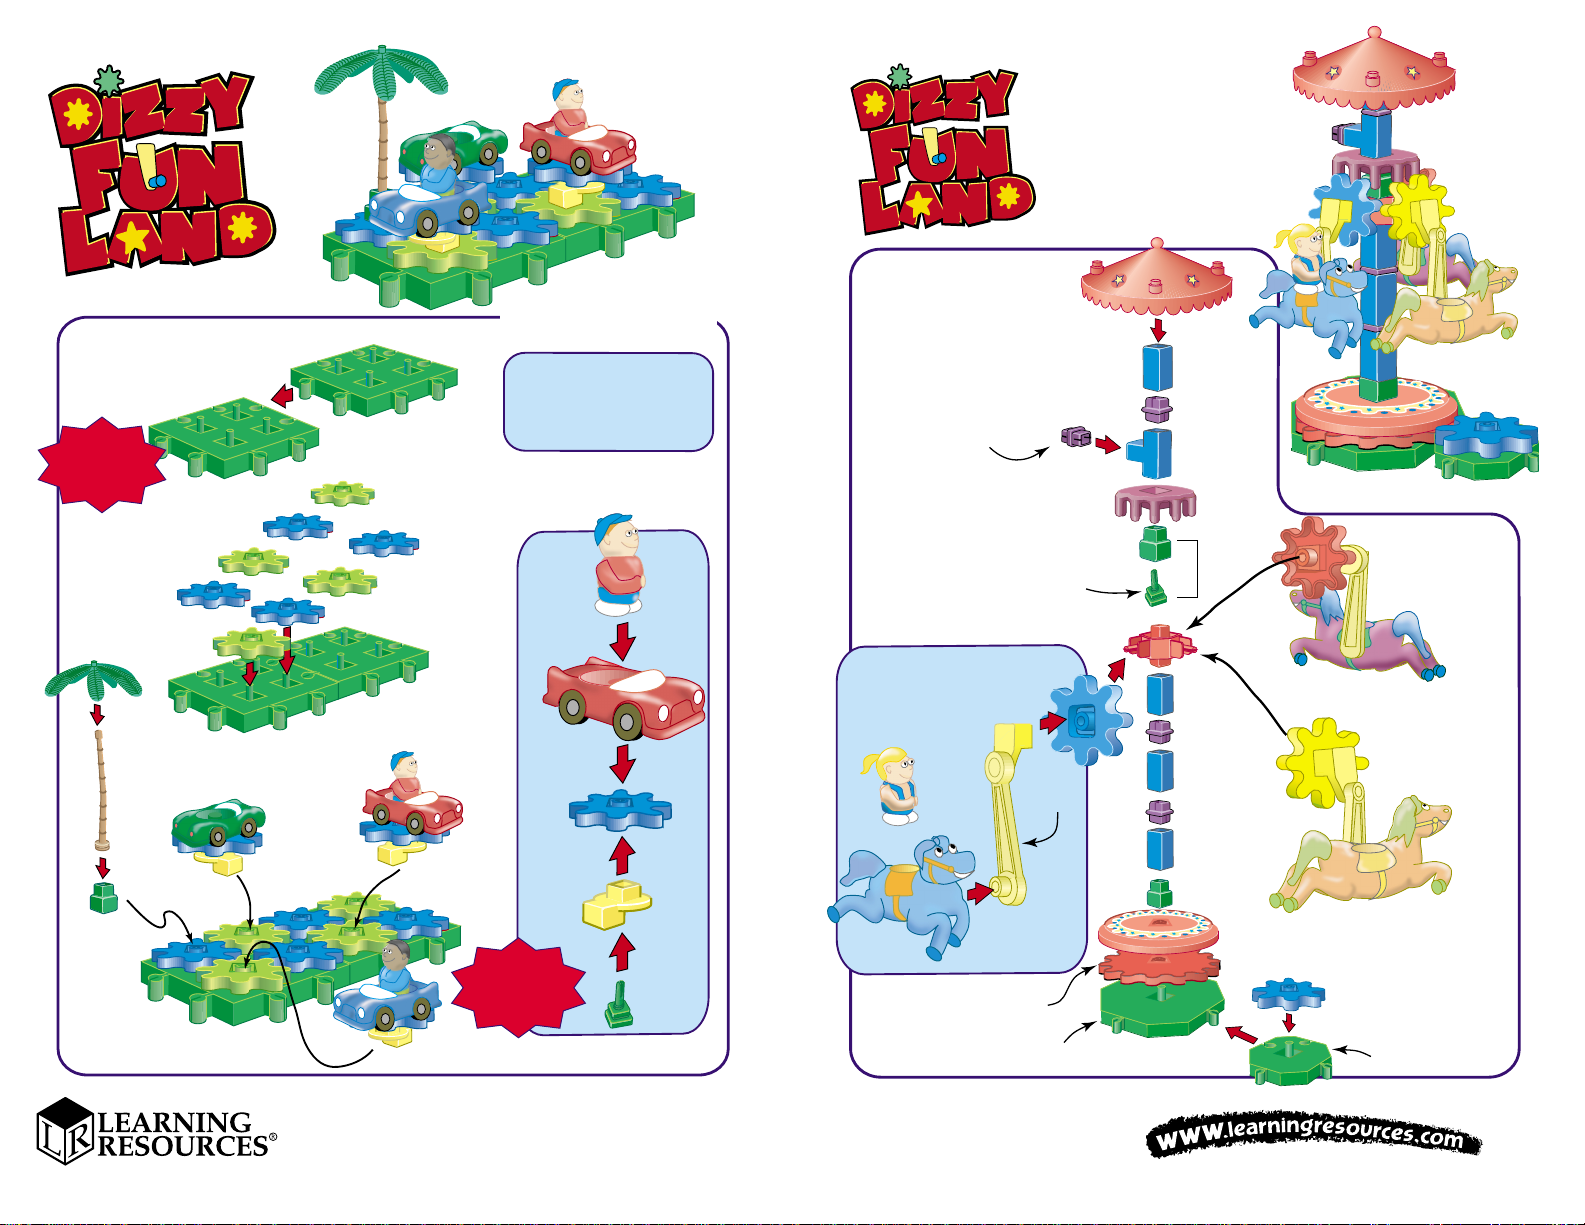
MERRY - GO - ROUND
MERRY - GO - ROUND
TM
TM
STEP 1
Build a tower
BUMPER CARS
BUMPER CARS
to hold the horses.
STEP 1
Join two square bases.
Building Hint:
Try to build from
the base up.
STEP 2
Add eight small gears.
STEP 4
Put the cars on
the gears.
DIZZY FUN LAND is built
in sections. The completed
rides will be joined
together in the last steps.
STEP 3
Build three cars.
You can
add drivers
too.
The Ferris wheel
will attach here.
STEP 2
Build three carousel
horses with gears.
Add a rider
Snap a peg
1
inside
above.
Arm crank
/2 pillar
(Step 2)
(Step 2)
Small gear
Small base
STEP 5
Put a palm tree on the last gear.
It will turn as the cars go around.
Building Hint:
Always snap a
peg into place.
All the cars gears should move together.
You have finished the first ride.
Large gear
Large base
LER 9199 — Dizzy Fun Land © Learning Resources, Inc., Vernon Hills, IL 60061 (USA)
Page 4

STEP 1
FERRIS WHEEL
Build this support on
the base. The motor
should turn this gear
and the three gears
on the base.
The merry-go-round
will connect here.
Add a medium
gear to the side pin.
M
T
FERRIS WHEEL
FERRIS WHEEL
STEP 2
Add two large gears
to the Ferris wheel
motor
.
Put three small gears
on a square base.
STEP 3
Attach this side of the Ferris
wheel to the support you
built in Step 1.
STEP 4
Add a medium gear
and medium base.
STEP 6
Attach the center of the
other side of the Ferris
wheel to this pin.
STEP 7
Attach this small base
to the medium base.
STEP 5
Build this support
for the other side
of the Ferris wheel.
LER 9199 — Dizzy Fun Land © Learning Resources, Inc., Vernon Hills, IL 60061 (USA)
Page 5

TM
ROLLER COASTER
ROLLER COASTER
PUT ALL THE SECTIONS TOGETHER
PUT ALL THE SECTIONS TOGETHER
TM
Join the Ferris wheel
and roller coaster track
to the merry-go-round.
STEP 1
Build the support for
the top of the roller
coaster track.
STEP 2
Add two small gears
and a hand crank.
STEP 3
Build the track
.
base
STEP 5
Add two flags
STEP 6
Attach the
.
support
Next add the
The two bases join
together here.
Put a car and
driver on
STEP 4
Build the roller
.
coaster track
.
Add flags to
the top of the
merry-go-round
roller
and
coaster.
the top.
Turning the
crank will
release the
car and driver!
bumper cars.
STEP 7
STEP 8
Attach the
track support
to the Ferris
.
wheel
LER 9199 — Dizzy Fun Land © Learning Resources, Inc., Vernon Hills, IL 60061 (USA)
Attach the track base
to the bottom of the
roller coaster
track.
You've done it!
The Dizzy Fun Land
is now complete.
Page 6

Now use the pieces from
your Dizzy Fun Land
Amusement Park to
build the following models
one at a time.
STEP 3
Build a pair of wheels
using large gears.
DIZZY ROLLER
DIZZY ROLLER
STEP 1
Start by building
a support.
Put a small
gear on outside.
STEP 4
Add four small gears
to each side. Add handle
to one gear as shown.
Snap a peg
inside this part.
wheel
Small gear
STEP 5
STEP 2
Place the support on
the motor and add more
pieces to the front.
LER 9199 — Dizzy Fun Land © Learning Resources, Inc., Vernon Hills, IL 60061 (USA)
Attach the wheels to
each side of the motor.
wheel
Page 7

STEP 5
DIZZY ROBOT
Add an extra gear
to the motor in front.
STEP 6
Attach three
gears to each leg.
STEP 3
Add arm cranks
to each legs.
STEP 1
Start by building
a pair of legs.
STEP 4
Join the legs
together with the
motor in the middle.
STEP 2
Add two flags
to the top of
the legs.
STEP 7
Add six more gears to the back,
three on each leg.
DIZZY ROBOT
DIZZY ROBOT
STEP 8
Build the head.
STEP 9
Put a small gear
on the back of
the head.
STEP 10
Attach merry-go-round base,
1
/
2
pillar and medium
peg,
The motor should
turn all the gears.
LER 9199 — Dizzy Fun Land © Learning Resources, Inc., Vernon Hills, IL 60061 (USA)
gears to the extra gear on
the front of the motor.
Page 8

DIZZY
SWINGING CARS
STEP 1
Build a square
frame with pillar
axles and a motor.
STEP 3
Add seven small gears to
the top of the frame so that
it looks like this.
STEP 2
Add four legs
using blue pillars.
DIZZY
DIZZY
SWINGING CARS
SWINGING CARS
STEP 4
Make three cars
with drivers on
small gears and
arm cranks.
Motor
STEP 5
Attach arm cranks
on the bottom of the
cars to the gear base
as shown here.
LER 9199 — Dizzy Fun Land © Learning Resources, Inc., Vernon Hills, IL 60061 (USA)
Turn on the motor for
dizzy swinging car action
.
Page 9

CAUTION:
• Use only 2 ‘’AA” batteries.
• To remove batteries, slide cover off hand-control (See arrow). Remove old batteries and replace with new batteries.
Be sure to insert batteries cor rectly according to (+) and (-) symbols on battery compartment.
• Be sure to inser t batter ies correctly with adult supervision and always follow the toy and battery manufacturer’s
instructions.
• Do not mix old and new batteries.
• Do not mix alkaline, standard (car b on-zinc), or rechargeable (nickel-cadmium) batteries.
• Rechargeable batteries are to be removed from the toy before b eing charged.
• Non-rechargeable batteries are not to be recharged.
• Rechargeable batteries are only to be charged under adult supervision.
• Only batteries of the same or equivalent type as recommended ar e to b e used.
• The supply terminals ar e not to b e short-circuited.
• Always remove weak or dead batteries from the product.
• Remove batteries if the product will be stor ed for an extended period of time.
• Check the cord fr equently and do not use if wire is damaged or exposed.
Please retain these instructions for future r efer ence.
Mise en garde:
• Utilise seulement 2 piles ‘AA’.
• Pour retirer les piles, glisse le couvercle pour le sortir du contrôle manuel (voir la flèche). Retire les vieilles piles
et remplace-les avec des neuves. Assure-toi d'insérer les piles correctement en suivant les symboles (+) et (-) dans
le compartiment de piles.
• Insère les piles corre ctement avec l'aide d'un adulte et suis toujours les instructions du fabricant de piles et du jouet.
• Ne mélange pas les piles, nouvelles et vieilles.
• Ne mélange pas de piles alcalines, standard (carbone-zinc) ou rechargeables (nickel-cadmium)
• Tu dois retirer les piles rechargeables du jouet avant de les recharger.
• Les piles non-rechargeables ne peuvent pas être rechargées.
• Les piles rechargeables doivent être chargées seulement sous la supervision d'un adulte.
• Tu dois utiliser seulement les types de piles recommandées ou l'équivalent.
• Il ne faut pas court-circuiter les bornes d'alimentation.
• Retire toujours les piles faibles ou mortes du produit.
• Si tu prévois ranger le produit pendant assez longtemps, retire les piles.
• Vérifie souvent le cordon et ne l'utilise pas si le fil est endommagé ou exposé.
Conserve ces instructions pour référence ultérieure.
Vorsicht:
• Nur 2 „AA" Batterien verwenden.
• Zum Entfernen der Batterien, schieben Sie zunächst die Abdeckung von der Handsteuerung (siehe Pfeil). Entfernen
Sie die alten Batterien und ersetzen Sie sie mit neuen. Beachten Sie dabei die korrekte Lage der Batterien
entsprechend der (+) and (-) Symbole am Batteriefach.
• Die Batterien müssen korrekt unter Aufsicht Erwachsener eingelegt werden; befolgen Sie stets die Anleitungen
der Spielzeug- und Batteriehersteller.
• Verwenden Sie nie alte und neue Batterien zusammen.
• Verwenden Sie nie Alkali- oder Standardbatterien (Kohle-Zink) bzw. aufladbare Akkus (Nickel-Kadmium)
zusammen.
• Aufladbare Akkus müssen vor dem Aufladen aus dem Spielzeug entfernt werden.
• Nicht aufladbare Batterien dürfen nicht geladen werden.
• Aufladbare Akkus dür fen nur unter Aufsicht Erwachsener geladen werden.
• Nur Batterien der gleichen Typ e o der einer empfohlenen gleichwertigen Type verwenden.
• Die Versorgungsklemmen nicht kurzschließen.
• Schwache oder leere Batterien immer aus dem Produkt entfernen.
• Entfernen Sie die Batterien, wenn Sie das Produkt für längere Zeit aufbewahren.
• Überprüfen Sie das Kabel r egelmäßig und verwenden Sie es nicht, wenn ein Draht beschädigt oder frei ist.
PRECAUCIÓN
• Use sólo 2 baterías "AA".
• Para retira r las baterías, deslice la cubierta hacia af uer a del control manual (vea la flecha). Retire las baterías
usadas y reemplácelas con otras nuevas. Asegúrese de insertarlas correctamente de conformidad con los
signos (+) y (-) que se muestran en el compartimiento correspondiente.
• Asegúrese de insertar las baterías correctamente con supervisión de un adulto y siga siempre las instrucciones
de los fabricantes de los jug uetes y las baterías.
• No mezcle baterías nuevas con otras usadas.
• No combine baterías alcalinas con otras estándar (carbono-zinc) o recargables (níquel-cadmio).
• Las baterías reca rgables se deberán retirar del juguete antes de cargarlas.
• Las baterías no recargables no se deberán volver a cargar.
• Las baterías reca rgables sólo se deberán cargar bajo supervisión de adultos.
• Sólo se deberán utilizar baterías del mismo tipo u otr o equivalente que se recomiende.
• Las terminales de alimentación no se deberán p oner en cor to circuito.
• Retire siempr e del producto las baterías débiles o agotadas.
• Quite las baterías si se va a almacenar el producto durante un periodo prolongado.
• Inspeccione el cable con frecuencia y no use el producto si está dañado o al desnudo.
Tenga la bondad de conservar estas instrucciones para consultas futuras.
LRM9199-
LER 9199 — Dizzy Fun Land © Learning Resources, Inc., Vernon Hills, IL 60061 (USA)
 Loading...