

Page 1
–
Page 2

–
Page 3

–
Dear customer,
Congratulations with the purchase of your very own Leapfrog Xeed 3d-printer. We want to help
you make your first 3d-print with the very first Leapfrog stand-alone printer.
To make your first impression the best one possible, we want to provide you with our manual
which will take you through the first steps and make you more familiar with your Xeed. For
maximum 3D-print pleasure.
It is possible that after reading this document or while operating your printer you have a question
that is not listed in this document. Therefore, we also explain you how to contact our support
department.
We wish you happy printing!
With kind regards,
The Leapfrog team
Page 4

–
Table of content
1. Installation page 5
1.1 Unpack page 5
2. Printing page 6
2.0 Printing page 6
2.0.1 Initial setup page 7
2.0.2 Setup Internet page 7
2.0.3 Update LilyPrint page 9
2.0.4 Setting z-offset page 10
2.0.5 Level bed page 11
2.1 Loading your filament page 12
2.2 Heating the extruders page 14
2.3 Manually controlling your Xeed page 16
2.3.1 Movements page 16
2.4 Uploading your 3D model page 17
2.4.1 Uploading a model from a USB device page 17
2.4.2 Uploading a model from your computer page 18
2.4.3 Start a print page 19
2.4.4 The terminal page 20
2.5 Making your print page 21
2.6 After the print page 25
3. Support page 26
3.1 Need support page 27
3.2 Updates page 29
3.3 Troubleshooting page 30
3.3.1 Transporting, unpacking and positioning the Xeed page 31
3.3.2. Turning off and (re)starting the Xeed page 31
3.3.3. Filament slipping page 31
3.3.4. Removing your print from the bed page 32
3.3.5. Replacing your print bed page 32
Page 5
–
1. Installation
The following steps are steps you only have to follow when your brand new Xeed arrives at your
doorstep for the first time. Please follow each step thoroughly to make sure the installation will be
successful and you will find yourself to be a member of the leapfrog eco-system.
1.1 Unpack
In this step we will show you how to unpack your Xeed when it arrives at your doorstep. Before
you start, make sure that you have cleared a spot where you want to place the printer. We advise
you to not place the Xeed next to a window or at a place where it is draughty.
Unscrew all the top screws of the top plate of the shipping crate and remove the top
plate.
Remove the filament you ordered
Have some tools to break down the shipping
crate carefully, Lift it with preferably 4 people
from the bottom plate.
After these steps place it on the desired spot and
remove all the plastic from the printer.
Open the door and place the door handle onto
the door (not always required).
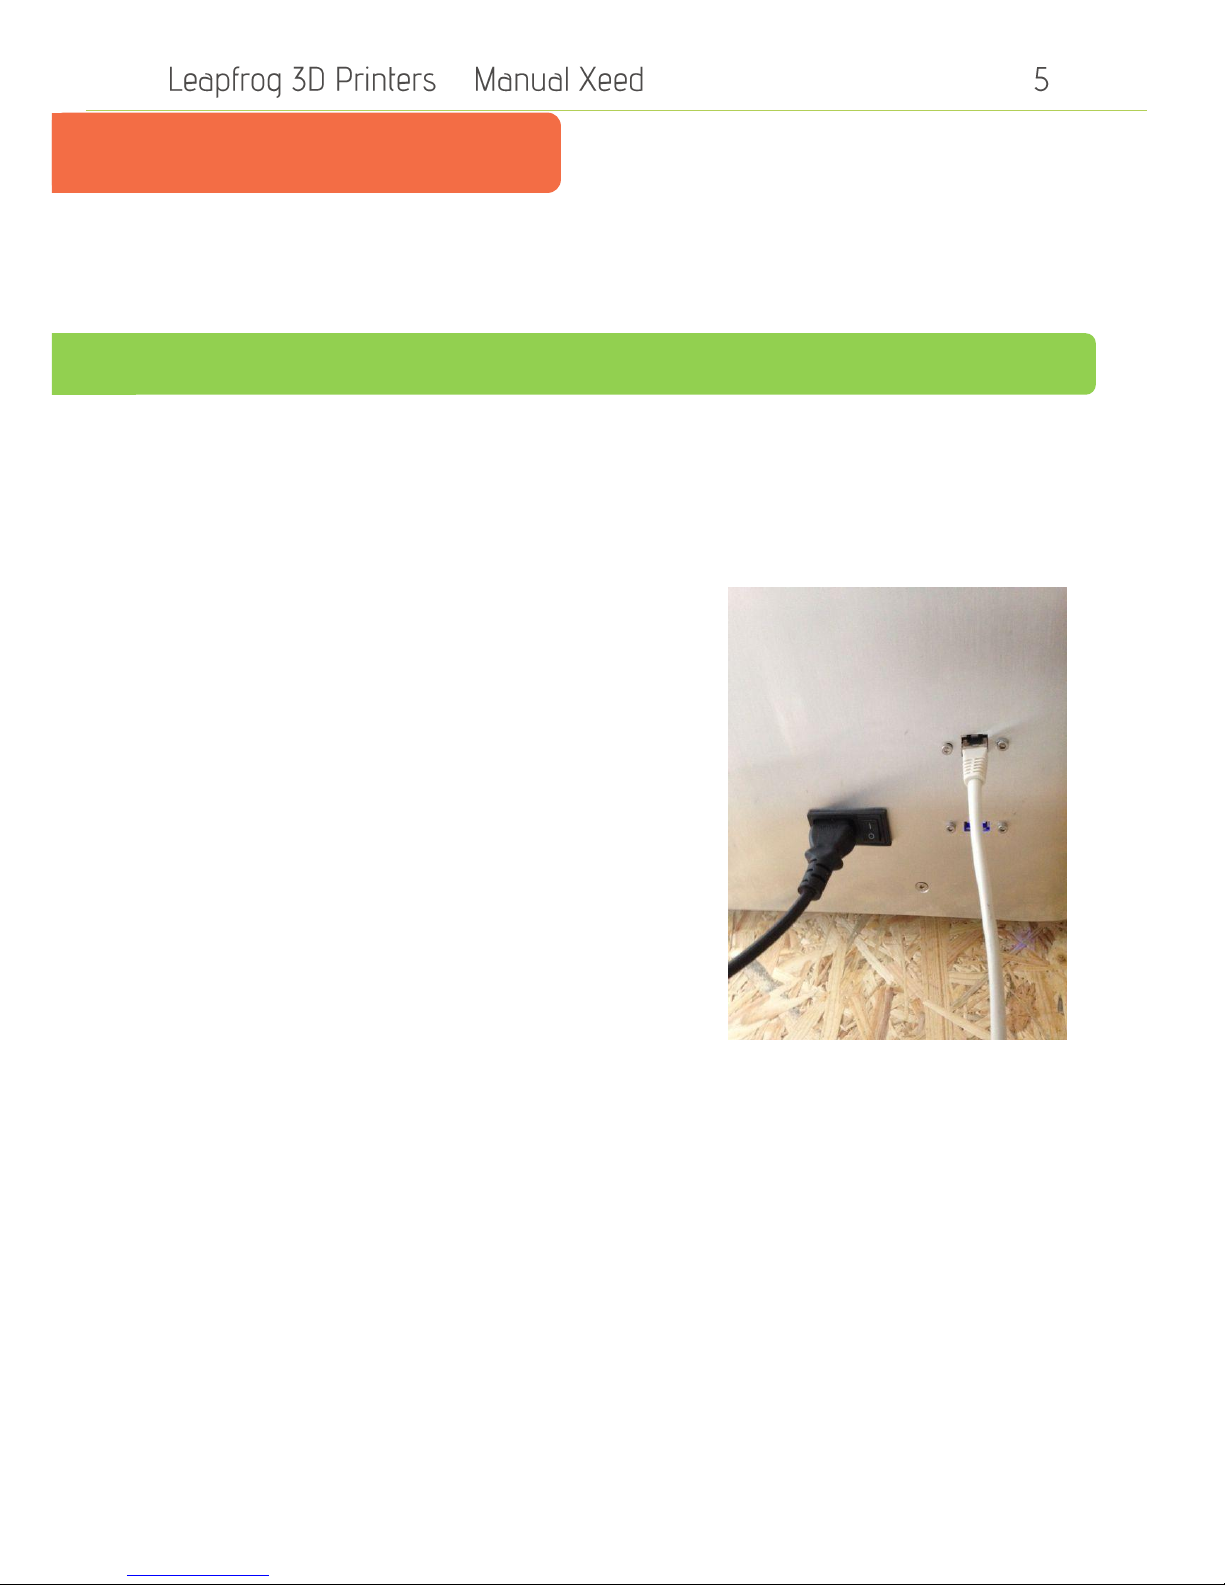
Insert the power cord in the outlet at the back of
the printer as shown in the next picture. Then
turn on your Xeed using the power switch next
to the outlet.
NB: Make sure that you connect the power cord to a grounded outlet!
Page 6

–
2. Printing
The following steps are general steps which you need to follow when making a 3D print with your
Xeed.
2.0 Setting up the Xeed
2.0.1 Initial setup
2.0.2 Setup Internet
2.0.3 Update LilyPrint
2.0.4 Setting z-offset
2.0.5 Level bed
2.1 Loading your filament
2.2 Heating the extruders
2.3 Manually controlling your Xeed
2.3.1 Movements
2.4 Uploading your 3D model
2.4.1 Uploading a model from a USB device
2.4.2 Uploading a model from your computer
2.4.3 Start a print
2.4.4 The terminal
2.5 Making your print
2.6 After the print
Page 7
–
2. Setting up the Xeed
2.0.1 Initial setup
Before you can use the Xeed, we have to go through the initial setup. This will make sure the Xeed
is connected to the network and is up-to-date. This will allow you to access the Xeed through a LAN
network later, which allows remote control of the printer, remote upload from gcode files and
more.
For the setup you will need the following:
-USB keyboard
-USB mouse
-Ethernet cable to Xeed with Internet access
Plug in the keyboard, mouse and ethernet cable at the back of the Xeed. Turn on the Xeed by
switching the button next to the power inlet. The keyboard and mouse are only needed during this
initial setup.
The Xeed will start-up, usually this takes around 30-60 seconds. The screen can show some text
scrolling during this start up period. When the Xeed is started up the home page of the software
running on the Xeed, LilyPrint, is shown on the 7" touch screen.
2.0.2 Setup Internet
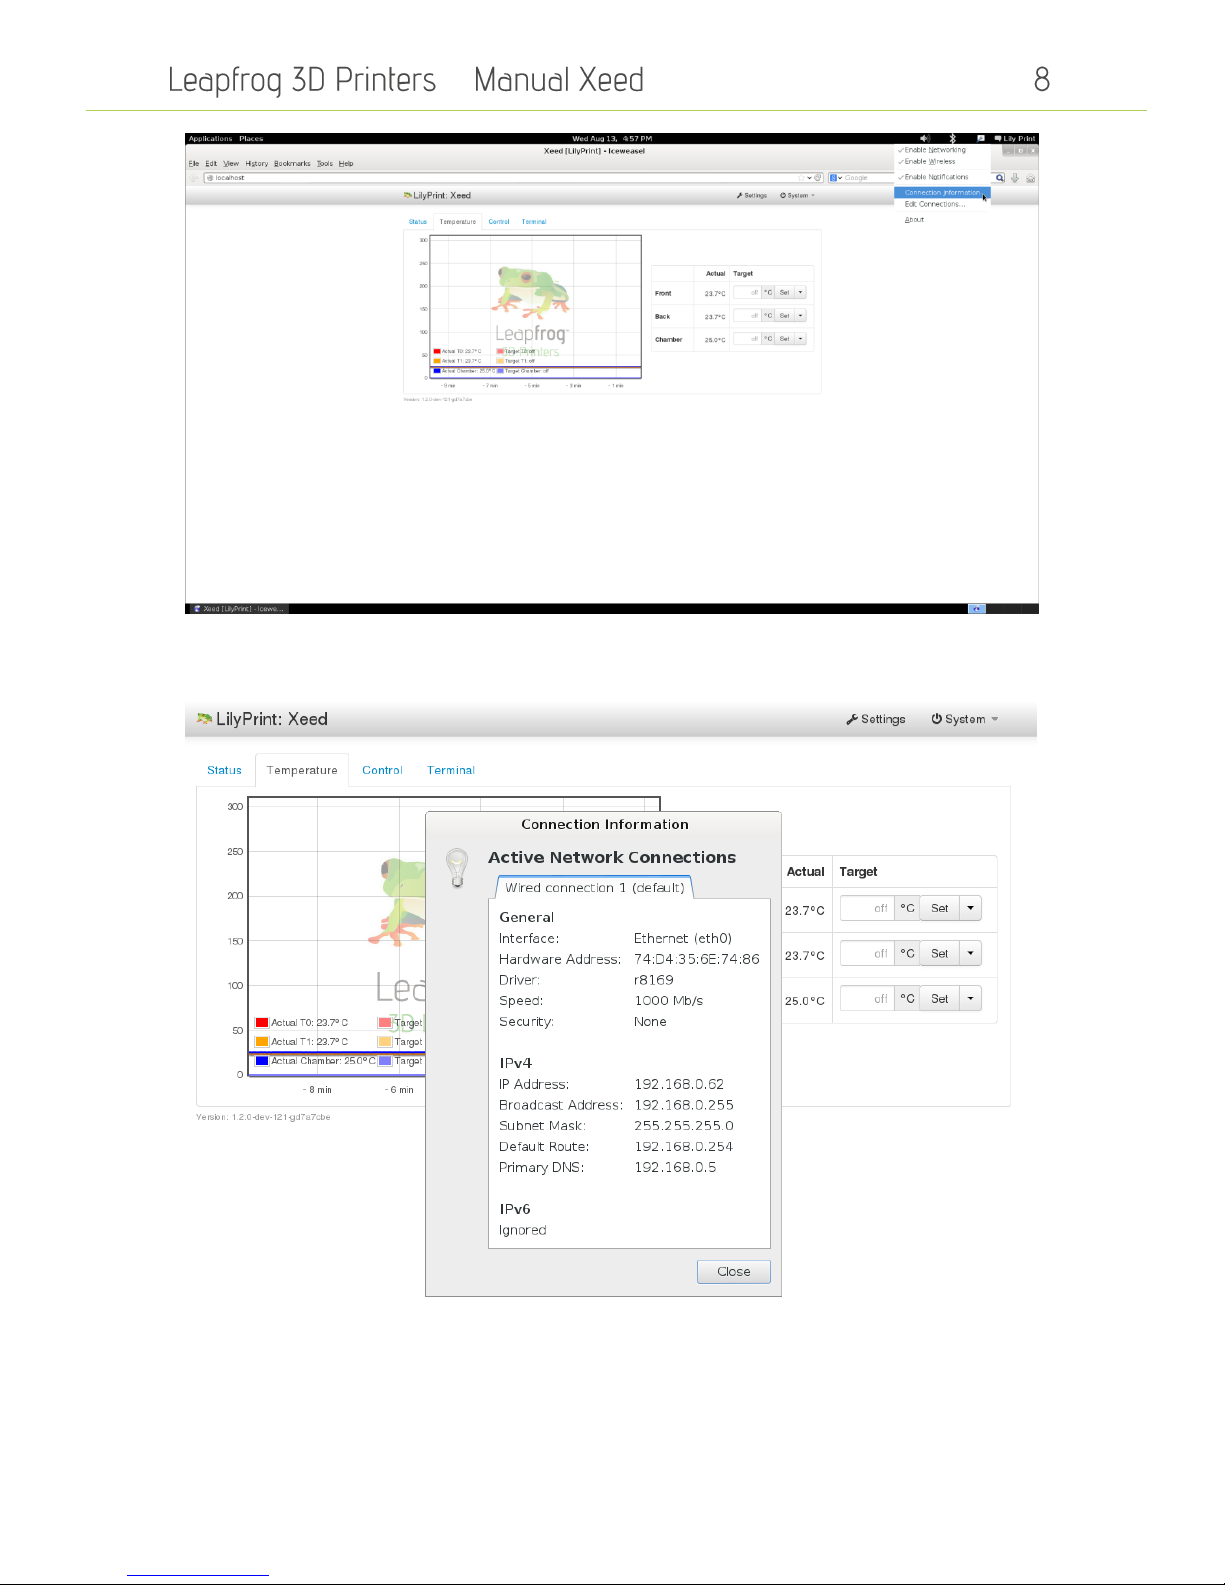
Press F11 on the keyboard to exit full screen mode of LilyPrint, a black application menu bar will
appear on the top of the screen. Right click on the network icon in the right top corner next to
LilyPrint. In the menu that appears click on Connection Information.
Page 8
–
In the pop-up that appears note the IP Adress under the IPv4 section, you can use this later to
access LilyPrint from your own computer in the same network.
To connect to a wifi network, left click on the network icon and select the wifi network. In the pop-
up enter the wifi password. (If it asks for admin password it is "lily" or "lpfrg").
Page 9
–
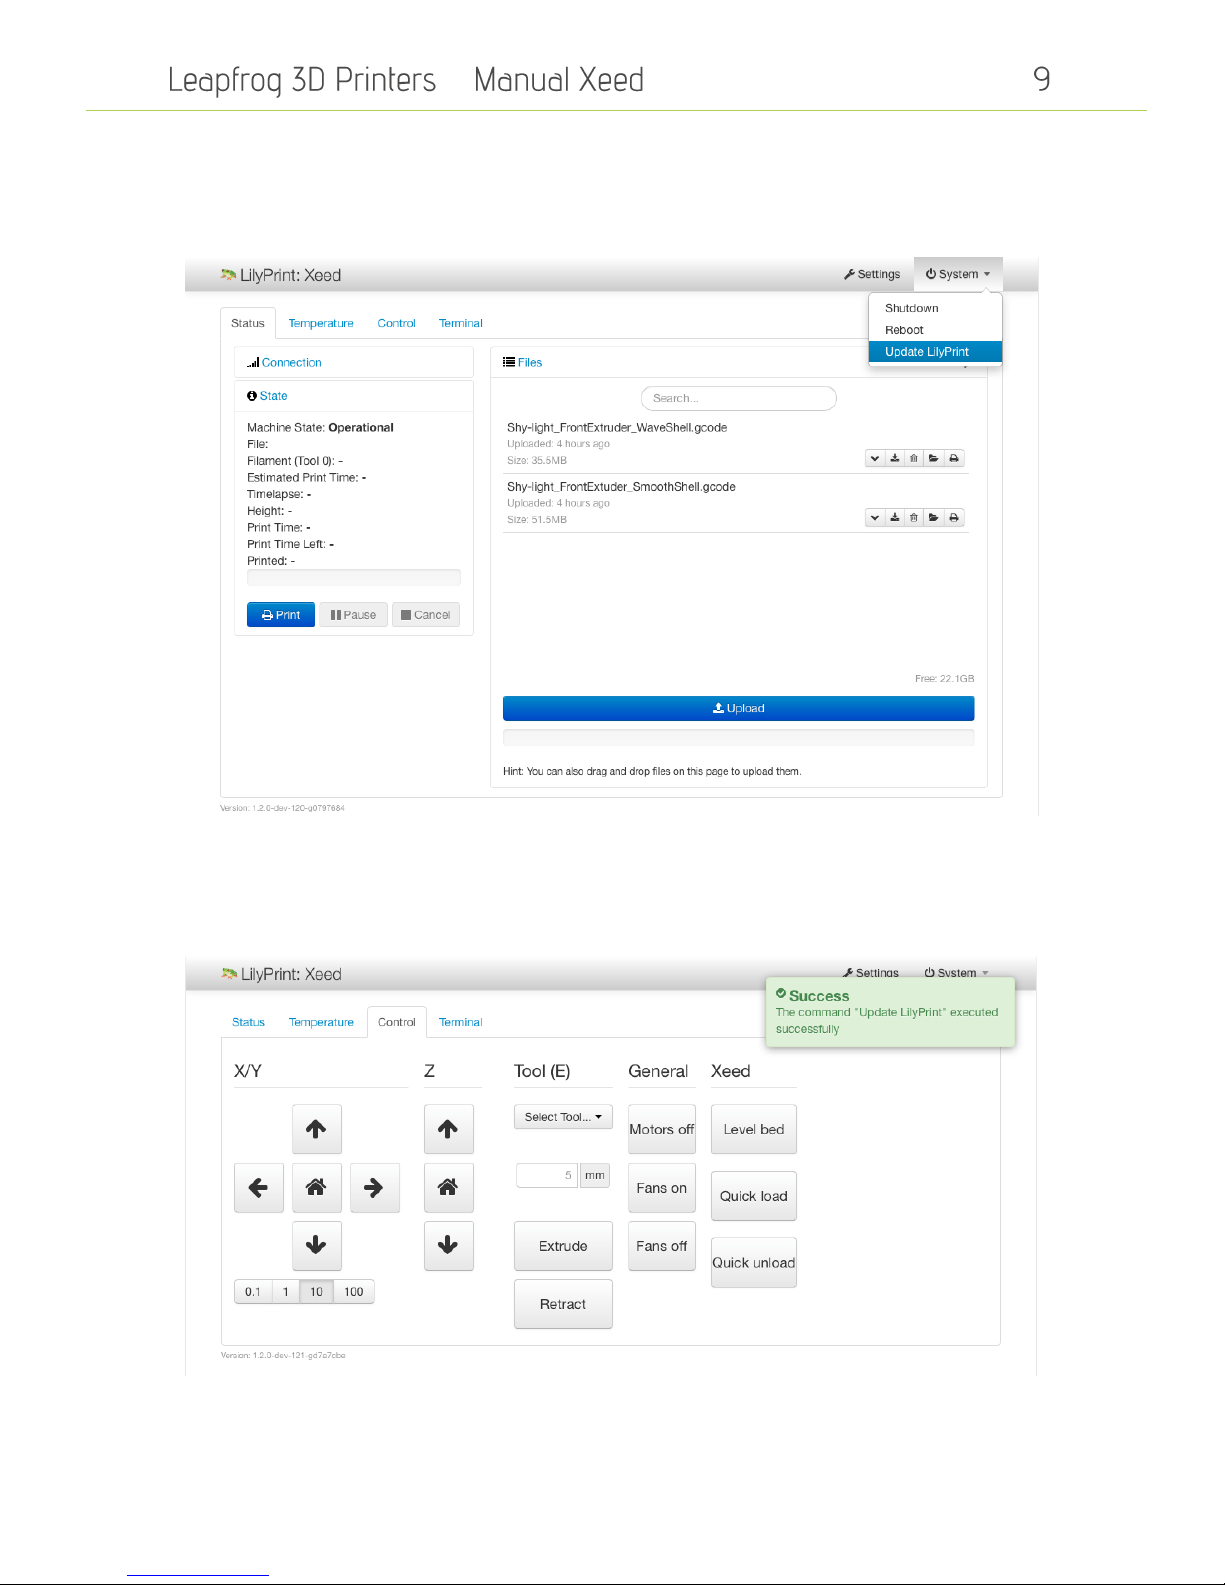
2.0.3 Update LilyPrint
LilyPrint has an update feature, we will run this to make sure that it is up-to-date before we start.
Click on the System menu in the top bar of LilyPrint and select "Update LilyPrint", confirm the
notification to start the update. Make sure you have Internet connection!
(If there is no system menu and it asks for a login, username: "lily"; password: "lily". Refresh
browser with F5 if the login does not show right away.)
A pop-up on the right top corner of the screen will notify you when the update has succeeded.
When the update is done .
Page 10
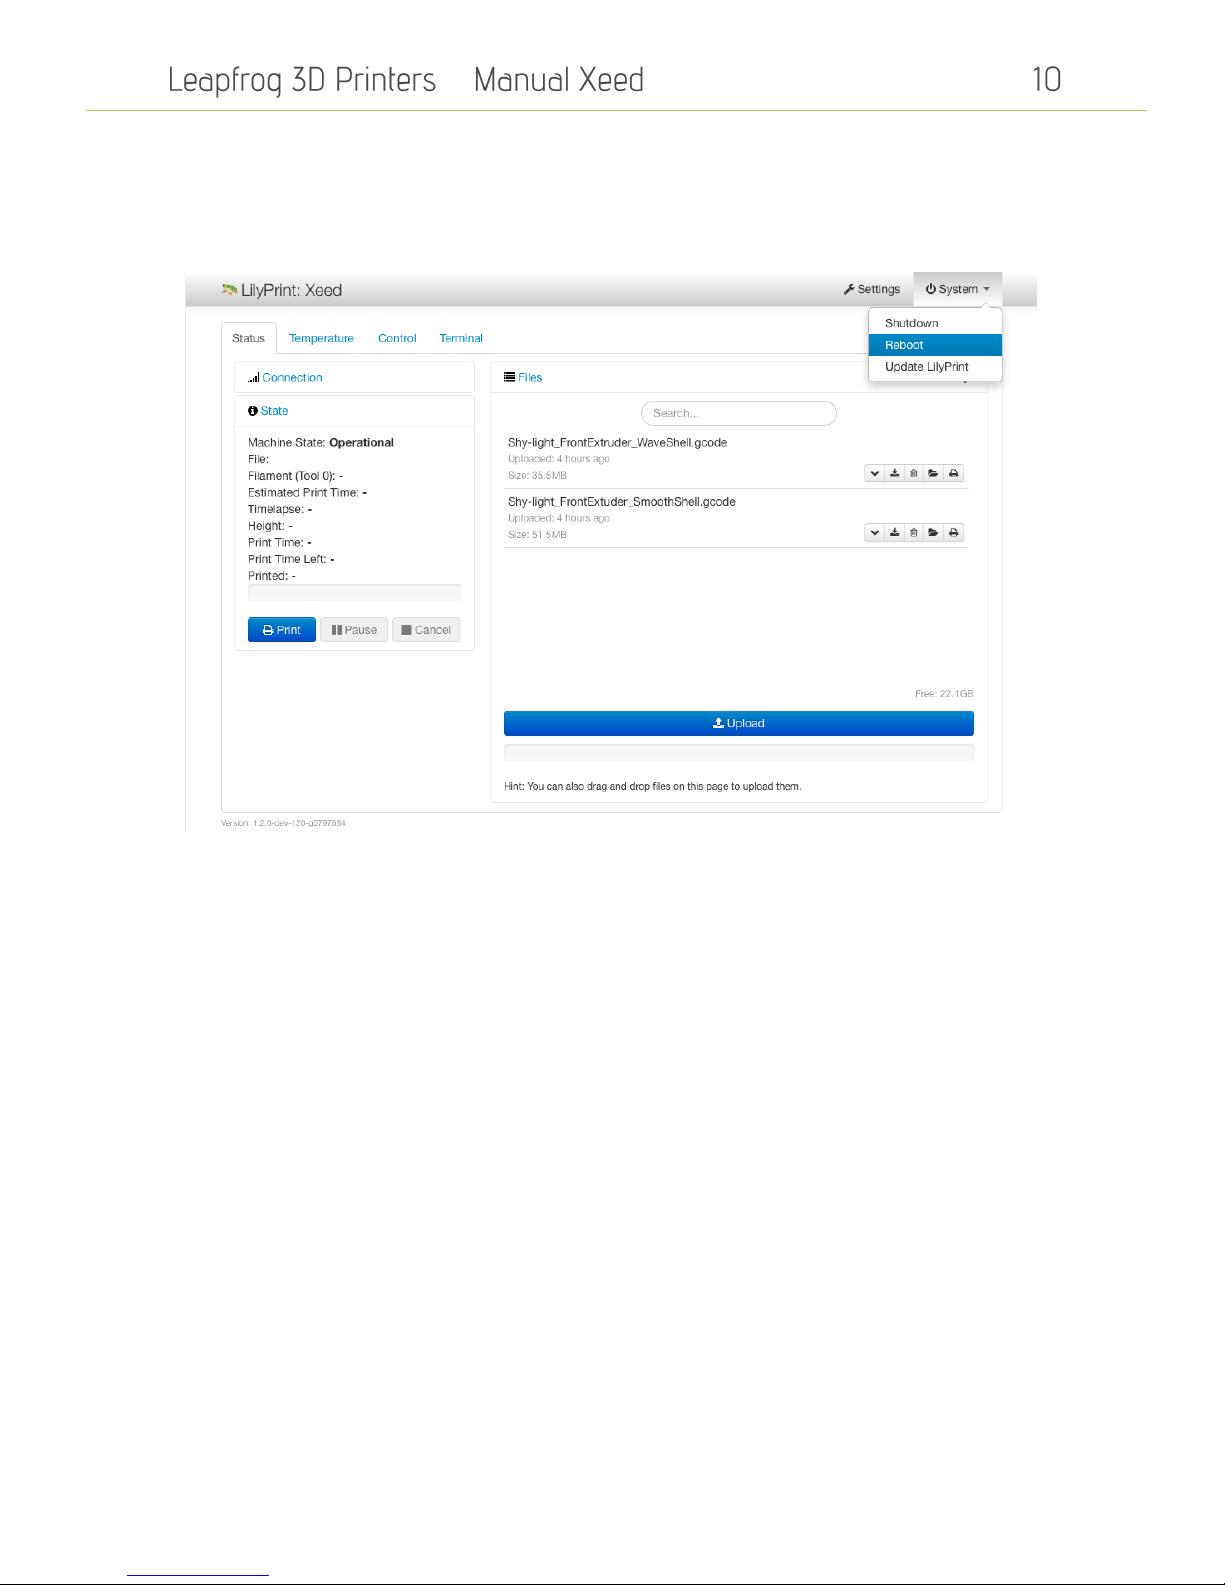
–
Reboot the system by clicking on the System Menu and selecting Reboot. (Update regularly to get
new features!)
If reboot through LilyPrint software does not work, click "LilyPrint" on the top right corner and
select "Shutdown..."" and then "Restart".
LilyPrint is now updated to the latest version.
2.0.4 Setting z-offset
The Xeed uses a variable called z-offset to calibrate the distance between the z-stop and the
nozzle. It basically depicts the distance between the nozzle and the bed at the start of a print and is
very important. This setting can be found under the LilyPrint settings and the Printer Parameters
section. Default is 3.15mm, but it slightly differs per printer or changes when you use a different
bed for example. If you notice at the start of a print that the nozzle is not close enough to the bed,
you have to increase the z-offset. Once calibrated there is often no need to adjust it any more until
a change in the printer happens. The Xeed comes calibrated, but transport might have changed the
calibration.
Increase by steps of 0.05-0.10 only! Adding too much might result in the nozzle being too close to
the bed and damage it!
Page 11

–
2.0.5 Level bed
Before we start to print we want to make sure that the bed is levelled. Under the "Control" tab in
LilyPrint there is a "Xeed" section. Press the "Level bed" button to start the sequence. It will probe
5 spots on the bed and make sure it is levelled. This can take up to 4-5 sequences.
Page 12

–
2.1 Loading your filament
We need filament loaded in the printer to start printing. This section will guide you through the
process.
Load your filament into the filament drawer. The filament drawer is located at the left side of the
printer and can be opened by gently pushing on the bottom of the drawer as shown in the next
picture
Once you have opened the drawer you can place your spool(s) of filament in it as shown in the
following picture. To make sure that the filament will be grabbed by the driver gear which is
indicated with a green arrow you need to clamp the filament by the driver gear. This can be done
by pushing the lever which is indicated with the other green arrow such that space opens up to
push the filament through. When you let go of the lever the filament will be stuck which is good.
Make sure that you push the filament through all the way into the hole after the driver gear such
that it will flow nicely when pulling it in later on. We will explain later how to actually load the
filament into the extruder.
Page 13

–
Page 14

–
2.2 Heating the extruders
The software that is used to control the Xeed is called LilyPrint. In the next screenshots we have
outlined real brief all the tabs in the main screen. During this manual we will explain each option
and its functions starting with the heating of your extruders.
Status – Printer status and upload files
Temperature – Control and set temperature. Temperature graph
Control – Control the printer manually. Home axis. Extrude, load filaments, level bed, etc.
Terminal – Terminal that shows all communications with the printer. Advanced users can send
commands.
Settings – Houses most of the LilyPrint settings. At the moment, only z-Offset is of real importance.
System – allows for an update of LilyPrint, aswell as shutdown and reboot.
To heat up your extruders you have to go to the “Temperature tab”. In the temperature tab you
can control the temperature of the front and back extruder.
To set the extruder to a certain temperature tap on the down arrow to select one of the predefined settings. In the example below the temperature for the front extruder is set to 200 degrees
Celsius. This is the standard temperature for printing PLA.
Page 15

–
You can notice that the temperature graph of the front extruder shows the current and target
temperature.
To load your filament into the extruder you can use the “EXTRUDE” button, located on the control
tab. Make sure your filament is placed correctly in the filament drawer and that your extruders are
heated to the correct temperature for your filament type. Select the correct tool that you want to
extrude.
After pushing the Extrude button, the filament will be guided through the tube towards the
extruder head and covers a small distance inside the tube each time you press this button. If you
want to do this quickly then push the “QUICK LOAD” button which automatically guides the
filament all the way to the extruder head. For the reverse process push “RETRACT” or “QUICK
UNLOAD”. Sometimes you might experience difficulty extruding the filament through the extruder
head above the print bed. In this case use “EXTRUDE” to slowly extrude filament through the
nozzle onto the print bed.
Page 16

–
2.3 Manually controlling your Xeed
The manual controls give you full control over all movement and actions of your printer when it is
not running a print job.
2.3.1 Movements
The movements of the printer are done at the control tab. Before moving the printer head and bed
manually it is highly recommended to home these first. This will make sure the printer does not
move in a direction it cannot move. Press both the X/Y- and Z-home button to home all three axes.
This means that the bed will be in its most upward position and the printhead is located in the leftback corner of the printer.
After this you can use the arrows to move the extruder head or the printer bed.
Page 17

–
2.4 Uploading your 3D model
Now that you have loaded the filament and the printer is on, it is time to load the model that you
wish to print. This section explains the steps to follow when uploading your 3D models.
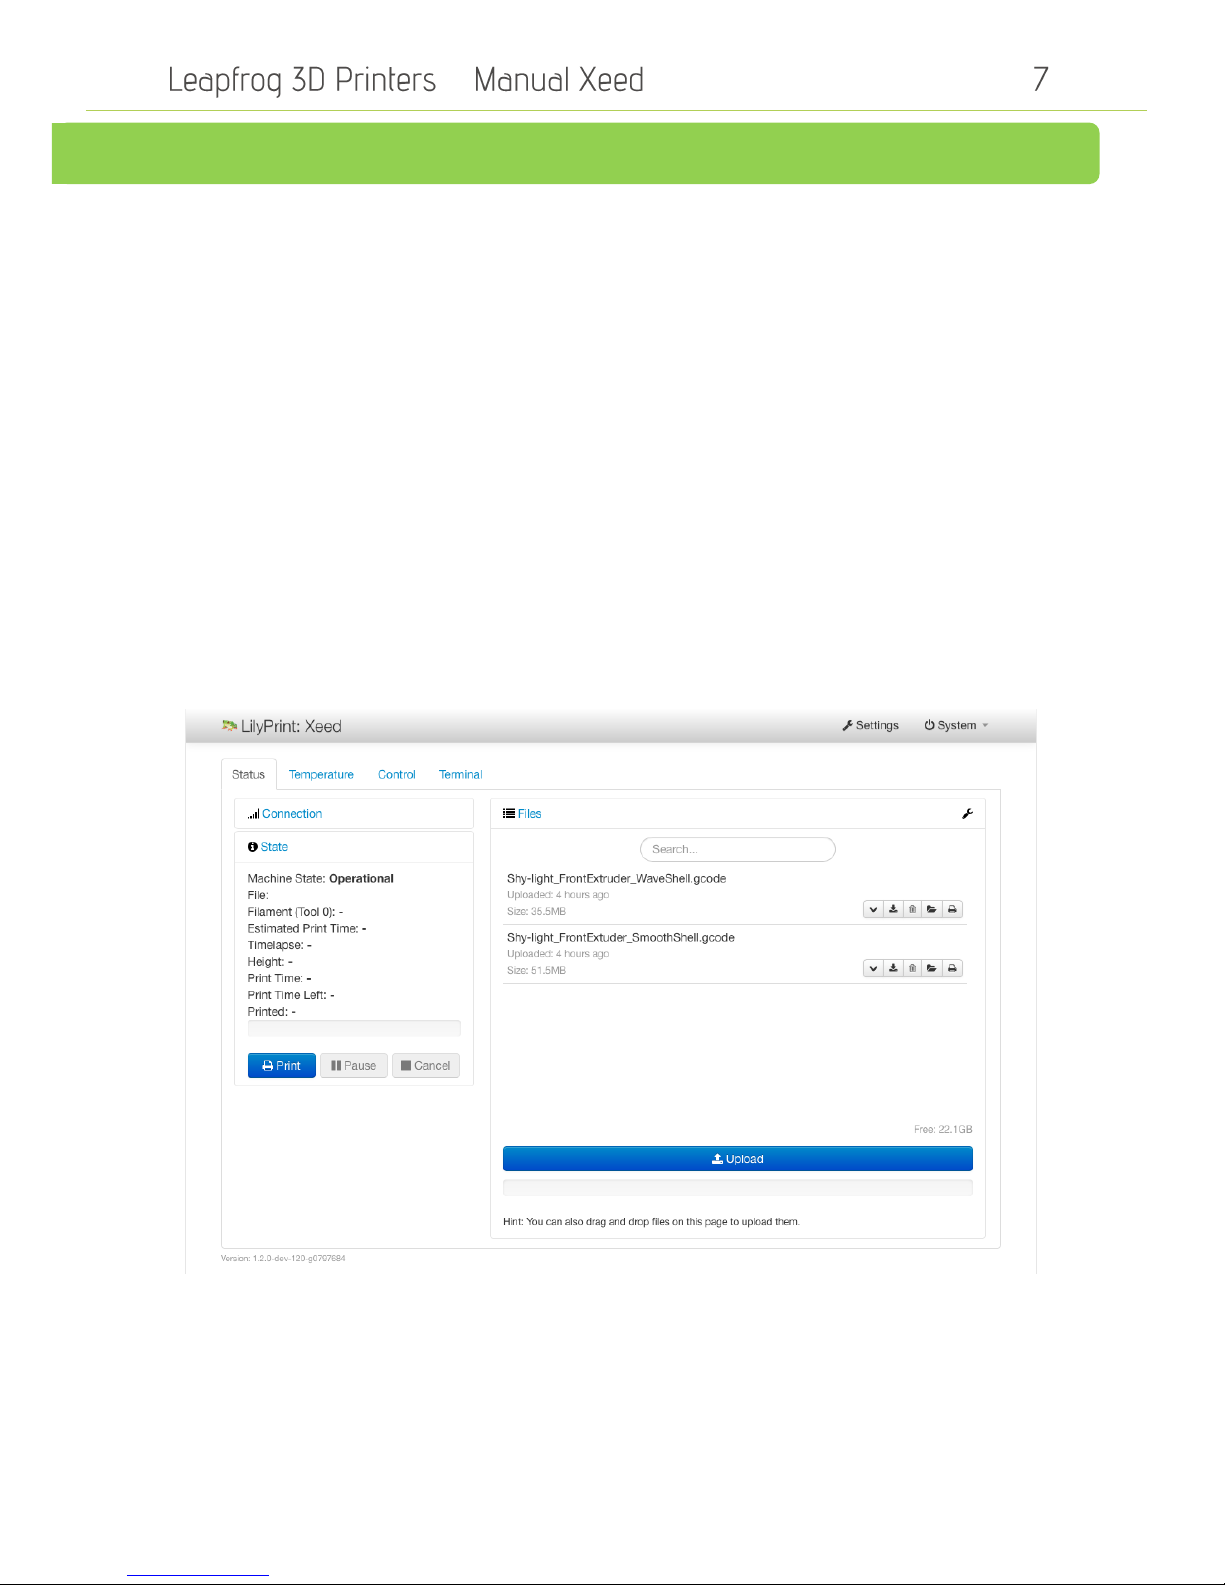
Go to the “Status” tab in the upper left corner.
There are two ways to upload your models to the Xeed. You can use a portable USB device, which
you can insert in the back of the printer or you can use a network connection that allows you to
connect your Xeed with your computer through your network.
2.4.1 Uploading a model from a USB device
To upload a gcode-file from your USB device plug the device in the back of the printer and tap on
the ”Upload”-button. In that menu select the removable device and select your gcode.
To upload the model from your USB device select it and tap on “CHOOSE”. The model will be
added to the model list in the Status tab. Below is a screenshot with keywords for the 5 icons.
Page 18

–
2.4.2 Uploading a model from your computer
To upload a model from your computer you will have to connect your Xeed to your network. This
can be done in two ways, either by Wi-Fi or using an Ethernet cable. For instructions see the Initial
Setup chapter of this manual.
It is really easy to access LilyPrint via your browser, just enter the IP number you have noted down
from the initial setup and input that into your browser. Make sure you are in the same internal
network as the printer (for example both “192.168.0.X”). You will have access to exactly the same
controls as on the touchscreen. Pressing upload will now guide you to your local hard drive where
you can select any GCODE and it will be uploaded to your printer.
Page 19

–
2.4.3 Start a print
It is very easy to start a print. Just press on the printer icon on the model and the printer will start
the GCODE. In the “State” field it will show the progress, time elapsed and time left (estimated).
Page 20

–
2.4.4 The terminal
The terminal tab shows all the communication between the printer and the software. This is useful
if there is an error or the printer is not working. Advanced users can also send manual GCODE
commands to the printer on this tab.
Page 21

–
2.5 Making your print
You received Simplify 3D slicing software with download instructions for your PC, which allows you
to “fine tune” your print settings for printing even the most complex 3D models.
The Simplify 3D Software comes with an integrated Quick Start Printing Guide that walks you
through the entire print process, beginning to end. We cover only the basics in this manual.
The first step is to import your 3D print model (STL-file) in the left upper window by pressing the
“Import” button as shown in the picture below.
“Double click” on your Imported model and enter numeric positioning information for shifting,
rotating or scaling your model.
Page 22

–
The second step is to click on the “Add” button in the left lower window. After pressing this button
the “FFF window” pops up where you can select a standard print profile in the drop down menu.
Leapfrog is continuously testing and developing Profiles with standard print settings in order to
establish the best print results and therefor might send you additional Profiles applicable to your
printer which you can add to your software by clicking the “Import” button in the FFF window.
At the time of writing we developed three Profiles:
1. “Leapfrog_Xeed ABS_BackExtruder.fff” most ideal settings for printing a random 3D model
in ABS with only the back extruder
2. “Leapfrog_Xeed ABS_FrontExtruder.fff” most ideal settings for printing a random 3D model
in ABS with only the front extruder
3. “Leapfrog_Xeed ABS_BothExtruder.fff” most ideal settings for printing a random 3D model
in ABS with both the front and back extruder
Page 23

–
With step three you can choose your own settings to optimize print results for your personal 3D
models and start exploring the 3D printing boundaries.
FFF Settings shown in the picture below allow you to easily select “Medium” or “High” print
quality. Be noted that printing in High quality increases the printing time.
Further it is possible to select:
-“Material” depending on the “Selected Profile” you are able to select optimal settings for printing
in PLA, ABS, PVA or Nylon.
-“Infill Percentage” changes the interior solidity (strength) of your print.
-“Include Raft” generates raft or support between the bed and your print for optimal cohesion.
-“Generate support” automatically generates support for steep overhangs.
Above mentioned functionalities are further explained in the integrated Quick Start Printing Guide.
For exploring the 3D print boundaries you have the option to select “Show Advanced” settings.
Click “Save” when you have finished configuring your settings in the FFF window.
Page 24

–
The final step after saving your settings is to press the “Prepare” button in the left lower window
to generate, save and preview your G-code.
The G-code can now be uploaded by your printer through a computer connection as explained in
paragraph “2.4.2. Uploading a model from your computer” and is ready to be printed!
Page 25

–
2.6 After the print
This section will explain what to do when your Xeed has finished the print job.
After the print you have to wait until the Xeed goes into its home position. It will home your x- and
y-axis and it will bring down your print bed, so it is easier for you to access your print. You can
open the doors and take your model off the print bed; you can also take out your print bed. This is
needed if the model is stuck to the bed. If you take out the print bed you can access your print
from more angles so it is possible to take off the model without damaging it.
Page 26

–
3. Support
In case anything in the manual is unclear and you still have some remaining questions or if you are
experiencing some kind of problem with your Xeed or your prints we are there to help you. This
section explains to you how to contact us with your questions so that we can help you as soon as
possible. This section contains the following:
3.1 Need support?
o How to contact the Leapfrog support team
Page 27

–
3.1 Need support?
Of course it is possible that you run into something that was not explained in this document. Here
we explain you what to do in such a case.
Go to https://www.lpfrg.com/
If you cannot find the solution to your problem at Knowledgebase or on our Forum, you
can always ask our support team by creating a ticket.
Click on the button with the Ticket icon, fill in the fields that are marked with an asterix.
You will receive an automatic email when your ticket has been updated. This way, you do
not have to check if you have received an answer but we will let you know.
Page 28

–
Page 29

–
3.2. Updates
LilyPrint has an update feature, we will run this to make sure that it is up-to-date before we start.
Click on the System menu in the top bar of LilyPrint and select "Update LilyPrint", confirm the
notification to start the update. Make sure you have Internet connection!
(If there is no system menu and it asks for a login, username: "lily"; password: "lily". Refresh
browser with F5 if the login does not show right away.)
A pop-up on the right top corner of the screen will notify you when the update has succeeded.
When the update is done .
Page 30

–
3.3. Troubleshooting
Although we work very hard on minimizing possible troubles some might occur while or even
before operating the machine. In general these troubles can be tackled quite easily.
We listed 5 possible troubles that could occur and how you can to tackle them.
3.3.1. Transporting, Unpacking and Positioning the Xeed
Transporting
Think carefully before delivery or (local) pick up how to transport your Xeed to its final destination.
Xeed weighs around 75KG with outer dimensions: 900 x 580 x 640 mm.
Xeed + Crate + filament weighs up to 135KG with outer dimensions: 1150 x 980 x 850 mm.
On arrival at destination (office, facility etc.) we advise to move the Xeed as far as possible inside
its wooden protection crate preferable by a forklift or pallet truck.
Avoid (strong) vibrations and tip the machine as little as possible to secure its print quality
Unpacking & Positioning
Disassemble the crate preferably in such a way that the side and top panels are removed leaving
the Xeed standing on just the bottom panel.
Have preferably 4 people available to lift the Xeed and position the machine at around 1 meter
height on for instance a stable and strong table, cabinet or the wooden crate after rebuilding.
Avoid positioning the Xeed in wet, cold and windy areas to secure its print quality
3.3.2. Turning off and (re)starting the Xeed
Turning off the Xeed should be done by pressing the digital shutdown button on the screen in IcosI.
This will shutdown the screen and motherboard first. After this you can switch off manually the
power button at the back of the machine.
Avoid shutting down the Xeed with the power switch only, this might damage the motherboard
After pushing the shutdown button and switching off the power button wait around 5 seconds to
switch on the power button again. If you switch on to quickly IcosI might not start.
After turning off your Xeed wait at least 5 seconds before switching on your Xeed
If an error occurred in the turning off or restarting process you might see an alternative start up
screen, with a black background and white instruction letters. Follow up the instructions by
plugging in a keyboard in the USB port at the back of the Xeed and press the key applicable to your
situation.
3.3.3. Filament slipping
Before loading the filament make sure that filament on the spool is free and not entangled which
can occur after removing and replacing the spool. Take the time to make sure that the filament is
inserted properly in the driver gear. Depending on the spool size it might help to place it upside
down in the drawer so that filament rolls of from the bottom instead of the top. Push the filament
manually as far until it reaches the white tube. After “QUICK LOADING" the filament up to the
Page 31

–
extruder head, check again if the filament is positioned correctly in the driver gear. Sometimes you
must use the “EXTRUDE”-button to push the filament through the extruder head step by step.
Take your time loading the filament correctly to prevent slipping and use the “EXTRUDE”-button
3.3.4. Removing your print from the bed
The advantage of using a plastic bed is that your object sticks well to the bed preventing it from
shifting. The disadvantage can be that your print sticks so well, that it is hard to remove.
Make sure that you remove your print just after the printing process finished when the print,
surroundings and print bed are still warm.
Use a spatula to slide in-between the print and the bed and gently wiggle and twitch to loosen the
print from the bed.
Another technique would be to remove the bed completely and bend the bed, so that the object
detaches itself from the bed. You need quite some force to establish this.
3.3.5. Replacing your print bed
Like a print sticker (in general used on a glass print platform) has to be replaced after it is wear out,
sometimes also the plastic print bed needs to be replaced.
Prints will leave marks on the bed, which can positively intensify the cohesion between the bed
and the print, however if the bed is damaged too much your print will not stick or stays levelled on
the surface (bed).
To increase the user time of the bed remove prints as soon as the printing process finishes and the
print, the bed and its surroundings are still warm. If the bed is damaged you can flip it upside down
or rotate it, to keep on printing a little longer.
 Loading...