

Page 1

UTG
MTU004 / MTU005 / MTU005E / MTU006 / MTU008
MODEL 4/15
QUAD RAILS
Made in USA
Page 2
1 2
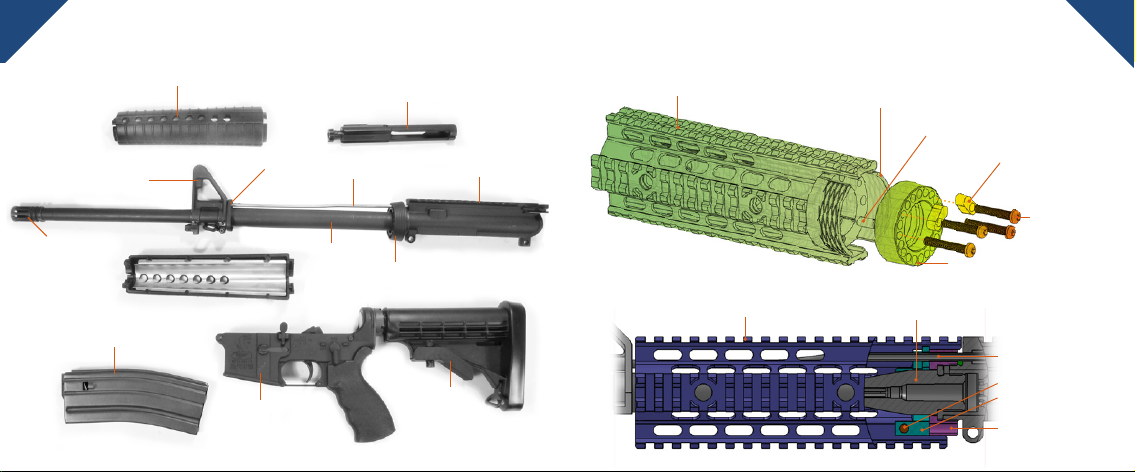
MODEL 4/15 RIFLE PART LIST
Handguard
Flash Hider
Front Sight
Front Cap
Gas Tube
Barrel
Barrel Nut / Delta Ring
Bolt Assembly
Upper Receiver
UTG INNOVATIVE FREE FLOATING DESIGN
Robust Integral, Lightweight
One-piece Quad-rail Handguard
Innovative Connector
to Ensure Firm Lock and
Quick Installation
Dual Alignment Pins for
Reliable and Precise Fitting
Innovative
Anti-rotation Tabs
High-strength
Locking Screws
Solid and Precision Machined
Barrel Nut
AFTER INSTALLATION
Magazine
Lower Receiver
Handguard
Butt Stock
Barrel
Gas Tube
Rivet
Connector
Barrel Nut
Page 3
3 4
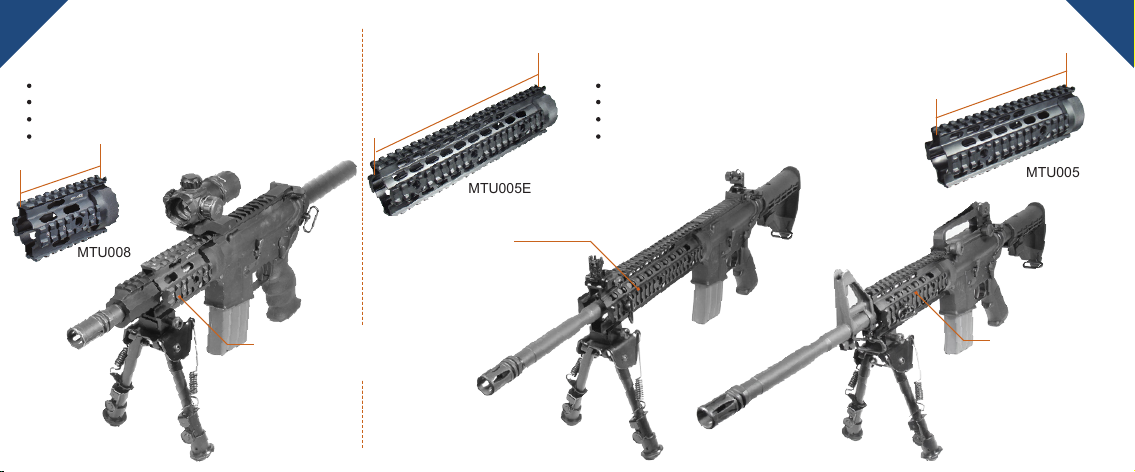
AR PISTOL APPLICATION MODEL 4/15 CARBINE APPLICATION
Slots: 10 on Top, 7 on Left/Right, 9 on Bottom
Includes 4 PCs Rail Covers
Fits AR Pistol with 7” Barrel
Compatible with Gas Tube and Piston System
106mm
MTU008
4” Free Float
Quad Rails
MTU008
253mm
MTU005E
10” Free Float
Quad Rails
MTU005E
Slots: 18 on Top, 15 on Left/Right, 17 on Bottom
Includes 12 PCs Rail Covers
Fits Carbine-length AR15
Compatible with Gas Tube and Piston System
183mm
MTU005
7” Free Float
Quad Rails
MTU005
Page 4
5 6
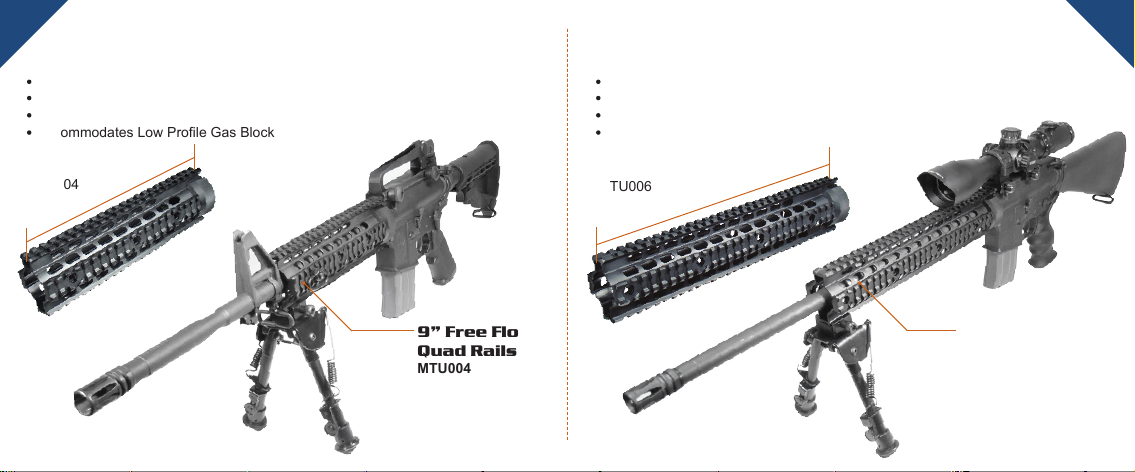
MODEL 4/15 MID-LENGTH APPLICATION MODEL 4/15 RIFLE-LENGTH APPLICATION
Slots: 23 on Top, 20 on Left/Right, 22 on Bottom
Includes 16 PCs Rail Covers
Fits Mid-length AR15 (Gas Tube Only)
Accommodates Low Prole Gas Block
Slots: 31 on Top, 28 on Left/Right, 30 on Bottom
Includes 20 PCs Rail Covers
Fits Rie-length AR15 (Gas Tube Only)
Accommodates Low Prole Gas Block
MTU004
235mm
9” Free Float
Quad Rails
MTU004
MTU006
318mm
13” Free Float
Quad Rails
MTU006
Page 5
7 8
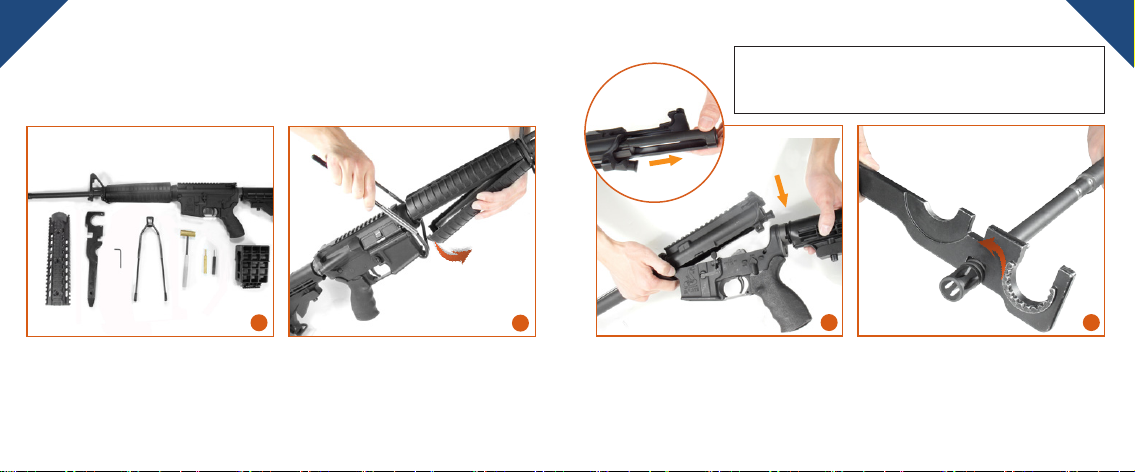
MODEL 4/15 FREE FLOATING QUAD RAILS
INSTALLATION GUIDE
Prepare the rie, the mount and necessary
tools (a hummer, a punch, an AR15 upper
receiver vise block, an AR15 handguard
removal tool, an AR15 combo wrench
and a vise). Set up a comfortable working
environment.
1
Remove the original plastic handguard with a
handguard removal tool.
2
Caution: Make sure rearm is not loaded.
Remove magazine and examine chamber.
Use safe handling procedures at all times.
Remove the lower receiver with stock
assembly. Take out the bolt assembly.
3
Remove the Flash Hider by turning it
counterclockwise with an AR15 combo
wrench.
4
Page 6
9
10
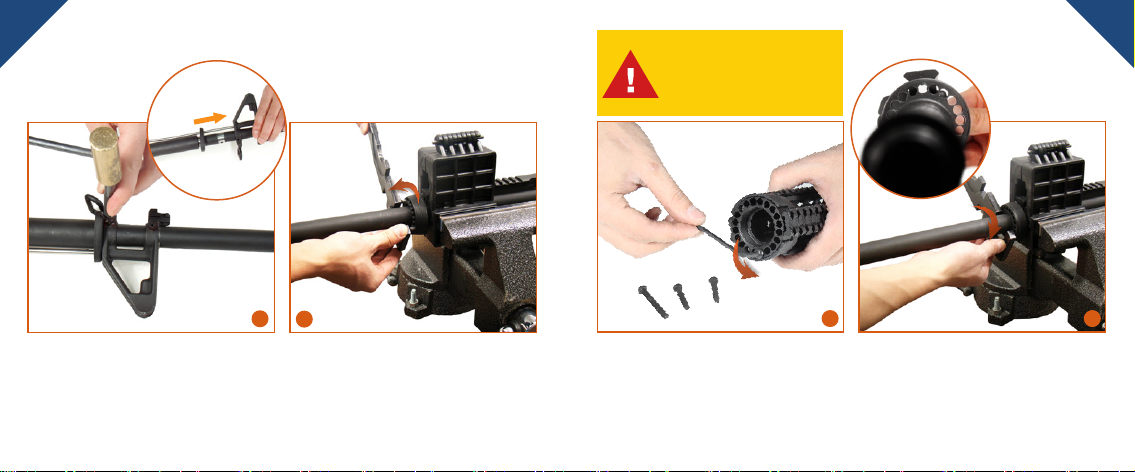
Max. torque value for
installing barrel nut
should not exceed
60ft.lbs.
5
Place the barrel on a well padded at surface
securely. Punch the two pins at the bottom of
the front sight out with a hummer and a punch.
Remove the Front Sight with the Gas Tube,
and take out the Front Cap.
6
Clamp the upper receiver on a vise with an
AR15 upper receiver vise block. Loosen the
barrel nut by turning it counterclockwise with
an AR15 barrel nut wrench. Take out the
original barrel nut with the delta ring assembly.
7
Release the 4 locking screws by turning them
counterclockwise with the included Allen
wrench, and take out the free oating barrel
nut from the handguard assembly.
Fit the free oating barrel nut on the upper
receiver, and tighten it with enough tension.
Make sure that one of the through holes on
the barrel nut is aligned well with the hole on
the upper receiver for the gas tube to pass.
8
Page 7
11
12
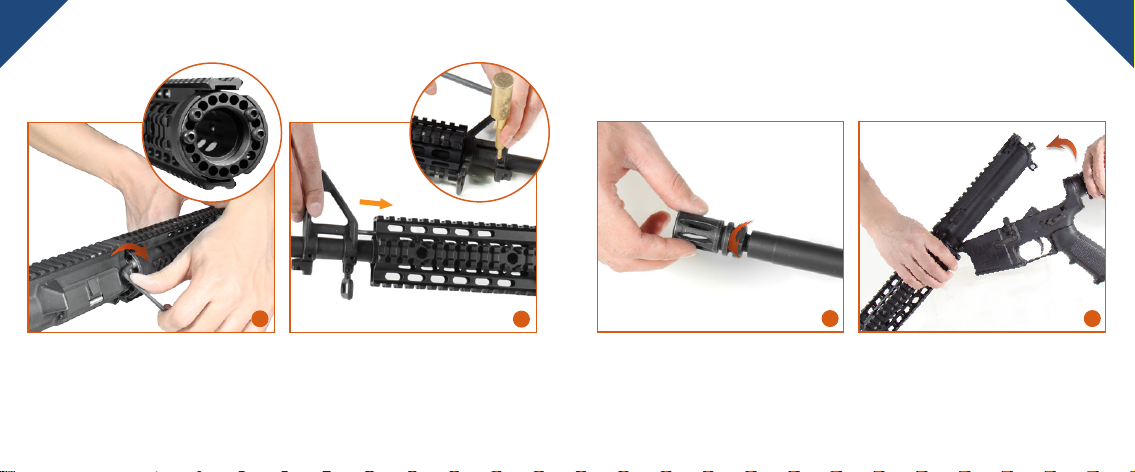
9
Fit the free oating handguard mount onto the
barrel nut, and make sure that the top rail of
the mount is aligned well with the at top and
that the two alignment pins go into the through
holes on the barrel nut. Tighten the 4 locking
screws into the handguard assembly with
about 35 inch-lb torque.
Put back the Front Sight with the Gas Tube.
Put back the two pins to lock the Front Sight
to the barrel.
10
Install the Flash Hider on the Barrel.
11
Put back the bolt assembly, the lower receiver
and the stock assembly.
12
Page 8
13
PRODUCT FEATURES
14
Optional
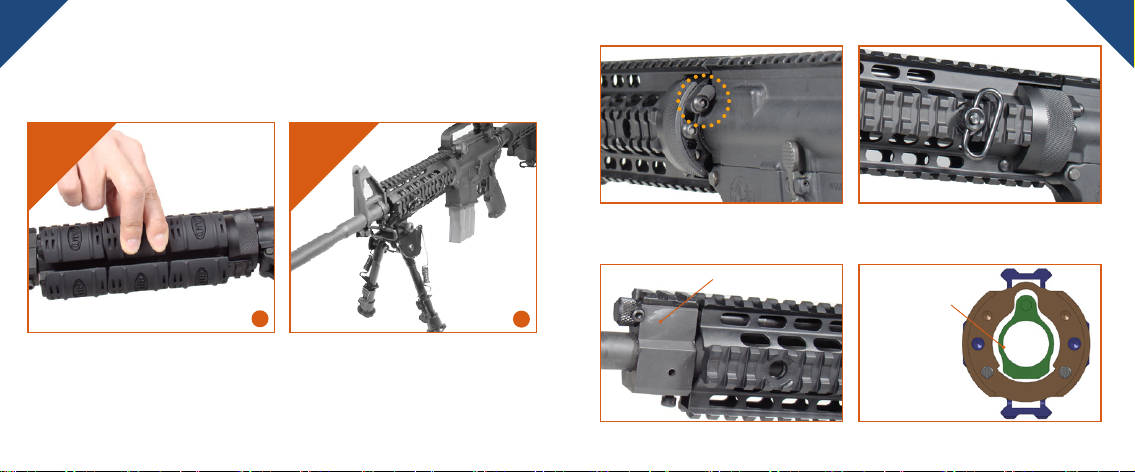
13
(Optional Step) - Install the Rubber Rail Guards
if desired. Simply extend the Rubber Rail Guard
to horizontally cover the rail. Press the whole
piece to clip onto the rail along 2 sides for a
tight t.
Optional
14
(Optional Step) - Install high quality UTG
accessories on the free oating quad rails,
such as foregrip, bipod, ashlight, laser, dot
sight, etc. Your rie is ready for test ring now.
Anti-rotation Tabs with Mid-length Screws
(MTU004, MTU005, MTU005E, MTU006, MTU008)
Piston System
Compatible with Piston System
(MTU005, MTU008)
(MTU004, MTU005, MTU005E, MTU006, MTU008)
QD Swivel Housing
Low Prole
Gas Block
Compatible with Low Prole Gas Block
(MTU004, MTU006)
Page 9

MUM021011104
UTG
MODEL 4/15
QUAD RAILS
MTU004 / MTU005 / MTU005E / MTU006 / MTU008
Made in USA Free Float AR Quad Rail Systems
Slim Profile and Super Lightweight Design
Solid Aircraft Aluminum Construction with Hard Anodizing
Top Rail Extends to Upper Receiver
Most Innovative Design and Satisfying Performance
 Loading...