

Page 1

Page 2
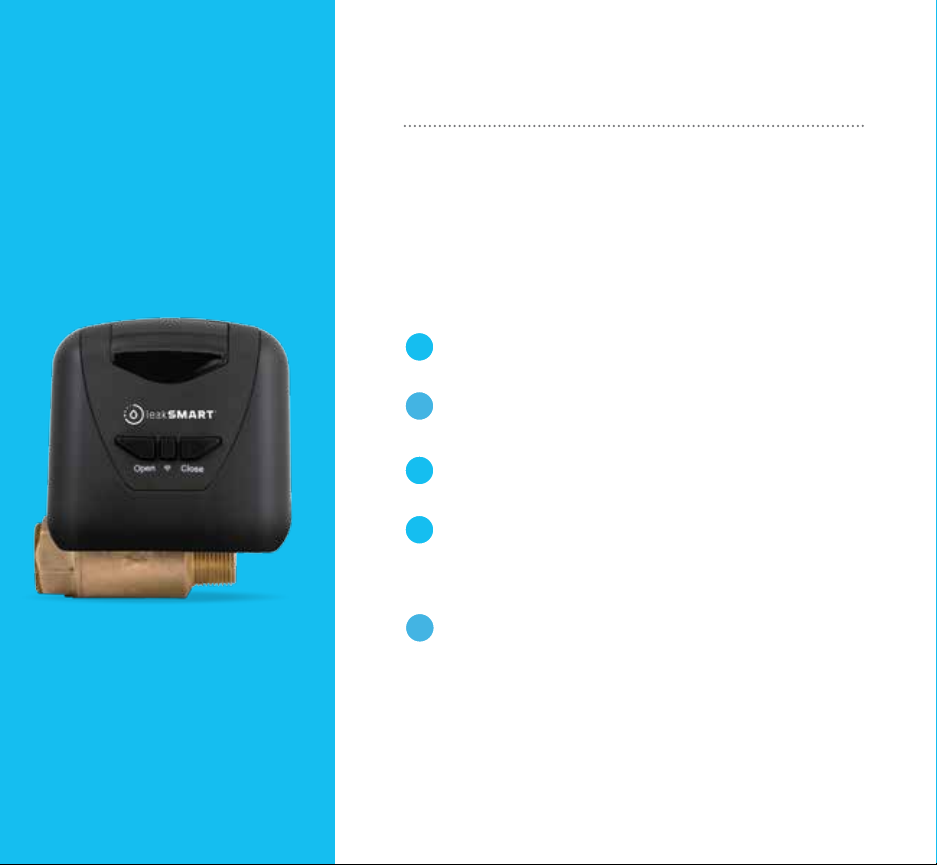
leakSMART® PRO Valve
Complete Home Water Protection
leakSMART® is an innovative, wireless system that
eliminates the threat of water damage by keeping you in
constant control of your home’s water supply. It not only
detects leaks in your home, but also immediately shuts off
the water, stopping damage before it can start — all in less
than 10 seconds (Smart system hub required).
It’s innovative technology that is
simple and easy to use:
Download the leakSMART® App on your mobile
1
device from the Apple Store or Google Play
Activate your leakSMART® hub (or other
2
compatable smart home system) with the
leakSMART® app.
3
Pair your leakSMART® Valve and waterproof
sensors to your leakSMART® hub.
4
Install your leakSMART® Valve to your
main water supply. PROFESSIONAL
INSTALLATION IS STRONGLY
RECOMMENDED.
5
Easily monitor, detect and control your main
water supply with your mobile device. Enjoy
peace of mind knowing that the threat of
water damage has been eliminated.
Once your leakSMART® system is up and running,
please keep this manual for future reference.
CAUTION: Read installation instructions BEFORE installing
batteries in your leakSMART® Valve.
Page 3

®
leakSMART
TABLE OF CONTENTS
• Homeowner Setup and Operation
Valve ..................................................... 5
Manual Operation Steps ..................... 8
Professional Installation Steps ........... 9-10
• Troubleshooting
Valve ..................................................... 11- 14
PRO
Page 4
leakSMART®
Package Contents
It’s never been easier to stay in control of your home’s water supply.
Setting up your leakSMART® system is as simple as launching an app, pairing with
your smart home system and getting your leakSMART® Valve installed.
Unpack your leakSMART
Package Includes:
Tools Required: (1) Phillips Head Screwdriver
(1) leakSMART® Valve
(1) 9V Power supply for the leakSMART® Valve (1 with 18 ft. reach)
(1) Instruction Manual
(4) AA Batteries
®
box and check the contents. You should have the following:
1.
Required:
leakSmart® or compatible home hub.
Download the leakSmart® app (or compatible smart home system app) from google play or app
store and create an account.
Log into leakSmart® app (or compatible smart home system app) to begin the next steps in the set
up process.
4
Page 5
leakSMART® PRO
Valve Setup and Operation
1. Download leakSMART® app via google play store (Android) or iTunes (IOS).
Pair your leakSMART® valve with your smart home system (Smart hub
required)
• Place your leakSMART
can verify that it is within range of your smart home leakSMART™ Hub.
Verification will be done in pairing mode in APP.
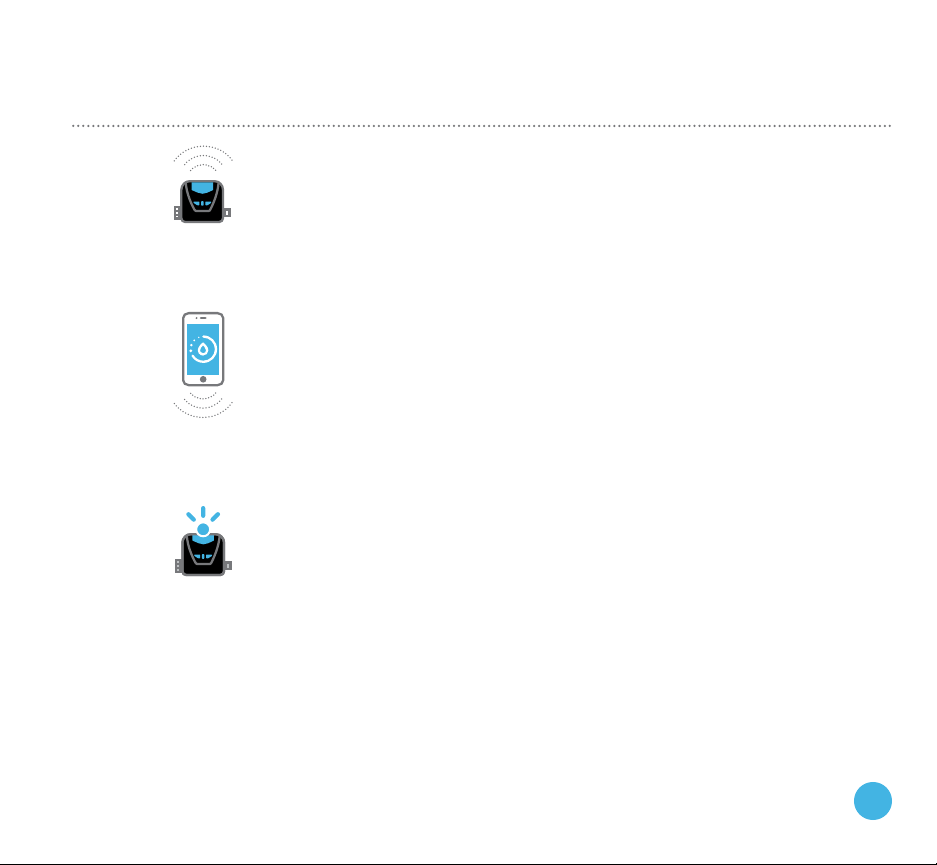
• Connect leakSMART® Valve to the provided 9V Power Supply and verify
that the AC power cord is long enough to reach the valve installation
location. (An optional 9 ft. AC power adapter extension wire is also
available. This, and other leakSMART® accessories, can be purchased at
leakSMART®.com) It is recommended to install 4 AA alkaline batteries
(provided) as a source of battery backup. ( A flashing blue light on the
front of the unit will indicate that it’s ready to pair. If the blue light stops
flashing, press the center button 5 times quickly to reset pairing mode.
®
Valve near your installation location, so you
Now, open the leakSMART® App on your smart device.
On the leakSMART
®
hub, press the blue button once to enter pairing
mode, or use the add device tab found on the home page of the
leakSMART® app. As a reminder, a steady-single green flashing light
on the leakSMART® Hub indicates pairing mode and will last 3 minutes
while in pairing mode.
CAUTION: Do not replace the 4 AA battery block with a 9v battery, this could damage the
device and void warranty.
5
Page 6
leakSMART® PRO
Valve Setup and Operation
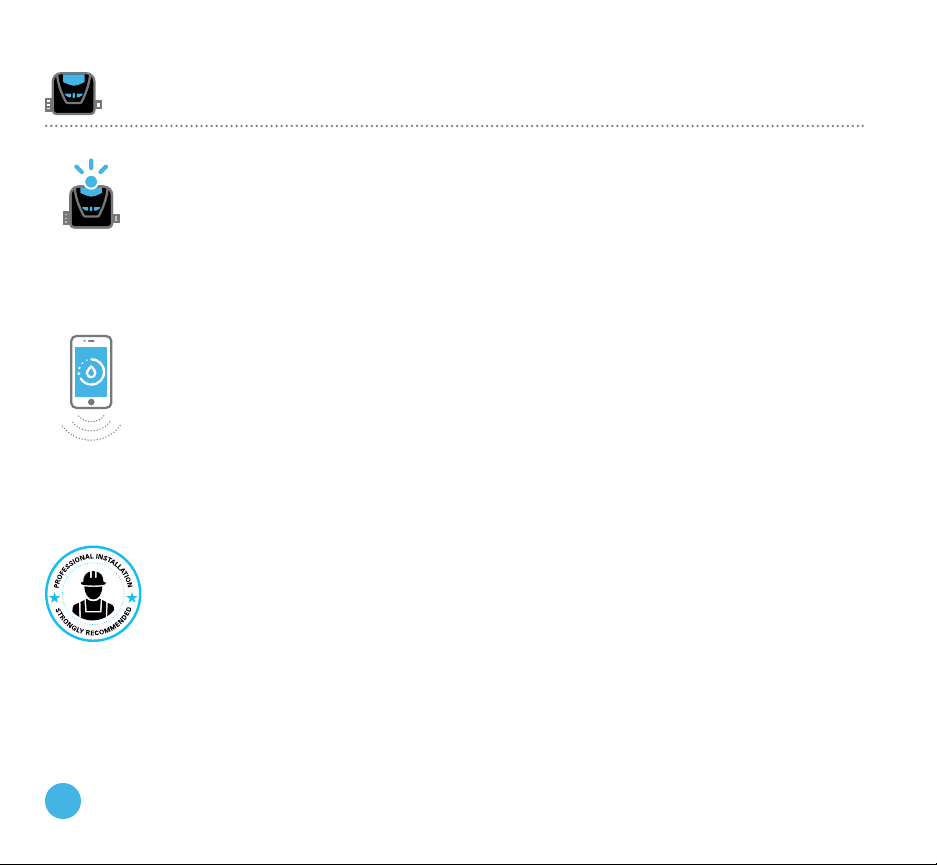
• Once the hub is in paring mode, press the center button once quickly on the valve
controller. Check app for the valve to show up. Note: that it may take up to a
minute for the valve to populate in the app.
• All leakSMART® Valve Lights should turn off once pairing mode has been
successfully completed.
A new valve on your home screen will verify the valve has been added.
• leakSMART® App, should register ‘New Valve’ on the home screen.
Note: You can manually open/close the leakSMART
®
Valve by pressing the
‘Open’ and ‘Close’ buttons located on the front of the valve Or use the toggle
button to remotely open and close the valve in the app.
• It is recommended to test the valve by opening and closing using both, the local
control buttons on the valve and in the app, prior to installation.
• Once communication has been tested between hub and valve, you will then be
ready to plumb in the valve.
Professional Installation Recommended. Contact a licensed plumber for
professional installation of your leakSMART® Valve.
• For fast, easy installation, provide your plumber with the details on pages 9-10
6
Page 7
leakSMART® PRO
Valve Setup and Operation
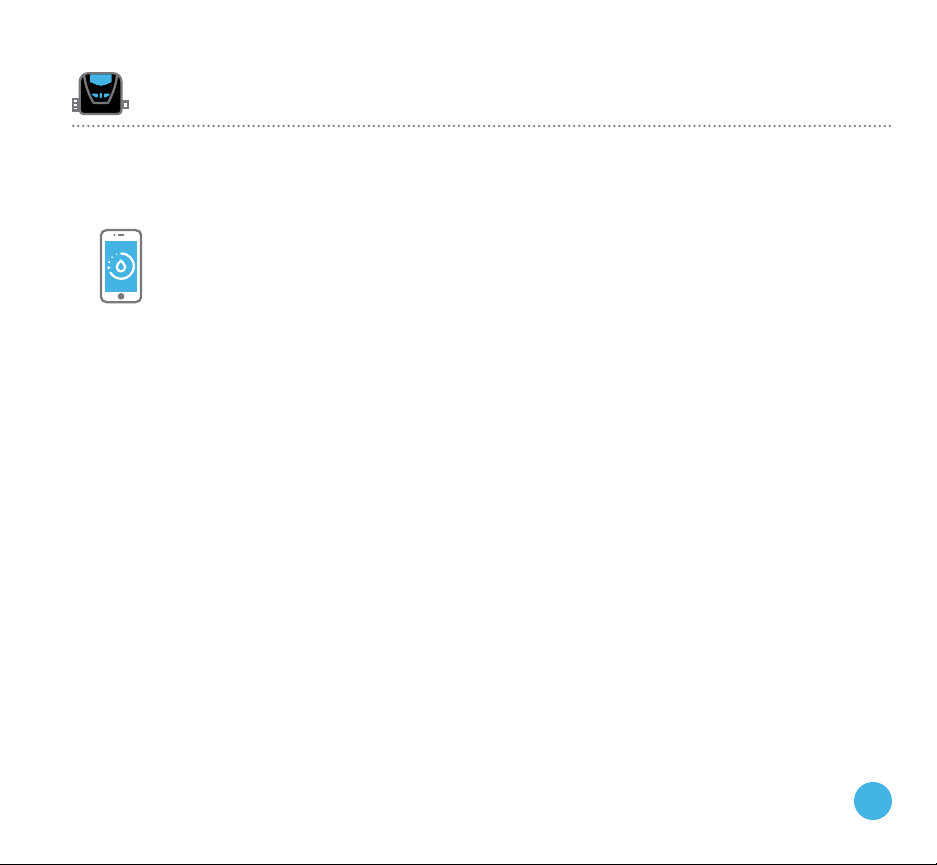
2. Be protected, (Sensors required)
®
• A leakSMART
alarm, even without connection to your leakSMART® Hub
— but pairing a sensor means the system will signal your
leakSMART® Valve to automatically shut off your water and
send you instant notifications, preventing water damage
within 10 seconds.
• To completely protect yourself from water damage, pair
each leakSMART® sensor with your smart home system.
Place the sensors in key locations you would like to
monitor. This will assure that your main water supply shuts
off in the event of a leak.
Note: Sense only option is available and will notify you of
the presence of water in regions that does not require the
shutting off of your main water supply (sensor required).
Note: The leakSMART® hub can support up to 32 individual
leakSMART® devices. Additional sensors may be purchased
separately for whole home monitoring.
sensor provides an audible water detection
7
Page 8
leakSMART® PRO
Manual Operation Steps
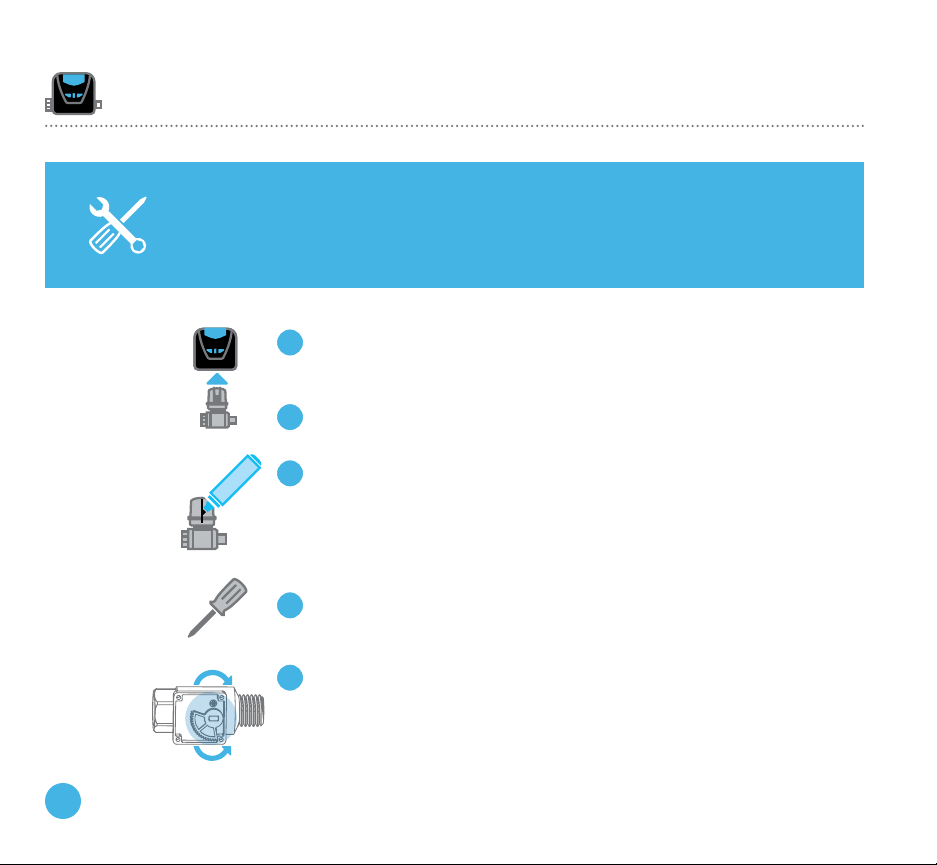
Manual Operation of your leakSMART® Valve:
In the event of repeated error messages from your smart home system that the valve is
not automatically opening and closing, the valve may be manually opened or closed.
1. Unplug the AC power cord from the
valve cover.
2. Remove the cover from the valve.
3. Use a marker to draw a line across one
side where the upper and lower motor
housing connects, so when the motor is
removed, you’ll know how to reposition
it for assembly.
4. Remove the 4 screws using a Phillips
head screwdriver.
Open
5. Place your thumb and finger on the
plastic gear and rotate clockwise to
open the valve or counter-clockwise
to close it; do not use tools to manually
Close
Shown in
8
closed position
open or close the valve.
Page 9
leakSMART®
Professional Installation Steps
The leakSMART® Valve is a patent-pending, wireless, motorized brass water
ball valve that connects directly to a home’s main water supply. Professional
installation is strongly recommended to ensure proper operation and
reliable water damage prevention.
• The leakSMART®Valve may only be installed in homes with an existing
main water shutoff
Please note:
• To avoid any injury, never place your fingers inside the valve
• Do not grip plastic motor drive for leverage when installing the valve
• Do not install on fire suppression systems or fire sprinkler water lines
• Indoor use only
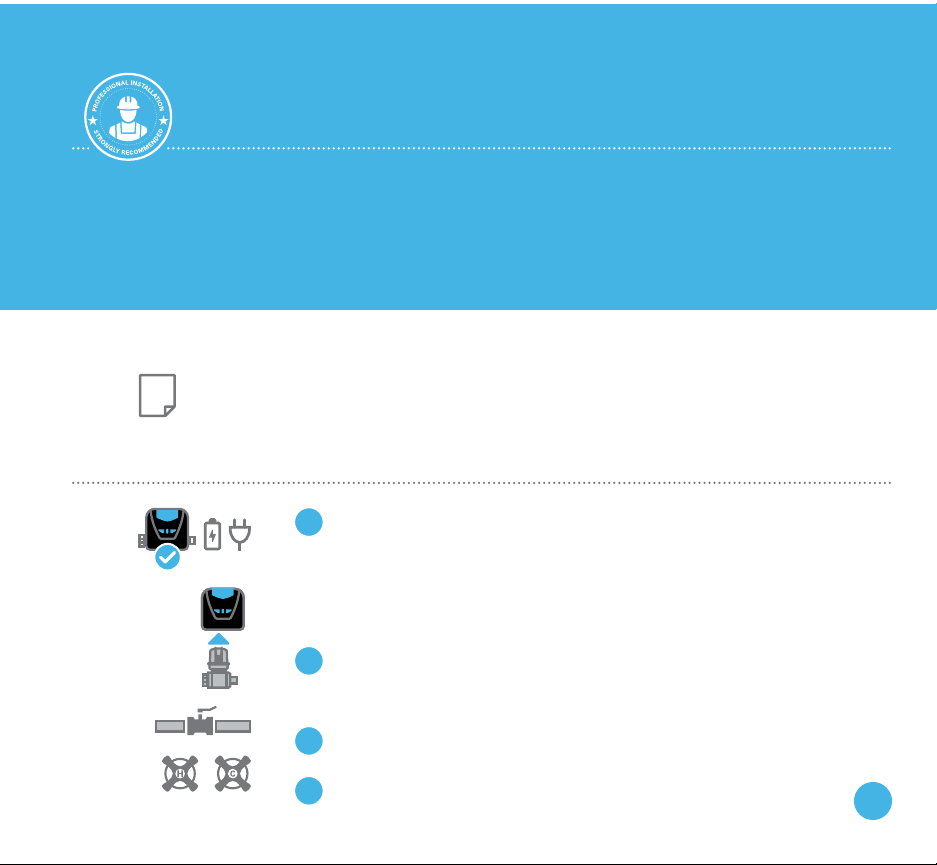
Ensure that you have all necessary leakSMART® Valve components
1.
and fittings required for installation:
• leakSMART® Valve (3/4” FIP x 3/4” MIP), (1” FIP x 1” MIP) or
(1-1/4” FIP x 1-1/4” MIP)
• AC power adapter with 18 ft. reach
• 4 AA Alkaline batteries (provided)
To protect the valve cover from possible damage, remove it by
2.
sliding it away from the valve, and keep it off until you’ve completed
installation.
Shut off the main water supply valve.
3.
4.
Open both hot and cold handles on the faucet nearest the
valve to relieve water pressure.
9
Page 10
leakSMART® PRO
Professional Installation
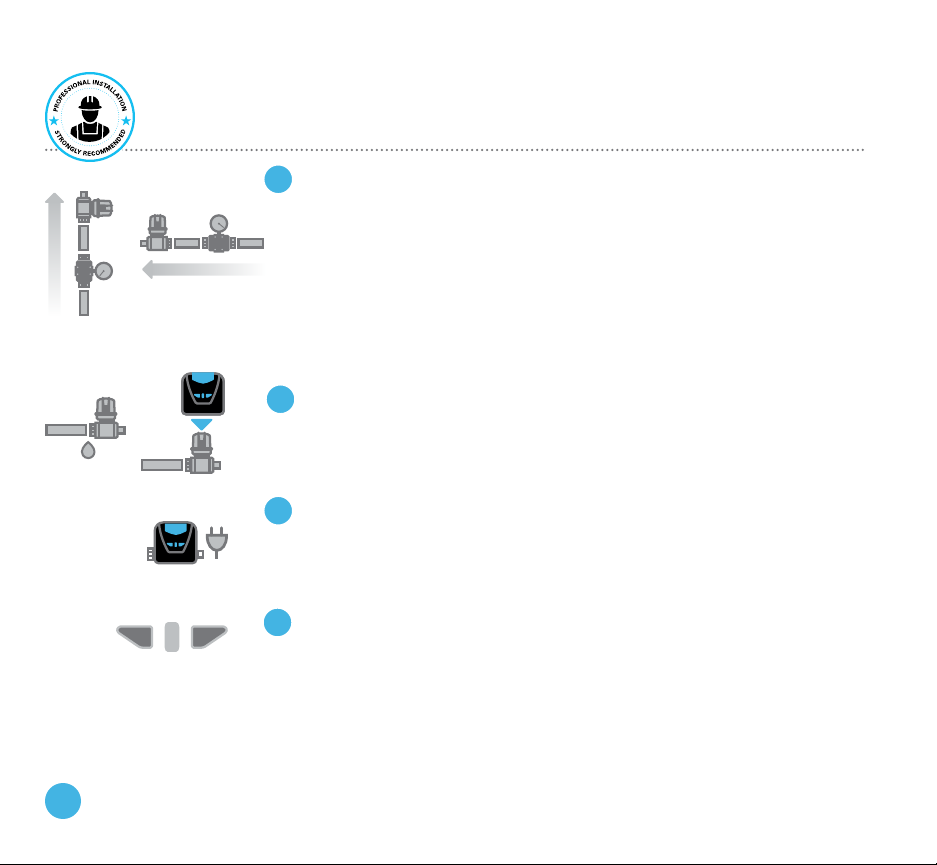
The valve will also need to reach an AC power source. It is recommended
5.
that the valve is kept operating on AC power (cord provided), with
Water Flow
Water Flow
Open Close
batteries used as a back-up power source.
IMPORTANT: The valve must be installed after the water main manual shut-off and
water meter. It is recommended that the valve be installed at least 8 inches away from
water shut-off to avoid damage. Additional fittings may be required.
• Do not solder fittings near the water meter or smart valve to avoid heat
affecting the devices.
• Position the valve so that the arrow on the side points away from
the water meter.
Note: The valve can be installed vertically or horizontally, do not install
upside down.
Once installed, close the faucet, turn on the main water valve and check for leaks.
6.
Reattach the valve cover by sliding it over the motor housing, with the front facing you.
Caution: When first opening the valve, air remaining in your plumbing
lines from cutting in the valve will rapidly vent out of the open faucet, this may create
water hammer effect on first time use. Once air has escaped, your system will go back to
mormal pressures.
Attach the AC power cord adapter to the valve cover and plug into the nearest 110 volt
7.
outlet.
• Using an extension cord is not recommended — please use the
18 ft. AC power adapter cord in this package.
• An optional 9 ft. AC power adapter extension wire is also available.
This, and other leakSMART
Check valve cover function by turning on a faucet and pressing
8.
the “Open” and “Close” buttons.
• When the valve is open, it will display a steady green light and
water will run.
Caution: When first opening the valve, air remaining in your plumbing lines from cutting
in the valve will rapidly vent out of the open faucet, this may create water hammer effect
on first time use. Once air has escaped, your system will go back to mormal pressures.
• When the valve is closed, it will display a steady red light and water
will stop running.
Confirm the valve is functioning properly with the leakSMART
®
accessories, can be purchased at leaksmart.com
®
App. Sensor(s) and hub.
10
Page 11
leakSMART® PRO
Troubleshooting
Your leakSMART® Valve works with your smart home system to keep you in control of your home’s
water supply. The valve, which operates on AC power with battery back-up, will close automatically
when paired with leakSMART
mobile device and detect a leak. The leakSMART
providing you with more control and protection for your home. Plus you can easily turn your water
supply on and off from anywhere using your smartphone, tablet.
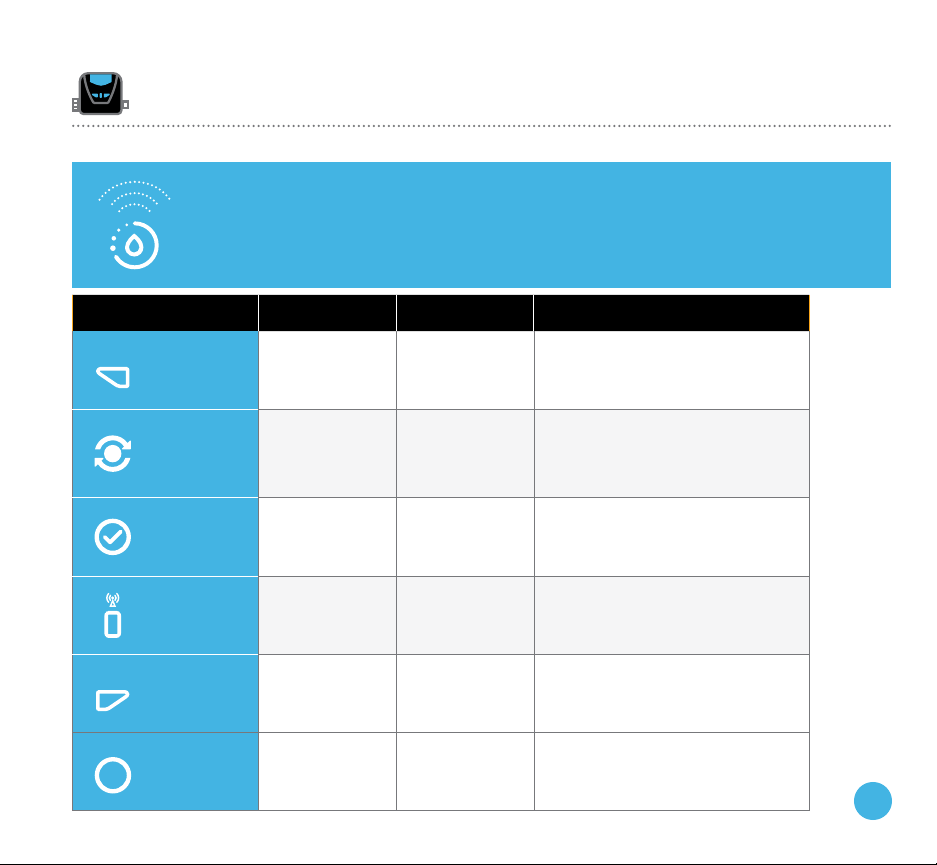
Status Operation Lights Notes
®
Hub and Sensors. Monitor your smart home system through your
®
Hub will send a signal to your personal smart device
Open
Close
X
Open Valve
Pairing Mode
Pairing
Successful
Reset to
Factory
Settings
Close Valve
Error
Press left side
“Open” button
Press center
button once
Press center
button five
times, quickly
Press right side
“Close” button
NOTE: When not in use, lights will go dark.
Steady green
light
Blue light blinks
twice every two
seconds
Blue light blinks
three times,
then stops
Blue light blinks
every two
seconds
Steady red light
Red & green
alternating
If the blue light stops flashing before
pairing is successful, press the
center button 5 time quickly, to reset
Pairing Mode
Check APP, Valve lights will go dark
Once the valve is reset, it can’t be
controlled manually until it’s re-paired
with your smart home system
Make sure controller is firmly
engaged on valve body
11
Page 12
leakSMART® PRO
Troubleshooting
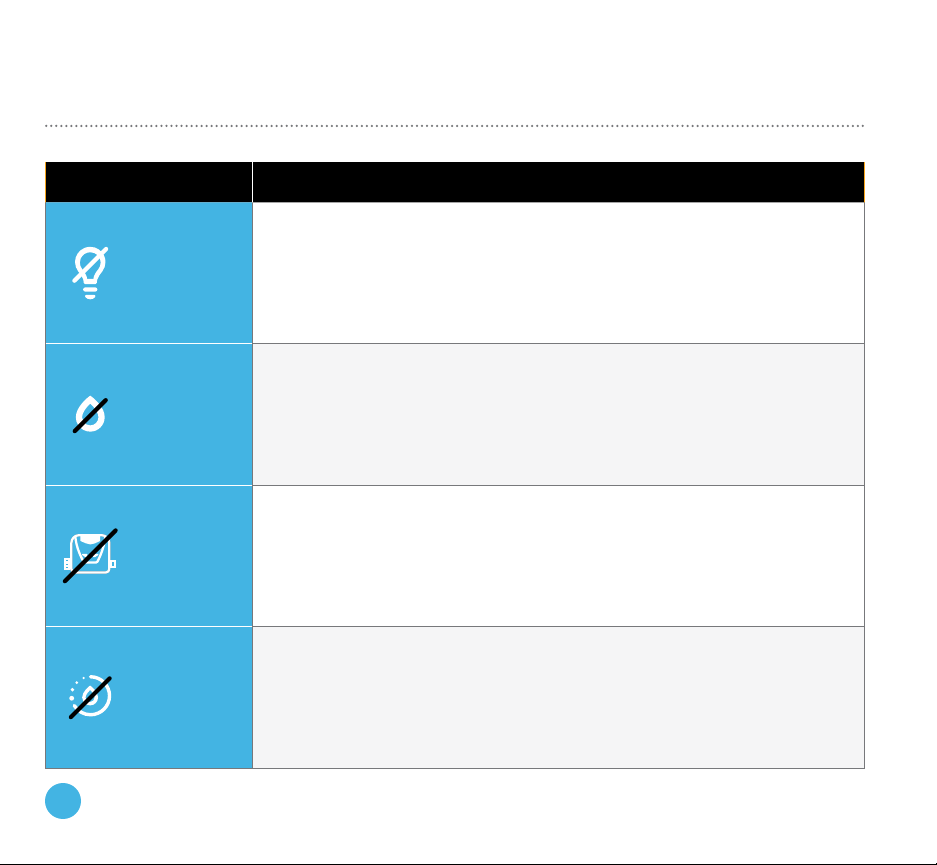
Problem What to Check
12
Status lights
do not come
on
No water
comes out
of the faucet
leakSMART™
Valve does
not operate
leakSMART™
Valve does
not operate
with your
smart home
system
• Make sure there is power to the outlet
• Unplug AC power adapter cord from valve cover and plug back in
• If AC adapter extension wire was used, unplug both ends and reconnect
• Replace batteries
• Check that your leakSMART™ Valve is open by pressing the "Open" button
on your Valve
• Make sure the main water supply valve is open
• Replace batteries
• Make sure valve cover or valve controller is firmly on valve assembly
• Check that the unit is powered from the AC power adapter
• Replace batteries
• Power down by removing both battery block and AC power cord, then plug
back in
• Check your smart home system app to ensure the valve is connected
• Check Internet connection to your hub
• Close out then re-open app
NOTE: All lights go dark when not in use.
Page 13
leakSMART® PRO
Device Reset Procedures
• To reset the valve controller, rapidly press the center button 5 times. The Blue LED light will
begin to flash indicating it is reset and ready to join the system.
Note 1: Sometimes the device may require that it be power cycled in advance. This is done
by removing the AC adapter cord connector and also removing a battery if any are installed.
Then power back up and procced by pressing the center button 5 times rapidly.
Note 2: If resetting the valve while connected to an existing leakSmart® system where the
valve is visible in the App, the valve will drop off, in being removed from the system.
To pair the valve, Put the smart system hub in pairing mode, press the center button once
on the valve, check app for the valve to show up. Note: Once joined, all lights will go dark.
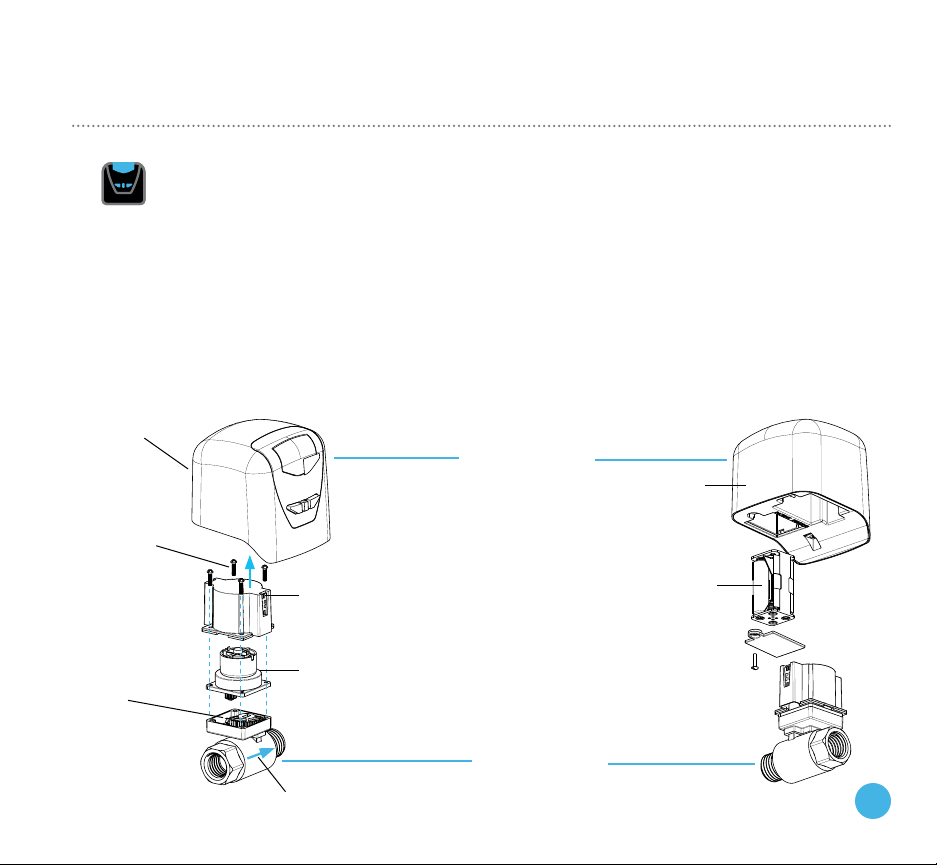
Controller
Remove
control top for
installation.
Note: controller
can be placed
either side of the
valve body.
Sector gear can
be accessed for
manual operation.
Electrical contacts must engage
spring tab contacts, inside valve
controller housing.
Drive Motor and electrical contact
housing assembly, operating on
6v DC Max.
Flow direction identified
by arrow on valve body.
Basic Valve and Controller Diagram
1. Valve Controller
Controller
1. Battery pack
Holds 4x AA
batteries,
included.
(Note: Never
replace battery
block with a
9v battery)
1. Brass Ball Valve
13
Page 14
leakSMART® PRO
Device Reset Procedures
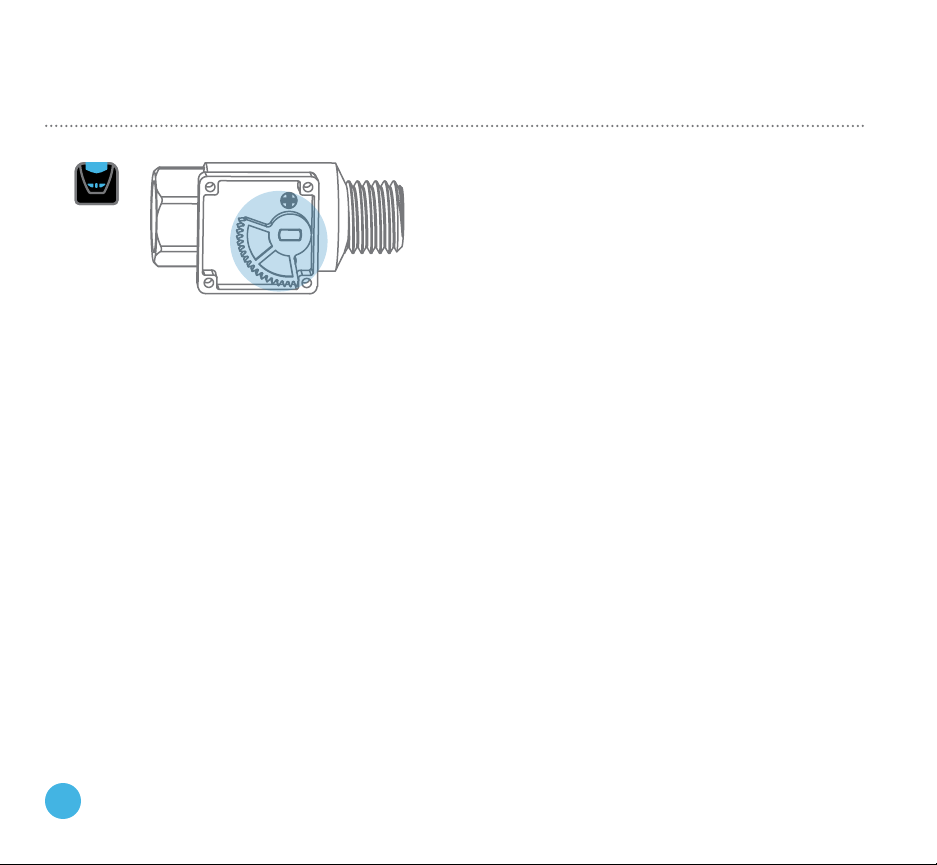
Shown in
closed position
1. Sector Gear (Manual Operation)
Manual operation:
Accessing the sector gear, allows for manual operation
of the valve. The sector gear is installed directly to the
valve stem. Maintain position of the sector gear if
removing, flipping the sector gear upside down reverses
operation.
14
 Loading...