

Page 1
Handheld USB Rechargeable
Electric Milk Frother
LBEC01
Instruction Manual
Thank you for choosing the Leaf & Bean
Handheld USB Rechargeable Electric Milk
Frother.
To ensure proper operation and to maintain
the lifespan of your appliance, please read
these instructions carefully before first use.
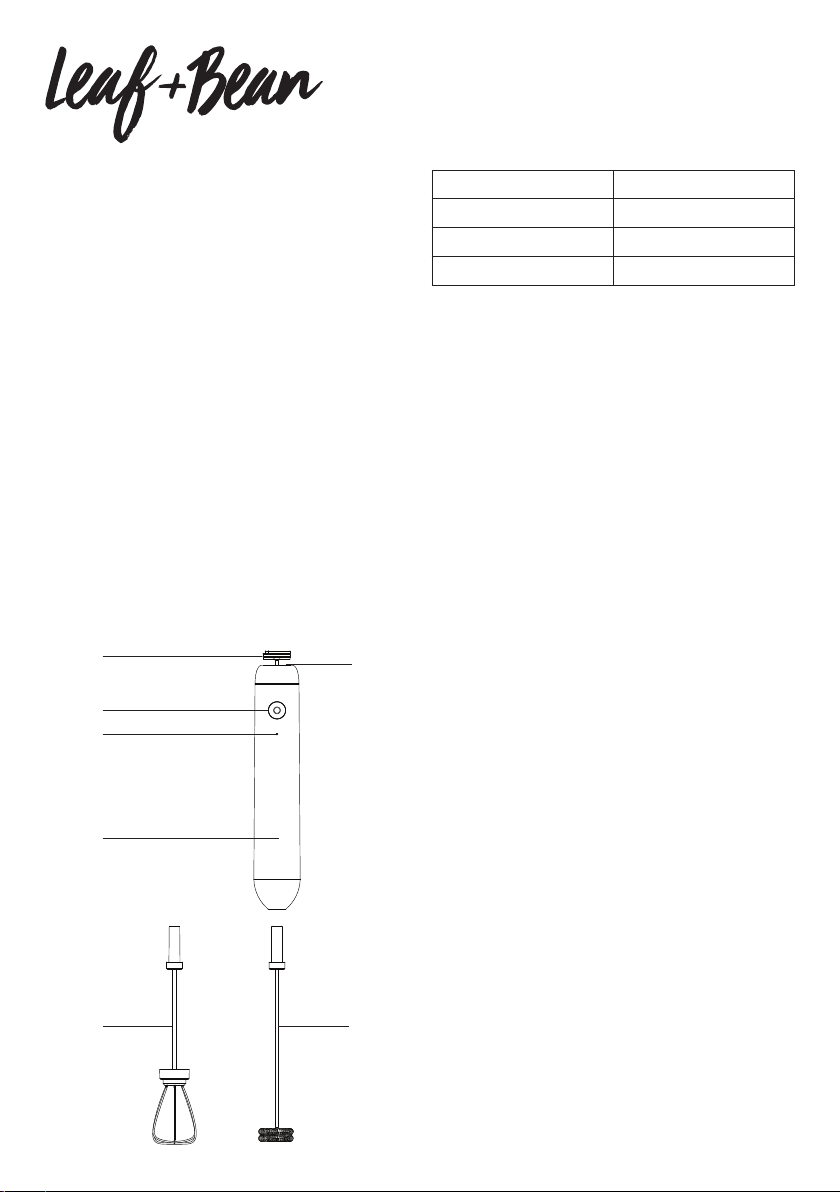
Features and Parts
1. USB-C Charging Port
2. Protective Back Cover
3. On/Off/Speed Switch
4. Status Indicator LED Light
5. Water-Resistant Body
6. Egg Beater Whisk
7. Milk Frother Whisk
2
3
4
5
6 7
1
Technical Parameters
Input Voltage 5V/1A Type C
Power 2000mAh/10W
Net Weight 160g
Battery Lithium oin
Safety First
• Please read the instructions carefully
before using this appliance.
• Keep the charging cable away from any
high temperature surfaces. Please try to
prevent any damage to the charging cable.
• Always make sure the protective back
cover is closed before washing the
appliance. Keep the USB charging port
clean and dry.
• Do not wash or clean the appliance when
connected to the charging cable.
• Do not wash the appliance in the
dishwasher.
• This product is to be strictly used indoors
within the kitchen.
• This product can only be used for stirring
and frothing liquid foods such as milk, hot
chocolate, or eggs.
• Keep out of reach of children.
• If the appliance is damaged, it must
be replaced or repaired either the
manufacturer or its maintenance
department, or similar professional
personnel. Do not attempt to repair or
dismantle the appliance by yourself.
• In case of product failure, refer to the
troubleshooting section of this instruction
manual. If the issue cannot be resolved,
contact the manufacturer for assistance by
professional technicians.
• Always use the appliance with its matching
whisks.
• Please keep these instructions for future
reference.
Page 2

Before First Use
Open the back cover and plug in the USB
charging cable. The indicator light will blink
white every 2.8 seconds while the appliance
is charging and will go out once it is fully
charged.
Using Your Frother
1. Connect the egg beater or the milk frother
to the main body, depending on your
required whisk.
2. Pour your milk or eggs into a stirring
container. This should be a cylindrical
container between 90mm and 100mm in
diameter with a depth of at least 110mm.
3. Place the whisk into the food materials
and hold the appliance in such a way that
the rotor is at least 10mm away from the
wall of the container and 5-10mm away
from the bottom of the container.
4. Gently press down the switch to start
the stirring and frothing. If you turn the
machine clockwise as it is working, the
stirring effect will be better.
5. The speed setting can be changed by
pressing the switch. Press once for normal
speed, a second time for high speed, and
once again to turn off the appliance.
6. The ideal quantity and temperature of
materials to be stirred varies as follows:
Cleaning and Maintenance
• This appliance has an IPX6 water
resistance grading as a precaution if
accidentally dropped in water. However,
we strongly recommend not to submerge it
in water. To clean the milk frother, please
wipe body with mild strength soapy cloth
and wipe clean with a warm damp cloth.
• Do not wash any of the components in the
dishwasher.
• After washing, use a dry and soft cloth to
wipe each component clean.
• The status indicator LED light will glow
red when the charge of the appliance is
below 10%. Open the protective back cover
to charge the appliance and remember to
close it after it is completely charged.
• If the whisk is stuck or blocked, the LED
will blink red and white alternately. Press
down the switch for 15 seconds to reset the
whisk.
• This product cannot be discarded with
normal household waste. Please check
your respective council guidelines on hard
rubbish disposal or take the product to an
approved recycling facility.
Function
Milk
Hot
Chocolate
Egg 2-4 eggs
Food Materials to be
Stirred
100ml of milk
(300ml at most)
60g of cocoa powder
+ 300ml of milk
Working
Time
30 sec
30 sec 70-80˚C
At least
5 mins
Milk
Temperature
Initial milk
temperature
Result
The milk-froth ratio is at
least 90%.
The mixture is stirred evenly
without obvious granules
and sediment.
The eggs are mixed evenly.
Page 3

Troubleshooting
No. Issue Possible Cause(s) Solution
Gently insert the head of the
The whisk head is
1
vibrating heavily and
not stirring properly.
The whisk is not inserted
properly or in place.
The whisk may be bent.
The appliance is out of
charge (check if the light is
flashing red).
whisk into the body of the
appliance leaving a gap of at
least 0.5mm between the two.
Inspect the whisk for any
bending and carefully
straighten it manually.
Recharge the appliance.
The appliance fails
2
to start or stops
midway.
The milk takes too
3
long to froth.
If all the above solutions fail, please contact a registered professional technician.
The appliance has switched
off to protect against
overload.
The back cover has not
been closed properly before
washing and water has
entered the charging port.
The whisk head is vibrating
heavily and not stirring
properly.
The milk is being frothed
incorrectly.
Wait for a few seconds before
pressing the on/off switch
again.
Return to the manufacturer
for repair.
Refer to Solution 1.
Immerse the whisk into the
milk as much as possible but
prevent it from touching the
body of the appliance.
Page 4

Recipes
Use your milk frother to create these
delicious drinks.
Cappuccino
1/3 espresso
Add 2/3 warmed and frothed milk, top with
cocoa powder.
Latte Macchiato
Pour warmed and frothed milk in a tall glass.
Add espresso carefully along rim of the glass.
Instant Frothy Coffee
Place instant coffee granules in a cup.
Add warmed and frothed milk and stir to mix.
Café Latte
1/3 espresso shot
Add 2/3 warmed and frothed milk and stir.
Hot Chocolate
Pour warmed and frothed milk in to a large mug.
Add chocolate powder and stir to mix.
Frothy Coffee Milkshake
1 part espresso - allow to cool.
Add 2 parts frothed cold milk.
4. Change from making circles to making
long sweeps across the pan until you see
larger, creamy curds. This takes about 20
seconds.
5. When the eggs are softly set and slightly
runny in places, remove the pan from
the heat and leave for a few seconds to
finish cooking. Give a final stir and serve
immediately. Serve with an extra sprinkle
of salt, a grind of black pepper and a few
fresh chopped herbs (if desired).
Tip: Scrambled eggs should be soft, creamy,
and gently scrambled. A quality non-stick pan
and silicone spatula are useful. It’s important
to use low heat and monitor the eggs to avoid
them overcooking. Eggs are delicate and
cook very quickly. It is recommended to take
the pan off the heat before the scramble has
finished cooking. Give the eggs a few seconds
in the hot pan (off the heat) and the eggs will
turn out to be perfectly cooked — not dry, and
not too wet.
Scrambled Eggs
Use your egg beater to create these soft and
creamy scrambled eggs.
Makes 2 Servings.
Ingredients:
• 1/2 tablespoon butter
• 4 large eggs
• 1/8 teaspoon kosher salt, or more to taste
Method:
1. Melt the butter in a medium non-stick pan
over medium-low heat.
2. Crack eggs into a bowl, add a pinch of salt
and use the whisk head of your handheld
frother until well blended.
3. When the butter begins to bubble, pour in
the eggs and immediately use a silicone
spatula to swirl in small circles around
the pan, without stopping, until the eggs
look slightly thickened and very small
curds begin to form. This takes about 30
seconds.
Page 5

Our 12-Month Guarantee
Our goods come with guarantees that cannot
be excluded under the Australian Consumer
Law. You are entitled to a replacement or
refund for a major failure and compensation
for any other reasonably foreseeable loss
or damage. You are also entitled to have
the goods repaired if the goods fail to be of
acceptable quality and the failure does not
amount to a major failure.
We stand by this product. Therefore, we offer
a 12-month guarantee on this appliance.
The benefits of this guarantee are in addition
to any rights and remedies imposed by
Australian Consumer Law. Our guarantee
excludes normal wear and tear and instances
where care and use instructions have not
been followed.
What IsAlbi will do: During this guarantee
period, IsAlbi will repair, replace or refund
any defective product. If identical product
is not available for replacement, a similar
product may be offered. IsAlbi asks you
to cover the cost of postage/transit if the
product needs to be sent back to us for
inspection. If IsAlbi deems the product is
defective, we will reimburse your postage/
transit expenses. IsAlbi will be responsible
for the postage/transit of the repaired/
replacement product back to you.
What to do: If a fault/defect is identified,
cease using the product immediately.
To make a claim on this guarantee, take the
product, proof of purchase and full details of
the alleged defect to the retailer from whom
the product was purchased. If you cannot
access the retailer or are unsatisfied with the
solution offered by the retailer, contact IsAlbi
via the details below.
IsAlbi
87 Chifley Drive, Preston, Victoria 3072
P: +61 (03) 9474 1300
E: [email protected]
isalbi.com.au
 Loading...