

Page 1
One Hand Smart Coffee Grinder
G0000041
Instruction Manual
Thank you for choosing the Leaf & Bean One
Hand Smart Coffee Grinder. To ensure proper
operation and to maintain the lifespan of
your device, please read these instructions
carefully before use.
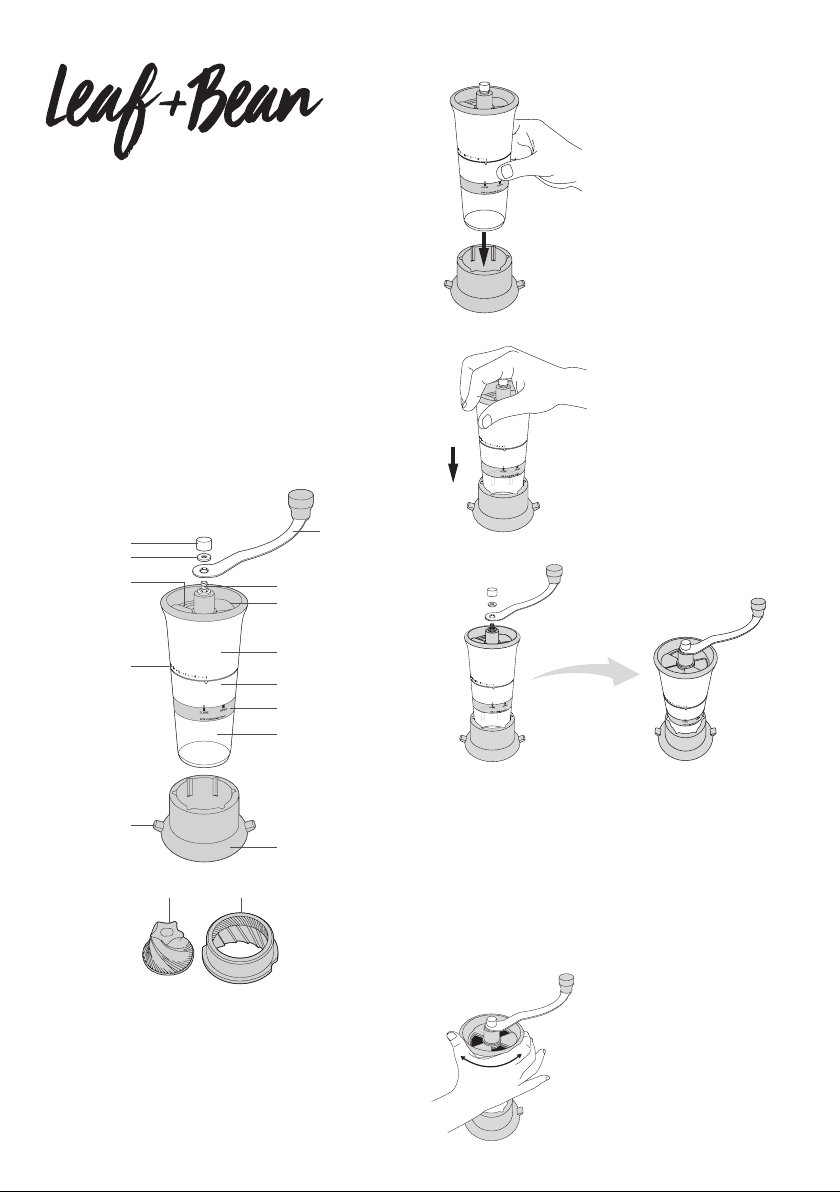
Product Overview
Nut
Washer
Gateways
to hopper
16 settings
Crank
Threaded shaft
Rim to open/close
gateways to hopper
Hopper
Adjusting ring
Black ring
Clear cup
Assembly Instructions
push
1. Place the rubber
suction base on
countertop.Insert
the grinder in rubber
suction base.
2. Hold the grinder over
the top of rubber base
and push downwards
until grinder cannot
go any further. The
rubber suction base
will not attach to
countertops with
rough and grainy
textured surfaces.
Lug
Rotor Stator
Conical burr ceramic grinder
Rubber
suction base
Important Safety Precautions
• For roasted coffee beans and household
use only.
3. Unscrew the nut and take out the white
washer from threaded shaft.
Attach the crank to the threaded shaft,
making sure that the hexagonal shape on
the crank fits into the hexagonal hole at the
end of the threaded shaft.
Replace the white washer and then attach
the nut. Screw the nut until tight.
4. The grinder is ready
for pouring in coffee
beans.Simply twist
the black hopper rim
in either direction for
the hopper gateways
to open.
Page 2
Operating Instructions
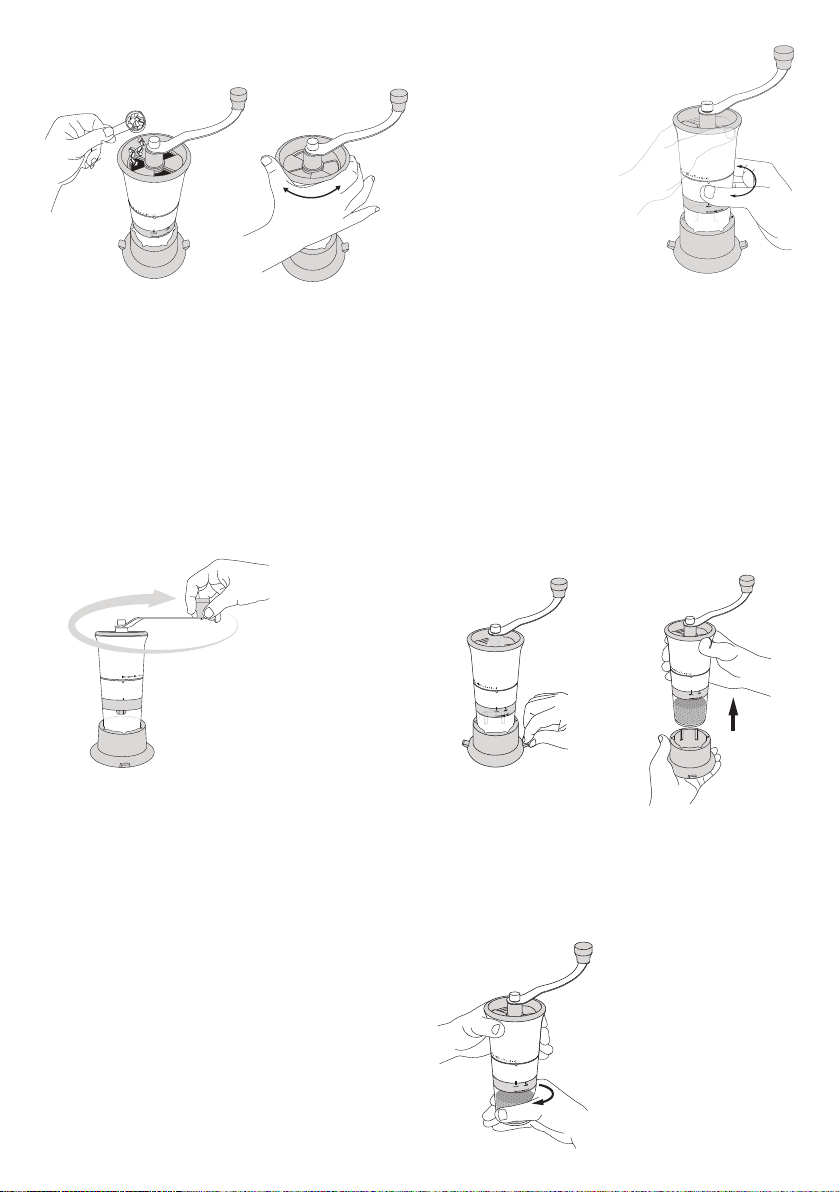
Grind Size Selection
Hold the hopper with
one hand and twist
the adjusting ring
with your other hand
to select grind setting
from 1 to 16.
1. Pour beans into hopper through top holes.
Twist again in either direction to shut hopper
gateways.
Tip: Max fill is approx. 50g (1.8oz). Always
run the grinder out of beans in each
operation. Any beans left in hopper, broken
beans retained in ceramic grinder and
grounds held in clear cup are in contact with
air and will start losing their original flavour
and freshness, so it is best to use them
immediately.
2. Once the rubber suction base is attached
firmly to the countertop and beans are
within the hopper, grab the knob of crank
and turn clockwise.
Coarse grind: Percolator and French press,
Medium grind: Pour over, automatic drip
Fine grind: Espresso and moka.
Setting 1 turns out the finest grind and the
coarsest grind is setting 16.
Tip: To determine the right grind, experiment
with different settings and coffee types to suit
your taste. While changing the setting from
coarse to fine, turn the crank a bit to help
twist the adjusting ring.
Removing Coffee Grounds
pull
1. To access ground
coffee, first remove
rubber base from
countertop by pulling
2. Hold and squeeze
the rubber base to
help pull out the
grinder from base.
on one of the lugs.
3. To remove clear
cup, hold the
hopper with one
hand and twist
the clear cup to
“OPEN” with the
other hand.
Page 3
Care Instructions
Wipe the silicone rubber base with a
damp cloth. Coffee oil and some aromatic
compounds in the coffee bean will start
building up on ceramic grinder after use, so
periodical cleaning is required to ensure the
freshness of ground coffee.
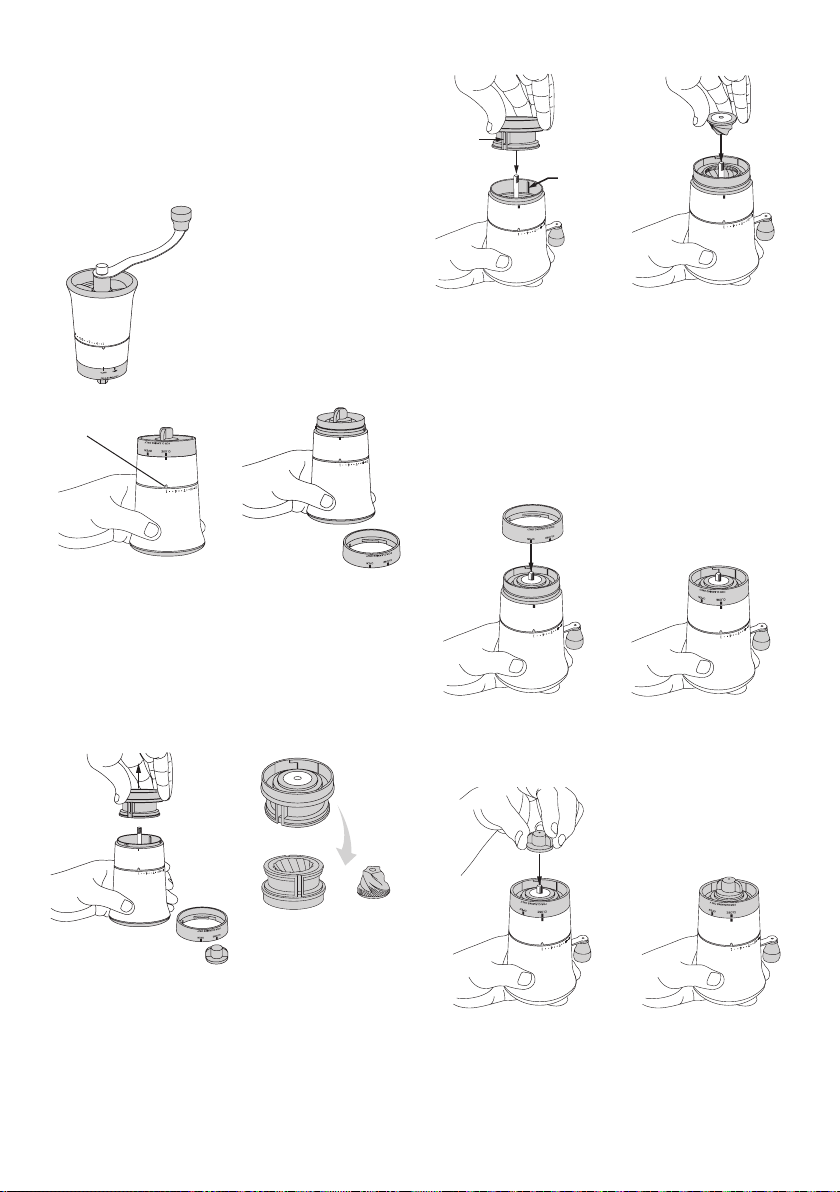
1. To access ceramic
grinder for cleaning,
empty the hopper,
turn the crank to
grind out beans held
in ceramic grinder
then remove the
clear cup.
setting 1
Replacing Parts After Cleaning
groove
raised
rib
1. Check the setting
remains at 1. Invert
the hopper then
slide the stator with
housing into hopper
by guiding either
grooves in housing
to either raised ribs
2. Put the rotor with
white support
back onto the
shaft. If rotor and
white support are
separate, put rotor
back first then the
white support.
in hopper.
2. Twist the adjusting
ring to setting 1 for
the finest grind and
3. Twist the black ring
to “OPEN” and lift
to remove it.
then turn the whole
grinder upside down
with “CLOSE” and
“OPEN” visible.
Stator with
black housing
Rotor
4. Unscrew the nut anti-clockwise from the
end of the shaft and then pull the ceramic
grinding unit out of the hopper. The ceramic
grinding unit includes a rotor and a stator.
Rinse parts under running water. Dry
thoroughly before replacing parts and storing.
Tip: a kitchen brush is handy for cleaning
under tap.
3. Align “OPEN” on black ring with the index on
adjusting ring to replace the black ring then
twist until “CLOSE” points to the index.
4. Place the nut back onto the shaft and turn it
clockwise until screwed tight.
Tip: Hold the crank still and screw the nut a
little closer to rotor with white support.
This will help the finest grind setting grind
even finer.
Page 4

IsAlbi
87 Chifley Drive, Preston, Victoria 3072
P: +61 (03) 9474 1300
E: [email protected]
isalbi.com.au
 Loading...