

Page 1

WinFast
TV Series
Quick Installation Guide
Code: LR66XX
P/N: W05G0312
Version J
Page 2
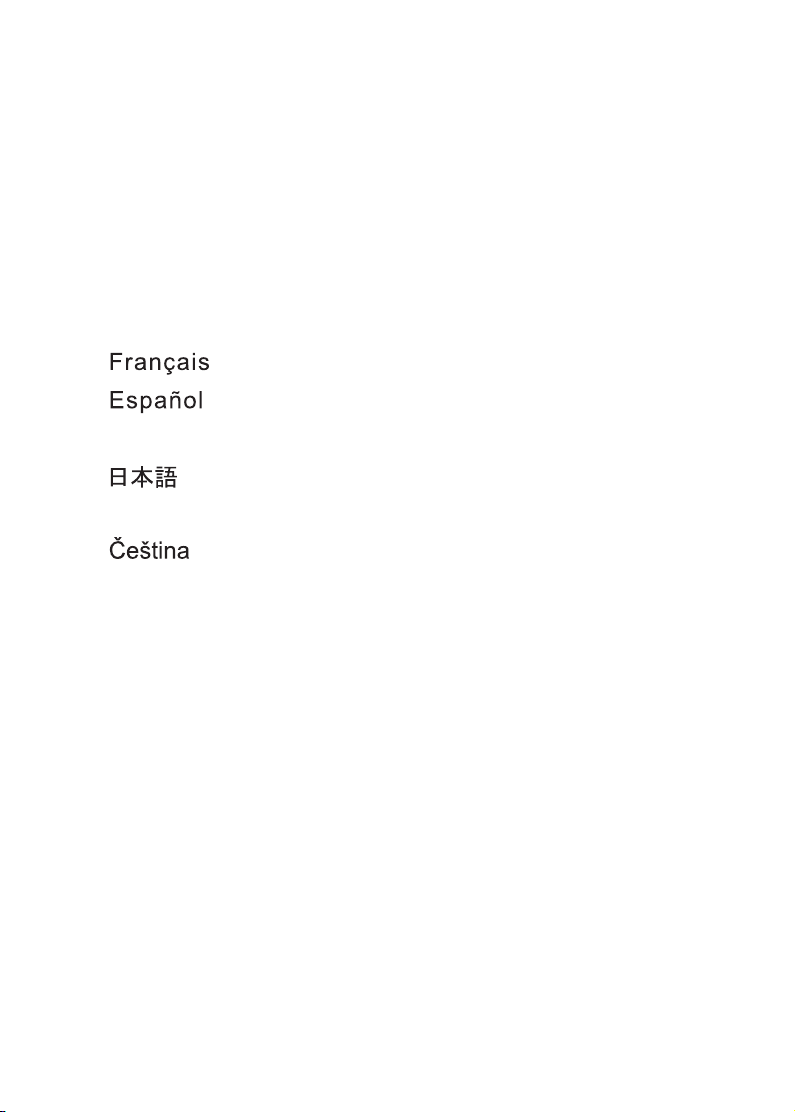
Table of Contents
Connect Input & Output Devices................................................1
Driver & Application Installation
English ...............................................................................7
Deutsch..............................................................................8
............................................................................9
...........................................................................10
繁體中文...........................................................................11
..............................................................................12
Polski ...............................................................................13
............................................................................14
сский
Ру
..........................................................................15
Romana
..........................................................................16
Magyar
............................................................................17
Page 3
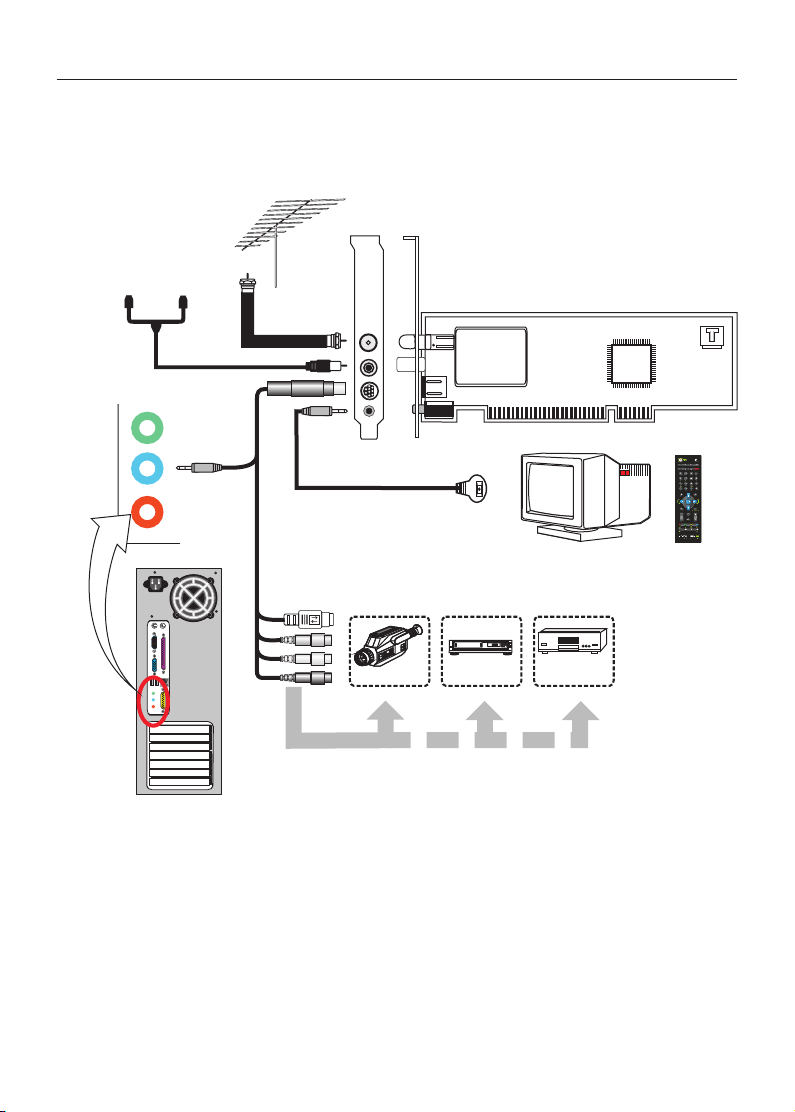
Connect Input & Output Devices
TV2100
From Cable TV
PC Monitor
or Antenna
TV
Remote
Control
Motherboard/
Sound card
Line-in
Connector
(Blue)
Remote control
CCD camera Camcorder
Audio In
Audio Out
DVD/VCD Player
VCR
Input sources
PlayStation
SELECT START
ANALOG
Video Game Console
Note: 1. The diagram is for reference only. The actual board appearance may differ from the
diagrams.
2. Audio In, S-Videio and Composite cable for TV2100 is optional. Please refer to the
descriptions on the retail box for the detailed product specifications.
1
Page 4
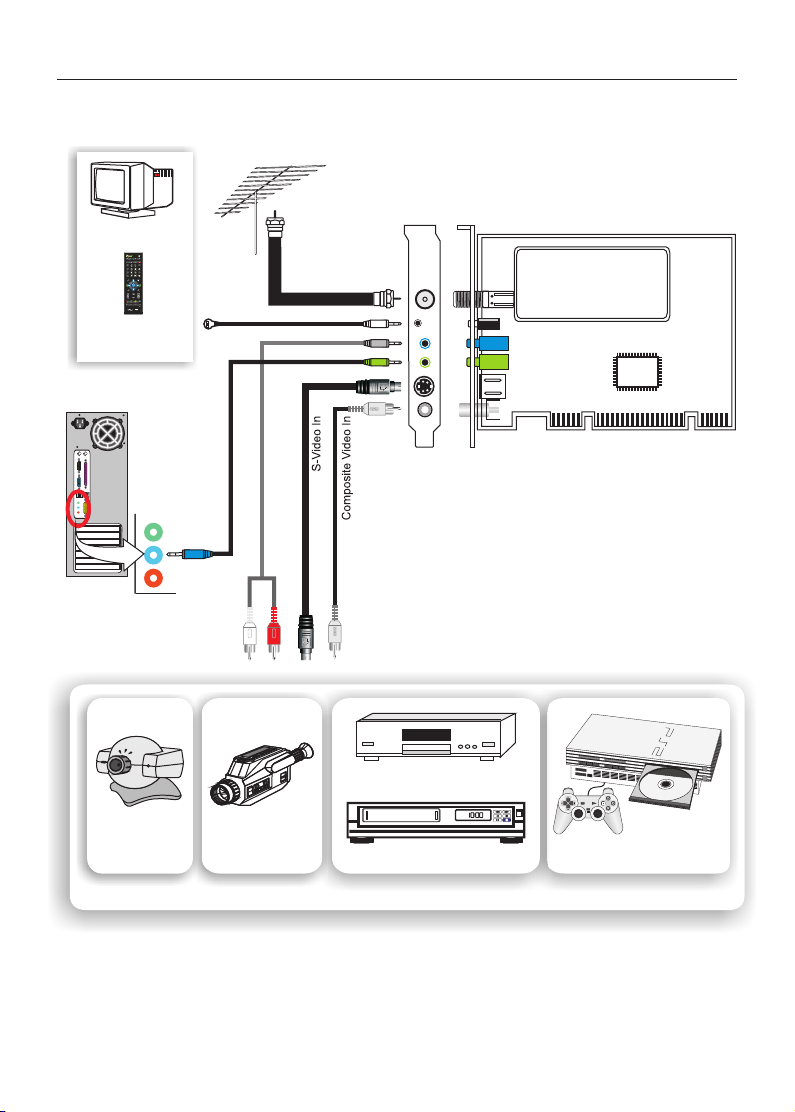
Connect Input & Output Devices
TV2100 FM
PC Monitor
Remote
Control
Motherboard/
Sound card
Line-in
Connector
(Blue)
From Cable TV
or Antenna
FM Antenna
TV
Remote control
Audio In
Audio Out
DVD/VCD Player
PlayStation
SELECT START
ANALOG
CCD camera Camcorder
VCR
Video Game Console
Input sources
Note: 1. The diagram is for reference only. The actual board appearance may differ from the
diagrams.
2. Audio In, S-Videio and Composite cable for TV2100 is optional. Please refer to the
descriptions on the retail box for the detailed product specifications.
2
Page 5
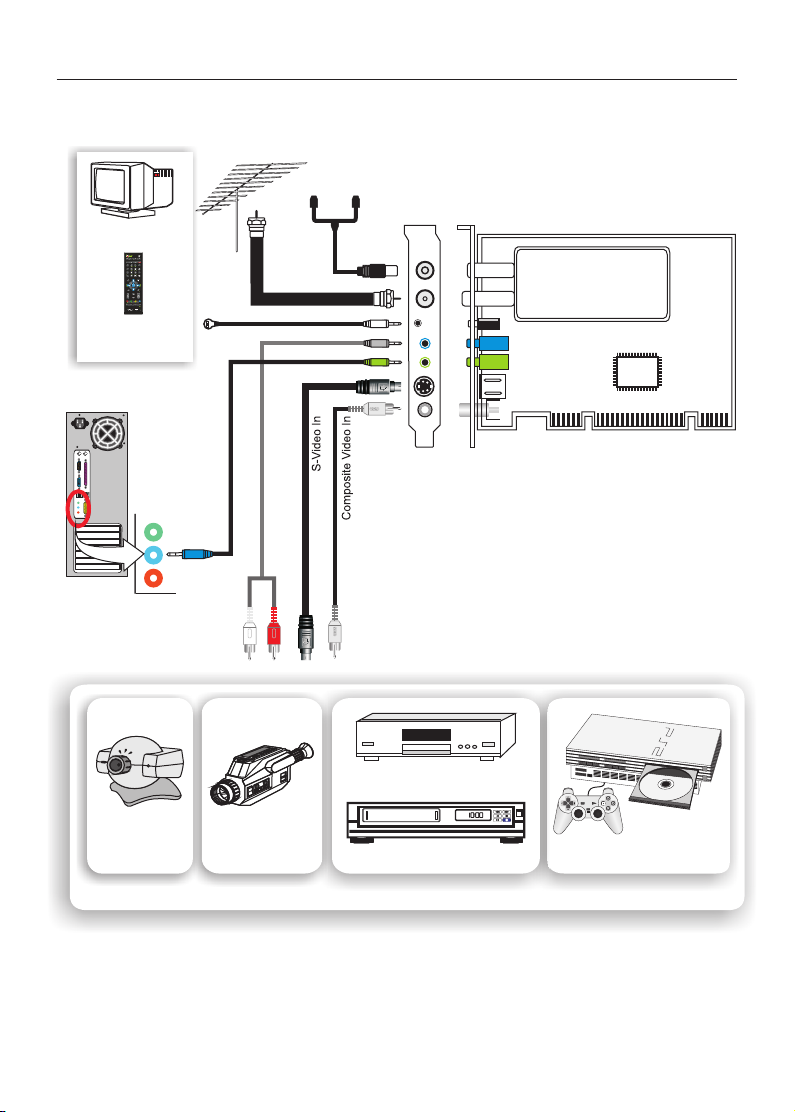
Connect Input & Output Devices
TV2000 XP Expert
From Cable TV
or Antenna
FM Antenna
Motherboard/
Sound card
Line-in
Connector
(Blue)
Remote
control
R L
Audio
Out
AV
Line-in
Camco rder
VCR
PC Monitor
DVD/VCD
Player
Remote
Control
Note: 1. The diagram is for reference only. The actual board appearance may differ from the diagrams.
2. FM and Remote Control functions are optional. Please refer to the descriptions on the retail
box for the detailed product specifications
3. After the installation is completed, please change the audio setting in the application to "Line
In".
3
Page 6
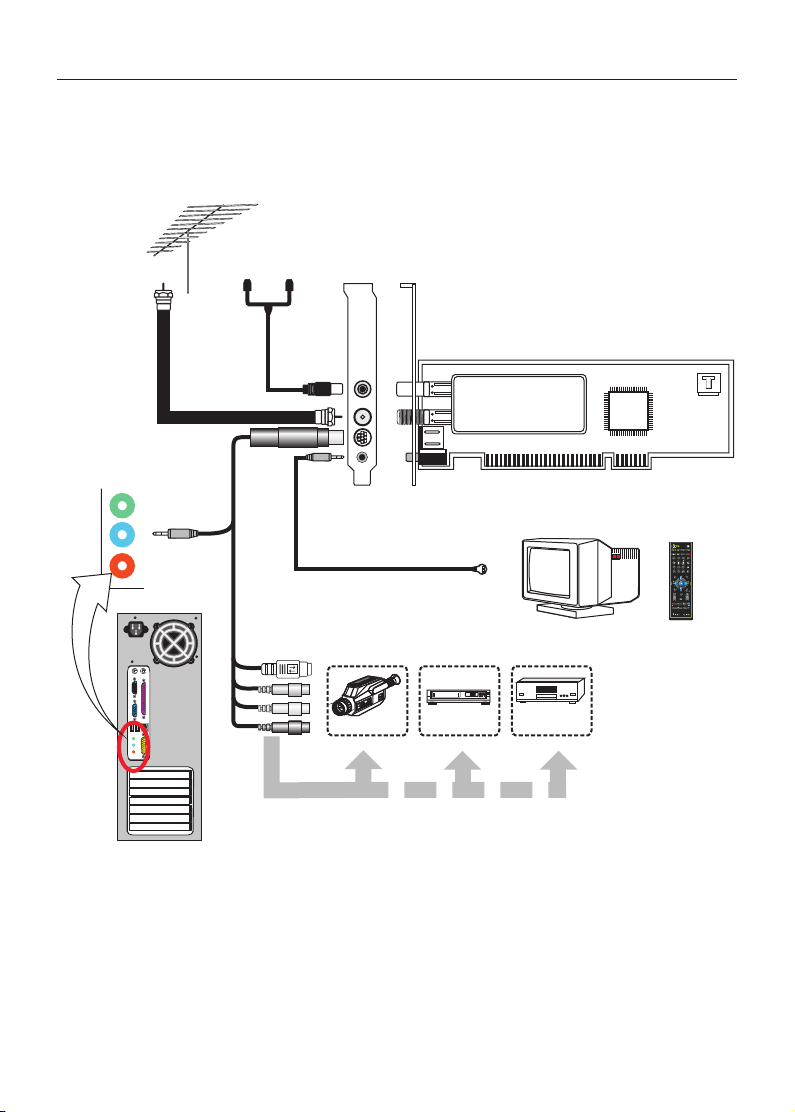
Connect Input & Output Devices
TV2000 XP Global
From Cable TV
or Antenna
FM Antenna
Motherboard/
Sound card
Line-in
Connector
(Blue)
Remote
control
R L
Audio
Out
AV
PC Monitor
Remote
Control
Line-in
Camco rder
VCR
DVD/VCD
Player
Note: 1. The diagram is for reference only. The actual board appearance may differ from the diagrams.
2. FM function is applicable to specific products, please refer to the description on the retail box
for the detailed product specifications.
3. After the installation is completed, please change the audio setting in the application to "Line
In".
4
Page 7

Connect Input & Output Devices
PxPVR2200/ PxTV1200/ PVR2100
From Cable TV
or Antenna
FM Antenna
)
S
VB
(C
e
t
i
s
n
I
o
eo
p
d
i
V
S
io
m
o
C
Aud
deo
e)
Vi
l
ent
Remote
cab
control
ow
mpon
ell
o
Y
(
C
)
e)
d)
en
lu
re
Re
(B
(
(G
r
b
P
Y
P
Motherboard/
Sound card
Line-in
Connector
(Blue)
PC Monitor
OR
(Optional)
Motherboard/
Sound card
Audio-in
Connector
R L
Remote
Control
Audio
Out
Input sources
DVD/VCD Player
CCD camera Camcorder
VCR
Note: 1. The diagram is for reference only. The actual board appearance may differ from the diagrams.
2. If you use the internal connection for audio out, please change the audio setting in the
application to "Aux-in"; if you use the external connection, please change the audio setting to
"Line In".
5
PlayStation
SELECT START
ANALOG
Video Game Console
Page 8

Connect Input & Output Devices
PalmTop TV Plus
Connect to Notebook
or Desktop's USB port
From Cable TV or Antenna,
or FM Antenna
FM Antenna
o
di
u
A
te
si
o
o
de
i
V
-
Comp
S
Input sources
AV input
CCD camera Camcorder
DVD/VCD Player
VCR
PlayStation
SELECT START
ANALOG
Video Game Console
Note: 1. The diagram is for reference only. The actual board appearance may differ from the diagrams.
2. If difficulty in trying to receive the signals from remote control occurs, please use the USB 2.0
extension cable to adjust WinFast PalmTop TV Plus to the proper position at which the remote
control can directly point to the IR receiver at the front of the WinFast PalmTop TV Plus.
6
Page 9

Driver & Application Installation
ish
l
Step 1:
ng
Turn on your PC and start up the Windows.
E
Step 2:
Shortly after entering the Windows , you will see the Found New Hardware Wizard dialog box. Click
"Cancel".
Step 3:
Insert the Multimedia Software DVD into your DVD-ROM drive. Autorun will start and the menu screen
will appear. Click the button marked “Install” on the menu.
Step 4:
Choose the language for the installation. Click “Next”.
Step 5:
The driver installation is going to start. Click “Next”.
Step 6:
The wizard is installing the driver. A window will appear indicating the status. Please wait.
Step 7:
If warning messages show up, please click “Continue Anyway”.
Step 8:
The installation is finished. Please choose “Yes, I want to restart my computer now” to reboot your
computer, and click “OK”.
Step 9:
After reboot, the wizard will automatically install WinFast application. Please choose the language for
installation and click “Next”.
Step 10:
A dialogue box wiil appear telling you the installation of WinFast PVR2 application is going to start.
Click “Next”.
Step 11:
Please click "Yes" in next few steps to continue.
Step12:
Please click "OK" to finish the entire installation.
Windows Vista MCE Function
The remote control also supports
Windows MCE. To enable MCE
remote, please right-click on the
icon on the toolbar at the bottom
right of the screen (as Fig.1
shows). Choose "Setting", then
check the box in front of "MCE
Remote" (as Fig. 2 shows). The
MCE function keys of the remote
control are active only when MCE
window is active or selected.
Note: Please refer to the specification on the retail
Fig. 1
MCE Remote
box to see if your product supports Windows
MCE.
For the use of WinFast PVR/PVR2 application, please refer to
the user manual file in the WinFast MoViE Pack disc.
7
Fig. 2
Capture Device
Remote Controller
Page 10

Installation von Treiber & Anwendung
Schritt 1:
Schalten Sie Ihren PC ein und starten Windows.
2:
Schritt
Kurz nach dem Hochfahren von Windows erscheint das Dialogfeld Found New Hardware Wizard
(Assistent für das Suchen neuer Hardware).
Schritt 3:
Legen Sie nun die mitgelieferte DVD mit der Multimediasoftware in Ihr DVD Rom ein. Die Autorun
Funktion sollte nun folgendes Fenster öffnen. Klicken Sie hier auf den Knopf "Install".
Schritt 4:
Klicken Sie auf den Eintrag Driver (Treiber), um mit der Installation zu beginnen.
Schritt 5:
Sie müssen für die Installation eine Sprache wählen. Treffen Sie Ihre Auswahl und klicken auf OK.
Schritt 6:
Der Assistent ist jetzt bereit WinFast Entertainment Center zu installieren.
Schritt 7:
Die Installation startet. Klicken Sie auf Next (Weiter).
Schritt 8:
Der Assistent installiert die für die Hardware benötigte Software. markieren Sie "Software automatisch
installieren (empfohlen)" und dann auf Next (Weiter).
Schritt 9:
Der Assistent hat die Installation der Software beendet. Klicken Sie auf Finish (Ende).
Schritt 10
:
Sie müssen Ihren Rechner neu starten. Klicken Sie hierzu auf .
Schritt 11:
Nach dem Neustart fährt der Assistent mit der restlichen Installation fort.
Schritt 12:
Die gesamte Installation ist jetzt fertig.
Klicken Sie auf “Cancel (Abbrechen)”.
Finish (Ende)
De
u
ts
ch
WindowsVista MCE Funktion
Die Fernbedienung unterstützt auch
Windows MCE. Um die MCE Funktion zu
aktivieren, klicken Sie bitte mit der rechten
Maustaste das Icon in der Toolbar unten
rechts auf Ihrem Bildschirm an. (vgl. Fig. 1)
Wählen Sie „Setting“ aus und klicken Sie das
Kästchen vor „MCE Remote“ an (vgl. Fig.
2)Die MCE Funktionstasten der
Fernbedienung sind hierdurch aktiviert, wenn
Sie das MCE Window aktiviert bzw.
ausgewählt haben.
Für die WinF ast PVR2 Anwendu ng inform ieren Sie s ich bitte i n
der Anleitun g, die Sie al s Datei auf d er Wi nFast MoViE CD/DV D
finde n können
Fig. 1
MCE Remote
Fig. 2
Capture Device
Remote Controller
Hinweis: Bitte beachten Sie auch die Hinweise auf der
Verpackung um die Windows MCE
Unterstützung Ihres Produktes zu
überprüfen.
8
Page 11

Installation des pilotes et des applications
Etape n°1:
Démarrez votre ordinateur et attendez que Windows soit démarré.
2:
Etape n°
Peu après le démarrage de Windows, une boîte de dialogue Found New Hardware Wizard (Nouveau
Matériel Détecté) s'affichera (tel que montré sur le premier dessin à droite). Cliquez “Cancel
(Annuler)”.
Etape n°3:
Insérez le DVD du Logiciel Multimédia dans votre lecteur de DVD-ROM. Autorun démarrera et l'écran
du menu apparaîtra. Cliquez sur le bouton marqué Install (Installer) sur le menu.
Etape n°4:
Cliquez sur l'élément Driver (Pilote) pour commencer l'installation.
çais
Etape n°5:
Choisissez la langue d'installation puis cliquez OK.
Fran
Etape n°6:
L'assistant est maintenant prêt à installer WinFast Entertainment Center.
Etape n°7:
L'installation va commencer. Cliquez sur Next (Suivant).
Etape n°8:
L'assistant va installer le logiciel correspondant au matériel. Choisissez “Installer le logiciel
automatiquement (Recommandé)” puis cliquez Next (Suivant).
Etape n°9:
L'assistant a terminé l'installation du logiciel. Cliquez sur Finish (Terminer).
Etape n°10:
Vous devez à présent redémarrer votre ordinateur. Pour cela, cliquez sur Finish (Terminer).
Etape n°11:
Après le redémarrage, l'assistant va terminer la procédure d'installation.
Etape n°12:
La totalité de l'installation est terminée.
Fonction WindowsVista MCE
La télécommande prend également en
charge Windows MCE. Pour activer
MCE distant, veuillez cliquez-droit sur
l'icône de la barre d'outils en bas à
droite de l'écran (comme montré sur la
Fig. 1). Choisissez « Configuration »
puis cochez la case devant « MCE
distant » (comme montré sur la Fig.2).
Les clés de la fonction MCE de la
télécommande sont actives uniquement
lorsque la fenêtre est active ou
sélectionnée.
Remarque: Veuillez consulter les spécifications de
Fig. 1
MCE Remote
l'emballage pour voir si votre produit prend
en charge Windows MCE.
Pour savoir comment utiliser l'application WinFast PVR2, veuillez
consulter le manuel utilisateur présent sur le DVD-ROM WinFast
MoViE Pack
9
2
Capture Device
Remote Controller
Page 12

Instalación del Controlador y la Aplicación
Paso 1:
Encienda el equipo e inicie Windows.
Paso
2:
Poco después de entrar en Windows, aparecerá el cuadro de diálogo del
( ). Haga clic en “Cancel (Cancelar)”.
Asistente para hardware nuevo encontrado
Paso 3:
Inserte el DVD de software multimedia en su unidad de DVD-ROM.Autorun se abrirá y aparecerá la
pantalla del menú. Haga clic en el botón Install en el menú.
4:
Paso
Haga clic en el elemento Driver (Controlador) para iniciar la instalación.
Paso 5:
Debe elegir un idioma para la instalación. Realice la selección y haga clic en OK (Aceptar).
Paso 6
:
Ahora, el asistente está listo para instalar WinFast Entertainment Center (Centro de ocio de WinFast).
Paso 7
:
La instalación está a punto de empezar. Haga clic en Next (Siguiente).
Paso 8
:
El asistente instalará el software para el hardware correspondiente. Seleccione la opción "Install the
software automatically (Recommended)" (Instalar automáticamente el software (recomendado)) y haga
clic en Next (Siguiente).
Paso 9:
El asistente habrá terminado de instalar el software. Haga clic en Finish (Finalizar).
Paso 10
:
Debe reiniciar el equipo. Haga clic en Finish (Finalizar) para continuar.
Paso 11:
Después del reinicio, el asistente llevará a cabo el resto del proceso de instalación.
Paso
12:
La instalación se habrá completado.
Función Windows Vista MCE
El mando a distancia también
soporta Windows MCE. Para
activar el mando pulse el icono
situado en la parte inferior derecha
de la barra de estado (ver Fig. 1).
Escoger “Setting” y luego marcar
“mando MCE” (ver Fig. 2). Las
teclas de función del mando a
distancia están activas unicamente
cuando la ventana está activa o
seleccionada.
Nota:
Fig. 1
Consultar las especificaciones incluídas en
el producto para que pueda confirmar que su
producto soporta Windows MCE.
Found New Hardware Wizard
Fig. 2
Capture Device
Remote Controller
MCE Remote
E
sp
añ
ol
Respecto a la aplicación de WinFast PVR2, por favor ver el
manual en el disco de WinFast MoViE Pack.
10
Page 13

安裝驅動程式及軟體
步驟 1 :
啟動電腦,進入 Windows 。
步驟 2 :
開啟 Windows 之後,會出現「增加新的硬體」對話框,點「取消」離開。
步驟 3 :
將多媒體軟體光碟放入光碟機中。自動安裝的畫面會出現。按「安裝」按鈕。
步驟 4:
「選取安裝語言」對話框出現,請選擇您所使用的語言,然後按「確定」。
步驟 5 :
驅動程式即將開始安裝,按「下一步」繼續。
步驟 6:
一對話框出現,顯示安裝狀態及進度。(在此時按「取消」會離開安裝程式。)
步驟 7 :
若有警告訊息出現,請按「繼續安裝」。
步驟 8 :
安裝完成的對話框出現,並問您是否要重新啟動電腦,點選「是,立即重新啟動電腦。」然後點
「確定」。
步驟 9 :
電腦重新啟動後,「選擇安裝語言」的對話框再度出現,請選擇您所使用的語言,然後按「下一
步」。
步驟 10 :
體中文
安裝程式的對話框出現,告訴您即將安裝「 WinFast PVR2 」應用軟體。按 下一步 開始安裝。「 」
繁
步驟 11 :
接下來幾個步驟請點選 「 確定」。
步驟 12 :
應用軟體結束安裝,按 「OK 」。
Windows Vista MCE 功能
遙控器也支援 MCE 功能。在位於桌面
右下角工作列的圖示上按下右鍵(如右
圖一),選擇「 Setting 」開啟功能頁
面,勾選「 MCE Remote 」(如右圖
二)即可啟動 MCE 遙控器各項功能。
當您使用 MCE 且 MCE 視窗處於活動狀
態或被選取時,您即可使用遙控器的
MCE 功能。
詳細 WinFast PVR/PVR2應用軟體的使用方法,請參考
WinFast MoViE Pack光碟中的使用手冊。
圖一
MCE Remote
注意:請參考彩盒上的規格說明來確認您產品是否支援
Windows MCE.
圖二
擷取裝置
遙控器功能設定
11
Page 14

ドライバとアプリケーションのインストール
ステップ :
PCの電源を入れて、Windowsを起動します。
ステップ2:
Windowsが起動すると間もなく、[新しいハードウェアが検出されましたウィザード]ダイア
ログボックスが開きますので、[キャンセル]をクリックしてください。
ステップ3:
DVD-ROMドライブにMultimedia Software DVDを挿入します。自己起動ファイルが自動的に実
行され、メニュースクリーンが表示されます。メニュースクリーンで[Install]と示されたボ
タンをクリックしてください。
ステップ4:
インストールしたい言語を選択し、[次へ]をクリックします。
ステップ5:
ドライバのインストールが開始されます。そこで[次へ]をクリックしてください。
ステップ6:
ウィザードがドライバをインストールしています。インストール状況を知らせるウィンドウが
開きます。インストールが完了するまでしばらく待ちください。
ステップ7:
警告メッセージが表示されたら、[続行する]クリックしてください。
ステップ8:
インストールが完了しました。[はい、今すぐコンピュータを再起動します]を選択してコン
ピュータをリブートし、[OK]をクリックします。
ステップ9:
コンピュータがリブートしたら、ウィザードが自動的にWinFastアプリケーションをインス
トールします。インストールしたい言語を選択し、[次へ]をクリックしてください。
ステップ10:
WinFast PVR2アプリケーションをインストール中であることを知らせるダイアログが表示さ
れますので、[次へ]をクリックしてください。
ステップ11:
次の数ステップでは[はい]をクリックして作業を続行してください。
ステップ12:
[OK]をクリックするとインストールが完了します。
1
日
本
語
Windows Vista MCE 機能
製品付属のリモコンは、Windows
MCEへも対応しています。MCEでリ
モコンを使用するには、ディスプレ
イモニタの右下にあるツールバーの
アイコンの上で右クリックして下さ
い。(図1参照) 設定を選択し、図
2の画面にある「MCE remote」の
ボックスをマークして下さい。
MCEウインドウがアクティブ、また
は選択された時だけリモコンの
MCEファンクションのボタンは使用
ご注意:
どうぞ、ご購入いただいた製品がWindows MCEをサ
ポートするかどうか、製品パッケージの製品仕様欄を
ご確認下さい。
図1
MCE Remote
WinFast PVR2のご使用方法については、WinFastMoViE Pack の
DVDに収録されているユーザーマニュアルを参照してください。
12
図2
Capture Device
Remote Controller
Page 15

Instalacja Sterownika & Programu
Etap 1:
Proszę włączyć PC i wystartować Windows.
Etap 2:
Chwile po włączeniu się Windows, pojawi się informacja Pojawił się Nowy Hardware, Kreator, proszę
nacisnąć "Anuluj".
Etap 3:
Włóż dysk DVD 'Multimedia Software' do napędu DVD-ROM. Autorun uruchomi menu, które
pojawi się na ekranie. Naciśnij przycisk 'Install' widoczny w menu.
Etap 4:
Proszę wybrać język, w którym ma się odbyć instalacja i nacisnąć: "Następny".
Etap 5:
Rozpocznie się instalacja sterownika. Proszę nacisnąć "Następny".
Etap 6:
Kreator zainstaluje sterownik. Pojawi się okienko informujące o statusie instalacji. Proszę poczekać.
Etap 7:
Jeśli pojawi się okienko z ostrzeżeniem, proszę wybrać "Kontynuuj pomimo to".
Etap 8:
Instalacja zakończona. Proszę wybrać "Tak, chce teraz restartować komputer" by restartować
komputer, i nacisnąć "OK".
Etap 9:
Po restartowaniu Kreator automatycznie zainstaluje program WinFast. Proszę wybrać język, w którym ma
się odbyć instalacja i nacisnąć: "Następny".
Etap 10:
Pojawi się informacja, że instalacja programu WinFast PVR2 zaraz się rozpocznie. Proszę nacisnąć
"Następny".
Etap 11:
W paru następnych etapach proszę naciskać "Tak" by kontynuować.
Etap l2:
Proszę naciskać "OK" by zakończyć instalacje.
Funkcja WindowsVista MCE
Pilot zdalnego sterowania wspiera
także funkcję Windows MCE. Aby
i
uruchomić tą funkcję przycisnąć
prawym klawiszem myszy na
sk
l
ikonie PVR2 w prawym dolnym
o
rogu ekranu (jak na zdjęciu nr 1).
P
Proszę wybrać "Setting" i
odznaczyć opcje "MCE remote"
(jak na zdjęciu nr 2). Klawisze
funkcyjne MCE pilota są aktywne
tylko wtedy, gdy wybrane lub
aktywne jest okno MCE.
Instrukc ja obsługi aplikacji WinFast PVR2 znajduje się w
pliku na dysku WinFast MoViE Pack.
1
MCE Remote
Uwaga: Prozę sprawdzić w opisie produktu luba na
opakowaniu czy wybrany produkt wspiera
funkcję Windows MCE.
2
Capture Device
Remote Controller
13
Page 16

Instalace aplikace a ovlada eč
Krok 1:
Zapnìte poèítaè a spust te systém Windows.
Krok 2:
Krátce po nastartování Windows se zobrazí dialogové okno Průvodce nalezeným novým hardwarem.
Klikněte na tlačítko "Storno".
Krok 3:
Vložte Multimedia Software DVD do Vaší DVD-Rom mechaniky. Autorun spustí menu. Klikněte na
tlačíto označené Install z menu.
Krok 4:
Zvolte jazyk pro instalaci. Klepněte na tlačítko "Další".
Krok 5:
Instalace ovladače je připravena. Klepněte na tlačítko "Další".
Krok 6:
Průvodce nainstaluje ovladač. Zobrazí se okno, které bude zobrazovat stav. Prosím sečkejte.
Krok 7:
Pokud se zobrazí varovná zpráva, klepnìte prosím na "Pøesto pokraèovat".
Krok 8:
Instalace je dokončena. Zvolte prosím "Ano, chci restartovat počítač nyní" pro restartování počítače a
klepněte na tlačítko "OK".
Krok 9:
Po novém spuštění počítače průvodce automaticky nainstaluje aplikaci WinFast. Zvolte prosím jazyk pro
instalaci a klepněte na tlačítko "Další".
Krok 10:
Zobrazí se dialogové okno, které bude informovat, že aplikace WinFast PVR2 je připravena k instalaci.
Klepněte na tlačítko "Další".
Krok 11:
V nìkolika následujících krocích klepnìte pro pokraèování na tlaèítko "Ano".
Krok 12:
Klepnìte prosím na tlaèítko "OK" pro dokonèení celé instalace.
Č
e
št
i
n
a
Funkce WindowsVista MCE
Dálkové ovládání také podporuje
Windows MCE.
Chcete-li aktivovat funkci dálkového
ovládání MCE, klikněte, prosím,
pravým tlačítkem myši na ikonu
seznamu ovládání v pravé spodní
části obrazovky (viz. Obr. 1) Zvolye
"Setting" a poté označte pole u
možnosti "MCE remote" (viz. Obr. 2).
Pamatujte, že funkce dálkového ov
ládání MCE je použitelná pouze v tom
případě, když je okno MCE aktivní.
Dříve , než začnete použív at ap likaci Wi nFa st PVR/PV R2,
prost udujte už ivatels kou p říručku uloženou n a disku WinFas t
MoVi E
1
MCE Remote
Poznámak: Podíve jte se prosím na seznam specikací,
uvedý na balení výrobku, zda-li Vámi
zakoupený produkt podporuje Windows
MCE.
2
Capture Device
Remote Controller
14
Page 17

Установка драйвера и приложения
Шаг 1:
Включите ПК и запустите Windows.
Шаг 2:
После входа в систему на экране появится сообщение Обнаружено новое устройство. Нажмите
Отменить (Cancel).« »
й
Шаг 3:
ски
Вставьте Multimedia Software DVD в привод DVD-ROM. Появится меню автозапуска. Нажмите
с
кнопку «Установить» (Install).
у
Р
Шаг 4:
Выберите язык для установки. Нажмите Далее ( ). « » Next
Шаг 5:
Драйвер готов в установке. Нажмите «Далее» (Next).
Шаг 6:
Помощник устанавливает драйвер. В появившемся окне демонстрируется процесс установки.
Пожалуйста, подождите.
Шаг 7:
Если появится предупреждение, нажмите Продолжить(Continue Anyway) . « »
Шаг 8:
Установка завершена. Нажмите Да, я хочу перезагрузить компьютер сейчас , чтобы
перезагрузить компьютер, и потом «OK».
Шаг 9:
После перезагрузки помощник автоматически установит приложение WinFast. Пожалуйста,
выберите язык установки и нажмите «Далее (Next)».
Шаг 10:
Появится сообщение о том, что приложение WinFast PVR2 готово к установке.
(Next)».
Шаг 11:
В следующих окнах нажмите Да(Yes) . « »
Шаг 12:
Нажмите OK , чтобы полностью завершить установку. « »
« »
Нажмите «Далее
Поддержка WindowsVista MCE
Пульт ДУ также поддерживает
Windows MCE. Чтобы включить
функции MCE,щелкните правой
кнопкой мыши на значке на панели
задач в правом нижнем углу
экрана (как показано на рис.1).
Выберите «Настройки» и поставьте
галочку напротив поля «Пульт
MCE» (как показано на рис.2).
Кнопки пульта для работы с MCE
активны только когда активно или
выбрано окно MCE.
Примечание: Чтобы узнать,поддерживает ли ваш
1
MCE Remote
продукт Windows MCE, пожалуйста,
прочитайте характеристики на коробке
Инструкцию к программе WinFast PVR2 вы найдете в
руководстве пользователя на диске WinFast MoViE Pack
15
2
Capture Device
Remote Controller
Page 18

Instalarea driverelor si a aplicatiei.
Pasul 1:
Porniti calculatorul si asteptati incarcarea sistemului de operare.
Pasul 2:
Imediat dupa intrarea in Windows, va fi afisata fereastra "Found New Hardware Wizard". Apasati
"Cancel".
Pasul 3:
apasati pe butonul, In cadrul meniului ce va fi afisat. ul Multimedia Software-Introduceti in unitatea op
tica DVD “Install”.
Pasul 4:
Alegeti limba interfetei si apasati "Next".
Pasul 5:
Se vor instala driverele. Apasati "Next”.
Pasul 6:
Va fi afisata o fereastra care indica progresul instalarii. Va rugam sa asteptati.
Pasul 7:
Daca apare un mesaj de avertisment, apasati "Contiue Anyway".
Pasul 8:
Instalarea s-a incheiat. Selectati "Yes, I want to restart my computer now" si dati "OK".
Pasul 9:
Dupa restartare, se va instala aplicatia WinFast. Alegeti limba interfetei si apasati "Next".
Pasul 10:
Va fi afisat un mesaj care anunta instalarea aplicatiei WinFast PVR 2. Apasati "Next".
Pasul 11:
Apasati "Yes" pentru mesajele ce urmeaza a fi afisate.
Pasul 12:
Apasati "OK" pentru a incheia instalatia.
R
R
o
o
mana
mana
Functie WindowsVista MCE
Tastele functionale MCE de pe te
lecomanda sunt active doar ca
nd fereastra MCE este activa sa u
selectata). ٢. vedeti Fig(Alegeti
“Setting” apoi bifati casuta in fata
“MCE remote” ). ۱. vedeti Fig( av
rugam faceti click dreapta in
bara de unelte aflata coltul dreapta
jos al ecranului , Pentru a activa
suportul MCE pentru telecomanda.
Telecomanda suporta de
asemenea Windows MCE.
Pentru folosirea aplicaţiei WinFast PVR/PVR2, vă rugăm
consultaţi manualul în format electronic aflat pe DVD-ul
WinFast MoViE Pack.
Fig. 1
MCE Remote
Nota: suporta Windows MCE. Va rugam verificati
pe cutia produsului pentru a vedea daca p
rodusul Dvs.
Fig. 2
Capture Device
Remote Controller
16
Page 19

Meghajtó & Szoftver Telepítés
Lépés 1:
Kapcsolja be a PC-t, és várja meg, míg a Windows betöltődik.
Lépés 2:
A Windows betöltése után rövidesen, az Új Hardver hozzáadása Varázsló párbeszéd-panel fog
megjelenni. Kattintson a "Mégse" gombra.
Lépés 3:
Helyezzük be a Multimedia Software DVD-t a DVD-ROM meghajtóba. Autómatikusan elindul a
telepítő és menu megjelenik. Klikkeljünk az Install ikonra a menüben.
Lépés 4:
Válassza ki a telepítés nyelvét. Kattintson a “Tovább”-ra.
Lépés 5:
A meghajtó telepítése elkezdődik. Kattintson a “Tovább”-ra.
Lépés 6:
A varázsló telepíti a meghajtókat. Egy ablakban látható lesz a telepítés folyamata. Várjon.
Lépés 7:
Ha figyelmeztető üzenet jelenik meg, kattintson a “Folytatás Mindenképp”-re.
r
Lépés 8:
ya
A telepítés befejeződött. Most válassza az “Igen, most akarom újraindítani a számítógépet” a
g
számítógép újraindításához, és kattintson az “OK”-ra.
a
M
Lépés 9:
Újraindítás után, a varázsló automatikusan telepíteni fogja a WinFast szoftvert. Először válassza ki a
telepítés nyelvét, és kattintson a “Tovább”-ra.
Lépés 10:
Egy párbeszéd-panel értesíteni fogja a WinFast PVR2 szoftver telepítésének megkezdéséről. Kattintson a
“Tovább”-ra.
Lépés 11:
A folytatáshoz kattintson az "Igen"-re a következő néhány lépésben.
Lépés12:
A telepítés befejezéséhez kattintson az "OK"-ra.
Windows Vista MCE Funkció
A távirányító szintén támogat ja a
Windows MCE-t. A Média Center
távirányítás eléréséhez klikkel
jünk az egér jobb gomb jával az
eszköztárban található iconra (a
képernyő jobb alsó sarrkán, ahogy
az l-es ábra mutatja). Válasszuk ki
a "Beállítások"-at és jelöljük be az
"MCE távirányítást" (2-es ábra). Az
MCE funlció billentyűk a
távirányítón csak akkor aktvívak,
ha az MCE ablak aktív vagy ki van
választva.
1-es ábra
MCE Remote
Megjegyzés: Kérjük ellenőrizze, hogy az ön
termékének csomagolásán fel can e
tüntetve a Windows MCE funkció
támogatása, egyéb esetben a
termék nem támogat ja ezt a
funkciót!
A WinFast PVR2 alkalmazás használatának leírását a WinFast
MoViE Pack lemezen a felhasználói kézikönyv tartalmazza
17
2-es ábra
Capture Device
Remote Controller
 Loading...