

Leadtek Quadro FX3000, Quadro FX1100, Quadro FX2000, Quadro FX500, Quadro 900 XGL User manual
...Page 1
Leadtek Quadro Series General Guide
Version A
December 2003
P/N: W0500858
1
7
Board Layout
Leadtek Quadro Series
General Guide (English)
36
65
Quadro
()
Contents
International Headquarters
18th Fl., 166, Chien-Yi Rd.
Chung Ho, Taipei Hsien
Taiwan (235)
Phone: +886 (0)2 8226 5800
Fax: +886 (0)2 8226 5801
http://www.leadtek.com.tw
E-Mail: service@leadtek.com.tw
United States Headquarters
Europe Headquarters
46732 Lakeview Blvd.
Fremont, CA 94538
U.S.A.
Phone: +1 510 490 8076
Fax: +1 510 490 7759
http://www.leadtek.com
Phone: +
Fax: +
http://www.leadtek.nl
Antennestraat 16 1322 AB
Almere
The Netherlands
31 (0)36 536 5578
31 (0)36 536 2215
Copyright 2003 Leadtek Research Inc.
All rights reserved.
No part of this document may be copied
or reproduced in any form or by any
means without the prior written consent of
Leadtek Research Inc.
Leadtek makes no warranties with respect
to this documentation and disclaims any
implied warranties of merchantability,
quality, or fitness for any particular
purpose. The information in this
document is subject to change without
notice. Leatek reserves the right to make
revisions to this publication without
obligation to notify any person or entity
of any such changes.
Leadtek Research Inc.Leadtek Research Inc.
Page 2
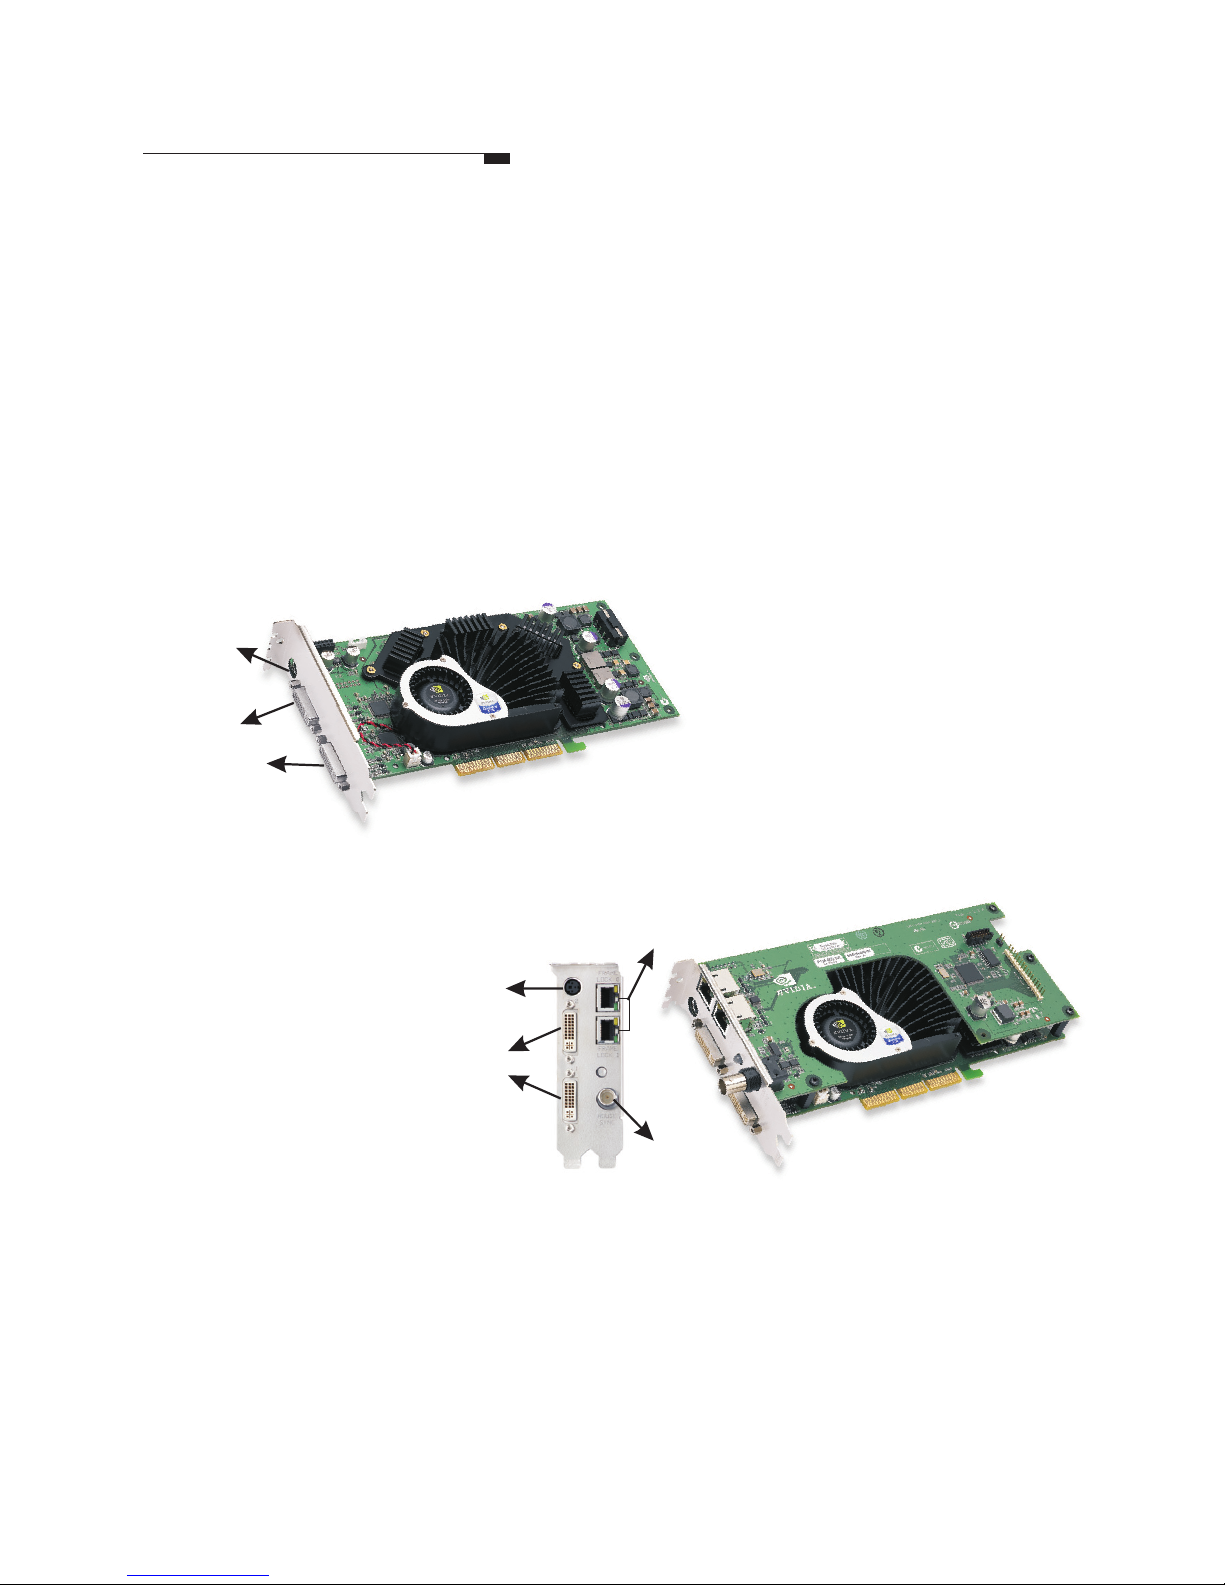
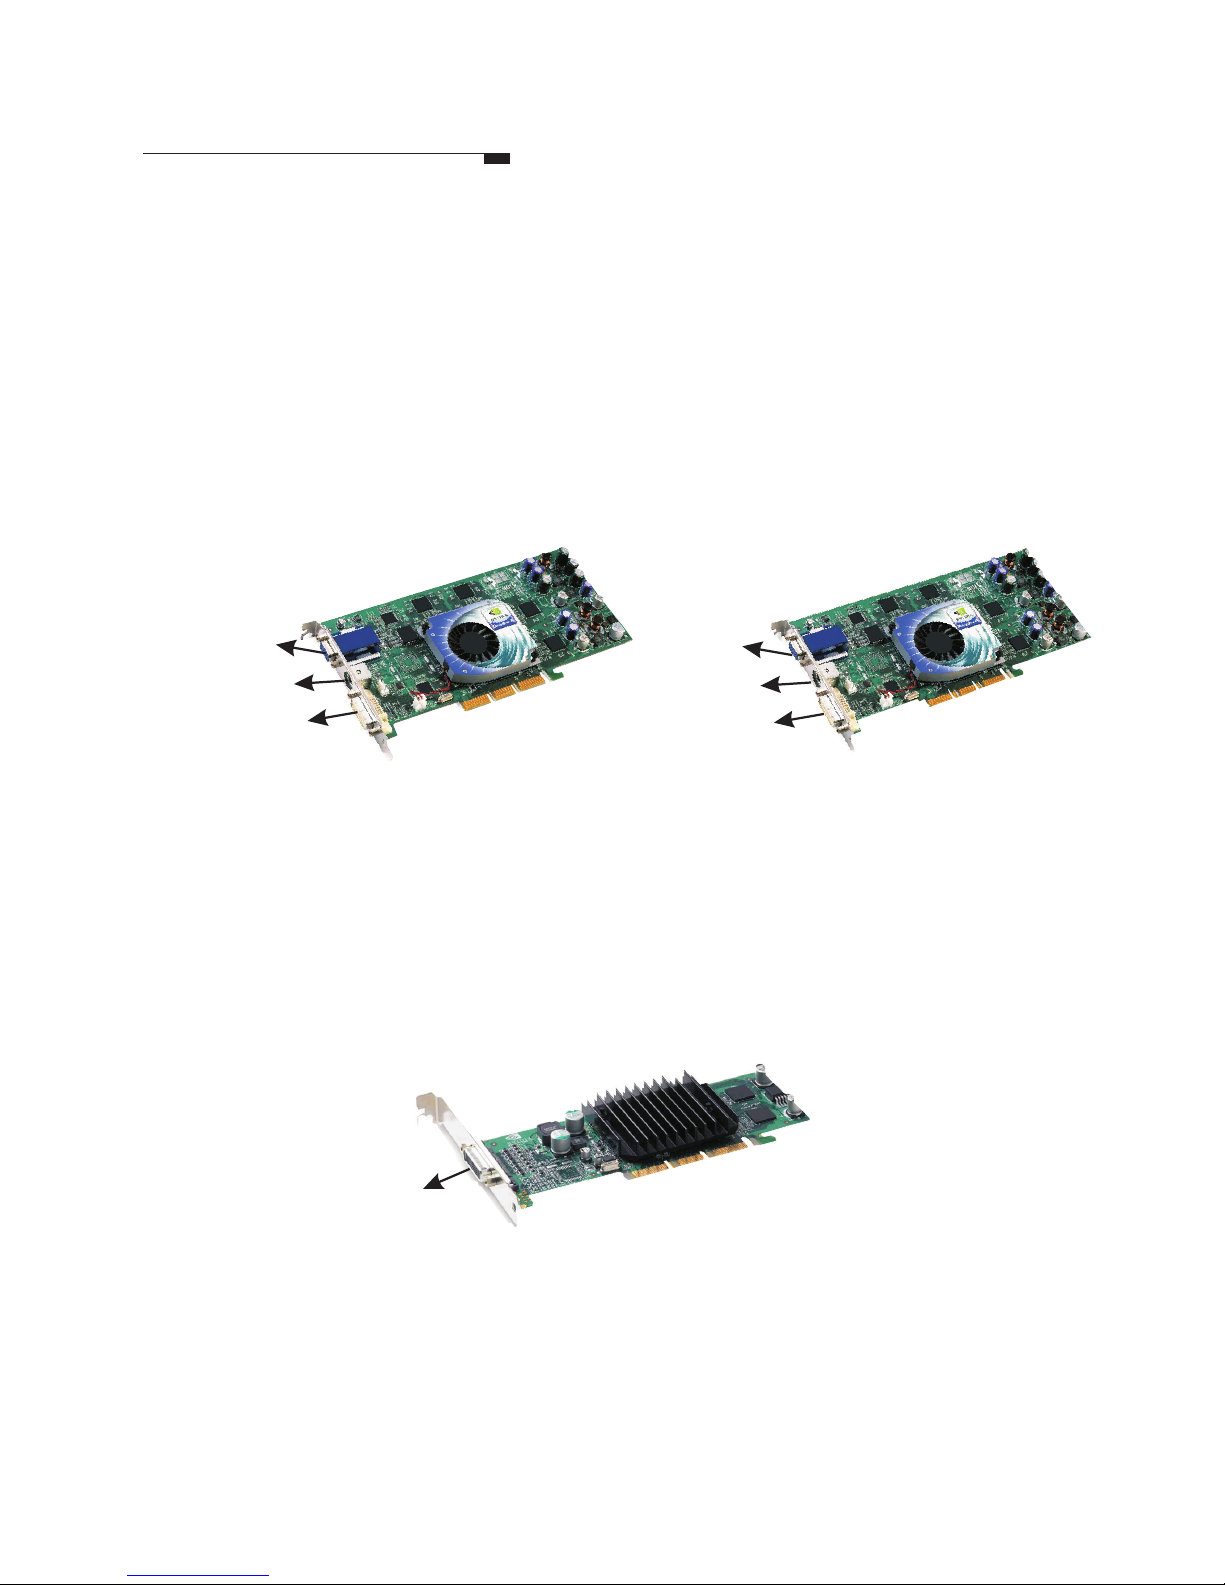
Quadro FX3000
Workstation stereo sync
connector
DVI-I
connector
Board Layout
Quadro FX3000/FX3000G connectors
The Quadro FX3000/3000G has dual DVI-I connectors. These cards support:
Single VGA output (using a DVI-I to VGA adapter)
Dual VGA output (using two DVI-I to VGA adapters)
VGA+DVI-I output (using a DVI-I to VGA adapter)
Single DVI-I output
Dual DVI-I output
Quadro FX3000G
Workstation stereo
sync connector
DVI-I
connector
RJ-45 frame lock connector
BNC
genlock
connector
Note: 1. Quadro FX3000G will occupy the AGP and
one adjacent PCI slot but use no power nor data from the
PCI slot.
2. For user's guide of Genlock & Frame Lock function, please
refer to the user's manual in Driver CD.
Quadro FX3000 &
1
Page 3
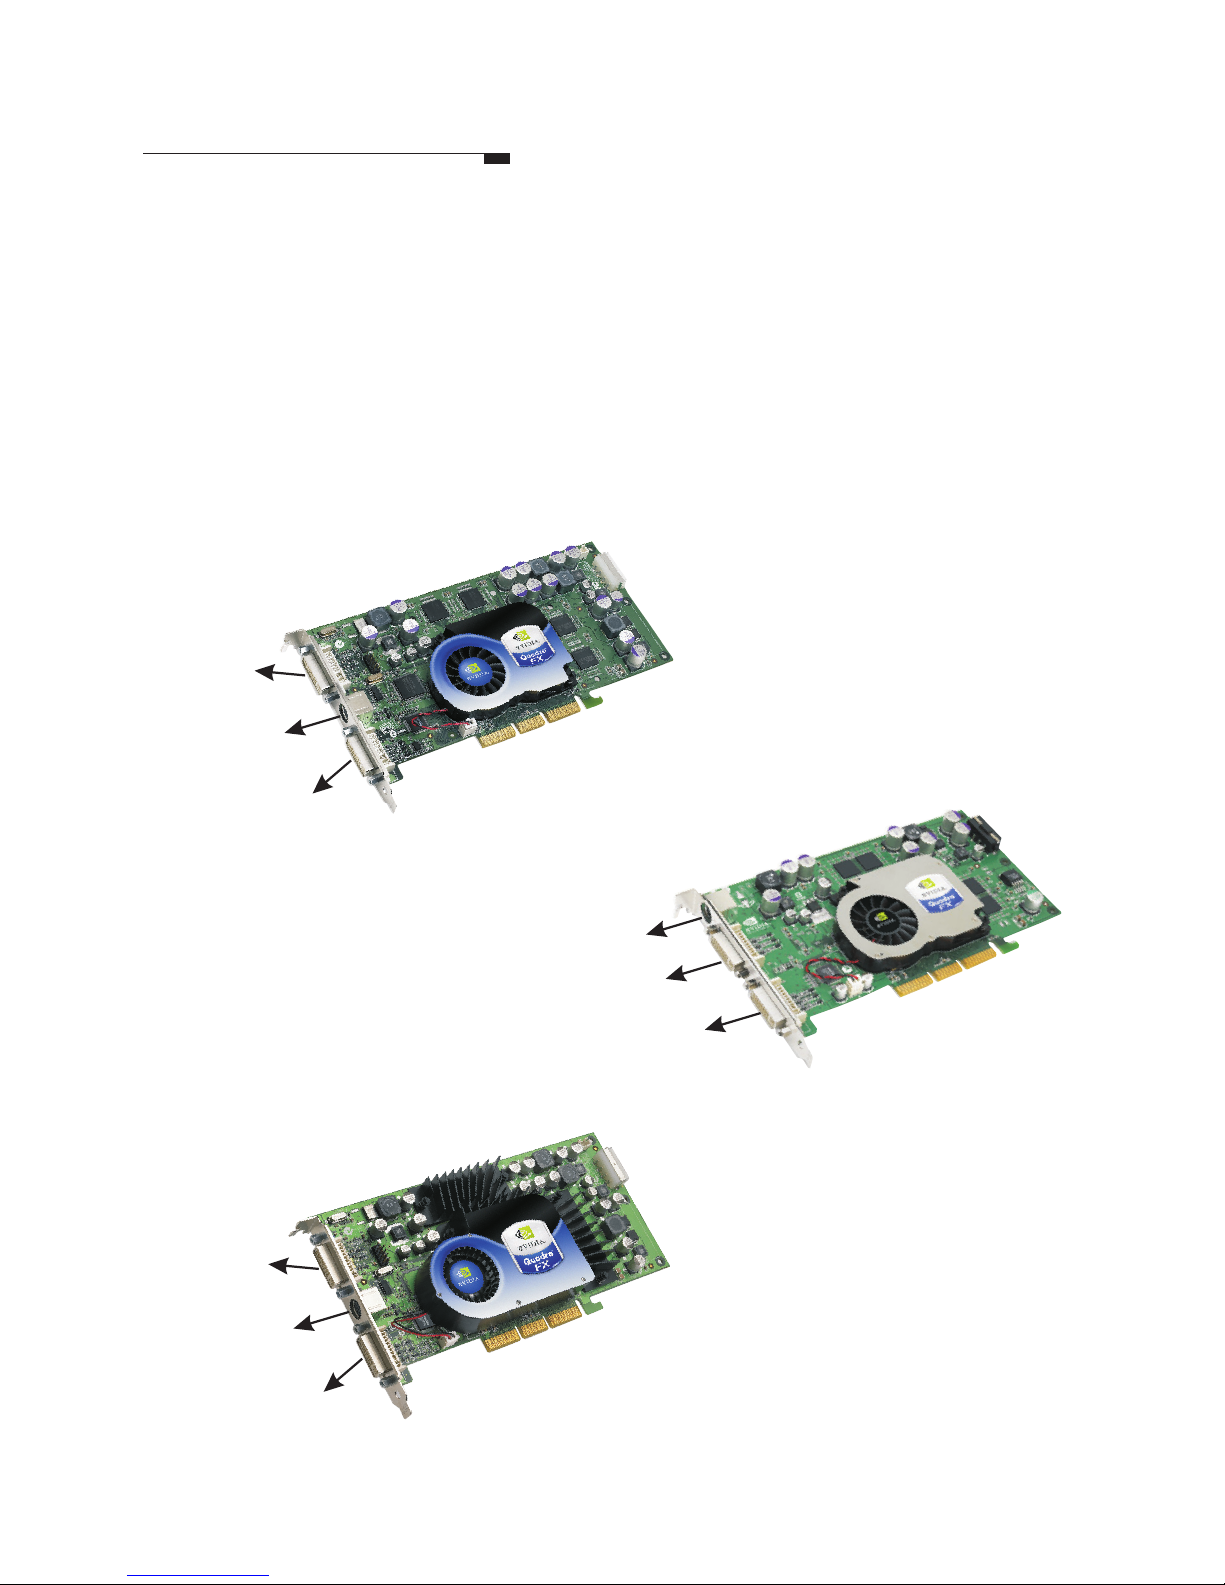
Board Layout
Quadro FX1000//FX1100/FX2000 connectors
The Quadro FX1000/1100/2000 has dual DVI-I connectors. These cards support:
Single VGA output (using a DVI-I to VGA adapter)
Dual VGA output (using two DVI-I to VGA adapters)
VGA+DVI-I output (using a DVI-I to VGA adapter)
Single DVI-I output
Dual DVI-I output
Quadro FX1000
DVI-I
Connector
Stereo 3D
Connector
DVI-I
Connector
Quadro FX2000
DVI-I
Connector
Stereo 3D
Connector
DVI-I
Connector
Leadtek Quadro Series General Guide 2
Stereo 3D
Connector
DVI-I
Connector
DVI-I
Connector
Quadro FX1100
(Continued on next page)
Page 4
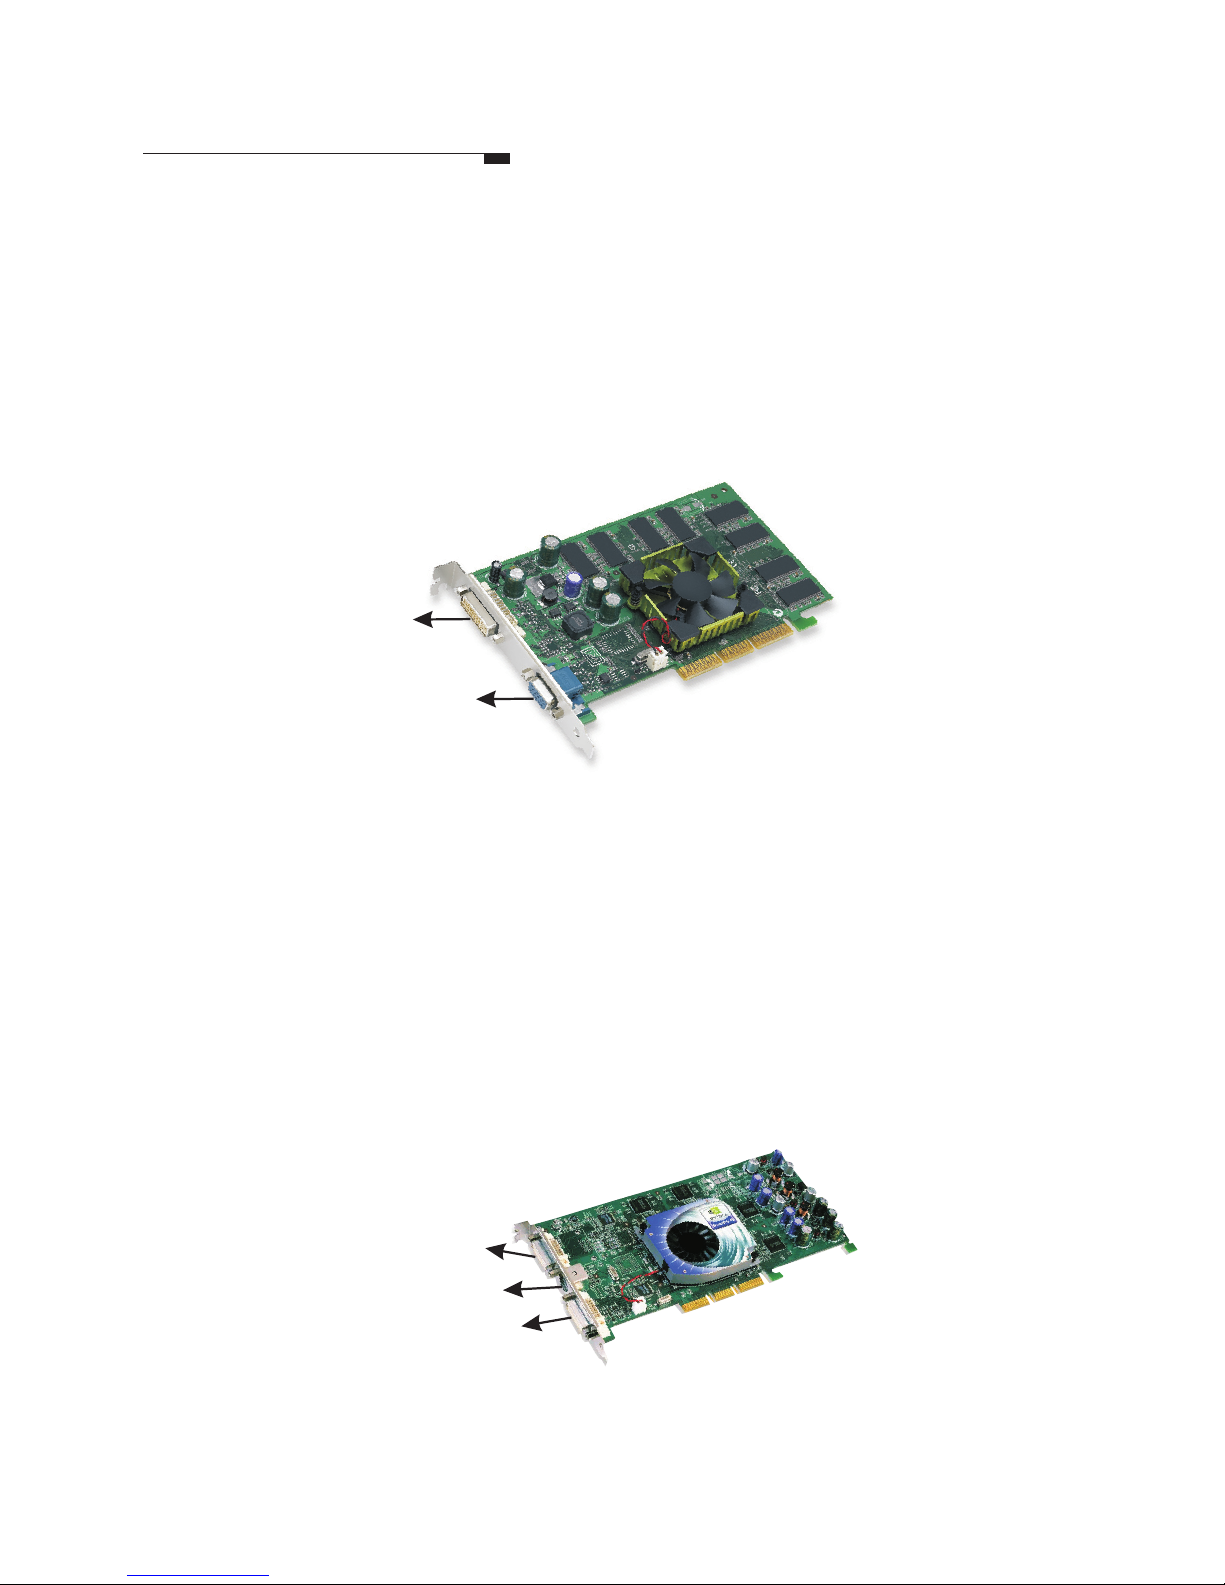
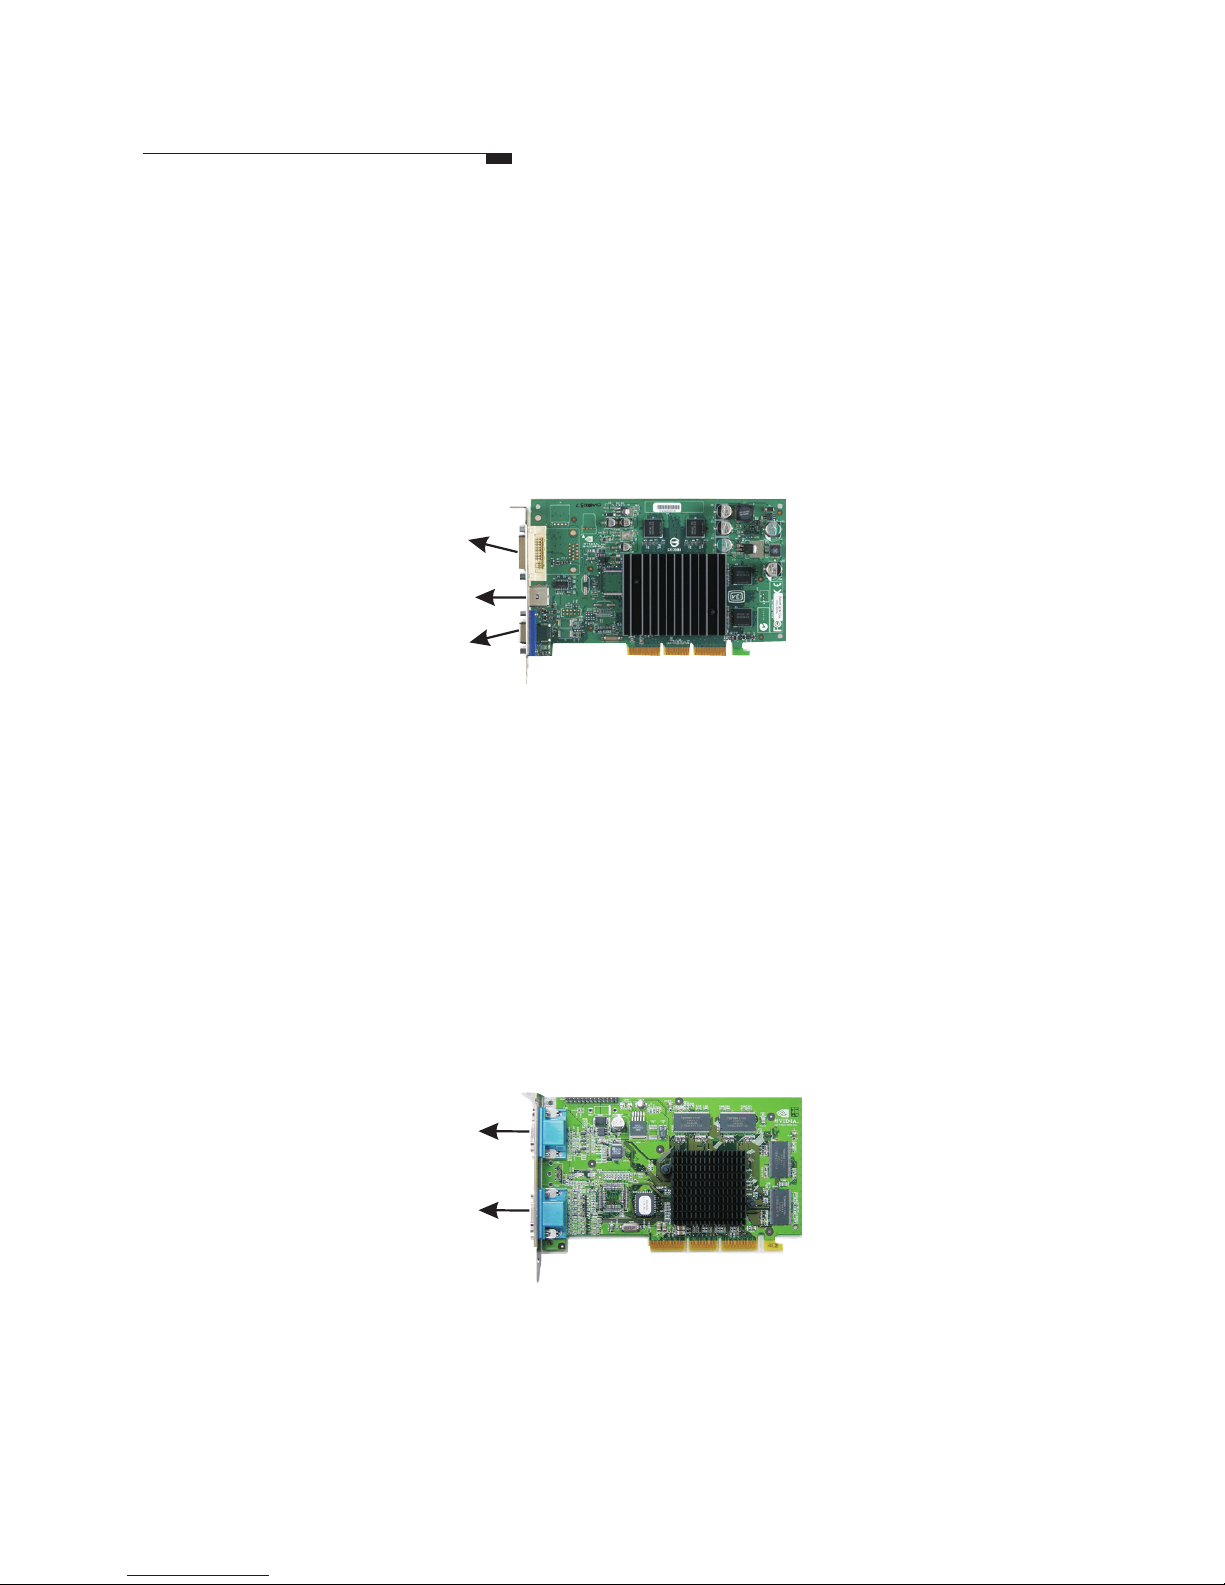
Quadro FX500 connectors
The Quadro FX500 has both VGA and DVI-I connectors. This card supports:
Single VGA output
Dual VGA output (using a DVI-I to VGA adapter)
Single DVI-I output
VGA+DVI-I output
DVI-I
Connector
Quadro FX500
VGA
Connector
Board Layout
Quadro 900/980 XGL
Quadro 900/980 XGL connectors
The Quadro 900/980 XGL has dual DVI-I connectors. These cards support:
Single VGA output ( using a DVI-I to VGA adapter )
Dual VGA output ( using two DVI-I to VGA adapters )
VGA + DVI-I output ( using a DVI-I to VGA adapter)
Dual DVI- I output
Single DVI-I output
DVI-I connector
DVI-I connector
Stereo 3D
connector
3
Page 5
Quadro 750 XGL
Quadro 700XGL
VGA
connector
DVI-I connector
Stereo 3D
Connector
DVI-I connector
Stereo 3D
connector
Board Layout
Quadro 700/750 XGL connectors
The Quadro 700/750 XGL has both VGA and DVI-I connectors. These cards
support:
Single VGA output
Dual VGA output ( using a DVI-I to VGA adapter)
Single DVI-I output
VGA+DVI-I output
VGA
connector
Quadro 550/580 XGL connectors
The Quadro 550/580 XGL has a single LFH 60-pin connector. Each LFH connector
can support two monitors, using the supplied splitter cable. Your card is shipped
with one DVI-I+DVI-I splitter cable per LFH port and two DVI-I to VGA adapters
per splitter cable.
LFH 60-pin
connector
Quadro 550/580 XGL
Leadtek Quadro Series General Guide 4
(Continued on next page)
Page 6
Board Layout
Quadro 380 XGL connectors
Quadro 380 XGL has both VGA and DVI-I connectors, but only supports a single
display. This card supports :
Single VGA output
Single DVI-I output
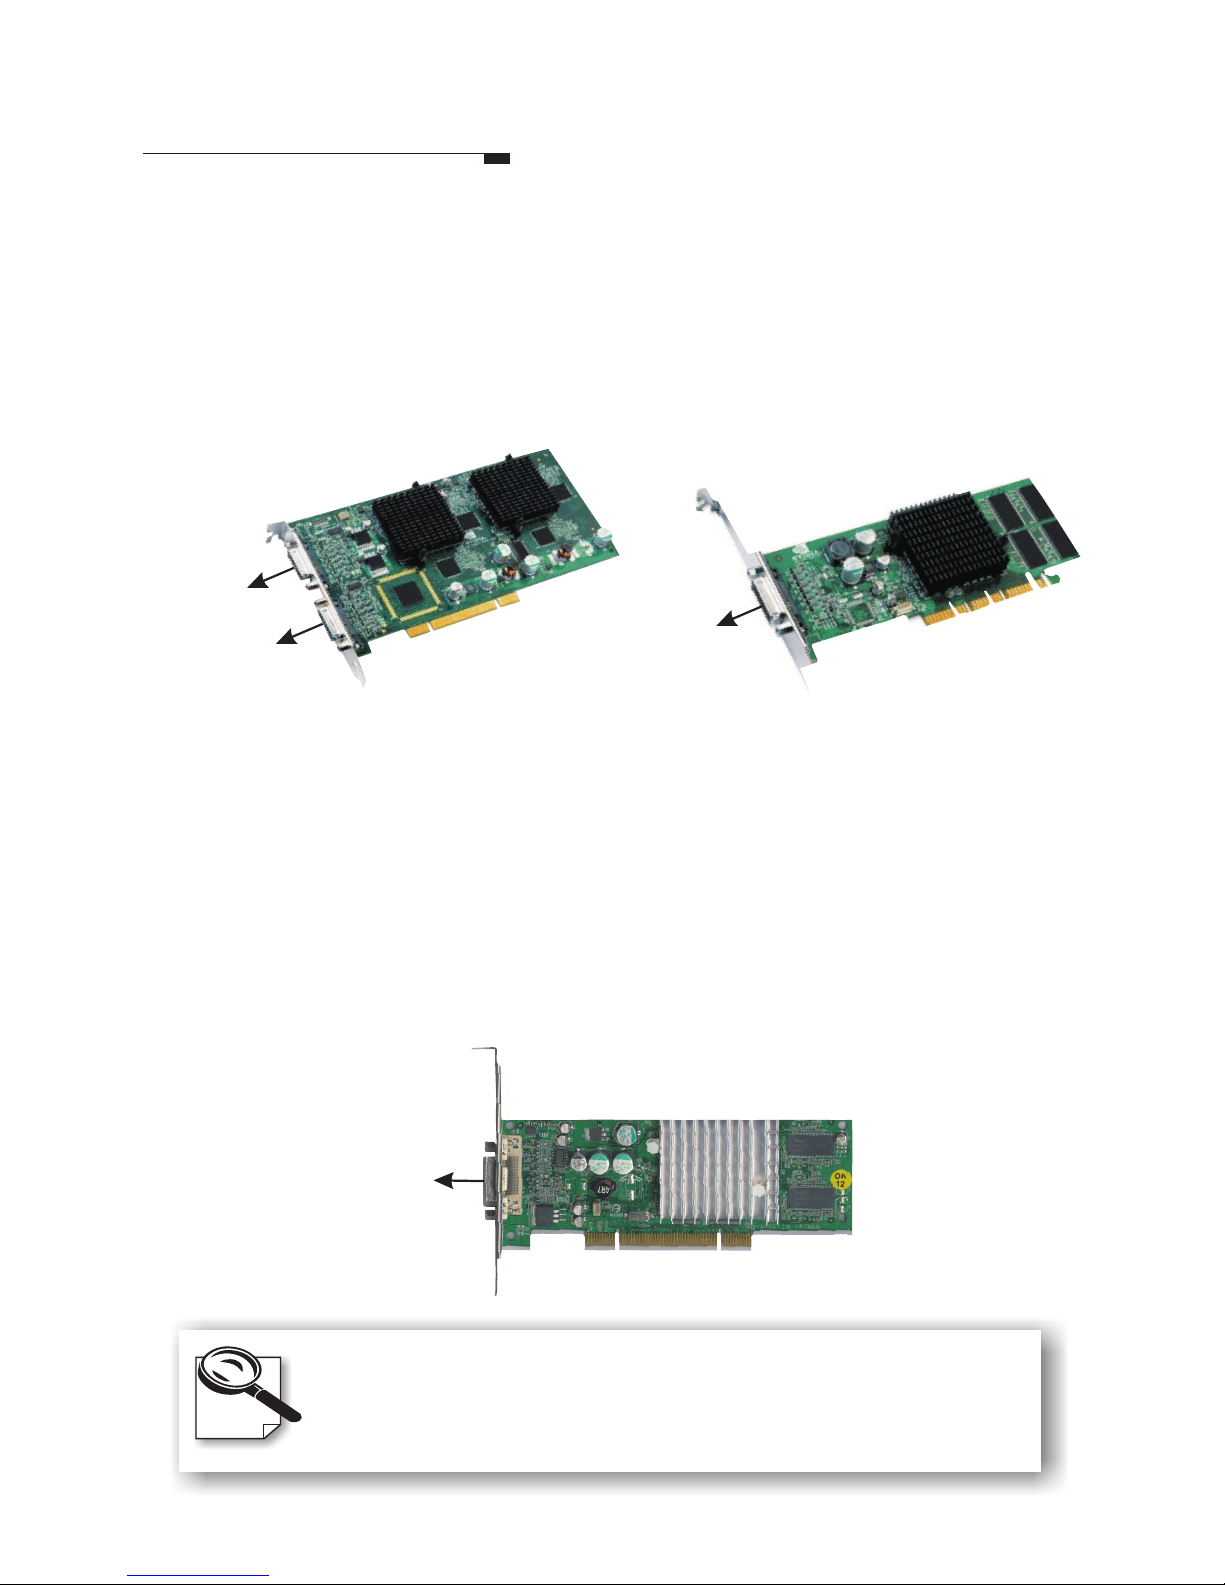
Quadro2 MXR connectors
The Quadro2 MXR has 2 VGA connectors. This card supports:
Single VGA output
Dual VGA
VGA connector
VGA connector
Quadro2 MXR
Quadro 380 XGL
DVI-I connector
TV output
connector
VGA
connector
5
Page 7
Board Layout
Quadro 200/280 NVS and Quadro 400 NVS connectors
The Quadro 200/280 NVS has a single LFH 60-pin connector. The Quadro 400
NVS has two LFH 60 pin connectors. Each LFH connector can support two
monitors, using the supplied splitter cable. Your card is shipped with one DVII+DVI-I splitter cable per LFH port and two DVI-I to VGA adapters per splitter
cable.
Quadro 200/280 NVS
LFH 60-pin
connector
Quadro 400 NVS (PCI)
LFH 60-pin
connector
Quadro NVS 280 PCI connectors
The Quadro NVS 280 PCI has a single DMS 59-pin connector. Each DMS
connector can support two monitors, using the supplied splitter cable. Your card is
shipped with one DVI-I+DVI-I splitter cable and two DVI-I to VGA adapters per
splitter cable.
Quadro NVS 280 PCI
DMS 59-pin
connector
Note:
The actual board appearance may differ from the diagram.
Leadtek Quadro Series General Guide 6
Page 8

7 How to Use this Guide
8
10
12
13
25
28
30
32
33
34
35
Removing the Old VGA Driver
Hardware Installation
Driver Installation
Display Properties
nView Desktop Manager
MAXtreme
POWERdraft
Installing 2 Bundled Software
Display Modes
Installing DirectX
Appendix
13 Settings
15 Advanced Settings
35 FCC Statement
35 Technical Support
Contents
Note: The latest user's guide can be
found in driver CD or can be downloaded
from http://www.leadtek.com.tw
Leadtek Quadro Series General Guide
ENGLISH
Page 9
This guide will familiarize you with the general information necessary for the more
advanced configuration and use of your new graphics card.
There are symbols and conventions that appear throughout this manual to help draw
your attention to important information and for your more effective use of this
manual. The figure below is a sample page.
Symbols and Conventions
Symbols
The exclamation mark
gives important
information on
precautions and how
to avoid damage.
The magnifying glass
indicates information
you should take a
closer look before
proceeding further.
Header
There is a header on each page to remind you which
section the current page belongs to. It also helps you find
the information you need without struggling through the
table of contents. This header indicates this page is
under the section.Switching to Standard VGA Driver
The hollow arrow is
intended to impersonate
the cursor on your computer
screen, indicating the area you
should click on with your mouse.
Arrow
The dialog box
appears on the screen as shown. Now
click on the tab.
Display Properties
Settings
Step 4
Step1
Step2
Step 3
Before installing your new graphics card,
it is recommended that you set your
display to use the standard VGA driver
before removing your legacy VGA card.
Here are the instructions for setting your
display driver as standard VGA driver:
Skip this section if your computer
runs on Windows NT 4.0 or Windows
2000. Only Windows 95/98 users
need to set the Standard VGA driver.
First click the right key of your mouse
on the desktop. A fly-out will appear on
your desktop as shown in the figure on
the right. Then click on , the
highlighted field in the figure.
Properties
Another dialog box appears. Click on the
tab to reveal the sheet of display
property that controls the VGA driver.
Adapter
The sheet turns on
top of the dialog box. Click on
the button.
Settings
Advanced
Windows 95/98 users
may encounter problems
if the VGA driver is not
changed to the Standard
VGA driver prior to the
installation of a new
VGA card.
L
How to Use this Guide
Leadtek Quadro Series General Guide 7
Page 10
Step1
Click , then select
from
the menu.
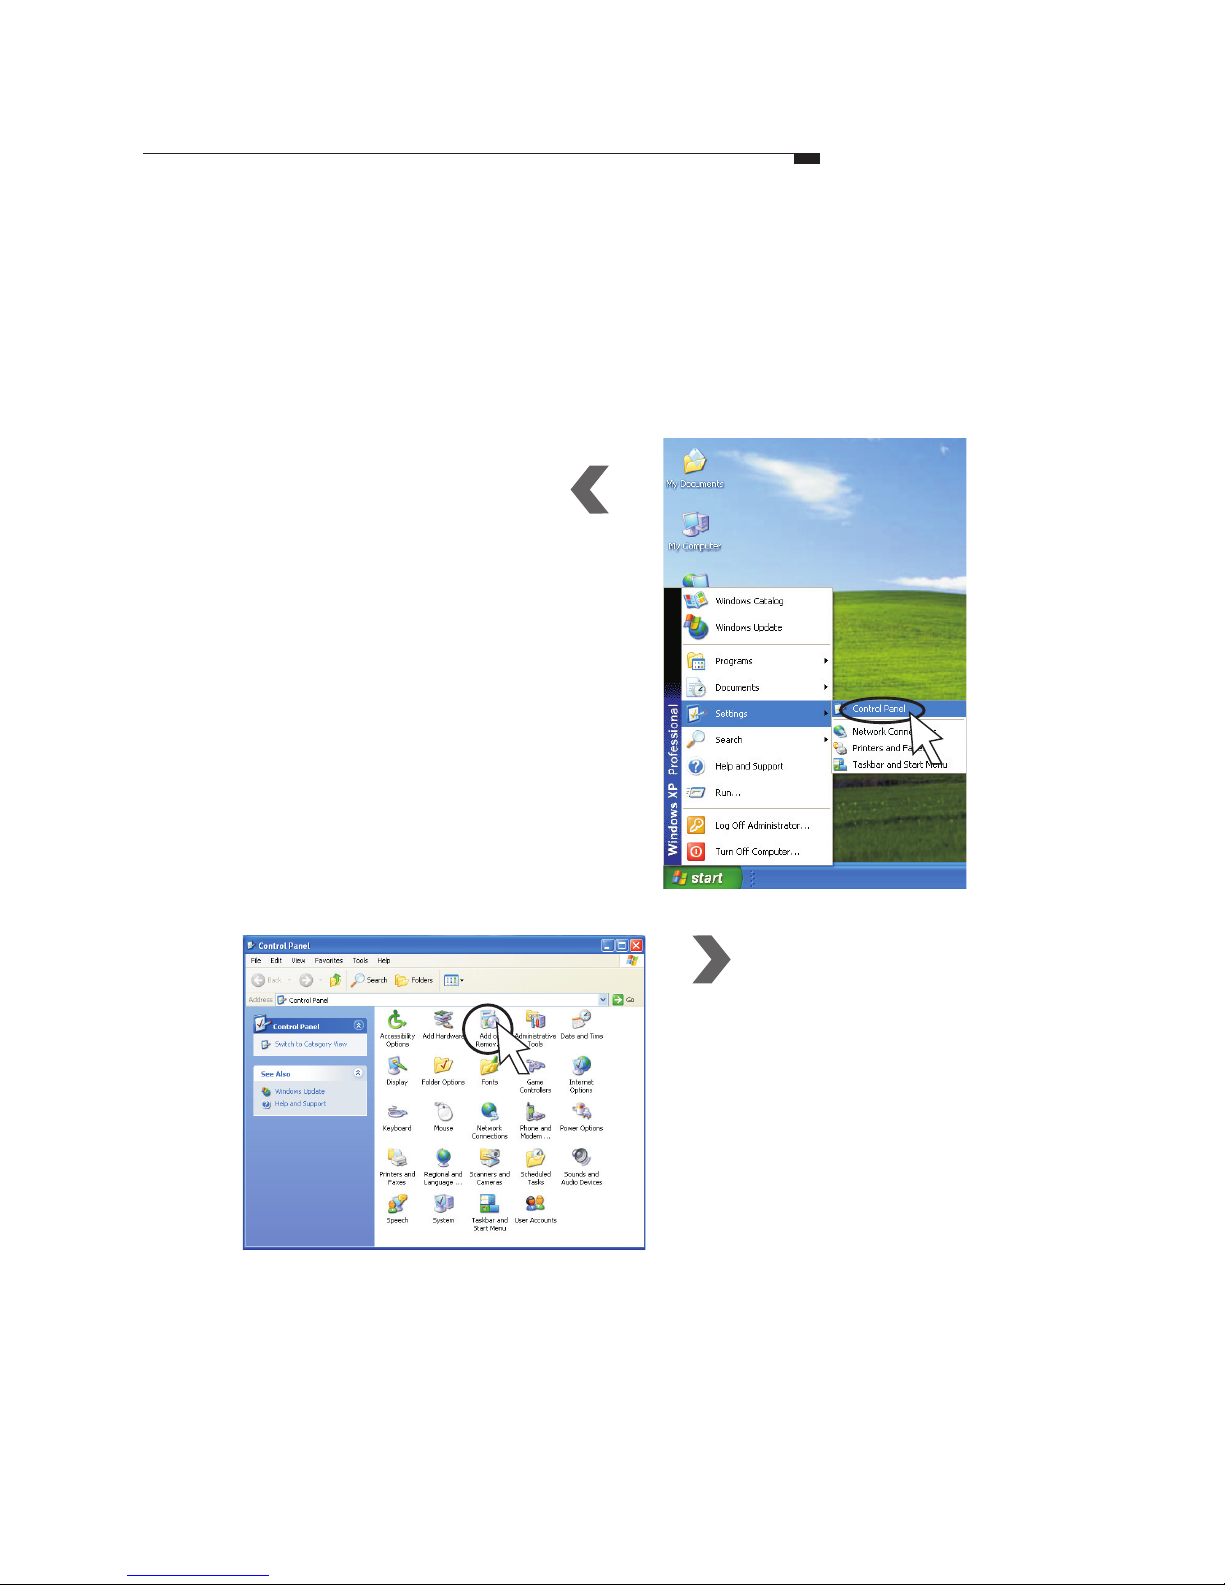
Start
Control Panel
Settings
Step2
Removing the Old VGA Driver
It is recommended that you remove or uninstall your existing display driver
before replacing your old video card with the new one. Here are the
instructions for removing your existing display driver:
Double-click the
icon.
Add or Remove
Programs
8
Page 11
Step
3
The window will list the programs
currently installed in your system.
Select the old display driver.
Step4
Click the button.
Follow the instructions on the screen
to remove the old VGA driver.
Change/Remove
Removing the Old VGA Driver
1. The screen shots are taken from Windows
XP. The screens for other systems may
vary.
2. If you can not find the current display
driver in the ADD or Remove Programs
window, Please ignore this section.
Leadtek Quadro Series General Guide 9
Users may encounter problems if the old VGA
driver is not removed prior to the replacement
of an old VGA card with a new one.
Page 12
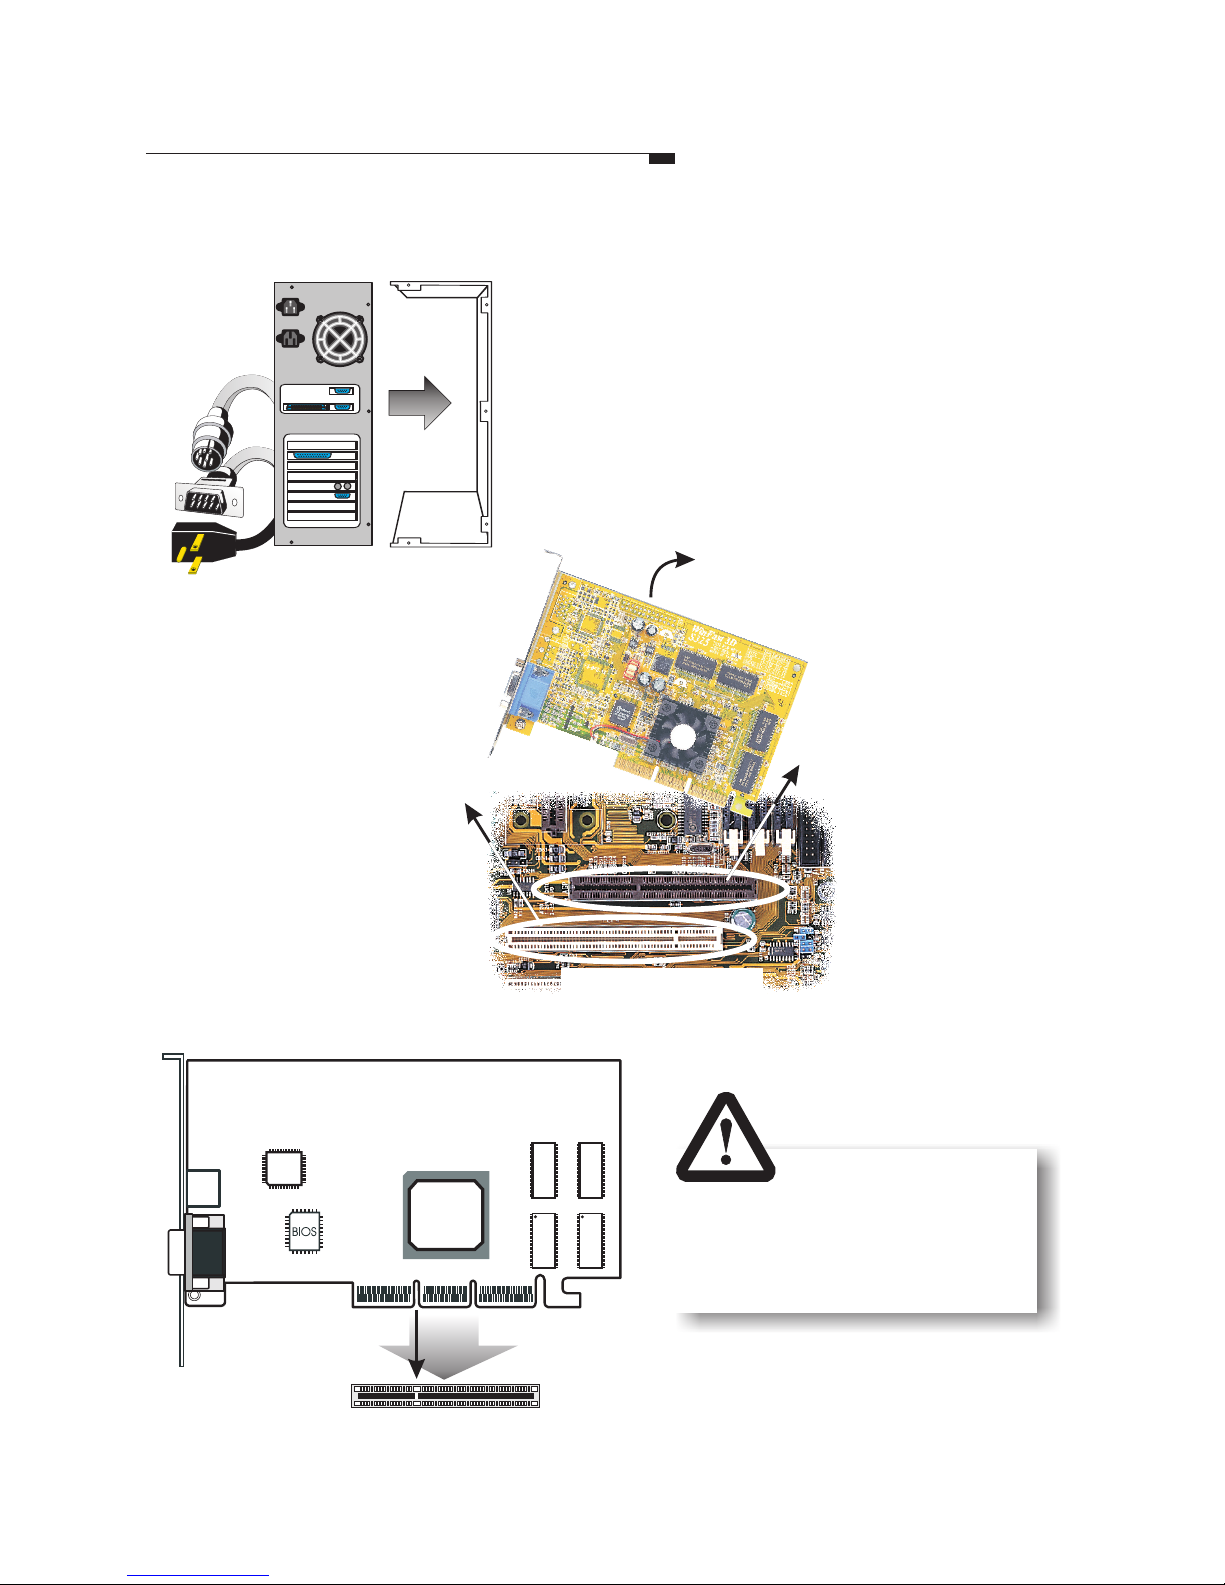
Hardware Installation
10
Locate the AGP/
PCI bus expansion
slot on your system
mainboard and
remove the cover if
there is one.
If there is an existing
VGA card, remove
the old card by
loosening the
mounting bracket
and pulling the card
off the slot.
OR
Step2
Shut down the
computer; unplug
all the cables and
electrical cords;
and remove the
cover from the
computer chassis.
Step1
Remove the
old card
System mainboard
AGP
slot
1
AGP slot
Step
3
Position the new card
over the AGP slot .
Insert the bus connector
in the slot and gently
press the bus connector
down. (For PCI
interface products,
please insert into PCI
bus slot.)
PCI slot
Inserting your card into
the wrong type of slot
can damage your card,
your computer or both.
Page 13

Hardware InstallationHardware Installation
NVIDIA
Quadro
4-pin connector
Before Installing the Driver
The product package contains the Software
Pack CD. Please read the Readme.txt file for
the latest information about the software before
proceeding with the driver installation.
If the heat dissipation device provided is a fan, it
is subject to damage if not properly handled. It is
important not to put pressure on the axle or
handle the fan by the axle. A shifted axle may
shorten the fan's lifespan.
A Note for the Fan
Do not handle the
fan by the axle.
Fasten the mounting bracket to the chassis.
Step4
Step7
Reconnect all the cables and cords.
To
monitor
Plug the cord into the matched connector of the
graphic card according to what kind of monitor
you have.
Step6
Step5
(Only for Quadro FX3000/3000G/2000/1100/1000 and other new
products with the 4-pin connector)
If your computer has an unused power cable you may
connect it to the product directly.
If the card has a 4-pin power connector located at
the edge of the board, as shown in the diagram left,
please use the included power cable, as shown to
the right, to connect the system power supply and
the 4-pin connector on the video card.
Leadtek Quadro Series General Guide 11
Page 14

Driver Installation
Step1
Step5
Step6
Step2
Insert the
software pack
CD into the
CD-ROM drive.
The screen will display on the
screen. Select by clicking
on it.
Autorun
Driver Install
Step3
The InstallShield Wizard is been
preparing.
Step4
A dialog box tells you it is ready to
install the driver. Click .Next
Windows is installing the driver. A
dialog box appears showing you the
progress.
When it is finished, a dialog box asks
you if you want to restart your
computer. Tick and then Finish.Ye s
12
Page 15

Display Properties
Settings
Right click on the desktop,
then click on
the popup menu to bring up
the display properties
dialog box. Click the
tab to set the color
mode and resolution of
your preference.
Properties
Settings
Color Quality
You may change the setting to get
color depth you need.
Display Area
Supports VESA standard super highresolution graphics modes.
If you have a second display connected to the
Quadro graphic card, the tab is shown
as above. Right click on the desktop, then click
on the popup menu to bring up the
display properties dialog box.
Settings
Properties
Leadtek Quadro Series General Guide 13
(Continued on next page)
Page 16

Select "Quadro NVS 280 PCI"
tab (or respective model name)
will bring up the submenu as the
right figure that allows you to do
some advanced settings including
nView, OpenGL Settings,
Direct3D Settings, Overlay
Controls, Desktop Utilities and
NVRotate, etc.
Quadro NVS 280 PCI is used as an
example here.
Card Name Tab
èQuadro NVS 280 PCI
(or respective model name)
Open the setting boxOpen the setting box
14
Display Properties
Settings
Provides information on the display
adapter, system and driver version.
Page 17

nView Tab
ènView Display Mode
nView
nView
nView
is a multi-display
technology developed by
NVIDIA. supports a wide
variety of multi-display modes,
offering users maximum
flexibility. It also allows you to
set independent resolution, color
depth, and refresh rate on a per
display basis.
Note:
Not all the nView functions
are available for every model
of the Quadro series. If you
encounter any problem while
using them, look up our
website for the display driver
update.
If you have a second display connected
to the Quadro graphic card, the
tab is shown as below. Open
the setting box and click on
.
Settings
nView
Display Mode
Display Properties
Advanced Settings
(Continued on next page)
Leadtek Quadro Series General Guide 15
Page 18

nView Modes
The option selected here
determines how the video is
displayed on the screen(s) using
the nView technology.
See the next page for further
information.
(Cont'd)
nView Tab
ènView Display Mode
16
Display Properties
Advanced Settings
Page 19

(Cont'd)
Single Display (nView Disabled)
Allows only one screen to display the
output video.
Vertical Span
Horizontal Span
Check to have the Windows desktop
span vertically across two screens.
Check to have the Windows desktop
span horizontally across two screens.
Clone
Check to have the same display on
the two screens.
(Continued on next page)
Refer to next page
nView Tab
ènView Display Mode
Here is an example using
Windows 2K/XP.
Leadtek Quadro Series General Guide 17
Display Properties
Advanced Settings
Page 20

Device Settings Button
Press to open a popup menu that includes
settings for output devices.
nView Tab
èDevice Settings
Primary Display
Click on one of the screens in the
preview window of the nView dialog
box to highlight it with a blue frame.
Tick the
check box to set the selected
screen the primary display (Screen 1).
When clicking the
button, you can see on the popup
menu is checked.
Make this the primary
display
Device Settings
Primary Display
Color Correction
USE the setting options to adjust the
brightness, contrast, and gamma.
(Cont'd)
18
Display Properties
Advanced Settings
Page 21

1
2
1
Extended Desktop
nView also provides a quick and easy
way to extend your desktop to another
video output device.
Under the Settings tab (see the figure on
top of the column on the right hand side,
the preview window shows that though
you have two screens connected to your
computer, only one of them is being
used for display (screen 1); the unused
one is blurred (screen 2). The is the
primary screen; , the extension.
1
2
To extend the desktop
2
3
Identify button
Click this button to display on your
primary screen the number 1, and the
extended screen, 2, as in the figure
below, for identification.
Desktop Arrangement
You can move either of the two screens around
freely and arrange them in any fashion. In
addition, the resolution of either screen can be
changed individually; simply click on one of the
screens in the preview window and drag the
resolution sliding knob to your desired resolution.
Settings Tab
Leadtek Quadro Series General Guide 19
Display Properties
Advanced Settings
Page 22

Card Name Tab
èPerformance and Quality
Performance and Quality
Drag the slider to select the
performance setting ( as the left
figure ) for quality enhancements
in Direct3D and OpenGL
applications.
Performance
There are three selections you
can choose : Application,
Balanced, and Aggresive.
Antialiasing
Use this slider by dragging it to
the degree of antialiasing to be
used in Direct3D and OpenGL
applications. Antialiasing is a
technique used to minimize the
"stairstep" effect sometimes see
along the edge of 3D objects.
Your selection can range from
turning antialiasing completely
off to selecting the maximum
amount possible for a particular
application.
Note: Some options may not be
available due to your hardware
limitation. Please consult your
NVIDIA User Guide for details.
Anisotropic Filtering
Use this slider by dragging it to
set the degree of anisotropic
filtering for improved image
quality. Enabling this option
improves image quality at the
cost of performance.
20
Display Properties
Advanced Settings
Page 23

Custom OpenGL settings
A list of the custom settings (or "tweaks") you
have saved. Selecting an item from the list will
activate the setting. To apply the setting, please
choose the "OK" or "Apply" button.
Card Name Tab
èOpenGL Settings
Default color depth for
textures
This setting item allows you to
select the default Color depth
for textures
.
Vertical Sync
Select the type of vertical
synchrony.
Buffer flipping mode
Turns on page flipping for fullscreen OpenGL applications
which may improve their
performance. If this is disabled,
OpenGL will use a bit block
transfer to flip from the back
buffer to the front buffer.
OpenGL Settings
Allowsyoutoadjustthe
performance and
compatibility options of
your OpenGL application.
Leadtek Quadro Series General Guide 21
Display Properties
Advanced Settings
Page 24

Custom Direct3D settings
Allows you to save the current settings as a
custom "tweak". Saved settings will be added to
the adjacent list. Once you have found the
optimal settings for a particular Direct3D before
starting the program and eliminates the need to
set each option individually.
Card Name Tab
èDirect3D Settings
Performance and
Compatibility Options
This field offers options that
change the performance and the
compatibility of your Direct3D
games.
Direct3D Settings
Allows you to adjust the
performance and compatibility
options and mipmapping for
your Direct3D games.
22
Display Properties
Advanced Settings
Mipmap detail level
A lower bias provides better
image quality; a higher bias
increases performances of the
applications. You can choose
from five preset bias values.
Maximum system memory for
PCI mode texture
Allows you to specify the
maximum size of PCI texture
heap. Increasing this value on
PCI systems with sufficient
memory may greatly improve
the performance of some
Direct3D applications. For
performance reasons, this utility
does not allow you to set the
value to more than half of the
available system memory as
reported by Windows.
Page 25

Overlay Controls
These controls are used to adjust
video quality such as brightness,
contrast, hue and saturation.
Desktop Management
Configures whether the Media Center
icon will be displayed in the system
tray.
Display the NVIDIA Settings icon in
the taskbar
Check here if you want the NVIDIA
Settings icon to be displayed in the
taskbar for easy and convenient access.
Card Name Tab
èOverlay Controls
Desktop Management
Leadtek Quadro Series General Guide 23
Display Properties
Advanced Settings
Page 26

Refresh Rate
Standard driver will set the refresh
rate to the default: 60 Hz.
We recommend you to set refresh
rate to 85 Hz to reduce the flickers
of the screen, for a better viewing
experience.
Monitor Tab
24
Display Properties
Advanced Settings
Page 27

Desktop Manager
nView Desktop Manager provides a
friendly environment for managing
desktops when multiple screens are in
use.
nView Desktop Manager
How to Enable nView
Desktop Manager
(Continued on next page)
Leadtek Quadro Series General Guide 25
Page 28

nView Desktop Manager
(Cont'd)
Display QuickTweak
icon in the taskbar
Check the
option to have the NVIDIA
Settings icon placed in the
system tray for easy access to
multiple control options, as
shown in the figure to the left.
Display the NVIDIA
Settings icon in the taskbar
Select and the follow
screen will appear. In the same time, please tick
"".
Desktop Management
Enable nView Desktop Manager
NVIDIA Settings icon
As you right click the button on
the desktop, please select
in the pop-up menu,
then the nView Desktop window
will appear as below.
nView
Properties
26
Page 29

nView extensions
When using Internet Explorer, you can
right-click on the Internet Explorer tab
in the taskbar to bring out a menu of
nView extensions for configuration.
(See the figure to the right.)
nView Desktop Manager
Each tab of nView
Desktop Manager
User Interface
Allows customization of the nView user
interface.
Effects
Provides special windows effects that users
can apply to their applications.
Hot Keys
Hot keys let users perform various actions
with shortcut keys or key combinations.
Tools
Tools improve nView functionality for
mobile and desktop users.
Profiles
A Profile contains a record of all nView
display settings for easy software setup.
Users can either select a Profile from the list
or create their own custom Profile.
Info
This tab contains information about the
nView Desktop Manager. The Setup Wizard
can also be accessed from this tab.
Zoom
Provides dynamic zoom functionality on the
desktop. Also enables full screen video
playback via the Video Mirroring Control.
Applications
Allows users to control nView settings on a
per application basis.
Desktops
Enables users to create up to 32 unique
desktops.
Windows
Allows control of window and dialog box
placement when using multiple monitors.
Leadtek Quadro Series General Guide 27
Note: If the content of this manual is
not detail enough or not up-to-date,
please browse manual in driver CD
or visit http://www.leadtek.com.tw
Page 30

MAXtreme
MAXtreme 3D application driver is a tool that enhances the productivity of Autodesk
and Autodesk discreet applications such as 3ds max 5, 3ds max4, 3D Studio MAX,
and 3D Studio MAX , and 3D Studio VIZ .
MAXtreme driver allows you to control the application's viewport display quality
and rendering speed, as well as enable a variety of rendering enhancements. The
driver is optimized for use with the full line of NVIDIA Quadro based (includes
Quadro2, Quadro4, and Quadro FX) graphics cards, which increase the capabilities of
the driver's interactive renderer.
TM
The
Introduction
Windows NT4.0 or Windows 2000/XP operating system
A Quadro workstation graphics card
Windows 2000/XP display driver or Windows NT 4.0 display driver
AutoCAD already installed
" Write access " to the 3D Studio MAX/VIZ main directory and the
Windows system directory
Before you install and use this driver, you must have the following components fully
functional on your system:
Installing MAXtreme
Readme.txt contains important release notes
Setup.exe installation program for Windows
( all others ) files required for installation
The MAXtreme setup program automatically installs the version of MAXtreme
(release3 or release4) that is compatible with your installed version of the 3D Studio
MAX/VIZ application
( MAXtreme 4 works with 3ds max 4 but isn't compatible with 3D Studio MAX 3)
The MAXtreme SETUP directory on your CD contains the following files:
R
R
R R R
R
You must have one of the following 3D Studio applications installed on your
computer installing NVIDIA MAXtreme.before
3ds max 5
3ds max 4
3D Studio MAX Release 3
3D Studio VIZ Release 3i
3D Studio VIZ Release 3
28
Page 31

Eject the software pack CD after completing the display driver installation. Then
follow the instructions in page 32 to install MAXtreme. The Help file
(MAXtreme*.chm ) will be installed during MAXtreme installation in the 3D Studio
Help directory.
If the installation program stops processing and generates an error message, run the
program when logged in with administrator privileges.
For additional information about MAXtreme, view the Readme.txt file in the
MAXtreme directory.
1. From Windows desktop, click
Start > Settings > Control Panel > Add / Remove Programs.
2. Click the "
3. Click " MAXtreme " from the list.
4.
5. Follow the instructions from the InstallShield program to complete
uninstallation.
Add / Remove Programs " icon.
Click the " Change / Remove " button.
MAXtreme
Uninstalling MAXtreme
Leadtek Quadro Series General Guide 29
Page 32

POWERdraft
POWERdraft is designed to elevate the performance and the features of the following
applications :
Introduction
Installing POWERdraft
To install POWERdraft
AutoCAD 2002/2000/2000i
AutoCAD Architectural Desktop Version 2/2i/3.3
Autodesk Mechanical Desktop 4/5/6
The driver Setup folder contains the following files:
Before you install and use this driver, you must have the following components fully
functional on your system.
1. Make sure AutoCAD is running.
2.
not
Eject the software pack CD after completing the display driver installation.
Then follow the instructions in page 32 to install POWERdraft.
Readme.txt important notes about using this software
SETUP.EXE installation program for Windows
( all others ) files needed by SETUP
Windows NT4.0 or Windows 2000/XP operating system
A Quadro workstation graphics card
Windows 2000/XP display driver or Windows NT 4.0 display driver
AutoCAD already installed
" Write access " to the AutoCAD main directory and the Windows system
directory
30
Page 33

POWERdraft
The driver is installed in a separate directory. SETUP creates a program group
containing the following icons:
The two Configure icons only work when AutoCAD is not running.
3. Use these icons to configure either POWERdraft or the original driver that comes
with AutoCAD ( WHIP ) as the actual display driver for AutoCAD. After Setup
has completed successfully, POWERdraft is already configured.
When POWERdraft is configured, the POWERdraft logo will appear when AutoCAD
starts up.
" POWERdraft HELP " opens the online Help file.
" Configure POWERdraft " configures POWERdraft as the
AutoCAD display driver.
" Configure Original Driver " configures the AutoCAD original
display driver ( WHIP ).
1. From Windows desktop, click
Start > Settings > Control Panel .
2. Click the "
3. Click " POWERdraft " from the list.
4.
5. Follow the instructions from the InstallShield program to complete
uninstallation.
Add / Remove Programs " icon.
Click the " Change / Remove " button.
Uninstalling POWERdraft
Leadtek Quadro Series General Guide 31
Page 34

Installing 2 Bundled Software
Step1
Step2
Step3
Step4
Insert the
software pack
CD into the
CD-ROM drive.
The screen will
display on the screen. Select
by clicking on it.
Autorun
Workstation Application
Utility
Select a language that is used
on your system. Then follow
the instructions that appear in
the subsequent prompts to
finish installation.
Select one application program
you prefer to use from
MAXtreme and POWERdraft.
32
Page 35

Display Modes
Display Modes Table
The highest refresh rates supported at each resolution:
Note: 1. The table shows the general supported resolutions on a CRT monitor.
2. EMI tests were conducted at resolutions of 1920 x 1440 and below.
640 x 480
800 x 600
1024 x 768
1152 x 864
Resolution
240
240
240
200
8bpp
240
240
240
200
16bpp
240
240
200
170
32bpp
8bpp=256 colors; 16bbp=65K high color; 32bbp=16M true color
1280 x 768
1280 x 960
1280 x 1024
1600 x 1200
1920 x 1440
2048 x 1536
170
170
170
120
85
60
170
170
170
120
85
60
150
150
150
100
85
60
Digital Flat Panel Supported Modes
640 x 480
800 x 600
1024 x 768
1280 x 1024
Resolution
8/16/32 bits
8/16/32 bits
8/16/32 bits
8/16/32 bits
Colors
Leadtek Quadro Series General Guide 33
Page 36

DirectX is required in many applications.
users can install DirectX from the provided CD following the instructions below.
Windows 95/98/ME/NT/2000/XP
Eject the Software Pack CD after completing the driver installation.
Load the same CD again. The Autorun program will be executed and the setup
screen will appear. Select . Follow the instructions on the screen to
install DirectX.
DirectX
Step1
Step2
Installing DirectX
Upgrading your DirectX
The manufacturer renews DirectX
from time to time. It is recommended
that you download from Microsoft
website the latest version of DirectX
and install it on your system.
34
Page 37

FCC Statement
This device complies with Part 15 of the FCC Rules. Operation is subject to the following two conditions:
This device may not cause harmful interference.
This device must accept any interference received, including interference that may cause undesired
operation.
This equipment has been tested and found to comply with the limits for a Class B digital device pursuant
to Part 15 of FCC Rules. These limits are designed to provide reasonable protection against harmful
interference in a residential installation. This equipment generates, uses and can radiate radio frequency
energy and, if not installed and used in accordance with the instructions, may cause harmful interference
to radio communications. However, there is no guarantee that interference will not occur in a particular
installation. If this equipment does cause harmful interference to radio or television reception, which can
be determined by turning the equipment off and on, the user is encouraged to try to correct the
interference by one or more of the following measures:
Reorient or relocate the receiving antenna.
Increase the separation between the equipment and receiver.
Connect the equipment into an outlet on a circuit different from that to which the receiver is connected.
Consult the dealer or an experienced radio/TV technician for help.
Shielded interface cables must be used in order to comply with emission limits. Changes or
modifications not expressly approved by the party responsible for compliance could void the user's
authority to operate the equipment.
!
!
!
!
!
!
!
FCC Statement
Appendix
Technical Support
! If the attempt of resolving the problem on your own was unsuccessful, please contact your vendor or
E-mail our technical support staff at : , and provide them in your message with:service@leadtek.com.tw
product name, software driver version, motherboard manufacturer, BIOS version and chipset,
Computer type and speed, Monitor manufacturer and model, and a detailed description of your
problem.
Leadtek Quadro Series General Guide 35
This product incorporates copyright protection technology that is protected by method claims of certain U.S.
patents and other intellectual property rights owned by Macrovision Corporation and other right owners. Use of
this copyright protection technology must be authorized by Macrovision Corporation, and is intended for home
and other limited viewing uses only unless otherwise authorized by Macrovision Corporation. Reverse
Engineering or disassembly is prohibited.
 Loading...