

Page 1
MetaEye® IVP256
User’s Manual
Leadtek Research Inc.
Page 2

Copyright © 2000 by Leadtek Research Inc. All rights reserved.
No part of this document may be copied or reproduced in any form or by any
means without the prior written consent of Leadtek Research Inc
Leadtek makes no warranties with respect to this documentation and disclaims
any implied warranties of merchantability, quality, or fitness for any particular
purpose. The information in this document is subject to change without notice.
Leadtek reserves the right to make revisions to this publication without
obligation to notify any person or entity of any such changes.
MetaEye
®
is a registered trademark of Leadtek Research Inc. Other trademarks
or brand names mentioned herein are trademarks or registered trademarks of
their respective owners.
Leadtek Research Inc.
International Headquarters
18F, No. 166, Chien-Yi Rd., Chung Ho,
Taipei Hsien, Taiwan (235)
Tel: +886-2-8226-5800
Fax: +886-2-8226-5801
ISDN: +886-2-8024-1092
http://www.leadtek.com.tw
E-mail: service@leadtek.com.tw
United States Headquarters
46721 Fremont Blvd.,
Fremont, CA94538, U.S.A.
Tel: +1-510-490-8076
Fax: +1-510-490-7759
http://www.leadtek.com
MetaEye IVP256 User’s Manual
Version A
December 2000
Page 3

Contents
Chapter 1 Introduction...............................................................1
1.1 Overview.................................................................... 1
1.2 Features..................................................................... 2
Chapter 2 Getting Started.......................................................... 3
2.1 Important Safety Instructions.................................. 3
2.2 Package Contents..................................................... 4
2.3 Panel Description ..................................................... 5
2.3.1 Front Panel....................................................... 5
2.3.2 Rear Panel & Connectors................................. 6
2.3.3 Side Panel & Switches ..................................... 7
2.4 Controls and Buttons............................................... 8
Chapter 3 Quick and Easy Operation..................................... 10
3.1 Before you start...................................................... 10
3.2 Quick Installation and Operation .......................... 11
3.3 Power Saving Mode................................................ 13
Chapter 4 OSD Introduction....................................................15
4.1 Before the Video Connection Established........... 15
4.1.1 Auto Answer Setup......................................... 15
4.1.2 Phone Book Editor ......................................... 16
4.1.3 A/V Setup ....................................................... 16
4.1.4 ISDN Setup..................................................... 19
4.2 After the Video Connection Established.............. 20
4.2.1 View Setup ..................................................... 20
4.2.2 A/V Setup ....................................................... 21
Chapter 5 Advanced Operation............................................... 24
5.1 Phone Book............................................................. 24
5.1.1 Phone Book Editor ......................................... 24
Page 4

5.1.2 Phone Book Dialing........................................ 24
5.2 Auto Answer............................................................ 25
5.3 Firmware Upgrade .................................................. 25
5.4 Connecting TV Set.................................................. 26
5.5 Connecting External Cameras .............................. 27
5.6 Connecting VCR ..................................................... 28
Appendix A. Operation Tree ............................................................ 29
Appendix B. Troubleshooting .......................................................... 31
Appendix C. Technical Support ....................................................... 32
Appendix D. Limited Warranty ......................................................... 32
Page 5

Introduction 1
Chapter 1 Introduction
1.1 Overview
Thank you for purchasing Leadtek MetaEye IVP256. This product is
specifically designed for you to see the one you are communicating with
during a phone call. You can use this VideoPhone for family chatting, friends
talking, business conferencing, medical consulting, and even job interviews.
Leadtek MetaEye IVP256 is designed to avoid the complicated installation
procedures. Simply connecting this product to the power outlet and an ISDN
line, you can make or receive a color video call with this product. And with
the direct access video control keys or the cursor keys, you can bring up the
user-friendly on screen menu (OSD) for further controls for you to operate
and control more easily.
The MetaEye IVP256 has a built-in high quality camera and an active matrix
liquid display, and transmit images up to 30 frames per second. Using this
product, you will enjoy seeing the real time and brilliant color images of your
correspond ents with self-vie w, remote view, and both view funct ion. When
you do not want the caller or receiver to see you while using MetaEye
IVP256, by pushing one-touch button and you can have a totally private
mode connection.
The MetaEye IVP256 can auto-answer the incoming phone and allows you to
remotely monitor your house while you are away from home.
The MetaEye IVP256, designed under conformation of ITU-T H.320
standards for video conferencing communication, can be used with any ISDN
VideoPhone products that are compatible with this standard.
Page 6

2 MetaEye IVP256 User’s Manual
1.2 Features
• Stand-alone H.320 compliant video phone
• Built-in true color CCD camera with cover protection
• 5.6-inch high quality TFT-LCD Display
• User friendly op eration through telephone keypads
• Phone book dialing function
• Auto Answer with password protection
• 2 A/V inputs & TV output for large display
• On-line software Upgradable
Page 7

Getting Started 3
Chapter 2 Getting Started
Important Safety Instructions
Always follow these basic safety precautions when using any piece of electronic
equipment. This will reduce the risk of fire, electric shock, and injury.
Please read and understand all the instructions before proceeding:
1.
Turn off the power of this product by disconnecting the AC main source
before cleaning. Do not use liquid or aerosol cleaners. Use a soft, damp cloth
for cleaning exposed surfaces.
2.
Do not operate this product near water or when your hands or body is wet.
Immersion in water could cause electric shock.
3.
Do not place this product on sofa, bed, rug, or other soft surface, which
might block these ventilation slots. Do not place this product near a heating
register or radiator.
4.
Install this product securely on a stable surface. Serious damage to this
product may result if it falls.
5.
Do not allow anything to be rested on the power cord. Do not place this
product where a person can step or trip on the power cord, television or
telephone cords.
6.
Do not disassemble this product. There are no user-serviceable parts inside.
7.
Do not put lighted candles, cigarettes, cigars, etc., on this product.
8.
Do not overload the AC main source and po wer extension cords. This will
increase the risk of fire and electric shock.
Page 8
4 MetaEye IVP256 User’s Manual
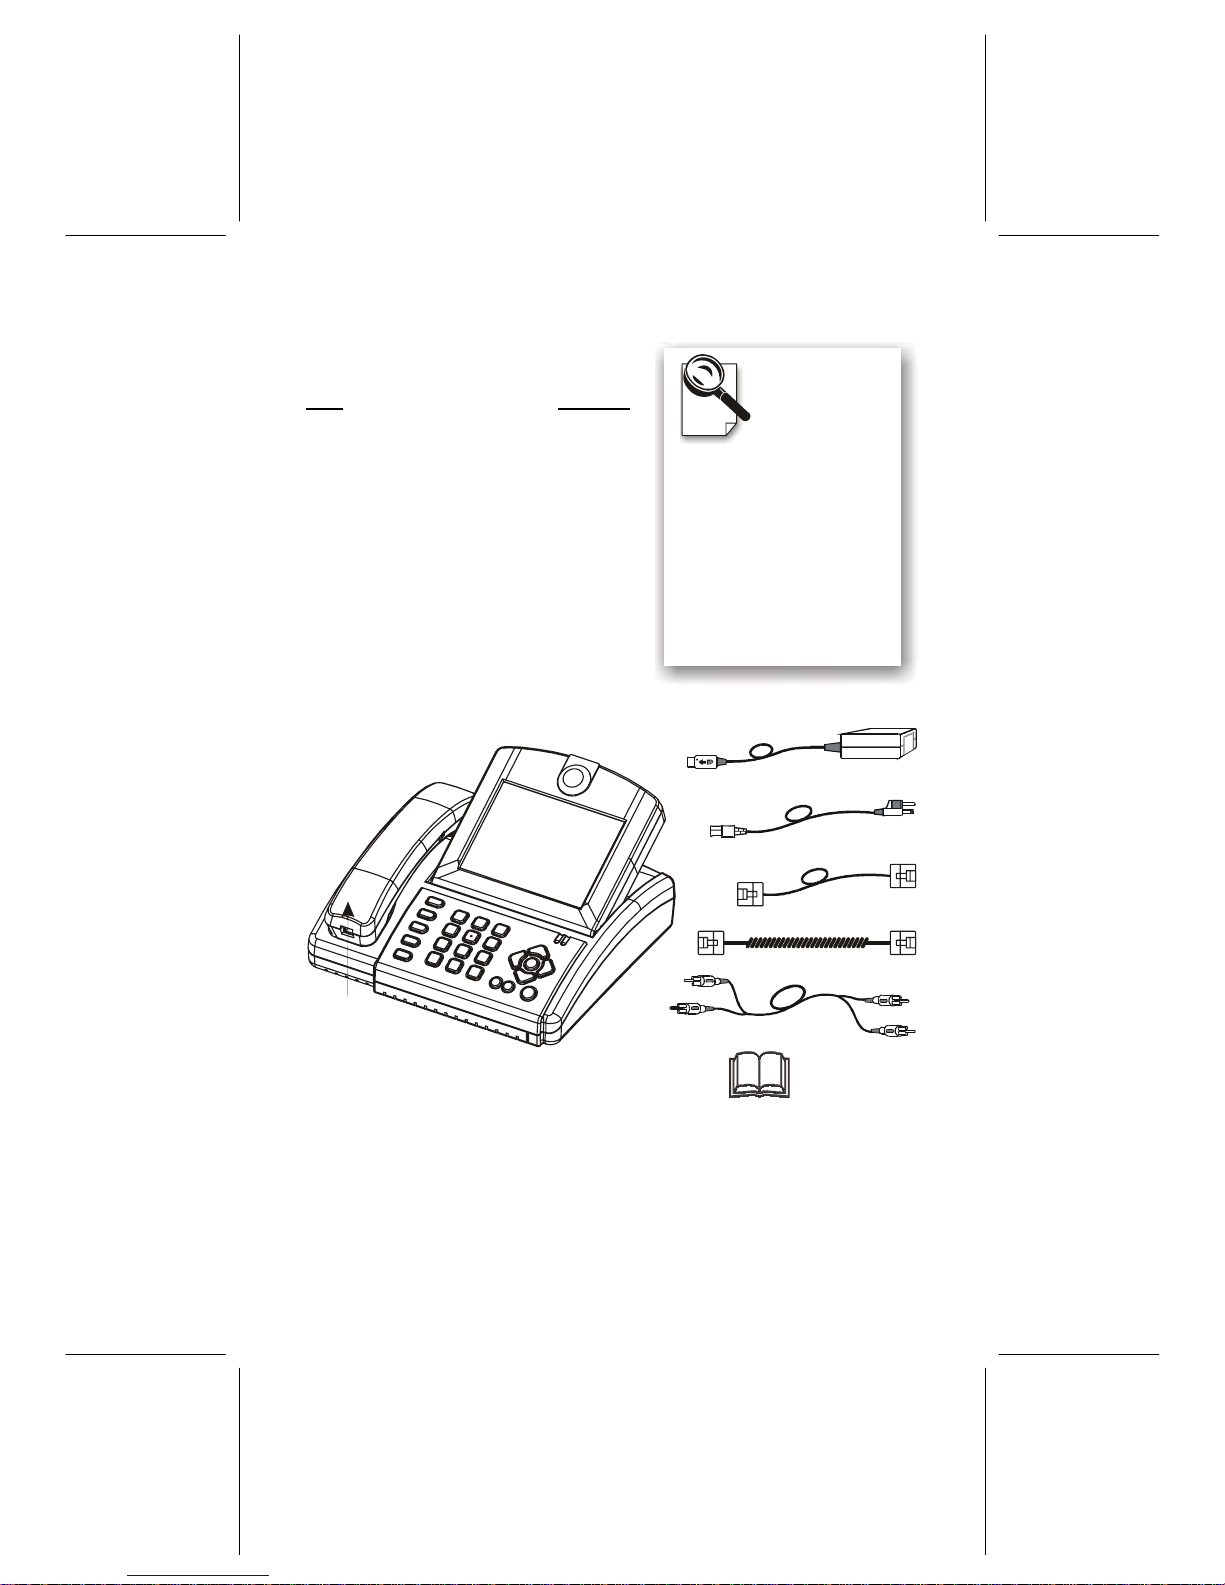
2.1 Package Contents
Item Quantity
MetaEye IVP256 1
Power Adapter 1
Power Cord 1
ISDN Cable (RJ-45) 1
Handset 1
Handset Cable 1
Audio/Video Cable 1
User’s Manual 1
Audio/Video Cable
Power Adapter
Power Cord
MetaEye IVP256
Handset
Handset Cable
ISDN Cable
User's Manual
Please unpack
the product
package with
caution; inspect
the Items closely. If you
find any damaged item,
please contact your local
distributor imme diately.
Also, please keep the
box and packing
material for future use in
the event of future
shipments.
Page 9
Getting Started 5
2.2 Panel Description
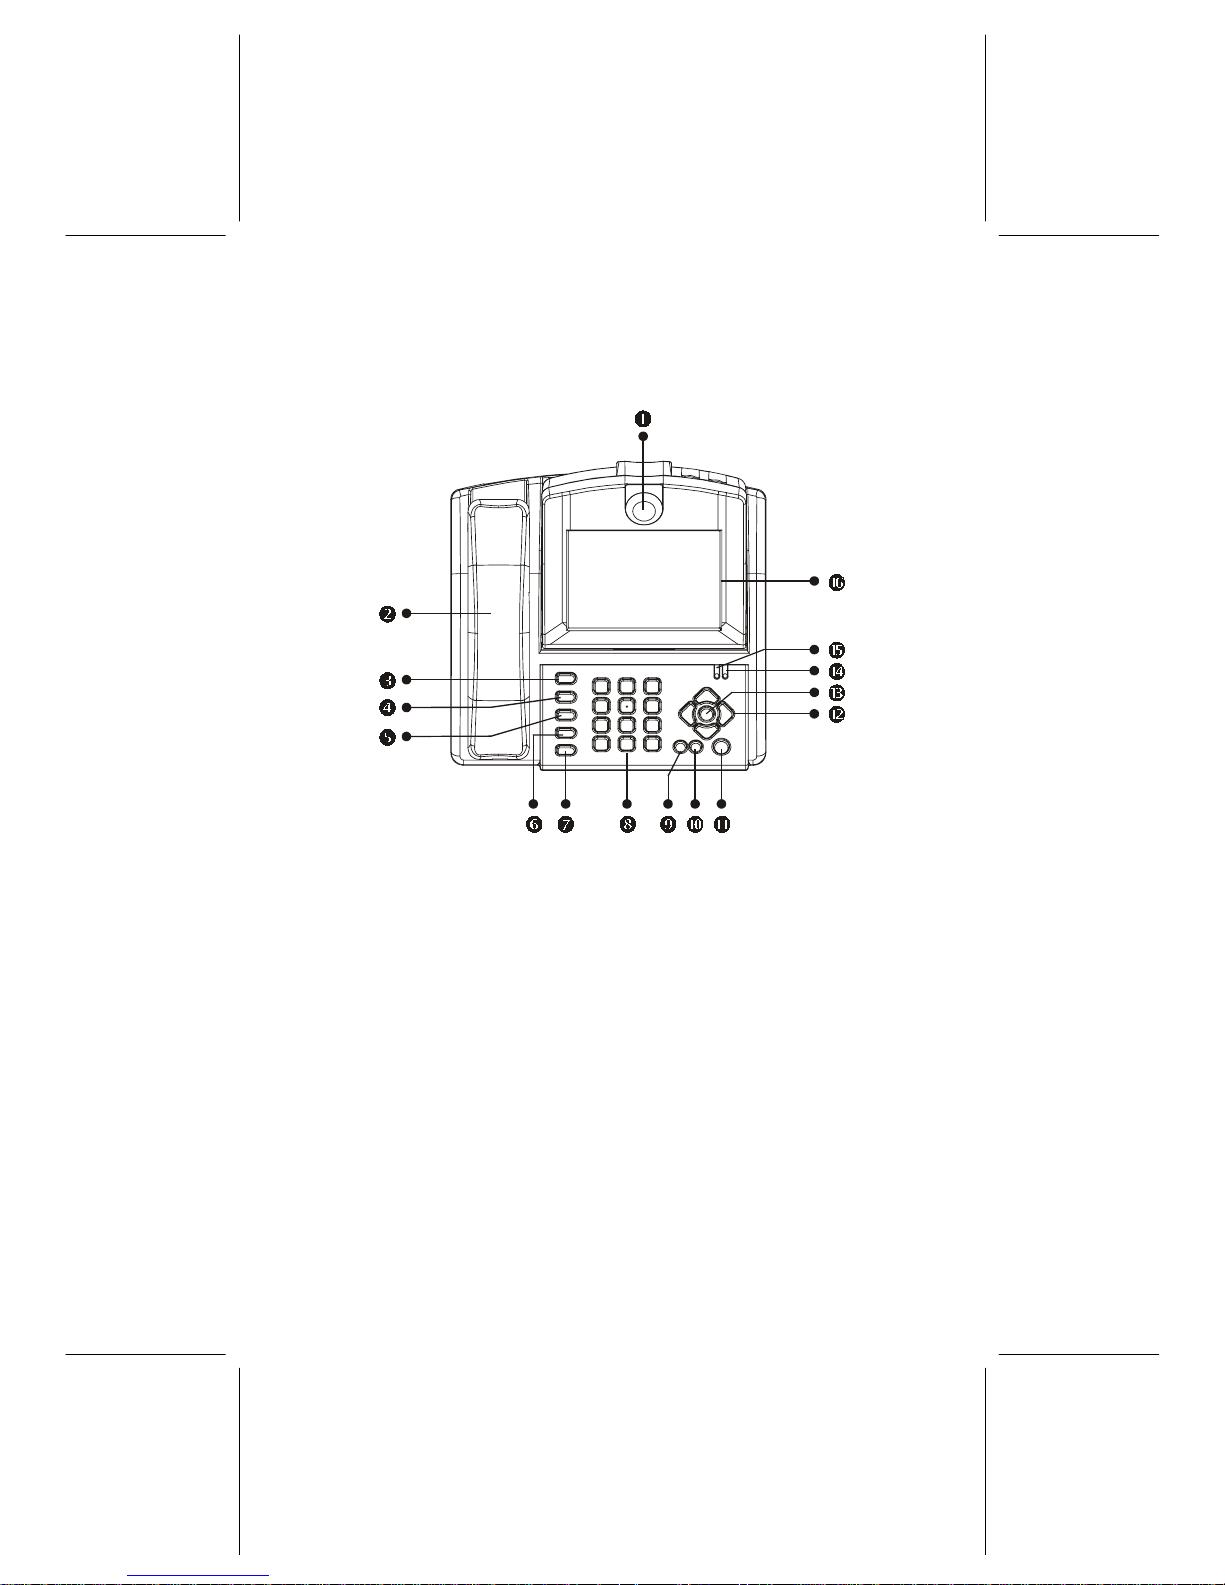
2.2.1 Front Panel
1.
CCD Camera – Local video input source with focus adjusting support
2.
Handset – For speaking and private listening
3.
Quality – Adjustable video quality and performance
4.
PIP – Switch sub screen position
5.
View – Switch video display
6.
Privacy – Black out user’s image
7.
Camera – Switches the input camera sources
8.
Keypad – 12-key alphanumeric keypad
9.
Video/Voice – Voice or video response
10.
Redial – Redial the last number dialed
11.
Speaker – For handsfree speaking and d i aling
12.
Cursor Panel – For OSD operation
13.
M – Pop up OSD menu
14.
Power – Power on indicator
15.
Video – Video connection indicator
16.
LCD Panel – Video display
Page 10
6 MetaEye IVP256 User’s Manual
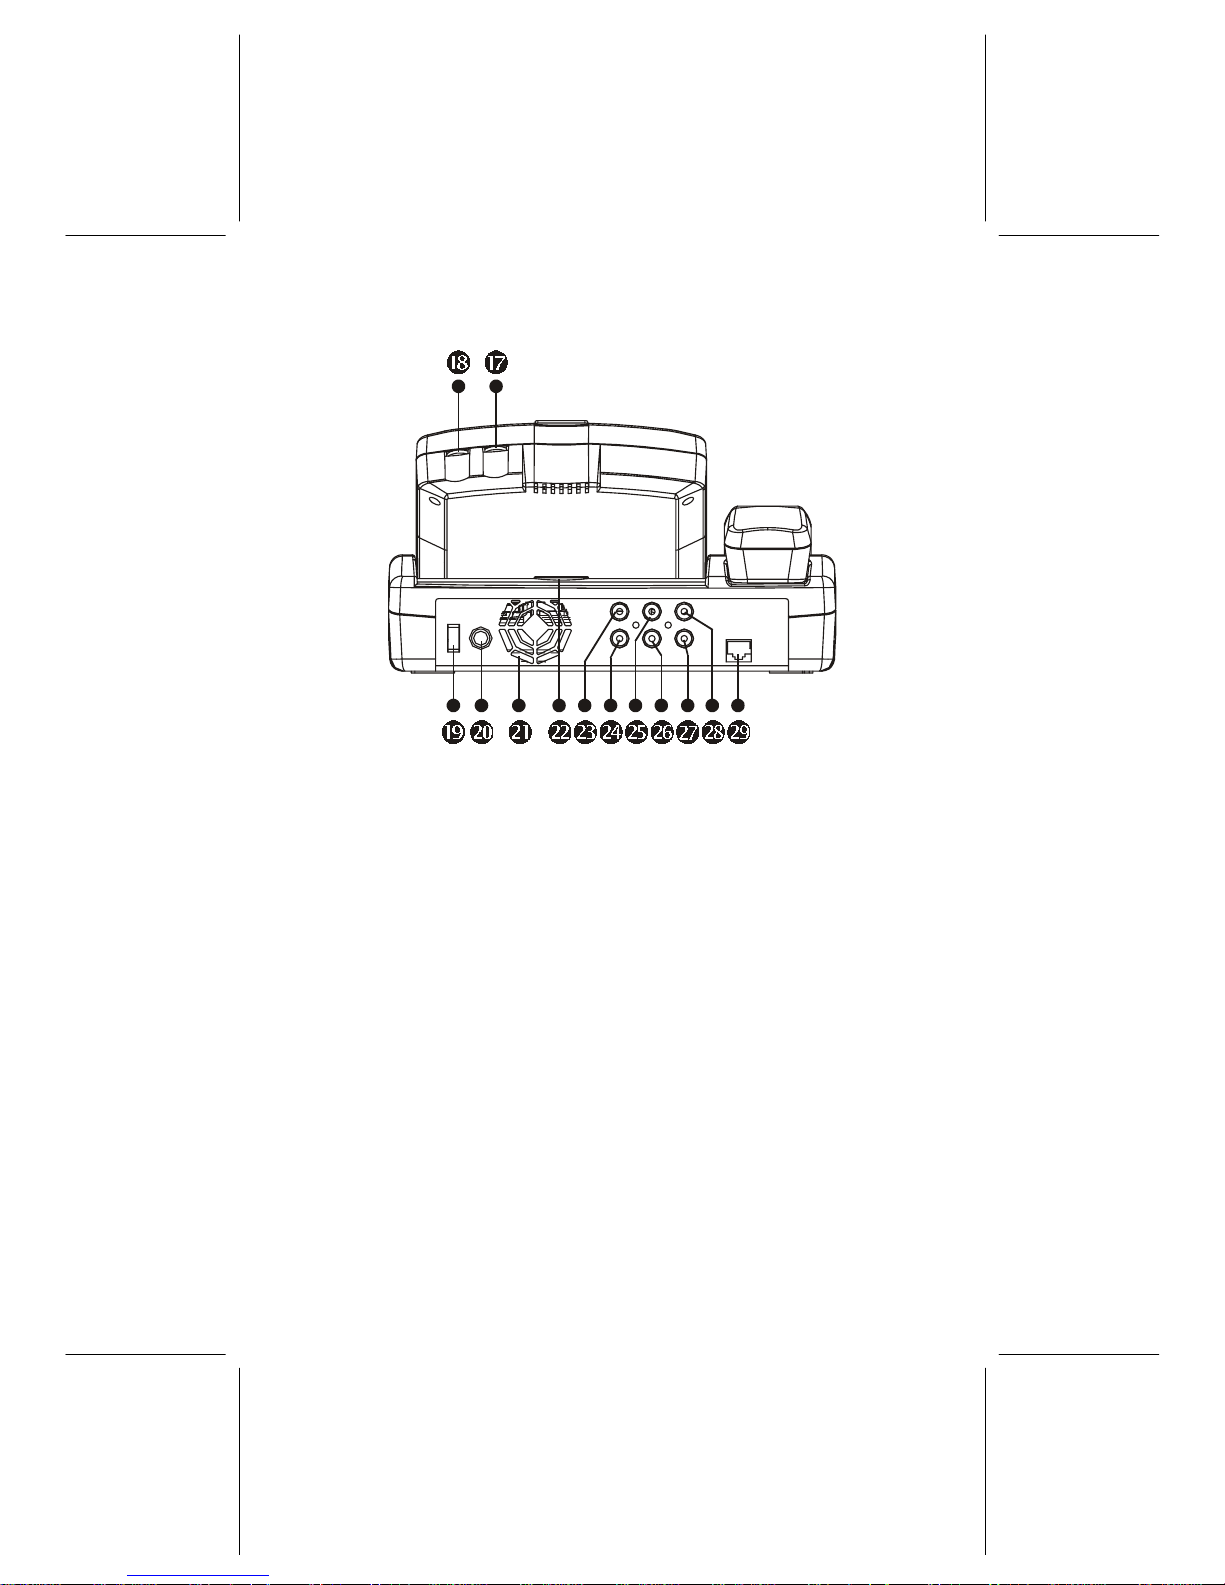
2.2.2 Rear Panel & Connectors
17.
Brightness – Adjusts the brightness
18.
Cotrast – Adjusts the video contrast
19.
Power Switch – Turns the power on/off
20.
DC IN – Connects to the DC output of power adapter
21.
Heat Fan – Prevents overheating
22.
Cover Holder – Holds the cover of CCD lens
23.
Audio Out – Audio output connector
24.
Video Out – Video output connector
25.
Audio In 2 – Audio input connector 2
26.
Video In 2 – Video input connector 2
27.
Video In 1 – Video input connector 1
28.
Audio In 1 – Audio input connector 1
29.
ISDN – ISDN connector
Page 11
Getting Started 7
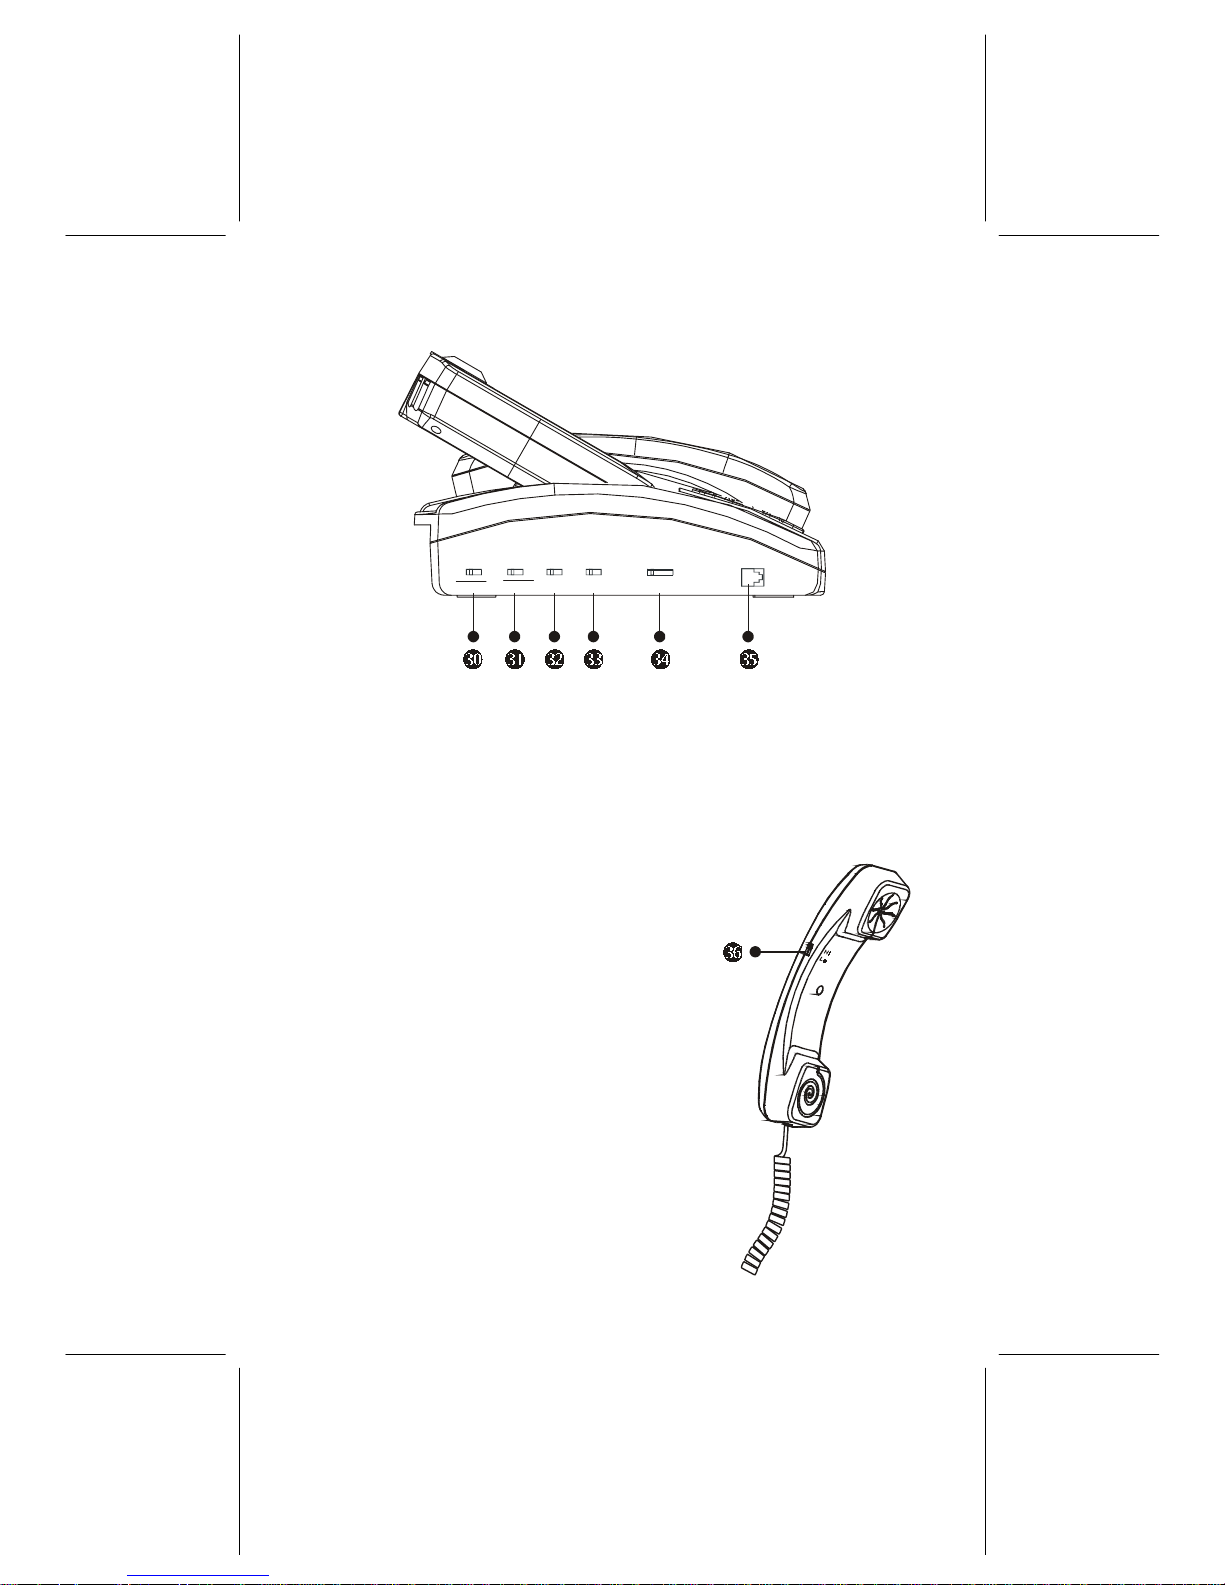
2.2.3 Side Panel & Switches
On Off On OffOn Off
ISDN
HI LO
TERMINATOR SETTING UPGRADE RINGER VOLUME
HANDSET
30.
Terminator – ISDN device terminator switch (Default setting is ‘On’)
31.
Setting – ISDN setting switch (Default setting is ‘On’)
32.
Upgrade – Software upgrade mode switch (Default setting is ‘Off’)
33.
Ringer – Volume control of the ringer
34.
Volume – Controls vocal volume
35.
Handset jack – Handset cable (RJ-45) connector
2.2.4 Handset
36.
Handset Volume Switch
– The volume of the voice from the other
end of the line can be adjusted on the
handset to give you more options and for
the convenience of users with minor
hearing problems. The options are Hi (High)
and Lo (Low). Default setting is Hi.
Page 12
8 MetaEye IVP256 User’s Manual
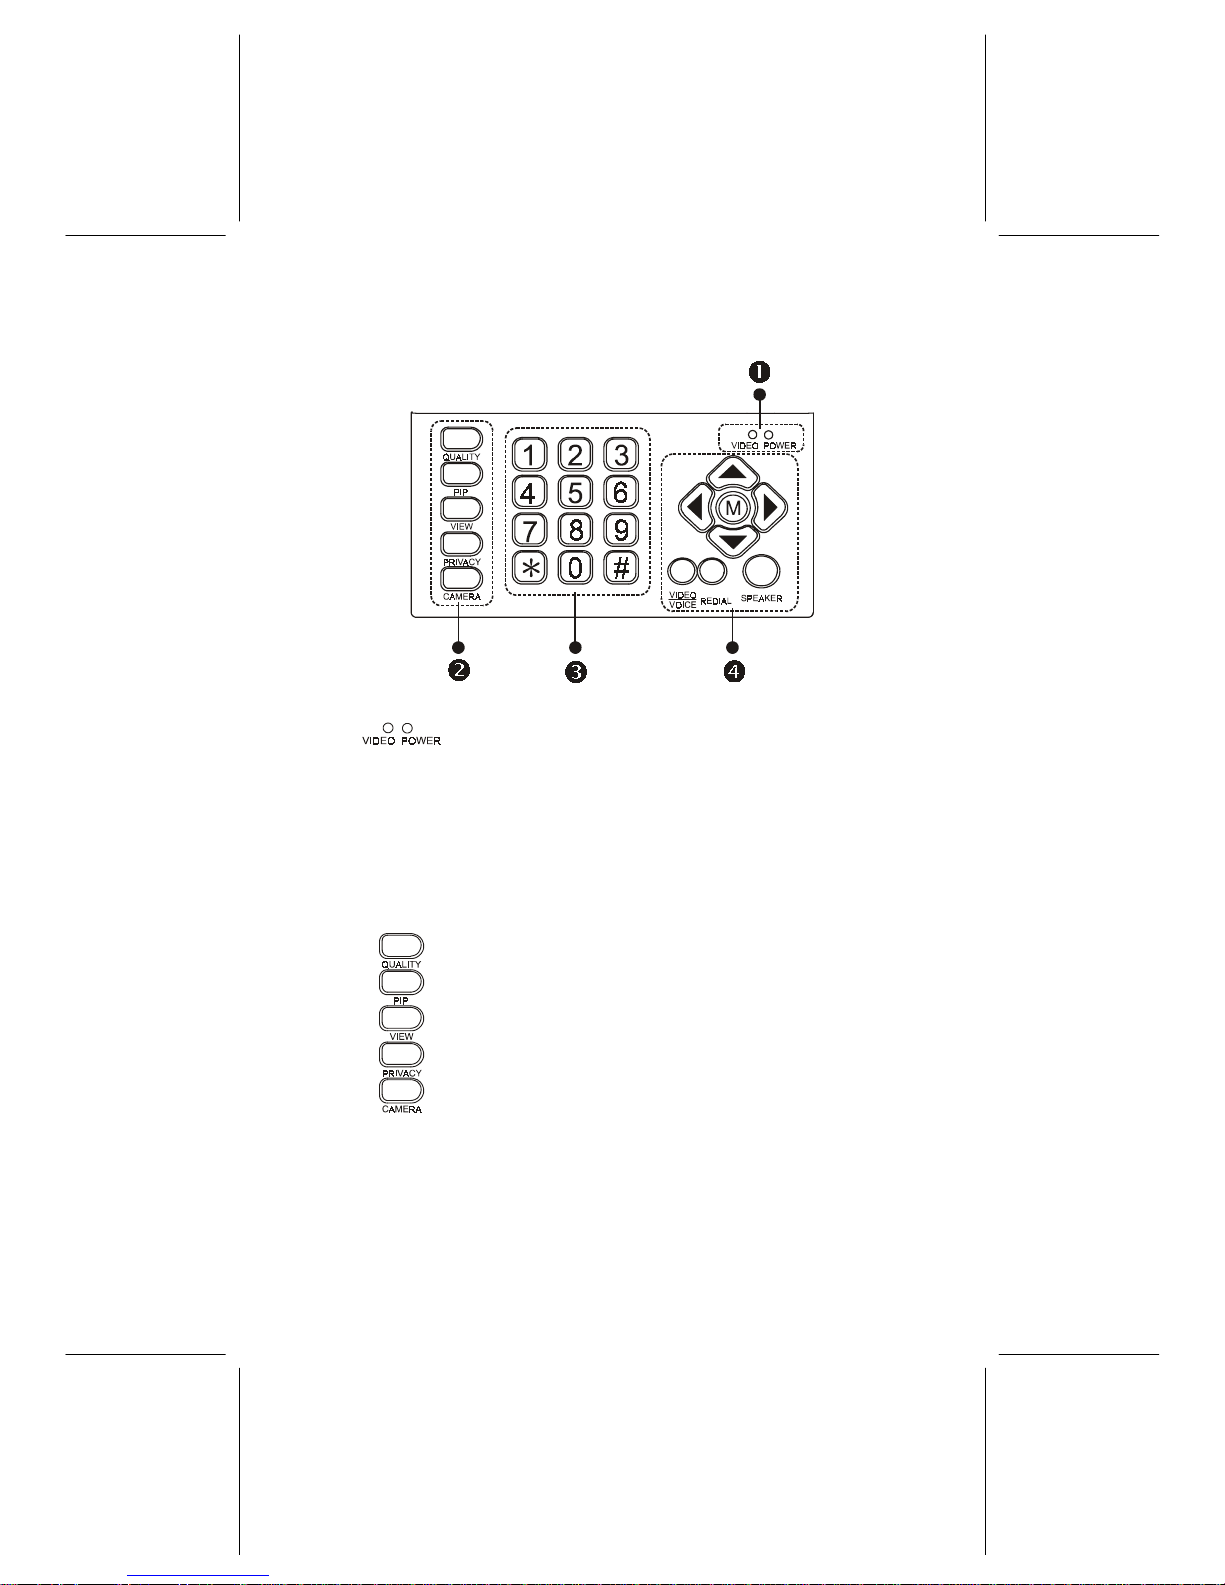
2.3 Controls and Buttons
!
!!
!
LED Indicators
Video Indicator: Lights orange when the main unit is in
video transmission. No light when in voice connection only.
In privacy mode, the video indicator blinks.
Power Indicator: Lights green when the power is on.
Lights intermittently green and red when the power saving
function is on. The power saving function activates only
when you are not making any movement after the welcome
screen appears.
"
Hot Keys
Quality: To pop up the OSD Quality menu, press to adjust
the frame quality.
PIP: To pop up the PIP (Picture in Picture) screen and to
switch its position.
View: To select the video displayed on the screen from
local image, remote image and both images.
Privacy: To enable or disable your self-view image and
audio to be shown and heard on the other party.
Camera: To switch video input sources among built-in
camera, and external cameras.
Page 13

Getting Started 9
#
Number keypad
Number 0-9: To dial the telephone numbers or to input
data required for accessing the OSD command.
$
Cursor Panel
<M>: Used with OSD menus; to pop up the OSD.
Up arrow: To go back to previous OSD menu.
Down arrow: To go on to next menu or to execute the
adjustments made.
Left arrow: To move the cursor to the left on OSD menus.
Right arrow: To move the cursor to the right.
Video/Voice: To switch between the voice call and video
call.
Redial: To dial the number last dialed.
Speaker: To dial the correspondent’s number without
picking up the hand set.
Page 14

10 MetaEye IVP256 User’s Manual
Chapter 3 Quick and Easy Operation
3.1 Before you start
Avoid having lights behind you that
might shine into the camera lens.
Do not point the MetaEye IVP256
at a mirror or bright light.
Keep a distance of 0.5 meters
away from MetaEye IVP256.
Make sure of the most
appropriate lighting source,
preferably from the front with
the beam on your face.
Here are a few things you need to consider before making a video call.
Use the self-view image and focus knob to get the
best shot of yourself.
Adjust the hue and brightness of the screen for
best image.
On Off On OffOn Off
Switching Type Terminat or Download
On Off On OffOn Off
Switching Type Terminator Download
On Off On OffOn Off
Switching Type Terminator Download
On Off On OffOn Off
Switching Type Terminator Download
0.5 m
Avoid having a
lot of movement
in the background
and try not to
move around
excessively. Too
much movement
tends to slow
down the frame
rate of the video
image, resulting
in a jerky picture.
Page 15

Quick and Easy Operation 11
3.2 Installation and Operation
Before proceeding the connection, please make sure the handset is placed on
hook, and the handset cable is connected to the handset cable connector of
MetaEye IVP256.
Step 1: Choose an appropriate location for your MetaEye IVP256. Make sure
the lighting is sufficient and the background is soft and evenly
painted.
Step 2: Place your MetaEye IVP256 on top of a counter, desk, or table with
the CCD camera opening in front.
Step 3: Connect the handset and the MetaEye IVP256 main unit with handset
cable.
Step 4: Plug one end of the ISDN cable to the jack labeled “LINE” on
MetaEye IVP256, the other end to the ISDN jack.
Step 5: Connect the power cord between the wall outlet and the power
adapter. Plug the free end of the power adapter into the power
connector (DC IN) on MetaEye IVP256.
Now you have completed the basic installation of the MetaEye
IVP256, you are ready to make video phone calls.
Step 6: Turn on the power of MetaEye IVP256. The opening screen
(MetaEye) shows on the LCD screen, indicating that you can start a
video call.
Step 7: Pick up the handset. The LCD screen shows the local view of your
self-view image.
Step 8: Dial the phone number directly.
Step 9: Waiting for the connection.
Step 10: The connection established after the correspondent answered the call.
Step 11: To end the connection, simply hang up the handset.
If there is difficulty in making connection, please check the MetaEye IVP256 has
been properly installed. There will be a normal dial tone heard from the receiver.
Page 16

12 MetaEye IVP256 User’s Manual
If not, check the connection between MetaEye IVP256 and the ISDN jack, or
please refer to the following instruction of ISDN Setup.
Before proceeding the ISDN Setup, you have to turn on the “Switching Type”
switch first. Pick up the handset, and then press the [M] button. A menu bar of
four setup commands will be popped up at the bottom of the LCD panel as:
1-Auto Answer 2-Phone Book 3-A/V Setup 4-ISDN Setup
Move the cursor to item 4 to set up the ISDN in which there are three ISDN
setup menus: 1-Call Type 2-Switch Type 3-Voice Type.
The call types you connected to are
1. 1x56K
2. 2x56K
3. 1x64K
4. 2x64K
The default set ting of ISDN Se tup is 2x64K, which uses 2B c hannels and give s
you the best video quality. But in some regions, the ISDN service provider only
provides 56K as 1B channel. If you are not sure about the call type, please
contact your ISDN service provider.
The ISDN switch types you connected to are:
1. DSS1: Generally used in European, Taiwan, and China
2. NI1: Generally used in North American area
3. 5ESS: Generally used in USA, AT&T switch
4. DMS 100: Generally used in North American area
5. NTT: Generally used in Japan
If your ISDN switch type is DSS1/NTT, you have to enter the Local Number,
which is designated by the ISDN service provider with the default value of
Empty. Use the “0” ~ “9” keys to input the number.
If your ISDN switch type is NI1/5ESS/DMS100, you have to set SPID and Local
(ISDN phone) number: 1. SPID: The maximum SPID digital number is 20.
ISDN service provider assigns the SPID number. 2. Local: The maximum Local
digital phone number is 20. ISDN service provider assigns the Local Number.
The voice types you connected are:
1. A-Law: general used in the European area and China.
2 µ-Law: general used in the North American area, Taiwan and Japan.
After finished all the settings, please hang up the handset to store them.
Page 17

Quick and Easy Operation 13
Now, pick up the handset, and you can hear the dial tone, turn on the “Switching
Type” switch, and then you can go back to previous steps 6 to retry the
connection.
If the MetaEye IVP256 is not working properly, or if you don’t know how to
setup the ISDN switch type, please contact your ISDN service provider.
3.3 Power Saving Mode
The MetaEye IVP256 has been designed into a power saving circuit to protect its
internal components so as to extend its service life.
After turning on the power switch, there is an opening screen (MetaEye) on the
LCD screen. If the MetaEye IVP256 has been kept without any use for 10
minutes, the screen will be shut downs automatically, and turns into a blank
screen. The power indicator flashes red and green in interval slowly.
The screen will come back to work when you pick up the handset.
Page 18

Page 19

OSD Introduction 15
Chapter 4 OSD Introduction
There are two types of OSD (On Screen Display) in setting up the MetaEye
IVP256: one is before the video connection established, and the other after. Note
that the settings before the video connection established could be stored, while
the one after could not.
4.1 Before the Video Connection Established
After finished the basic installation steps, you can turn on the power switch and
proceed with the following setting procedures before the video connection
established.
Pick up the handse t, and then press the [M] b utton. A menu bar of four setup
commands will be popped up at the bottom of the LCD panel as:
1-Auto Answer 2-Phone Book 3-A/V Setup 4-ISDN Setup
NOTE: While using the cursor panel to select any item, you can also do the
selection by directly pushing the corresponding digits of that item number.
4.1.1 Auto Answer Setup
Pick up the handset and press the [M] button to pop up the OSD menu, then go
to 1-Auto Answer menu, you will find out there are two items of Auto Answer
Setup which you can operate each of them according to your need:
• 1-# Rings
This item allows you to set the numbers of phone ringing.
Step 1: Press
or
to move to 1-# Rings menu and press
to enter.
Step 2: Input 0~9 for the numbers of phone ringing, or press
to disable
auto answer function. Press
again when finished.
Step 3: Press the
button to leave this menu.
• 2-Security Code
This item allows you to protect the Auto Answer function from being abused.
Step 1: Press
or
to move to 2-Security Code and press
to enter.
Page 20

16 MetaEye IVP256 User’s Manual
Step 2: Input 4-digit password from 0~9, or press
to disable the auto
answer function.
Step 3: Press the
button to leave this menu.
NOTE: After each set up procedure, you can leave it without further action for
over 30 seconds to let the OSD menu disappear by itself. All the settings will be
stored automatically only when you hang up the handset.
4.1.2 Phone Book Editor
Pick up the handset and press the [M] button to pop up the OSD menu, then go
to 2-Phone Book menu, you will find out there are two items of Phone Book
which you can operate each of them according to your need:
• 1-Dial
This item allows you to easily dial out the phone number from your phone book.
Step 1: Press
or
to move to 1-Dial menu and press to enter.
Step 2: Press
or
to select the number set (0~9) and press to dial.
Step 3: Press the
button to leave this menu.
• 2-Edit.
This item allows you to edit and store the frequently used phone numbers.
Step 1: Press
or
to move to 2-Edit menu and press to enter.
Step 2: Press
or
to select the number set (0~9) and press to edit.
Step 3: Input the name you want to edit through the keypad (refer to the
keypad definition as shown below).
Step 4: After selected a digit, press
to select the next digit, or press
to
move backward a digit.
Step 5: After finished the name input, press
again to go to p hone number
setting.
Step 6: Input the phone number 1 through the keypad, and then the phone
number 2 (if necessary). Press
again when finished.
Step 7: Press the
button to leave this menu.
4.1.3 A/V Setup
Pick up the handset and press the [M] button to pop up the OSD menu, then go
Page 21

OSD Introduction 17
to 3-A/V Setup menu, you will find out ther e are five menu ite ms which you
must operate each of them according to your need:
• 1-Camera
This item allows you to choose the source of video camera among “Front”,
“Video-1”, and “Video-2”.
NOTE: The image on the LCD screen will turn into a b lue scene if the source of
Video-1 or Video-2 is not connected with any camera.
Step 1: Press
or
to move to 1-Camera menu, then press to enter.
Step 2: Press
or
to select among 1-Front, 2-Video-1, 3-Video-2,
depending on your actual configuration.
Step 3: Press the
button to leave this menu.
• 2-Mirroring
This item allows you to change the LCD screen between a non-mirrored and
mirrored image.
Step 1: Press
or
to move to 2-Mirroring, then press to enter.
1-Non -Mi rrore d 2-Mirror ed
1-Non -Mi rrore d 2-Mirror ed
Page 22

18 MetaEye IVP256 User’s Manual
Step 2: Press
or
to select between 1-Non-Mirrored, 2-Mirrored:
Non-Mirrored: The direction of the image is opposite as you see in
the mirror.
Mirrored: The direction of the image is the same as you see in the
mirror.
Step 3: Press the
button to leave this menu.
• 3-Video
This item allows you to adjust the brightness, contrast, and color of the image on
the LCD screen.
Step 1: Press
or
to move to 3-Video menu, then pr ess to enter.
Step 2: Press
or
to select among 1-Brightness, 2-Contrast,
3-Color, then press
to enter.
Step 3: Use the cursor panel to adjust each item ranging from 1(low) ~
7(high).
Step 4: Press the
button to leave this menu.
• 4-Language
This item allows you to cha nge the language between English and French.
Step 1: Press
or
to move to 4-Language menu, then press to
enter.
Step 2: Press
or
to select between 1-English, 2-French.
Step 3: Press the
button to leave this menu.
• 5-Clock
Page 23

OSD Introduction 19
This item allows you to adjust the clock settings.
Step 1: Press
or
to move to 5-Clock menu, then press to enter.
Step 2: Press
or
to move to the item for editing date and time, press
or
to increase or decrease the digits by each item.
Step 3: Press
or
button to leave this menu.
4.1.4 ISDN Setup
There is only one item of ISDN setup under a normal operation. If you want a
complete setup, please refer to section 3.2.
• 1-Call Type
This item allows you to set up the ISDN transmission rate.
Step 1: Press
or
to move to 1-Call Type menu and press to enter.
Step 2: Press
or
to select the type of the ISDN bandwidth
(1-1x56K, 2-2x56K, 3-1x64K, 4-2x64K).
Step 3: Press the
button to leave this menu.
NOTE: The default setting of ISDN Setup is 2x64K, which uses 2B channels and
gives you the best video quality. But in some regions, the ISDN service provider
only provides 56K as 1B channel. If you are not sure about the call type, please
contact your ISDN service provider. When you finished all the settings before
connection, please hang up the handset to store them.
Page 24

20 MetaEye IVP256 User’s Manual
4.2 After the Video Connection Established
Press [M] b utton after the video call connection had been established, a menu bar
of two setup commands will be popped up at the bottom of the LCD panel as:
1-View 2-A/V Setup .
4.2.1 View Setup
This menu allows you to switch the primary image to be displayed on LCD
screen between the local and remote site. There are three items of View setup:
1-Remote, 2-PIP, 3-Local.
• 1-Remote
This item allows you to set the main screen to be displayed with the other party’s
image.
Step 1: Press
or
to move to 1-View menu, then press to enter.
Step 2: Select 1-Remote
Step 3: Press the
button to leave this menu.
• 2-PIP
This item allows you to enable or disable the PIP (Picture-In-Picture) function,
and to control the position and size of the PIP.
Step 1: Press
or
to move to 2-PIP menu, then press to enter. A
menu bar of 1-Position, 2-Size will be popped up at the bottom of
the screen.
Step 2: By selecting 1-Position, you can change the position of the PIP
among:
1-Top-Left, 2-Top-Right, 3-Bottom-Left, 4-Bottom-Right.
Page 25

OSD Introduction 21
Step 3: By selecting 2-Size, you can change the size of the PIP among
1-Small, 2-Medium, 3-Large.
Step 4: Press the
button to leave this menu.
You can also press the hot key “PIP” to switch the picture position.
• 3-Local
This item allows you to set the LCD screen to be displayed with your image
only.
Step 1: Press
or
to move to 3-Local menu, then pr ess to enter.
Step 2: Press the
button to leave this menu.
You can also press the hot key “View” to switch the remote and local
view.
4.2.2 A/V Setup
This menu allows you to select the content o f the primary image to be d isplayed
with the local or remote site. There are four items of A/V setup:
1-Camera, 2-Mirroring, 3-Video
• 1-Camera
This item allows you to choose the source of video camera among “Front”,
“Video-1”, and “Video-2”.
NOTE: The image on the LCD screen will turn into a b lue scene if the source of
Video-1 or Video-2 is not connected with any camera.
Step 1: Press
or
to move to 1-Camera menu, then press to enter.
Step 2: Press
or
to select among 1-Front, 2-Video-1, 3-Video-2,
depending on your actual configuration.
Page 26

22 MetaEye IVP256 User’s Manual
Step 3: Press the
button to leave this menu.
You can also press the hot key “Camera” to select the camera cource.
• 2-Mirroring
This item allows you to change the LCD screen between a non-mirrored and
mirrored image.
Step 1: Press
or
to move to 2-Mirroring, then press to enter.
Step 2: Press
or
to select between 1-Non-Mirrored, 2-Mirrored:
Non-Mirrored: The direction of the image is opposite as you see in
the mirror.
Mirrored: The direction of the image is the same as you see in the
mirror.
Step 3: Press the
button to leave this menu.
• 3-Video
This item allows you to adjust the brightness, contrast, color, and q uality of the
image on the LCD screen.
1-Non -Mi rrore d 2-Mirrore d 1-Non -Mi rrore d 2-Mirrore d
Page 27

OSD Introduction 23
Step 1: Press
or
to move to 3-Video menu, then press to enter. A
menu bar of
1-Brightness, 2-Contrast, 3-Color, 4-Quality will be popped up
at the bottom of the screen.
Step 2: By selecting the 1-Brightness and then press
to enter, you can
use the cursor panel to adjust the brightness ranging from 1(low) ~
7(high).
Step 3: By selecting the 2-Contrast and then press
to enter, you can use
the cursor panel to adjust the brightness ranging from 1(low) ~
7(high).
Step 4: By selecting the 3-Color and then press
to enter, you can use the
cursor panel to adjust the brightne ss ranging from 1(low) ~ 7(high).
Step 5: By selecting the 4-Quality and then press
to enter, you can use
the cursor panel to adjust the brightness ranging from 1(Sharp) ~
7(Fast).
(The video quality is controlled by the output frame rate. The higher
frame rate, the worse quality and quicker motion. The lower frame
rate, the better quality and slower motion.)
Step 6: Press the
button to leave this menu.
You can also press the hot key “Quality” to pop up the quality
adjustment bar.
Page 28

24 MetaEye IVP256 User’s Manual
Chapter 5 Advanced Operation
5.1 Phone Book
5.1.1 Phone Book Editor
MetaEye IVP256 provides you the phone book editor function that allows you to
edit and store 10 sets of the frequently used phone numbers. No more effort
needed to find and search in a telephone list.
Step 1: Pick up the handset or press the [Speaker] button.
Step 2: Press [M] button to pop up the OSD menu.
Step 3: Press
or
to move to 2-Phone Book menu, then press to
enter.
Step 4: Press
or
to move to 2-Edit menu and press to enter.
Step 5: Press
or
to select the number set (0~9) and press to edit.
Step 6: Input the name you want to edit through the keypad (refer to the
keypad definition as shown below).
Step 7: After selected a digit, press
to select the next digit, or press
to
move backward a digit.
Step 8: After finished the name input, press
again to go to p hone number
setting.
Step 9: Input the phone number 1 through the keypad, and then the phone
number 2 (if necessary). Press
again when finished.
Step 10: Press the [M] button to exit the OSD menu.
NOTE: Please refer to the Keypad Definition in Appendix A.
5.1.2 Phone Book Dialing
This item allows you to easily dial out the phone number from your phone book.
Step 1: Turn on the power of MetaEye IVP256. The opening screen shown on
the LCD panel indicating that you can start a video call.
Step 2: Pick up the handset. The screen shows the local view of your
self-view image.
Step 3: Press [M] button to pop up the OSD menu.
Step 4: Use
or to enter 2-Phone Book menu and press to enter.
Step 5: Use
or to move to 1-Dial menu and press to enter.
Step 6: Use
or to select the desired preset-number and press to dial.
Page 29

Advanced Operation 25
Step 7: Waiting for connection.
Step 8: The connection established after the correspondent answered the call.
5.2 Auto Answer
MetaEye IVP256 provides you the auto answer function that allows you to set
the numbers of phone ringing and the security code to protect the auto answer
function from being abused. Please refer to section 4.1.1 for setup procedures.
With this “Auto Answer” function enabled, you are able to answer the incoming
calls at anytime automatically. No more hurriedly rush out of bathroom to
answer the in coming calls.
If the other party has enabled the “Auto Answer” function, his MetaEye will
answer your call and setup the video connection automatically. If the other party
has enabled the function of “Security Code” along with “Auto Answer”, you
must key in the correct 4-digit-password right after the video connection got
through within 30 seconds, or it will be d i sconnected.
NOTE: After each set up procedure, you can press
to go back to previous
menu, or press the [M] button to exit the OSD menu, and the setting will be
saved automatically, or just leave it without further action for 30 seconds to let
the OSD menu disappear by itself.
5.3 Firmware Upgrade
MetaEye IVP256 provides you the firmware upgrade function that allows you to
perform the on-line firmware upgrade. To do the software setup, turns the
[Upgrade] switch to “On” position before turning the power on:
Step 1: Turn the [Upgrade] switch to “On” position, and then turn the po wer
switch on.
Step 2: After the video call connection established (you must dial the
telephone number of firmware Upgrade station), press [M] button to
pop up the OSD menu.
Step 3: Press
or
to move to 3-Software menu, then press to enter.
Step 4: The firmware is now automatically upgraded.
Step 5: After co mpleted the upgrading, please hang up the handset, turn of f
the power, and turns the [Upgrade] switch to “Off” position. Now you
have completed the firmware upgrade.
NOTE: Please contact your local dealer first before doing this firmware
upgrading.
Page 30

26 MetaEye IVP256 User’s Manual
5.4 Connecting TV Set
The MetaEye IVP256 can be connected to a TV set for you to view the images
on a large screen during a video call.
Step 1: Connect the A/V OUT jack on the rear panel of the MetaEye IVP256
to one set of A/V IN jacks of your TV set with the supplied RCA
cable.
Step 2: Turn on your TV, and switch the TV channel to the auxiliar y A/V IN
video source (Video 1, Video 2, or Video 3, depending on your TV
sets) where your MetaEye IVP256 is connected.
NOTE: The installation requires that your TV is ready for switching between a
main and an auxiliary video source (Video 1, Video 2, or Video 3, depending on
your TV sets). The auxiliary video source mu st be selected to view images from
the MetaEye IVP256.
Page 31

Advanced Operation 27
5.5 Connecting External Cameras
To compose different objects, the MetaEye IVP256 provides two A/V inputs on
its rear panel for two external camera connections. With these two external
camera inputs, you can switch the camera from built-in camera to Camera 1 or
Camera 2.
Step 1: Connect one set of A/V IN jacks on the rear panel of the MetaEye
IVP256 to the A/V OUT jack of your camcorder or CCD camera with
the supplied RCA cable. Note that you have to place your camcorder
or CCD camera in a location with sufficient light, and follow the
instructions of your camcorder’s or CCD ca mera’s manual to set up
and control your camcorder or CCD camera.
Step 2: If you need to connect a second camcorder or CCD camera, please
follow the same procedures in step 1 to connect the second camera.
Step 3: Go back to the A/V setup of OSD to switch the input source to
2-Video-1 (Camera 1) or 3-Video-2 (Camera 2).
You can also press the hot key “Camera” to switch the camera source.
Page 32

28 MetaEye IVP256 User’s Manual
5.6 Connecting VCR
Connect the A/V OUT jack on the rear panel of the MetaEye IVP256 to the A/V
IN jack of the VCR with the supplied RCA cable.
Turn on your VCR and switch the VCR channel to the auxiliary A/V IN video
source where your MetaEye IVP256 is connected. Put a video tape into VCR and
follow the standard operating procedures of VCR’s to record the MetaEye
IVP256 video call conversation.
Page 33

Appendix 29
Appendix A. Operation Tree
• Before Video Connection Established
1-Auto Answer
2-Phone Book
1-#Rings
2-Security Code
4-ISDN Setup
3-A/V Setup
1-Dial
2-Edit
[0] Leadtek 886280241092
1-Enter Security Code -> N/A
1-How Many rings? Auto Answer Off
[0] Leadtek 886280241092
Enter Phone Number 2: N/A
Enter Phone Number 1: 886280241092
Enter name: Leadtek
4-Language
3-Video
5-Clock
1-Camera
2-Mirror
2-Switch Type
1-Call Type
3-Voice Type
Edit Date/Time: 2000 Jan 1 Sat 12:00:00
1-English 2-French
1-Brightness 2-Contrast 3-Color
1-Non-Mirrored 2-Mirrored
1-Front 2-Video-1 3-Video-2
1-DSS1
4-DMS100
2-NI1
5-NTT
3-5ESS
1-1x56K 2-2x56K 3-1x64K 4-2x64K
2-SPID#2
1-SPID#1
Enter MSN or Local number -> N/A
Enter SPID#1 -> N/A
4-Local#2
3-Local#1
Enter SPID#2 -> N/A
Enter Local#1 -> N/A
Enter Local#2 -> N/A
2-u-Law
1-A-Law
Page 34

30 MetaEye IVP256 User’s Manual
• After Video Connection Established
1-View
3-Software
1-Small 2-Medium 3-Large2-Size
1-Top-Left 2-To p-Right 3-Bottom-Left 4-Bottom Right
1-Position
3-Local
2-PIP
1-Remote
2-A/V Setup
Low 1 - 2 - 3 - 4 - 5 - 6 - 7 - High
2-Contrast
1-Brightness
1-Non-Mirrored 2-Mirrored
3-Video
2-Mirroring
1-Camera 1-Front 2-Video-1 3-Video-2--
Sharp 1 - 2 - 3- 4 - 5 - 6 - 7 Fast
Low 1 - 2 - 3 - 4 - 5 - 6 - 7 - High
Low 1 - 2 - 3 - 4 - 5 - 6 - 7 - High
4-Quality
3-Color
1-Upgrade
• Keypad Definition
Key Character Displayed
0 + - * / = > < # 0
1 _ . ? ! , @ & : \ “ ( ) ‘ % $ 1
2 A B C 2 a b c 2
3 D E F 3 d e f 3
4 G H I 4 g h I 4
5 J K L 5 j k l 5
6 M N O 6 m n o 6
7 P Q R S 7 p q r s 7
8 T U V 8 t u v 8
9 W X Y Z 9 w x y z 9
Page 35

Appendix 31
Appendix B. Troubleshooting
Your MetaEye IVP256 is designed to be simple and reliable to use. If you
encounter any problem in utilizing this product, please refer to the table below
for possible solutions on some symptoms.
(1) Power Indicator OFF % Plug power adapter into the wall socket.
% Plug power cord into MetaEye IVP256.
% Turn on the power switch.
(2) No MetaEye is displayed on LCD
screen
% Make sure the power indicator is ON.
% If auxiliary video input is used on TV, select the
appropriate video input with the TV remote
control.
(3) The MetaEye IVP256 is not
responding when the “M” button is
pressed on the touch-tone keypad
% Be sure the RJ-45 wire is plugged into the
“Line” jack directly on the MetaEye I V P256.
(4) No dial tone on touch-tone phone
when attached to the MetaEye
% Plug touch-tone phone RJ-45 wire into “Line”
jack on the MetaEye IVP256.
% Plug the RJ-45 cable from wall socket into
“Line” jack on MetaEye IVP256.
% Check the ISDN setup is correct or not.
(5) Video in local view is dark
% Increase light on the image and reduce back
lighting.
(6) Video in local view has a red cast
% Aim the MetaEye IVP256 at a strong white
light source momentarily
% Increase the room light level.
(7) Video is jerky and audio/video
synchronization is poor
% Move QUALITY slide control to FAST.
(8) Video is jerky and audio/video
synchronization is poor, even
when QUALITY slide control is at
FAST
% Connecting rate may be low.
(9) Video connection is not able to be
established correctly
% Hang up and call again.
% Make sure the remote VideoPhone is
compatible with H.320 standard.
% Ask the other party to call you.
(10) Buzzing or humming noise in
cordless phone
% Move the phone base station away from the
TV.
(11) Green or yellow blocks appear in
the remote picture
% Probable cause is bad connection (noisy line).
Hang up and try again. This time, ask the other
party to call you.
Page 36

32 MetaEye IVP256 User’s Manual
Appendix C. Technical Support
In the event of not finding the solution for your problem, please contact your
local distributor. You may also contact our technical support staff, E-mail to
<service@leadtek.com.tw>.
Product name:
It will be easier for our staff to answer your question if you know the name of the
product. The name of the product is displayed during system booting.
Detailed description of your problem:
Please describe in detail all the problems you encountered, including the kind of
software and hardware you are using, and the contents of your system files.
Appendix D. Limited Warranty
Leadtek warrants to the original purchaser of this product that it shall be free of
defects resulting from workmanship or components for a period of one (1) year
from the date of sale. Defects covered by this Limited Warranty shall be
corrected either by repair or, at Leadtek’s discretion by replacement. In the event
of replacement, the replacement unit will be warranted for the remainder of the
original one (1) year period or thirty (30) days, whichever is longer. THERE
ARE NO OTHER ORAL OR WRITTEN WARRANTIES, EXPRESSED OR
IMPLIED, INCLUDING BUT NOT LIMITED TO THOSE OF
MERCHANTABILITY OR FI TNESS FOR A PARTICULAR PURPOSE.
This Limited Warranty is nontransferable and does not apply if the product has
been damaged by negligence, accident, abuse, misuse, modification,
misapplication, shipment to the Manufacturer or service by someone other than
the Leadtek Transportation charges to Leadtek are not covered by this Limited
Warranty. To be eligible for warranty service, a defective product must be sent to
and received by Leadtek within one (1) year of the date of sale and be
accompanied with proof of purchase. Leadtek does not warrant that this product
will meet your requirements; it is your sole responsibility to determine the
suitability of this product for your purposes. Leadtek does not warrant the
compatibility of this product with your computer or related peripherals, software.
LEADTEK’S SOLE OBLIGATION AND LIABILITY UNDER THIS
WARRANTY IS LIMITED TO THE REPAIR OR REPLACEMENT OF A
DEFECTIVE PRODUCT. THE MANUFACTURER SHALL NOT, IN ANY
EVENT, BE LIABLE TO THE PURCHASER OR ANY THIRD PARTY FOR
ANY INCIDENTAL OR CONSEQUENTIAL DAMAGES OR LIABILITY IN
TORT RELATING TO THIS PRODUCT OR RESULTING FROM ITS USE
OR POSSESSION.
This limited warranty is governed by the laws of Taiwan.
Page 37

CODE: LR8571 P/ N: W 0500398
 Loading...