

Page 1
SecuMesh DVR
ID & Password for Setup
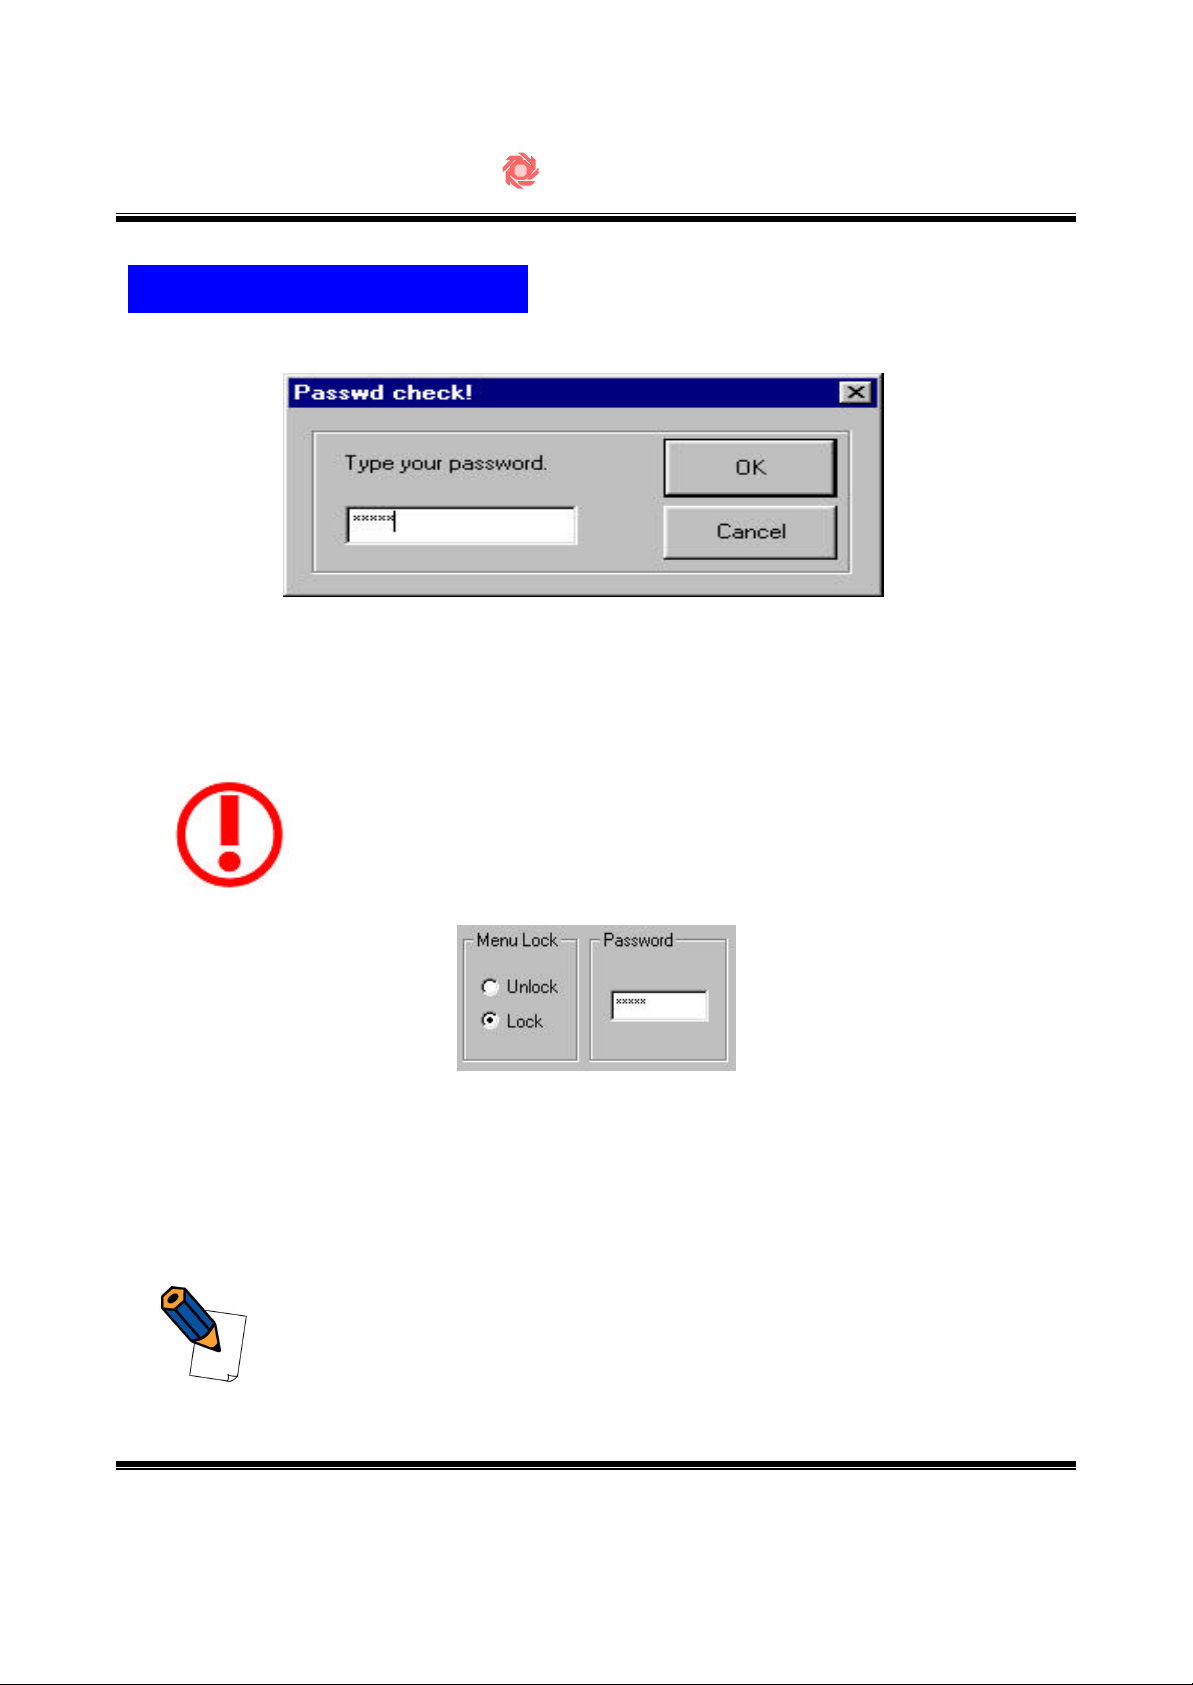
When you setup, you need password to proceed further.
When “Menu Lock ”is set to “Lock” as picture below, operator
cannot control any functions on DVR screen. Operator must
enter “Configuration Menu” to unlock the system.
Password can be changed in the “Basic Configuration” section.
☞ page 41
-43-
Page 2
SecuMesh DVR
Basic Configuration
① ②
③
④
⑤
⑦
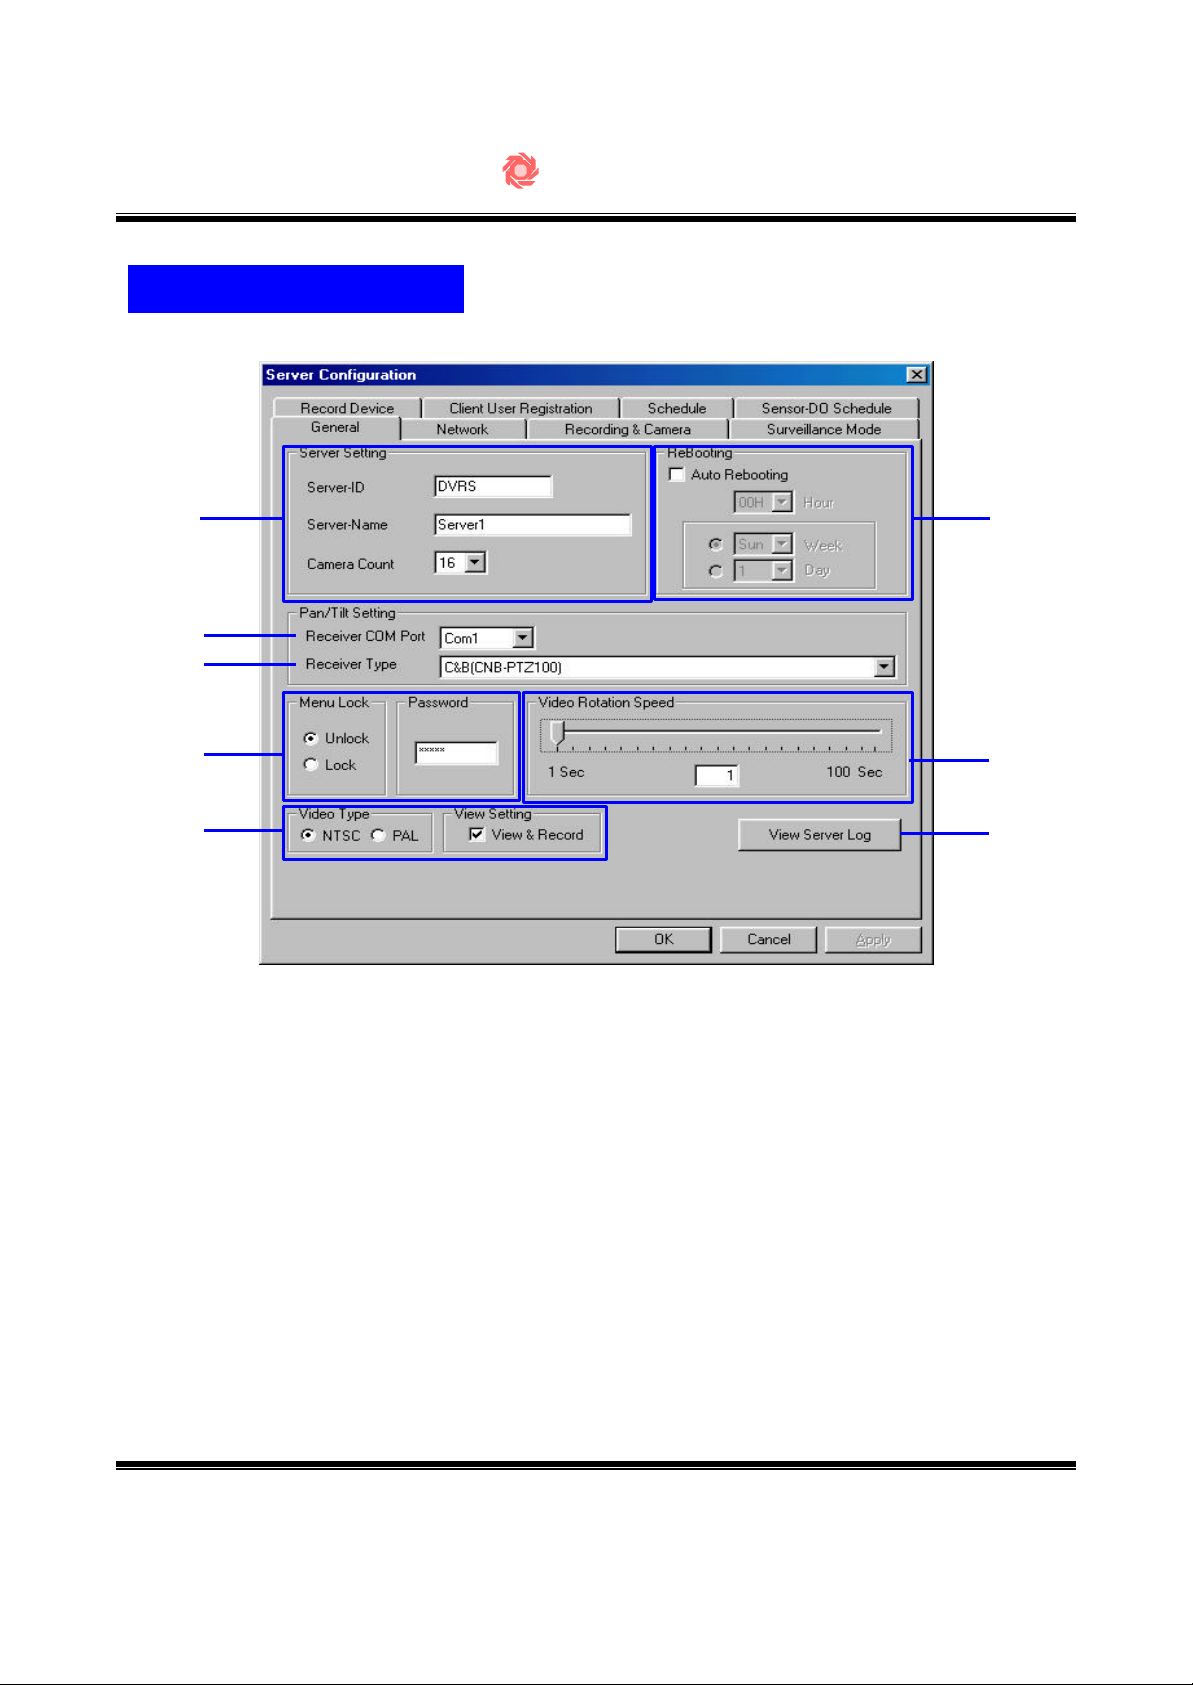
① Server Information : Server ID, Server Name, Number of Recording Cameras.
(You should reboot the program after changing this number.)
② Auto Rebooting Option : Reboot everyday at selected time. (Hours and Minutes)
③ Pan/Tilt Receiver Com Port Selection
④ Pan/Tilt Receiver Brand Selection
⑤ Menu Lock/Password : (Default is no password.)
⑥ Period of time in second for “Alternating channel display ” function in Page35.
⑦ Video Format Selection (NTSC : USA, Japan, Korea, etc / PAL : Europe, China,
South America)
⑥
⑧
⑧ Server Log File Check (Log-in/out time, Log-in time & IP address of Remote
users can be checked.)
-44-
Page 3
Network Setup
SecuMesh DVR
④
①
②
③
⑤
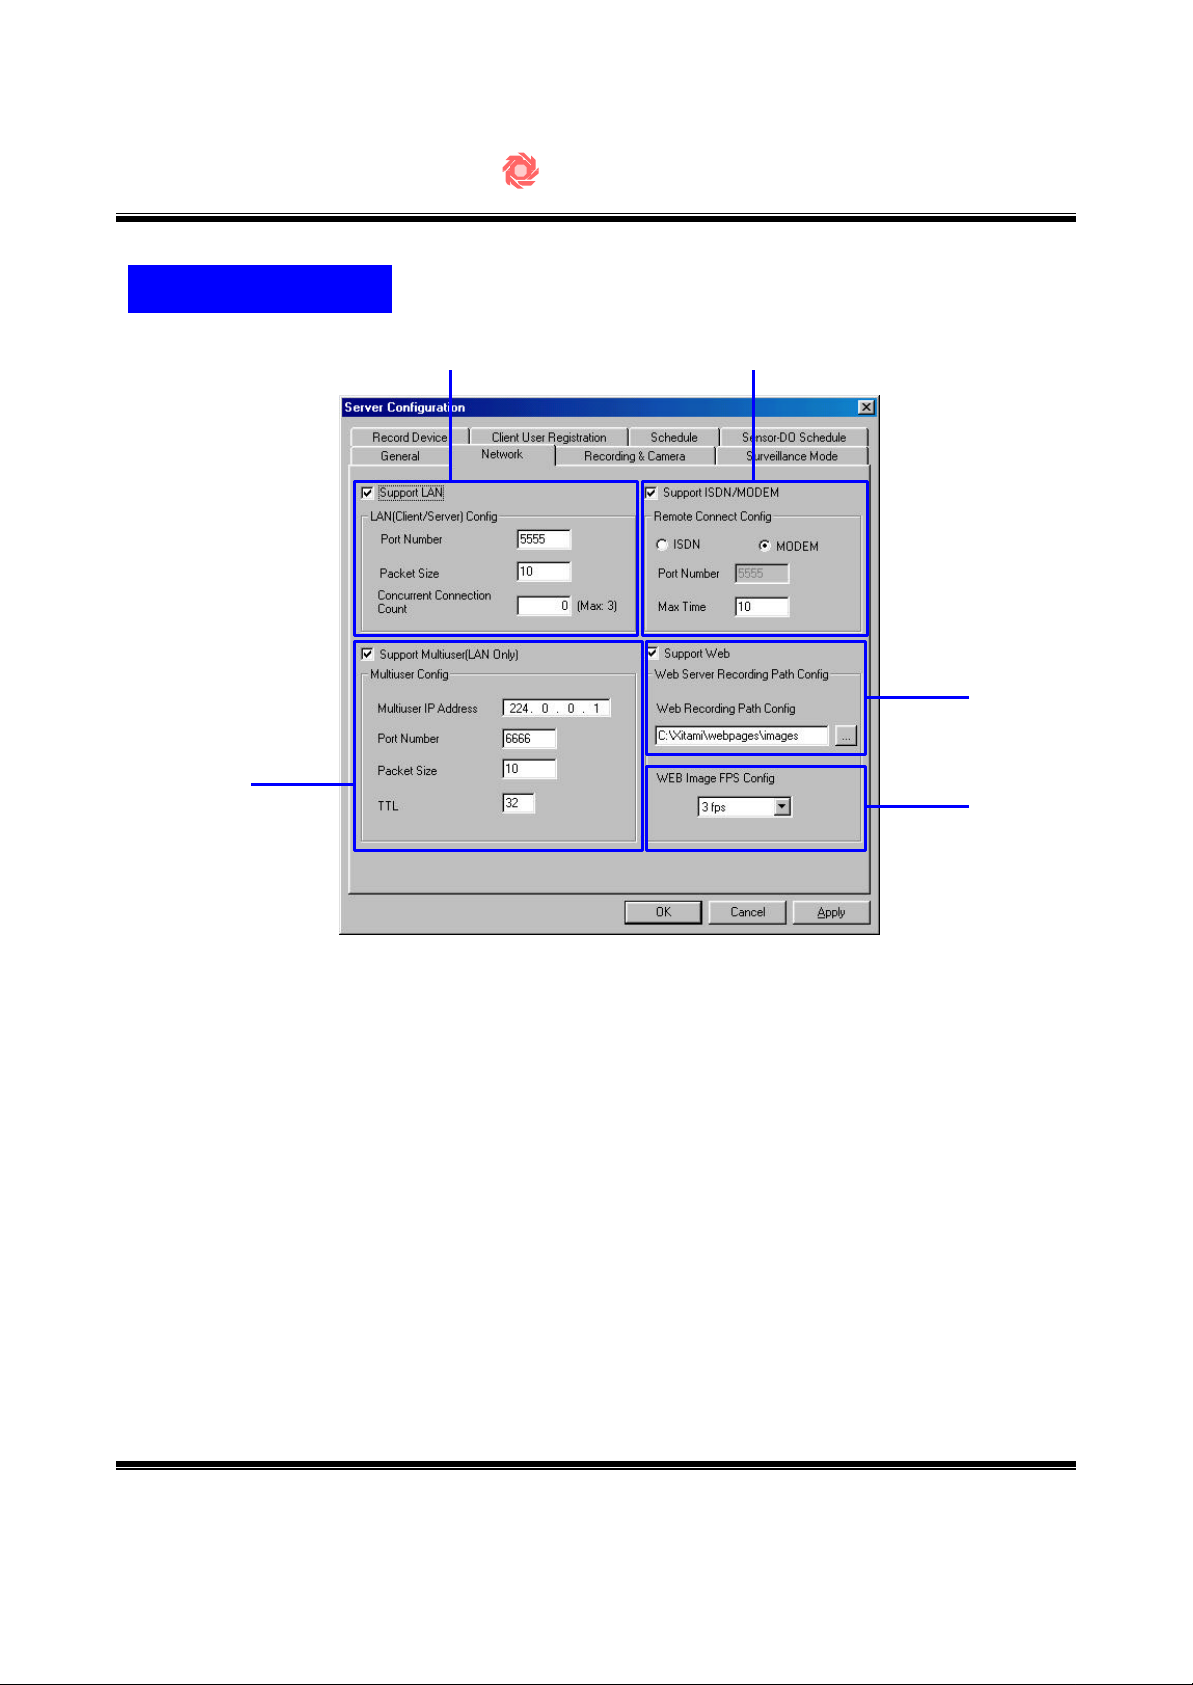
① LAN support check box, Port number, Number of Multi-user(Max:3), Packet size
② MODEM, ISDN Setup support check box, ISDN&Modem selection, delay time of
connection
③ Web support check box (Optional for client PC, ☞ page 62)
④ Multicasting LAN support check box, IP address, Port number, Packet size,
TTL(Max: 255) : The multicasting router is needed.
⑤ WEB image FPS configuration can setup 1 frame/sec to 20 frames/sec
-45-
Page 4
Setup of Recording Cameras
①
SecuMesh DVR
②
③
④
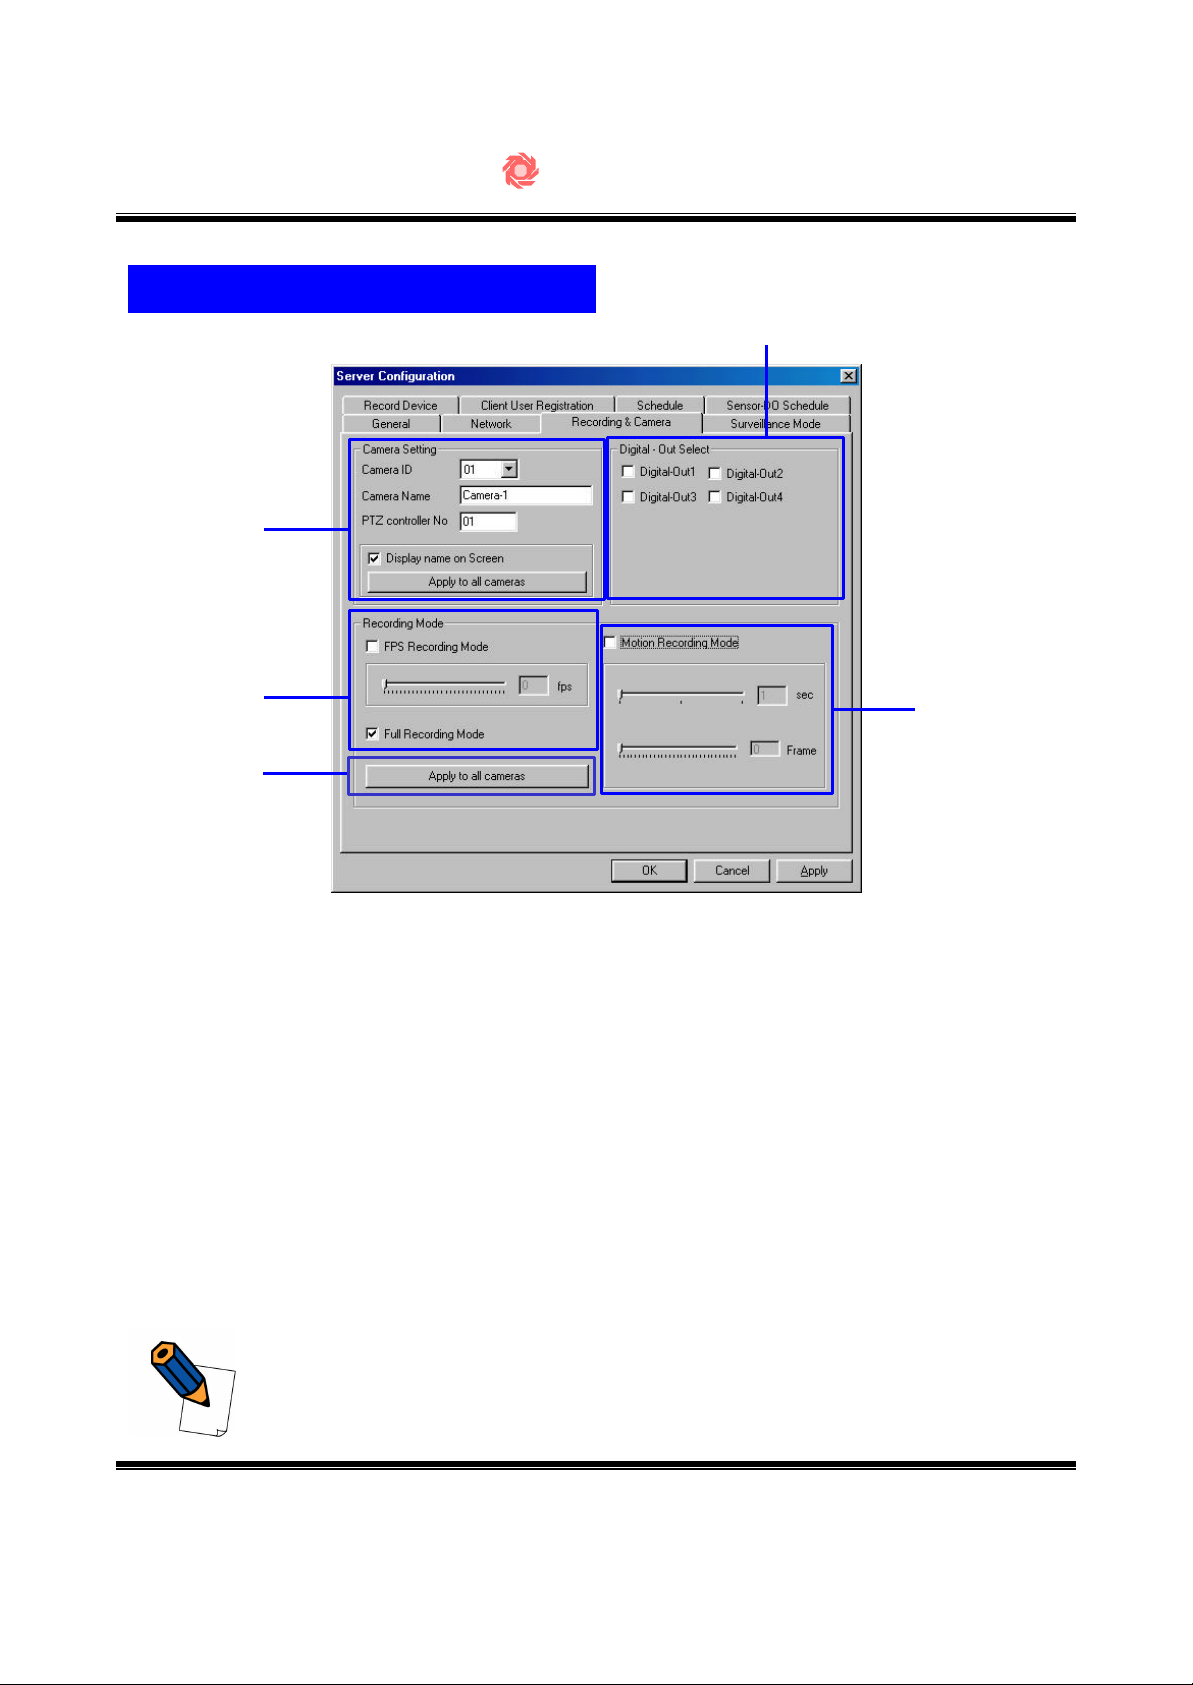
① Camera Setup : Camera ID, Camera Name for Recording, Receiver ID for the
Pan/Tilted Camera and Camera Name Prompt with the Global Apply Button.
② Setup of Digital-Out at Motion detection : If motion is detected, digital output is
provided.
③ Recording mode selection : Full Recording Mode and FPS(Frames Per Second)
Recording Mode. Detection Mode and the FPS Selection Mode can be checked
simultaneously. You can have recording of preset FPS mode in the normal
situation but you can also have full recording mode when motion is detected.,
the full recording mode starts for the preset period of tim e.
④ Global Apply Button
⑤
⑤ Motion Recording Mode : sets up for motion detection and can be configured to
various rate per seconds or frames.
FPS Recording Mode is to record in preset frames per second (FPS).
By doing this you can select quality of the recording.
-46-
Page 5
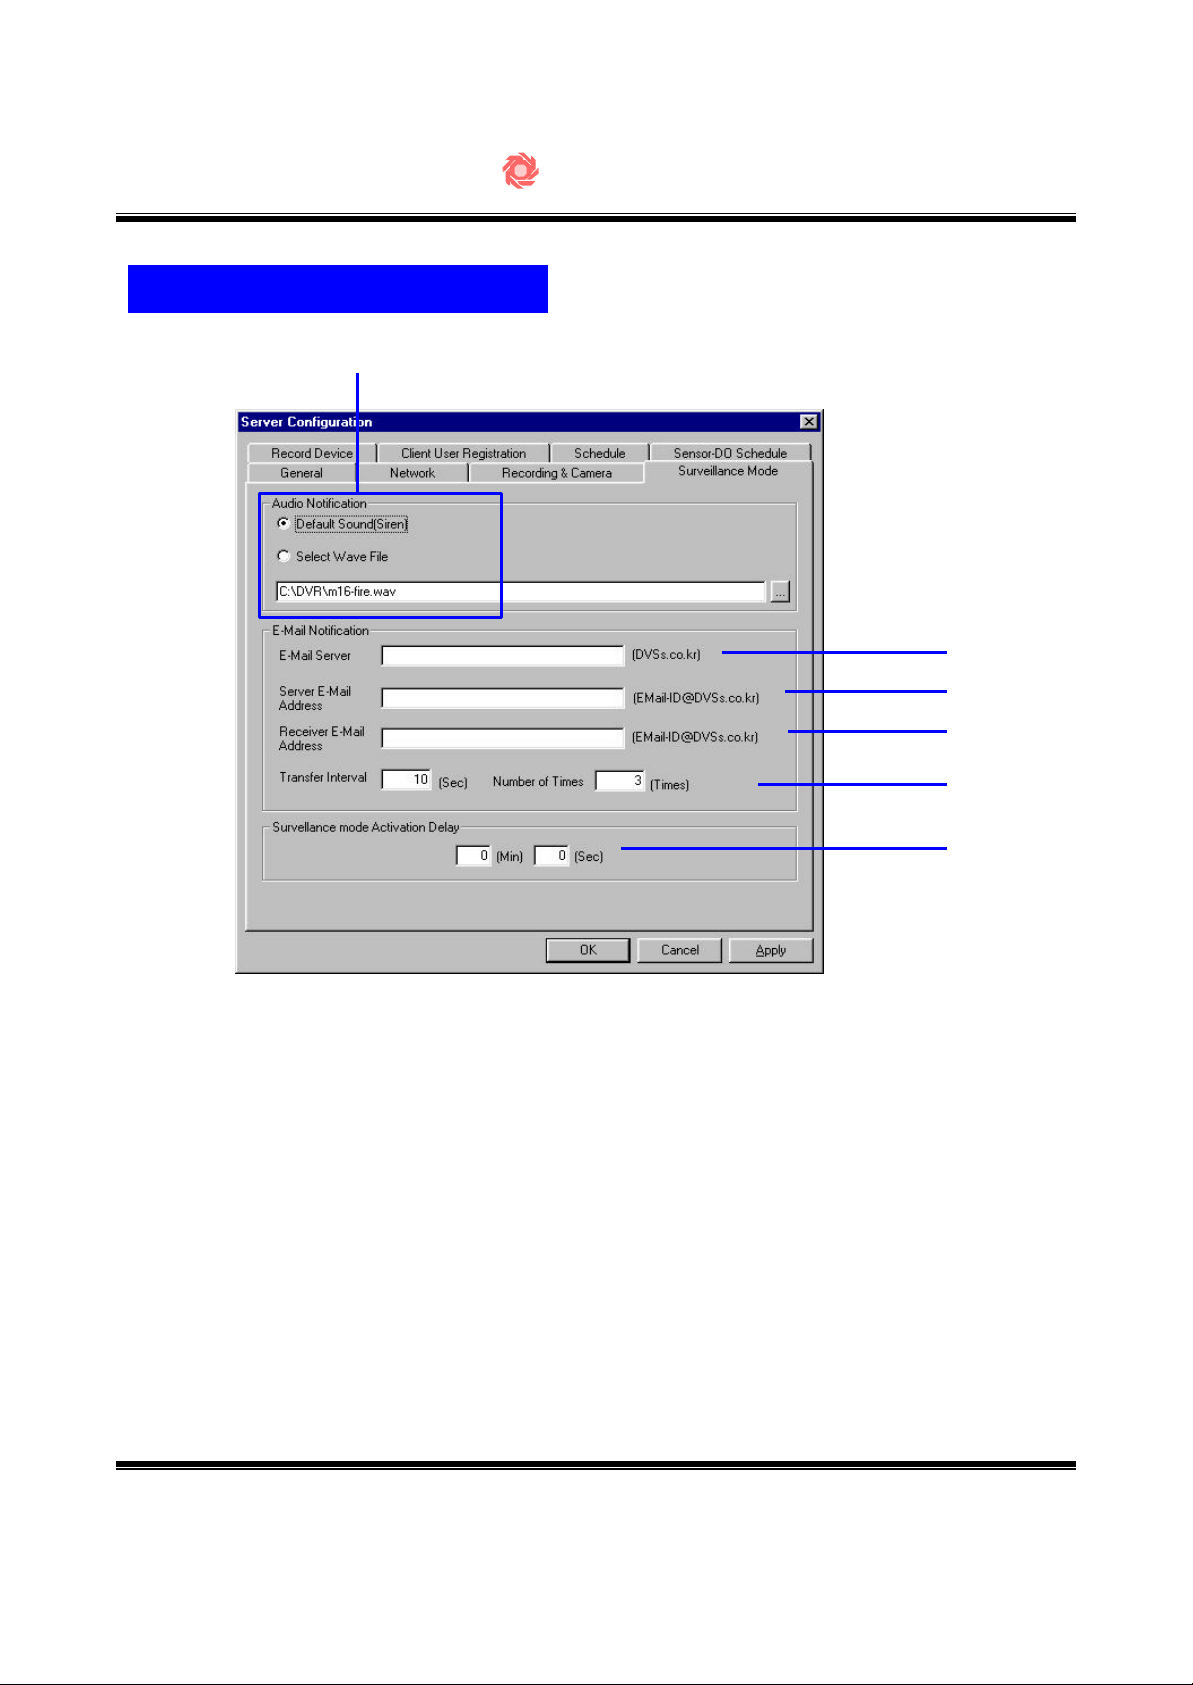
Surveillance Mode Setup
①
SecuMesh DVR
②
③
④
① Sound options for Motion Detection : Siren or Sound File
② URL of the E-mail Server for the Alarm to be sent.
③ E-mail ID of the Email Server
④ E-mail ID of the Email Receiver
⑤ E-mailing Time Interval and Iteration, in seconds and in number.
⑥ Delay time after Motion Detection, in minutes and seconds
⑤
⑥
-47-
Page 6
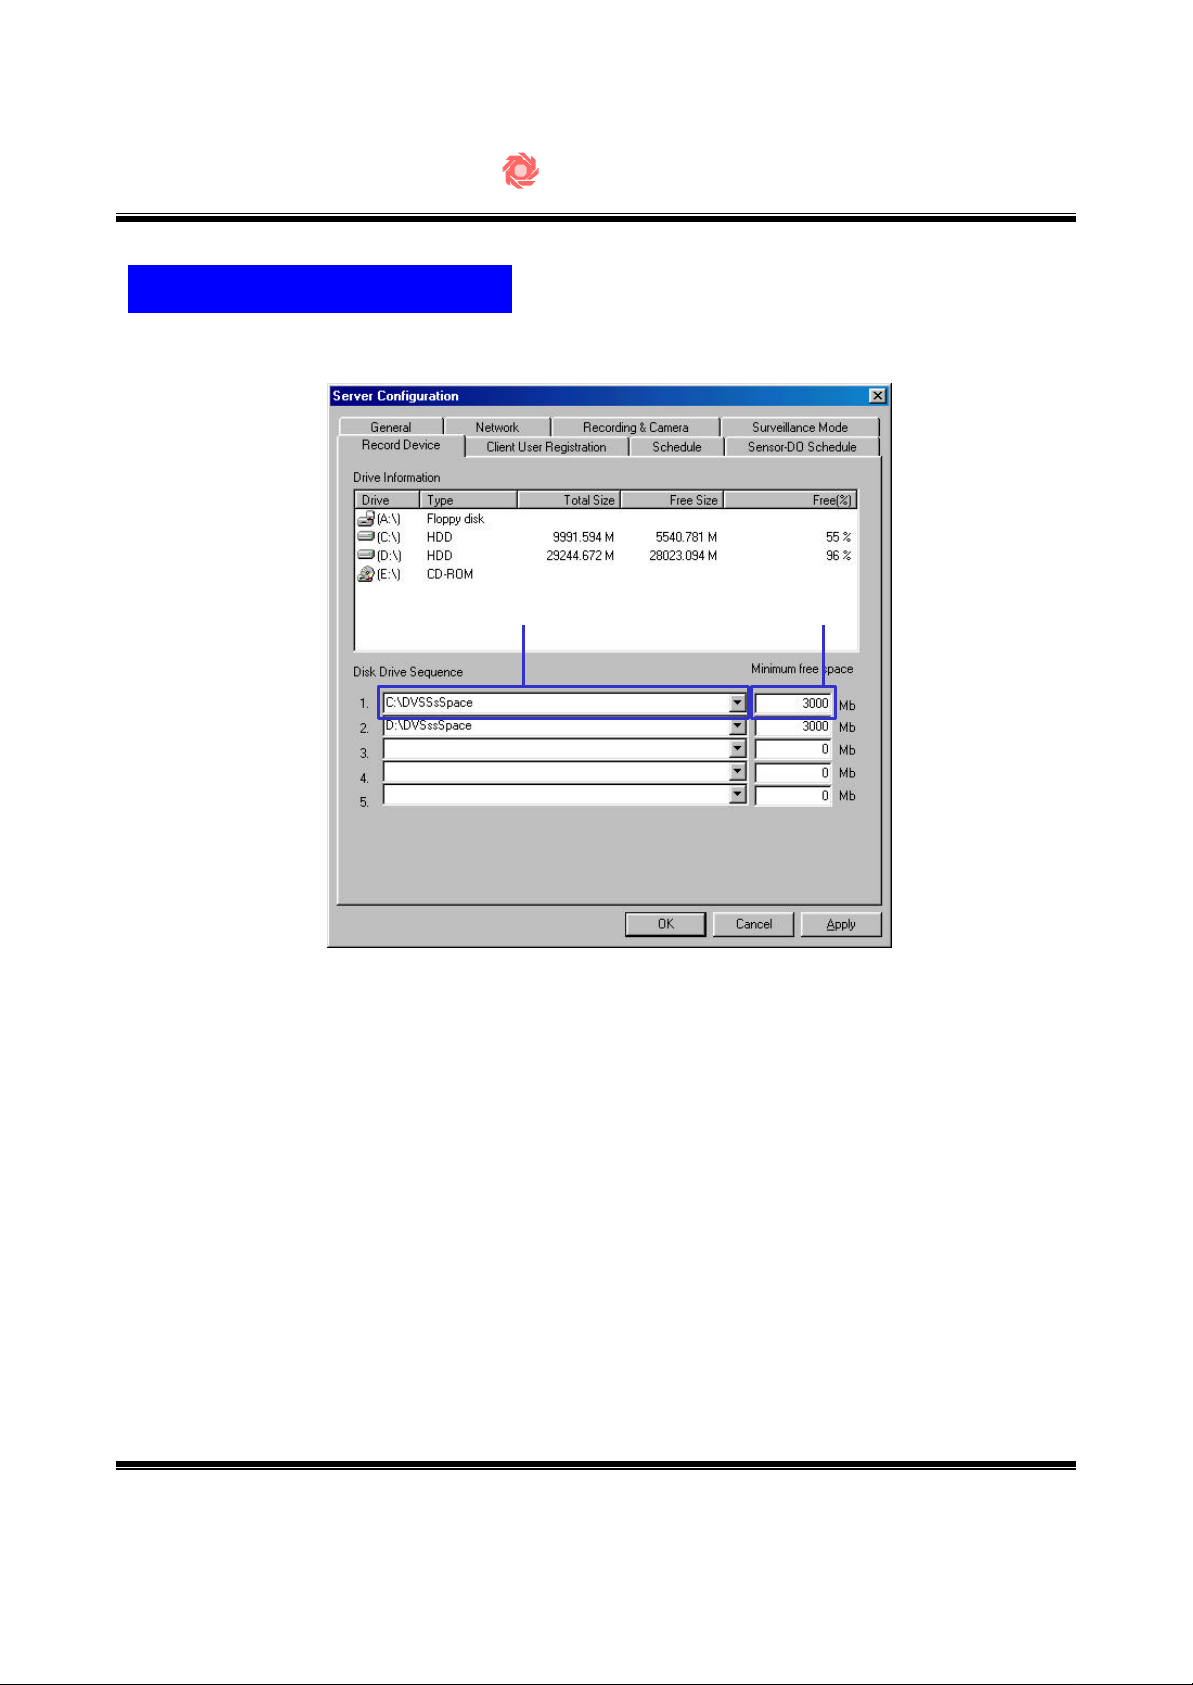
Setup of Storage Drives
SecuMesh DVR
①
① Select Directory for Recording Storage
② Minimum Storage Capacity not allocated for Recording
(Default: 3000 Mbytes)
②
-48-
Page 7
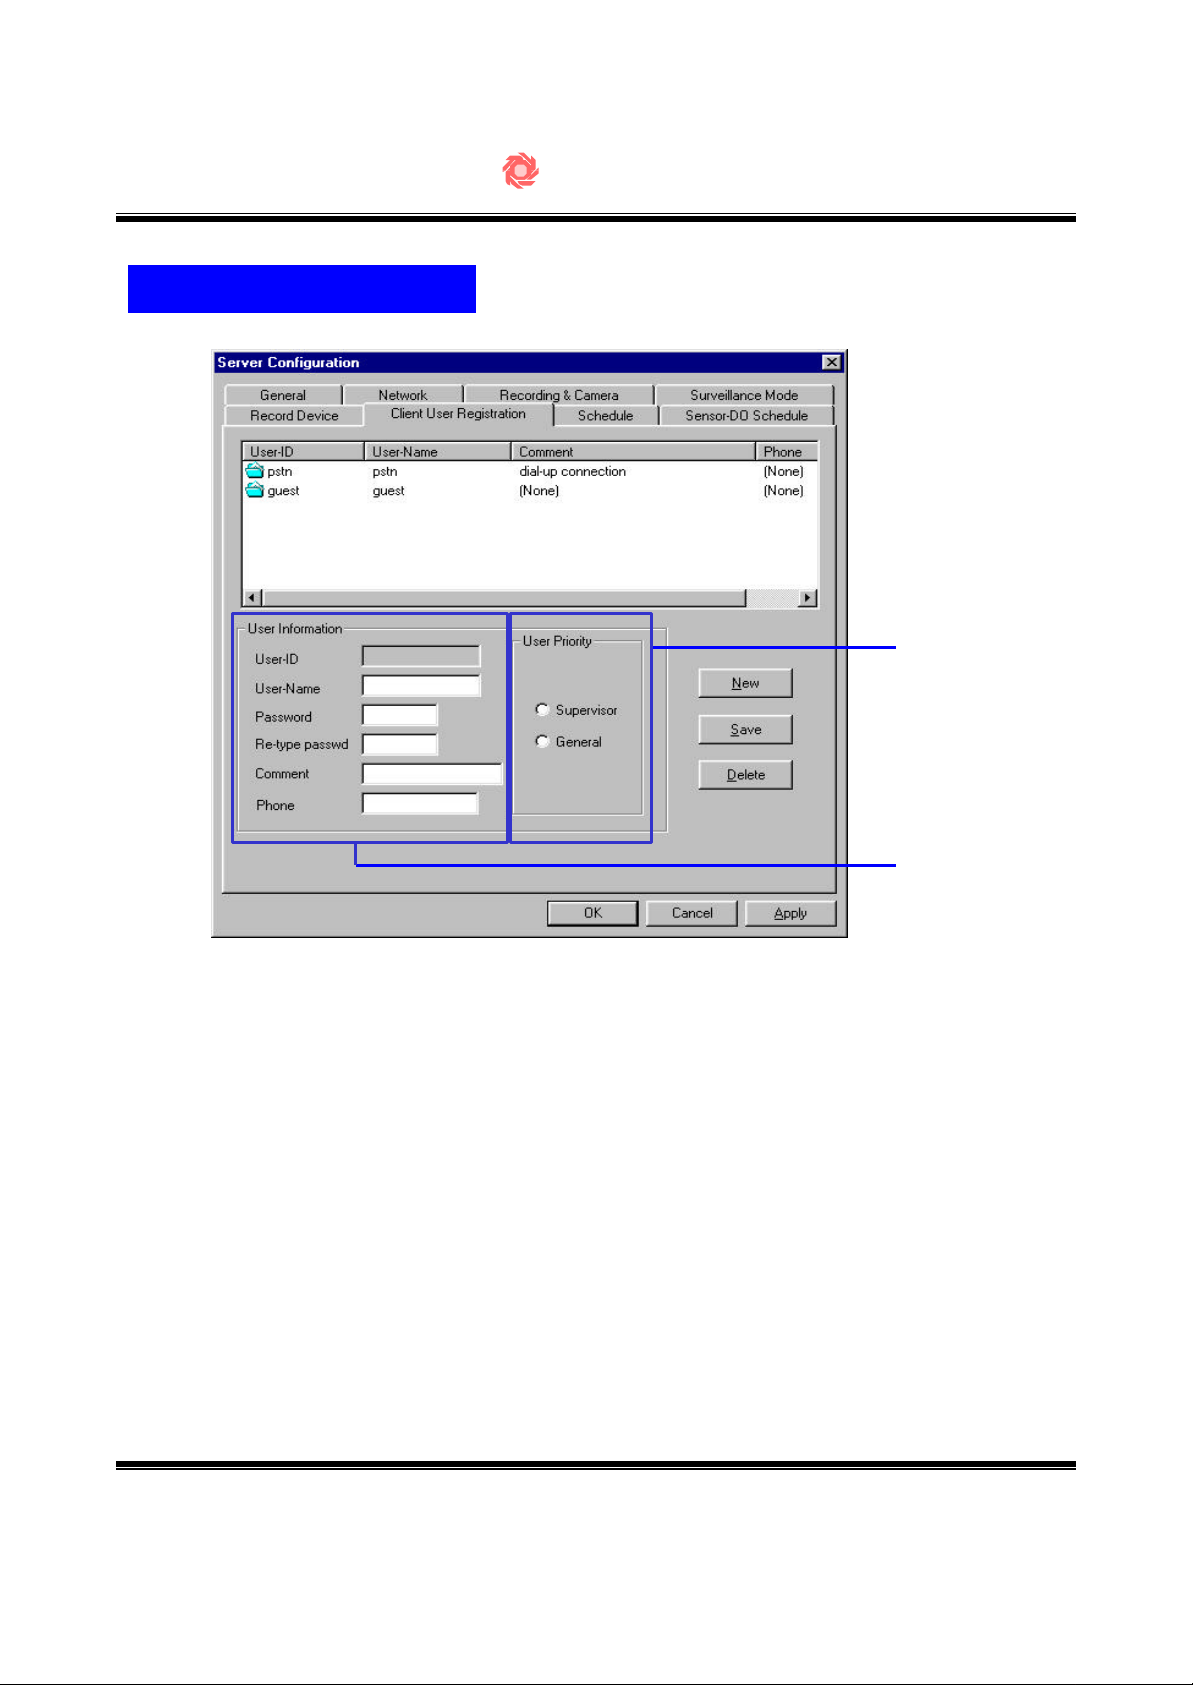
Registration of Users
SecuMesh DVR
①
②
① Access Level Setup (need Supervisor Level for Remote Control of the System :
You can click the right mouse button on the active window to see the controllable
menu.)
② Registration for the Remote Access
- ID & Password for the Remote Access
-49-
Page 8
SecuMesh DVR
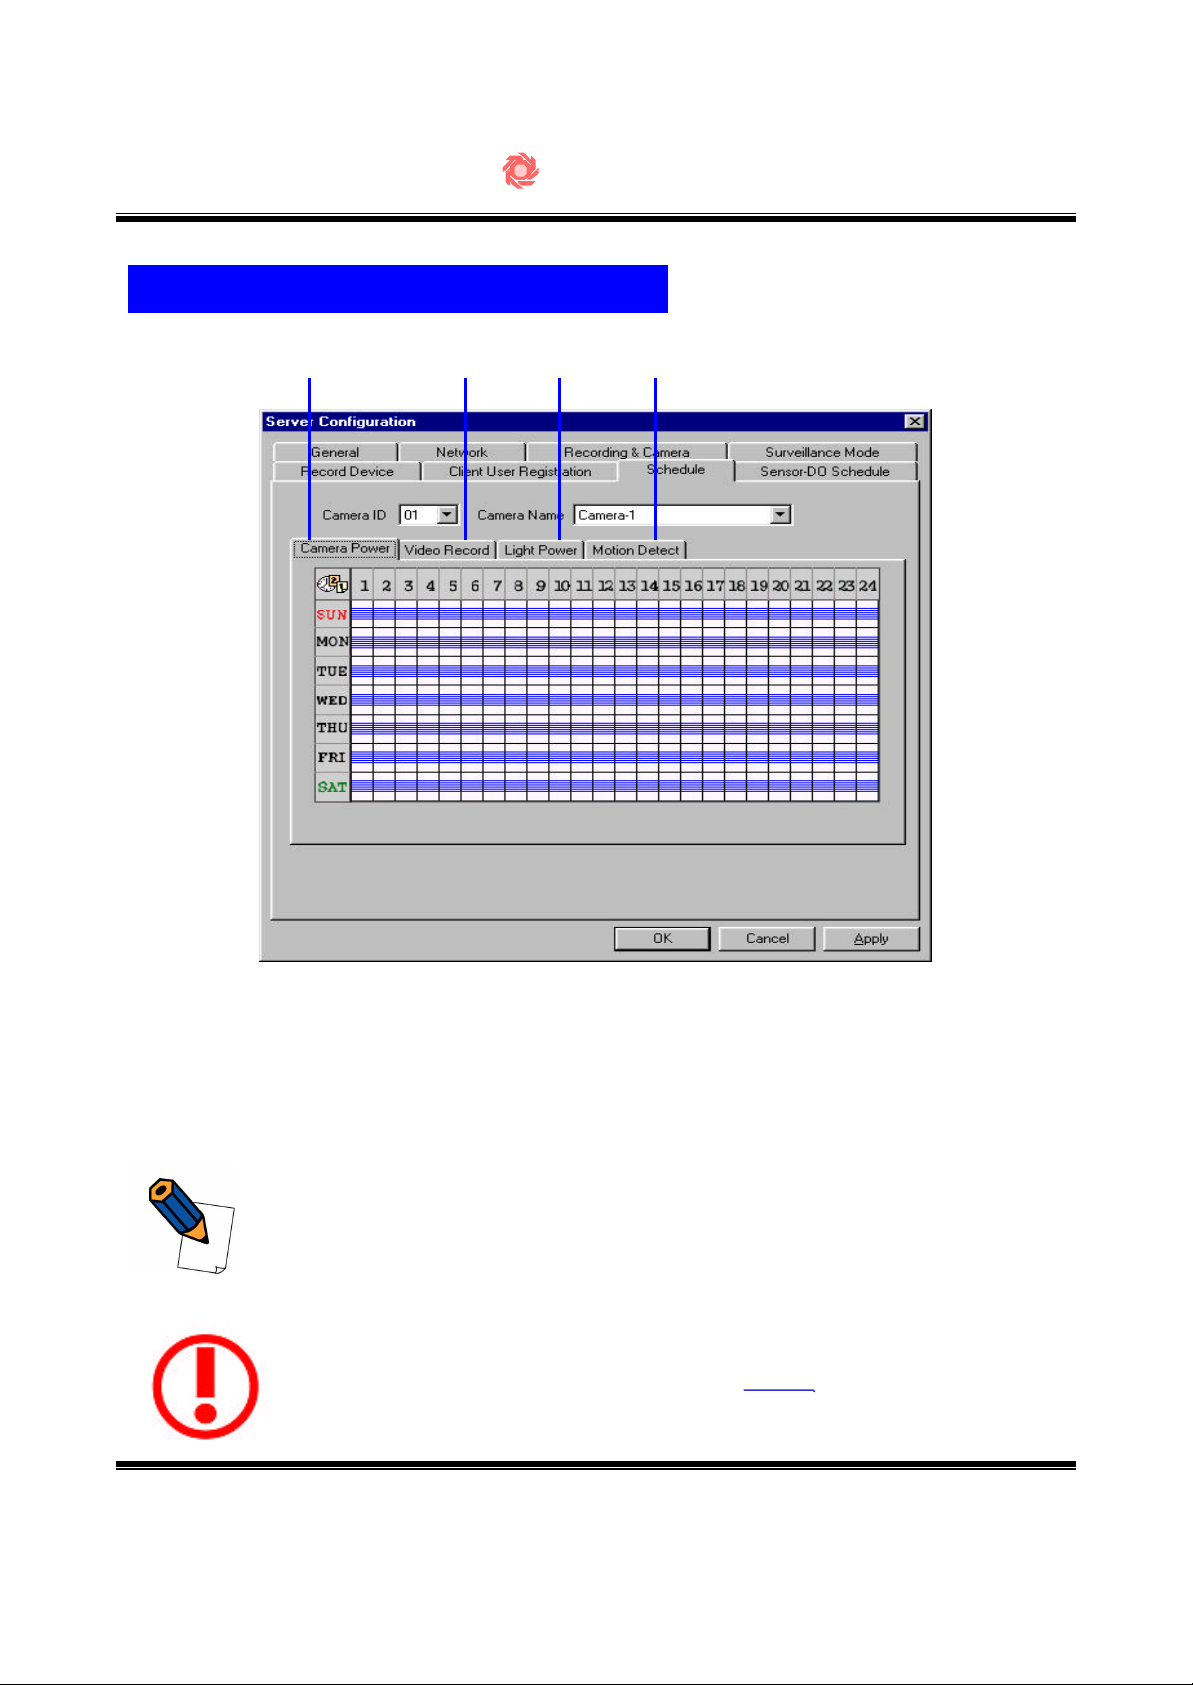
Scheduling of Recording Cameras
① ② ③ ④
① Camera Power : Setup for Camera On/Off Time
② Video Record : Recording Schedule Setup for each Camera
③ Light Power : Setup for Receiver(RX) On/Off Time
④ Motion Detect : Setup Time for Motion Detection
Schedule setup method
Schedule on ☞ Click the left button of the mouse and drag over
the period
Schedule off ☞ Click the right button of the mouse and drag over
the period
When you schedule a camera in ②, you should schedule every
camera. The unscheduled camera will not record.
-50-
Page 9
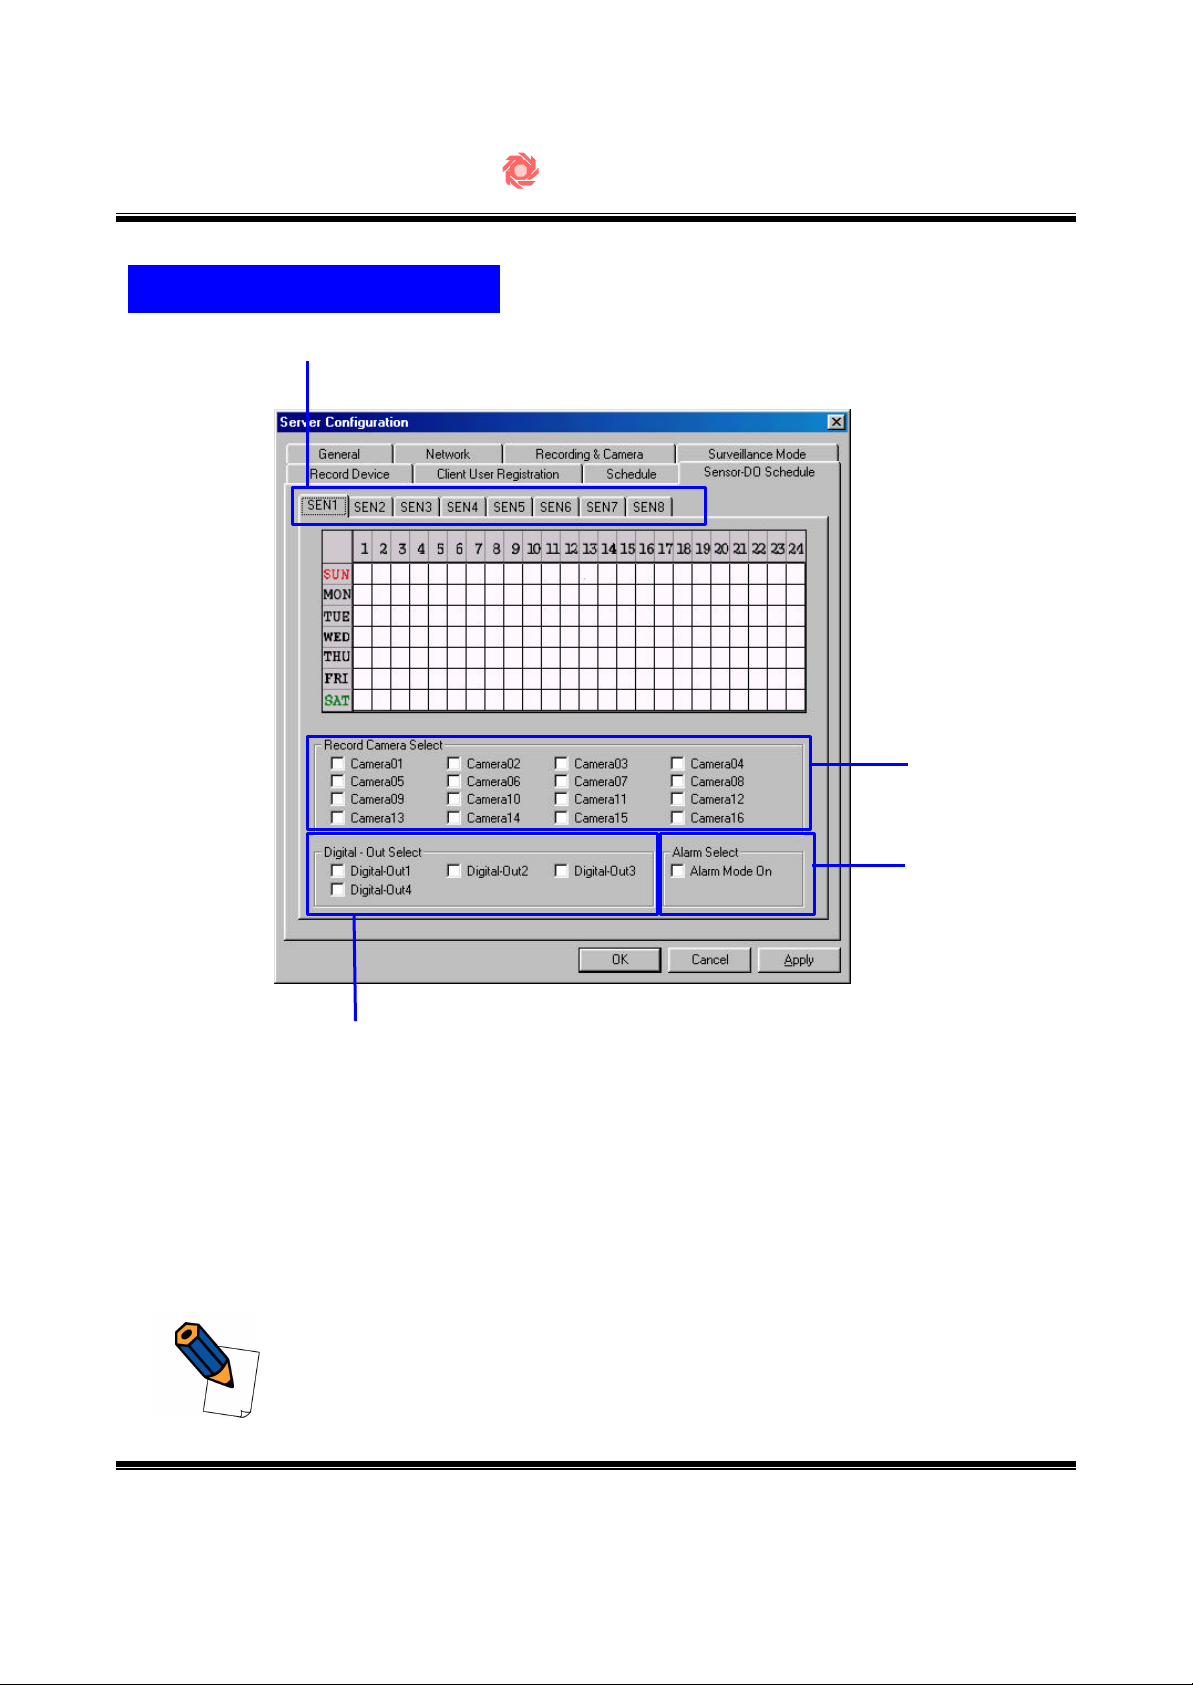
Scheduling of Sensors
①
SecuMesh DVR
v
v
②
③
④
① Schedule setup for each sensor
② Select camera to link the sensor
③ Select Alarm mode on sensor detecting. If checked, the sensor
detection triggers the “Motion Detection Mode”automatically.
④ Select Digital Out port on sensor detecting
Example : the status of the above figure
When the sensor#1 detects, the camera#1 records and the output will
be ported through the digital out#1. This setup is good through 0AM
to 8AM and 9PM to 24PM everyday.
-51-
Page 10

SecuMesh DVR
SEARCH MODE MENU
-52-
Page 11
SecuMesh DVR
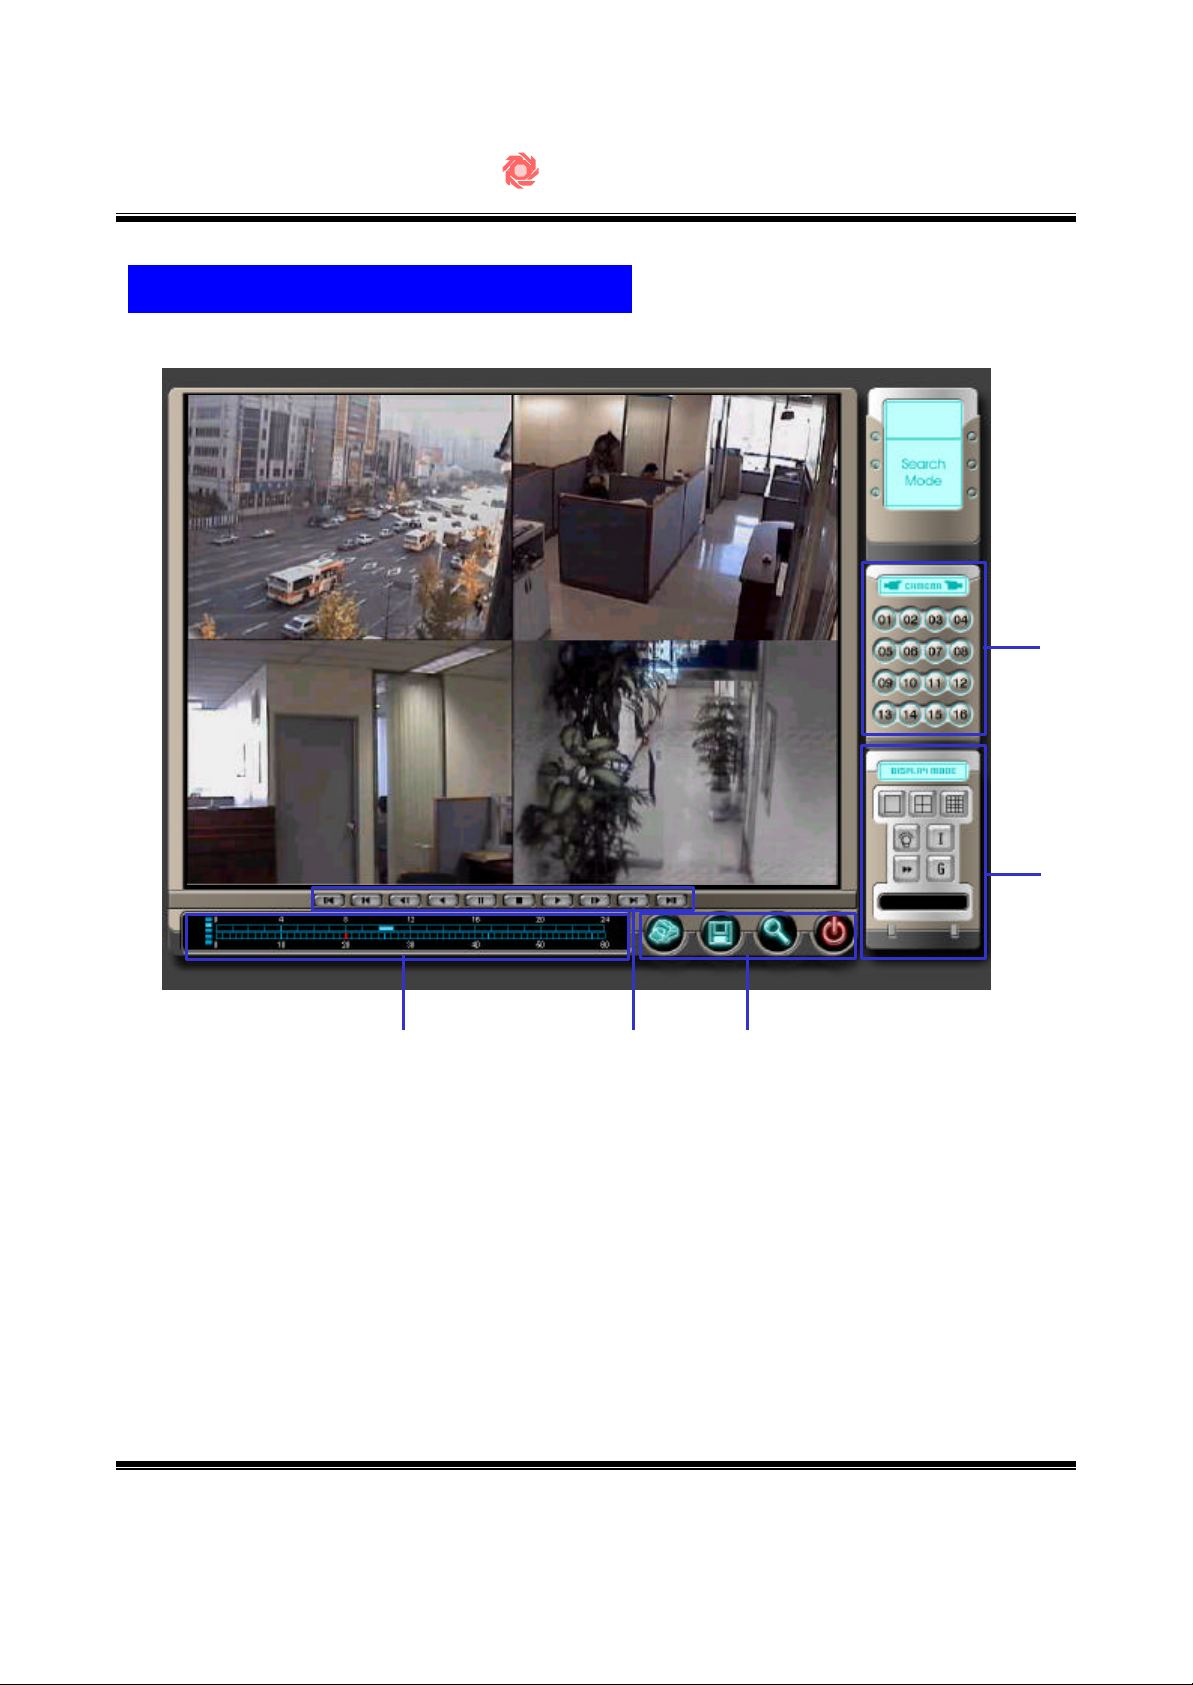
Searching the Recorded Images
①
③④⑤
① Search channel selection button.
② Channel play mode ☞page 53
③ Printing, AVI file backup, search, exit buttons. ☞ page 59~60
④ Search playing options ☞ page 54
⑤ Recorded time spans are marked by red bar. You can move to that time by
clicking the yellow bar. ☞ page 55
②
-53-
Page 12
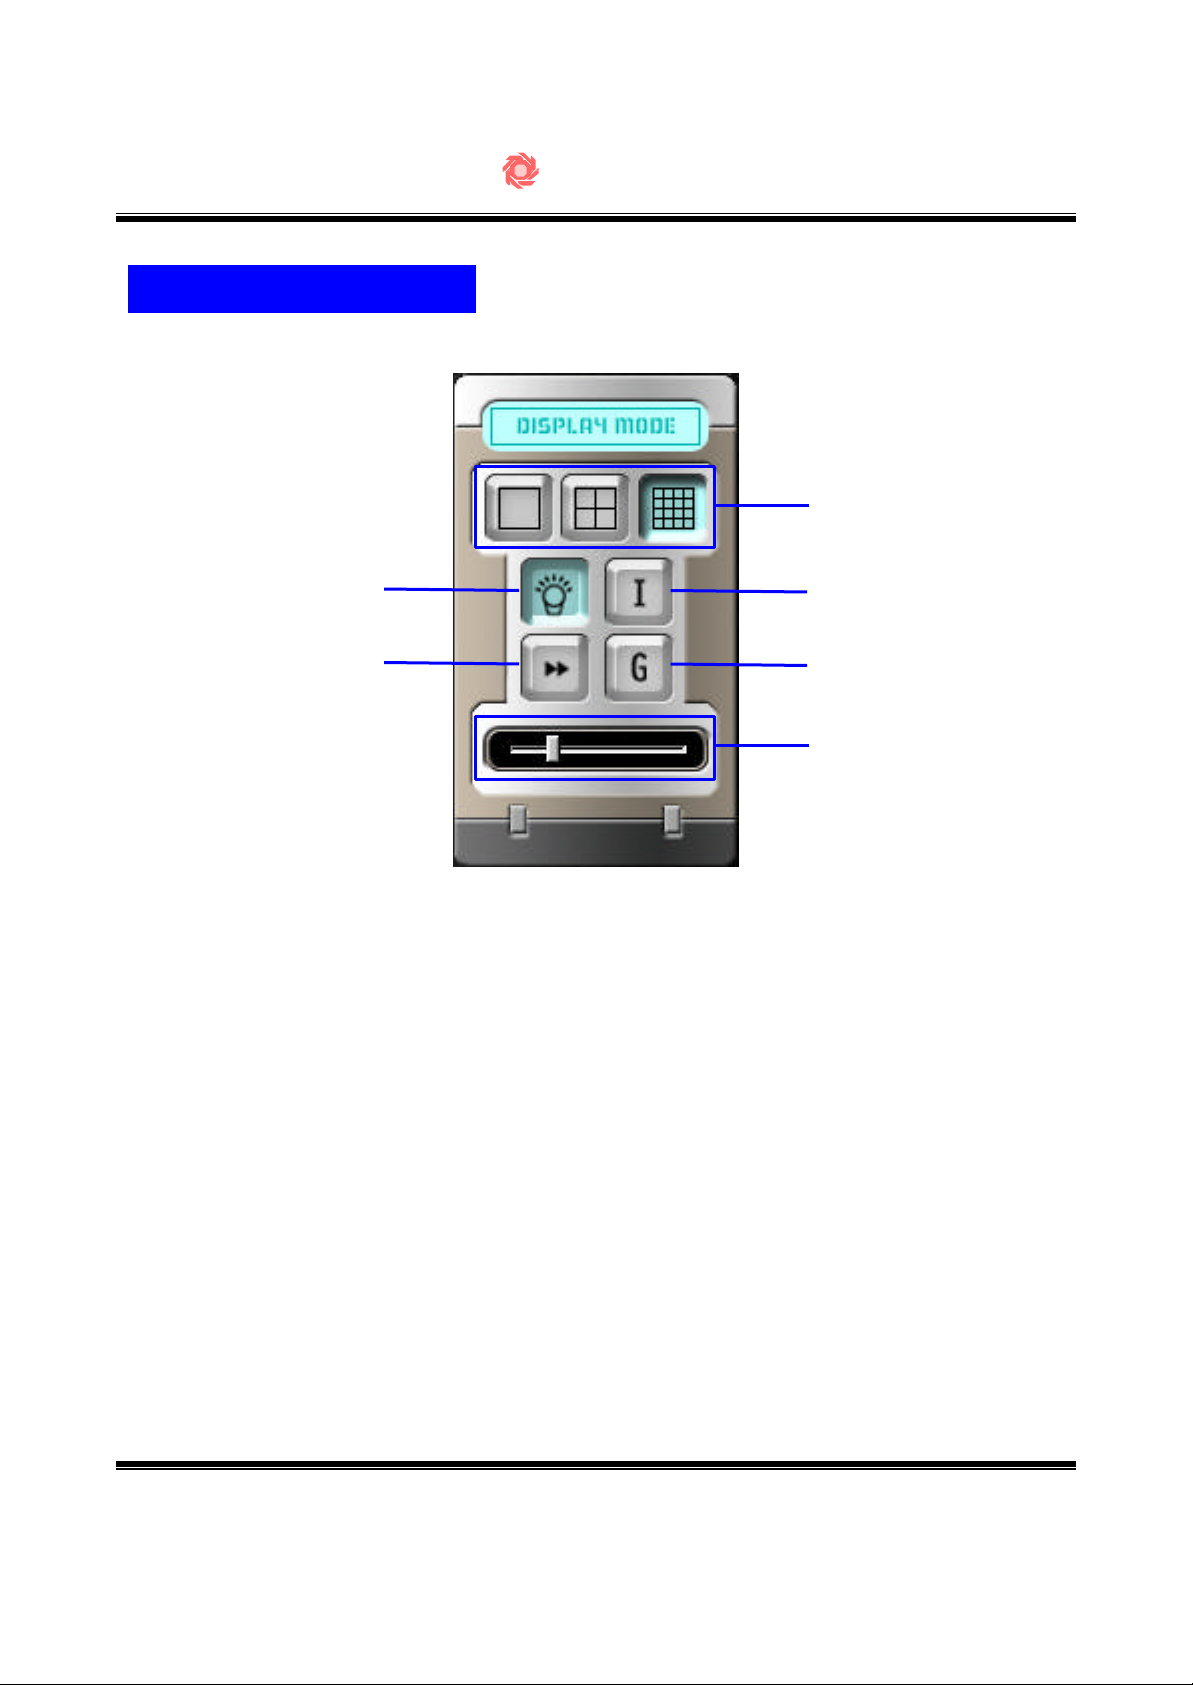
Channel Play Mode
SecuMesh DVR
①
②
④
① Displays various display mode as button shown.
② Brightness button.
③ Sharpness button.
④ Display speed button.
⑤ Gray scale display button.
⑥ Adjustment bar for button ② ~ ④
③
⑤
⑥
-54-
Page 13
SecuMesh DVR
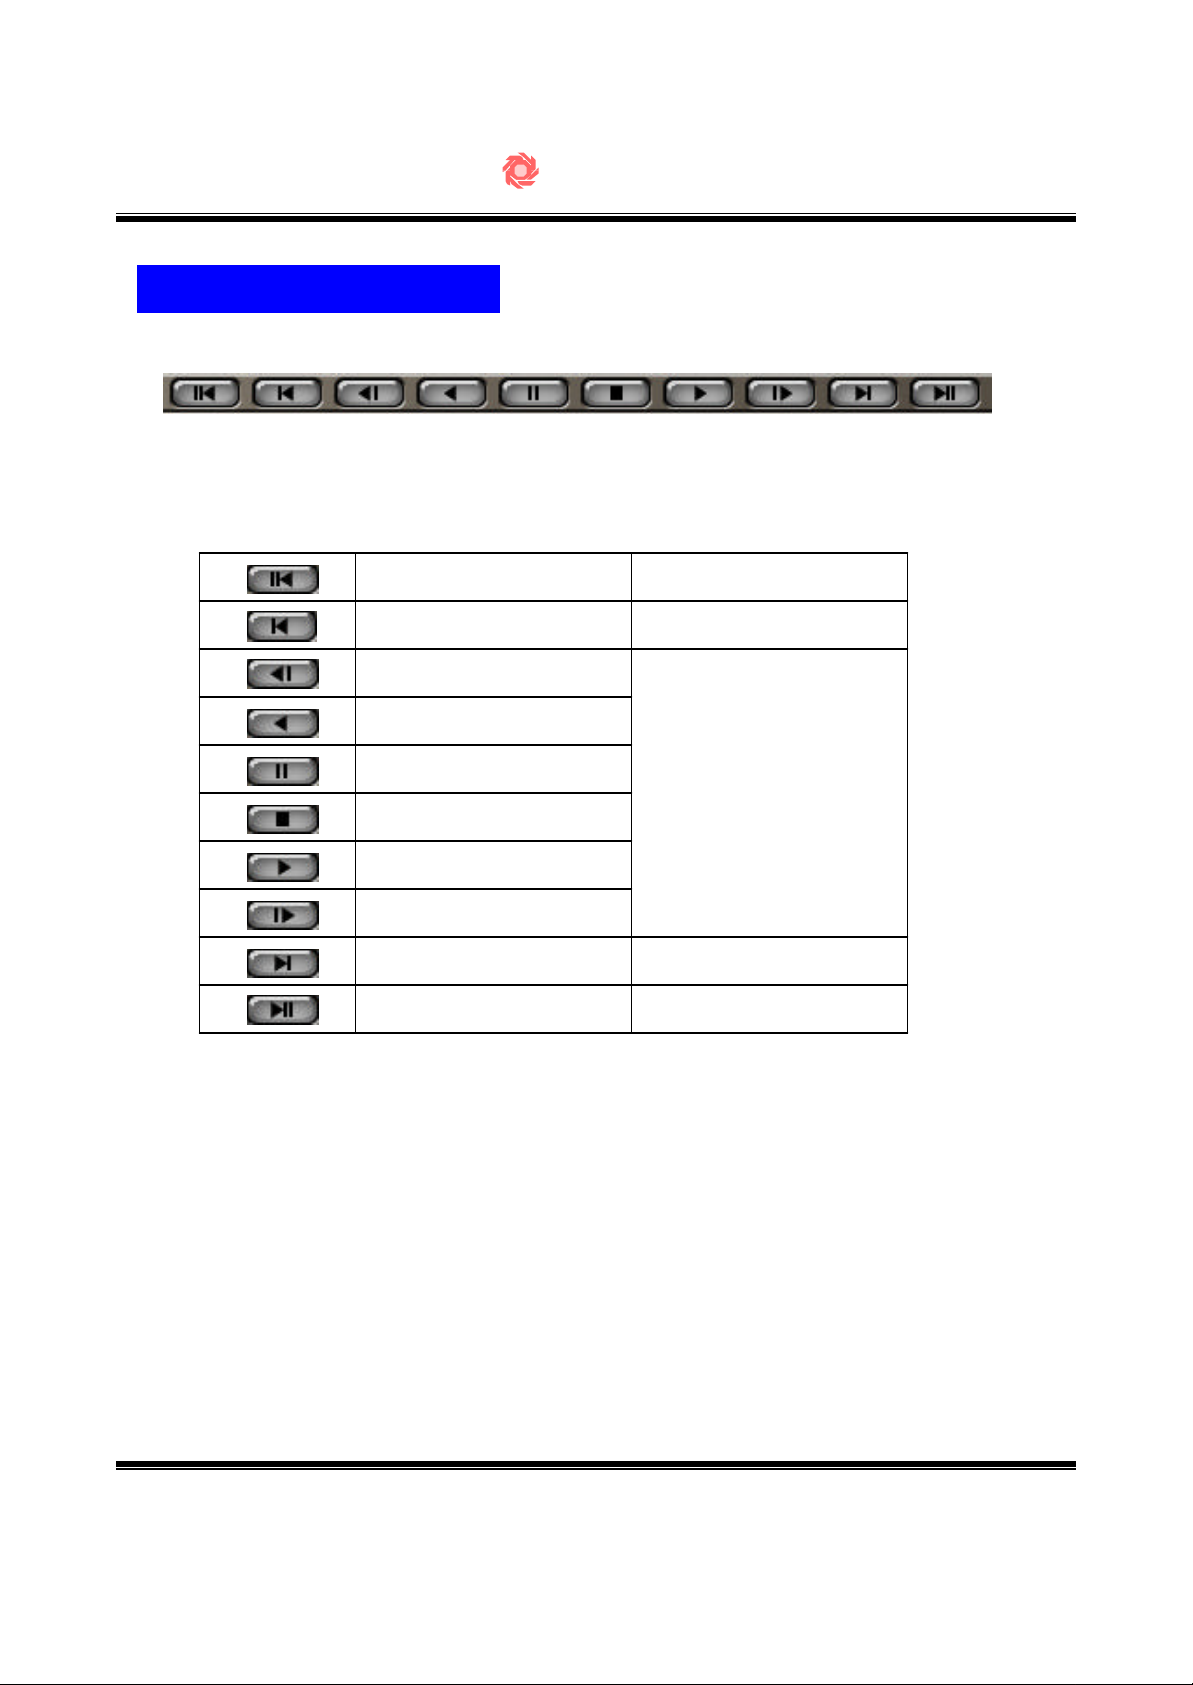
Searching Play Option
Display control buttons will let operator can search from various points as follows.
Hour back
Hour start
One frame back
Play Backward
Pause
Stop
Play
One frame next
Hour end
Hour next
11:30AM
12:00PM
↑
If current time is
12:30PM
↓
1:00PM
1:30PM
-55-
Page 14
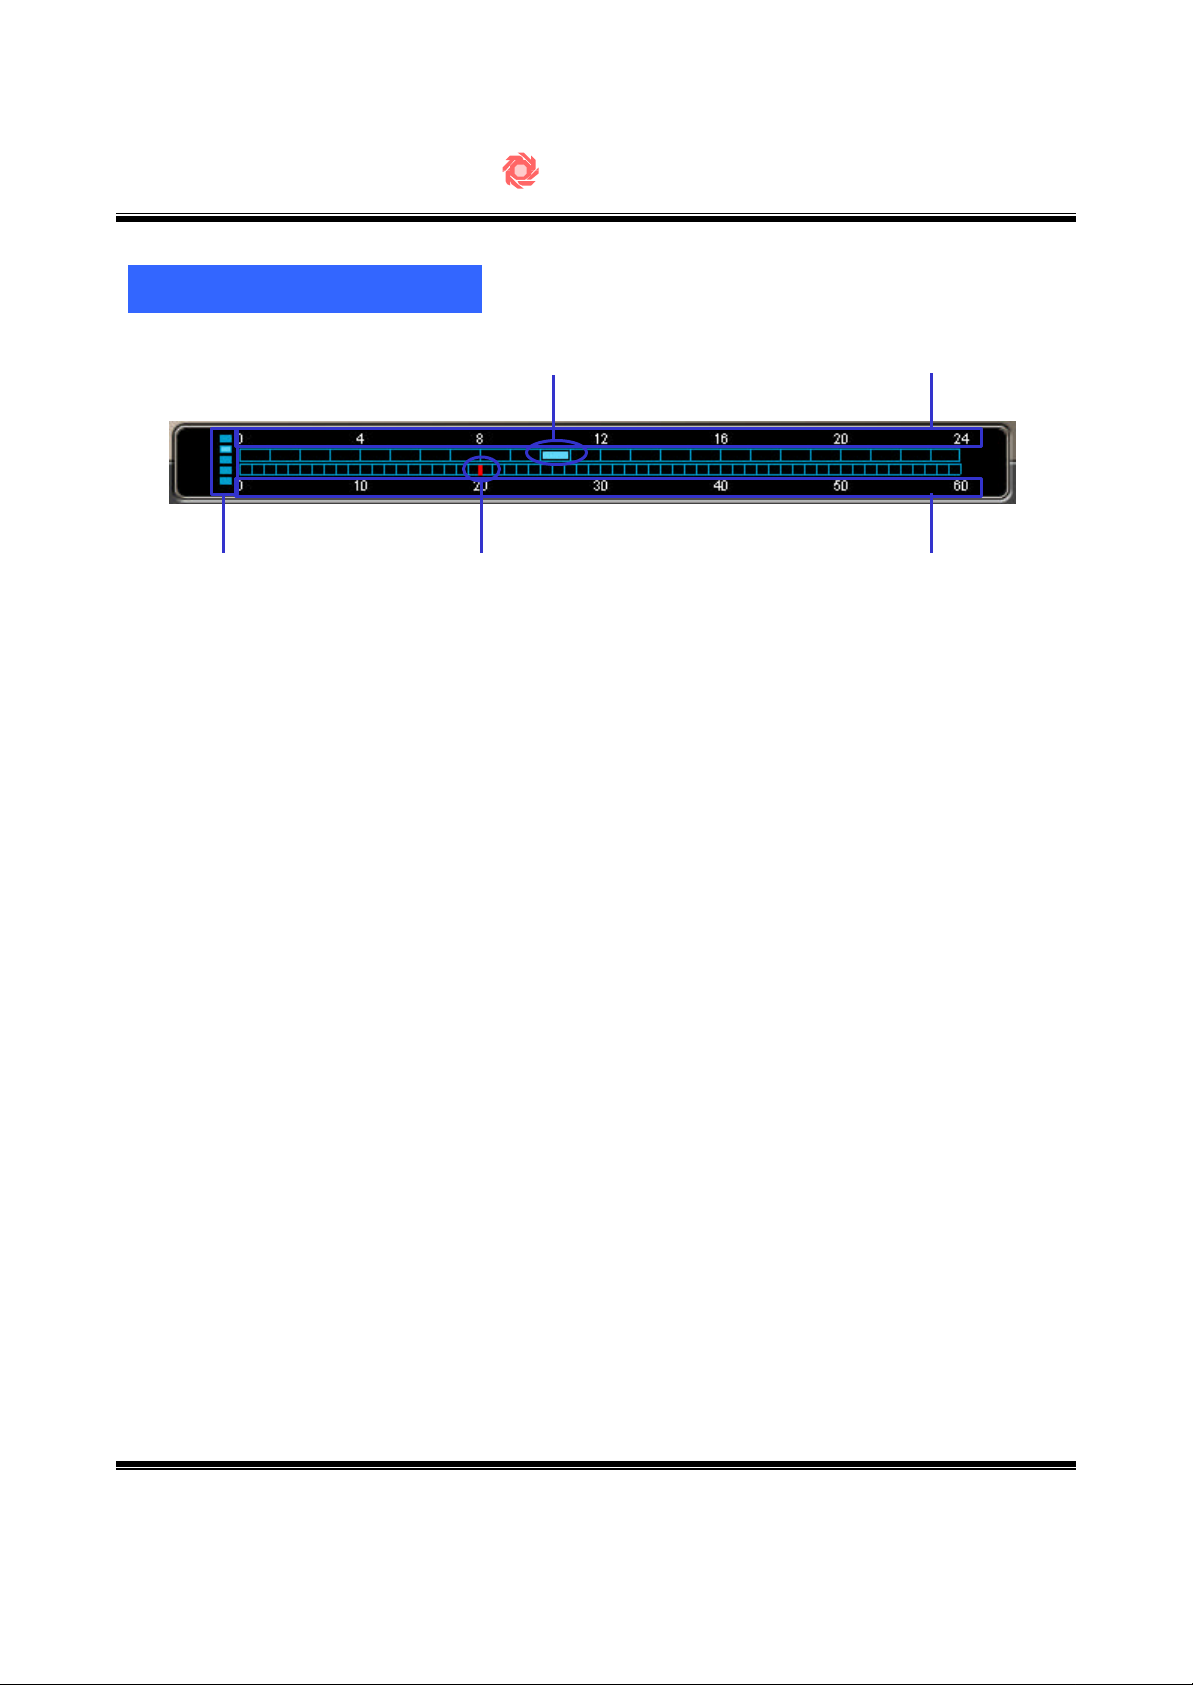
Record Status Graph
SecuMesh DVR
②
③
① Red bar indicates current playing time.
② Blue-colored area indicates recorded area.
③ Indicates the selected file is being played by illumination.
(Illuminating speed may vary for its play speed)
①
Hour
Min.
-56-
Page 15
SecuMesh DVR
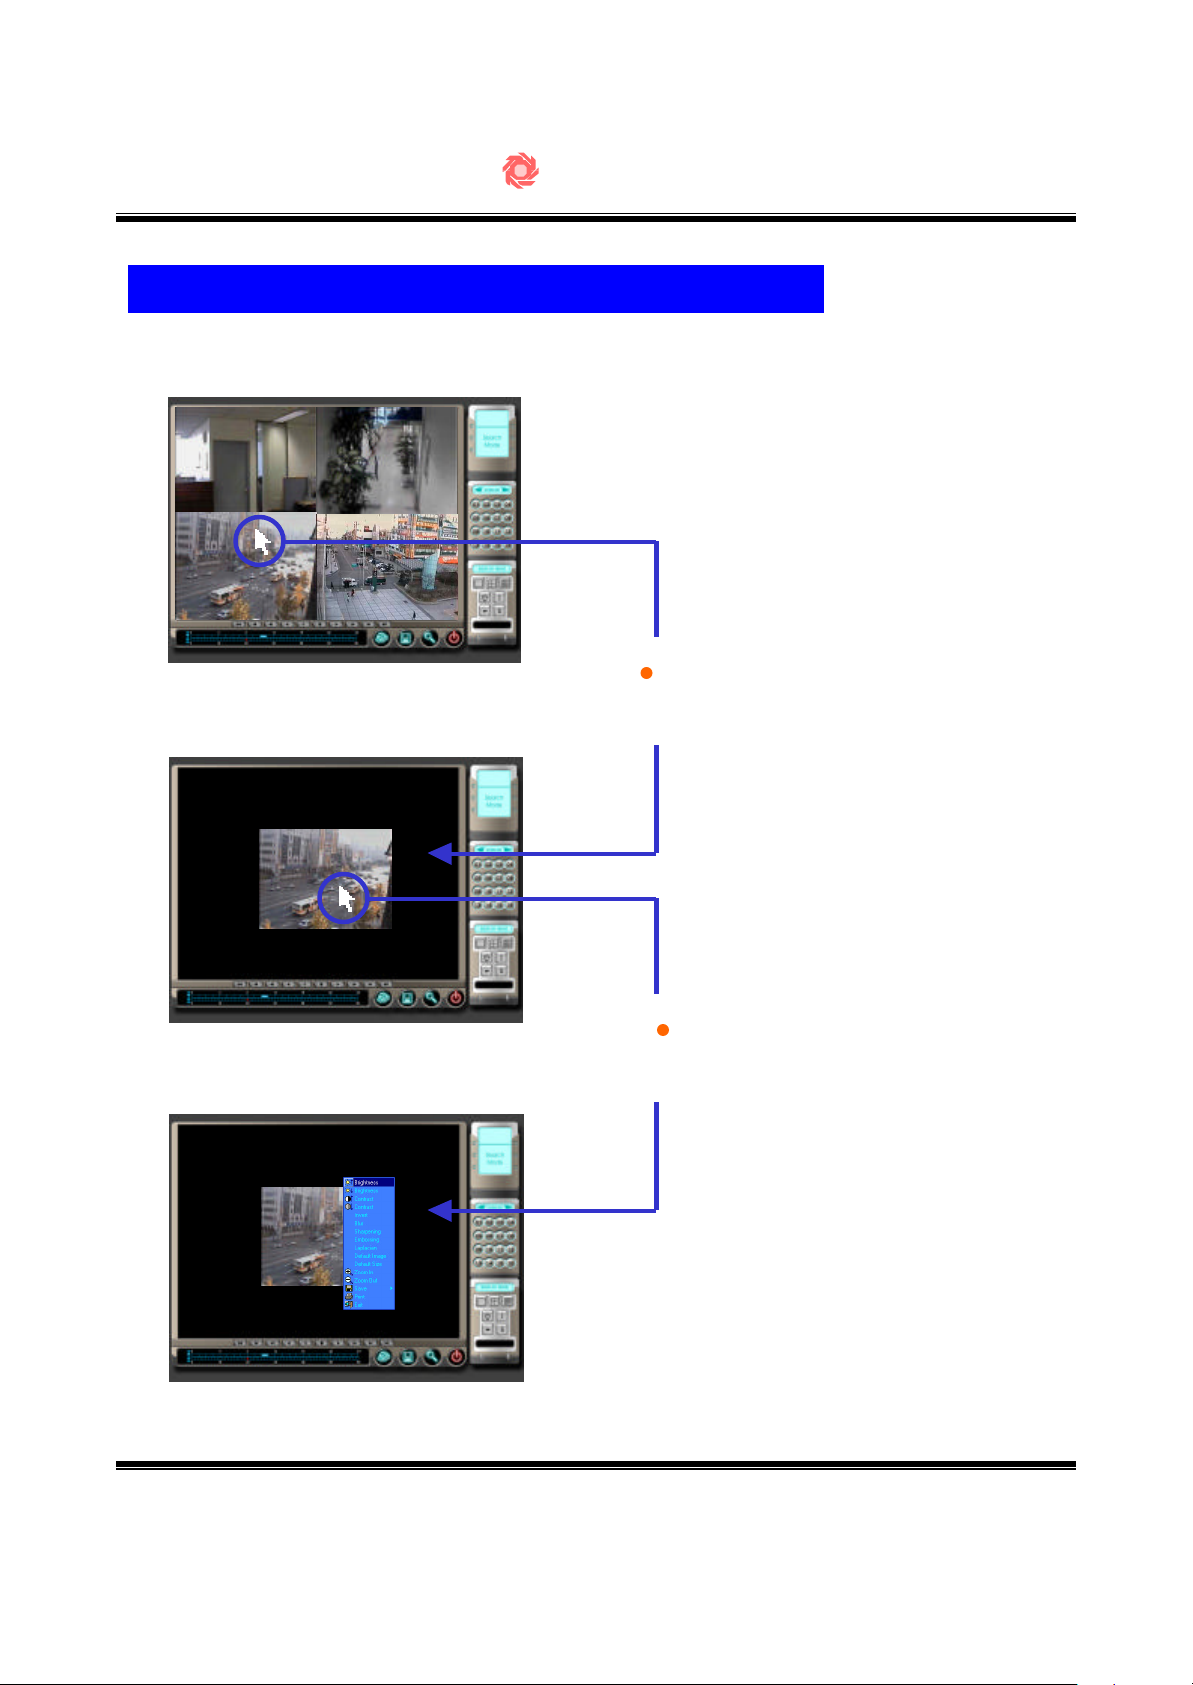
Enlarging and Calibrating the selected image
Choose one
screen to enlarge
8
8
Left-button
double click
Right-button
click
Opens Image
Zoom Controls
-57-
Page 16
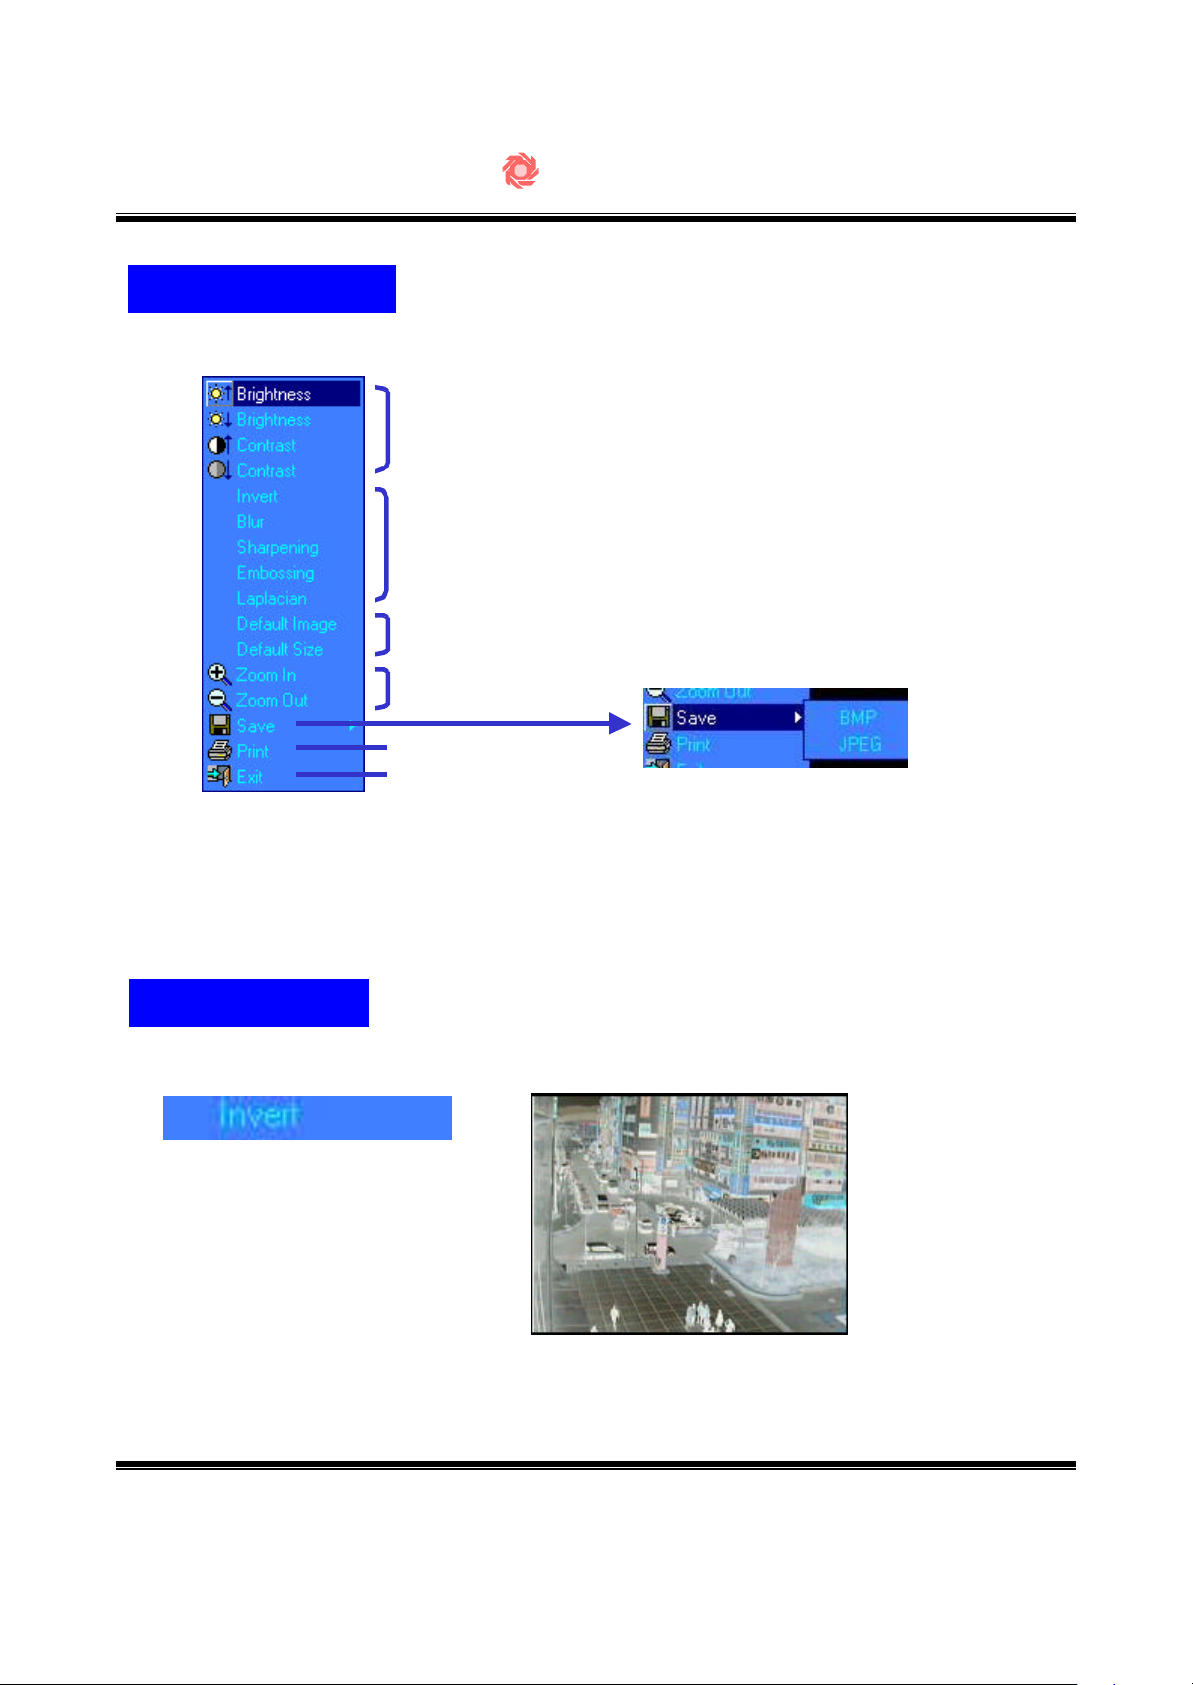
Image Control
SecuMesh DVR
Brightness and Contrast control
Filter control
Goes back to default
Zoom control (X 10)
Print
Exit to Search window
Saves image file to
BMP or JPEG format
Filter Control
Inverts color of
image
-58-
Page 17
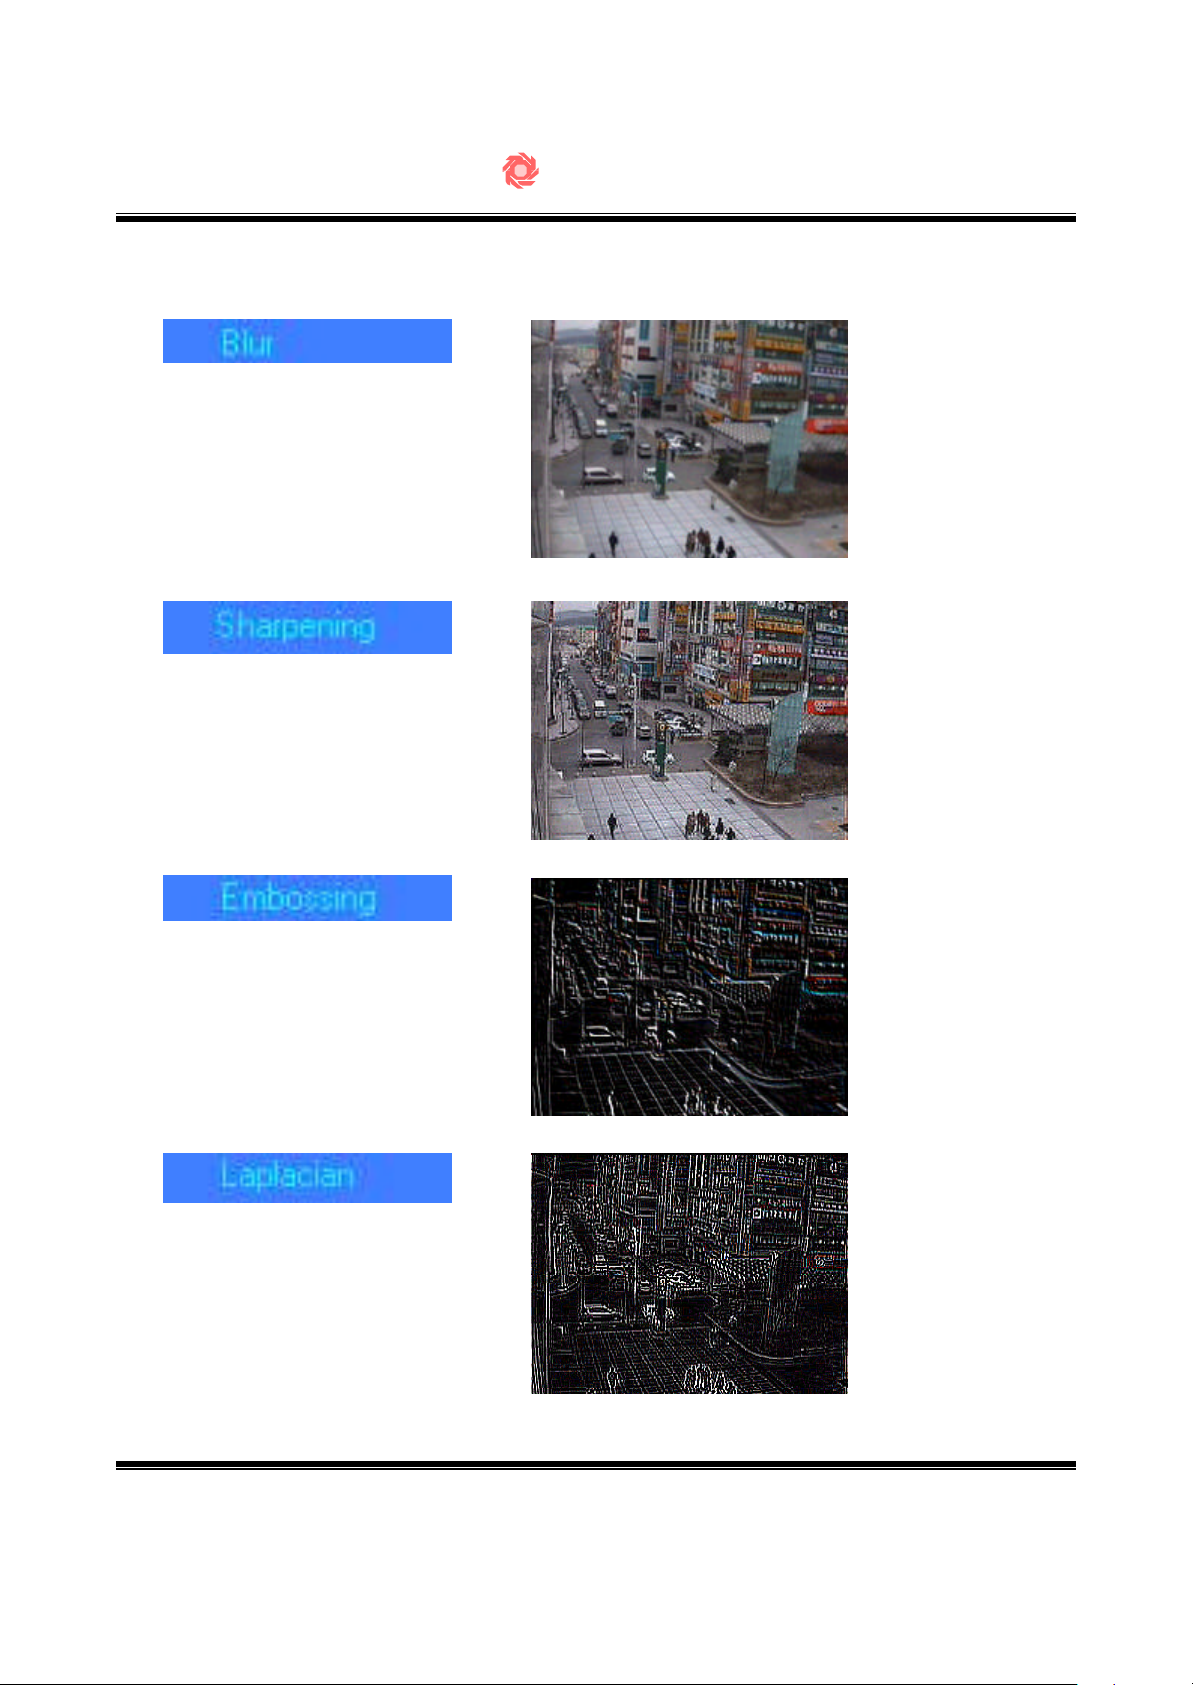
Soften the selected
image
Sharpen the
selected image
SecuMesh DVR
Embosses the
selected image
Shows only outline
of the selected
image
-59-
Page 18
SecuMesh DVR
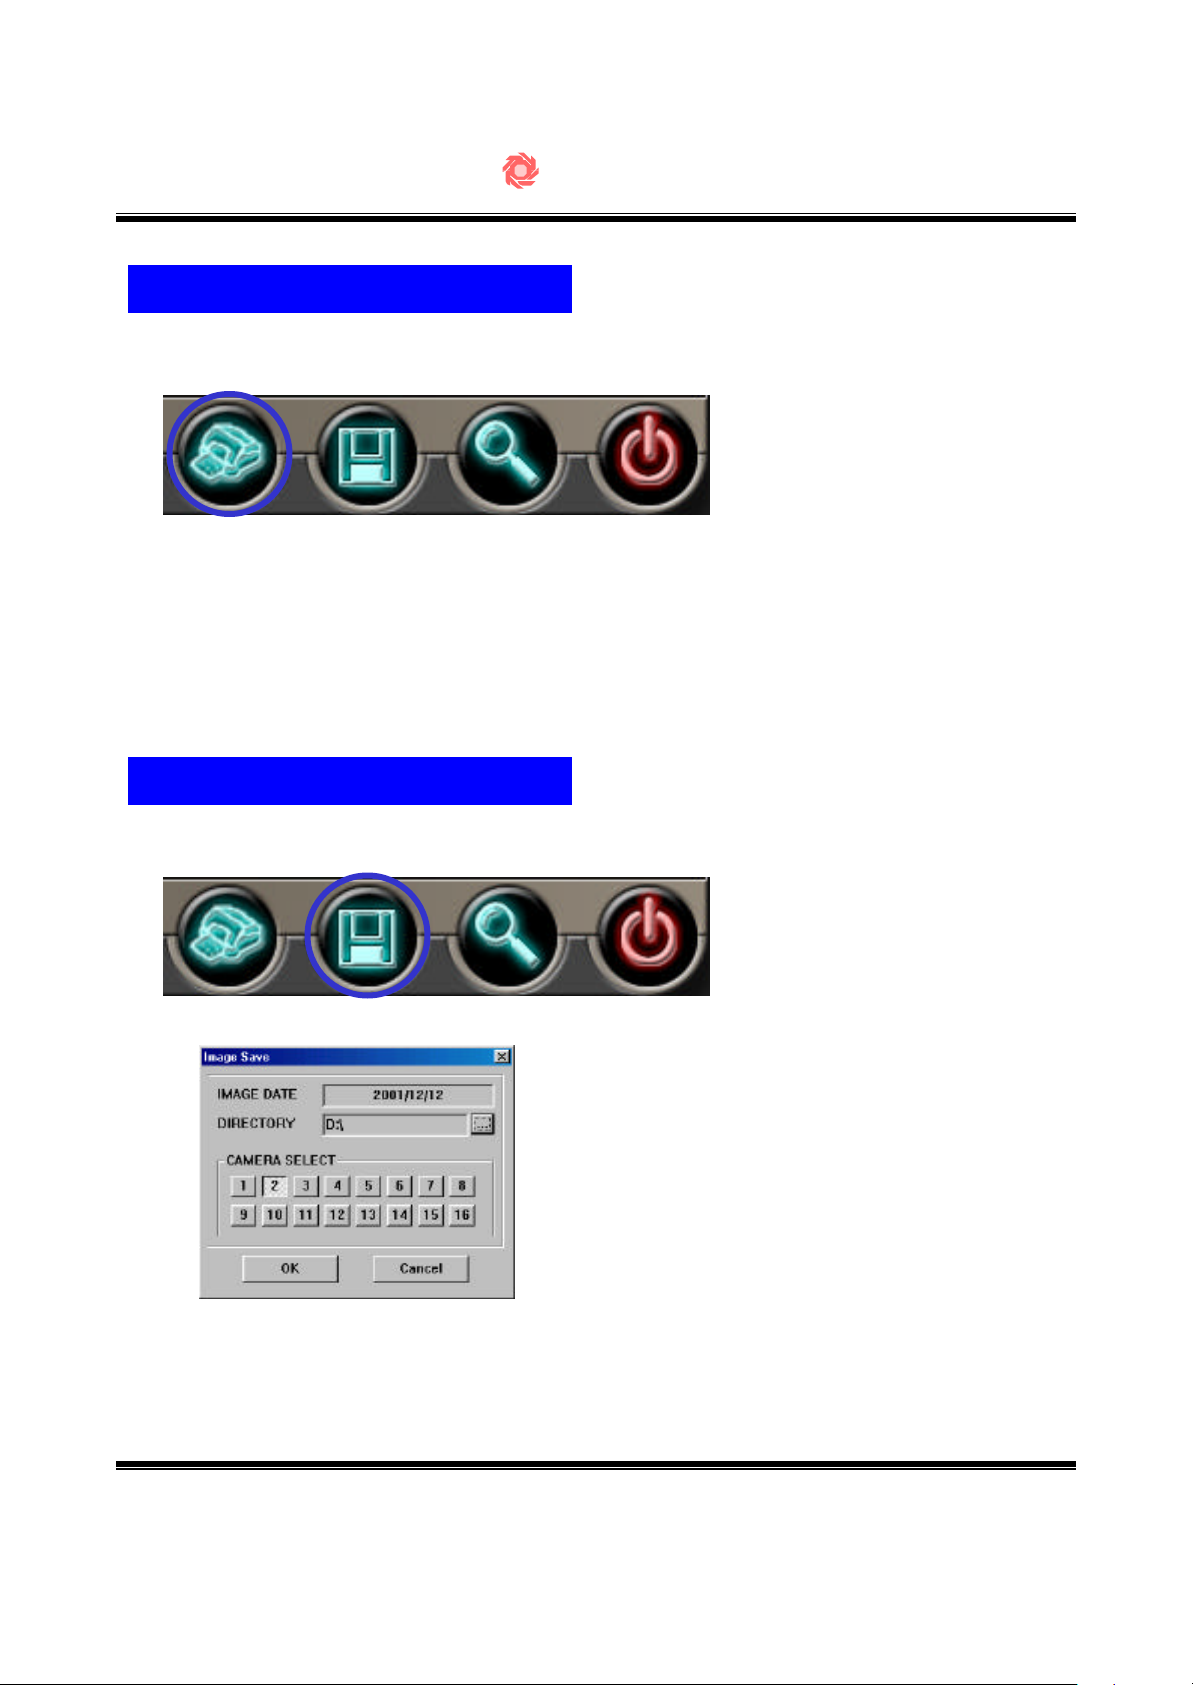
Printing the selected screen
▼
① Prints selected screen
② Operator can also print from “Image Control”
Saving the selected screen
▼
Example : the status of the above figure
The recorded data of camera#2 is to be recorded in the disk D:/ as AVI format.
-60-
Page 19
SecuMesh DVR
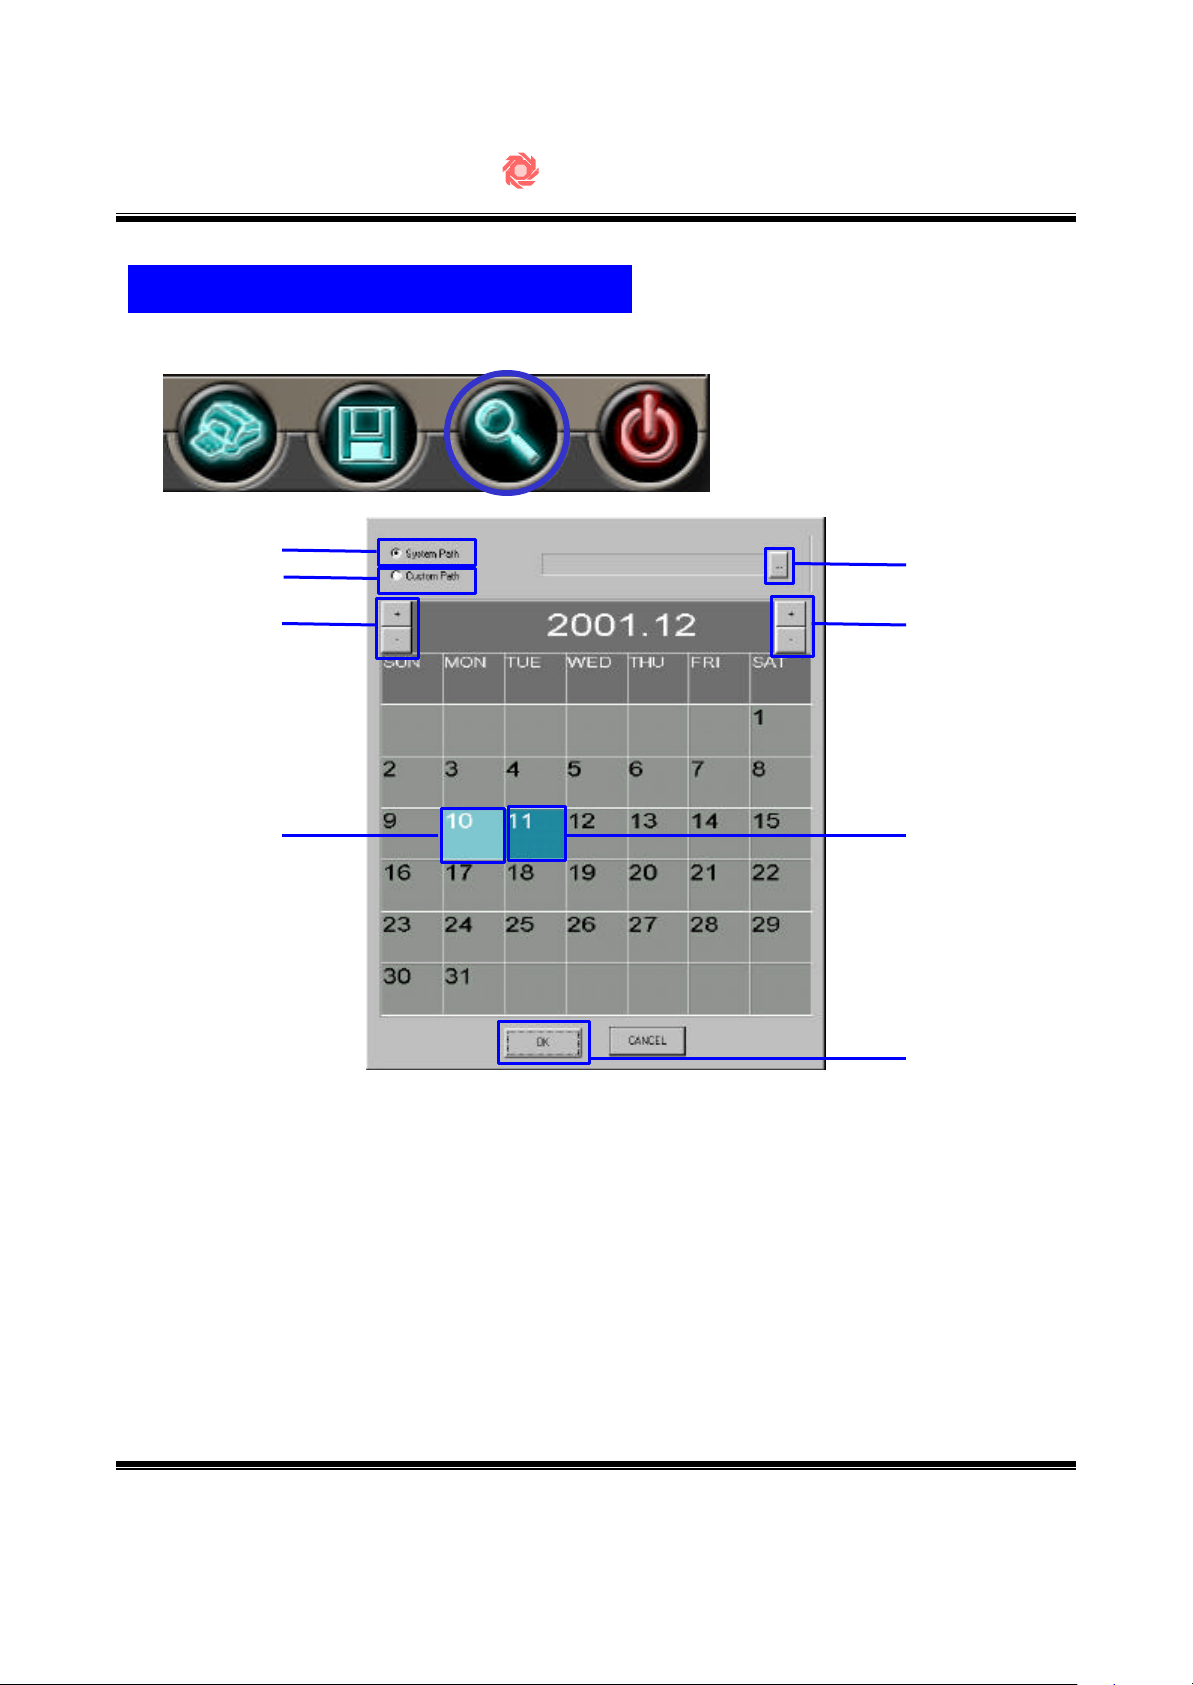
Locating the Recorded images
▼
①
②
④
⑥ ⑦
① Looks for recorded files in system path (default)
③
⑤
⑧
② Use custom path for recorded file location.
③ Opens file browse window for custom path use.
④ Year selection.
⑤ Month selection.
⑥ Indicates date that files were recorded.
⑦ Current date
⑧ Clicking “OK ”button will start play recorded files in selected date.
-61-
Page 20
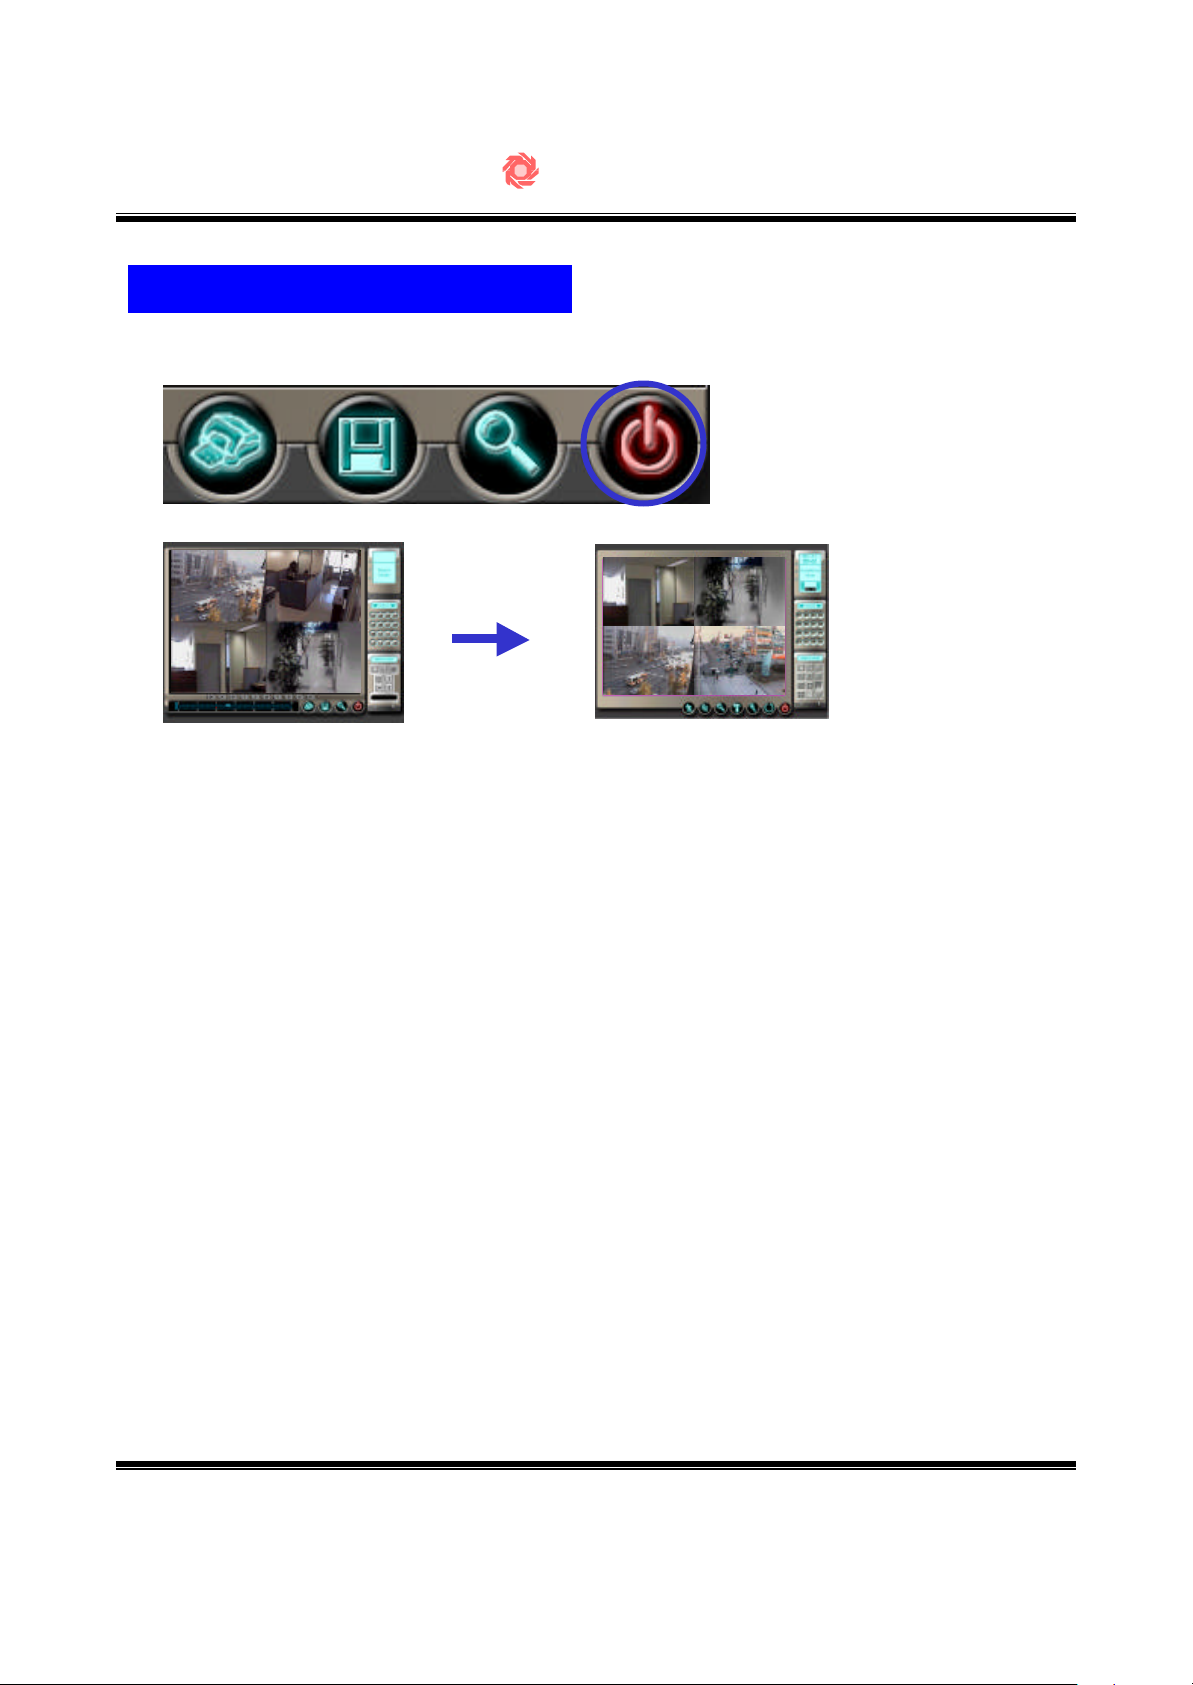
Exit to Main Search Screen
SecuMesh DVR
▼
Goes back to Main screen
-62-
Page 21

This page was left blank intentionally.
SecuMesh DVR
-63-
Page 22

SecuMesh DVR
Remote Client PC Setup & Guide
All instructions are based on Windows 98
-64-
Page 23
SecuMesh DVR
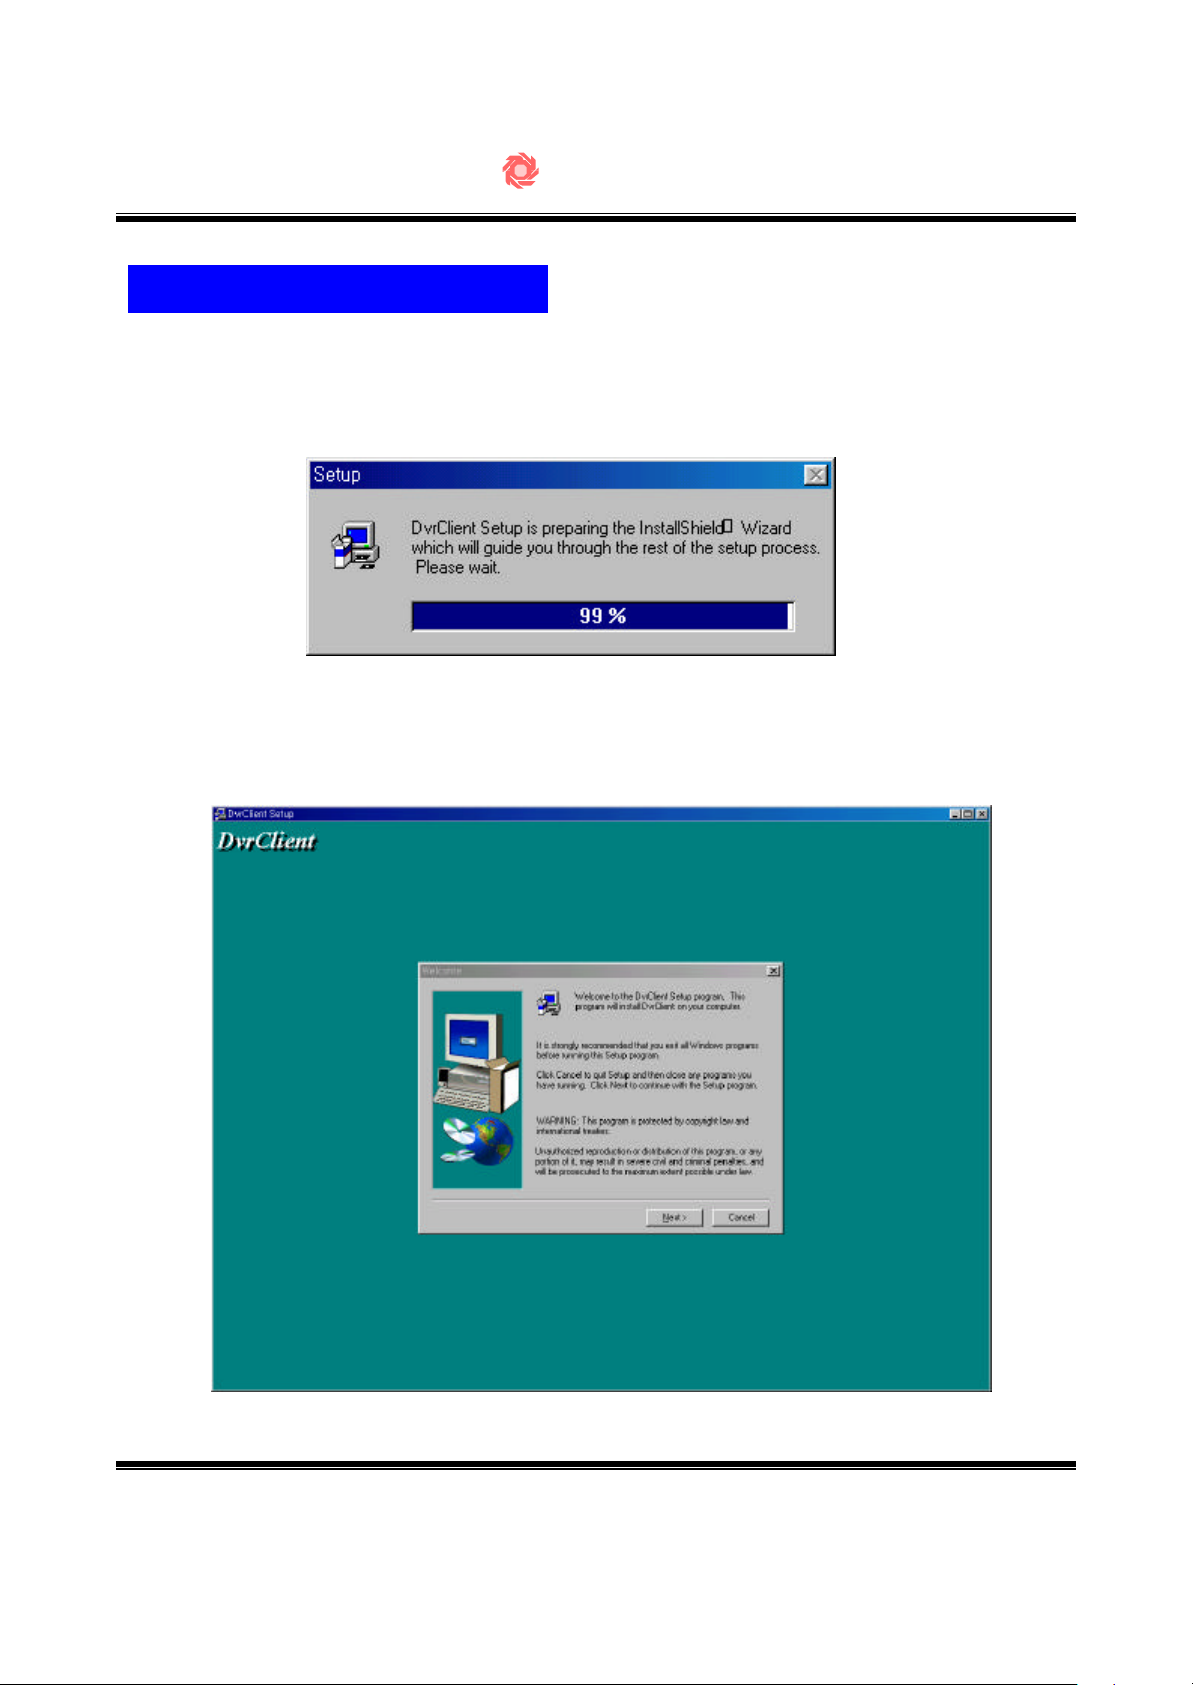
Client Program Installation
1. Insert the installation CD provided with DVR and select “SecuMesh → client →
setup.exe” → Click “next” button at the first screen as follows.
2. Click “NEXT” button in the “DVR Client Setup”window to start setup.
-65-
Page 24
SecuMesh DVR
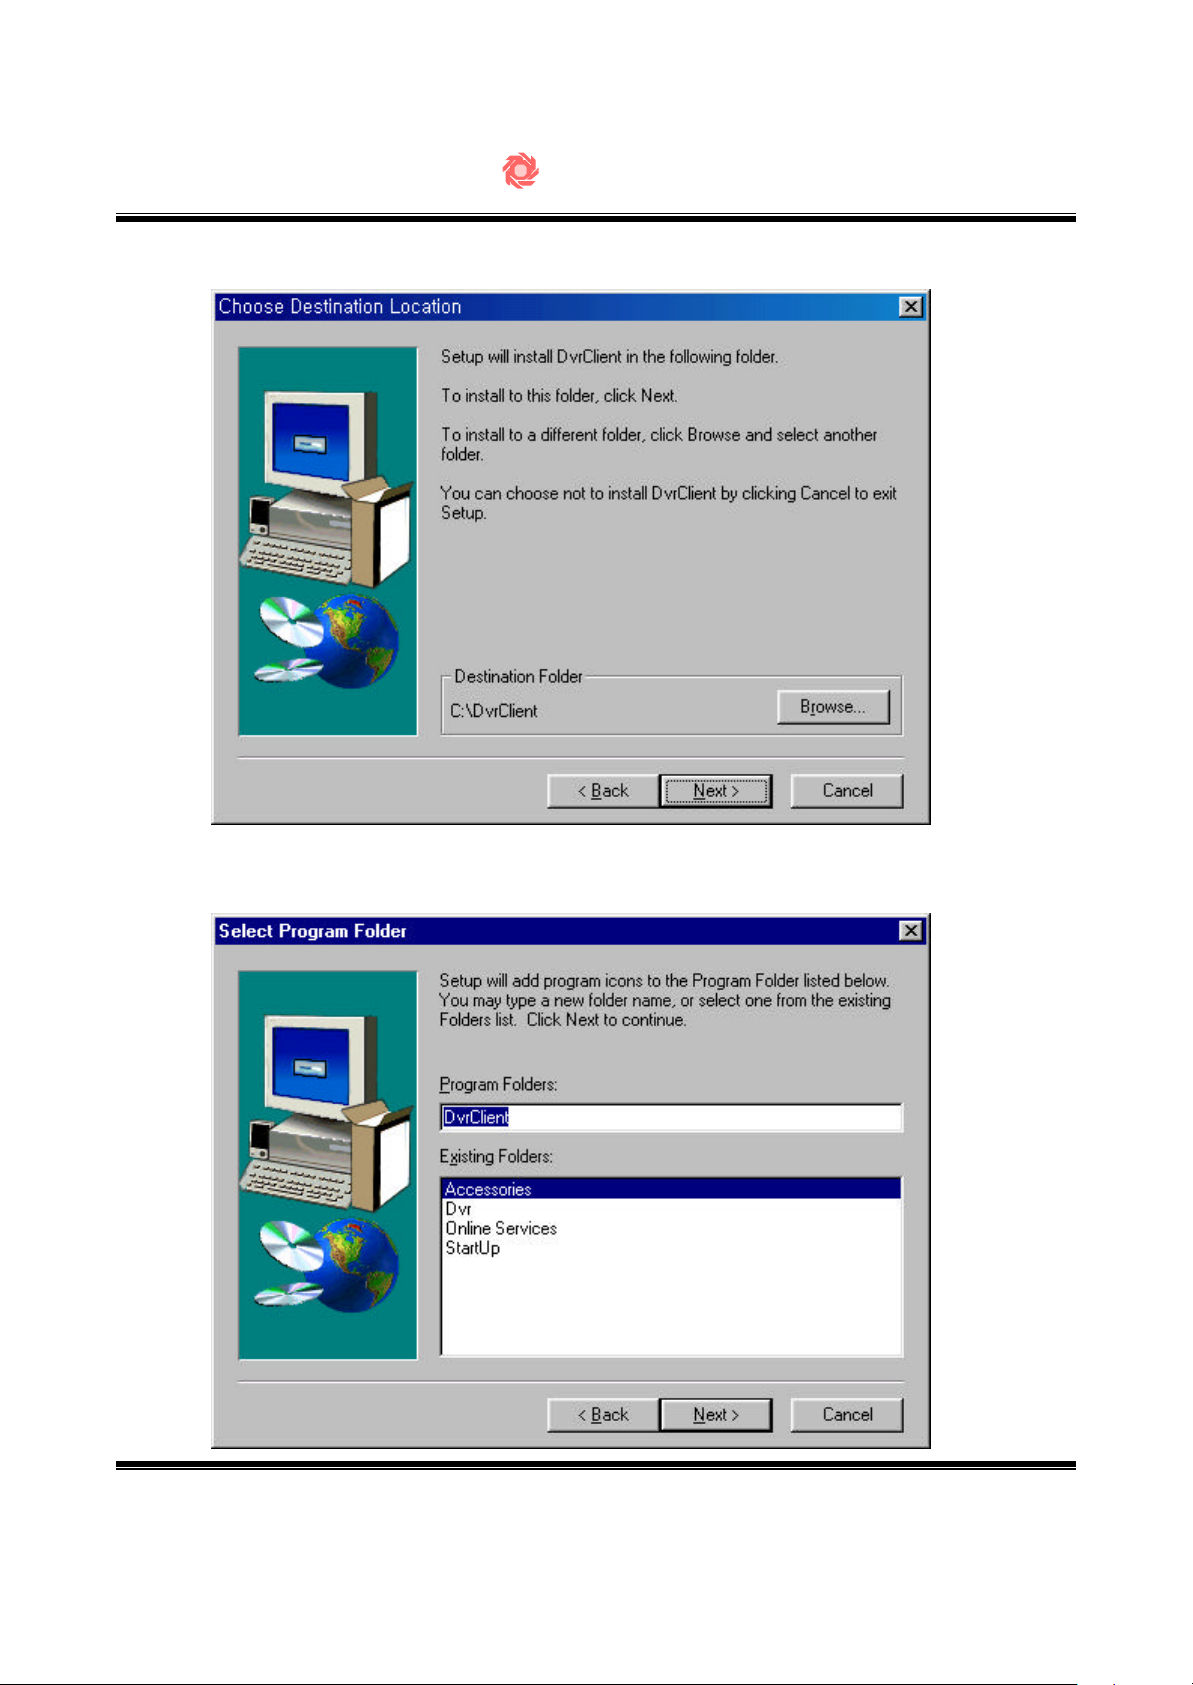
3. Click “NEXT” button in the “Choose Destination Location” window.
4. Click “Next ” button at “Select Program Folder” window if you do not want to
change the folder name.
-66-
Page 25
SecuMesh DVR
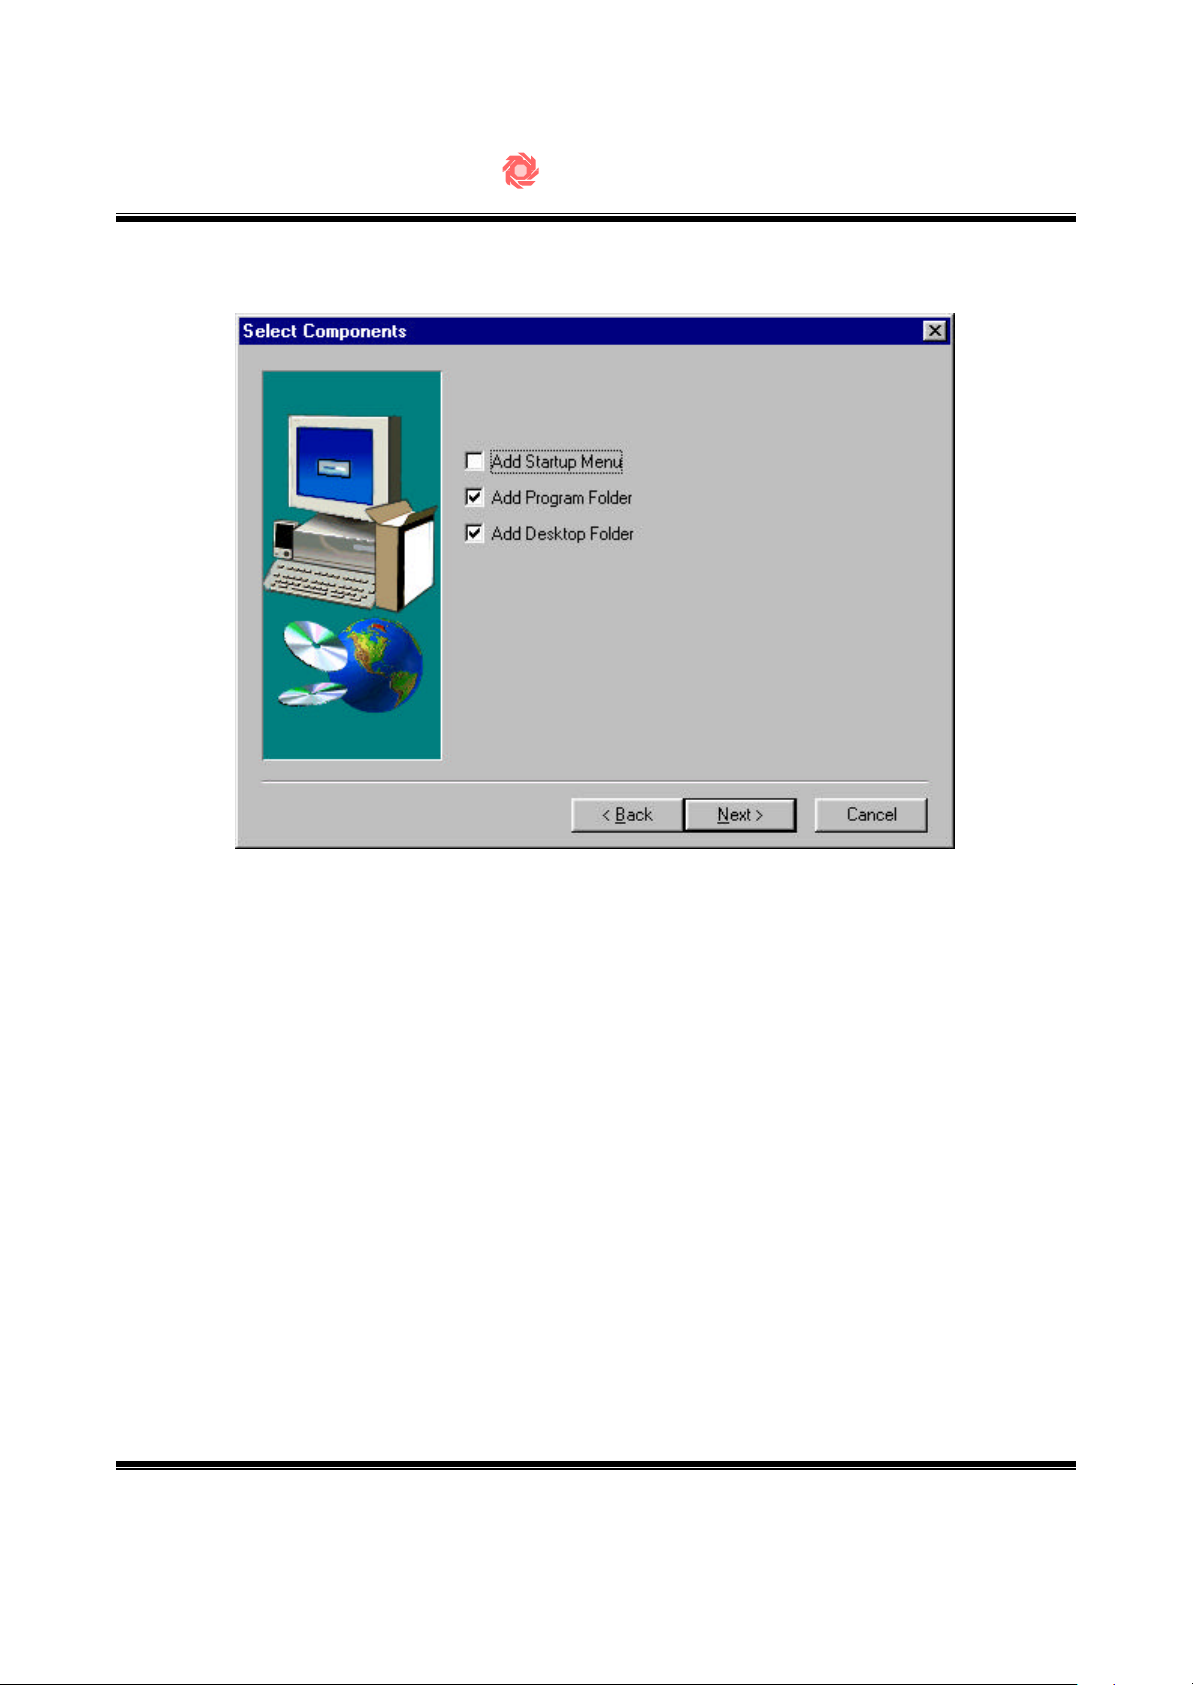
5. Check the boxes of options you want to add.
- Add Startup Menu : Program automatically starts when DVR is turned on.
- Add Program Folder : Register in the “Program Files”.
- Add Desktop Folder : Register in the “Desktop”.
-67-
Page 26
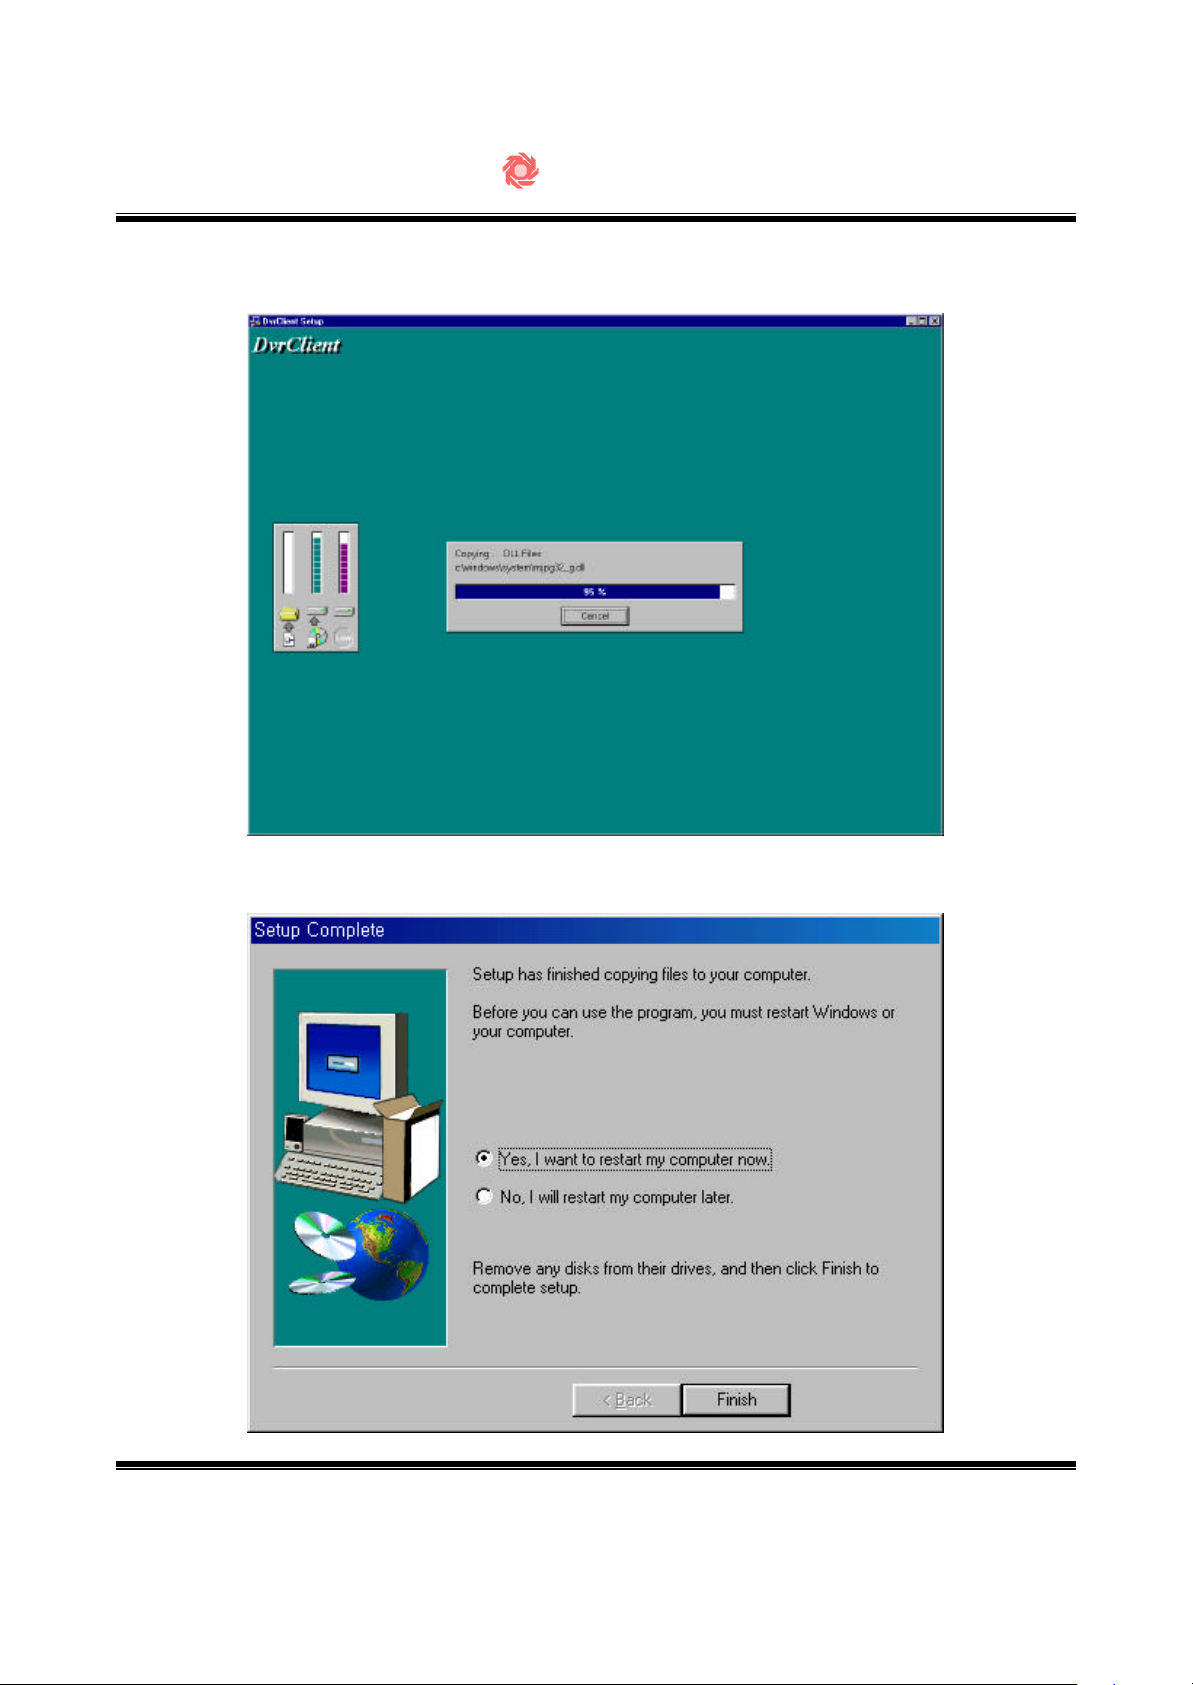
6. Installation is going on.
SecuMesh DVR
7. Click ”Finish” button when setup is complete. System will reboot.
-68-
Page 27
SecuMesh DVR
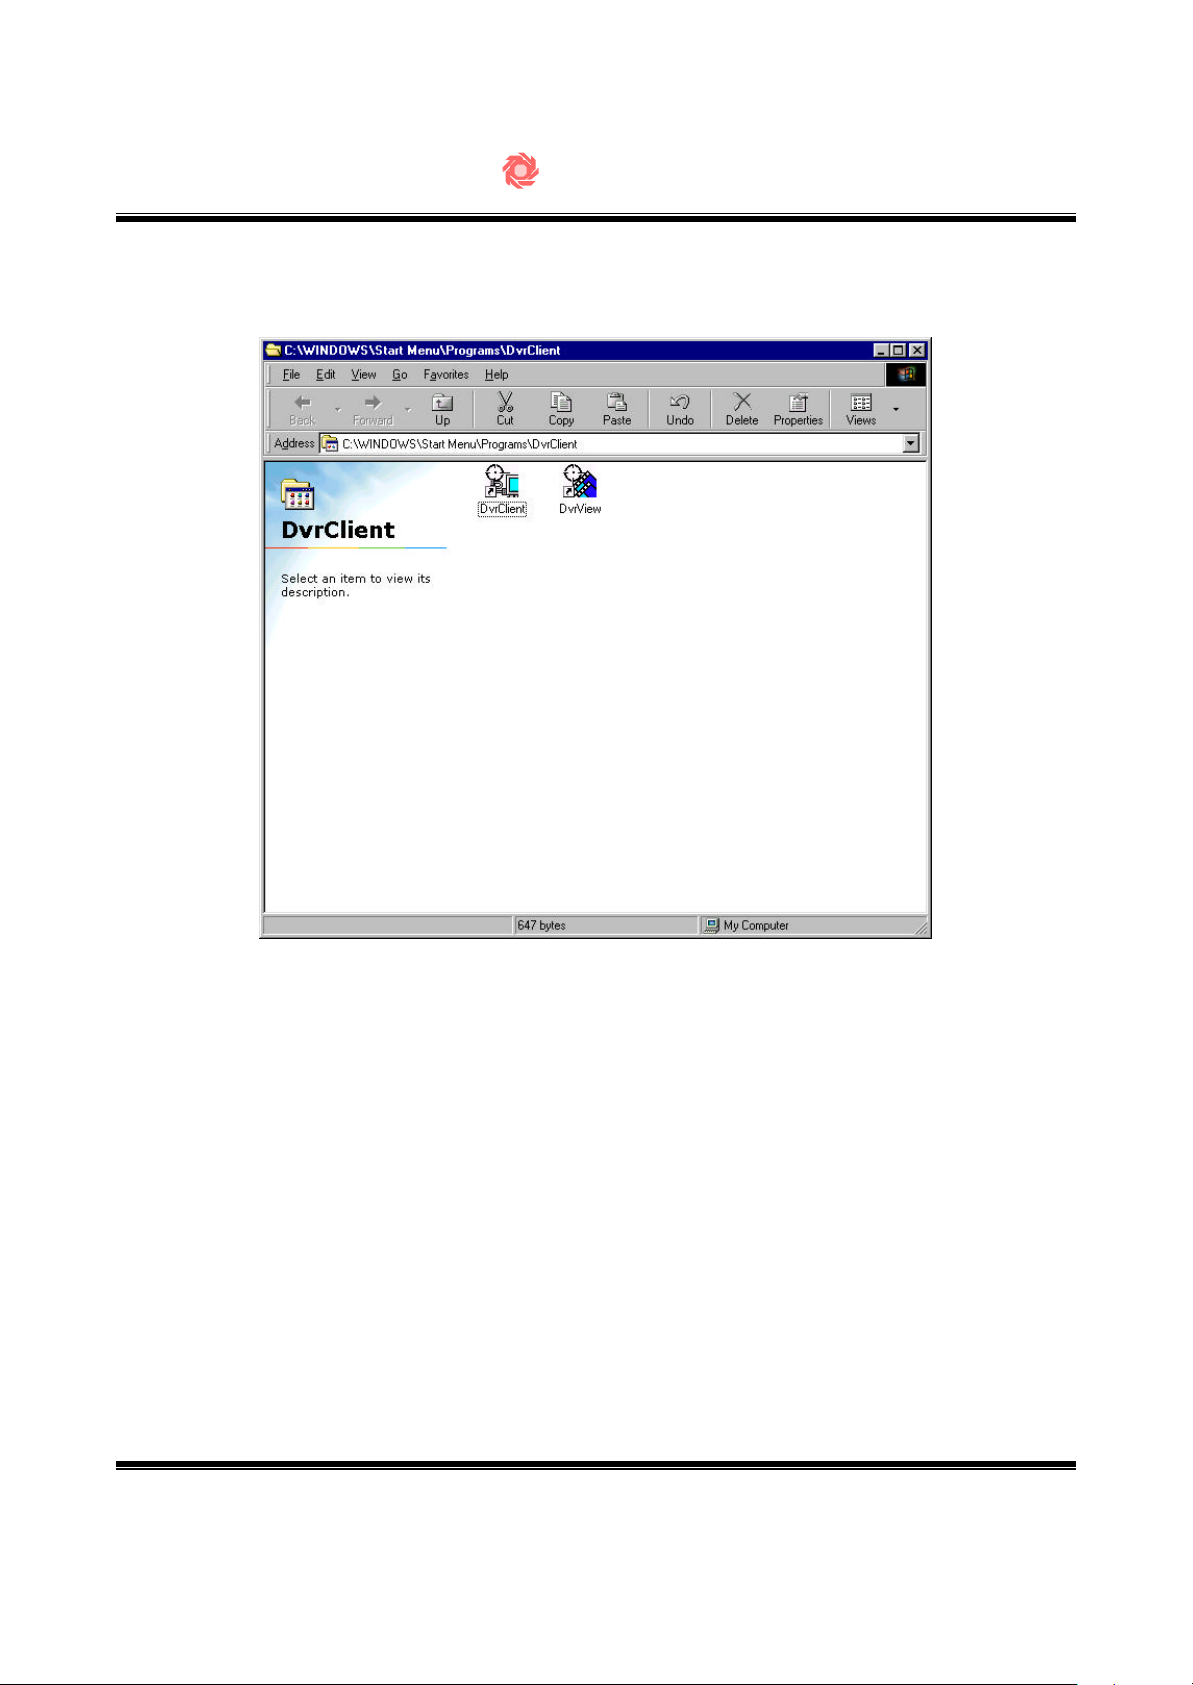
8. Close the window when the following widow is prompted.
-69-
Page 28

This page was left blank intentionally.
SecuMesh DVR
-70-
Page 29

This page was left blank intentionally.
SecuMesh DVR
-71-
Page 30
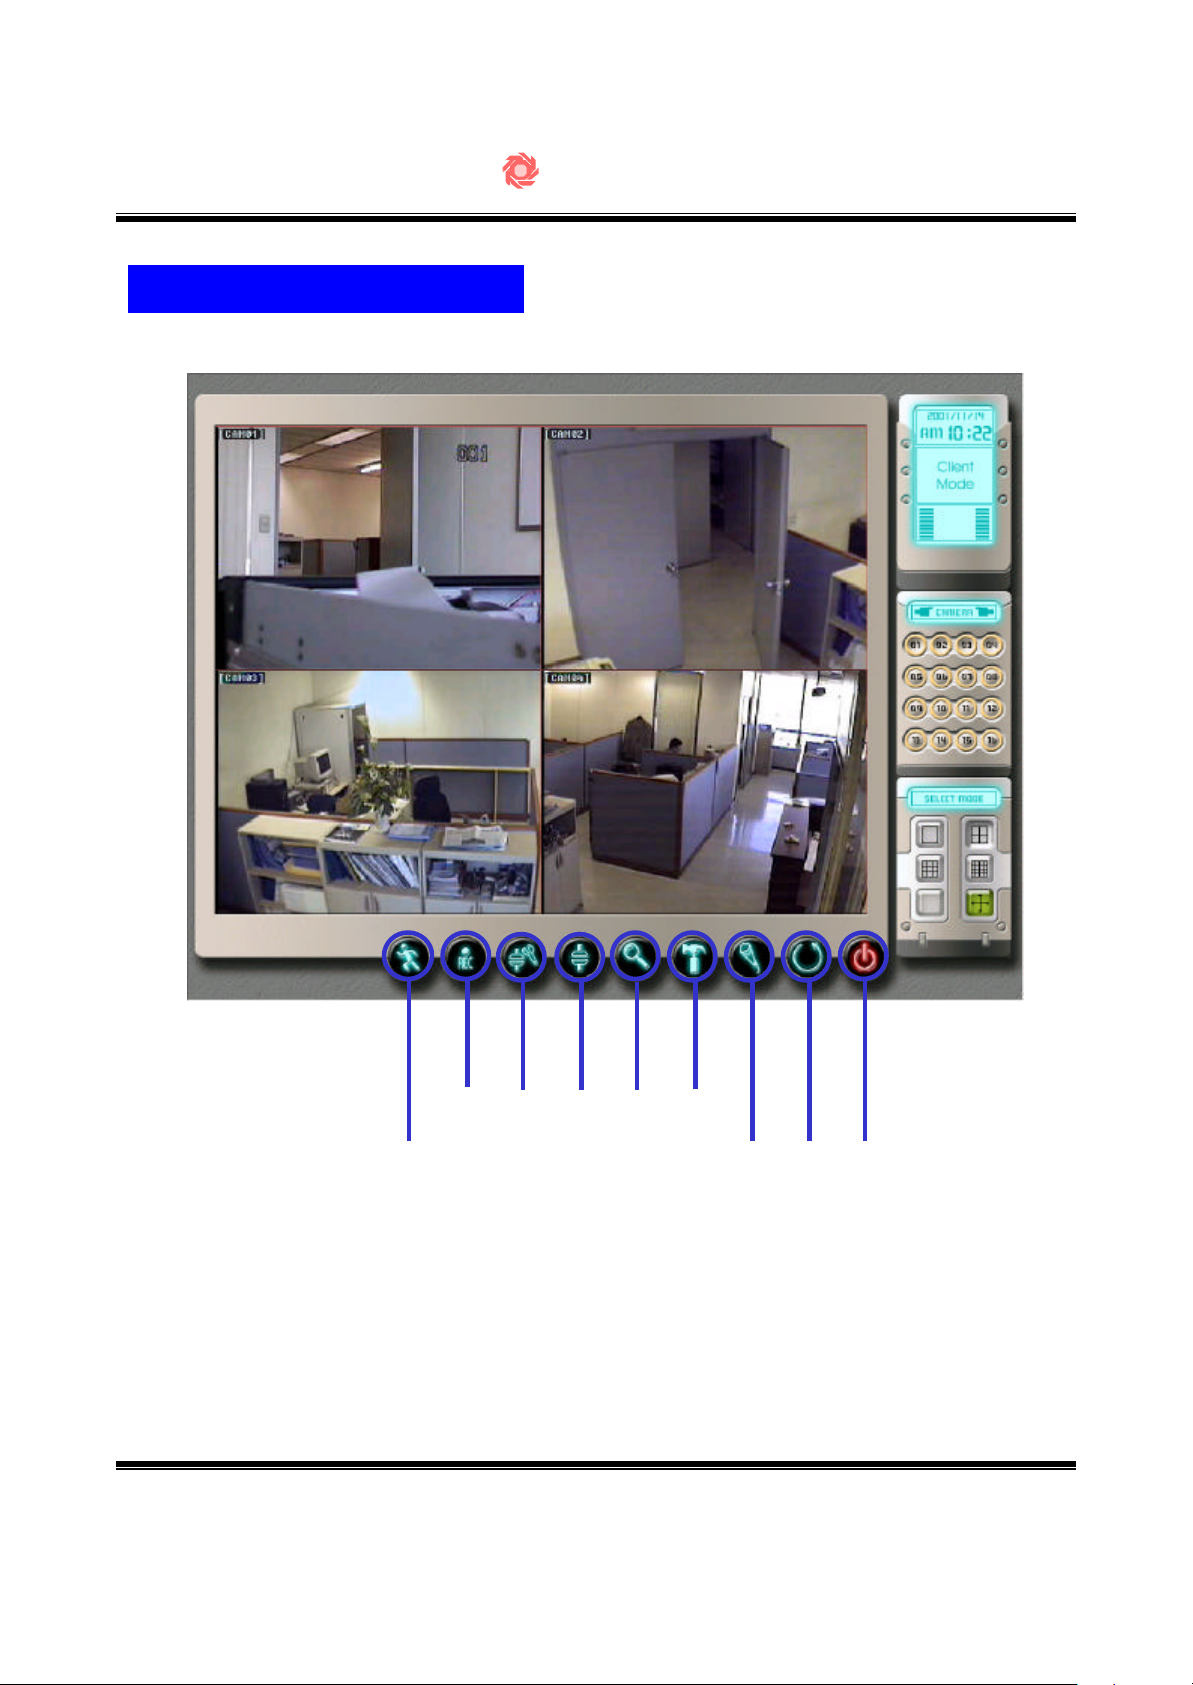
Main Screen – Client PC
SecuMesh DVR
①
Page
28
②
③
④
1. Recording transferred images in the HDD.
2. Setup of Connection to Server
3. Connection Execution Button
4. Search in the Local Client Directory
5. Setup for basic configuration
-72-
⑤
Page
32
Page
33
Page
34
Page 31

SecuMesh DVR
Function Button - Recording
▼
1. Client program displays surveillance image, not if this button is clicked.
2. This button starts recording received images in the local hard disk.
3. The recording directory can be setup in “Basic Configuration”section.
4. When the allocated hard disk space gets bellow some level, the oldest
images will be deleted to accommodate the newest images to be recorded.
-73-
Page 32
SecuMesh DVR
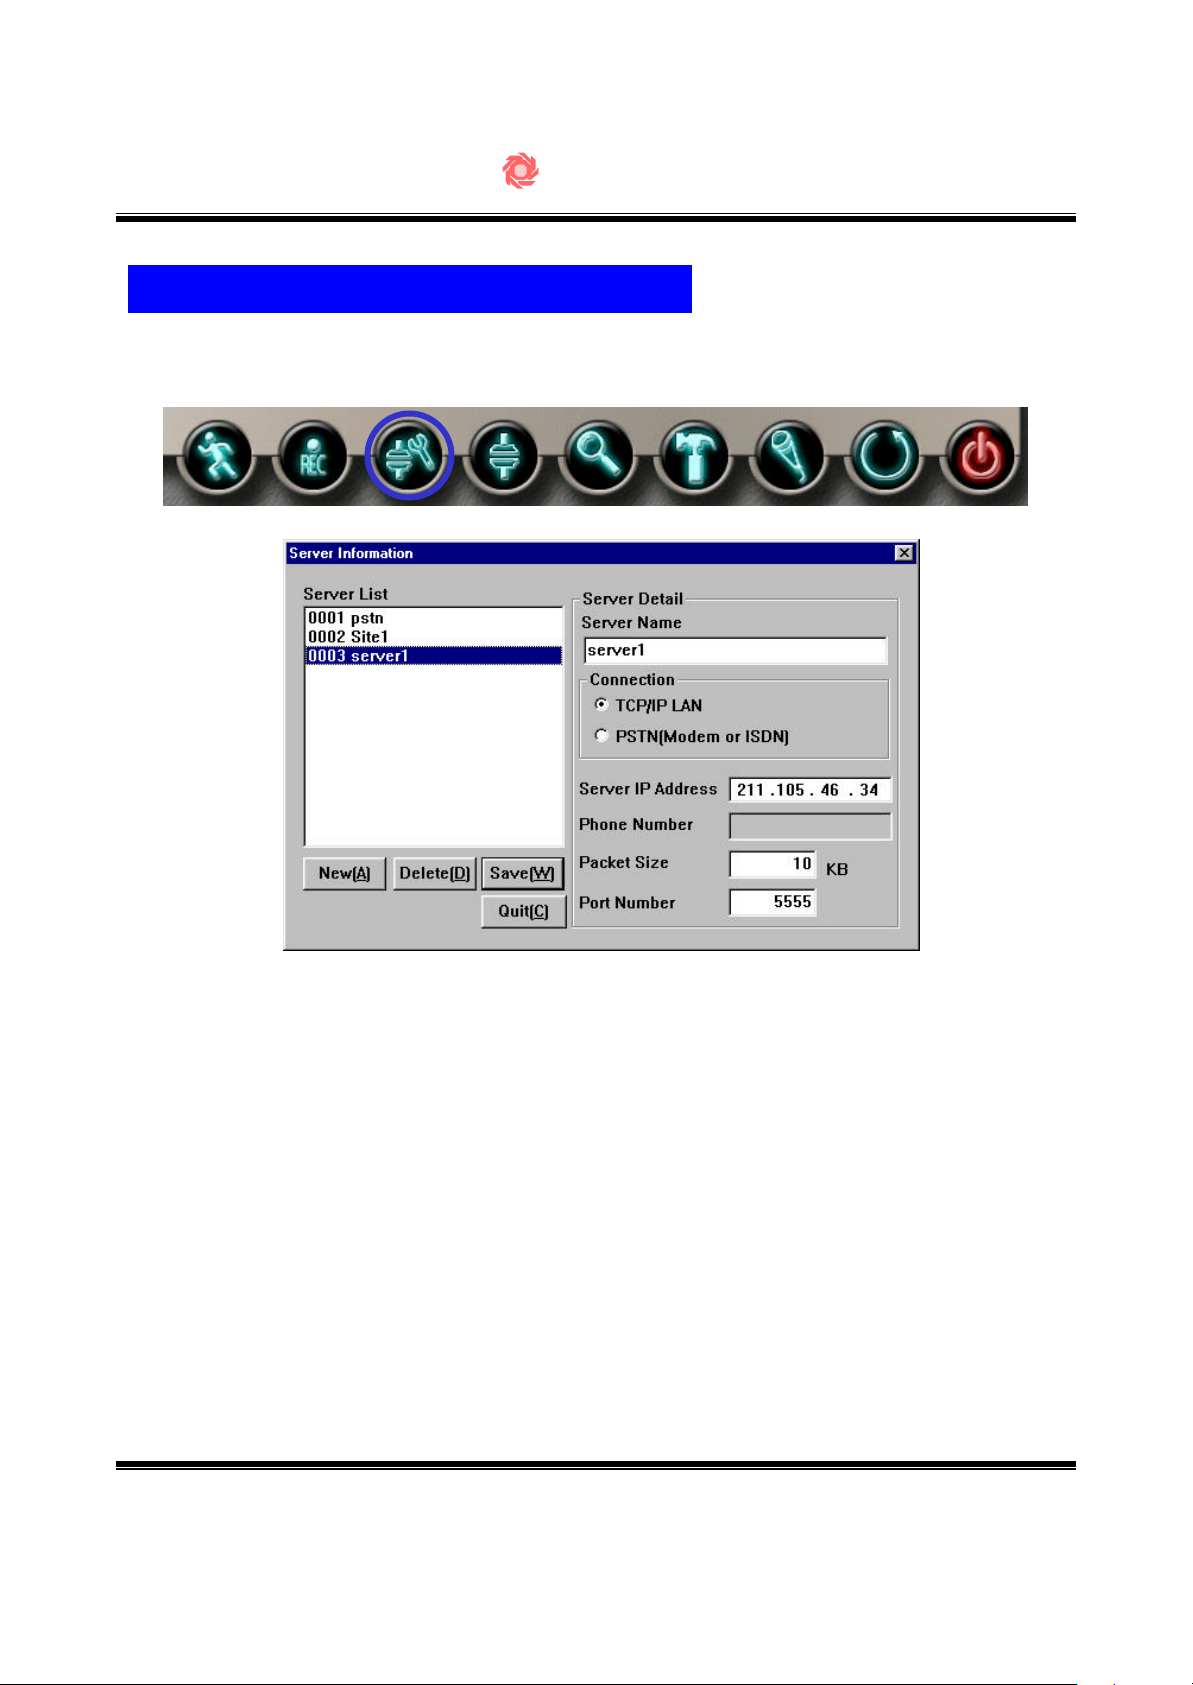
Function Button – Connection Setup
▼
1. You can register the server here.
2. The server name to be registered.
3. Choose “TCP/IP” in the LAN environment, or “PSTN” if Modem
environment.
4. “Server IP Address ”is activated if “TCP/IP”is chosen.
5. “Telephone Number ”is activated if “PSTN” is chosen.
6. “Packet Size”is the minimum data size to communicate with the server.
7. “Port Number ”is the port number to communicate with server.
8. We recommend “Packet Size”and “Port Number” not to be changed.
-74-
Page 33
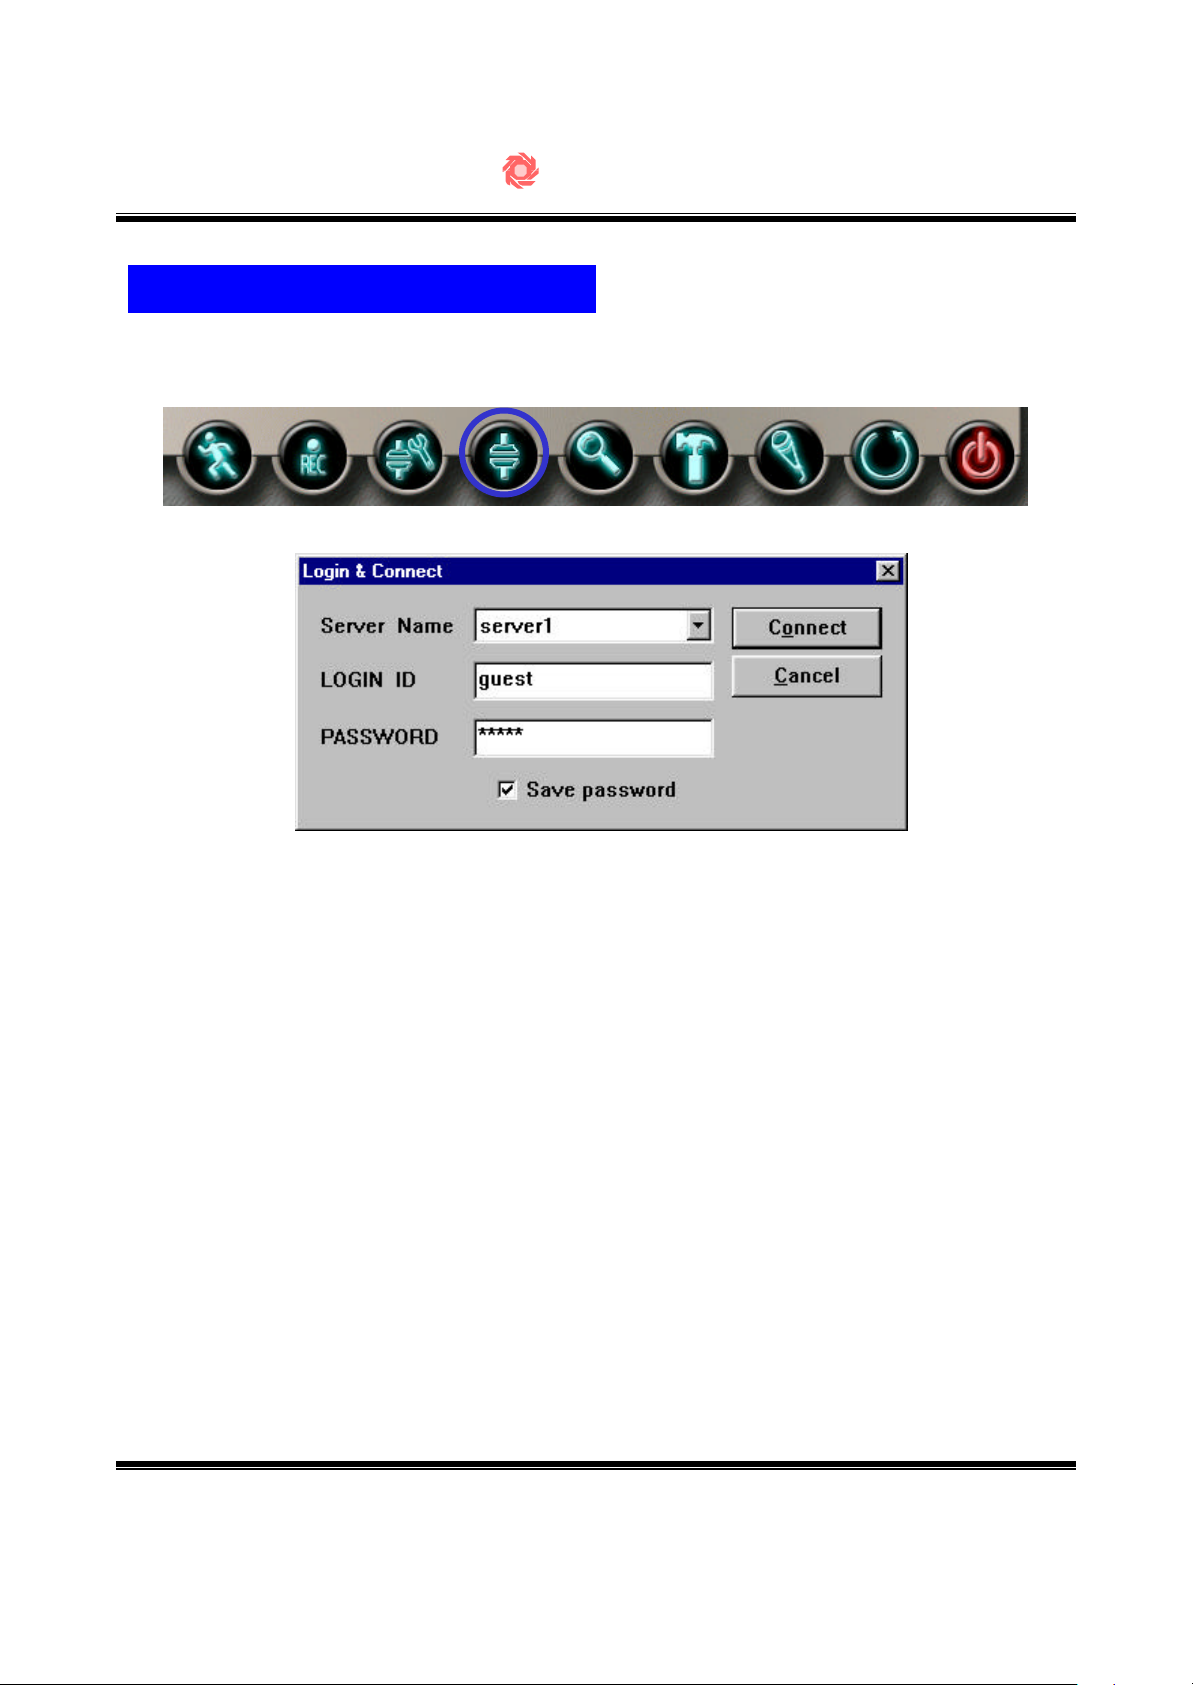
Function Button - Connection
▼
SecuMesh DVR
1. You can choose the registered server to be connected.
2. Enter ID here which is registered in the server.
3. Enter Password here which is registered in the server.
4. “Save Password” let the password prompt automatically when you try to
connect next time for convenient access.
-75-
Page 34
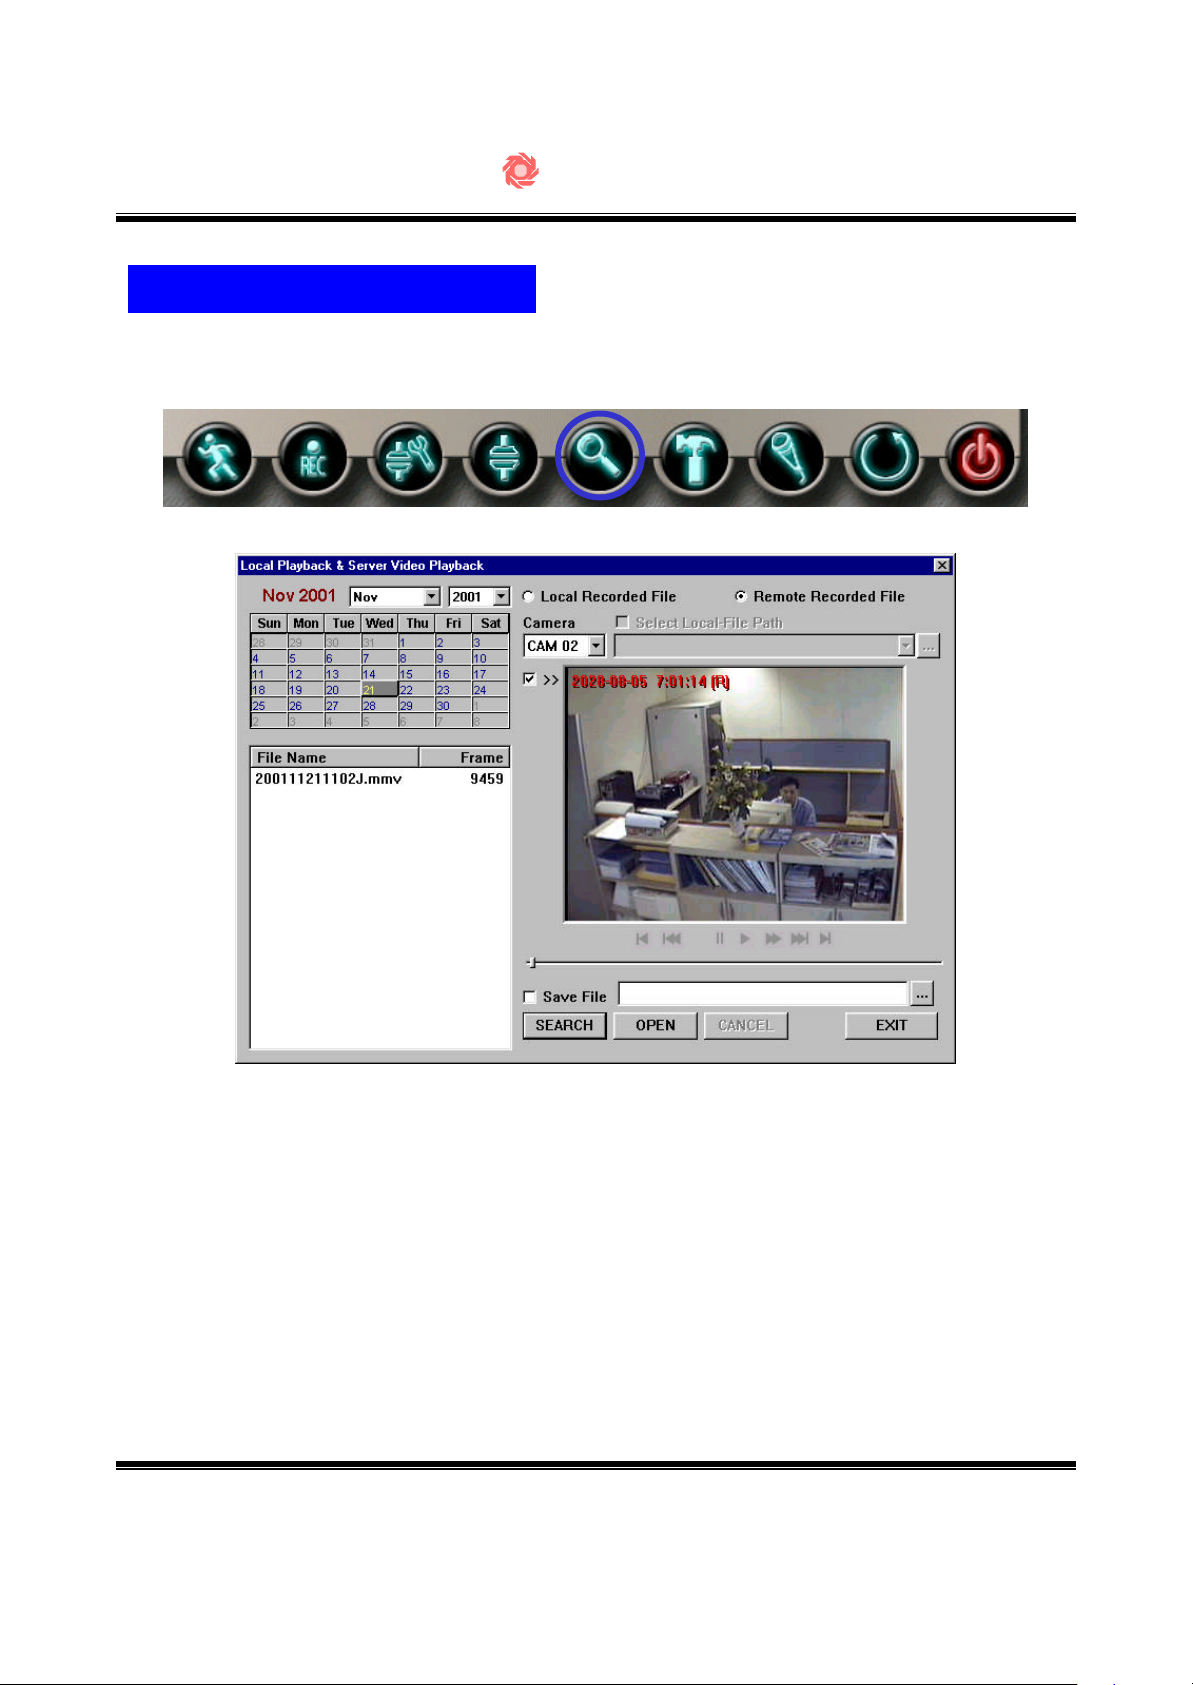
Function Button - Search
SecuMesh DVR
▼
1. Designate the folder(C:\DVSssSpace\Site1) in which the images are
recorded.
2. Select date to search.
3. Select the camera channel to search.
4. “File Search” button lists the files with recorded images.
5. The listed files are sorted in the order of date and time so that you can
easily select files you need.
-76-
Page 35
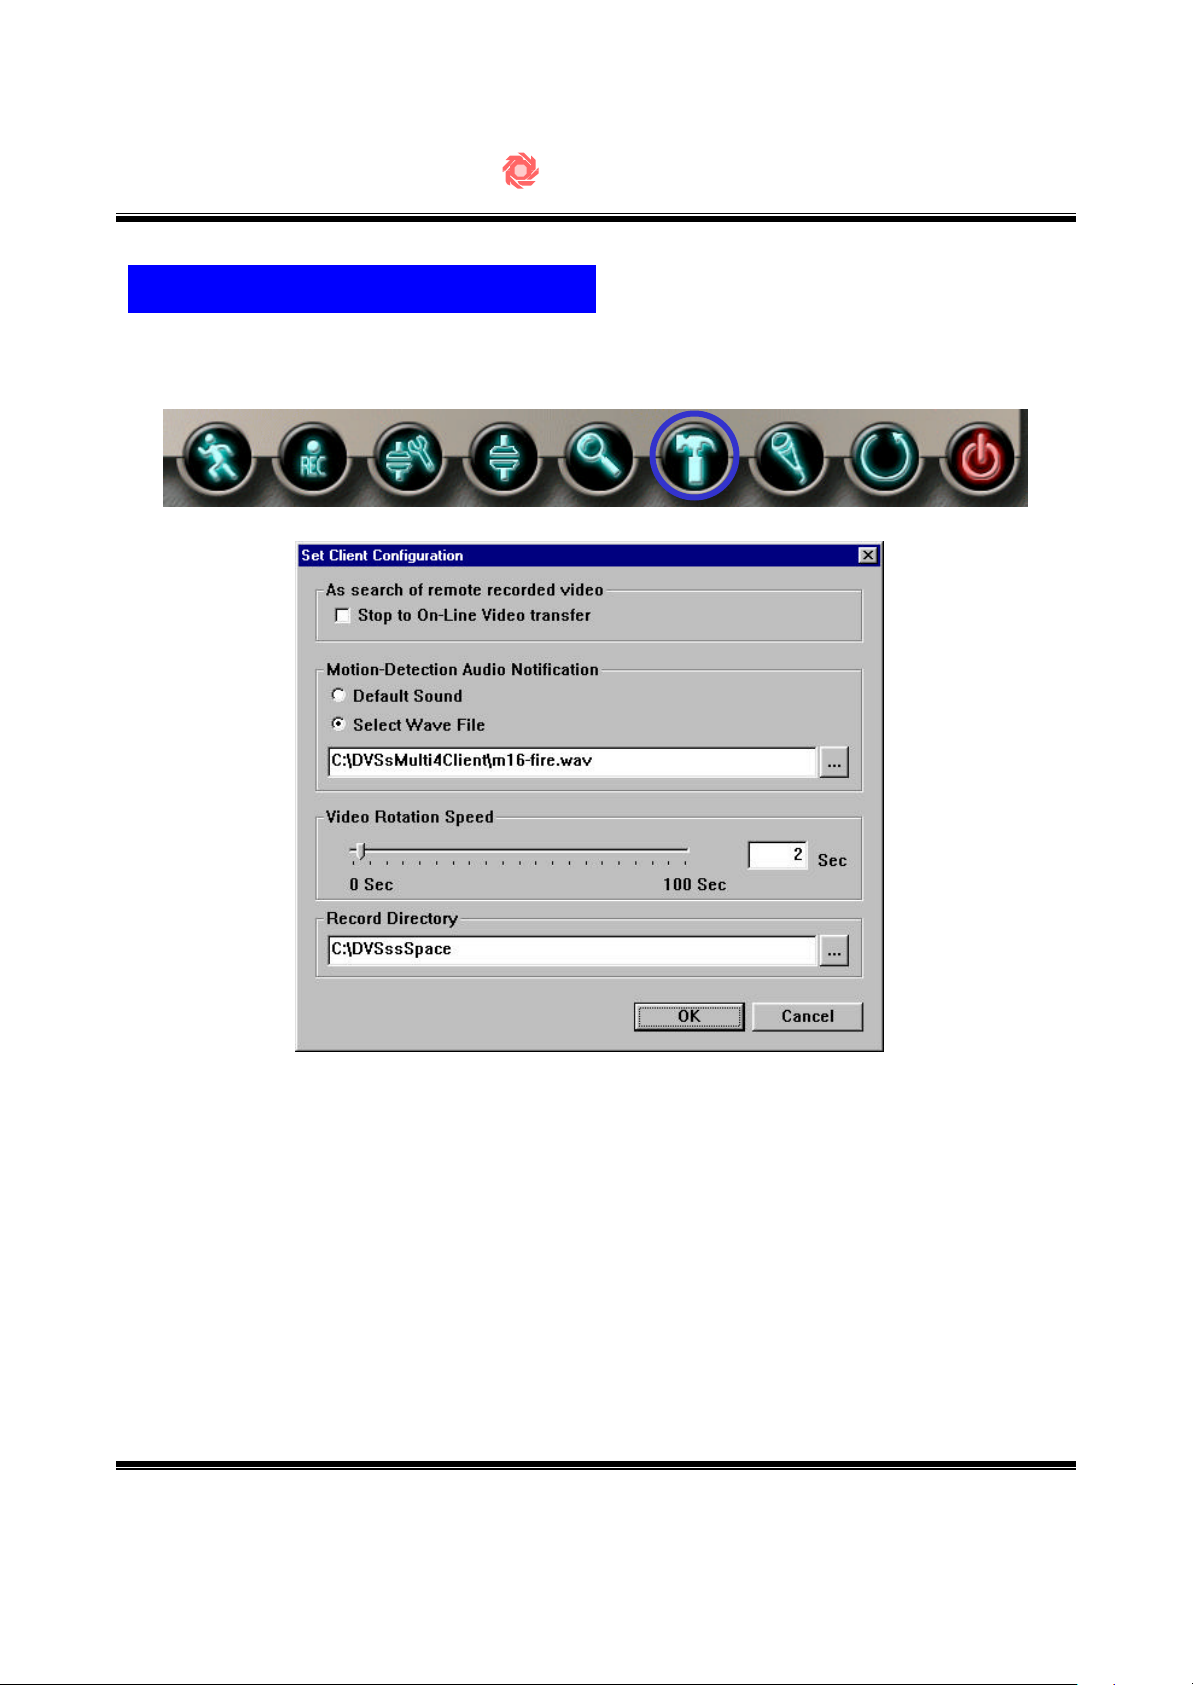
Function Button – Client Setup
SecuMesh DVR
▼
1. If this “Real time remote image not selected” option is checked, you can
accelerate the image transfer rate from the server by skipping the notthat-important images.
2. “Alarm Select ”let you choose between the siren and the sound file for the
alarm when motion detected.
3. “Alternating time period” let you control the time period of alternating
camera channels. Alternating stops if set to “0”.
4. “Recording directory ”is the directory for the image to be stored.
-77-
Page 36

SecuMesh DVR
Trouble Shooting
Please check the following cases to find out whether they can solve your problem
before contacting us to save time and effort. Thank you.
DVR board is not detected(installed) correctly.Problem
Change the PCI slot.Answer 1
Remove the colliding devices.Answer 2
Program was installed, but Main screen is corrupted.Problem
Check if the monitor color is set to 16bit (high color).Answer 1
Answer 2
Answer 4
Answer 5
Program works O.K. But the display quality is low.Problem
Check camera, and/or cord connectionAnswer 1
Control brightness and contrast by clicking the right mouse button on the
screen.
Recording is not done.Problem
Check if “Camera Count” is set OK in page 41.Answer 1
Check if “Video Type” is correctly set in page 41.Answer 2
Check if “Scheduling” of each camera is set OK in page 47.Answer 3
Check if each camera is set to record in either the full recording mode or
the motion recording mode in page 36.
Check if, when motion detecting mode is set, the responsiveness is to low
in page 27.
-78-
Page 37
SecuMesh DVR
No voice communication between the server and the client.Problem
Check if the sound card is installed correctly.Answer 1
Answer 2
Answer 1
Answer 1
Follow through ”Start → Program → Accessories → Entertainment →
Sound Recorder” and try to record a voice. → If recorded, It is OK.
If not recorded, check the software compatibility of the sound card.Answer 3
Email setup (POP3 )Problem
Check if the “Outlook Express” is a default email application because the
email of the DVR server is transferred only through the “Outlook Express”.
(Ask to the system administrator or to the web hosting company.)
Client User Registration MethodProblem
In the DVR server, register the User ID and Password with necessary
access level. The “Supervisor” access level can have a full control over the
server. If the User ID is “guest”, you can not have full control even if you
have “Supervisor” access level.
If your problem is not solved until this moment after checking all the cases
listed above, please contact us at our sales agents in your area or directly
contact to LeadTech Corp. by your preferred contact method.
82 31 708 7677
82 31 708 7673
-79-
Page 38

SecuMesh DVR
Optional Web Package
This web server program provides you with accessibility to the remote DVR
server through the Internet to let you monitor and control the DVR without any
other help of hardware or software.
1. Web server program installation
▶ Double click the file “bk3224d7.exe” in the “WebPack” directory of the Installation
CD provided.
▶“Installation Wizard” will guide you through the installation.
▶ Register your ID and Password.
▶ Leave all other options as default status.
2. After finishing the Web server program installation, Copy the “default.html”, “vcr
class files” in the “WebPack” directory of the Installation CD to
“..\Xitami\Webpages” which is the subdirectory of the Web server program
directory.
The “default.html” includes the module to execute the Java Applet which load
images on the web browser. You can modify this file to customize your web page
output.
3. Start Web server program. You can start this by double-clicking the “xiwin32.exe”
file in the Web server program directory.
4. Start the DVSS server.
Check the “Web browser support” check box in the “Network setup” section in page
28 and enter the image streaming directory path as “..\Xitami (Web server root
directory)\webpages\images”.
5. Installation is finished.
From the remote client PC, start the web browser and enter the IP address of the
DVSS server or domain name if available.
example) http://211.188.40.211/default.html
6. Now you can see the video images of the DVR server.
-80-
Page 39

SecuMesh DVR
Warranty
Limited Warranty
LeadTech Corp. warrants this products and all parts thereof, except as set forth
below ONLY TO THE ORIGIAL PURCHASER to be FREE FROM DEFECTIVE
MATERIALS AND WORKMANSHIP from the date of purchase for the period of ONE
YEAR. If this product is found to be defective in the warranty period, LeadTech Corp.
will repair or replace defective parts at no charge to the original owner.
What is not covered :
This limited warranty provided by LeadTech Corp. does not cover :
- Products which have been subject to abuse, accident, alteration, modification,
tampering, negligence, misuse, faulty installation, lack of reasonable care, or if
repaired or serviced by anyone other than a service facility authorized by LeadTech
Corp. to render such service, or if affixed to any attachment not provided with the
products, or if the model or or serial number has been altered, tampered with,
defaced or removed;
- Damage due to line power surge or fire.
- Damage due to operation not under Environmental Specification.
- Damage that occurs in shipment, due to act of God, and cosmetic damage.
- Damage due to incorrect maintenances.
- Damage that occurs due to use of any hardware/software/other accessories not
provided initially.
- Reinstallation of the bundled software and/or the software which was installed
initially.
- Accessories, Batteries (except rechargeable batteries are covered 90 days from the
date of purchase.)
-81-
Page 40

SecuMesh DVR
Enter below necessary information and retain this for future ref erence.
Purchase date
Purchaser
Dealer
Warranty SheetWarranty Sheet
Model No.
Serial No.
One year from the date of purchaseWarranty Period
company
name
address
telephone
company
name
address
telephone
-82-
Page 41

Memo
SecuMesh DVR
-83-
Page 42

Memo
SecuMesh DVR
-84-
Page 43

Memo
SecuMesh DVR
-85-
 Loading...