

LeadLight Technology 60502 User Manual
Digital Green Laser Presenter with 2.4GHz RF Remote Control
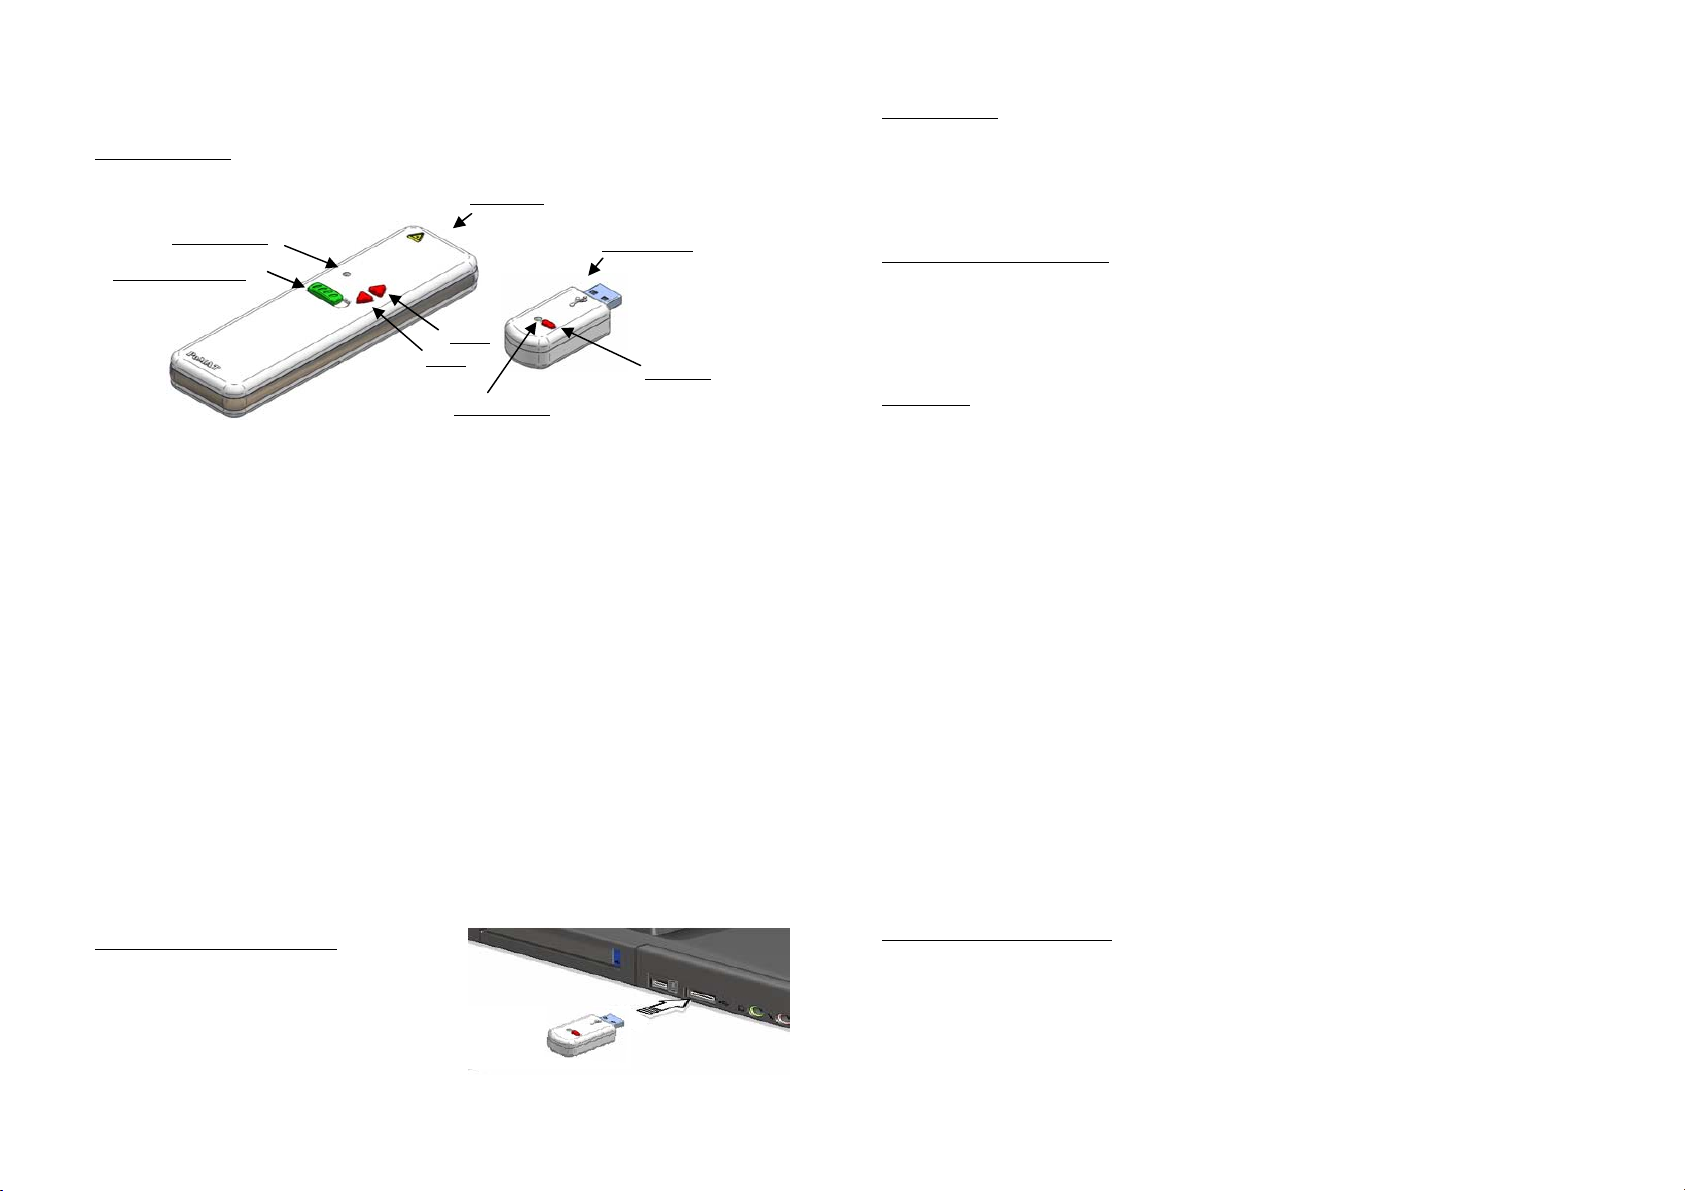
1. Introduction
Presenter
LED indicator
Green laser button
PgUp
PgDn
LED indicator
Presenter:
• Integrated green laser pointer with auto
• Precision green laser optical power control±100uW.
• Rechargeable via AC charger or USB charger (option).
• Slide forward and slide back control.
• 2.4GHz wireless extended 50-foot remote control.
• Low battery indicator.
• Dual color LED indicator for pointer and slide control.
• Operating temperature: 15
• CE, FCC, JQA certification.
*1: Auto CW/Pulse switching at battery voltage=2.4V.
*2: Default laser power=0.6mW.
USB dongle:
• Plug and play
• No software is required for windows XP and windows 2000 and Mac.
• Multi-user mode support.
• Compatible with USB 1.1 and USB 2.0 interface.
o
C – 35oC.
*1
CW/Pulse mode extend battery life (>10 hours).
USB dongle
ID button
3. Operation
1. Move Green laser button to right.
2. Press Green laser button to active green laser, LED indicator is green.
3. Press PgUp to control slide back, LED indicator is red.
4. Press PgDn to control slide forward, LED indicator is red.
4. Low battery operation
1. When battery voltage is less than 2.4V.
2. Press Green laser button to active green laser.
3. After 0.5sec., the green LED automatically become darker and the red LED is flashing
to indicate low battery.
5. Pairing
1. Default setting : (Factory Default Mode)
c Disconnect battery from Presenter, then press Green laser button.
d Keep pressing Green laser button and connect battery, the red LED will be flashing.
When red LED is flashing, then release Green laser button.
e Press PgUp or PgDn button, when red LED is flashing.
f When red LED is off, the Presenter is set to factory default mode.
g Connect USB dongle to PC USB port.
h Keep pressing ID button for 5sec., the red LED will be flashing.
i After 5 sec. the red LED become light, then release ID button.
j After 5 sec. the red LED will go off, then USB dongle is set to factory default mode.
2. Set random ID for Presenter :
c Disconnect battery from Presenter, then press PgUp or PgDn button.
d Keep pressing PgUp or PgDn button and connect battery, the green LED will be
flashing. When green LED is flashing, then release PgUp or PgDn button.
e Press Green laser button when green LED is flashing.
f When green LED is off, a unique ID for the Presenter is set and saved.
3. Pairing Presenter with USB dongle :
c Connect USB dongle to PC USB port.
d Pressing ID button once, the red LED will be flashing.
e Press PgUp or PgDn button once.
f The red LED go off, the Presenter and the USB dongle are paired.
2. USB dongle installation
1. Make sure of power turn on of PC
2. Connect to USB port of PC
3. New device will be automatically detected
4. Ready and start to run
6. Error protection mode (Both LED is “ON”)
1. Battery voltage < 1.8V.
2. Fault circuit is detected.
3. Laser output is failed.

INSTRUCTIONS MANUAL
FEDERAL COMMUNICATIONS COMMISSION
INTERFERENCE STATEMENT
This equipment has been tested and found to comply with the limits for a Class B digital
device, pursuant to Part 15 of the FCC Rules. These limits are designed to provide
reasonable protection against harmful interference in a residential installation. This
equipment generates, uses, and can radiate radio frequency energy and, if not installed
and used according to the instructions, may cause harmful interference to radio
communications. However, there is no guarantee that interference will not occur in a
particular installation. If this equipment does cause harmful interference to radio or
television reception, which it found by turning the equipment off and on, the user is
encouraged to try to correct the interference by one or more of the following measures:
-- Reorient or relocate the receiving antenna.
-- Increase the separation between the equipment and receiver.
-- Connect the equipment into an outlet other than the receiver’s
-- Consult the dealer or an experienced radio/TV technician for assistance.
CAUTION:
To assure continued FCC compliance:
(1) Any changes or modifications not expressly approved by the grantee of this device
could void the user's authority to operate the equipment.
FCC Label Compliance Statement:
This device complies with Part 15 of the FCC Rules. Operation is subject to the
following two conditions: (1) this device may not cause harmful interference, and (2)
this device must accept any interference received, including interference that may
cause undesired operation.
 Loading...