

LEAD dynamic CDC Operating Manual
VERSION 2.1 10/15
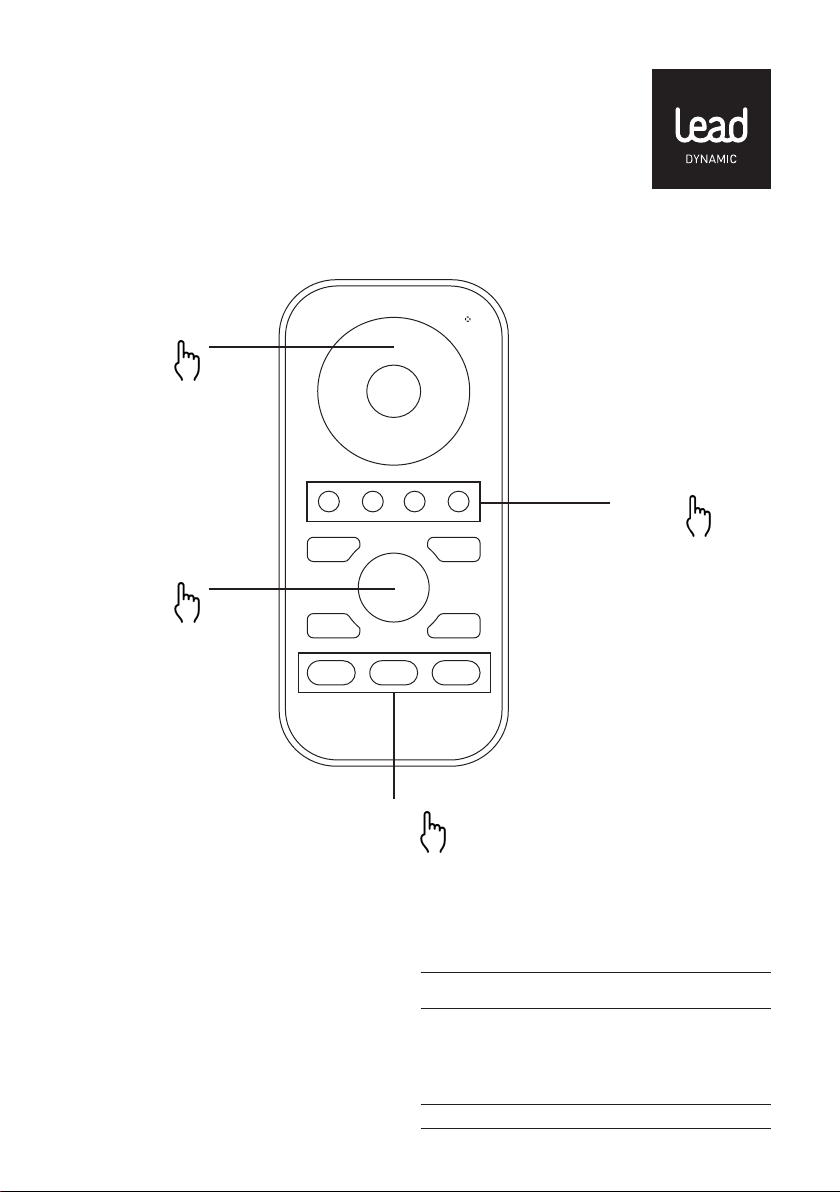
COLOR WHEEL
ON / OFF
4 ZONES
BEDIENUNGSANLEITUNG
OPERATING MANUAL
MANUEL D’UTILISATION
HANDLEIDING
BRUKSANVISNING
NÁVOD KOBSLUZE
NÁVOD NA POUŽITIE
INSTRUCŢIUNI DE UTILIZARE
3 SCENES
CONTROL DYNAMIC COLOR
CDC
CDC Art. Nr. 70100006

DEUTSCH
Vielen Dank, dass Du Dich für ein Produkt der LEAD
energy AG entschieden hast. Falls Du unseren
Service erreichen möchtest, sind wir für Dich auf
unserer Homepage und per E-Mail erreichbar.
Bestimmungsgemäße Verwendung Hinweis
Diese Fernbedienung ist Zubehör zu den steuerbaren LED DYNAMIC COLOR Produkten der Marke
LEAD DYNAMIC.
1
Installation
AAA
AAA
AAA
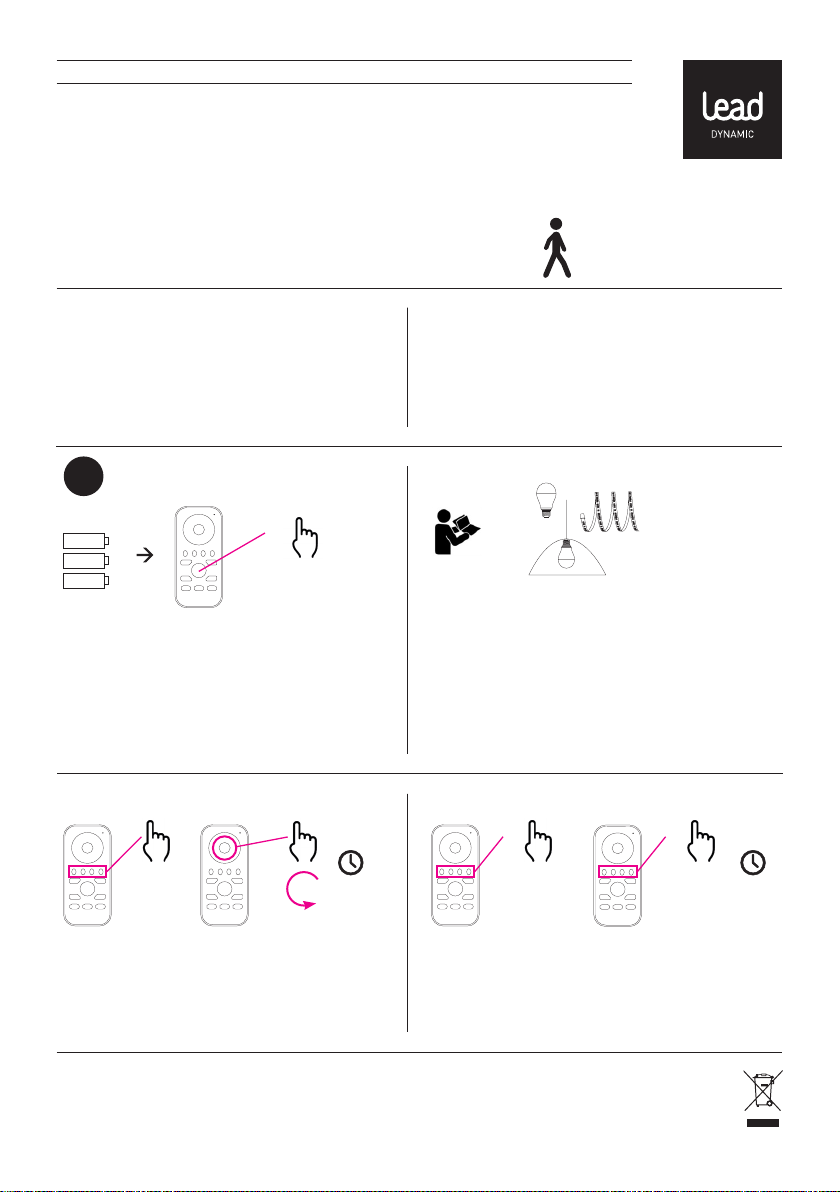
1.1 Lege die drei 1,5 V Zellen vom Typ AAA, die im
Lieferumfang enthalten sind, in Deine Fernbedienung ein und schalte Deine Fernbedienung ein.
Lernen-Funktion
1 x
On
15 sec.
Frequenz:
Stromversorgung:
Schutzart:
1.2 Beachte die Schritte zur Installation aus der
Bedienungsanleitung Deines LED DYNAMIC COLOR
Produktes der Marke LEAD DYNAMIC. Und starte
die „LERNEN“-Funktion auf Deinem LED DYNAMIC
COLOR Produkt. Wenn es über einen „LERNEN“-Knopf verfügt drücke den Knopf und befolge
die Anweisungen in Punkt 1.3.a. Ansonsten schalte
Dein Produkt ein und fahre mit dem Punkt 1.3.b fort.
?
service@lead-energy.com
www.lead-energy.com
868 MHz
3 x 1,5 V AAA
IP 20
2 x 1 x
1.
kurz
2.
lang
15 sec.
1.3.a Drücke auf einen der Knöpfe 1-4 um die
Leuchte dieser Zone zuzuordnen und bestätige
mit einem Wisch über das Farbrad. Schließe den
gesamten „Lernen“–Vorgang innerhalb von 15
Sekunden ab.
LEAD ENERGY AG Am Stadtbad 37 45219 Essen-Kettwig Irrtümer und Änderungen vorbehalten Informationen / technischer Support: www.lead-energy.com
1.3.b Drücke innerhalb von 2 Sekunden hintereinander 2x kurz und dann 1x lange auf einen der
Knöpfe 1-4 um die Leuchte dieser Zone zuzuordnen. Schließe den gesamten „Lernen“-Vorgang
innerhalb von 15 Sekunden ab.
DEUTSCH
2
Steuerung
> 2 sec.
1.4 Deine Leuchte blinkt einmal zur Bestätigung,
dass es der gewählten Lichtzone zugewiesen wurde
und nun mit Deiner Fernbedienung gesteuert
werden kann.
2.2 Dimmen
Du dimmst Deine Leuchte indem Du über die beiden
„Dimm“-Knöpfe die Dimmung einstellst.
2.1 EIN/AUS
Drücke für mehr als 2 Sekunden auf einen der Knöpfe
1-4 um die Leuchten, die Du dieser Zone zugewiesen
hast, ein- oder auszuschalten. Du kannst einer Zone
beliebig viele Leuchten zuweisen.
2.
1.
2.3 Szenen speichern
Du kannst Deinen Zonen bis zu 3 verschiedene
Szenen zuweisen. Hierzu wählst Du eine Zone 1–4,
dann die gewünschte Dimmung über das Dimmrad
und speicherst es als Szene ab, indem Du einen Szenenknopf (S1-S3) für länger als 2 Sekunden gedrückt
hälst. Deine Leuchte blinkt einmal zur Bestätigung.
LEAD ENERGY AG Am Stadtbad 37 45219 Essen-Kettwig Irrtümer und Änderungen vorbehalten Informationen / technischer Support: www.lead-energy.com
DEUTSCH
2.
lange
1.
2.4 Szenen abrufen
Um eine gespeicherte Szene abzurufen wähle erst
die Zone 1-4 und dann die gespeicherte Szene
S1-S3.
2.5 Lauflicht
Du startest ein Lauflicht-Programm für Deine
Leuchte indem Du sie mit einer der Tasten 1-4
anwählst und anschließend kurz auf die Lauflicht-Taste drückst. Mit einem langen Druck auf die
Taste kannst Du die Geschwindigkeit des Lauflichts
verändern.
LEAD ENERGY AG Am Stadtbad 37 45219 Essen-Kettwig Irrtümer und Änderungen vorbehalten Informationen / technischer Support: www.lead-energy.com
ENGLISH
Thank you for choosing a product from LEAD energy
AG. If you would like to get in touch with our service
team, please contact them via our website or by
e-mail.
Intended use Note
This remote control is an accessory for the controllable LED DYNAMIC COLOR products in the LEAD
DYNAMIC range.
1
Installation
AAA
AAA
AAA
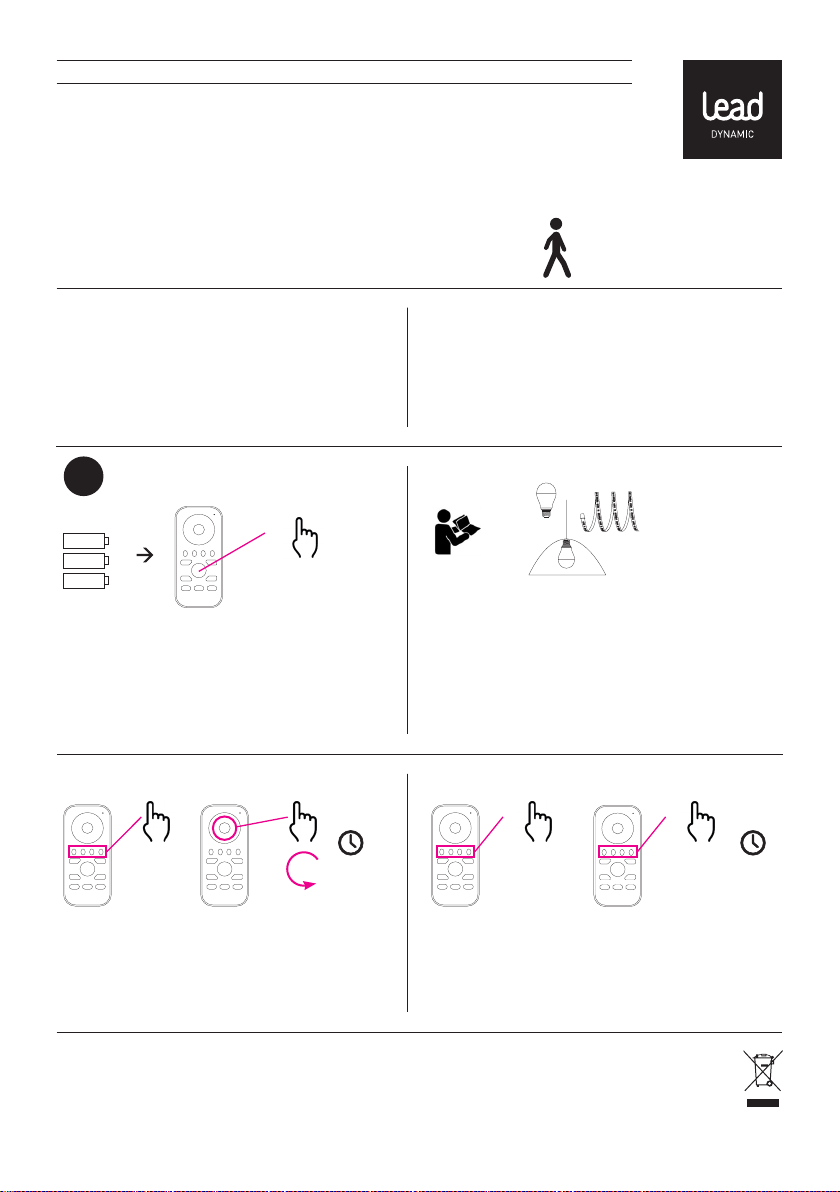
1.1 Insert the three 1.5 V AAA batteries included into
your remote control unit and switch it on.
Learn-Function
1 x
On
15 sec.
Frequency:
Power supply:
Protection class:
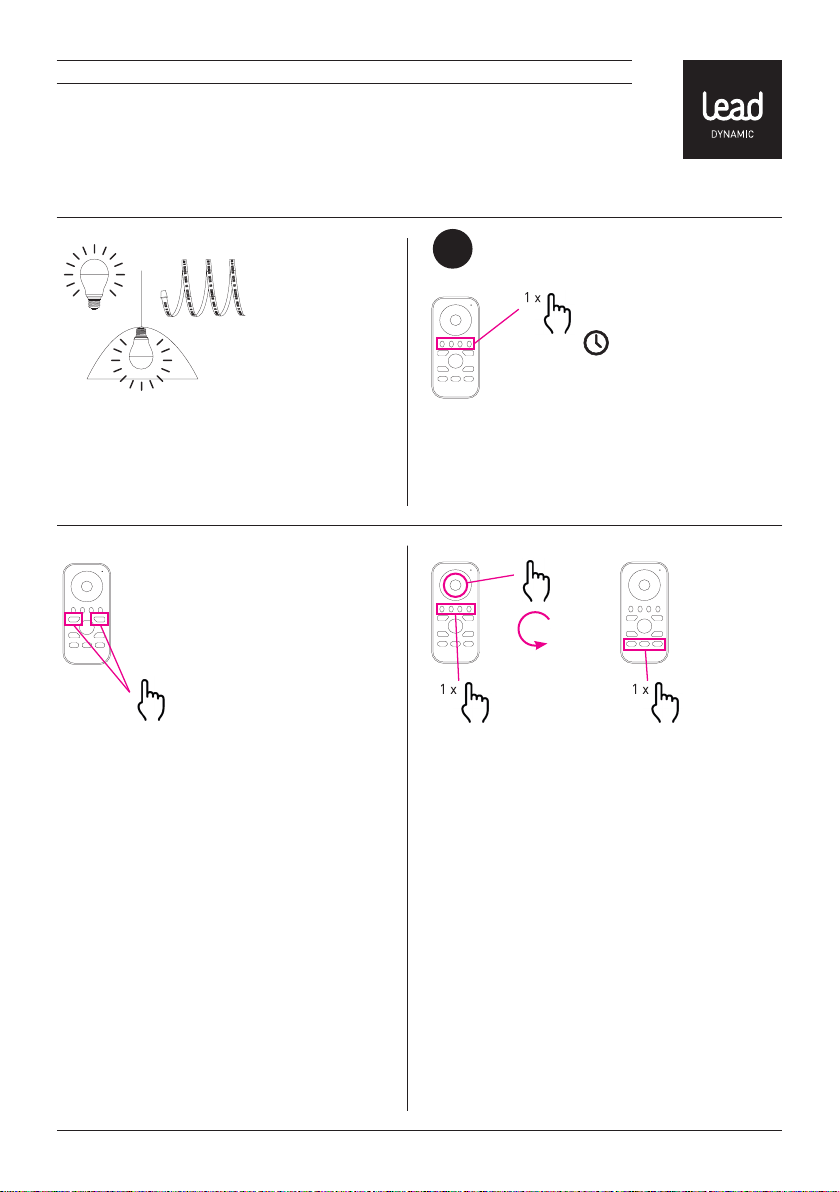
1.2 Note the installation steps from the operating
manual for your LED DYNAMIC COLOR product from
LEAD DYNAMIC. Start the ‘LEARN’ function on your
LED DYNAMIC COLOR product. If it has a ‘LEARN’
button, press the button and follow the instructions in
Section 1.3.a. Otherwise switch your product on and
continue with Section 1.3.b.
?
service@lead-energy.com
www.lead-energy.com
868 MHz
3 x 1,5 V AAA
IP 20
2 x 1 x
1.
short
2.
long
15 sec.
1.3.a Press one of the buttons 1-4 to assign the
luminaire to the respective zone and confirm by
swiping the colour wheel. Complete the entire
‘learning’ process within 15 seconds.
LEAD ENERGY AG Am Stadtbad 37 45219 Essen-Kettwig Subject to errors and amendments Information / Technical support: www.lead-energy.com
1.3.b Press one of the buttons 1-4 twice quickly
within a space of 2 seconds and then once for a
longer period to assign the luminaire to this zone.
Complete the entire ‘learning’ process within 15
seconds.

ENGLISH
2
Control
> 2 sec.
1.4 Your luminaire will flash once to confirm that it
has been assigned to the selected zone and can now
be controlled using your remote control unit.
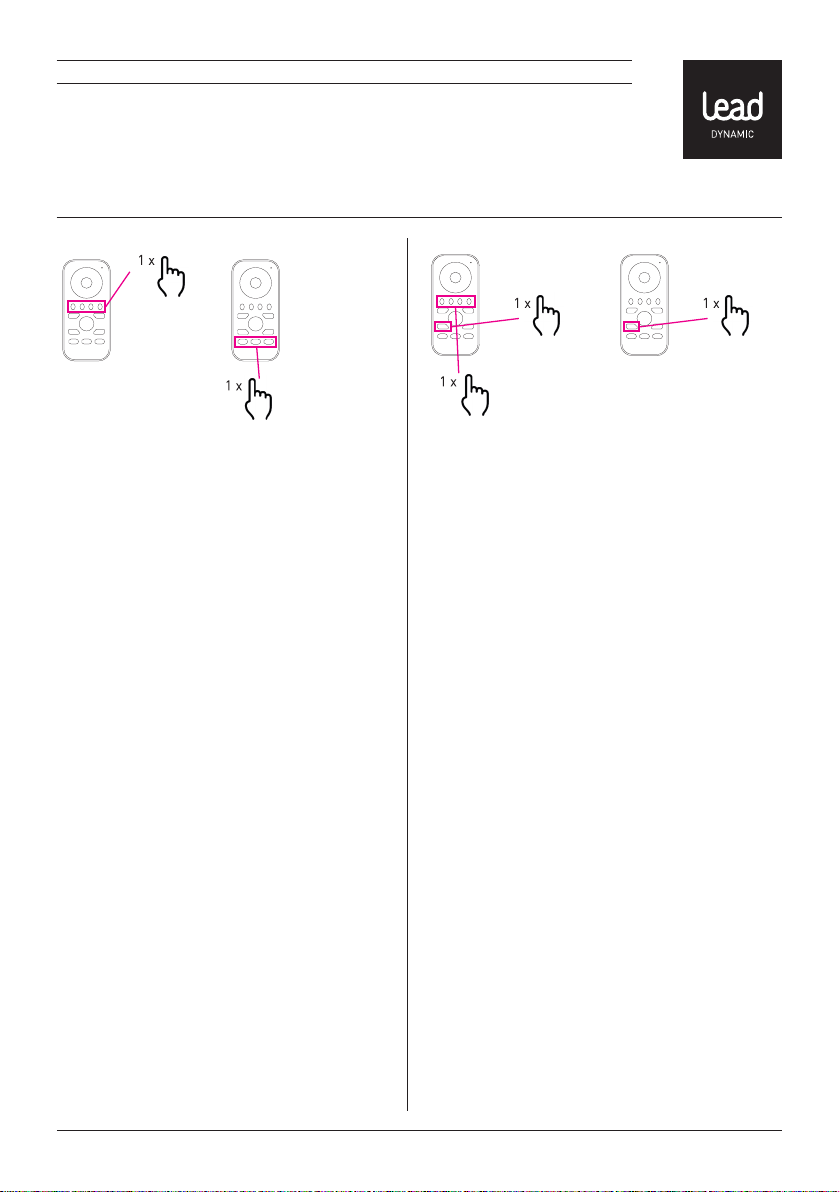
2.2 Dimming
Dim your luminaire by adjusting the dimming level
using both ‘dim’ buttons.
2.1 ON/OFF
Press one of the buttons 1-4 for more than 2 seconds
to switch the luminaires you have assigned to this
zone on or off. You can assign any number of luminaires to a zone.
2.
1.
2.3 Save scenes
You can assign your zones up to 3 different scenes.
Select a zone 1-4 then the required dimming level
using the dimmer wheel and save it as a scene by
holding down a scene button (S1-S3) for at least 2 seconds. Your luminaire flashes once as confirmation.
LEAD ENERGY AG Am Stadtbad 37 45219 Essen-Kettwig Subject to errors and amendments Information / Technical support: www.lead-energy.com

ENGLISH
2.
long
1.
2.4 Retrieve scenes
To retrieve a saved scene, first select zone 1-4 and
then the saved scene S1-S3.
2.5 Chaser light
Start a chaser light programme for your luminaire
by selecting one of the buttons 1-4 and then pressing
briefly on the chaser light button. You can change the
speed of the chaser light by holding the button down
for longer.
LEAD ENERGY AG Am Stadtbad 37 45219 Essen-Kettwig Subject to errors and amendments Information / Technical support: www.lead-energy.com
FRANÇAIS
Merci d’avoir choisi un produit LEAD energy AG. Si
vous avez besoin de notre SAV, vous pouvez nous
joindre sur notre page d’accueil et par e-mail à
l’adresse suivante:
Utilisation conforme Remarque
Cette télécommande est un accessoire des produits
contrôlables LED DYNAMIC COLOR de la marque
LEAD DYNAMIC.
1
Installation
AAA
AAA
AAA
1.1 Insérez dans votre télécommande les trois piles
1,5 V de type AAA fournies et mettez en marche
votre télécommande.
1 x
MARCHE
Fréquence:
Alimentation électrique:
Indice de protection:
1.2 Respectez les étapes d’installation du manuel
d’installation de votre produit LED DYNAMIC COLOR
de la marque LEAD DYNAMIC. Et démarrez la fonction « APPRENTISSAGE » sur votre produit LED
DYNAMIC COLOR. Quand la télécommande possède
un bouton «APPRENTISSAGE», pressez le bouton
et suivez les instructions contenues au point 1.3.a.
Sinon, mettez en marche votre produit et continuez
avec le point 1.3.b.
?
service@lead-energy.com
www.lead-energy.com
868 MHz
3 x 1,5 V AAA
IP 20
Fonction Apprentissage
2 x 1 x
1.
15 sec.
1.3.a Appuyez sur l’un des boutons 1-4 afin d’affecter les luminaires à cette zone et confirmez
avec un geste de balayage via la roue chromatique.
Fermez tout le processus «d’apprentissage» dans
un délai de 15secondes.
LEAD ENERGY AG Am Stadtbad 37 45219 Essen-Kettwig Sous réserves d‘erreurs ou modifications Informations/assistance techniquecom: www.lead-energy.com
1.3.b Dans un délai de 2secondes, appuyez consécutivement 2fois brièvement et une fois longtemps
sur l’un des boutons 1-4 afin d’affecter le luminaire
à cette zone. Fermez tout le processus «d’apprentissage» dans un délai de 15secondes.
court
2.
longue
15 sec.
 Loading...