

Page 1
Bedienungsanleitung
Operating instructions
LDEB152A
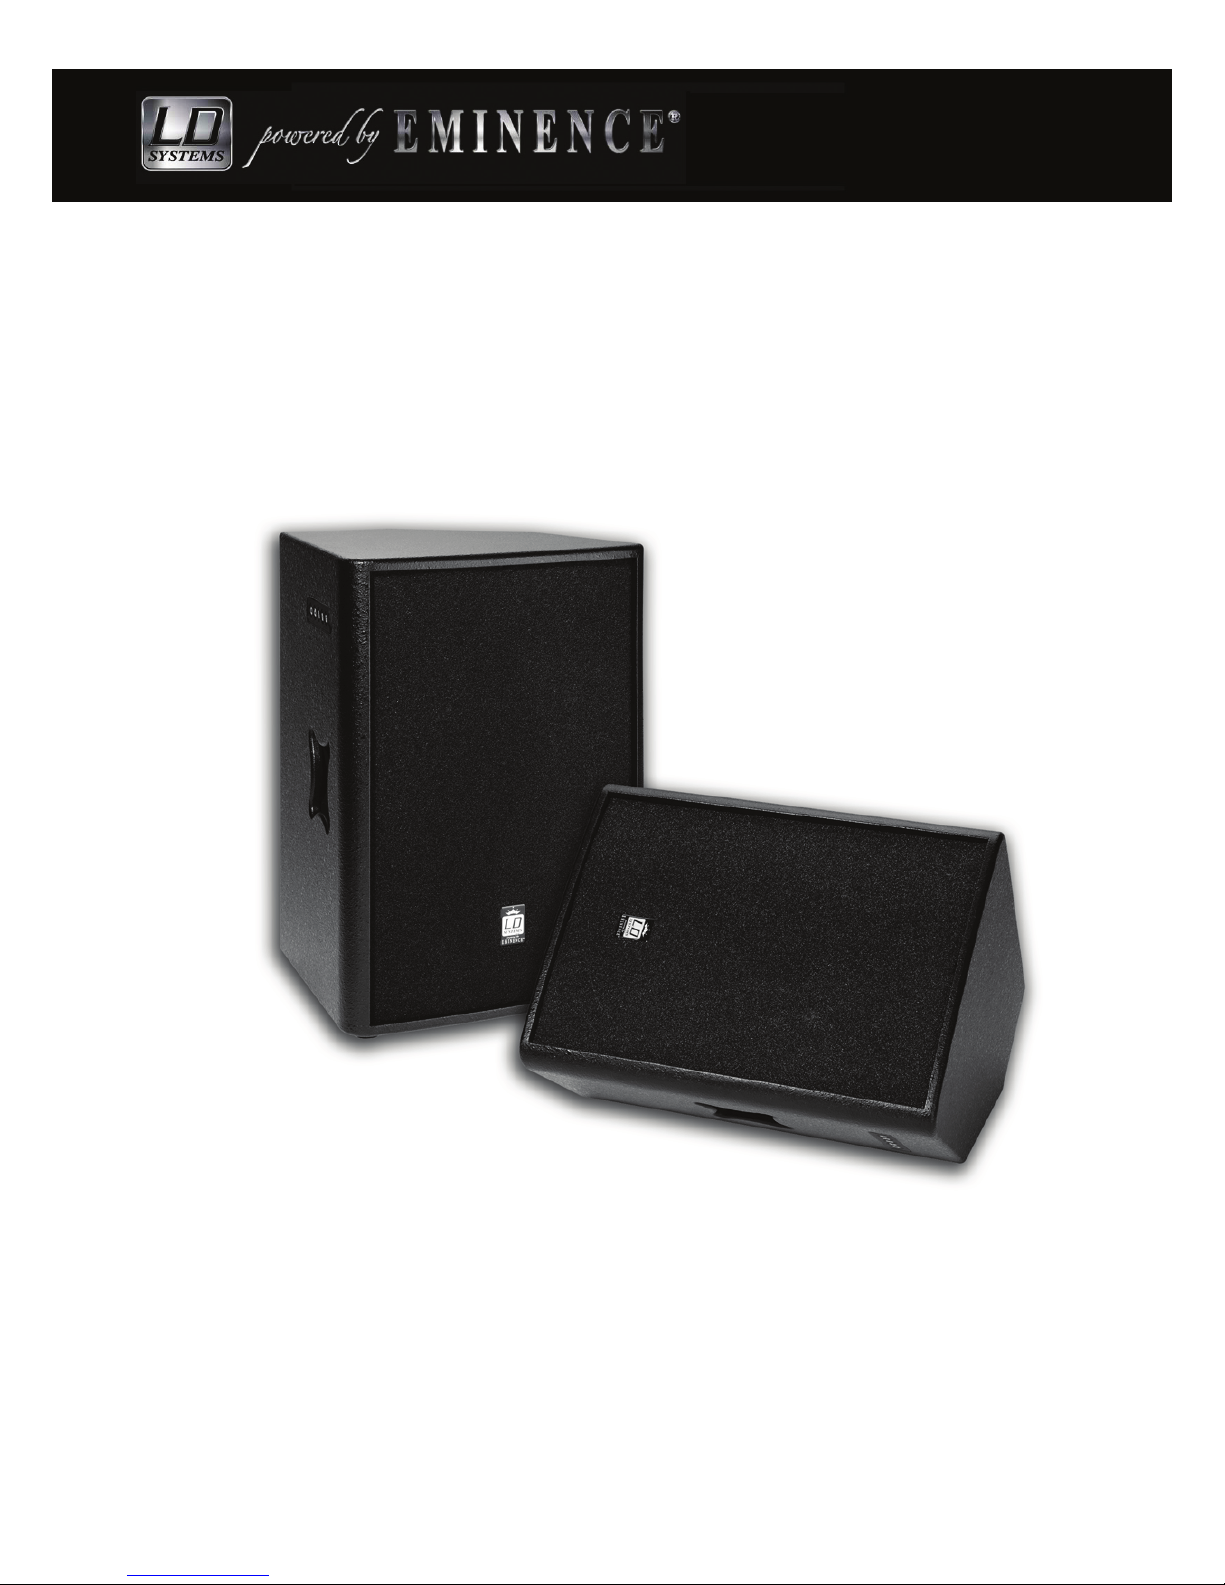
15”/1” Aktiver Multifunktionslautsprecher 500W
15”/1” Active Multifunctional Loudspeaker Cabinet 500W
Deutsch / English
Page 2

Page 2
LDEB152A - Operating instructions
Einleitung
Die mit BMS Treiber bestückte Box ist darüber hinaus mit einem Bang & Olufsen ICEpower Digitalendstufenmodul ausgestattet. Wie die passive Version verfügt sie über 500W RMS. Die Vorstufe verfügt über Line IN/OUT, Mic In, Volume Regler, Ground-Lift, 2-fach EQ sowie einen
SPKn Passive Output um eine weitere passive Box oder Subwoofer ohne größeren Leistungsverlust anzuschließen. Das ist einmalig in dieser
Preisklasse. Als Lautsprecher wird der Eminence Kappalite 15’’ ND Woofer eingebaut, abgerundet wird die Box durch die Verwendung des
patentierten Adam Hall SM707 Boxenansches mit variablem Neigungswinkel welcher in 4° Schritten bis +/- 18° justiert werden kann.
Introduction
The speaker is equipped with a BMS Driver and a Bang & Olufsen ICEpower digital amplier module. It disposes like the passive version of
500 W RMS. The preamp provides line in/out, mic in, volume control, ground lift, 2-band EQ and a SPKn passive output permitting a passive speaker or subwoofer to be connected without much loss of power. Thats unique in this price range. The LDE152A has a Eminence 15’’
Kappalite ND woofer built in. The speaker also features the patented Adam Hall SM707 speaker ange with a variable tilt angle, adjustable in
intervals of 4° to +/- 18°.
Nachträgliche Montage von Flyware Komponenten:
Die LDE152 ist für die nachträgliche Montage der Adam Hall 5720 Flugschiene vorgesehen. Dafür entfernen Sie bitte mit einem Schraubenzieher die Flywareblenden. In den passenden Ausfräsungen mit vordenierten Bohrlöchern können die 5720 Flugschienen mit passenden
Montageschrauben montiert werden. Wir empfehlen gehäuseinnenseitig Verstärkungsplatten, z. Bsp. Adam Hall 5730 zu verwenden. Dafür
muss das Frontgitter abgeschraubt sowie der 15’’ Eminence Lautsprecher ausgebaut werden. Sicherheitshinweis : Für nachträglichen Einbau
von Flyware Komponenten übernimmt Adam Hall keine Haftung !
Subsequent installation of flyware components:
The LDE152 is designed to permit later installation of Adam Hall 5720 cargo restraint tracks. To do this, please remove the yware faceplates
using a screwdriver (see drawing). The 5720 cargo restraint tracks with matching mounting screws can be installed in the matching milled
edges. We recommend using cargo restraint back plates inside the cabinet, e.g., Adam Hall 5730. To this end, it is necessary to remove the
front grille and the 15” Eminence loudspeaker. Safety notice: Adam Hall accepts no liability whatsoever for subsequent installation of yware
components!
Anwendungshinweis zum variablen Boxenflansch SM707
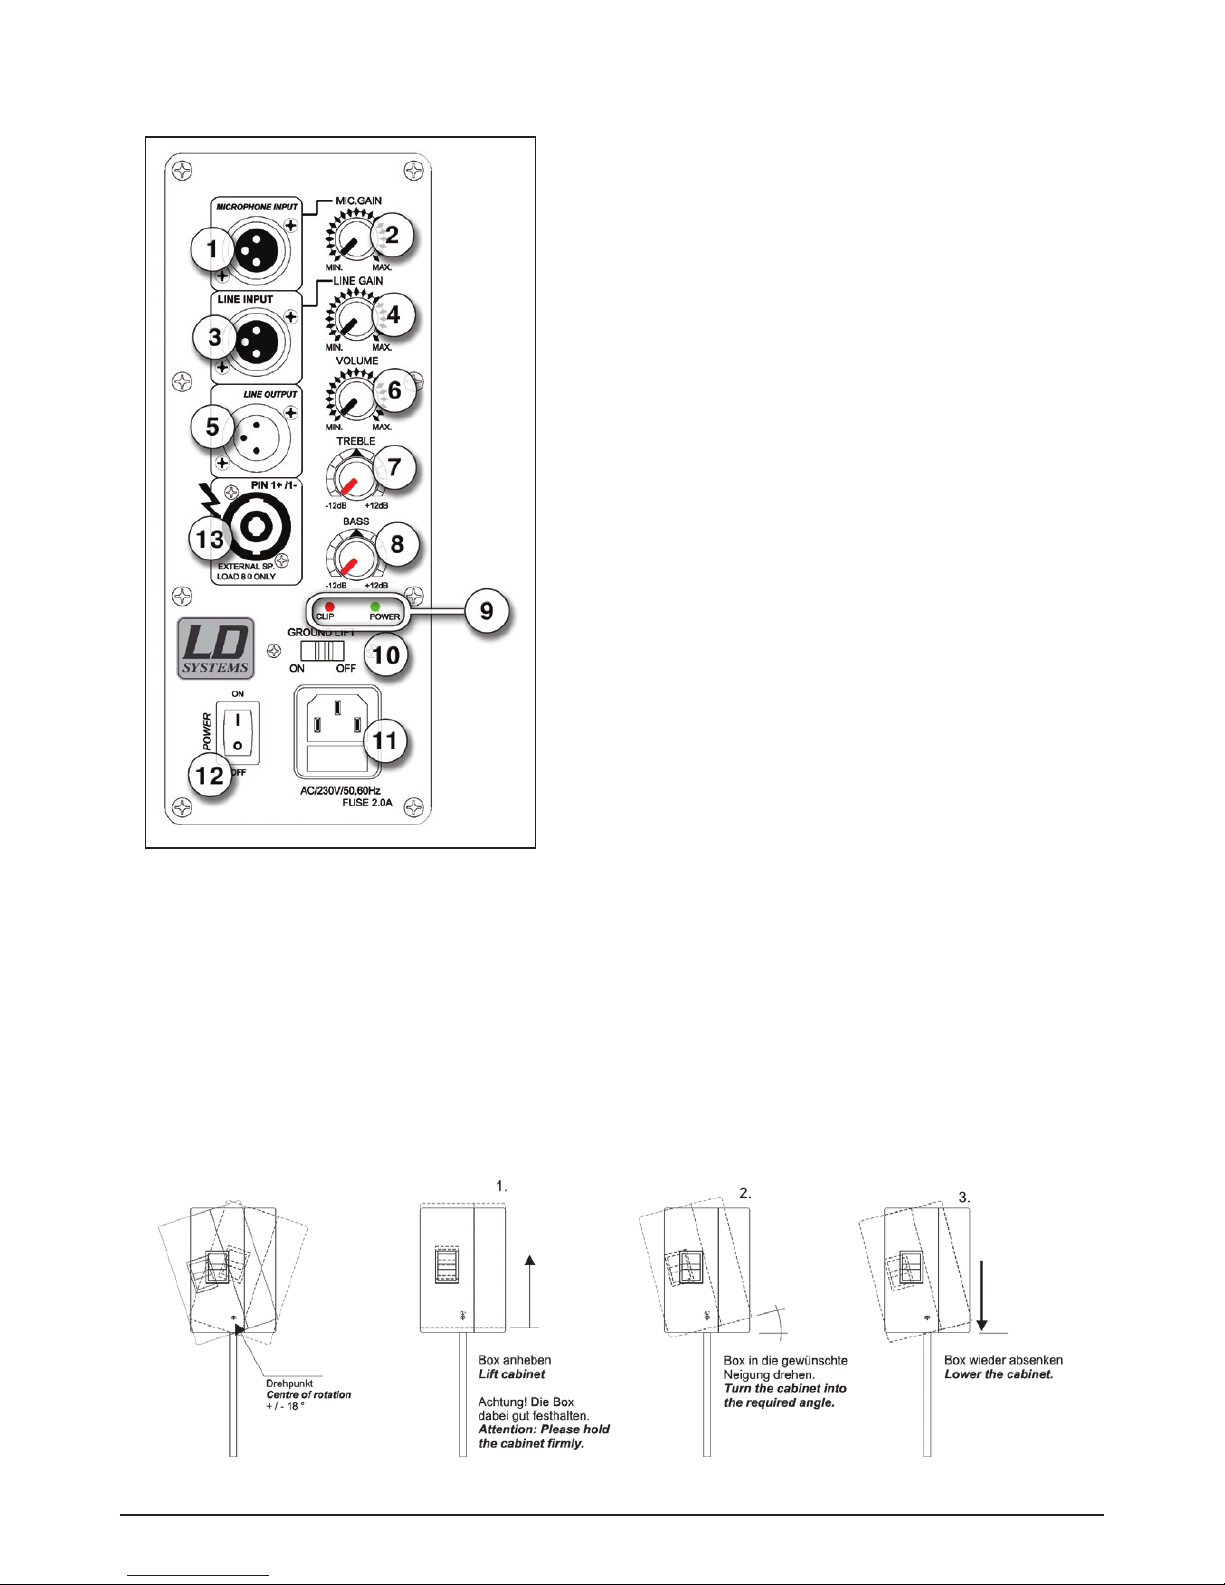
Mit dem eingebauten und patentierten Boxenansch SM707 ergeben sich nie da gewesene Einstellungsmöglichkeiten von +/- 18° in jeweils 4°
Schritten. Dafür die Box auf dem Lautsprecherstativ einfach leicht anheben wobei sich der eingestellte Neigungspunkt löst und den gewünschten Neigungswinkel durch absenken der Box auf das Stativ wieder einrasten lassen (siehe auch Skizze).
Application notice regarding the SM707 adjustable speaker stand receptacle
The built-in, patented SM707 adjustable speaker stand receptacle offers unparalleled possibilities for adjustment to +/-18° in 4° increments.
To do this, simply lift the cabinet slightly on the speaker stand, causing the set angle to loosen, and lower the cabinet on the stand again to
cause it to engage at the desired angle (see drawing).
Volex Power Plug
LD Systems nutzt bei diesem Produkt den neuen und sicheren Volex Power Plug. Die Vorteile auf einen Blick:
-Erhöhte Betriebssicherheit, keine Wackelkontakte (Kurzschlussgefahr)
-Alle Stromkabel sind werkseitig konfektioniert und verfügen über ASA, VDE, KEMA, CCC, SA und UL Zulassung (andere Anbieter verfügen
nur über UL Zulassung und müssen vom Kunden konfektioniert werden = erhöhtes Haftungsrisiko im Schadensfall)
-100% kompatibel zu allen IECC Steckern und Buchsen
With this Product, LD Systems has implemented the new and safer Volex Power Plug. The main Advantages are:
-Increased operating reliability, with no loose contacts (risk of a short circuit)
-All power cables are readymade at the factory and certied according to ASA, VDE, KEMA, CCC, SA and UL standards. (Other suppliers have
only UL certication and require assembly by the customer – with increased risk of liability in the event of damage.)
-100% compatible with all IECC power inlets and plug connectors
Garantie
ADAM HALL leistet Garantie für alle nachweisbaren Material- und Fertigungsfehler für die Dauer von 24 Monaten ab Verkauf. Von der Garantie
ausgenommen sind alle Schäden, die durch falsche oder unsachgemäße Bedienung verursacht werden. Bei Fremdeingriffen oder eigen-
mächtigen Änderungen erlischt jeder Garantieanspruch (Ausnahme nachträglicher Einbau der Flyware wie beschrieben)
Warranty
ADAM HALL warrants this product to be free of demonstrable aws in material and workmanship for a period of 24 months from the date
of invoice. This limited warranty does not include damage due to improper operation or use for purposes other than those intended by the
manufacturer. Tampering with or modifying the product will also void any and all warranties.
Page 3
Page 3
LDEB152A - Operating instructions
1. Symmetrischer Mikrofoneingang in XLR – Ausführung
2. Über diesen Gain Regler können Sie die Empndlichkeit des Mikrofoneingangs einstellen.
Beachten Sie bitte, dass Mikrofone die eine Phantomspeisung benötigen (beispielsweise ein Kondensatormikrofon) an diesen Eingängen
nicht funktionieren werden, da sie nicht über eine Phantomspeisung
verfügen.
3. Symmetrischer Mono Lineeingang in XLR – Ausführung
4. Über diesen Gain Regler können Sie die Empndlichkeit des Lineeingangs einstellen
5. Symmetrischer Mono Ausgang in XLR - Ausführung. Die zusammengemischten Eingangssignale werden vor der Endstufeneinheit abgezweigt und zu diesem Ausgang geleitet.
Sie können diesen Ausgang beispielsweise dafür verwenden, um die
zusammengemischten Eingangssignale an einen weiteren aktiven
Lautsprecher oder Verstärker zu verteilen.
Wichtig: Dieses Ausgangssignal wird vor der Masterklangregelung
(die Regler 6, 7 und 8 der Abbildung) abgegriffen, es ist also unabhängig von diesen Einstellungen.
6. Hiermit regeln Sie die Gesamtlautstärke der Endstufe.
7. Mit dem Treble Regler können Sie die Höhen des Ausgangssignals
jeweils um 12dB anheben oder absenken.
8. Mit dem Bass Regler können Sie die Bässe des Ausgangssignals
jeweils um 12dB anheben oder absenken.
9. Die Power LED leuchtet grün wenn das Gerät eingeschaltet ist. Die
rote Clip-LED beginnt zu blinken wenn der Verstärker übersteuert, also
in den clip Bereich ausgesteuert wird. Ein Blinken dieser LED sollten Sie
vermeiden, regeln Sie dazu die Gesamtlautstärke (Regler Nr. 6 auf der
Abbildung) so weit zurück, bis die clip LED aufhört zu Blinken.
10. Ground Lift Schalter. Wenn Sie an die Eingänge der Aktivbox netzgespeiste und durch Schutzkontakt geerdete Instrumente anschließen,
kann eine Brummschleife durch doppelte Erdung entstehen. Das dadurch zustande kommende tieffrequente Brummen können Sie durch
Betätigen des Ground-Lift-Schalters beseitigen.
11. Spezielle verriegelbare Netzbuchse (Volex Power Plug). Schließen Sie an dieser Kaltgerätebuchse das Netzkabel für die Stromversorgung
an. Direkt unter dem Stecker bendet sich ein Fach für die Sicherung. Zum Wechseln der Sicherung ziehen Sie das Fach heraus. Darin benden sich zwei identische Sicherungen (eine wird verwendet und die andere dient als Ersatz).
WICHTIG: Verwenden Sie nur passende Sicherungen und überbrücken Sie niemals den Kontakt!
12. Netzschalter, schalten Sie hierüber den Lautsprecher and und aus. Bevor Sie das Gerät einschalten, sollten alle Level-Regler auf Min.
Position gebracht werden, andernfalls können angeschlossene Mikrofone eine unerwünschte Rückkoppelung erzeugen.
13. Zusätzlicher Lautsprecherausgang in Speakon-Ausführung (keine Impedanz < 8Ω). Dieser Ausgang erfolgt nach der Verstärkereinheit. D.h.
Sie können an diesem Anschluss eine zusätzliche passive Lautsprecherbox (z.B. das passive Modell dieser Lautsprecherbox, die LDE152)
anschließen und betreiben.
Die Rückseite:
500WATTS
Page 4
Page 4
LDEB152A - Operating instructions
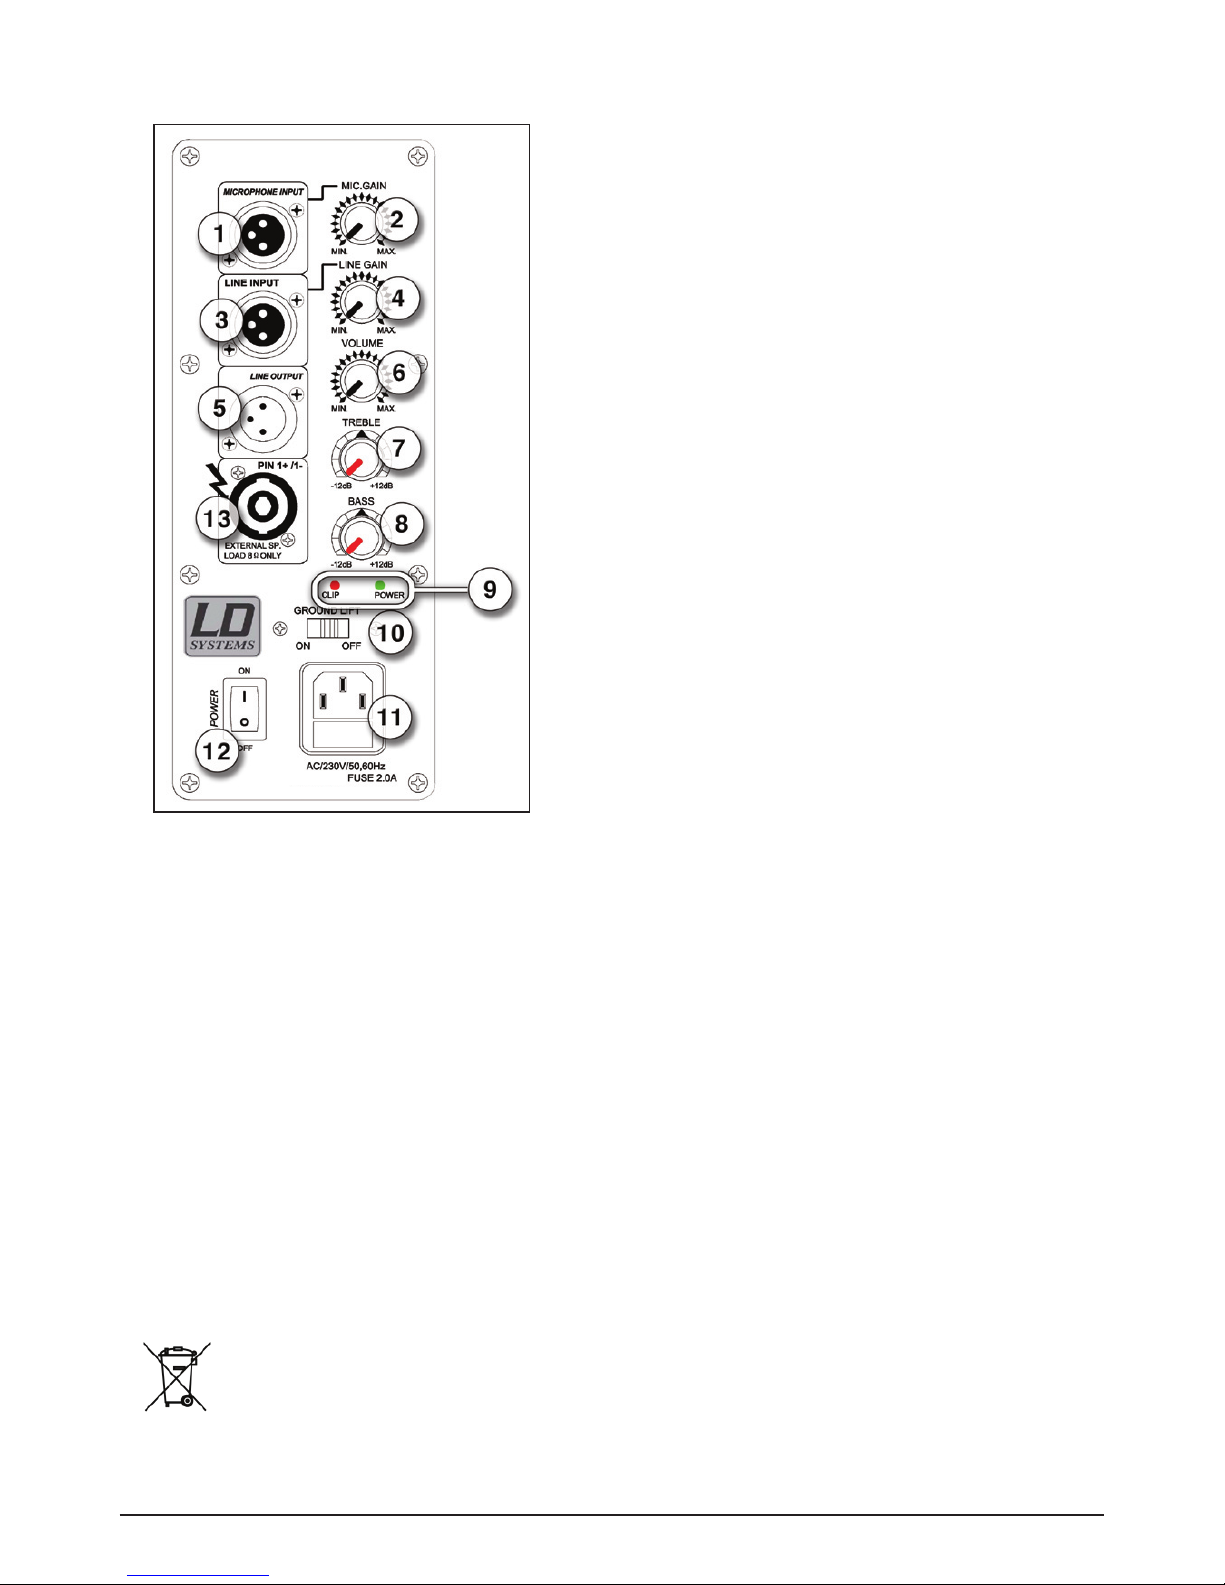
1. Balanced XLR microphone input
2. Adjust the input sensitivity of the microphone input with this gain control.
Please regard that microphones needing phantom power (condenser microphones for example) will not work at these inputs since they do not supply a
phantom power.
3. Balanced XLR line input (mono)
4. Adjust the input sensitivity of the line input with this gain control.
5. Balanced XLR output (mono). The two inputs (mic and line inputs) are mixed
together according to the adjusted levels and sent to this output.
You can use this output to split the mixed inputs out to another active speaker
or amplier.
Note: This output is split out before the master section (the controls 6,
7, and 8 on the diagram). This output is thus independent from these
controls.
6. This is the master volume control. You can adjust the overall volume of the
amplier – unit.
7. The treble control allows you to pad or boost high frequencies by -12dB
respectively +12dB.
8. The bass control allows you to pad or boost low frequencies by -12dB
respectively +12dB.
9. The power LED lights up green when the device is turned on. The red ClipLED starts blinking when the amplier reaches it’s clipping threshold. This
should be avoided, to do so, reduce the master level (control nr. 6 on the
diagram) until the LED stops blinking.
10. This switch is to avoid ground loop hum. Should a low humming noise
(ground loop) occur, it can be eliminated by switching the Ground Lift to On.
Ground looping is caused by two pieces of equipment being doubly earthed.
11. Special lockable mains socket (Volex Power Plug). Connect an IEC plug to this socket. The Fuse can be found in the little compartment
directly below this socket. To change fuses, pull out the little drawer. You will nd two fuses, one is in use and the other spare.
IMPORTANT NOTE: Only use suitable fuses. Never bridge the fuse contacts.
12. Mains switch. Before switching on the power to the unit, all level controls should be set to minimum. Otherwise, microphones already
connected to the system may cause undesired feedback
13. This additional speaker output (no impedance < 8Ω) is split out from the amplication unit. That means you can connect a passive
speaker (e.g. the passive version of this speaker, the LDE152) to this output and thus drive two speakers with a single amplier – unit.
Specifications
Article No.: LDEB152A
Nominal Impedance: 8 Ω
Rated power capacity RMS 500 W
Amplier Module: B&O ICEpower 1000 ASP
Max. SPL: 130 dB
Frequency range (-10 dB): 45 Hz – 18 kHz
Crossover frequency: 1.5 kHz
Connections: Mic/Line Input, Volume Control, LF+HF EQ, External Speaker Output
Cabinet style: 18 mm Multiplex plywood
Dimensions (W x H x D) 499 mm x 650 mm x 438 mm
Weight: 30,5 kg
Correct disposal of this product
(Applicable in the European Union and other European countries with separate collection systems) This marking shown on the product or its literature, indicates that
it should not be disposed with other household wastes at the end of its working life. To prevent possible harm to the environment or human health from uncontrolled
waste disposal, please Seperate this from other types of wastes and recycle it responsibly to promote the sustainable reuse of material resources. Household users
should contact either the retailer where they purchased this product, or their local government ofce, for details of where and how they can take this item for environmentally safe recycling. Business users should contact their supplier and check the terms and conditions of the purchase contract. This product should not be mixed
with other commercial wastes for disposal.
Copyright by LD SYSTEMS, a division of ADAM HALL GmbH, 61267 Neu Anspach (www.adamhall.com)
www.ld-systems.com
The rear controls
500WATTS
 Loading...