

USER’S GUIDE
LDLC RS32
LED BACKLIGHT LCD DISPLAY 31,5”

USER’S GUIDE
LDLC RS32
EN
Preface
Every effort has been made to ensure that the information in this document
is accurate. However, the manufacturer and the distributor of this product
assume no responsibility for any error, omission in this document, or use of
the information contain herein.
Please preserve this manual for the life of the equipment.
Congratulations on your purchase!
INFORMATION ABOUT RECYCLING
This product bears the selective sorting symbol for waste electrical and electronic equipment
(WEEE).
This means that this product must be handled pursuant to European Directive 2002/96/EC in
order to be recycled or dismantled to minimize its impact on the environment.
For further information, please contact your local or regional authorities.
Electronic products not included in the selective sorting process are potentially dangerous for
the environment and human health due to the presence of hazardous substances.
DECLARATION OF CE CONFORMITY MARKING
Product in accordance with the applicable regulations on European territory. Conformity with
the requirements EMC 2014/30/EU and LVD 2014/35/EU.

USER’S GUIDE
LDLC RS32
EN
TABLE OF CONTENTS
Safety
Safety precautions
Maintenance and cleaning
1. Product Description
1.1 Welcome
1.2 Packing list
1.3 Introduction to the screen
1.3.1 Specications
1.3.2 Front view
1.3.3 Rear view
2. Installation
2.1 Mounted on wall
2.1.1 Choice of wall bracket
2.1.2 Choice of place of installation
2.2 Base Installation
2.3 Installation Instructions of the xation plate (Only used for mini PC mounting)
2.3.1 Installation of the xation plate
2.3.2 Use with a VESA mounting sytem (Mini-PC)
2.4 Tilt Adjustment
2.5 Cables connection
2.6 Switch on the screen
3. General Instructions
3.1 OSD Menu
3.1.1 Conguration
3.1.2 Picture
3.1.3 Display
3.1.4 Color
3.1.5 Advance
3.1.6 Input
3.1.7 Audio
3.1.8 Other
3.2 Resolutions and Frame Rates
3.3 Basic troubleshooting
Warranty terms
USER’S GUIDE
LDLC RS32
EN
Safety precautions
• Please read all the instructions carefully before using this product.
• To reduce any re or electrical risk, do not spill any liquids into the cabinet or use
your monitor near water.
• DO NOT REMOVE MONITOR BACK COVER. There are no user serviceable
parts inside and opening or removing covers may expose you to dangerous shock
hazards or other risks.
• Do not place this product on a sloping or unstable cart, stand or table, as it may
fall, causing serious damage to the monitor.
• Do not put anything on top of the monitor
• If the power supply is lost, do not try to repair it. Please contact the distributor.
• Before use, make sure all the cables are well plugged and not damaged. In case
of any damage, please contact the distributor.
• Only the type of power source indicated on the nameplate applies to this display.
In you have any questions on the type of power source you use, please consult
the dealer of the display.
• Use an appropriate outlet, complying with the local electrical norms.
• Do not place any heavy objects on the power cord. Damage to the cord may
cause shock or re.
• Do not use monitor in high temperature (-20°~55°C), humid, dusty, or oily areas.
• In case of storm or prolonged non-use, unplug the screen to protect against any
overvoltage damage.
• When disconnecting the power cord of display or power adapter, always remember
to hold the plug instead of puling the wire to unplug the power cord.
• Do not insert objects of any kind into the cabinet slots, as they may touch
dangerous voltage points, which can be harmful or fatal or may cause electric
shock, re or equipment failure.
• Use a power cord that matches the AC voltage of the power outlet (100 ~ 240
V CA ), that has been approved, and complies with the safety standard of your
country.
• The power cable connector is the primary means of detaching the system from
the power supply. The monitor should be installed close to a power outlet, which
is easily accessible.
• Any technical issue, please contact the distributor.
CAUTION: DO NOT REMOVE MONITOR BACK COVER. Opening or removing cover may expose
you to dangerous voltages and other hazards.
There are no user serviceable parts inside and opening or removing covers may expose you to
dangerous shock hazards or other risks. Refer all servicing to qualied service personnel.
USER’S GUIDE
LDLC RS32
EN
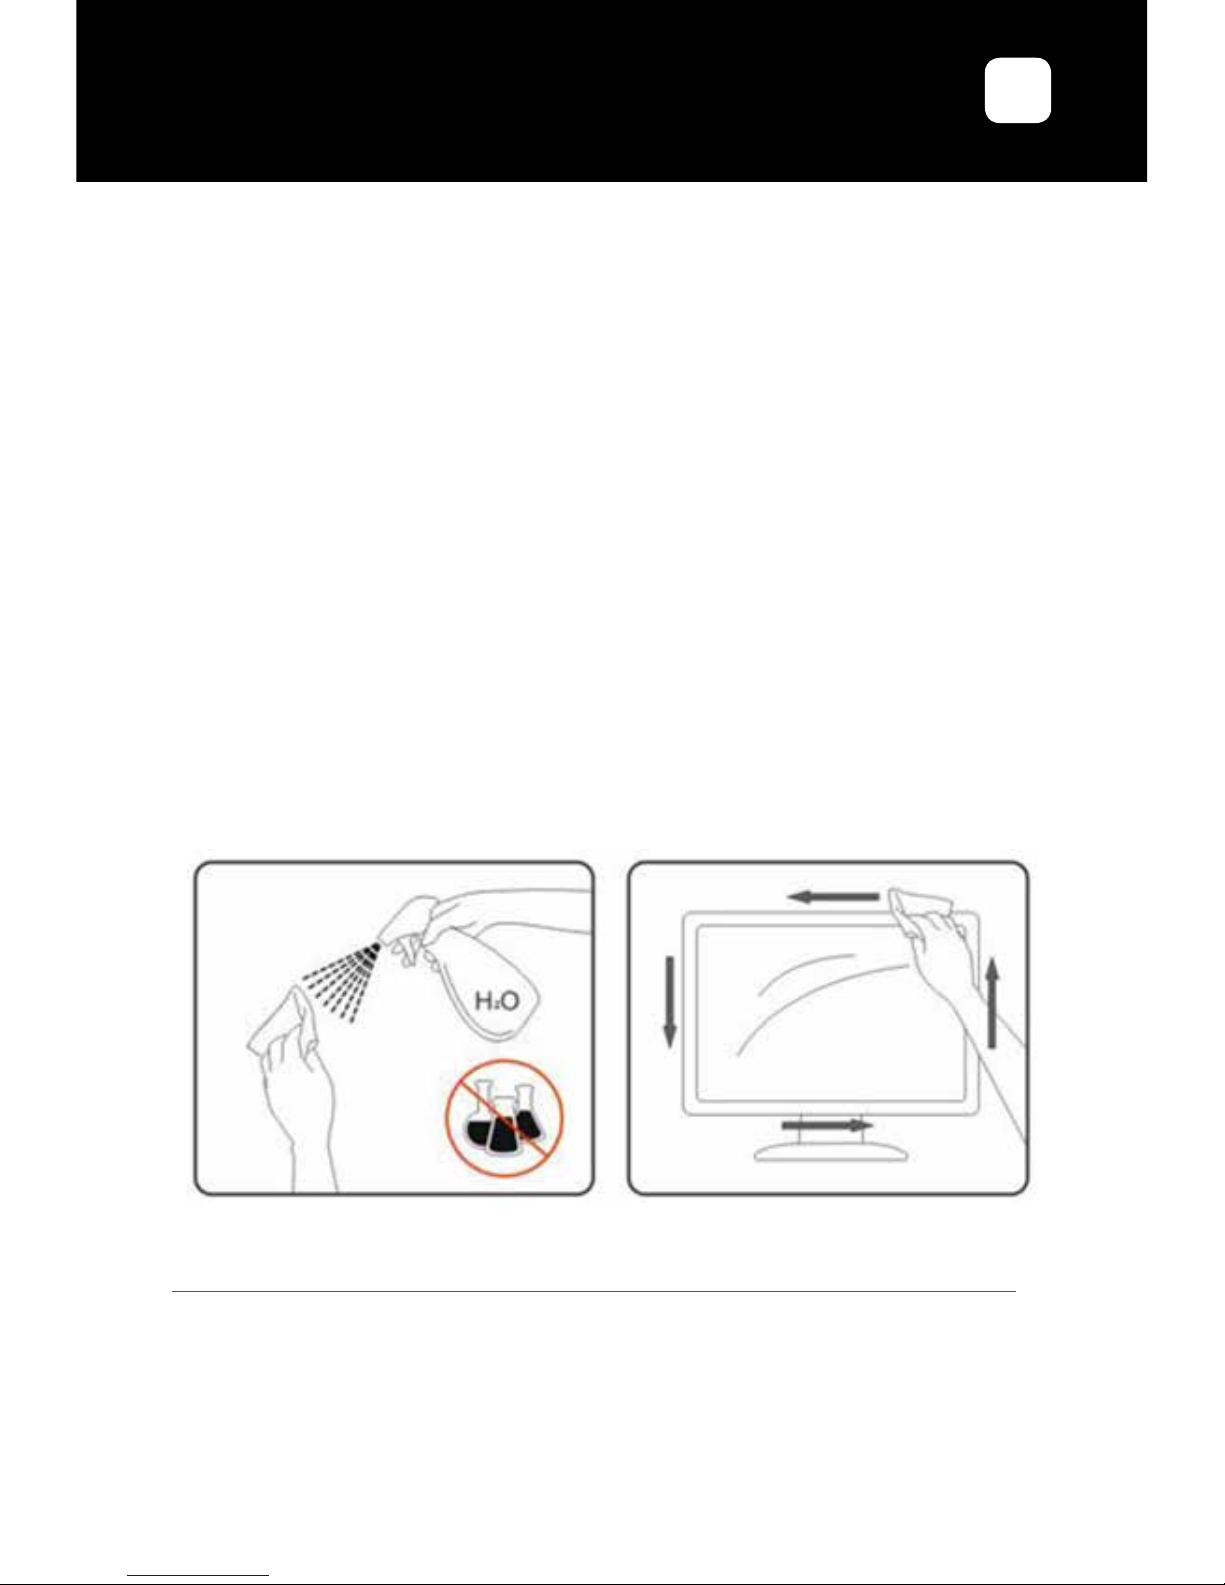
Maintenance and cleaning
• For safety reasons, turn off and unplug the display before cleaning.
• Clean the panel surface with a lint-free, non-abrasive cloth. Treat stubborn stains
with a wet cloth and a gentle specic solution.
• Avoid using cleaning products containing alcohol or acetone. Use a cleaning
solution specically made for cleaning LCD screens. Never spray any liquid
directly on the screen. It could fall into the display and cause an electrical shock.
• When cleaning, ensure that any liquid enters the display housing. Please make
sure only soft cloths are used for cleaning purposes. A hard cloth could damage
the panel.
• Clean the housing with a slightly humidied cloth and a gentle detergent, then
wipe it with a dry and clean cloth.
• Do not insert anything in the unit, and never spill liquid of any kind on it.
Please nd all LDLC’s cleaning specic products on our website:
http://www.ldlc.com/consommables/nettoyage/chiffon-lingette/c4464/+fb-C000000888.html

USER’S GUIDE
LDLC RS32
EN
1. Product Description
1.1 Welcome
Chose the elegance and the high image quality of LDLC RS32 display! Performant
and design, it’s an unique blend of simplicity and sophistication. QHD resolution
(2560 x 1440), LED backlighting, and comprehensive connectivity, LDLC RS32 is
suitable both for standard office or multimedia entertainment applications.
1.2 Packing list
Check out if the product box includes the following parts:
• LCD monitor
• Base + screws M4*10 (x5)
• 1x AC Adapter with 1,5 m cable + 1 m power cable
• 1x HDMI cable 1,5 m
• VESA xation plate+ screws M4*10 (x4)
• User’s guide
If any part is missing or damaged, contact LDLC’s Technical Support:
http://www.ldlc.com/faq/n1769/il-manque-des-accessoires-dans-la-boite-de-mon-article/
USER’S GUIDE
LDLC RS32
EN
1.3 Introduction to the screen
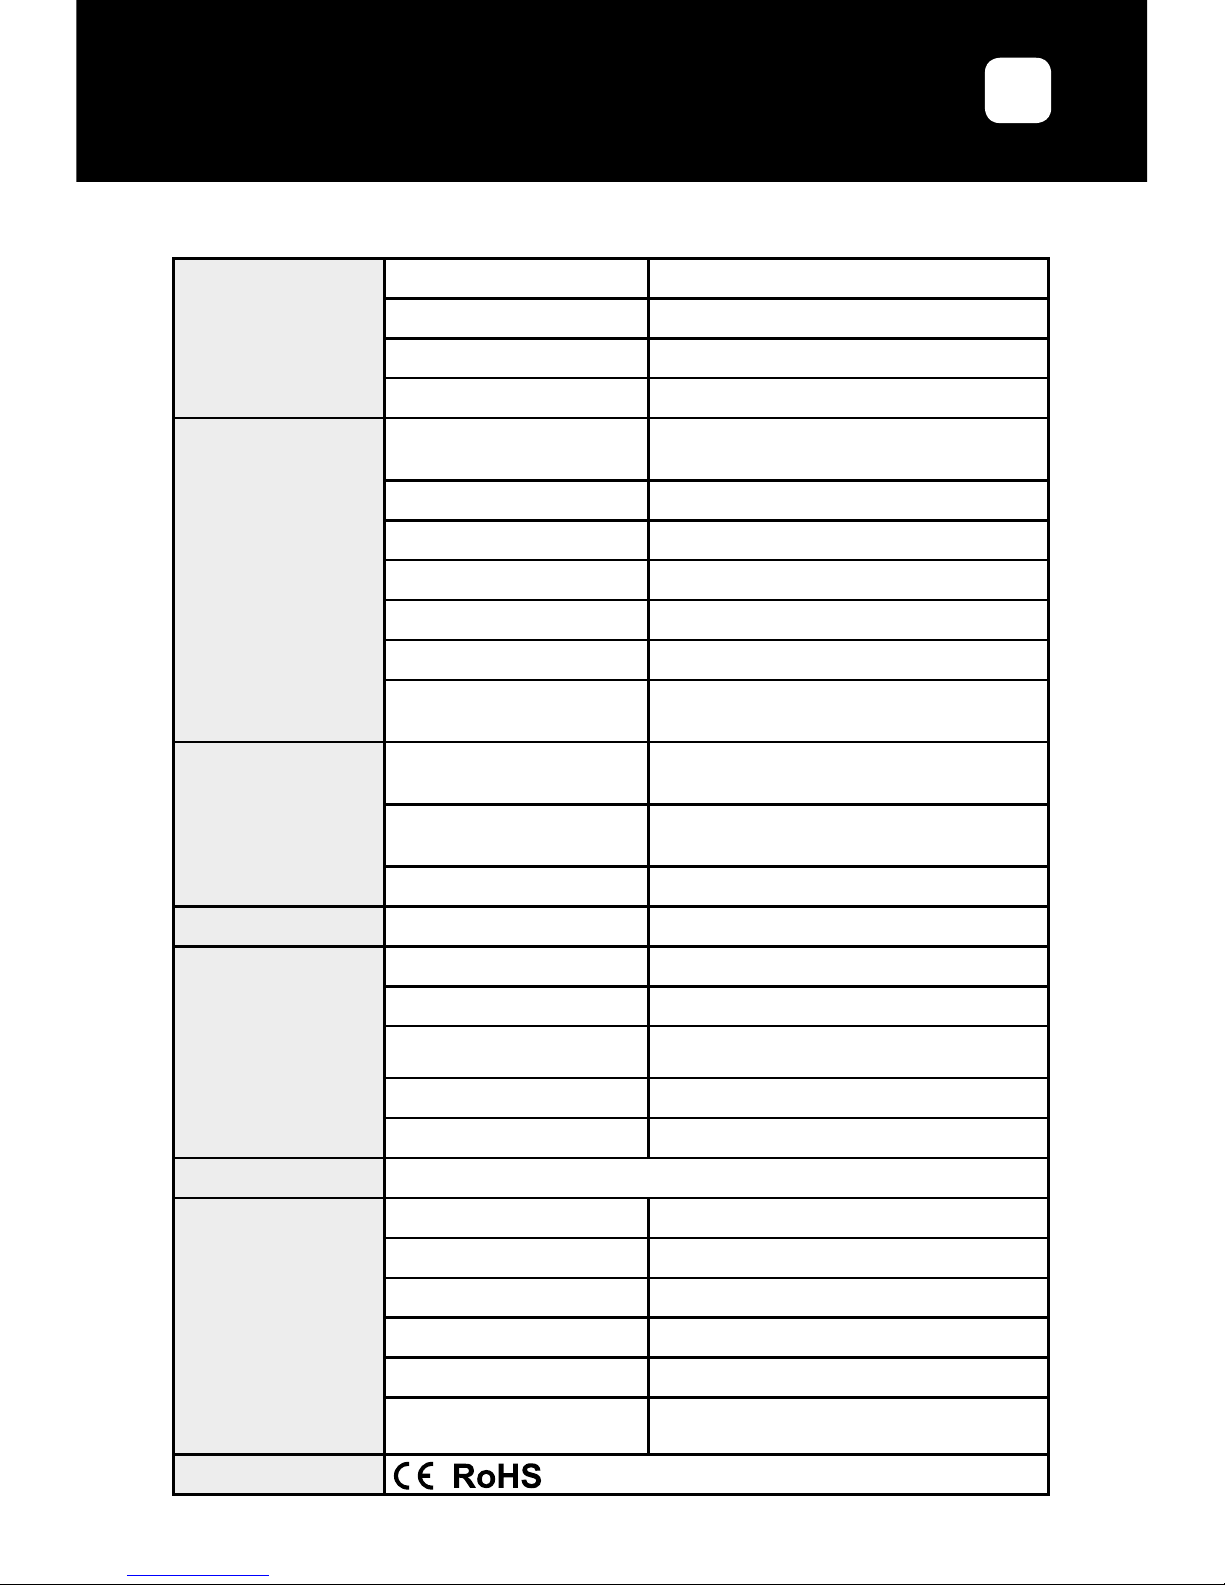
1.3.1 Specications
Model LDLC RS32
LCD Panel
Display size / diagonal 31,5’’
Panel LED backlight LCD display
LCD Technology IPS
Brightness 250cd/m2 (Min) 300cd/m2 (Typical)
Contrast 1200/1 (Typical)
Pixel pitch 0,2727 mm (H) x 0,2727 mm (V)
Max. Resolution QHD : 2560x1440
Aspect Ratio 16/9
Response Time 8 ms (Typical) / 5-7 ms (OverDrive)
View angles (H/V) 178°/178° (CR>10)
Display colors 1.073 G
Display area 698.112 (H) x 392.688 (V)
Panel Surface Anti-glare
PC Input Range
Horizontal Frequency 74,8-112,3 KHz
Vertical Frequency 50-75 Hz
Max. display Frequency 2560x1440@60 Hz
Inputs/Outputs
Video Inputs
2x HDMI 1.4 Female, 1x VGA (D-sub 15)
Female, 1x DP 1.2, 1x Mini DP 1.2
Audio Input No
Audio Output 1x Earphone (Jack 3,5 mm female)
Speakers No
Operating
Conditions
Operating Temperature 5°C ~ 40°C
Operating Humidity 10 % ~ 85 %, non-condensing
Storage Temperature -20°~ 55°C
Storage Humidity 5 % ~ 95%, non-condensing
USER’S GUIDE
LDLC RS32
EN
Power
On 50 W
Stand-by 0,5 W
AC Power range AC 100 ~ 240 V, 50 ~ 60 Hz
Power Input 12 V 4,5 A
Design
Color
Black borders / Rear Metallic dark
brown
Tilt -5° ~ +15°
Rotation No
Swivel No
Height Adjustment No
VESA Mounting 100 x 100 mm
VESA xation plate
dimensions (W x H)
120x155 mm – Complies with mini PC
VESA plate 75 x 75 mm
Physical
Dimensions without base
(W x H x D)
724,34 x 424,19 x 46,43 mm
Dimensions with base
(W x H x D)
724,3 x 502,6 x 183 mm
Gross / Net Weight 5,5 Kg / 7,6 Kg
Security Kensington Lock No
Controls
Front N/A
Rear Rocker Button
9 languages
English, French, German, Spanish, Italain, Dutch,
Corean, Traditionnal and Simplied Chines
Colors 9300K, 7500K, 6500K, sRGB, User
Modes Standard, Game, Movie, Photo, FPS, RTS
Compatible OS
Windows XP, Windows 7, Windows 8, Windows 10
Accessories
Power Cable/Adaptor Yes: 1,5 + 1 m
VGA (D-Sub) Cable No
DVI Cable No
HDMI to HDMI Yes: 1,5 m
Audio Cable No
Fixation plate
Vesa norm 100 x 100 mm, for mini PC
mounting use only (norm 75 x 75 mm)
Norms

USER’S GUIDE
LDLC RS32
EN
1.3.2 Front view
1.3.3 Rear View
Power Mode Indicator
Light
Power ON : LED blue color (no ash)
Stand by : LED red color (ash)
Power OFF : LED OFF
2 DC-IN port. This port is reserved to the power cord.
3 HDMI 1 port. This port is reserved to a HDMI connection.
4 HDMI 2 port. This port is reserved to a HDMI connection.
5 DP port. This port is reserved to a DP connection.
6 Mini DP port. This port is reserved to a Mini DP connection.
7 VGA port. This port is reserved to a VGA connection.
8 Audio output port. This port is reserved to an external audio device connection.
1
2
3 4 5 6 7 8
1
Rocker Button. Rear control :
Signal source input
OSD Menu Display
Backlight adjustment shortcut key
Volume adjustment shortcut key
Power ON/OFF

USER’S GUIDE
LDLC RS32
EN
2. Installation
• This machine should be installed adjacent to an easily pluggable AC power socket.
• For the sake of safety, we suggest that suitable wall-mounted bracket or base be
used.
• In order to prevent injury, this machine shall be placed on a stable and level
surface or xed on a rm wall.
• DO NOT place this machine in places with mechanical vibration.
• DO NOT place this machine in places where insects are accessible.
• DO NOT install this machine directly opposite to air-conditioner, otherwise its
inner panel may be dewed and cause failure.
• DO NOT place by heating, chimney, expose to direct sunlight, or any direct heat
source. Failure to comply with this warning may lead to damages on screen and
increase the risk of re.
• DO NOT install in a passage way in order to avoid any shock and harm, (on top
of a bed, a chair, a door, in a hallway…).
• DO NOT place this machine in places with strong electromagnetic eld, otherwise
it may be interfered by the electromagnetic wave and get damaged.
2.1 Mounted on wall
2.1.1 Choice of wall bracket
It is recommended to purchase a wall bracket that suits your device dimensions and
weight. The wall support must also comply with the screen’s VESA norm: 100 x 100
mm.
Be sure to follow carefully the wall mount’s instructions. It will indicate you the
different stages, step by step, and the screws to be used according to the wall for
this installation.
If in any doubt for wall-mounting, please ask a specialist to install. Improper installation
may cause instability of this machine.
Please nd a large selection of wall mounts on our website:
http://www.ldlc.com/image-son/meuble/support-mural-tv/c4354/+816-l32h32+fv630-4305.html
2.1.2 Choice of place of installation
The wall to which the screen is to be being installed must be of sufficient space, be
at, steady and be able to support at least four times the weight of the device.

USER’S GUIDE
LDLC RS32
EN
Be sure to allow enough space between the screen and the ceiling, and the projecting
section of the wall, as shown below:
To provide the necessary ventilation and avoid the accumulation of any dust and dirt:
• Do not lay the display at, and do not place it upside down, backwards or at a
slight angle.
• Avoid operating the display on a shelf, a carpet, a bed or in a cabinet.
• Do not cover the display with cloth, curtains, or any other objects such as
newspaper, etc.
• Select a well ventilated area to avoid any risk of overheat. DO NOT place it as
shown below:
Wall
Air circulation is blocked

USER’S GUIDE
LDLC RS32
EN
Fig. 1 Fig. 2
Fig. 3 Fig. 4
2.2 Base Installation
We recommend you to place a soft piece of cloth before to avoid any damage on the
surface panel. Place the monitor on the desk, face down.
Fig. 1: Hold and press the hat and then lift it up from the back cover.
Fig. 2: Install the metal support to the back screw holes, use the 4 pcs machine
screws to lock the support and back.
Fig. 3: Replace the hat cross the support.
Fig. 4: Install the base to the screw hole below the support as the arrow direction,
and lock with 1 PC screw.
Disassembling: Disassemble the base according to the opposite order above.
Do not place the monitor upside down for the base installation.
Note: Handle with care when mounting LCD monitor stand. DO NOT touch the
surface panel. Mishandling or excessive pressure on the panel may cause damage
to the device. Always handle the monitor by the opposite sides in order to avoid direct
contact with the panel.

USER’S GUIDE
LDLC RS32
EN
To allow heat to disperse, leave space between surrounding objects as shown in the
diagram below:
To provide the necessary ventilation and avoid the accumulation of any dust and dirt:
• Avoid operating the display on a shelf, a carpet, a bed or in a cabinet.
• Do not cover the display with cloth, curtains, or any other objects such as
newspaper, etc.
• Select a well ventilated area to avoid any risk of overheat. DO NOT place it as
shown below:
Wall
Air circulation is blocked

USER’S GUIDE
LDLC RS32
EN
2.3 Installation Instructions of the xation plate – Only used for
mini PC mounting
(Fixation plate + Mini-PC screws not included)
2.3.1 Installation of the xation plate (Included)
1. Hold and press the hat and then lift it up from the back cover
2. Unscrew the base below the support as the arrow direction
3. Uninstall the metal support by unscrewing the 4 pcs screws
4. Remove the rear cover
5. Re-Install the base according to steps described in section «2.2 Base
Installation»
6. Attach the xation plate (provided) with the 4 M4*10 screws (provided)

USER’S GUIDE
LDLC RS32
EN
2.3.2 Use with a VESA mounting system (Mini PC)
Your mini PC comes with a VESA bracket and its screws, allowing you to mount it at
the back of this device.
Be sure to follow carefully your Mini PC’s installation instructions. It will indicate you
the different stages, step by step, to realize installation.
General Instructions (Instructions may be different depending on your mini PC
model)
1. Attach the VESA bracket of your Mini-PC to the xation plate of the monitor.
(Compatible with VESA 75x75 mm). Use the screws that were included in the
box of your Mini-PC.
2. Attach the two slightly larger screws to the bottom chassis cover of your Mini-PC.
3. Slide the Mini PC onto the VESA mount bracket.
2.4 Tilt Adjustment
For optimal vison, it is recommended to have the monitor directly in front of you, and
to adjust the view angle in the way that suits you the most.
1. Handle the base in order not to make it fall when you adjust tilt.
2. You can adjust the monitor view angle from -5° forward to +15° back.

USER’S GUIDE
LDLC RS32
EN
2.5 Cables Connection
1. First turn off the power of all the attached equipment.
2. To connect the power cord, plug the adapter cable in the monitor DC-In port.
Plug the appropriate end of the power cord to the adapter, plug the other end to
into an electrical outlet.
3. To connect the signal source cables (HDMI 1 / HDMI 2 / DP / Mini DP / VGA)
connect the appropriate end of the signal cable to the monitor, and the other end
to your computer or any other compatible video device. (When several cables
are plugged, use the Source menu of OSD the select the desired source, or
press when the OSD menu is not displayed).
4. To connect an external audio device: connect the device’s audio cable to the
output audio port of your monitor (only when connecting in HDMI / DP / mini
DP).
2.6 Switch on the screen
Press the power button located on the rocker button at the rear of the display
for a few second:
The Power Led lights in blue when the monitor is powered on.

USER’S GUIDE
LDLC RS32
EN
Signal source input
OSD Menu Display
Backlight adjustment shortcut key
Volume adjustment shortcut key
Power ON/OFF
3. General Instructions
3.1 OSD Menu (On-Screen Display)
Access and control of the OSD Menu is via the rocker button located at the rear of
the screen.
3.1.1 Conguration
1. Press the key of the rocker button to activate the OSD Menu.
2. Press < or > to select the function to set.
3. Highlight and activate the desired sub-menu by pressing the button of the
rocker.
4. Press < or > to select the function to set. Validate with the key .
5. Press < or > to change the settings of the selected function. Validate by pressing
the button .
6. To exit the function setting, return to the highest menu level, exit the OSD Menu,
or return to the previous action, press .
7. Repeat steps 3, 4, 5 and 6 to adjust another function.
3.1.2 Picture
• Backlight: Adjusts the overall image and background screen brightness.
Adjustment value varies from 0 to 100.
• Contrast: Adjusts the image’s contrast. Adjustment value varies from 0 to 100.
• Black Equalize: Adjusts the black level. Adjustment value varies from 0 to 100.

USER’S GUIDE
LDLC RS32
EN
3.1.3 Display (Menu only available when using VGA input source)
• Auto Adjust : Automatically adjusts the image’s size.
• Clock: Adjust the Clock to correct horizontal and vertical wavy noise in the screen
background. Adjustment value varies from 0 to 100.
• H Position: Controls Horizontal Image position within the display area of the LCD.
Adjustment value varies from 0 to 100.
• Phase: To adjust image distorsion and shaking. Adjustment value varies from 0
to 100.
• V Position: Controls Vertical Image position within the display area of the LCD.
Adjustment value varies from 0 to 100.
• Shape: To have a clearer and sharpener image.. Adjustment value varies from 0
to 4.
3.1.4 Color
• Temperature: Color temperature adjustment. Contains 5 modes : 9300K, 7500K,
6500K, sRGB, User.
• The USER mode leads to a sub-menu to adjust the levels of Red, Green and
Blue. Adjustment value varie from 0 to 100. To access this sub-menu,
press when USER is highlighted.

USER’S GUIDE
LDLC RS32
EN
• Hue: Adjust the hue of the entire image. Adjustment value varies from 0 to 100.
• Color Effect: 6 available modes: Standard, Game, Movie, Photo, FPS, RTS.
• Saturation: Adjust color saturation. Adjustment value varies from 0 to 100.
• Gamma: OFF., 1.8, 2.0, 2.2, 2.4 (Only availbale when using VGA source).
• Low Bluelight: ON, OFF. Attenuation function of the amount of blue light emitted
by the screen.
3.1.5 Advance
• Ultra Vivid: OFF., L (Low), M (Middle), H (High).
• Aspect Ratio: Adjust the Aspect Ratio . 16/9, 4/3, 5/4, 1/1, Full.
• OD (OverDrive): ON. / OFF : Adjust the response time (8ms typical / 5-7ms OD).
3.1.6 Input
Auto Select To auto-select an available input
VGA To select VGA input
Mini DP To select Mini DP input
DP To select DP input
HDMI 1 To select HDMI 1 input
HDMI 2 To select HDMI 2 input

USER’S GUIDE
LDLC RS32
EN
3.1.7 Audio
• Volume: Adjust the sound volume. Adjustment value varies from 0 to 100.
• Mute: ON, OFF.
3.1.8 Other
• Language: OSD control menus are available in 9 languages : English, French,
German, Spanish, Italian, Dutch, Corean, Traditional and simplied Chinese.
• Menu Time: Adjust the display time of the OSD Menu. Adjustment value varies
from 10 to 60.
• Information: Displays input source and resolution.
• OSD H-Position: Adjusts the horizontal position of the OSD menu. Adjustment
value varies from 0 to 100.
• OSD V-Position: Adjusts the vertical position of the OSD menu. Adjustment value
varies from 0 to 100.
• Transparency: Adjusts the transparency of the OSD menu. Adjustment value
varies from 0 to 100.
• Reset: Selecting Screen reset allows you to reset all OSD settings from PICTURE
setting.

USER’S GUIDE
LDLC RS32
EN
3.2 Resolutions and frame rates
VGA Refresh Rate Horizontal frequency
720*400 70 Hz 31,5 kHz
640*480 60 Hz 31,5 kHz
800*600 60 Hz 37,9 kHz
1024*768 60 Hz 48,4 kHz
1280*720 60 Hz 45,0 kHz
1280*960 60 Hz 60,0 kHz
1280*1024 60 Hz 64,0 kHz
1360*768 60 Hz 47,7 kHz
1600*900 60 Hz 60,0 kHz
1920*1080 60 Hz 67,5 kHz
HDMI Refresh Rate Horizontal frequency
720*400 70 Hz 31,5 kHz
640*480 60 Hz 31,5 kHz
800*600 60 Hz 37,9 kHz
1024*768 60 Hz 48,4 kHz
1280*720 60 Hz 45,0 kHz
1280*960 60 Hz 60,0 kHz
1280*1024 60 Hz 64,0 kHz
1360*768 60 Hz 47,7 kHz
1600*900 60 Hz 60,0 kHz
1920*1080 60 Hz 67,5 kHz
2560*1440 60 Hz 88,7 kHz
DP Refresh Rate Horizontal frequency
720*400 70 Hz 31,5 kHz
640*480 60 Hz 31,5 kHz
800*600 60 Hz 37,9 kHz
1024*768 60 Hz 48,4 kHz
1280*720 60 Hz 45,0 kHz
1280*960 60 Hz 60,0 kHz
1280*1024 60 Hz 64,0 kHz

USER’S GUIDE
LDLC RS32
EN
DP Refresh Rate Horizontal frequency
1360*768 60 Hz 47,7 kHz
1600*900 60 Hz 60,0 kHz
1920*1080 60 Hz 67,5 kHz
2560*1440 60 Hz 88,7 kHz
Unlisted modes on this table cannot be supported. For an optimal resolution, we suggest to
choose one of the listed mode.
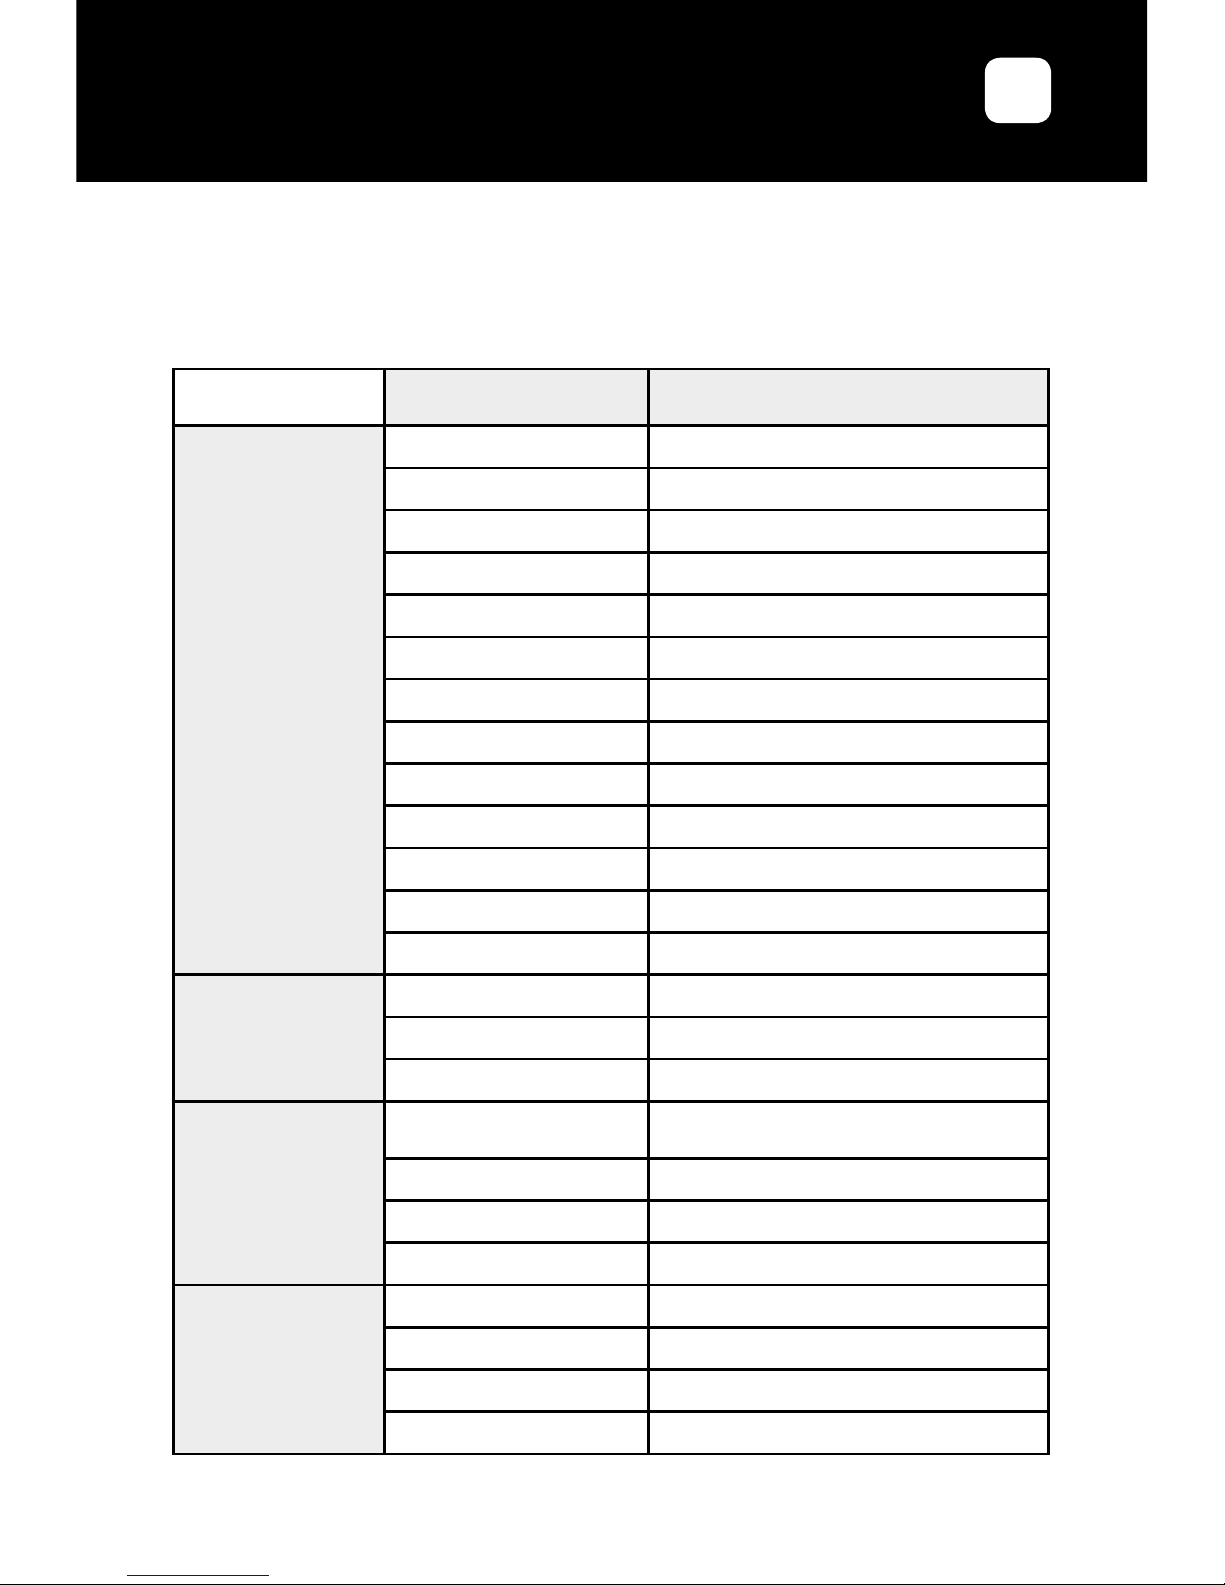
3.3 Basic Troubleshooting
Before contacting LDLC’s Customer Service, please proceed the following basic
checks. If you cannot solve the problem by following below instructions, please
contact our Technical Support team.
Phenomenon Troubleshooting
Absence of image
• Make sure the display is well plugged into a properly powered outlet.
• Ensure you correctly powered on the screen.
• Check the brightness and contrast settings of image.
The power Led does not light up
• Press the button to make sure the monitor is turned on.
• Make sure that the power cable is correctly connected to the monitor
and an electrical outlet.
Blurred or imperfect image
• Make sure that the video cable is correctly plugged.
Image over light or over dark
• Adjust the brightness and contrast setting in the OSD menu.
The image is not correctly
centered or sized
• Activate the Auto Adjust function of the Display Menu of the OSD to auto
adjust the image (VGA input only).
• Adjust the horizontal or vertical position via the OSD Menu (VGA input
only).
The image jumps and waves
appear on the screen
• Make sure the used signal source cable is well plugged to the screen,
and to the PC.
• Keep any electrical device that may cause interferences away.
Colors are abnormal (whites
don’t appear white)
• Check the used signal source cable to ensure its connectors are not
damaged.
• Perform a Reset via the OSD Menu.
• Adjust the color settings or select another color temperature via the
OSD Menu.

USER’S GUIDE
LDLC RS32
EN
Phenomenon Troubleshooting
Blurred or unclear image
• Activate the Auto Adjust function of the Display Menu of the OSD to auto
adjust the image (VGA input only).
• Set the Clock and Phase settings on the OSD Menu (VGA input only).
No sound or too low sound
volume
• Make sure that the external device cable is correctly plugged.
• Adjust the volume settings on the volume Menu of OSD.
Warranty terms
1. Contractual warranty regulations of GROUPE LDLC.
GROUPE LDLC’s guarantee is limited to the replacement of the product itself or
of some parts which are recognized as defective, by an identical or comparable
product, or by new or as-new parts.
Warranty covers repair or replacement of the defective product during the warranty
period, as described herein :
Warranty period :
1. 24 months, from GROUPE LDLC’s invoice date
2. Defective pixels covered by warranty: if at least 7 defective pixels are distributed
over the panel surface, or 4 consecutive defective pixels.
3. You may combine to the purchase of your display the « 0 dead pixel warranty up
to 3 months after purchase » on our website : http://www.ldlc.com
Careful: to be valid, the purchase of this warranty must be done simultaneously with the purchase of a
display.
2. Warranty Exclusions
This warranty is excluded in the following cases :
This warranty does not include damages due to external conditions, improper use or
intervention by unqualied repair personnel.
GROUPE LDLC has no responsibility for any loss, or data or software corruption of
the equipment or data carriers that are returned for technical intervention, whether
the products are under warranty or not.
GROUPE LDLC commits itself to replace some parts which are recognized as
defective, and to repair the defective goods provided to the client by GROUPE LDLC.

USER’S GUIDE
LDLC RS32
EN
To the client shall be granted an equivalent or a better product, or a credit note, if the
product cannot be replaced by an identical one,
Subject to the compulsory provisions of the law, any responsibility of GROUPE
LDLC is limited to the obligations dened in these Conditions.
GROUPE LDLC will not be held liable for any material or immaterial damage which
may arise during intervention in case the client sends goods that have not been
supplied by the Seller.
The warranty will not be applicable and LDLC may not be held liable for any defects
or damages directly or indirectly due to the following:
• Extended or unprotected storage.
• Any negligence, error of connection or handling, maintenance or use of the
equipment not complying with the technical specications provided by GROUPE
LDLC, or, more generally a defective or awkward use.
• Any addition of accessory or complementary mechanism, or the use of any parts
required for the equipment’s exploitation not complying the technical specications
provided by GROUPE LDLC.
• Any mechanical, electronic, electrical or other modication or transformation to
the equipment or its connecting mechanism by any person not approved by LDLC.
• In the case of bankruptcy or impossibility of supply of the manufacturer, the
Client may not claim against LDLC, which shall assume no responsibility in this
manufacturer’s goods.
3. Warranty Limitations
GROUPE LDLC guarantee is limited to product repairing, replacement or repayment
in value of the goods which are recognized as defective by LDLC, taking into account
how they have been used, at LDLC’s free choice.
GROUPE LDLC only commits itself to replace some parts which are recognized as
defective, and to repair the damages on defective goods provided to the client by
GROUPE LDLC. Thus this warranty does not cover the cost of manual labor of the
following operations : disassembling, reassembling, transporting, except in the case
of standard exchange. GROUPE LDLC After Sale Department may only intervene
under GROUPE LDLC’s warranty or under the legal warranty.
GROUPE LDLC will not be held liable for any material or immaterial damage which
may arise during intervention in case the client sends goods that have not been
supplied by the Seller.
In any way and under no circumstances, GROUPE LDLC may be held liable for any
other costs, charge, damages, expense or loss of any kind, resulting from the use
of the goods, the presence of a virus (or of a pre-programmed mechanism having a
similar effect) in the equipment, whatsoever, whether directly, indirectly (and without

USER’S GUIDE
LDLC RS32
EN
this list being exhaustive) loss of date or income or any other commercial damage.
GROUPE LDLC will not be held liable for events independent of its will that would
make it impossible to ensure the provision of proposed services, included, but not
limited to, failure of telephone line, airports shutdowns interrupting goods delivery,
natural disasters, whether conditions, strikes, and the impossibility to contact the
Client to conrm the different stages related to assumption of the equipment’s
guarantee.
4. Reclamation and After Sale Service
In case of failure of the product inside the warranty period, LDLC recommend the
Client to nd out the origin of the problem through a summary technical verication
using the included user’s guide.
If the problem persists, the Client is invited to contact our Technical Support by phone
or by email, as detailed below, and provide the following details:
• His customer number;
• The original purchase invoice of the equipment;
• Detail of the malfunction that occurred ;
• Detail of the eventual hardware of software changes to the equipment;
• The evidence that the defect is not the result of a third party equipment or software;
• The exact description of all error that are displayed;
A technician of GROUPE LDLC will diagnose and try to solve the issue by phone or
by email. If the problem cannot be solved, and provided that the defect is covered by
this contractual warranty, LDLC.com will repair or replace the equipment.
If GROUPE LDLC does not nd any defect or malfunction, or if the client does not
full one of the condition detailed in this section, the company reserves the right to
charge for parts and labor.
Return of goods is exclusively by post, if not specied otherwise. Any return of goods
requires prior agreement of LDLC.com and a number of return which can be obtained
free via the CONTACTS page accessible since the banner page from the site.
The Client will receive by the means considered to be most convenient by an
agreement of return.
In the absence of agreement of return, goods shall will be returned to the Client or
held subject to his disposition, at his risk and, any transport, storage, handling costs
beard by him.
Return of goods is at the expense and risk of the customer. The Client is therefore
advised to declare the value of the goods and subscribe a shipping insurance.
After obtaining the return agreement the Client has seven days to carry out the return
of faulty goods to LDLC.

USER’S GUIDE
LDLC RS32
EN
For more detailed information, please read our “Sales Conditions” available on our
website.
5. Transfer of ownership clauses and warranties
If the equipment is passed on to another user, this warranty may be transferred.
However, the new user will benet from this warranty only for the remainder of
the original warranty period, under the condition to possess the Original proof of
purchase.
6. To contact us
You will nd any related information on our website: http://www.ldlc.com
As an individual, please contact our Technical support :
• By e-mail, via our page: http://www.ldlc.com/faq/
• By phone:
From France: 04 27 46 6000*
From Abroad: + 33 4 27 46 6000*
*Call rate: any surcharge, the call rate is the one applied by your operator.
As a professional, please contact our Technical support :
• By e-mail, via our CONTACT page: http://www.ldlc-pro.com/content/2757.html
• By phone (Unique Number):
From France: 04 27 46 6005*
From Abroad: +33 4 27 46 6005*
*Call rate: any surcharge, the call rate is the one applied by your operator.
 Loading...