

Page 1

LDG FT-Meter
g
For Yaesu FT-857 and FT-897
Version 1.1
St. Leonard MD 20685-2903 USA
LDG Electronics
1445 Parran Road, PO Box 48
Phone: 410-586-2177
Fax: 410-586-8475
ldg@ldgelectronics.com
www.ld
electronics.com
1
Page 2

LDG FT-Meter
For Yaesu FT-857 and FT-897
Table of Contents
Introduction 2
Jumpstart, or “Real hams don’t read manuals!” 3
Specifications 3
Getting to know your FT-Meter 4
Installation 6
Setup 8
Initial Calibration 8
Receive parameter setup 8
Transmit parameter setup 9
Operation 10
Application Notes 10
Base Station Use 10
Mobile Use 10
Other Applications 10
Care and Maintenance 11
Technical Support 11
Warranty and Service 11
Feedback 11
Introduction
Congratulations on selecting the LDG FT-Meter. The FT-Meter provides accurate and precise
readings for a wide range of receive and transmit parameters. While most users will choose SMeter readings on receive and Power Output on transmit, several other useful readings are
available. The FT-Meter simply plugs into the meter jack of your FT-857 or FT-897 transceiver.
It is highly portable, in keeping with the popularity of these radios for use on Dxpeditions.
LDG pioneered the automatic, wide-range switched-L tuner in 1995. From its laboratories near
the Nation's Capitol, LDG continues to define the state of the art in this field with innovative
automatic tuners and related products for every amateur need.
2
Page 3

Jumpstart, or “Real hams don’t read manuals!”
Ok, but at least read this one section before you transmit:
1. Set up your transceiver for normal operations
2. Plug your FT-Meter into the meter jack using the right angle plug. This is on the bottom of
the front panel, under the FUNC button on the FT-857, and just to the right of the main
tuning knob on the FT-897. Plug the other end of the cable into the FT-Meter.
3. Connect a 12 volt power supply capable of delivering 100 mA to the 2.5 x 5.5 mm
coaxial
power jack (center positive) if desired. The 12 volt connection is for the light only; the meter
will work fine without it.
4. Select the parameters you want to display on receive and transmit from the radio's extended
setup menu (items 60 and 61, respectively)
5. Operate normally; the meter continuously displays the selected values.
Specifications
• S-meter, Discriminator or Voltage on receive
• Power output, SWR, Modulation, ALC or Voltage on transmit
• Externally powered cool blue backlighting
• On/Off switch for backlight.
• Size: 3.5 x 3 x 2 inches
• Sensitive 500 micro-amp meter movement
• Light requires 12 volts at 100 ma, 2.5 x 5.5 mm jack, center positive
3
Page 4
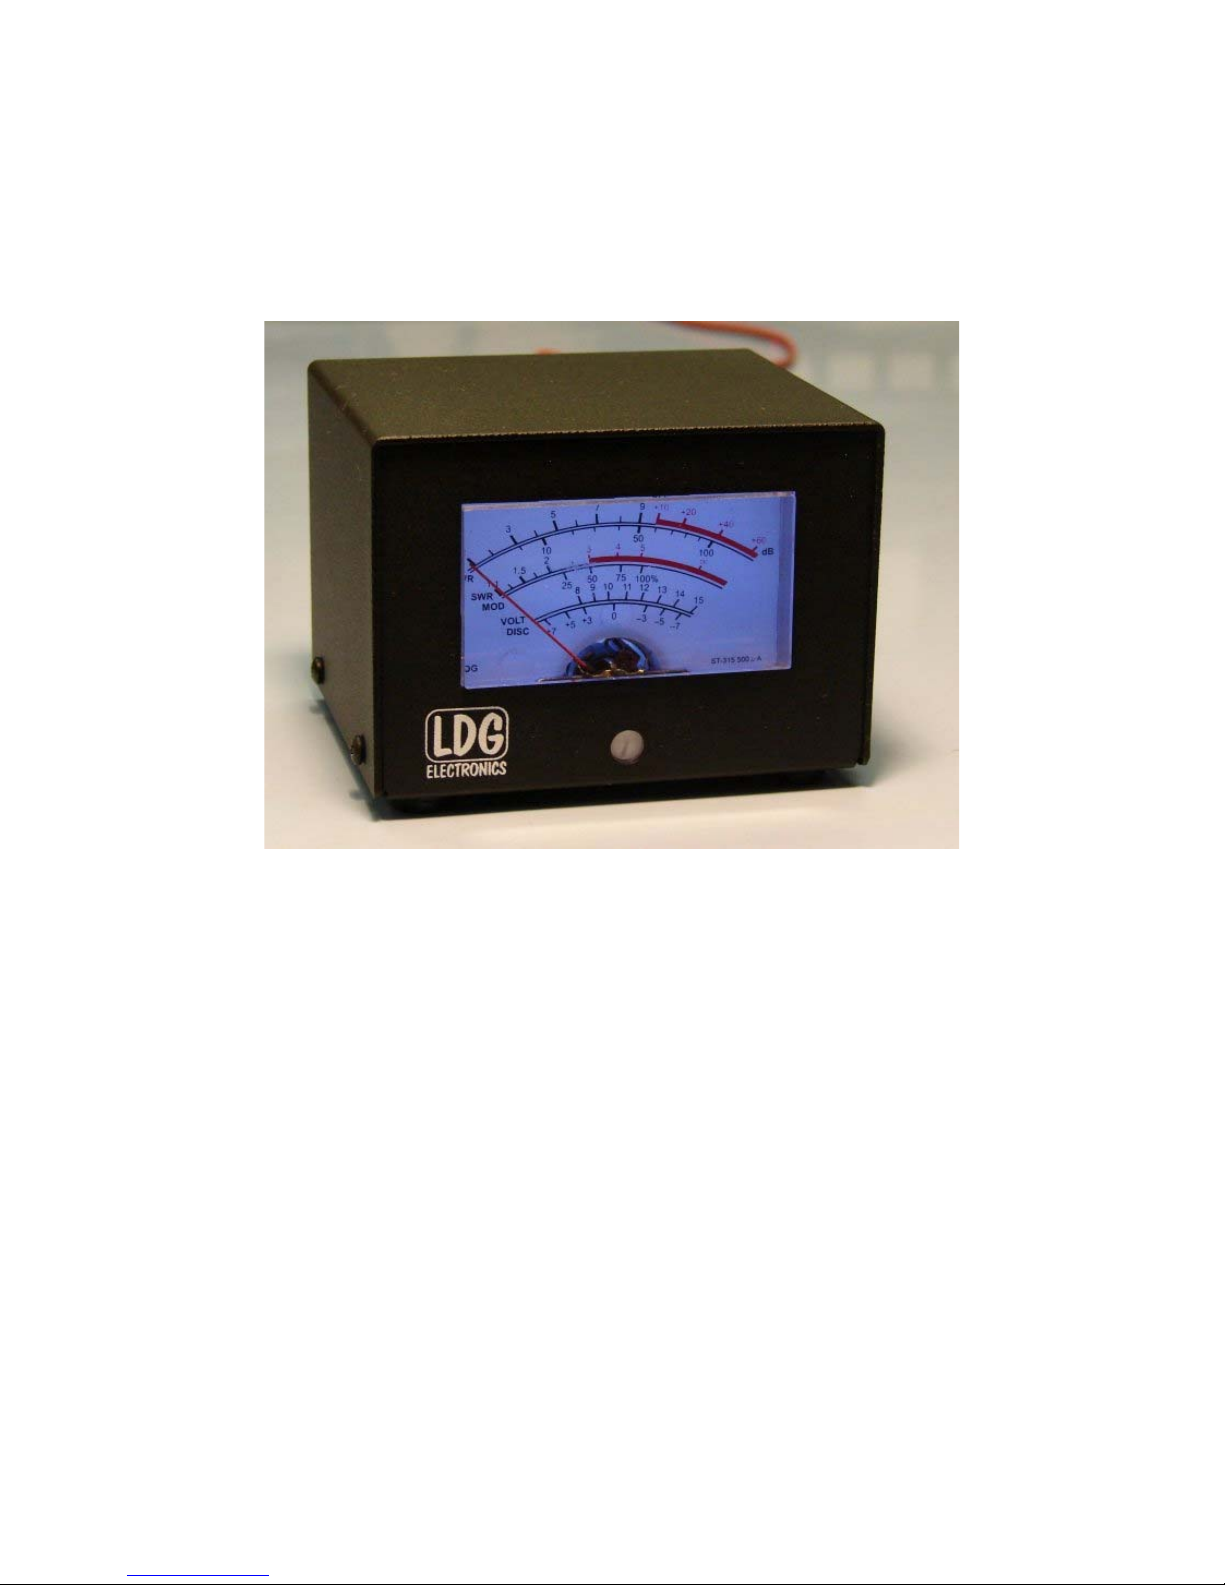
Getting to know your FT-Meter
Your FT-Meter is a quality, precision instrument that will give you many years of outstanding
service; take a few minutes to get to know it.
The front panel presents the meter face with seven calibrated scales:
S: Signal strength on receive, calibrated in "S" units and dB above S9
ALC: Automatic Level Control voltage on transmit (shares S Meter scale)
PWR: Transmitter output power in Watts
SWR: Standing Wave Ratio on transmit
MOD: Percent modulation on transmit
VOLT: Power supply voltage on receive or transmit
DISC: Discriminator reading on receive
You will select two of these scales for display, one for receive mode and one for transmit mode,
from the radio's setup menu. You can change among them as often as you like.
There are no controls on the FT-Meter; operation is fully automatic.
4
Page 5

On the rear panel, the 2.5 x 5.5 mm jack coaxial DC power connector is on the left.
The three foot
stereo 1/8” input cable connects to the radio attaches on the right. This is a standard stereo cable,
If you wanted to extend the distance away from the radio, a standard headphone extension cable
would work fine. Near the top is the on off switch for the back light.
The brightness control is in the middle and can be adjusted with a small screwdriver. The meter
zero calibration can also be adjusted with a small screwdriver and is near the bottom of the back
panel and will be described in the calibration section.
5
Page 6

Installation
The FT-Meter is intended for indoor use only; it is not water resistant. If you use it outdoors
(packing up Mount Everest, for example) you must protect it from rain.
Position your FT-Meter in a convenient spot on your operating position, anywhere within reach
of its six-foot cable. Plug the cable into your transceiver as follows:
The meter jack on the FT-857 is located on the bottom of the front panel, under the FUNC button
on the left.
6
Page 7

The meter jack on the FT-897 is similarly located on the bottom of the front panel, but a little
right of center, just to the right of the main tuning knob.
Your FT-Meter requires 12 volts DC at 100 ma to operate the light. Connect a suitable power
supply to the 2.5 x 5.5 mm
coaxial DC input jack using the provided 2.5 x 5.5 mm jack coaxial
power connector (center positive). If you don't want to use the meter light, simply leave the
power jack unconnected; the meter itself is a passive device and will work fine without the 12
volt input.
7
Page 8

Setup
Your FT-Meter will display any two parameters you select, one on receive and one on transmit.
You specify the parameters in the radio's extended setup menu.
Press and hold the FUNC button on the radio to bring up the menu. Rotate the SELECT knob to
menu item 1, labeled "EXT MENU" and turn the main tuning knob until the setting is "ON". This
enables the extended menu items.
Initial Calibration
When off, the meter needle should rest on the bottom index mark of the SWR scale, labeled
"1:1". If it doesn't, insert a small flat-blade screwdriver into the hole under the center of the meter
face into the needle adjustment slot. Gently turn the screwdriver to center the needle on the mark.
Rotate the SELECT knob to menu item 60, labeled "MTR ARX SEL". Turn the main tuning
knob until the menu option reads "FS". This provides a full scale meter reading for calibration.
Check that the meter settles at the top of the red portion of the S Meter scale, just to the right of
the +60 mark.
If the meter needs calibration, locate the FS adjustment on the back of the meter enclosure. Adjust
it with a small flat-blade screwdriver until the meter is exactly at the top of the red arc.
Your meter is now calibrated. The meter is calibrated at the factory, but shipping or other forces
may require a recalibration. You should only have to do this once, when you first set up the
meter.
Receive parameter setup
Leave the SELECT knob on menu item 60, labeled "MTR ARX SEL" to set the parameter that
will be displayed during receive. Turning the main tuning knob, you can select from the
following options:
OFF: no meter display on receive
VLT: power supply voltage
CTR: discriminator center meter
SIG: received signal strength ("S" meter)
Select whichever parameter you want displayed on receive.
8
Page 9

Transmit parameter setup
Turn the SELECT knob to menu item 61, labeled "MTR ATX SEL". This sets the parameter that
will be displayed during transmit. Turning the main tuning knob, you can select from the
following options:
OFF: no meter display on transmit
VLT: power supply voltage
SWR: standing wave ratio
MOD: deviation level
ALC: automatic level control voltage
PWR: transmit power
Select whichever parameter you want displayed on transmit.
Turn the SELECT knob to menu item 1, and reset the extended menu option to "OFF" if desired.
Press and hold the radio's FUNC button to exit the setup menu.
You can repeat this process to select different parameters as often as you like. You can even
change parameters while operating.
9
Page 10

Operation
To operate your FT-Meter you just, well, operate. The meter has no controls and requires no input
from you. Simply use your transceiver normally, and your FT-Meter will continuously display the
selected parameters.
Application Notes
Base Station Use
Your FT-Meter can go practically anywhere on your operating desk. The three foot cable gives
you a lot of latitude in where you place it. Some obvious choices are on top of the radio or beside
your computer monitor.
Mobile Use
The FT-Meter is ideal for mobile operation. You can mount the meter on the dashboard with
Velcro tape in any convenient location. The meter is much easier to read than the radio's display,
especially if the radio is mounted at any distance from the driver's position.
If you choose to connect the 12 vdc input to light up the meter, be sure to use a fused power line
(not provided by LDG). LDG recommends a 1 amp "fast blow" fuse.
Mobiling with the FT-Meter is great, but don't be distracted by its beautiful face; keep your eyes
on the road!
Other Applications
LDG designed your FT-Meter specifically for the Yaesu FT-857 and FT-897 transceivers, and
does not recommend using it in any other application. However, the meter is in fact simply a 500
micro-amp meter movement; the calibration potentiometer gives you a range of .5 - 2 ma. If you
choose to use it in a different application, take care not to exceed the maximum current
specification; the meter movement will be damaged or destroyed by current in excess of this
specification.
10
Page 11

Care and Maintenance
Your FT-Meter tuner is essentially maintenance-free. The outer case may be cleaned as needed
with a soft cloth slightly dampened in a mild household cleaning solution. Do not use solvents of
any kind on the plastic meter face.
As with any modern electronic device, your FT-Meter can be damaged by temperature extremes,
water, impact or static discharge.
Technical Support
We are happy to help you with your product. Telephone technical support is available at 410-5862177 weekdays from 9 am to 5pm Eastern Time. Inquiries by Fax at 410-586-8475 are welcome,
and prompt e-mail support is available at ldg@ldgelectronics.com.
Warranty and Service
Your product is warranted against defects in parts or workmanship for two years from purchase.
The warranty does not cover damage due to abuse or exceeding specifications. This warranty
applies to the original purchaser only; it is not transferable. A copy of the receipt showing the
purchaser’s name and the date of purchase must accompany units returned for warranty service.
All returns must be shipped to us pre-paid; we will not accept units with postage due. A return
form is provided on our web site for your convenience.
If you need to return your product to us for service, package it carefully, keeping in mind that we
will re-use your packaging to return the unit to you. Download the return form from our web site
(www.ldgelectronics.com), fill it out and return it with your tuner. A self-addressed returnshipping label, while not required, will help insure speedy and accurate delivery of your repaired
unit. Include a full description of the problem, along with your name, address and a phone
number or e-mail address where we can reach you with any questions. Repairs average about 3 to
6 weeks.
We will be glad to service your LDG product after the warranty period has ended. We will notify
you of repair charges by phone or e-mail, and bill you after repairs are completed.
Visit LDG’s web site for support, sales and for information on exciting new products from LDG.
You can find us on the web at
www.ldgelectronics.com
.
11
 Loading...