

LCT0804/ver.1.0 www.hrcctv.com
ALLARMED SPEED DOME
User Manual
LCTSD318
LCTSD326
LCTSD336
User Manual
LCTSD318-326-336
pag.
2
www.hrcctv.com
NORME GENERALI DI SICUREZZA -
General safety recommendations
Sicurezza delle persone - Safety warnings
Leggere e seguire le istruzioni - Tutte le
istruzioni per la sicurezza e per l'operatività
devono essere lette e seguite prima che il
prodotto sia messo in funzione.
Precauzioni particolari - Rispettare
tassativamente l'ordine delle istruzioni di
installazione e collegamento descritte nel
manuale. Verificare le indicazioni riportate sulla targa di
identificazione: esse devono corrispondere alla vostra rete
elettrica di alimentazione ed al consumo elettrico. Conservate le
istruzioni per una consulta futura.
Read and follow the instructions - Read the installation
instructions before connecting the system to its power source.
Follow these guidelines to ensure general safety.
In order to prevent injury, burns or electrical shock to yourself
and others, follow the connection instruction plan carefully.
Sicurezza del prodotto - Product Safety
Non posizionare in prossimità di liquidi oppure in un ambiente ad
umidità eccessiva.
Non lasciare penetrare del liquido o corpi estranei all'interno
dell'apparecchiatura.
Non ostruire le griglie di aerazione.
Non sottoporre all'esposizione dei raggi solari oppure in prossimità
di fonti di calore.
Do not use the product in a wet location.
Never push a foreign object through an opening inside the
product.
Slots and openings are provided for ventilation and should never
be covered.
Do not place under direct sunlight or heat sources.
INFORMAZIONI SULL’AMBIENTE ENVIRONMENT INFORMATION
Note per lo smaltimento del prodotto
valide per la Comunità Europea
Questo prodotto è stato progettato e
assemblato con materiali e componenti
di alta qualità che possono essere
riciclati e riutilizzati. Non smaltire il
prodotto come rifiuto solido urbano ma
smaltirlo negli appositi centri di
raccolta. E’ possibile smaltire il
prodotto direttamente dal distributore
dietro l’acquisto di uno nuovo,
equivalente a quello da smaltire. Abbandonando il prodotto
nell’ambiente si potrebbero creare gravi danni all’ambiente
stesso. Nel caso il prodotto contenga delle batterie è
necessario rimuoverle prima di procedere allo smaltimento.
Queste ultime debbono essere smaltite separatamente in
altri contenitori in quanto contenenti sostanze altamente
tossiche.
Il simbolo rappresentato in figura rappresenta il bidone dei
rifiuti urbani ed è tassativamente vietato riporre
l’apparecchio in questi contenitori.
L’immissione sul mercato dopo il 1° luglio 2006 di prodotti
non conformi al DLgs 151 del 25-07-05 (Direttiva RoHS
RAEE) è amministrativamente sanzionato.
Disposal of waste products for European Union
This products was designed to minimize their impact on the
environment by reducing or eliminating hazardous
materials and designing for recyclables.
This product should be handed over to a designated
collection point, e.g., on an authorized one -for-one basis
when you buy a new similar product or to an authorized
collection site for recycling waste electrical and electronic
equipment. Improper handling of this kind of waste could
have a possible negative impact on the environment and
human health due to potentially hazardous substances.
This symbol indicates that this product has not to be
disposed of with your household waste, according to the
WEEE Directive.
For more information about where you can drop off your
waste equipment for recycling, please contact your local
city waste authority, or your household waste disposal
service.
GARANZIA - Warranty
Questa garanzia ha validità di 2 anni a partire dalla data
di acquisto assicurata solo dietro presentazione della
fattura o scontrino rilasciati al cliente dal rivenditore.
L’assistenza gratuita non è prevista per i guasti causati da:
-Uso improprio del prodotto, immagazzinamento
inadeguato, cadute o urti, usura, sporcizia, acqua, sabbia,
manomissione da personale non autorizzato del prodotto
rispetto a quanto previsto nei manuali d’uso inclusi.
-Riparazioni, modifiche o pulizia effettuate da centri
assistenza non autorizzati da HR EUROPE.
-Danni o incidenti le cui cause non possono essere attribuite
alla HR EUROPE, comprendenti e non limitati a fulmini,
eventi naturali, alimentazione e ventilazione inadeguata.
This warranty is valid for 2 years from the date of
purchase obtained only against presentation of the
original invoice/ cash ticket issued to the customer by
the retailer.
Warranty repair service is excluded if damage or defects
have been caused by:
-Improper use, incorrect storage, dropping or shocks,
corrosion, dirt, water, handing or operation of the product
as referred to in the users’ manuals.

User Manual
LCTSD318-326-336
www.hrcctv.com pag.3
SUMMARY
1. Introduction............................................................................................................................... 4
1.1 Technical specific ............................................................................................ 4
LCTSD318......................................................................................................................................4
LCTSD326......................................................................................................................................4
LCTSD336......................................................................................................................................4
1.2 Side identification............................................................................................. 5
2. Installation................................................................................................................................. 6
2.1 Preparations ..................................................................................................... 6
2.2 Brackes assembling ............................................................................................ 6
2.3 Connection....................................................................................................... 6
2.4 Switch adjustment ............................................................................................ 8
3. Menu Configuration................................................................................................................ 10
3.1 Menu Operation................................................................................................. 10
3.2 Boot-up Screen ................................................................................................. 11
3.3 Menu explanation .............................................................................................. 12
3.4 System Setup .................................................................................................... 13
3.5 Lens – Optics setup............................................................................................. 14
3.6 CAMERA – Camera Setup ...................................................................................... 15
3.7 PAN/TILT – PTZ setup .......................................................................................... 16
3.8 Auto running – Automated setup........................................................................... 16
3.9 Privacy mask – Privacy Aree setup ......................................................................... 18
3.10 Alarm - Alarm setup ......................................................................................... 19
4. APPENDIX ............................................................................................................................... 21

User Manual
LCTSD318-326-336
pag.
4
www.hrcctv.com
1. Introduction
1.1 Technical specific
Specifics Details
Preset 220
Tour 4 – max 27 Preset
Cruise 4
Pattern 4
Horizontal Movimento 360° ; speed 300°/sec.
OSD password Ok
Proportional Pan/Tilt Ok
Day/night Auto, Color, Night (select)
S/N Ratio >50dB
Electronics shutter 1/1 - 1/10,000 sec., 22 steps
White bilance Auto, ATW, Inside, Outside, One-Push, Manual
Gain Auto/Manual ( -3dB , 28dB, 2dB steps)
AE control Auto, Manual, Priority Mode, Bright, EV compensation, Back light compensation
Back Light Compensation On/Off
Privacy Zone 8
Input / output Alarm 8 / 1
Autorunnig ok
Auto Flip 180° Tilt
Video Output VBS: 1.0Vp-p (sync negative), Y/C output
Security grade IP66
Environmental temperature -10° ~ 50°C ; 95% UR
Power – Uptake 24VAC nominal (18-30VAC) - 10VA min / 90VA max heating up
Language Italian - English - French – Spanish
Weight 3,1 Kg
Size (With Wall brachet LCTST300M) 325mm (H) x 220mm (Ø) x 290mm (P)
LCTSD318
camera Module Sony FCB-EX480CP
Image Sensor 1/4 type EXview HAD CCD
Pixels Approx. 440,000 pixels
Lens 18x Zoom, f=4.1mm (wide) to 73.8 mm (tele), F1.4 to F3.0
Digital Zoom 12x (216x with optical zoom)
Vision (horizontal) 48° (wide end) to 2.8° (tele end)
Min. functioning distance 35mm (wide end) to 800mm (tele end)
Min. Lighting 0.7 lx (typical) (50 IRE)
LCTSD326
camera Module Sony FCB-EX980P
Image Sensor 1/4 type EXview HAD CCD
Pixels Approx. 440,000 pixels
Lens 26x Zoom, f=3.5 (wide) to 91.0 mm (tele), F1.6 to F3.8
Digital Zoom 12x (312x with optical zoom)
Vision (horizontale) 55° (wide end) to 2.3° (tele end)
Min. functioning distance 320mm (wide end) to 1500mm (tele end)
Min. Lighting 1.0 lx (typical) (50 IRE)
LCTSD336
camera Module Sony FCB-EX1000P
Image Sensor 1/4 type EXview HAD CCD
Pixels Approx. 440,000 pixels
Lens 36x optical zoom, f=3.4 mm (wide) to 122.4 mm (tele), F1.6 to F4.5
Digital Zooml 12x (432x with optical zoom)
Vision (horizzontale) 57.8° (wide end) to 1.7 ° (tele end)
Min. functioning distance 1.5 m at tele end
Min. Lighting 1/60s. mode: 1.4 lux typical (F1.6, 50 IRE) / 1/4 s mode: 0.1 lux typical (F1.6, 50 IR
User Manual
LCTSD318-326-336
www.hrcctv.com pag.5
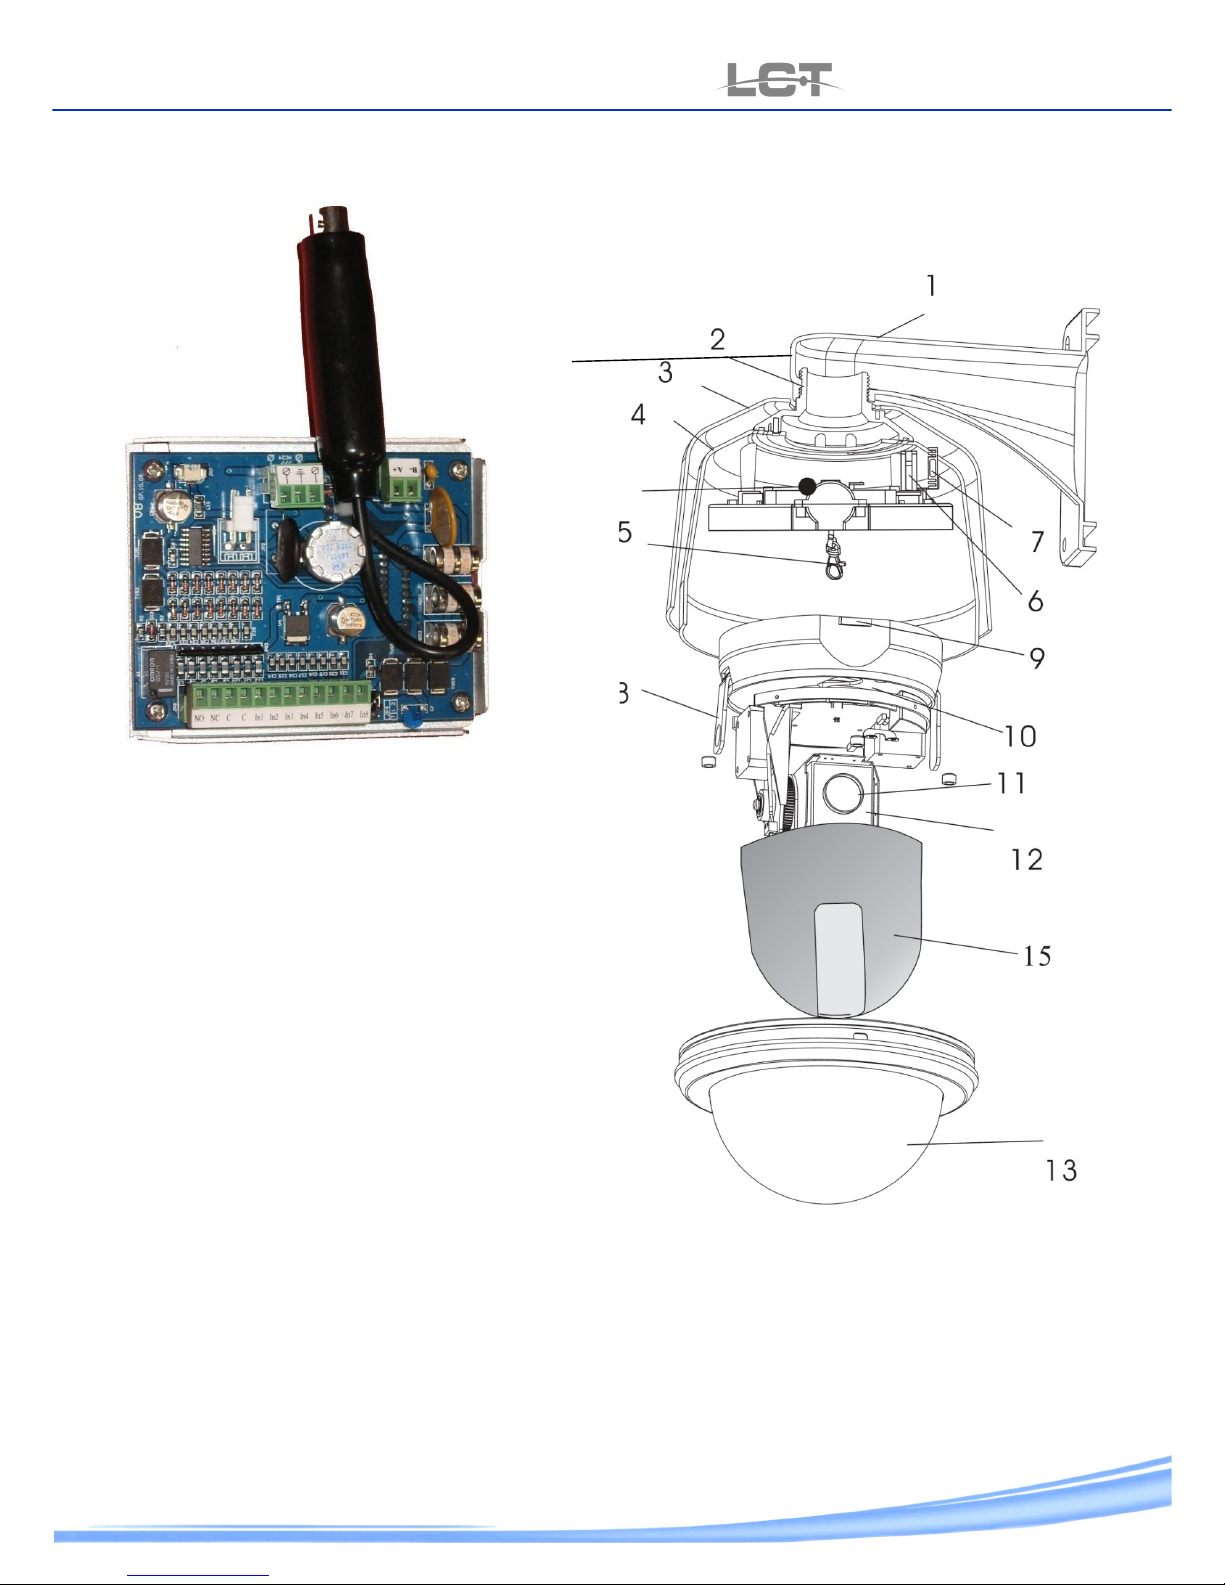
1.2 Side identification
1. Bracket of wall to fix
2. Threaded inside attack
3. Drip
4. Inside custody
5. Security hook
6. Fan
7. Heating up plate
8. Hook-up lever and quick shell out
9. Hook tack on of security
10. Speed Dome block off
11. Objective
12. camera module
13. Transparent cover
14. Connection card
15. Inside shell blot out
8
14
User Manual
LCTSD318-326-336
pag.
6
www.hrcctv.com
2. Installation
2.1 Preparations
Precautions
• Qualified and experienced person can carry out the installation. In many countries and areas licensed people is required.
• Before the installation and connection put off the camera .
• Do not putin the camera near to the air vent of the air conditioner.
• To wall montage, lay up for LCTST300M bracket.
• Installation surface.
• Precaution: disassemble can only be carried out by qualified people.
• For fixing to wall make the necessary article of tool shop (ad es. plug, anchorage screw, etc.) .
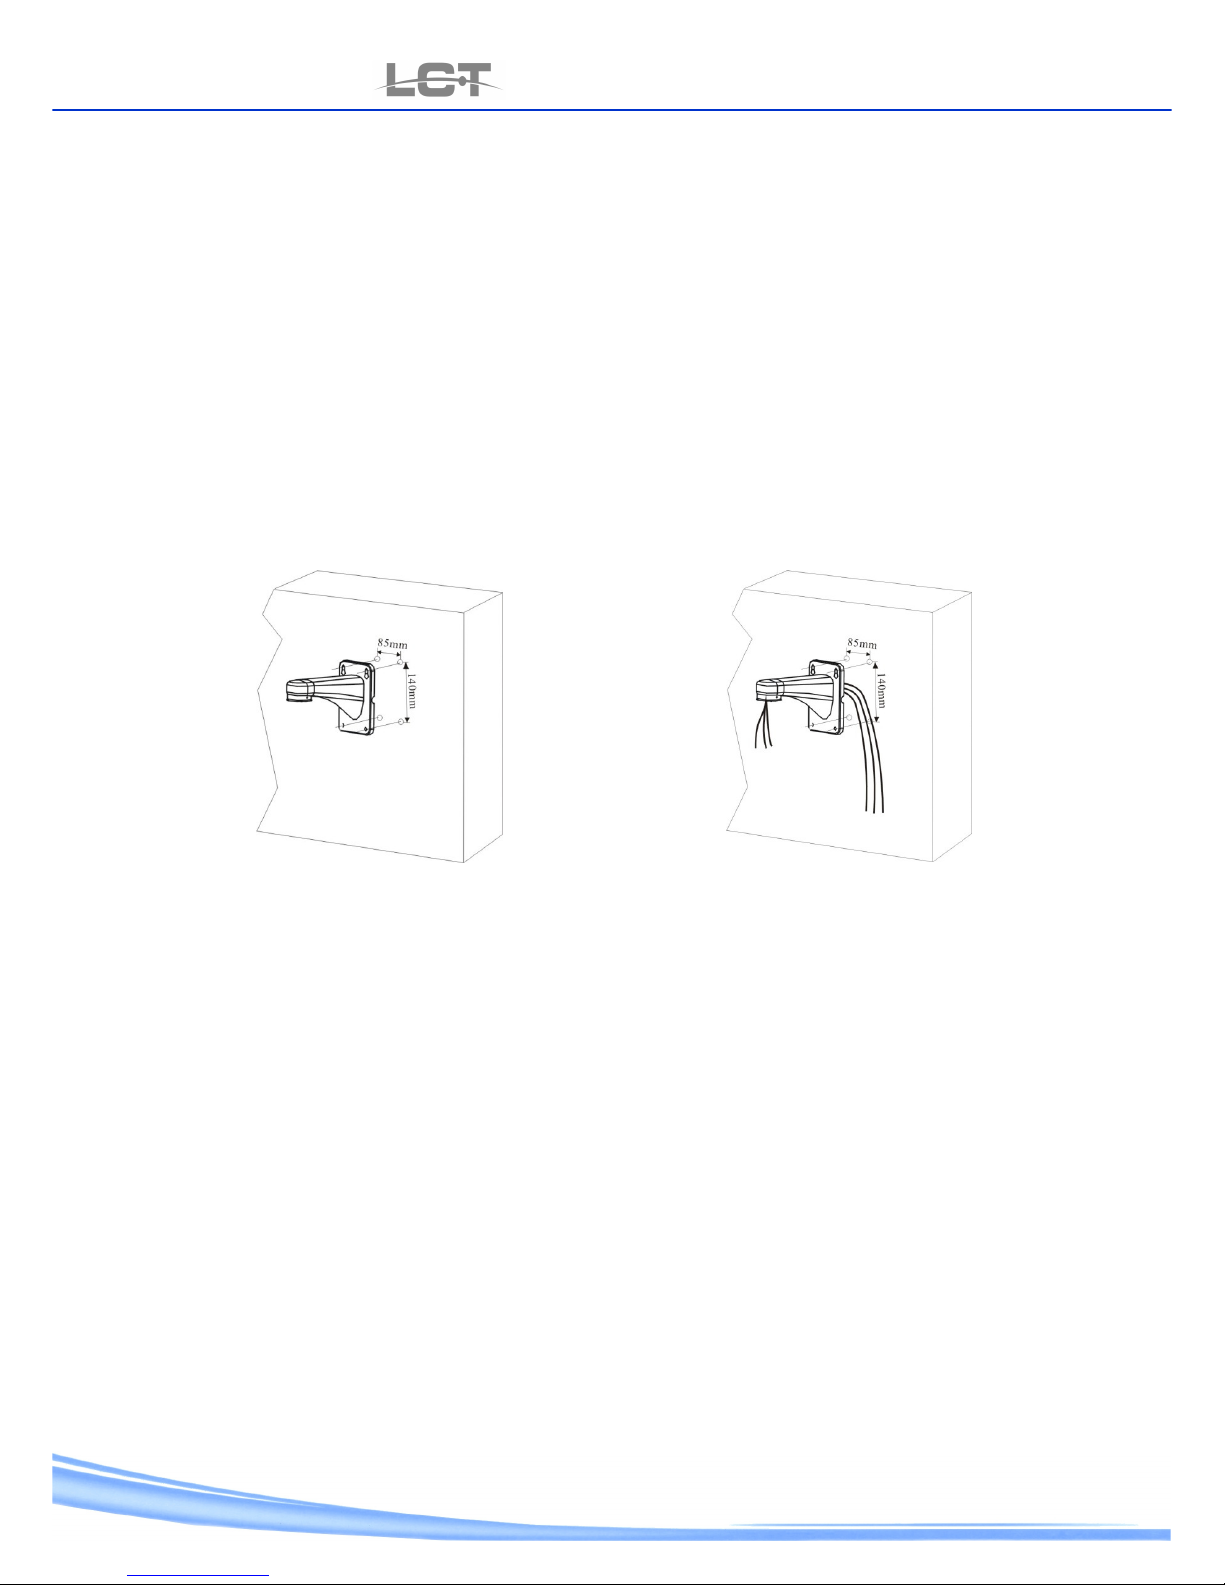
2.2 Bracket assembling
Used screw ,darts or apt to similar to fix the bracket on the surface of installation.
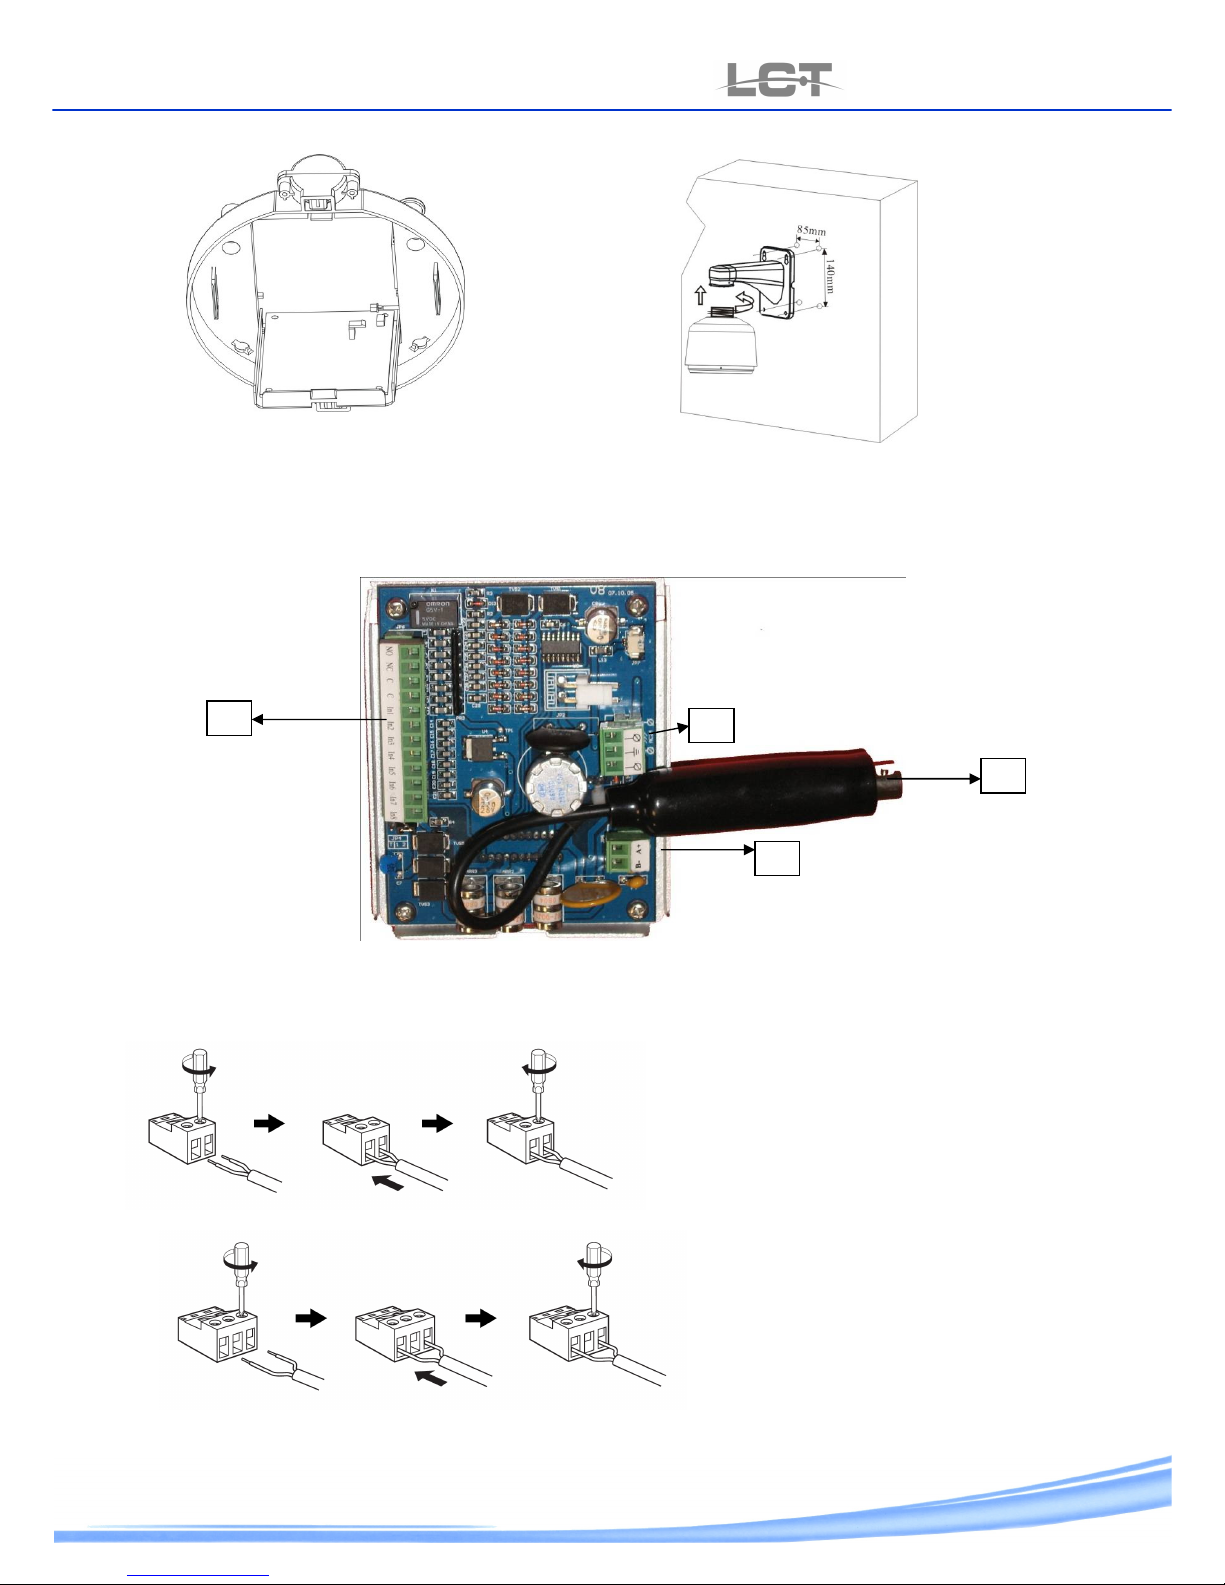
1. Use bracket to marke the mounting position on wall (fig.1)
2. Fix bracket on the wall and put cables through the wall inside the bracket (fig.2).
Fig.1 Fig.2
2.3 Connection
All series LCTSD Speed Dome camera have got one cable for video signal which end female BNC connector terminal box to
connect power PTZ and auxiliary alarms.
Be needed 3 types of wiring for structure set up of Speed Dome :
• Power 24V to alternate current .
• Video signal. the camera makes one commun composite video signal . Use the RG59 coaxial cable for distance 120 m ,while
for higher distances use video balun to transport the video signal up the UTP cable (LCT202T-LCT202R-LCT302T-LCT302R).
• PTZ. The LCTSD series camera use one RS485 serial BUS connection with twisted cable. Use only twisted cable RS485 Bus
can stringently to 1200 m of length and she connected to falls device. The section of the cable depends of the connection
length: one section of 0.5 mmq is sufficient for a short distance, while to use section higher of 1 mmq or 2.5 mmq is necessary
link up long distance (max. 1200 m.) . use screen cable in the wiring execution. Go to connect the camera and console in
cascade that is entering and exting from the RS485A and RS485B. do not invert the cable (A-B) during the equipment
connection . on the first and last device is necessary to connect the resistance for the correct functioning of the RS485. the
resistance value to use is 120Ohm.
proceed:
1. open the access door of connection inside of the custody (fig 3.)
2. screw the custody to the bracket to conduct cables through the hole on top of the housing (fig 4).
User Manual
LCTSD318-326-336
www.hrcctv.com pag.7
Fig.3 Fig.4
3. connect cables.
Connect these cables into the relative connector relative:
A. Video signal - BNC female connector.
B. RS485+A and RS485-B terminal box.
Open the screw of clamps put in the cables and close .Attention to the polarity electric wires( RS485+A (RX+) and RS485-B
(RX-)) in the connection with the control device (control keyboard , DVR).
C. Power cable 24VAC. Open the screw of the clamps put in the cable and close the screw.
C
A
B
D

User Manual
LCTSD318-326-336
pag.
8
www.hrcctv.com
D. IN/OUT alarm clamps
8 in put with 1 common of reference ( the in put must to pilot
at clean contacts).
1 output alarm to relay (Common, NC e NO); max. 30V, 1A.
2.4 Switches adjustment
For access to the 2 DIP-SWITCHES reverse the block of Speed dome ( pag 5) .
The DIP-SWITCH have two functions. Use for setup the switch value (Baud Rate and Protocol) and use for unit address .
Put out the camera before switches adjustment, then put on .Next table show the switch position and function .
The switch 7 and 8 of DIP Swicth 1 (SW1) be useful to setup speed of the BUS that has be common at all RS485 connect
devices:
SW 1
Baud Rate
DIP 7-8
parameter choice
Switch position
Baud Rate Data bit Parity Stop bit
2400 8 No one 1
4800
(Default)
8 No one 1
9600 8 No one 1
19200 8 No one 1
The factory start up is: 4800.
1-6 Protocol
7-
8 Baud Rate
1-8 address
SW2 SW1

User Manual
LCTSD318-326-336
www.hrcctv.com pag.9
The protocol of communication that need to use is assigned by DIP Swicthes 1-2-3-4-5- 6
SW 1
Protocol
DIP 1-6
Protocol Switch Position Protocol
Switch Position
Pelco PD
(Default)
Lilin
Pelco C
Kalatel
Pelco PDC
Vicon
The factory start up is : Pelco PD
Second the next table that consent to obtain 254 different address (1 at 254 ) all switches of the second DIP Switch assign the
address of the camera.
Each camera on the bus need to assign a different address that is put in to the keyboard .
SW 2
Do reference at appendix A for the complete address list
For stave off accidental push down to the Speed Dome lock on the
block on the security hook.
After to have finish the connection and adjustment necessary, close
the access door of the connection board and hook-up the speed dome
block of in the place of house.
*Note: before to proced logn out the security
.
Pay attention to the direction of the quick courcins,.
Control the lever of hook and unhook are correctly insert.
For end the installation i twill be now hook up sufficient the seethrough dome and fix the closing screw.
*Note: Put the dome with the prescribed centre in to fixing
correspondence.
Switch Position
Switch Position
ID 1 2 3 4 5 6 7 8 ID 1 2 3 4 5 6 7 8
1 ON 6 ON ON
2 ON 7 ON ON ON
3 ON ON 8 ON
4 ON 9 ON ON
5 ON ON 10 ON ON
Security
Hook

User Manual
LCTSD318-326-336
pag.
10
www.hrcctv.com
3. Menu Configuration
To understand the potentiality of LCTSD camera high speed dome,system see the followed illustration. Video wiring
note,come true with usual coaxial cable or twisted cable and the BUS RS485 for the Speed Dome management. At the RS485
BUS ,fin place too recorder(DVR) and on the BUS, is possible to put on :LCTspeed dome, HR DVR,HR keyboard (HRKB001 and
HRKB001NET).By these devices is possible to manage and setup the Speed Dome.
3.1 Menu Operation
• Use the console Joystick or the HR DVR directional key( up and down) to move in item of menu.
• Use right Joystick or the HR DVR directional right key to select vary item or go in sub menu.
• Use the console Joystick or the DVR HR directional key up and down for vary parameter.
• Use left Joystick or the HR DVR directional left key to give the OK at programming.
• Select the back item or exit , for return to the past menu or exit to the OSD.
Recall 95 preset or call consecutive 2 times preset 1 with in 5 second, the OSD menu it may be activated .Preset recall it may
be at keyboard or HR DVR.

User Manual
LCTSD318-326-336
www.hrcctv.com pag.11
3.2 Boot-up Screen
When the Speed dome power on , the device wants a few seconds for boot up information will display on screen and will conduct
self-testing.Will show on the screen until “booting success”.
Protocol: display the protocol in use, set up by DIP-Switch 1
• Com: display the parameter of communication set up by DIP-Switch 1
• address: display the Speed Dome address assigned ,set up by DIP-Switch 2
• Model: display the model in use of the three available (LCTSD318-LCTSD326-
LCTSD336)
• Version: firmware version
Protocol: Pelco PD
Com: 4800 N 8 1
address: 001
Model: LCTSD318
Version: 1.01
Booting up

User Manual
LCTSD318-326-336
pag.
12
www.hrcctv.com
3.3 Menu explanation
The main menu is subdivide in 7 sub menu .
System setup (
pag.
13)
• Site Info: Dome ID, Name, broadcast address.
• Display Setup: Screen display.
• Boot-up Screen: Display boot-up information
On/Off.
• Password: Change password.
• Default: Restore factory default settings.
• System Reboot: Reboot Dome system.
• Language: select the language.
Lens setup (
pag.
14)
• Zoom Speed: high / low
• Digital Zoom: On /Off
• Joystick AF/AI: AF+AI / Iris / Focus /Off
• AFtime Autofocus: 0 -255 / Off
• AI timeAutoIris: 0 -255 / Off
• ALC: 0 -31
• Day-Night: Auto /Off
Camera setup (
pag.
15)
• Sensibility: x1 –x10000
• Freeze Mode: On / Off
• White Balance: Auto / inside / outside / OPW /
ATW / manual
• BLC Mode: Level On / Off
Pan/Tilt se
tup (pag.16)
• Auto Stop Time: 1-255 / Off
• Speed Amplify : 1-32 /Off
• Proportional P/T: On /Off
• Set Nord: Set Nord
Auto running setup (pag.15)
• Preset: Save– Remove – Rename Preset
• Tour: Setup – Remove and test 4 Tour
• Cruise: Select speed and restrict 4 Cruise
• Pattern: Record – Test and bootup 4 Pattern
• Zona: Zone name identification and passage
speed.
• Park time: 1-255 /Off
• Park action: Preset / Pattern 1-4 / Cruise 1-4 /
Tour 1-4
Aree privacy setup (
pag.18
)
• Mask Number: 1-8
• Mask Setup: Select zone to mask
• Remove Mask: Remove current mask
• Remove All: Remove all mask
Alarm setup
(pag.
19)
• Alarm Input 1-8: Preset / Pattern 1-4 / Cruise 1-
4 / Tour 1-4
• Alarm1: Output
• Arm/Disarm: Arm / Disarm
• Interval <s>: 1-255
Main Menu
Note
• OSD menu will close
automatically after 1
minute without any
operation.
Zoom Speed:
Digital Zoom:
Joystick AF/AI:
AF Resume time :
AI Resume Time:
ALC:
Day/Night
Back
Alarm In 1:
Alarm In 2:
Alarm In 3:
Alarm In 4:
Alarm In 5:
Alarm In 6:
Alarm In 7:
Alarm In 8:
Exit 1:
Arm/Disarm
Interval <s>:
Back:
Mask Number:
Mask Setup
Remove Mask
Remove All Mask
Back
Preset
Tour
Cruise
Pattern
Zone
Park Time:
Park Action:
Back
Auto Stop Time
Speed Amplify
Proportional P/T
Set Nord:
Back
Sensibility:
Freeze Mode:
White Balance:
BLC Mode
Back
Site Info
Display setup
Boot-up screen
Password
Default
System Reboot
Language
Back
System
Lens
Camera
Pan/Tilt
Auto Running
Privacy Mask
Alarm
Exit

User Manual
LCTSD318-326-336
www.hrcctv.com pag.13
Site Info
-up Screen
Password
Default
3.4 System Setup
Site Info
The menu permits to use have Dome information.
<address>: The parameter is not changeable and display that address is be assigned to the
Speed Dome by DIP-Switch ( pag. 8).
<Name> :Assigning name to a dome helps user to remember which dome it is.
<Broadcast ID>:Each other want to assigne software address to the Speed Dome, Setup here the
desired value.
Display Setup
Here is possible to select information need to display in over-printing.
<Dome Name>:On/Off. To display the camera name.
<Preset Name>: On/Off.To display the preset name .
<Nome Cruise>: On/Off. To display the Cruise name .
<Pattern Name>: On/Off. Arm or disarm the Pattern name up to display.
<Zoom>: On/Off. To display the zoom .
<Orientation>: On/Off. To display the rotation degree .
<Alarm Name>: On/Off. To display current .
<Zone Name Mask>: On/Off. To display the zone name mask crossing by camera.
Boot-up Screen
Here is possible to display starting the Dome information.
<Protocol>: Display protocol in use, fil to DIP-Switch 1
<Comm>: Display the communication parameter fil to DIP-Switch 1
<address>: Display assigning address of Speed Dome fil to DIP-Switch 2
<Model>: Display the model in use of three available (LCTSD318-LCTSD326-LCTSD336)
<Version>: firmware version
Call the Preset 1 to back.
A
B
C
E
F
D
Address: 001
Back
System
Privacy Mask
C
B
Dome Name: Off
Preset Name: On
Cruise Name: On
Pattern Name: On
Orientation: Off
Back
: Pelco PD
Comm: 4800 N 8 1
Address: 001
SD318
A

User Manual
LCTSD318-326-336
pag.
14
www.hrcctv.com
Zoom Speed:
Digital Zoom:
Joystick AF/AI:
AutoFocus Time:
AutoIris Time:
ALC:
Day/Night
Back
Password
In this menu is possible to bump up the security level if the password is enable.
<Input PW>:For input the password the next sub menu display .
Before to change,input the old password.If old password is correct , cursor goes back, behind
“input password” ,so that new password can be input . If old password is not correct,cursor goes
back to front of “input password”.
<Confirm PW>:Confirm new password.
<PW protection>: On/Off. Arm or Disarm the password request to access system and save
Preset.
Note:Default password of the system is 123456
Default
In this menu is possible to restore factory default settings of Speed Dome.
<Password>: Arm the password protection and input user password .
<Setup>: Restore default and remove the configurations.
System reboot
Select <system reboot> the dome reboot immediately to make autotest cycle.
3.5 Lens setup
Zoom Speed
Set the zoom speed level to high or low .
Digital Zoom
Arm <On> or disarm <Off> digital zoom.
Joystick AF/AI
Select function wanted between <AF+AI>, < Iris>, < Focus> and <Off>.
<AF+AI>: Select this option ,camera can put automatically mode auto focus and electronics shutter.
<Iris>: Select this option camera can put on mode automatically only electronics shutter,but focus can also be manually
controlled. (Point E)
<Focus>: Select this option camera can put on mode automatically only focus up,but electronics shutter can also be manually
controlled . ( Point D)
<Off>. Select this option camera do not make any automated control, that is necessary operator intervention.
Old PW: ******
E
F
Password: ******
Input PW : ******
Back
A
B
C
E
D
F
A
System
Lens
Privacy Mask
G
B
C
D

User Manual
LCTSD318-326-336
www.hrcctv.com pag.15
Sensibility
Freeze Mode:
White Balance:
BLC Mode
Back
Autofocus Time
In this menu is possible disarm/arm <Off> If on is up , select seconds <0-255>, In here the dome can be manually controlled, this
function consent to restore auto focus automated , After user time .
Autoiris Time
In this menu is possible disarm/arm <Off> ,if on is up seconds <0-255>.In here the dome can be manual IRIS, this function
consent to restore auto IRIS automated, after user time.
ALC
Select value between 0 and 31 for electronics shutter standard opening to define. The parameter is programmed if IRIS manual
control is up .
Default value : 23X
NOTE: Keep the default value is strongly recommended.
Day/Night
Arm <Auto> or disarm <Off> the Day/Night function.
<Auto>: The Dome changes automatically color to black from white second environment lightness.
<Off> The Dome always as a color camera. Use this option in light environment.
3.6 CAMERA – Camera Setup
Sensibility
In This menu is possible to change setup time of the shutter, to get the light, that has to pass on the CCD sensor; time is most
high to open , more elevated show to light so CCD charget; the image always come out of more brightness .Time of show will be
smaller and image come out of more darkness. Select one of the next option : x1-x2-x4-x8-x15-x30-x60 (Default)-x80-x90-x100-
x125-x180-x250-x350-x500-x725-x1000-x1500-x2000-x3000-x4000-x6000-x10000.
Freeze Mode
Arm <On> or disarm <Off> Freeze function for image freeze.
White Balance
Select modality between the next option:
<Auto>: Select this option, automatically carry out.
<Inside>:Use this option for inside application .
<Outside>:Use this option for outside application.
<ATW> Auto Tracking White. Function automated of middle white balance.
<OPW> Do not use.
<Manual> Select Manual, the video displays sub menu to adjust color red and blue manually.
WB-R : 000
-B : 000
Back
D
E
F
G
A
B
C
D
A
System
Lens
Camera
Privacy Mask
B
C

User Manual
LCTSD318-326-336
pag.
16
www.hrcctv.com
Auto Stop Time
Speed Amplify
Proportional P/T
Set North:
Back
Preset
Tour
Cruise
Pattern
Zone
Park Time:
Park Action:
Back
BLC Mode
Select this option to access in sub menu and arm <On> or disarm <Off> the function.
3.7 PAN/TILT setup
Auto Stop Time
The function and select some particular protocol Dome will not stop moving even there is no operation on joystick. In this menu
is possible arm/disarm ,the seconds that dome will stop moving without receiving any commands.
Note: Do not put in the function with protocol Pelco PD.
Speed Amplify
The speed of Dome is mush lower with some protocols’ control. In this menu is possible set (speed amplify) to accelerate domes.
Select one parameter between x1 and x32.
Note: Do not put in the function with protocol Pelco PD.
Proportional P/T
Arm <On> and disarm <Off> function, for proportional movement while zooming in. If is up, this function decreases pan and tilt
movement while zooming in.
Set North
Be better to set geographic north.
3.8 Auto running setup
BLC Mode : On
A
B
C
D
A
System
Lens
Camera
Pan/Tilt
Privacy Mask
B
C
D
A
B
C
D
System
Lens
Camera
Pan/Tilt
Auto Running
Privacy Mask
E
F
G

User Manual
LCTSD318-326-336
www.hrcctv.com pag.17
Preset
Back
Preset No:
Next Test
Preset
Tour
Cruise
Back
Preset
Tour
Cruise
n:
Back
Cruise Number
Right Position :
Speed
Back
Tour No:
Back
Preset
Select <Preset> to enter sub menu and control Preset:
<Preset Number>: Select preset number to be make on or adjustment.
<Name>: Put preset name to show.
<Current Setup >: Save Preset .
<Test>: The current preset test.
<Next Test >:The next preset test.
<Remove current>: Select to delete the current preset.
Tour
Select <Tour> To enter sub menu and make on or adjustment 4 Tours:
<Tour Number>: Set tour number.
<Interval>: Select standard dwell time of preset status.
<Edit>: Selected this, in the sub menu is possible select preset order looked and its length of time.
<Test>: The current tour test.
<Run>: To run the current manual tour.
Cruise
Select <Cruise> to enter sub menu and control 4 Cruise :
<Cruise Number>: Set Cruise number.
<Left Position>: In here , move the camera to the desired limit of left position.
<Right position>: In here ,move the camera to the desired limit of right position.
<Speed>: Set the scanning speed . Range value is (1-255)
<Run>: To run the current manual Cruise .
A
B
C

User Manual
LCTSD318-326-336
pag.
18
www.hrcctv.com
Preset
Tour
Cruise
Pattern
Back
Pattern Numbe:
Preset
Tour
Cruise
Pattern
Zone
Back
Zona Number:
Mask Number:
Mask Setup
Remove Mask
Remove All
Back
Pattern
Select<Pattern> to enter sub menu and control Pattern :
<Pattern Number>: Select Pattern record number.
<Record>: Here move the camera to desired positions, to recording really passage.
<Test>: The current pattern test.
<Run>: to run the current manual Pattern.
Zone
Select <Zone> to enter sub menu and control 6 zone at personal :name and passage speed.
<Zone Number>: Select zone name.
<Name>: Put desired zone name.
<Left limit >: In here , move the camera to the desired left limit.
<Right limit>: In here, move the camera to the desired right limit .
<Remove>: Select to delete the current Zone.
<Speed>: Set the current scanning speed . Range value is (1-255) .
<Run>: To start scanning the current zone.
Park Time
This function let the system automatically run on assigned function after a specific period of idle time. Select time between 1
and 255s to arm function. Select OFF to disable this function.
Park Action
Park action refers to the function that system will automatically run when park time is up.The function liable to be constituted
from the: call preset; run tour, cruise or pattern setup.
3.9 Privacy mask - Area privacy setup
D
E
F
C
System
Lens
Camera
Pan/Tilt
Auto Running
Privacy Mask

User Manual
LCTSD318-326-336
www.hrcctv.com pag.19
Privacy Mask
Select <Privacy Mask> to enter sub menu and control 8 masking zones.
< Mask Number>: Select mask zone number.
<Mask setup>: Set the position and size of the masking zone. Before to mask, make sure with camera just be position to the
cover zone. Up on in menu is not possible to move the dome.
<Mask Remove>: Remove current mask.
<All Remove>: Remove all mask zone.
3.10 Alarm - Alarm setup
System
Lens
Camera
Pan/Tilt
Auto Running
Privacy Mask
Alarmi
Alarm In 1:
Alarm In 2:
Alarm In 3:
Alarm In 4:
Alarm In 5:
Alarm In 6:
Alarm In 7:
Alarm In 8:
Exit 1:
Arm/Disarm
Interval <s>:
Back:

User Manual
LCTSD318-326-336
pag.
20
www.hrcctv.com
Alarm
Select <Alarm> to enter sub menu and control input and output alarm.
< Alarm In 1-8>: For each input alarm , is possible associate preset or select 1 to the 4 tour, cruise or pattern setup.
<Output 1>:ON/OFF. Select arm/disarm output relay.
<Arm/Disarm>: Arm or disarm the alarm system.
<Interval>: Set the time after which the alarm will be reset . During setup this time output relay stays up.

User Manual
LCTSD318-326-336
www.hrcctv.com pag.21
4. APPENDIX
DIP-SWITCH AND ADDRESS SETTING CHART
ID 1 2 3 4 5 6 7 8 1 2 3 4 5 6 7 8
1
ON ON ON
2
ON
3
ON ON
4
ON
5
ON ON
6
ON ON
7
ON ON ON
8
ON
9
ON ON
10
ON ON
11
ON ON 0N
12
ON ON
13
ON ON ON
14
ON ON ON
15
ON ON ON ON
16
ON
17
ON ON
18
ON ON
19
ON ON ON
20
ON ON
21
ON ON ON
22
ON ON ON
23
ON ON ON ON
24
ON ON
25
ON ON ON
26
ON ON ON
27
ON ON ON ON
28
ON ON ON
29
ON ON ON ON
30
ON ON ON ON
31
ON ON ON ON ON
32
ON
33
ON ON
34
ON ON
35
ON ON ON
36
ON ON
37
ON ON ON
38
ON ON ON
39
ON ON ON ON
40
ON ON
41
ON ON ON
42
ON ON ON
43
ON ON ON ON
44
ON ON ON
45
ON ON ON ON
46
ON ON ON ON
47
ON ON ON ON ON
48
ON ON
49
ON ON ON
50
ON ON ON
51
ON ON ON ON
52
ON ON ON
53
ON ON ON ON
54
ON ON ON ON
55
ON ON ON
56
ON ON ON ON
57
ON ON ON ON
58
ON ON ON ON ON
59
ON ON ON ON
60
ON ON ON ON ON
61
62
ON ON ON ON ON
63
ON ON ON ON ON ON
64
ON
65
ON ON
66
ON ON
67
ON ON ON
68
ON ON
69
ON ON ON
70
ON ON ON
71
ON ON ON ON
72
ON ON
73
ON ON ON
74
ON ON ON
75
ON ON ON ON
76
ON ON ON
77
ON ON ON ON
78
ON ON ON ON
79
ON ON ON ON ON
80
ON ON
81
ON ON ON
82
ON ON ON
83
ON ON ON ON
84
ON ON ON
85
ON ON ON ON
86
ON ON ON ON
87
ON ON ON ON ON
88
ON ON ON
89
ON ON ON ON
90
ON ON ON ON
91
ON ON ON ON ON
92
ON ON ON ON
93
ON ON ON ON ON
94
ON ON ON ON ON
95
ON ON ON ON ON ON
96
ON ON
97
ON ON ON
98
ON ON
99
ON ON ON ON
100
ON ON ON
101
ON ON ON ON
102
ON ON ON ON
103
ON ON ON ON ON
104
ON ON ON
105
ON ON ON ON
106
ON ON ON ON
107
ON ON ON ON ON
108
ON ON ON ON
109
ON ON ON ON ON
110
ON ON ON ON ON
111
ON ON ON ON ON ON
112
ON ON ON
113
ON ON ON ON
114
ON ON ON ON
115
ON ON ON ON ON
116
ON ON ON ON
117
ON ON ON ON ON
118
ON ON ON ON ON
119
ON ON ON ON ON ON
120
ON ON ON ON
121
ON ON ON ON ON
122
ON ON ON ON ON
123
ON ON ON ON ON ON
124
ON ON ON ON ON
125
ON ON ON ON ON ON
126
ON ON ON ON ON ON
127
ON ON ON ON ON ON ON
128
ON
129
ON ON
130
ON ON
131
ON ON ON
132
ON ON
133
ON ON ON
134
ON ON ON
135
ON ON ON ON
136
ON ON
137
ON ON ON
138
ON ON ON
139
ON ON ON ON
140
ON ON ON
141
ON ON ON ON
142
ON ON ON ON
143
ON ON ON ON ON
144
ON ON

User Manual
LCTSD318-326-336
pag.
22
www.hrcctv.com
145
ON ON ON
146
ON ON ON
147
ON ON ON ON
148
ON ON ON
149
ON ON ON ON
150
ON ON ON ON
151
ON ON ON ON ON
152
ON ON ON
153
ON ON ON ON
154
ON ON ON
155
ON ON ON ON ON
156
ON ON ON ON
157
ON ON ON ON ON
158
ON ON ON ON ON
159
ON ON ON ON ON ON
160
ON ON
161
ON ON ON
162
ON ON ON
163
ON ON ON ON
164
ON ON ON
165
ON ON ON ON
166
ON ON ON ON
167
ON ON ON ON ON
168
ON ON ON
169
ON ON ON ON
170
ON ON ON ON
171
ON ON ON ON ON
172
ON ON ON ON
173
ON ON ON ON ON
174
ON ON ON ON ON
175
ON ON ON ON ON ON
176
ON ON ON
177
ON ON ON ON
178
ON ON ON ON
179
ON ON ON ON ON
180
ON ON ON ON
181
ON ON ON ON ON
182
ON ON ON ON ON
183
ON ON ON ON ON ON
184
ON ON ON ON
185
ON ON ON ON ON
186
ON ON ON ON ON
187
ON ON ON ON ON ON
188
ON ON ON ON ON
189
ON ON ON ON ON ON
190
ON ON ON ON ON ON
191
ON ON ON ON ON ON ON
192
ON ON
193
ON ON ON
194
ON ON ON
195
ON ON ON ON
196
ON ON ON
197
ON ON ON ON
198
ON ON ON ON
199
ON ON ON ON ON
200
ON ON ON
201
ON ON ON ON
202
ON ON ON ON
203
ON ON ON ON ON
204
ON ON ON ON
205
ON ON ON ON ON
206
ON ON ON ON ON
207
ON ON ON ON ON ON
208
ON ON ON
209
ON ON ON ON
210
ON ON ON ON
211
ON ON ON ON ON
212
ON ON ON ON
213
ON ON ON ON ON
214
ON ON ON ON ON
215
ON ON ON ON ON ON
216
ON ON ON ON
217
ON ON ON ON ON
218
ON ON ON ON ON
219
ON ON ON ON ON ON
220
ON ON ON ON ON
221
ON ON ON ON ON ON
222
ON ON ON ON ON ON
223
ON ON ON ON ON ON ON
224
ON ON ON
225
ON ON ON ON
226
ON ON ON ON
227
ON ON ON ON ON
228
ON ON ON ON
229
ON ON ON ON ON
230
ON ON ON ON ON
231
ON ON ON ON ON ON
232
ON ON ON ON
233
ON ON ON ON ON
234
ON ON ON ON ON
235
ON ON ON ON ON ON
236
ON ON ON ON ON
237
ON ON ON ON ON ON
238
ON ON ON ON ON ON
239
ON ON ON ON ON ON ON
240
ON ON ON ON
241
ON ON ON ON ON
242
ON ON ON ON ON
243
ON ON ON ON ON ON
244
ON ON ON ON ON
245
ON ON ON ON ON ON
246
ON ON ON ON ON ON
247
ON ON ON ON ON ON ON
248
ON ON ON ON ON
249
ON ON ON ON ON ON
250
ON ON ON ON ON ON
251
ON ON ON ON ON ON ON
252
ON ON ON ON ON ON
253
ON ON ON ON ON ON ON
254
ON ON ON ON ON ON ON

User Manual
LCTSD318-326-336
www.hrcctv.com pag.23
Technical specifications can be modified without any preliminary notice
This manual may not be reproduced in whole or in part (except brief quotations in articles or
magazines), without the 'written permission of HR EUROPE.
MEMO

User Manual
LCTSD318-326-336
pag.
24
www.hrcctv.com
HR EUROPE s.r.l.
ROMA: sede legale e amministrativa; Via Giulianello, 1-7 – 00178 Roma, ITALIA – Tel +39 06 7612912 Fax +39 06 7612601
TORINO: sede operativa; Via G.B.Feroggio, 10 – 10151 Torino, ITALIA – Tel +39 011 453 53 23 Fax +39 011 453 70 49
SHANGHAI: ufficio di rappresentanza; Minhang Residence, Room 506, N°50 Jinzhu Road 200336 Shanghai, CHINA
Tel(Fax):+86 21 62086781 – e-mail: infoshangai@hrcctv.com
e-mail:
info@hrcctv.com web: www.hrcctv.com – Codice Fiscale e Partita IVA 06397551000 – Iscrizione R.E.A. 966880
 Loading...