

Page 1

LCT Engines
Service Manual
PGM45015 12/04/17 rev G
ENGINEERING A NEW
GENERATION OF POWER
Page 2

Table of Contents
Engine Model Number & Serial Numbering System 2-3
General Specifications 4-5
General Troubleshooting 6-7
Advanced Troubleshooting (for authorized LCT technicians) 8-10
Spark Plug Service 10
Engine Oil Level Check 11
Engine Oil Change 11
Engine Oil Recommendations 11
Maintenance Schedule 12
Torque Specifications 13-14
Summer Engine Dimensions 15-20
79cc 15
136cc 16
179cc / 208cc 17
291cc 18
414cc 19
420cc 20
Winter Engine Dimensions 21-25
136cc 21
179cc / 208cc (Gen II) 22
254cc 23
291cc / 306cc 24
369cc / 414cc 25
Current Patents: D596649; D634,337; D611,411; D593,190; D635,585, D549,241; RE43920; RE45,913; D572,659; D595,227; 9328696; 7975806; D580610; D590,110S; D627,368; D585,348;
D600,252; D604,686; 201030127679.3; 200830020200.9; 200830299875.1; 201530458407.4; 201520911505.3; 201630277717; 201620636943.8; 201620636960.1; 201620636872.1; 201620636858.1;
201620528656.5; 201620583290.1; 201620616109.2; 200720046150.1; 200820217113.7; 200820214886.X; 200820217112.2; 200820214887.4; 200920040686.1; 200920038850.5; 200920044163.4;
201020258898.X; 200730184074.6; 200730184075; 200830021742.8; 200830023405.2; 200830028283.6; 200830299876.6; 200830299874.7; 200830299873.2; 200930031746.9; 200930036278.4;
200930035200; 201030127696.7; 201030127678.9; 201030127608.3; 200910210967.1; 201130459836.5; 201130500118.8; 201130459770.X; 201220024217.2; 201220042903.2; 201220186503.9;
201220218354.X; 201230237494.7; 201230271026.1; 201420342024.0; 201420633124.9; 201430417951.X; 201520233712.8; 201530103964.4; 201530225241.1; 201530225068.5; 201530225179.6;
201520911627.2; 201621429154.3; 201621429150.5; 201621429142.0; 201630636079.7; 201630636165.8; 201630636136.1; 201621326210.0; 201621429144.X; 201630636166.2
Page 3

Engine Model Number & Serial Numbering System
The rst two lines of an engine’s number is the model number. It is alphanumeric and engraved on the side of the block to the right of
the recoil. The third line is alphanumeric and is also the serial number.
Engine Serial Number Sequence
16 95H 03 00001 A:
Example:
Engine Serial Number 1695H0300001A represents:
16: 2016
95H: 306cc Horizontal Engine Series
03: March
00001: 1st Engine Produced During Month of March
A: Horizontal Assembly Line
Assembly Line Designation (A, B, C, D)
Sequential Engine Number
Produced Month
Engine Series Designation
Produced Year
LCT Engine Model Numbering System Definition (see chart on page 3):
1. Preproduction - This column is coded and reserved for prototype engines only.
2. Plant - This column is coded and used for LCT internal use only.
3. Design Family - This column is used for emissions regulations and coded for LCT internal use only.
4. Crankshaft - This column indicated whether the PTO shaft (crankshaft) is congured in the engine horizontally or vertically.
5. Shaft - This column is used for the description of the PTO shaft. This will aid in determining what will be the engine’s primary use.
6. Shaft Detail - This column references a chart that designates which LCT engineering drawing corresponds to the PTO shaft.
This is for LCT internal use only.
7. Horsepower - This column is coded to designate the engine’s power output (horsepower) with its corresponding size
(cubic centimeters).
8. Paint Code - This column is coded to which color scheme the engine is equipped with.
9. Starter Type - This column is coded to which type of starting system the engine is equipped with.
10. Options - This column is coded to designate which equipment options the engine is equipped with.
11. Emissions Label - This column is coded for the emissions standards the engine meets.
12. Pack Code - This column is reserved for LCT Packaging Department only.
NOTE:
The LCT Engine Model and Serial Number Systems is subject to be changed or edited at any time.
Copyright © 2018 Liquid Combustion Technology, LLC LCT Engine Service Manual: 79, 136, 179, 208, 254, 291, 306, 369, 414 & 420cc 2
Page 4

Engine Model Number & Serial Numbering System
Plant Design Family
P LM Moderate H Horizontal T Threaded 150
S LO ***Hybrid V Vertical K Straight-Keyed 175
D LX Extended P Tapered 200
LD Diesel S Splined (No Attach.) 250
W1 GEN I Snow G1 2:1 Reduction (GEAR) 350
W2 GEN II Snow G2 6:1 Reduction (GEAR) 400
W3 Single Stage
Snow 1
W4 *Snow King G4 2:1 Reduction (CLUTCH) 650
W5 **Snow King 750
W6 Private Label
Snow
W7 Ariens Single
Stage
W8 GEN III Snow 1000
ID Inverter Design
Engine
NOTES:
* W4 DESIGNATOR IS USED FOR FULL ENGINE DRESSED SNOW KING PLATFORMS
** W5 DESIGNATOR IS USED FOR LIMITED ENGINE DRESSED SNOW KING
PLATFORMS
*** LO DESIGNATOR IS USED FOR SUMMER SPEC ENGINES WITH WINTER SELF
TAPPING MOUNT CYLINDERS
Crankshaft
Shaft HP Paint Code Starter Type Options Emissions Label Pack Code
[1.5hp (63cc)]
[ 1.75hp (79cc) ]
[ 2.0hp (87cc) ]
[ 2.5hp (98cc) ]
[ 3.5hp (106cc) ]
G3 2:1 Reduction (CHAIN) 500
Both Model & ID Numbers to be
on PMI & Specification Sheet
[ 4.0hp (136cc) ]
[ 5.0hp (179cc) ]
[6.5hp (208cc) ]
[7.5hp (254cc) ]
850
[ 8.5hp (291cc) ]
950
[ 9.5hp (306cc) ]
[ 10.0hp (369cc) ]
1250
[ 12.5hp (414cc) ]
1300
[13.0hp (420cc) ]
CI219A
[ 4hp (219cc) ]
CI306
[ 6hp (306cc) ]
CI306A
[ 7hp (306cc) ]
CI418
[ 8hp (418cc) ]
CI418A
[ 9hp (418cc) ]
CI219
[ 3.5hp (219cc)]
CI219A
[4.0hp (219cc)]
CI435A
[ 9hp (435cc) ]
▼ ▼
Model No. PLMHK14650124PBGPSTUVE2M ID Number 920811000
P Manufacturing Facility 9 Horizontal
LM Moderate Design Family 208 cc Displacement
H Horizontal Crankshaft 1 Summer
K Keyed PTO design 1000 Sequential Number
14 #14 Crankshaft Drawing
650 6.5hp (208cc) engine
1 Black Recoil (Glossy)
2G Blue Recoil (PMS287C)
2 Black Tank (Glossy)
4 Black Blower Housing (Glossy)
P Pull Start
B Manual Choke
G High Oil Fill Tube
P Pleated Paper Air Filter
S Atmosphere Vented Plastic Fuel
T Two Low Oil Fill Plugs
U C&U Bearings
V Viton Oil Seals
E2 49 State Compliant
M Multi-Pack
Cap w/ Tether Cord
1 - JPC Black Recoil
(Standard JPC Black)
2 - Black Tank
(Pantone Black G (Glossy))
3 - Titan Yellow Blower Housing Z - Recoil/
4 - Black Blower Housing (Pantone
Black G (Glossy))
5 - Yellow Recoil
(Pantone 1235C)
6 - Yellow Tank
(Pantone 1235C)
7 - Black Tank
(Pantone Black M (Matte))
8 - Black Blower Housing (Pantone
Black M (Matte))
9 - Yellow Blower Housing
(Pantone 1235C)
1A - Titan Green Blower Housing
(Pantone Green 364C)
1B - Titan Green Recoil
(Pantone Green 364C)
1D - XH Black Recoil
(Pantone Black M (Matte))
1C - Carmine Red Blower Housing
(RAL 3002)
1E - Blue Recoil
(PMS 294C)
1F - Blue Fuel Tank
(PMS 294C)
1G - Blue Blower Housing
(PMS 294C)
1H - Titan Orange Blower Housing Q - No Low Oil Sensor
1I - Titan Orange Recoil R - Low Temperature Muffler
IJ - Sliver Recoil
(Titan Spec Silver)
1K - Sliver Blower Housing
(Titan Spec Silver)
1L - [TBD] U - Upgrade Bearing
1M - [TBD] V - Viton Oil Seals
1N - XH Black Recoil (Pantone
Black G (Glossy)
1O - Yellow Fuel Tank
(PMS B1046)
1P - JPC Black Recoil (Lightweight
Recoil Design)
1Q - [TBD] 1 - Integrated On/Off Speed Controls
1R - [TBD] 2 - Remote Choke
1S - [TBD] 3 -2.7L Fuel Tank
1T - [TBD] 4 - 3.6L - Fuel Tank
1U - [TBD] 5 - 60W AC Alternator
1V - [TBD] 6 - ROV Fuel Tank Equipped
1W - [TBD] 7 - Reduced Sound Muffler Package
1X - [TBD] 8 - [TBD]
1Y - [TBD] 9 - Front Oil Drain Tube
1Z - [TBD] 10 - [TBD]
2A - [TBD] 11 - [TBD]
2B - [TBD]
2C - [TBD]
2D - Yellow Recoil (Yellow C)
2E - Yellow Blower Housing
(Yellow C)
2F - Yellow Fuel Tank (Yellow C)
2G - Blue Recoil (PMS 287C)
2H - Blue Blower Housing
(PMS 287C)
2I - Blue Fuel Tank (PMS287C)
2J - [TBD]
2K - [TBD]
2L - [TBD]
EXAMPLE
2M - [TBD]
2N - [TBD]
2O - [TBD]
2P - [TBD]
E - 12VDC/
120VAC Electric
P- Recoil B - Manual Choke E2 - 49 State M - Multi-Pack
Electric Provision
Y - 220VAC Electric D - Generator Air Filter E5 - California Exh Only
X - 12V DC with Starter Box E - Generator Muffler E7 - European Compliant
V - [TBD] F - No Tank E8 - Australian Compliant
U - [TBD] G - High Oil Fill Tube E9 - South East Asia
T - [TBD] H - Commercial Fuel Tank (Large
S -[TBD] I - AC Charging Coil Equipped EB - NON CERTIFIED
A - Fixed Speed E1 - 50 State S - Single Pack
C - Catalytic Muffler E4 - California Preempt
Fuel Tank)
J - DC Charging Coil Equipped E12 - [TBD]
K - Evaporative Emission Equipped E13 - [TBD]
L - Coaxial Idle Down Equipped E14 - [TBD]
M - Remote Throttle Control E15 - [TBD]
N - High Ouput Air Filter - Non CA
O - Snow Equipped
P - Pleated Paper Air Filter
S - Atm. Vented Plastic Fuel Cap w/
Tether Cord
T - Two Low Oil Fill Plugs
X - Single Stator Charging System
Y - Dual Stator Charging System
Z - CE Compliance Package
EA - Canadian Compliant
Copyright © 2018 Liquid Combustion Technology, LLC LCT Engine Service Manual: 79, 136, 179, 208, 254, 291, 306, 369, 414 & 420cc 3
Page 5
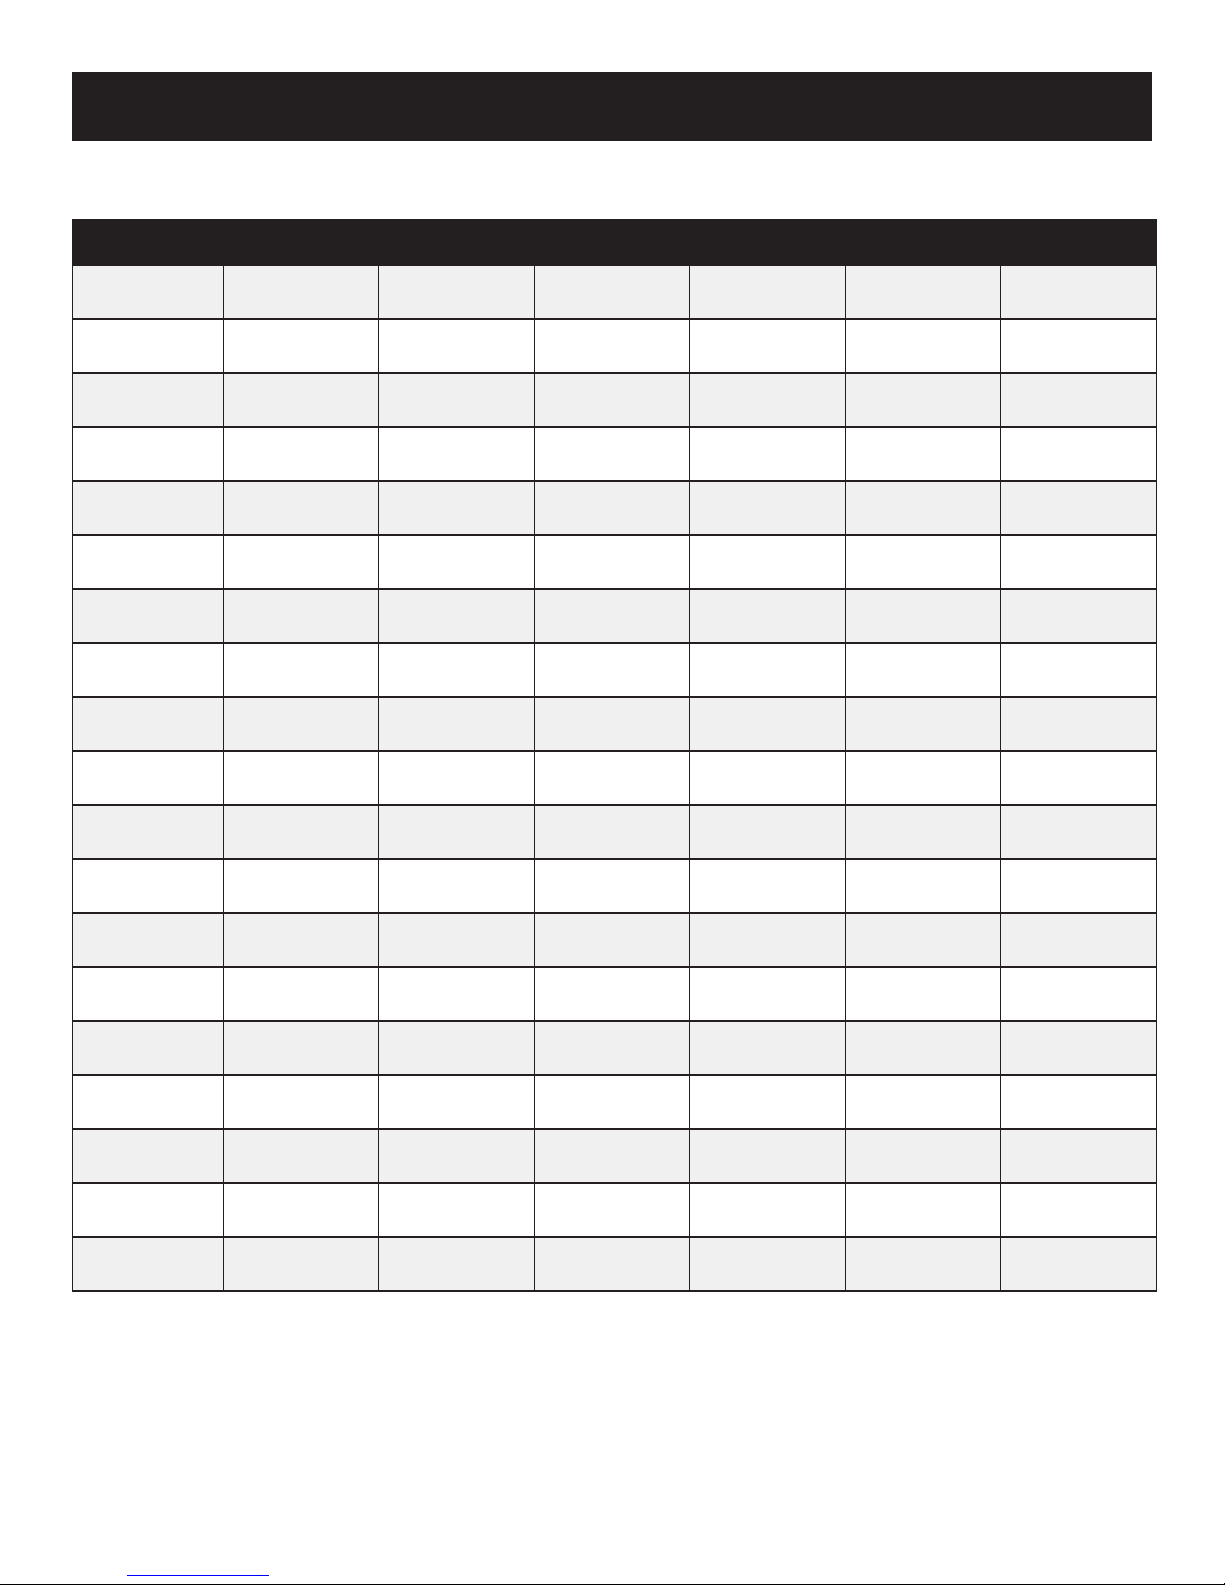
General Specifications
Item 79cc 136cc 179cc 208cc 223cc 254cc
Maximum Speed 3850±50rpm 3850±50rpm 3850±50rpm 3850±50rpm 3850±50rpm 3600±50rpm
Idle Speed 2050+/-50rpm 2050+/-50rpm 2050+/-50rpm 2050+/-50rpm 2050+/-50rpm 2050+/-50rpm
Compression Ratio 8.5:1 8.5:1 8.5:1 8.5:1 8.5:1 8.5:1
Displacement 79cc 136cc 179cc 208cc 223cc 254cc
Compression Release yes yes yes yes yes yes
Cast Iron Sleeve yes yes yes yes yes yes
Bore x Stroke
PTO Rotation
Fuel
(DO NOT USE E85)
Low Oil Shutoff if equipped if equipped if equipped if equipped yes if equipped
Fuel Shutoff Valve yes yes yes yes yes yes
Oil Fill Capacity 13oz 16oz 16oz 16oz 16oz 20oz
Spark Plug Gap
Ignition Air Gap
(At Flywheel)
Valve Adjustment
(gap) Intake
Valve Adjustment
(gap) Exhaust
Dry Weight
(Summer Engines)
Dry Weight
(Winter - Gen II / PW2)
Dry Weight (Winter
- PW3)
2.02" x 1.49" (51.4mm
x 38mm)
CCW (measured from
PTO side)
regular unleaded
gasoline
0.7-0.8mm (.027-.030
in.)
0.4 +/- 0.2mm 0.4 +/- 0.2mm 0.4 +/- 0.2mm 0.4 +/- 0.2mm 0.4 +/- 0.2mm 0.4 +/- 0.2mm
.11 +/- .02mm (.003-
.005in)
.13 +/- .02mm (.004-
.006 in.)
22.72 lbs. (10.3kg) 31 lbs. (14.1kg) 35 lbs. (16.6kg) 35 lbs. (16.6kg) 35 lbs. (16.8kg) NA
NA 38 lbs. (17.3kg) 42 lbs. (19.1kg) 42 lbs. (19.1kg) 42 lbs. (19.3kg) 45.23 lbs. (20.5kg)
NA 30 lbs. (13.6kg) 36 lbs. (16.4kg) 36 lbs. (16.4kg) NA NA
2.44" x 1.77" (62mm x
45mm)
CCW (measured from
PTO side)
regular unleaded
gasoline
0.7-0.8mm (.027-.030
in.)
.15 +/- .02mm (.005-
.007in)
.20 +/- .02mm (.007-
.009 in.)
2.55" x 2.13" (65mm x
54mm)
CCW (measured from
PTO side)
regular unleaded
gasoline
0.7-0.8mm (.027-.030
in.)
.15 +/- .02mm (.005-
.007in)
.20 +/- .02mm (.007-
.009 in.)
2.76" x 2.13" (70mm x
54mm)
CCW (measured from
PTO side)
regular unleaded
gasoline
0.7-0.8mm (.027-.030
in.)
.15 +/- .02mm (.005-
.007in)
.20 +/- .02mm (.007-
.009 in.)
70x58
CCW (measured from
PTO side)
regular unleaded
gasoline
0.7-0.8mm (.027-.030
in.)
.15 +/- .02mm (.005-
.007 in.)
.20 +/- .02mm (.007-
.009 in.)
2.99" x 2.2" (76mm x
56mm)
CCW (measured from
PTO side)
regular unleaded
gasoline
0.7-0.8mm (.027-.030
in.)
.15 +/- .02mm (.005-
.007in)
.20 +/- .02mm (.007-
.009 in.)
Copyright © 2018 Liquid Combustion Technology, LLC LCT Engine Service Manual: 79, 136, 179, 208, 254, 291, 306, 369, 414 & 420cc 4
Page 6
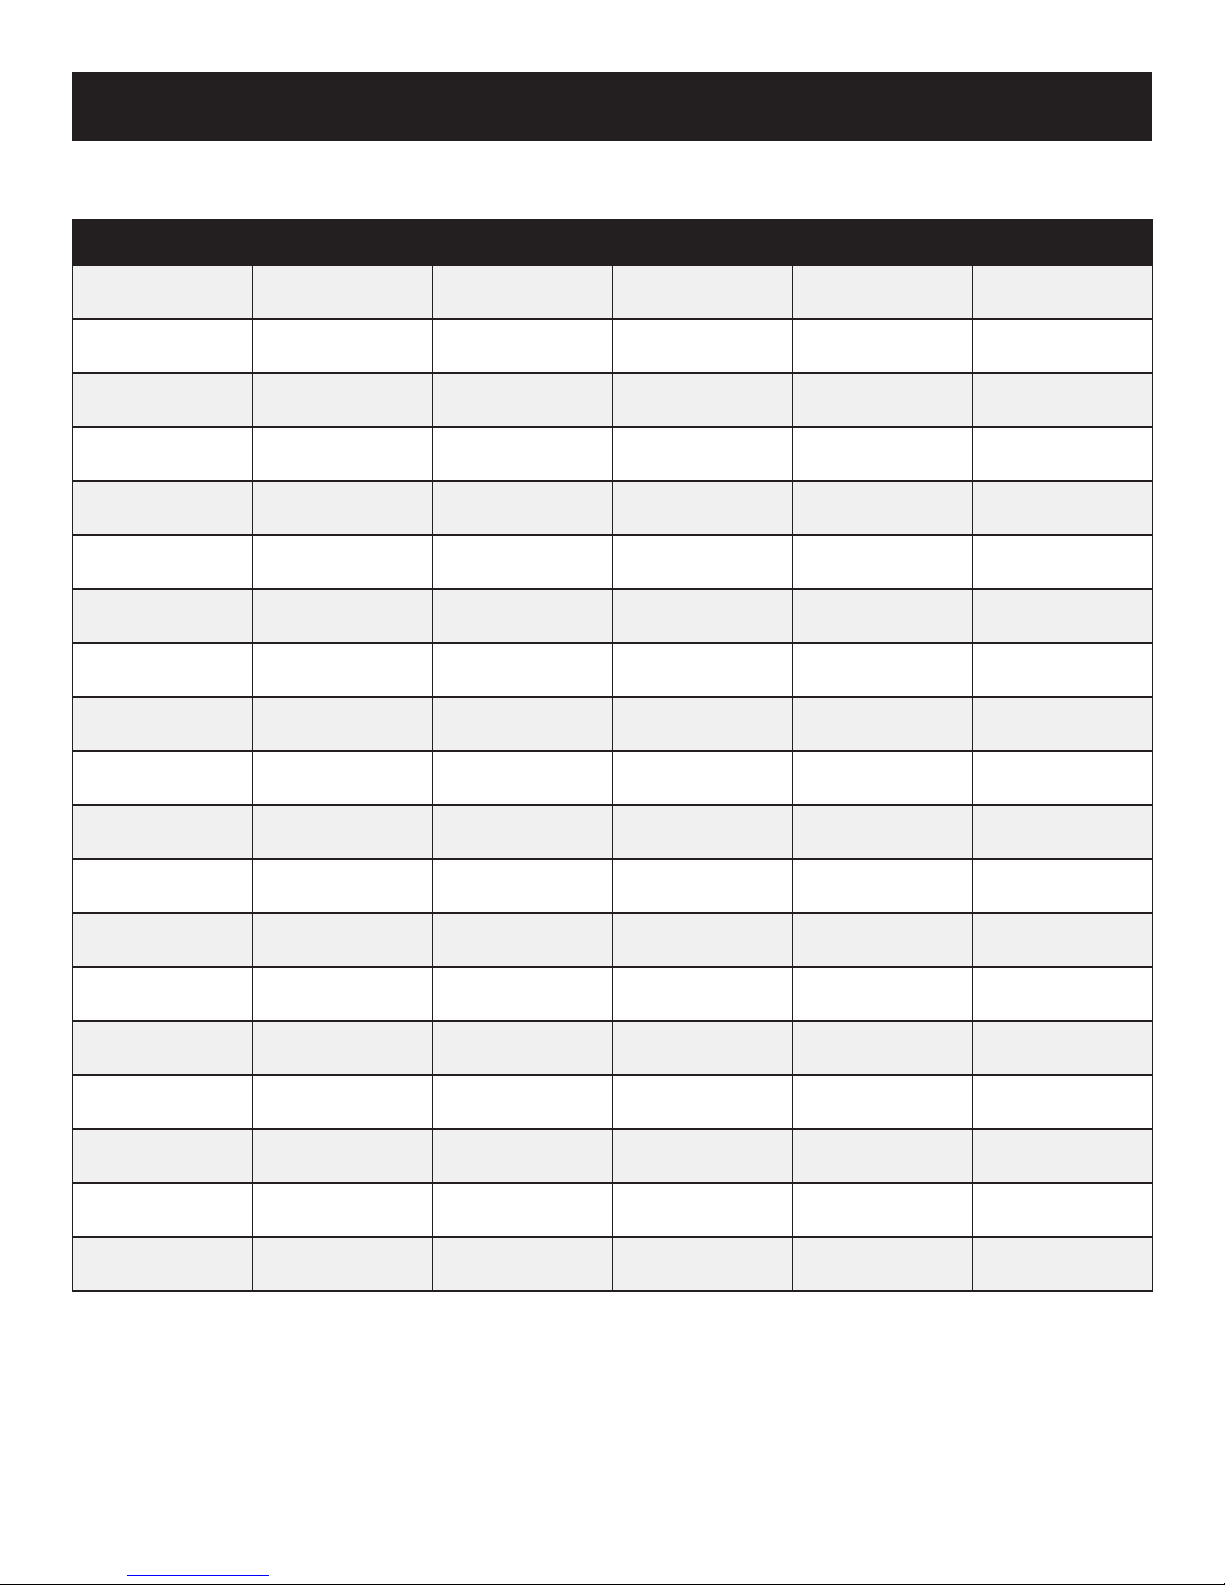
General Specifications
Item 291cc 306cc 369cc 414cc 420cc
Maximum Speed 3850±50rpm 3850±50rpm 3850±50rpm 3850±50rpm 3850±50rpm
Idle Speed 2050+/-50rpm 2050+/-50rpm 2050+/-50rpm 2050+/-50rpm 2050+/-50rpm
Compression Ratio 9:1 9:1 8.1:1 8.1:1 8.1:1
Displacement 291cc 306cc 369cc 414cc 420cc
Compression Release yes yes yes yes yes
Cast Iron Sleeve yes yes yes yes yes
Bore x Stroke
PTO Rotation
Fuel (DO NOT USE E85) regular unleaded gasoline regular unleaded gasoline regular unleaded gasoline regular unleaded gasoline regular unleaded gasoline
Low Oil Shutoff if equipped if equipped if equipped if equipped if equipped
Fuel Shutoff Valve yes yes yes yes yes
Oil Fill Capacity 32oz 32oz 38oz 38oz 38oz
Spark Plug Gap 0.7-0.8mm (.027-.030 in.) 0.7-0.8mm (.027-.030 in.) 0.7-0.8mm (.027-.030 in.) 0.7-0.8mm (.027-.030 in.) 0.7-0.8mm (.027-.030 in.)
Ignition Air Gap
(At Flywheel)
Valve Adjustment
(gap) Intake
Valve Adjustment
(gap) Exhaust
Dry Weight
(Summer Engines)
Dry Weight
(Winter - Gen II / PW2)
3.15" x 2.28" (80mm x
58mm)
CCW (measured from PTO
side)
0.4 +/- 0.2mm 0.4 +/- 0.2mm 0.4 +/- 0.2mm 0.4 +/- 0.2mm 0.4 +/- 0.2mm
.15 +/- .02mm (.005-
.007in)
.20 +/- .02mm (.007-.009
in.)
57.32 lbs. (26kg) 57.32 lbs. (26kg) 69.45 lbs. (31.5kg) 69.45 lbs. (31.5kg) 69.45 lbs. (31.5kg)
61 lbs. (27.7kg) 61 lbs. (27.7kg) 72 lbs. (32.7kg) 72 lbs. (32.7kg) 72 lbs. (32.7kg)
3.22" x 2.28" (82mm x
58mm)
CCW (measured from PTO
side)
.15 +/- .02mm (.005-
.007in)
.20 +/- .02mm (.007-.009
in.)
3.34" x 2.55" (85mm x
65mm)
CCW (measured from PTO
side)
.15 +/- .02mm (.005-
.007in)
.20 +/- .02mm (.007-.009
in.)
3.54" x 2.56" (90mm x
65mm)
CCW (measured from PTO
side)
.15 +/- .02mm (.005-
.007in)
.20 +/- .02mm (.007-.009
in.)
3.54" x 2.59" (90mm x
66mm)
CCW (measured from PTO
side)
.15 +/- .02mm (.005-
.007in)
.20 +/- .02mm (.007-.009
in.)
Dry Weight (Winter - PW3) NA NA NA NA NA
Copyright © 2018 Liquid Combustion Technology, LLC LCT Engine Service Manual: 79, 136, 179, 208, 254, 291, 306, 369, 414 & 420cc 5
Page 7
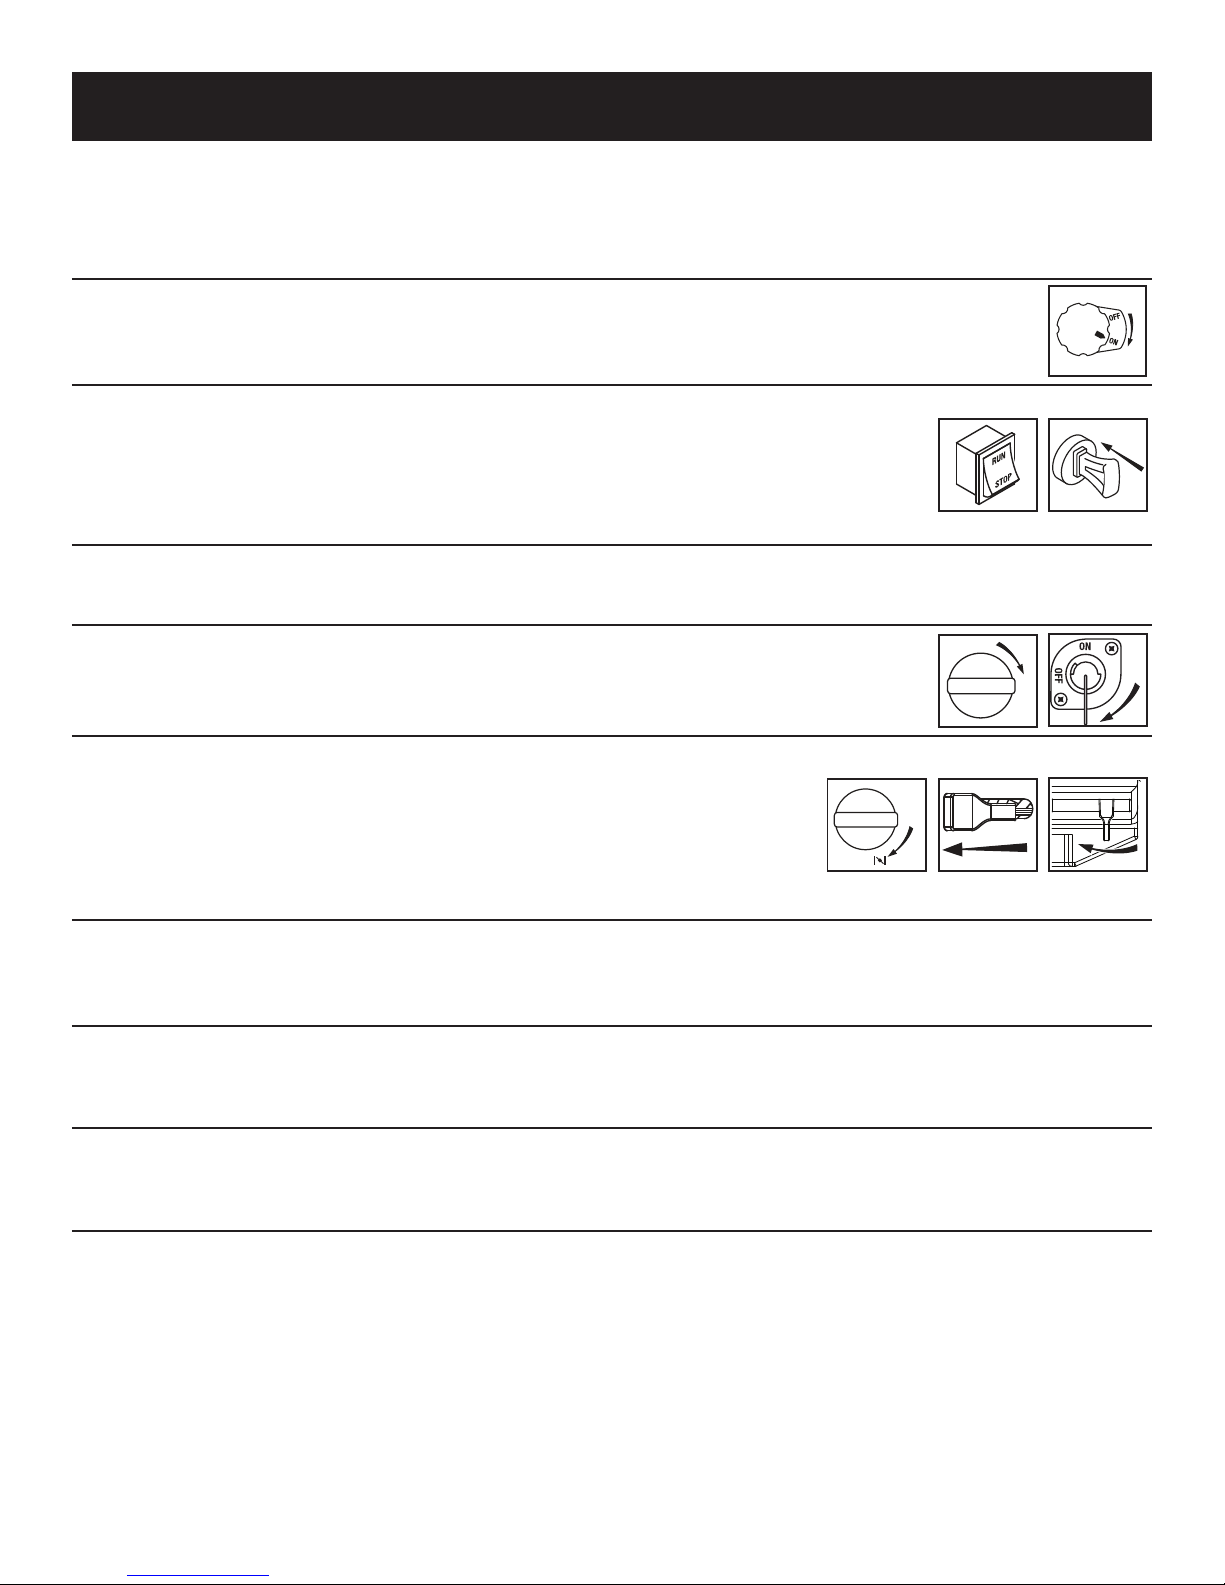
General Troubleshooting
ST ART
Engine will not start:
1. Check oil level- Do you have the correct amount of oil? (Ref: Engine Oil Service, pg. 10)
Remedy: Oil should be visible and to the top 2 threads of the LOWEST oil ll spout.
2. Is on/off switch on?
Remedy: Turn to the on position per engine specication.
3. Snow Only:
a) Is the Run/Stop switch in the Run Position?
Remedy: Push switch to the Run Position.
b) Is the snow safety key inserted into slot?
Remedy: Push key into slot to fully engage.
4. Do you have fuel in the fuel tank?
Remedy: Add fuel.
5. Is the fuel petcock turned to the on position?
Remedy: Turn to the on position.
OFF
ON
6. Was the engine choked?
Remedy: When starting the engine the choke lever should be pushed left to the on
position, and after starting, pushed right to the off position. If engine is equipped with
RUN
twist type choke, the knob should be turned clockwise to the start position, and after
starting, turned counter-clockwise to the run position. If engine still does not start
move to half choke and pull twice.
START
SnowTwist Choke
7. Is the spark plug boot securely fastened to the spark plug?
Remedy: Slide over spark plug and t securely.
8. Has the fuel being used been purchased within the last 30-days and was it stored in a plastic container?
Remedy: Replace old fuel with new fuel.
9. Is the engine ooded?
Remedy: Remove spark plug and replace with any of the spark plugs listed under Spark Plug Service, pg. 9.
• NOTICE
Using an incorrect spark plug may cause engine damage.
Summer
Copyright © 2018 Liquid Combustion Technology, LLC LCT Engine Service Manual: 79, 136, 179, 208, 254, 291, 306, 369, 414 & 420cc 6
Page 8
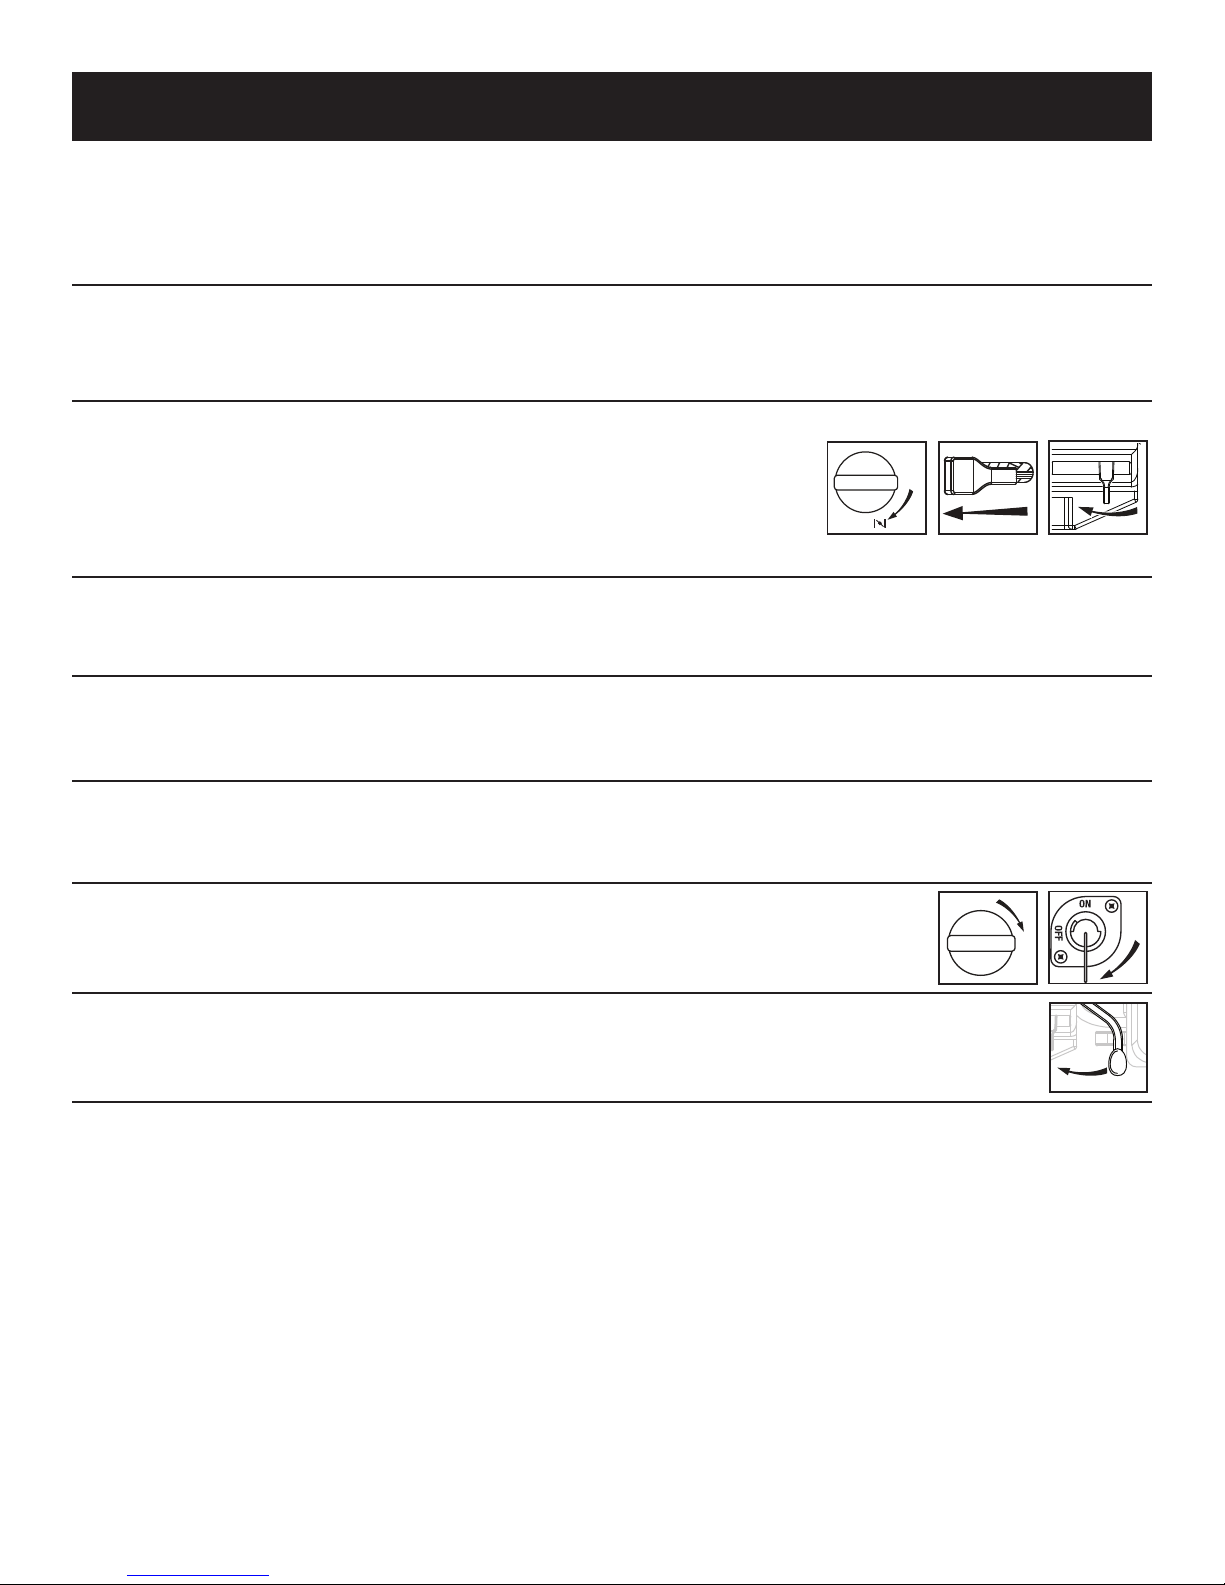
General Troubleshooting
ST ART
Engine stops running:
1. Has the fuel being used been purchased within the last 30-days and was it stored in a plastic container?
Remedy: Replace old fuel with new fuel.
2. Is the air lter dirty?
Remedy: Replace air lter element if dirty. Clean prelter of any dirt or dust per engine specication.
3. Was the engine choked?
Remedy: When starting the engine the choke lever should be pushed left to the on
position, and after starting, pushed right to the off position. If engine is equipped with
twist type choke, the knob should be turned clockwise to the start position, and after
starting, turned counter-clockwise to the run position. If engine still does not start
move to half choke and pull twice.
Twist Choke
4. Is the spark plug corroded?
Remedy: Remove spark plug and replace with any of the plugs listed under Spark Plug Service, pg.9.
RUN
START
Snow
Summer
• NOTICE
Using an incorrect spark plug may cause engine damage.
5. Has the engine run out of fuel?
Remedy: Refuel engine.
6. Is the fuel petcock turned to the on position?
Remedy: Turn to the on position.
7. Is the throttle set too low (variable speed models only)?
Remedy: Increase the throttle per engine specication.
OFF
ON
Copyright © 2018 Liquid Combustion Technology, LLC LCT Engine Service Manual: 79, 136, 179, 208, 254, 291, 306, 369, 414 & 420cc 7
Page 9
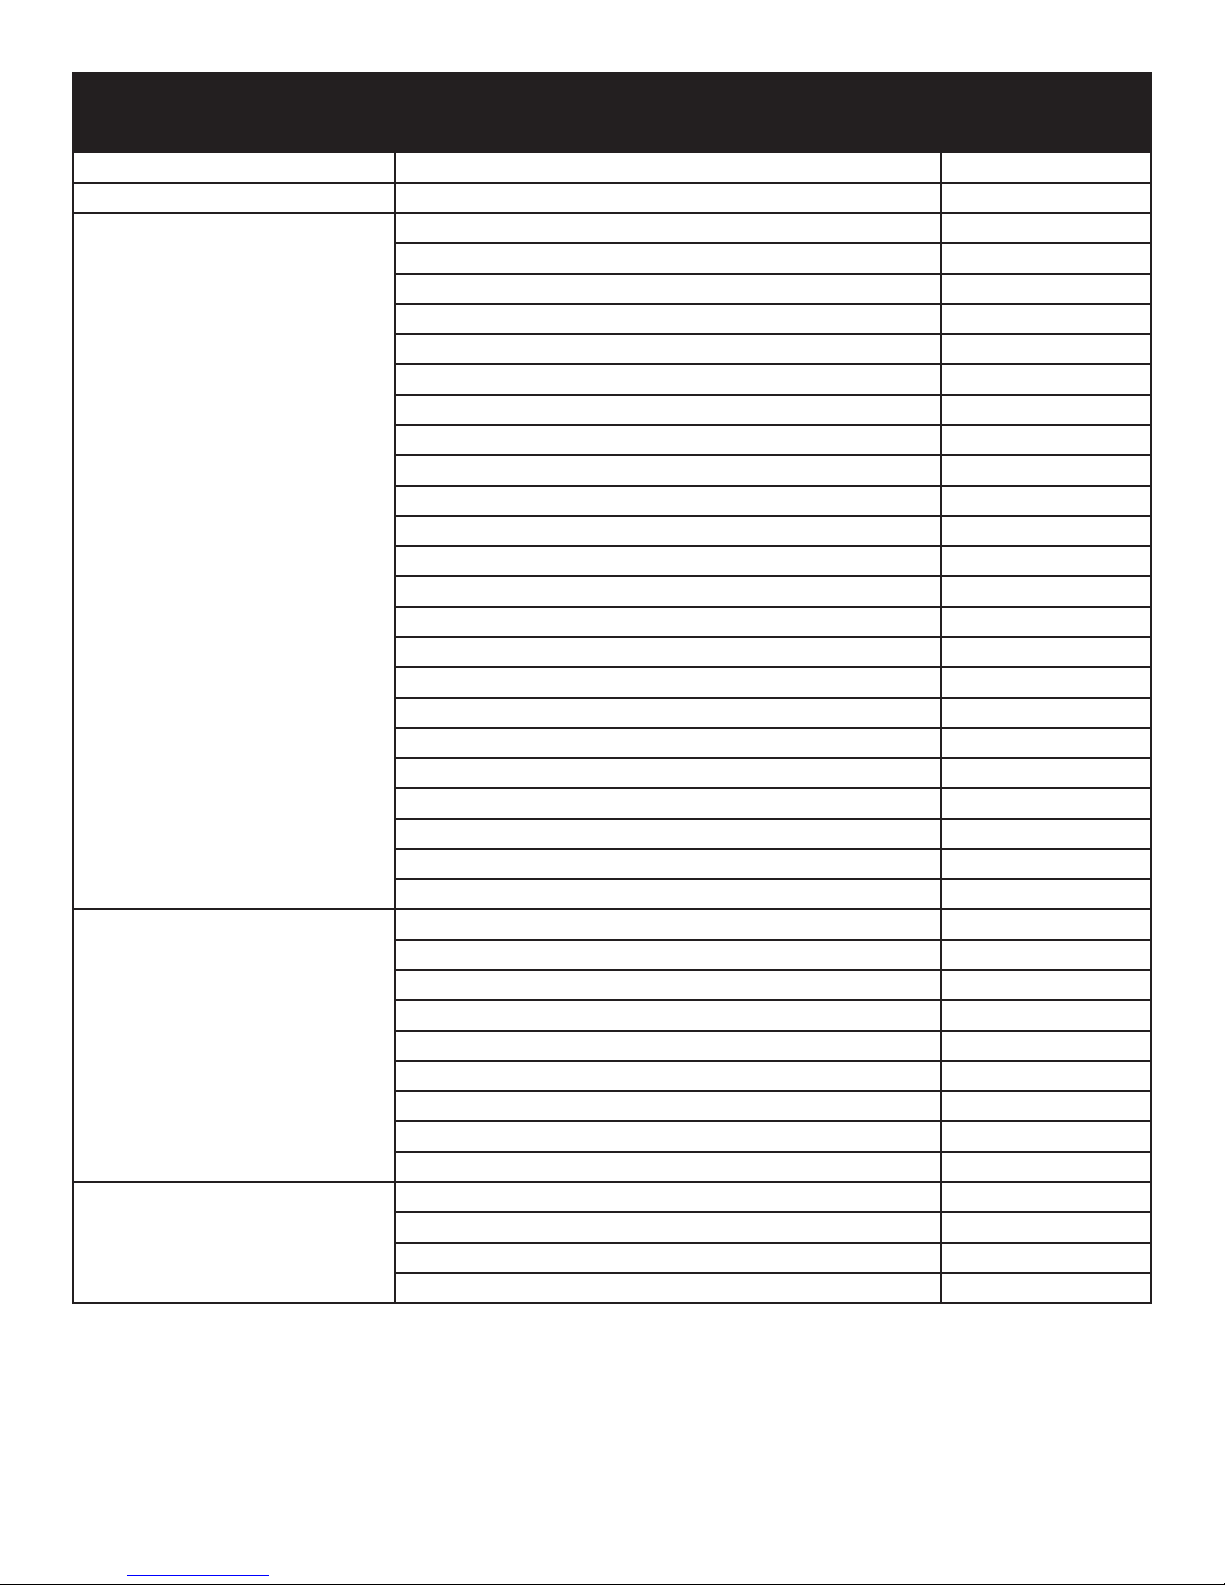
Advanced Troubleshooting – For Authorized LCT Technicians
ENGINE
Complaint Symptom and possible causes Remedy
Engine will not start, or is
hard to start
Compression too low
1. Valves out of adjustment Adjust
2. Worn valve guides or poor seating of valves Repair or Replace
3. Mistiming valves Adjust
4. Excessively worn piston rings Replace
5. Worn-down cylinder bore Replace
6. Poor seating of spark plug Retighten
7. Failed head gasket Replace
Plug not sparking
1. Fouled spark plug Replace
2. Wet spark plug Dry off
3. Defective ignition coil Replace
4. Spark plug wire damaged Replace
5. Kill switch in “OFF” position Switch to “On”
6. Ignition coil air gap is too wide Reset
7. Ignition coil failure Replace
No fuel reaching the intake manifold
1. Clogged fuel filter or fuel line Replace
2. Dirty/gummed up carburetor Clean
3. Fuel petcock is turned off Turn on
4. Fuel tank is empty Fill
Engine idles poorly 1. Out of adjustment tappet clearance Adjust
2. Poor seating of valves Replace or Repair
3. Defective valve guides Replace
4. Worn down camshaft Replace
5. Too wide spark plug gap Adjust or replace
6. Defective ignition coil Replace
7. Ignition coil air gap too wide Adjust
8. Dirty/gummed up carburetor Clean
9. Stale fuel Replace
Engine stalls easily 1. Dirty/gummed up carburetor Clean
2. Fouled spark plug Replace
3. Clogged fuel line Replace
4. Valves out of adjustment Adjust
Copyright © 2018 Liquid Combustion Technology, LLC LCT Engine Service Manual: 79, 136, 179, 208, 254, 291, 306, 369, 414 & 420cc 8
Page 10
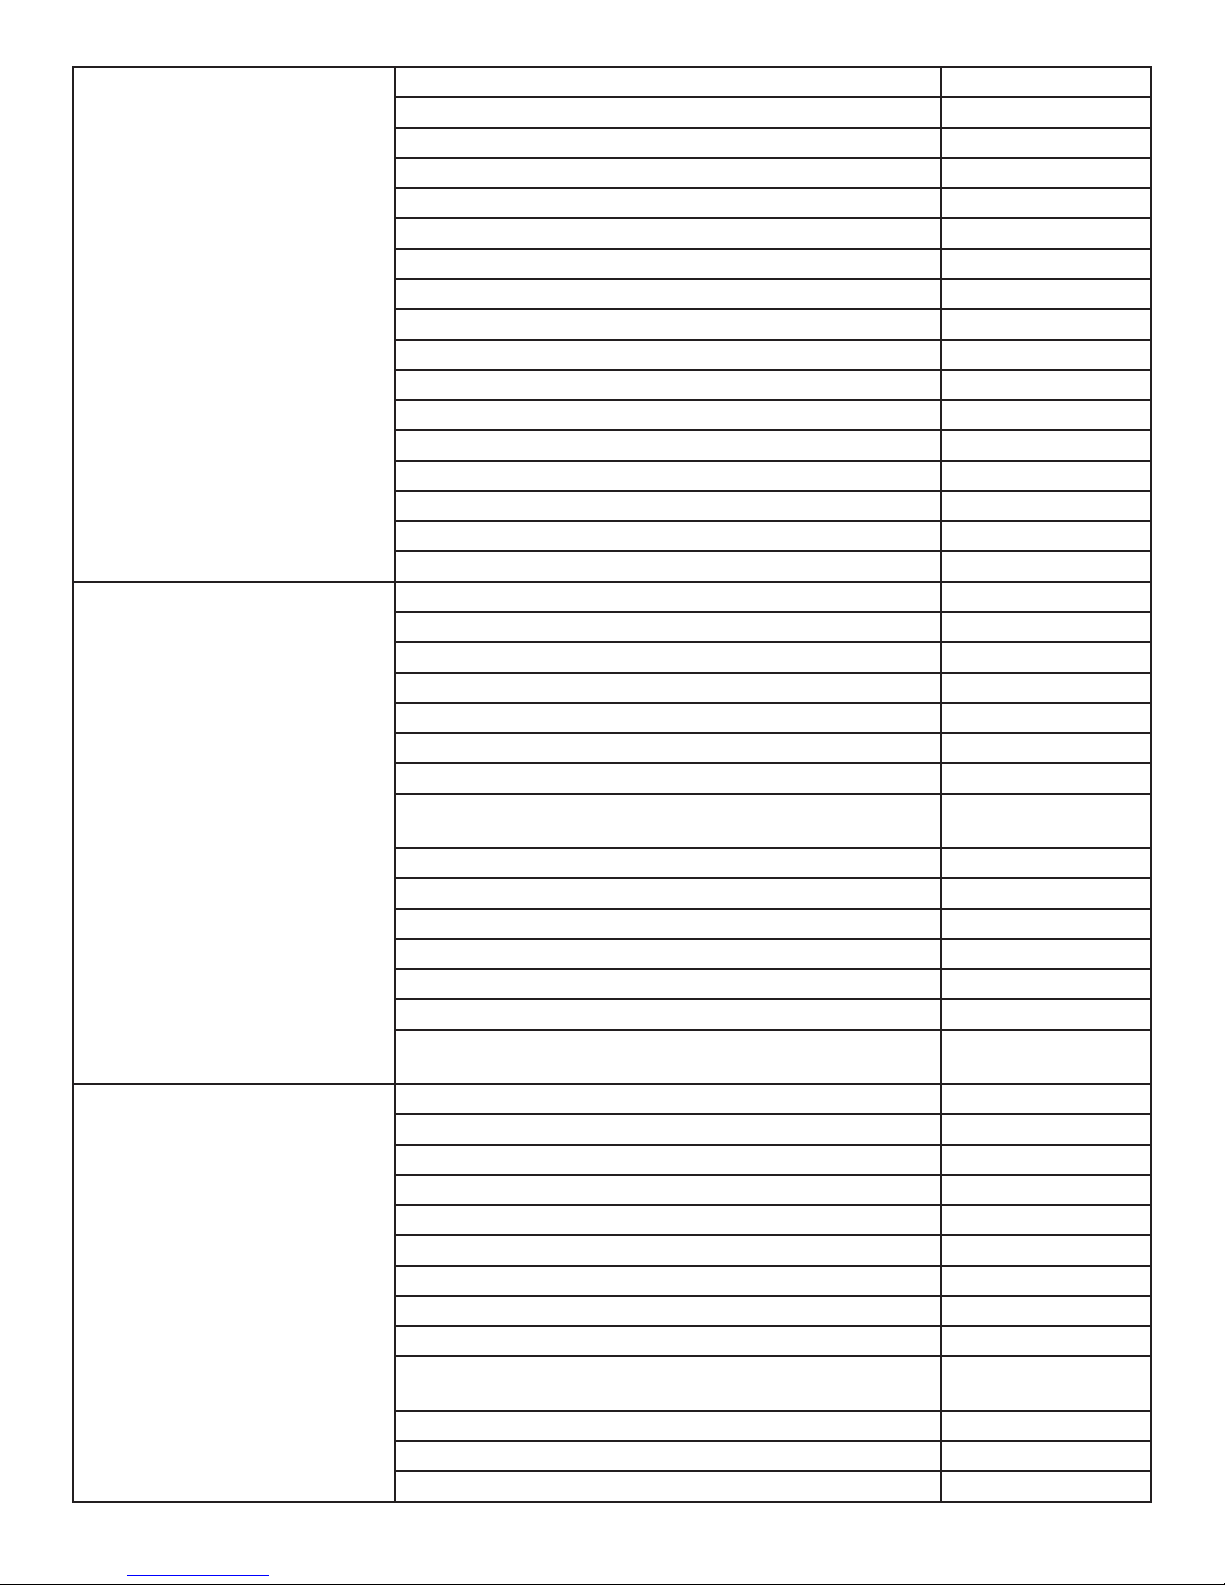
Noisy Engine Excessive Valve Chatter
1. Too large valve clearance Adjust
2. Weakened or broken valve spring Replace
3. Worn tappet or cam lobe Replace
4. Worn and burnt camshaft journal Replace
Noise seems to come from piston
1. Worn down piston or cylinder Replace
2. Fouled with carbon combustion chamber Clean
3. Worn piston pin or piston pin bore Replace
4. Worn piston rings or ring grooves Replace
Noise seems to come from crankshaft
1. Rattling bearings due to wear Replace
2. Worn and burnt main bearings Replace
3. Worn and burnt pin bearing Replace
4. Too large endplay Adjust
Noise seems to come from outside of engine
1. Loose trim item Tighten
Engine runs poorly in high
speed range
Defective engine internal/electrical parts
1. Weakened valve springs Replace
2. Worn camshaft Replace
3. Valve timing out of adjustment Adjust
4. Too narrow spark plug gaps Adjust
5. Defective ignition coil Replace
6. Clogged air cleaner element Replace
7. Clogged fuel line, resulting in inadequate fuel supply
to carburetor
8. Worn bearings Replace
9. Blown head gasket Replace
10. Ignition coil air gap too wide Adjust
11. Dirty/gummed up carburetor Clean
12. Stale fuel Replace
Defective air flow system
1. Carburetor gasket leak - sucking air causing engine to
run lean
Engine lacks power Defective engine internal/electrical parts
1. Loss of valve clearance Adjust
2. Weakened valve springs Replace
3. Out of adjustment valve timing Adjust
4. Worn piston ring or cylinder Replace
5. Poor seating of valves Replace
6. Fouled spark plug Replace
7. Incorrect spark plug Replace
8. Clogged air filter element Replace
9. Carburetor gasket leak - sucking air causing engine to
run lean
10. Too much engine oil Adjust
11. Air fins clogged on engine causing to overheat Remove debris
12. Not enough oil in engine Adjust
Replace
Replace
Replace
Copyright © 2018 Liquid Combustion Technology, LLC LCT Engine Service Manual: 79, 136, 179, 208, 254, 291, 306, 369, 414 & 420cc 9
Page 11
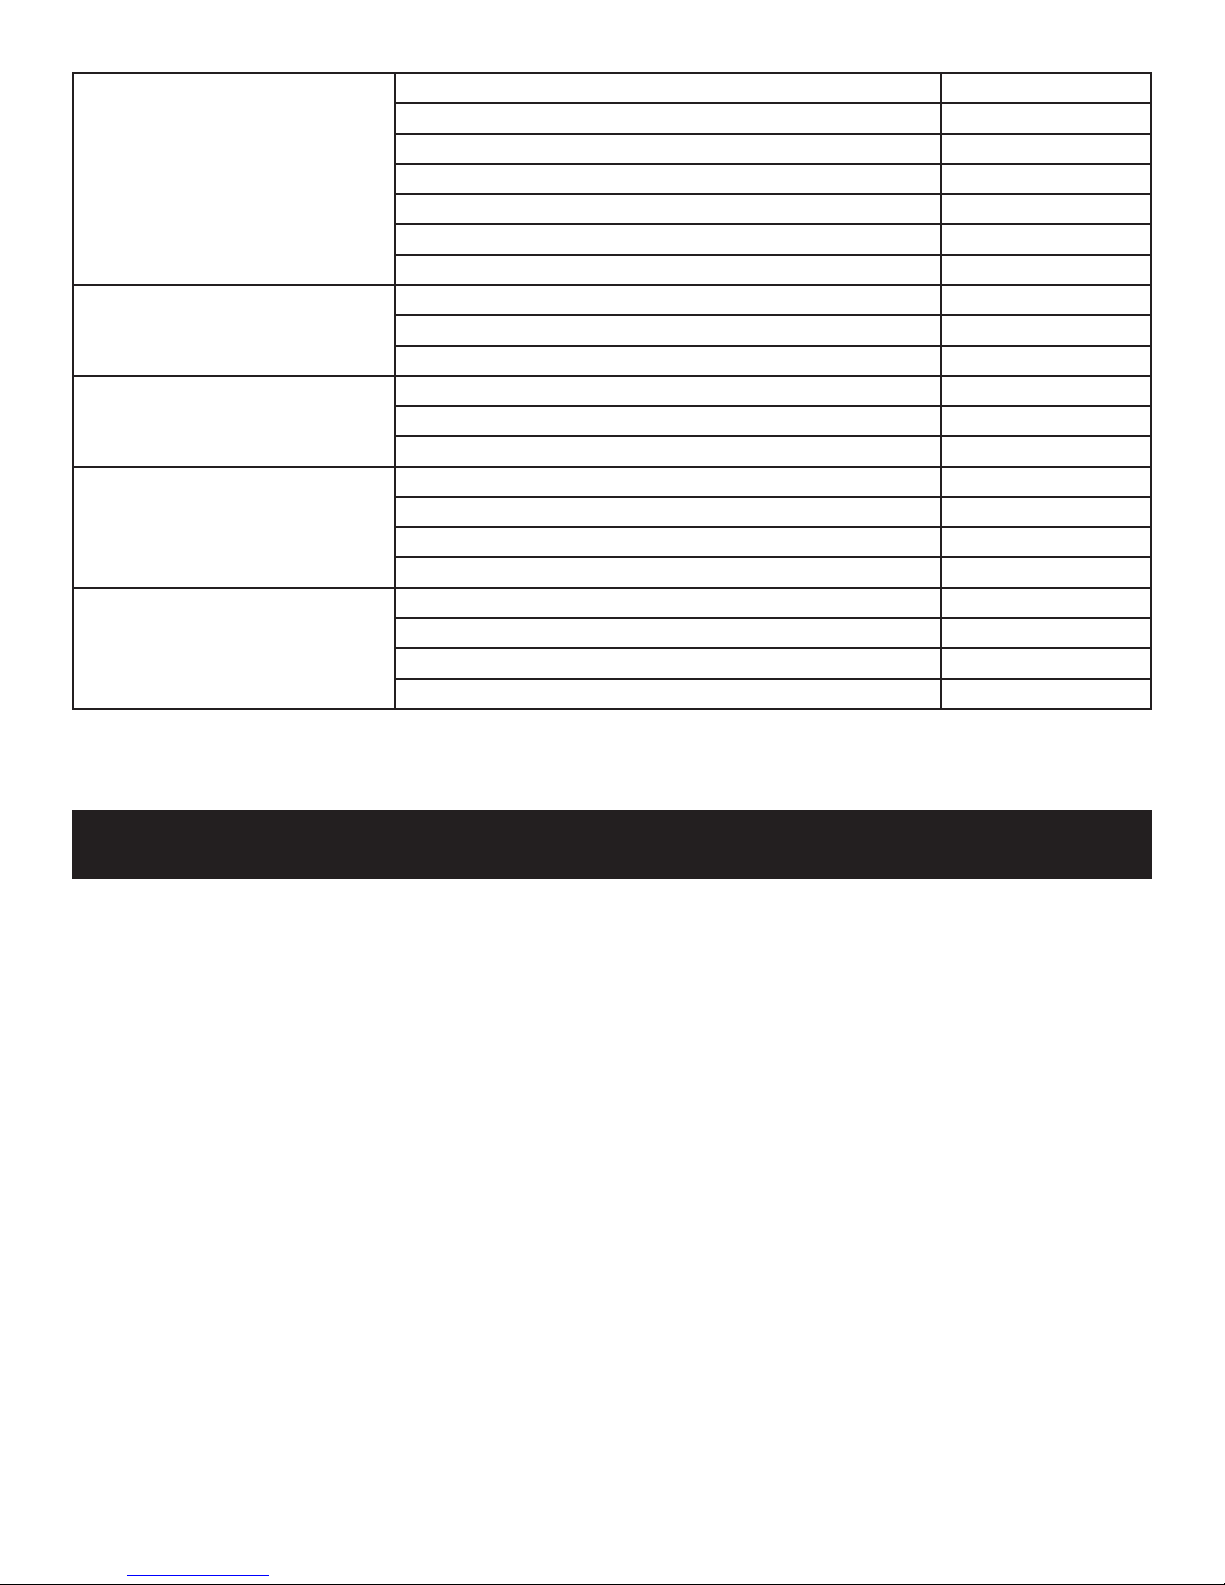
Dirty or heavy exhaust smoke 1. Too much engine oil in the engine Adjust
2. Worn piston rings or cylinder Replace
3. Worn valve guides Replace
4. Scored or scuffed cylinder wall Replace
5. Worn valve stems Replace
6. Defective stem seal Replace
7. Worn oil ring side rails Replace
No spark or poor spark 1. Defective ignition coil Replace
2. Defective spark plug Replace
3. Open-circuit wiring connection Check and repair
Spark plug fouled with carbon 1. Incorrect gasoline Replace
2. Dirty air cleaner element Replace
3. Too cold spark plug Use hotter plug
Spark plug becomes fouled
too soon
Spark plug electrode overheated or burnt
1. Worn piston rings Replace
2. Worn piston or cylinder Replace
3. Excessive clearance of valve stems in valve guides Replace
4. Worn valve stem oil seal Replace
1. Too hot spark plug Use colder plug
2. Overheated the engine Tune up
3. Loose spark plug Tighten
4. Too lean fuel mixture Check for air leak
Spark Plug Service
Recommended spark plugs: Torch Plug: F6RTP (Platinum) and F6RTC
Cross References
• Champing plug cross reference is: RN9YC (some tables show RN9YCC)
• NGK plug cross reference is: BPR6ES
• BOSCH plug cross reference is: WR6DC
• NOTICE
Using an incorrect spark plug may cause engine damage.
1. When engine is cool, disconnect the spark plug cap and remove any debris from the spark plug area with high pressure air.
2. Remove the spark plug with a 13/16-inch (21mm) spark plug wrench.
3. Inspect the spark plug. Replace it if the electrodes are worn or if the insulator is cracked or chipped. Spark plug gap should
be set to 0.027 - 0.030 inches (0.7 - 0.8mm).
4. Install the spark plug carefully to avoid cross threading. Screw in spark plug by hand until it stops turning.
5. Tighten the spark plug with a 13/16-inch (21mm) spark plug wrench. Tighten 1/4 turn after the spark plug seats.
• NOTICE
A loose spark plug can overheat and damage the engine. Over-tightening the spark plug can damage the threads in the
cylinder head.
6. Attach the spark plug cap. Ensure spark plug cap snaps into place securely.
Copyright © 2018 Liquid Combustion Technology, LLC LCT Engine Service Manual: 79, 136, 179, 208, 254, 291, 306, 369, 414 & 420cc 10
Page 12
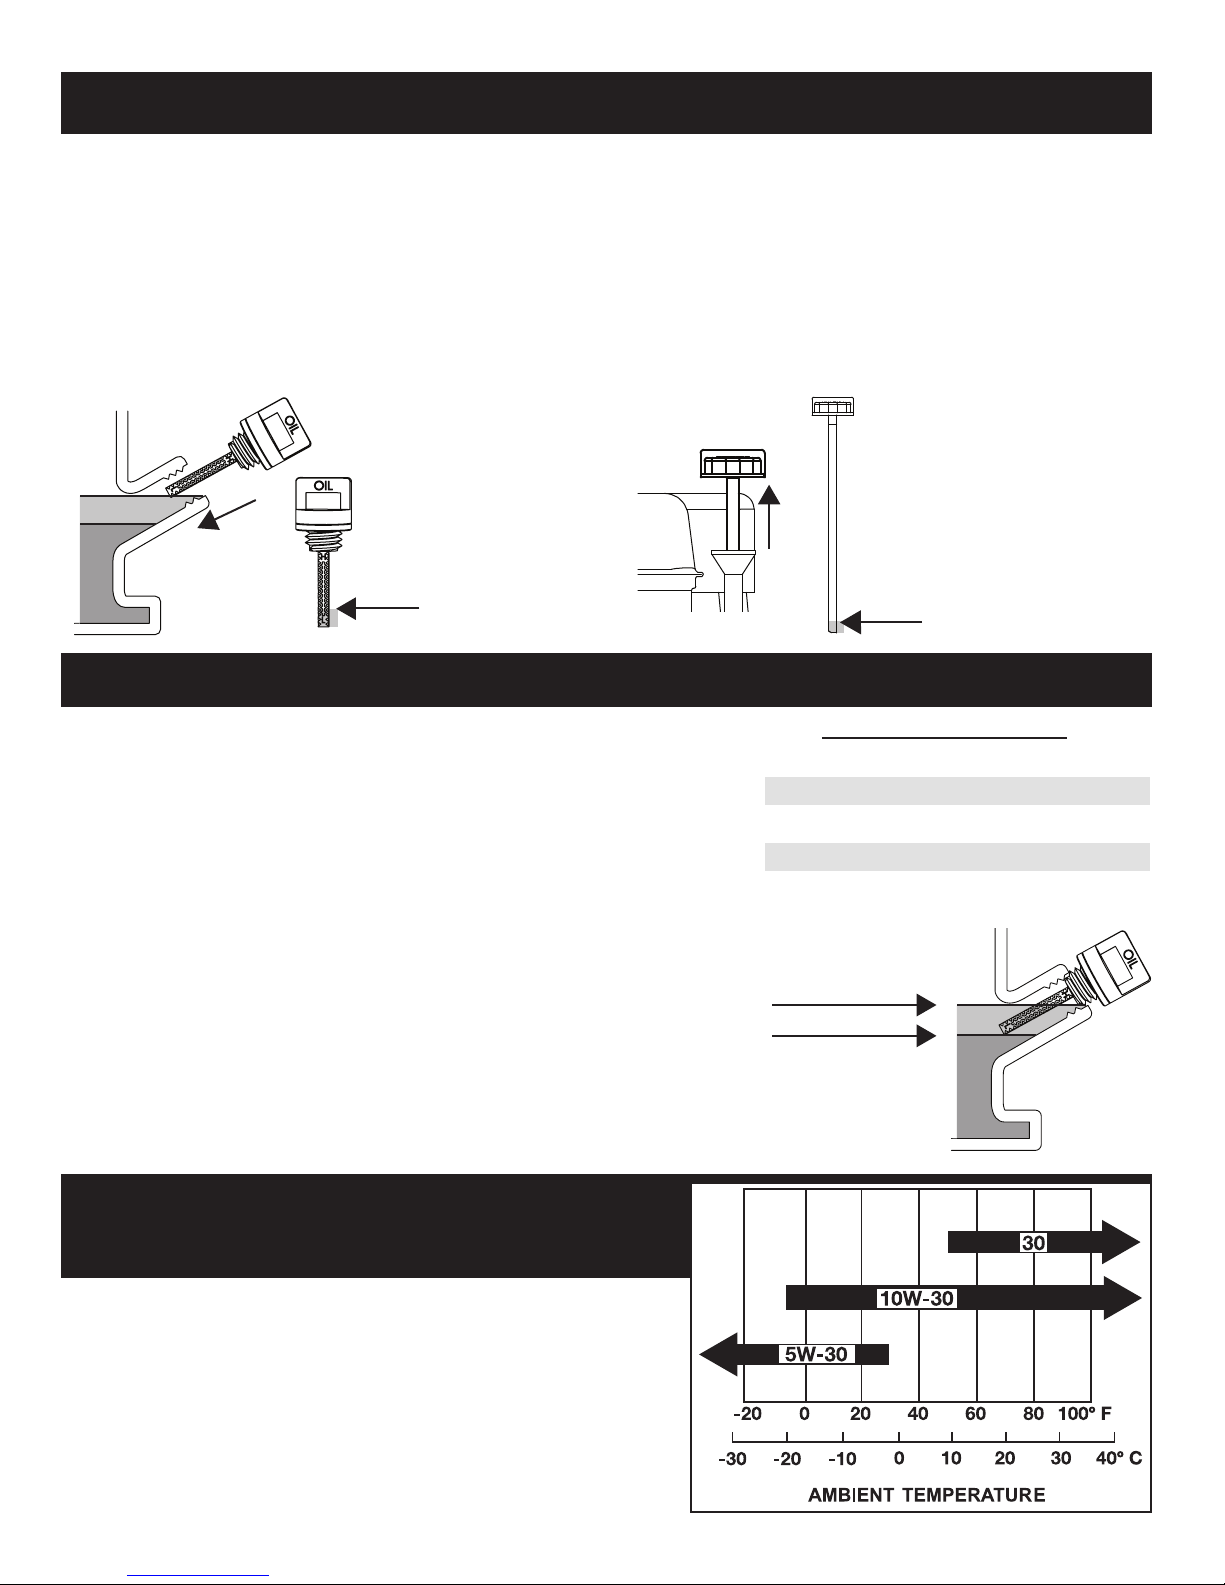
Engine Oil Level Check
Check the engine oil level with the engine stopped and with the engine in a level position.
1. Remove either side mounted ller cap dipstick or high oil ll dipstick and wipe it clean.
2. Insert the dipstick into the ller neck and turn clockwise until fully seated. Then remove the dipstick by turning it counter clockwise.
Check the oil level shown on the dipstick.
3. If the oil level is low, ll to the edge of the oil ller hole with the recommended oil.
4. Securely screw in the ller cap/dipstick. Running the engine with a low oil level can cause engine damage.
Always check the engine oil before start up.
ALL
MODELS
Fill if oil is
below letter
“L” on the
filler cap
Engine Oil Change
Drain the used oil while the engine is warm. Warm oil drains quickly and
completely. Avoid contact with hot oil.
1. Place a suitable container below the engine to catch the used oil then remove
the ller cap/dipstick and the drain plug.
2. Allow the used oil to drain completely, then reinstall the drain plug, and
tighten it securely. Do not over tighten. Dispose of used motor oil in a
manner that is compatible with the environment. We suggest you take used
oil in a sealed container to your local recycling center or service station for
reclamation. Do not throw used oil in the trash, pour it on the ground, or pour
down a drain.
179, 208, 254cc
ONLY
Fill if oil
is below
“Add”
on the
dipstick
Engine Oil Capacities
79cc 13 oz (.384 liter)
136cc/179cc/208cc 16 oz (.473 liter)
254cc 20 oz (.591 liter)
291cc/306cc 32 oz (.946 liter)
369cc/414cc/420cc 38 oz (1.123 liter)
Max Upper
Level
3. With the engine in a level position, ll to the outer edge of the oil ller hole
with the recommended oil. (see ll limits right)
• NOTICE Running the engine with a low oil level can cause engine damage.
4. Securely screw in the ller cap/dipstick.
Engine Oil
Recommendations
Engine oil affects performance and service life. Use 4-stroke automotive
detergent oil.
SAE 10W-30 is recommended for general use. Other viscosities shown in
the chart may be used when the average temperature in your area warrants.
The SAE oil viscosity and service classication are in the API label on the oil
container. The manufacturer recommends you use API SERVICE category
SJ engine oil, or better.
Copyright © 2018 Liquid Combustion Technology, LLC LCT Engine Service Manual: 79, 136, 179, 208, 254, 291, 306, 369, 414 & 420cc 11
Max Lower
Level
Page 13
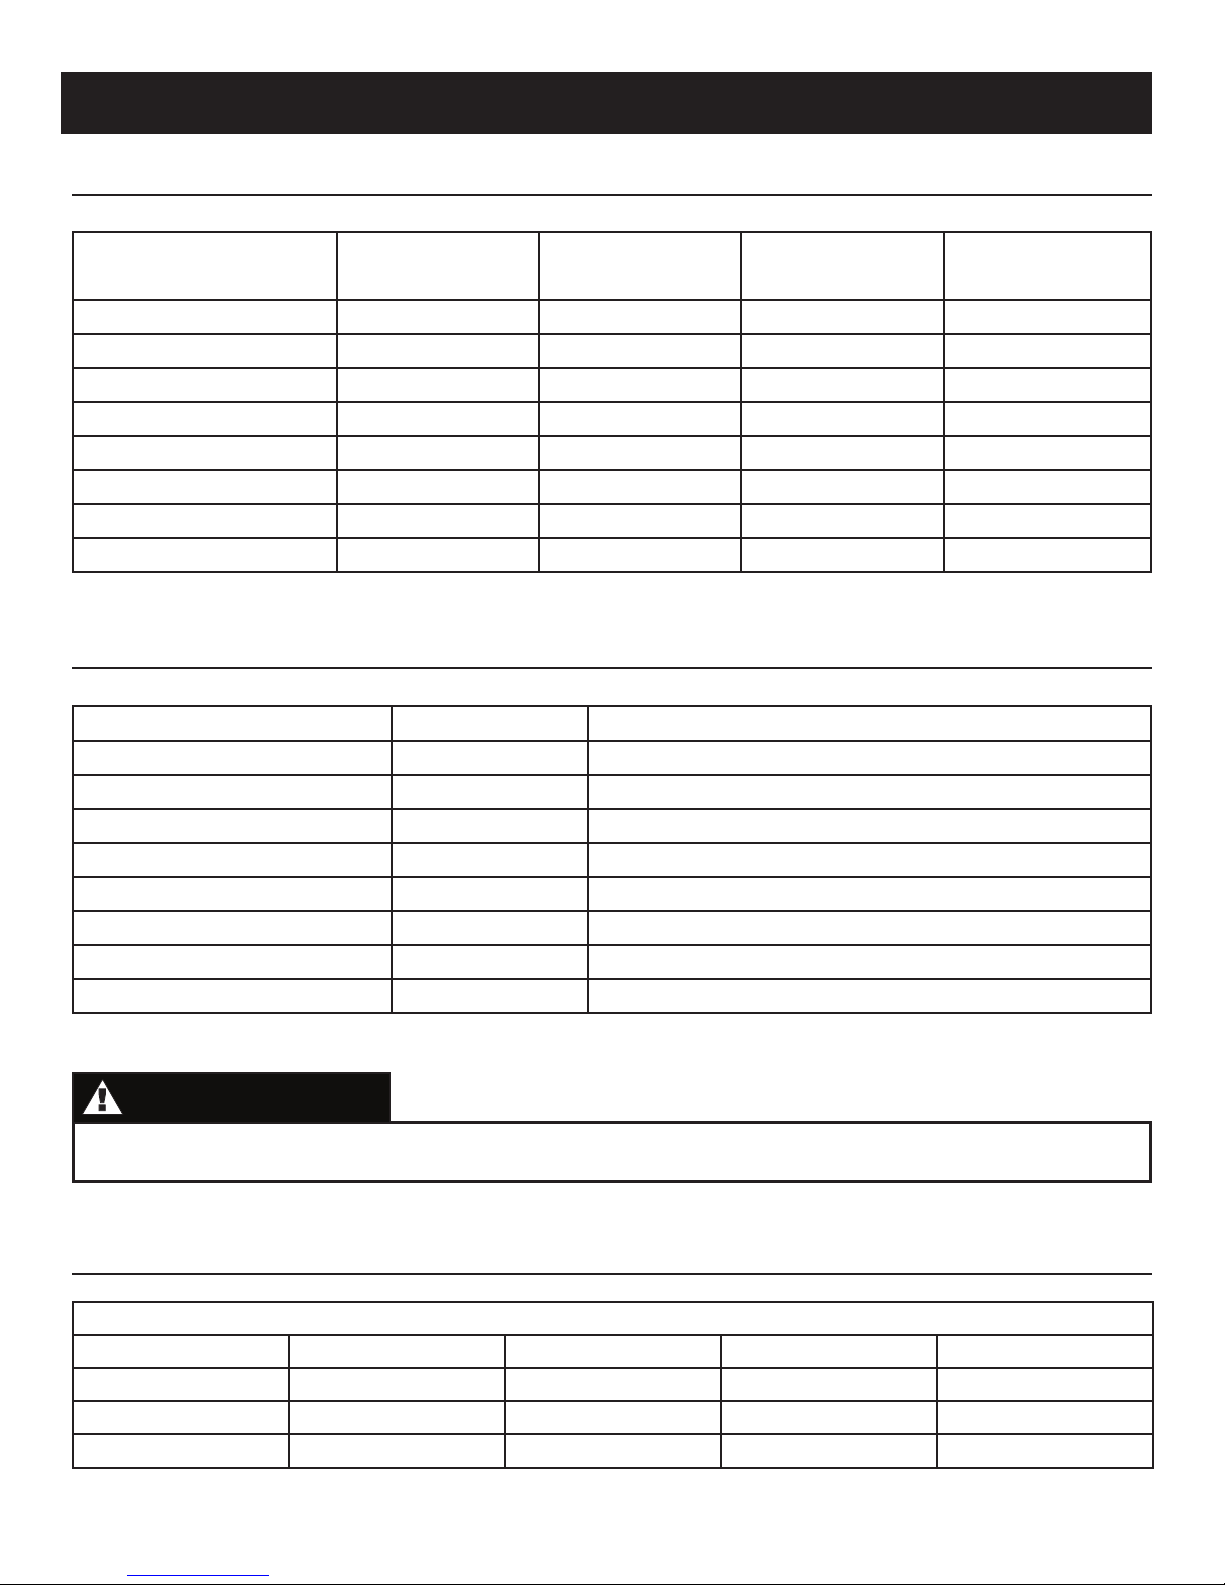
Maintenance Schedule
Normal Operating Conditions (less than 40 hrs. per year)
EACH USE FIRST
MONTH
Engine Oil Level Check
Engine Oil Replace Replace
Air Filter Check Clean / Replace
Spark Plug* Clean Replace
Cylinder/Head Fins Clean
Oil Leaks Check
Bolts Check
Fuel Hose Clamps Check
* Spark plug gap to be set to 0.027 - 0.030 inches (0.7 - 0.8mm).
EVERY
6 MONTHS
ONCE
A YEAR
Extreme Operating Conditions (greater than 40 hrs. per year)
EACH USE EVERY 40 HOURS
Engine Oil Level Check
Engine Oil Replace
Air Filter Check
Spark Plug* Replace
Cylinder/Head Fins Check Clean
Oil Leaks Check
Bolts Check
Fuel Hose Clamps Check
* Spark plug gap to be set to 0.027 - 0.030 inches (0.7 - 0.8mm).
NOTE
Following proper maintenance is critical under extreme operating conditions.
Liquid Combustion Technology engines are
made under one or more of the following patents:
PATENT NUMBER:
US D503,723 S US D534,923 S US D560,275 S US D593,190 S US D533,195 S
US D516,582 S US D539,818 S US D570,877 S US D596,649 S US D611,411 S
US D521,024 S US D543,216 S US D570,879 S US D600,252 S US D627,368 S
US D532,794 S US D549,241 S US D585,348 S US D604,686 S
Other Patents Pending
Copyright © 2018 Liquid Combustion Technology, LLC LCT Engine Service Manual: 79, 136, 179, 208, 254, 291, 306, 369, 414 & 420cc 12
Page 14
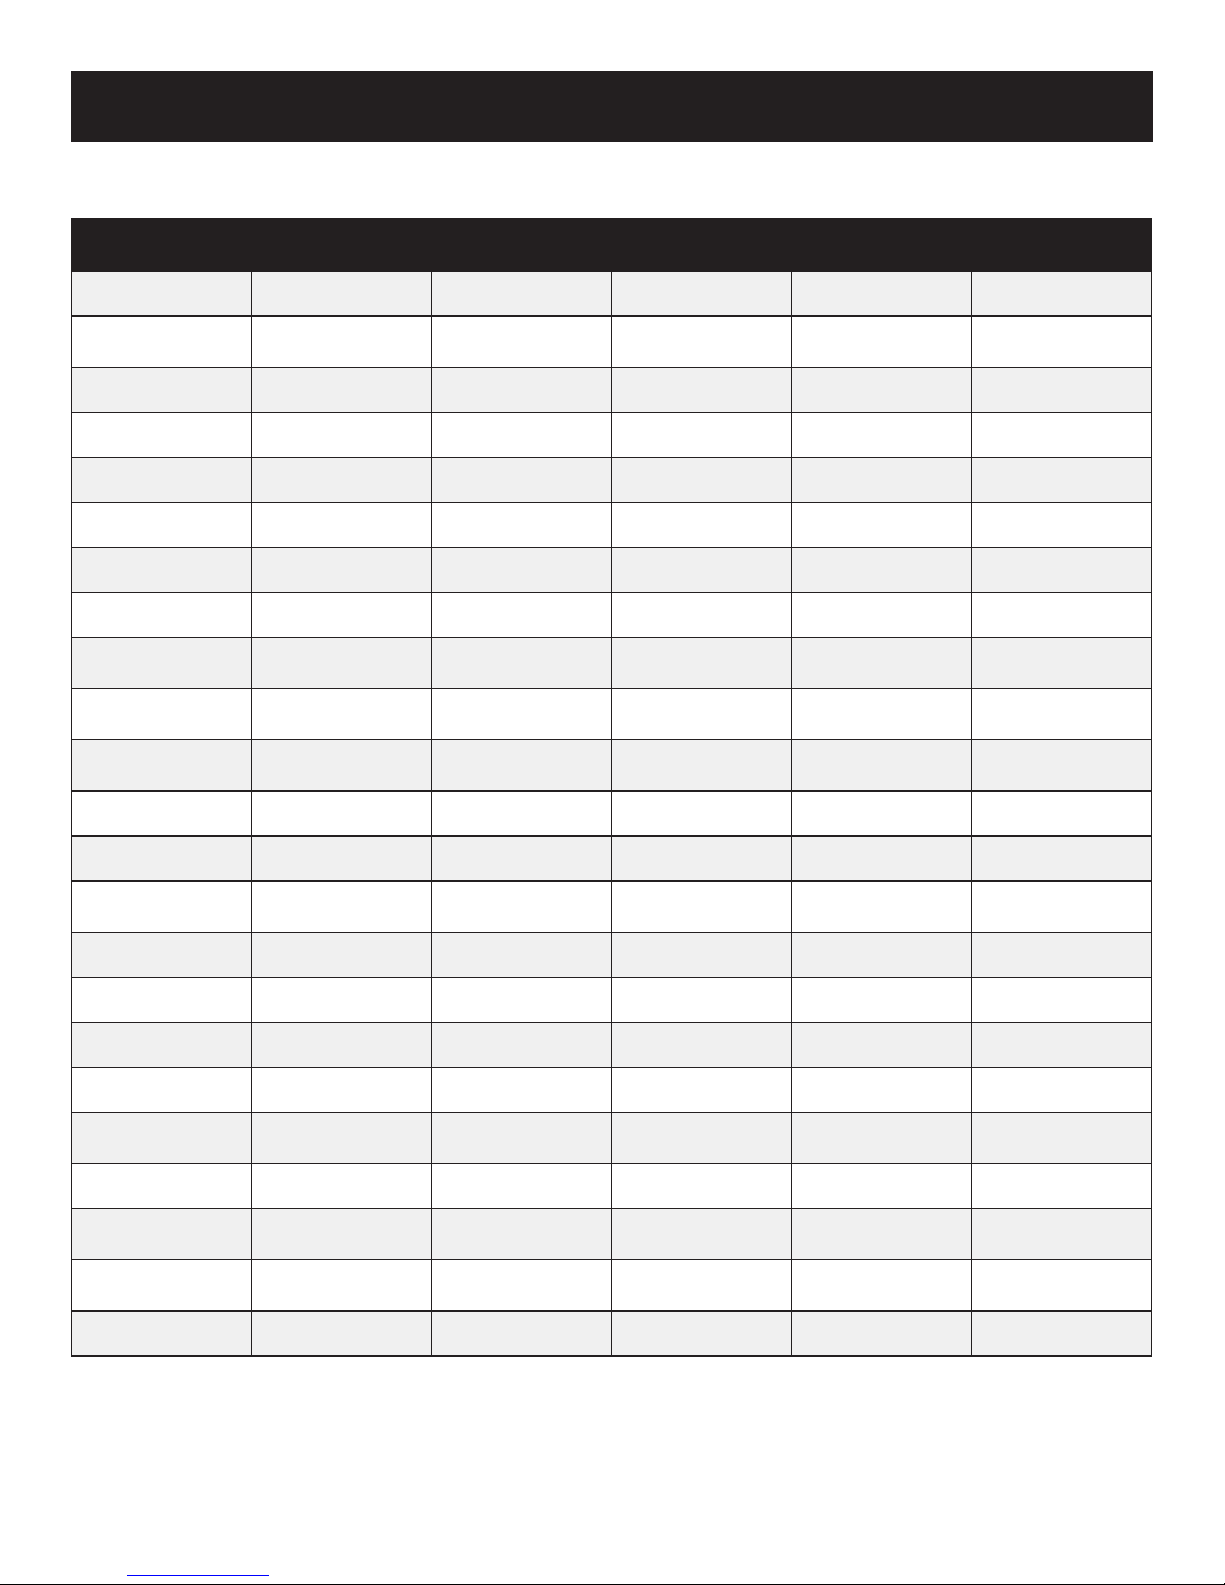
Torque Specifications
Item
Oil Drain Bolt 31 (270-280 in-lbs.) 31 (270-280 in-lbs.) 31 (270-280 in-lbs.) 31 (270-280 in-lbs.) 31 (270-280 in-lbs.)
Oil drain extended tube
(if equipped)*
LOS Switch Mtg Bolts NA 8 (71 in-lbs.) 8 (71 in-lbs.) 8 (71 in-lbs.) 8 (71 in-lbs.)
Spark plug 20-25 (177-222 in-lbs.) 20-25 (177-222 in-lbs.) 20-25 (177-222 in-lbs.) 20-25 (177-222 in-lbs.) 20-25 (177-222 in-lbs.)
Carburetor Mtg Studs 8-12 (71-106 in-lbs.) 8-12 (71-106 in-lbs.) 8-12 (71-106 in-lbs.) 8-12 (71-106 in-lbs.) 8-12 (71-106 in-lbs.)
Exhaust Studs 20-24 (177-212 in-lbs.) 20-24 (177-212 in-lbs.) 20-24 (177-212 in-lbs.) 20-24 (177-212 in-lbs.) 20-24 (177-212 in-lbs.)
Connecting rod bolt 12-14 (106-124 in-lbs.) 12-14 (106-124 in-lbs.) 12-14 (106-124 in-lbs.) 12-14 (106-124 in-lbs.) 12-14 (106-124 in-lbs.)
Ignition Coil mtg bolts 10-12 (86-106 in-lbs.) 10-12 (86-106 in-lbs.) 10-12 (86-106 in-lbs.) 10-12 (86-106 in-lbs.) 10-12 (86-106 in-lbs.)
Valve adjustment locking nut
Governor Arm locking
bolt
Carburetor mtg nut
(summer/winter)
Muffler mtg nut 20 (172 in-lbs.) 20-24 (177-212 in-lbs.) 20-24 (177-212 in-lbs.) 20-24 (177-212 in-lbs.) 20-24 (177-212 in-lbs.)
79cc Torque
(N.M)
NA 36 (320-330 in lbs.) 36 (320-330 in lbs.) 36 (320-330 in lbs.) 36 (320-330 in lbs.)
10 (86 in-lbs.) 10 (86 in-lbs.) 10 (86 in-lbs.) 10 (86 in-lbs.) 10 (86 in-lbs.)
8 (71 in-lbs.) 8 (71 in-lbs.) 8 (71 in-lbs.) 8 (71 in-lbs.) 8 (71 in-lbs.)
7 (62 in-lbs.) 7 (62 in-lbs.) 7 (62 in-lbs.) 7 (62 in-lbs.) 7 (62 in-lbs.)
136cc Torque
(N.M)
179cc Torque
(N.M)
208cc Torque
(N.M)
254cc Torque
(N.M)
Rocker Arm mtg stud 8 (71 in-lbs.) 20-25 (177-222 in-lbs.) 20-25 (177-222 in-lbs.) 20-25 (177-222 in-lbs.) 20-25 (177-222 in-lbs.)
Crankcase PTO Cover
bolts
Cylinder Head Bolts 30 (22 ft-lbs.) 36 (27 ft-lbs.) 36 (27 ft-lbs.) 36 (27 ft-lbs.) 38-42 (28-31 ft-lbs.)
Flywheel nut 60 (44 ft-lbs.) 75-80 (55-59 ft-lbs.) 75-80 (55-59 ft-lbs.) 75-80 (55-59 ft-lbs.) 84-86 (62-64 ft-lbs.)
Valve Cover mtg bolt(s) 6-10 (52-86 in-lbs.) 6-10 (52-86 in-lbs.) 6-10 (52-86 in-lbs.) 6-10 (52-86 in-lbs.) 6-10 (52-86 in-lbs.)
Fuel Tank mtg bolts 6-10 (52-86 in-lbs.) 6-10 (52-86 in-lbs.) 6-10 (52-86 in-lbs.) 6-10 (52-86 in-lbs.) 6-10 (52-86 in-lbs.)
Speed Control mtg
bolts
Recoil Starter mtg bolts 6-10 (52-86 in-lbs.) 6-10 (52-86 in-lbs.) 6-10 (52-86 in-lbs.) 6-10 (52-86 in-lbs.) 6-10 (52-86 in-lbs.)
Electric Starter mtg
bolts
Blower Housing mtg
bolts
Sheet Metal mtg bolts 6-10 (52-86 in-lbs.) 6-10 (52-86 in-lbs.) 6-10 (52-86 in-lbs.) 6-10 (52-86 in-lbs.) 6-10 (52-86 in-lbs.)
12-14 (106-120 in-lbs.) 24-26 (212-230 in-lbs.) 24-26 (212-230 in-lbs.) 24-26 (212-230 in-lbs.) 24-26 (212-230 in-lbs.)
6-10 (52-86 in-lbs.) 6-10 (52-86 in-lbs.) 6-10 (52-86 in-lbs.) 6-10 (52-86 in-lbs.) 6-10 (52-86 in-lbs.)
NA 6-10 (52-86 in-lbs.) 6-10 (52-86 in-lbs.) 6-10 (52-86 in-lbs.) 6-10 (52-86 in-lbs.)
6-10 (52-86 in-lbs.) 6-10 (52-86 in-lbs.) 6-10 (52-86 in-lbs.) 6-10 (52-86 in-lbs.) 6-10 (52-86 in-lbs.)
*Torque values are with thread locking compound applied to the threads.
Copyright © 2018 Liquid Combustion Technology, LLC LCT Engine Service Manual: 79, 136, 179, 208, 254, 291, 306, 369, 414 & 420cc 13
Page 15
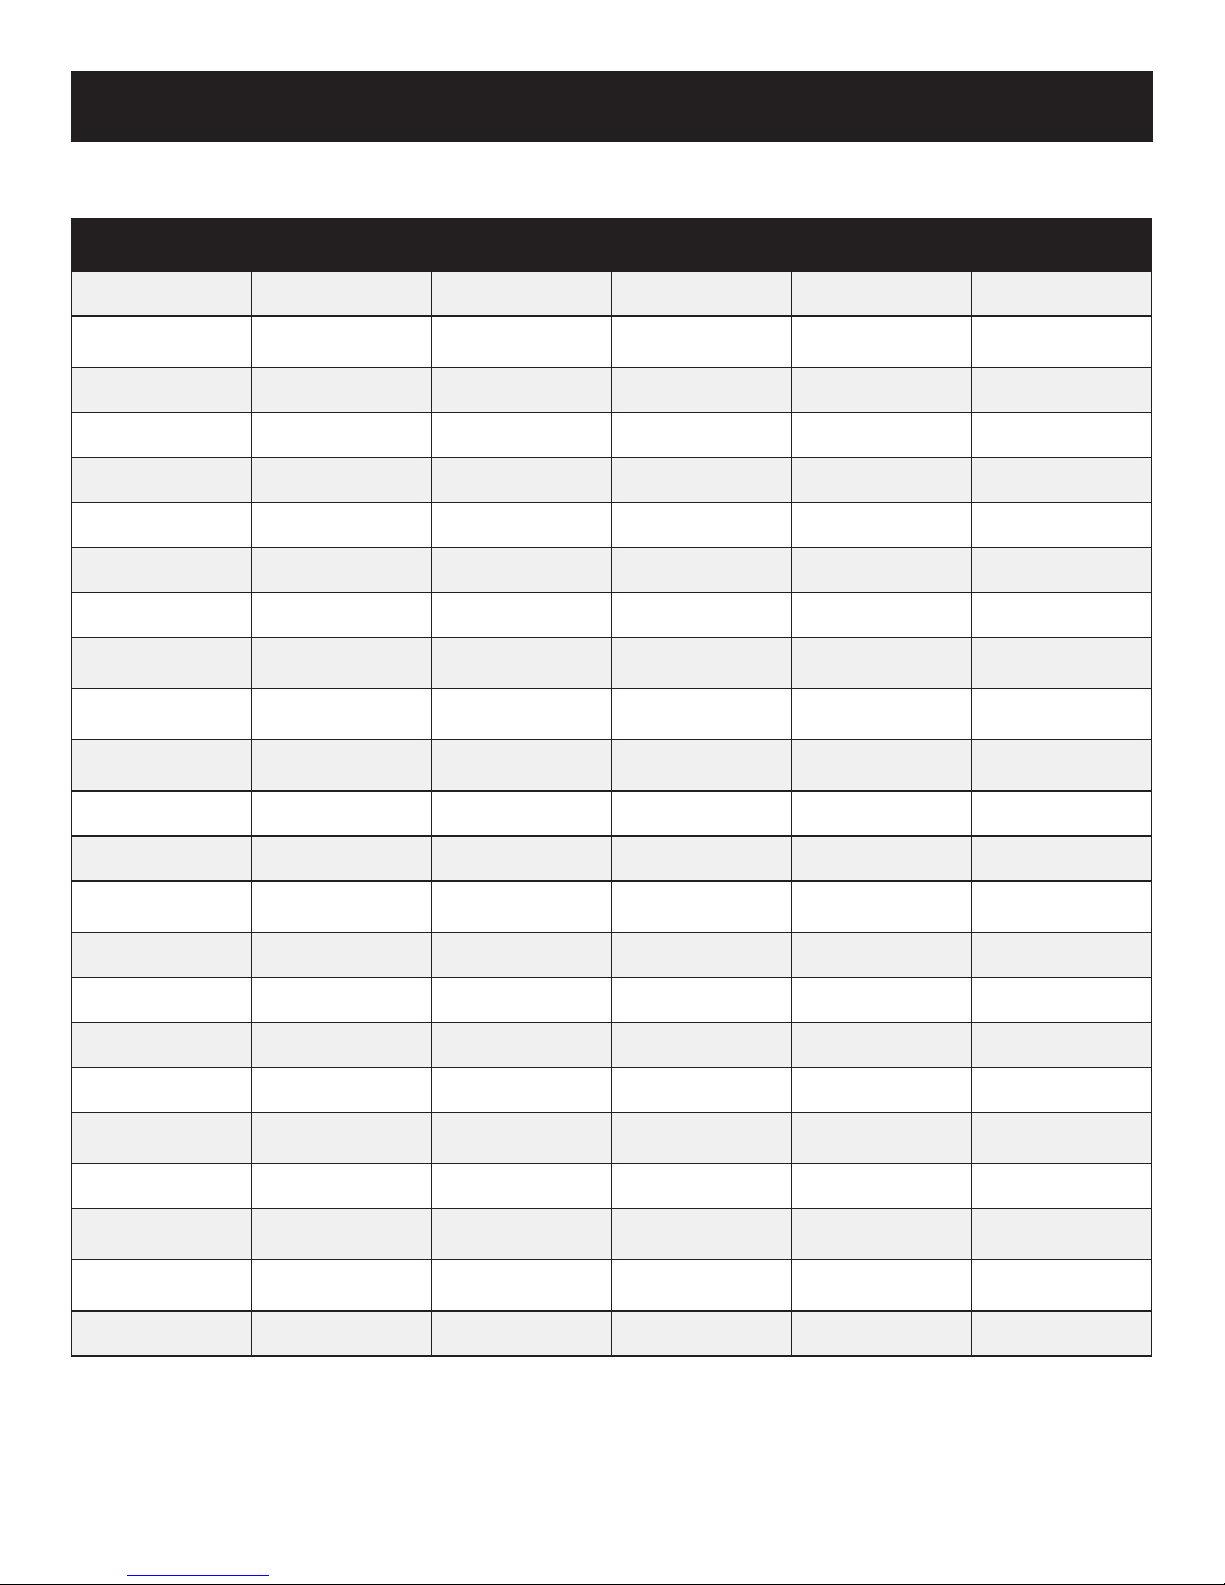
Torque Specifications
Item
Oil Drain Bolt 38 (330-340 in lbs.) 38 (330-340 in lbs.) 38 (330-340 in lbs.) 38 (330-340 in lbs.) 38 (330-340 in lbs.)
Oil drain extended tube
(if equipped)*
LOS Switch Mtg Bolts 8 (71 in-lbs.) 8 (71 in-lbs.) 8 (71 in-lbs.) 8 (71 in-lbs.) 8 (71 in-lbs.)
Spark plug 20-25 (177-222 in-lbs.) 20-25 (177-222 in-lbs.) 20-25 (177-222 in-lbs.) 20-25 (177-222 in-lbs.) 20-25 (177-222 in-lbs.)
Carburetor Mtg Studs 8-12 (71-106 in-lbs.) 8-12 (71-106 in-lbs.) 8-12 (71-106 in-lbs.) 8-12 (71-106 in-lbs.) 8-12 (71-106 in-lbs.)
Exhaust Studs 20-24 (177-212 in-lbs.) 20-24 (177-212 in-lbs.) 20-24 (177-212 in-lbs.) 20-24 (177-212 in-lbs.) 20-24 (177-212 in-lbs.)
Connecting rod bolt 20 (177 in-lbs.) 20 (177 in-lbs.) 20-24 (177-212 in-lbs.) 20-24 (177-212 in-lbs.) 20-24 (177-212 in-lbs.)
Ignition Coil mtg bolts 10-12 (86-106 in-lbs.) 10-12 (86-106 in-lbs.) 10-12 (86-106 in-lbs.) 10-12 (86-106 in-lbs.) 10-12 (86-106 in-lbs.)
Valve adjustment locking nut
Governor Arm locking
bolt
Carburetor mtg nut
(summer/winter)
Muffler mtg nut 20-24 (177-212 in-lbs.) 20-24 (177-212 in-lbs.) 20-24 (177-212 in-lbs.) 20-24 (177-212 in-lbs.) 20-24 (177-212 in-lbs.)
291cc Torque
(N.M)
45 (400-410 in lbs.) 45 (400-410 in lbs.) 45 (400-410 in lbs.) 45 (400-410 in lbs.) 45 (400-410 in lbs.)
10 (86 in-lbs.) 10 (86 in-lbs.) 10 (86 in-lbs.) 10 (86 in-lbs.) 10 (86 in-lbs.)
8 (71 in-lbs.) 8 (71 in-lbs.) 8 (71 in-lbs.) 8 (71 in-lbs.) 8 (71 in-lbs.)
8 (71 in-lbs.) 8 (71 in-lbs.) 8 (71 in-lbs.) 8 (71 in-lbs.) 8 (71 in-lbs.)
306cc Torque
(N.M)
369cc Torque
(N.M)
414cc Torque
(N.M)
420cc Torque
(N.M)
Rocker Arm mtg stud 20-25 (177-222 in-lbs.) 20-25 (177-222 in-lbs.) 20-25 (177-222 in-lbs.) 20-25 (177-222 in-lbs.) 20-25 (177-222 in-lbs.)
Crankcase PTO Cover
bolts
Cylinder Head Bolts 40-42 (29.5-31 ft-lbs.) 40-42 (29.5-31 ft-lbs.) 48 (35 ft-lbs.) 48 (35 ft-lbs.) 48 (35 ft-lbs.)
Flywheel nut 116-120 (86-89 ft-lbs.) 116-120 (86-89 ft-lbs.) 116-120 (86-89 ft-lbs.) 116-120 (86-89 ft-lbs.) 116-120 (86-89 ft-lbs.)
Valve Cover mtg bolt(s) 12-13 (106-115 in-lbs.) 12-13 (106-115 in-lbs.) 12-13 (106-115 in-lbs.) 12-13 (106-115 in-lbs.) 12-13 (106-115 in-lbs.)
Fuel Tank mtg bolts 22-26 (189-223in-lbs.) 22-26 (189-223in-lbs.) 22-26 (189-223in-lbs.) 22-26 (189-223in-lbs.) 22-26 (189-223in-lbs.)
Speed Control mtg
bolts
Recoil Starter mtg bolts 6-10 (52-86 in-lbs.) 6-10 (52-86 in-lbs.) 6-10 (52-86 in-lbs.) 6-10 (52-86 in-lbs.) 6-10 (52-86 in-lbs.)
Electric Starter mtg
bolts
Blower Housing mtg
bolts
Sheet Metal mtg bolts 6-10 (52-86 in-lbs.) 6-10 (52-86 in-lbs.) 6-10 (52-86 in-lbs.) 6-10 (52-86 in-lbs.) 6-10 (52-86 in-lbs.)
24-26 (212-230 in-lbs.) 24-26 (212-230 in-lbs.) 24-26 (212-230 in-lbs.) 24-26 (212-230 in-lbs.) 24-26 (212-230 in-lbs.)
6-10 (52-86 in-lbs.) 6-10 (52-86 in-lbs.) 6-10 (52-86 in-lbs.) 6-10 (52-86 in-lbs.) 6-10 (52-86 in-lbs.)
10-14 (86-124 in-lbs.) 10-14 (86-124 in-lbs.) 10-14 (86-124 in-lbs.) 10-14 (86-124 in-lbs.) 10-14 (86-124 in-lbs.)
6-10( 52-86 in-lbs.) 6-10 (52-86 in-lbs.) 6-10 (52-86 in-lbs.) 6-10 (52-86 in-lbs.) 6-10 (52-86 in-lbs.)
*Torque values are with thread locking compound applied to the threads.
Copyright © 2018 Liquid Combustion Technology, LLC LCT Engine Service Manual: 79, 136, 179, 208, 254, 291, 306, 369, 414 & 420cc 14
Page 16
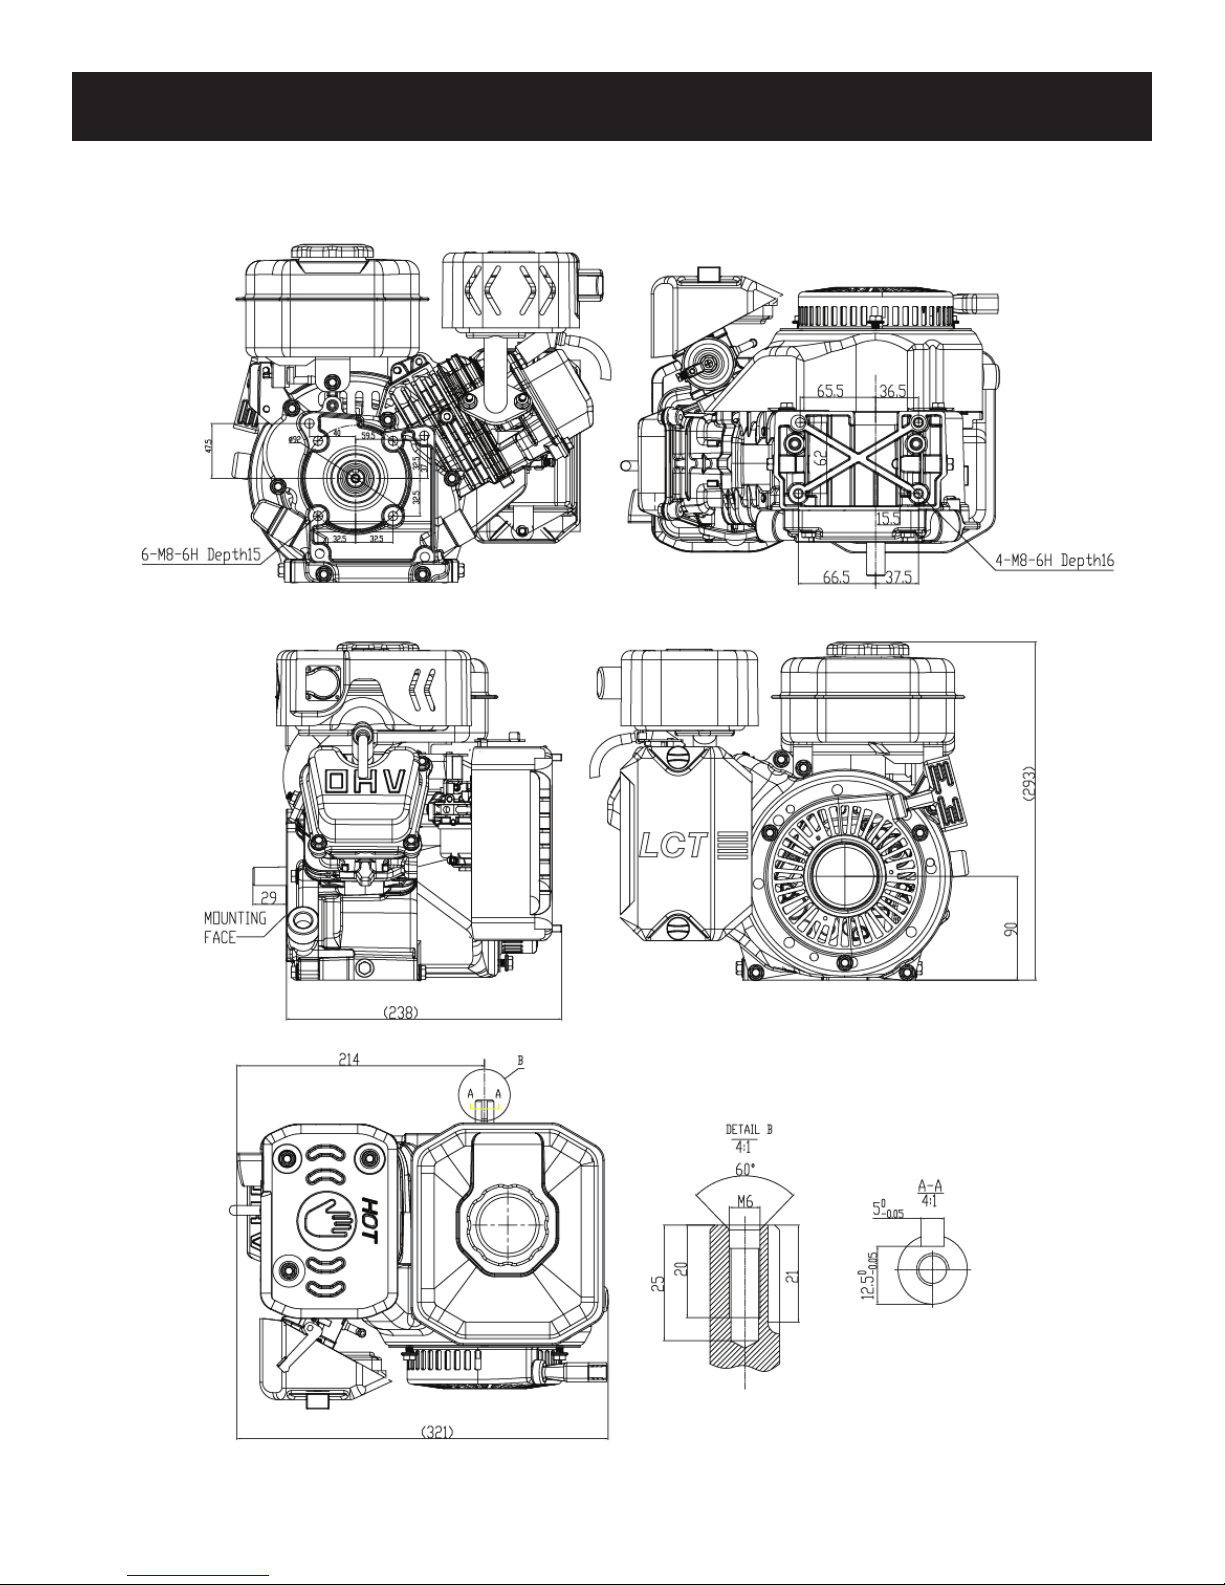
79cc Summer Engine Dimensions
*Drawings do not accurately represent actual engine appearance.
Copyright © 2018 Liquid Combustion Technology, LLC LCT Engine Service Manual: 79, 136, 179, 208, 254, 291, 306, 369, 414 & 420cc 15
Page 17
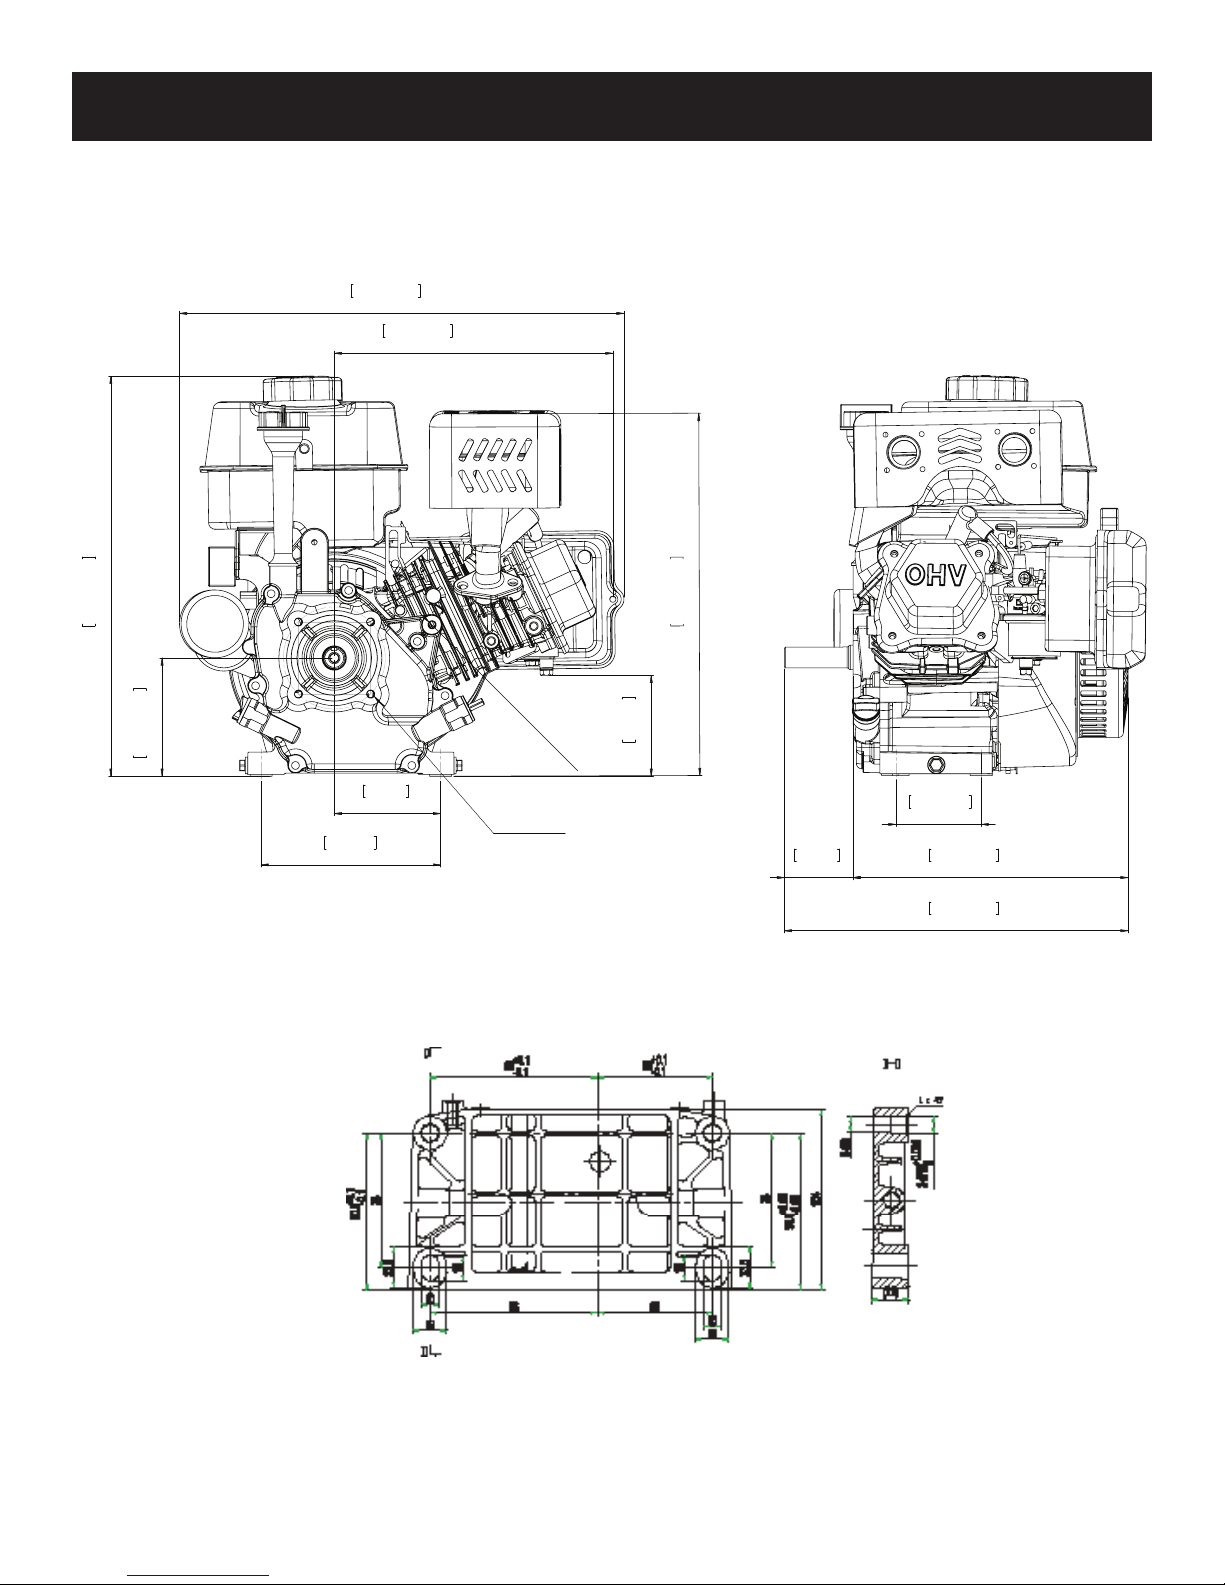
136cc Summer Engine Dimensions
*Drawings do not accurately represent actual engine appearance.
401.18mm
15.794in
251.50mm
9.902in
mm99.623
14.208in
360.89mm
ni478.21
4.201in
106.70mm
162mm
6.378in
96mm
3.780in
5/16-24UNF
3.625in[92mm]
Bolt Circle
4-5/16-UNF
91mm
3.583in
62mm
2.441in
76.88mm
3.027in
248.19mm
9.771in
310.19mm
12.212in
Copyright © 2018 Liquid Combustion Technology, LLC LCT Engine Service Manual: 79, 136, 179, 208, 254, 291, 306, 369, 414 & 420cc 16
Page 18
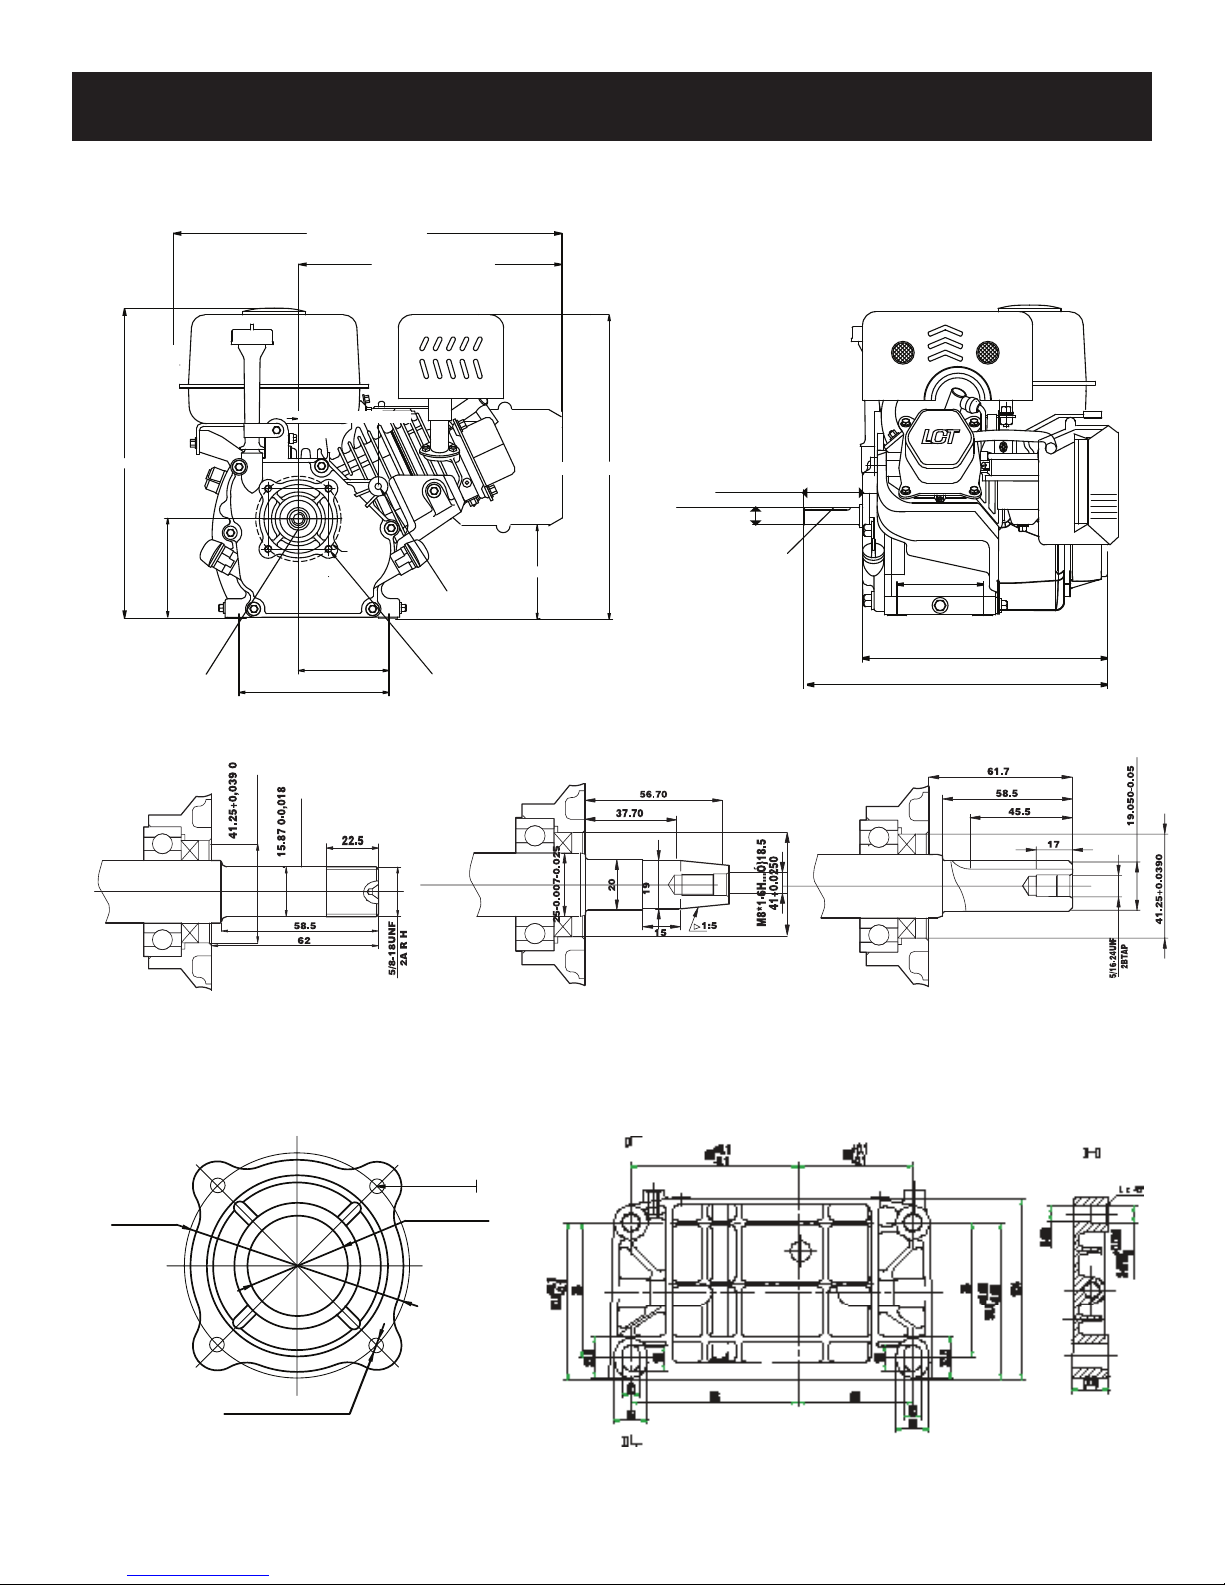
179cc / 208cc Summer Engine Dimensions
*Drawings do not accurately represent actual engine appearance.
16.250 in (412.75mm)
11.625 in (295.275mm)
3.475 in (88.265mm)
14.00 in (355.6mm)
5/16"-24 thread
4.17 in [106mm]
3.78 in [96mm]
6.38 in [162mm]
3.190 in (81.026mm)
5/16-24UNF
3.625 in [92mm]
BOLT CIRCLE
4-5/16-24UNF
13.45in (341.63mm)
2.4309 in (61.7mm)
.750 in (19.05mm)
Key width
3/16 in (4.76mm)
3.05"(77.5mm)
10.110 in (256.79mm)
12.500" in (317.50mm)
3.622
4-5/16-24
Copyright © 2018 Liquid Combustion Technology, LLC LCT Engine Service Manual: 79, 136, 179, 208, 254, 291, 306, 369, 414 & 420cc 17
2.200"
41.25+0.025
Page 19
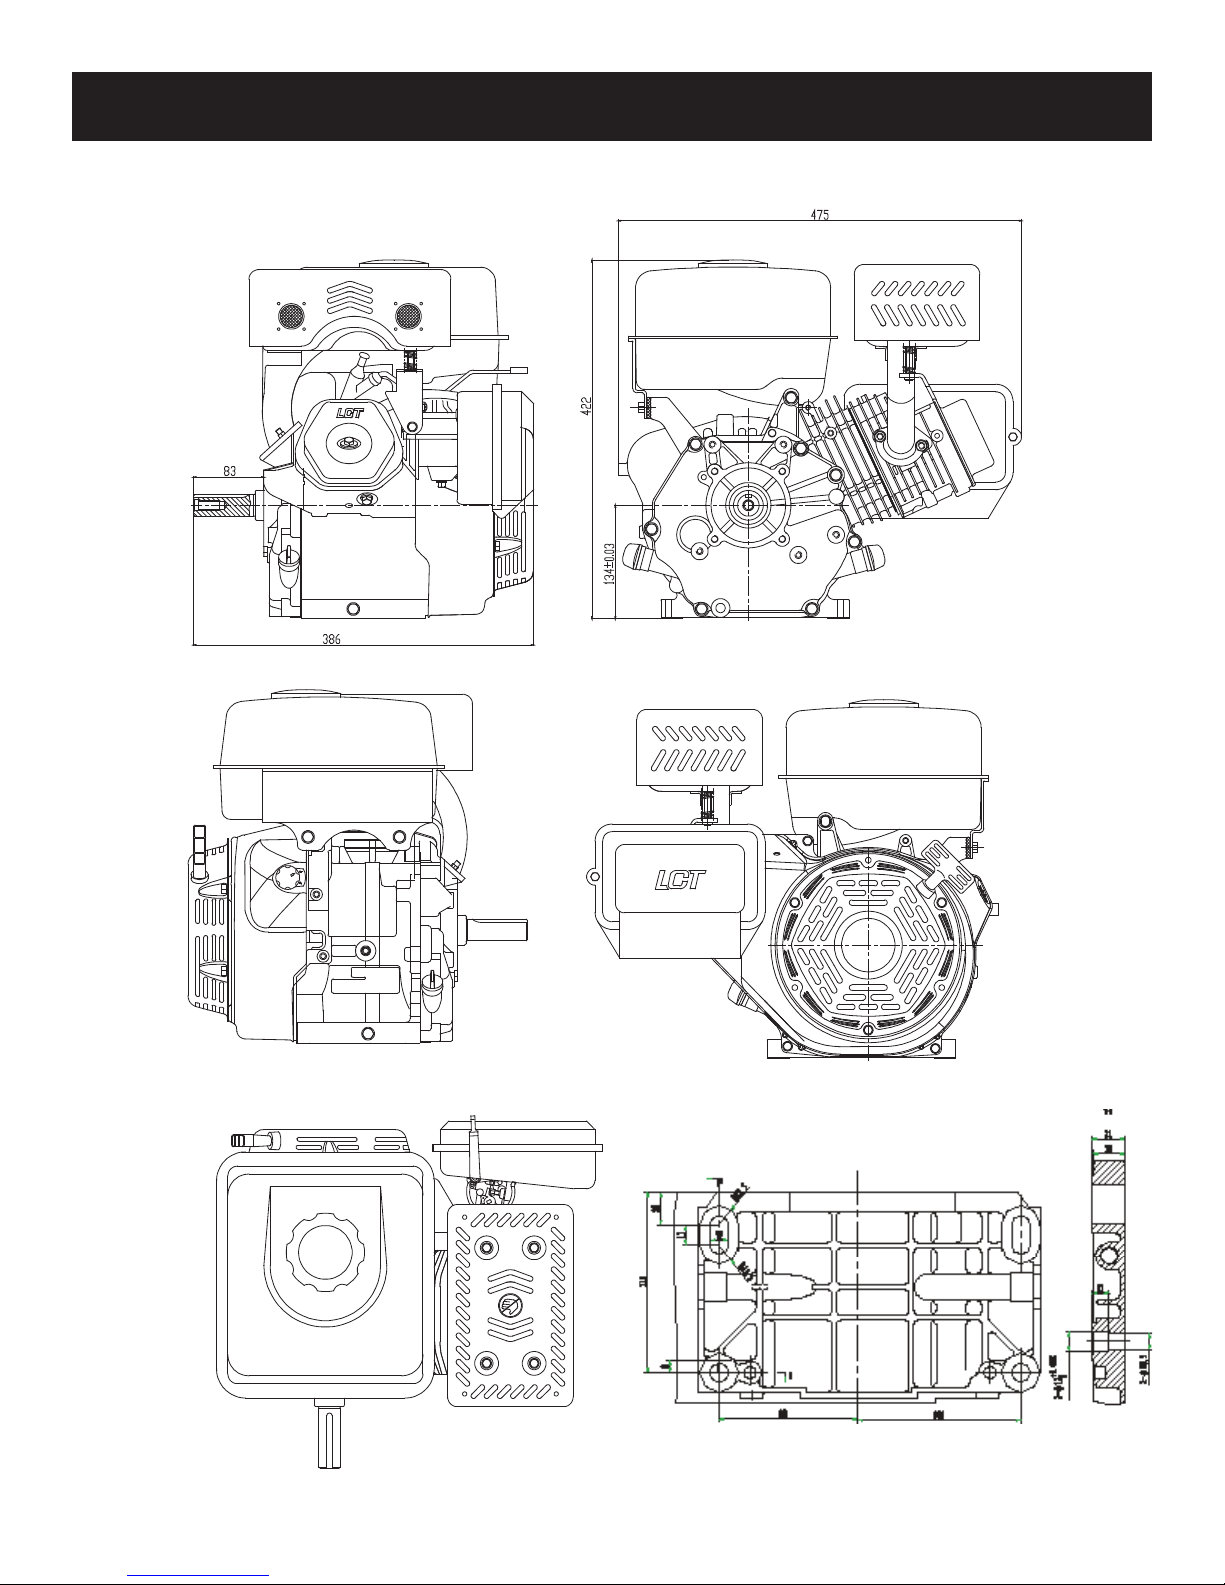
291cc Summer Engine Dimensions
*Drawings do not accurately represent actual engine appearance.
Copyright © 2018 Liquid Combustion Technology, LLC LCT Engine Service Manual: 79, 136, 179, 208, 254, 291, 306, 369, 414 & 420cc 18
ø12
22.5
132
2-ø10.5
90
29
14
17
R7
R13
106
Page 20
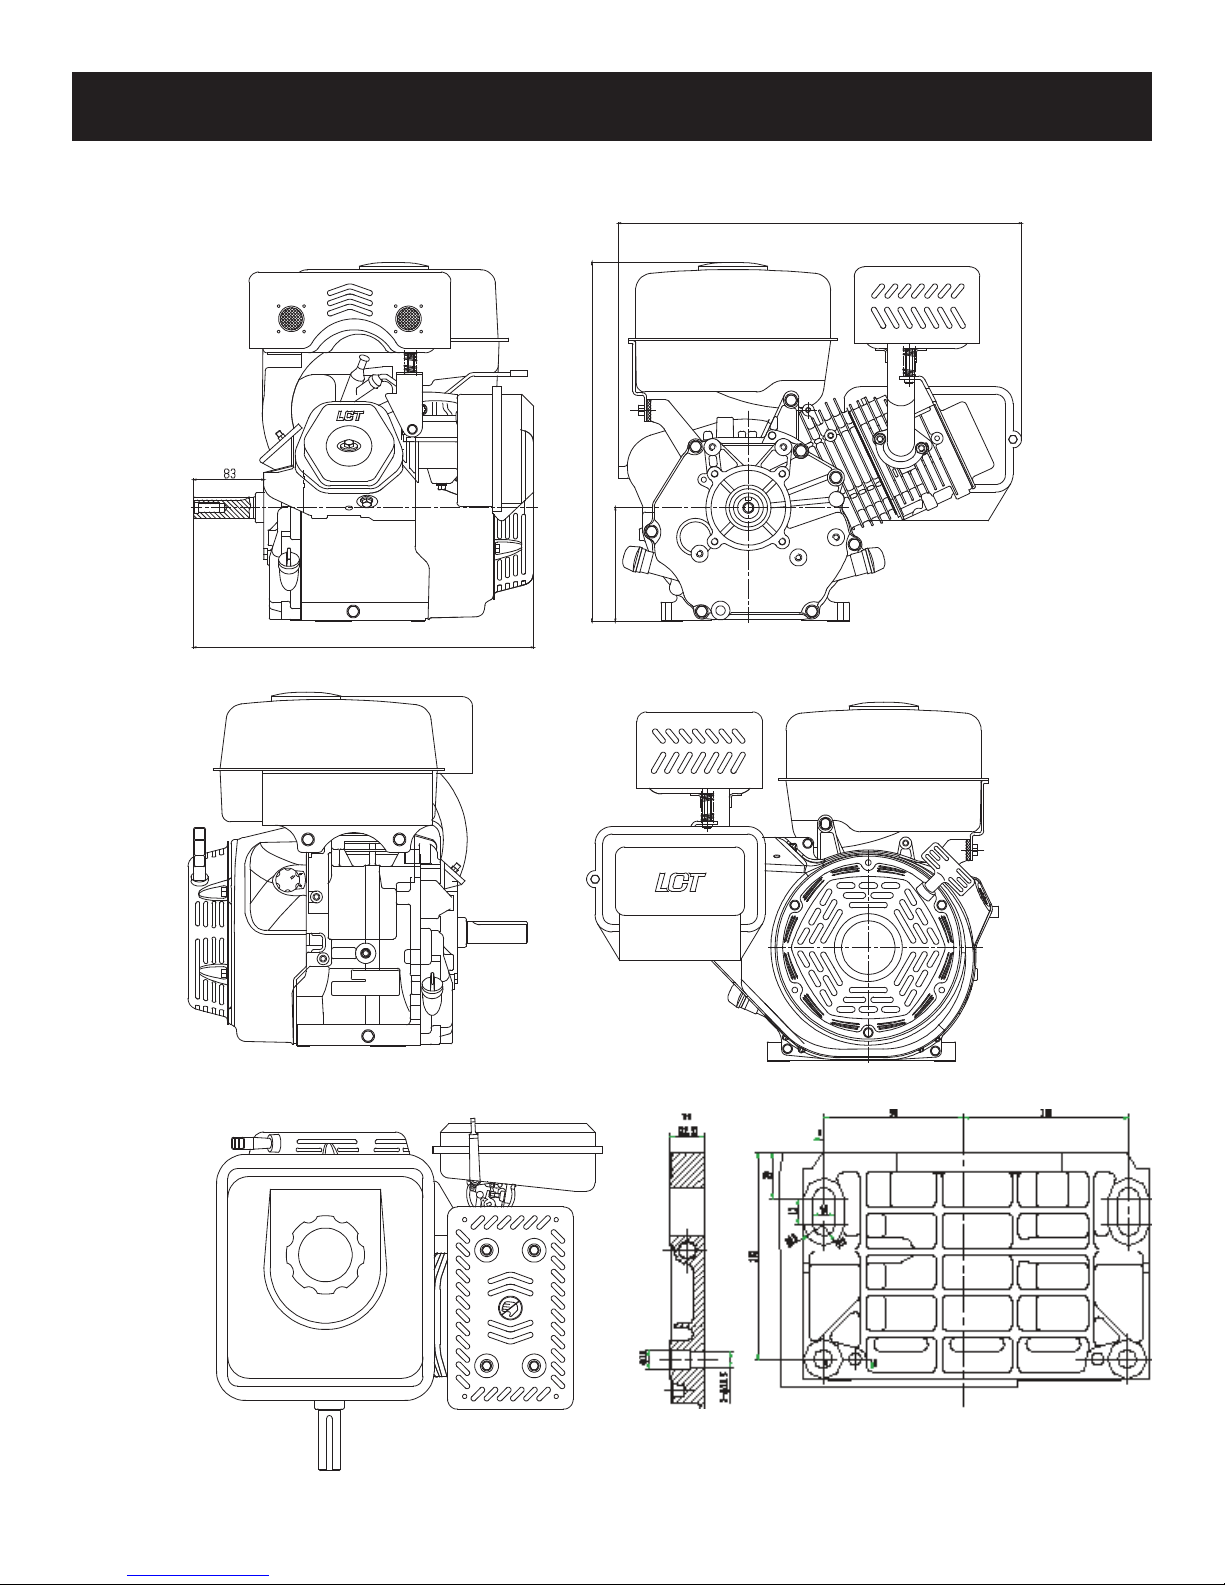
414cc Summer Engine Dimensions
*Drawings do not accurately represent actual engine appearance.
432
133±0.03
400
485
Copyright © 2018 Liquid Combustion Technology, LLC LCT Engine Service Manual: 79, 136, 179, 208, 254, 291, 306, 369, 414 & 420cc 19
ø12
22.5
132
2-ø10.5
90
29
14
17
R7
R13
106
Page 21
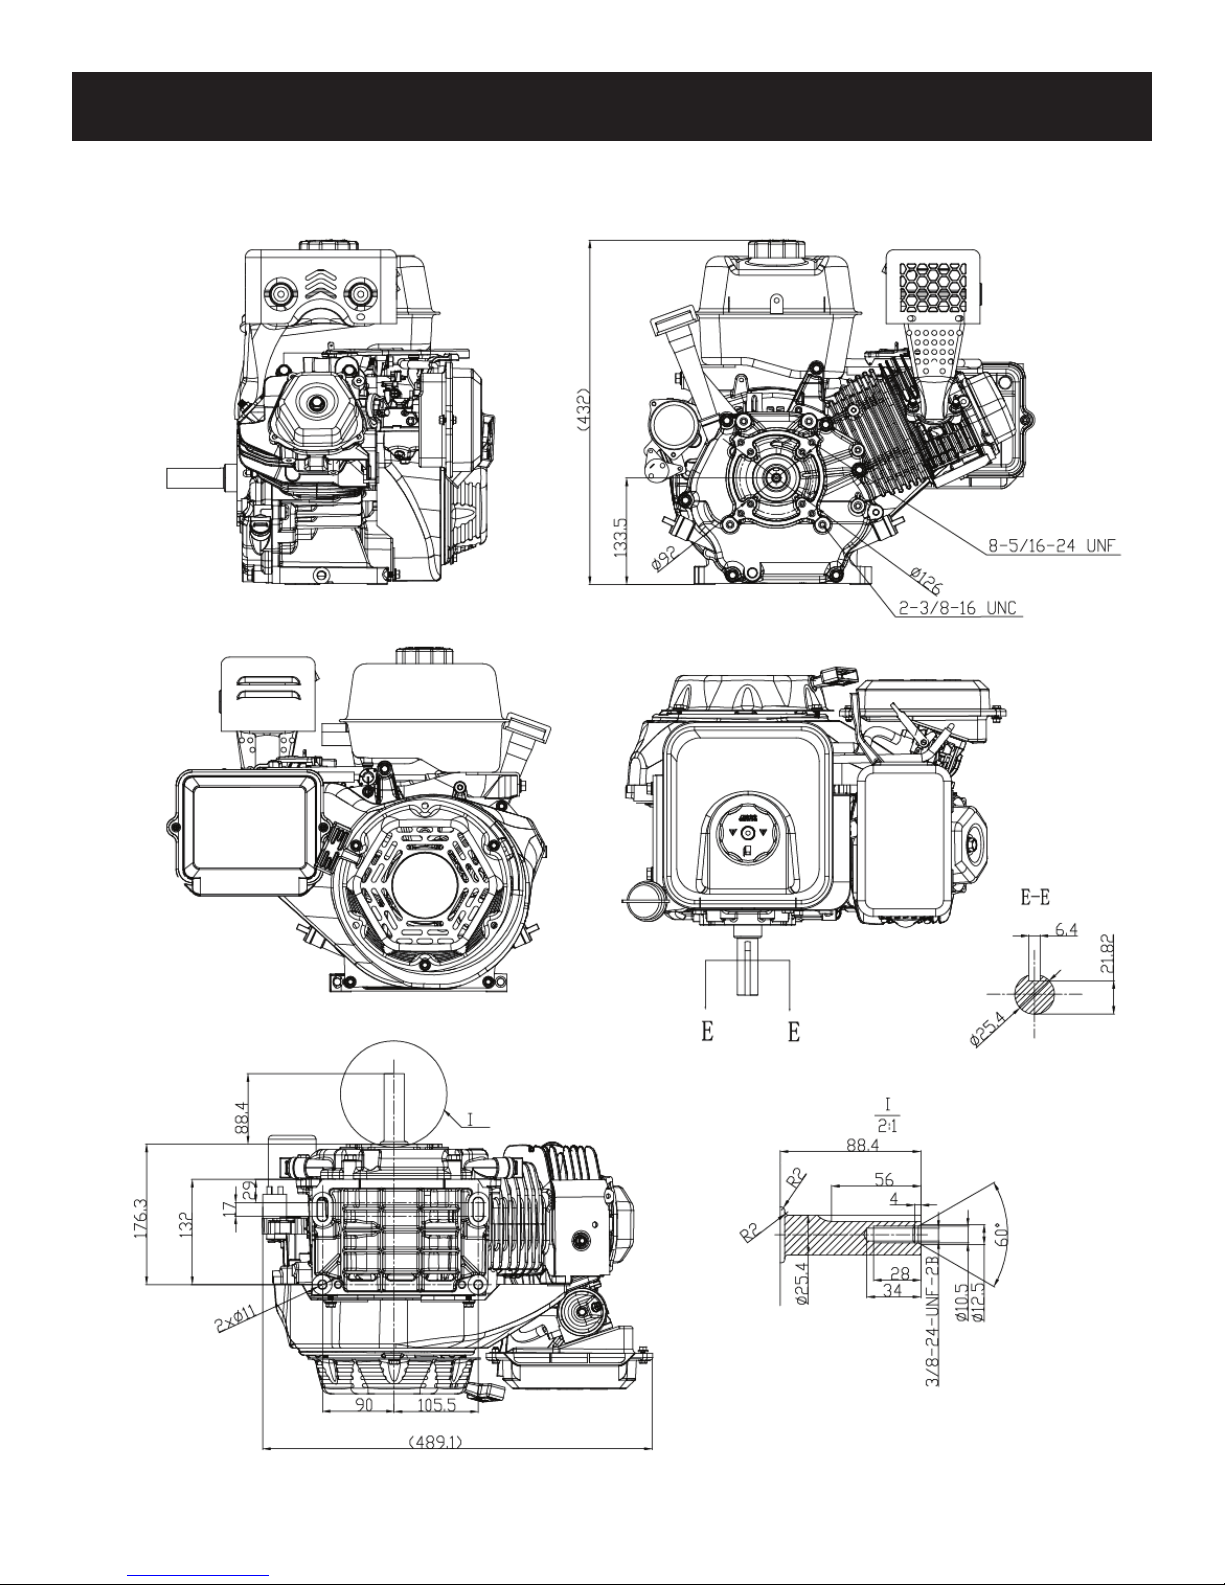
420cc Summer Engine Dimensions
*Drawings do not accurately represent actual engine appearance.
Copyright © 2018 Liquid Combustion Technology, LLC LCT Engine Service Manual: 79, 136, 179, 208, 254, 291, 306, 369, 414 & 420cc 20
Page 22
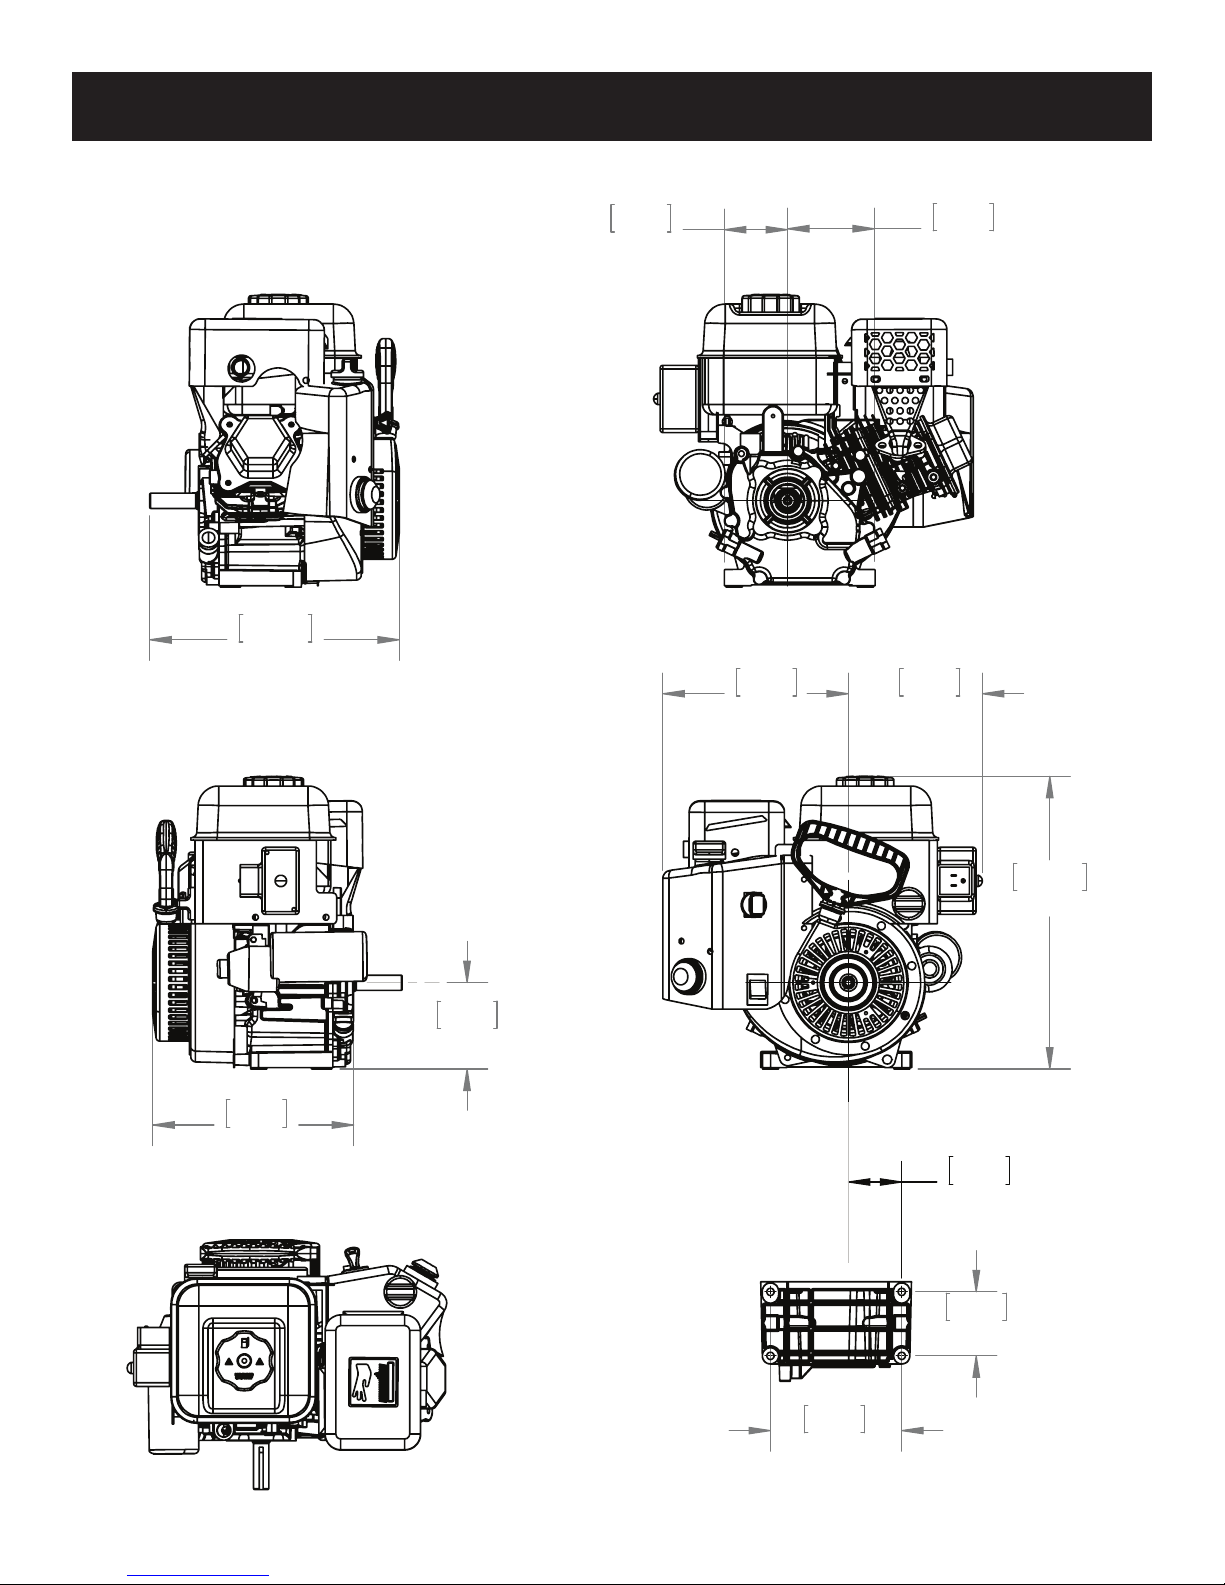
136cc Snow Engine Dimensions
*Drawings do not accurately represent actual engine appearance.
12.12
307.8
3.07
78
4.21
107
9.01
228.9
6.51
165.4
9.75
247.6
14.23
361.3
4.20
106.70
2.59
65.8
3.11
79
6.38
162
Copyright © 2018 Liquid Combustion Technology, LLC LCT Engine Service Manual: 79, 136, 179, 208, 254, 291, 306, 369, 414 & 420cc 21
Page 23
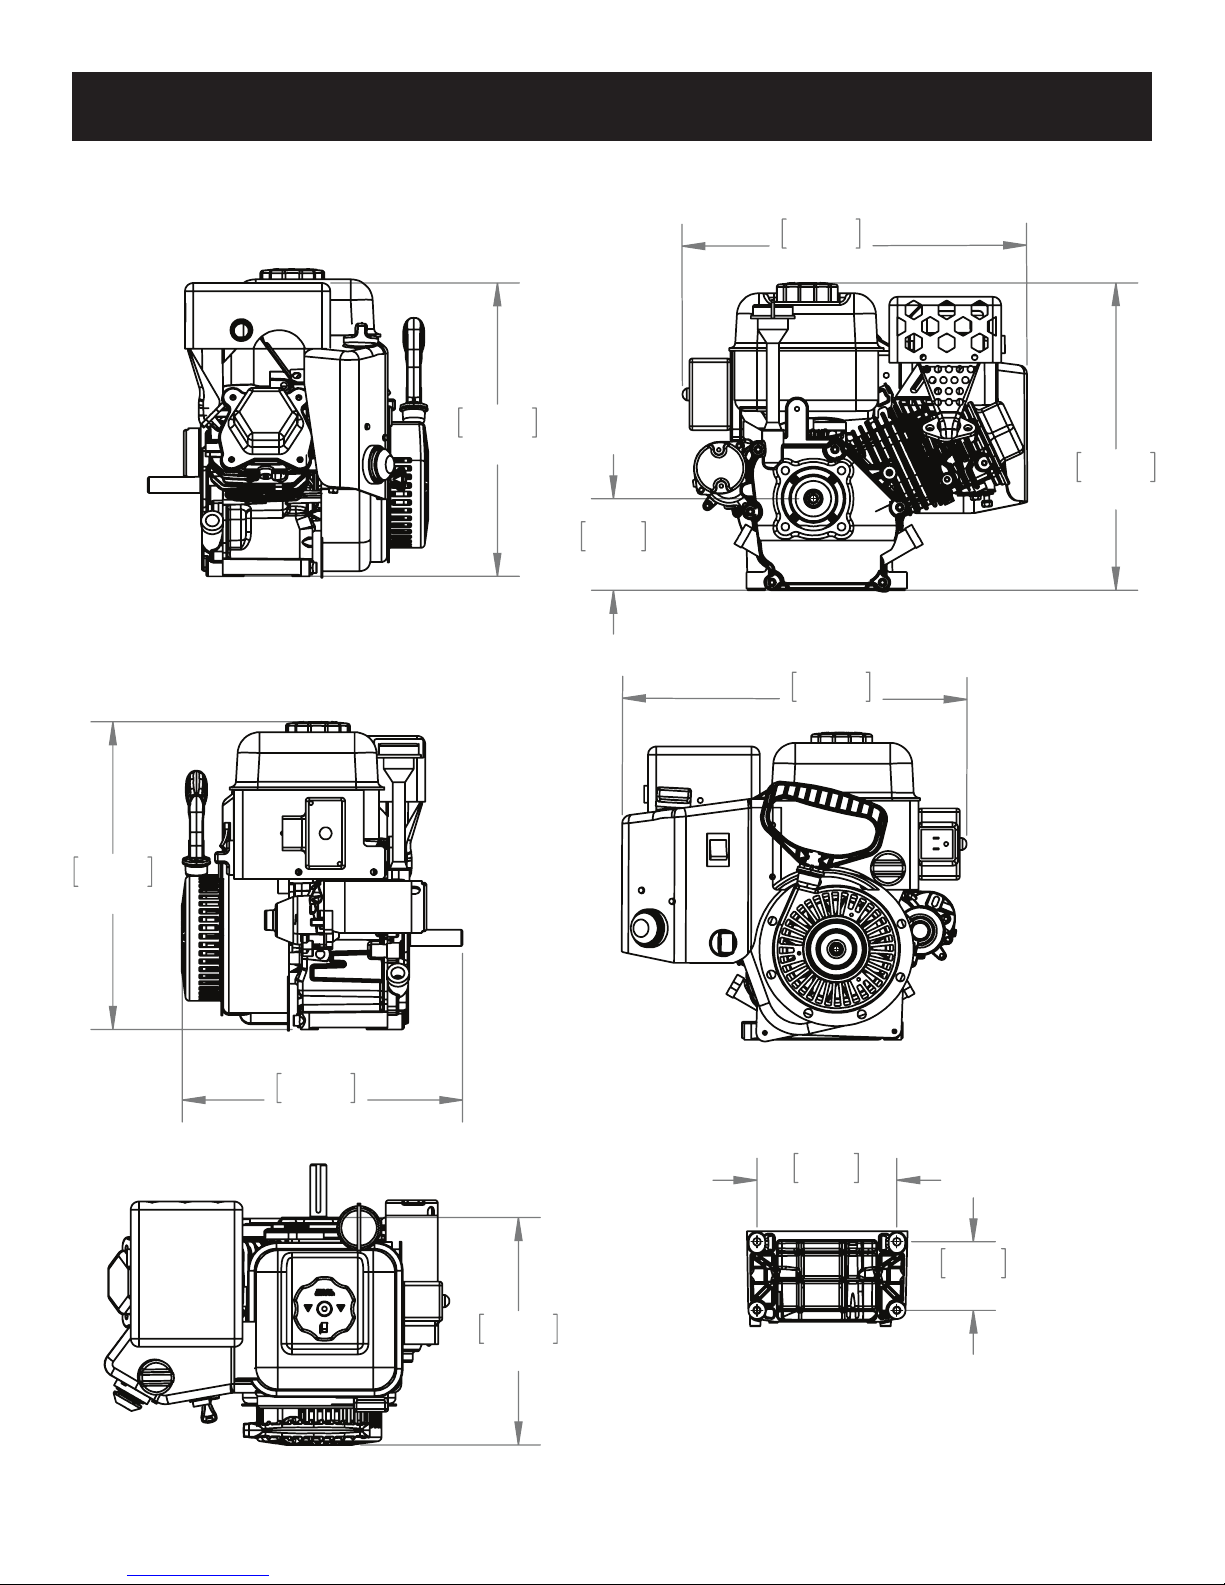
179cc / 208cc GEN II Snow Engine Dimensions
*Drawings do not accurately represent actual engine appearance.
15.75
400.1
13.39
340
4.18
106.1
15.75
400.1
14.00
355.6
14.00
355.6
12.80
325
6.38
162
3.13
79.4
10.36
263.1
Copyright © 2018 Liquid Combustion Technology, LLC LCT Engine Service Manual: 79, 136, 179, 208, 254, 291, 306, 369, 414 & 420cc 22
Page 24
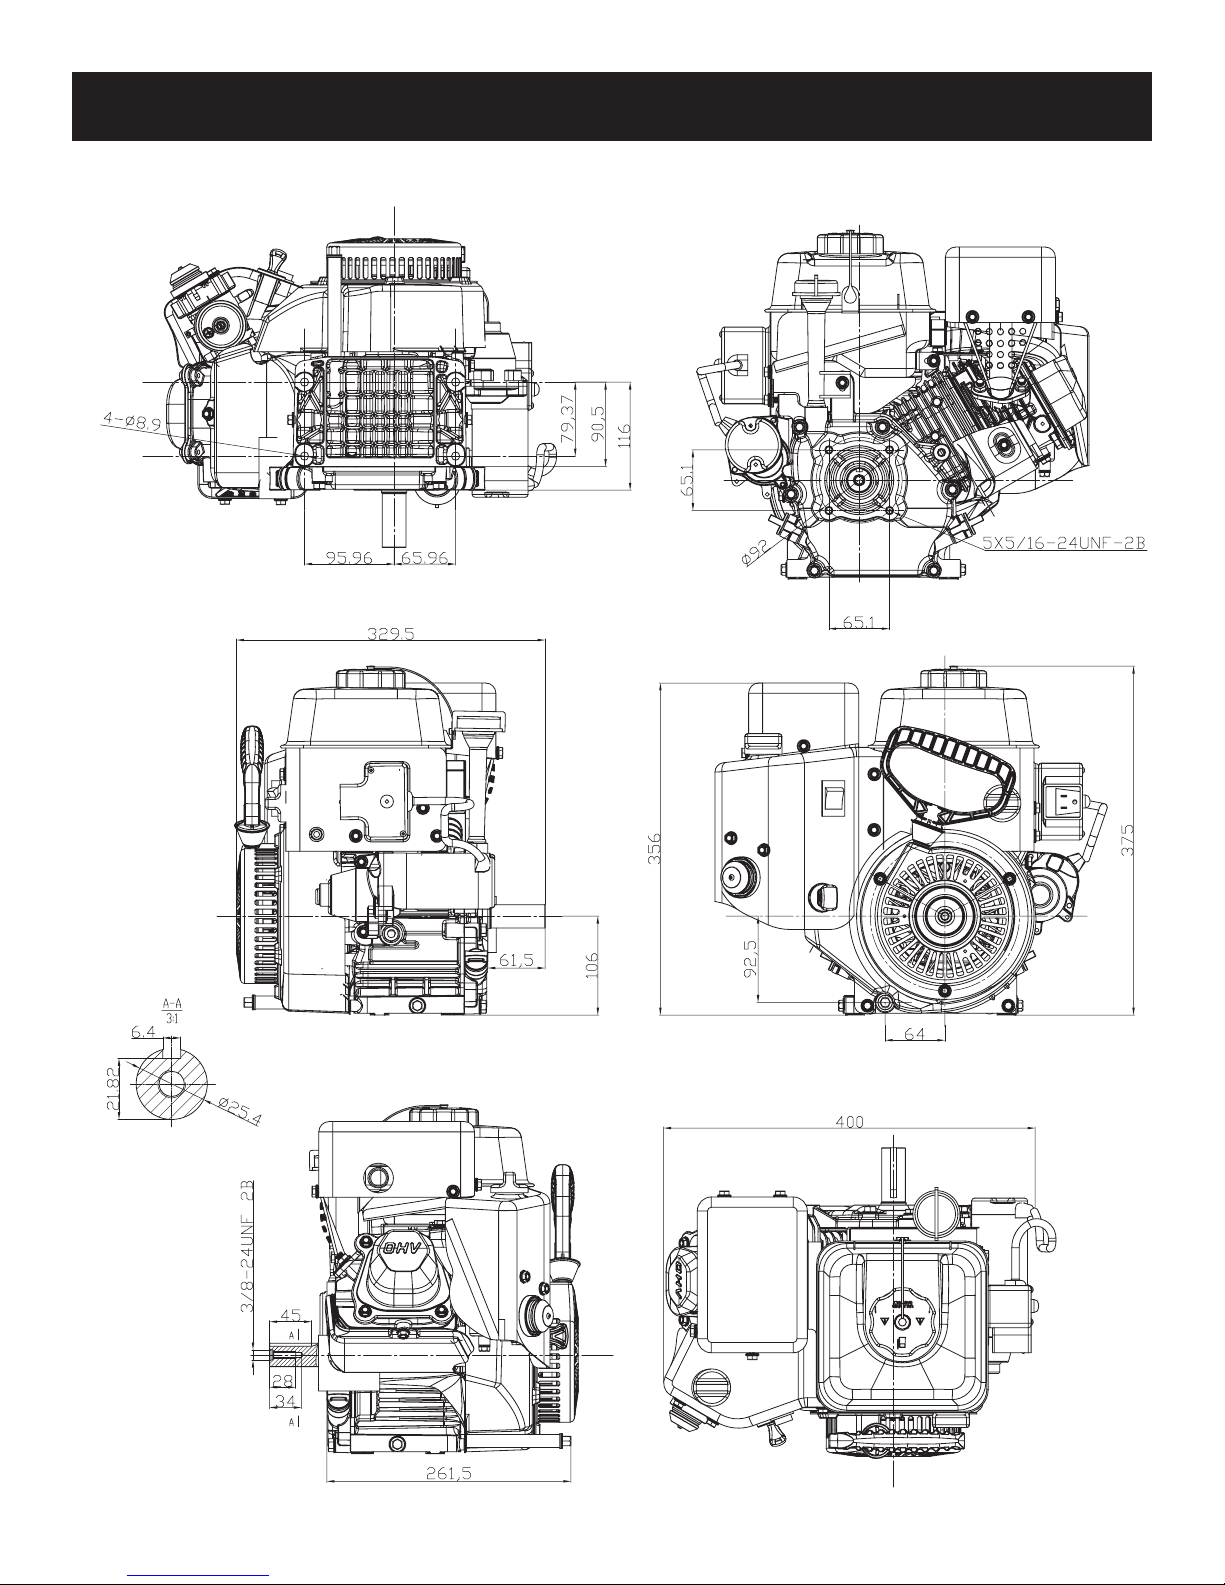
254cc Snow Engine Dimensions
*Drawings do not accurately represent actual engine appearance.
Copyright © 2018 Liquid Combustion Technology, LLC LCT Engine Service Manual: 79, 136, 179, 208, 254, 291, 306, 369, 414 & 420cc 23
Page 25
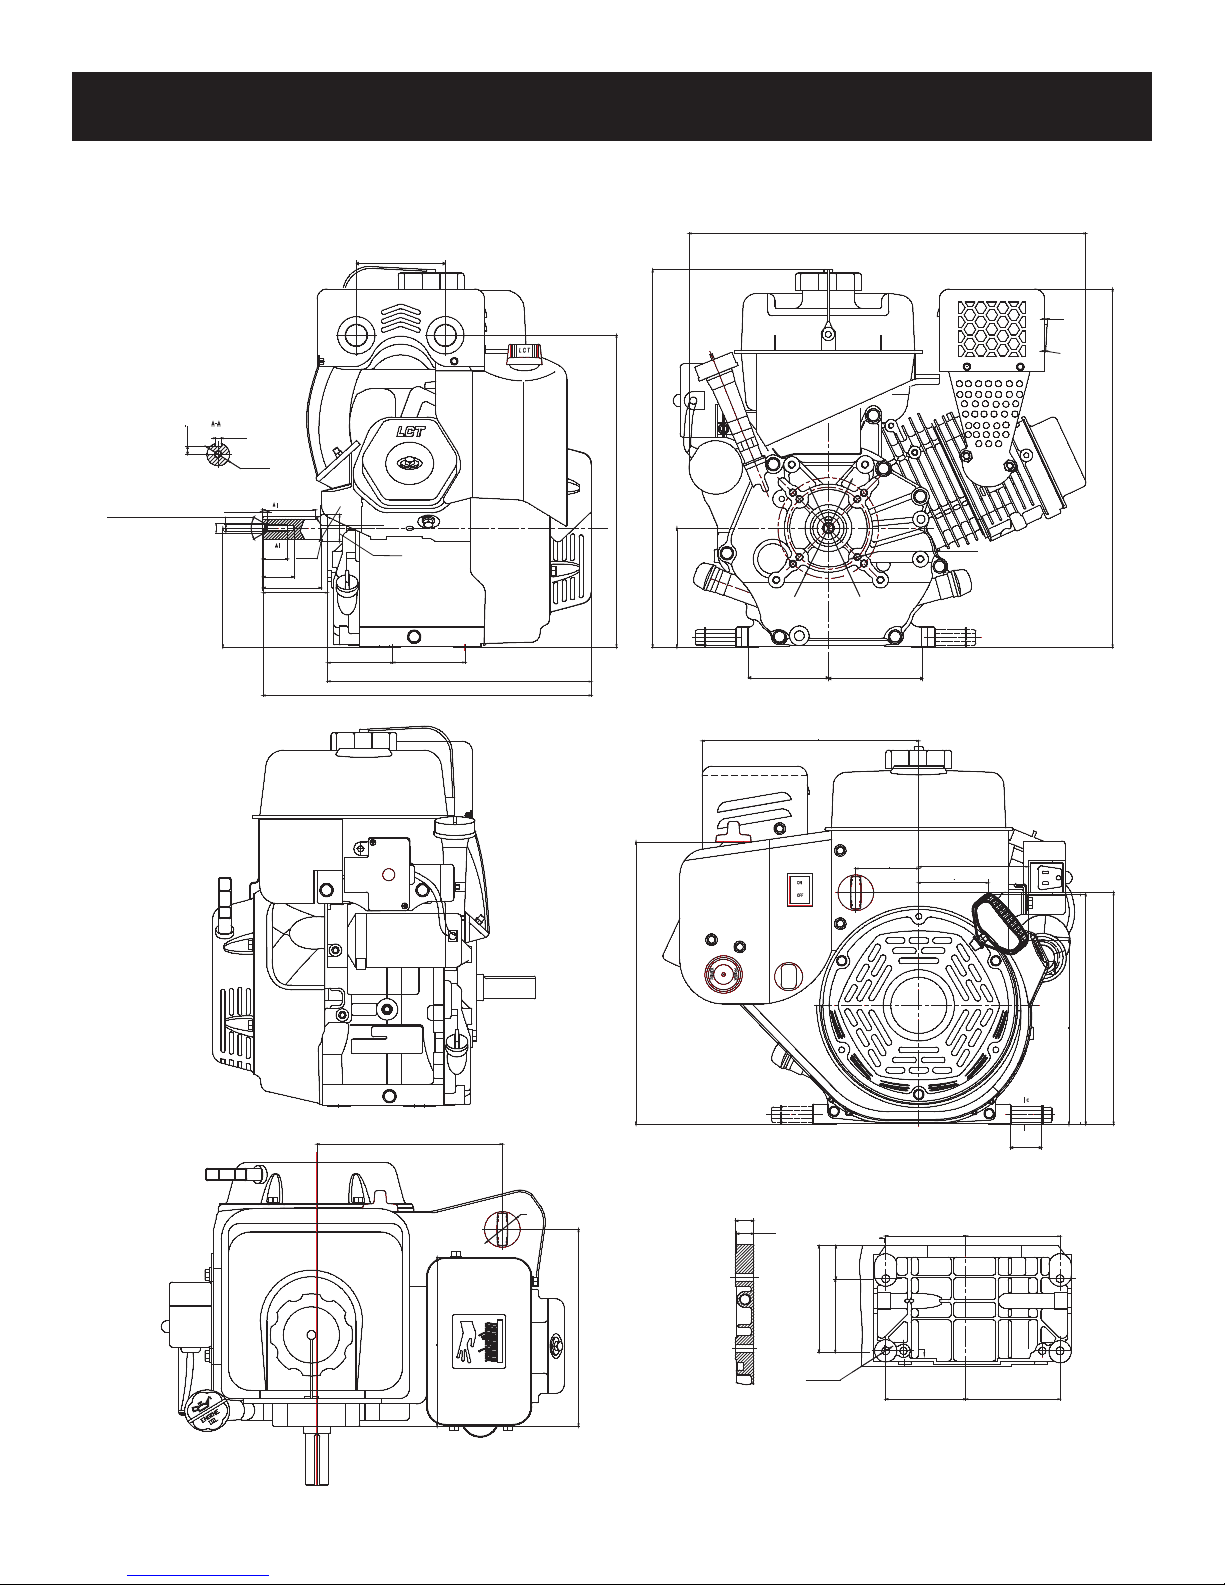
291cc / 306cc Snow Engine Dimensions
*Drawings do not accurately represent actual engine appearance.
100
100
0
-0.13
9.12
3/8-24UNF-2B
0
6.4
-0.05
ø25.4
-0.025
4.5
ø/10.5
60˚
28
34
-
+
73.03
133.5 0.05
0
59
+1
424
+1
0
R2
R3
-0.04
ø30
73
73
-0.06
+
+
81 0.1
81 0.1
-
-
369.03
296
R2
0
65
349
349
-
+
133.5 0.05
+
ø113 0.15
-
+
90 0.1
-
446
+
ø92 0.15
-
+
105.5 0.1
-
3º
2º
402
8x5/16-24
208.3
195
640
220.9
317
317
21
20
4xø8.9
3781 0.1
-
+
118
0
-0.1
70.8
70.8
90 0.1
N
90 0.1
+
-
+
-
N
145
145
182
182
35
35
+
105.5 0.1
-
+
105.5 0.1
-
182
182
297
297
260
260
Copyright © 2018 Liquid Combustion Technology, LLC LCT Engine Service Manual: 79, 136, 179, 208, 254, 291, 306, 369, 414 & 420cc 24
Page 26
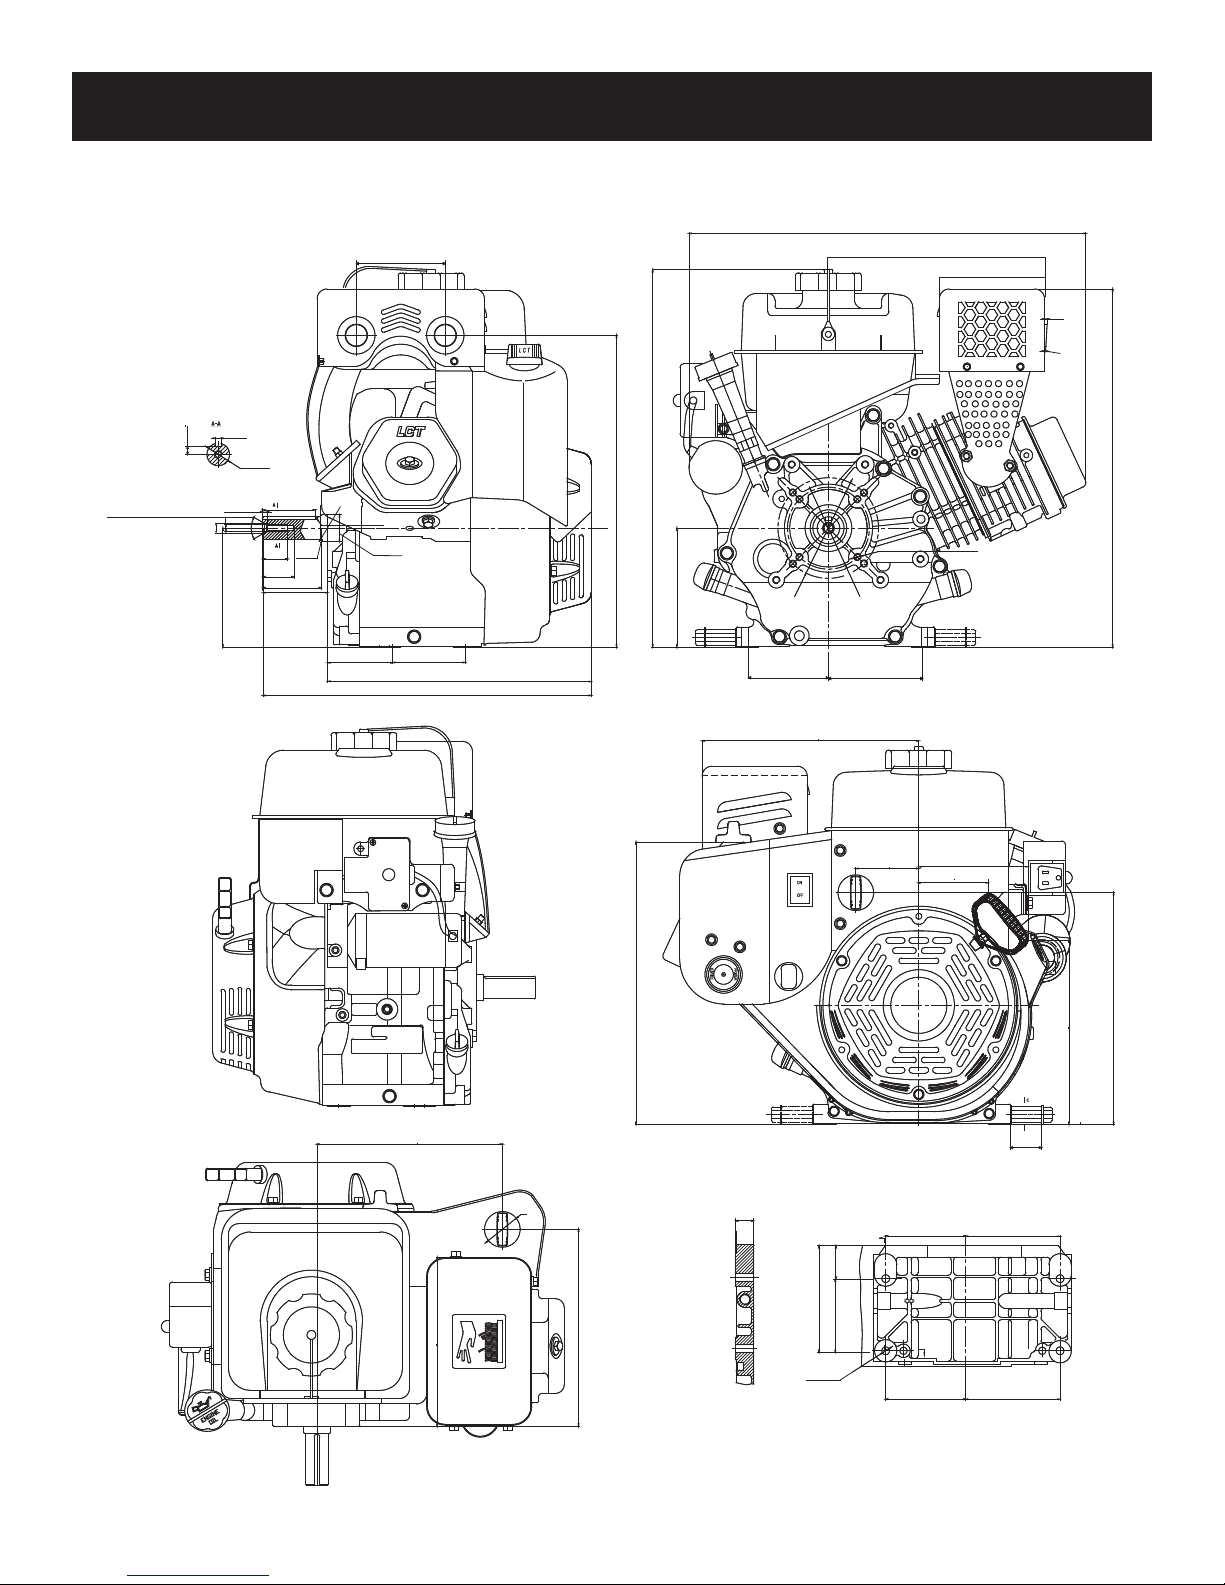
369cc / 414cc Snow Engine Dimensions
*Drawings do not accurately represent actual engine appearance.
100
100
0
-0.13
9.12
3/8-24UNF-2B
0
6.4
-0.05
ø25.4
-0.025
4.5
ø/10.5
60˚
28
34
-
+
73.03
133.5 0.05
0
59
+1
431
+1
0
R2
R3
-0.04
ø30
73
73
-0.06
103
387.03
314
R2
0
65
359
-
+
133.5 0.05
+
ø113 0.15
-
+
90 0.1
-
465
+
ø92 0.15
-
+
105.5 0.1
-
249
118
3º
2º
412
8x5/16-24
223.2
195
640
270
236.85
22.5
4xø8.9
29103 0.1
-
+
132
0
-0.1
70.8
70.8
90 0.1
N
90 0.1
+
-
+
-
N
183
103
35
35
+
105.5 0.1
-
+
105.5 0.1
-
225
322
Copyright © 2018 Liquid Combustion Technology, LLC LCT Engine Service Manual: 79, 136, 179, 208, 254, 291, 306, 369, 414 & 420cc 25
Page 27

California Proposition 65
WARNING:
The engine exhaust from this product and this product contains chemicals known
to the state of California to
cause cancer and birth defects, or other reproductive harm.
Liquid Combustion Technology, LLC 100 Roe Road Travelers Rest, SC 29690
Phone: 877-274-2214
 Loading...