

LC-Power LC-M24-FHD-144-C, LC-M27-FHD-144-C, LC-M32-QHD-144-C, LC-M34-UWQHD-100-C User Guide
Page 1
LC-M24-FHD-144-C
LC-M27-FHD-144-C
LC-M32-QHD-144-C
LC-M34-UWQHD-100-C
PC gaming monitor series
Thank you for choosing our product. Please read the manual carefully before you use the product.
Page 2
1. Product overview
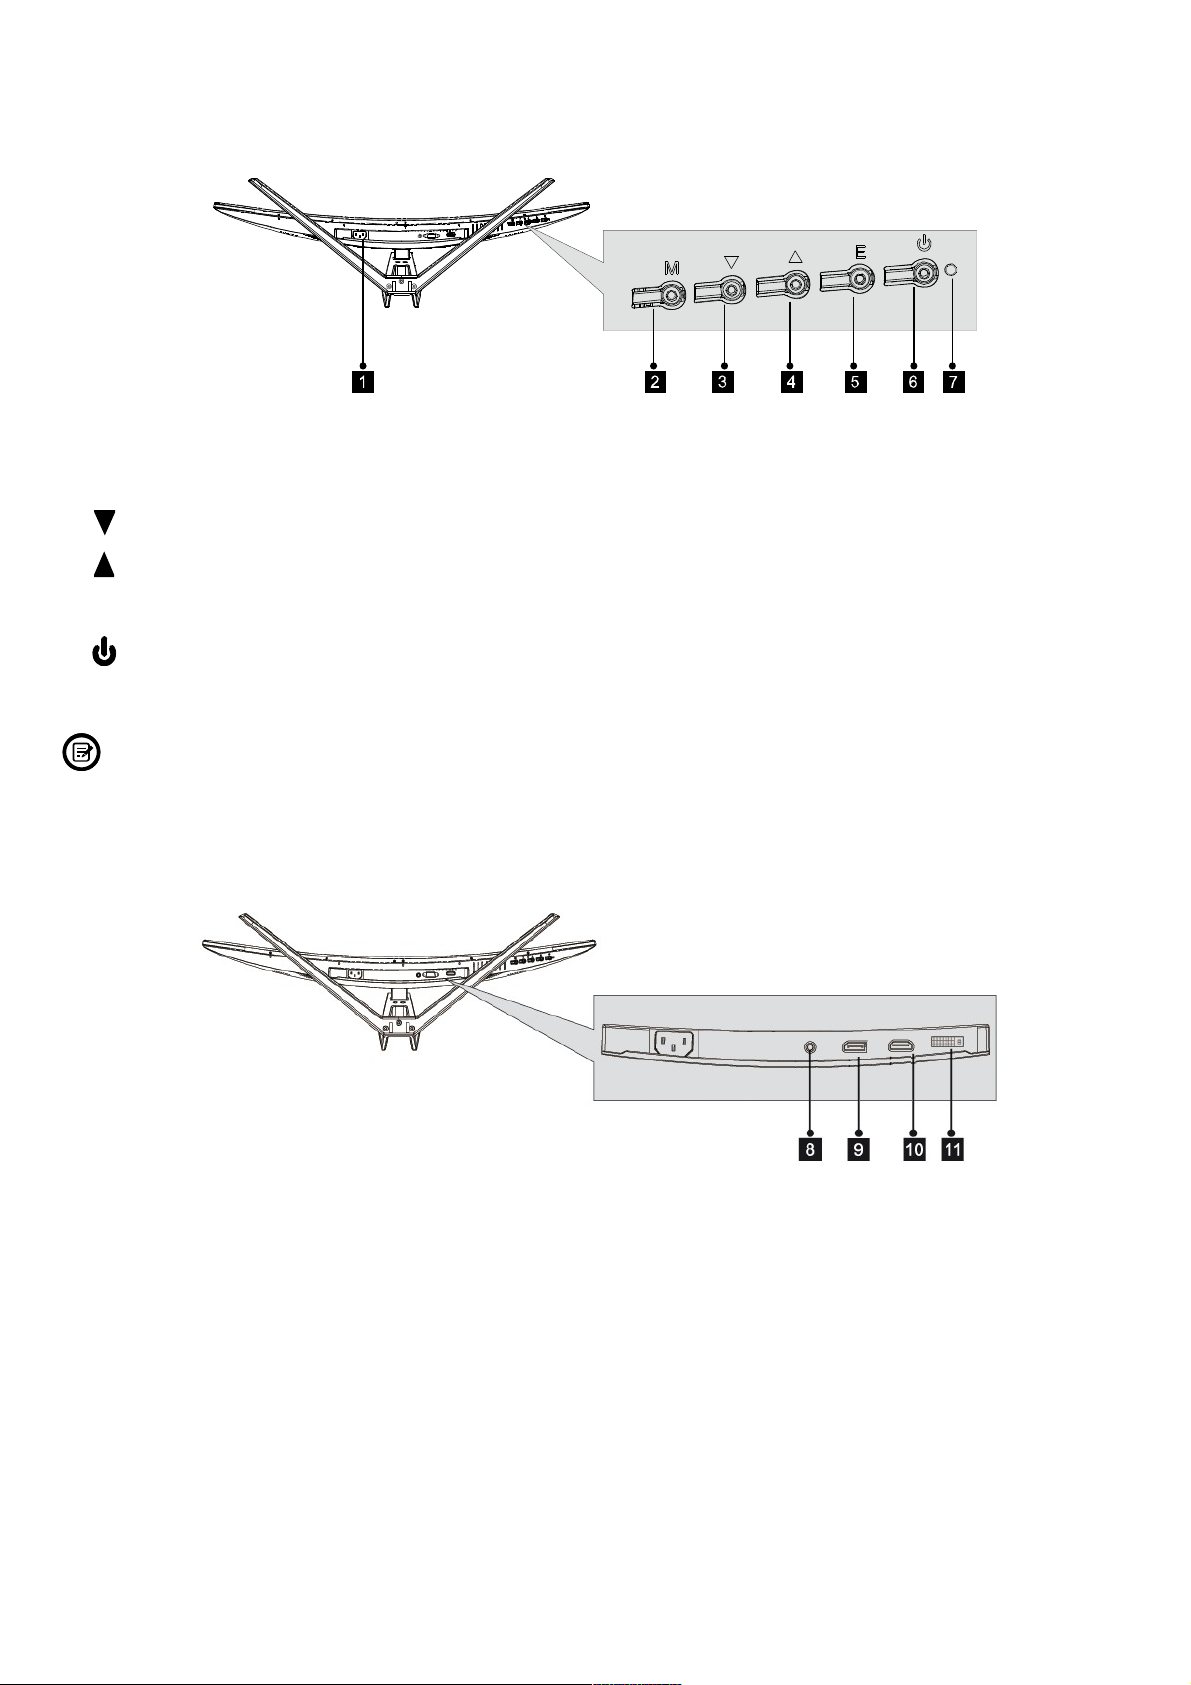
1.1 Monitor buttons
1. Power connector: Insert the power cable here.
2. M – menu button: Press to enter the OSD menu or to enter submenus.
3. Down arrow button: Press to move down in the menus.
4. Up arrow button: Press to move up in the menus.
5. E – exit button: Press to exit the menu.
6. Power button: Press to turn the monitor on and off.
7. LED indicator: Changes colour to indicate the status. Refer to chapter 6 for more details.
Note: The E button can also be used to switch between two color gamuts when a compatible
graphics card and either HDMI or DP connections are used.
1.2 Monitor ports (please check if available on your purchased model)
8. Audio output: Connect the audio cable from your computer's audio output to receive the audio signal on
your monitor.
9. DP port: Connect your monitor with the DP (DisplayPort) port of your computer.
10. HDMI port: Connect your monitor with the HDMI port of your computer.
11. DVI port: Connect your monitor with the DVI port of your computer.
Page 3
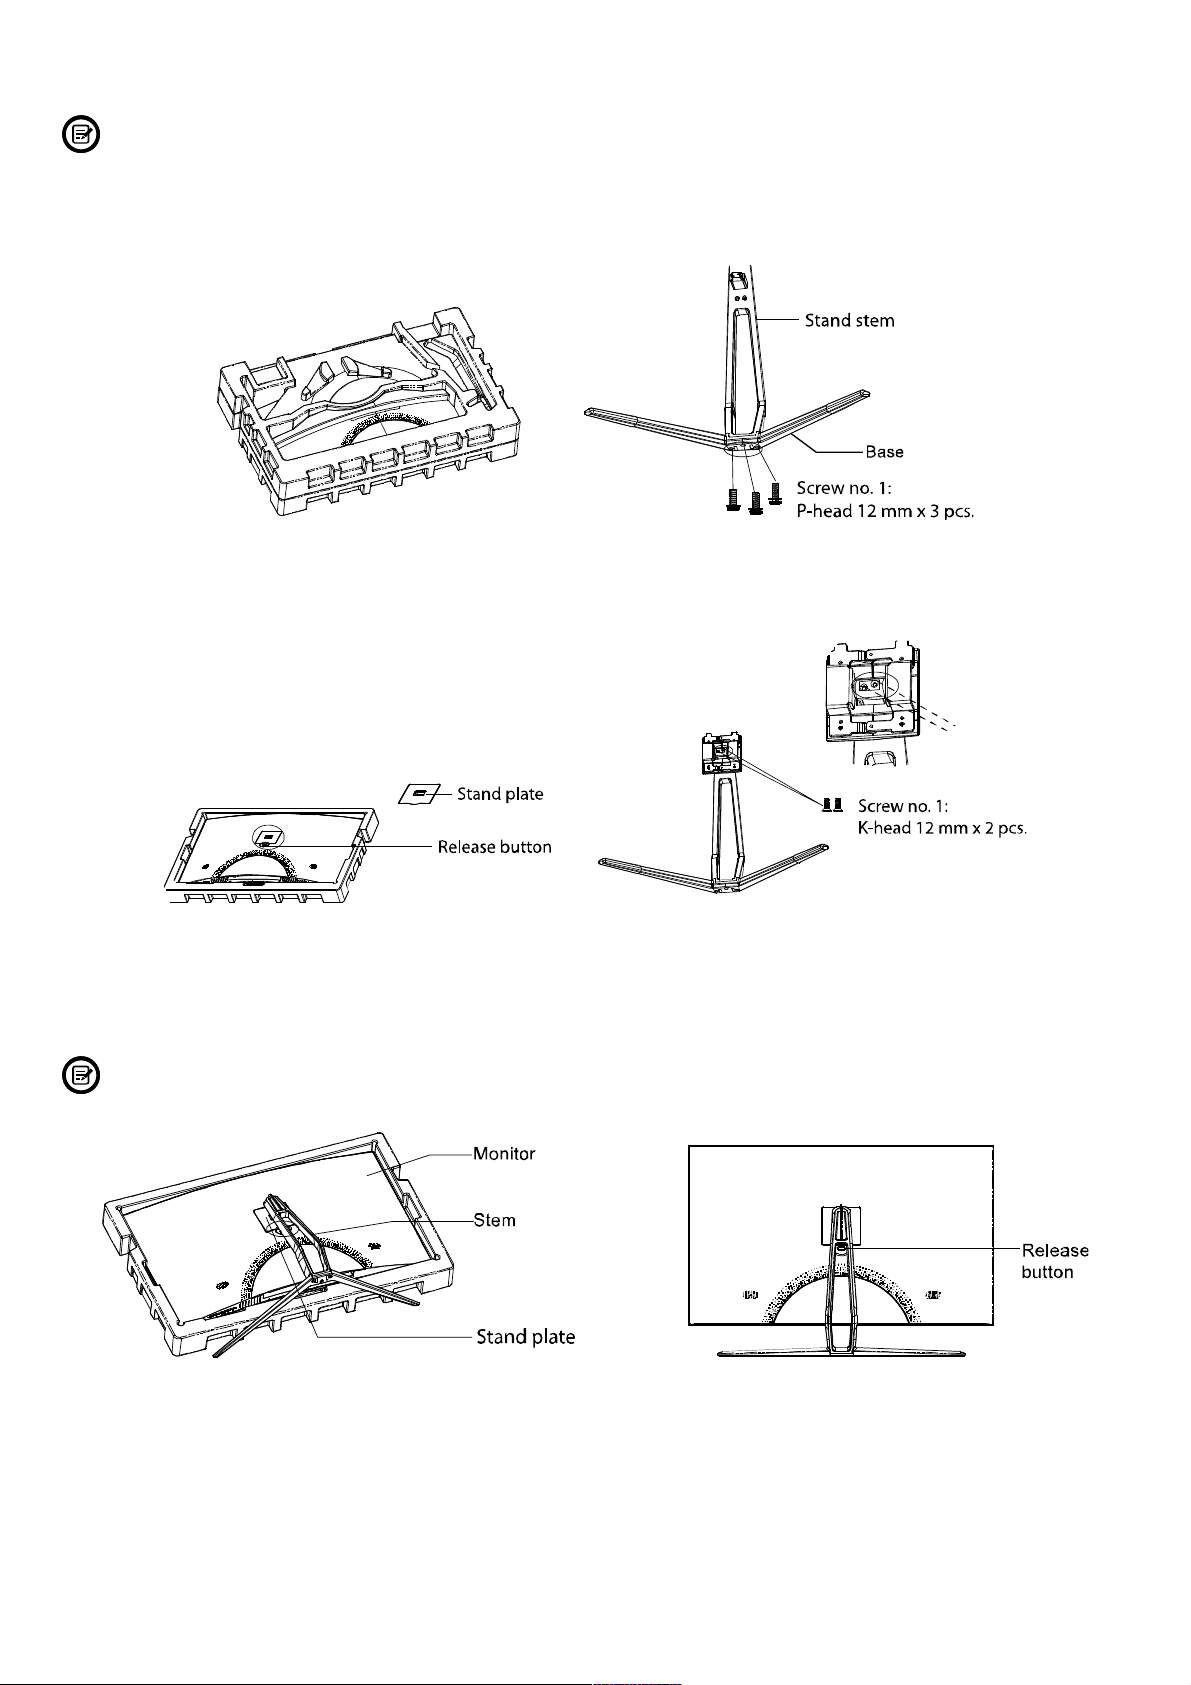
2. Stand installation
Keep the foam underneath the monitor before attaching the stand.
1. Open the packaging, take out the product with the foam parts still attached, and gently place it on a
desktop or table. Use the included screwdriver and three no. 1 screws to fasten the base to the stem.
2. Remove the foam covering the back of the monitor, then press the button to remove the stand plate.
Use two no.1 screws to fasten the stand plate to the stem.
3. Insert the stand’s plate into the opening on the back of the monitor. It should click into place. Make sure
the stand is securely attached to the back of the monitor, then remove the remaining foam part from the
monitor and put it on a table or desk.
If needed, the stand can easily be detached from the monitor by pressing the button near the stand
plate. Make sure the monitor is laid on a flat surface before removing the stand.
Page 4
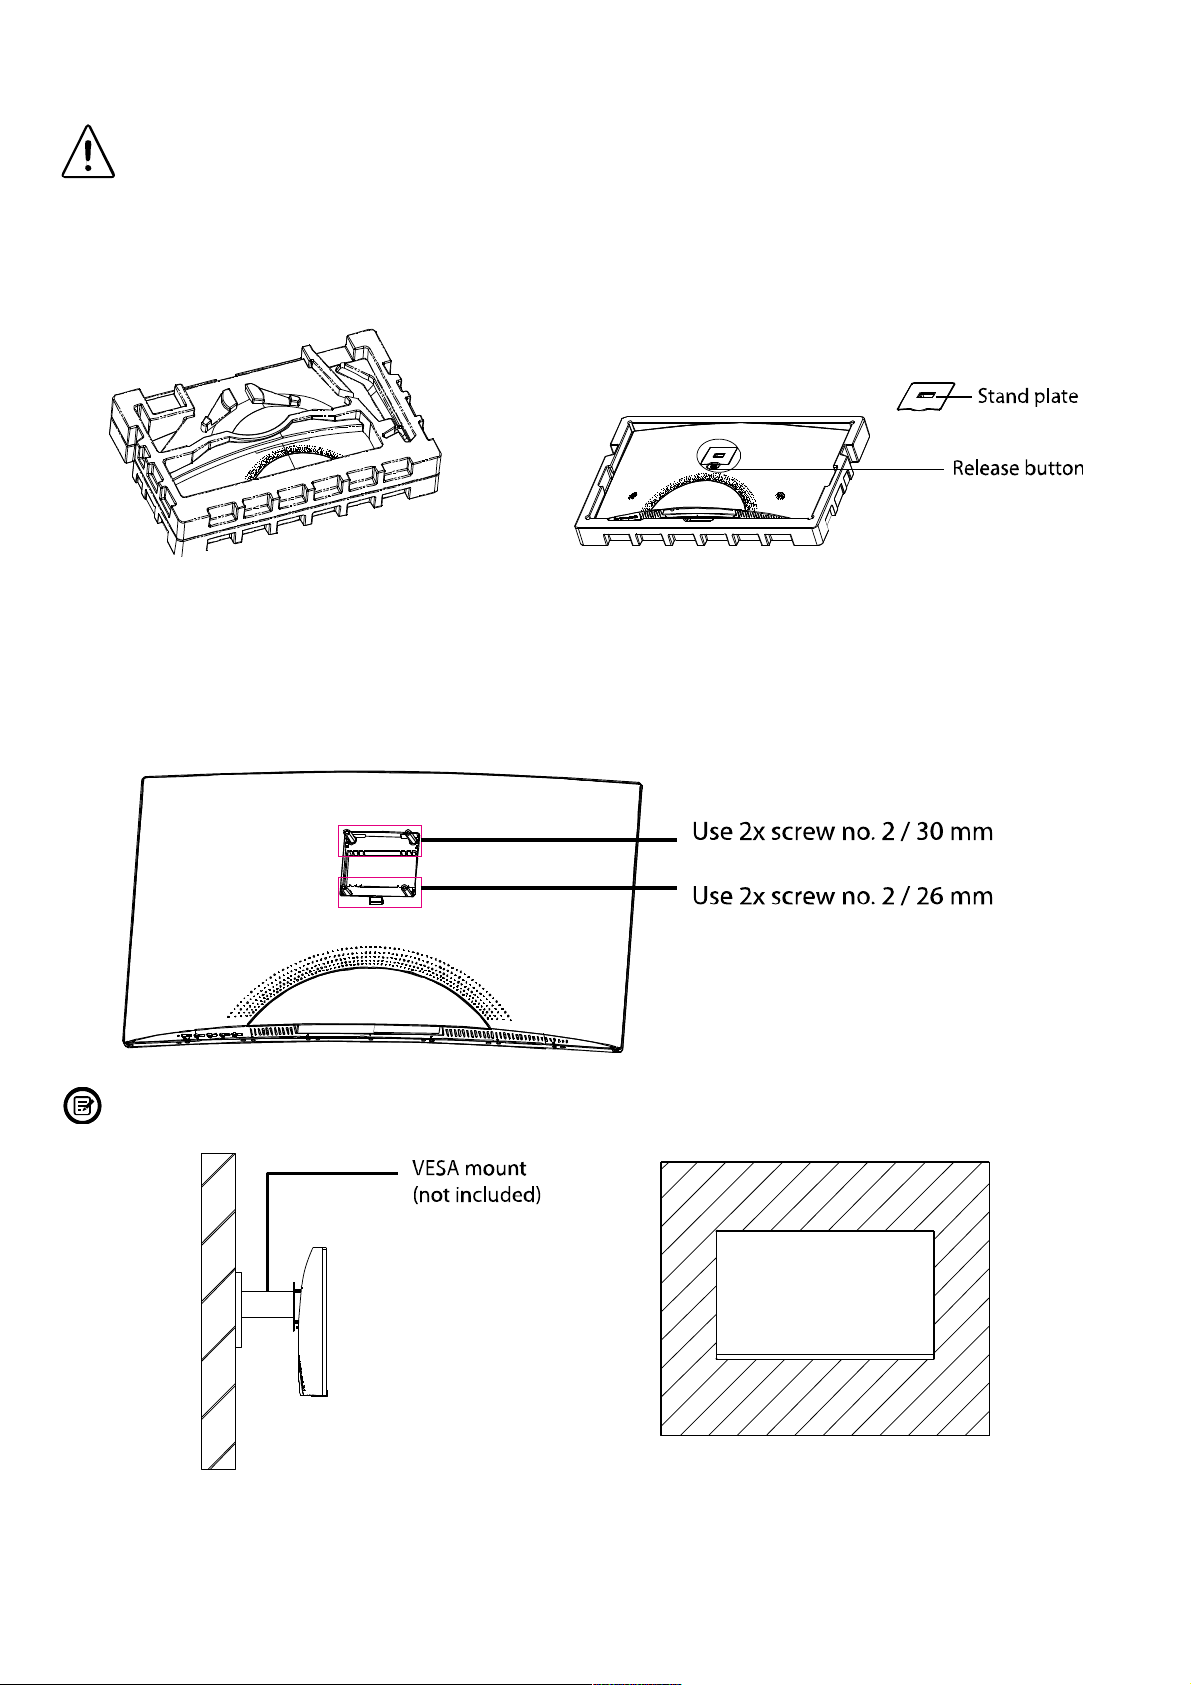
Section 3: VESA mount installation
The monitor packaging includes screws which may be used when attaching the monitor to a VESA
75x75 mm type mount. No VESA mount or mounting accessory is included in delivery.
1. Open the packaging, take out the product with the foam parts still attached, and gently place it on a
desktop or table. Remove the extra parts and the foam part covering the back of the monitor. Press the
button to remove the stand plate. If the monitor is already attached to the stand, remove the stand.
2. Remove the 4 original screws from the opening on the back of the monitor.
3 . Follow the instruction manual of your VESA mount, stand or accessory and install the monitor on the wall
or fixture as desired. Remember to use the included no. 2 screws when attaching any mount etc. to the back
of the monitor. Refer to the image for correct screw placement:
Use only the no. 2 screws (2 pcs. with 30 mm, 2 pcs. with 26mm) provided for this type of
installation. Do not discard the original screws as these may be needed for future use.
Page 5

Section 4: Connectivity options
4.1 Connect the power cable
Connect the included power cable to the power connector of the monitor, then plug it into a wall outlet.
The same procedure applies for external power supplies.
4.2 Video and audio port connectivity (depending on your model)
Please use a matching cable to connect your monitor and your computer. Depending on your model, the
existing ports may be DP (DisplayPort), HDMI or DVI for video signals.
Also the monitor may have an audio out port or included speakers for audio signals.
Section 5: Basic operation
1. Connect your monitor to the PC's graphics card or mainboard video output.
For an optimal refresh rate of the monitor, it is recommended to use the DP or HDMI connection.
2. Connect the power cable to your monitor and to a wall outlet.
3. Press the power button on the monitor (see section 1.1) to turn the monitor on.
Page 6

Section 6: Indicator light
The indicator light is located on the bottom of the monitor.
Bottom view
* Solid blue light indicates that power is on and the monitor is operating normally.
* Flashing blue light indicates that no video source has been detected.
* Red light indicates that no horizontal or vertical signal has been detected or that the voltage is low.
Please ensure your computer is on and all video cables are correctly connected.
Section 7: ECO modes and Gameplus switching
1. Press any button (M, , , E, ) to activate the navigation window.
2. Press the button to switch to Gameplus modes. According to the needs of your game, choose the
corresponding game icon. These game icons are primarily designed to optimize your aim during shooting
games, though they can also be used for other scenarios.
3. Press the button to switch between ECO modes. These modes include Standard, Text, Movie, Game, FPS
and RTS and can be used to optimize settings according to your activity. Standard mode is suitable for most
activities.
Service
If you need technical support, please contact us via support@lc-power.com or visit www.lc-power.com.
If you need after sales service, please contact your retailer directly.
Page 7

LC-M24-FHD-144-C
LC-M27-FHD-144-C
LC-M32-QHD-144-C
LC-M34-UWQHD-100-C
PC Gaming Monitor Serie
Vielen Dank, dass Sie sich für unser Produkt entschieden haben.
Bitte lesen Sie die Anleitung sorgfältig durch, bevor Sie das Produkt benutzen.
Page 8

1. Produktübersicht
1.1 Monitor-Tasten
1. Stromanschluss: Schließen Sie hier das Stromkabel an.
2. M – Menütaste: Drücken Sie diese Taste, um in das Bildschirmmenü oder deren Untermenüs zu gelangen.
3. Pfeil-abwärts-Taste: Drücken Sie diese Taste, um in den Menüs nach unten zu navigieren.
4. Pfeil-aufwärts-Taste: Drücken Sie diese Taste, um in den Menüs nach oben zu navigieren.
5. E – Exit: Drücken Sie die Taste, um das Menü zu verlassen.
6. An-/Aus-Taste: Drücken Sie diese Taste, um den Monitor ein- und auszuschalten.
7. LED-Anzeige: Wechselt die Farbe, um den aktuellen Status anzuzeigen. Weitere Details finden Sie in
Kapitel 6.
Hinweis: Die E-Taste kann benutzt werden, um zwischen zwei Farbumfangmodi zu wechseln, wenn
eine kompatible Grafikkarte über den HDMI- oder DP-Anschluss verbunden ist.
1.2 Monitor-Anschlüsse (bitte prüfen Sie, welche Anschlüsse an Ihrem Modell vorhanden sind)
8. Audio-Ausgang: Hier können Sie einen Kopfhörer anschließen, um Audiosignale Ihres Computers zu
empfangen (DP/HDMI).
9. DP-Anschluss: Verbinden Sie Ihren Monitor mit dem DP-Anschluss (DisplayPort) Ihres Computers.
10. HDMI-Anschluss: Verbinden Sie Ihren Monitor mit dem HDMI-Anschluss Ihres Computers.
11. DVI-Anschluss: Verbinden Sie Ihren Monitor mit dem DVI-Anschluss Ihres Computers.
Page 9

2. Standfußinstallation
Lassen Sie das Styropor unter dem Monitor, während Sie den Fuß befestigen.
1. Öffnen Sie die Verpackung, nehmen Sie das Produkt mit den Styropor-Teilen heraus und platzieren Sie es
vorsichtig auf einem (Schreib-) Tisch. Nutzen Sie drei Schrauben Nr. 1, um den Fuß zu montieren.
2. Entfernen Sie das Styropor-Teil von der Rückseite des Monitors, drücken Sie danach den Knopf, um die
Abdeckplatte zu entfernen. Nutzen Sie zwei Schrauben Nr. 1, um die Abdeckplatte am Fuß zu montieren.
3. Schieben Sie nun die Abdeckplatte wieder in die Öffnung an der Rückseite des Monitors. Sie sollten dabei
ein Klickgeräusch hören. Vergewissern Sie sich, dass der Standfuß sicher mit dem Monitor verbunden ist,
und entfernen Sie danach das Styropor-Teil der Vorderseite des Monitors, um ihn auf einen (Schreib-) Tisch
zu stellen.
Falls nötig, kann der Standfuß einfach wieder vom Monitor entfernt werden, indem Sie auf den Knopf
in der Nähe der Abdeckplatte drücken. Vergewissern Sie sich, dass der Monitor auf einer ebenen
Fläche liegt, bevor Sie den Standfuß entfernen.
Page 10

3. Installation einer VESA-Halterung
Die Monitorverpackung beinhaltet zusätzliche Schrauben, welche nur benötigt werden, wenn Sie
eine VESA-Halterung (75 x 75 mm) am Monitor befestigen wollen. Eine VESA-Halterung oder
entsprechendes Zubehör gehört nicht zum Lieferumfang.
1. Öffnen Sie die Verpackung, nehmen Sie das Produkt mit den Styropor-Teilen heraus und platzieren Sie es
vorsichtig auf einem (Schreib-) Tisch. Entfernen Sie die Styropor-Teile von der Rückseite des Monitors.
Drücken Sie nun auf den Knopf, um die Abdeckplatte zu entfernen. Wenn der Standfuß bereits montiert war,
entfernen Sie ihn zuvor.
2. Entfernen Sie die 4 ursprünglichen Schrauben aus der Öffnung an der Rückseite des Monitors.
3 . Folgen Sie der Montageanleitung Ihrer VESA-Halterung, -Fußes oder -Zubehör und installieren Sie den
Monitor wie gewünscht an der Wand oder einer Halterung. Denken Sie daran, die Schrauben Nr. 2 zu
nutzen, wenn Sie eine Halterung an der Rückseite des Monitors befestigen. Beachten Sie das Bild bzgl. der
korrekten Platzierung der Schrauben:
Nutzen Sie für diese Art der Installation nur die Schrauben Nr. 2 (2 Stück mit 30 mm, 2 Stück mit
26mm). Schmeißen Sie die ursprünglichen Schrauben nicht weg, eventuell brauchen Sie diese in der
Zukunft wieder.
Page 11

4. Anschlussmöglichkeiten
4.1 Schließen Sie das Netzkabel an
Schließen Sie das Netzkabel am Stromanschluss des Monitors an, stecken Sie das andere Ende des Kabels
danach in die Steckdose. Die gleiche Prozedur gilt für externe Netzteile.
4.2 Video- und Audio-Anschlüsse (abhängig von Ihrem Modell)
Bitte nutzen Sie ein passendes Kabel, um Ihren Monitor an Ihren Computer anzuschließen. Abhängig von
Ihrem Modell, kann für die Übertragung von Videosignalen der DP- (DisplayPort), HDMI- oder DVI-Port
genutzt werden.
Außerdem kann der Monitor einen Audioausgang (3,5mm-Klinkenstecker) oder Lautsprecher besitzen, um
Tonsignale wiederzugeben.
5. Grundlagen der Nutzung
1. Verbinden Sie den Monitor mit der Grafikkarte oder dem Video-Ausgang Ihres PCs.
Für eine optimale Bildwiederholrate empfehlen wir die Nutzung des DP- oder HDMI-Anschlusses.
2. Stecken Sie das Stromkabel in den Monitor und die Steckdose.
3. Drücken Sie auf den Ein-/Aus-Schalter des Monitors (siehe Kapitel 1.1), um den Monitor einzuschalten.
Page 12

6. LED-Anzeige
Die LED-Anzeige befindet sich an der Unterseite des Monitors.
Ansicht von unten
* Dauerhaftes blaues Licht zeigt an, dass der Monitor eingeschaltet ist und normal funktioniert.
* Blinkendes blaues Licht zeigt an, dass keine Videoquelle erkannt wurde.
* Rotes Licht zeigt an, dass kein horizontales oder vertikales Signal erkannt wurde, oder dass die
Stromsspannung zu gering ist.
Bitte vergewissern Sie sich, dass Ihr Computer eingeschaltet ist und alle Kabel korrekt angeschlossen sind.
7. ECO-Modi und Gameplus-Wechsel
1. Drücken Sie eine beliebige Taste (M, , , E, ), um das Navigationsfenster zu aktivieren.
2. Drücken Sie die Taste , um zu den Gameplus-Modi zu wechseln. Wählen Sie das entsprechende
Spielsymbol entsprechend den Anforderungen Ihres Spiels. Diese Spielsymbole sind primär dafür entworfen
worden, die Zielfähigkeit für Shooter-Spiele zu verbessern, obwohl sie auch in anderen Situationen genutzt
werden können.
3. Drücken Sie die Taste , um zwischen den verschiedenen ECO-Modi zu wechseln. Diese Modi beinhalten
Standard, Text, Film, Spiel, FPS und RTS und können genutzt werden, um die Einstellungen entsprechend
Ihrer aktuellen Aktivität zu optimieren. Der Standard-Modus ist für die meisten Aktivitäten geeignet.
Service
Wenn Sie technische Unterstützung benötigen, kontaktieren Sie uns bitte unter support@lc-power.com
oder besuchen Sie www.lc-power.com. Für Kundendienstbelange wenden Sie sich bitte direkt an Ihren
Händler.
 Loading...