


TM
Probot
Micro Fraction Collector
User’s Manual
P/N 161403
D960R3
www.lcpackings.com

Notice: The Probot Micro Fraction Collector is covered by a limited warranty. A
copy of this warranty is included with this manual. The customer is required to
perform routine maintenance as described in the User’s Manual on a periodic
basis to keep the warranty in effect.
All information in this manual is subject to change without notice and does not
represent a commitment on the part of LC Packings, BV.
The material included in this manual is provided to assist users in the operation,
maintenance and repair of the Probot Micro Fraction Collector. It is assumed that
the individual using this manual has sufficient training in the use of analytical
instrumentation and is aware of the potential hazards including (but not limited
to) electrical hazards, chemical solvent hazards and the exposure to pressurized
solvents.
© November 2004, LC Packings, BV - A Dionex Company. All rights reserved.
No part of this manual may be reproduced or transmitted in any form or by any
means without the written permission of LC Packings, BV.
The following are Trademarks or Registered Trademarks of LC Packings - A
Dionex Company: Probot, Carrier, UltiMate, UltiChrom, FAMOS, Thermos,
Switchos II, Acurate, UZ-View, UV-Booster, FluoBoost, Pepmap, µ-Dumper, µFluidics, Fusica, Nano Series, Pico Series, µ-Guard, µ-Precolumn, NanoPrecolumn.
Dionex™ is a Trademark of Dionex Corporation.
CHROMELEON is a Trademark of the Dionex Corporation.
PEEK™ polymer is a Trademark of Victrex plc.
Teflon® is a Registered Trademark of E.I. duPont de Nemours and Company.
Analyst® is a Registered Trademark of Applied Biosystems/MDS Sciex.
HyStar is a Trademark of Bruker-Daltonics Group.
MassLynx is a Trademark of Waters® Corporation.
Xcalibur® is a Registered Trademark of ThermoFinnigan.
TM
Belkin
and VideoBusII are Trademarks of the Belkin Corporation.
Windows® and Microsoft® are Registered Trademarks of Microsoft Corporation.
Other product names or company names mentioned herein may be the
trademarks of their respective owners.
Printed in the Netherlands.
ii D960R3 User’s Manual Probot

Table of Contents
Warranty vii
Liability viii
Instructions for Returning Instruments ix
Warnings xi
Safety Precautions xi
CHAPTER 1
Introduction 1-1
1.1 Features of the Probot Micro Fraction Collector 1-1
1.2 General Design of the Probot Micro Fraction Collector 1-2
1.3 Front View of Probot 1-4
1.4 The Manual Control Unit 1-4
1.5 Rear View of Probot 1-5
1.6 Control of the Probot Micro Fraction Collector 1-5
1.7 About this Manual 1-6
CHAPTER 2
Installation and Getting Started 2-1
2.1 Installation 2-1
2.1.1 Location of Probot in the Laboratory 2-2
2.2 Unpacking 2-3
2.3 Removing Shipping Components 2-3
2.3.1 Removing the Top Cover 2-4
2.3.2 Drive Table Safety Brackets 2-5
2.4 Installing the Probot with the UltiMate Capillary HPLC System 2-6
2.4.1 Electrical Connections 2-6
2.4.1 A RS-232 Connector 2-6
2.4.1 B START Connector 2-6
2.4.1 C REMOTE Connector 2-7
2.4.1 D TTL IN Connector 2-7
2.4.1 E INTERLOCK Connector 2-7
2.4.1 F RELAY Connector 2-7
2.4.1 G ANALOG IN Connector 2-8
2.4.1 H VIDEO Connector 2-8
2.4.1 I POWER Connector 2-8
2.4.2 Fluidic Connections for Fraction Collection 2-9
2.4.2 A Connecting the µ-Tee for Matrix Addition 2-9
2.4.2 B Connecting the Dosage Module 2-10
2.5 Software Installation 2-11
2.5.1 System requirements 2-11
2.5.2 Installation of Carrier 2-11
2.6 Introduction to the Carrier Software 2-12
2.6.1 Key Features 2-12
2.6.2 Design of µCarrier 2-13
2.6.3 The Editors and Wizards 2-13
User’s Manual Probot
D960R3 iii

Table of Contents
2.6.4 Necessary Steps to create and run the Application 2-13
2.6.5 The Main Toolbar 2-14
2.7 µCarrier – First Steps 2-15
2.7.1 Launching µCarrier 2-15
2.7.2 Using the Predefined Applications, Trays and Sample Carriers 2-17
2.7.2 A Loading a Predefined Application 2-17
2.7.3 Alignment of the Sample Carriers 2-19
2.7.4 Checking and Modifying Application Parameters 2-21
2.7.4 A Checking and Modifying Groups 2-21
2.7.4 B Checking/Modifying the Tasks List 2-22
2.7.4 C Checking/Modifying the Task Parameters 2-23
2.7.5 Running a predefined Application 2-24
2.8 µCarrier – Basics Steps 2-25
2.8.1 Create a New Sample Carrier using the Sample Carrier Wizard 2-26
2.8.2 Create a New Tray using the Tray Setup Wizard 2-30
2.8.3 Modify an Existing Tray Setup using the Tray Editor 2-32
2.8.4 Create a New Application using the Wizard 2-34
2.8.5 Control the Table Position Manually 2-44
2.8.5 A Using the Manual Drive Panel 2-44
2.8.5 B Using the Manual Control Unit 2-44
2.8.6 Measure the Column (X) and Row (Y) Distance 2-45
2.8.7 Default Calibration and Acceleration Settings 2-47
CHAPTER 3
Maintenance and Troubleshooting 3-1
3.1 Overview 3-1
3.2 Maintenance 3-2
3.3 Replacing Major Components 3-3
3.3.1 Installing the Pipetting Option 3-3
3.3.2 Installing the Video Camera 3-4
3.3.3 Replacing the Syringe 3-4
3.3.4 Replacing the Dosage Unit 3-5
3.3.5 Replacing the Fractionation Needle of the µ-Tee 3-6
3.3.6 Replacing the Standard Needle 3-8
3.3.7 Replacing the Light Bulb of the Pen Light 3-8
3.3.8 Replacing the Main Fuse 3-9
3.4 Troubleshooting 3-10
3.5 Spare Parts Lists 3-11
3.5.1 Major Items 3-11
3.5.2 Accessories 3-11
3.5.3 Spare Parts 3-12
3.5.4 Adapter Tables 3-13
CHAPTER 4
Specifications 4-1
4.1 Physical 4-1
4.2 Electrical 4-1
4.3 Electrical Connections 4-2
4.4 Rotary Valve 4-2
4.5 Safety Devices 4-2
iv D960R3 User’s Manual Probot

Table of Contents
APPENDIX A
Dosage Module Purge Routine 1
A.1 Overview 1
A.1.1 The Step-By-Step Purge Routine 1
APPENDIX B
Peak Collection in Conjunction with CHROMELEON®
Software 1
B.1 Overview 1
B.2 Contact Closure Signals for Peak Detection with CHROMELEON 2
B.3 Setting up µ-Carrier for Peak Collection 3
B.4 Electrical Connections 6
B.5 Listing of the CHROMELEON Program used for this Example 6
B.6 Additional Hints/Troubleshooting 8
APPENDIX C
Table Alignment Instructions 1
C.1 Overview 1
C.2 Table Alignment 2
C.2.1 Leveling 2
C.2.2 Test Needle and Carrier Setup 2
C.2.3 Checking and Aligning of the X-axis and Y-axis 3
C.2.4 Alignment of the X-axis 4
C.2.5 Alignment of the Y-axis 4
APPENDIX D
The Vacuum Waste Removal Option 1
D.1 Overview 1
D.2 General Design 2
D.3 Setting up the Probot 3
D.3.1 Electrical Connections 3
D.3.2 Connecting the Vacuum Pump 3
D.3.3 Installing the Fused Silica Capillary 4
D.4 Setting up µCarrier and CHROMELEON 5
D.4.1 Enabling the Vacuum Waste Removal Option 5
D.4.2 Adjusting the Fused Silica Capillary and the Needle Height 5
D.4.3 Using the Waste Removal Option - Example 6
D.5 Listing of the CHROMELEON Example Program 8
D.6 Additional Hints/Troubleshooting 9
APPENDIX E
Installing and Using the Belkin
E.1 Installation of the Belkin VideoBusII Image Capture Device 1
E.2 Software Installation and µCarrier Setup 2
E.2.1 Connecting the Camera and Displaying the Video Signal 2
E.2.2 Saving a the current Image or Recording a Sequence 4
E.2.3 Optimizing the Video Settings in Carrier 2.0 4
E.2.4 Troubleshooting 5
E.3 Uninstall Instructions 6
USB Video Adapter 1
User’s Manual Probot D960R3 v

Table of Contents
[This page intentionally left blank]
vi D960R3 User’s Manual Probot

Warranty
LC Packings (Netherlands) BV, warrants that the products manufactured and sold
by it to be free from defects in material and workmanship for normal use and
service from the date of delivery to original purchaser for a period of one (1) year
from the date of shipment. This limited warranty does not cover, and no
warranty is provided, for parts that by their nature are required to be replaced
periodically as a function of use of the normal operation of the system. These
items include, without limitation: HPLC columns, fuses, tubing, detector sources,
pump piston seals, injector rotors, check valves, filters, any software, etc. In
addition, damage due to corrosion, misuse, negligence, accident, alteration of the
system or repair by an unauthorized individual is not covered by the warranty. It
is understood that the performance characteristics of the instrument require that
the mobile phase is degassed with He or vacuum degassed as described in the
User’s Manual.
This warranty covers products sold under the LC Packings trademark. If a
different warranty than the above is indicated in the sales literature, the warranty
indicated in the sales literature will prevail. If the system includes equipment
supplied by LC Packings but manufactured by a third party, LC Packings makes
no warranty of any kind, express or implied, including, without limitation, any
warranty of merchantability or fitness for a particular purpose. LC Packings will
make available to you, to the extent permitted, the warranties of the
manufacturer of the relevant equipment following your timely written request.
If any product covered by this warranty becomes defective during the warranty
period, it will be repaired or replaced by LC Packings at no charge to the
customer (the repair/replace decision is solely at the option of LC Packings). All
warranty requests must be received by LC Packings during the warranty period.
LC Packings will pay for surface transportation to the applicable LC Packings
Office (North America – Sunnyvale CA, Europe and Asia - Amsterdam, the
Netherlands), if the instrument proves defective within thirty (30) days from the
date of shipment (this does not include air freight, drayage, labor, crating
charges, customs clearance charges, etc.). The user should carefully follow the
directions indicated on the Return Goods Instruction Sheet in the User’s Manual.
After thirty days, all transportation costs will be at the expense of the customer.
User’s Manual Probot
D960R3 vii

Warranty
Liability
Under no circumstances shall LC Packings be liable for damage to persons or
property. This warranty is the only warranty given by LC Packings with respect
to products and software provided with the products and is given in lieu of all
other warranties, express or implied, including, without limitation, any warranty
of merchantability or fitness for a particular purpose.
Your exclusive remedies and LC Packings’s sole liability for any non-conformity
or defect in the products and such software will be those expressed herein.
Under no circumstances will LC Packings’s liability arising from the performance
or failure to perform of any product or software, in contract, in tort (including
negligence), or otherwise, exceed the purchase price of the product and
software. In no event will LC Packings be liable, in contract, in tort (including
negligence), or otherwise for special, incidental, consequential or analogous
damages, including, without limitation, damages resulting from loss of use, loss
of profits, loss of business or loss of goodwill, even if LC Packings has been
advised of the possibility of such damages.
This warranty comprises the entire warranty between LC Packings and the
customer. It overrides any warranty related language that may appear in the
customer purchase order or other documentation provided by the customer.
This warranty shall be governed by, and construed and enforced in accordance
with, the laws of the Netherlands. It is non-transferable and shall run to the
benefit of the original purchaser only. Any change, alteration or amendment to
this warranty is not valid unless it has been approved in writing by an officer of
LC Packings.
North America Europe and Asia
LC Packings / Dionex LC Packings (Netherlands) BV
A Dionex Company
500 Mercury Drive Abberdaan 114
Sunnyvale, CA 94088-3603 1046 AA Amsterdam
USA The Netherlands
Technical Call Center Phone: + 31 20 683 9768
USA/CA: (800) 346-6390 Fax: + 31 20 685 3452
viii D960R3 User’s Manual Probot

Instructions for Returning Instruments
Before you return any item for repair, please contact the nearest LC Packings
office or its local distributor for instructions and obtain a return authorization
number and the ‘Health and Safety Form’ (if applicable).
Pack the equipment carefully, preferably in its original shipping container and
ship it to the LC Packings Service Department, using the appropriate address.
North America Europe and Asia
LC Packings / Dionex LC Packings (Netherlands) BV
A Dionex Company
500 Mercury Drive Abberdaan 114
Sunnyvale, CA 94088-3603 1046 AA Amsterdam
USA The Netherlands
Technical Call Center Phone: + 31 20 683 9768
USA/CA: (800) 346-6390 Fax: + 31 20 685 3452
IMPORTANT:
1) Make certain that the return authorization number together with the HEALTH
AND SAFETY form (if applicable) is attached outside of the package so that
we can properly track and account for your system.
2) Please include the following
a) Company letterhead with the following information.
Your Name
Complete Mailing Address
Telephone Number, fax number and e-mail address
Return Authorization Number
A detailed description of the problem.
The name of the LC Packings personnel to whom you have
spoken to regarding the problem
Return Shipping Information (if appropriate)
b) Relevant chromatograms
c) A purchase order (if the system is not in warranty)
Note: The completed and signed HEALTH AND SAFETY form must be returned
to LC Packings service department (fax or mail) prior to the return of any
component, or attached outside the shipping package. In addition, the provided
RMA number must be clearly marked on the outside of the shipping package.
Failure to complete and return this form will result in the return of the unopened
package. The parts will not be inspected nor will credit be issued.
User’s Manual Probot
D960R3 ix

Instructions for Returning Instruments
[This page intentionally left blank]
x D960R3 User’s Manual Probot
Warnings
The Danger sign, Warning sign and the Caution sign shown below are included in
various locations in this manual. These signs provide the following information:
DANGER
Danger: The information in a danger statement relates to a procedure, practice
condition or action that if not done correctly or adhered to could lead to personal
injury or loss of life.
WARNING
Warning: The information in a warning statement relates to a procedure, practice
condition or action that if not done correctly or adhered to could lead to severe
injury and/or damage or destruction to parts or all of the equipment.
CAUTION
Caution: The information in a caution statement relates to a condition that could
lead to damage to equipment and/or lead to invalid analytical results.
Note: The information in a note statement relates to important information that
should be read and understood before continuing.
Safety Precautions
Note: The following precautions should be followed to minimize the possibility of
personal injury and/or damage to property.
Note: Make certain that you are familiar with the contents of this manual before
working on the system.
The Probot Micro Fraction Collector is typically incorporated into an LC/MS
system. The user should follow all safety precautions, warnings, etc provided by
the manufacturer of the system(s), in addition note the items presented below:
1) Install the system in a well-ventilated laboratory. If the mobile phase includes
volatile or flammable solvents, make certain that they are not allowed to
enter the workspace.
2) If the mobile phase includes volatile or flammable solvents, avoid open
flames and sparks.
User’s Manual Probot
D960R3 xi

Warnings and Safety Precautions
3) If a leak occurs, turn off power to the instrument and remedy the situation
immediately.
4) All components of the system should be plugged into a common power line
that is directly connected to a true ground.
5) Always replace blown fuses with fuses of the same size and rating indicated
on the fuse holder and panel. Refer to Section 3.3.8 of this manual for more
information on how to replace fuses.
6) Repair or replace faulty power cords and all communication cables.
7) Many organic solvents and buffers are toxic. Make certain that you know the
toxicological properties of all mobile phases that you are using.
8) The toxicological properties of many samples may not be well known. If you
have any doubt about a sample, treat it as if it contained a potentially
harmful substance.
9) Wear protective eye goggles when handling mobile phases or operating the
instrument. An eye wash facility and a sink should be close to the unit. If
any mobile phase is splashed on the eyes or skin, wash the affected area
and seek medical attention.
10) Dispose of all waste mobile phase in an environmentally safe manner that is
consistent with all local regulations. Do not allow flammable and/or toxic
solvents to accumulate. Follow a regulated, approved waste disposal
program. Never dispose flammable and/or toxic solvents through the
municipal sewage system
11) Wear protective eye goggles when handling fused silica tubing (i.e.
installation, cutting etc.)
12) If a buffer is used as a part of the mobile phase, flush the system with
several volumes of a methanol/water (50/50) solution before it is shut down.
This will prevent salt buildup inside the unit.
13) Do not use the instrument in ways other than those indicated in the
instructions given in this manual.
xii D960R3 User’s Manual Probot

DECLARATION OF CONFORMITY
We
declare that our product
LC Packings Nederland BV
A Dionex Company
Abberdaan 114
1046 AA Amsterdam
The Netherlands
Probot Micro Fraction Collector
is in confirmation with the following documents:
# EEC directives 89/392, incl. 91/368 and 93/44 (machine safety) and EEC
directives 73/23 and 93/68 (low voltage safety), applied with the following
standard:
EN61010-1 Safety requirements for laboratory equipment
(Class I, Installation cat. II, Pollution degree II)
WARNING
# EEC directives 89/336 and 92/31 (EMC requirements), applied with the following
EN 50081-1 Generic emission standard
EN 50082-1 Generic immunity standard
EN 61000-3-2 Harmonic current emissions
LC Packings will not accept any liability for damages direct or indirect
caused by connecting this instrument to devices which do not meet relevant
safety standards.
standards:
Use shielded cables and connectors for all remote connections.
Amsterdam, January 11, 2001
User’s Manual Probot
D960R3 xiii
Robert van Ling, QA manager

CE Declaration
[This page intentionally left blank]
xiv D960R3 User’s Manual Probot

CHAPTER 1
1.1 Features of the Probot Micro Fraction Collector
Introduction
The LC Packings Probot Micro Fraction Collector is a robotic fraction collector
that can be used to collect samples from a capillary HPLC or CZE system and
deposit onto targets such as a MALDI mass spectrometer target, a PVDF
membrane (e.g. for protein sequencing), a nitrocellulose membrane or a micro
titer plate.
The heart of the unit is a robotic table that can be positioned in the X, Y and Z
directions by means of 3 stepper motors under the control of a personal
computer and the Carrier software package. The table can be driven in either
a linear or circular motion and the distance from point to point, the time spent at
a point and the speed of movement are readily programmed. A reference position
is defined by the system, and the user can select a starting position as well as a
park position (where the plate should be moved to during rest periods). Various
adapter tables are available for carrying the different targets.
When the Probot Micro Fraction Collector is employed with the µCarrier
software, the system provides the following features:
High precision X-Y-Z movement of the table – any position within the working
area can be programmed with a resolution down to ± 2 µm.
Smooth operation – results in no vibration of the needle, which is essential for
nanoliter spotting and smooth UV-detection.
Short capillary connection between outlet and needle – extremely low dwell
volume.
Fully automated adding of matrixes or make-up solutions – simplifies spotting
Capillary/Nano LC fractions onto MALDI targets. The matrix can either be
added before the needle (µ-Tee) or co-axially at the needle tip (standard Tee).
Dual-Collection mode - a fraction can be split between two sample carriers
simultaneously, i.e., a MALDI/MS target and a well plate, or a PVDF
membrane. The split ratio is programmable and all sample vessels, including
1536 well plates can be used.
User’s Manual Probot
D960R3 1-1

Introduction
µ
1.2 General Design of the Probot Micro Fraction Collector
The general configuration of the system (with sample deposition on a MALDI
target and the Dosage Module option) is presented in FIGURE 1-1.
UltiMate UV Detector
Flow Cell
Probot
Target
Table
From LC/CZE
Z
Y
Rotary
Valve
System
X
-Tee
Union
Needle
Capillary
Waste
Dosage
Module
Syringe
Vials
Fill
Wash
FIGURE 1-1 General Configuration of the Probot Micro Fraction Collector
The Probot Micro Fraction Collector is supplied with a µ-Tee connection
(FIGURE 1-1). The lower end of the needle Tee holds a hollow needle in which a
fused silica capillary is mounted, the horizontal inlet is used to add reagent (e.g.
a matrix solution) to the sample using the Dosage Module and the upper
connection is connected to the LC/CZE system (e.g. the capillary flow cell outlet
of the UltiMate UV detector).
1-2 D960R3 User’s Manual Probot

Introduction
The following options are available for the Probot:
Manual Control Unit – allows for moving the sample table manually.
Dosage Module – The dosage module consists of a 4 way rotary valve with a
syringe drive and a 100 L syringe. It can be used in different modes:
- Continuous Flow Mode – a matrix solution/reagent is added on a
continuous basis (nL/min to µL/min).
- Dosage Mode –a user-defined volume is added to each sample.
- Wash Mode – the needle can be entirely flushed to avoid crystallization of
the matrix solution.
µ-Tee for Matrix Addition – allows for adding the matrix solution before the
needle directly in the Nano flow path (default configuration).
Standard Needle Tee – allows for adding the matrix solution through the
hollow needle co-axially at the needle tip (supplied with the instrument).
Camera Option – A camera kit (P/N 160590) is available which allows for easy
monitoring of the needle and target(s) in conjunction with µCarrier 2.x or a
standalone monitor.
Pipetting Option – The pipetting option (P/N 161072) allows for pipetting from
a source plate (e.g. a well plate) to a destination plate (e.g. MALDI target). It
consists of a Teflon tube (45 cm, I.D. 250 m) with fittings and a fused silica
capillary (15 cm, O.D. 280 m, I.D. 100 m).
Waste Removal Option – allows the user to remove undesired portions of the
separation (‘waste’) without the need to spot them onto the target. A vacuum
can be applied to draw the solvent into a waste container.
User’s Manual Probot D960R3 1-3

Introduction
1.3 Front View of Probot
Light Pencil
Light Switch
Rotary Valve LEDs
FIGURE 1-2 Front View Probot - Doors and Needle Cover Removed
Power Switch
µ-Tee
with
Needle
Camera
(optional)
Target
Table
Adapter
X-Y-Z Drive
Dosage
Module
(optional)
1.4 The Manual Control Unit
X Axis Control Buttons
Y Axis Control Buttons
Z Axis Control Buttons
Mode Buttons
Mode LEDs
FIGURE 1-3 Manual Control Unit
1-4 D960R3 User’s Manual Probot

1.5 Rear View of Probot
Introduction
VIDEO out
POWER
Connector
RELAY
Connector
INTERLOCK
Connector
RS-232
Connector
FIGURE 1-4 Rear View Probot
1.6 Control of the Probot Micro Fraction Collector
The Carrier Application Designer software, which is a Windows® based program
is used to control all functions of the Probot Micro Fraction Collector and to
support time based fraction collection. It can be used for peak collection in
conjunction with any software package that allows for peak detection (e.g. the
LC Packings CHROMELEON
contact closure signals). Fractionating can then be controlled by the TTL inputs
“Peak Start’, ‘Peak Top’ and ‘Peak End’ of the Probot Micro Fraction Collector.
Software) and that can provide control signals (e.g.
START
Connector
ANALOG IN
Connector
TTL IN
Connector
REMOTE
Connector
User’s Manual Probot D960R3 1-5

Introduction
1.7 About this Manual
This manual describes the LC Packings Probot Micro Fraction Collector and
includes the following information:
CHAPTER 2: Installation and Getting Started describes how to install the
Probot and the
performed to setup the system, defines how to define a table and targets, set up
a task list with the
CHAPTER 3: Maintenance and Troubleshooting describes a variety of
maintenance procedures to optimize the performance of the Probot Micro
Fraction Collector. In addition, it discusses how the operator can determine the
cause of a difficulty in the operation of the instrument and includes a list of
spare/replacement parts.
CHAPTER 4: Specifications presents the specifications of the Probot.
In addition, a number of appendices discussing different topics in more details
are included:
Carrier Software. It includes the various steps that should be
Carrier software and prepare the system for operation.
APPENDIX A: Dosage Module Purge Routine provides a step-by-step procedure
of how to purge the syringe and tubing of the dosage module properly.
APPENDIX B: Peak Collection in Conjunction with CHROMELEON® Software
discusses the setup of the CHROMELEON and the µCarrier software packages
and the Probot for peak collection.
APPENDIX C: Table Alignment Instructions
are recommended whenever the instrument has been relocated or shipped.
APPENDIX D: The Vacuum Waste Removal Option describes the features and
usage of this option in conjunction with the CHROMELEON software.
APPENDIX E: Installing and Using the Belkin USB Video Adapter describes the
installation and usage of the Belkin VideoBusII Image Capture Device.
If you are using the Probot Micro Fraction Collector in conjunction with the
LC Packings UltiMate System and/or CHROMELEON software, please refer to the
documentation provided with these products for supplemental information.
The Probot Micro Fraction Collector is used with equipment supplied by other
manufacturers (e.g. a mass spectrometer). The manuals provided with these
systems should be consulted for additional information (e.g. interfacing).
discusses alignment procedures that
The manual provides basic information about how to install, setup and use the
µCarrier software package. In addition, it provides information about defining
tables and targets and how to control the Probot Micro Fraction Collector. For
more detailed information how to use the
software manual provided on the
Note: This manual covers the Probot with S/N 1120 or higher and with the
standard Needle-Tee or the Micro-Tee installed (factory installed since January
2004). If you are using instruments with a serial number lower than 1120, please
refer to the documentation provided with the instrument.
1-6 D960R3 User’s Manual Probot
Carrier installation CD ROM.
Carrier software package refer to the

CHAPTER 2
2.1 Installation
Installation and Getting Started
The instructions provided below are provided for installation of the LC Packings
Probot Micro Fraction Collector as part of the LC Packings Capillary HPLC
System or for installing the instrument as a stand-alone component in an HPLC
system. When the Probot Micro Fraction Collector is used in conjunction with the
UltiMate system and the FAMOS Microautosampler, please refer to the User’s
Manuals supplied with these units for additional information.
Chapter 2 provides the following installation information:
Removing Shipping Components (Section 2.3 )
Installing the Probot with the UltiMate Capillary HPLC System (Section 2.4)
Electrical Connections (Section 2.4.1).
Fluidic Connections (Section 2.4.2).
Software Installation (Section 2.5).
Introduction to the Carrier (Section 2.6).
User’s Manual Probot
D960R3 2-1

Installation and Getting Started
2.1.1 Location of Probot in the Laboratory
The Probot Micro Fraction Collector should be installed in a facility with the
following environmental conditions:
The temperature range should be maintained between 10 and 40
o
C. The
system should be installed in an area in which the temperature is fairly
constant (do not place the system near a window, an air conditioning duct or a
heating duct). The humidity should be maintained between 20 and 80 %
relative humidity.
If flammable or toxic solvents are to be used, a suitable ventilation system
should be provided.
The use of open flames in the laboratory should be prohibited.
Corrosive vapors or dust should not be present as these materials can
adversely affect the long-term performance of the system.
The Probot Micro Fraction Collector requires approximately 480 mm (18.9”) of
linear bench space. The lab bench should be capable of supporting the entire
system (for the LC Packings
UltiMate, FAMOS and Switchos II, we recommend
that the lab bench be capable of supporting at least 100kg (225 lb.). The power
consumption of the Probot is 100 VA (the power consumption of the
UltiMate
Capillary HPLC System is 250 VA and of the FAMOS Microautosampler it is
250 VA).
DANGER
Danger: The Probot Micro Fraction Collector must be connected to a power
source that is connected to a true ground. In addition, all other components of
the system (e.g. the HPLC pump, the detector) should be connected to the same
ground.
CAUTION
Caution: Do not install the Probot Micro Fraction Collector in areas subject to
shock, dust, or in direct sunlight.
Note: It is recommended that you check the alignment whenever the instrument
has been moved (e.g. after shipping or relocation of the instrument). See
APPENDIX C for more details.
2-2 D960R3 User’s Manual Probot

Installation and Getting Started
2.2 Unpacking
When the Probot Micro Fraction Collector is received, carefully unpack the unit
and verify receipt of all components according to the packing list (some
components include sub-packing lists). It is recommended that all packing
materials be saved in the event that it is necessary to return any item to the
factory.
CAUTION
Caution: When lifting the instrument from the shipping container, make sure that
the unit is kept upright. Lift the unit by placing your hands under the instrument.
CAUTION
Caution: The instrument weighs 23 kg. When the unit is being unpacked and
placed on the laboratory bench, take care to ensure that suitable support is
provided at all times.
If there is external damage to the shipping box, the damage should be reported
to the shipping agent and LC Packings upon receipt of the goods. If internal
damage is observed or if any items are missing, this should be reported to the
shipping agent and to LC Packings as soon as it is observed.
CAUTION
Caution: If there is any apparent damage to the instrument, the user should
investigate the nature of the damage before plugging the unit into the mains to
ensure that powering up of the instrument will not create a hazardous condition
or damage internal components. If the damage appears significant, call
LC Packings or its local representative before connecting the unit to the mains.
2.3 Removing Shipping Components
To ensure that the Probot Micro Fraction Collector is not damaged during
shipment, several components are secured before the unit is packed. It is
necessary for the user to remove the brackets securing these items before the
unit is used. The top cover must be removed to access these brackets.
CAUTION
Caution: Do not operate the Probot Micro Fraction Collector with the safety
brackets installed.
CAUTION
Caution: Do not discard the safety brackets. Whenever the instrument needs to
be shipped, the safety brackets must be re-installed to avoid any damage before
the instrument is moved or shipped.
User’s Manual Probot D960R3 2-3

Installation and Getting Started
2.3.1 Removing the Top Cover
To remove the top cover of the Probot:
Remove the needle cover that covers the needle tee.
a)
Remove the left door and right door by simply lifting them few centimeters
b)
(item 1; FIGURE 2-1).
Rear Cover
Top Cover
Needle Cover
1
2
3
4
FIGURE 2-1 Removing the Covers – Left Side View
c) Remove the screw on the left side (item 2; FIGURE 2-1) and the screw on
the right side that hold the rear cover. Remove the rear cover.
d)
Remove the two black screws on the lower left side (item 3, 4; FIGURE 2-1)
and the two screws on the lower right side that hold the top cover.
1
2
FIGURE 2-2 Removing the Rear Cover
e) Remove the two screws (item 1, 2; FIGURE 2-2).
Carefully lift the top cover.
f)
CAUTION
Caution: When replacing the covers, take care not to bend or damage any tubing
or cable.
2-4 D960R3 User’s Manual Probot

Installation and Getting Started
2.3.2 Drive Table Safety Brackets
Two safety brackets (two pieces of metal) are used to secure the drive table as
shown in FIGURE 2-3.
To remove the drive table safety brackets:
Remove the top cover as described in Section 2.3.1.
a)
Remove the piece of styrofoam supporting the table unit.
b)
Unscrew the four screws that hold the brackets in place (item 1-4;
c)
FIGURE 2-3).
Remove the brackets.
d)
Replace the covers.
e)
1
2
4
FIGURE 2-3 Removing the Safety Brackets - Location of the Screws
CAUTION
Caution: Do not keep these screws in the original holes inside Probot. The
movement of the Probot table may be seriously impaired by these screws!
Note: Keep all screws and the two safety brackets in the accessory box in case
it is necessary to move the Probot in future.
3
Note: It is recommended that you check the alignment whenever the instrument
has been moved (e.g. after shipping or relocation of the instrument). See
APPENDIX C for more details.
User’s Manual Probot D960R3 2-5

Installation and Getting Started
2.4 Installing the Probot with the UltiMate Capillary HPLC System
The following section describes how to install the Probot Micro Fraction Collector
as a component in the LC Packings UltiMate Capillary HPLC system.
2.4.1 Electrical Connections
The Probot Micro Fraction Collector is controlled by the Carrier software
package using a serial communication port of the personal computer (PC). In
addition, the Probot can be controlled by external events (e.g. START, TTL IN).
A manual control unit can be connected which allows for manual movement of
all three axes.
All electrical connections are made on the rear panel of the instrument
(FIGURE 1-4).
CAUTION
Caution: Avoid touching the electrical contacts on the terminal strips.
Electrostatic discharges could damage internal components. The manufacturer
will not accept any liability for damages directly or indirectly caused by
connecting the Probot Micro Fraction Collector to instruments which do not meet
relevant safety standards.
2.4.1 A RS-232 Connector
Connect the RS-232 cable to the RS-232 connector on the Probot and to the
COM port of the personal computer.
TABLE 2-1 The Probot RS-232 Communication Cable
Probot (9-pin male) PC (9-pin female) Description
2 3 TxD
3 2 RxD
5 5 Ground
7 7 Reset
2.4.1 B START Connector
If the external start feature is used, connect the Start Cable to the START
connector on the Probot and to the device that will provide the start signal for
the Probot (e.g. a TTL output of the UltiMate Micropump or a relay output of the
FAMOS).
TABLE 2-2 The START Cable
Input Pin No. Color Code Description
Start 7 lilac Start input
Ground 9 black Ground connection
CAUTION
Caution: If the controlling device does not use a switch or relay contacts, make
certain that the polarity is correct (e.g. connect the ground pin of the Probot to
the ground pin of the controlling device). The output signal of the controlling
device must be TTL level compatible.
2-6 D960R3 User’s Manual Probot

Installation and Getting Started
2.4.1 C REMOTE Connector
Connect the manual control unit to the REMOTE connector.
2.4.1 D TTL IN Connector
The TTL IN connector is used for fraction collection. The TTL input provides four
control signals as presented in TABLE 2-3.
TABLE 2-3 The TTL Cable
Input Pin No. Color Code Description
TTL1
TTL2
TTL3
TTL4
Ground
1
3
5
7
9,11,13,15
Red Peak Start
Orange Peak End
Yellow
Green
Blue
Peak Top
n/a - reserved option
Ground Connection
Refer to APPENDIX B for more details and an example describing how to control
the Probot by the TTL inputs using the peak detection functionality of the
CHROMELEON software.
CAUTION
Caution: If the controlling device does not use a switch or relay contacts, make
certain that the polarity is correct (e.g. connect the ground pin of the Probot to
the ground pin of the controlling device). The output signal of the controlling
device must be TTL level compatible.
Note: If you are using a TTL output (e.g. of the UltiMate Micropump), the control
logic will be inverted (e.g. an inactive output of the Micropump will be recognized
as an active input by the Probot).
2.4.1 E INTERLOCK Connector
The INTERLOCK connector is used if the Probot is to be installed in conjunction
with a system that is operated at high voltage (e.g. a CZE system). If connected,
the entire system can be shut down to avoid any hazardous situation. Connect
the Interlock Cable to the shut down input of your system (TABLE 2-4).
TABLE 2-4 The INTERLOCK Cable
Output Pin No. Color Code Description
Relay
Ground
- 2,3 - (internal jumper)
1 Brown
4 Yellow
6,7,8 green, blue,
lilac, black
Interlock contact closure
Ground connection
2.4.1 F RELAY Connector
The Probot provides 4 programmable relay outputs. Connect the input(s) of the
device(s) to be controlled to the RELAY output(s) using the Relay Cable to meet
the needs of your application (TABLE 2-5).
User’s Manual Probot D960R3 2-7

Installation and Getting Started
TABLE 2-5 The RELAY Cable
Output Pin No. Color Code Description
1 brown Relay 1, normally open
Relay 4
Relay 3
Relay 2
Relay 1
2 red Relay 1, common
3 orange Relay 1, normally closed
4 pink Relay 2, normally open
5 yellow Relay 2, common
6 green Relay 2, normally closed
8 blue Relay 3, normally open
9 light blue Relay 3, common
10 lilac Relay 3, normally closed
11 gray Relay 4, normally open
12 white Relay 4, common
13 Black Relay 4, normally closed
2.4.1 G ANALOG IN Connector
This input is reserved for future use.
2.4.1 H VIDEO Connector
If the camera option is installed in your Probot, connect the BNC type connector
of the VIDEO output to the monitor (e.g. P/N 160567) using the connecting
cable provided with the camera.
2.4.1 I POWER Connector
Since the Probot Micro Fraction Collector is fitted with a universal power supply
for input voltages from 90 to 260 V (47 - 62 Hz), manual setting of the supply
voltage is not required. The power cord should be inserted in the black socket on
the left side of the rear panel (FIGURE 1-4).
CAUTION
Caution: Make certain that the system is properly grounded to a true earth
ground. Connecting the instrument to an ungrounded power line can cause
injuries and serious damage to the system.
2-8 D960R3 User’s Manual Probot

Installation and Getting Started
2.4.2 Fluidic Connections for Fraction Collection
2.4.2 A Connecting the µ-Tee for Matrix Addition
The Probot Micro Fraction Collector should be installed as near as possible to the
UltiMate Capillary HPLC system. Since the µ-Tee is located in the center of the
cover of the unit, the Probot can be placed on either side of the LC system.
The µ-Tee as originally installed in the Probot is equipped with 30 µm I.D.
(280 µm O.D.) fused silica fractionation needle which allows for a maximum flow
rate of up to 30 µL/min (matrix solution and LC flow). To reconfigure the
instrument for a maximum flow rate up to 300 µL/min, refer to Section 3.3.5.
CAUTION
Caution: Exceeding the maximum flow rate limits specified in Section 3.3.5 may
cause the rotary valve to leak or may damage the rotary valve.
To connect the Probot µ-Tee to the flow cell outlet of the UltiMate UV Detector:
Depending on your application (e.g. capillary or Nano LC) use either a 30 m
a)
I.D. (280 µm O.D.) fused silica capillary (P/N 161473, for Nano LC) or a 100
m I.D. (280 µm O.D.) capillary (P/N 160479, for capillary LC) to extend the
outlet capillary of the flow cell (not included in the accessory kit).
Install the fused silica capillary into the upper port of the µ-Tee (FIGURE 2-4)
b)
inside the Probot using one long orange PEEK sleeve (P/N 162146), which is
provided with the Probot. Turn the fitting until it is finger tight. You should
not be able to move the capillary in the sleeve (e.g. it should be grabbed by
the sleeve).
Fused Silica Capillary
PEEK Sleeve (long)
Ferrule
Inlet for Matrix
Solution
µ-Tee
PEEK Sleeve (short)
Stainless Steel
Needle
X
Fused Silica
Needle
X = 2 - 3 mm
I.D. of the
Fractionation Needle
30 µm 30 µL/min
100 µm 300 µL/min
Maximum Flow Rate
(Matrix + LC flow)
FIGURE 2-4 The µ-Tee
c) Use a Microtight union (P/N 161497, not included in the accessory kit) and
two orange PEEK sleeves (P/N 161498) to connect the capillary to the outlet
of the flow cell (280
m O.D.).
User’s Manual Probot D960R3 2-9

Installation and Getting Started
d) Depending on your application, either connect the matrix tubing (Section
2.4.2 B) or use the blind plug provided with the accessories to plug the third
needle tee port.
2.4.2 B Connecting the Dosage Module
The Dosage Module (optional) consists of a 4 way rotary valve and a syringe
drive (FIGURE 2-5). It is used to add a reagent in continuous or in dosage mode.
Vials
Syringe with
Luer Lock
Adapter
Port 3
PURGE
Port 2
FILL
Rotary
Valve
Center
Port
Port 4
(AUX)
Port 1
PUMP
FIGURE 2-5 The Dosage Module with Rotary Valve
To connect the rotary valve and the syringe:
Connect the tubing from the needle tee to port 1 (PUMP).
a)
Connect port 2 (FILL) to one of the 3 vials. Use the tubing supplied with the
b)
accessories kit. Fill the vial with the matrix solution that fit the needs of your
application.
c)
Connect port 3 (PURGE) to one of the 3 vials. Use the tubing supplied with
the accessories kit.
d)
To use the extra wash option, connect port 4 (AUX) to one of the 3 vials.
Use the tubing supplied with the accessories kit. Fill the vial with a wash
reagent that is suitable for your application (e.g. water/acetonitrile [50/50] or
methanol).
e)
Fill the syringe with the matrix solution, remove any air bubbles and install
the syringe in the holder. Tighten the holding screw hand tight. Refer to
A.1.1 for more information how to purge the syringe.
Connect the syringe to the port in the center of the rotary valve. Use the
f)
adapter that is supplied.
2-10 D960R3 User’s Manual Probot

Installation and Getting Started
2.5 Software Installation
The following section describes the installation of the Carrier Software, Version
2.0. Please refer to the ‘Readme’ file provided on the
additional information and updated instructions.
2.5.1 System requirements
To run the Carrier software, your personal computer must fulfill the following
minimal specifications:
PC with Intel Pentium II, Celeron, AMD ATHLON, DURON microprocessor or
compatible, min. 277 MHz.
64 MB main memory.
One CD ROM drive, a hard disk with at least 20 MB free storage capacity.
SVGA-graphics adapter (at least: 800x600 pixels, 32kByte colors).
Color monitor with appropriate resolution and color specifications.
Microsoft
Windows 2000.
Windows XP (SP1 recommended), NT (Version 4.0 SR3, 5, 6),
Carrier CD ROM for
Mouse (a mouse-wheel is recommended).
One free serial COM-port for the RS232-connection to the Probot Micro
Fraction Collector.
One free USB port for the connection of the video adapter (as part of the
optional camera).
2.5.2 Installation of Carrier
To install the Carrier software:
Put the Carrier CD ROM into the CD ROM drive. If you have the Autostart
a)
function of Windows activated, the setup program will start automatically. If
Autostart is not activated, use the Windows Explorer or the
from the Windows Start menu to run SETUP.EXE on the CD ROM. All
necessary files are decompressed and copied to your computer.
b)
Select which options you want to install. If your Probot includes the camera
option with the Belkin
TM
VideoBusII, you can choose to unpack the required
drivers to a specified location on your hard disk.
c)
Respond to each dialog box of the installation program as it is presented. If
you always choose the
the default folder (e.g.
Next button, the µCarrier software will be installed in
C:\Program Files\LCP\uCarrier).
Run command
If you have chosen to copy the Belkin drivers to your PC, the installation
d)
software will tell you at some point to connect the Belkin video adapter.
Windows will automatically start the ‘New hardware found’ wizard. Enter the
location where the wizard finds the drivers installed in step b). Refer to
APPENDIX E for more details about the installation and usage of the video
adapter.
e)
After installation is completed, restart your computer.
User’s Manual Probot D960R3 2-11

Installation and Getting Started
2.6 Introduction to the Carrier Software
The following sections provide a basic introduction in the Carrier Liquid
Handling Application Designer Software (V2.0) and information of how to setup
and use the software. For more detailed information, refer to the user’s manual
of µCarrier provided with the CD ROM.
2.6.1 Key Features
To improve the ease of use, the following features have been introduced in
Carrier 2.0 and can be found throughout the program.
One window design – All relevant information is displayed in one window.
Various wizards – Easy design of sample carriers, trays and applications.
Easy file access – via the new browser pane.
‘What You See Is What You Get’ operation (WYSIWYG) – in both, the editors
and the wizards.
Basic fractionation task – Only the most important settings need to be
programmed, what can be set by default is set by default.
Advanced fractionation task – Advanced settings can be programmed to
achieve for optimized applications.
Easy file access
with preview
option.
New button opens the wizard, corresponding to the active editor
Only the most
relevant settings
are displayed.
WYSIWYG
Changes made in the settings, are
immediately visible in the Preview window
FIGURE 2-6 Sample Carrier Window
Note: Carrier 2.0 is backward compatible, e.g. you can load your old
applications in Carrier 2.0. Saving them again in Carrier 2.0 will automatically
update your programs.
2-12 D960R3 User’s Manual Probot

Installation and Getting Started
2.6.2 Design of µCarrier
The Carrier Liquid Handling Application Designer Software (V2.0) is built around
the following three basic components:
The sample carrier – represents the target (e.g. a MALDI target or a microtiter
plate), which is used. It describes the number of spots on this target and their
position relative to each other.
The tray – represents a number of sample carriers and there positions on the
table. It is required to define the position of every spot on the tray. By aligning
the sample carriers, every spot on the MALDI targets is defined with respect to
the exact X, Y and Z coordinate relative to the needle of the Probot.
The application – represents all ‘rules’ (tasks) required for spotting. A
collection of spots is grouped and these groups are used within the different
tasks. Every spot is defined by its X, Y and Z coordinates, so each spot can be
found individually. This allows you to use your MALDI targets in any way you
want (e.g. you can collect two runs on one MALDI target or one run on two
MALDI targets). The application file holds the parameters for the sample
carriers, the tray and the tasks.
For each component a special wizard assisted ‘Editor’ is available.
2.6.3 The Editors and Wizards
For the ease of use µCarrier provides various wizards and editors for the design
of the sample carrier, the tray and the application:
Sample Carrier Alignment Wizard – Section 2.7.3
Sample Carrier Wizard – Section 2.8.1
Sample Carrier Editor – Section- 2.8.1
Tray Setup Wizard – Section 2.8.2
Tray Editor – Section 2.8.3
Fractionation Application Wizard - Section 2.8.4
Application Editor – Section 2.8.4
Depending on the editor which is currently active or the task that is to be done
next, the corresponding wizard starts automatically if the
2.6.4 Necessary Steps to create and run the Application
A series of basic steps is required to create and to prepare and to run your
application. For the ease of use, µCarrier V2.0 provides predefined sample
carriers and tray definitions for the most commonly used MALDI mass
spectrometer. In addition, predefined standard applications are available to get
easily started.
New button is selected.
Section 2.7.2 shows how to define applications using these definitions. Sections
2.8.1 - 2.8.4 show how to use the wizards to create new sample carriers, tray
and application.
User’s Manual Probot D960R3 2-13

Installation and Getting Started
2.6.5 The Main Toolbar
The main toolbar (FIGURE 2-7), which is presented in the upper left of the main
window of µCarrier (FIGURE 2-10) presents several buttons:
FIGURE 2-7 The Main Toolbar
Removes the tray and all tasks in the task list and starts the
wizard corresponding to the editor which is currently active.
This button shows or hide the browser pane on the left and
enables or disables easy file access.
Opens an existing sample carrier, tray table or application file.
The sample carrier files have the extension ‘.rck’, the tray files
have the extension ‘.try’ and the application files have the
extension ‘.app.’
/
/
Saves a (new) sample carrier, a tray table or an application.
Activates the
Sample Carrier Editor to create new or modify
existing sample carriers.
Activates the
Tray Editor to create new or modify existing trays.
Tray layout and spot grouping is available in this editor.
Activates the
Application Editor to create new or modify
existing applications. Grouping of sample carrier spots is also
available.
Activates
Manual Device Control to control the Probot table and
dosage module manually.
Opens the manual control panel of the robot drive.
Runs the application
Pauses the application (only active during run)
Aborts the application (only active during run)
2-14 D960R3 User’s Manual Probot

Installation and Getting Started
2.7 µCarrier – First Steps
2.7.1 Launching µCarrier
When µCarrier is opened for the first time, the following window appears
(FIGURE 2-8):
FIGURE 2-8 The Run a Real Device? Window
a) Choose the Yes button if you want to control Probot (all available COM ports
will then be scanned until µCarrier will detect the instrument), choose the
button if you want to launch the software in offline mode.
No
Note: Depending on the position of the table, one or more of the security
switches may be activated. If a switch is activated, a corresponding message is
presented and the Probot will perform reference runs.
b) In the next window that appears you will be asked whether or not a dosage
module is present in your Probot. Choose the
present or choose the
No button if not (FIGURE 2-9).
Yes button if there is one
FIGURE 2-9 The Dosage Module Installed? Window
c) After initializing of the Probot (when running in ‘real device’ mode only) the
Carrier software is ready and the Main Screen will be presented
(FIGURE 2-10).
Note: After the initial launch of µCarrier, the last saved application is
automatically loaded when µCarrier is opened. In the case the last saved
application could not be loaded, µCarrier will present the Main Screen
(FIGURE 2-10) again.
User’s Manual Probot D960R3 2-15

Installation and Getting Started
FIGURE 2-10 The Main Window of Carrier with Table
If desired, Carrier can be configured so that it does not show some the previous
dialogs on each start. Select the
Options menu in the main window to open the
Options Window (FIGURE 2-10) and adjust the ‘Startup’ settings (e.g. select
‘Always start the software in the real device control mode’ to start up in real
device control node).
FIGURE 2-11 The Settings Window –Startup Section on the Main Tab
2-16 D960R3 User’s Manual Probot

Installation and Getting Started
2.7.2 Using the Predefined Applications, Trays and Sample Carriers
In addition to the predefined sample carriers and trays, µCarrier V2.0 provides
ready-to-use applications for the most common used MALDI MS instruments.
These applications are based on a ‘Basic fractionation task’, which is a time
controlled collection by default. It requires only three steps to run such an
application.
Loading a Predefined Application – Section 2.7.2 A
Alignment of the Sample Carriers– Section 2.7.3
Checking and Modifying Application Parameters – Section 2.7.4
As an example, the following sections will present in detail how to use and
modify the predefined application for a time controlled fractionation application
onto 6 Applied Biosystems® OptiTof
not meet the specific needs of your application, it is likely that it can be used
with minor modification.
2.7.2 A Loading a Predefined Application
24x24 targets. While this example may
a) Activate the Application Editor by selecting the ApplicationEditor button.
Select the Show Browser button to replace the list of available ‘Tasks’ by the
b)
browser pane (FIGURE 2-12).
Available
Tasks
Browser
Pane
FIGURE 2-12 Left - List of available Tasks, Right – The Browser Pane
c) Select the desired application, and then double click to load this application.
All parameters of this task are then loaded in the
the
Tray Editor (FIGURE 2-13).
User’s Manual Probot D960R3 2-17
Application Editor and in

Installation and Getting Started
Task List
Parameters
of the
selected
Task
Group
Definitions
FIGURE 2-13 Application Editor - Application loaded
All tasks of this application are loaded in the Task List and the parameters of a
selected task (row) are displayed in the right part of the
Application Editor.
Selecting a different task (row) in the table will automatically load the
corresponding parameters. The tray with the six sample carriers and all groups
are presented in the
Group Mode section, which is the lower part of the window.
2-18 D960R3 User’s Manual Probot

Installation and Getting Started
2.7.3 Alignment of the Sample Carriers
The following procedure needs to be performed to define the exact position of
the sample carriers on the table relative to the needle tip (including the ‘spotting
height’). During this procedure the table is moved manually to certain reference
positions and their coordinates (X, Y, Z) will be stored in the
Once this procedure has been performed successfully, this setup can be used as
long as the hardware has not been modified (e.g. the needle has been replaced or
bent).
Note: The proper alignment is essential to achieve optimal spotting performance.
Once the hardware has been modified (e.g. the needle has been replaced or bent
or a different table is used) or the Probot has been moved, it is necessary to
repeat this procedure.
If the tray definition includes the exact positions of all sample carriers relative to
each other (e.g. multiple sampler carriers of the same type in predefined
positions), the µCarrier software needs only one spot as reference position to
align all carriers in one step. If the tray definition does not provide the exact
(relative) X and Y positions, the alignment has to be performed for each sample
carrier individually.
Carrier Software.
To align the sample carriers:
Open the Sample Carrier Alignment Wizard by selecting Sample carrier
a)
alignment
from the Tools menu. The introduction window (FIGURE 2-14)
presents the origin of reference sample carrier as red diagonal cross.
Red ‘X’ represents the
origin of the reference
sample carrier.
Current coordinates.
Z = Spotting Height
FIGURE 2-14 Introduction Screen of the Sample Carrier Alignment Wizard
b) To select one or more carriers, draw a frame around the origins (the red ‘+’)
of all sample carriers while keeping the left mouse button pressed. After the
selection the origin of the reference carrier is presented by a red ‘X’
(FIGURE 2-14).
User’s Manual Probot D960R3 2-19

Installation and Getting Started
c) Follow the steps of the wizards by choosing the Next button. The origin of
the reference sample carrier will start to blink for a better identification.
d)
Choose the ‘Manual Drive Panel’ of µCarrier (Section 2.8.5 A) or the ‘Manual
Control Unit’ of the Probot (Section 2.8.5 B) to move the table. Select one
option, and then choose
Enter the ‘step width’ (e.g. 0.1 mm) and choose Next.
e)
Now move the table by either the ‘Manual Drive Panel’ or the ‘Manual
f)
Control Unit’ (as selected in step d) to that the needle tip is centered above
the reference position of the reference target.
Next.
FIGURE 2-15 Aligning the Reference Position using the Camera
g) Finally, adjust the table height (Z axis) so that the needle tip just touches the
surface of the target. This adjustment is the ‘spotting height’ which will be
used during spotting for all carrier positions (selected in step b).
Note: The optimal distance of the needle tip to the carrier surface depends on
your application parameters (e.g. the LC flow rate, the matrix flow rate, etc.).
h) Once all axes are moved to their proper positions confirm by Next, and then
wait for the message box telling you the sample carriers have been aligned
(FIGURE 2-18). This can take a few seconds. When finished, the table will
move to home position
FIGURE 2-16 The Alignment Procedure of one (or more) Carriers is finished
i) Repeat steps a) – h) for any unaligned sample carrier on the table.
Exit the wizard and save the application.
j)
2-20 D960R3 User’s Manual Probot

Installation and Getting Started
2.7.4 Checking and Modifying Application Parameters
The next step is to check and/or modify the application parameters. After the
application parameters have been checked/modified, the alignment of the sample
carriers should be checked (Section 2.7.3).
2.7.4 A Checking and Modifying Groups
All predefined applications have a tray setup with the maximum number of
sample carriers on the tray, one group per sample carrier and a meander spotting
pattern.
1
FIGURE 2-17 6 Sample Carriers, 1 Group on each Sample Carrier
Check if this groups setup fulfills the requirements of the application you need to
perform. If not, the group setup can be modified as follow:
Select a group in the group list (e.g. click on ‘LC_Collect_1 in the table).
a)
To remove all spots from this group, use the Clear Group button.
b)
To assign non-grouped spots to a certain group, mark the spots with the
c)
mouse cursor.
To change the spotting pattern, select the appropriate spotting pattern from
d)
the drop down menu.
e)
Add a new group with the Create a new Group button.
User’s Manual Probot D960R3 2-21

Installation and Getting Started
f) To remove the group, make sure that it is not used as ‘Collect group’ or
‘Standby position’ in a task, e.g. ‘Users’ must be ‘0’ (item 1, FIGURE 2-17).
Unselect if appropriate, and then use the
Note: There is no need to change group settings of groups you do not intend to
use them. As an example, if you want to spot on the first target only, you do not
need to modify the groups 2 - 6. Just make sure that your task list is correct and
that these groups are not used.
2.7.4 B Checking/Modifying the Tasks List
If you changed the number of groups or if you want to perform fewer runs than
the total number of this predefined application, you may have to modify the task
list (FIGURE 2-18), e.g. to add, delete or modify tasks.
Delete Group button.
Tasks
FIGURE 2-18 Available Tasks, Task List and Task Description
Task List
Task Description
To delete a task in the task list, select the task and press the Del key on the
keyboard or click the right mouse key, and then select ‘Delete’.
To add a task to the task list:
selecting the
To add a new task, double click on the required task from the ‘Tasks’ section
b)
Show Browser button ((FIGURE 2-18)).
Present ‘Tasks’ section (e.g. if the browser pane is currently visible) by
a)
presented in the left side of the window. The new task will be added to the
bottom of the task list (FIGURE 2-18).
Note: Selecting a task in the ‘Tasks’ section with one mouse click (rather than
double-click) will display the task description in the right side of the Application
Editor window (FIGURE 2-18).
c) Drag and drop the task to the desired position in the task list.
Check or modify the task parameters (Section 2.7.4 C).
d)
2-22 D960R3 User’s Manual Probot

Installation and Getting Started
2.7.4 C Checking/Modifying the Task Parameters
To check or modify the task parameters, select the task that needs to be
checked in the task list. The task parameter box (e.g. Basic Fractionation) will be
presented in the
Application Editor window (FIGURE 2-19).
Task List Task
Parameters
FIGURE 2-19 Task List and Parameters
FIGURE 2-20 Basic Fractionation Task
The most common task, which is to be performed with the Probot, is a time
controlled fractionation task. The ‘Basic Fractionation’ task is provided to
simplify the setting up of such a task, and it needs very few parameters to run it.
FIGURE 2-20 shows the parameters box. The
Basic Fractionation box is divided
in three sections.
1 – How… - The column flow rate and the matrix flow rate is specified (as
multiples of the column flow rate) via this box. The
prior to fractionation
option compensates the dilution of the matrix solution in
Dispense 10 l of matrix
the case the needle rests in the wash vial between runs.
2 - When… - All timing related parameters are programmed via this box. The
Collection time is the maximum spotting time of the corresponding task.
Regardless of the number of available spots, the current task will be aborted if
User’s Manual Probot D960R3 2-23

Installation and Getting Started
the time elapsed after the task was started exceeds this limit. In the case all
spots have been processed, the run also stops. In both cases µCarrier will
prepare the next task. The
time includes the time the Probot needs to move, to lift the table and to spot
(t
spotting = tmovement + ton spot). It can be as low as 4 seconds (with optimized
needle movement only).
3 – Where… - The positions (groups) are defined via this box. The Collect
is where the Probot collects the LC eluent (with the matrix solution).
group
Standby position is where the needle rests before and after the spotting.
The
The
Z-coordinate for in-task movement defines the height at which the table
moves from spot to spot (‘0’ represents the lowest position of the table). A
typical value is approximately 2 mm below the spotting height (which was
defined during the sample carrier alignment step, Section 2.7.3).
CAUTION
Caution: The Z-coordinate for in-task movements must ALWAYS be lower than
the spotting height (Section 2.7.3). If it’s not lower, you may scratch your
MALDI target.
Note: For faster spotting (e.g. the spotting time needs to be decreased), the
Z-coordinate for in-task movements should be as close as possible to the spotting
height (Section 2.7.3).
Time per spot(s) is the actual spotting time. This
Check all tasks in the task list and save the application under any appropriate
name.
Carrier is now ready to fractionate. To run the application in this stage,
continue with step c) of the instructions provided in Section 2.7.5.
2.7.5 Running a predefined Application
To load and to run a predefined application, perform the following steps:
CAUTION
Double-click on the application you want to run in the browser window
a)
(FIGURE 2-13) or use the
The Application Editor and the Tray Editor is updated accordingly.
b)
Caution: To verify your application, we recommend that you remove the needle
and all parts from the table so that they cannot be damaged during the
verification process.
c) Start the application by selecting the Run the application button. You can
pause the application by choosing the
can stop the application by choosing the
Open file button in the main menu toolbar.
Pause the application button or you
Abort the application button.
2-24 D960R3 User’s Manual Probot

Installation and Getting Started
2.8 µCarrier – Basics Steps
The following sections discus the basis steps of the µCarrier software. We show
how to
Create a New Sample Carrier using the Sample Carrier Wizard – Section 2.8.1.
Create a New Tray using the Tray Setup Wizard – Section 2.8.2.
Modify an Existing Tray Setup using the Tray Editor – Section 2.8.3.
Create a New Application using the Wizard – Sect. 2.8.4.
Control the Table Position – Section 2.8.5.
Measure the Column (X) and Row (Y) Distance – Section2.8.6.
The various steps are explained in detail using the following typical application
example:
A table with six rectangular MALDI target plates with 24 x 24 spots is used
for the fractionation of a NanoLC run. The LC flow rate is 300 nL/min, the
distance between columns and rows is 1.45 mm and the spot diameter is 1
mm.
The fraction collection time is 20 sec.
A MALDI matrix solution is added at a flow rate of 1.2 µL/min (= 4 times the
LC flow rate) along with the fractionation of the mobile phase.
The start of the fractionation is synchronized with the injection of the UltiMate
Capillary HPLC system and the start signal is delayed by 5 minutes.
Between the runs the needle should remain in a wash vial to prevent
crystallization of the matrix solution. Dispensing 10
to fractionation will prevent any matrix dilution.
All available spots will be used.
The application discussed here corresponds to the application that was used to
shown in the ‘µCarrier – First Steps’ section. Please refer also to the user’s
manual of the
Carrier software for more detailed information.
L of matrix solution prior
User’s Manual Probot D960R3 2-25

Installation and Getting Started
2.8.1 Create a New Sample Carrier using the Sample Carrier Wizard
If the required sample carrier is not pre-defined, it has to be created. The Sample
Carrier Wizard
an existing one.
To define a new sample carrier using the wizard:
Open the Sample Carrier Editor by choosing the sample carrier editor icon.
a)
Then choose the
assists you in creating a new sample carrier as well as modifying
New button.
The Confirm message box will be presented. Choose Yes (FIGURE 2-21) if
b)
you are willing to lose any unsaved data. If you want to keep the existing
tray and tasks setup, quit with
Cancel and start the wizard from the File
menu (New/Sample Carrier).
FIGURE 2-21 Confirm Discarding the Tray and Tasks
c) The welcome screen of the Sample Carrier Wizard is presented
(FIGURE 2-22). Select the ‘Create a new sample carrier … ‘ option and
confirm with the
Next button.
FIGURE 2-22 Sample Carrier Wizard – Welcome Screen
d) In the first step (FIGURE 2-23) the spot geometry (e.g. diameter or size and
height) will be defined. Indicate the appropriate shape and dimensions of the
2-26 D960R3 User’s Manual Probot

Installation and Getting Started
spot (well, vial). Based on this information the spot volume is calculated. In
our example the shape is ‘circular’, the ‘Diameter’ is 1.000 mm and the
‘Height’ is 0.000 mm. Enter this data and confirm with the
Next button.
FIGURE 2-23 Sample Carrier Wizard - Single Spot Specifications
Note: The dimensions of the spot are used to calculate the volume of the spot
and are used for ‘overfill control’ within the application (if this option is enabled).
MALDI targets are usually planar surfaces (height = 0) making ‘overfill control’
virtually impossible to use with MALDI targets.
Note: The shape selected does not need to match exactly the shape of the
actual spot(s) of the MALDI target. Some manufacturers use triangular spot
shapes or round and rectangular shapes on the same MALDI target. Choose the
shape that fits best with your target. Circular shape is a safe choice to begin,
because the droplets created have also a circular shape.
e) In the next step the sample carrier geometry and the orientation of the spots
relative to each other are specified (FIGURE 2-24). Select the ‘rectangular
option’ and confirm with the
Next button.
User’s Manual Probot D960R3 2-27

Installation and Getting Started
FIGURE 2-24 Sample Carrier Wizard - Sample Carrier Geometry
f) Now enter the number of spots in X and Y direction (e.g. 24 by 24 in our
example) and the distance (e.g. 1.45 mm) between the rows and the
columns. The wizard automatically presents a preview of the target
(FIGURE 2-25).
FIGURE 2-25 Sample Carrier Wizard – Sample Carrier Dimensions
g) Choose Next to save the sample carrier. You are prompted to define a name
and a directory where you want µCarrier to save the sample carrier definition
(FIGURE 2-26).
2-28 D960R3 User’s Manual Probot

FIGURE 2-26 Sample Carrier Wizard - Completed
Installation and Getting Started
h) Either quit the wizard or continue to define or modify the next sample carrier.
Sample Carrier Editor (FIGURE 2-27) offers the same settings as the wizard,
The
but all at the same screen. It is an ideal tool for experienced users and if only
small changes of existing sample carriers are required.
FIGURE 2-27 Sample Carrier Editor
User’s Manual Probot D960R3 2-29

Installation and Getting Started
2.8.2 Create a New Tray using the Tray Setup Wizard
If the required tray is not predefined, it has to be created. The Tray Setup Wizard
assists you in creating a new tray setup as well as modifying an existing one.
Open the Tray Editor by clicking the TrayEditor icon, and then select the New
a)
button.
The Confirm message box will be presented. Choose Yes (FIGURE 2-28) if
b)
you are willing to lose any unsaved data. If you want to keep the existing
tray and tasks setup, quit with
Cancel and start the wizard form the File
menu (New/Tray).
FIGURE 2-28 Confirm Discarding the Tray and Tasks
c) The welcome screen of the Tray Setup Wizard is presented (FIGURE 2-29).
Select the ‘Make a new tray … ‘ option and confirm with the
Next button.
FIGURE 2-29 Tray Setup Wizard – Welcome Screen
d) In the first step, select the sample carrier(s) you want to use from the
available sample carriers (FIGURE 2-30). If you want to place only one carrier
choose the
Next button and continue with step f).
2-30 D960R3 User’s Manual Probot

Installation and Getting Started
FIGURE 2-30 Tray Setup Wizard – Selecting a Sample Carrier
e) If you want to place multiple carriers (of the same type) press the right
mouse button, and then select the
Add multiple carriers .. ‘ option
(FIGURE 2-31). Enter the appropriate coordinates of your tray setup, the
Preview box will be updated according to the current settings. Choose Next
to add another carrier or finish the wizard.
FIGURE 2-31 Tray Setup Wizard – 6 Sample Carriers added
User’s Manual Probot D960R3 2-31

Installation and Getting Started
f) If you want to add another sample carrier, or if you want to define a waste
or a wash position, select the
the steps above (FIGURE 2-32).
Add another sample carrier option and repeat
FIGURE 2-32 Tray Setup Wizard – 6 Sample Carriers added
g) To finish the wizard and to save your setup, select the Exit tray wizard …
option (FIGURE 2-32). Alternatively, you can start the Sample Carrier
Alignment Wizard
(Section 2.7.3) or the Fractionation Application Wizard
(Section 2.8.4).
2.8.3 Modify an Existing Tray Setup using the Tray Editor
The Tray Editor offers more options than the Tray Setup Wizard. It is an ideal
tool for experienced users or if only small changes of existing tray setups are
required. You can add and delete sample carriers and change their positions on
the tray table.
To modify an existing tray setup:
Load the tray setup that needs to be modified (FIGURE 2-33).
a)
2-32 D960R3 User’s Manual Probot

Installation and Getting Started
FIGURE 2-33 Tray Editor with the 6 Sample Carriers
b) Click the Add sample carrier icon and the list of sample carriers is presented
in the browser pane. Select a carrier and wait until the preview is generated.
Double-click on the selected carrier to add it to the tray.
c)
Note: Do not double-click on a sample carrier immediately. µCarrier requires that
you load the sample carrier preview first, before it can add it to the tray.
d) After choosing the Lock/unlock … button you can move the carriers with the
mouse. To move the carriers, move the mouse cursor to the reference point
(the red mark) and keep the left mouse button press as long as you are
moving the carrier. This positioning is not very accurate, use the
Carrier Alignment Wizard
Groups can be defined in the Group Mode, which can be accessed through
e)
the
Group/Edit button.
Lock the carrier positions and save the setup.
f)
for exact positioning (Section 2.7.3).
Sample
Note: The Application Wizard will automatically delete all groups upon start,
because grouping is part of the wizard. If you intend to use the Application
Wizards as next step, no groups need to be defined here.
Note: µCarrier displays only the file types that can be opened by the editor
currently used. As an example, you will not see any sample carriers (*.rck files)
in the browser pane if the Tray Editor is active (only files with the extension
‘*.try’ are displayed).
User’s Manual Probot D960R3 2-33

Installation and Getting Started
2.8.4 Create a New Application using the Wizard
Depending on the requirements and complexity of a specific application, various
parameters need to be defined to achieve the best performance. This can make it
difficult for even an experienced user to get started. However, the most common
application is a time controlled fractionation task, which requires only a few
parameters to run it successfully on the Probot.
µCarrier offers the
an application. This section explains how to use the
Wizard
on a step by step basis.
Fractionation Application Wizard to assist you in creating such
Fractionation Application
The application presented in this section is based on the ‘Advanced fractionation
task’. If a ‘Basic fractionation task’ is required, please use the application editor
to modify one of the predefined applications.
Note: The figures (screenshots) provided below may vary depending on the
choices made in the wizard. For this example, the most general choices were
selected.
a) Switch to the Application Editor by selecting the ApplicationEditor icon.
Select the New button to start the wizard.
b)
The Confirm message box is presented. Choose Yes (FIGURE 2-34) if you are
c)
willing to lose any unsaved data. If you want to keep the existing tray and
tasks setup, quit with
(
New/Application).
Cancel and start the wizard from the File menu
FIGURE 2-34 Confirm Discarding the Tray and Tasks
d) The Fractionation Application Wizard is presented (FIGURE 2-35). Select a
‘Load a tray from a file’ option and confirm with the
Next button.
2-34 D960R3 User’s Manual Probot

Installation and Getting Started
FIGURE 2-35 The Fractionation Application Wizard – Welcome Screen
e) Select the appropriate tray and choose Next (FIGURE 2-36).
FIGURE 2-36 The Fractionation Application Wizard – Selecting a Tray
f) The ‘fraction control mode’ will be specified in the next step (FIGURE 2-37).
The ‘fraction control mode’ specifies if the collection is controlled by time or
by a control signal or by the user.
User’s Manual Probot D960R3 2-35

Installation and Getting Started
FIGURE 2-37 The Fractionation Application Wizard – Fraction Control Mode
The following modes are available:
Time – The fractionation is controlled by time. The intervals are specified in
seconds and can be as low as 4 seconds. Time control is the most commonly
and safest control mode. This control mode allows also for fractionation by a
time table.
External –Input signals control the fractionation (e.g. peak start and peak end).
A CHROMELEON program can be designed to generate to generate such
signals on the Ultimate Micropump while the UV signal is used for peak
detection. This allows for collecting of peaks only.
Manual – This control mode requires input of the operator. The operator
determines by manual input (mouse) the when a peak starts or ends. This
requires that the operator monitors the entire chromatographic run and
provides the right signal with each peak.
Note: In time control mode the entire chromatogram is collected, e.g. all peaks
and ‘waste’. With external and manual control, the ‘waste’ can be discarded.
Make certain that the peak detection parameters are properly set to avoid the
possibility that peaks are treated as ‘waste’ in external control mode.
The next step is to specify the number of LC runs (injections) and to define in
which way the available sample carriers are used (e.g. one sample carrier per
injection or LC run). FIGURE 2-38 shows the three basic possibilities and which
option the appropriate is depending on the requirements:
One injection - The LC run (‘sample’) is collected in one group. This group can
use all spots of all sample carriers.
Multiple injections, optimal use of spots – Multiple LC runs are collected in one
large group. This group can use all spots of all sample carriers.
2-36 D960R3 User’s Manual Probot

Installation and Getting Started
Multiple injections, collect each run in a new group - Multiple LC runs are
collected in the same number of groups. Typically, one group refers to one
sample carrier. A group can also use multiple carriers or multiple groups can be
collected on one carrier, depending on the needs of the application.
These three options are called ‘collection presets’ and a schematically preview is
presented in the wizard (FIGURE 2-38).
FIGURE 2-38 Select the collection preset and the number of successive injections
g) Select the option that is required for your application. For this example select
the ‘Multiple injections, collect each run ...’ option and choose
Next to
confirm the entry.
In the next step the LC parameters are specified (FIGURE 2-39). This includes
h)
the start signal, the collection time (automatically calculated if you enter start
and end time), the LC flow rate and the delay (dead volume) between the
detector and the Probot needle. Enter the appropriate values and choose
Next.
Note: The proper setting of the delay or dead volume is especially important in
the external control mode. In the instant that a peak is detected by the detector,
the peak of interest is still in the flow cell and it takes a certain time to reach the
Probot needle (the ‘delay’ time, which defined by the tubing volume).
User’s Manual Probot D960R3 2-37

Installation and Getting Started
FIGURE 2-39 The Fractionation Application Wizard – LC Parameters
i) To add reagent (matrix) solution to the LC flow, select the Add a reagent
option in the ‘Reagent addition’ screen of the Fractionation Application
Wizard
. Choose if the reagent is to be added ‘Continuously’ or if the
‘Discrete volume to every fraction’ is selected. Set an appropriate ‘Dosage
speed’, and then choose
Next to confirm the entry.
Note: The continuous addition of reagent makes certain that the matrix
concentration is the same in all spots. Use the ‘Dispense 10 l of matrix … ‘
option, to avoid any matrix dilution during a needle rest.
CAUTION
Caution: Exceeding the maximum flow rate limits may cause the rotary valve to
leak or may even damage the rotary valve. Refer to Section 2.4.2 for the flow
rate limits if a µ-Tee for matrix addition is installed.
2-38 D960R3 User’s Manual Probot

Installation and Getting Started
FIGURE 2-40 The Fractionation Application Wizard – Reagent Addition Specifications
j) To specify the spots that should be used during the LC run, select a group
from the list and frame the spots while keeping the left mouse pressed. Only
if ‘Multiple runs, collect each run on a new group’ option was selected, more
than one group is available. Each group represents then one LC run. All
groups are typically of the same size and one sample carrier is used for one
LC run (FIGURE 2-41).
FIGURE 2-41 The Fractionation Application Wizard – Selecting the Spots of Multiple Groups
User’s Manual Probot D960R3 2-39

Installation and Getting Started
k) Select the pattern in which the spots are be used. Define the pattern for all
groups and confirm all settings with the
Next Button.
FIGURE 2-42 The Fractionation Application Wizard – Standby Position
l) As the last step of the group definitions, the ‘Standby position’, where the
needle stays before and after each collection, needs to be defined. Frame this
position in the same way as described in the step above. Choose
Next to
define a ‘special Z coordinate for horizontal movements’ (FIGURE 2-43).
FIGURE 2-43 The Fractionation Application Wizard – Z-Coordinate for Horizontal Movements
2-40 D960R3 User’s Manual Probot

Installation and Getting Started
On default the Probot table moves to its lowest position (0.0 mm) for all
horizontal movements. This means, when moving from one spot to the next the
table first moves down to its lowest position, and then it moves up upon arrival
at the new XY position. This movement may take several seconds.
The ‘spotting time’ is defined as the actual time required to spot and the time to
move the table:
tspotting = tmovement + ton spot
To reduce the time to move the table to a minimum, a ‘special Z coordinate for
horizontal movements’ can be programmed so that the table will move all the
way down. This table height (Z-axis) is used during movements. It is defined as
the height above the lowest table position (0.0 mm).
In addition to the Z movement, XY movements can be optimized by choosing an
appropriate spotting pattern (e.g. meander vs. saw tooth pattern).
To define the ‘special Z coordinate for horizontal movements’, the table is moved
to the desired travel height using the Manual Drive Panel (Section 2.8.5 A):
m)
Carefully adjust the Probot table height with the panel (FIGURE 2-43, and
then choose the
stored in the application.
Read current Z button. The current table height will now be
CAUTION
Caution: The Z-coordinate for in-task movements must ALWAYS be lower than
the Collect group height. If it is not lower, you may scratch your MALDI target.
Note: As basic rule for the collection of Nano flow rates, the Z-coordinate should
be 2 mm lower than the spotting height (Section 2.7.3)
n) Choose Next for the last step of the wizard.(FIGURE 2-44).
User’s Manual Probot D960R3 2-41

Installation and Getting Started
FIGURE 2-44 The Fractionation Application Wizard – Completed
The last screen of the wizard (FIGURE 2-44) offers three options.
Align the sample carriers – Select this option if no alignment was performed
with the sample carriers before. Proper alignment is essential!
Start (Run) the application – Select this option if the sample carriers were
already aligned, the application can run immediately.
Exit wizard – allows you to review the application in the Application Editor and
to make modifications, if required.
Select one of the options and choose Next to save the application and to
o)
finish the wizard.
Note: It is recommended to review the application before running it.
After exiting the wizard the Application Editor (FIGURE 2-45) is automatically
opened with the application defined above.
2-42 D960R3 User’s Manual Probot

Installation and Getting Started
FIGURE 2-45 The Application Editor
In the Application Editor you can modify the application by changing task
parameters, deleting tasks or adding tasks. From the
can be started by clicking the
displayed on the top right section of the screen. The needle position will be
shown on the bottom (FIGURE 2-46).
Run icon. During the run the audit trail will be
Application Editor the run
FIGURE 2-46 The Run Application Window
User’s Manual Probot D960R3 2-43

Installation and Getting Started
2.8.5 Control the Table Position Manually
The robot table can be controlled either by drive control panel of the µCarrier
software or by the manual control unit (optional, in conjunction with the
software only).
CAUTION
Caution: Make certain that the needle does not touch the table when the table is
moving to avoid damaging the needle.
2.8.5 A Using the Manual Drive Panel
Carrier
To control the position of the table by the drive panel:
Select the Manual robot drive… button. The drive control panel will appear
a)
as presented in FIGURE 2-47.
FIGURE 2-47 The Drive Panel
b) Move the table as follows:
Choose the left and right arrows to move the table to the left or right side
(X-direction).
Choose the large up and down arrows to move the table to the back or to
the front (Y-direction).
Choose the small up and down arrows located in the center to move the
table up and down (Z-direction).
To change the length of each step, use the + and – symbols.
c)
The table is moved into the home position by selecting the homing button.
d)
2.8.5 B Using the Manual Control Unit
To control the table with the manual control unit (FIGURE 1-3 on page 1-4):
Select Manual Device Control from the Tools menu or select the Manual
a)
Device Control
Module’
window (FIGURE 2-48).
button to present the ‘XYZ Robot Module’ and ‘Dosage
2-44 D960R3 User’s Manual Probot

Installation and Getting Started
FIGURE 2-48 The XYZ Robot Module Section
b) Choose the External button to control the position of the table manually with
the manual control unit (FIGURE 1-3 on page 1-4).
c)
To control the position of the table:
Choose the X+ and X- buttons to move the table to the left or right side
(X-direction).
Choose the Y+ and Y- buttons to move the table to the back or to the
front (Y-direction).
Choose the Z+ and Z- buttons to move the table up and down
(Z-direction).
Select the Internal button in the Robot window. The current X,Y,Z
d)
coordinates are displayed (in ‘mm’).
To change from step mode to continuous movement, press the appropriate
e)
button of the manual control unit.
f)
To change the length of each step, adjust the stepwidth parameter.
2.8.6 Measure the Column (X) and Row (Y) Distance
The dimensions of the target, e.g. the exact distance between each column (X1-
X
2) and the distance between each row (Y1-Y2) are essential for the proper
positioning of the needle (table) and control of the Probot Micro Fraction
Collector.
Even the smallest deviation may result in a significant offset error because it
accumulates. There are several ways to obtain the appropriate data, either you
can get this data directly from the manufacturer of the sample carriers or
measure the distances with help of the manual control options (Section 2.8.2).
User’s Manual Probot D960R3 2-45

Installation and Getting Started
The following section describes the procedure how to measure the dimensions of
your sample carrier by using the manual control of the Probot.
a)
Using one of the remote control options, move the table so that the needle is
positioned exactly above to the center of the first
Choose the Internal button and read the current coordinates.
b)
Choose the External button, and then move the table along the X axis so that
c)
the needle is positioned exactly above to the center of the last
Read the coordinates again and divide the distance between the first and last
d)
vessel by the number of vessels in that row/column minus 1. Enter this value
in the
SampleCarrierEditor.
Repeat step a) to d) with the Y axis.
e)
Repeat the steps above for any target placed on the table.
f)
vessel.
vessel.
2-46 D960R3 User’s Manual Probot

Installation and Getting Started
2.8.7 Default Calibration and Acceleration Settings
The setup of the calibration and acceleration parameters is important for a proper
operation of the Probot Micro Fraction Collector (FIGURE 2-49). In the case of a
malfunction of the table drive or the syringe drive (e.g. noise, slow movement,
position errors) check if all the settings are correct.
To check if the calibration and acceleration parameters are properly, select the
Settings option from the Tools menu. Then select the Robot or Dosage Module
tab (FIGURE 2-49).
FIGURE 2-49 The Robot and Dosage Module Setup - default Settings
User’s Manual Probot D960R3 2-47

Installation and Getting Started
[This page intentionally left blank]
2-48 D960R3 User’s Manual Probot

CHAPTER 3
3.1 Overview
Maintenance and
Troubleshooting
This chapter provides information to assist in optimizing the performance of the
Probot
the following material:
Maintenance – describes a series of activities that should be performed on a
Replacing Components – provides directions for replacing components due to
Troubleshooting – discusses a series of activities that should be used to
Spare Parts Lists – Presents a listing of components that are used to maintain
™ Micro Fraction Collector and maintaining it in your laboratory. It includes
periodic basis to optimize the performance of the system and minimize down
time (Section 3.2).
wear or to re-configure the system (e.g. changing the syringe) to meet the
requirements of a different analytical procedure (Section 3.3).
determine the cause of a problem (Section 3.4).
the unit or to change the configuration, e.g. targets and table adapters
(Section 3.5).
User’s Manual Probot
D960R3 3-1

Maintenance and Troubleshooting
3.2 Maintenance
Maintenance refers to a variety of activities that should be performed on a
routine basis to optimize performance of the system. Many routine maintenance
activities can be readily performed by the user.
In some cases (e.g. replacement of critical components), we recommend that a
factory trained service engineer should be called to perform the operation. This
will ensure optimal long term performance and maximum uptime. LC Packings
provides a broad range of service support activities to ensure that the Probot
Micro Fraction Collector is functioning in a suitable manner. These activities can
be customized to meet the specific needs of the customer. For further
information, please contact your local LC Packings office or representative.
TABLE 3-1 Recommended Maintenance Schedule
Frequency Operation
Every Day
Every 3 months
Every 6 months
Every year
Before operating, check for any air bubbles in
the fluidic lines and degas the wash solvent.
Check that there are no leaks of the fluidics
connections.
Check that salts are not deposited by the
fluidics joints or the needle.
When using buffer solutions, flush the system
thoroughly after use with a solvent that does
not contain buffers/salts.
Inspect the condition of all tubing (cracks, nicks,
cuts, clogging).
Check:
Rotary valve
Syringe
Replacing the Syringe/Syringe tip
Inspection, cleaning and lubrication of all
spindles (
contact LC Packings).
Note: The frequency of the various activities described above is a good starting
point. As the user gains experience with the system, it will be found that some
activities can be done less frequently and other need to be done more frequently.
The frequency is dependent on a number of factors including the nature of the
sample and the mobile phase.
3-2 D960R3 User’s Manual Probot

Maintenance and Troubleshooting
3.3 Replacing Major Components
A variety of components on the Probot Micro Fraction Collector can be readily
changed by the user as required to ensure that the instrument is maintained in
optimal condition. In some circumstances the analyst may want to alter the
configuration of the system (e.g. installing the pipetting option, Section 3.3.1).
In most cases, re-assembly of a component is identical to its disassembly, except
that the steps are performed in the reverse order. If no comment is made, it
should be assumed that the assembly of a component or installation of a
component is identical to disassembly or removal, except that the actions are in
the reverse order.
WARNING
Warning: Hazardous voltages are present inside the instrument. Disconnect the
instrument from the electrical supplies before removing any panel or cover.
3.3.1 Installing the Pipetting Option
The pipetting option (P/N 161072) allows for pipetting from a source plate (e.g.
a well plate) to a destination plate (e.g. MALDI target). It consists of a Teflon
tube (45 cm, I.D. 250
m, I.D. 100 m).
280
Flat Ferrule
FIGURE 3-1 The Pipetting Option
m) with fittings and a fused silica capillary (15 cm, O.D.
Teflon Tubing
Fused Silica Capillary
max.
4 mm
a) Cut the fused silica capillary to the appropriate length.
Carefully insert the fused silica capillary all the way through the needle and
b)
tighten the fingertight nut.
c)
Connect the fingertight fitting with the flat ferrule to port 1 (PUMP) of the
rotary valve.
Note: For pipetting volumes less than 500 nL, the fused silica should be as short
as possible. In such a case, cut it to the minimum length required and insert the
fused silica capillary. The part of the capillary in the Teflon tube should be less
than 4 mm long.
User’s Manual Probot D960R3 3-3

Maintenance and Troubleshooting
3.3.2 Installing the Video Camera
A camera kit (P/N 160590) which allows for easy monitoring of the needle and
target(s) is available as an option.
To install the video camera:
Locate the nut close to in the support bar to the µ-Tee (item 1; FIGURE 3-2).
a)
3
1
Support Bar
with Nut
5
FIGURE 3-2 Installing the Video Camera
2
4
b) Use the long knurled screw to attach the camera to the support bar (item 2;
FIGURE 3-2).
Plug the connector into the socket on the back of the support bar (item 3;
c)
FIGURE 3-2).
d)
Connect the VIDEO output on the Probot back panel to the monitor using the
connecting cable provided with the camera.
Set the monitor to video mode.
e)
Adjust the camera position and tighten the knurled screws.
f)
CAUTION
Caution: Make certain that the table and/or the target does not touch the camera
to avoid any damage to the camera.
3.3.3 Replacing the Syringe
The Probot Micro Fraction Collector is supplied with a 100 µL syringe
(P/N 161080).
To replace the syringe:
Disconnect the tubing that goes to the rotary valve (e.g. unscrew the Luer-
a)
Lock adapter from the syringe, item 1, 2; FIGURE 3-3).
3-4 D960R3 User’s Manual Probot

Maintenance and Troubleshooting
4
3
2
1
5
FIGURE 3-3 Replacing the Syringe
b) Loosen the screw of the clamp that holds the syringe and turn the clamp by
90 degrees (item 3; FIGURE 3-3).
Carefully lift the syringe and pull the plunger tip out of the spring clip.
c)
When replacing the syringe, fill it with solvent and make sure that all air
d)
bubbles are removed from the syringe before placing it into the system.
Re-connect the tubing and check for any leakage.
e)
Note: Make sure that the plunger tip is placed correctly in the spring clip of the
dosage module.
3.3.4 Replacing the Dosage Unit
The Probot Micro Fraction Collector is shipped with a dosage module (option)
installed. It is located in a small tray in the right side of the instrument.
To remove the dosage module:
Remove the top cover (Section 2.3.1) and disconnect the rotary valve.
a)
Move the table to the middle of the instrument by rotating the spindle
b)
manually (item 1; FIGURE 3-4). Remove the two screws (items 2, 3;
FIGURE 3-4) and then move the table drive into the most left position.
2
4
3
1
FIGURE 3-4 Removing the Cover
User’s Manual Probot D960R3 3-5

Maintenance and Troubleshooting
c) Remove the cover plate (items 4; FIGURE 3-4).
Disconnect the connector of the dosage unit (FIGURE 3-5).
d)
1
FIGURE 3-5 Disconnecting the Dosage Module
e) Remove the two screws that hold the module (FIGURE 3-6).
FIGURE 3-6 Removing the Screws of the Dosage Unit
f) Remove the dosage unit from the Probot.
Note: When replacing the dosage module, make certain that the two screws are
inserted all the way through the bottom of the Probot. If you attach the dosage
module directly to the tray, a malfunction of the dosage module may result.
3.3.5 Replacing the Fractionation Needle of the µ-Tee
The fractionation needle is a fused silica tubing with an O.D. of 280 µm and an
I.D. of 30 µm or 100 µm depending on the LC application. Refer to TABLE 3-4 to
select the appropriate needle for your application.
TABLE 3-2 I.D. of the Fractionation Needle vs. Maximum Flow Rate
Part Number Fractionation Needle Maximum Flow Rate (Matrix + LC flow)
162144 30 µm I.D. 30 µL/min
162145 100 µm I.D. 300 µL/min
CAUTION
Caution: Exceeding the maximum flow rate limits may cause the rotary valve to
leak or may even damage the rotary valve.
3-6 D960R3 User’s Manual Probot

Maintenance and Troubleshooting
To replace the fused silica needle fractionation needle:
Remove the fluidic connections on the upper and right µ-Tee, remove the
a)
ground cable.
Unscrew the mounting screw (item 5, FIGURE 3-2) and remove the µ-Tee
b)
from the mounting plate.
c)
Remove the lower nut from the µ-Tee and take the fused silica needle out of
the stainless steel needle.
Put the replacement fused silica needle with the short (10 mm) PEEK sleeve
d)
around it through the stainless steel needle starting at the ferrule side. Let
the PEEK sleeve and fused silica needle protrude for approximately 2 mm
(FIGURE 3-7).
2 mm
4
µ-Tee
FIGURE 3-7 Fused Silica Fractionation Needle with Stainless Steel Supporting Needle
4
1
2
3
Fused Silica
Needle
Stainless Steel
Needle
Ferrule with Nut
PEEK Sleeve,
330 µm I.D.
3
2
1
30 µm: P/N162144
100 µm: P/N162145
P/N 162147
P/N 162146
e) Connect the nut to the µ-Tee to tighten the fused silica needle.
Connect the fused silica column / UV flow cell outlet and the connecting
f)
tubing from the rotary valve to the µ-Tee.
g)
Mount the µ-Tee on the Probot mounting plate with the mounting screw and
connect the ground cable.
TABLE 3-3 Replacement Parts for the µ-Tee Assembly
Part Number Description
162144 30 µm I.D. fused silica needles for Probot™ µ-Tee for
matrix addition (3 pcs.)
162145 100 µm I.D. fused silica needles for Probot™ µ-Tee for
matrix addition (2 pcs.)
162146 PEEK sleeves for Probot™ µ-Tee for matrix addition,
330 µm I.D., 4x 30 mm and 3x 10 mm
162147 Needle and ferrule for Probot™ µ-Tee for matrix addition
162148 Connecting tubing Probot™ rotary valve to µ-Tee
User’s Manual Probot D960R3 3-7

Maintenance and Troubleshooting
3.3.6 Replacing the Standard Needle
To replace the hollow stainless steel needle (P/N 161375):
Remove the fused silica capillary from the needle tee and hollow needle.
a)
Remove the needle cover to get access to the needle tee.
b)
c)
Loosen the screw the ground cable (item 1; FIGURE 3-8) and remove the
ground cable.
3
1
2
FIGURE 3-8 The Pen Light and the Needle Tee
d) Unscrew the lower fingertight nut and remove the needle from the needle tee
(item 2; FIGURE 3-8).
When re-installing the needle, push the needle all the way into the needle tee
e)
while tighten the fingertight nut. Make certain that the needle tip extends the
stainless steel needle by approximately 1 mm.
Re-install the ground cable, the needle cover and the fused silica capillary.
f)
3.3.7 Replacing the Light Bulb of the Pen Light
To replace the light bulb (P/N 161402) of the pen light:
Pull the lamp holder out of the pen light housing (item 3; FIGURE 3-8).
a)
Replace the light bulb and re-install the holder.
b)
3-8 D960R3 User’s Manual Probot

Maintenance and Troubleshooting
3.3.8 Replacing the Main Fuse
DANGER
Danger: Disconnect the instrument from the electrical supply before
inspecting/changing the fuse. Replace the blown fuse by a fuse of identical type
and rating.
To change the Fuse:
Pull out the fuse holder.
a)
FIGURE 3-9 The Fuse Compartment
b) Replace the blown fuse by a fuse of identical type and rating (1.6 A, Slo Blo
fuse).
Re-install the fuse holder.
c)
User’s Manual Probot D960R3 3-9

Maintenance and Troubleshooting
3.4 Troubleshooting
Troubleshooting refers to the determination of the cause of a problem. Since the
Probot Micro Fraction Collector is typically incorporated into an HPLC system,
the first step is to determine if the problem is due to the collector. The Probot
should be removed from the system and an injection should be performed.
Compare the results from the two runs; if the observed results without the
Probot present acceptable data, the problem is most likely due to the Probot
Micro Fraction Collector.
Analytical problems also might be caused by external influences, like temperature
and/or light sensitive samples. For this reason it is important to be sure the
application was running without problems before and nothing has been changed.
TABLE 3-4 Troubleshooting the Probot Micro Fraction Collector
Problem Probable Cause Solution
The table drops during a run
or homes itself
unexpectedly.
The distance between
needle and table increases
during a run.
Strange noise from the
stepper motors, table not
moving.
Different volume of droplets
or no droplets on the target
(e.g. the following pattern is
obtained):
Wrong OK
Wrong control parameter.
The Z-stepper motor is
missing steps.
TTL signals are generated
very shortly after each
other.
Wrong control parameter.
The Z-stepper motor is
missing steps.
Wrong table alignment.
The motor is losing steps.
Air in the connecting tubing
or in the syringe.
Probot needle with the
fused silica capillary is too
far above the target.
Fused silica capillary not
properly installed.
Fused silica capillary/needle
is damaged.
Wrong table alignment.
Check the maximum speed
and acceleration settings
(Section 2.8.7).
Check the timing (Sections
B.6 and D.6).
Check the maximum speed
and acceleration settings
(Section 2.8.7).
Check table alignment
(APPENDIX C).
Check the maximum speed
and acceleration settings
(Section 2.8.7).
Check the entire flow path
for air bubbles (e.g. syringe,
tubing, etc.).
Adjust the table height
(e.g. the fused silica
capillary should touch the
target during sample
deposition when nano flows
are applied).
Visible part of the fused
silica capillary should extend
the needle by 0.5 – 1 mm.
Replace capillary/needle.
Check table alignment
(APPENDIX C).
The first droplets are
different (e.g. too small).
Crystallization of the matrix
solution on the needle tip.
Perform a wash and/or a
dispense step prior
fractionation.
3-10 D960R3 User’s Manual Probot

3.5 Spare Parts Lists
3.5.1 Major Items
P/N Description
160560
161467
161374 µ-carrier software for PROBOT™
3.5.2 Accessories
P/N Description Figure
161403 Probot Micro Fraction Collector User's
160567 CCIR Monochrom monitor 12"
160590 Built in camera system, including the
Probot™ incl. software, microdosage unit and manual control,
without table
Probot™ incl. software and manual control, without microdosage
unit, without table
Manual
Belkin VideoBusII Image Capture Device.
Maintenance and Troubleshooting
N/A
163973 BNC to Video Adapter
160563 Manual control unit for table positioning N/A
160561 Microdosage unit for automatic addition
of reagents
161718
161072
-Tee for Matrix Addition (pre-needle)
Propet fused silica/Teflon tubing 100
µm
N/A
N/A
/ 0.25 mm I.D. (Pipetting Option)
161080 100 µL syringe for Probot
162179 250 µL syringe for Probot
162189 Luer Lock Adapter for Probot
161473 Fused silica tubing I.D. 30 µm, O.D.
280 µm, 5 meters
160479 Fused silica tubing I.D. 100µm,
O.D. 280µm, 5 meters
N/A
N/A
161092 TTL-Cable for Probot
161712 Serial communication cable for Probot N/A
User’s Manual Probot D960R3 3-11

Maintenance and Troubleshooting
3.5.3 Spare Parts
P/N Description Figure
161402 Light bulb for pen-light for Probot
Standard Needle Tee
162158 Probot™ needle TEE for coaxial addition
of matrix solution, incl. 3 fingertight
fittings and screws
161375 Standard needle for Probot™
(set of 3)
162158 PEEK Tee for Probot™
160492 PEEK sleeves, precision cut and polished
for connections with fused silica tubing
(280 µm O.D.), 5 each
-Tee
163883
-Tee assembly
162147
Needle and ferrule for Probot
-Tee
needle assembly
162144 30 µm I.D. fused silica needles for
Probot
-Tee needle assembly (2 each)
162145 100 µm I.D. fused silica needles for
-Tee needle assembly (2 each)
-Tee needle
m I.D., 4x 30 mm, 3x
162146
Probot
PEEK sleeves for Probot
assembly, 330
10 mm
162148 Connecting tubing Probot rotary valve to
-Tee needle assembly
Microtight Connection
161497 Microtight Union, includes 2 fittings and
1 gauge plug
161405 PEEK sleeves, precision cut and polished
for connections with Microtight Union
(380 µm O.D.), 10 pieces
161498 PEEK sleeves, precision cut and polished
for connections with Microtight Union
(280 µm O.D.), 10 pieces
orange: for 280 µm I.D.
green: for 360 µm I.D.
3-12 D960R3 User’s Manual Probot

Maintenance and Troubleshooting
Rotary Valve
161382 Rotary Valve for Probot
161732 Probot tubing kit 0.5 mm I.D. Tefzel
tubing, 2 x 40 cm, 1x 15 cm, 1x 65 cm,
incl. fittings
163678 1/4-28 Tube end Fitting, Knurled Head,
1/16 PEEK
Housing
161093 Door left, acrylic (without hinges) for
Probot
161094 Door right, acrylic (without hinges) for
Probot
162104 Light holder and stand for Probot pen
light
N/A
N/A
162105 Camera holder and stand for Probot
camera
3.5.4 Adapter Tables
P/N Description
163211 Table for MassTech MALDI Target
162340
(a, b)
161717 Table for Ciphergen SELDI targets
Universal Table for AB4700 Proteomics
Analyzer for 6 targets
AB Q-Star/ AB Voyager target:
Back view Top view
Figure
161436 Table for Bruker AutoFlex/UltraFlex for
Anchor Chip target plate without frame
for 2 targets
User’s Manual Probot D960R3 3-13

Maintenance and Troubleshooting
161401 Table for compact disk for 1 CD
161392 Table Micromass for 6 rectangular
targets
160580 Table for Nanospray Needle Holder
160579 Table for two well plates/micro titer
Plates
160577 Table PVDF / PVDF, dual collect
160576 Universal table with adjustment stripes
N/A
160575 Table Finnigan target, circular, dual
collect
160574 Table Finnigan target, linear, dual collect
160573 Table Shimadzu target, dual collect
160572 Table Shimadzu/KRATOS Axima QIT for
2 targets
160570 Table Bruker target, dual collect, circular
Notes: (a) Replaces P/N 160568, P/N 161390
Product names or company names mentioned herein may be the trademarks of their respective
owners.
(b) Also compatible with the AB Opti-TOF MALDI plate system with reusable holder
and the AB Q-Star or AB Voyager target.
3-14 D960R3 User’s Manual Probot

CHAPTER 4
4.1 Physical
Specifications
X axis 195 mm
Table Movement
Table Speed
Table
Positioning
Precision
Reference
Position
Lifting Force
(Y axis)
Dimensions
(WxDxH)
Weight 23 kg
Y axis: 135 mm
Z axis: 95 mm
X axis: 0.250 to 20 mm/sec
Y axis: 0.250 to 10 mm/sec
Z axis: 0.125 to 10 mm/sec
Better than 20
All axes are controlled by reference switches.
Reproducibility better than
> 20 kp
480 mm (18.9 in) x 500 mm (19.6 in) x 300 mm (11.8 in).
m
1 motor step (2.5 m)
4.2 Electrical
Power
Requirements
Fuse 1.6 x Slo-Blo (5 x 20 mm)
Stepper Motors
X/Y/Z Axes
Stepper Motor
Syringe Drive
User’s Manual Probot D960R3 4-1
90 - 260 V, 47 - 62 Hz, 100 VA
400 steps/revolution for the X / Y / Z axis
microstep technology (2000 steps/revolution).

Specifications
4.3 Electrical Connections
4.4 Rotary Valve
Remote Remote, X, Y, Z
RS-232
Start Remote Start input
TTL Inputs TTL1 (Peak Start), TTL2 (Peak End), TTL 3 (Peak Top), TTL4
Outputs 4 Relay outputs
HV off HV switch off (safety feature for CZE)
9600 Baud, 8 bit, 1 stop bit, no parity
Maximum Flow
Rate a)
Maximum
Pressure
µ-Tee installed:
30 µL/min (30 µm
300 µL/min (100 µm I.D. Fractionation Needle)
Standard Needle Tee installed:
300 µL/min
20 bar (290 psi)
Note: a) Total flow rate of matrix solution and LC system.
I.D. Fractionation Needle)
4.5 Safety Devices
All functions are stopped when:
General
CZE In CZE mode the CZE voltage is interrupted when:
a front door is opened
an axis runs over its end switch
the table exerts too much force on the needle
a front door is opened
Probot is unplugged or switched off
4-2 D960R3 User’s Manual Probot

µ
APPENDIX A
Dosage Module Purge Routine
A.1 Overview
The dosage module (optional) is provided to add a reagent solvent (e.g. a matrix
solution) to the mobile phase flow. The figures presented below are provided to
describe the step-by-step procedure of how to remove air from the syringe and
how to purge the dosage module. For a detailed description of the software
control of the dosage module, refer to the
Carrier software user’s manual.
Note: All fluidics pathways of the dosage module (e.g. the rotary valve, the
syringe and all tubing) must be free of any air bubbles and must be properly
purged.
A.1.1 The Step-By-Step Purge Routine
(FIGURE 2-5, Page 2-10) presents the dosage module with the syringe installed
in the syringe drive. FIGURE A-1 presents a schematic of this normal
configuration.
Dosage Module
-Tee
OR
Needle
Tee
FIGURE A-1 Normal Configuration of the Dosage Module
Rotary Valve
PUMP
AUX
FILL
PURGE
Pump
Waste
Fill
Fill
Syringe Pump
Reagent
Vials
Aux (a)
a) Wash Solvent
User’s Manual Probot D960R3 A-1

Appendix A
µ
µ
To purge the dosage module:
Switch the rotary valve into the PUMP position, remove the syringe (FIGURE
a)
A-2) and push the piston all the way forward to remove any air or solvent
left. Refer to Section 3.3.3 for more information about how to replace the
syringe.
Dosage Module
-Tee
Rotary Valve
Fill
Syringe Drive
Reagent
Aux
Vials
OR
Needle
Tee
PUMP
FILL
PURGE
Waste
FIGURE A-2 Step 1 – Purge the Tubing
Switch the rotary valve into the FILL position and withdraw the reagent
b)
solvent from the vial. Fill the syringe completely and make sure that enough
reagent solvent is in the vial (FIGURE A-3).
Dosage Module
-Tee
Rotary Valve
Fill
Syringe Drive
Reagent
Aux
Vials
OR
Needle
Tee
PUMP
FILL
PURGE
Waste
FIGURE A-3 Step 2 – Fill the Syringe
Switch the rotary valve into the PUMP position and purge the tube to the
c)
needle (FIGURE A-4).
A-2 D960R3 User’s Manual Probot

Appendix A
µ
µ
-Tee
Dosage Module
Rotary Valve
Fill
Syringe Drive
Reagent
Aux
Vials
OR
Needle
Tee
PUMP
FILL
PURGE
Waste
FIGURE A-4 Step 3 – Purge the Tubing
Switch the rotary valve back into the FILL position, withdraw the reagent
d)
solvent and fill the syringe completely.
e)
Remove the plunger from the syringe. Lower the syringe and allow the
contents to drain via gravity, then replace the plunger (FIGURE A-5).
Dosage Module
-Tee
Rotary Valve
Needle
Tee
FIGURE A-5 Step 4 – Drain the Syringe
PUMP
FILL
PURGE
Waste
Plunger
(removed)
Fill
Syringe Drive
Reagent
Aux
Vials
Reinstall the syringe.
f)
User’s Manual Probot D960R3 A-3
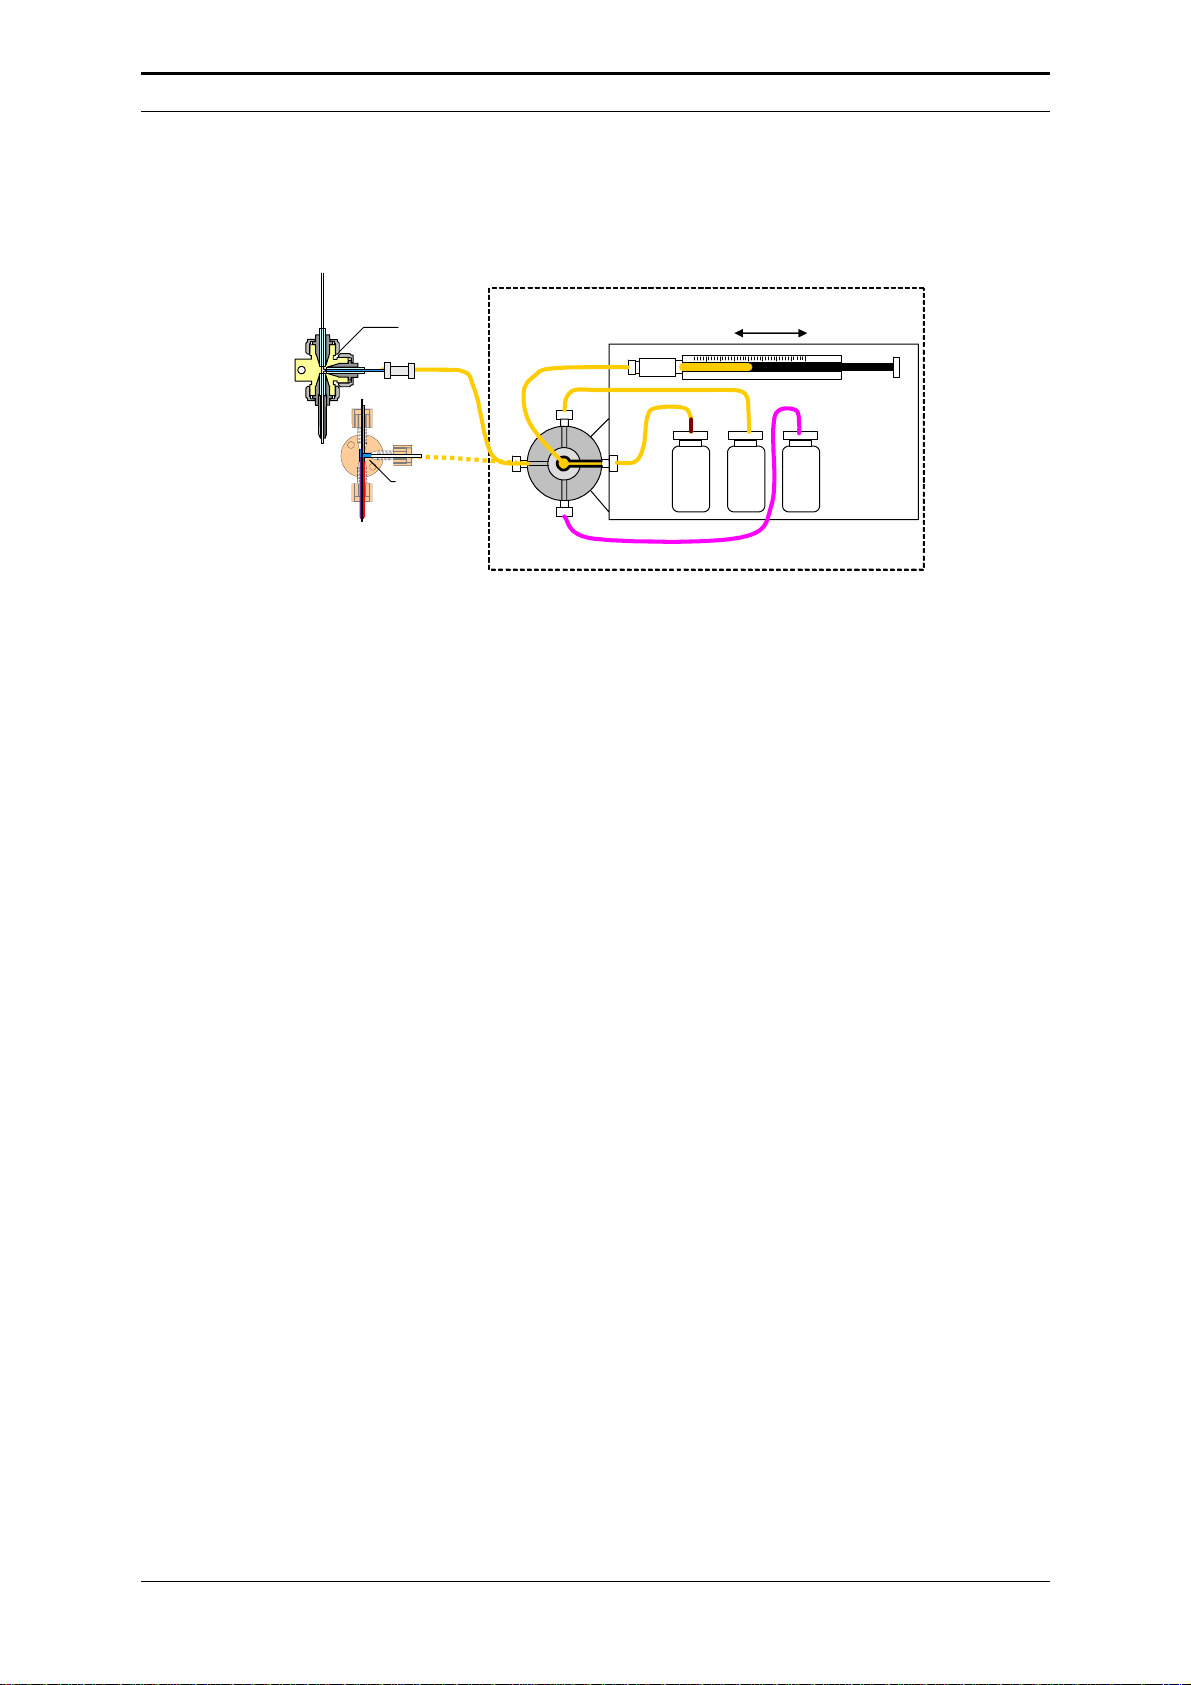
Appendix A
µ
g) Switch the valve into the PURGE position and purge again (FIGURE A-6).
Refill the syringe in the FILL position.
Dosage Module
-Tee
Rotary Valve
Pump
Fill
Fill
Syringe Pump
Reagent
Vials
Spare
OR
Needle
Tee
PUMP
FILL
PURGE
Waste
FIGURE A-6 Step 5 – Reinstall the Syringe
A-4 D960R3 User’s Manual Probot

APPENDIX B
Peak Collection in Conjunction
with CHROMELEON® Software
B.1 Overview
This appendix describes how to setup the Probot Micro Fraction Collector for
peak collection in conjunction with the CHROMELEON
The peak detection capabilities of CHROMELEON can be used to control event
outputs (e.g. event outputs of the UltiMate
generated at the beginning of a peak and at the end of the peak. The conditions
that CHROMELEON uses to detect peaks can be programmed and adjusted to the
needs of the application.
The peak collection function of the Probot Micro Fraction Collector and the
Carrier software involves the TTL inputs (Section 2.4.1 D).
The information provided in this appendix refers to CHROMELEON version 6.5
SP3 and to
Carrier version 2.0.
Micropump) so that a signal is
software.
User’s Manual Probot D960R3 B-1

Appendix B
B.2 Contact Closure Signals for Peak Detection with
CHROMELEON
The following example uses three relay outputs of the UltiMate Micropump. The
relay 1 (event output 7) will generate the ‘Peak Start’ signal while relay 2 (event
output 8) will generate the ‘Peak End’ signal. The OC1 output (event output 3) is
used to generate the ‘START’ signal for the remote start of the
software. The pulse length of all signals is 1 second.
The peak start will be generated if the slope of the UV signal exceeds a certain
limit (e.g. 0.1 mAU/sec), the peak end signal will be generated if the UV signal is
lower than a certain limit (e.g. 1.0 mAU) and
if the slope of the UV signal drops
beyond a certain limit (e.g. - 0.03 mAU/sec).
The following listing shows the programming of these limits, a complete listing of
this example is presented in Section B.5.
…
Trigger peakstart UV_VIS_1.Delta > 0.1, true=2.00
Pump_Relay_1.State = On
Pump_Relay_1.Duration = 1.00
EndTrigger
Trigger peakend UV_VIS_1 < 1.0 and UV_VIS_1.Delta > -0.03, true=2.00
Pump_Relay_2.State = On
Pump_Relay_2.Duration = 1.00
EndTrigger
…
Carrier
The parameters “UV_VIS_1.Delta” and “UV_VIS_1” can be used independently,
you can define either or both and they need to be modified according the
requirements of your application. FIGURE B-1 shows a chromatogram obtained
with the method presented in Section B.5. The triggers are shown as vertical
lines (using the appropriate CHROMELEON options in the ‘decoration’ menu).
PEPMIX TFA C ON TU B 30 EN 50 UM for Probot #10 pepmix 1 ng /ul UV_VIS_1
3.50
mAU
peakend
peakstart
3.00
2.50
2.00
1.50
1.00
0.50
-0.00
-0.50
-1.00
0.0 2. 0 4.0 6.0 8.0 10.0 12.0 14.0 16.0 18.0 20.0 22.0 25.0
peakstart
1 - 10.183
peakend
2 - 10.892
4 - 11.975
peakend
peakend
peakend
peakend
peakstart
peakstart
3 - 11.883
peakstart
5 - 13.250
peakstart
6 - 14.067
peakend
peakstart
8 - 17.167
7 - 16.750
peakend
peakend
peakstart
FIGURE B-1 Chromatogram with Triggers indicated
WVL:214 nm
min
B-2 D960R3 User’s Manual Probot

Appendix B
B.3 Setting up µ-Carrier for Peak Collection
The following sections describe how to setup the Carrier (V2.0) software for
peak collection. The Probot Micro Fraction Collector is controlled via external
contact signals (START, TTL inputs). The detected peaks are collected in
collection vessels and the mobile phase in between peaks can either be collected
into one waste vessel or into a group of waste vessels.
To setup
Prepare a collection group with the amount of vessels required to collect all
a)
Carrier for peak collection using a waste group:
peaks and a waste group with the appropriate amount and size of vessels
(FIGURE B-2).
Waste
Group
Collect
Group
Park
Position
FIGURE B-2 Defining the Collection, Waste and Park Groups
Note: The number of vessels required to collect the peaks and the waste may
differ and depends on the chromatography conditions (e.g. the peak resolution)
and the trigger settings.
b) If required, define a park position and a wash position. FIGURE B-3 shows all
groups used for the peak collection task in this example.
FIGURE B-3 Collection, Waste and Park Groups
User’s Manual Probot D960R3 B-3

Appendix B
To setup the fractionation task:
Set the collection control mode to External on the General tab (FIGURE B-4).
a)
FIGURE B-4 General Settings of the Fractionation Task
b) Enter the flow rate of the LC system and the calculated volume between the
detector flow cell and Probot needle outlet. The delay time will be calculated
automatically according to the flow rate of the LC system and the calculated
volume (FIGURE B-4).
c)
Define the primary collect group used for sample collection, select the Collect
peaks only
phase in between the peaks on the
option and define the waste group used to collect the mobile
Destination tab (FIGURE B-5).
FIGURE B-5 Destination Definitions of the Fractionation Task
B-4 D960R3 User’s Manual Probot

Appendix B
d) If you want Carrier to prevent overfilling of the vessels, activate overfill
control
. The Probot will then automatically move to the next fraction when
the vessel is full (calculated by vessel volume and flow rate).
e)
For the remote start of Carrier, select the Wait for contact start … from the
Relay Table tab (FIGURE B-6). The Carrier software will use the start delay
from the
General tab (FIGURE B-4).
FIGURE B-6 The Relay Table Tab
f) Start the program.
In the fraction action window you can see which fraction (or waste) has been
put in what vessel (FIGURE B-7).
FIGURE B-7 Fraction Action Window
To setup Carrier for peak collection using one waste vessel:
User’s Manual Probot D960R3 B-5

Appendix B
Follow the steps a) – g) as discussed above except that you define one waste
position rather than a group. The ‘Type’ must be ‘Reagent’.
FIGURE B-8 The Group Editor
B.4 Electrical Connections
To control the TTL inputs of the Probot (Section 2.4.1 D) by the relay outputs of
the UltiMate Micropump:
a)
Connect the event output 3 (Open Collector 1) to the Probot START input as
presented in TABLE B-1.
b)
Connect the event output 7 (relay 1) to the Probot TTL 1 (‘Peak start’) input
as presented in TABLE B-1.
c)
Connect the event output 8 (relay 2) to the Probot TTL 2 (‘Peak end’) input
as presented in TABLE B-1.
TABLE B-1 Connecting the Probot and the Micropump
Probot Color Code UltiMate Micropump EVENTS
Start Signal
Start
Ground
Lilac
Black
Event 3, pin 3
Ground, pin 4
TTL Inputs (TT1=Peak Start, TTL2=Peak End)
TTL1, pin 1
TTL2, pin 3
Ground, pins 9,11,13,15
Red
Orange
Blue
Event 7, pin 7
Event 8, pin 9
Event 7 and 8, pins 8, 10
B.5 Listing of the CHROMELEON Program used for this Example
Pressure.LowerLimit = 0.0
Pressure.UpperLimit = 400.0
%A.Equate = "%A"
%B.Equate = "%B"
%C.Equate = "%C"
%D.Equate = "%D"
CRP = 104.2
ParkPercentage = Disabled
B-6 D960R3 User’s Manual Probot

Appendix B
MasterPressure.LowerLimit = 1.0
MasterPressure.UpperLimit = 400.0
Data_Collection_Rate = 2
TimeConstant = 0.1
Wait Sampler.Ready
InjectMode = FullLoop
LowDispersionMode = Off
UseAirSegment = Off
UseHeadSpace = Off
SyringeSpeed = Normal
SyringeSpeedFactor = 0.2
SampleHeight = 5
FlushVolume = 5.0
WashVolume = 50
UV_VIS_1.Wavelength = 214
ColumnPressure.Formula Formula=Pump.Columnpressure.value
ColumnPressure.Type = Analog
PumpPressure.Formula Formula=Pump.Masterpressure.value
PumpPressure.Type = Analog
0.000 UV.autozero
Flow = 2.50
%B = 0
%C = 0
%D = 0
Wait UV.Ready and Pump.Ready and Sampler.Ready
Inject
UV_VIS_1.AcqOn
ColumnPressure.AcqOn
PumpPressure.AcqOn
Flow = 2.50
%B = 0
%C = 0
%D = 0
Probot_Start.On Duration = 1.00
Trigger peakstart UV_VIS_1.Delta > 0.1, true=2.00
Pump_Relay_1.State = On
Pump_Relay_1.Duration = 1.00
EndTrigger
Trigger peakend UV_VIS_1 < 1.0 and UV_VIS_1.Delta > -0.03, true=2.00
Pump_Relay_2.State = On
Pump_Relay_2.Duration = 1.00
EndTrigger
17.500 %B = 50
18.000 %B = 50
18.100 %B = 0
25.000 UV_VIS_1.AcqOff
ColumnPressure.AcqOff
PumpPressure.AcqOff
Flow = 2.50
%B = 0
%C = 0
%D = 0
End
User’s Manual Probot D960R3 B-7

Appendix B
B.6 Additional Hints/Troubleshooting
For the proper handling of a fractionation task and to make sure that no peak is
lost, it is important to calculate or measure the delay time between the flow cell
of the detector (where the peak is detected) and the fractionation needle (where
the peak then will be collected).
If two Peak Start (TTL 1) signals are generated immediately after each other, the
Probot moves to the next vial.
If two Peak End (TTL 2) signals are generated immediately after each other, the
Probot moves the table to the next vial or stays in the waste vial if a waste
position is selected.
Some older
collection in only one waste vessel; it requires that you define as many waste
positions as collect positions (Section B.3 ). To get only one ‘virtual’ waste
position with the proper amount of vessels, you can program a very small
distance (e.g. only 0.1 mm) between each vessel.
For additional information refer to the
Task, Section 5-51), the CHROMELEON on-line help (e.g. tutorial, see trigger)
and to the UltiMate User’s Manual.
Carrier version (e.g. versions lower than 1.70) do not allow
Carrier user’s manual (e.g. Fractionation
B-8 D960R3 User’s Manual Probot

APPENDIX C
Table Alignment Instructions
C.1 Overview
This appendix provides information about how to check the alignment of the
table of the Probot
alignment is important to make certain that the distance of the fused silica
needle remains constant at all X and Y positions.
Note: It is recommended that you check the alignment whenever the instrument
has been moved (e.g. after shipping or relocation of the instrument).
Micro Fraction Collector and how to align it. Proper
User’s Manual Probot D960R3 C-1

Appendix C
C.2 Table Alignment
To check the table alignment (X and Y), the Manual Control Unit (in conjunction
with the
performing any check or aligning of the table, the Probot instrument must be
properly leveled.
C.2.1 Leveling
Before checking the alignment or performing any alignment, check to ensure that
the Probot is properly leveled. Use a spirit level if there is any doubt (FIGURE C-
10). If necessary, adjust the four feet until the instrument is leveled properly.
Carrier software) is used to manually move the table. Before
Front View
FIGURE C-10 Leveling the Probot
Right Side View
C.2.2 Test Needle and Carrier Setup
Note: The following procedure discusses all steps using the standard needle. If
the µ-Tee is installed, all steps are identical except step a).
A piece of fused silica is used as ‘test needle’. The table is then moved as close
as possible to the needle tip. The manual control unit is used to control the table
position.
a)
Install a piece of fused silica capillary. Adjust ‘X’ to 1 – 2 mm (0.04 – 0.08
inch).
Fused Silica Capillary
PEEK Adapter
Tube
Fitting
Tee
Needle
X = 1 - 2 mm
FIGURE C-11 Installing the Fused Silica Capillary
C-2 D960R3 User’s Manual Probot

Appendix C
b) Select Manual Device Control from the Tools menu or choose the Manual
Device Control
window (FIGURE C-12).
button to open the ‘XYZ Robot module’ and ‘Dosage module’
FIGURE C-12 The Robot Section
c) Select the External button to gain control of the Probot with the manual
control unit.
d)
Control the position of the table by the appropriate buttons (e.g.: press on
the X+ and X- buttons to move the table to the left or right side [Xdirection]).
To change from step mode to continuous movement, press the appropriate
e)
button of the manual control unit. To change the length of each step (speed),
adjust the ‘Stepwidth’ parameter.
C.2.3 Checking and Aligning of the X-axis and Y-axis
To check/ align the X-axis:
Remove all targets from the table adapter and remove the adapter from the
a)
table.
Lift the table and position the table so that one of the two small grooves
b)
(item 1, FIGURE C-13) is located directly under the needle tip. Adjust the
distance between the needle tip and the table to approximately 0.1 mm
(0.004 inch, use the camera for positioning, if available).
1
23
X
Screw 2
Screw 3
Y
Front view
FIGURE C-13 Adjusting the X-direction
User’s Manual Probot D960R3 C-3

Appendix C
c) Move the table from one side to the other (X-direction) and check that the
needle is centered above the groove and that the distance to the needle tip
remains constant.
Move the table to the front and to the back (Y-direction) and check that the
d)
distance to the needle tip remains constant.
In case the table needs some adjustment, proceed as follows.
C.2.4 Alignment of the X-axis
To adjust the X direction:
Loosen the two screws labeled ‘3’ in FIGURE C-13.
a)
Turn the two screws labeled ‘2’ in FIGURE C-13 clockwise to lift the table on
b)
the left side, turn the screws counterclockwise to lower the table on the left
side.
Note: Turn both screws labeled ‘2’ in FIGURE C-13 by the same angle to keep
the Y-adjustment (e.g. to lift the table on the left side by 1mm, turn both screws
approximately 30 degrees clockwise).
c) Retighten the screws labeled ‘3’ in FIGURE C-13 and check the X-direction
again.
d)
Repeat step a) – c) if necessary.
C.2.5 Alignment of the Y-axis
To check/adjust the alignment of the Y-axis:
Remove the cover plate to get access to the adjustment screws (FIGURE C-
a)
14).
FIGURE C-14 Removing the Cover Plate of the Y-axis
b) Slightly unscrew the screws labeled ‘4’ – ‘6’ in FIGURE C-15, but do not
loosen screw 3.
C-4 D960R3 User’s Manual Probot
 Loading...