

Page 1

USB TO RS-232 ADAPTER
User’s Manual
UMC-201 / UMC-102 / UMC-104 / UPR-202
Page 2

Table of Contents
1. Introduction........................................................................................................................................... 2
System Requirements....................................................................................................................... 2
Features .............................................................................................................................................
Specification......................................................................................................................................
2. Windows OS Installation Guide........................................................................................................... 4
3. Driver Installation thru the FTDI Driver Package ............................................................................... 6
4. Driver Installation ................................................................................................................................. 9
Windows 98 Installation Guide......................................................................................................... 9
Uninstalling Instruction........................................................................................................... 14
Troubleshooting....................................................................................................................... 16
Windows 2000 Installation Guide................................................................................................... 17
Uninstalling Instruction........................................................................................................... 22
Troubleshooting....................................................................................................................... 23
Windows CE Installation Guide...................................................................................................... 24
Troubleshooting....................................................................................................................... 25
Windows XP Installation Guide...................................................................................................... 29
Uninstalling Instruction........................................................................................................... 37
Troubleshooting....................................................................................................................... 38
Windows VISTA (Win 7, 8, 8.1, 10) Installation Guide................................................................... 40
Uninstalling Instruction........................................................................................................... 44
Troubleshooting....................................................................................................................... 45
MAC OS X Installation Guide.......................................................................................................... 47
Uninstalling instruction........................................................................................................... 50
Troubleshooting....................................................................................................................... 51
Regulatory Compliance ......................................................................................................................... 53
2
3
1
Page 3

1. Introduction
Universal Serial Bus (USB) port technology has emerged in response to the proliferation of external peripheral
devices (scanner, digital camera, portable hard-disk drive, cell phone, PDA, MP3 player, etc.) that are increasingly
being connected to the latest generation of PCs. The USB behaves in a similar fashion to conventional bus ports
like Serial (COM) and PS/2. As it doesn’t require any IRQs, more devices can be attached to the system without
conflicts.
This USB to Serial converter provides an external plug-and-play connection for RS-232 enabled devices with PC or
any computerizing devices that support the USB specification. The converter comes with the standard connectors
of Serial DB-9 and USB Type A or B to fulfill your working requirements. With the link of USB to Serial cable,
communication starts interacting without any barriers.
For further convenience, this product is designed to work by using the power drawn from the Universal Serial Bus
and no external power is required. As it is an USB compliant device, features of plug and play, hot-swapping,
energy-saving suspend, and resume are provided.
Since the most computers have limited USB and COM ports, USB hubs can be employed to gain more USB ports
for numerous USB peripheral devices to be connected up with your PC at the time.
System Requirements
Windows OS : 98SE / ME / 2000 / XP / Vista / 7 / 8 / 8.1 / 10; Windows Server 2003 / 2008 / 2008R2 / 2012 /
2012R2 or higher
WinCE OS: V4.2 ~ V7.0
Mac OS: 8.6 / 9.x / 10.x
Linux OS: Kernel 1.5.0 or higher
The system is equipped with USB Host Controller
Features
Fully Compliant with USB Specification 1.1 and 2.0
Supports the asynchronous serial interfaces.
Supports data transfer rate up to 230 kbps
Supports remote wake-up and power-on-reset
Supports ±15kV HBM ESD protection
2
Page 4

Specification
Model No. UMC-201 UMC-102 UPR-202 UMC-104
Chipset FTDI
USB Specification USB 1.1/2.0 compliant
Data Speed
Connector
USB 1.5 / 12 Mbps
Serial 230 kbps
Host USB A/M USB B/F
Device DB-9/M DB-9/M*2 DB-9/M & Mini DIN DB-9/M*4
Power Mode Bus
Cable Length 1.1m 0.6 m 1.8 m
Housing PVC Plastic Aluminum
RS-232 Pin Assignment
3
Page 5
2. Windows OS Installation Guide
Driver can be installed through Windows Update automatically (Internet connection needed)
The FTDI drivers that have passed the WHQL tests are available for download using Windows Update.
OS requirements: Windows 7/8/8.1/10 or later.
Please go below ways for easy installation.
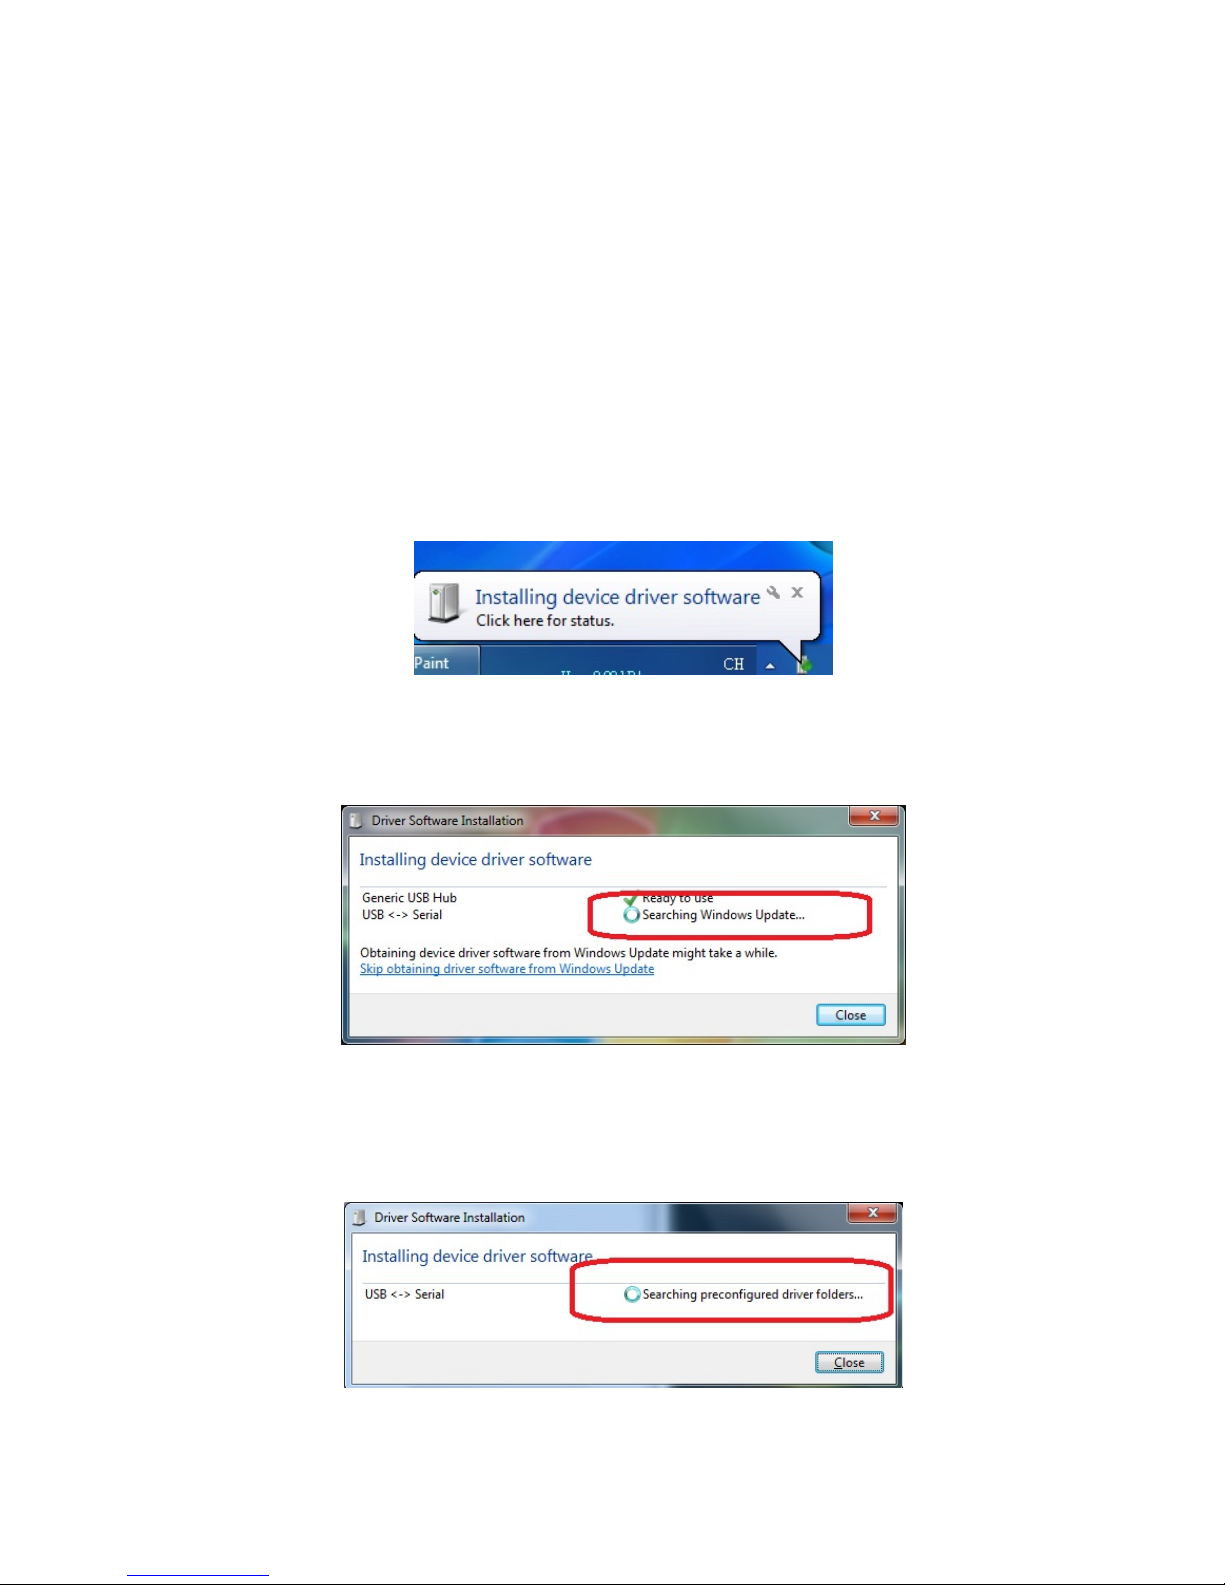
1. You may plug the device into host computer. And then it will pop up ‘Installing device driver software’ from the
taskbar of the screen. (Fig. 1) Click and connect to the Windows Update.
2. It will check your computer OS and download the applicable driver at the Windows Update automatically.
Fig. 1
3. The program goes ‘Searching Windows Update’ from ‘Driver Software Installation’. (Fig. 2)
Fig. 2
4. When the applicable driver is detected, it will run ‘Installing device driver software’. (Fig. 3)
Fig. 3
4
Page 6
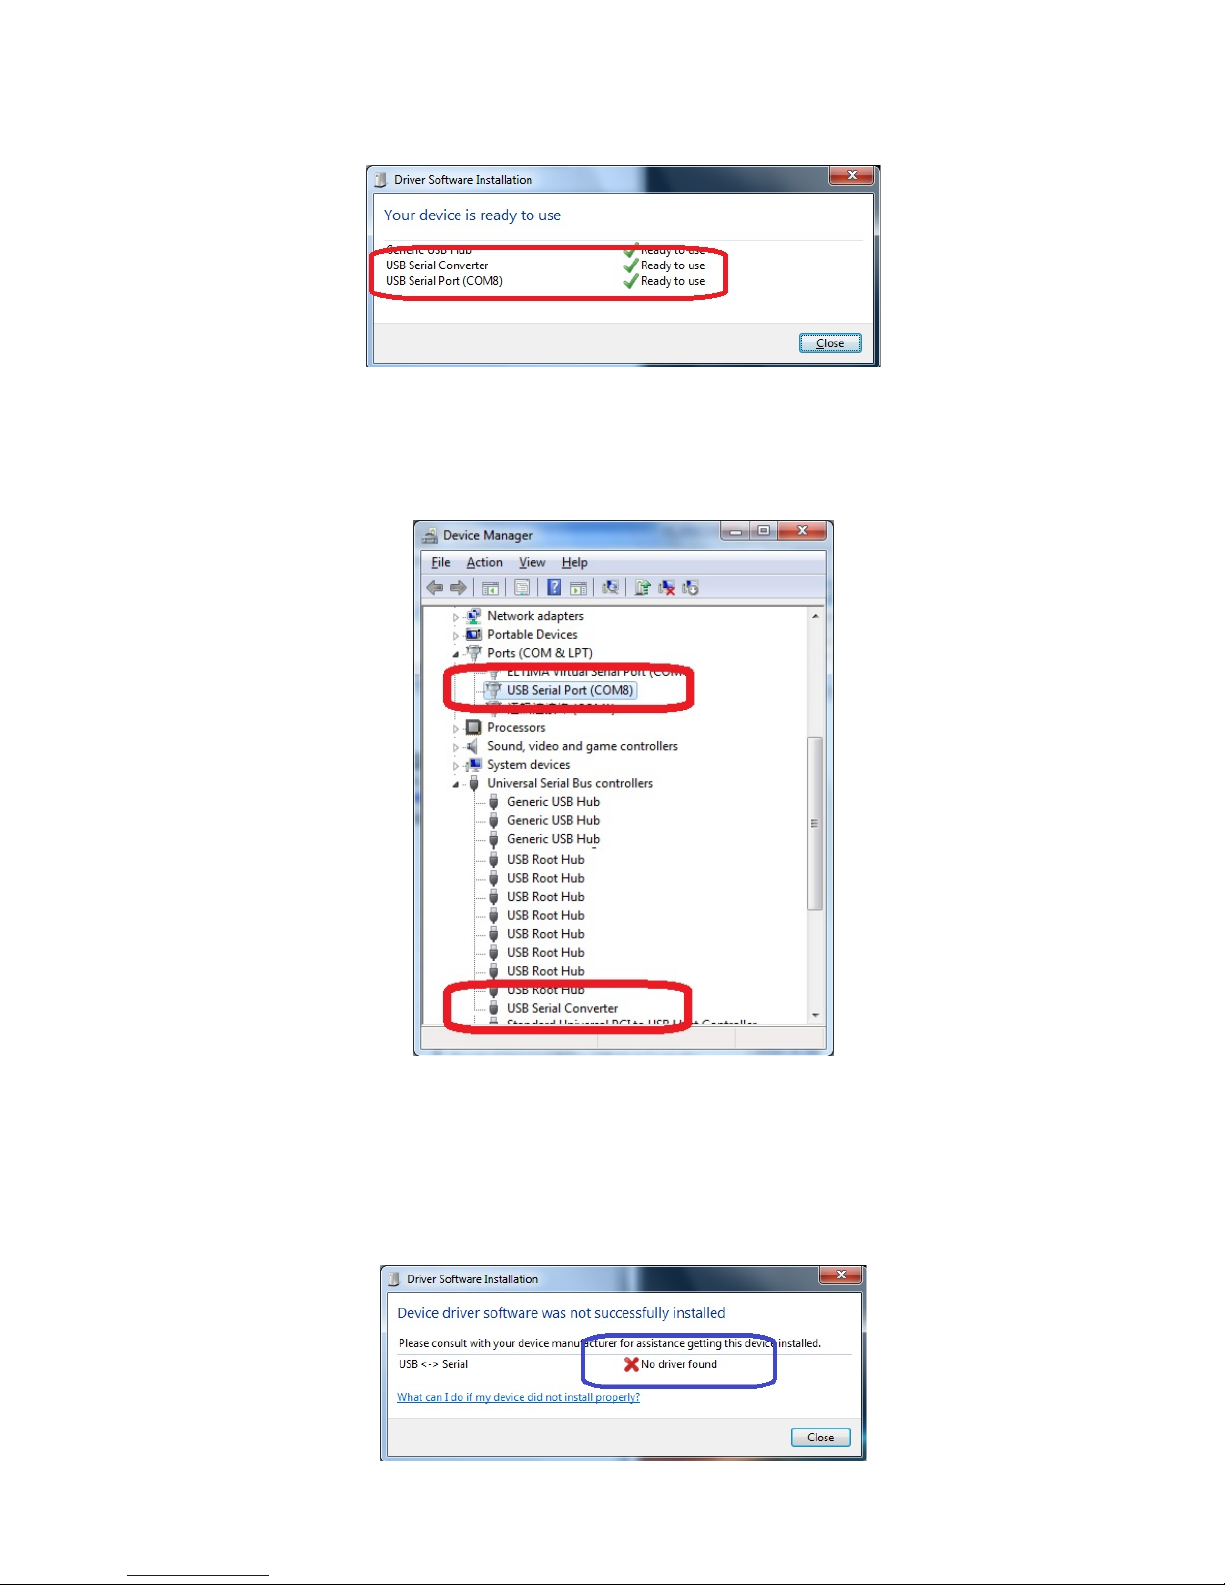
5. Then it shows ‘USB Serial Port (COM8) installed’. Click ‘Close’ and go next step. (Fig. 4)
.
Fig. 4
6. Check ‘Device Manager’ of Control Panel from the computer OS and there shows USB Serial Port (COM8) under
‘Ports (COM & LPT)’; the other one shows USB Serial Converter under ‘Universal Serial Bus controllers’. (Fig. 5)
Congratulation! You have finished installing the USB to Serial device successfully.
Fig. 5
NOTE:
1. There is busy on access databank of Microsoft’s Support link. Please try again or install driver of CD-ROM
provided.
2. Check your internet if it is failed to access Microsoft’s Support link.
3. Check your computer configuration if it is disabled on Windows Update wizard.
It may occur when driver is not installed successfully, please check below steps.
5
Page 7
3. Driver Installation thru the FTDI Driver Package
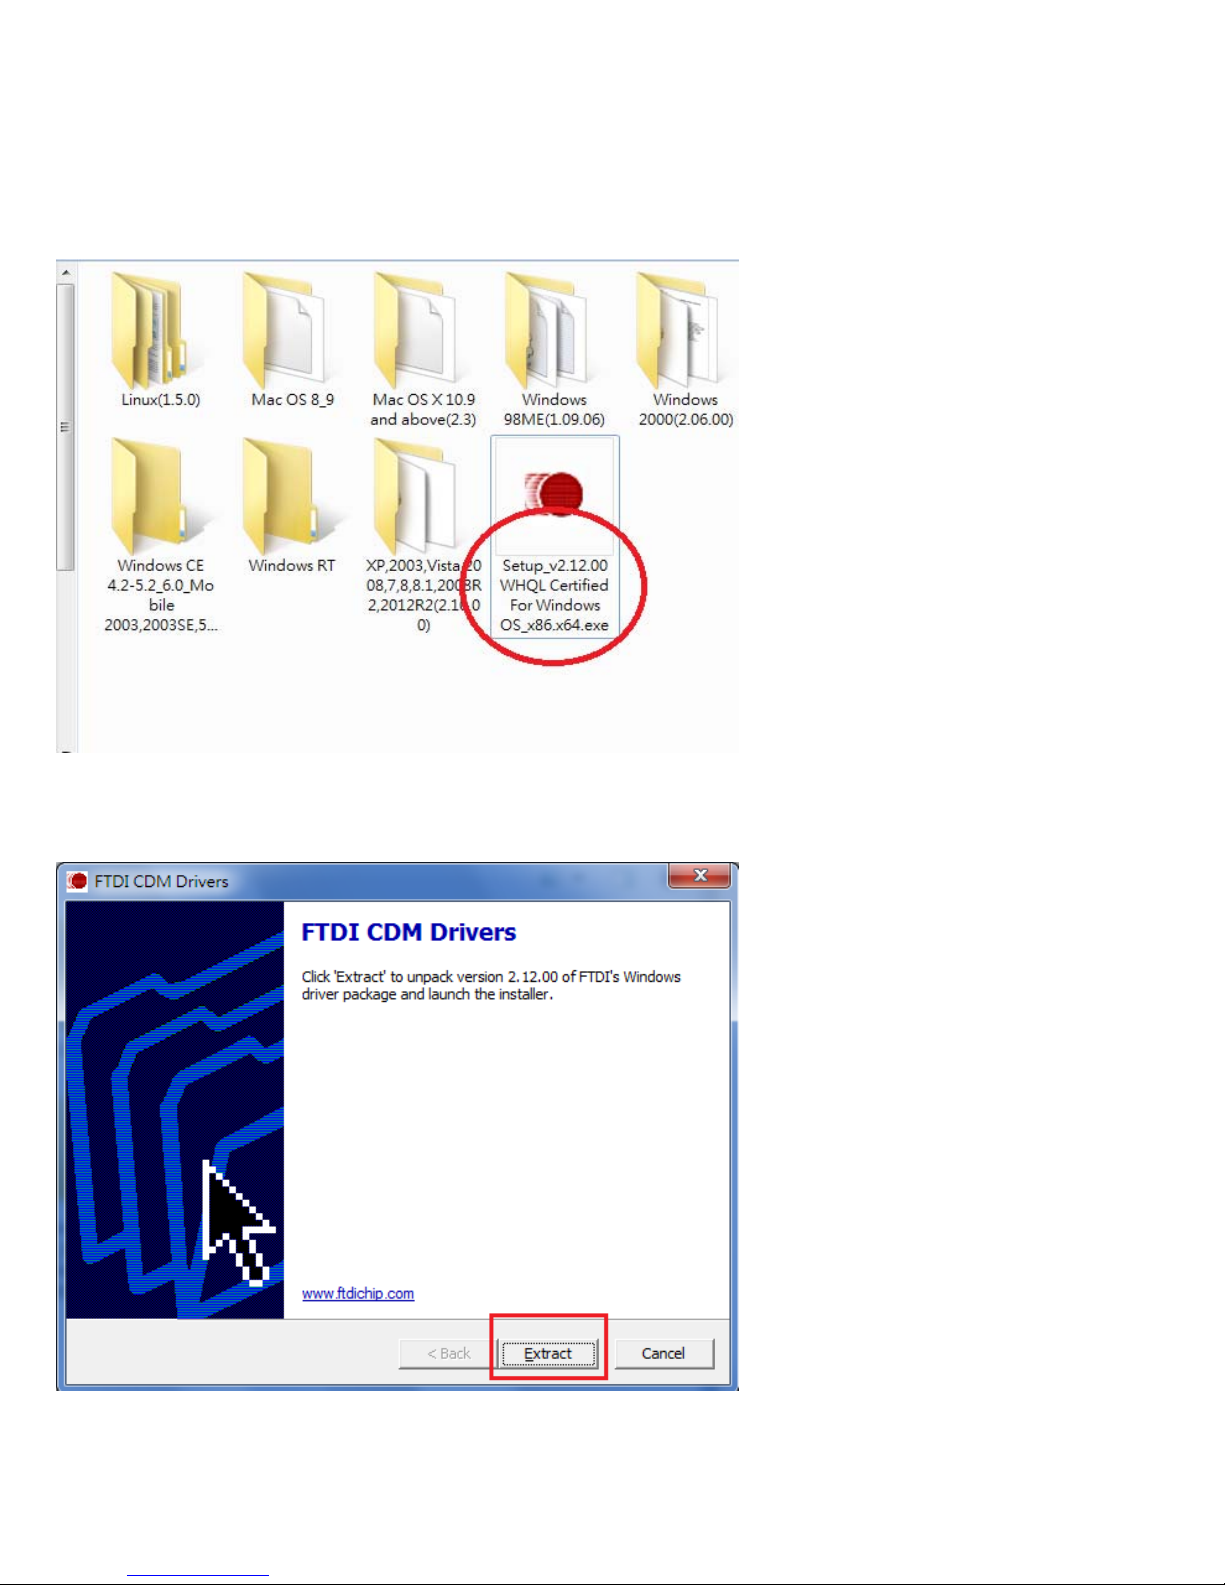
Driver can be installed through the FTDI driver package of the CD-ROM provided.
3.1. Double click ‘Setup_v2.12.00 WHQL Certified For Windows OS_x86.x64.exe’
3.2. It will pop up ‘FTDI CDM Drivers’ from the screen. Click ‘Extract’ and go next step.
6
Page 8
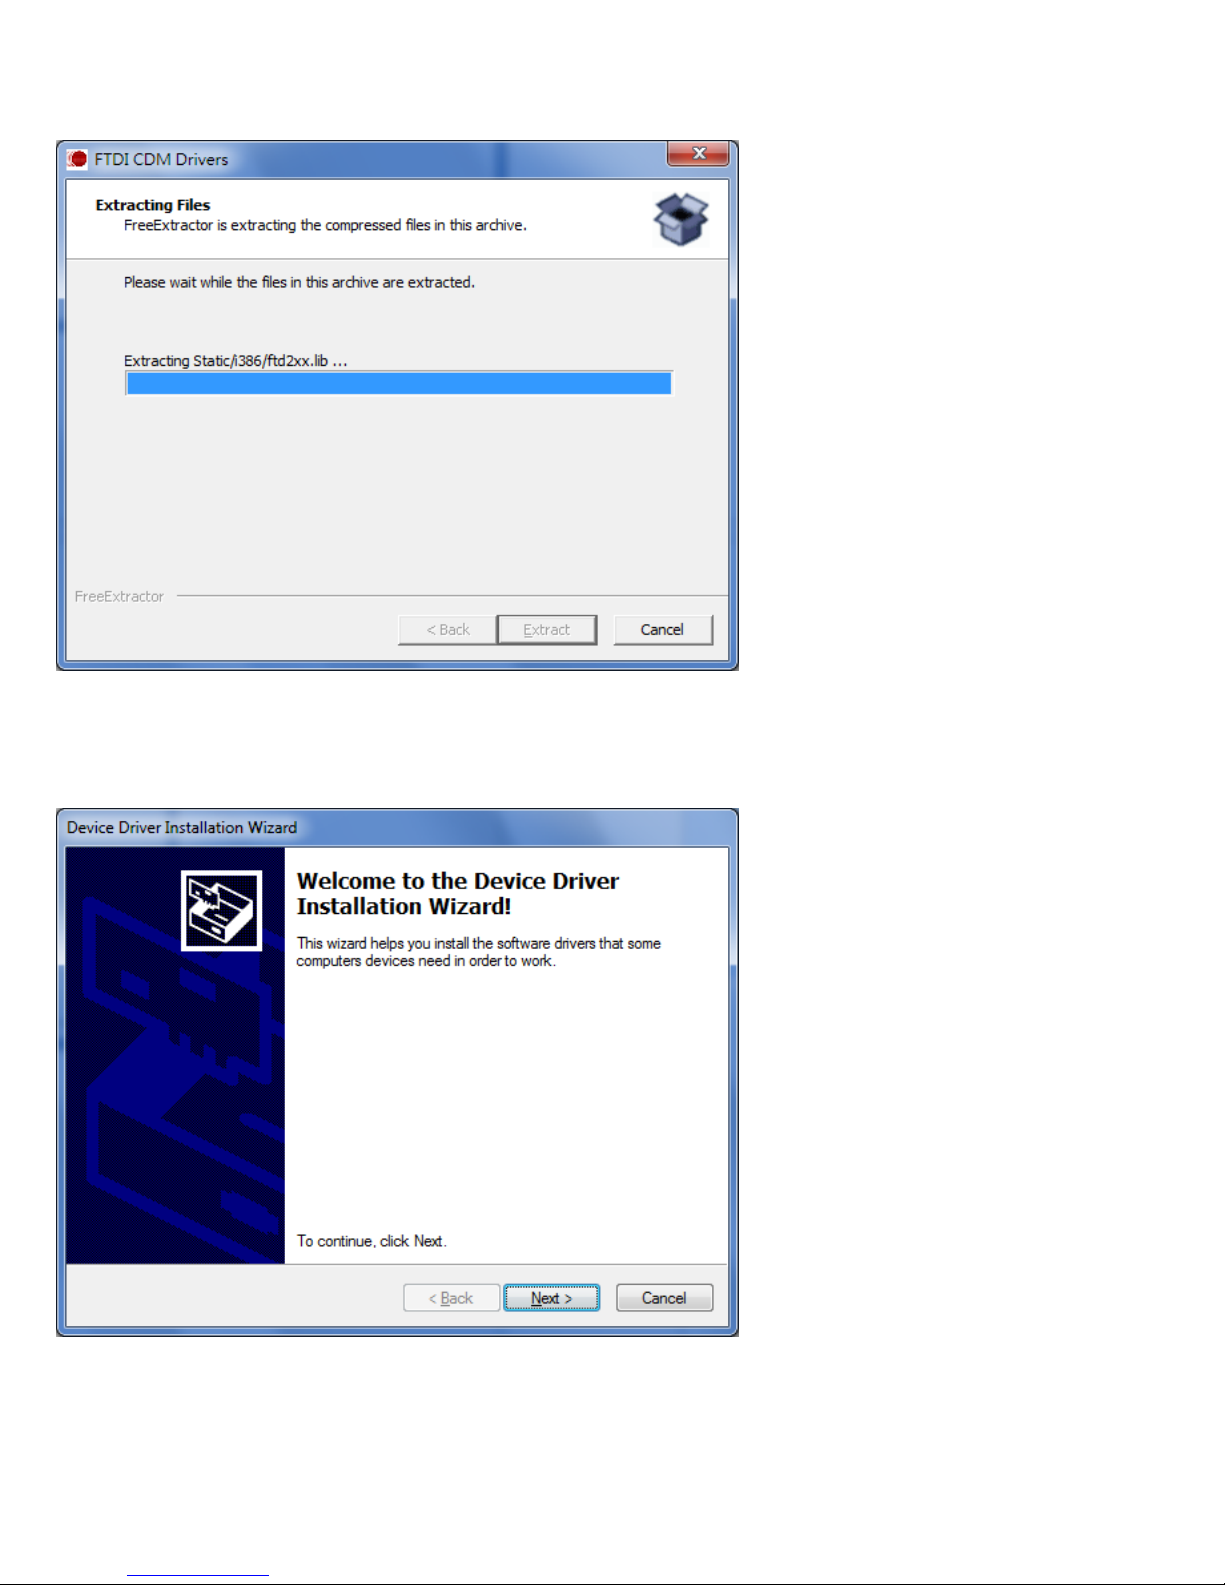
3.3. Extracting Files
3.4. Click ‘Next’ to continue.
7
Page 9
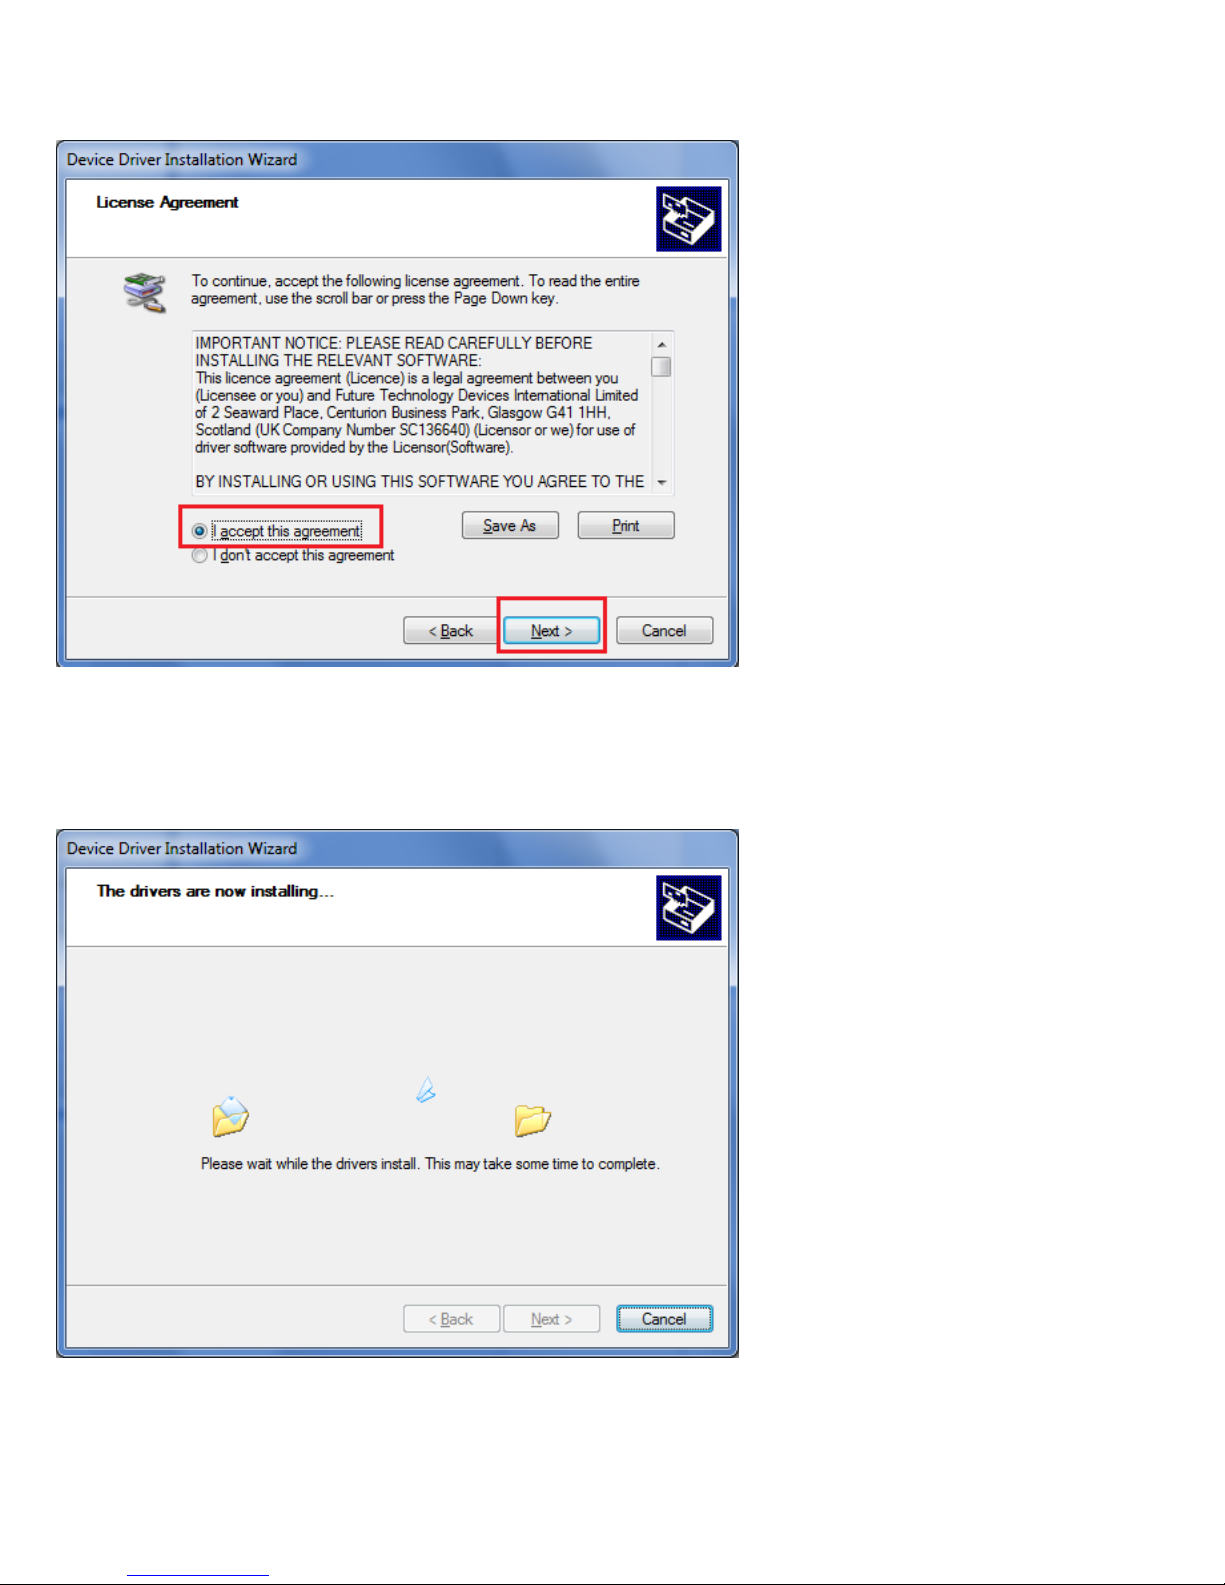
3.5. Select ‘I accept this agreement’ and click ‘Next’.
3.6. The Device Driver Installation Wizard will detect your computer OS and install the applicable driver
automatically.
8
Page 10
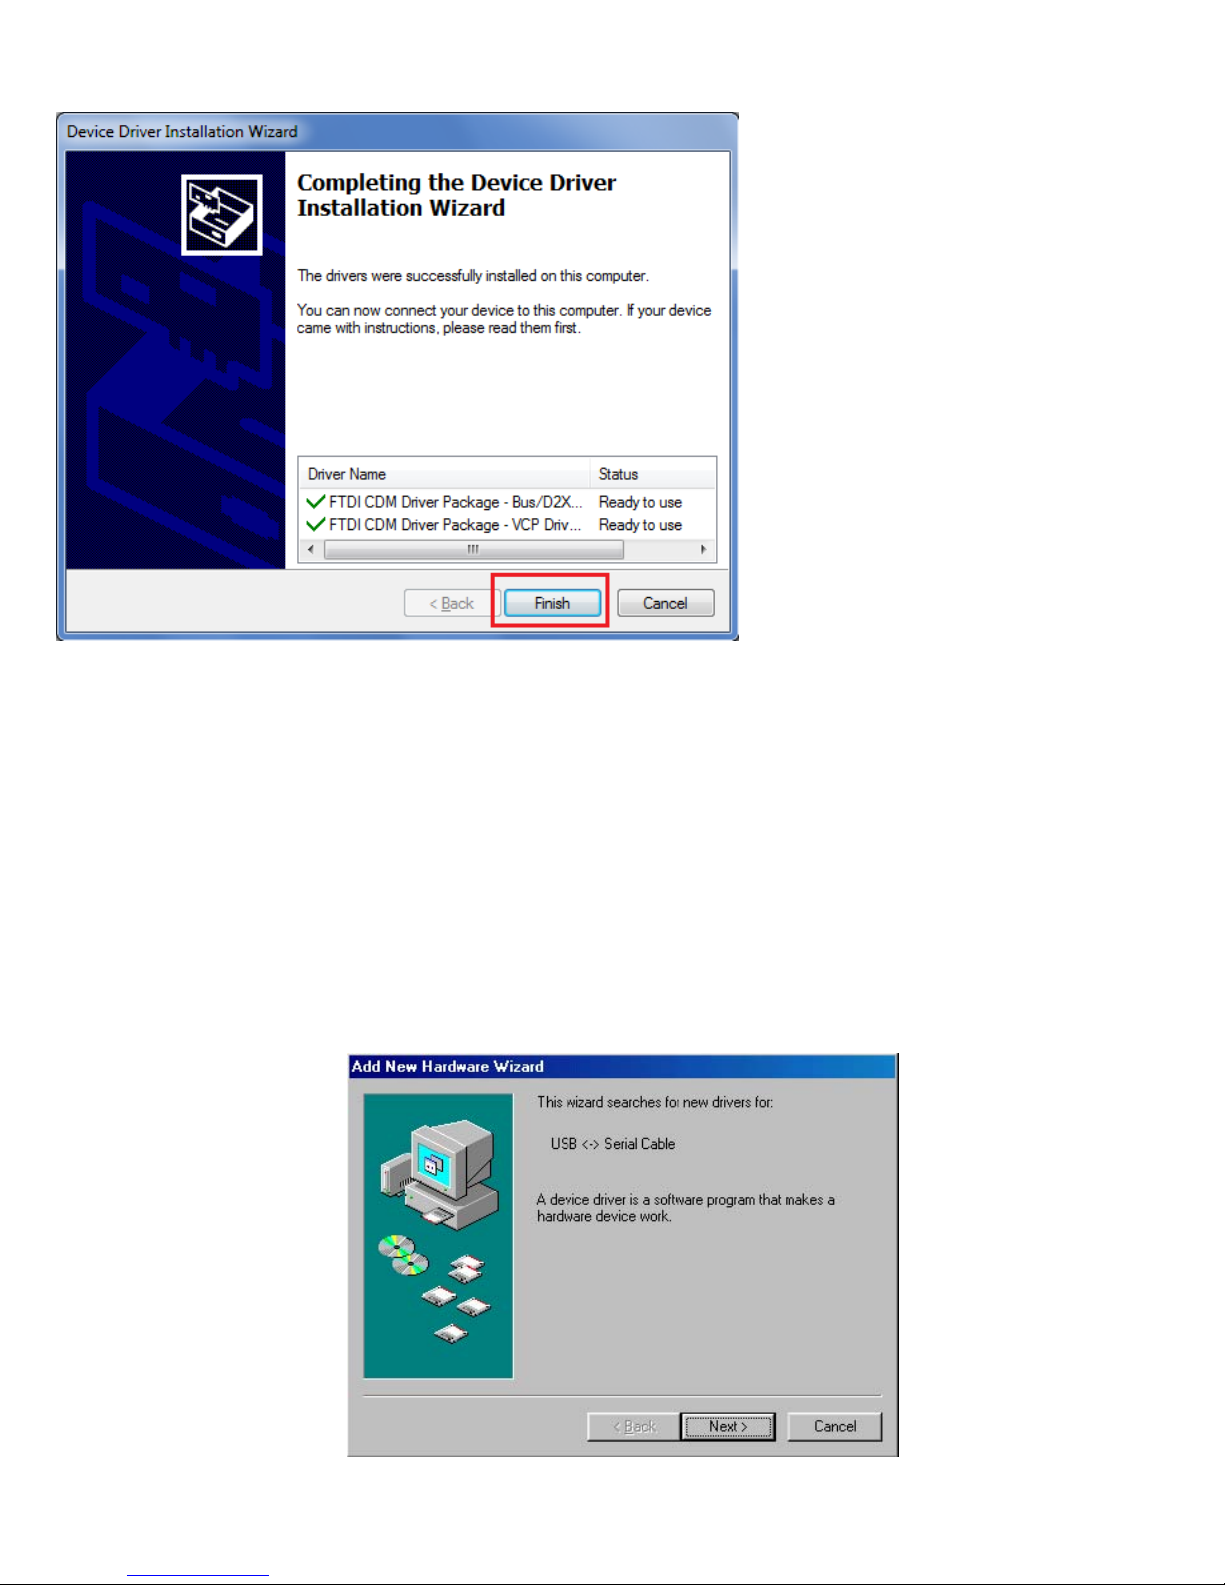
3.7. While the Device Driver Installation Wizard is completing, click ‘Finish’ to exit.
4. Driver Installation
Windows 98 Installation Guide
If a device of the same type has been installed on your machine before and the drivers that are about to be installed
are different from those installed already, the original drivers need to be uninstalled. Please refer to the uninstalling
instruction.
Download the latest available drivers from the FTDI website and unzip them to a location on your PC.
Connect the device to a spare USB port on your PC. This will launch the Windows Add New Hardware
Wizard. Windows may display a message reading "Building driver database" at this point which may take
a few minutes to pass. Click "Next" to proceed with the installation.
9
Page 11
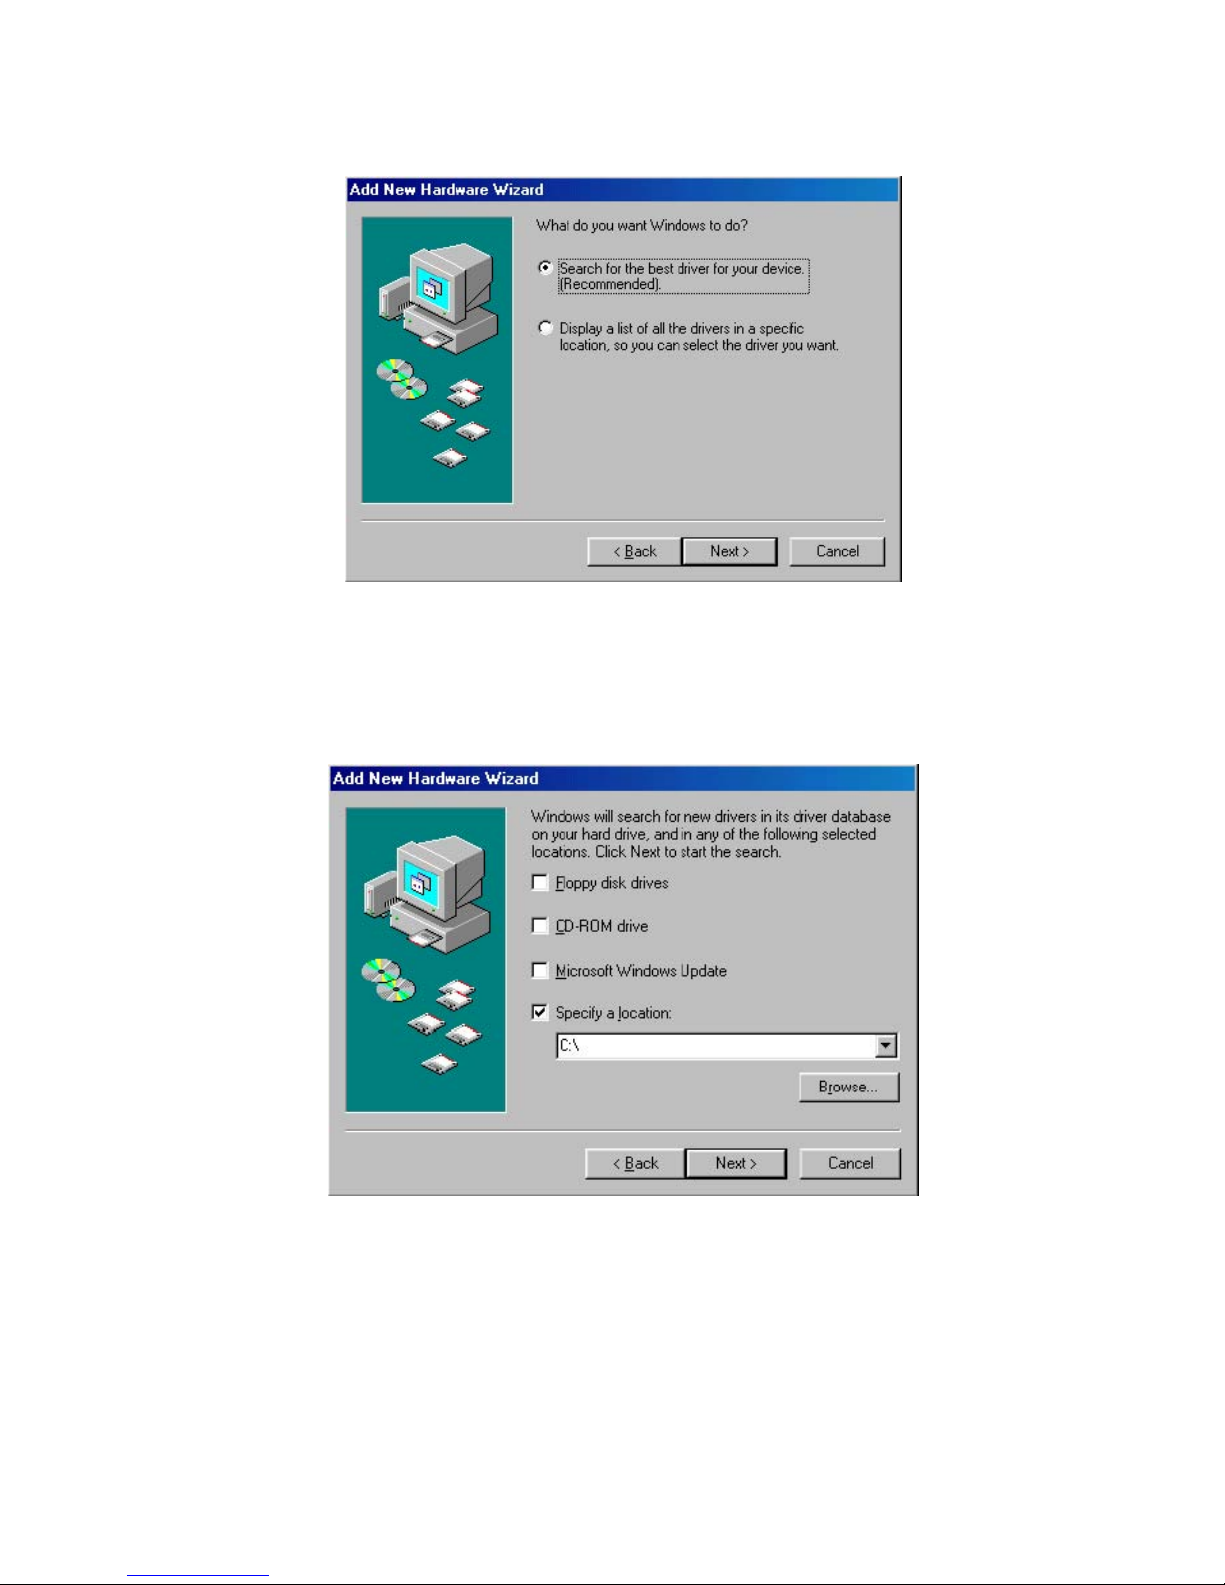
Select "Search for the best driver for your device. (Recommended)." as shown below and then click "Next".
Check the box next to "Specify a location" and uncheck all others as shown below. Click "Browse" and locate the
driver files. Once the files have been located, click "Next" to proceed with the installation.
10
Page 12
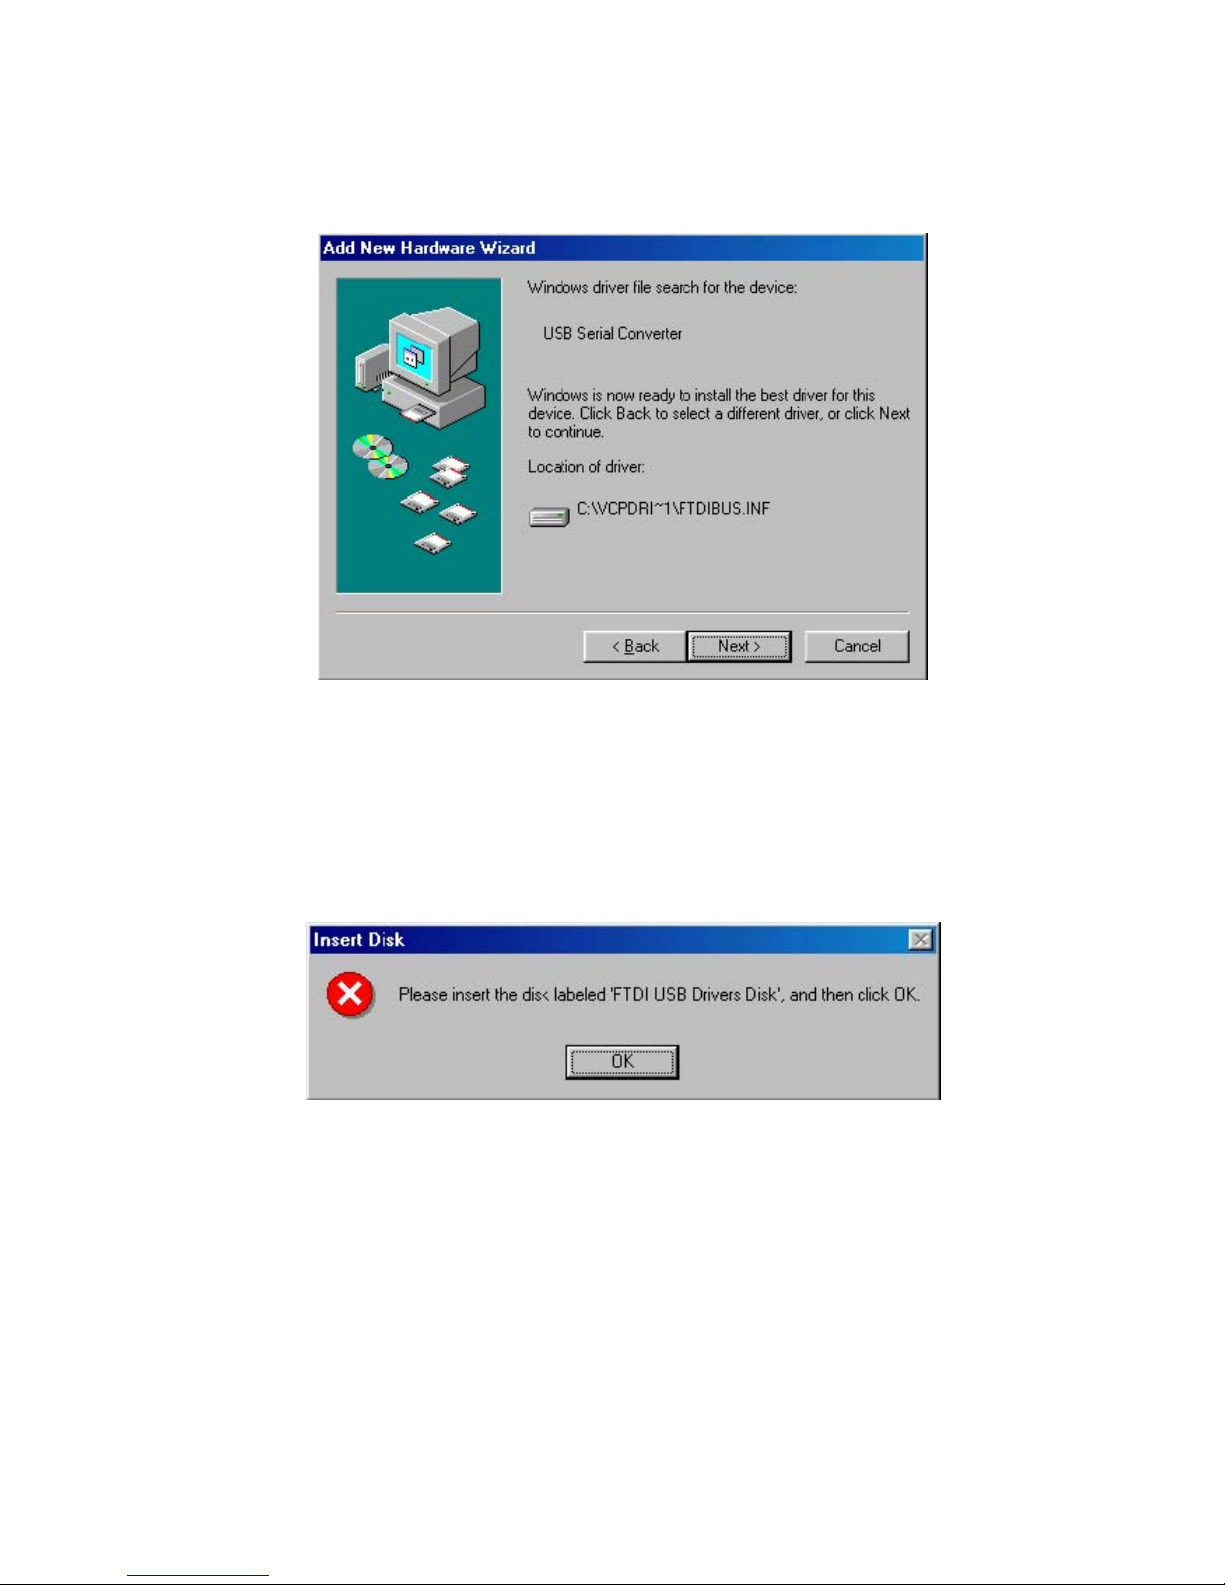
Windows may display a message reading "Building driver database" at this point which may take a few
minutes to pass. Once Windows has found the required files, click "Next" to install the device.
If the driver being installed does not have Microsoft WHQL signature files (.CAT files), the wizard will request a
driver disk to attempt to find them. Click "OK" on the "Insert Disk" message box.
The following window will appear to assist in locating the file. To proceed with the installation without the .CAT file,
click "Skip File".
11
Page 13
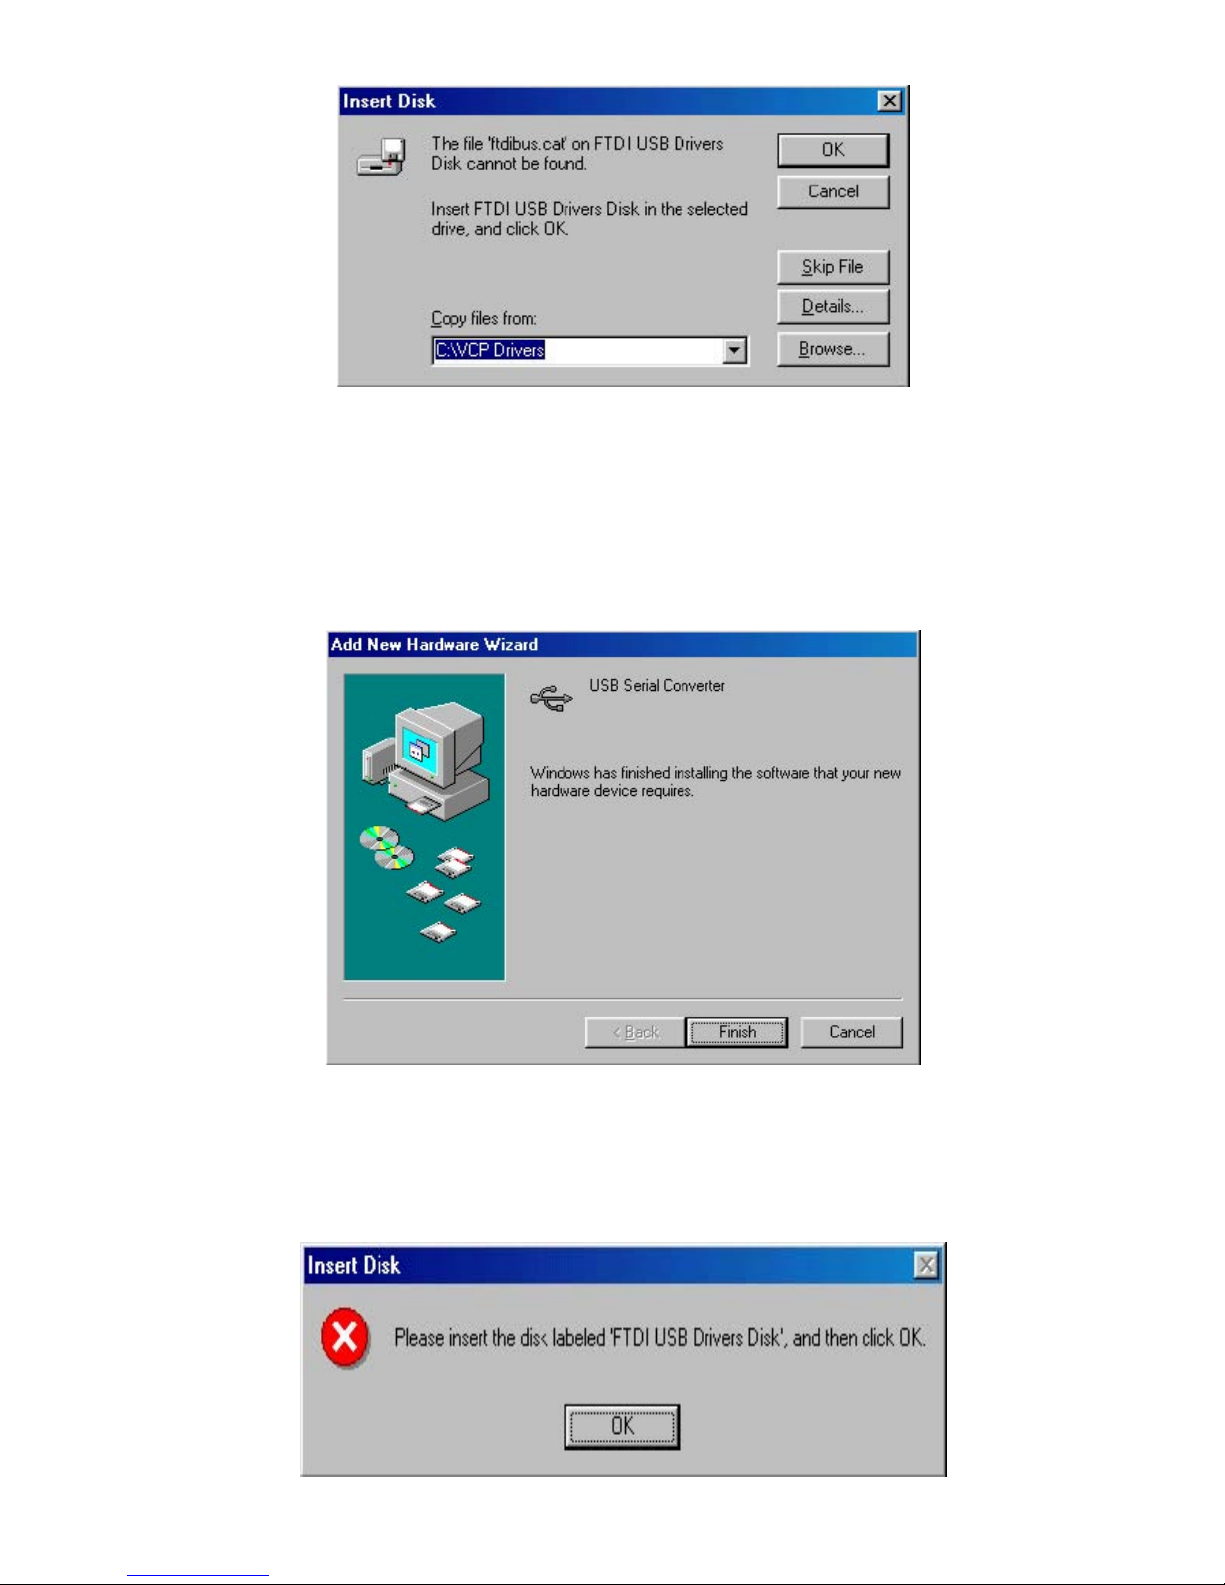
If the driver being installed is Microsoft WHQL certified, then the .CAT files will be located with the other
driver files and should be installed automatically.
Windows should then display a message indicating that the installation of the serial converter driver was
successful. The COM port emulation driver must now be installed. Click "Finish" to complete the
installation of the serial converter and proceed to the COM port emulation driver.
Under Windows 98, the COM port emulation driver will be automatically installed from the same location as the
serial converter driver. However, if the driver is not WHQL certified as explained above for the serial converter driver,
the wizard will ask for the location of .CAT files. Click "OK" on the "Insert Disk" message box.
12
Page 14
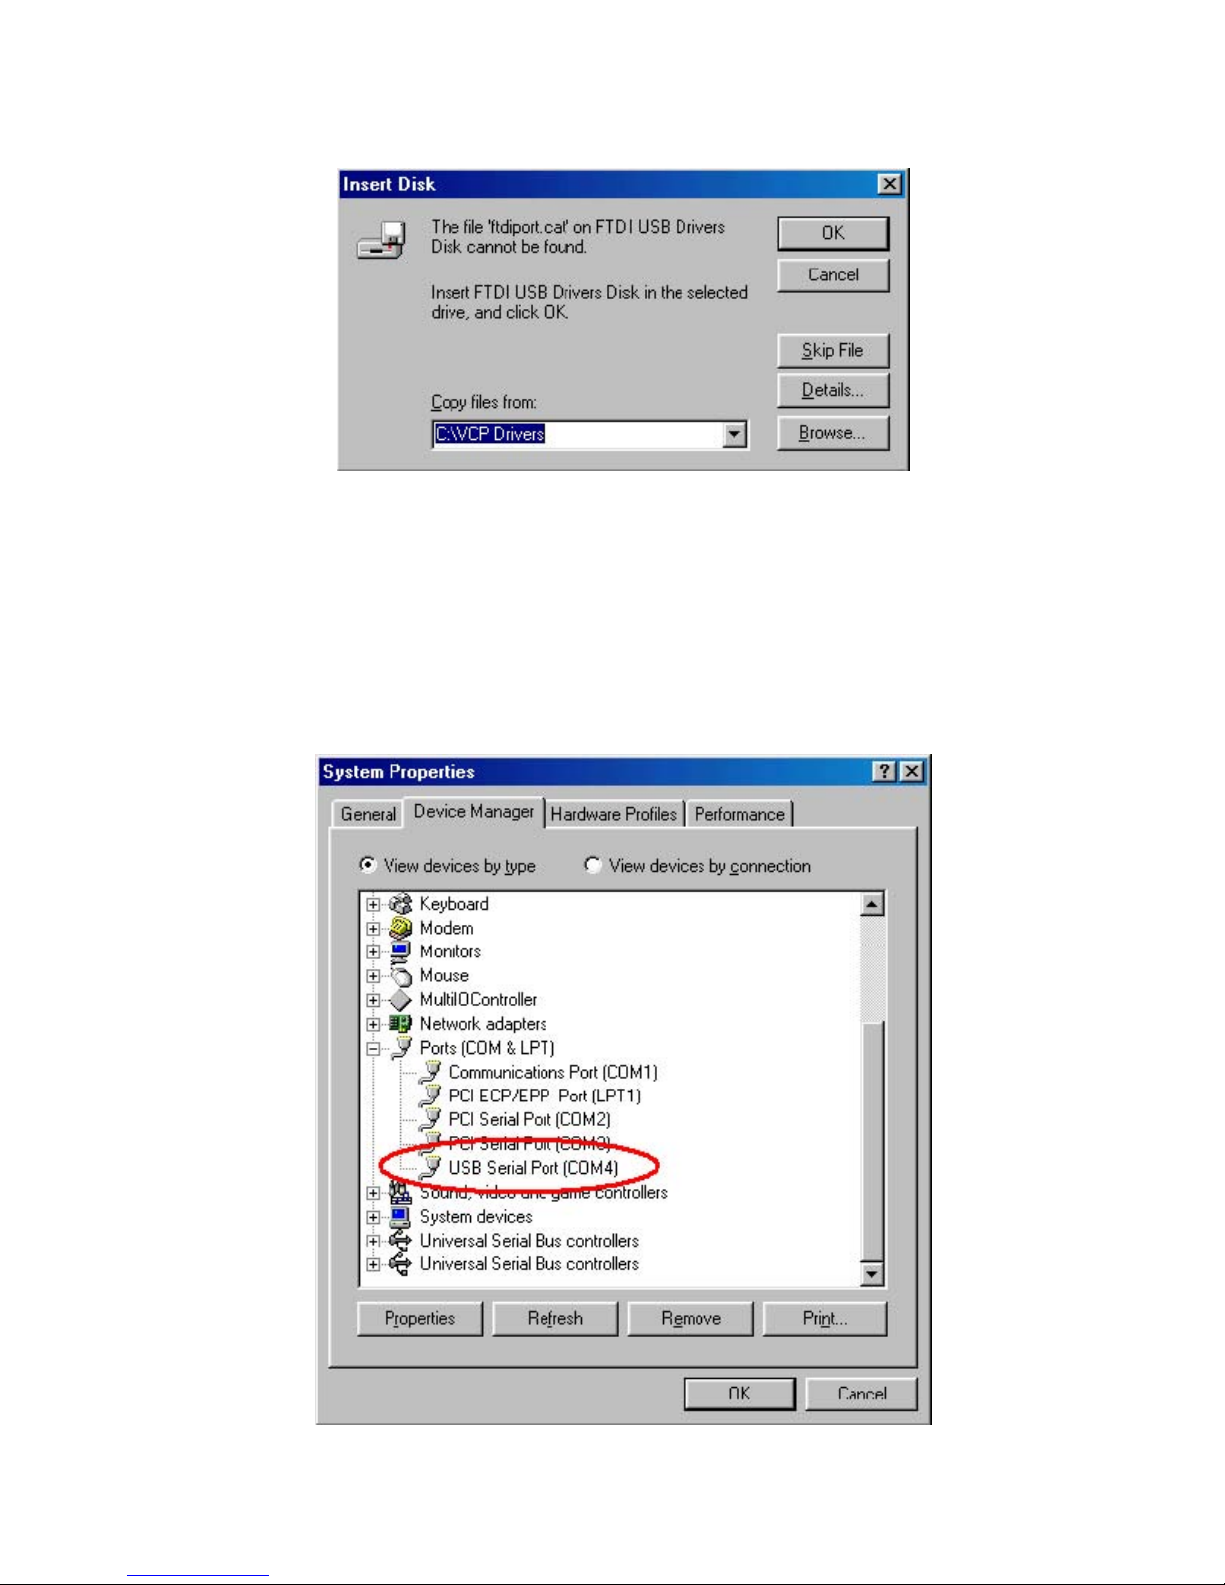
The following window will appear to assist in locating the file. To proceed with the installation without the .CAT file,
click "Skip File".
If the driver being installed is Microsoft WHQL certified, then the .CAT files will be located with the other driver files
and should be installed automatically.
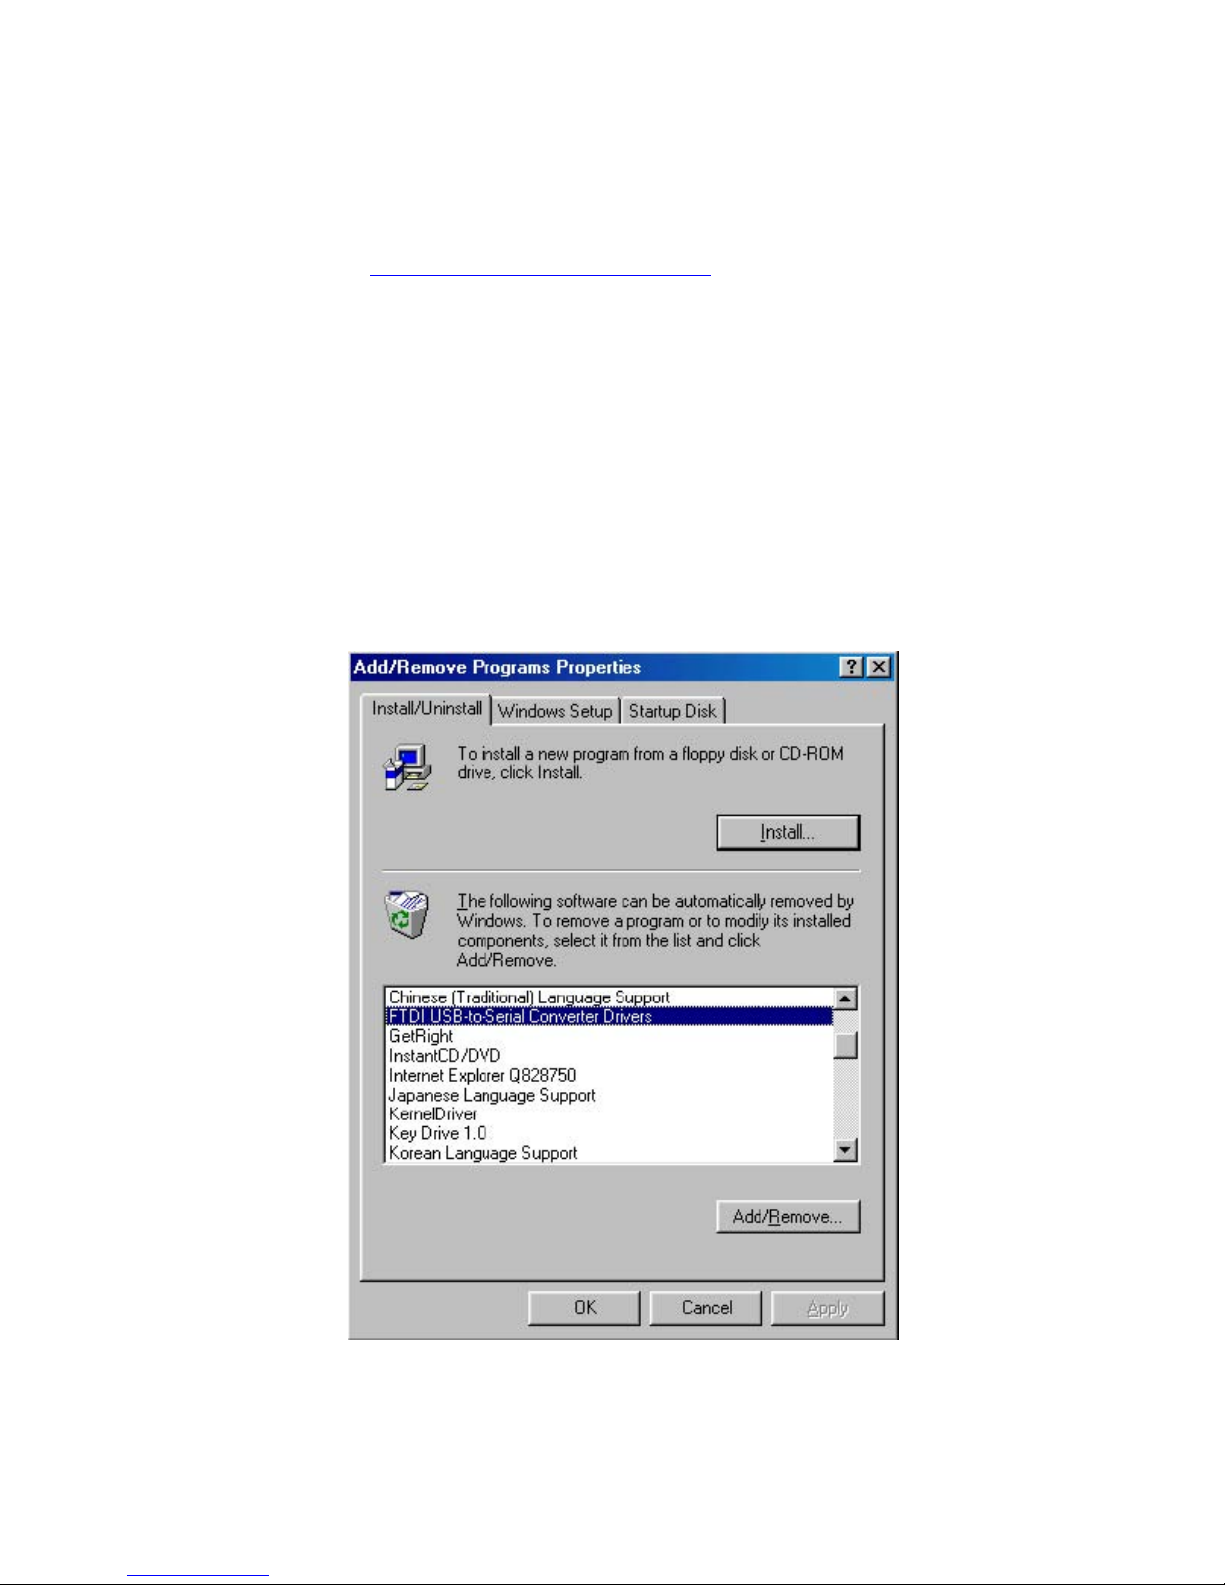
Open the Device Manager (located in "Control Panel\System" then select the ""Device Manger" tab) and select
"View devices by type". The device appears as an additional COM port with the label "USB Serial Port".
13
Page 15
lease note:
P
. For multiple-port converter, each port has to be installed with the driver individually, i.e. you have to repeat this
1
installation procedure 2 times (2-port converter) or 4 times (for 4-port converter).
If you have any
2.
versions from FTDI Web site www.ftdichip.com/Drivers/VCP.htm
difficulties with the drivers we provided in this CD, you may down
supported device “FT232BL(M)”.
load the updated or appropriate
Uninstalling Instruction
To uninstall drivers, follow the instru
isconnect any devices that are attached to the PC. D
pen the Add/Remove Programs utility located in "CoO
USB-Serial Converter Drivers" from the list of installed programs.
ctions below:
ntrol Panel\Add/Remove Programs". Select "FTDI
14
Page 16
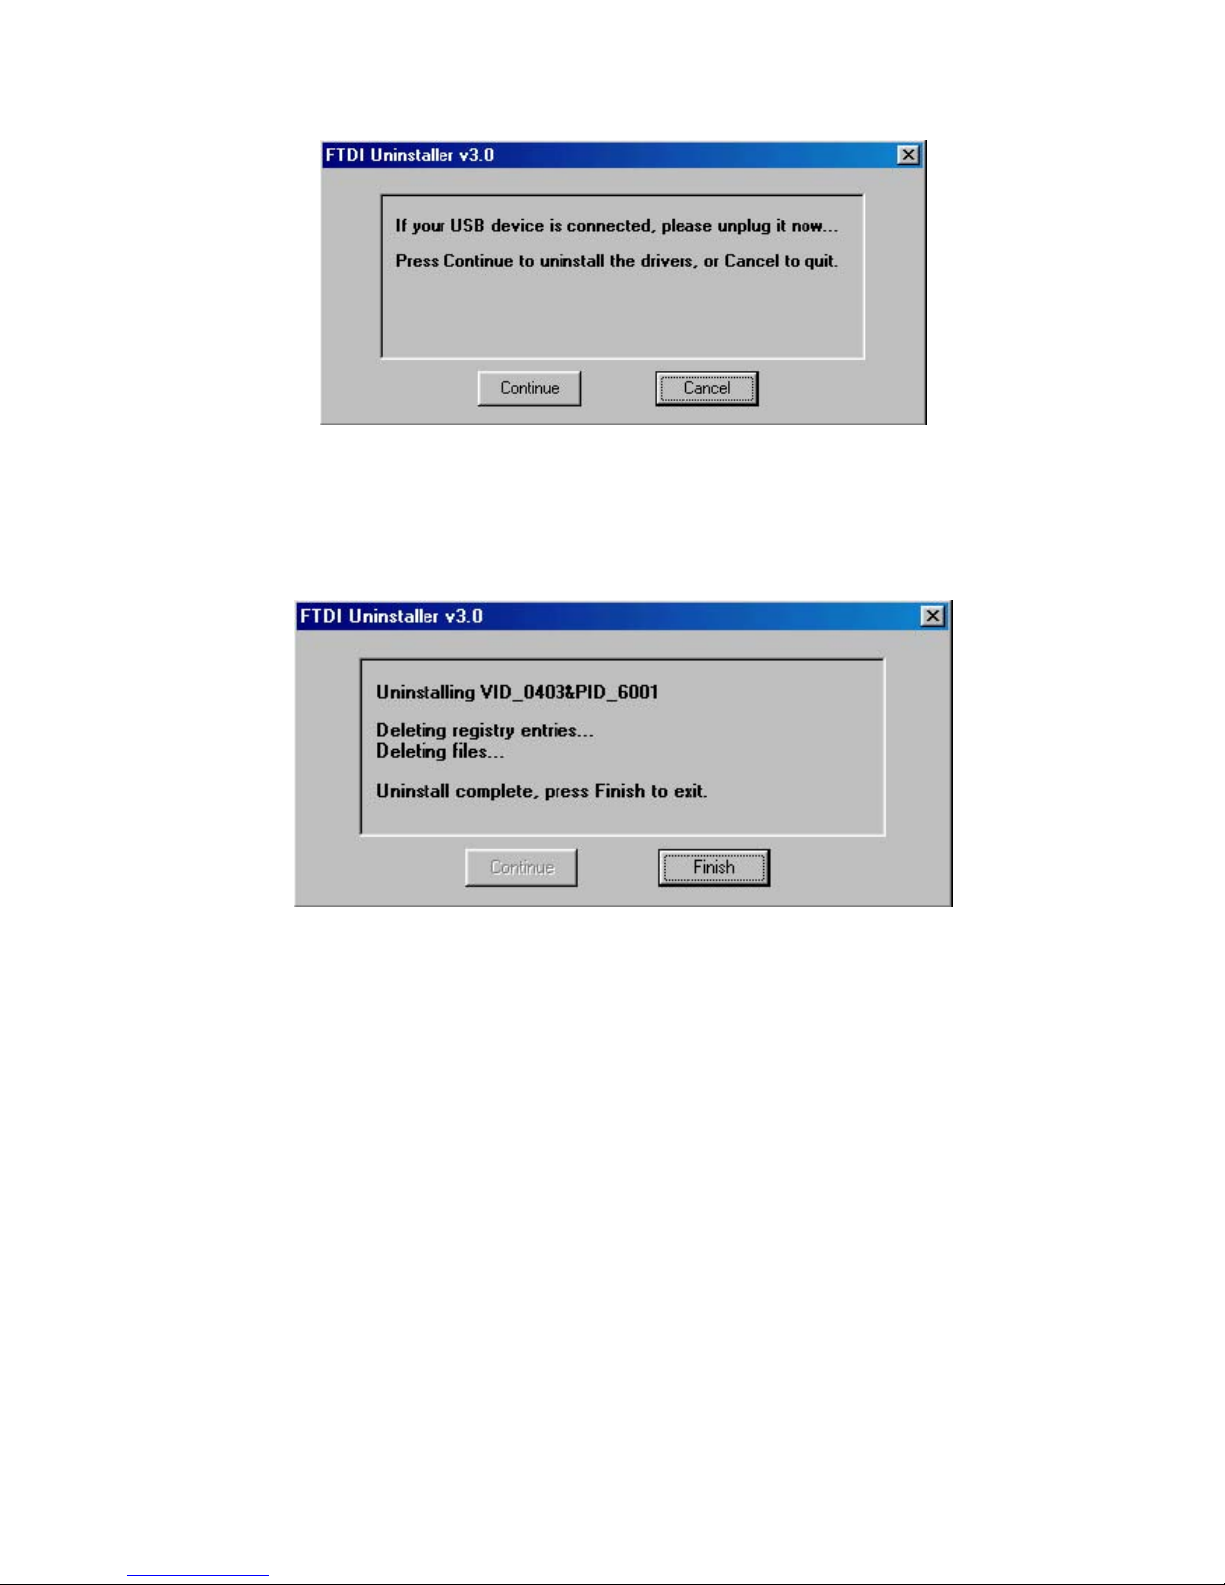
lick the "Add/Remove" button. This will run the FTDI uninstaller program. Click "Continue" to run the uninstaller or C
"Cancel" to exit.
hen the uninstaller has finished removing the device from the system, the caption on the "Cancel" button will
W
change to "Finish". Click "Finish" to complete the process.
15
Page 17

Troubleshooting
1. Windows 98 cannot find drivers for my device
This error can occur if the VID and PID programmed into the device EEPROM do not match those listed in the INF
files for the driver. The VID and PID programmed into the device EEPROM may be found by using the USBView
utility from the FTDI
they do not
that driver cannot be installed for that device without either re-programming the device EEPROM or modifying the
list of VID and PID numbers in the INF files. Please note that only your own company VID and PID or FTDI's VID
(0x0403) and FTDI PID issued for use by your company should be used in the EEPROM and INF/INI files.
match, that driver cannot be installed the VID and PID entries in the driver INF files. If they do not match,
2. Windows 98 forces a reboot after installing a device
This problem can occur if an application is accessing a file while the New Hardware Wizard is trying to copy it. This
usually occurs with the FTD2XX.DLL file. If installing a D2XX device, selecting not to restart the computer then
unplugging and re-plugging the device may allow the device to function properly without restarting. Restarting the
machine will allow the device to work correctly.
3. Driver installation fails and Windows 98 gives error code 10
Windows error code 10 indicates a hardware error or failed driver installation. This error may appear if a device has
insufficient power to operate correctly (e.g. plugged into a bus powered hub with other devices), or may indicate a
more serious hardware problem. Also, it may be indicative of USB root hub drivers being incorrectly installed. Please
refer to the example schematics on
contact the
FTDI support department.
4. Windows 98 complains about missing .CAT files
Files with the .cat extension are signature files issued by Microsoft that indicate a device driver is WHQL certified. If
a driver is not certified, there will be no .cat files available.
When installing drivers in Windows 98 or Windows ME, the user is prompted to locate the .cat files if the operating
system cannot find them. If the driver is not certified but you wish to install it anyway, the files may be skipped by
clicking the "Skip" button.
5. Windows 98 complains about missing ftccomms.vxd file
This can occur when the USB Composite driver has been installed if the user has not browsed to the location of the
driver files. If this message appears, do not skip it but browse to the driver file location. The wizard will then be able
to correctly install the device.
website. These can then be checked against the VID and PID entries in the driver INF files. If
the FTDI website for standard device configurations. If the error persists, p
lease
16
Page 18
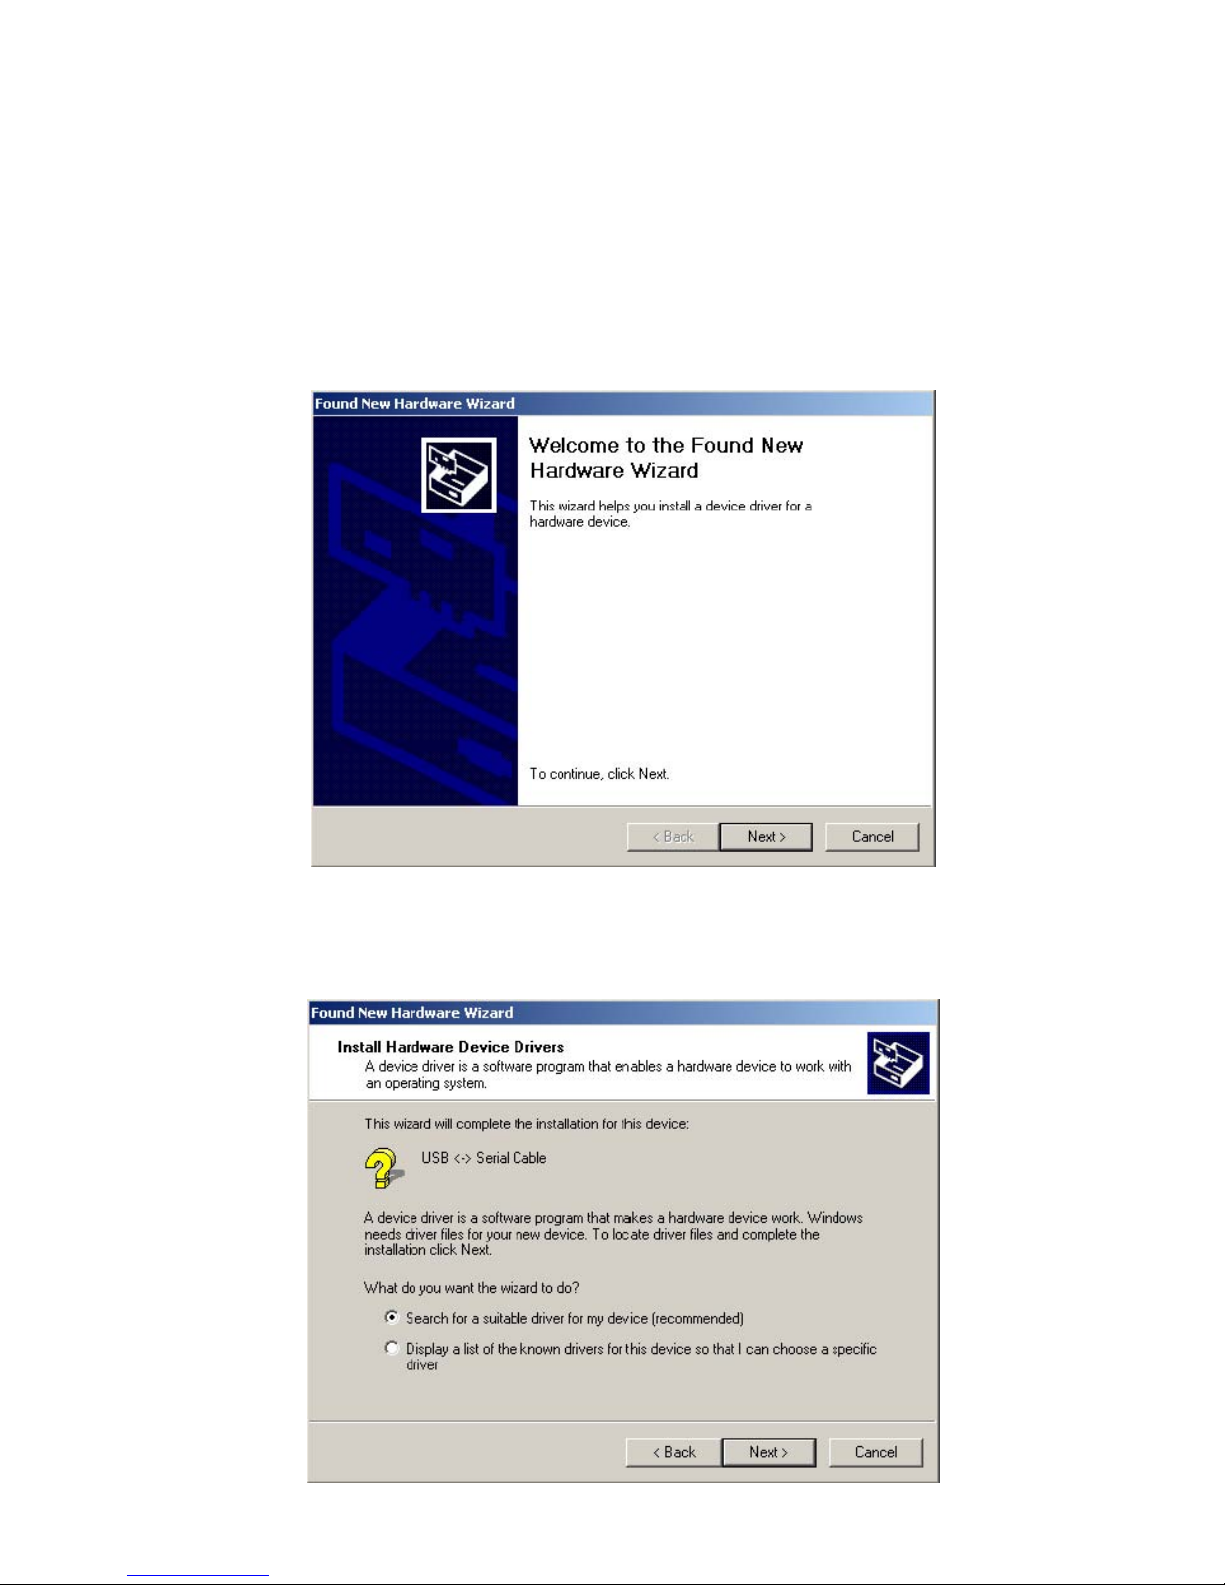
Windows 2000 Installation Guide
If a device of the same type has been installed on your machine before and the drivers that are about to be
installed are different from those installed already, the original drivers need to be uninstalled. Please refer
to the uninstalling instruction.
Download the latest available drivers from the FTDI web site and unzip them to a location on your PC.
Connect the device to a spare USB port on your PC. Once the composite driver has been installed the
Found New Hardware Wizard will launch. Click "Next" to proceed with the installation.
Select "Search for a suitable driver for my device (recommended)" as shown
below and then click "Next".
17
Page 19
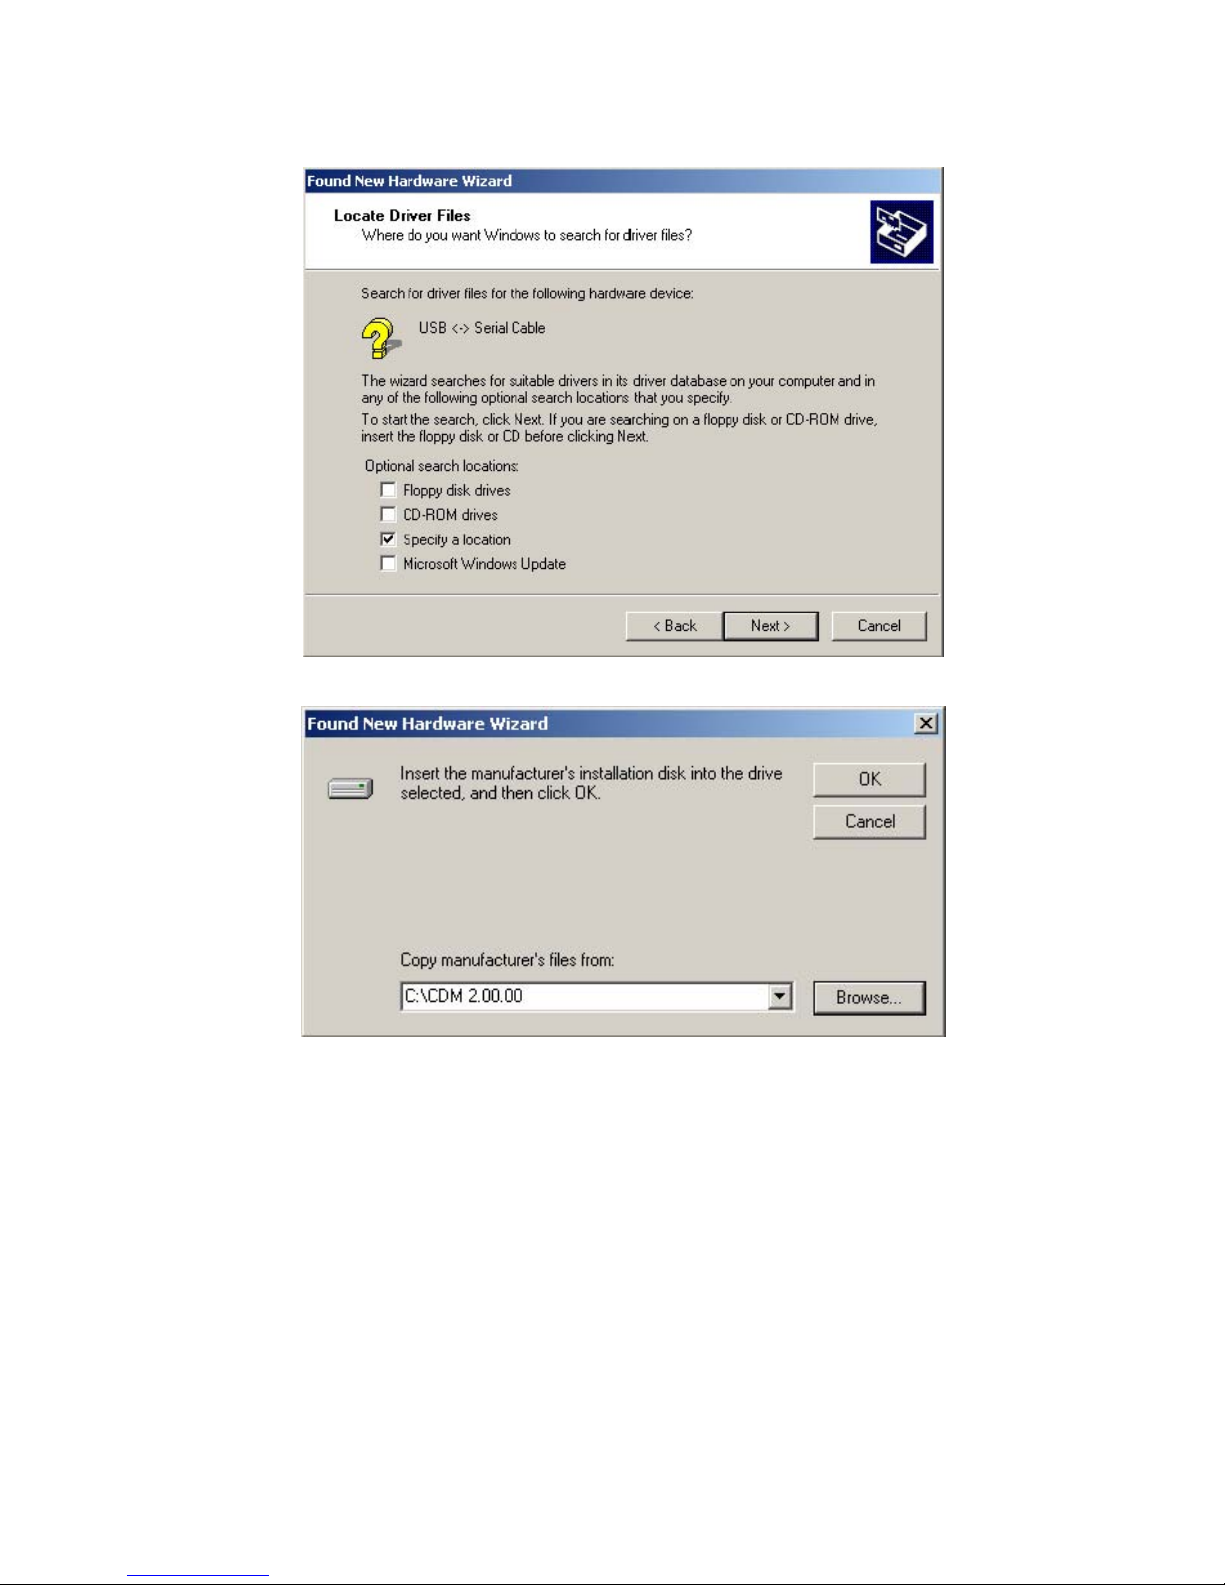
Check the box next to "Specify a location" and uncheck all others as shown below. Clicking "Next" displays a
dialog box for you to enter to the location of the drivers.
18
Page 20
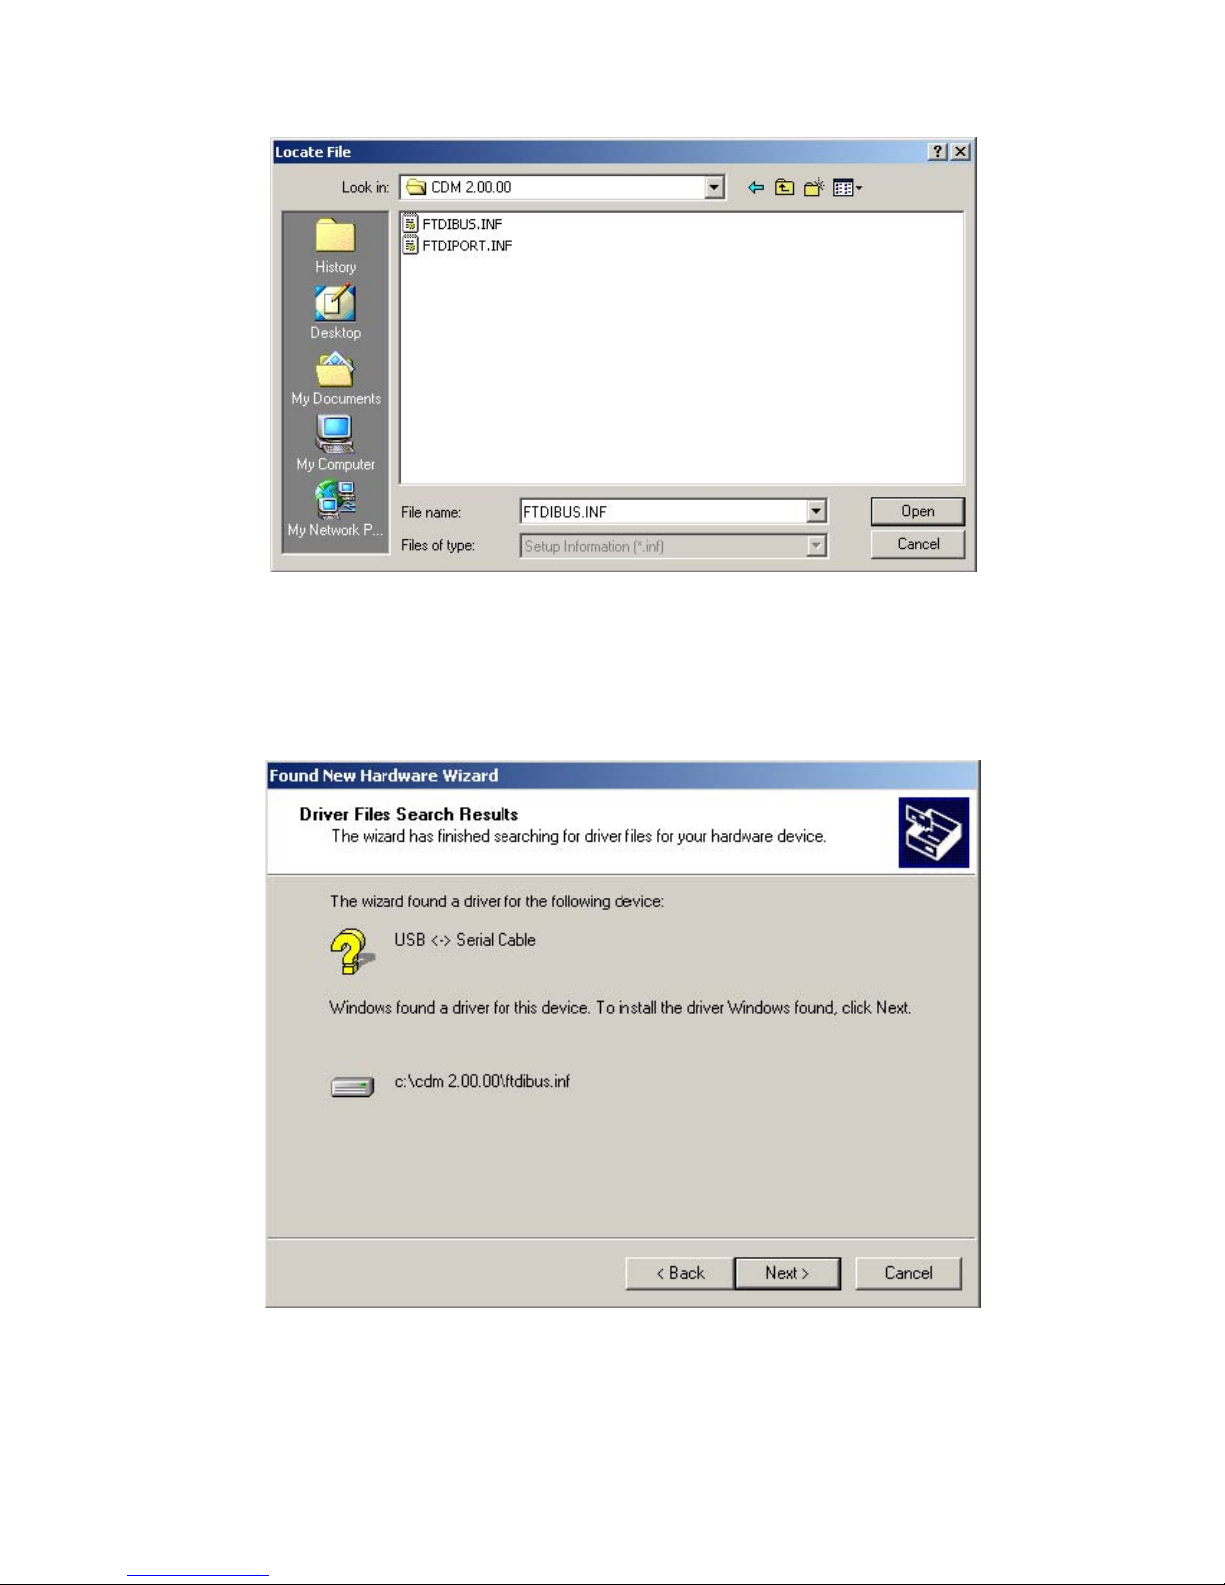
Click "Browse" to display an open file dialog box.
Locate the folder containing the latest drivers downloaded from the FTDI web site above and click "Open", then
click "OK". The PC auto selects the correct INF file, in this
case FTDIBUS.INF.
Once Windows found the required driver .INF file, please click "Next" to proceed.
19
Page 21
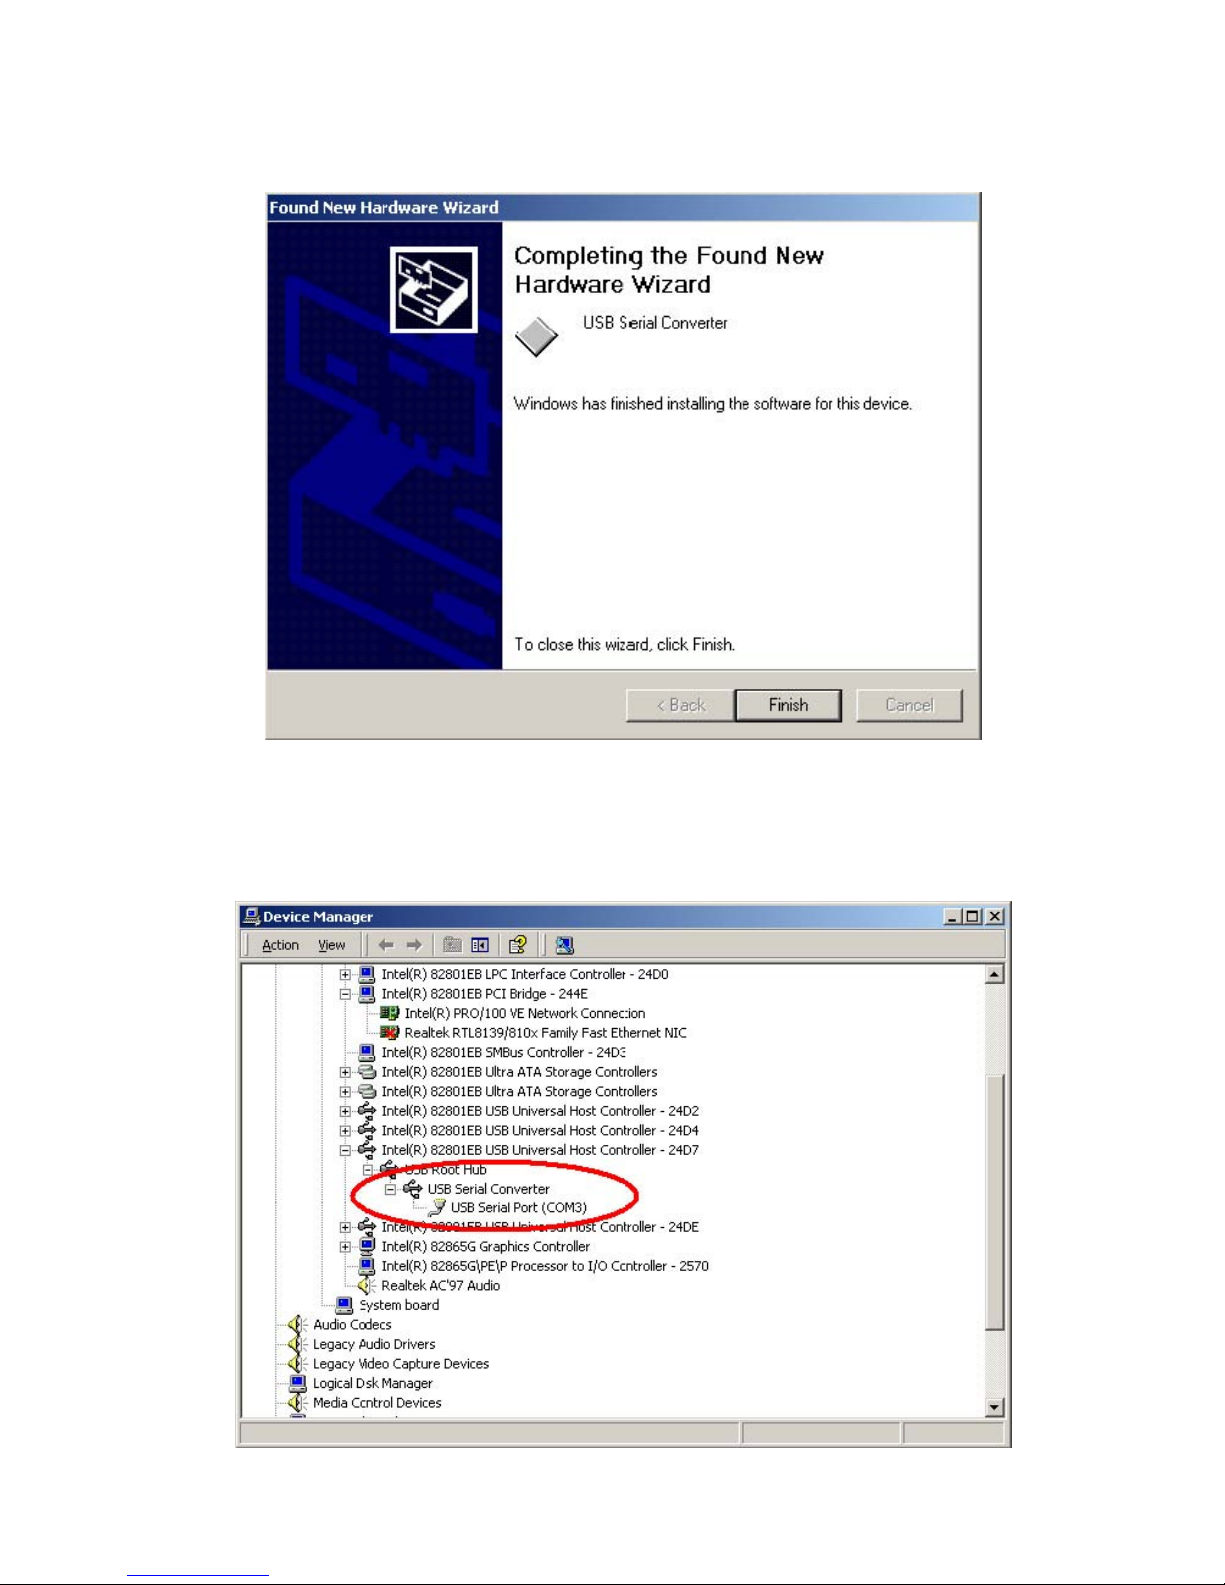
Windows should then display a message indicating that the installation was successful. Click "Finish" to complete
the installation for the serial converter driver for this port of the device. The COM port emulation driver must be
installed after this has completed.
By examining the Device Manager (located in "Control Panel\System" then select the "Hardware" tab and click
"Device Manger…") and viewing by connection ("View > Devices by connection"), the device appears as a "USB
Serial Converter" with an additional COM port with the label "USB Serial Port".
20
Page 22

Please note:
1. For multiple-port converter, each port has to be installed with the driver individually, i.e. you have to repeat this
installation procedure 2 times (2-port converter) or 4 times (for 4-port converter).
2. If you have any
difficulties with the drivers we provided in this CD, you may download the updated or appropriate
versions from FTDI Web site www.ftdichip.com/Drivers/VCP.htm
, supported device “FT232BL(M)”.
21
Page 23
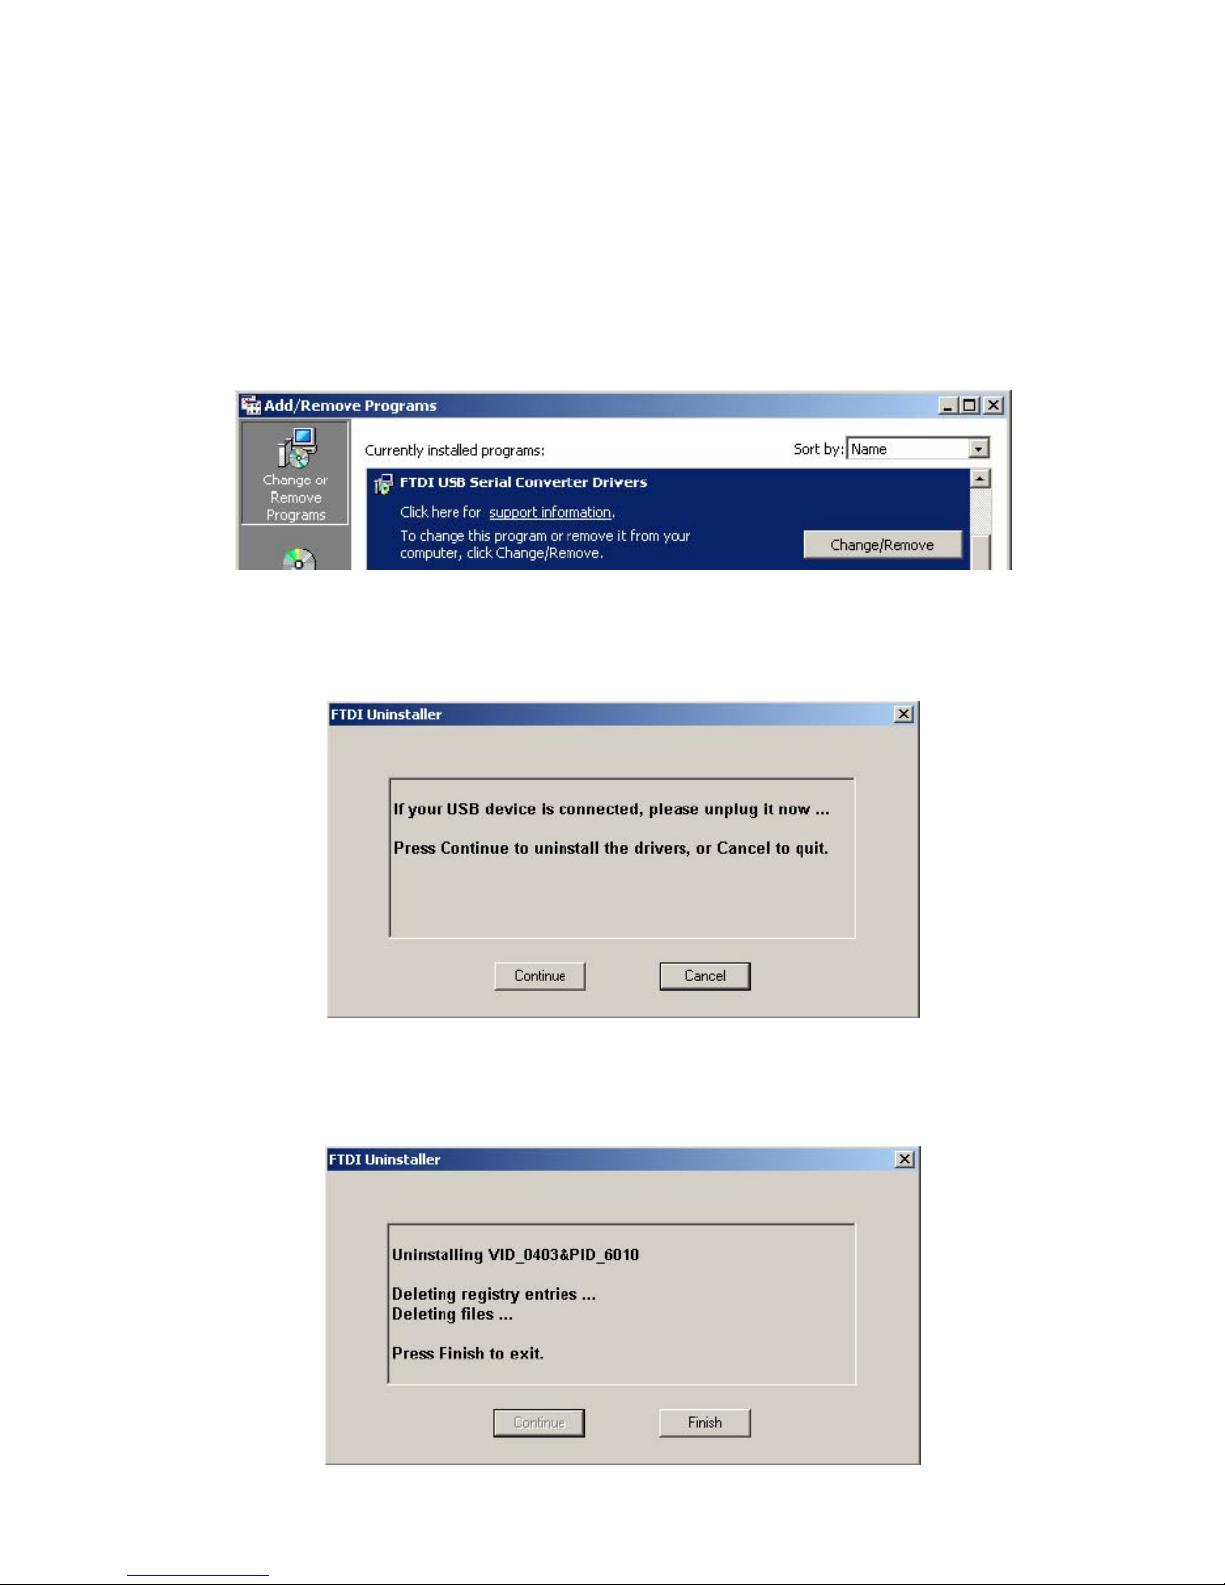
Uninstalling Instruction
When uninstalling devices from Windows 2000, it should always be done through the Add/Remove Programs utility
as this uses the FTDI driver uninstaller program to remove files and registry entries to leave a clean system. Other
methods may leave fragments of the driver that may interfere with future installations.
Disconnect any devices that are attached to the PC.
Open the Add/Remove Programs utility located in "Control Panel\Add/Remove
Programs ".Select "FTDI USB Serial Converter Drivers" from the list of installed programs.
Click the "Change/Remove" button. This will run the FTDI uninstaller program. Click "Continue" to run the uninstaller
or "Cancel" to exit.
When the uninstaller has finished removing the device from the system, the caption on the "Cancel" button will
change to "Finish". Click "Finish" to complete the process.
22
Page 24

Troubleshooting
1. Windows 2000 cannot find drivers for my device
This error can occur if the VID and PID programmed into the device EEPROM do not match those listed in the INF
files for the driver. The VID and PID programmed into
the device EEPROM may be found by using the USBView utility from the FTDI web site. These can then be checked
against the VID and PID entries in the driver INF files. If they do not match, that driver cannot be installed for that
device without either refiles. Please note that only your own company VID and PID or FTDI's VID (0x0403) and FTDI PID issued for use by
your company should be used in the EEPROM and INF/INI files.
2. Windows 2000 forces a reboot after installing a device
This problem can occur if an application is accessing a file while the New Hardware Wizard is trying to copy it. This
usually occurs with the FTD2XX.DLL file. Selecting
not to restart the computer then unplugging and re-plugging the device may allow the device to function properly
without restarting. Restarting the machine will allow the device to work correctly.
3. Driver installation fails and Windows 2000 gives error code 10
Windows error code 10 indicates a hardware error or failed driver installation. This
error may appear if a device has insufficient power to operate correctly (e.g. plugged into a bus powered hub with
other devices), or may indicate a more serious hardware problem. Also, it may be indicative of USB root hub drivers
being incorrectly installed. Please refer to the example schematics on the FTDI web site for standard device
configuratio
ns.
programming the device EEPROM or modifying the list of VID and PID numbers in the INF
23
Page 25
Windows CE Installation Guide
Download the latest available drivers for the required processor model from the FTDI website and unzip them, the
critica
l files in the driver package are:
ftdi_ser.dll - the VCP driver file
FTDIPORT.inf - user changeable file to allow devices with custom VID and PID combinations to be installed
Copy all of the unzipped files to the \\Windows directory on the PDA.
If the PDA requires a host adaptor (e.g. USB host cable, presentation pack or Compact Flash host card), make
sure that it is connected and installed before proceeding.
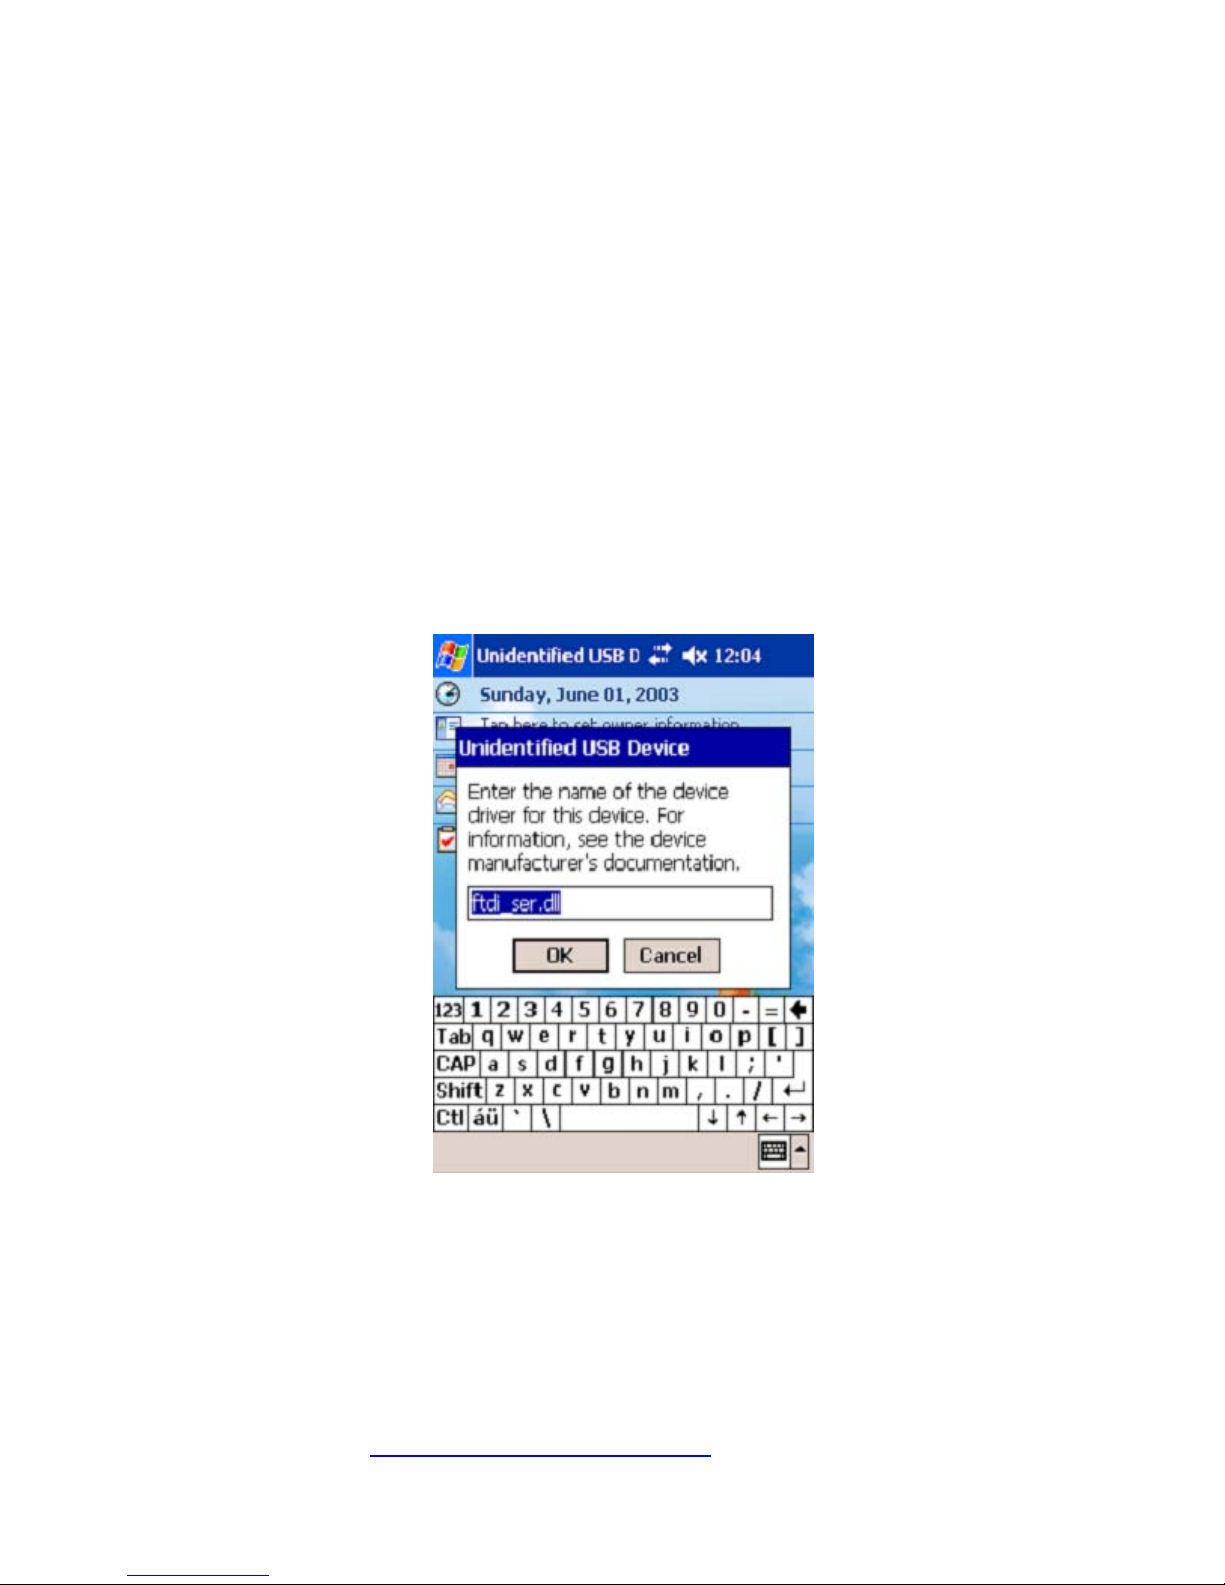
Connect the FTDI device to a host USB port on the PDA. This will provide a dialog box to direct Windows CE to the
driver files.
Type the full name of the VCP driver file into the dialog box as shown below. If the file name is incorrect, the driver
will not be found and the device will not function.
The device installation is now complete. The installation may be verified using the test program available form the
Utilities page of the FTDI website.
Please note:
1. For multiple-port converter, each port has to be installed with the driver individually, i.e. you have to repeat this
installation procedure 2 times (2-port converter) or 4 times (for 4-port converter).
2. If you have any
versions from FTDI Web site www.ftdichip.com/Drivers/VCP.htm
difficulties with the drivers we provided in this CD, you may download the updated or appropriate
, supported device “FT232BL(M)”.
24
Page 26
Troubleshooting
1. "Unidentified USB Device" dialog is not displayed when device is
connected for the first time
If the "Unidentified USB Device" dialog is not displayed when the device is connected for the first time, it is likely
that the PDA does not have a USB host capability or that the host is not installed correctly.
Many PDAs require some form of adaptor (USB host cable, presentation pack or Compact Flash USB host card)
to provide the USB host capability that FTDI devices require.
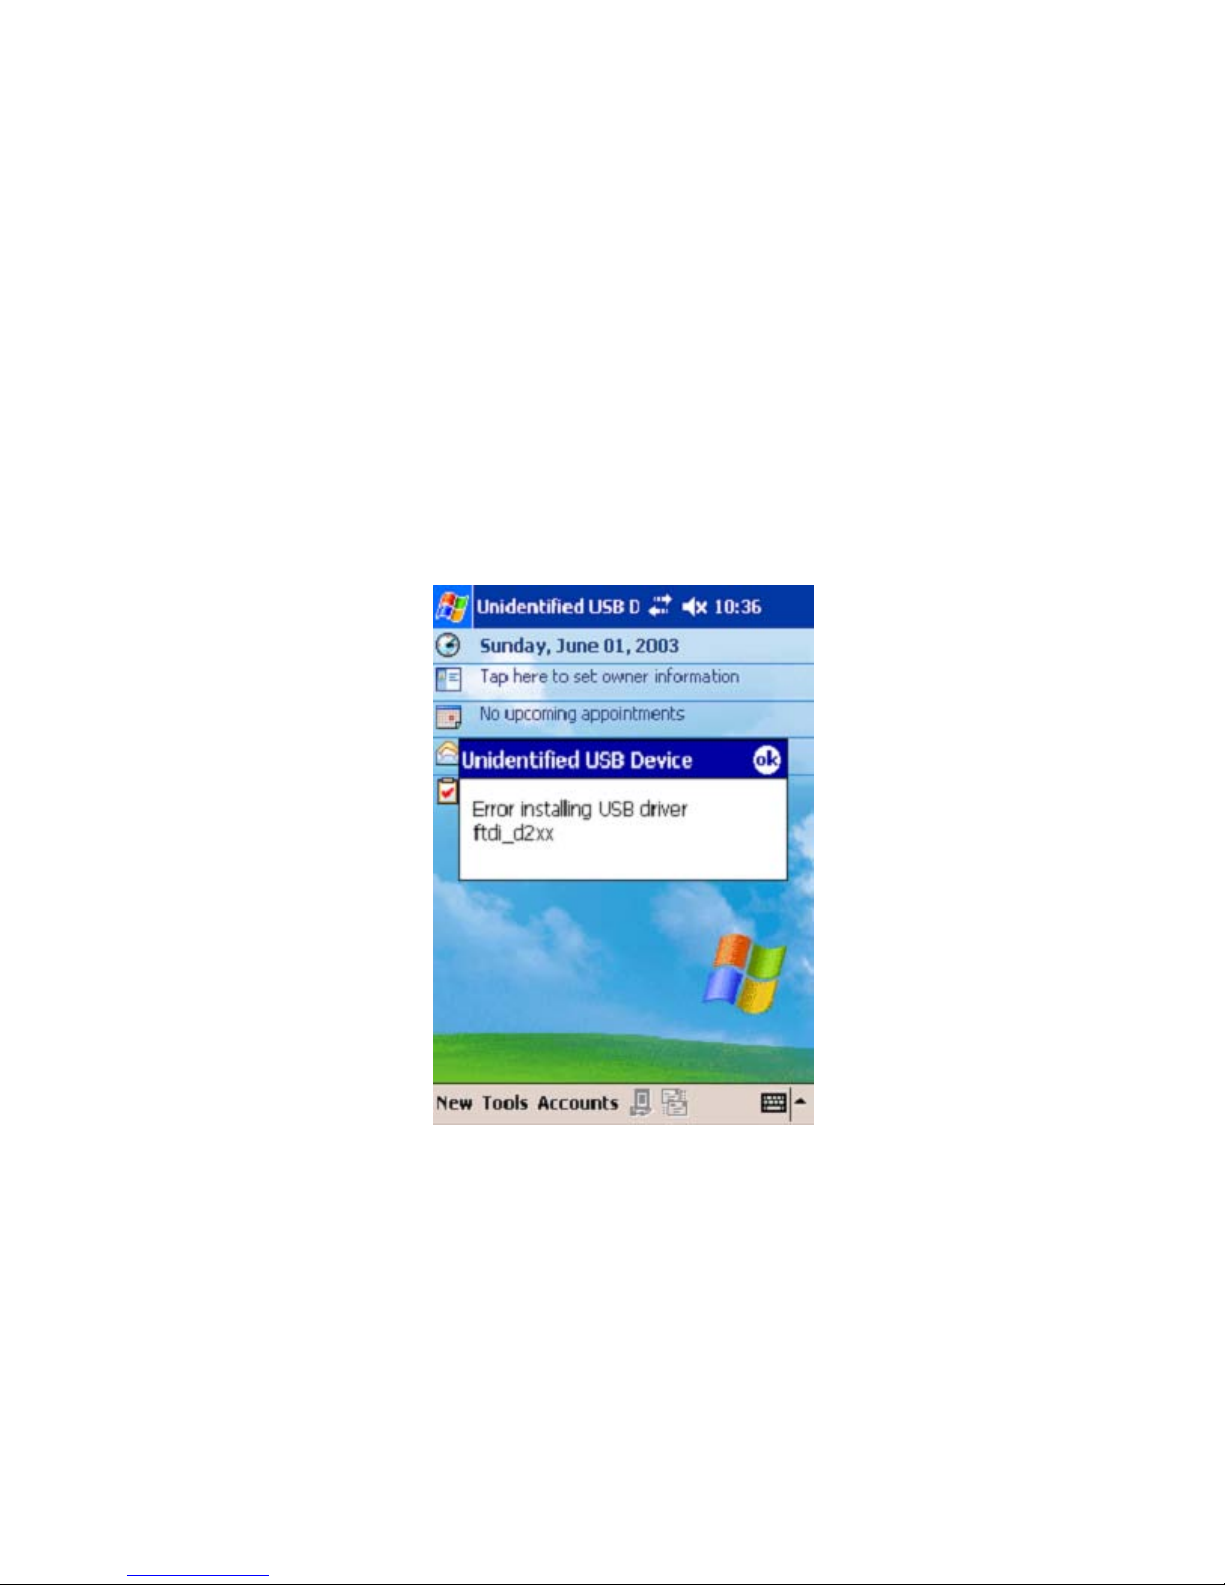
2. "Error installing USB driver ftdi_d2xx.dll" message
The following installation error may be displayed for a number of reasons:
The driver name has been misspelt · The ".dll" file extension may be required for some platforms · The required
driver files are not in the \\Windows directory · The driver file is in the wrong binary format
25
Page 27
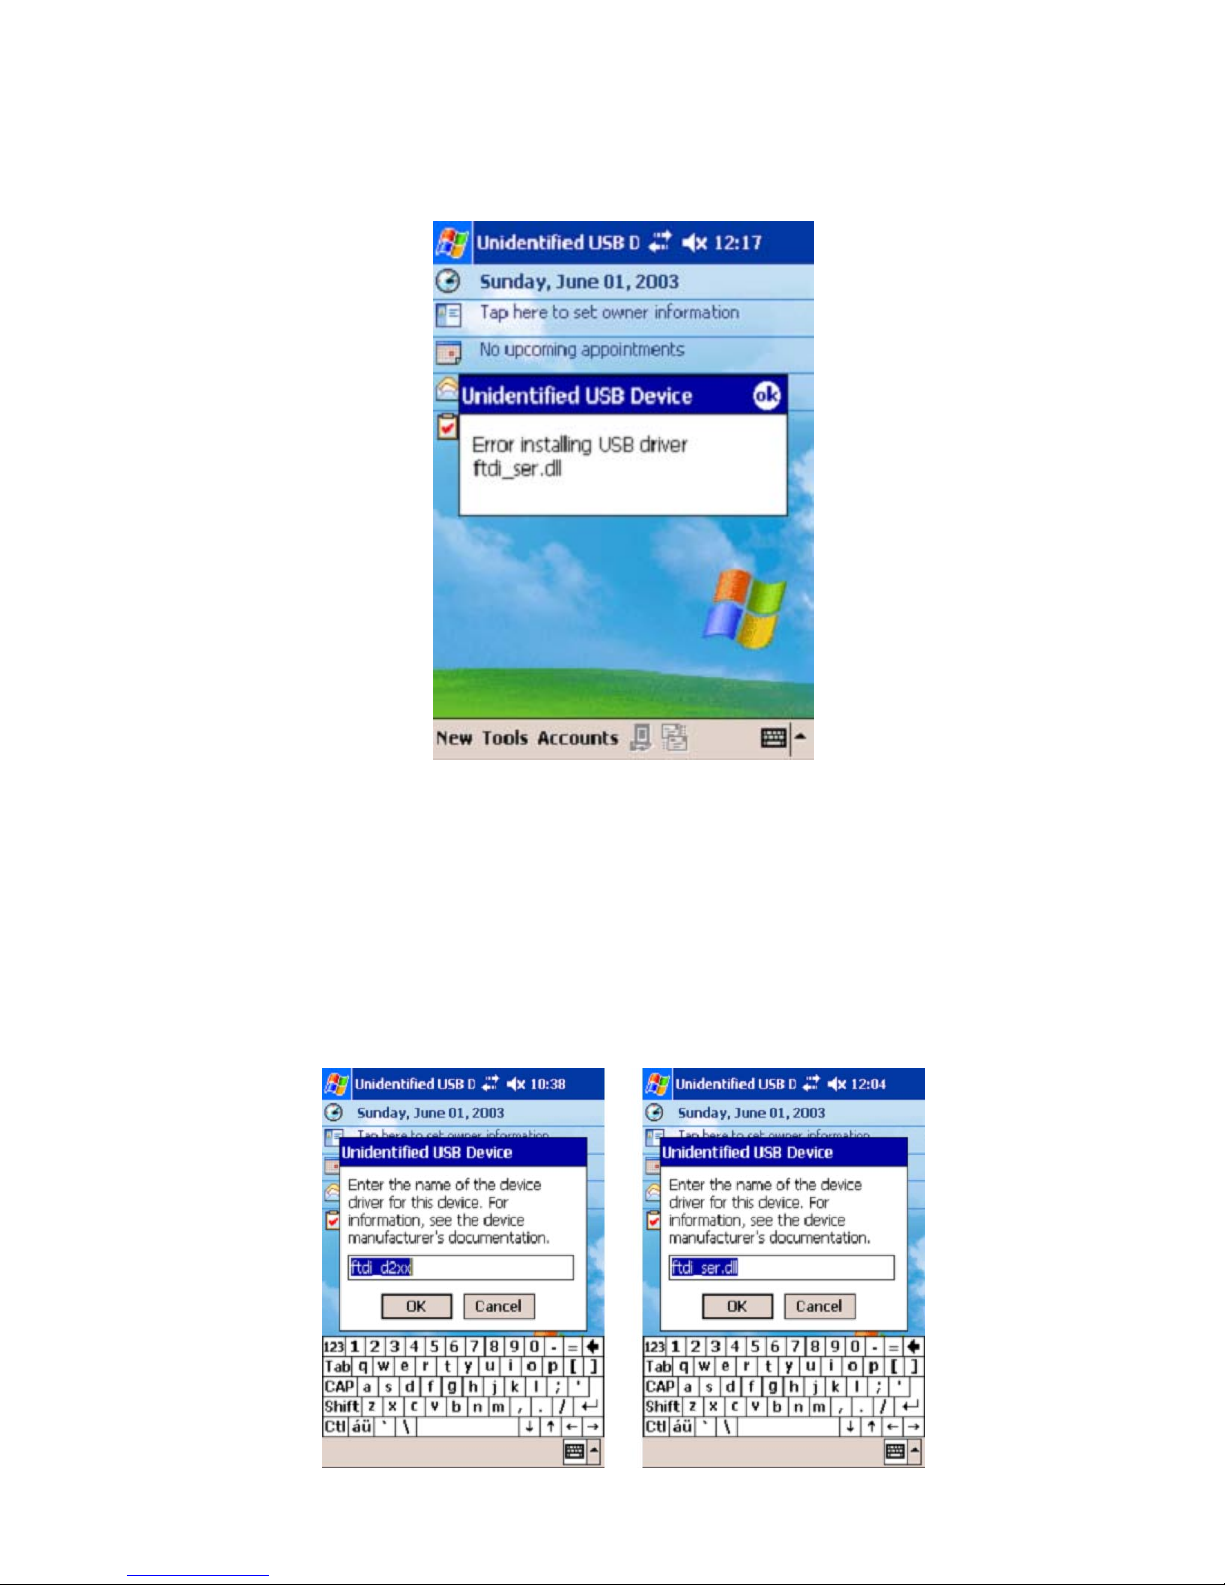
3. "Error installing USB driver ftdi_ser.dll" message
The following installation error may be displayed for a number of reasons:
The driver name has been miss pelt · The ".dll" file extension may be required for some platforms · The required
driver files are not in the \\Windows directory · The driver file is in the wrong binary format
4. "Unidentified USB Device" appears each time the driver name is entered
This error can be caused when the VID and PID listed in the INF file does not match the VID and PID combination
programmed into the device. It can also be caused if the INF file has not been copied to the \\Windows directory.
26
Page 28
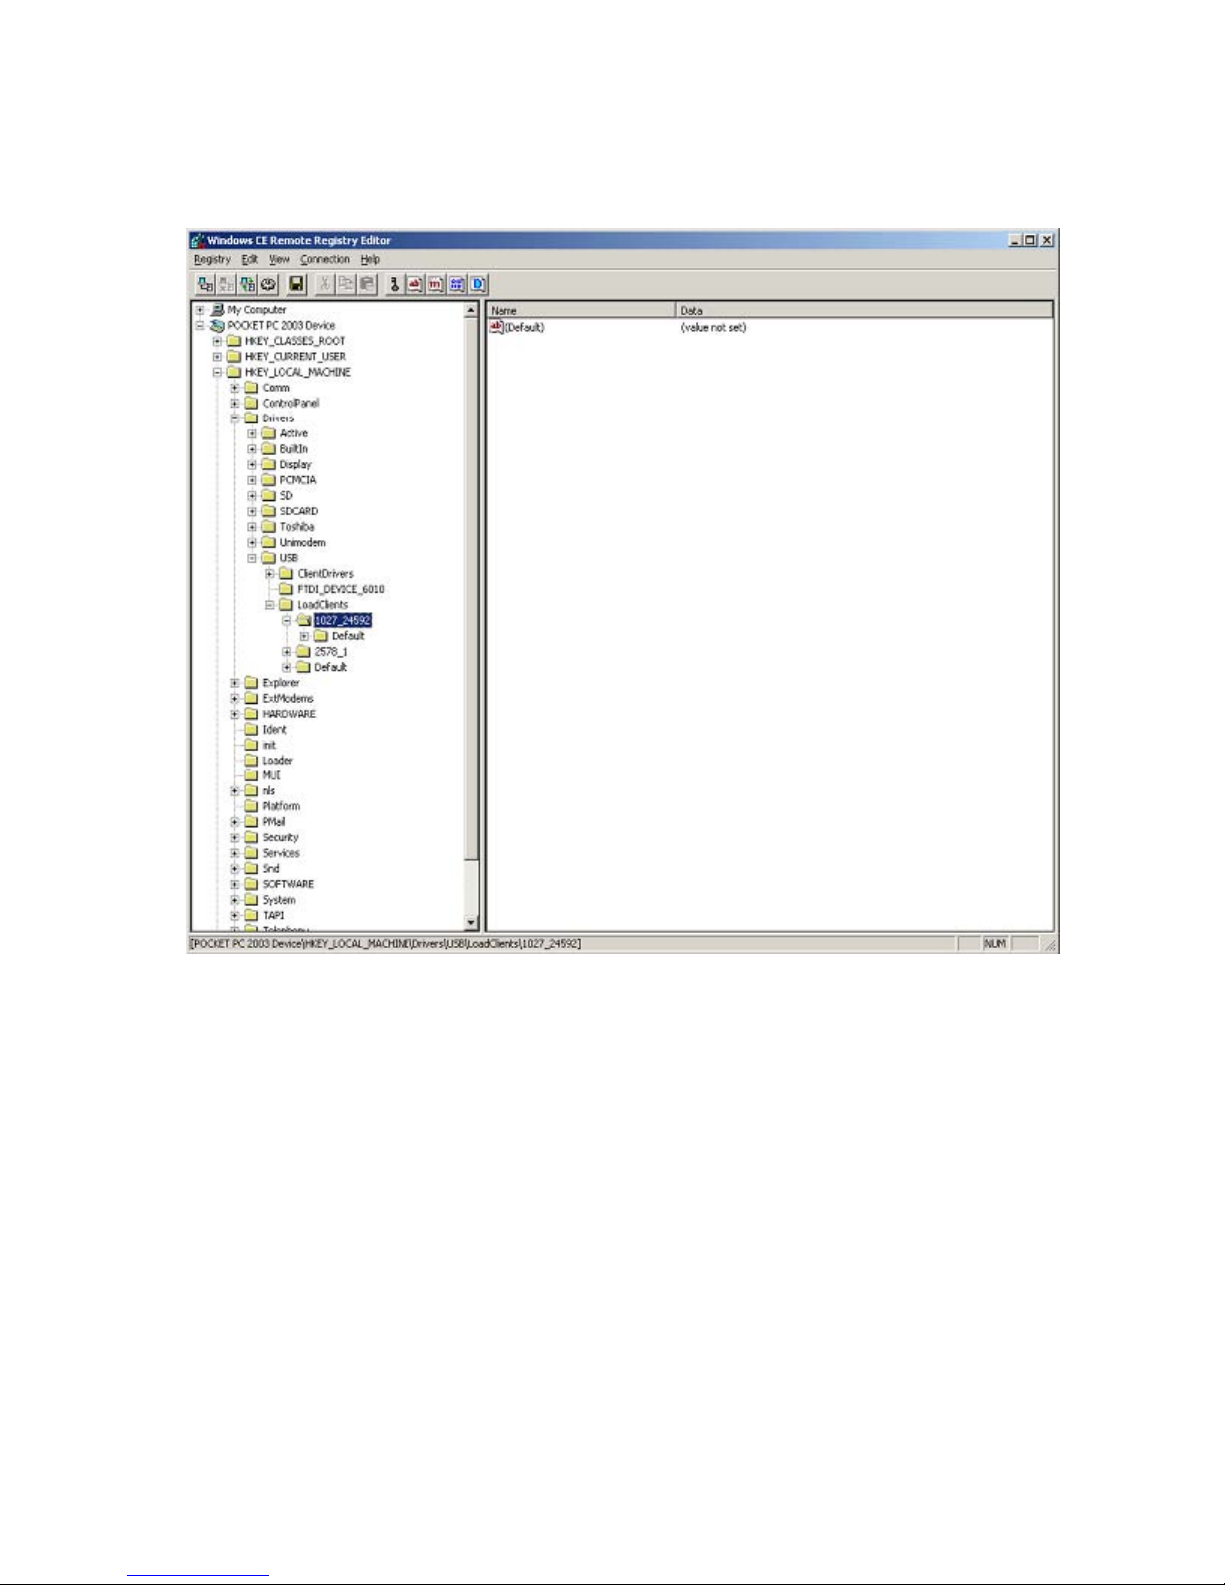
One way to check this is to use the Registry editor that comes with Embedded Visual C++ (or a suitable registry
editor on the Windows CE device itself); you may check for the registry settings (Tools > Remote Registry Editor).
With ActiveSync running, connect to your device then look at the registry setting
KEY_LOCAL_MACHINE\Drivers\USB\LoadClients\
In this case, the entry is 1027_24592, which corresponds to a VID of 0x0403 (1027) and a PID of 0x6010 (24592)
device. If this is not the device to be installed, the message will recur.
To solve the problem, the INF files must be edited to accommodate the required VID and PID. For the D2XX drivers,
edit the bold red entries in the following line in the ftd2xx.inf file:
[FtdiHw]
"FTDI Dual device"=FTDI,USB\&VID_0403&PID_6010
For the VCP drivers, edit the bold red entries in the following line in the FTDIPORT.inf:
[FtdiHw]
%VID_0403&PID_6010.DeviceDesc%=FtdiPort232,FTDIBUS\COMPORT&VID_0403&PID_6010
27
Page 29

5. Device can write but cannot read
If the hardware does not work correctly under Windows 2000 or Windows XP then the problem is most likely a
hardware issue. Windows CE is not very tolerant of noisy hardware, so even "good" designs for Windows 2000
and XP may experience problems with Windows CE.
Another issue that has arisen with Windows CE is that different host devices support different bulk transfer sizes.
One method to attempt to resolve this is to reduce In Transfer Size to 64. This is the smallest possible transfer size
and will have a severe effect on performance, but should resolve most other issues. Larger values may be tried to
improve performance.
If a USB host CF card is being used, it may help to set the Raton bit in the configuration settings.
6. Bytes missing or data corrupt
This can occur when a host driver fails to send vendor commands properly which can result in the device running at
a different Baud rate to the one intended. The Baud rate can be verified easily by transferring data from PDA/target
to HyperTerminal.
Some host device drivers have been seen to lose packets of data which would also cause this problem.
7. Driver isn't sending or receiving any data
Sending and receiving data can be tested with an application such as VCPTest. However, this will not highlight
problems due to incorrect Baud rates. To check f
PDA/target to and from HyperTerminal.
or the wrong Baud rate being set, try to transfer data from the
28
Page 30
Windows XP Installation Guide
1. Installing Via The Found New Hardware Wizard
If a device of the same type has been installed on your machine before and the drivers that are about to be installed
are different from those installed already, the original drivers need to be uninstalled. Please refer to the Uninstalling
instruction.
Download the latest available drivers from the FTDI web site and unzip them to a location on your PC.
If you are running Windows XP or Windows XP SP 1, temporarily disconnect your PC from the Internet. This can be
done by either removing the network cable from your PC or by disabling your network card by going to the "Control
Panel\Network and Dial Up Connections", right clicking on the appropriate connection and selecting "Disable" from
the menu. The connection can be re enabled after the installation is complete. This is not necessary under Windows
XP SP 2 if configured to ask before connecting to Windows Update. Windows XP SP 2 can have the settings for
Windows Update changed through "Control Panel\System" then select the "Hardware" tab and click "Windows
Update".
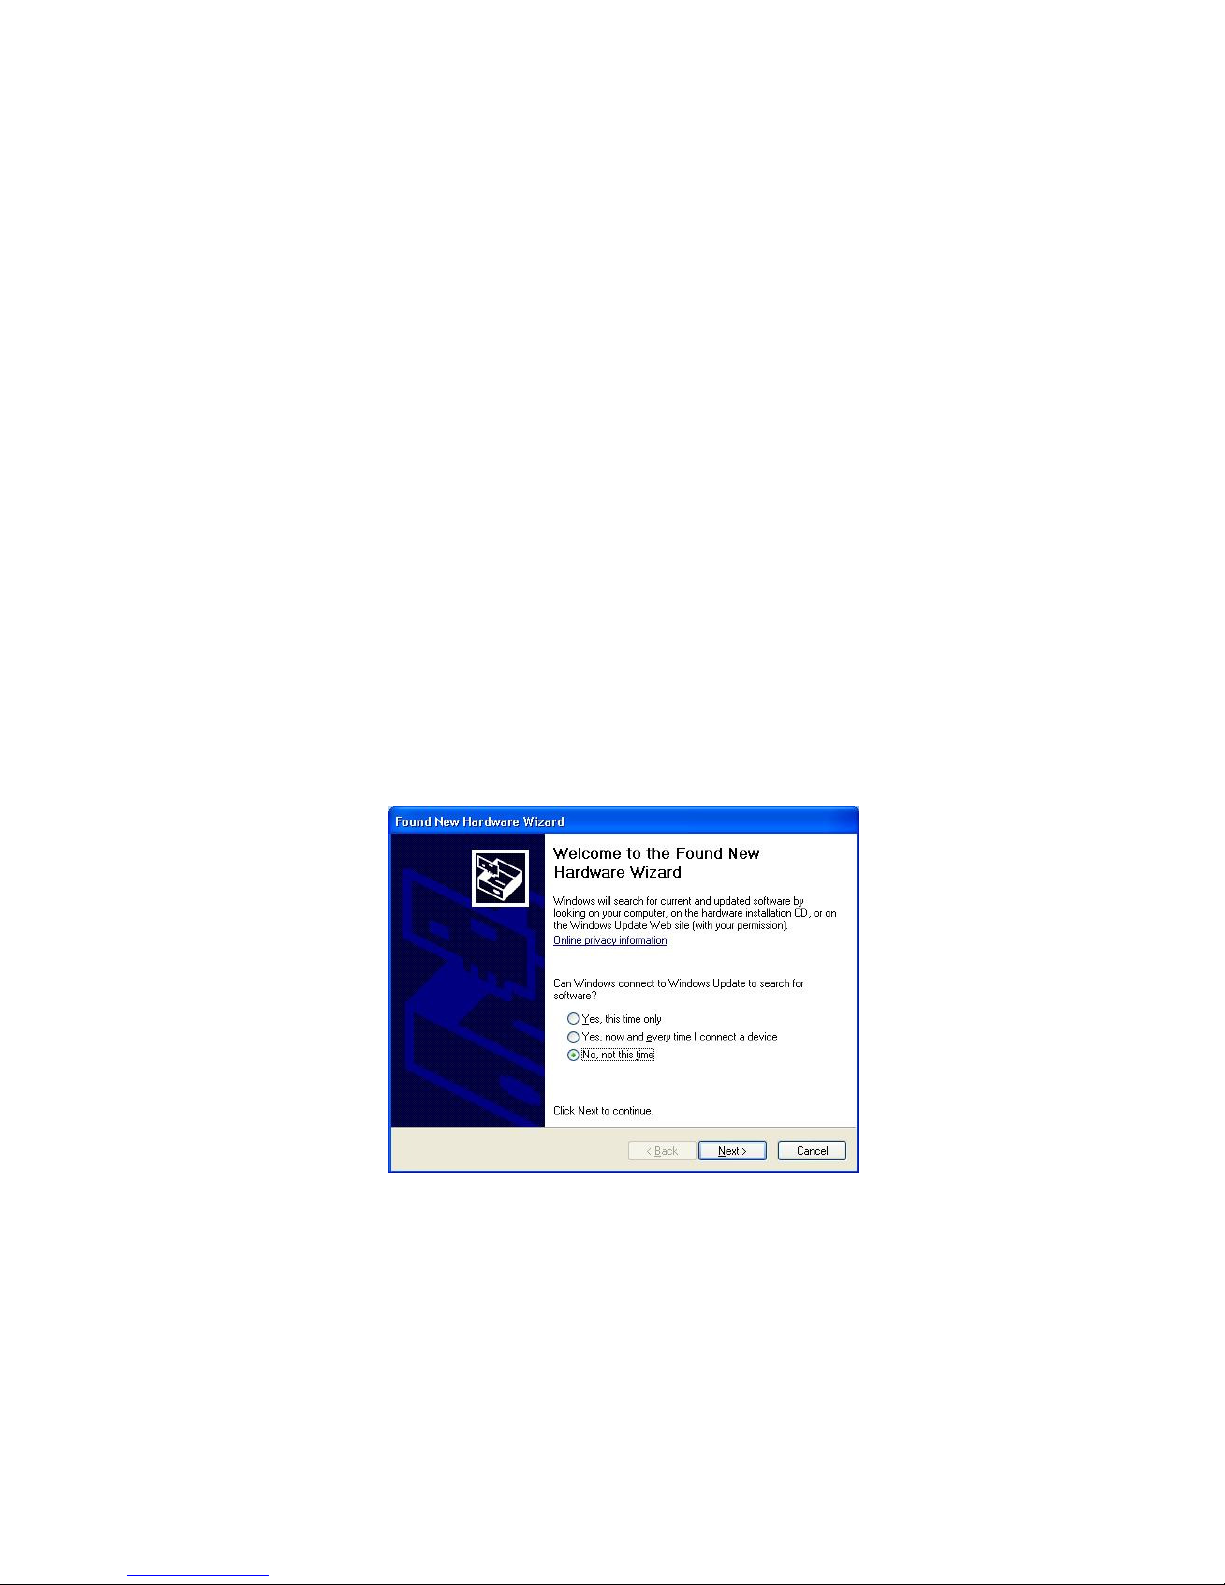
Connect the device to a spare USB port on your PC. If there is no available Internet connection or Windows XP SP
2 is configured to ask before connecting to Windows Update, the screen shown in Figure 2.1 is displayed. Select
"No, not this time" from the options available and then click "Next" to proceed with the installation. If there is an
available Internet connection, Windows XP will silently connect to the Windows Update website and install any
suitable driver it finds for the device in preference to the driver manually selected.
Figure 2.1
Select "Install from a list or specific location (Advanced)" as shown in Figure 2.2 below and then click "Next".
29
Page 31
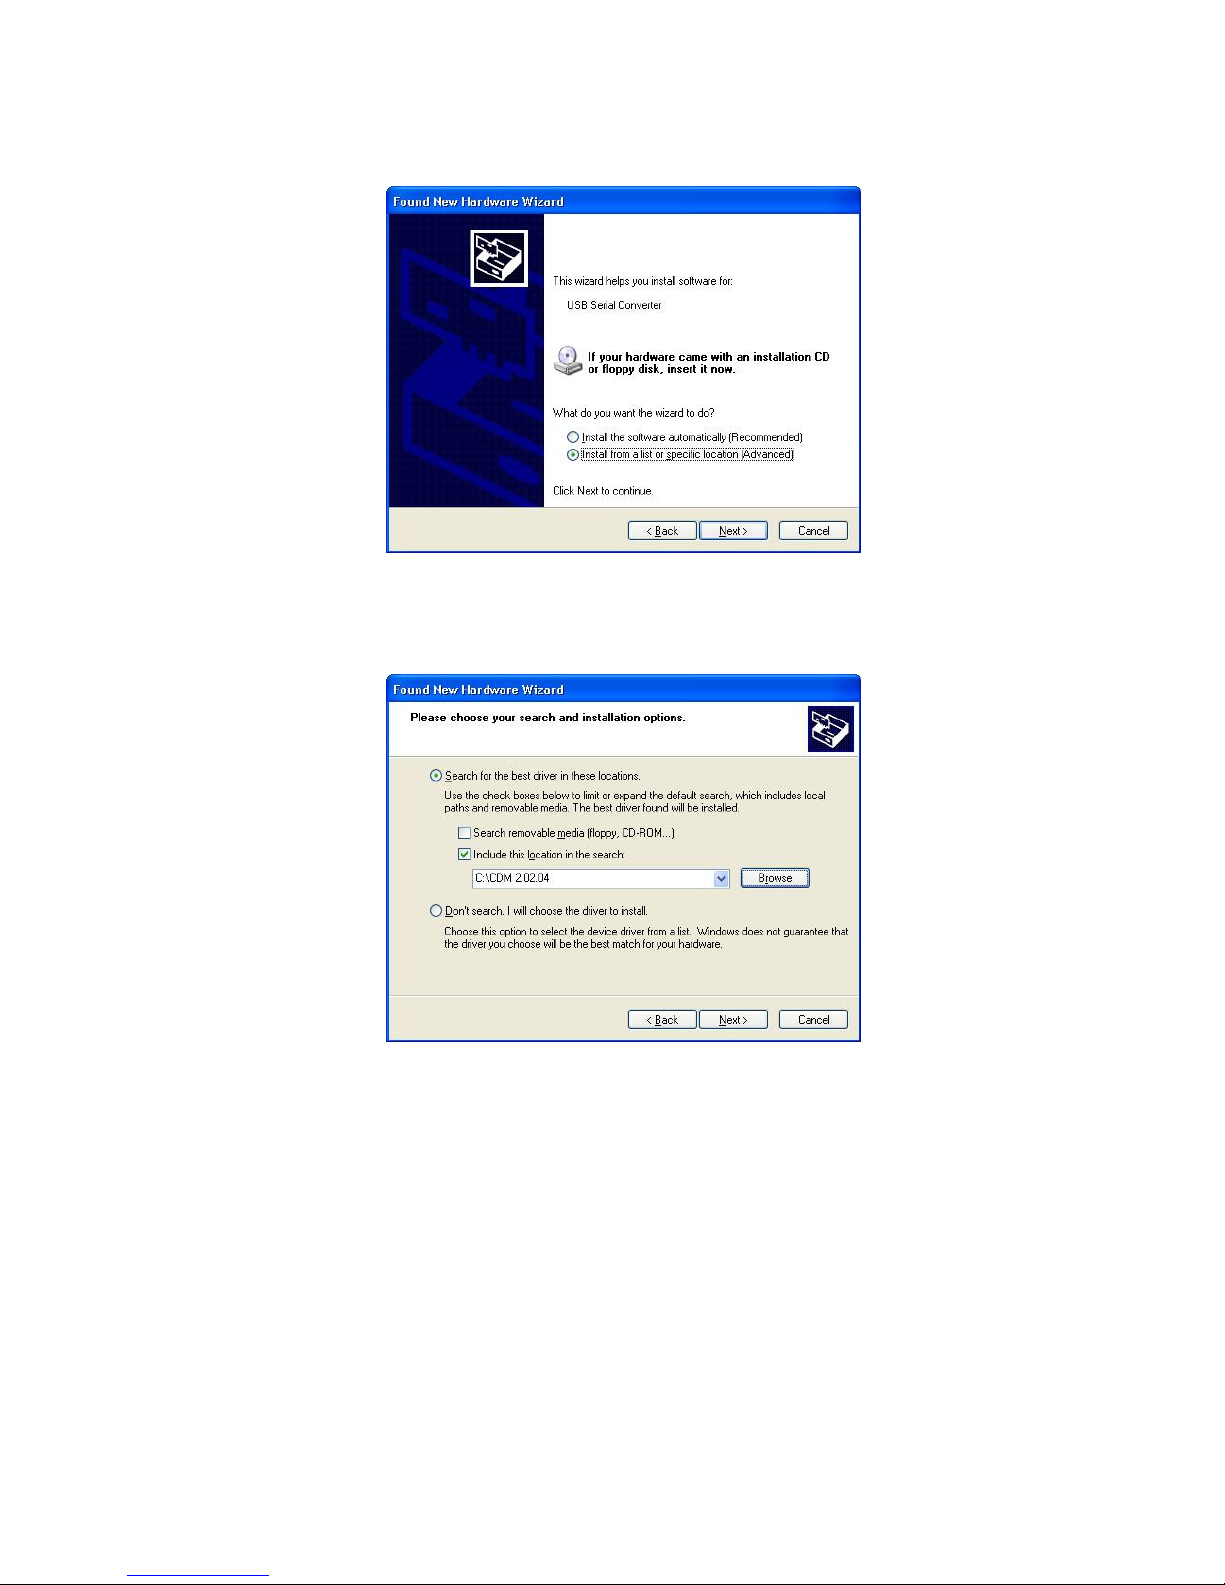
Select "Search for the best driver in these locations" and enter the file path in the combo box ("C:\CDM 2.02.04" in
Figure 2.3 below) or browse to it by clicking the browse button. Once the file path has been entered in the box, click
next to proceed.
Figure 2.2
Figure 2.3
If Windows XP is configured to warn when unsigned (non WHQL certified) drivers are about to be installed, the
message dialogue shown in Figure 2.4 will be displayed unless installing a Microsoft WHQL certified driver. Click on
"Continue Anyway" to continue with the installation. If Windows XP is configured to ignore file signature warnings, no
message will appear.
30
Page 32
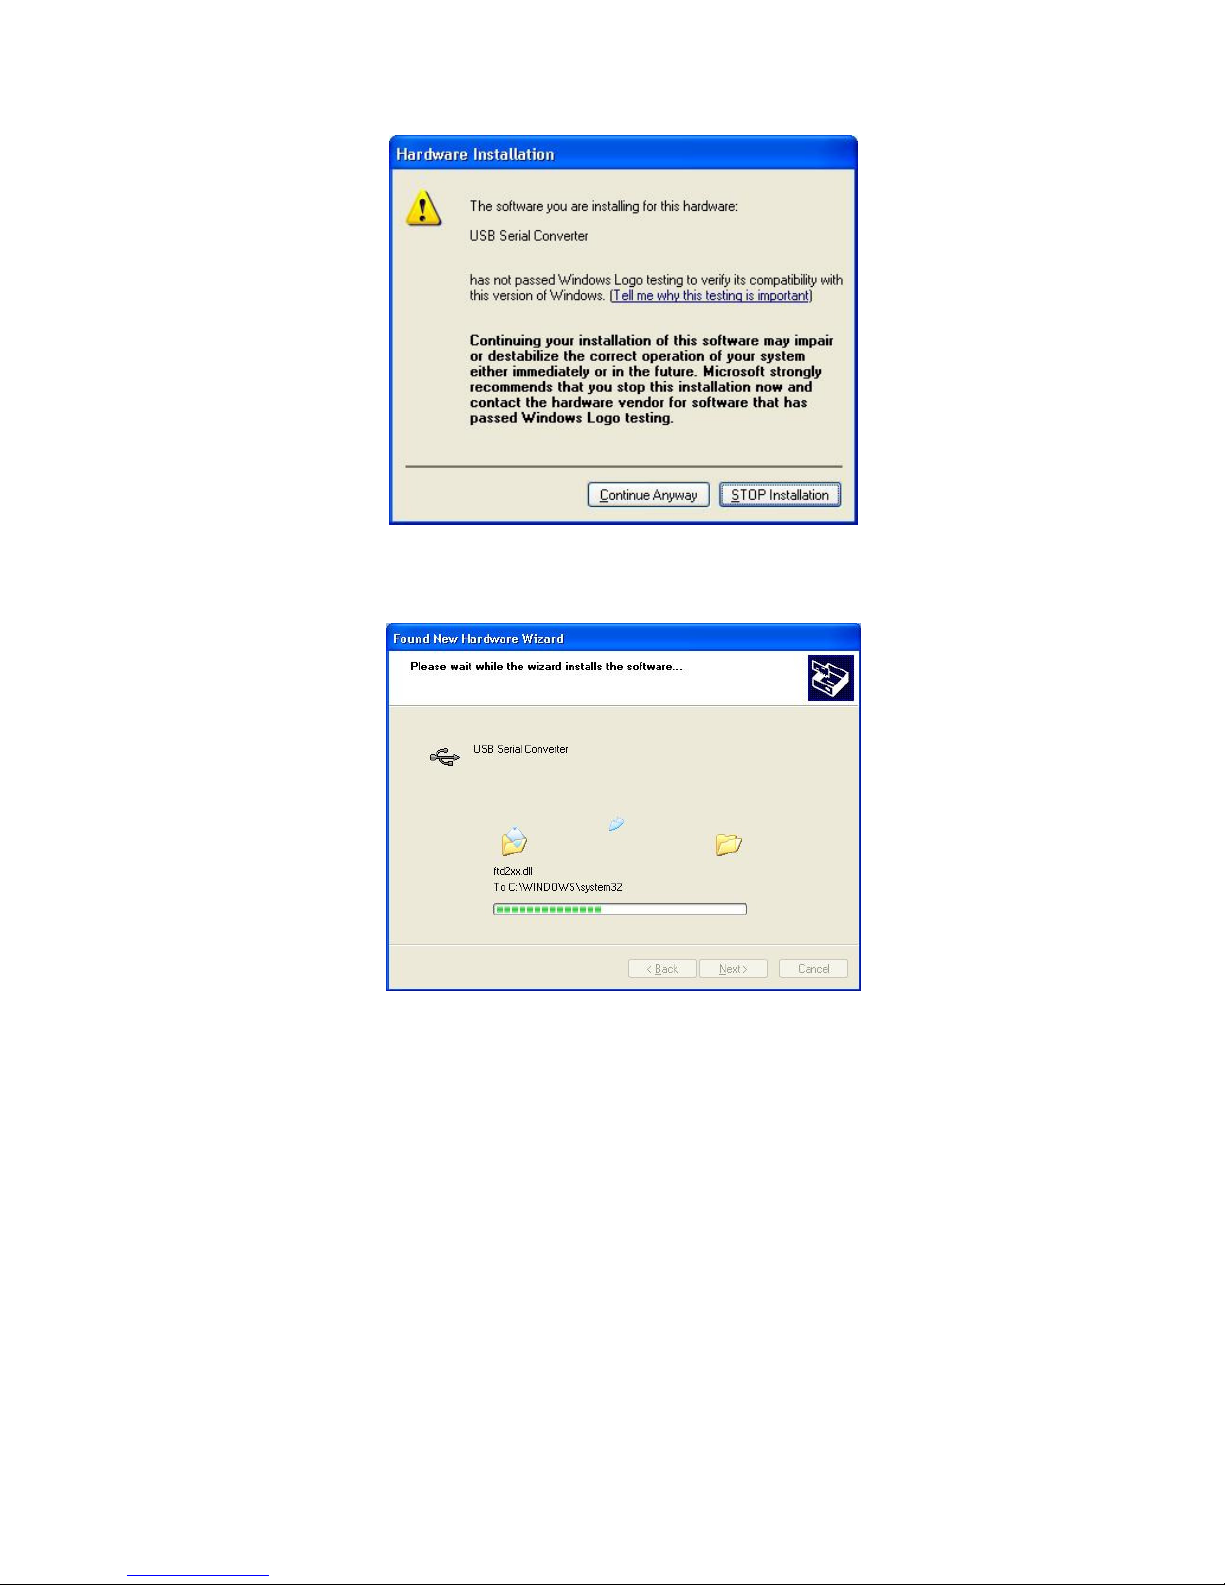
The screen shown in Figure 2.5 will be displayed as Windows XP copies the required driver files.
Figure 2.4
Figure 2.5
Windows should then display a message indicating that the installation was successful (Figure 2.6). Click "Finish" to
complete the installation for the first port of the device.
31
Page 33
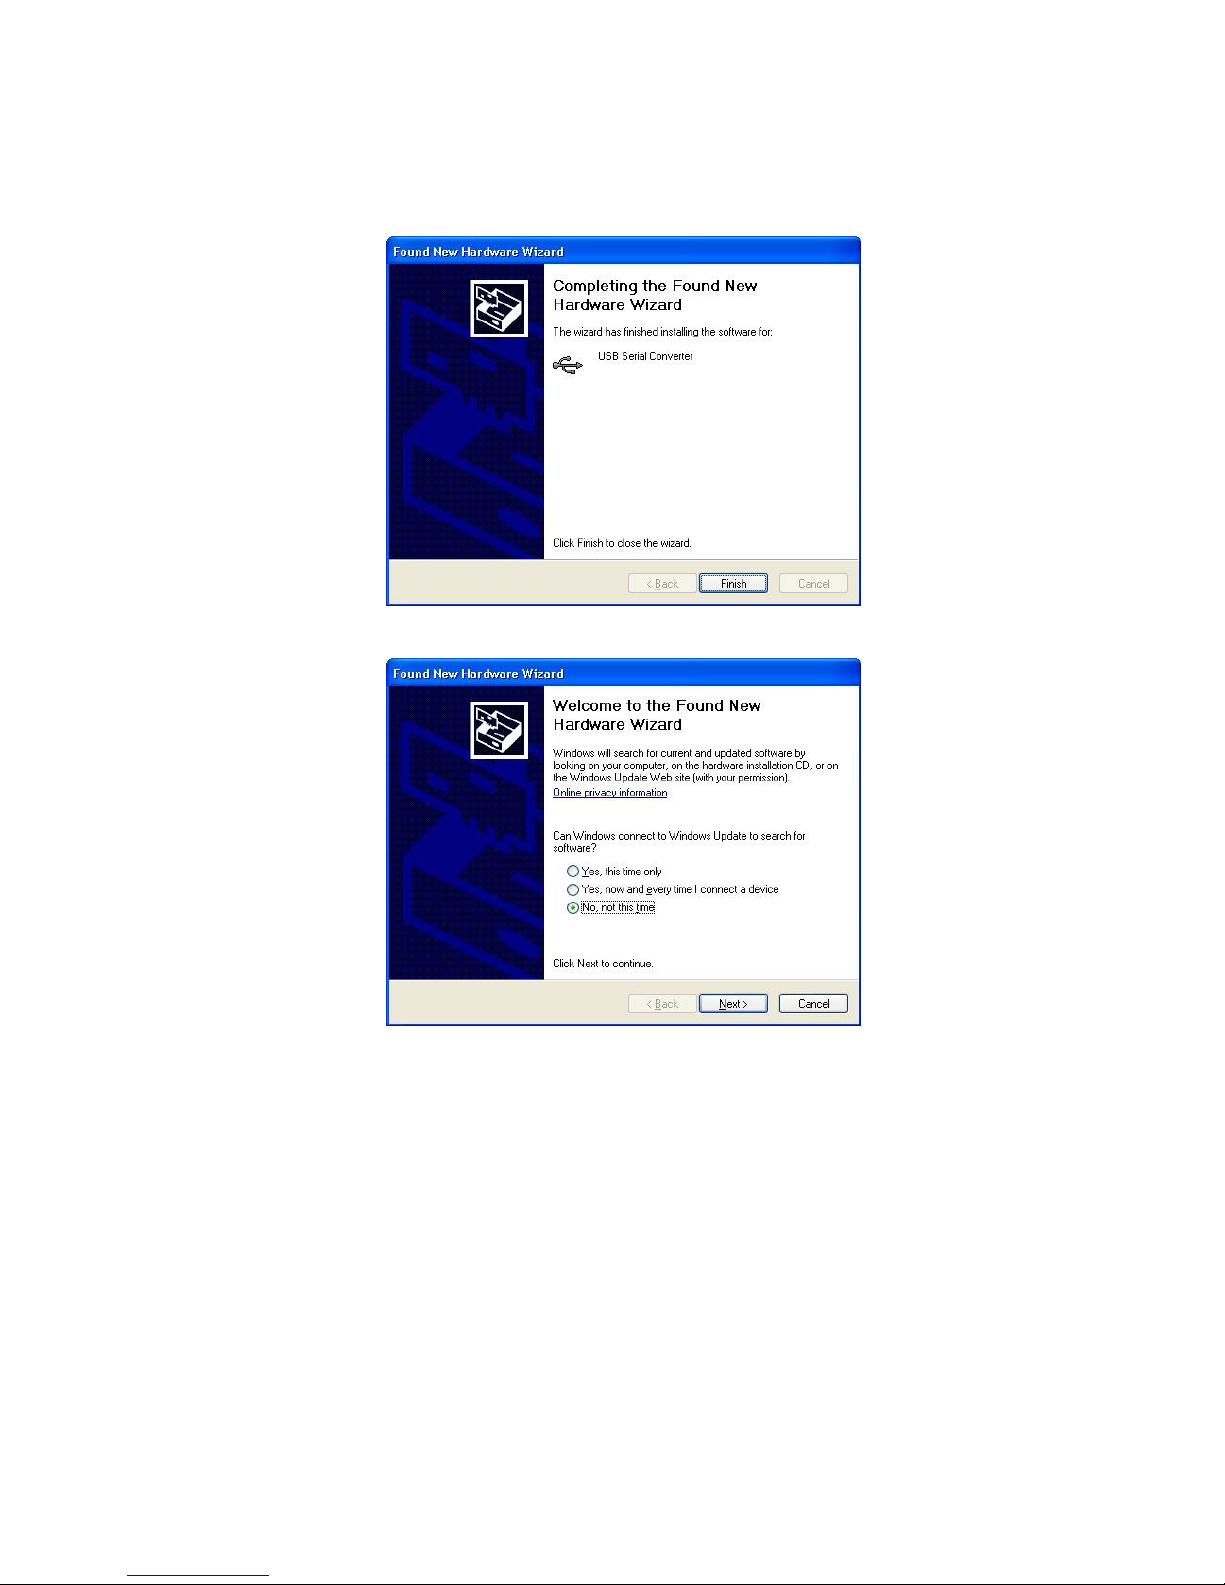
The Found New Hardware Wizard will launch automatically to install the COM port emulation drivers. As above,
select "No, not this time" From the options and click "Next" to proceed with the installation (Figure 2.7).
Figure 2.6
Figure 2.7
Select "Install from a list or specific location (Advanced)" as shown in Figure 2.8 below and then click "Next".
32
Page 34
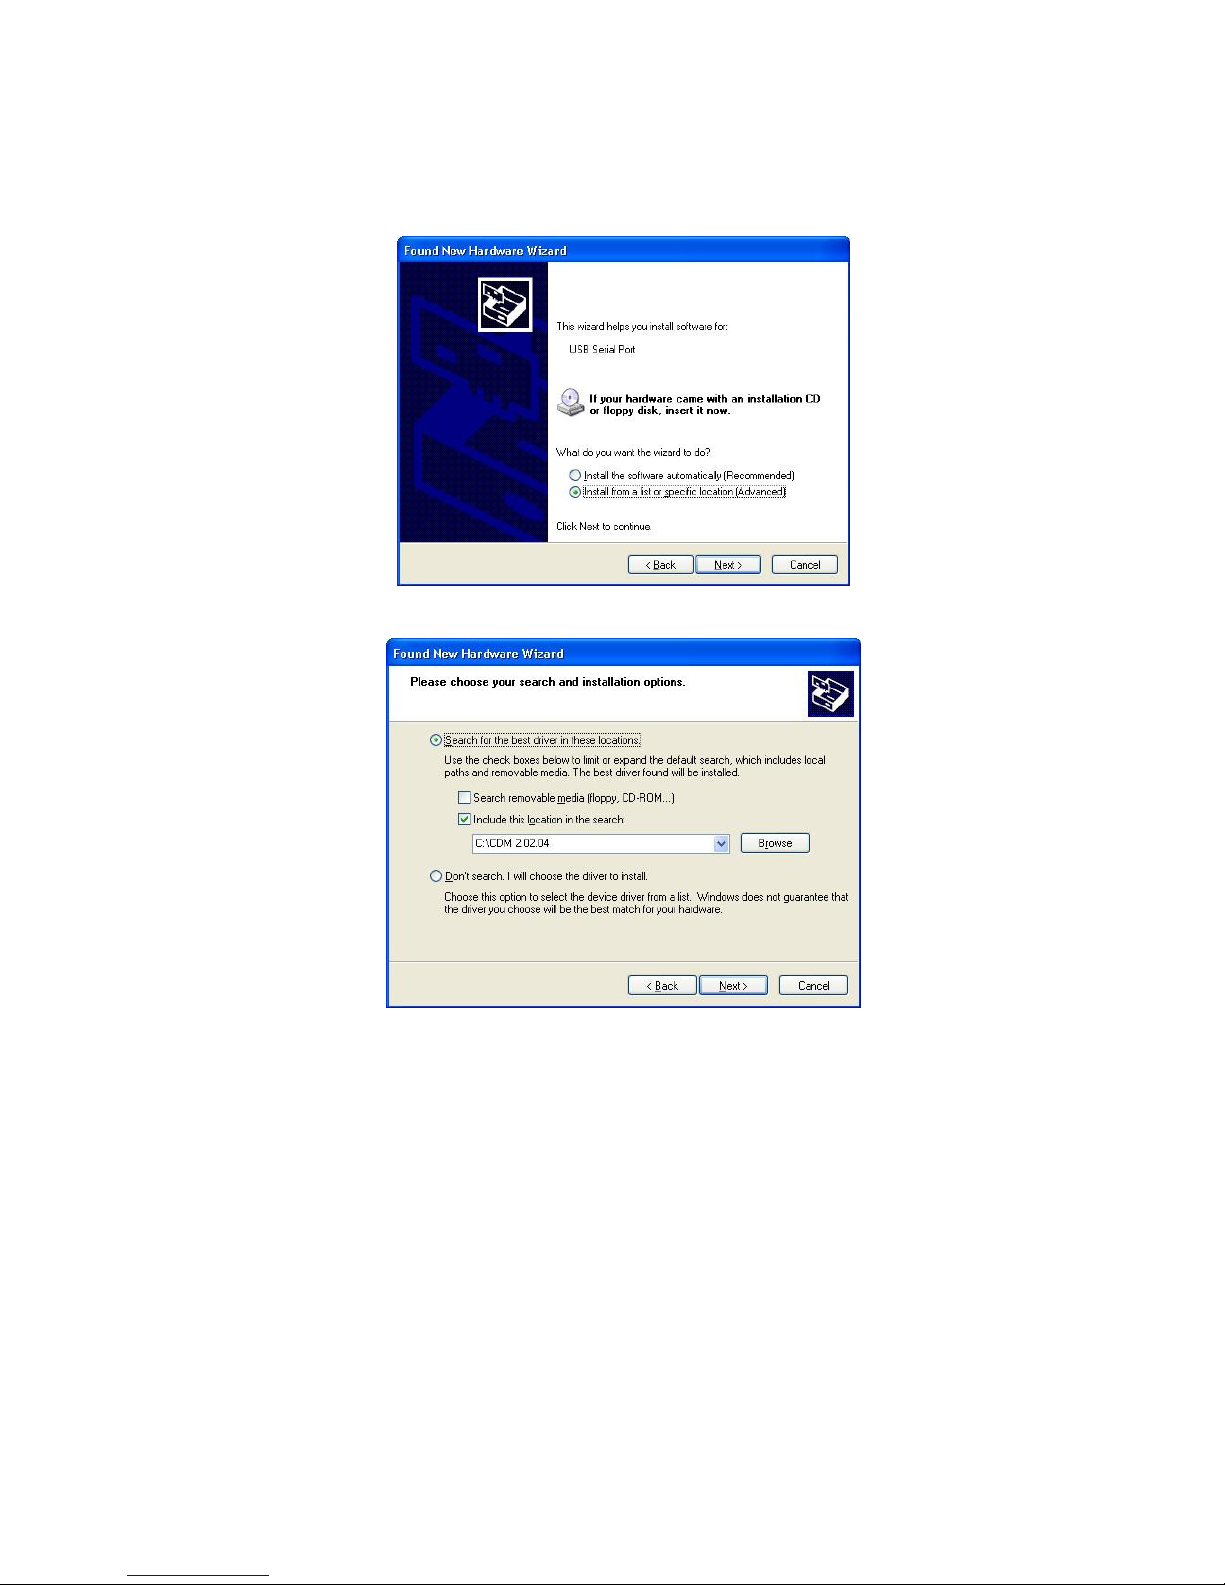
Select "Search for the best driver in these locations" and enter the file path in the combo box ("C:\CDM 2.02.04" in
figure 2.9 below) or browse to it by clicking the browse button. Once the file path has been entered in the box, click
next to proceed.
Figure 2.8
Figure 2.9
If Windows XP is configured to warn when unsigned (non WHQL certified) drivers are about to be installed, the
message dialogue shown in Figure 2.10 will be displayed unless installing a Microsoft WHQL certified driver. Click
on "Continue Anyway" to continue with the installation. If Windows XP is configured to ignore file signature warnings,
no message will appear.
33
Page 35
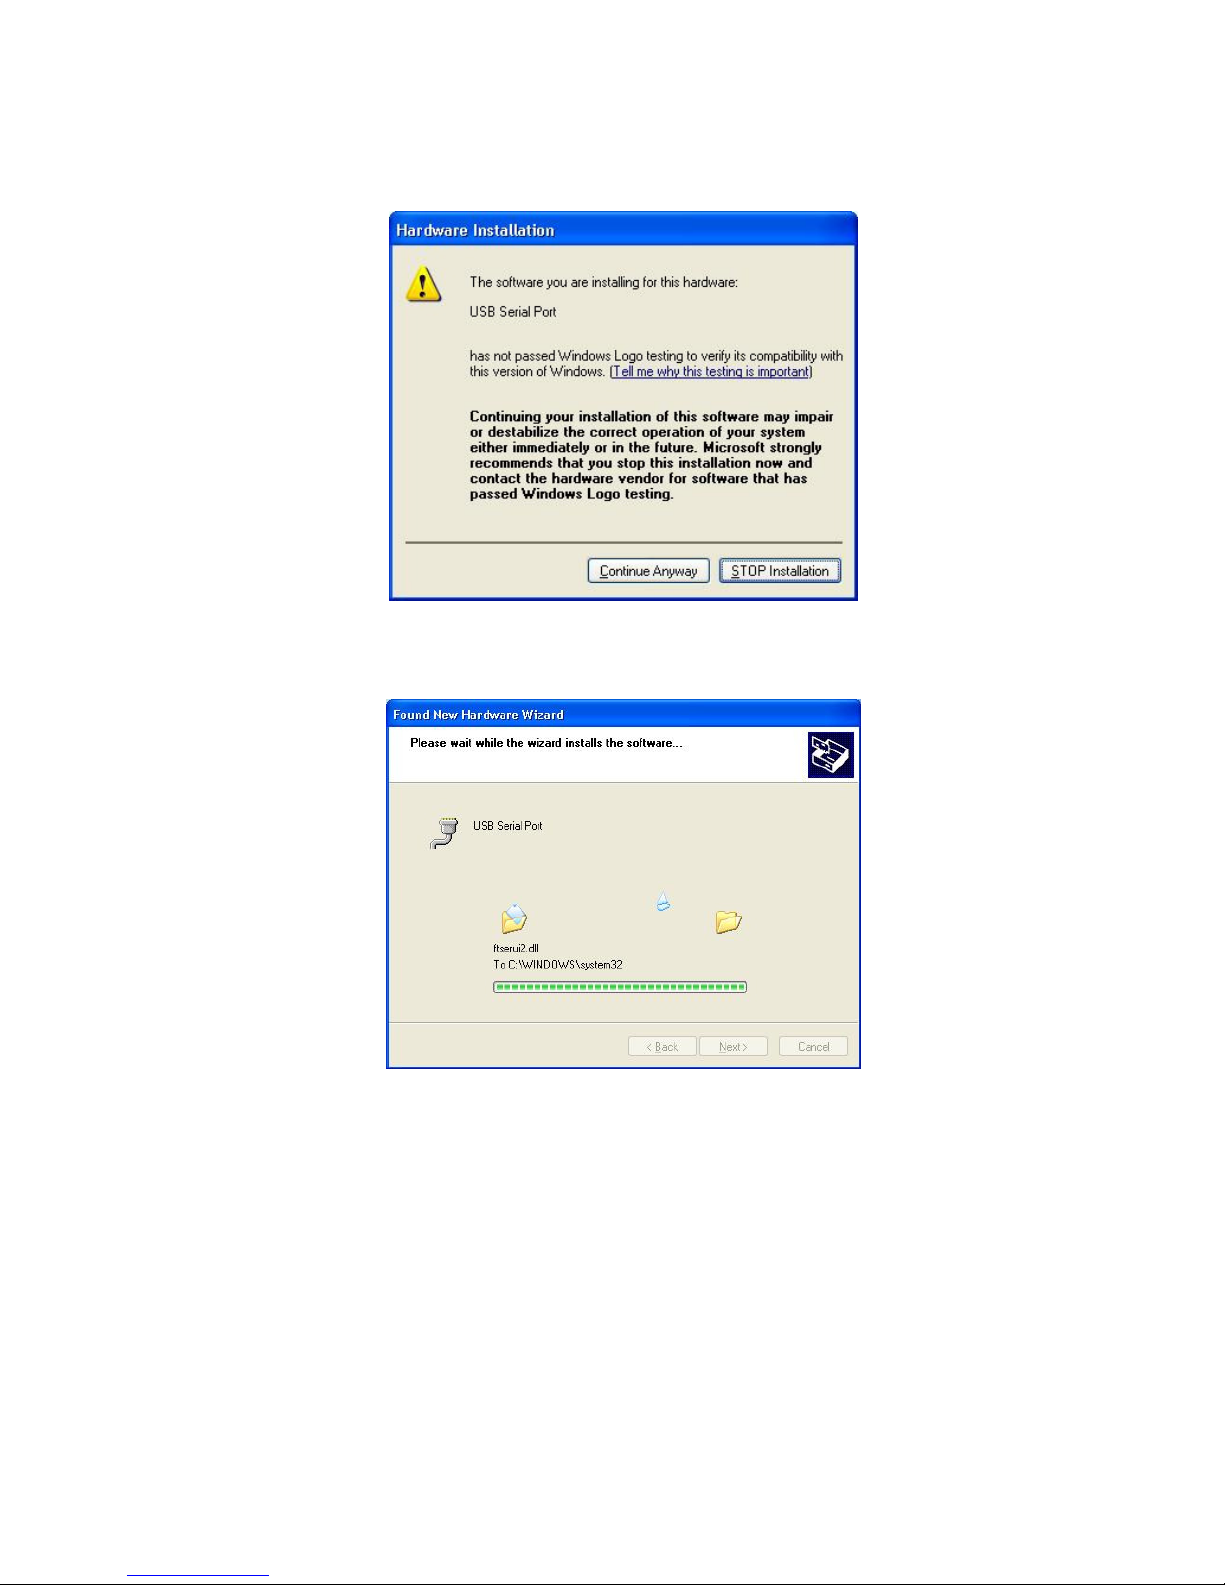
The screen shown in Figure 2.11 will be displayed as Windows XP copies the required driver files.
Figure 2.10
Figure 2.11
Windows should then display a message indicating that the installation was successful (Figure 2.12). Click "Finish"
to complete the installation for the first port of the device.
The procedure for installing the second port is identical to that for installing the first port from the first screen of the
Found New Hardware Wizard for the USB Serial Port device. If the driver is Microsoft WHQL certified, this is done
automatically.
34
Page 36
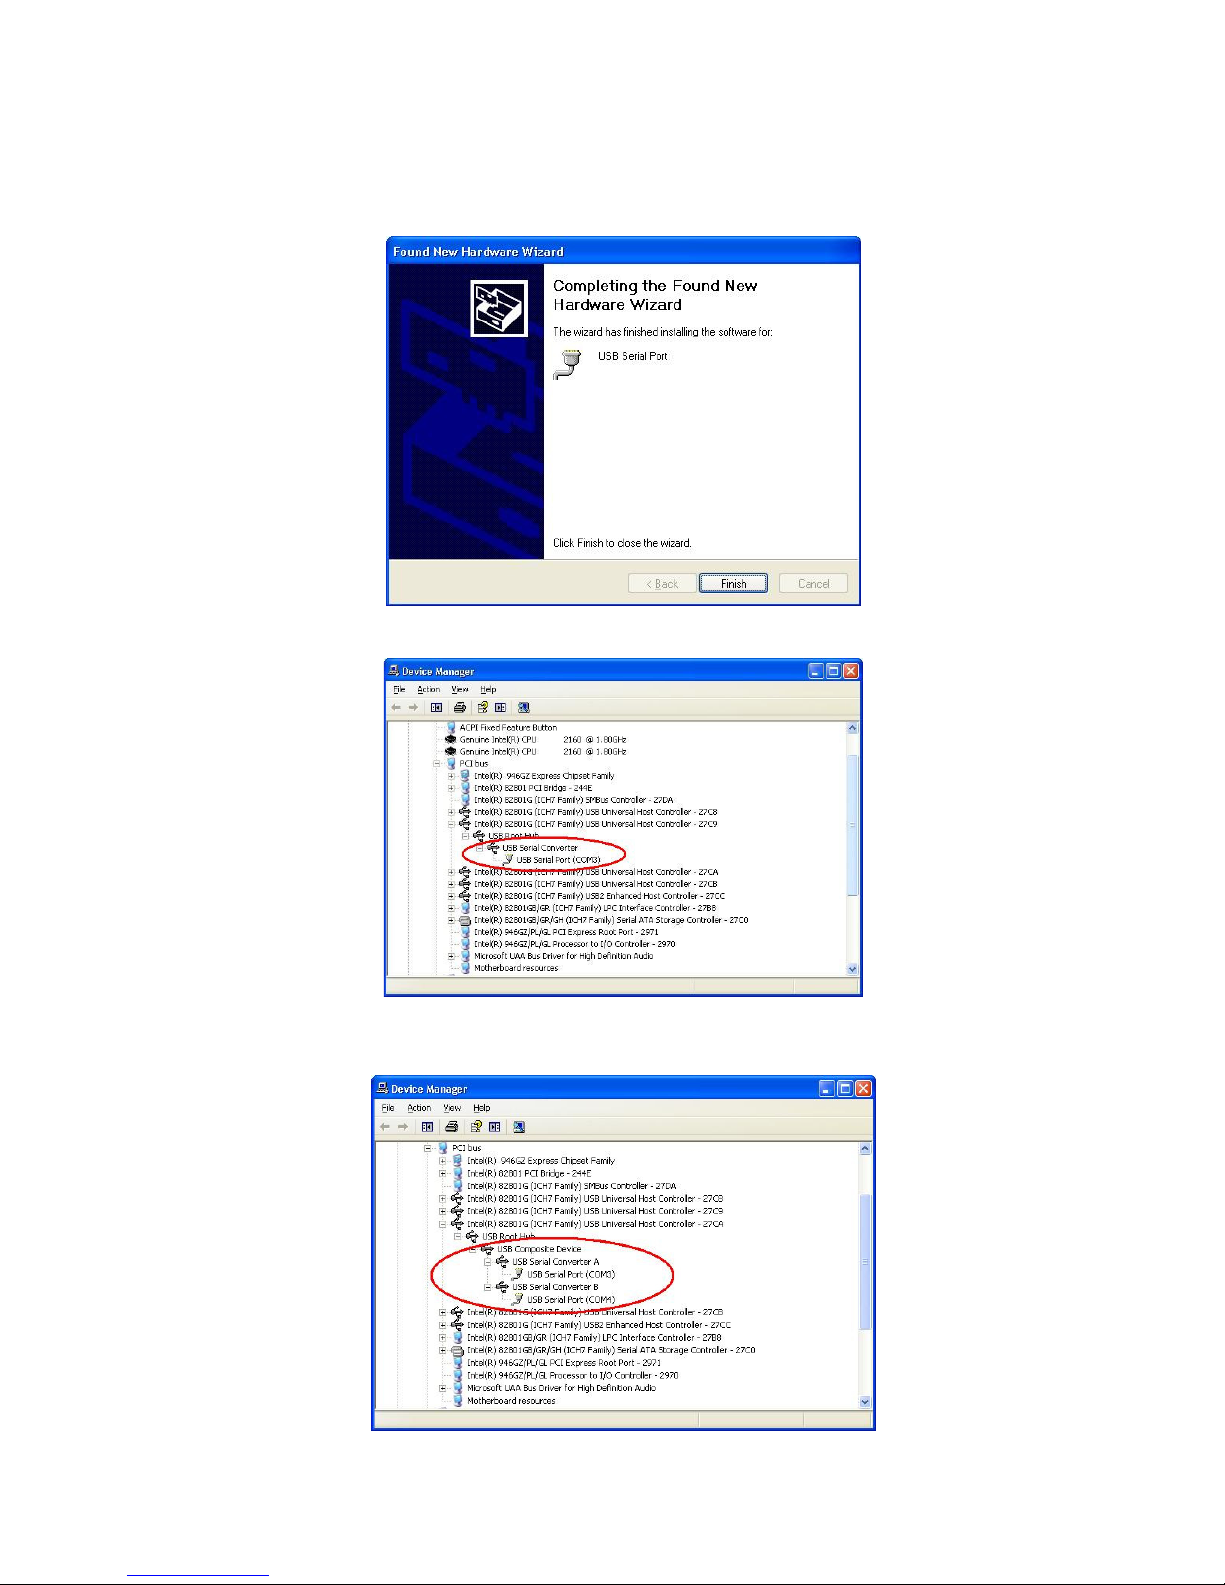
Open the Device Manager (located in "Control Panel\System" then select the "Hardware" tab and click "Device
Manger") and select "View > Devices by Connection", the device appears as a "USB Serial Converter" with an
additional COM port with the label "USB Serial Port" (Figure 2.13).
Figure 2.12
Figure 2.13
Figure 2.14
35
Page 37

2. Installing Using DPInst
In the case of a Microsoft WHQL certified driver package, it is possible to preinstall the driver package using the
Microsoft Driver Install Frameworks (DIFx) tools. The simplest tool provided is the Driver Package Installer (DPInst).
When placed in the same directory as the INF files for the driver package, simply run DPInst.exe and the certified
driver package will be installed on the machine.
The current driver package supports 32bit and 64bit systems through common INF files. DPInst has separate
executables for 32bit and 64bit installation. This means that if a single solution is desired for 32bit and 64bit systems,
the developer must be able to detect which version of DPInst is required for the system the driver is being installed
on.
For more information on DPInst, see the FTDI Windows Driver Installation application note.
3. Installing From Windows Update
If a certified driver is available for the target operating system, it is possible to install the driver from the
Windows Update web site.
Directions to install the driver from Windows Update are very similar to those outlined in 2.1 Installing Via The New
Hardware Wizard, except that the “Yes, this time only” or “Yes, now and every time I connect a device” option
should be selected on the first screen of the wizard when asked if Windows Update should be checked for a driver.
If the wizard finds a matching driver on Windows Update, the driver will be automatically downloaded and installed
for the device.
Please note:
1. For multiple-port converter, each port has to be installed with the driver individually, i.e. you have to repeat this
installation procedure 2 times (2-port converter) or 4 times (for 4-port converter).
2. If you have any
versions from FTDI Web site www.ftdichip.com/Drivers/VCP.htm
difficulties with the drivers we provided in this CD, you may download the updated or appropriate
, supported device “FT232BL(M)”.
36
Page 38

Uninstalling Instruction
Consequently, a new method for uninstalling has to be used. Devices can be removed using the Device Manager by
simply right clicking on the device and selecting "Uninstall". This will delete the associated registry entries for that
device only.
Under Windows XP, driver files and OEM INF and PNF files must be removed manually or by using a custom
application. OEM INF and PNF files are located in the Windows\Inf directory and can be identified by searching for a
VID and PID string matching the device installed e.g. VID_0403&PID_6001. Once the matching OEM INF files are
found (e.g. oem10.inf for FTDIBUS.INF and oem11.inf for FTDIPORT.INF), the corresponding PNF files must also
be removed (e.g. oem10.pnf and oem11.pnf). Driver files are located in the Windows\System32 and
Windows\System32\Drivers directories.
Some points to note about this uninstallation method:
If the VCP driver has been installed, the COM port driver should be removed before the bus driver. If the bus is
removed first, the COM port will no longer appear in the Device Manager.
If the driver files are deleted while other installed devices still require them those devices will not work correctly. This
can be fixed by right clicking the device and selecting "Reinstall Driver" which will replace the missing files.
If a device to be uninstalled is not connected to the PC, the device can still be removed by setting the device
manager to show phantom devices. This can also allow a virtual COM port to be uninstalled if the bus layer has
been removed first. Instructions on how to display phantom devices are given in the Advanced Driver Options
application note.
37
Page 39

Troubleshooting
1. Windows XP cannot find Drivers for My Device
This error can occur if the VID and PID programmed into the device EEPROM do not match those listed in the INF
files for the driver. The VID and PID programmed into the device EEPROM may be found by using the USB View
utility from the FTDI web site. These can then be checked against the VID and PID entries in the driver INF files. If
they do not match, that driver cannot be installed for that device without either reprogramming the device EEPROM
or modifying the list of VID and PID numbers in the INF files.
Please note that only your own company VID and PID or FTDI's VID (0x0403) and FTDI PID issued for use by your
company should be used in the EEPROM and INF/INI files.
End customers should obtain modified drivers from the OEM of the device, and not necessarily edit the files
themselves.
2. Windows XP Forces a Reboot after Installing a Device
This problem can occur if an application is accessing a file while the New Hardware Wizard is trying to copy it. This
usually occurs with the FTD2XX.DLL file. Selecting not to restart the computer then unplugging and re-plug the
device may allow the device to function properly without restarting. Restarting the machine will allow the device to
work correctly.
3. Driver Installation Fails and Windows XP Gives Error Code 10
Windows error code 10 indicates a hardware error or failed driver installation. This error may appear if a device has
insufficient power to operate correctly (e.g. plugged into a bus powered hub with other devices), or may indicate a
more serious hardware problem. Also, it may be indicative of USB root hub drivers being incorrectly installed.
Please refer to the example schematics on the FTDI web site for standard device configurations. If the error persists,
please contact the FTDI support department.
38
Page 40
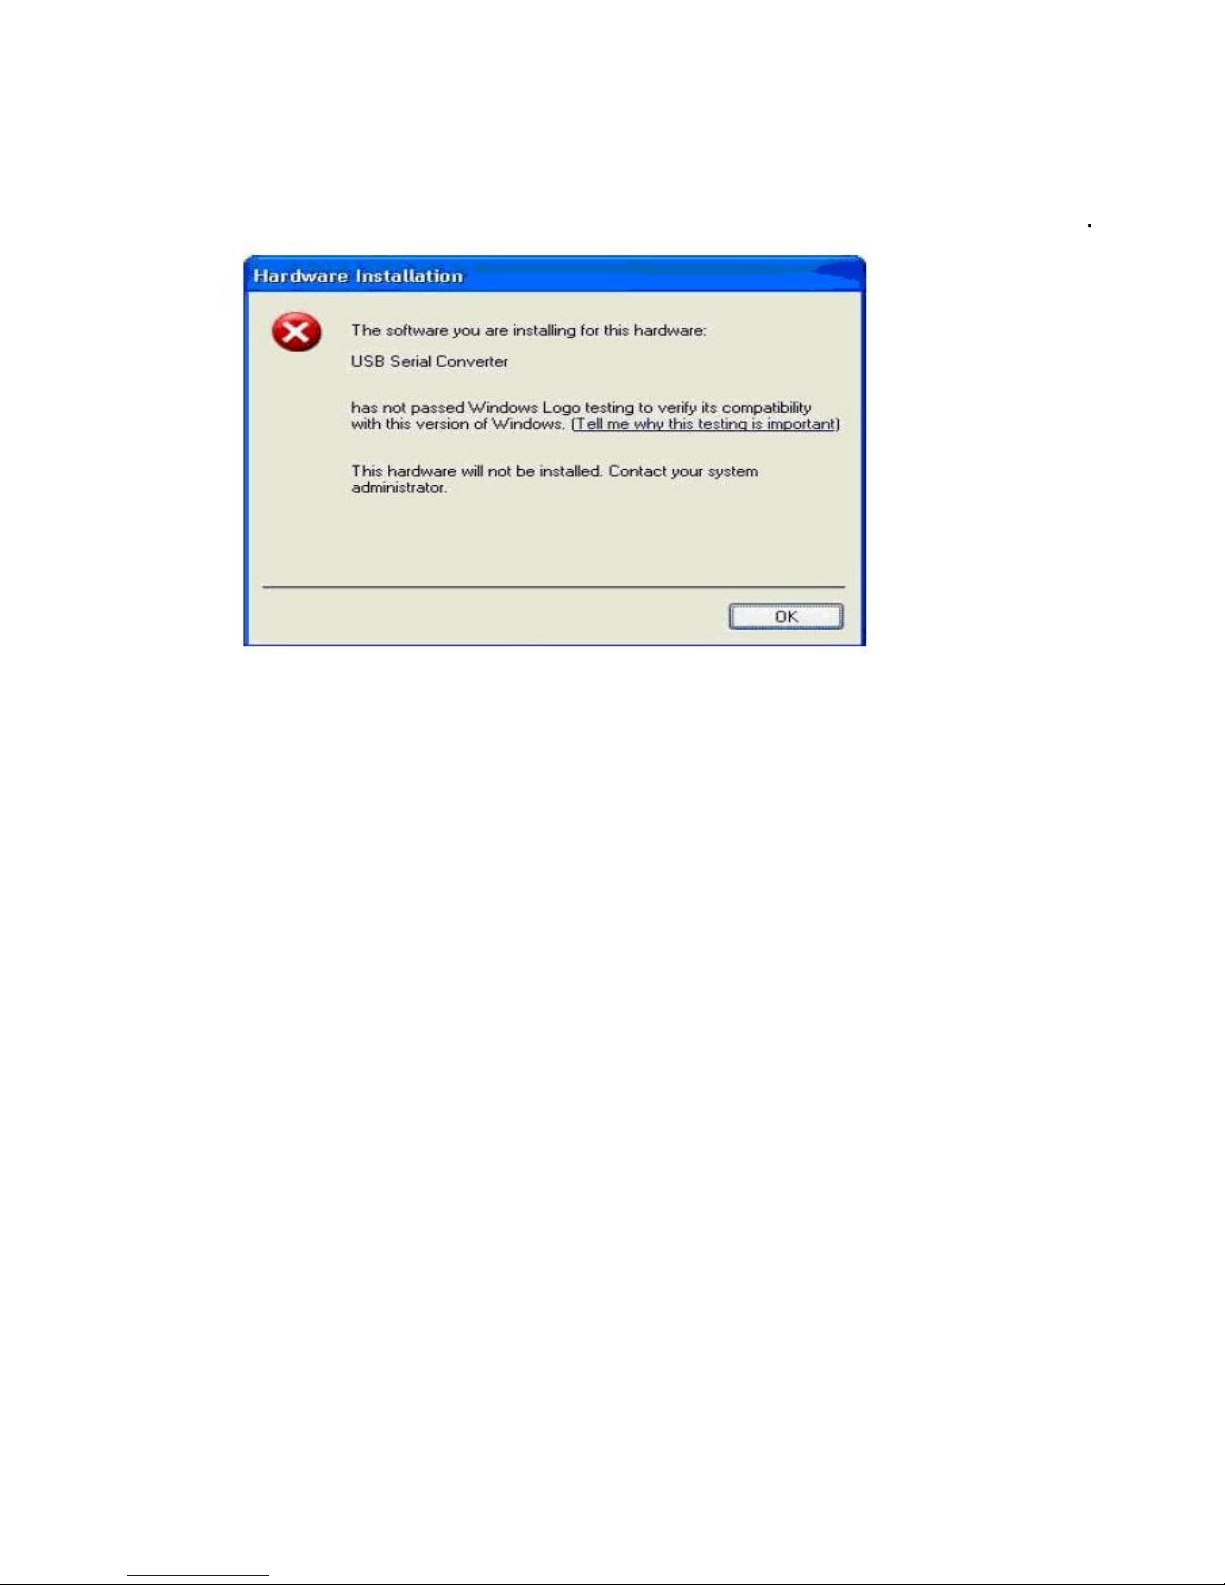
4. Windows XP Displays An Error And Then Terminates Installation
If the following screen is displayed with this message, Windows XP has been configured to block the
installation of any drivers that are not WHQL certified.
Figure 4.1
Two options are available to successfully install the device. Either a certified version of the driver can be installed
(if available) or the driver signing options can be changed to either warn or ignore to allow the installation to
complete.
To change the current driver signing setting, go to "Control Panel\System", click on the "Hardware" tab and then
click "Driver Signing". The desired signing option may then be selected.
39
Page 41
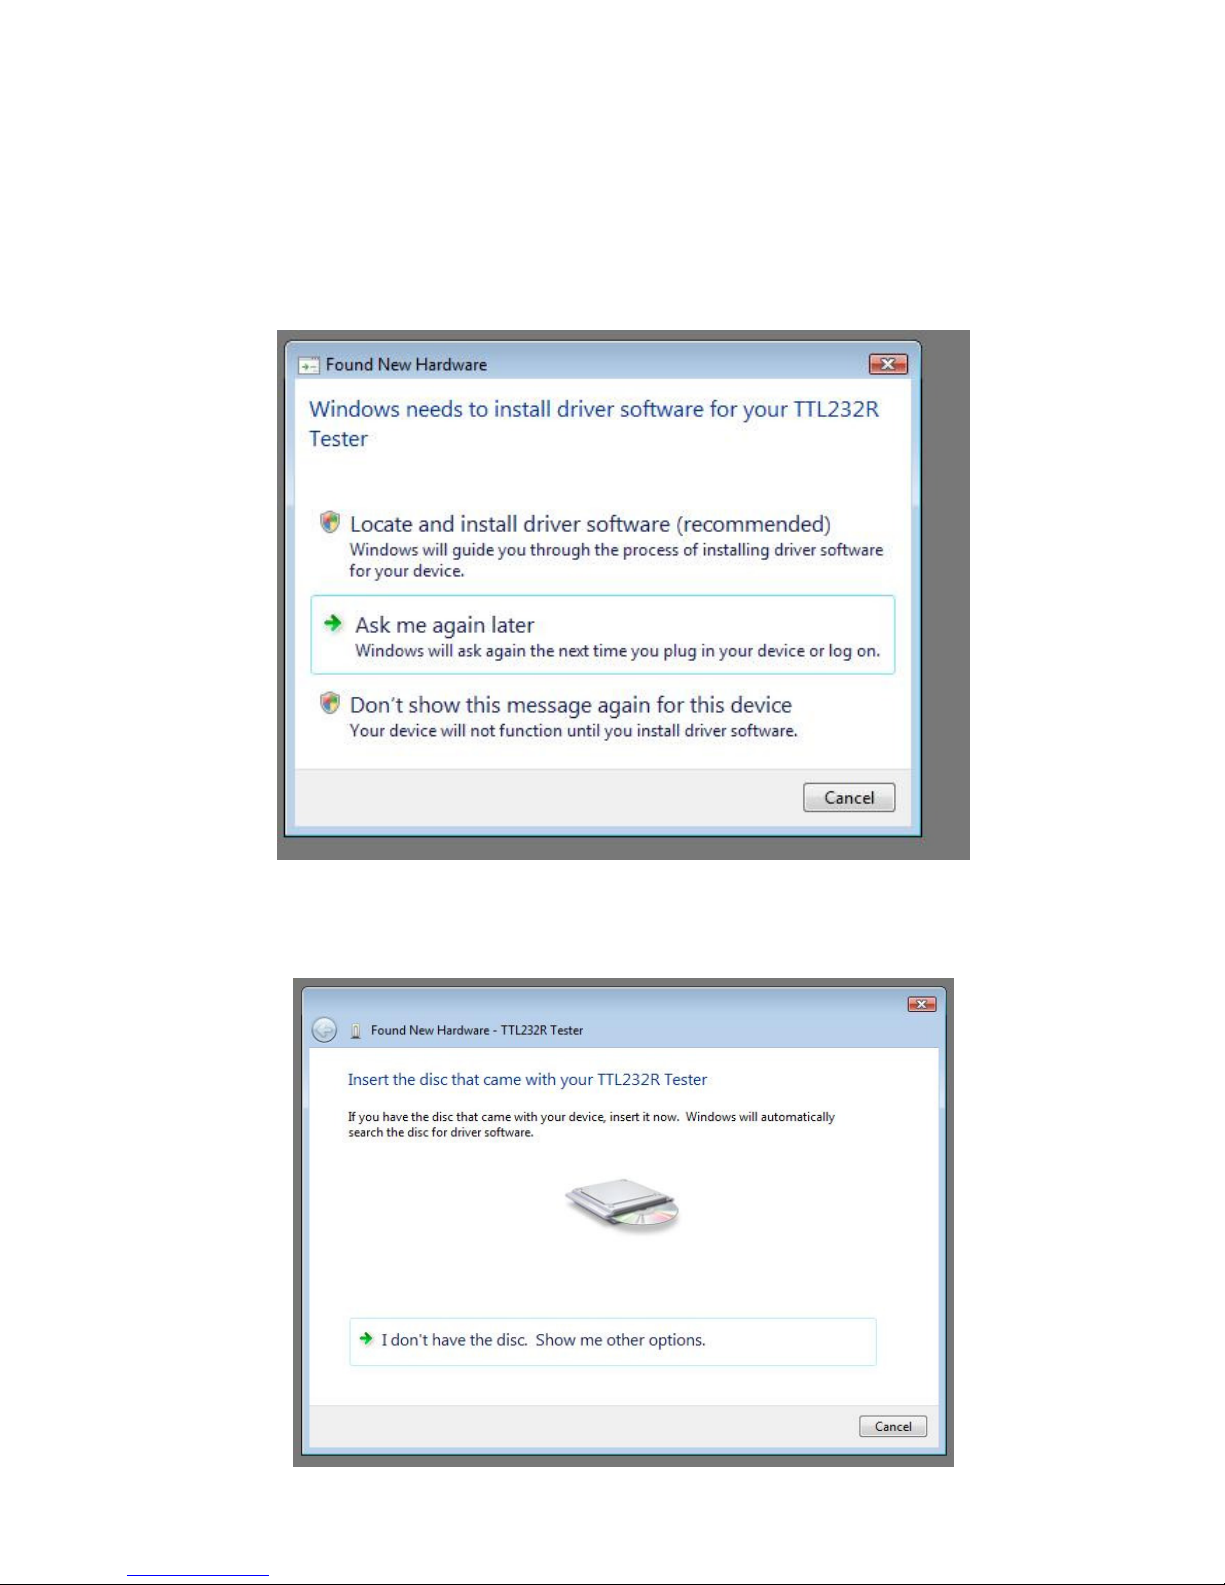
Windows VISTA (Win 7, 8, 8.1, 10) Installation Guide
Connect the device to a spare USB port on your PC.
If there is an available Internet connection, Windows VISTA (Win 7, 8, 8.1, 10) will silently connect to the Windows
Update website and install any suitable driver it finds for the device in preference to the driver manually selected. If
no suitable driver is automatically found then the following procedure should be followed.
When locate and install driver software (recommended)" is selected the following screen will appear. Note: the text
“TTL Tester” is replaced with the description of the customer hardware.
40
Page 42
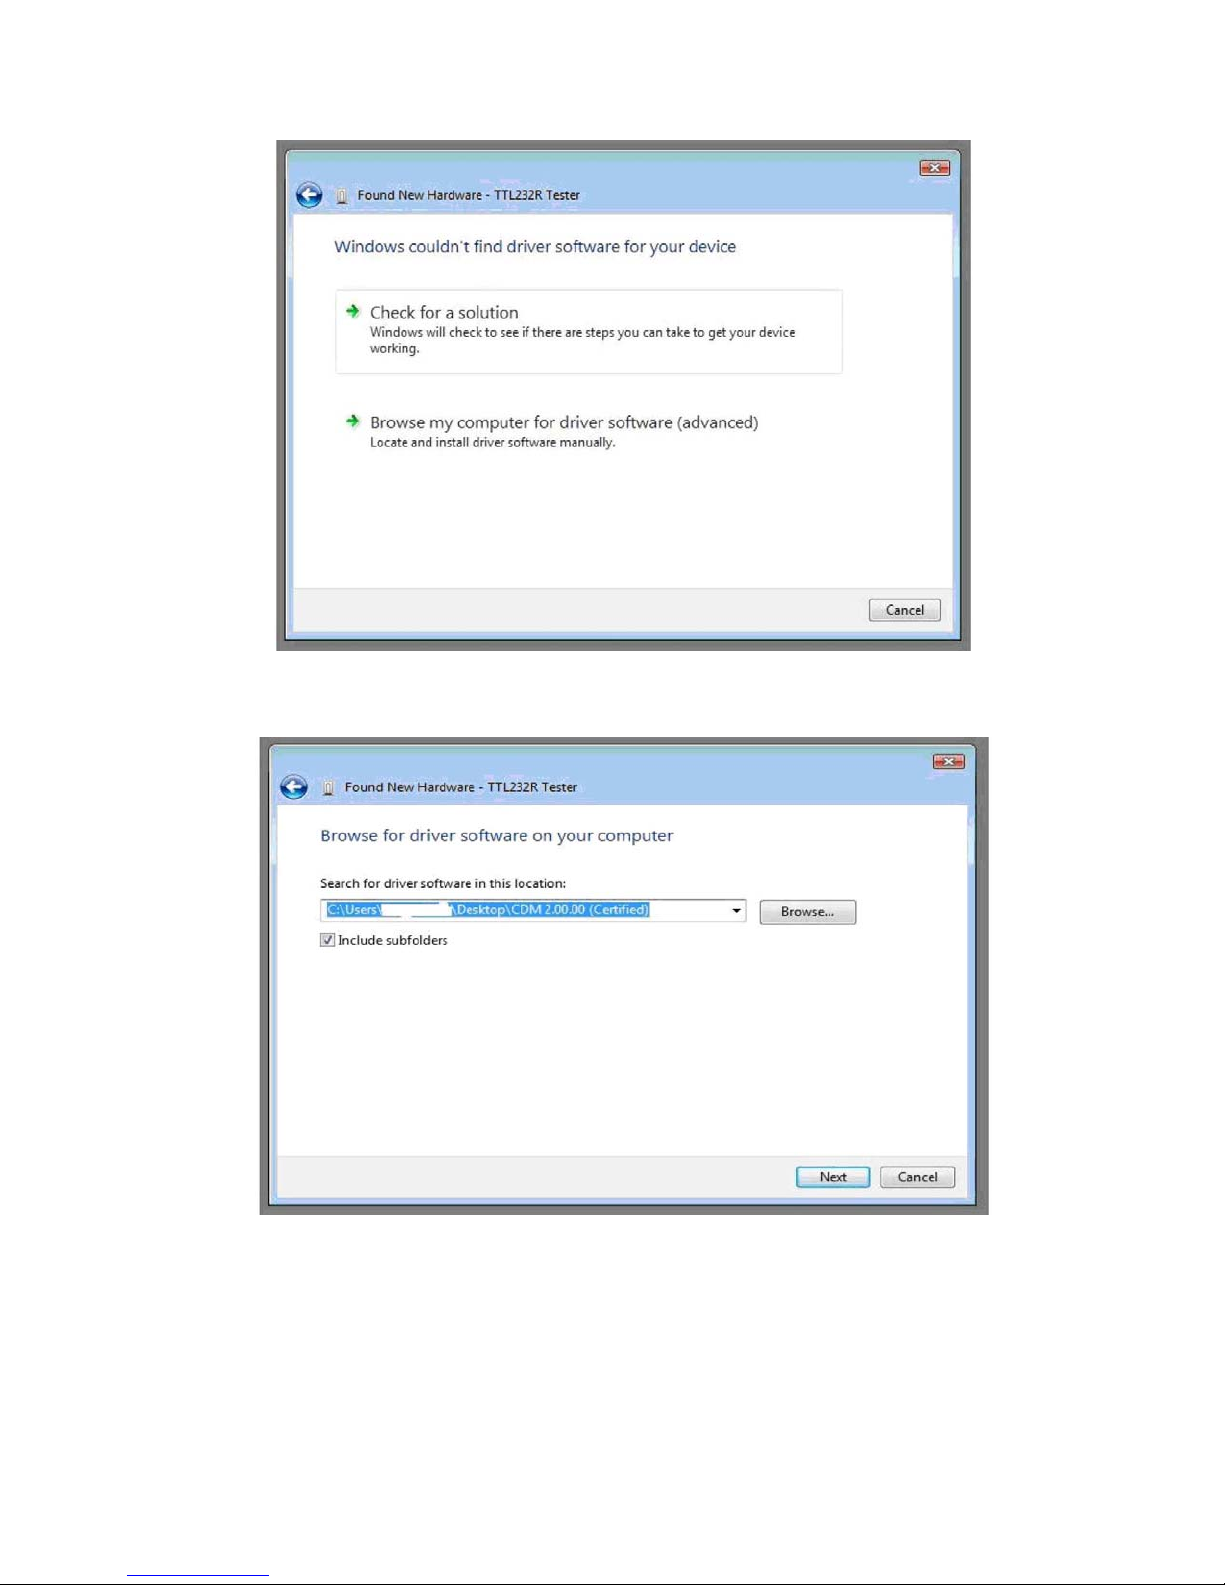
Select “I don’t have the disk. Show me other options” The next screen will appear.
Select “Browse my computer for driver software (advanced)”. The next screen will appear.
Browse to the folder where the CDM driver has been stored (when uncompressed) and press “Next”
The example shown above uses a folder on the desktop.
41
Page 43
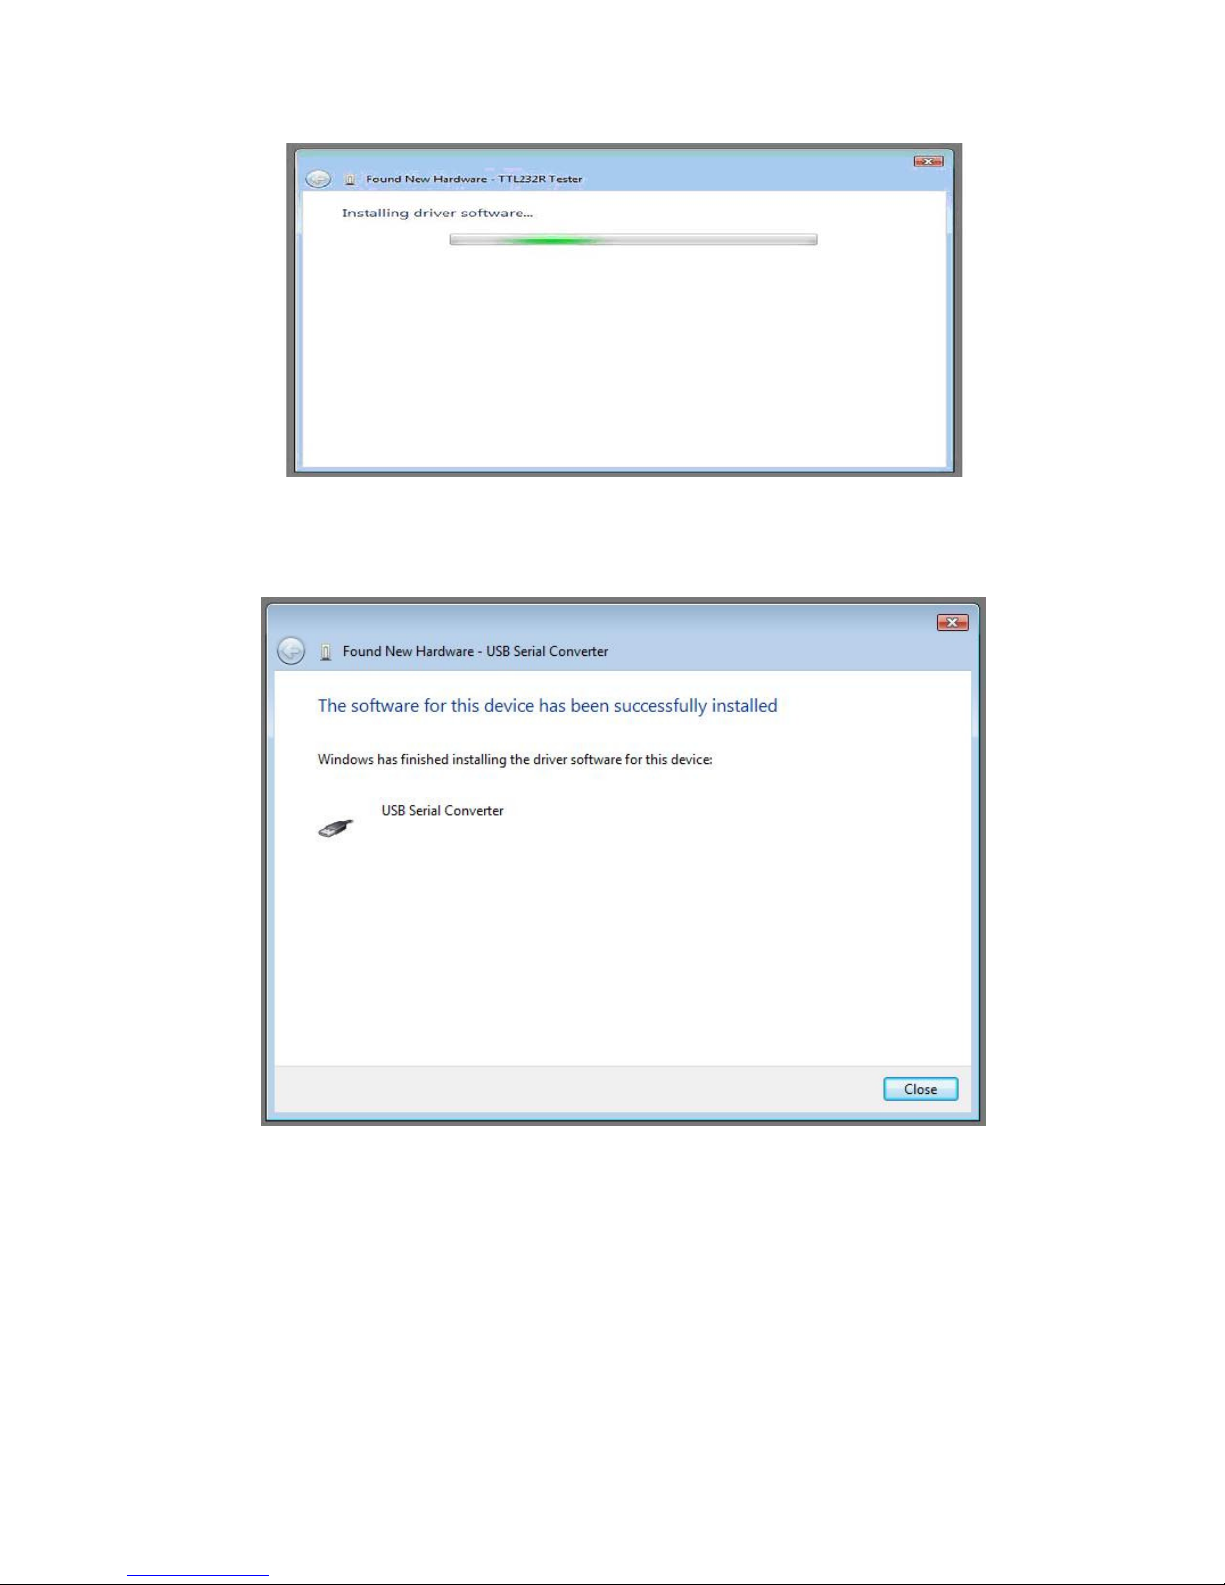
The next screen will appear.
This screen will automatically complete and then change to the one below:
The bus layer of the driver is now installed.
After the driver is installed it is important to determine which COM port has been assigned to the device for
configuring the application that will use the device.
42
Page 44
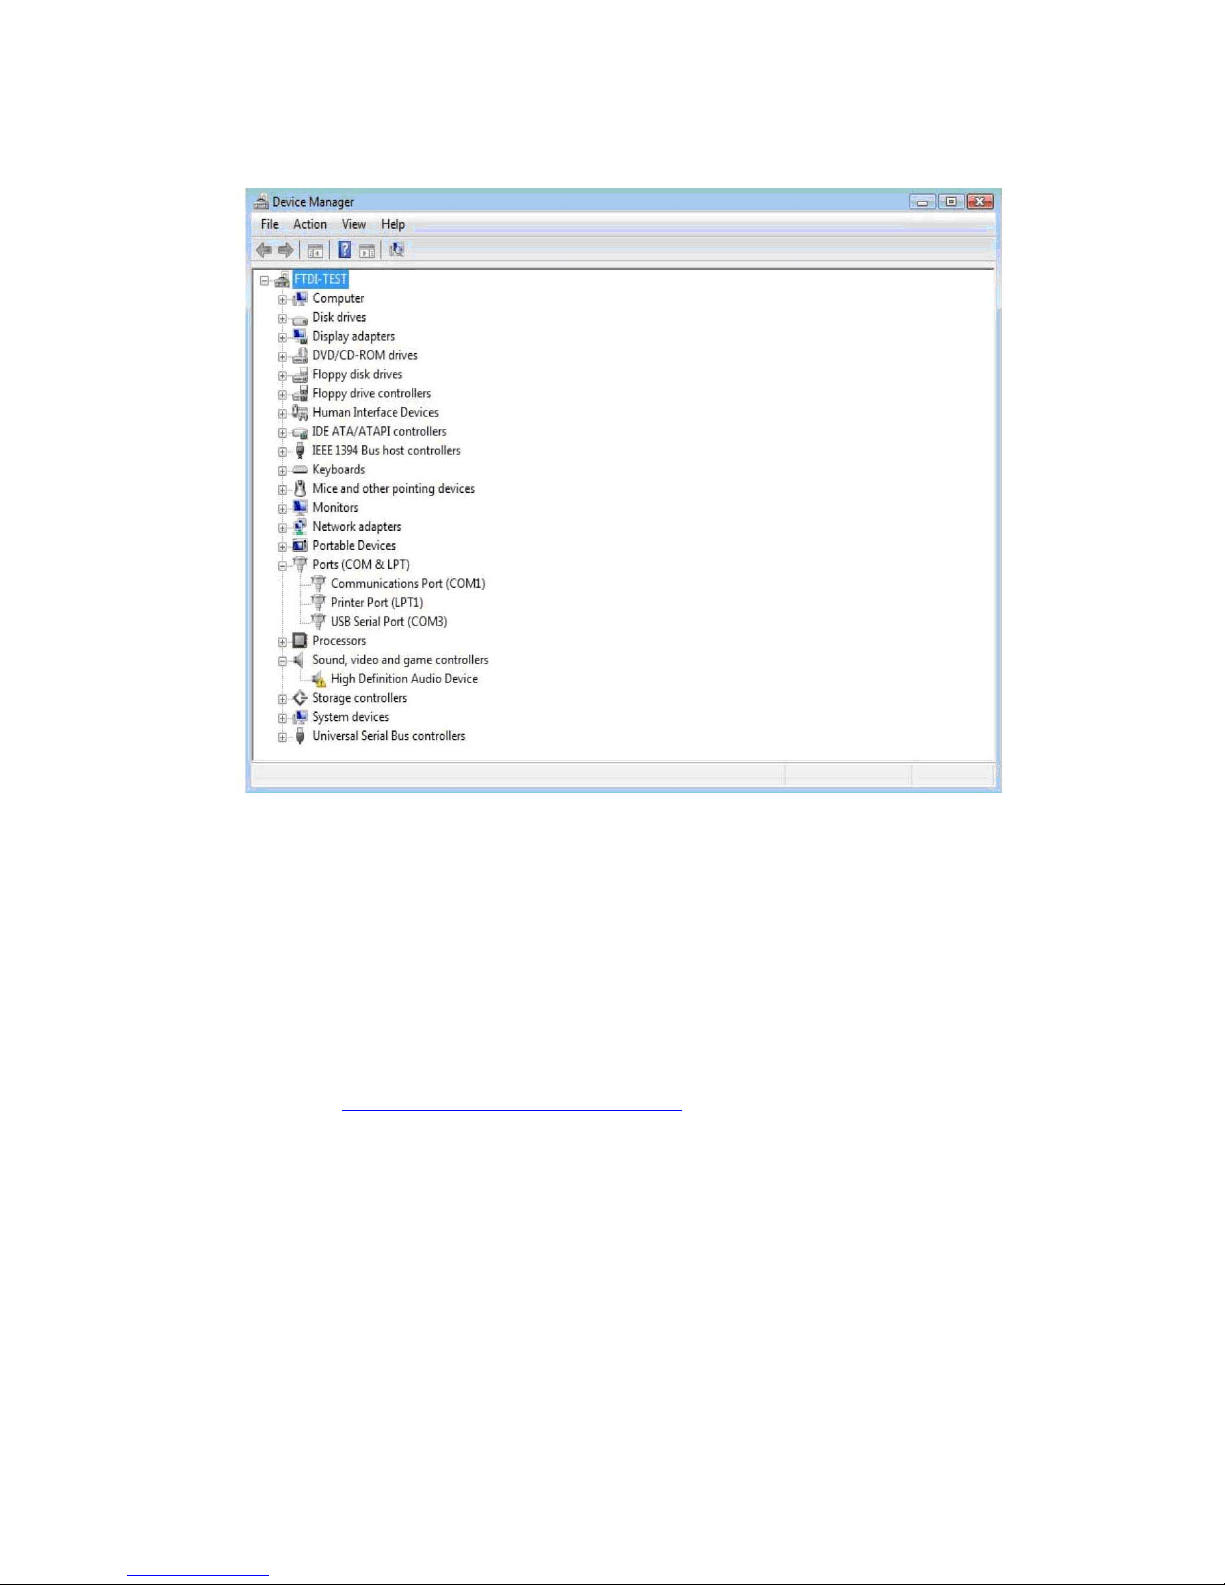
Open the Device Manager (located in "Control Panel\System" then select the "Hardware" tab and click "Device
Manager") and select "View > Devices by Connection", the device appears as a" USB Serial Converter" with an
additional COM port with the label "USB Serial Port".
This screen shows the device connected to COM3.
Please note:
1. For multiple-port converter, each port has to be installed with the driver individually, i.e. you have to repeat this
installation procedure 2 times (2-port converter) or 4 times (for 4-port converter).
2. If you have any
versions from FTDI Web site www.ftdichip.com/Drivers/VCP.htm
difficulties with the drivers we provided in this CD, you may download the updated or appropriate
, supported device “FT232BL(M)”.
43
Page 45
Uninstalling Instruction
With the release of Microsoft Windows Vista, the FTDI uninstaller has been rendered unusable due to Windows
Resource Protection preventing the executable from deleting driver files and associated registry values. Vista will
only allow the system itself to modify files and registry values in these locations.
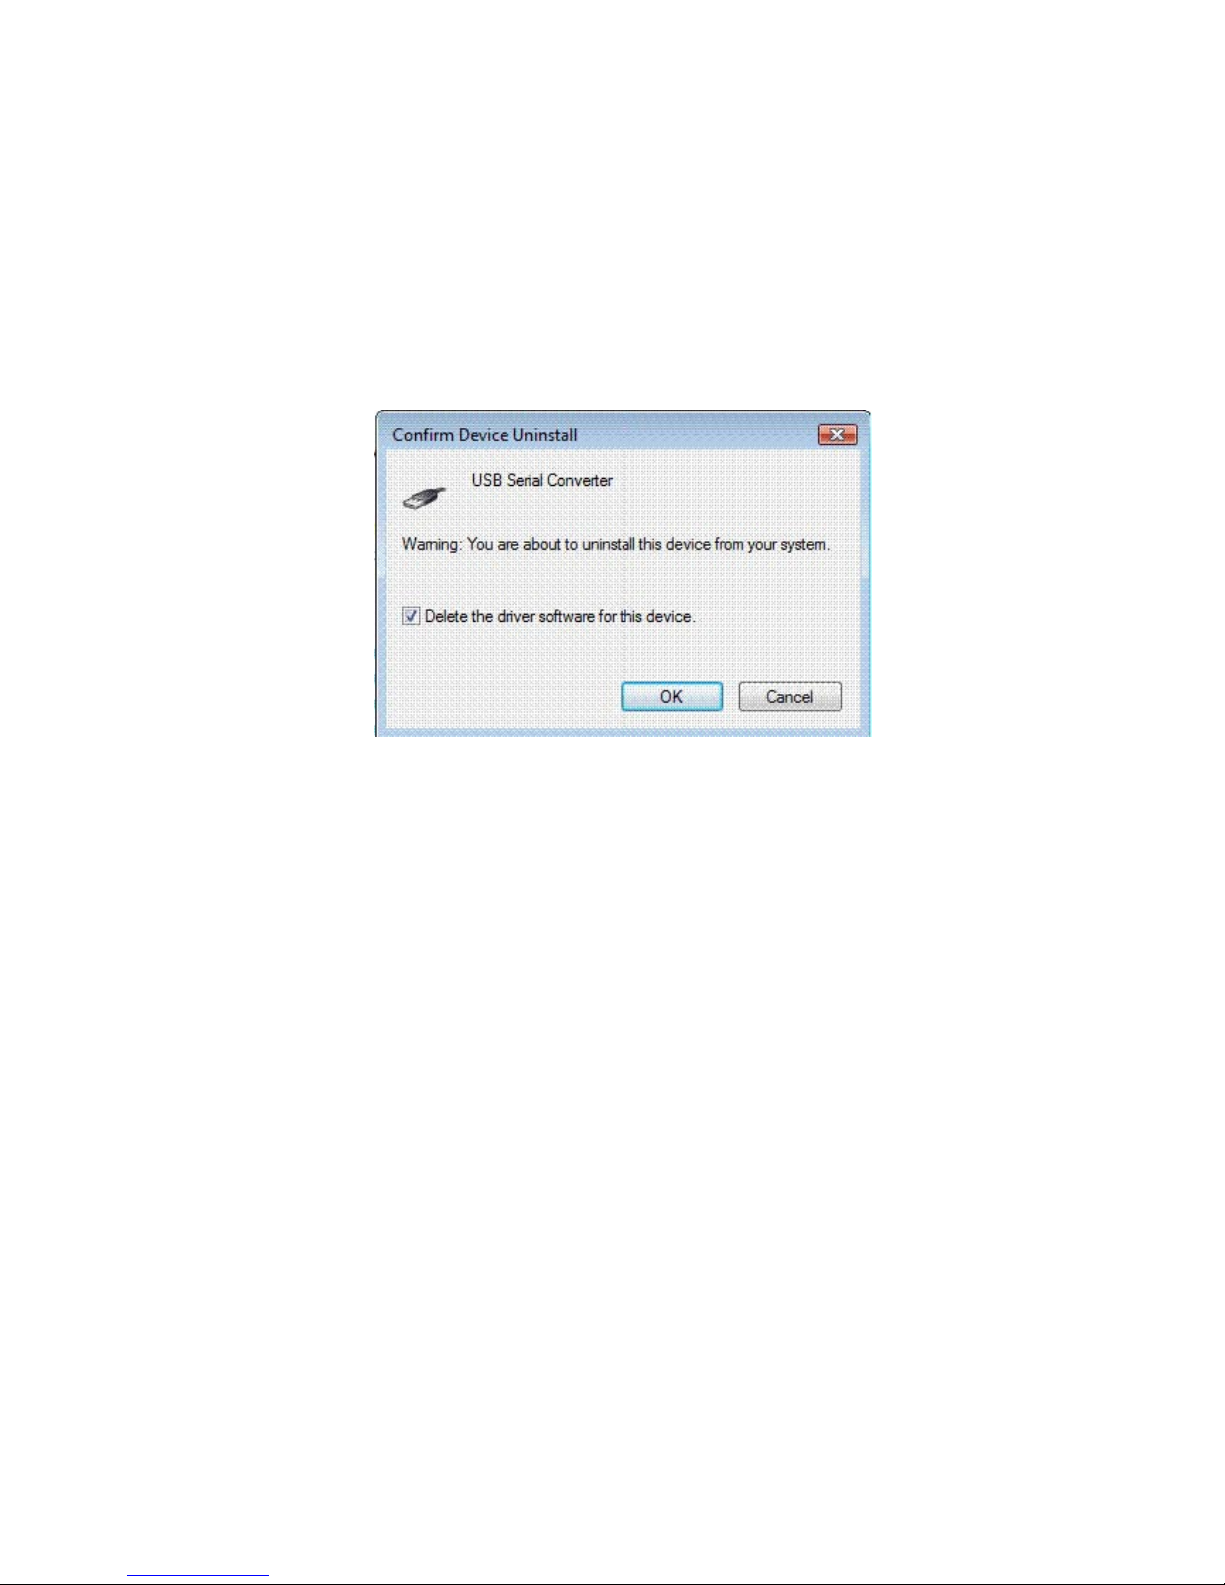
Consequently, a new method for uninstalling is required. Devices can be removed using the Device
Manager by simply right clicking on the mouse and selecting "Uninstall". This will delete the associated
registry entries for that device only. Vista provides an automatic method to delete driver files via a check
box to "Delete the driver software for this device" on the uninstall dialog box.
Windows 2000, XP and Server 2003 do not have this check box, so driver files and OEM INF and PNF files
must be removed manually or by using a custom application.
Some points to note about the new uninstallation method:
If the VCP driver has been installed, the COM port driver should be uninstalled before the bus driver. If the bus is
removed first, the COM port will no longer appear in the Device Manager.
If the files are deleted while other installed devices still require them those devices will not work correctly. This can
be fixed by right clicking the device and selecting "Reinstall Driver" which will replace the missing files.
.
If a device to be uninstalled is not connected to the PC, the device can still be removed by setting the device
manager to show phantom devices. This also allows a virtual COM port to be uninstalled if the bus layer has been
removed first.
44
Page 46
Troubleshooting
1. Windows VISTA (Win 7, 8, 8.1, 10) can not find drivers for my device
This error can occur if the VID and PID programmed into the device EEPROM do not match those listed in the INF
files for the driver. The VID and PID programmed into the device EEPROM may be found by using the USB View
utility from the FTDI web site. These can then be checked against the VID and PID entries in the driver INF files. If
they do not match, that driver cannot be installed for that device without either reprogramming the device EEPROM
or modifying the list of VID and PID numbers in the INF files. Please note that only your own company VID and PID
or FTDI's VID (0x0403) and FTDI PID issued for use by the customer should be used in the EEPROM and INF files.
End customers should obtain modified drivers from the OEM of the device, and not necessarily edit the files
themselves.
2. Devices not shown in Device Manager for uninstalling
Devices that have been installed on a system but are not currently available are referred to as "phantom devices".
These devices are not usually displayed in the device manager, but can be made to be displayed as though they are
attached. This allows device properties to be changed or devices to be uninstalled via Device Manger even though
the device is not physically connected to the PC.
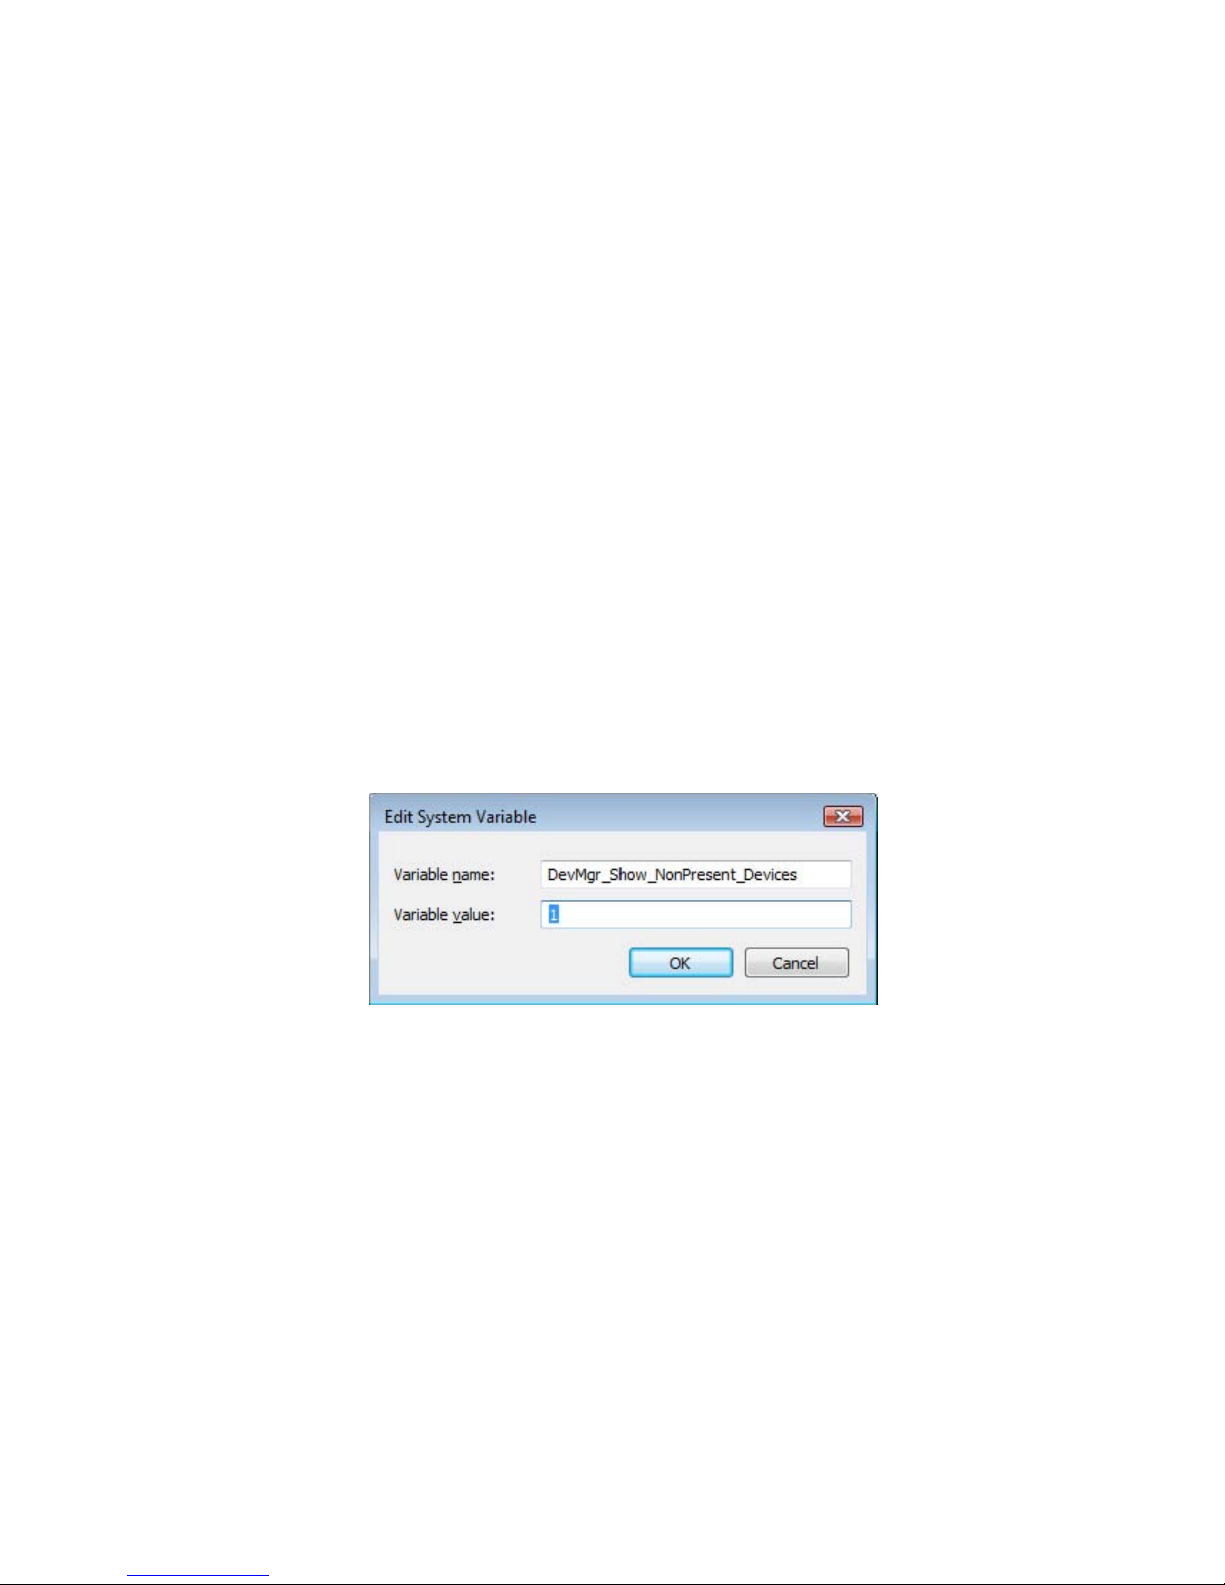
To display phantom devices in Device Manager, a new system variable is required. Open "Control Panel >
System" then select the "Advanced" tab and click "Environment Variables". In the System Variables section
(NOT THE USER VARIABLES SECTION), click "New..." to display the following window:
Create a new System Variable called "DevMgr_Show_NonPresent_Devices" and set the value to 1, then
click OK.
Open the Device Manager ("Control Panel > System" then select the "Hardware" tab and click "Device
Manager…", or "Control Panel > Device Manger" in Vista) and select "View > Show Hidden Devices".
Device Manager will then show all hidden and phantom devices available on that PC as shaded.
45
Page 47
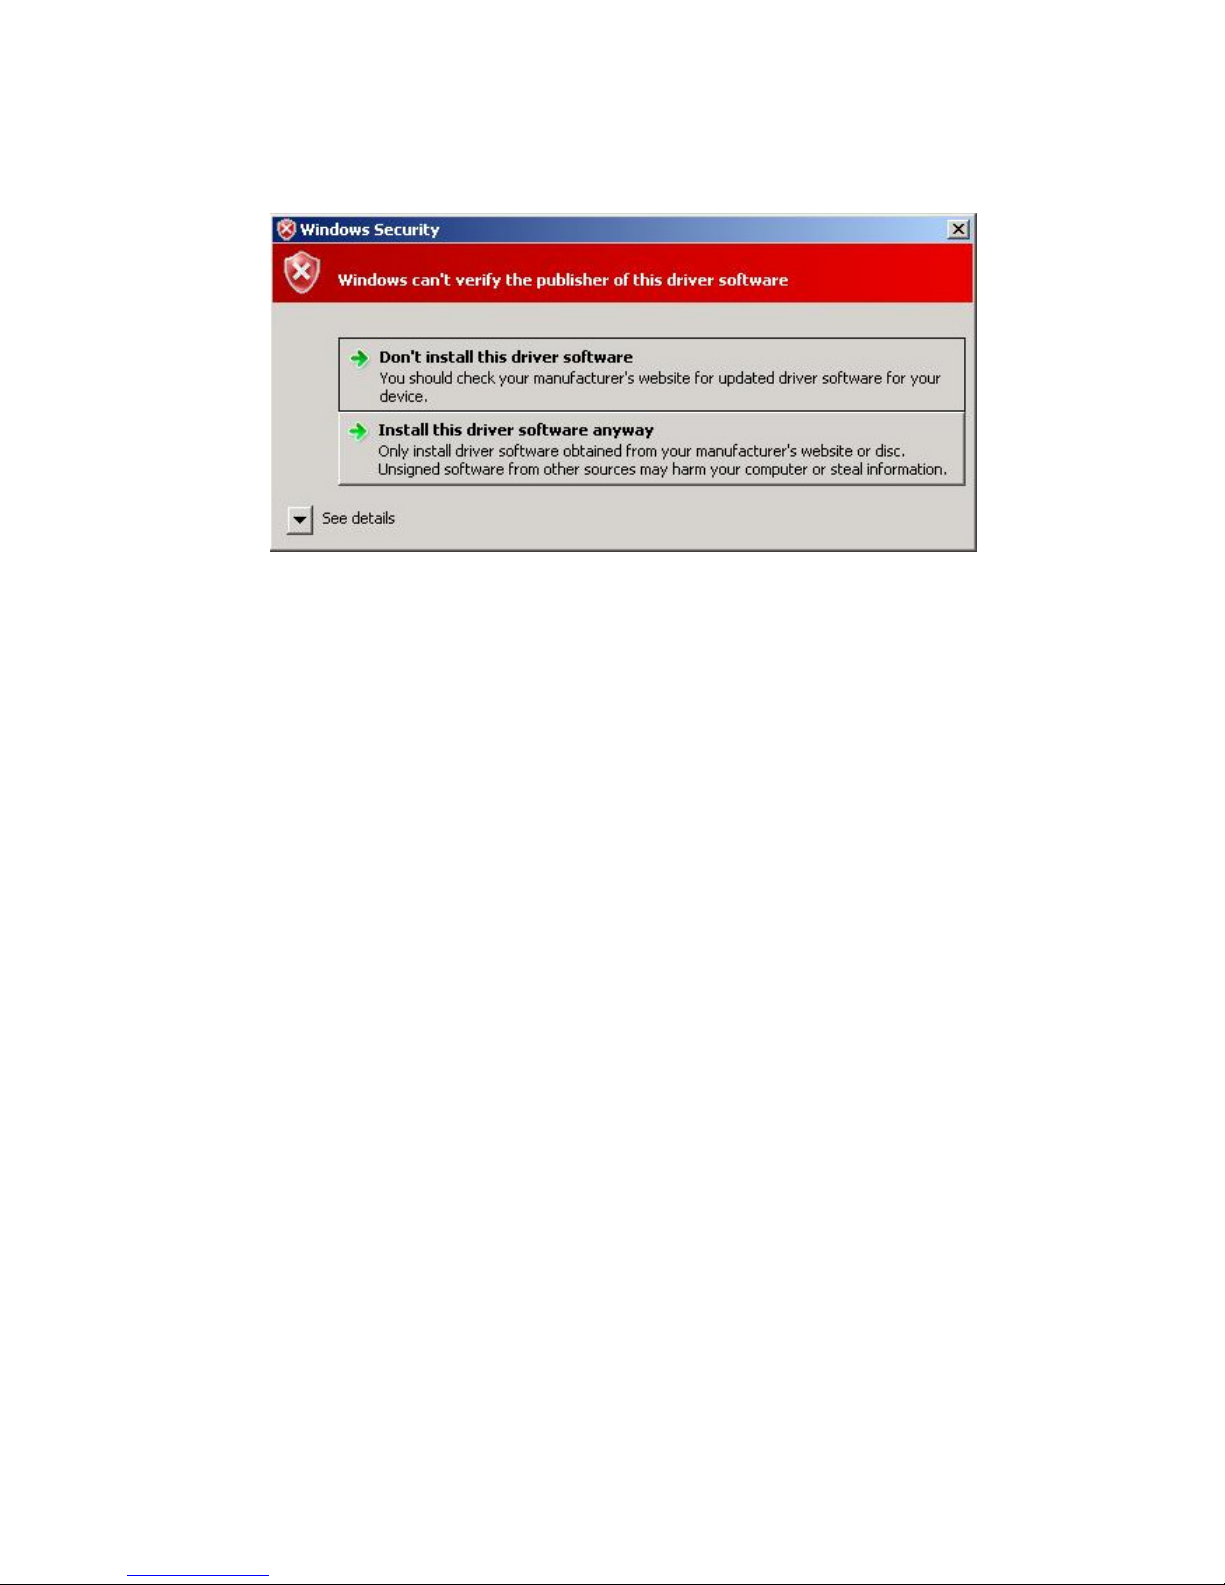
3. Windows Vista (Win 7, 8, 8.1, 10) shows a warning that the driver is not certified
If the driver is not certified then a pop up window such as shown below will be displayed.
If you are certain of the source of the driver the warning can be ignored and you can continue installation
by selecting “Install this driver software anyway”.
4. Driver will not install on VISTA x64
VISTA x64 OS will only allow certified drivers to be installed. The certified driver supplied by FTDI will work with VID
0403 and PID 6001 for FT232 devices.
If you have a product where the manufacture has customized the driver but has not recertified it, then the driver will
not load. You should contact your vendor to determine if they will support VISTA x64.
46
Page 48
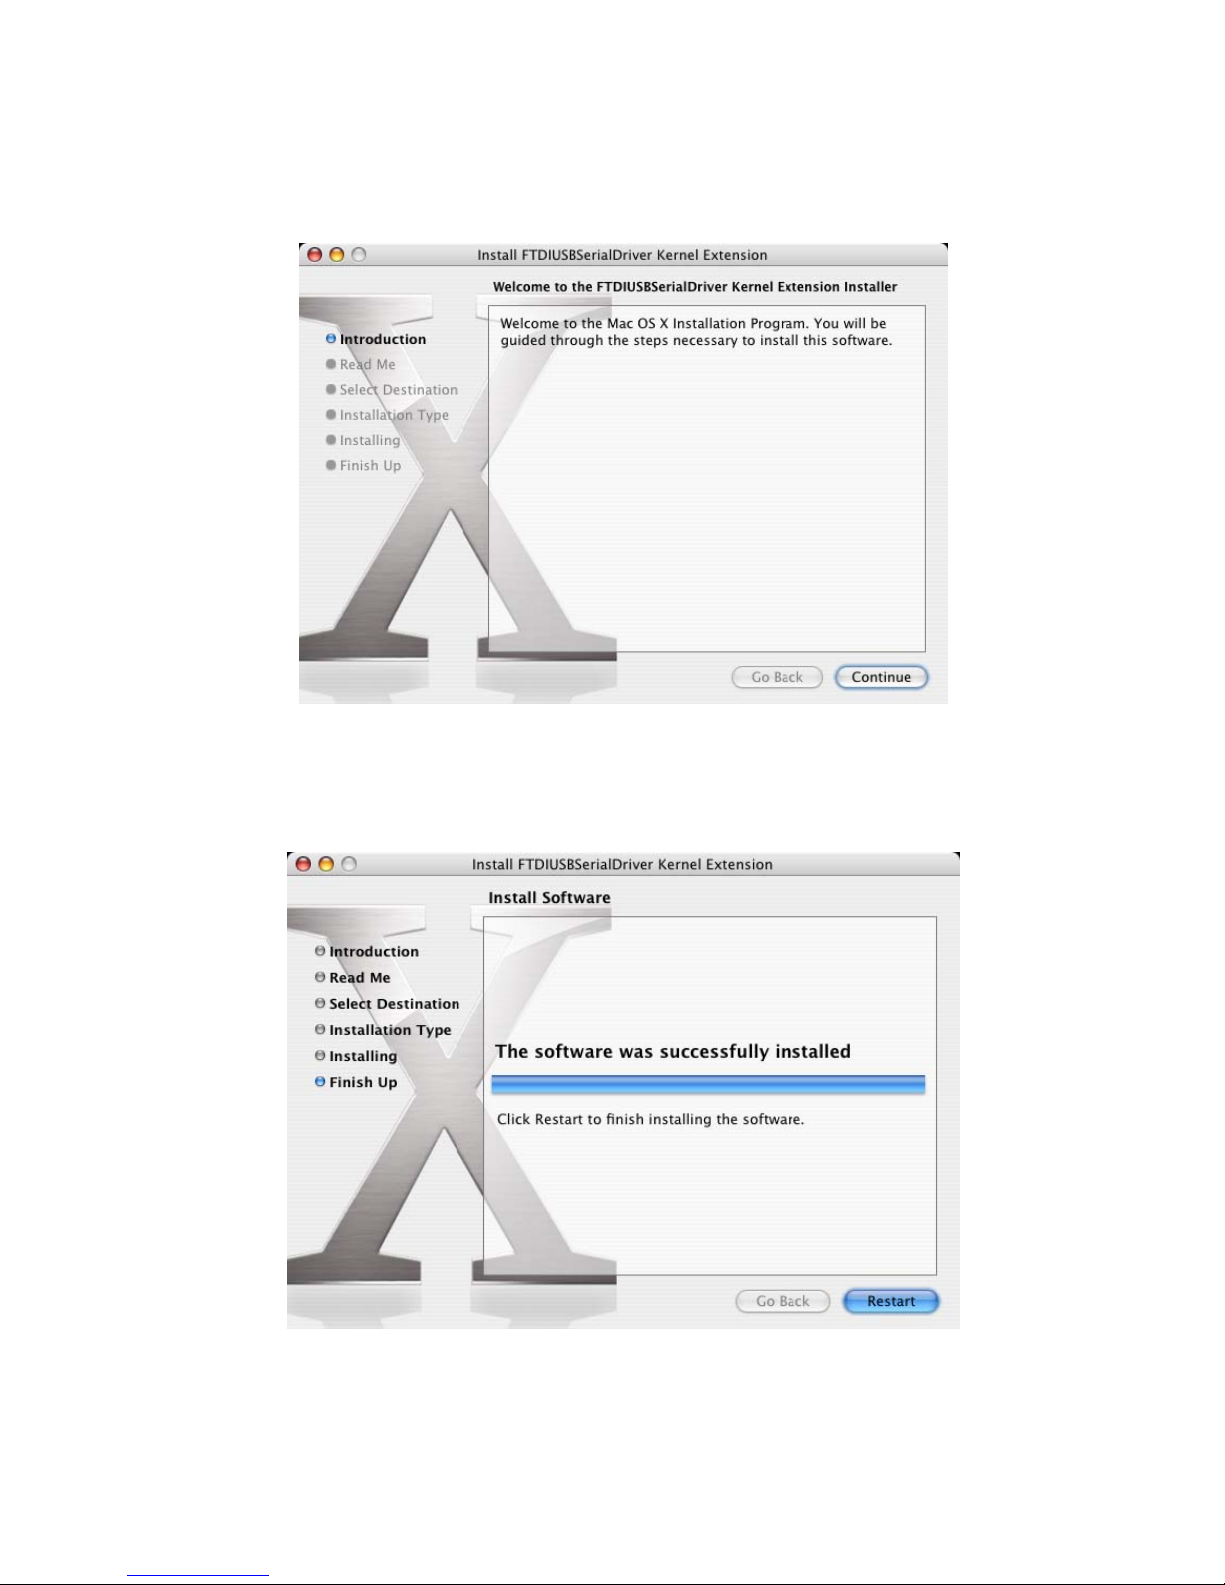
MAC OS X Installation Guide
Download the driver from the VCP Drivers section of the FT
now available in disk image (.dmg) format. Run the installer by double clicking on the FTDIUSBSerialDriver.dmg
icon.
DI web site and save it to the hard disk. The driver is
Click Continue to proceed with the installation and follow the instructions on screen.
When the installation is complete, reboot the computer.
47
Page 49
When the computer has rebooted, plug in the device. If the device is installed properly, you will see entries in the
/dev directory:
/dev/cu.usbserial-xxxxxxxx
/dev/tty.usbserial-xxxxxxxx
Where xxxxxxxx is either the device's serial number or, for unserialized devices, a location string that depends on
which USB port your device is connected to. The Terminal application can be launched by selecting Go >
Applications > Utilities > Terminal. Type the following lines in the Terminal window to produce the file list:
cd /dev
ls-l
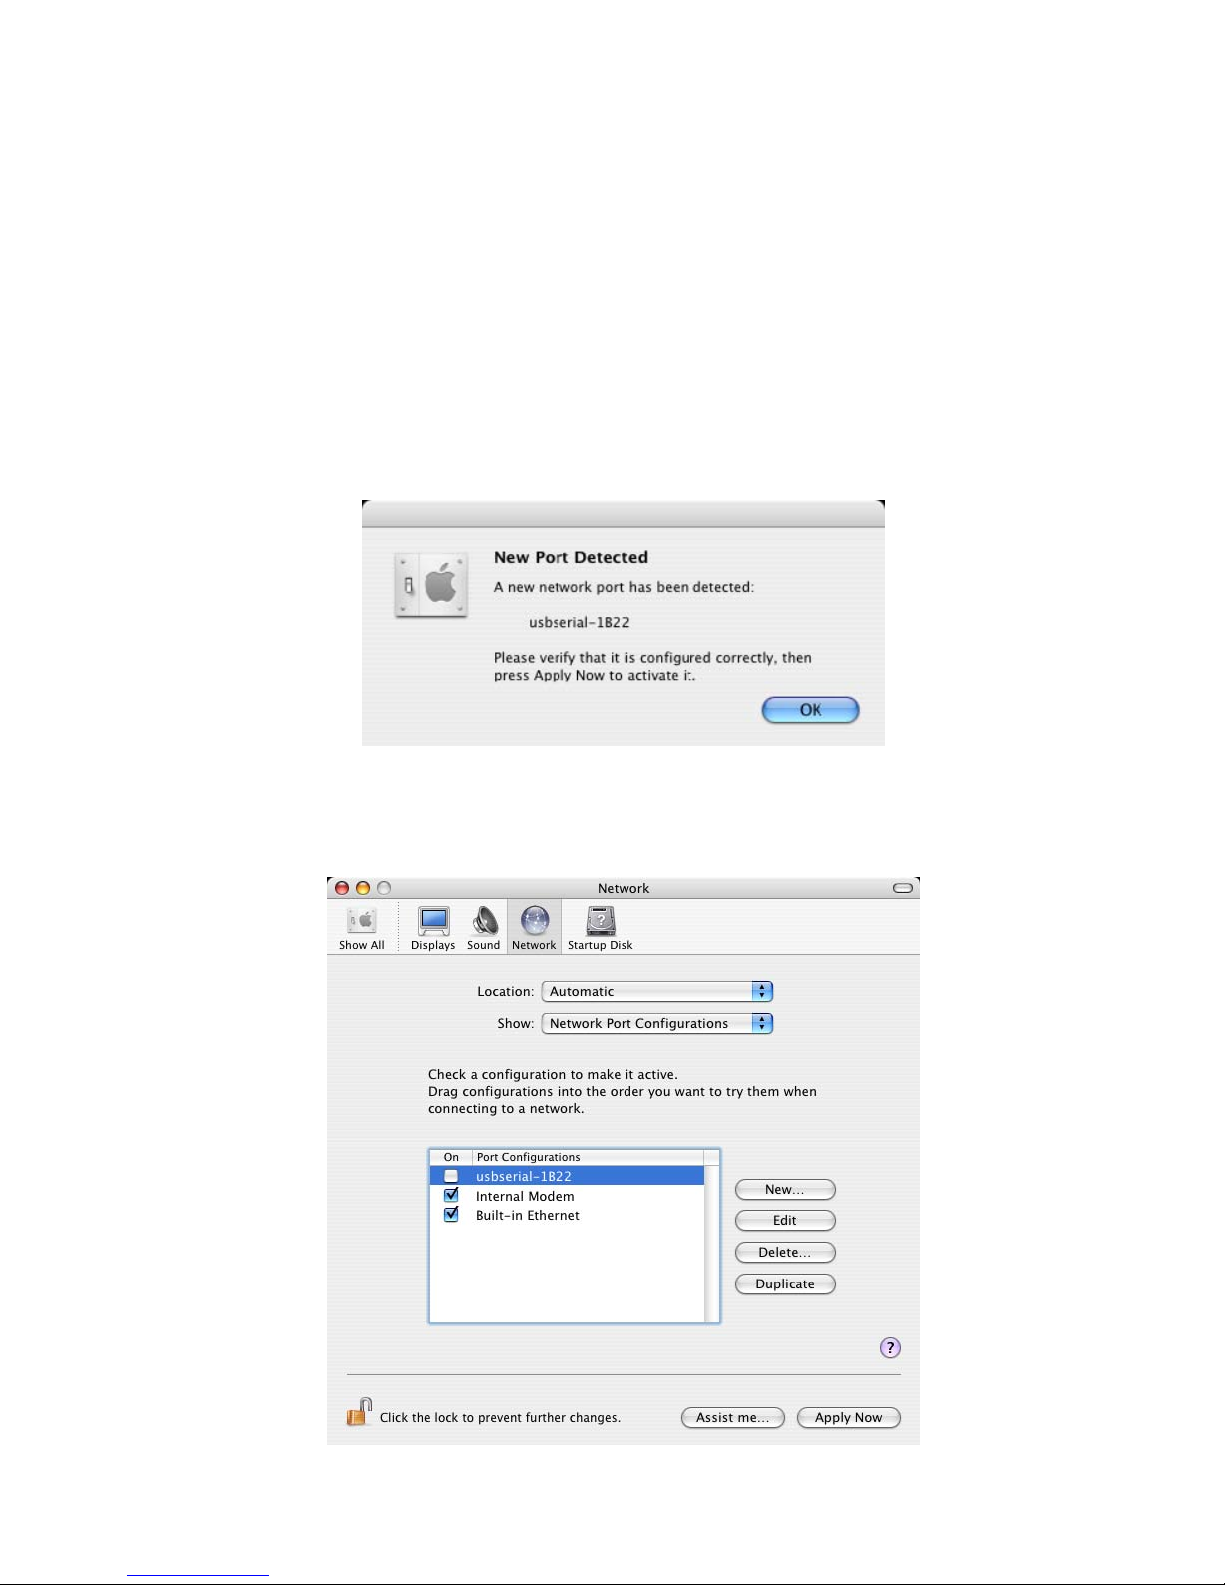
If you run the application System Preferences and select Network (Go > Applications > System Preferences >
Network), you should see the text "New Port Detected".
Click OK and select Network Port Configurations from the show list. The new port can be enabled from this screen
by checking the on box and clicking Apply Now.
48
Page 50
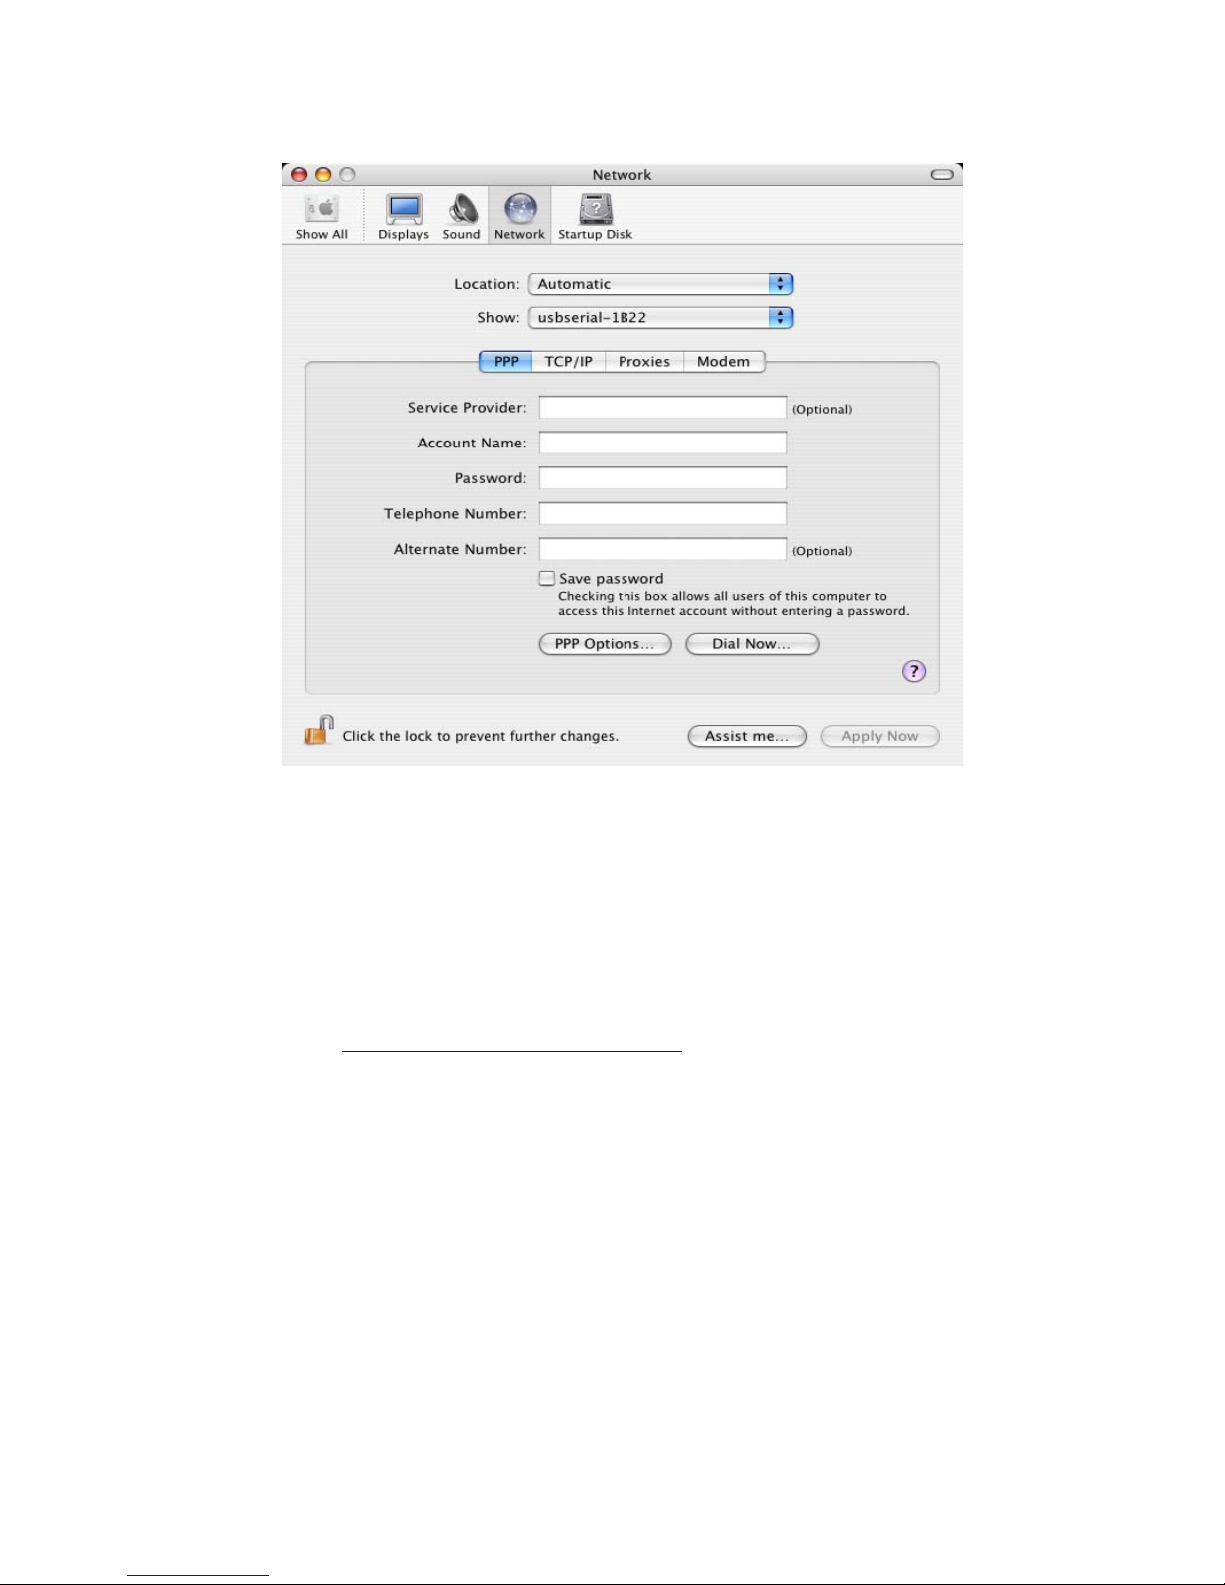
At this point, it is possible to exit Network and use the device as a COM port. If you wish to set the device up a
modem for an Internet connection, select the new port from the Show list to display the window below.
Entries for this screen are specific to the Internet account for each user. If you do not know the required details,
contact your Internet service provide
Please note:
1. For multiple-port converter, each port has to be installed with the driver individually, i.e. you have to repeat this
installation procedure 2 times (2-port converter) or 4 times (for 4-port converter).
2. If you have any
versions from FTDI Web site www.ftdichip.com/Drivers/VCP.htm
difficulties with the drivers we provided in this CD, you may download the updated or appropriate
, supported device “FT232BL(M)”.
49
Page 51
Uninstalling instruction
To remove the drivers from Mac OS X, the user must be logged on as root. Root is a reserved username that has
the privileges required to access all files.
Start a Terminal session (Go > Applications > Utilities > Terminal) and enter the following commands at the
command prompt:
cd /System/Library/Extensions
rm -r FTDIUSBSerialDriver.kext
cd /Library/Receipts
rm -r FTDIUSBSerialDriver.kext
The driver will then be removed from the system.
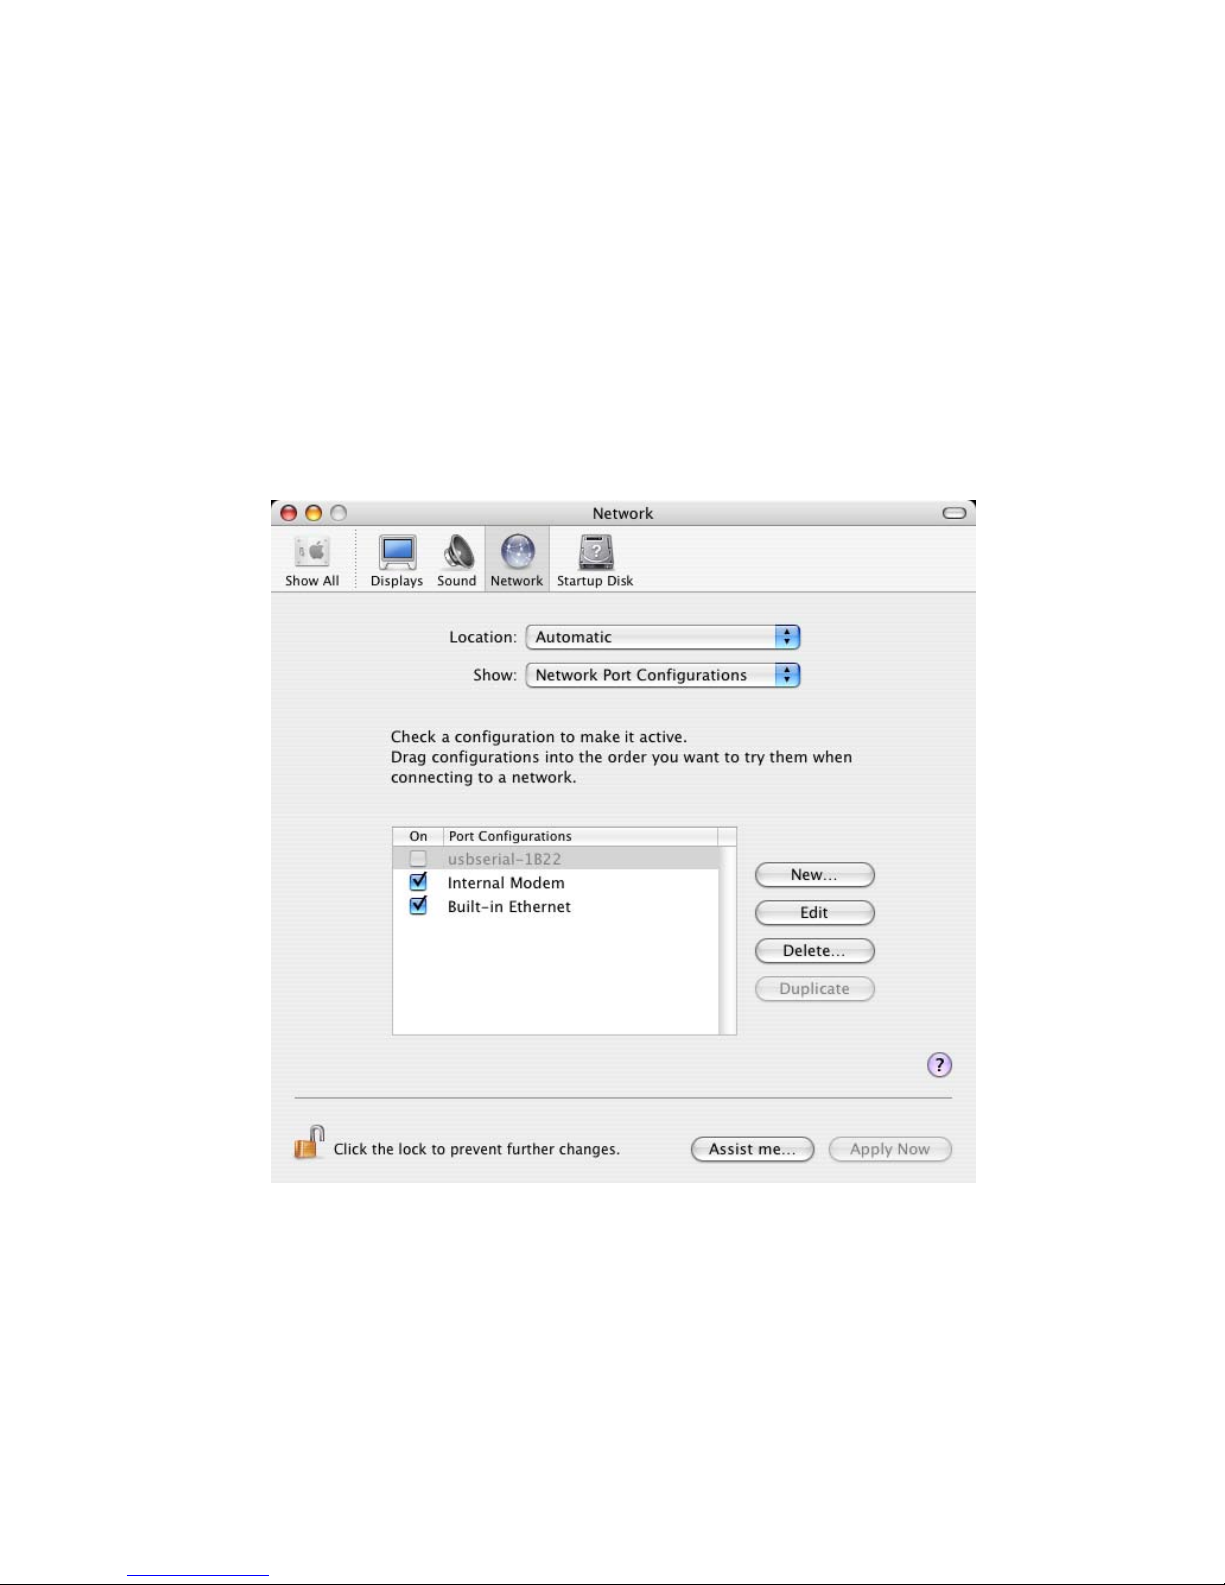
To remove the port from the system, run the application System Preferences and select Network. Selecting Network
Port Configurations from the Show menu will display the port as greyed out. Select the uninstalled port and click
Delete. Confirm the deletion to remove the port.
50
Page 52
Troubleshooting
1. How do I know what my device ID is?
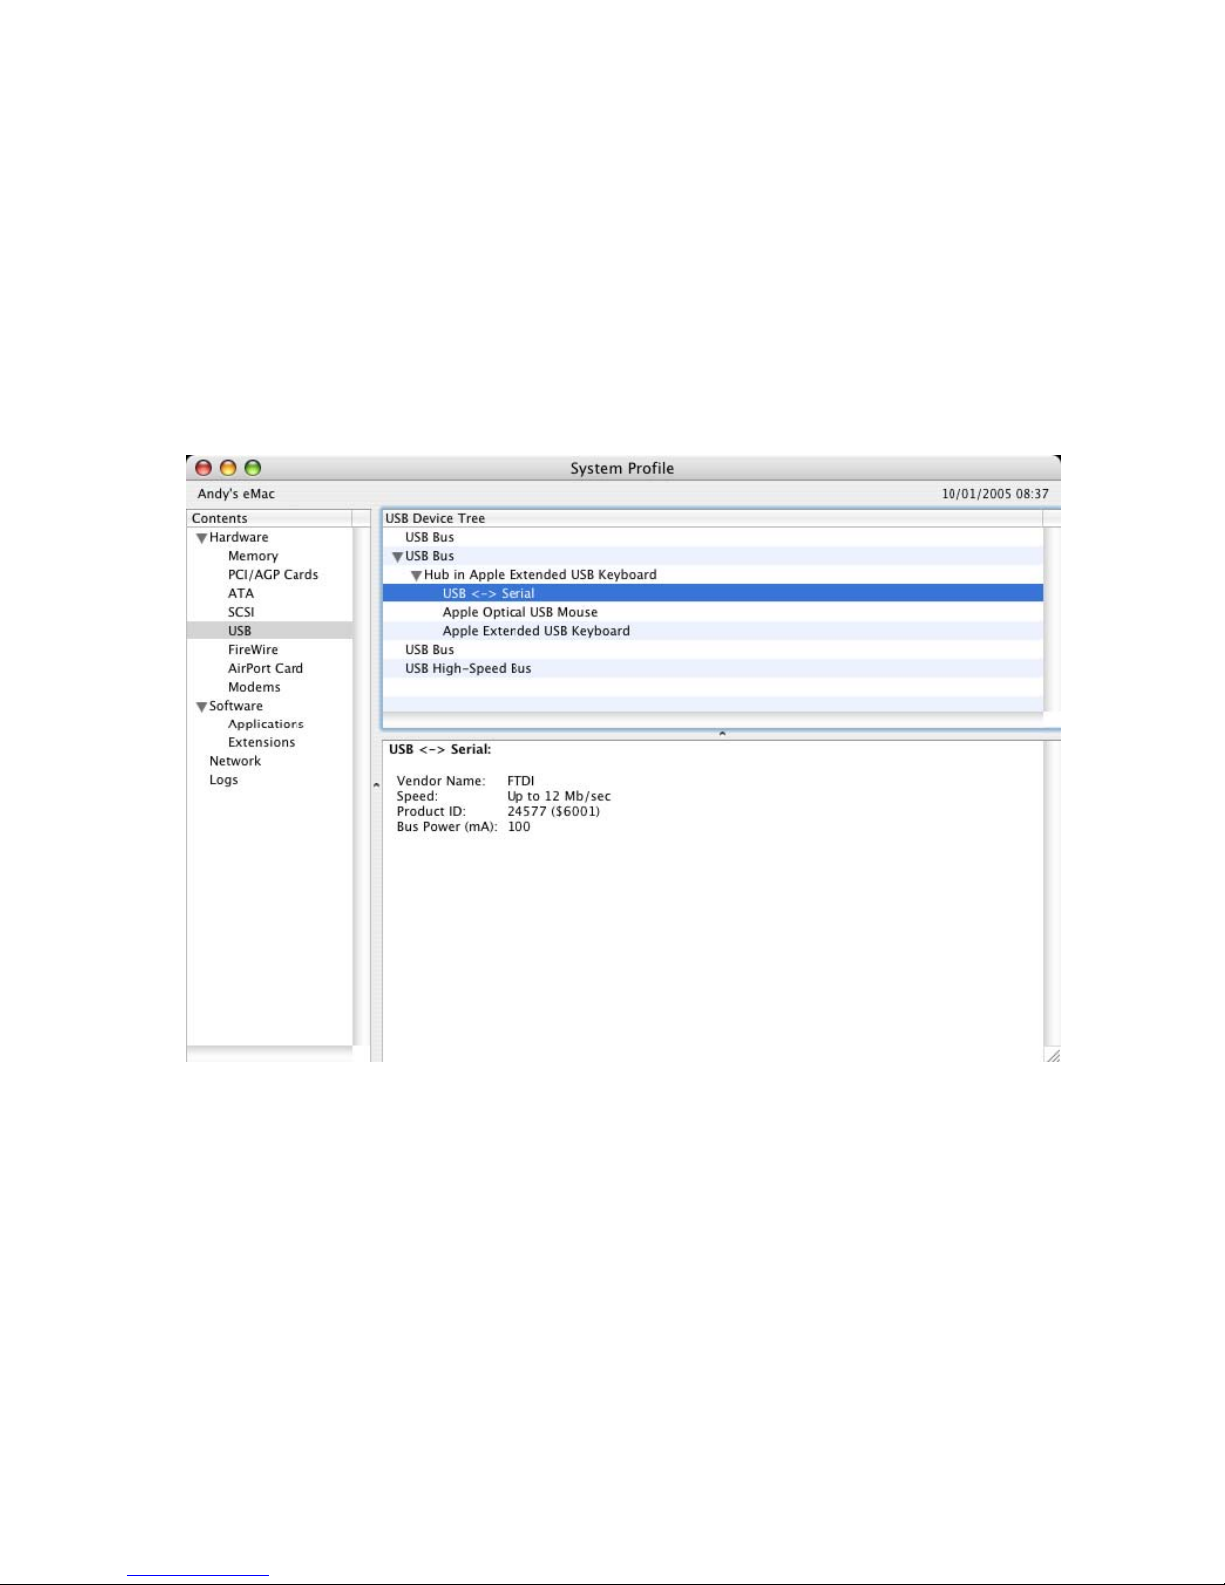
Launch the System Profiler utility, or Apple System Profiler for earlier versions of OS X. This can be accessed by
going to the Finder and selecting Applications from the Go menu, then open the Utilities folder.
Select USB under Hardware in the pane to the left and then select the appropriate device from the USB Device Tree.
In the screen shot below (from OS 10.3), the device has a device ID given by:
Vendor Name: FTDI
Product ID: 24577 ($6001)
A Vendor Name of FTDI is equivalent to a Vendor ID of 1027 ($0403).
If the device does not work after installing the driver, it is likely to be because the PID is not supported by the driver.
If this is the case, contact FTDI Support with the PID that needs to be added to the driver. If the VID is not 0x0403, it
is likely that the device is not an FTDI device and we cannot support it.
51
Page 53

2. The device does not appear in the /dev directory or the text "New Port
Detected" is not displayed in System Preferences-Network
FTDI USBSeria Driver does not support your device ID (VID and PID). Disable the EEPROM so that the
device reverts to its default device ID, then replug. To get support for your device ID built into FTDI
USBSerial Driver, contact FTDI quoting your device ID and a description of your device.
3. The device cannot be accessed even though the device ID is Supported
in FTDI USBSerial Driver
An ownership or permissions problem is preventing the system from making the device accessible. Check
that the driver is owned by root and wheel. The most common symptom is the group for FTDI USBSerial
Driver is not wheel. To change the group, login as root and perform the following script in a Terminal
window (Go > Applications > Utilities > Terminal):
cd /system/library/extensions
chgrp -R wheel FTDIUSBSerialDriver.kext
Reboot for the change to take effect.
4. How do I open a Terminal window?
A Terminal window can be started by selecting Go > Applications > Utilities > Terminal .The terminal
window is equivalent to a DOS prompt in Windows.
52
Page 54
Regulatory Compliance
Disclaimer
Information in this document is subject to change without notice. The manufacturer does not make any
representations or warranties (implied or otherwise) regarding the accuracy and completeness of this document and
shall in no event be liable for any loss of profit or any other commercial damage, including but not limited to special,
incidental, consequential, or other damages.
No part of this document may be reproduced or transmitted in any form by any means, electronic or mechanical,
including photocopying, recording or information recording and retrieval systems without the express written
permission of the manufacturer.
All brand names and product names used in this document are trademarks, or registered trademarks of their
respective holders.
53
 Loading...