

LCNDT DT-100 User Manual

Portable Digital Densitometer
User's Manual
Wen Zhou Lu Cheng NDTEquipment Corp.
Wen Zhou Lu Cheng NDT Equipment Corp.
Address: RM.308,KangYuan South Building XinChengAvenue,
Wenzhou City, Zhejiang Province, P.R.China.
Post Code: 325000
Tel: 86-577-88293040, 88293242, 88293909
Fax: 86-577-88259689
Http://www.Lcndt.net
E-mail: Lcndt@163.com
DT-100
Technical Specifications:
Range:
Density:
* We strongly suggest DT-100 work with FV series LED
viewers. With FV-2008, the maximum density of DT-100
would be > 5.00D.
Optical Aperture:
Probe Temperature compensated
Display:
Accuracy:
Resolution:
Repeatability:
Detector:
Power supply:
Battery life:
4 digit LCD
0.03 D
0.01D
0.02D
Silicon photodiode
(AA/1.5V)x2-Alkaline Battery
1200 hours
(Continuous duty, without illuminated)
3mm diameter
650Cd/m - 320 000 Cd/m
22
4.50D - 5.00D
Dimensions:
Weight:
160mm x 65mm x 23mm
760g
Factor NO.
Factor value
0
1
3
0.00(default)
-0.05
+0.05
Density in strip
Density we measured
error
0.15
0.60
1.60
0.15
0.65
1.55
0.00
-0.05
+0.05
User's Manual
Instruction:
The DT-100 is a robust, easy to use, portable densitometer for measuring the
transmission density of x-ray film. The unit has been designed for using in one-site
mobile darkrooms, laboratories and offices. The DT-100, with a extremely wide light
range of between 650Cd/m and 320 000 Cd/m , has a density measuring range from
0D to 4.5D with an accuracy to within ±0.03D over an aperture of 3mm in diameter.
The operator simply places the film on the viewer (emulsionside up), places the probe
on the film where the reading is required and the reading will appear on the 4 digit
LCD screen with white light illuminated display. And a low battery warning indicator
is provided on the digital display.
Measurement:
1. Turn on DT-100's power switch(1), then "--.--" appears which indicate waiting for
Zeroing.
2. Place DT-100 on a film viewer. We strongly suggest work with LED film viewers,
such as FV-2008, FV-2009, FV-2010 etc.
3. Keep the DT-100 on the viewer, pressed down the Zero adj(2), keep it down until
0.00 indication appears, then release the Zero adj(2).
4. Place the area of the specimen that you want to measure, then put Measuring Spot(3)
of DT-100 on the area of the specimen.
5. Digital reading shows density of the specimen.
6. Short Press of Zero adj, the back light will turn on or off.
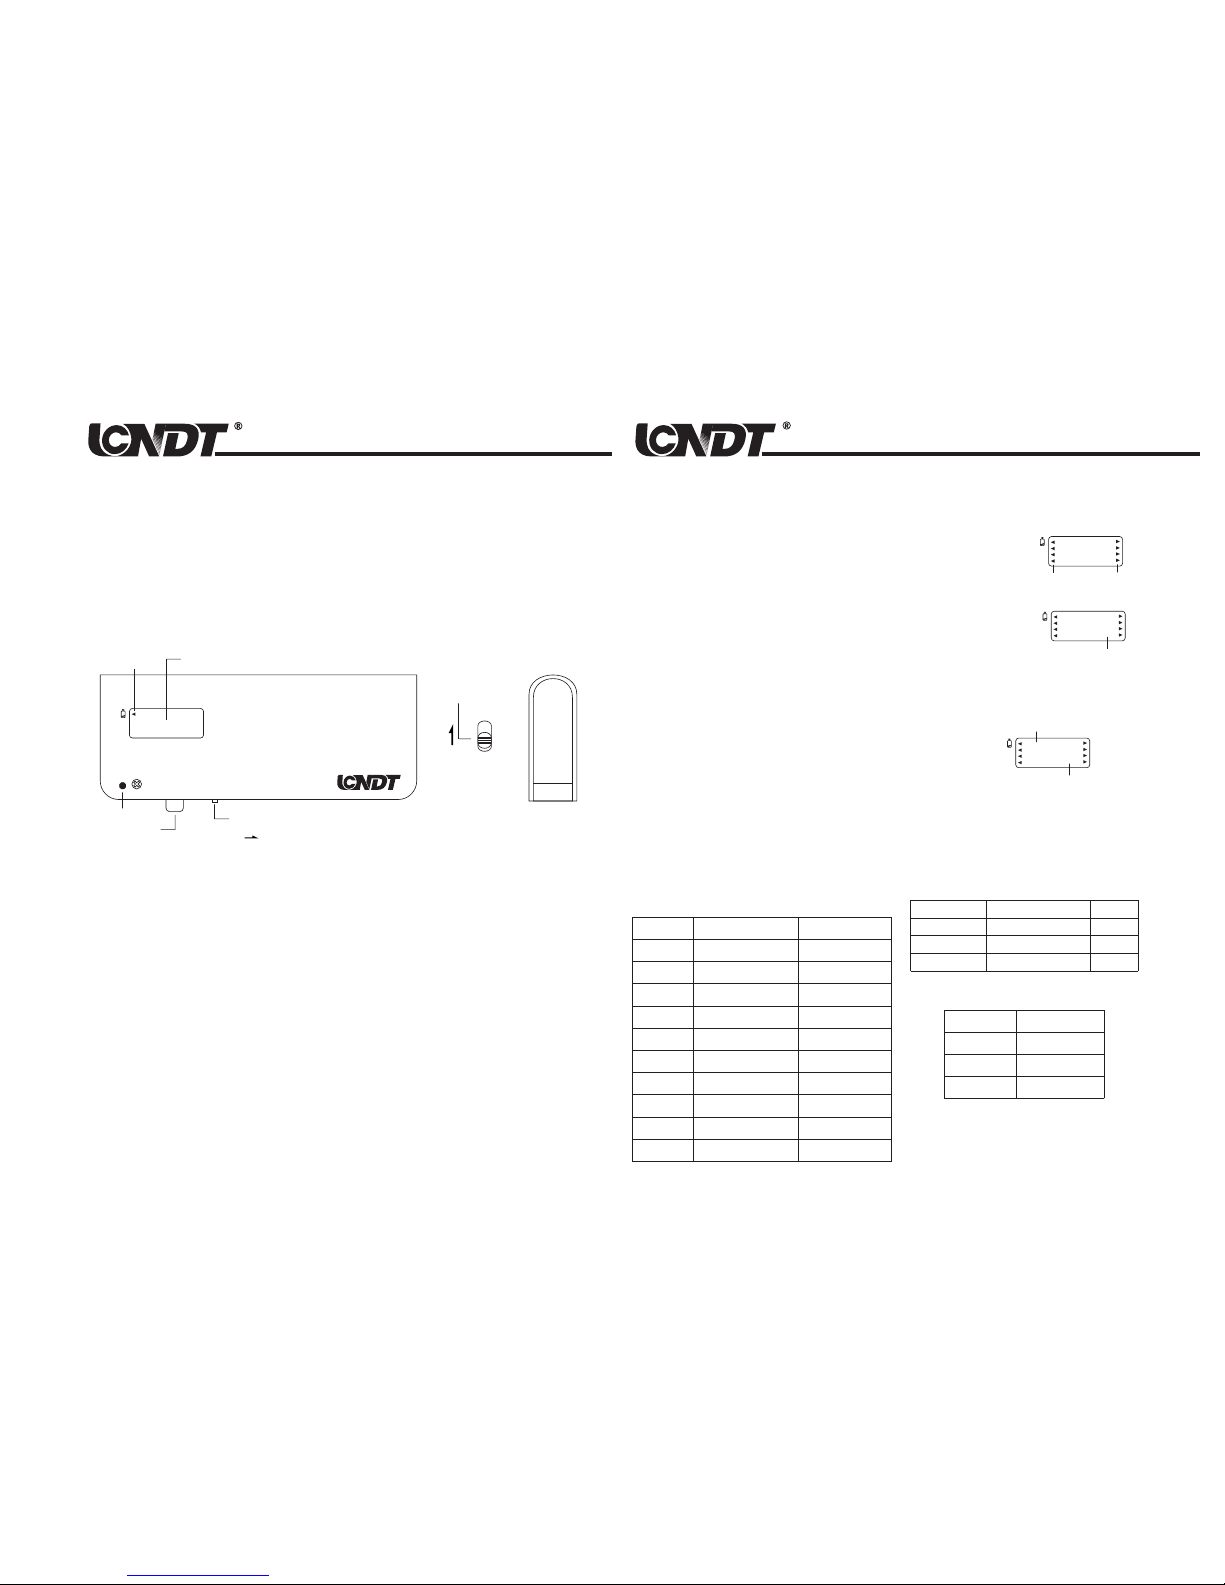
User's Manual
Handy Densitometer
DT-100
ZeroAdj
Measuring Spot
Lower bettery
LCD
+
_
Battery Lock
Lock
Power Switch
Turn On
Program Mode
1. Enter into Program Mode:
Keep Zero button pressed down, then turn on power switch(1), until 8 arrows appears, then
release the Zero button. It means you have entered into Program Mode.
2. F-x function
After entered into Program Mode, you will see F- x(x=0,1,2 or 3).
F0: original data, suit to our local market.
F1: suit to China market
F2: s uit to U. S marke t (defa ult)
F3: Null
Short press the Zero button, factor x will be turn between 0-1-2-3-0.
Note: the factor will save automatically
8 ARROWS MEANS
PROGRAM MODE
0.00
FACTOR X TURN
BETWEEN 0-1-2-3-0
F - 2
FACTOR B WILLTURN
BETWEEN 0,1,2,...9,-9,-8,...-1,0
0.00
FACTORA WILLTURN
BETWEEN 0,1,2,...9,0
Factor A Valid Step range Factor B
0
1
2
3
4
5
6
7
8
9
0 :0.1-0.5
1 :0.5-1.0
2 :1.0-1.5
3 :1.5-2.0
4 :2.0-2.5
5 :2.5-3.0
6 :3.0-3.5
7 :3.5-4.0
8 :4.0-4.5
9 :4.5-5.0
-0.19 ~ +0.19
-0.19 ~ +0.19
-0.19 ~ +0.19
-0.19 ~ +0.19
-0.19 ~ +0.19
-0.19 ~ +0.19
-0.19 ~ +0.19
-0.19 ~ +0.19
-0.19 ~ +0.19
-0.19 ~ +0.19
3. Advanced calibration function
In the F-x interface, long press Zero button, after display A
.0B(A,B=0,1,2 …or 9), release Zero button.
Short press the Zero button, factor B will turn between
0,1,2,3,…9,-9,-8,-7…-1,0.
Long press the Zero button, factor A will turn between
0,1,2,3,…9,0, and save the previous factor B.
In previous version, we can only set 1 factor(from -0.05 to +0.05),
this factor will be valid from 0.00-5.00 H/D.
Now, we can set 20 factors(from -0.19 to +0.19),
each factor be only valid for corresponding
density range, see the table below:
With the help of this function, we can just
calibrate several certain density ranges,
for example:
So we can set corresponding factor as below:
After that, you will get the right measurement.
For most of case, you don’t need to calibrate,
because we already have F0-F1-F2-F3 mode.
 Loading...