

Page 1
Revised 5/1/2009
LCD4Video
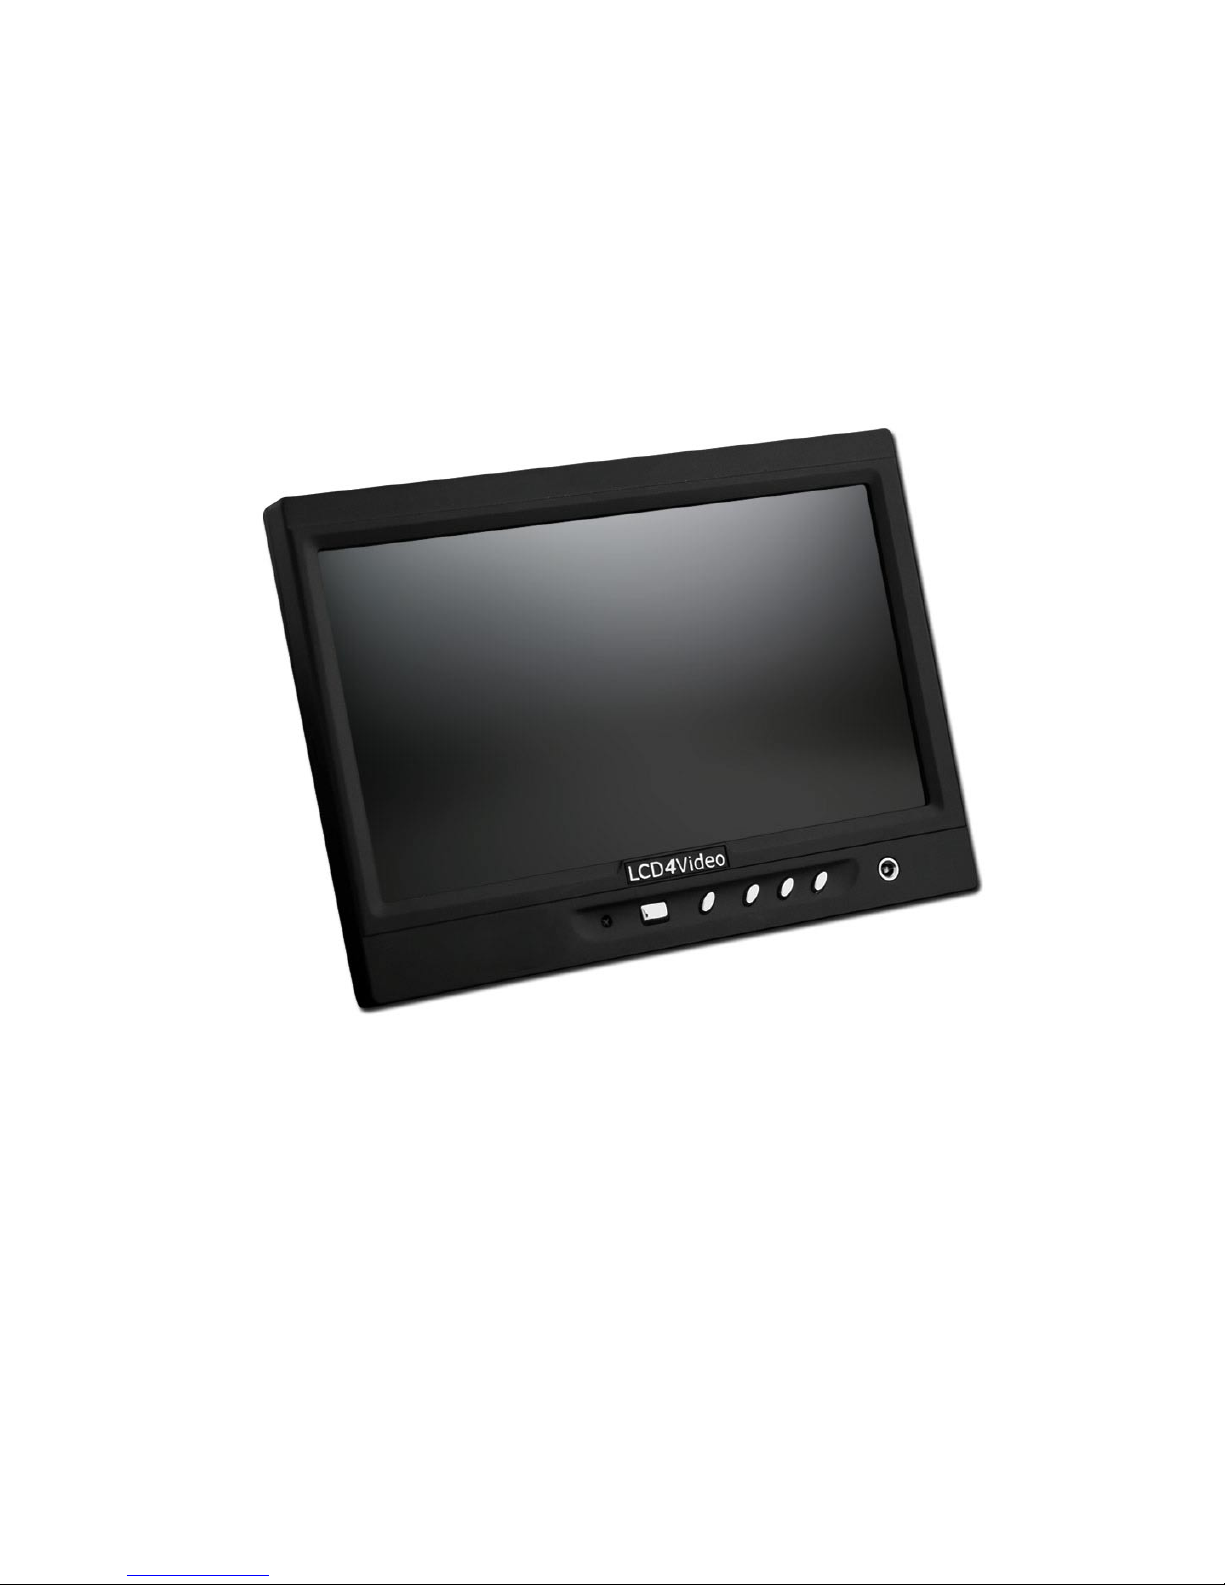
7” LCD Monitor User Manual
www.lcd4video.com
Page 2

Page | 1
Thank you for purchasing our 7” LCD Monitor Kit.
This 7" LCD Monitor is designed to be used as an external video display, allowing you to step
back from the camera while still being able to frame and capture the action without having to
look through the cameras built-in viewfinder.
This monitor is compact enough for camera top mounting or attaching to a tripod or crane, jib
or arm... and large enough to be seen on a desktop or rack mount from a distance. It's light
weight, low power consumption and low cost make it ideal for any DV and HD video cameras.
This monitor easily switches between 16:9 and 4:3 aspect ratios and has image orientation
controls where the picture can be flipped horizontally and vertically for DOF (depth-of-field)
adapters.
To insure best use of this unit, please read this user’s manual carefully.
Important Safety Instructions__________________________
For your own safety and that of your equipment, always take the following precautions.
Use only the power adapter that came with your LCD. Adapters for other equipment may look
similar, but may damage your display.
Disconnect the power (by pulling the plug, not the cord) if any of the following conditions exists:
• the power cord or plug becomes frayed or otherwise damaged
• you spill something into the case
• your display is exposed to rain or any other excess moisture
• your display has been dropped or the case has been otherwise damaged
• you suspect that your display needs service or repair
LCD4Video
www.lcd4video.com
Page 3

Table of Contents
Page 3 - 7” LCD Monitor - Front View
Page 4 - Remote Control
Page 5 - Specifications
Page 6 - Standard Accessories
Page 7 - Optional Accessories
Page 8 - Optional Batteries & Adapters
Page 8 - Compatible Batteries
Page 9 - LCD Monitor Setup – AV Cable to LCD Monitor
Page | 2
Page 10 - LCD Monitor Setup – AV Cable to Camera
Page 11 - LCD Monitor Setup – LCD Monitor to Power
Page 12 - Mounting the LCD with Optional Shoe Mount
Page 13 - LCD Monitors On-Screen Display Settings
Page 13 - LCD Monitors Image Flip Functions
Page 14 - LCD4Video Warranty, Contact & Support
LCD4Video
www.lcd4video.com
Page 4
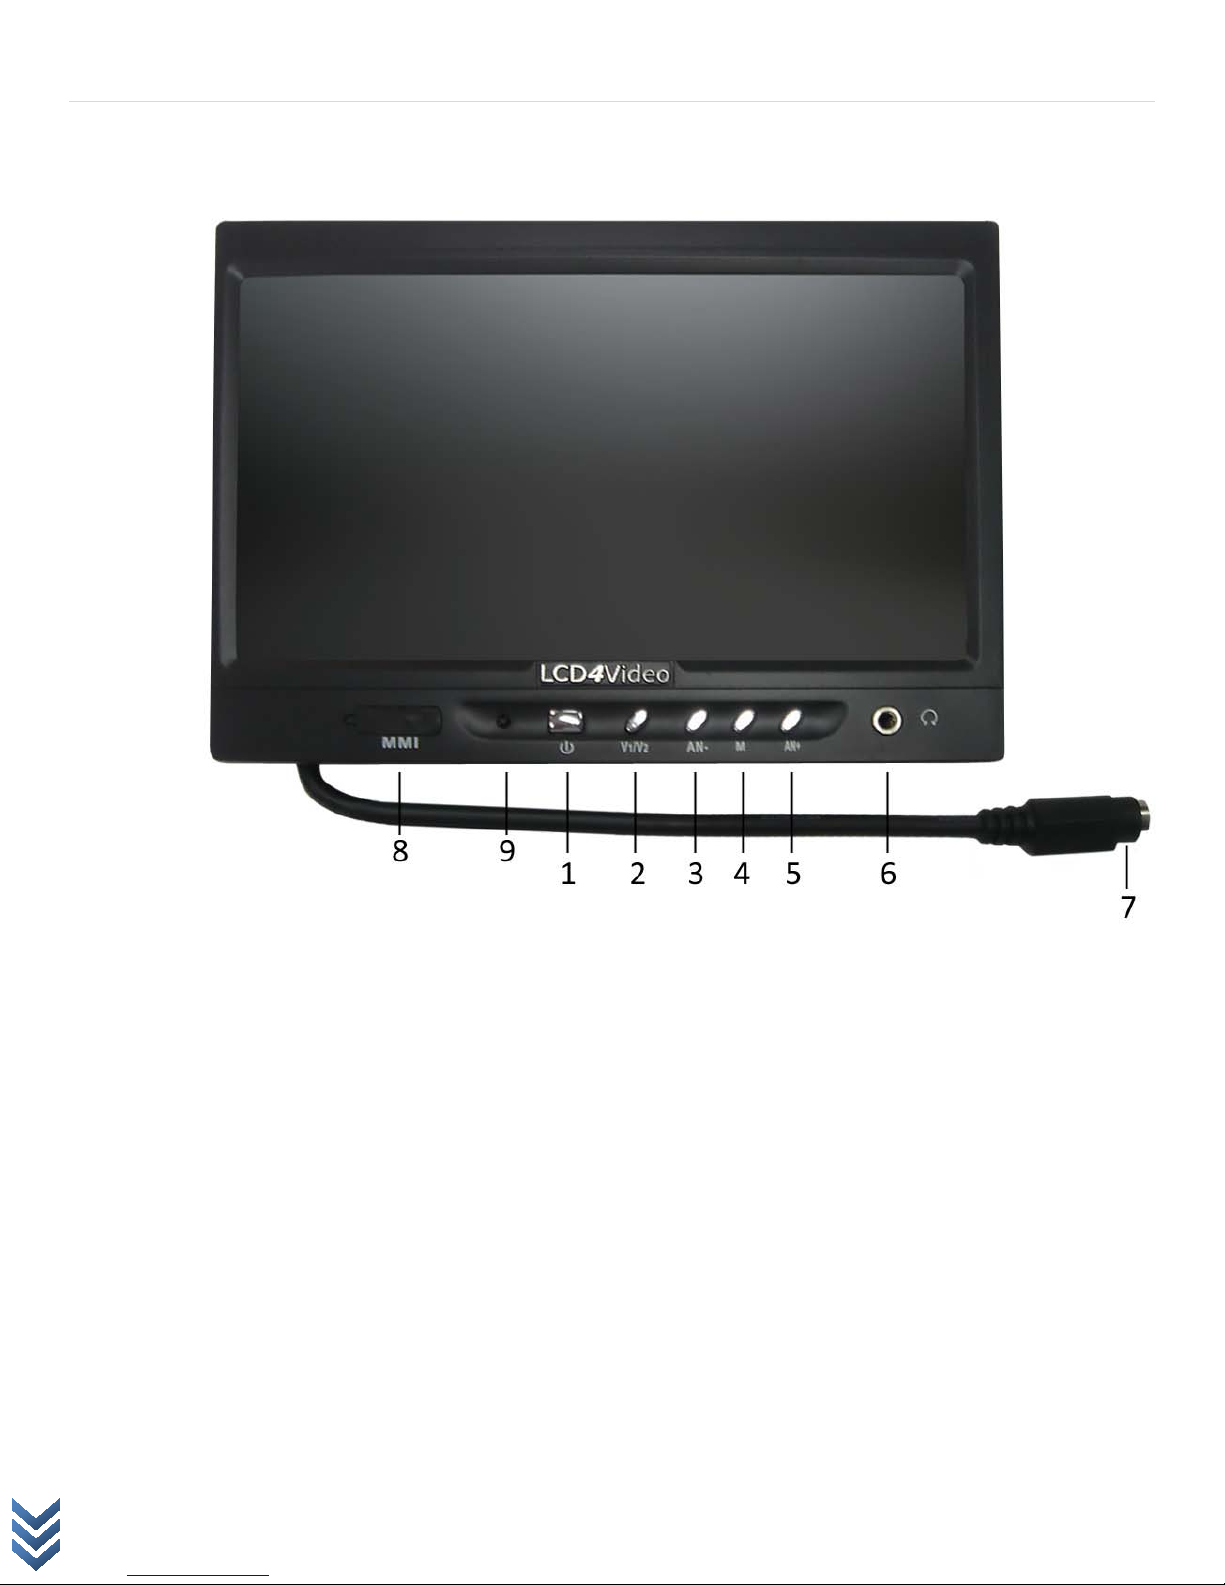
7” LCD Monitor - Front View
Page | 3
1) Power Button (on/off)
2) Video Input Select v1/v2
3) Menu/Volume Adjustment -
4) On-Screen Display Menu Button
5) Menu/Volume Adjustment +
6) Headphone Jack
7) Monitor AV Cable Input (Power, Audio & Video)
8) MMI Input (Not Used)
9) Remote IR Sensor
LCD4Video
www.lcd4video.com
Page 5
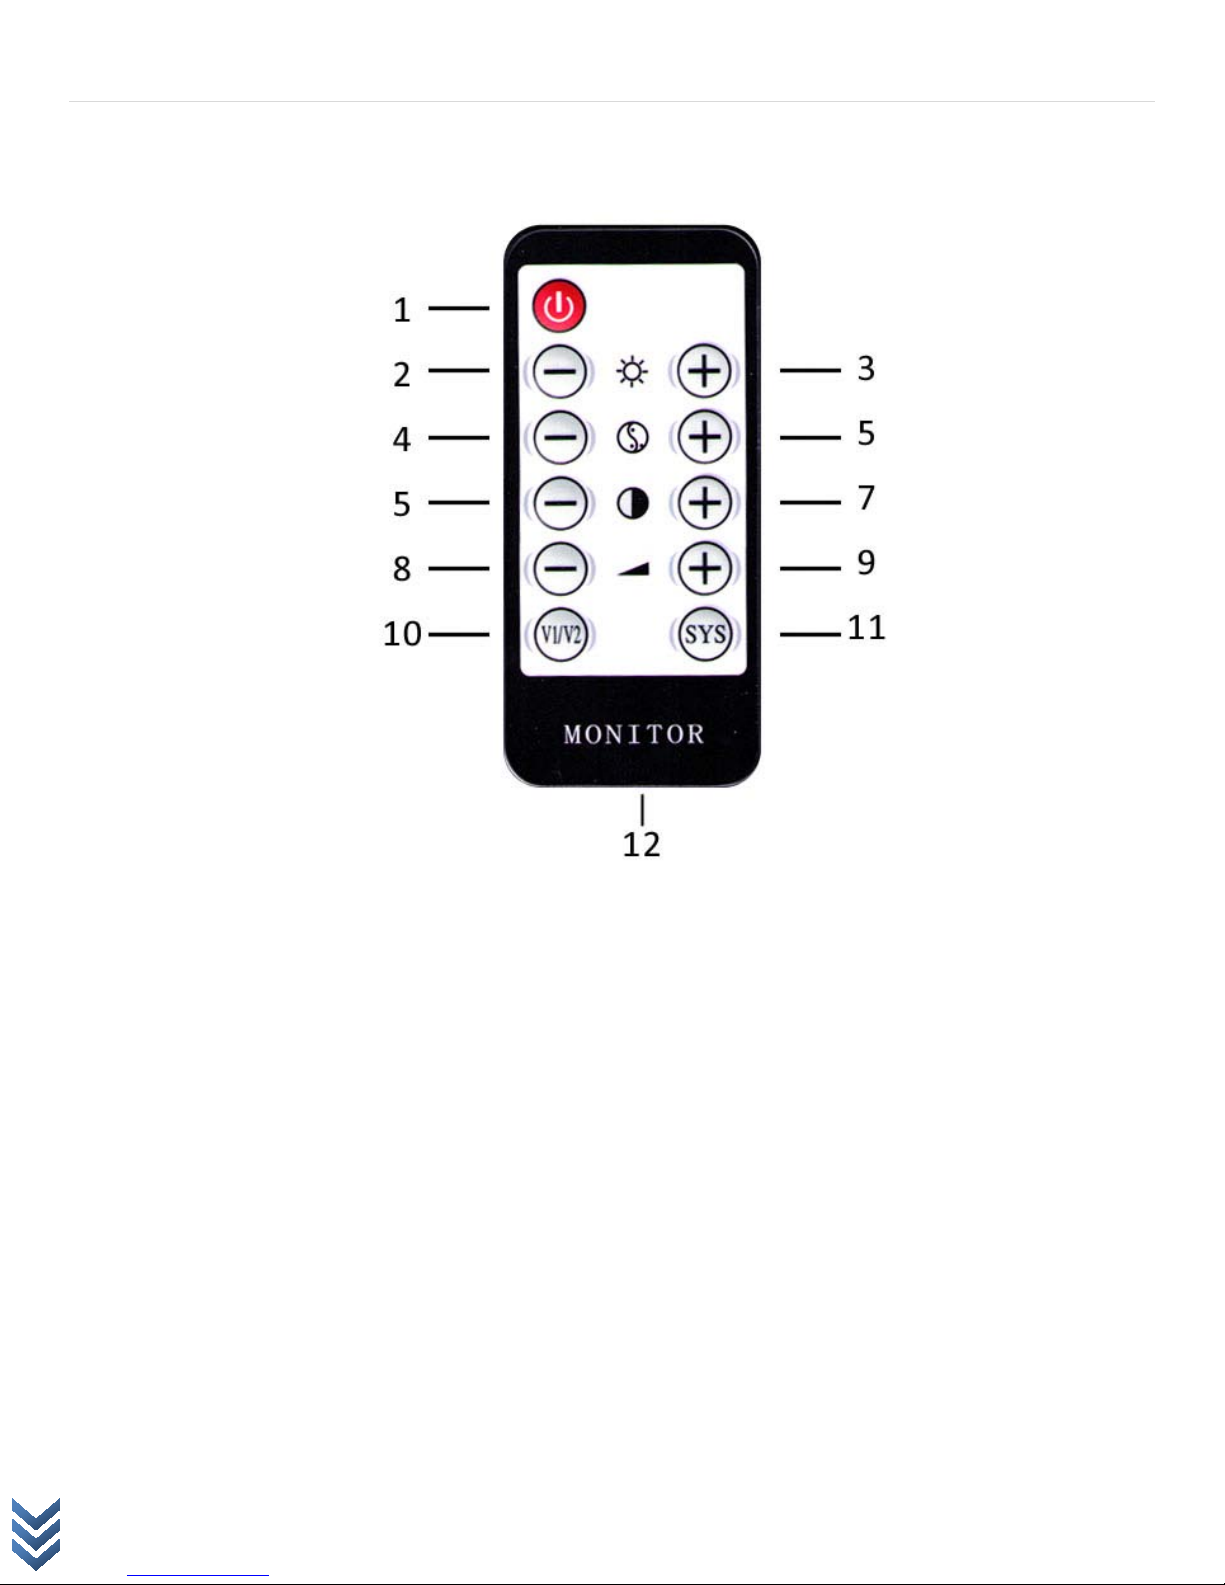
Remote Control
Page | 4
1) Power Button (on/off)
2) Brightness –
3) Brightness +
4) Color –
5) Color +
6) Contrast –
7) Contrast +
8) Volume –
9) Volume +
10) Video Input Select v1/v2 (RCA/BNC)
11) SYS – Image Flip Functions
LCD4Video
www.lcd4video.com
Page 6

Screen Size
7” Diagonal 16:9 AR
Resolution
1440 x 234 pixels / 480 x 240 lines
Viewing Angle
(60° horizontal x 30° vertical)
Video Input
Dual Channel RCA & BNC Video Inputs
OSD Adjustments
Brightness > Color > Contrast > Tint > Aspect Ratio
Mount Type
Bottom & Rear Mount Bracket
Backlight
Cold Cathode Filament Tube
250-300cd/mSQ
Operating Conditions
32°-140° F, 85% Max Humidity
Specifications
Display Type 'Panasonic' TFT LCD Panel
Active Area 6.12” (W) x 3.45” (H)
Video System NTSC & PAL Standards Compatible (Auto detect)
Aspect Ratio 16:9 & 4:3 Selectable
Power Supply 12v DC
Current 0.7A
Audio Built-in Speaker with RCA Audio Input
Page | 5
Image Flip Function Vertical & Horizontal (Mirror Image) Flip w/Remote 'SYS'
Brightness
Power Consumption Low Power Consumption - 12 volts Input, 10W Max
Weight 0.78 lb
Dimensions 7.08" (W) x 5.35" (H) x .98" (D)
LCD4Video
www.lcd4video.com
Page 7
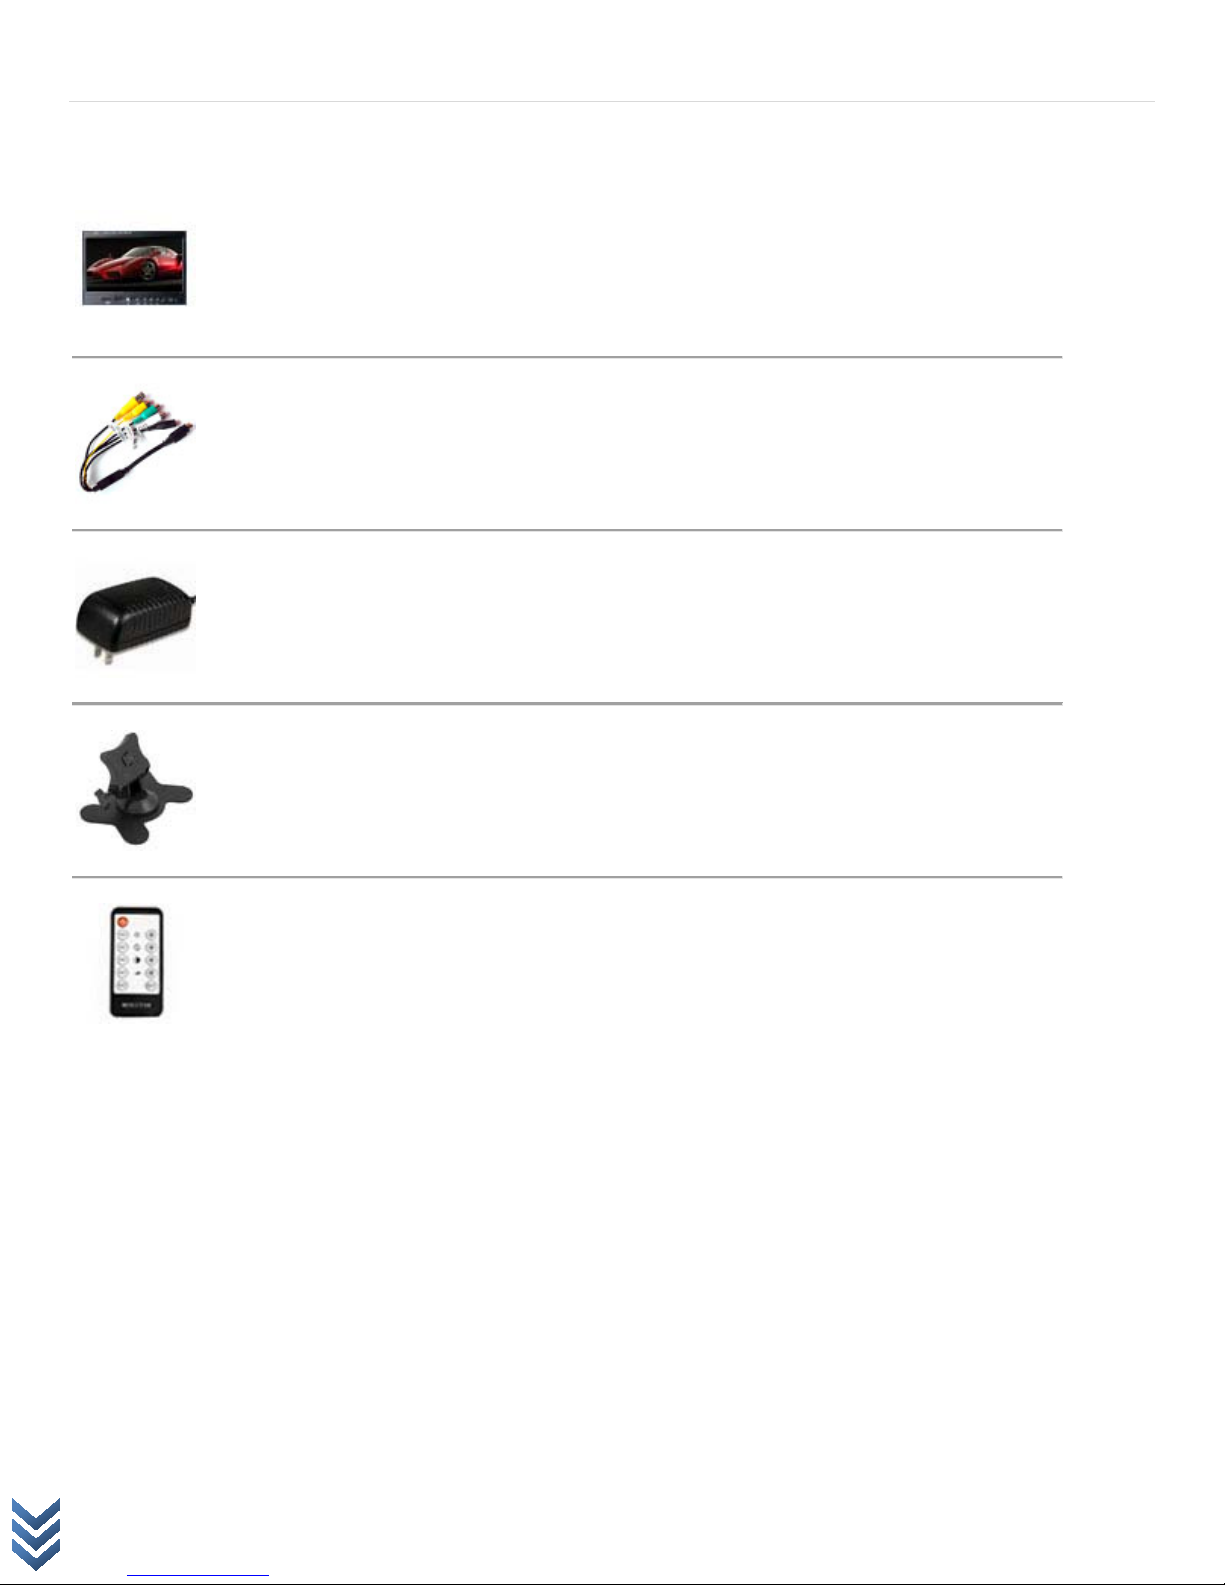
Standard Accessories
7" LCD Monitor
7" Widescreen 16:9 / 4:3 Selectable TFT LCD Monitor (480 x 240 lines)
AV Cable
Allows you to connect two video sources (RCA/BNC), one audio source (RCA) and the power
source into the monitor - with video loop through.
AC Adapter
12 volt AC adapter allows you to power the monitor from any outlet.
Page | 6
Desktop/Wall Stand
Allows you to mount the monitor on a table or wall.
Remote Control
Wirelessly controls the monitors’ functions.
LCD4Video
www.lcd4video.com
Page 8
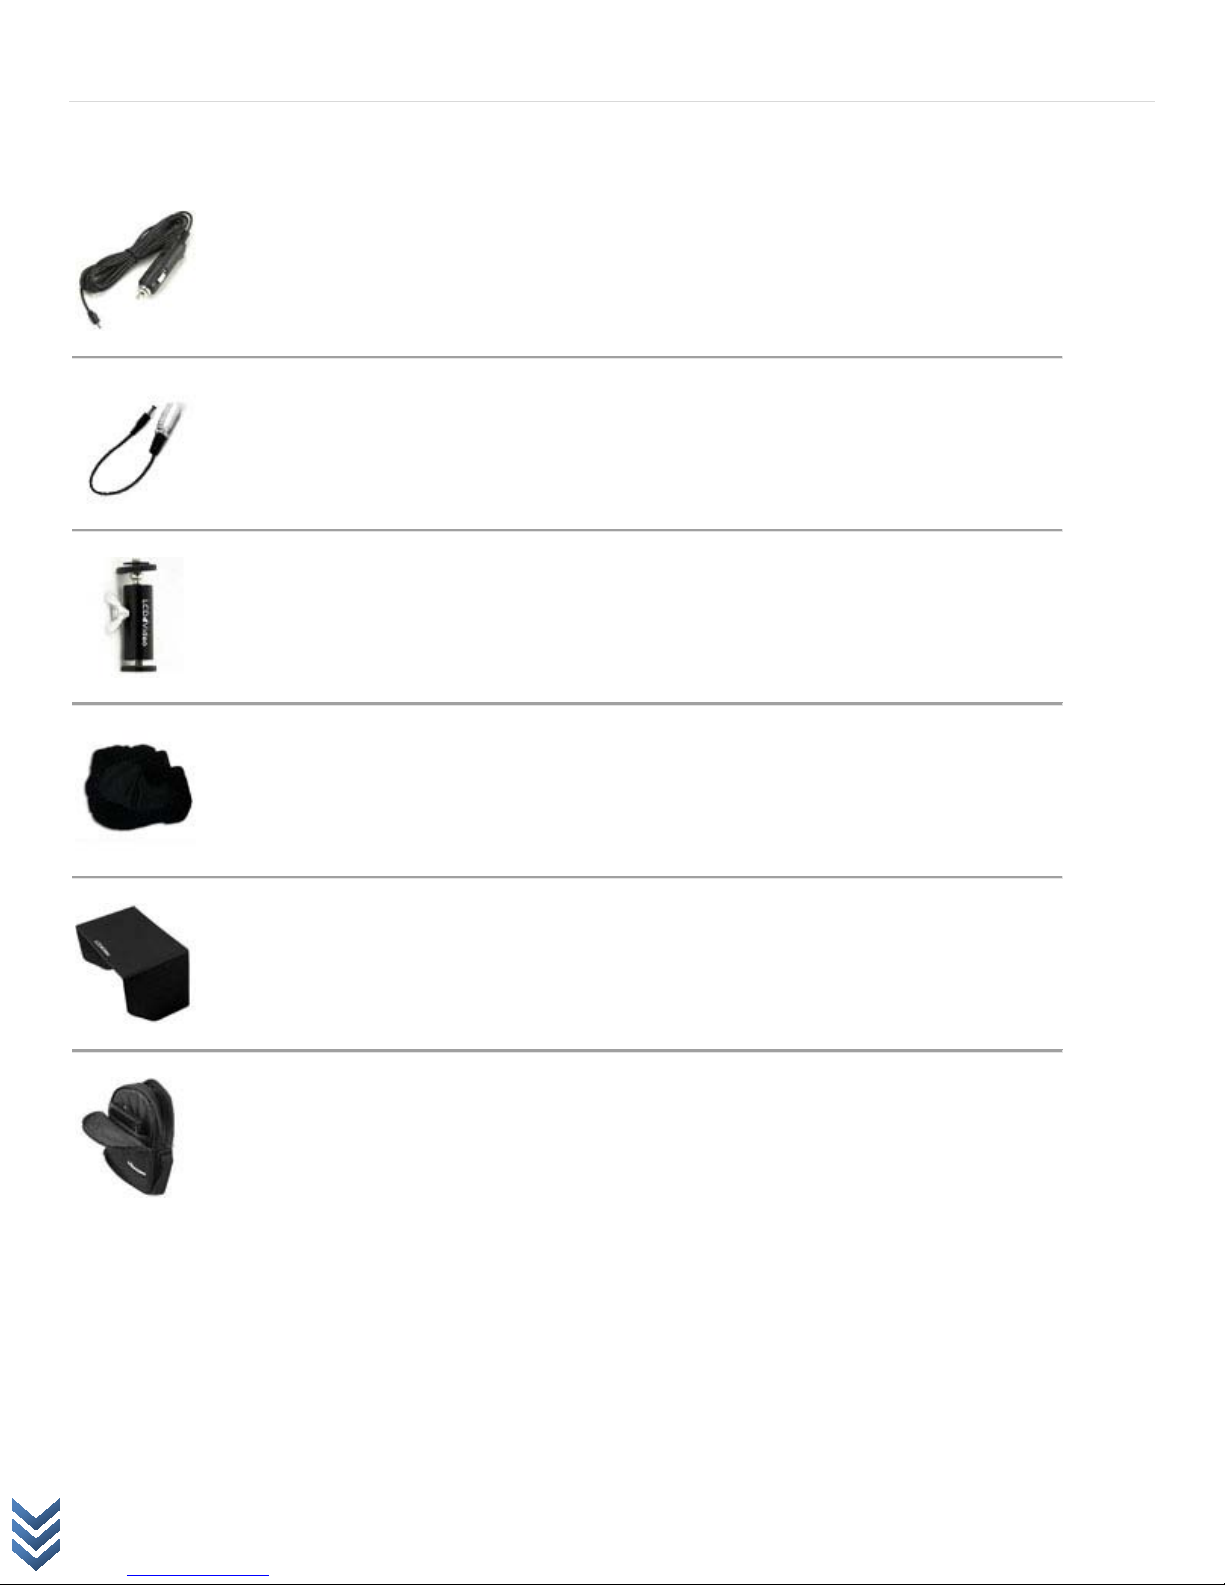
12 volt DC adapter that will allow you to power the monitor through a Cigarette Lighter
Optional Accessories
Cigarette DC Adapter
Plug.
4-Pin XLR Adapter
This XLR Adapter will allow you to power the monitor from a 4-pin XLR receptacle such
as an external 4-pin 12 volt battery pack or battery belt.
Shoe Mount
Allows you to mount the monitor on the shoe on top of your camera.
Page | 7
LCD Dust Cover
Protective cloth cover that covers that stretched over the entire LCD monitor.
Sunhood
Provides shade in direct sunlight for enhanced viewing. Attaches to the monitor with
included Velcro strips.
Carrying Case
Protective cloth carrying case with two zippered pockets and various compartments to
store and transport your monitor and accessories safely.
LCD4Video
www.lcd4video.com
Page 9
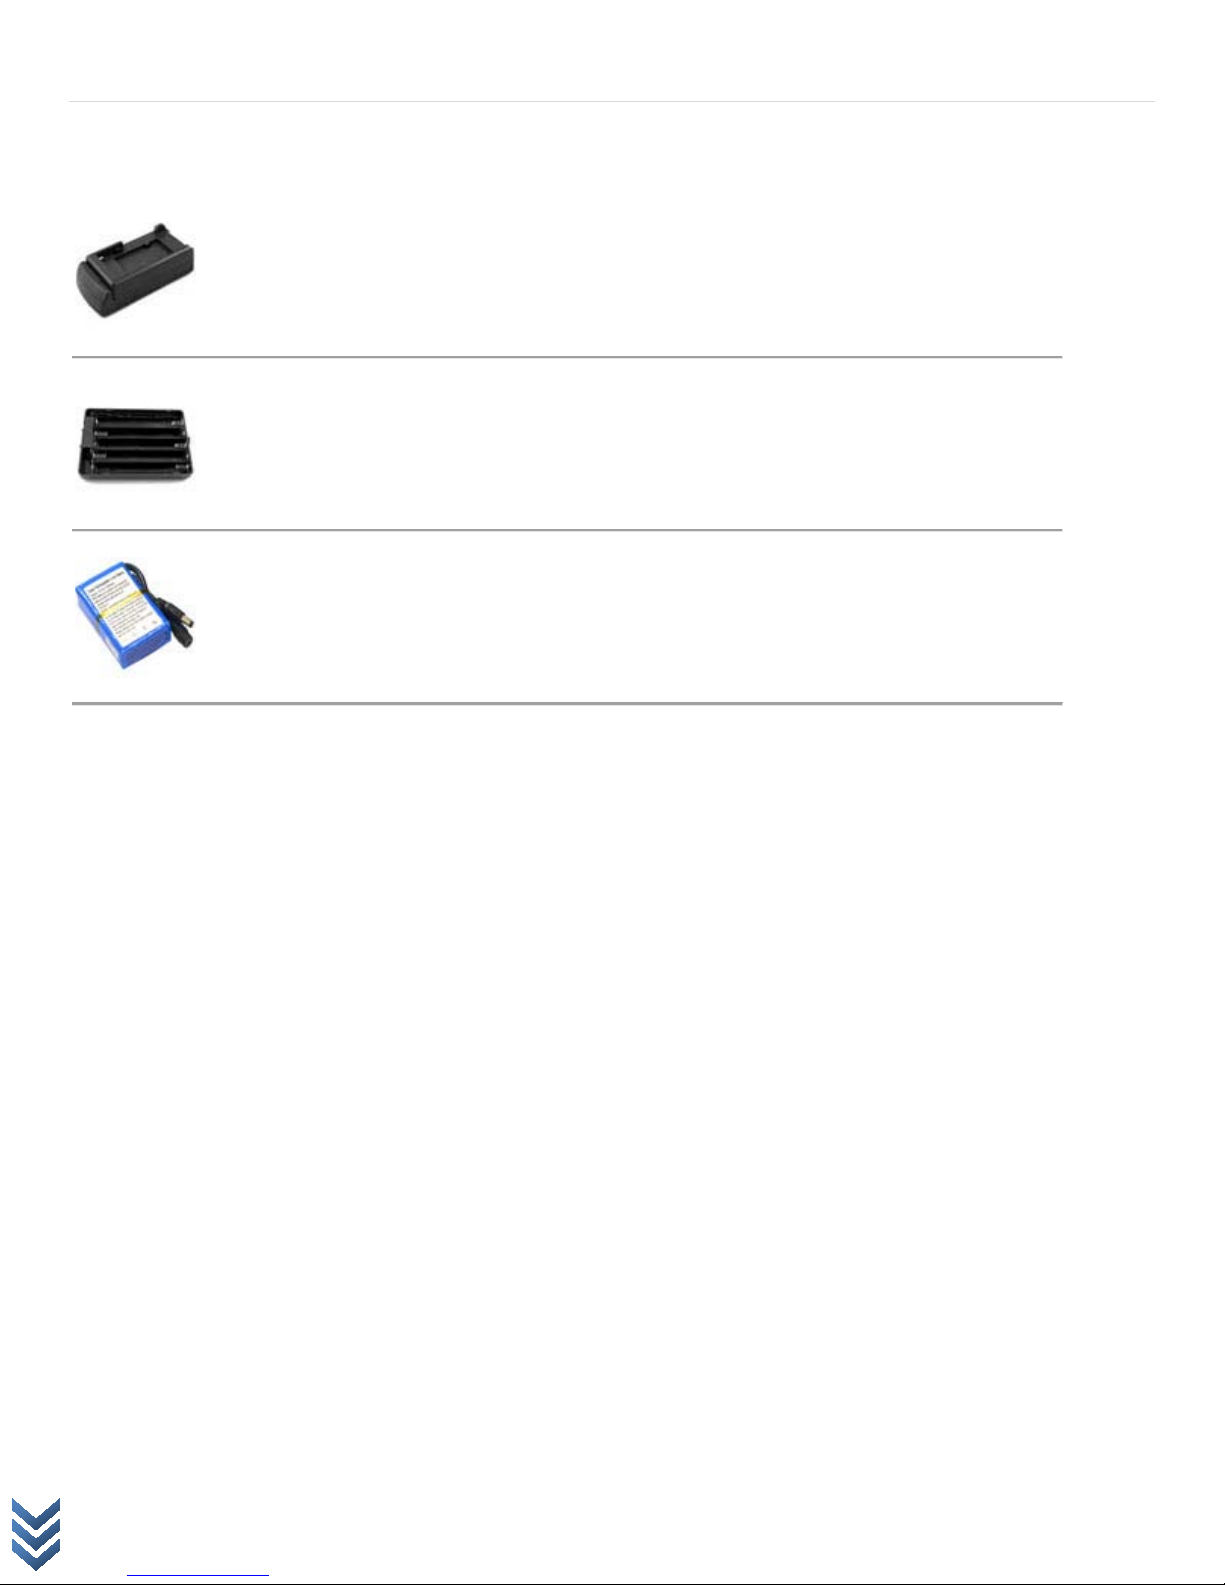
Optional Batteries & Adapters
Sony, Canon, or Panasonic Battery Adapter
This adapter plate allows you to use a camera battery to power your monitor. Separate
adapters available for Sony, Canon & Panasonic Batteries.
*Battery not included.
AA Battery Adapter
This adapter allows you to use 10 AA Batteries to power your monitor.
*Batteries not included.
Lithium-Ion Battery Kit
This is a 12 volt, 4500mAh lithium-ion battery that will power your monitor.
Includes an AC Charger and Case.
Page | 8
Compatible Batteries
The Sony Battery Adapter is compatible with a Sony NP-F570 / NP-F970 L Series Camcorder Battery
(Run time tested at up to 8hrs.)
The Canon Battery Adapter is compatible with a Canon BP-930 Extended Lithium-Ion Battery
(Run time tested at up to 8hrs.)
The Panasonic Battery Adapter is compatible with a Panasonic CGR-D54 Lithium-Ion Battery
(Run time tested at up to 8hrs.)
The AA Battery Adapter works with Ten (10) Standard AA Batteries.
(Run time tested at up to 3hrs. - Rechargeable Lithium AA Batteries will run longer)
LCD4Video
www.lcd4video.com
Page 10
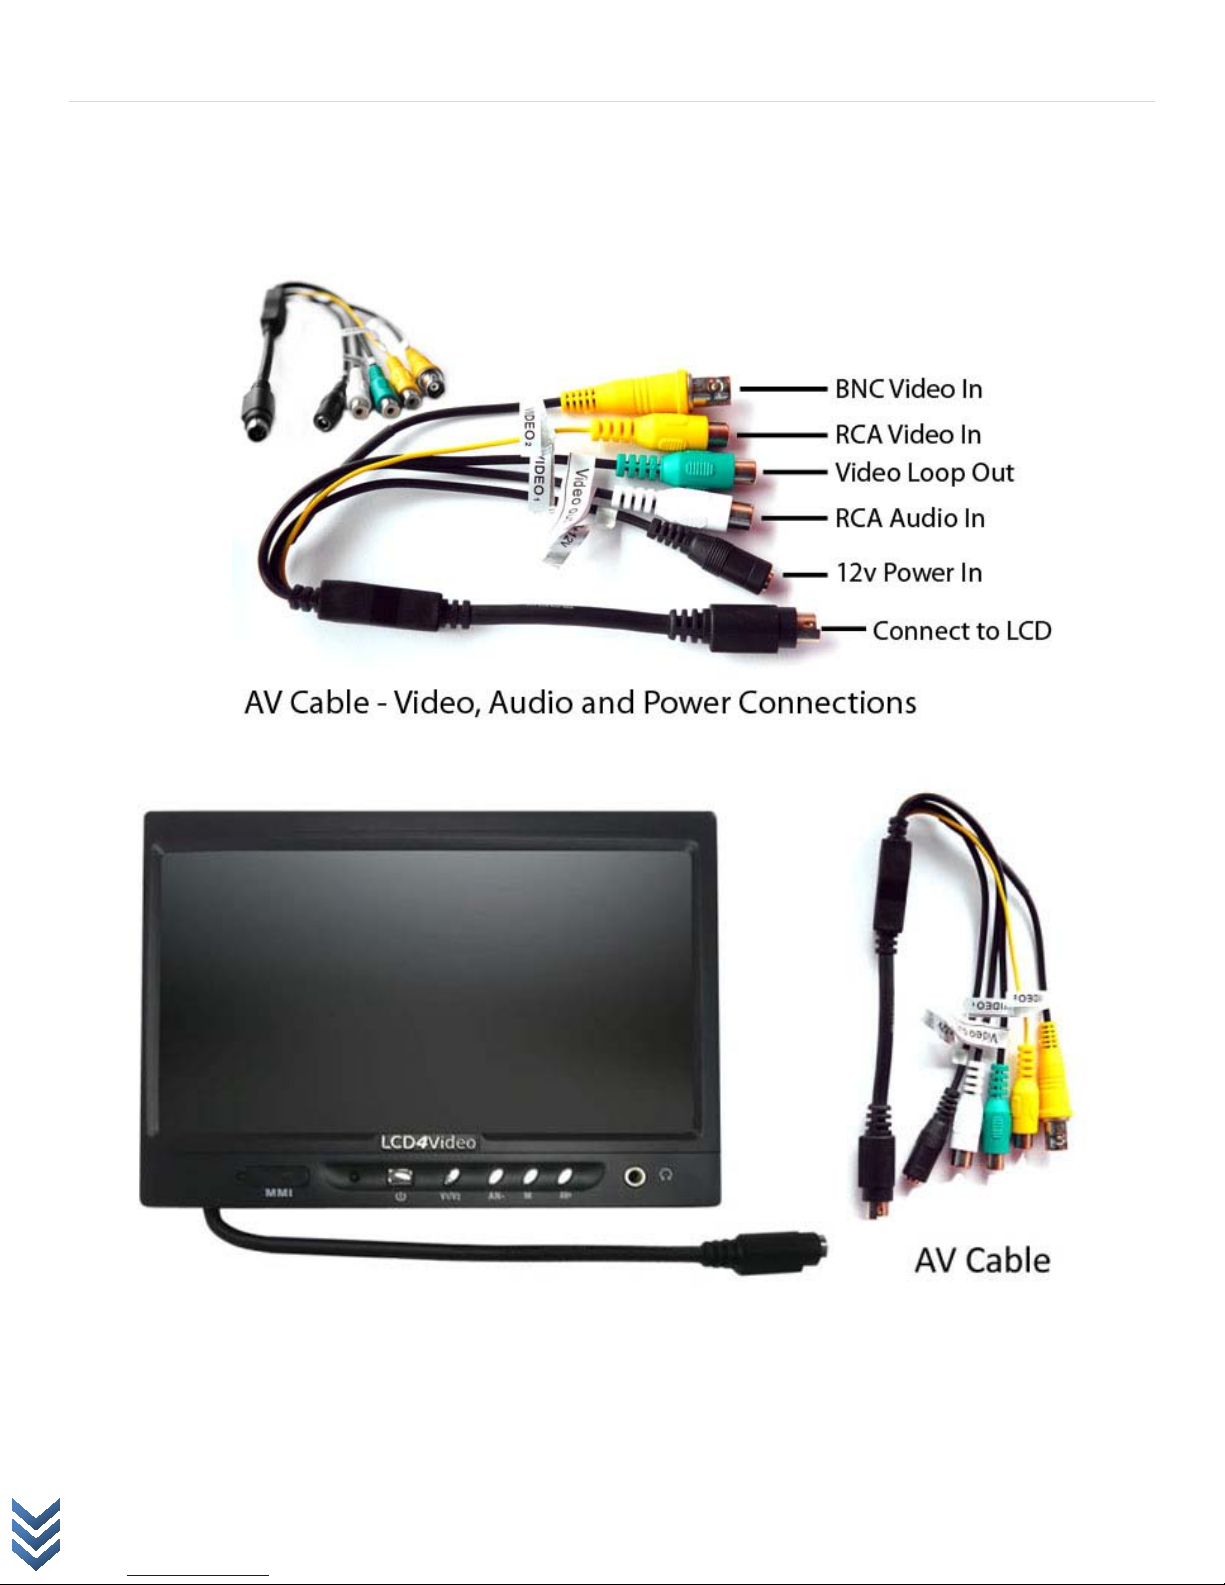
LCD Monitor Setup – AV Cable to LCD Monitor
Connect the AV Cable to the LCD Monitor as shown below
Page | 9
The Green RCA Plug is the Video Loop out.
If needed - This will allow you to pass your video signal out to another display.
LCD4Video
www.lcd4video.com
Page 11
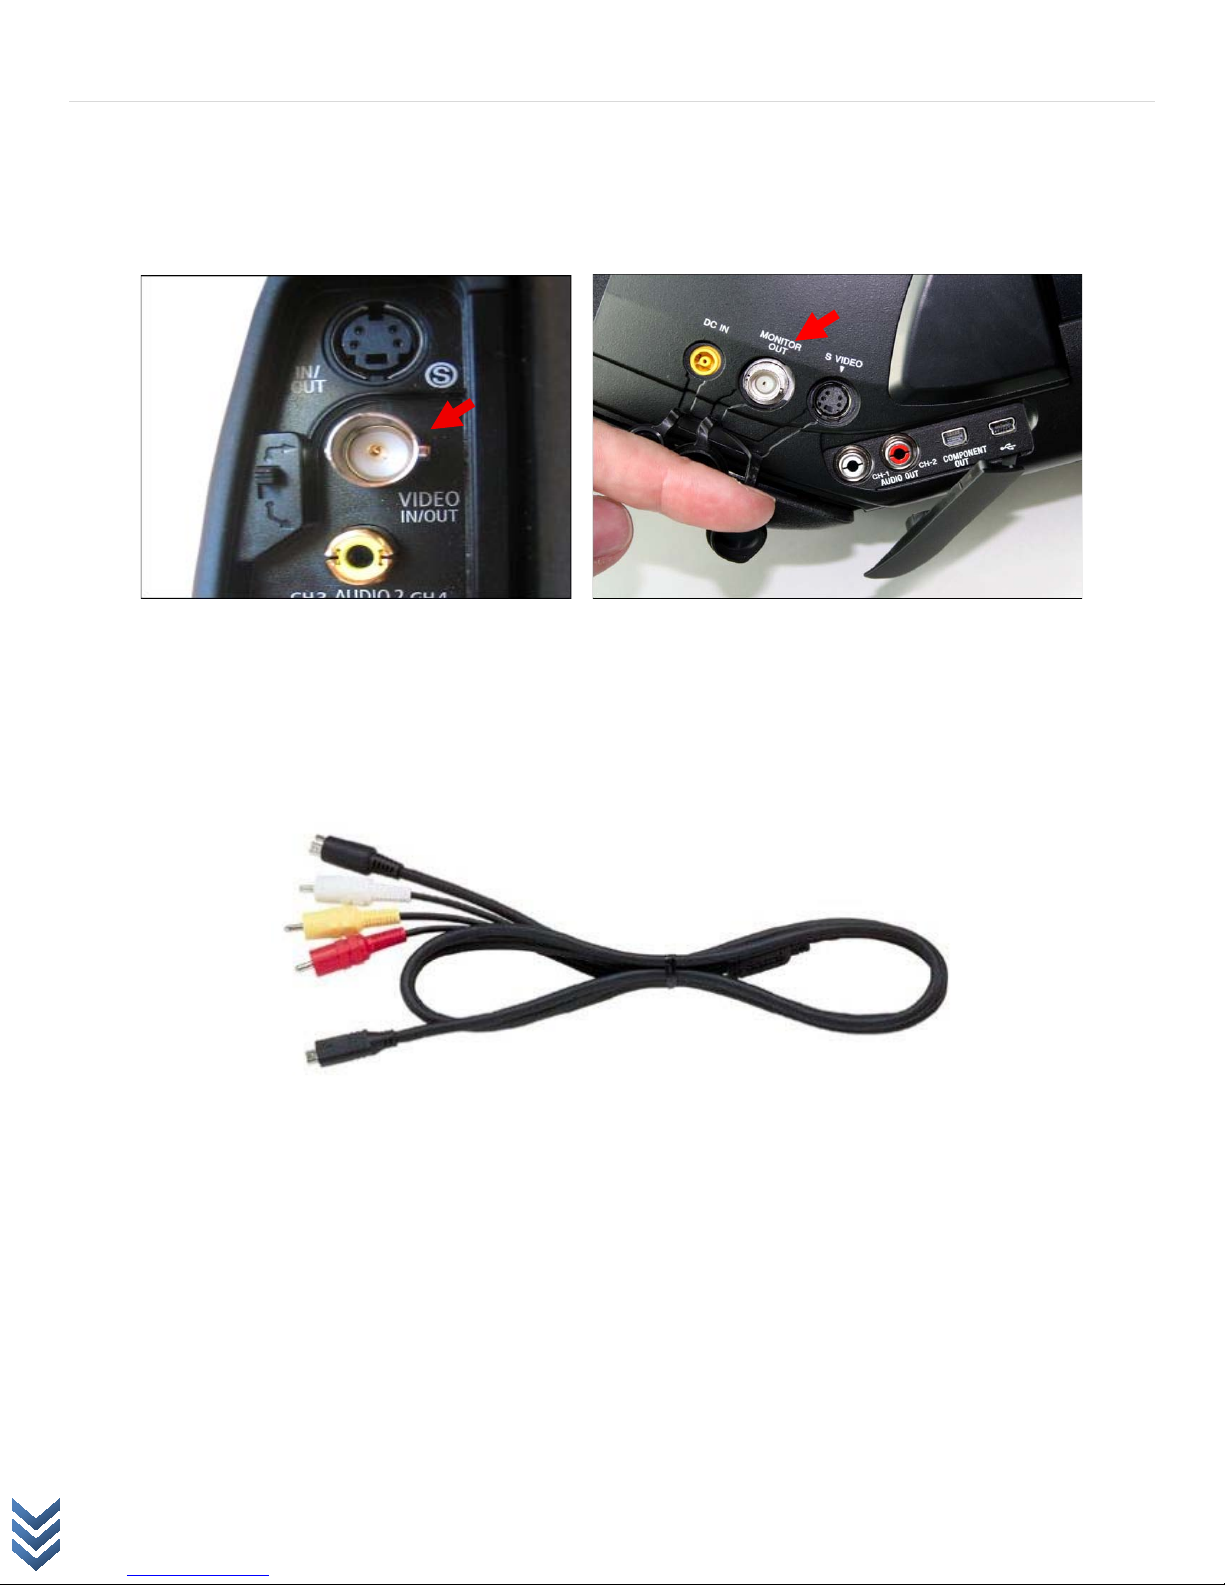
LCD Monitor Setup – AV Cable to Camera
Connect the yellow RCA or BNC end on the AV Cable to your cameras video out or other source.
Example of the BNC Video out on a Canon XL2 and a Sony PMW-EX3 Video Camera.
Page | 10
This LCD Monitor is compatible with any Canon, Sony, Panasonic and JVC Cameras including HD models as well
as Digital Cameras and any other video source. Video source must have an RCA or BNC video out to output the
video to the LCD monitor. Some cameras may require an adapter such as a 'Male to Male RCA Adapter' or an
'S-Video to RCA Adapter'.
Example of the Video adapter that comes with many professional video cameras. (Mini Plug to RCA/S-Video)
Note: Canon XL2 Users:
The AV jack panel next to the battery well on the right side of the XL2, you'll find an S-video jack, a BNC video jack and a
yellow RCA composite video jack. There's a small switch just to the left of the BNC jack which toggles the video signal
between the BNC and RCA video jacks. If you're plugged into one of these two jacks and you're not getting a signal, it's
probably because this switch isn't positioned correctly. It's very tiny and kind of easy to miss! See photo above.
LCD4Video
www.lcd4video.com
Page 12
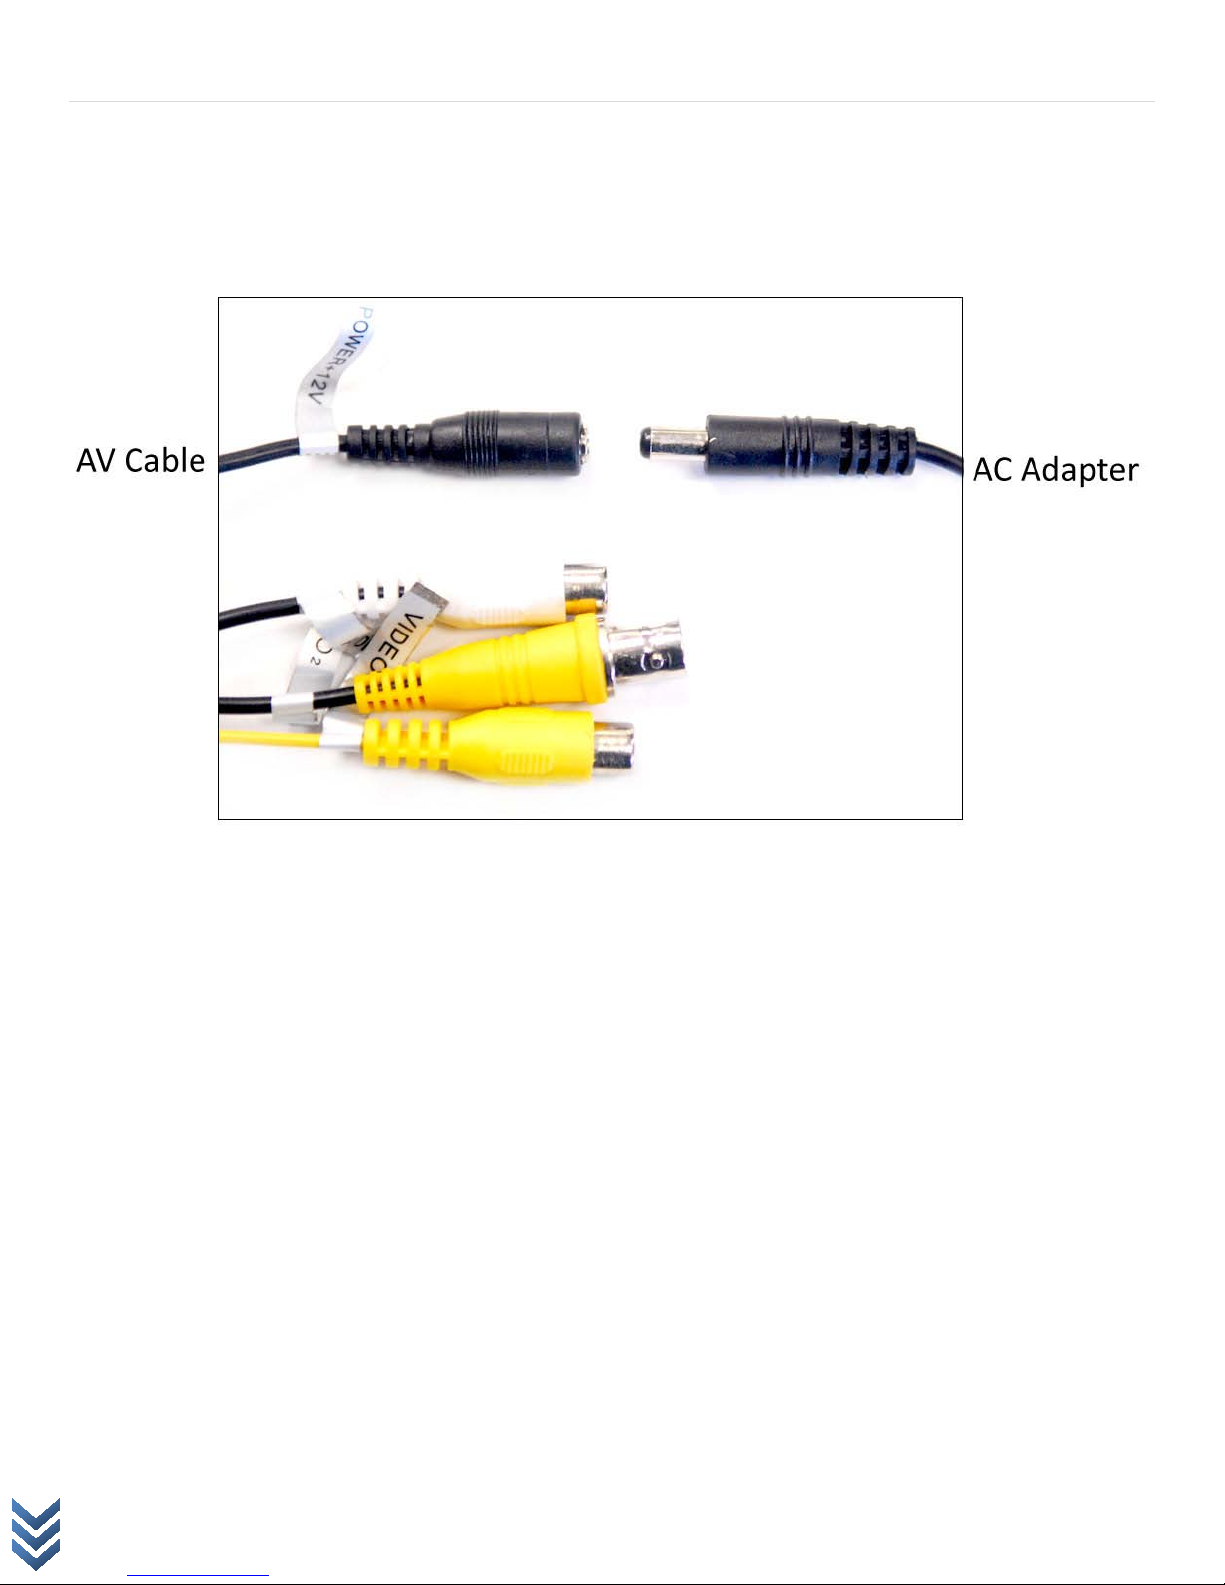
LCD Monitor Setup – LCD Monitor to Power
Connect the AC Adapter to the small black end of the AV Cable.
Plug the AC Adapter into a power outlet.
Page | 11
LCD4Video
www.lcd4video.com
Page 13
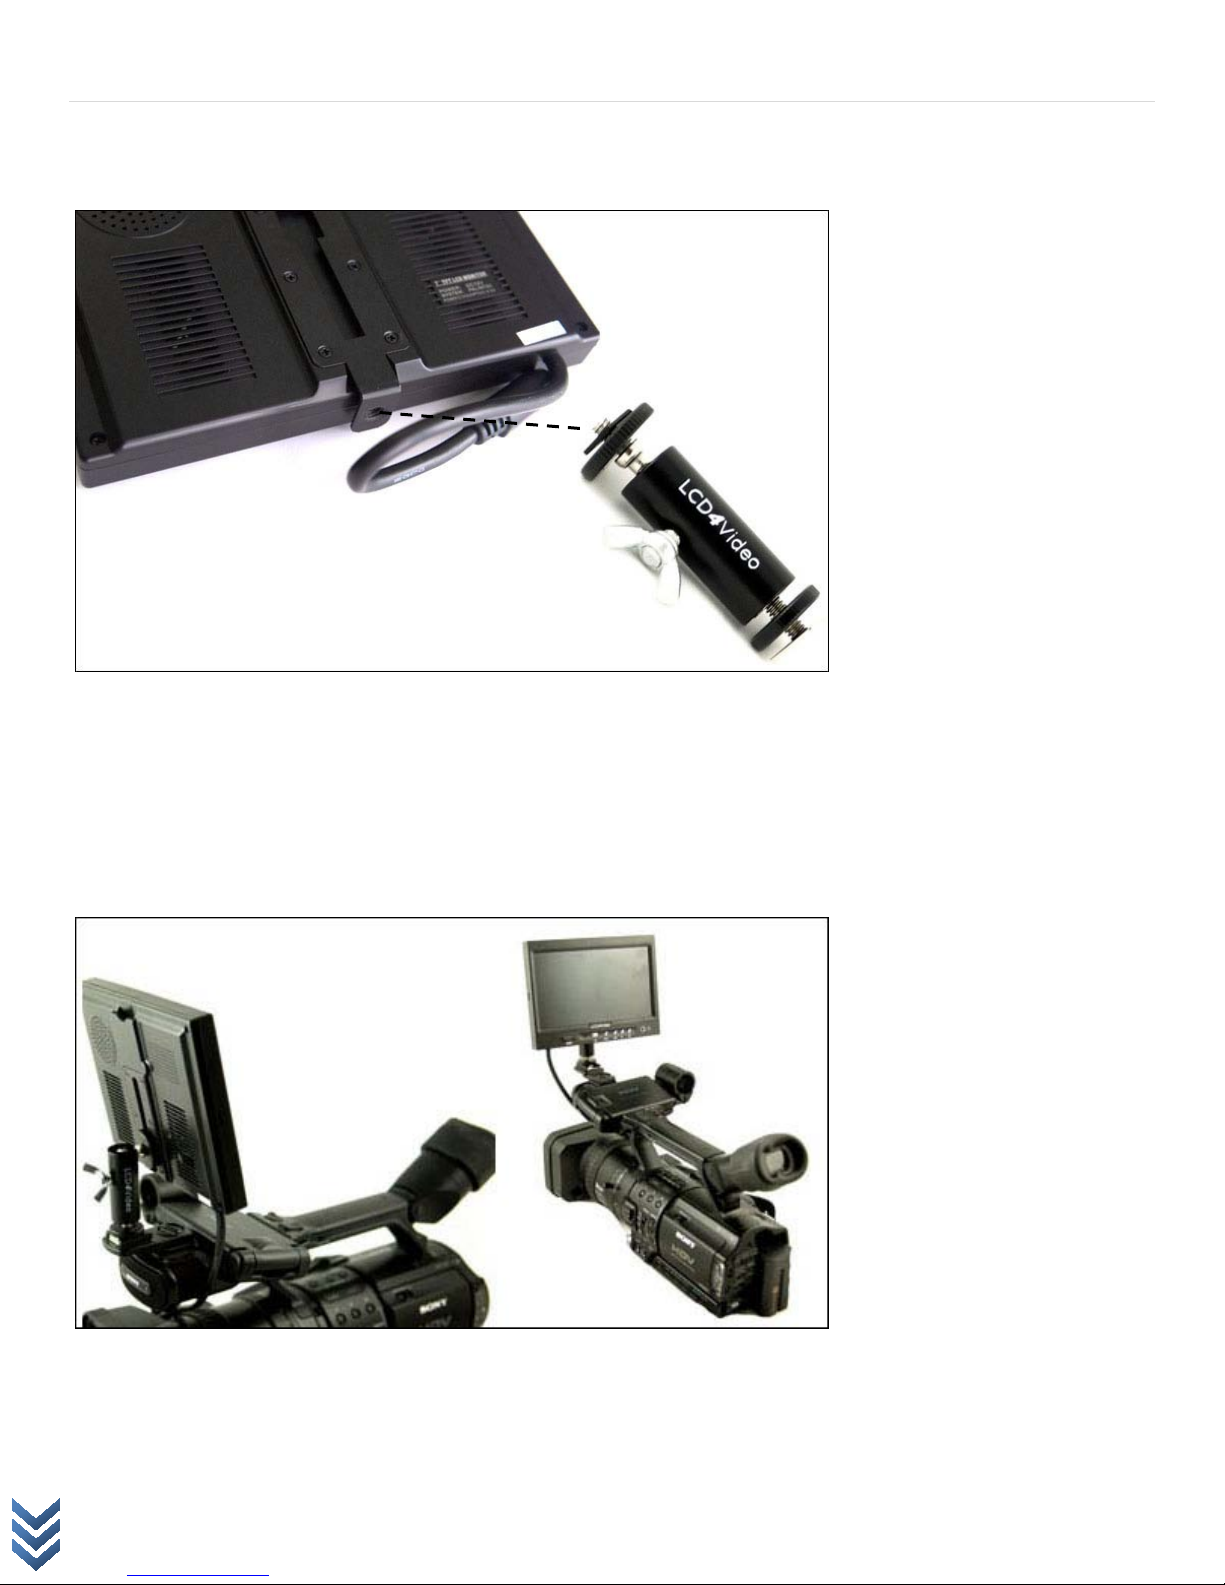
Mounting the LCD with Optional Shoe Mount
Page | 12
Screw the shoe mount to the bottom of the LCD Monitor, then tighten the round nut to secure the
mount to the bottom of the LCD.
Slide the shoe mount with the LCD monitor attached onto the cameras hot shoe slot, and then tighten
the round nut on the bottom of the shoe mount to secure the monitor to the LCD. You can adjust the
wing nut to swivel the angle of the LCD on the camera.
Note:
Remove the square washer from the shoe mount. Do not use the rear channel on LCD to mount on a camera.
LCD4Video
www.lcd4video.com
Page 14
Page | 13
LCD Monitors On-Screen Display Settings
Access the adjustment functions by pressing the M (Menu) button on the front of the LCD Monitor.
Press the button again to cycle through the various adjustments:
Brightness > Color > Contrast > Tint > Aspect Ratio (16:9 & 4:3)
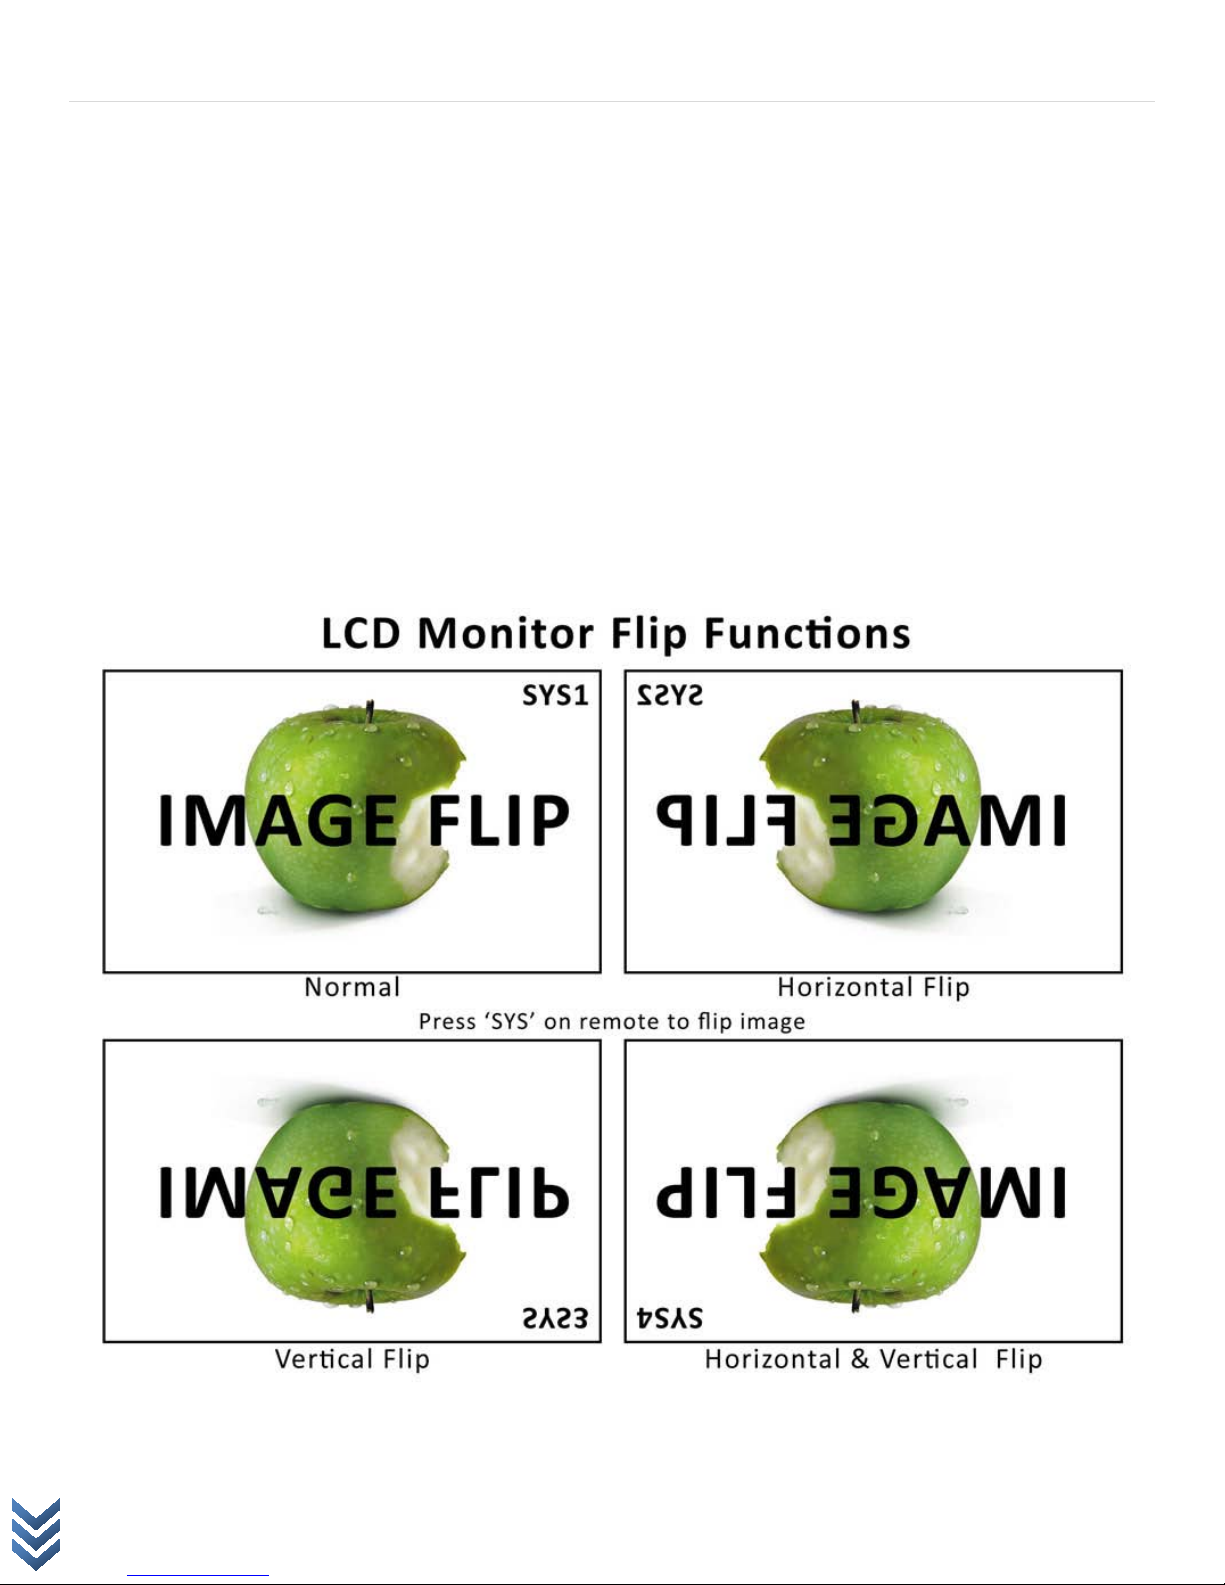
LCD Monitors Image Flip Functions
This monitor easily switches between 16:9 and 4:3 aspect ratios and has image orientation controls where the
picture can be flipped horizontally and vertically for DOF (depth-of-field) adapters.
To flip the image, press the ‘SYS’ button on the remote, Repeat to cycle through the various modes.
LCD4Video
www.lcd4video.com
Page 15

Page | 14
E-mail:
Address:
39050 Schoolcraft Rd.
Warranty
This LCD Monitor is covered with a Full 90-Day Warranty.
If you find your product to be defective within 90 days, you may exchange it for a new one.
Damage caused during installation is not considered as a product defect and will not be
covered by the warranty.
LCD4Video Contact & Support
It is our ultimate goal to provide all of our customers with the best customer service and support. We want to make sure
that all of our customers are 100% satisfied. Pl ease f i rst take a look at our Frequently Asked Questions page on our
website to see if you can find answers to your quest ions. For direct assistance, please feel free to contact us at:
Telephone:
Fax:
Skype:
(734) 259-3500
(734) 462-0285
LCD4Video
Livonia, MI 48150
www.lcd4video.com
LCD4Video
www.lcd4video.com
 Loading...