

Page 1
Solution
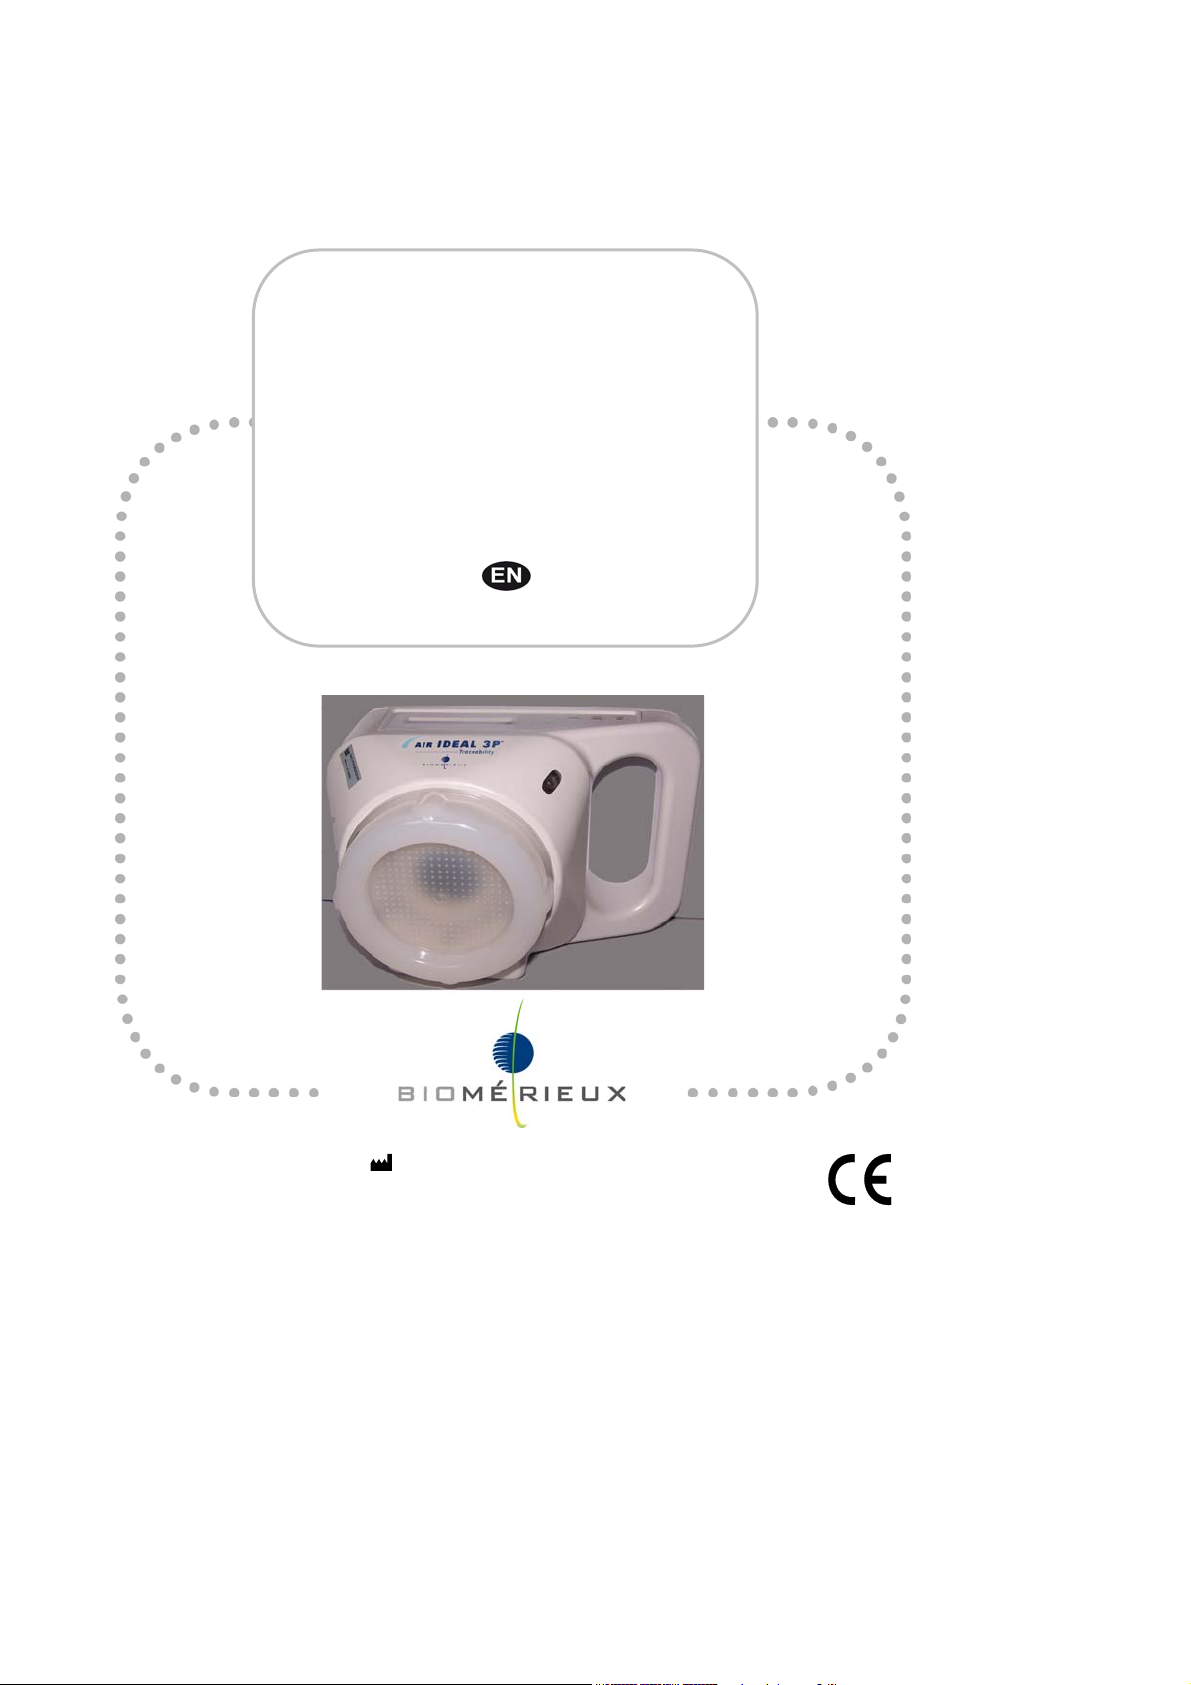
airIDEAL
®
3P
TM
Traceability
AeroBioCollector
User's Manual
96307 - G – en - 2010/07 — P/N 4501 - 1716
Manufactured par:
Distributed by:
LCB 71260 La Salle France
bioMérieux S.A. 69280 Marcy l'Étoile / France
RCS Lyon 673 620 399
Tel. 33 (0)4 78 87 20 00 - Fax 33 (0)4 78 87 20 90
http://www.biomerieux.com
Page 2

Page 3

Revisions
The list of revisions below summarizes replacements or additional pages in your
User’s Manual
Version
Date of
printing
Modifications Pages modified
A 2001/01 Bilingual
(FR / EN)
B 2001/04 Multilingual
(FR / EN / ES / IT / DE / PT)
C 2005/11 Update of the manual
(FR / EN / ES)
D 2006/03 Update of the manual
(FR / EN / ES / IT / DE / PT)
E 2008/03 Environmental conditions
(FR / EN / ES / IT / DE / PT)
F 2010/10 Addition of a remote user interface device (RUID)
to ensure sampling traceability.
G 2011/01 Regulatory modifications:
FCC (USA) and IC (Canada).
All
All
All
All
2-12
All
Pages 2-7, 2-8, 2-11, 2-13
Pages 3-2 and 5-1
airIDEAL
®
3P™ Traceability AeroBioCollector User's Manual Revisions-1
Page 4

Page 5
Warning
IMPORTANT! Use of the instrument and manual implies acceptance of the clauses
The content of this manual is based on the Software release 0.9
This manual is periodically updated. The updates shall be included in the new
releases of the Software.
Information supplied in this manual may be subject to modifications before the
products described become available.
This manual may contain information or references relating to certain
bioMérieux S.A. products, software or services which are not available in the
country of release; this shall not mean that bioMérieux S.A. intends to market
such products, software or services in such country
To request copies of publications or for any technical request, contact
bioMérieux S.A. or your local distributor.
below and the clauses set out in the regulatory booklet. Users are invited
to refer to these clauses.
DANGER! To ensure user safety, the instrument must be used in accordance with
this manual.
Trademarks
bioMérieux, the blue logo, 3P, airIDEAL and Count-Tact are used, pending
and/or registered trademarks belonging to bioMérieux S.A. or one of its
subsidiaries.
Any other name or trademark is the property of its respective owner.
© 2010 bioMérieux S.A.
Photos: bioMérieux / Printed in France / bioMérieux S.A. RCS Lyon 673 620 399
Page 6

Page 7

Table of contents
1 How to use this manual 1-1
Finding topics and procedures ................................................................................................................ 1-1
Glossary.................................................................................................................................................. 1-2
Typographic conventions ........................................................................................................................ 1-3
The airIDEAL 3P Traceability keypad................................................................................................... 1-3
2 Functional description 2-1
Presentation............................................................................................................................................ 2-1
Principle of use.................................................................................................................................. 2-1
Operating principle ............................................................................................................................ 2-2
Performance...................................................................................................................................... 2-2
Collection efficiency validated according to the ISO 14698 standard ..........................................2-3
Physical efficiency testing approach............................................................................................2-3
Biological efficiency testing approach ..........................................................................................2-3
Use in glove boxes ......................................................................................................................2-4
Applications....................................................................................................................................... 2-4
Description.............................................................................................................................................. 2-5
Consumables ....................................................................................................................................2-6
Culture media for general use .....................................................................................................2-6
Irradiated media........................................................................................................................... 2-6
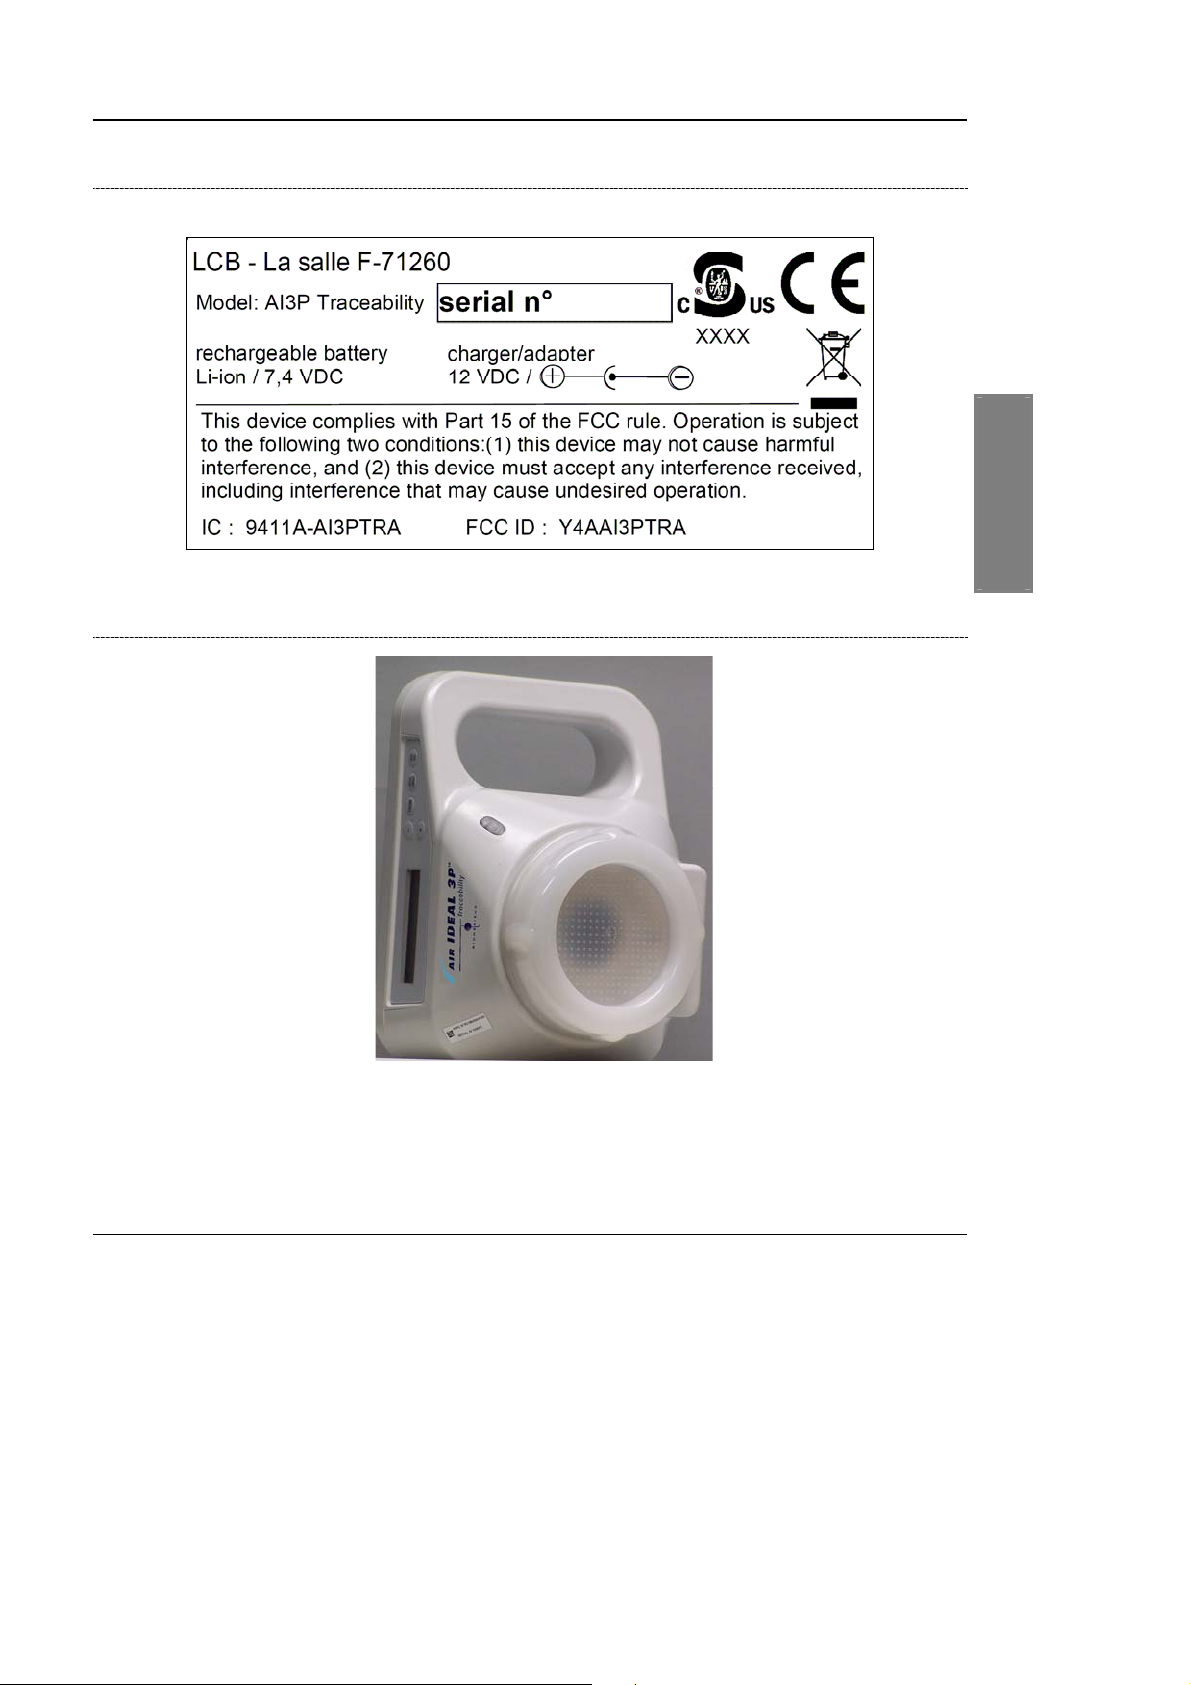
Identification of the instrument .......................................................................................................... 2-7
Front face of the airIDEAL 3P Traceability...................................................................................... 2-7
Rear face of the airIDEAL 3P Traceability ...................................................................................... 2-8
Keypad .............................................................................................................................................. 2-8
Configuration for 65, 70 or 90 mm Petri dishes ................................................................................. 2-9
Tripod assembly .............................................................................................................................. 2-10
General specifications........................................................................................................................... 2-11
Environmental conditions ................................................................................................................ 2-11
Physical features ............................................................................................................................. 2-11
Dimensions................................................................................................................................ 2-11
Mass .......................................................................................................................................... 2-11
Materials .................................................................................................................................... 2-11
Characteristics of materials .......................................................................................................2-11
Technical characteristics ................................................................................................................. 2-12
Electrical characteristics.................................................................................................................. 2-13
Functional specifications ................................................................................................................. 2-13
airIDEAL
®
3P™ Traceability AeroBioCollector User's Manual I-1
Page 8

Table of contents
Using airIDEAL 3P Traceability 3-1
3
Unpacking airIDEAL 3P Traceability.....................................................................................................3-1
Recommendations for installation and use .............................................................................................3-2
Cleaning and decontamination procedure...............................................................................................3-2
Sterilization of grids ...........................................................................................................................3-3
Decontamination of the external part.................................................................................................3-3
Decontamination of the air circuit ...................................................................................................... 3-3
Decontamination in a glove box ........................................................................................................3-3
Sampling positions..................................................................................................................................3-4
Screwing on the sampling grid ................................................................................................................3-5
Electrical power supply ...........................................................................................................................3-6
Operation on the battery.................................................................................................................... 3-6
Low battery signals ...................................................................................................................... 3-6
Charging ......................................................................................................................................3-7
Operation using mains power............................................................................................................3-8
Automatic standby.............................................................................................................................3-8
Automatic switch off ..........................................................................................................................3-8
Operation in slave mode .........................................................................................................................3-9
Operation in manual mode......................................................................................................................3-9
Programming.....................................................................................................................................3-9
Programming characteristics .......................................................................................................3-9
Sampling controls ........................................................................................................................ 3-9
airIDEAL 3P Traceability menus......................................................................................................3-10
Turning on airIDEAL 3P Traceability ...............................................................................................3-11
Standby ...........................................................................................................................................3-12
Turning off airIDEAL 3P Traceability.............................................................................................3-12
Selection of one of the 4 pre-programmed sample volumes (Menu 1) ............................................ 3-12
Programming a sample volume not in memory (Menu 2)................................................................ 3-14
Modification of the 4 pre-programmed sample volumes (Menu 3)................................................... 3-15
Programming delayed start-up (Menu 4) ......................................................................................... 3-18
Programming sequenced sampling (Menu 5)..................................................................................3-20
Battery autonomy test (Menu 6) ......................................................................................................3-22
Starting sampling ...............................................................................................................................3-23
Stopping the motor ..........................................................................................................................3-25
Setting airIDEAL 3P Traceability parameters (summary diagram)...................................................3-26
Navigation using <+> and<-> keys........................................................................................................3-28
I-2 airIDEAL® 3P™ Traceability AeroBioCollector User's Manual
Page 9

Table of contents
4 Procedure 4-1
Principle ..................................................................................................................................................4-1
Procedure ............................................................................................................................................... 4-1
How to obtain a good quality sample ...................................................................................................... 4-2
Precautions of use.............................................................................................................................4-2
Sampling in manual mode.................................................................................................................4-3
Incubation and reading......................................................................................................................4-3
Sampling plan ......................................................................................................................................... 4-4
Recording and evaluating results............................................................................................................4-5
5 Maintenance 5-1
Preventive maintenance .........................................................................................................................5-1
Routine servicing ....................................................................................................................................5-2
Cleaning ............................................................................................................................................ 5-2
Decontamination of the external part.................................................................................................5-2
Decontamination of the air circuit ...................................................................................................... 5-2
Decontamination in a glove box ........................................................................................................ 5-2
Sterilization of the sampling grid .......................................................................................................5-2
Airflow control.................................................................................................................................... 5-2
6 Troubleshooting 6-1
7 Appendix 7-1
Using the reading table ........................................................................................................................... 7-1
Information on FELLER’s law .................................................................................................................7-2
Reading tables ........................................................................................................................................ 7-3
Notes
airIDEAL® 3P™ Traceability AeroBioCollector User's Manual I-3
Page 10

Note: Screen captures and figures are given as examples only.
2 Functional description
Figure 2-1: Principle of the impaction biocollector .......................................................................2-2
Figure 2-2: airIDEAL 3P Traceability in its carrying case...........................................................2-5
Figure 2-3: Identification of the instrument...................................................................................2-7
Figure 2-4: Front face .................................................................................................................. 2-7
Figure 2-5: Rear face................................................................................................................... 2-8
Figure 2-6: Keypad ...................................................................................................................... 2-8
Figure 2-7: Sampling head and grid – 65, 70 or 90 mm Petri dishes ........................................... 2-9
Figure 2-8: Tripod assembly ...................................................................................................... 2-10
List of figures
3 Using airIDEAL 3P Traceability
Figure 3-1: Sampling positions ....................................................................................................3-4
Figure 3-2: Screwing on the sampling grid................................................................................... 3-5
I-4 airIDEAL
®
3P™ Traceability AeroBioCollector User's Manual
Page 11

1 How to use this manual
IMPORTANT! Please read the "General safety and regulatory information" booklet
provided with the instrument.
Finding topics and procedures
This manual is divided into 7 chapters.
Table of contents
List of figures
The table of contents of the manual is located on pages I-1 to I-3.
It lists each chapter and the procedures within each chapter.
The list of figures for the manual is located on page I-4.
Warnings
Different types of warnings are used throughout the manual:
- for safety reasons (DANGER!),
- to ensure that the instruments are maintained in good working condition
(CAUTION!),
- for regulatory reasons (WARNING!) or,
- for optimum performance of operations, procedures, etc. (IMPORTANT!).
Page headers and
page footers
Notes
Apart from the first page of every chapter, each page of the manual includes a
page header and a footer.
Each page header includes the chapter title and the title of a procedure or its
corresponding description.
The footers contain the title of the manual, the name of the product and the
page number.
This manual contains a certain number of notes that are used to emphasize a
procedure or certain information.
airIDEAL
®
3P™ Traceability AeroBioCollector User's Manual 1-1
Page 12

How to use this manual
Glossary
Glossary
ABS Acrylonitrile butadiene styrene.
AeroBioCollector or
Air sampler
CFU
Delayed start-up
Li-ion
MPN
PVDF Polyvinylidene fluoride.
Ra coefficient
RUID "Remote User Interface Device"
Sampling grid
airIDEAL 3P Traceability, instrument used to collect and count viable bacterial
and fungal particles in a known and precise volume of air.
Number of Colony Forming Units read on the agar plate.
The number of CFU corresponds to the number of clusters that have grown on
the agar.
Time between pressing the
Lithium ion
Most Probable Number of micro-organisms collected. Statistical correction of
the CFU value (FELLER’s law).
Roughness factor of a surface. It is the arithmetic mean of all profile deviations,
positive or negative, compared to the mean line.
Remote control containing the user interface.
Perforated and calibrated plastic device. The number of orifices, their diameter
and arrangement, guarantee a CFU count (positive clusters) and a flow of air
corresponding to the motor setting.
START button and the motor starting up.
Solution
airIDEAL 3P Traceability
Time-delay
1-2 airIDEAL® 3P™ Traceability AeroBioCollector User's Manual
airIDEAL 3P Traceability (AeroBioCollector) + RUID (remote control) +
airIDEAL 3P Traceability software.
Two seconds required by the software to record a parameter.
Page 13

How to use this manual
Typographic conventions
Typographic conventions
These conventions are used in the different chapters of the manual.
• Press
PROGRAM 1
A bullet point is used to denote an action to be performed.
This typography is used to represent messages which appear on the display.
The airIDEAL 3P Traceability keypad
There are 5 keys on the instrument keypad. (See page 2-8 of the manual).
In this manual, the keys are referred to by their individual names, enclosed in
angle brackets "< >".
1
2
3
airIDEAL
®
3P™ Traceability AeroBioCollector User's Manual 1-3
4
5
Page 14

Page 15

2 Functional description
Presentation
“Pharmaceutical manufacturing evolves from an art to a science”.
This sentence alone from the FDA Guideline “Pharmaceutical cGMP for the 21st
century – A Risk-Based Approach” summarizes the current revolution in the
Pharmaceutical industry.
Conscious of these changes and remaining attentive to its customers,
bioMérieux decided to improve its airIDEAL 3P Traceability AeroBioCollector in
Principle of use
order to best respond to these new needs.
The instrument was thus developed and validated in order to provide a tool to
the pharmaceutical industry that would guarantee a scientifically proven method
of air sampling.
This instrument evidently remains perfectly suited to the enumeration of airborne
micro-organisms in less demanding work environments such as agribusiness.
In addition and in order to continue its universal application,
airIDEAL 3P Traceability is still available in two versions:
− one for the use of culture media in 90 mm diameter Petri dishes,
− the other designed for use with 65 or 70 mm plates.
The aspiration flow-rate of airIDEAL 3P Traceability is calibrated at 100 l/min
with an impact velocity of less than 20 m/s.
According to good sterilization practices, sampling grids can be sterilized in an
autoclave, see "Sterilization of grids" on page 3-3.
1
2
3
4
airIDEAL 3P Traceability can operate in 2 modes:
• Slave mode: using airIDEAL 3P Traceability with the RUID.
• Manual mode: autonomous operation using the keypad.
The present manual describes how to use the instrument in
manual mode; for use of the instrument in slave mode, please refer
to the RUID User Manual.
airIDEAL® 3P™ Traceability AeroBioCollector User's Manual 2-1
5
Page 16
Functional description
A
A
A
Presentation
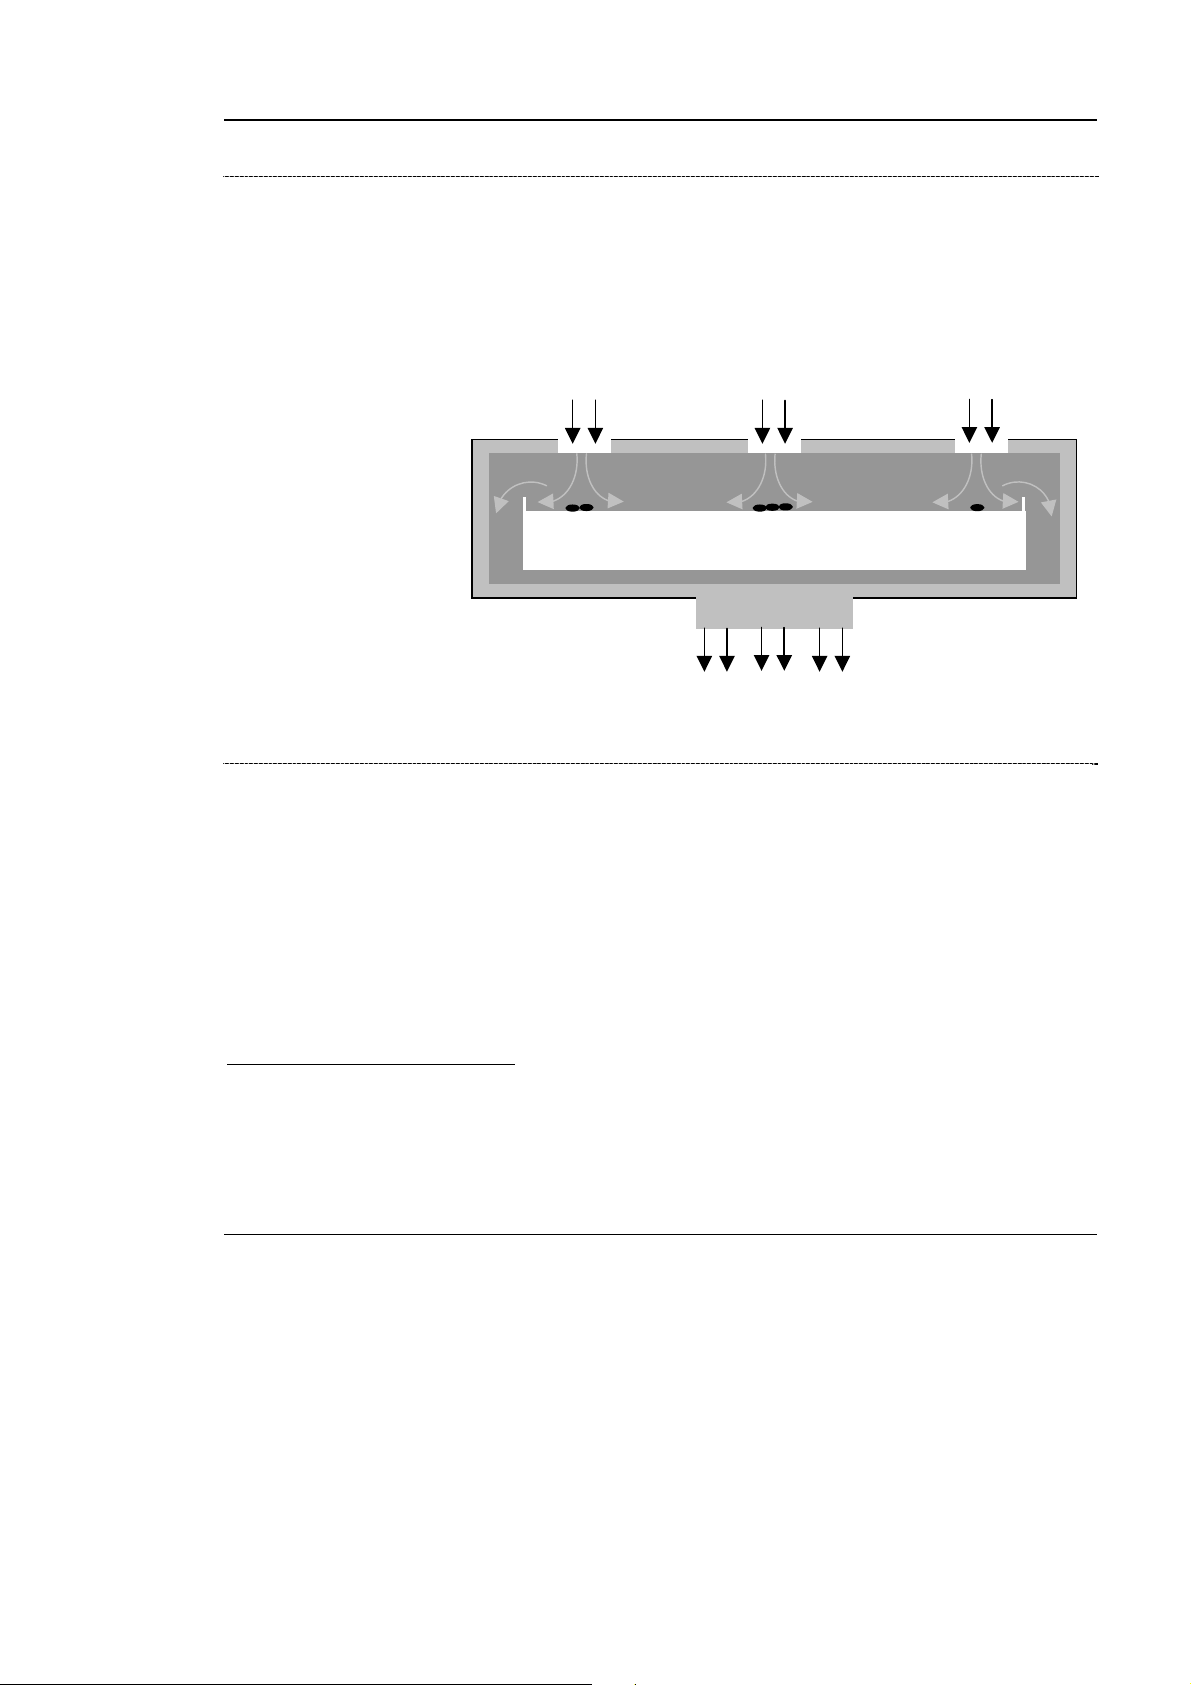
Operating prin ciple
airIDEAL 3P Traceability is an impaction AeroBioCollector used to detect the
presence of viable micro-organisms in the environment to be tested, by precise
sampling of a given volume of air.
Air is taken up with a turbine through a grid surface. The acceleration of airflow
results in the impaction of airborne micro-organisms on the agar. Passage of the
air through the grid filters out particles, thereby facilitating the enumeration of
CFU (colony forming units) after incubation of the medium.
A reading and statistical correction table is used to convert the number of CFU
to the most probable number of micro-organisms collected per m
ir inlet
Micro-organisms
Impaction
Nutrient medium
90 or 65 mm diameter
Petri dishes
ir outlet
3
of air.
Calibrated orifice
ir jets
Figure 2-1: Principle of the impaction biocollector
Performance
The performance characteristics of an AeroBioCollector depend on its capacity
to collect micro-organisms in the air without compromising their viability during
impaction on the agar. This property can be obtained only with a perfect
compromise between the high aspiration velocity leading to effective collection,
and a sufficiently low impaction velocity to guarantee the revivification of
collected micro-organisms.
airIDEAL 3P Traceability was developed in close cooperation with aeraulics
experts in order to optimize this ratio.
Since the industry has increasing needs for scientifically proven methods,
bioMérieux commissioned two recognized independent organizations
*
to
validate the physical and biological efficiency of the instrument.
*
CETIAT: Centre Technique des Industries Aérauliques et Thermiques/Technical Center of Aeraulic and Thermal
Industries
Domaine Scientifique de la Doua, 69603 Villeurbanne, France
HPA : Health Protection Agency - Porton Down - Wiltshire SP4 0JG Salisbury - UK
2-2 airIDEAL® 3P™ Traceability AeroBioCollector User's Manual
Page 17

Functional description
Presentation
Collection efficiency validated according to the ISO 14698 standard
airIDEAL 3P Traceability was third party validated by the Health Protection
Agency (UK) to meet the requirements of ISO 14698-1 for the control of clean
rooms. Both the physical and biological efficiencies of the equipment have been
validated according to this standard.
Physical efficiency testing approach
The physical efficiency of an air sampler for collecting airborne bacteria is
evaluated by comparison with a membrane filter sampler. Uniform particles of
different diameters containing bacterial spores of Bacillus subtilis var niger were
generated in a controlled room. The physical efficiency of the instrument was
determined by comparison with the membrane filtration standard operating sideby-side.
1
2
Biological efficiency testing approach
Air sampler inefficiency can either be due to a failure of the sampler to capture
particles containing micro-organisms (physical loss), or to inactivation of viable
micro-organisms during collection, so that formation of visible colonies on agar
will not occur (biological loss).
To address this point, airIDEAL 3P Traceability was evaluated for recovery of a
mixture of Bacillus subtilis (standard indicator for physical loss) and
Staphylococcus epidermidis (standard indicator for biological loss).
The ratio of S. epidermidis / B. subtilis for the test samplers was divided by the
ratio obtained with the reference standard membrane filter sampler to give a
comparative biological efficiency.
airIDEAL® 3P™ Traceability AeroBioCollector User's Manual 2-3
3
4
5
Page 18

Functional description
Presentation
Use in glove boxes
In order to be used to test glove boxes, the design and materials of
airIDEAL 3P Traceability had to be entirely reviewed in order to optimize
system air tightness.
In addition and in order to guarantee the optimal operation of the instrument in
this application, the system underwent a complete validation in a glove box
(SKAN AG, model ARIS glove box).
Applications
airIDEAL 3P Traceability enables precise and reproducible air sampling.
The volumes taken can be set in 10 l steps up to a maximum volume of 2000 l.
This sampling range enables the instrument to be used in all types of
environments, from sterile zones to more contaminated surroundings and in all
applications, e.g. qualification of sterile rooms or daily monitoring.
2-4 airIDEAL® 3P™ Traceability AeroBioCollector User's Manual
Page 19
Functional description
Description
Description
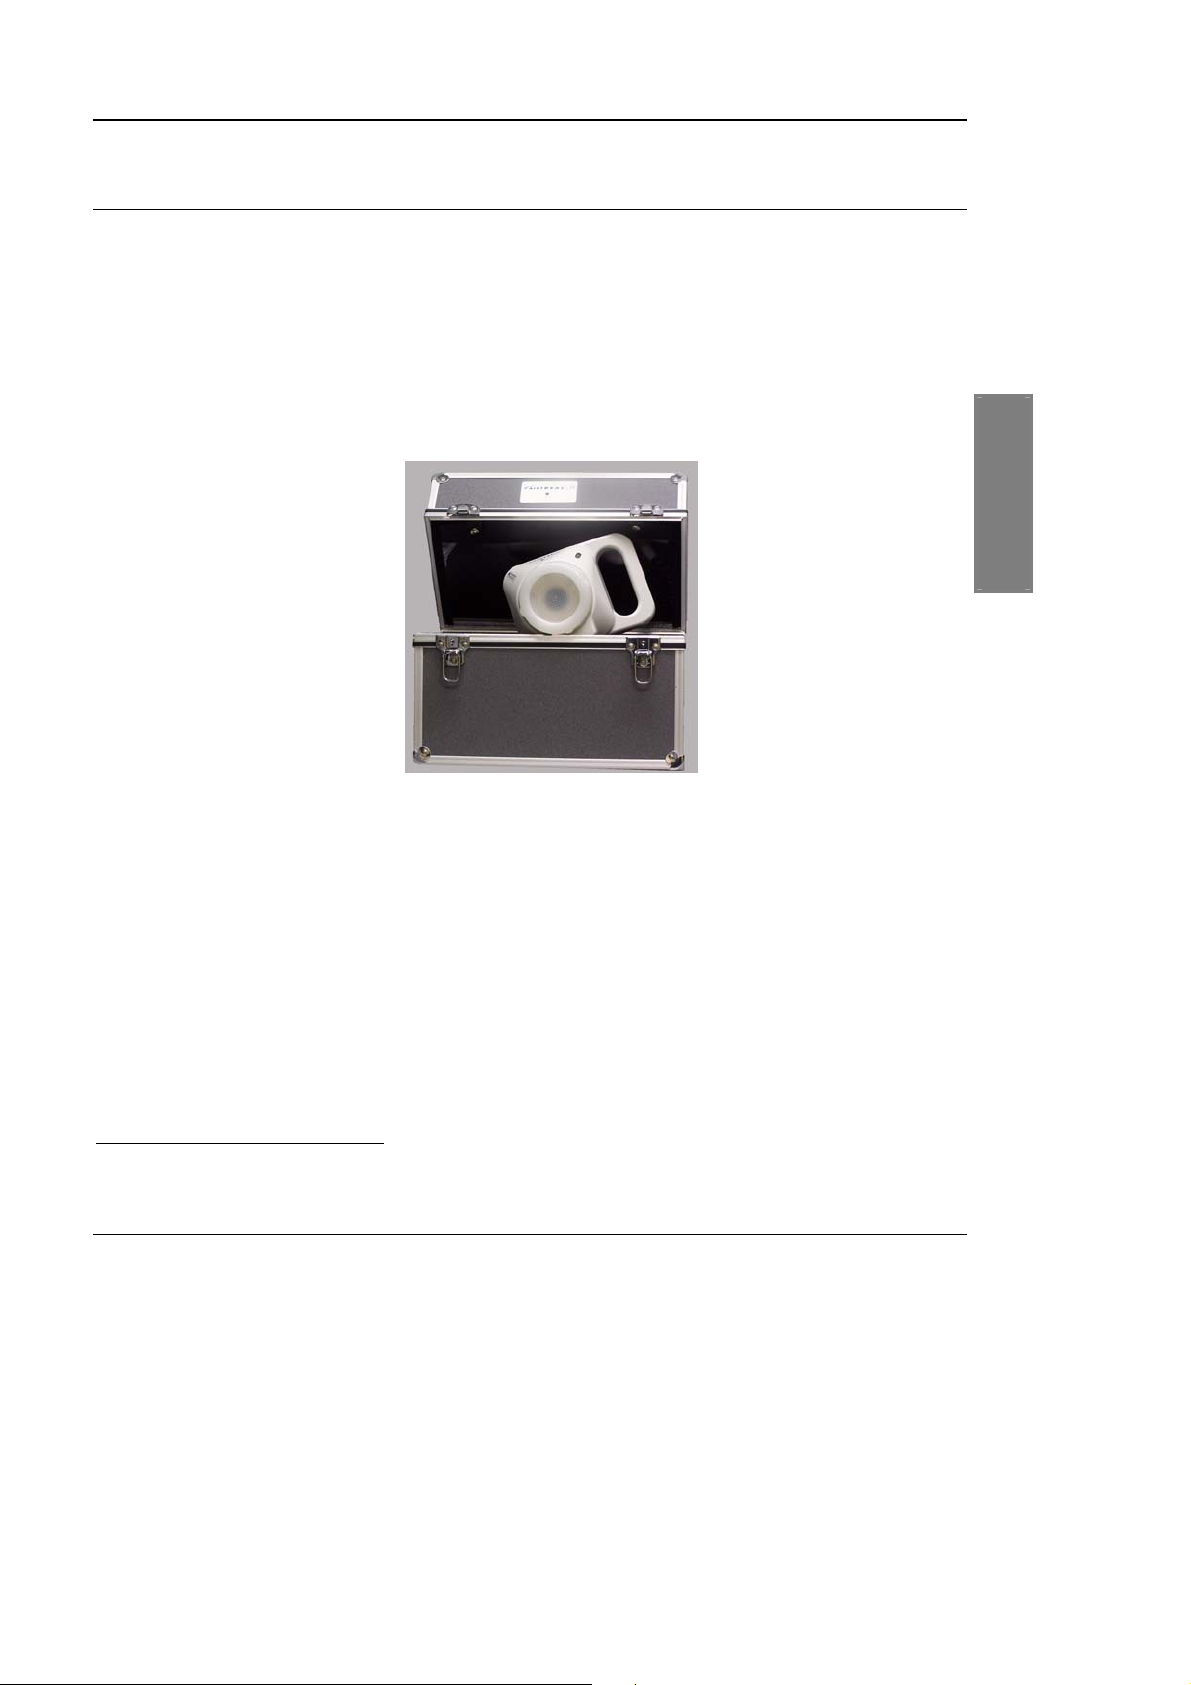
airIDEAL 3P Traceability is supplied in a carrying case. Inside the case is a
rigid lid which can be used as a small work surface [dimensions 22.7 x 13.9 cm
(8.9 in. x 5.4 in.)].
The instrument is available in two versions:
− for 90 mm agar plates (product no. 96302)
− for 65/70 mm agar plates Count-Tact
®
(product no. 96303)
∗ For each product no., please refer to the packing list provided with the
instrument.
1
2
3
Figure 2-2: airIDEAL 3P Traceability in its carrying case
∗ Accessories:
− 65/70 mm Count-Tact diameter additional sampling grid (product No. 96304).
− 90 mm diameter additional sampling grid (product No. 96309).
− Aluminum telescopic tripod with ball joint (product No. 96308).
− Sterile box for transport and incubation of 65/70 mm Count-Tact plates – Kit of 10
(product No. 96301).
− Sterile box for transport and incubation of 90 mm plates – Kit of 10
(product No. 96311
*
).
4
5
*
Availability: consult bioMérieux
airIDEAL® 3P™ Traceability AeroBioCollector User's Manual 2-5
Page 20

Functional description
Description
Consumables
airIDEAL 3P Traceability is adapted to all types of Petri dishes available on the
market: 65, 70 and 90 mm.
Moreover, the use of a large range of ready-to-use culture media – irradiated or
classic – developed and manufactured by bioMérieux, the reference in this field,
enables you to obtain the best possible performance from the instrument.
The media comply with specific industrial and hospital environmental controls.
Culture media for general use
− TSA 20 x 90 mm plates (product No. 43011) / GTS 100 x 90 mm plates
(product no. 43018 and product no. 43019)
− PCA agar 20 x 90 mm plates (product no. 43558)
− Sabouraud Dextrose agar 20 x 90 mm plates (product no. 43555)
− Sabouraud Dextrose Chloramphenicol agar 20 x 90 mm plates (product no.
43596)
− Count-Tact
− Count-Tact TSA agar 20 x 65 mm plates (product no. 43582)
− Count-Tact Sabouraud Dextrose Chloramphenicol agar 20 x 65 mm plates
(product no. 43580)
®
agar 20 x 65 mm plates (product no. 43501)
Irradiated media
− Irradiated GTS 3P agar 20 x 90 mm plates (product no. 43711)
− Irradiated GTS 3P agar 100 x 90 mm plates (product no. 43169)
− Irradiated GTS 3P agar with neutralizers 20 plates (product no. 43811)
− Irradiated GTS 3P agar with neutralizers 100 plates (product no. 43819)
− Irradiated Count-Tact 3P agar 20 x 65 mm plates (product no. 43691)
− Irradiated Count-Tact 3P agar 100 x 65 mm plates (product no. 43699)
− irradiated Sabouraud Dextrose agar 20 x 90 mm plates (product no. 43554)
− Irradiated Sabouraud Dextrose 3P agar with neutralizers 20 plates (product
no. 43814)
− Irradiated Sabouraud Dextrose Chloramphenicol agar 20 x 90 mm plates
(product no. 43595)
− Irradiated Count-Tact Sabouraud Dextrose 3P agar with neutralizers 20
plates (product no. 43812)
− Irradiated Count-Tact Sabouraud Dextrose Chloramphenicol agar with
neutralizers 20 x 65 mm plates (product no. 43581)
2-6 airIDEAL® 3P™ Traceability AeroBioCollector User's Manual
Page 21
Functional description
Description
Identification of the instrumen t
Figure 2-3: Identification of the instrument
Front face of the airIDEAL 3P Traceability
1
2
3
airIDEAL® 3P™ Traceability AeroBioCollector User's Manual 2-7
Figure 2-4: Front face
4
5
Page 22
Functional description
A
Description
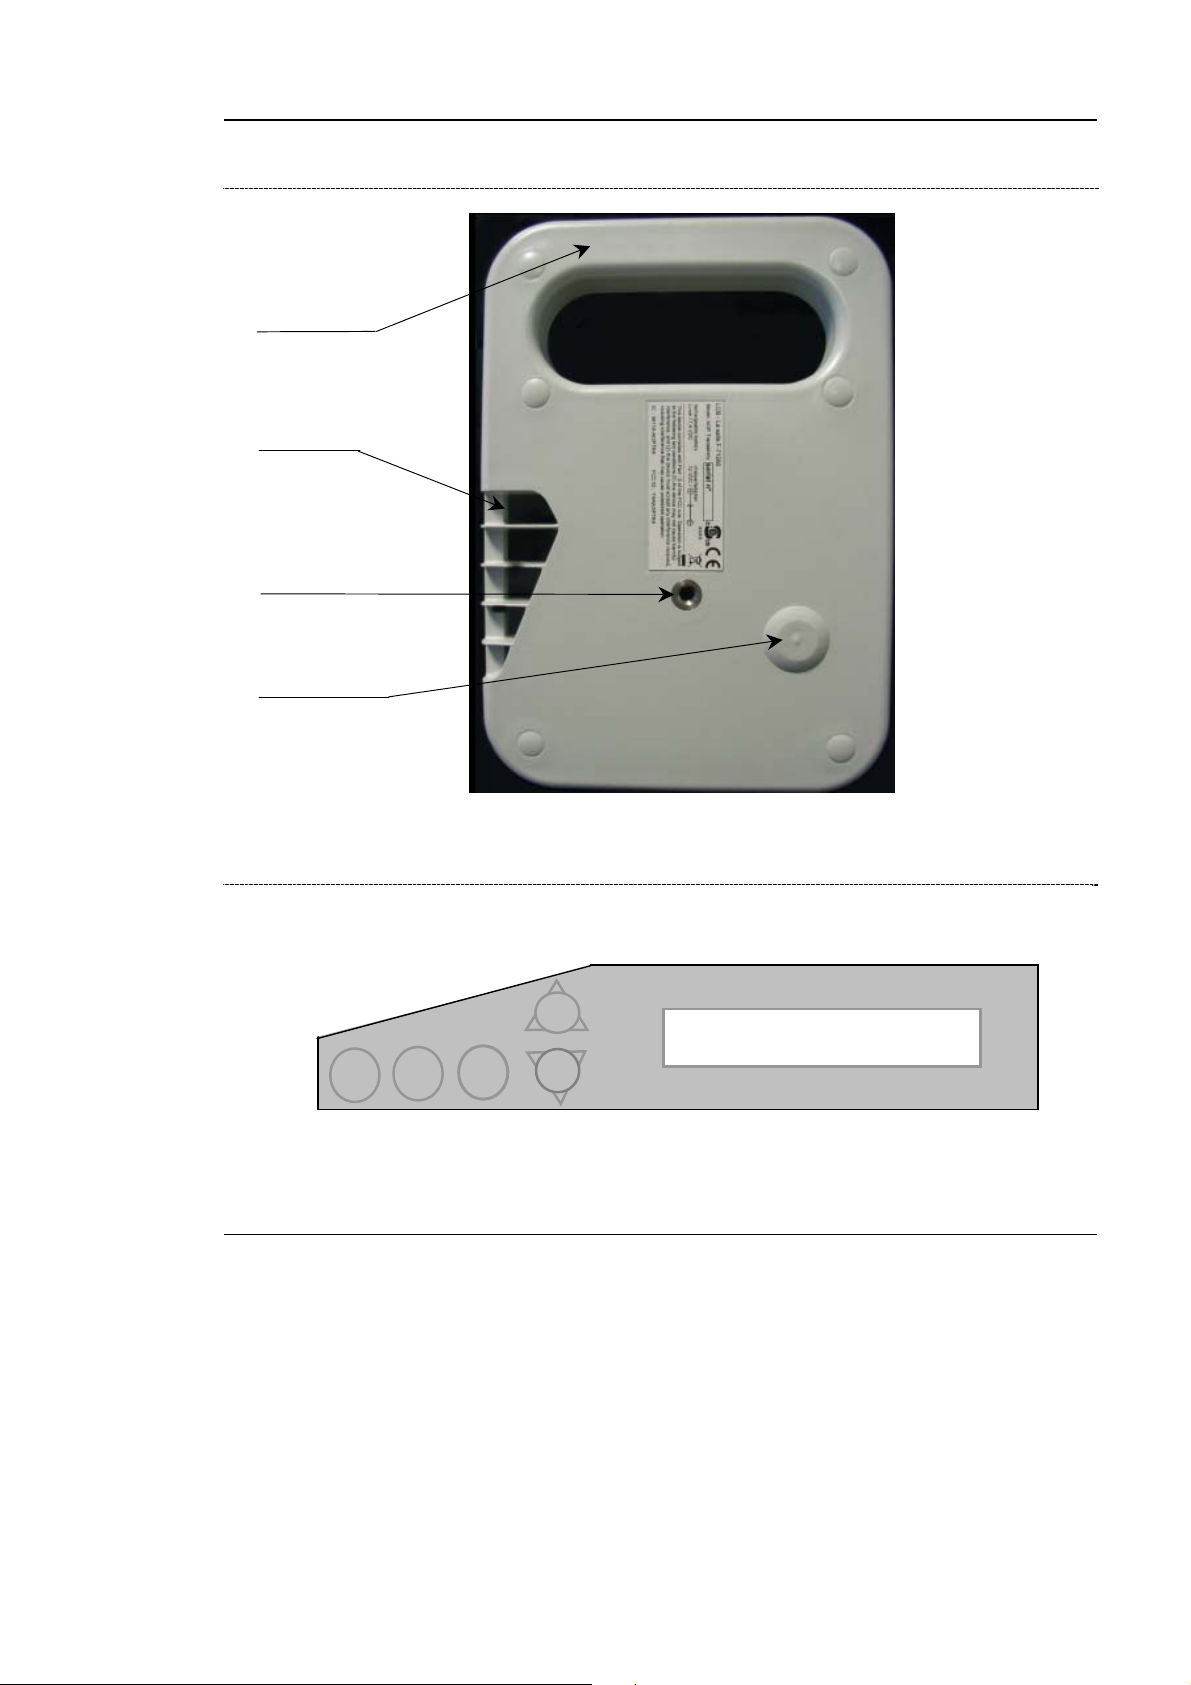
Rear face of the airIDEAL 3P Traceability
Handle
ir outlet
Threading
for tripod
Jack socket
Figure 2-5: Rear face
Keypad
+
ON
2-8 airIDEAL® 3P™ Traceability AeroBioCollector User's Manual
OFF
START
STOP
MENU
-
Figure 2-6: Keypad
Page 23
Functional description
A
Description
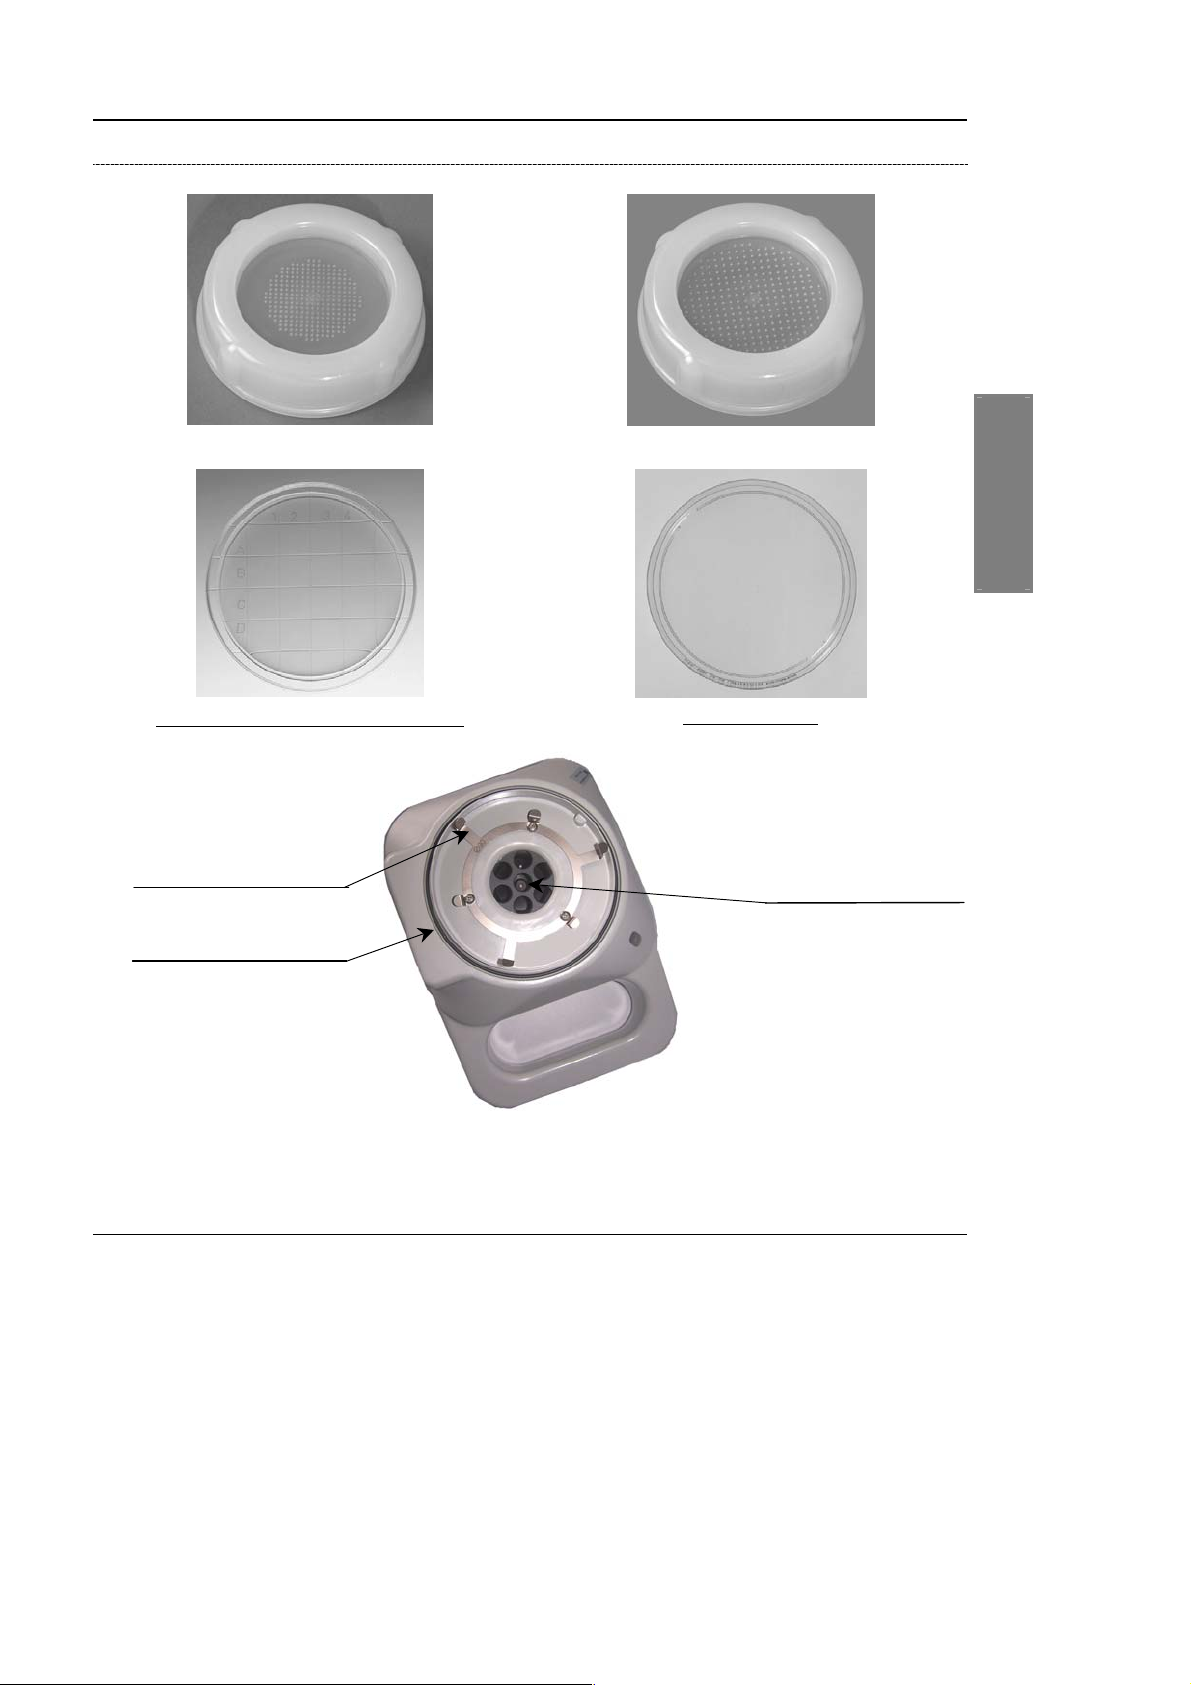
Configuration for 65, 70 or 90 mm Petri dishes
Sampling grid for 65 or 70 mm Petri dishes
®
65 or 70 mm (Count-Tact
) Petri dish
Stainless steel strip
for attachment
Seal
1
Sampling grid for 90 mm Petri dishes
2
90 mm Petri dish
spiration orifice
3
4
Figure 2-7: Sampling head and grid – 65, 70 or 90 mm Petri dishes
airIDEAL® 3P™ Traceability AeroBioCollector User's Manual 2-9
5
Page 24
Functional description
Description
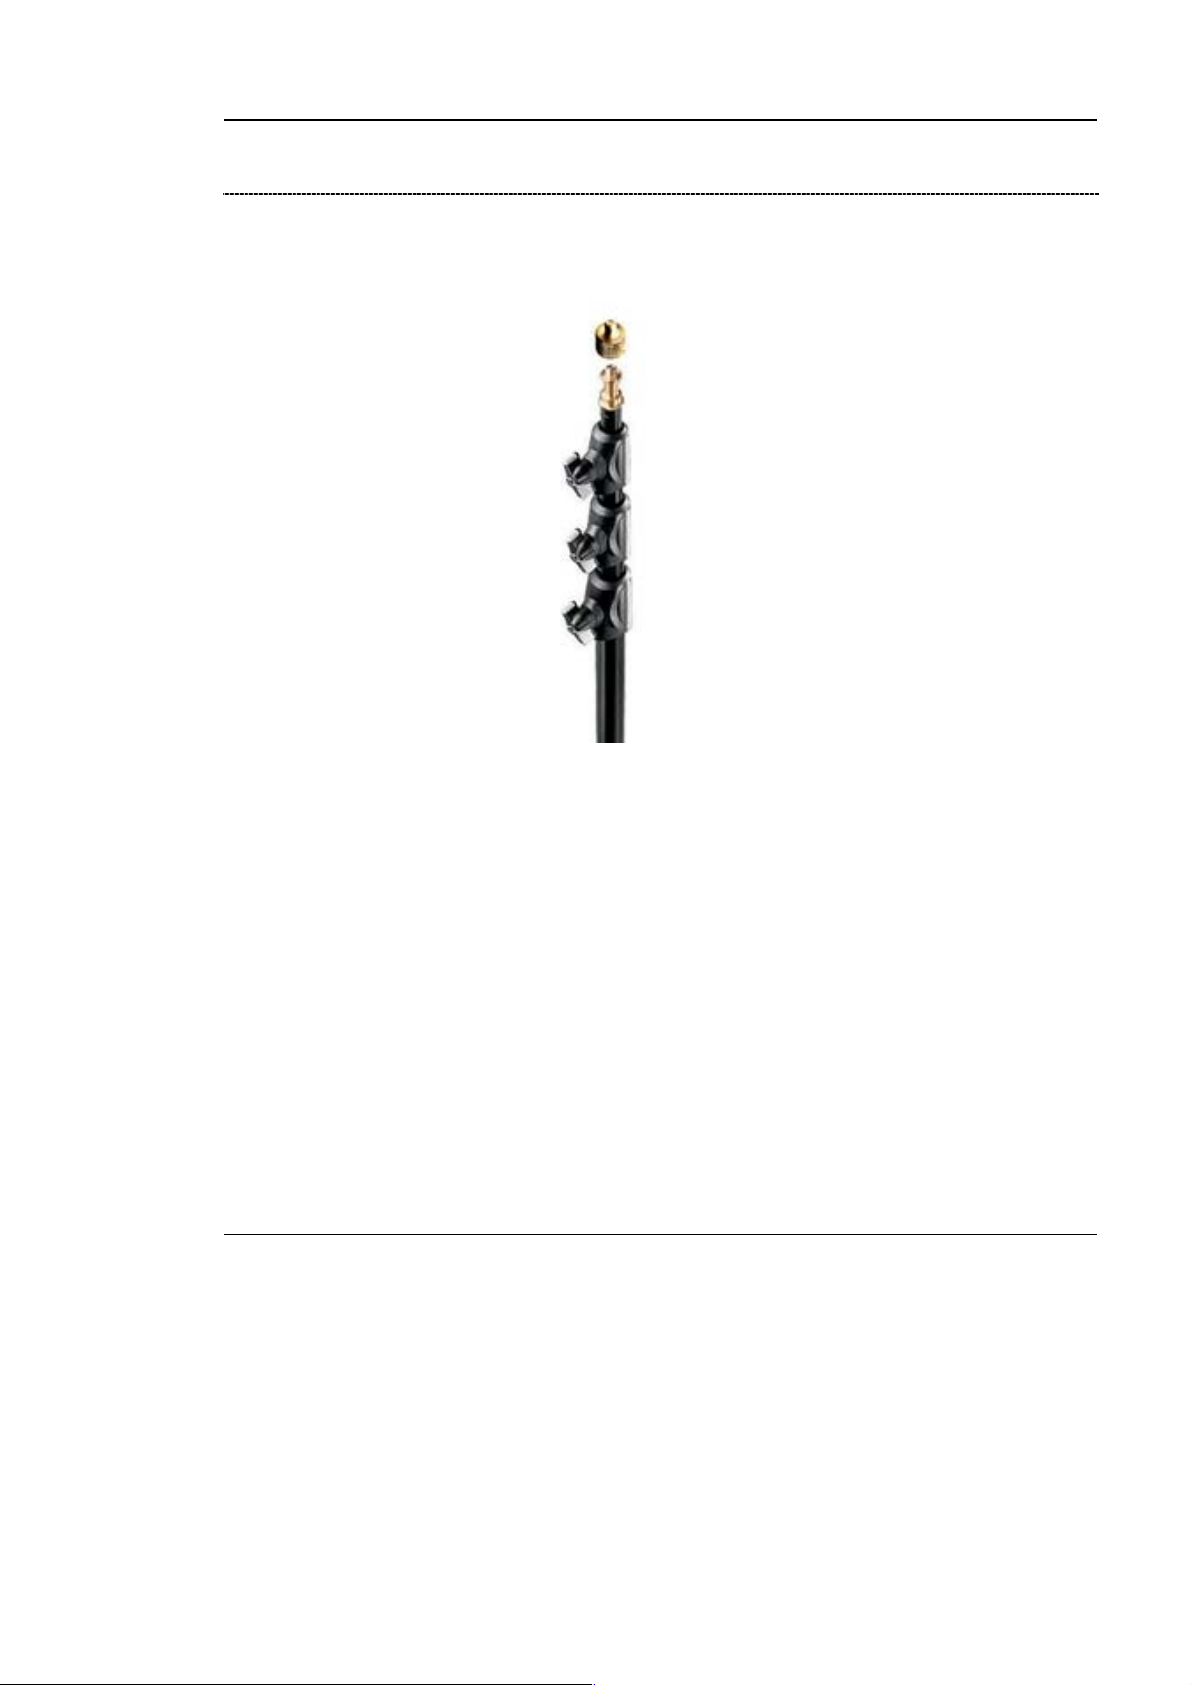
Tripod assembly
Figure 2-8: Tripod assembly
2-10 airIDEAL® 3P™ Traceability AeroBioCollector User's Manual
Page 25

Functional description
General specifications
General specifications
Environmental conditions
Physical features
Dimensions
Instrument alone Instrument in its case
Height 128 mm
Width 146 mm
Depth 208 mm
Mass
Instrument alone Instrument in its case Shipping carton
≈ 1.2 kg ≈ 5.5 kg ≈ 7.1 kg
Materials
Characteristics of materials
Normal storage condition................................................................-20° to + 50°C
Inside use in an air class zone, sterile room or glove box.
Normal conditions of use ...........................................0 to 40 °C (32 °F to 104 °F)
Relative humidity ....................................................................................0 to 95%
Maximum installation altitude................................................................ < 2 000 m
Standards applicable .........................................................See product certificate
The instrument must be transported in its specific case.
(5.03 in.) 301 mm (11.8 in.)
(5.75 in.) 250 mm (9.84 in.)
(8.18 in.) 400 mm (15.75 in.)
∗ ABS/Polycarbonate shell
∗ Polycarbonate keypad
∗ PVDF sampling grid
∗ Stainless steel mounting strips and screws
∗ Elastomer jack protection caps
1
2
3
4
− Shock resistance: shell and keypad.
− Chemical resistance: to most standard disinfectants (hydrogen peroxide,
concentrated peracetic acid, bleach, 70% ethanol, quaternary ammoniums,
etc).
− Thermal resistance: sampling grid that can be autoclaved using Good
Note: With increasing numbers of autoclaving cycles, the grids become increasingly yellow-gray,
airIDEAL® 3P™ Traceability AeroBioCollector User's Manual 2-11
Sterilization Practices, see section "Sterilization of grids" on page 3-3.
but this has no effect on grid performance.
− Surface finish: Ra coefficient of grid = 0.14 micron.
− Fire resistance: ABS/POLYCARBONATE V0 shell (highest grade of fire
resistance).
5
Page 26

Functional description
General specifications
Technical characteristics
Keypad Key control.
Display Liquid crystal display (2 x 16 characters).
Sampling grid 1/8-turn screw-on sampling grid.
Possibility of sampling on 90 mm 65/70 mm diameter Petri dishes (specific
sampling grids and fixing strips).
User interface airIDEAL 3P Traceability can operate in 2 modes:
• Slave mode: using airIDEAL 3P Traceability with the RUID.
• Manual mode: autonomous operation using the keypad.
5 buttons for access to all airIDEAL 3P Traceability functions.
An LCD screen is used to program the instrument and follow its operation.
Messages are in English.
Additional information on instrument operation is given as audible signals.
A flashing indicator light indicates, from a distance, the status of the instrument:
− Green flashing indicator light: sampling in progress. The indicator light
changes to constant green when sampling is performed successfully. In
slave mode the green indicator light continues to flash until sampling is
stopped using the RUID.
− Slow flashing green indicator light: the battery is charging. The indicator light
changes to constant green as soon as the battery has been fully charged.
− Constant green indicator light: the instrument is powered on and ready to start
sampling in manual or slave mode.
− Flashing green/red indicator light: the battery is low.
− Flashing or constant red indicator light: a problem has occurred.
− Indicator light off: the instrument is powered off.
Language used for the software: English
Ergonomics Ergonomic handle (right hand/left hand).
Possibility of stable sampling with the unit in four positions (see page 3-4).
Possibility of suspending airIDEAL 3P Traceability with a hook, especially in a
glove box.
Optionally, the instrument can be mounted on a telescopic tripod equipped with
a ball joint enabling the sampling axis to be orientated through an angle of 0° to
90° (from horizontal to vertical), and its height to be adjusted (between 0.7 and
2.50 meters).
2-12 airIDEAL® 3P™ Traceability AeroBioCollector User's Manual
Page 27

Functional description
General specifications
Electrical characteristics
Voltage ...................................................................................... 7.4 VDC nominal
Power supply .......................................................................................... 1 A max.
airIDEAL 3P Traceability is designed to run on a battery (6 NiMH batteries
CAUTION! The AC-DC power supply adapter must have the following characteristics:
connected in series, each with a nominal voltage of 3.7 V).
The instrument can also be powered and/or recharged using one of the
adapters indicated or an equivalent one.
- Voltage: 12 VDC
- Power: 2 A max.
- Plug mod. Jack 12.0 x 2.1 mm
-
AC input voltage corresponding to the characteristics of the power
supply in the country where the instrument is installed.
1
2
Note: It is recommended to use the adapter provided with the instrument. You will find the
Functional specifications
Flow-rate 100 ± 6.4 liters per minute regardless of the grid used.
Autonomy More than or equal to 4 hours, enabling at least 24 consecutive 1000 liter
Charge time It takes 3 hours to fully charge the battery.
Soud level < 50 dB
Security Male plug outlet serves as the power supply sectioning device.
details of its characteristics below.
POWER SUPPLY complying with - UL/CSA standards
INPUT 100 – 240 VAC 0.7 A – 0.4A 47 – 63 Hz
UL STD plug or STD European plug
OUTPUT 12 VDC 2 A max.
d = 2.1 mm JACK plug
Flow-rate measured and adjusted according to the bioMérieux quality control
protocol reference 96302-protocol.
samples to be collected.
Specification valid for a new battery not having undergone a thermal shock or a
prolonged period of inactivity.
3
4
5
airIDEAL® 3P™ Traceability AeroBioCollector User's Manual 2-13
Page 28

Page 29

3 Using airIDEAL 3P Traceability
Unpacking airIDEAL 3P Traceability
The instrument is supplied in a carrying case and box.
∗ When opening the box:
• Make sure you have all the items described in the packing list.
• Keep the shipping carton in case you need to ship the instrument back to
bioMérieux.
CAUTION! Any damage directly or indirectly resulting from the transport of the
instrument without adequate containers will not be covered by the
warranty or maintenance contract.
1
2
DANGER! Do not use the instrument in an explosive atmosphere as sparks could
cause an explosion.
Recommendations for installation and use
• Install the instrument on a flat, perfectly horizontal surface, on its tripod or by
IMPORTANT! When the instrument is used for th e first time, it is imperative to perform 1
its hook.
• Avoid locations directly exposed to sunlight, excessive heat, damp or dust.
• The instrument must not be used near strong sources of electromagnetic
interference.
• Do not use the instrument with its original protective cover cap, but with a
grid.
battery charge-discharge cycle.
•
Charge the battery for 3 hours.
•
Discharge the battery by performing successive sampling
(see page 3-22 "Battery autonomy test (Menu 6)").
•
Recharge for 3 hours.
•
Make sure the grid holes are not blocked.
3
4
5
airIDEAL® 3P™ Traceability AeroBioCollector User's Manual 3-1
Page 30

Using airIDEAL 3P Traceability
Recommendations for installation and use
WARNING! The user’s manual or instruction manual for an intentional or unintentional
WARNING! Industry Canada requirements:
radiator shall caution the user that changes or modifications not expressly
approved by the party responsible for compliance could void the user’s
authority to operate the equipment.
In cases where the manual is provided only in a form other than paper,
such as on a computer disk or over the Intern et, the information required
by this section may be included in the manual in that alternative form,
provided the user can reasonably be expected to have the capability to
access information in that form.
This equipment has been tested and found to comply with the limits for a
Class B digital device, pursuant to part 15 of the FCC Rules. These limits
are designed to provide reasonable protection against harmful
interference in a residential installation. This equipment generates uses
and can radiate radio frequency energy and, if not installed and used in
accordance with the instruction, may cause harmful interfer ence to radio
communications. However, there is no guarantee that interference will not
occur in a particular installation. If this equipment does cause harmful
interference to radio or television reception which can be determined by
turning the equipment off and on, the user is en couraged to try to correct
interference by one or more of the following measures:
• Reorient or relocate the receiving antenna.
• Increase the separation between the equipment and receiver.
• Connect the equipment into an outlet on circuit different from that to
which the receiver is connected.
• Consult the dealer or an experienced radio/TV technician for help.
RSS-Gen - General Requirements and Information for the Certification of
Radio Apparatus, Clause 7.1.2 statement:
Under Industry Canada regulations, this radio transmitter may only
operate using an antenna of a type and maximum (or lesser) gain
approved for the transmitter by Industry Canada. To reduce potential radio
interference to other users, the antenna type and its gain should be so
chosen that the equivalent isotropically radiated power (e.i.r.p.) is not
more than that necessary for successful communication.
RSS-Gen - General Requirements and Information for the Certification of
Radio Apparatus, Clause 7.1.3 statement:
This device complies with Industry Canada licence-exempt RSS
standard(s). Operation is subject to the following two conditions: (1) this
device may not cause interference, and (2) this device must accept any
interference, including interference that may cause undesired operation of
the device.
This device complies with FCC and Industry Canada RF radiation
exposure limits set forth for general population (uncontrolled exposure).
This device must not be collocated or operating in conjunction with any
other antenna or transmitter.
3-2 airIDEAL® 3P™ Traceability AeroBioCollector User's Manual
Page 31

Using airIDEAL 3P Traceability
Cleaning and decontamination procedure
Cleaning and decontamination procedure
Sterilization of grids
airIDEAL 3P Traceability is delivered with a set of 5 grids. They can be
sterilized by autoclaving at 134°C for 18 min.
Decontamination of the external part
bioMérieux has validated that the grid specifications and performance are not
altered after autoclaving up to:
- 40 times at 134°C for 18 minutes
- 200 times at 121°C for 20 minutes
After autoclaving 14 times or more, the grid may begin to turn yellow and may
become difficult to screw onto the instrument.
1
Decontamination of the air circuit
All the external parts of the instrument can be decontaminated with most of the
usual disinfectants at the usual effective concentration (hydrogen peroxide,
concentrated peracetic acid, bleach solution, 70% ethanol, quaternary
ammonium).
∗ Decontamination protocol:
• Spray twice with 70% isopropyl alcohol with the motor off: one spray at the
air inlet, the other at the outlet.
Decontamination in a glove box
• Allow to react for 15 minutes before using the instrument.
Decontamination of the instrument according to this protocol with ClearKlens
IPA (Johnson Diversey) has been validated.
A summary of this validation is available on request.
airIDEAL 3P Traceability was specially developed for use in production or
control glove boxes. The suitability of this instrument for use in glove boxes was
evaluated by the SKAN ag "Center of Competence for Isolator Technology".
∗ Two parameters were tested:
− The capacity of the instrument to withstand standard decontamination cycles
in glove boxes.
− The capacity of a standard decontamination cycle to disinfect the different
types of materials that compose the instrument.
A summary of this validation is available on request.
2
3
4
airIDEAL® 3P™ Traceability AeroBioCollector User's Manual 3-3
5
Page 32

Using airIDEAL 3P Traceability
Sampling positions
Sampling positions
c d
e f
Figure 3-1: Sampling positions
IMPORTANT! airIDEAL 3P Traceability is delivered with a hook for suspending it in a
glove box during decontamination phases. Even though sampling can be
done while suspended, it is preferable to position the instrument along the
axis of one-way flow at the air outlets. This con figuration is the worst ca se
scenario since the air sampled has swept the entire volume of the gl ove
box before emerging.
Do not obstruct the air outlet during use to respect operating parameters.
3-4 airIDEAL® 3P™ Traceability AeroBioCollector User's Manual
Page 33

Using airIDEAL 3P Traceability
Screwing on the sampling grid
Screwing on the sampling grid
CAUTION! Do not insert any foreign objects into the aspiration orifice located under
the grid (see pages 2-9).
∗ To screw on the sampling grid easily,
• Position the grid on the threading of the shell and turn it clockwise by 1/8 of
a turn without forcing or pressing it.
1
Figure 3-2: Screwing on the sampling grid
2
3
4
airIDEAL® 3P™ Traceability AeroBioCollector User's Manual 3-5
5
Page 34

Using airIDEAL 3P Traceability
Electrical power supply
Electrical power supply
airIDEAL 3P Traceability operates self-sufficiently through a Lithium-ion battery
pack.
It can also run off the mains using the charger/adapter.
Operation on the battery
The microprocessor manages and displays the available autonomy at all times,
on the basis of a theoretical autonomy of 4 hours for sampling cycles of 1000
liters.
As soon as the flashing symbol appears , there are 20 minutes of
autonomous running remaining.
Immediately put the battery on charge; if a sampling cycle is in progress it will be
completed just the same.
A sampling cycle cannot start if its duration exceeds the remaining autonomy
displayed.
Low battery signals
∗ When the autonomy has expired, the following low battery signals are output:
Visual signal on the welcome message display:
STORED VOL: ZZZL
BATTERYLIFE XHXX
Flashing symbol
Visual signal on the sample in progress display:
Audible signal when the instrument is turned on: 2 lon g bee ps emitted eac h tim e
the instrument is powered on.
IMPORTANT! In slave mode, if the battery is low at the beginning of an analysis, the
operator is warned by a message displayed on the RUID (please r efer to
the remote control user manual).
3-6 airIDEAL® 3P™ Traceability AeroBioCollector User's Manual
STORED VOL ZZZL
SAMPLE VOL: XL
Flashing symbol
Page 35

Using airIDEAL 3P Traceability
Electrical power supply
Charging
∗ To charge the battery,
• Use the charger supplied or one with the same specifications.
• During the charging phase, the instrument can be either switched on or
IMPORTANT! During sampling with airIDEAL 3P Traceability running off the mains, do
switched off.
• Connect the charger to the instrument jack connector after removing the
protection cap.
• Connect the charger to the power outlet.
The display indicates:
Charge
Battery
The normal time required to completely charge a discharged battery pack is 3
hours.
During the charging phase, it is possible to perform sampling with airIDEAL 3P
Traceability running off the mains. The charging process will be suspended
during sampling and will restart automatically when sampling is finished.
not disconnect the instrument from the mains as there is a risk of it
switching off and the sampling cycle in progress would be definitively
lost.
1
2
3
∗ At the end of the operation,
IMPORTANT! If airIDEAL 3P Traceability is not used for more than 10 days, the battery
airIDEAL® 3P™ Traceability AeroBioCollector User's Manual 3-7
• Disconnect the charger from the power outlet.
• Disconnect the charger from the the instrument jack connector.
• Install the protection cap.
• Check that the battery life displayed is again 4 hours.
must be totally recharged (3 hours).
4
5
Page 36

Using airIDEAL 3P Traceability
Electrical power supply
Operation using mains pow er
Connection to the mains is carried out in the same way as for charging the
battery.
The display indicates:
Charge
Battery
• Press the <START> or <MENU> button to return to the welcome
message.
Then
• Press the <START> button to start (the volume sampled will be the last
recorded).
or,
• Select the sample volume by means of MENU 1 or MENU 2, and then start
by pressing the
∗ To turn off,
• Disconnect the charger from the Jack socket on the instrument.
IMPORTANT! During sampling with airIDEAL 3P Traceability running off the mains, do
not disconnect the instrument from the mains as there is a risk of it
switching off and the sampling cycle in progress would be definitively
lost.
<START> button.
Automatic standby
To preserve the battery life, the instrument automatically goes into standby
mode after 5 minutes of inactivity.
Pressing any key will reactivate the instrument.
The RUID can activate the instrument so that it is ready for sampling.
Automatic switch off
In manual or slave mode, the instrument switches off after 1 hour of inactivity.
While it is switched off, airIDEAL 3P Traceability cannot communicate with a
RUID.
3-8 airIDEAL® 3P™ Traceability AeroBioCollector User's Manual
Page 37

Using airIDEAL 3P Traceability
Operation in slave mode
Operation in slave mode
In slave mode, the airIDEAL 3P Traceability is used with a RUID.
Please refer to the RUID User Manual.
Operation in manual mode
In manual mode the airIDEAL 3P Traceability operates autonomously.
Programming
airIDEAL 3P Traceability enables sampling to be programmed and monitored.
This section describes how to program the instrument.
Programming characteristics
− Sample volumes adjustable from 5 to 10 liters in 1-liter steps.
− Sample volumes adjustable from 10 to 2000 liters in 10-liter steps.
− Automatic selection of last sample volume used.
− Storage of 4 sample volumes in the memory.
− Delayed start-up (maximum 60 minutes).
• 0 to 60 seconds in 1-second steps
• 1 minute to 60 minutes in 1-minute steps
− Sequenced sampling.
1
2
3
Sampling controls
− Volume counter.
− Volume of air sampled remains on display after sampling is interrupted.
− Sampling status is indicated by an indicator light.
− Possibility of interrupting and resuming a sample in progress (only in manual
mode).
− End of sample buzzer (6 short beeps).
− Count-down of time.
airIDEAL® 3P™ Traceability AeroBioCollector User's Manual 3-9
4
5
Page 38

Using airIDEAL 3P Traceability
Operation in manual mode
airIDEAL 3P Traceability menus
ON_
OFF
Turning on
WELCOME
MESSAGE
Last sample taken.
Remaining autonomy.
MENU 1:
Selection of one of 4 sample volumes among the 4 volumes preprogrammed in menu 3.
MENU 2: Programming 1 sample volume not in memory.
MENU 3: Modification of the 4 pre-programmed sample volumes.
MENU 4: Programming delayed start-up
MENU 5: Programming sequenced sampling.
MENU 6: Battery autonomy test.
ON_
OFF
Turning off
3-10 airIDEAL® 3P™ Traceability AeroBioCollector User's Manual
Page 39

Using airIDEAL 3P Traceability
L
X
Operation in manual mode
Turning on airIDEAL 3P Traceability
ON_
OFF
∗ To turn on the instrument,
• Press <ON/OFF>.
The display indicates:
STORED VOL: ZZZ
BATTERYLIFE XHX
Note: The symbol is displayed if a delayed start-up is programmed.
− ZZZL corresponds to the last sample volume recorded.
XHXX corresponds to remaining autonomy.
−
1
2
∗ If the symbol appears:
• Recharge the instrument.
∗ If the last sample did not terminate correctly (sampling stopped before the end,
protection cap in place of the grid, motor blocked),
AND
3
∗ If the instrument is then switched off or put on standby,
The following message will appear when the instrument is switched on again or
is reactivated:
LAST SAMPLING
In this case, press <MENU> once to display the welcome message.
NOT COMPLETED
4
DANGER! Do not insert any foreign objects into the motor compartment when the
instrument is running.
airIDEAL® 3P™ Traceability AeroBioCollector User's Manual 3-11
5
Page 40

Using airIDEAL 3P Traceability
Operation in manual mode
Standby
ON_
OFF
∗ To put the instrument on standby,
• Briefly press <ON/OFF> , the indicator light must not go off.
or
• Wait for 5 minutes.
∗ To reactivate the instrument,
• Press any key.
Turning off airIDEAL 3P Traceability
ON_
OFF
∗ To turn off the instrument,
• Press <ON/OFF> until the indicator light goes off.
Selection of one of the 4 pre-programmed sample volumes (Menu 1)
∗ Factory programming memorizes the following 4 volumes in
airIDEAL 3P Traceability: 100, 500, 1000, 2000 liters.
3-12 airIDEAL® 3P™ Traceability AeroBioCollector User's Manual
MENU
∗ To select menu 1,
• Press <MENU>.
The display indicates:
MENU 1 : CHOSEN
PRESET VOLUME
• Press the < + > button to select 1 of the 4 volumes memorized.
Page 41

Using airIDEAL 3P Traceability
Operation in manual mode
Example:
+
+
∗ To select stored volume No. 2 from menu 1,
• Press < + > twice.
• Wait 2 seconds.
Note: If you did not wait for the end of the first timeout, in other words if you pressed another
button before the 2 seconds, the new value selected (
value (
Preset volume 1
XX Liters
PRESET VOLUME 2
YYY LITERS
ZZZ) remains in memory.
YYY) is not recorded. The initial
1
2
The value YYY selected is recorded.
The display indicates:
RECORDED
3
4
∗ There are 3 possibilities:
• Start sampling immediately by pressing the <START> button.
• Wait: the selected sampling can be started at a later time.
• Press the <ON/OFF> button to turn off the instrument. The volume selected
will be displayed the next time it is turned on.
5
airIDEAL® 3P™ Traceability AeroBioCollector User's Manual 3-13
Page 42

Using airIDEAL 3P Traceability
Operation in manual mode
Programming a sample volume not in memory (Menu 2)
MENU
∗ To select menu 2,
• Press <MENU> twice.
The display indicates:
MENU 2: CHOSEN
VOLUME XXL
∗ To program a new volume,
• Press < + > or <- > until the desired volume is displayed.
IMPORTANT! It is imperative to press the
program a new volume.
After a 2-second delay, the volume displayed is recorded.
The display indicates:
RECORDED
∗ There are 3 possibilities:
• Start sampling immediately by pressing <START>.
• Wait: the selected sampling can be started at a later time.
• Press the <ON/OFF> button to turn off the instrument. The volume selected
will be displayed the next time it is turned on.
< + > or < - > buttons immediately to
3-14 airIDEAL
®
3P™ Traceability AeroBioCollector User's Manual
Page 43

Using airIDEAL 3P Traceability
Operation in manual mode
Modification of the 4 pre-programmed sample volumes (Menu 3)
MENU
∗ To select menu 3,
• Press <MENU> 3 times.
The display indicates:
MENU 3:
STORE IN MEMORY
1
• Wait 2 seconds.
The display indicates:
PROGRAM 1
Volume: XL
2
3
∗ To program a new volume for program 1,
• Press < + > or <- > until the desired volume is displayed.
IMPORTANT! It is imperative to press the
program a new volume.
Note: If the <MENU>, < + > or < - >, buttons are not pressed, each of the 4 pre-
After a 2 second delay, the volume displayed is recorded.
The display indicates:
programmed volumes is displayed every 2 seconds.
PROGRAM 2
Volume
: XL
< + > or < - > buttons immediately to
4
5
airIDEAL® 3P™ Traceability AeroBioCollector User's Manual 3-15
Page 44

Using airIDEAL 3P Traceability
Operation in manual mode
∗ To program a new volume of program 2,
• Press < + > or < - > until the desired volume is displayed.
IMPORTANT! It is imperative to press the
program a new volume.
After a 2-second delay, the volume displayed is recorded.
The display indicates:
PROGRAM 3
Volume
: XL
∗ To program a new volume for program 3,
• Press < + > or < - > until the desired volume is displayed.
IMPORTANT! It is imperative to press the
program a new volume.
After a 2-second delay, the volume displayed is recorded.
The display indicates:
PROGRAM 4
Volume: XL
< + > or < - > buttons immediately to
< + > or < - > buttons immediately to
3-16 airIDEAL® 3P™ Traceability AeroBioCollector User's Manual
Page 45

Using airIDEAL 3P Traceability
L
X
Operation in manual mode
∗ To program a new volume for program 4,
• Press < + > or < - > until the desired volume is displayed.
IMPORTANT! It is imperative to press the
Note: If the < + > or < - > buttons are not pressed, the pre-programmed volumes are
program a new volume.
After a 2-second delay, the volume displayed is recorded.
The display indicates:
The screen the returns to the welcome message.
STORED VOL: ZZZ
BATTERYLIFE XHX
sequentially displayed without modification.
END
< + > or < - > buttons immediately to
1
2
3
∗ Possibility of going directly to "MENU 4", once selected volumes are modified:
When "END" is displayed on the screen,
airIDEAL® 3P™ Traceability AeroBioCollector User's Manual 3-17
• Immediately press <MENU>.
Menu 4 is displayed.
4
5
Page 46

Using airIDEAL 3P Traceability
Operation in manual mode
Programming delayed start-up (Menu 4)
∗ Delayed start-up can be programmed for up to 60 minutes:
− 0 to 60 seconds in 1-second steps
− 1 minute to 60 minutes in 1-minute steps.
MENU
∗ To select menu 4,
• Press <MENU> 4 times.
The display indicates:
MENU 4: TIMED
Ømin Øsec
∗ To program a delay value,
• Press < + > or < - > until the desired delay value is displayed.
IMPORTANT! It is imperative to immediately press
volume.
After 2-seconds, the delay value is recorded.
The display indicates:
3-18 airIDEAL® 3P™ Traceability AeroBioCollector User's Manual
RECORDED
< + > or < - > to program a new
Page 47

Using airIDEAL 3P Traceability
L
X
Operation in manual mode
The screen returns to the welcome message.
STORED VOL ZZZ
BATTERYLIFE XHX
1
The delay is recorded: the symbol
∗ There are 3 possibilities:
appears in the welcome message.
2
• Start sampling immediately by pressing <START>.
• Wait: the selected sampling can be started at a later time.
• Press the <ON/OFF> button to turn of the instrument. The volume selected
will be displayed the next time it is turned on.
3
4
airIDEAL® 3P™ Traceability AeroBioCollector User's Manual 3-19
5
Page 48

Using airIDEAL 3P Traceability
Operation in manual mode
Programming sequenced sampling (Menu 5)
Menu 5 is used to sample a selected volume several times.
∗ This sequencing is defined with 3 parameters:
− The unit volume (of each sequence).
This volume is defined with menus 1 or 2 (see pages 3-12 and 3-14).
− The number of sequences.
This number is included between 2 and 5.
− The time interval between each sequence.
It is included between 10 minutes and 4 hours, in 10-minute steps.
∗ Total sampling time must be less than 5 hours or else an error message
appears.
MENU
∗ To select menu 5,
• Press <MENU> 5 times.
The following message appears and the 1
MENU 5 : SEQ NB X
VOL ZZZL INTXHXX
The unit volume is shown on the lower left and cannot be modified in this menu.
st
line flashes:
∗ To modify the number of sequences,
• Press < + > or < - > until the desired number is displayed.
• Press <MENU> once the number of sequences is selected.
The "INTXHXX" (INTERVAL ) field flashes.
• Press < + > or < - > to define the time interval between each sequence.
IMPORTANT! Check that the remaining battery autonomy is sufficient to carry out
complete sampling (base: 10 min/1000 liters).
3-20 airIDEAL® 3P™ Traceability AeroBioCollector User's Manual
Page 49

Using airIDEAL 3P Traceability
Operation in manual mode
∗ Once sequenced sampling has been correctly programmed,
• Press the <START> button to start sampling.
IMPORTANT! A sequenced sampling is run from the specific menu, without returning to
The total duration of sequences and intervals must not exceed 5 hours or else
an error message appears:
Then,
The screen automatically returns to Menu 5.
To return to the welcome message, press <MENU> twice.
the main menu.
If the last sampling was sequenced, the menu 5 screen is d isplayed when
the instrument is turned on.
ERROR
TIME > 5H
1
2
3
airIDEAL® 3P™ Traceability AeroBioCollector User's Manual 3-21
4
5
Page 50

Using airIDEAL 3P Traceability
Operation in manual mode
Battery autonomy test (Menu 6)
This menu is used to verify that the battery is still compliant with specifications of
new material (autonomy ≥ 4 hours).
The autonomy test can be performed using a volume chosen by the operator.
1000 liters is the reference volume for verifying that specifications have been
respected (4 hours of autonomy for 1000-liter samples).
If the volume generally used is, for example, 100 liters, then it is wiser to
perform the test on 100 liter volumes.
∗ To check battery autonomy:
− Note the autonomy displayed when the instrument is turned on.
− Using Menu 1, select a 1000 liter sample volume.
− Go to Menu 6.
• Press the <START> button to run the battery discharge cycle.
MENU
∗ To select menu 6,
• Press <MENU> 7 times.
The display indicates:
MENU 6:AUT . TEST
BATTERYLIFE : XHXX
∗ The battery discharge cycle can be stopped as follows:
• Press <STOP>.
∗ To resume at a later time,
• Press <START>.
CAUTION! After stoppage of more than 5 minutes, the instrument goes into standby
mode and the sampling program is interrupted.
When the instrument is reactivated, the following message is displayed:.
• Press <MENU> to return to the welcome message.
3-22 airIDEAL® 3P™ Traceability AeroBioCollector User's Manual
LAST SAMPLING
NOT COMPLETED
Page 51

Using airIDEAL 3P Traceability
Starting sampling
Starting sampling
CAUTION! Before starting, check that airIDEAL 3P Traceability is fitted with a
sampling grid and not its protective cover otherwise it could undergo
irreversible damage which is not covered by the bioMérieux warranty.
∗ If the protective cover remains on the instrument, the following alarm message
is displayed after several seconds and sampling stops automatically:
PROTECTION COVER
The indicator light flashes red.
REMOVE
• Remove the protection cover.
• Install the grid.
• Press <MENU> to return to the welcome message.
∗ To start sampling,
ON_
OFF
START
STOP
• Turn on the instrument,
• Press <ON/OFF>.
The indicator light is constant green and the following message appears:
STORED VOL: ZZZL
BATTERYLIFE XHXX
• Press <START/STOP>.
1
2
3
4
∗ During sampling, the display indicates:
STORED VOL: ZZZL
The indicator light changes to flashing green.
airIDEAL® 3P™ Traceability AeroBioCollector User's Manual 3-23
SAMPLE VOL: XL
5
Page 52

Using airIDEAL 3P Traceability
Starting sampling
The SAMPLE VOL display flashes during the sampling phase and the volume
counter is displayed.
− The last sample volume recorded is automatically displayed (shown as
A buzzer indicates the end of sampling (6 short buzzes) and the display returns
to the original message with automatic correction of the remaining battery life.
The indicator light changes to constant green. The instrument is free to perform
a new sampling cycle.
If a delayed start-up has been programmed, the display indicates:
∗
TIMED flashes during the count-down phase.
Note: The motor stops 2 liters before the total volume has been sampled.
ZZZL).
STORED_VOL:_ZZZL
BATTERYLIFE: XHXX
STORED VOL: ZZZL
TIMED : X Min YS
∗ Last sampling not terminated:
If the instrument was turned off during sampling, the following message appears
the next time the instrument is turned on:
The indicator light changes to flashing red.
CAUTION! In this case, the user will take all necessary precautions to deal with this
interrupted sampling.
• Press <MENU> to return to the welcome message.
3-24 airIDEAL® 3P™ Traceability AeroBioCollector User's Manual
LAST SAMPLING
NOT COMPLETED
Page 53

Using airIDEAL 3P Traceability
Starting sampling
Stopping the motor
START
STOP
• Press <START/STOP>.
Note: It is always possible to stop a sampling operation under way by pressing
<START/STOP>.
If the motor is stopped during the program, i.e. during the delayed start-up
count-down phase or during the sampling phase, the value displayed freezes
and the display continues to flash.
STORED VOL: ZZZL
SAMPLE VOL: XL
∗ To resume sampling,
• Press <START/STOP>.
If the motor is restarted after being stopped during a program, the program will
resume from the point where it was stopped.
1
2
3
Note: If stoppage during sampling is more than 5 minutes, the instrument will go into standby
mode and the sampling program will not be able to resume.
airIDEAL® 3P™ Traceability AeroBioCollector User's Manual 3-25
4
5
Page 54

Using airIDEAL 3P Traceability
Setting airIDEAL 3P Traceability parameters (summary diagram)
Setting airIDEAL 3P Traceability parameters (summary diagram)
MENU
1 ×
Menu 1 : Selection of one of
the 4 sampling volumes
among the 4 pre-programmed
volumes.
Press < + > or < - > until the
desired volume in memory is
displayed.
("Preset volume")
ON
OFF
LAST SAMPLING
NOT COMPLETED
STORED VOL: ZZZL
BATTERYLIFE : XHXX
MENU
2 ×
Menu 2 : Selection of a sampling
volume not in memory.
Press < + > or < - > until the
desired volume is displayed.
("CHOSEN VOLUME")
Menu 3 : Modification of the 4 pre-
programmed sampling volumes.
"PROGRAM 1, 2, 3 and 4
Press < + > or < - > until the
chosen volume is displayed.
3 ×
MENU
MENU
4 ×
MENU
STORED VOL: ZZZL
BATTERYLIFE : XHXX
3-26 airIDEAL® 3P™ Traceability AeroBioCollector User's Manual
Page 55

Using airIDEAL 3P Traceability
q
g
q
Setting airIDEAL 3P Traceability parameters (summary diagram)
ON
OFF
LAST SAMPLING
NOT COMPLETED
MENU
Select delay before
startin
MENU
4 ×
Menu 4 : Programming
delayed start-up
Press < + > or < - > until the
delay value is displayed.
STORED VOL: ZZZL
BATTERYLIFE : XHXX
MENU
5 ×
Menu 5 : Programming
sequenced samplings.
Press< + > or < - > until the
desired number is displayed.
MENU
1 ×
Press < + > or < - > until the
desired time is displayed.
Select number of
se
Select time between
se
MENU
MENU
7 ×
Menu 6 : Battery autonomy test
uences
uences
STORED VOL: ZZZL
BATTERYLIFE : XHXX
airIDEAL® 3P™ Traceability AeroBioCollector User's Manual 3-27
Page 56

Navigation using <+> and<-> keys
ON
OFF
STORED VOL: ZZZL
BATTERYLIFE : XHXX
+
NEXT CALIBRATION
MM/DD/YYYY
-
Using airIDEAL 3P Traceability
Navigation using <+> and<-> keys
+
FSE (Field Service Engineer)
XXXXXX
-
+
RUID Serial
XXXXXXXXX
-
XX
-
-
+
FRMB Serial
+
LAST CALIBRATION
MM/DD/YYYY
XXXX
-
-
+
FREE MEMORY
XXXX WORDS
-
+
Soft Version
X.X
-
+
-
+
Serial number
+
MAC ADRESS
XXXXYXXXXYXX
3-28 airIDEAL® 3P™ Traceability AeroBioCollector User's Manual
Page 57

Using airIDEAL 3P Traceability
Navigation using <+> and<-> keys
Welcome message
Date of next calibration (Month/Day/Year)
ID of operator who performed calibration
Serial number of RUID used for calibration
Flow Rate Measurement Bench serial number
Date of last calibration
airIDEAL 3P Traceability firmware version
airIDEAL 3P Traceability available memory size
MAC address (Media Access Control)
airIDEAL 3P Traceability serial number
airIDEAL® 3P™ Traceability AeroBioCollector User's Manual 3-29
Page 58

Page 59

4 Procedure
Principle
Implementation and following of a procedure to measure aerobiocontamination
corresponds to a process based on prevention, which involves:
• Evaluating the current level and standard of hygiene and controls.
• Selecting the critical areas to be controlled.
• Establishing a reference level and an alert level for each of the critical points.
• Developing a sampling plan.
• In manual mode, preparing a document for recording air sampling results.
• In slave mode, recording of air sampling results using the RUID
• Preparing a plan for corrective action in case of deviation.
The result of sampling should provide information on the level of risk, global
hygiene conditions and environment.
1
2
3
Procedure
The procedure must be adapted to the actual conditions in which air sampling
will take place (contaminated areas, clean areas, sterile areas, etc.)
airIDEAL® 3P™ Traceability AeroBioCollector User's Manual 4-1
When strictly followed, the procedure guarantees good quality sampling and
should include:
− Operators’ qualifications.
− Names of qualified operators.
− Hygiene of operators (clothes, hands, etc.).
− Protocol for disinfection of the AeroBioCollector.
− Detailed steps of the procedure.
4
5
Page 60

Procedure
How to obtain a good quality sample
How to obtain a good quality sample
Precautions of use
• Check the condition of the instrument and sampling grid.
• When unscrewing and screwing on the sampling grid avoid touching the
perforated zone.
The choice of medium depends on the area to be controlled and the type of
micro-organism to be isolated.
The agar in 90 mm Petri dishes, must be at least 2.5 mm thick at the center and
have a flat surface. It should not present dehydration or humidity droplets.
• During sampling, avoid any unnecessary movement, do not pass in front of
the instrument or cough etc.
• Begin by collecting from low contaminated areas.
• Collect several samples in each zone in order to obtain results that can be
used for statistical studies.
• Clean the instrument after use and sterilize sampling grids.
• Recharge the battery if necessary.
• Place the instrument in its carrying case and store it in a suitable place.
4-2 airIDEAL® 3P™ Traceability AeroBioCollector User's Manual
Page 61

Procedure
How to obtain a good quality sample
Sampling in manual mode
Note: For slave mode, please refer to the RUID User Manual.
• Turn on the instrument.
• Check the remaining battery life.
• Place the instrument on a flat surface (work bench, table...) in a vertical or
• Select the sample volume according to the critical area to be controlled.
• Remove the protective cover or the sampling grid.
• Mark the date, time and sample location on the Petri dish.
• Place the Petri dish with its cover between the attachment clips and make
• Remove the Petri dish cover and place it on a clean surface.
• Screw on the sampling grid corresponding to the type of plate used.
• Perform sampling.
• The instrument indicates the end of sampling (6 beeps and a constant green
• Unscrew the sampling grid.
• Carefully remove the Petri dish without touching the agar.
• Put the cover back on the Petri dish used.
• Put the protective cover back on.
Incubation and reading
The Petri dishes must be placed in the incubator as rapidly as possible.
After incubation, read as follows:
− Count the number of CFU (Colony Forming Units) which have grown and
− If results are not acceptable, proceed with colony identification to orientate
horizontal position, or set it up on its tripod.
sure it is correctly positioned.
indicator light).
refer to the reading table for the final result (see page 6-1).
corrective action.
1
2
3
4
5
airIDEAL® 3P™ Traceability AeroBioCollector User's Manual 4-3
Page 62

Procedure
Sampling plan
Sampling plan
The sampling plan must be drawn up very carefully and followed strictly. The
aim is to guarantee that the values obtained are comparable. Any discrepancy
between values should reveal a variation in aerobiocontamination.
A sampling plan must include:
− the critical points to be controlled
− the following must be mentioned for each point controlled:
• the time and frequency,
• the micro-organism(s) to be isolated,
• the media used,
• the revivification conditions,
• the sample volume,
• the number of samples per area controlled,
• the reference level and the alert level,
In practice, the alert level can be fixed at 3 times the reference level.
• sampling conditions (temperature, hygrometry, staff numbers, activity,
etc.).
4-4 airIDEAL® 3P™ Traceability AeroBioCollector User's Manual
Page 63

Procedure
Recording and evaluating results
Recording and evaluating results
The person in charge of controlling the quality of air collects the results
recorded.
− Results which give expected values are validated.
− If unacceptable results are obtained, corrective action may be necessary.
The document for recording results must include:
− date and time of sample,
− operator’s name,
− critical point controlled,
− the situation of the control in relation to the activity (production cycle, pre or
post operative, etc.),
− detailed stages of the procedure,
− level of internal activity (number of people present, number of lines running,
etc.),
− thermohygrometric conditions (real or reference),
− micro-organism to be isolated,
− culture medium used,
− incubation conditions (duration, temperature),
− date and time of incubation,
− date and time of reading,
− reference level and alert level,
− result: acceptable/unacceptable,
− decision: validation/ corrective action.
1
2
3
4
airIDEAL® 3P™ Traceability AeroBioCollector User's Manual 4-5
5
Page 64

Page 65

5 Maintenance
Preventive maintenance
CAUTION! No preventive maintenance needs to be performed by the user.
If an anomaly occurs on your instrument, call bioMérieux or your local
distributor. Do not open the shell of the instrument.
Always use a replacement battery of the same type (Li-on 7.4 V – 4.4 to 5Ah)
to avoid the risk of explosion.
Used batteries must be returned to bioMérieux or your local distributor.
1
2
3
airIDEAL® 3P™ Traceability AeroBioCollector User's Manual 5-1
4
5
Page 66

Maintenance
Routine servicing
Routine servicing
The routine servicing operations to be carried out by the user are:
− Battery charging.
− Cleaning and disinfection.
− Sampling grid sterilization.
Cleaning
All parts, including the case (inside and outside), can be cleaned with soapy
water, rinsed and dried.
The stainless steel strip for attachment of Petri dishes can be dismantled for
cleaning.
IMPORTANT! Do not use acetone or chlorinated solvents (chloroform, etc.) o n the shell
or keyboard.
Decontamination of the external part
All the external parts of airIDEAL 3P Traceability can be decontaminated with
most usual disinfectants (hydrogen peroxide, concentrated peracetic acid,
hypochlorite (bleach) solution, 70% ethanol, quaternary ammonium).
Decontamination of the air circuit
bioMérieux has validated the bacteriological efficacy of air circuit
decontamination with ClearKlens IPA (Johnson Diversey).
Decontamination in a glove box
The instrument was specially developed and validated in order to be
decontaminated during the disinfection cycle of glove boxes
Sterilization of the sampling grid
The sampling grid can be sterilized in an autoclave:
− at 134°C for 18 minutes for 40 autoclave cycles.
− at 121°C for 20 minutes for 200 autoclave cycles.
IMPORTANT! Do not sterilize under a flame.
Airflow control
A yearly airflow control is recommended.
The first control should be performed one year after airIDEAL 3P Traceability
has been used for the first time.
IMPORTANT! The airflow control must be done by a qualified person who has all the
necessary equipment to perform this task and to enter the data into the
airIDEAL 3P Tracealibility.
5-2 airIDEAL® 3P™ Traceability AeroBioCollector User's Manual
Page 67

6 Troubleshooting
Indicator light
status
Flashing red
Error message Possible cause
LAST SAMPLING
NOT
COMPLETED
LAST SAMPLING
NOT
COMPLETED
ERROR
BATTERYLIFE
Sampling is interrupted in
MANUAL mode.
Sampling is interrupted in
SLAVE mode.
There is insufficient
battery life to perform the
sampling program.
Action
in MANUAL mode
Press <MENU> to return to
the welcome message.
N/A Acknowledge the fault on the RUID
Connect the instrument to
the mains power so that
sampling can start or put the
battery on charge.
Press <MENU> to return to the
welcome message.
and stop the sampling cycle with
the RUID that was used to start it.
If this RUID is not available,
press <MENU> for 10 seconds on
the instrument and then select
"Yes" to return to the welcome
message.
Acknowledge the fault on the RUID
and then connect the instrument to
the mains so that sampling can
start, or to charge the battery.
Action
in SLAVE mode
airIDEAL® 3P™ Traceability AeroBioCollector User's Manual 6-1
Page 68

Troubleshooting
Indicator light
status
Flashing red
Error message Possible cause
ERROR TIME > 5H
Flashing volume is
displayed
Screen is frozen on
"MENU 6"
The total duration of
sequenced samplings
programmed in
has exceeded 5 hours.
Sampling has been
accidentally interrupted
by the operator.
The autonomy test
started from
has been interrupted
using the <STOP> key.
MENU 6
MENU 5
Action
in MANUAL mode
Reprogram so that the total
duration does not exceed 5
hours.
To continue sampling, press
<START>. The volume
collected will flash on the
display.
To stop sampling, press
<STOP>.
To continue the autonomy
test, press <START>.
Action
in SLAVE mode
Not applicable as the fault is
detected when the sampling
campaign is programmed on the
PC application.
Acknowledge the fault on the
RUID and then close the
sampling cycle with the RUID that
was used to start it.
If this RUID is not available,
press <MENU> for 10 seconds on
the instrument and then select
"
Yes" to return to the welcome
message.
Sampling cannot continue.
The volume collected flashes on the
instrument.
Not applicable as the autonomy
test can only be performed in
MANUAL mode.
6-2 airIDEAL
®
3P™ Traceability AeroBioCollector User's Manual
Page 69

Troubleshooting
Indicator light
status
Flashing red
Error message Possible cause
REMOVE
PROTECTION
COVER
MOTOR JAMMED
CALIBRATION
DATE EXPIRED
Sampling has been
interrupted as the
protective cover has
been detected.
Sampling has been
interrupted as the motor
has jammed.
The calibration date has
expired.
Can only be
detected by the RUID in
slave mode.
Action
in MANUAL mode
Replace the protective cover
with the grid and then press
<MENU> to return to the
welcome message.
If the message appears
when the protective cover
has been removed, please
contact your supplier.
Inspect the black grid under
the Petri dish retaining
claws.
Press <MENU> to return to
the welcome message.
Not applicable as the
instrument cannot detect when
the calibration date has expired.
Sampling can be performed.
Action
in SLAVE mode
Acknowledge the fault to allow
another sampling cycle to start.
Close the sampling cycle using
the RUID.
Replace the protective cover with
the sampling grid in order to start
sampling.
If the message appears when the
protective cover has been
removed, contact your supplier.
Inspect the black grid under the
Petri dish retaining claws.
Acknowledge the fault using the
RUID.
Use the RUID to acknowledge the
fault and allow another sampling
cycle to start.
Even if the calibration date is
not updated, the instrument
returns to the welcome message
and is able to perform the
programmed sampling cycle.
However, the calibration date
expiry is recorded in the sampling
data.
airIDEAL® 3P™ Traceability AeroBioCollector User's Manual 6-3
Page 70

Troubleshooting
Indicator light
status
Green / Red
flashing
Off
Error message Possible cause
Welcome message
with battery symbol
crossed out and
sound signal
(2 long beeps).
SERIAL NUMBER
UNKNOWN
NO CALIBRATION
DATA
Screen off Sampling has been
Battery is low. Charge the instrument
The serial number is
undefined.
No calibration data
stored in the instrument
memory.
interrupted as the
instrument was
disconnected from the
mains power
Action
in MANUAL mode
Charge the instrument battery.
battery.
Sampling is allowed, unless
the battery life is shorter
than the autonomy required
to perform the requested
sampling cycle.
Contact your supplier. Contact your supplier. Constant red
Contact your supplier. Contact your supplier.
Reconnect the instrument to
the mains and press
<ON/OFF> to turn it on.
Sampling cannot
continue.
Sampling is allowed, unless the
battery life is shorter than the
autonomy required to perform the
requested sampling cycle.
Reconnect the instrument to the
mains and press <ON/OFF> to
switch it on.
Acknowledge the fault on the
RUID to allow another sampling
cycle to start and then close the
sampling cycle using the RUID.
Sampling cannot continue.
Action
in SLAVE mode
Screen off Battery is low. Charge the battery. Charge the battery.
.
6-4 airIDEAL® 3P™ Traceability AeroBioCollector User's Manual
Page 71

7 Appendix
Using the reading table
The following reading tables indicate the most probable number of microorganisms collected per plate (MPN collected) with respect to the number of
agglomerates of colonies counted on the agar (CFU read).
The MPN value is calculated from the CFU count, using FELLER’s law. This
statistical correction corresponds to the random passing of bacteria through the
orifices of the grid.
It quantifies for each « visited » orifice, (i.e. for each cluster counted) and as a
function of the total number of clusters counted, the most probable number of
bacteria which make up the cluster concerned, i.e. the number of bacteria
having passed through the same orifice.
The application of the statistical correction assumes that the CFU count on the
agar concerns the number of colony clusters, i.e. the number of orifices with a
positive impact, without distinguishing, within a given cluster, the number of
confluent colonies of which it is made up.
In order to determine the most probable number of micro-organisms
collected per cubic meter, the most probable number of micro-organisms
collected per plate (MPN collected) must be multiplied by 1000 and divided by
the volume sampled in liters.
Example: Volume of air sampled = 50 liters
airIDEAL® 3P™ Traceability AeroBioCollector User's Manual 7-1
CFU count: 120
MPN value: 159, 380905
Result expressed as the MPN collected per cubic meter = 159 x 1000 / 50 = 3180
Page 72

Appendix
Information on FELLER’s law
Information on FELLER’s law
The formula for FELLER’s law is the following:
MPN = N .( 1/N + 1/N-1 + 1/N-2 + ………. + 1/N-CFU+1)
where:
MPN = most probable number of bacteria having passed through the orifices of
the grid
N= number of orifices on the grid.
CFU = colony forming units, value obtained by the laboratory.
In the case of a sampling grid for which the passage of a particle through a
given orifice of the grid is purely random, there is a probability that, during a
sampling cycle, several particles pass through the same orifice and are
therefore counted as a single and unique CFU, while other orifices are not
passed through by any particles.
The closer the CFU count obtained by the laboratory is to N, (total number of
orifices on the grid), the higher the probability is.
Moreover, the notion of probability density arises:
Example: for a given CFU value:
− there is a probability p2 that the same orifice is passed through by 2 particles
− there is a probability p3 that the same orifice is passed through by 3 particles
− there is a probability pi that the same orifice is passed through by i particles
etc…
The probability pi decreases as i increases.
It is therefore particularly relevant to apply the statistical correction using
FELLER’s law when high CFU values are read, i.e. close to N, i.e. in the case of
agar plates almost completely saturated with colonies.
IMPORTANT! In practice, and whenever possible, to minimize statistical correction , it is
recommended to adjust the sample volume so that the CFU count does
not exceed 100.
7-2 airIDEAL
®
3P™ Traceability AeroBioCollector User's Manual
Page 73

Reading tables
Appendix
Reading tables
CFU
count
1 1 31 32,902158 61 69,177312 91 111,217670
2 2,003788 32 34,034636 62 70,476332 92 112,740659
3 3,011392 33 35,171976 63 71,781750 93 114,272451
4 4,022843 34 36,314217 64 73,093631 94 115,813148
5 5,038168 35 37,461403 65 74,412039 95 117,362856
6 6,057399 36 38,613577 66 75,737039 96 118,921679
7 7,080565 37 39,770782 67 77,068698 97 120,489727
8 8,107697 38 40,933063 68 78,407081 98 122,067108
9 9,138825 39 42,100464 69 79,752259 99 123,653934
10 10,173982 40 43,273030 70 81,104300 100 125,250320
11 11,213197 41 44,450808 71 82,463274 101 126,856380
12 12,256504 42 45,633844 72 83,829254 102 128,472234
13 13,303935 43 46,822184 73 85,202311 103 130,098001
14 14,355523 44 48,015878 74 86,582519 104 131,733803
15 15,411300 45 49,214973 75 87,969954 105 133,379766
16 16,471300 46 50,419519 76 89,364690 106 135,036016
17 17,535557 47 51,629564 77 90,766807 107 136,702683
18 18,604105 48 52,845161 78 92,176381 108 138,379898
19 19,676979 49 54,066359 79 93,593494 109 140,067796
20 20,754215 50 55,293211 80 95,018225 110 141,766514
21 21,835848 51 56,525769 81 96,450657 111 143,476191
22 22,921913 52 57,764087 82 97,890875 112 145,196971
23 24,012448 53 59,008218 83 99,338962 113 146,928997
24 25,107490 54 60,258218 84 100,795006 114 148,672418
25 26,207075 55 61,514142 85 102,259094 115 150,427385
26 27,311241 56 62,776047 86 103,731317 116 152,194051
27 28,420028 57 64,043990 87 105,211764 117 153,972575
28 29,533473 58 65,318028 88 106,700528 118 155,763115
29 30,651617 59 66,598221 89 108,197703 119 157,565836
30 31,774498 60 67,884629 90 109,703385 120 159,380905
Corrected
MPN
CFU
count
Corrected
MPN
CFU
count
Corrected
MPN
CFU
count
Corrected
MPN
airIDEAL® 3P™ Traceability AeroBioCollector User's Manual 7-3
Page 74

Appendix
Reading tables
CFU
count
121 161,208491 151 222,874919 181 303,387386
122 163,048769 152 225,199481 182 306,542148
123 164,901916 153 227,544613 183 309,734919
124 166,768113 154 229,910685 184 312,966627
125 168,647546 155 232,298072 185 316,238232
126 170,540403 156 234,707163 186 319,550732
127 172,446878 157 237,138356 187 322,905162
128 174,367167 158 239,592059 188 326,302598
129 176,301474 159 242,068695 189 329,744156
130 178,250003 160 244,568695 190 333,230999
131 180,212966 161 247,092504 191 336,764332
132 182,190578 162 249,640581 192 340,345413
133 184,183059 163 252,213397 193 343,975550
134 186,190635 164 254,811436 194 347,656105
135 188,213536 165 257,435198 195 351,388500
136 190,251998 166 260,085198 196 355,174214
137 192,306261 167 262,761966 197 359,014794
138 194,376574 168 265,466048 198 362,911853
139 196,463188 169 268,198007 199 366,867077
140 198,566362 170 270,958423 200 370,882228
141 200,686362 171 273,747897 201 374,959151
142 202,823459 172 276,567046 202 379,099776
143 204,977931 173 279,416508 203 383,306125
144 207,150062 174 282,296943 204 387,580319
145 209,340144 175 285,209031 205 391,924581
146 211,548478 176 288,153475 206 396,341248
147 213,775369 177 291,131003 207 400,832773
148 216,021131 178 294,142367 208 405,401739
149 218,286089 179 297,188344 209 410,050862
150 220,570571 180 300,269739 210 414,783004
Corrected
MPN
CFU
count
Corrected
MPN
CFU
count
Corrected
MPN
7-4 airIDEAL
®
3P™ Traceability AeroBioCollector User's Manual
Page 75

Appendix
Reading tables
CFU
count
211 419,601186 239 610,669016
212 424,508594 240 620,861324
213 429,508594 241 631,461324
214 434,604748 242 642,502990
215 439,800826 243 654,024729
216 445,100826 244 666,070184
217 450,508989 245 678,689231
218 456,029823 246 691,939231
219 461,668120 247 705,886600
220 467,428990 248 720,608822
221 473,317879 249 736,197057
222 479,340606 250 752,759557
223 485,503397 251 770,426224
224 491,812921 252 789,354796
225 498,276335 253 809,739411
226 504,901335 254 831,822744
227 511,696207 255 855,913653
228 518,669891 256 882,413653
229 525,832053 257 911,858098
230 533,193165 258 944,983098
231 540,764593 259 982,840241
232 548,558711 260 1027,006907
233 556,589014 261 1080,006907
234 564,870264 262 1146,256907
235 573,418651 263 1234,590241
236 582,251984 264 1367,090241
237 591,389915 265 1632,090241
238 600,854201
Corrected
MPN
CFU
count
Corrected
MPN
airIDEAL® 3P™ Traceability AeroBioCollector User's Manual 7-5
Page 76

Page 77

Notes
.................................................................................................................................................................................................................................................................
.................................................................................................................................................................................................................................................................
.................................................................................................................................................................................................................................................................
.................................................................................................................................................................................................................................................................
.................................................................................................................................................................................................................................................................
.................................................................................................................................................................................................................................................................
.................................................................................................................................................................................................................................................................
.................................................................................................................................................................................................................................................................
.................................................................................................................................................................................................................................................................
.................................................................................................................................................................................................................................................................
.................................................................................................................................................................................................................................................................
.................................................................................................................................................................................................................................................................
.................................................................................................................................................................................................................................................................
.................................................................................................................................................................................................................................................................
.................................................................................................................................................................................................................................................................
.................................................................................................................................................................................................................................................................
.................................................................................................................................................................................................................................................................
.................................................................................................................................................................................................................................................................
airIDEAL® 3P™ Traceability AeroBioCollector User's Manual Notes-1
Page 78

Notes
................................................................................................................................................................................................................................................................
................................................................................................................................................................................................................................................................
................................................................................................................................................................................................................................................................
................................................................................................................................................................................................................................................................
................................................................................................................................................................................................................................................................
................................................................................................................................................................................................................................................................
................................................................................................................................................................................................................................................................
................................................................................................................................................................................................................................................................
................................................................................................................................................................................................................................................................
................................................................................................................................................................................................................................................................
................................................................................................................................................................................................................................................................
................................................................................................................................................................................................................................................................
................................................................................................................................................................................................................................................................
................................................................................................................................................................................................................................................................
................................................................................................................................................................................................................................................................
................................................................................................................................................................................................................................................................
................................................................................................................................................................................................................................................................
................................................................................................................................................................................................................................................................
................................................................................................................................................................................................................................................................
................................................................................................................................................................................................................................................................
................................................................................................................................................................................................................................................................
Notes-2 airIDEAL® 3P™ Traceability AeroBioCollector User's Manual
Page 79

Page 80

 Loading...