

Page 1
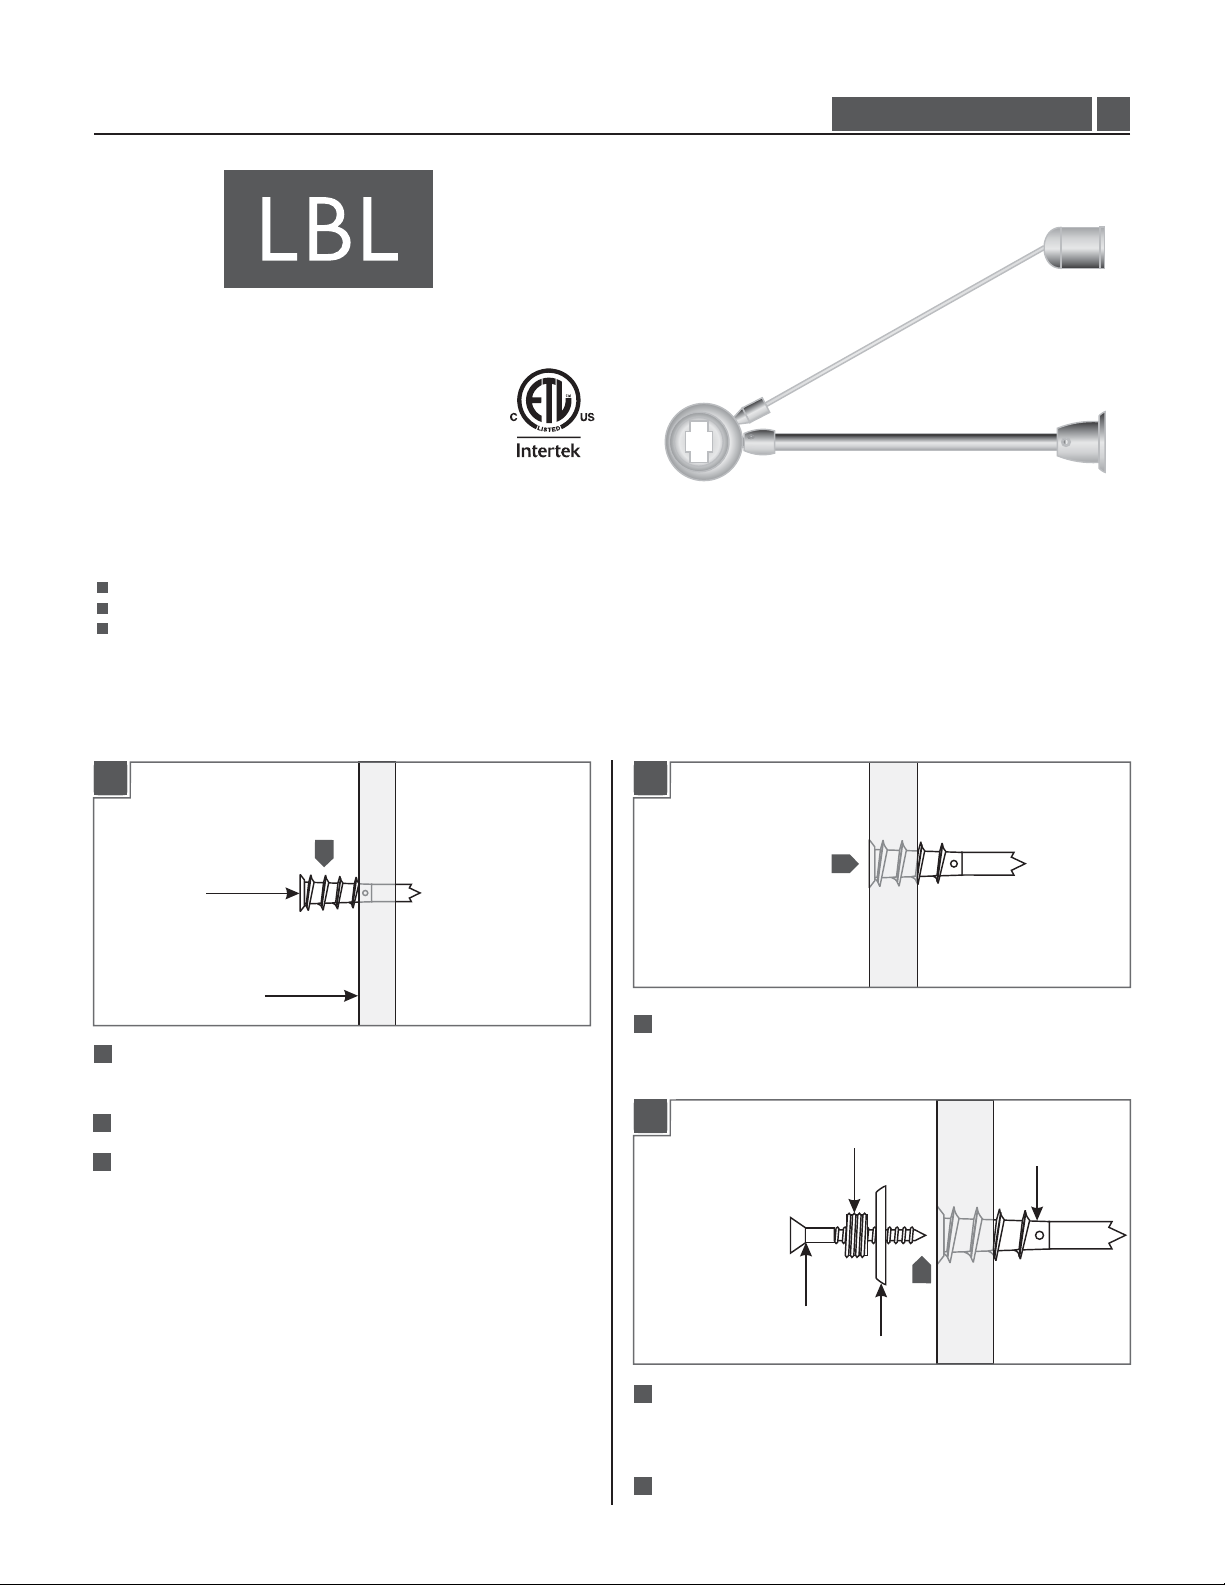
Installation Instructions for
980MRLCSP
Telescoping Rigid Standoffs with Wall Bracket
Monorail
GP I :ENERAL RODUCT NFORMATION
This product is suitable for indoor dry locations only.
This product must be used with LBL Monorail system only.
This instruction is for the following models:
Monorail Support 2.6" - 4" (HANGER-ADJ-_-1WB)
Monorail Support 6" - 10" (HANGER-ADJ-_-2WB)
Monorail Support 12" - 24" (HANGER-ADJ-_-3WB)
HANGER-ADJ-_-WB
1.3
Install the Telescoping Rigid Standoffs
1A
3
ANCHOR
WALL
11
Select a location on the wall where the Monorail is to be
mounted.
2
Mark the standoff points on the wall.
3
Tap the anchor at the marked point up to the threaded portion
with a hammer.
1B
4
4
Screw the anchor in the rest of the way with a Phillips
screwdriver.
1C
4
THREADED NIPPLE
5
ANCHOR
#8 SCREW
WASHER
5
Insert the #8 screw into the threaded nipple and washer.
Tighten the #8 screw completely into the anchor to secure the
washer and threaded nipple in place.
6
Repeat step 1 through 5 for the remaining standoffs.
1
Page 2

Adjust the Standoff Height (Optional)
1D
2 MM ALLEN WRENCH
M4 SET SCREW
7
Loosen the M4 set screw on the support(Do Not Remove)
post with the 2 MM Allen wrench provided to remove the
support post.
1E
THREADED
NIPPLE
7
SUPPORT POST
2A
11
1.5MM ALLEN
WRENCH
2
1
TELESCOPING POST
Slightly loosen the M3 set screw on the(Do Not Remove)
M3 SET
SCREW
side of the telescoping post with th 1.5 MM Allen wrench
provided.
2
Adjust standoff height and tighten M3 set screw with 1.5 MM
Allen wrench.
Repeat steps 1 and 2 for the remaining standoffs.
3
Install the Cable Post
3A
WALL
ANCHOR
1
8
SUPPORT POST
8
Screw the support post completely onto the threaded nipple.
1F
2 MM ALLEN WRENCH
STANDOFF ROD
M4 SET SCREW
SUPPORT POST
Push the standoff rod completely into the support post and
9
tighten the M4 set screw with the 2 MM Allen wrench.
10
Repeat steps 7 through 9 for the remaining standoffs.
9
3
11
Select a location on the wall above the support post to install
the cable post (the cable is recommended to be at a minimum
angle of 30
2
Tap the anchor at the marked point up to the threaded portion
º to the support rod).
with a hammer.
3
Screw the anchor in the rest of the way with a Phillips
screwdriver.
3B
#8 SCREW
THREADED WASHER
4
Insert the #8 screw into the threaded washer and tighten the
4
ANCHOR
#8 screw completely into the anchor to secure the threaded
washer in place.
5
Repeat step 1 through 4 for the remaining standoffs.
2
Page 3

3C
STRAIN RELIEF
AIRCRAFT CABLE
6
SLOTTED CABLE POST
6
Insert the aircraft cable completely into the slotted cable post.
Pull the aircraft cable so that the strain relief sits against the
slot.
3D
THREADED WASHER
7
3G
AIRCRAFT CABLE
11
10
Insert the aircraft cable into the cable connector post.
11
Pull aircraft cable until it is taut and secure it by tightening the
10
SLOTTED POST
30
º
M3 set screw on the cable connector post with the 1.5MM
Allen wrench.
12
Repeat steps 6 through 11 for the remaining standoffs.
Install the Monorail
4A
7
Screw in the slotted cable post completely onto the threaded
washer.
3E
8
8
Remove the M3 set screw on the housing next to the standoff
rod with the 1.5 MM Allen wrench.
3F
CABLE CONNECTOR POST
M3 SET SCREW
1.5MM ALLEN WRENCH
1
PLASTIC INSULATOR
1
For all standoffs, slightly loosen the two(Do Not Remove)
M3 set screws on the side of the housing with the 1.5MM Allen
wrench to ease inserting the Monorail.
4B
MONORAIL
2
9
9
Tighten the cable connector post completely into the housing
thread hole.
PLASTIC INSULATOR
2
Insert the Monorail through the plastic insulator.
3
Page 4

4C
MONORAIL
MONORAIL
4
3
PLASTIC INSULATOR
SAVETHESE INSTRUCTIONS!
4
3
PLASTIC INSULATOR
If necessary (depending on design) rotate the Monorail to the
3
desired angle or horizontal position.
Tighten the M3 set screw on housing with the 1.5 MM Allen
4
wrench to the secure the Monorail in place.
7400 Linder Ave, Skokie, IL 60077
800.323.3226 - 847.626.6300
www.lbllighting.com
© 2014 LBL Lighting.All rights reserved. The "LBL Lighting" graphic is a
registered trademark of LBL Lighting. LBL Lighting reserves the right to
change specifications for product improvements without notification.
A Generation Brands Company
4
 Loading...