

Page 1
Installation Instructions for
980LULUC
Lulu Ceiling
Ceiling
GENERAL PRODUCT INFORMATION:
This product can mount to either a 4” square electrical box with a
round plaster ring or an octagon electrical box.
This product is suitable for damp locations.
This instruction shows a typical installation.
CAUTION - RISK OF FIRE
This product requires installation by a qualified
electrician. Before installing be sure to read all
instructions and TURNTHE POWER TO THE
ELECTRICAL BOX OFF.
LC661_LED
1.0
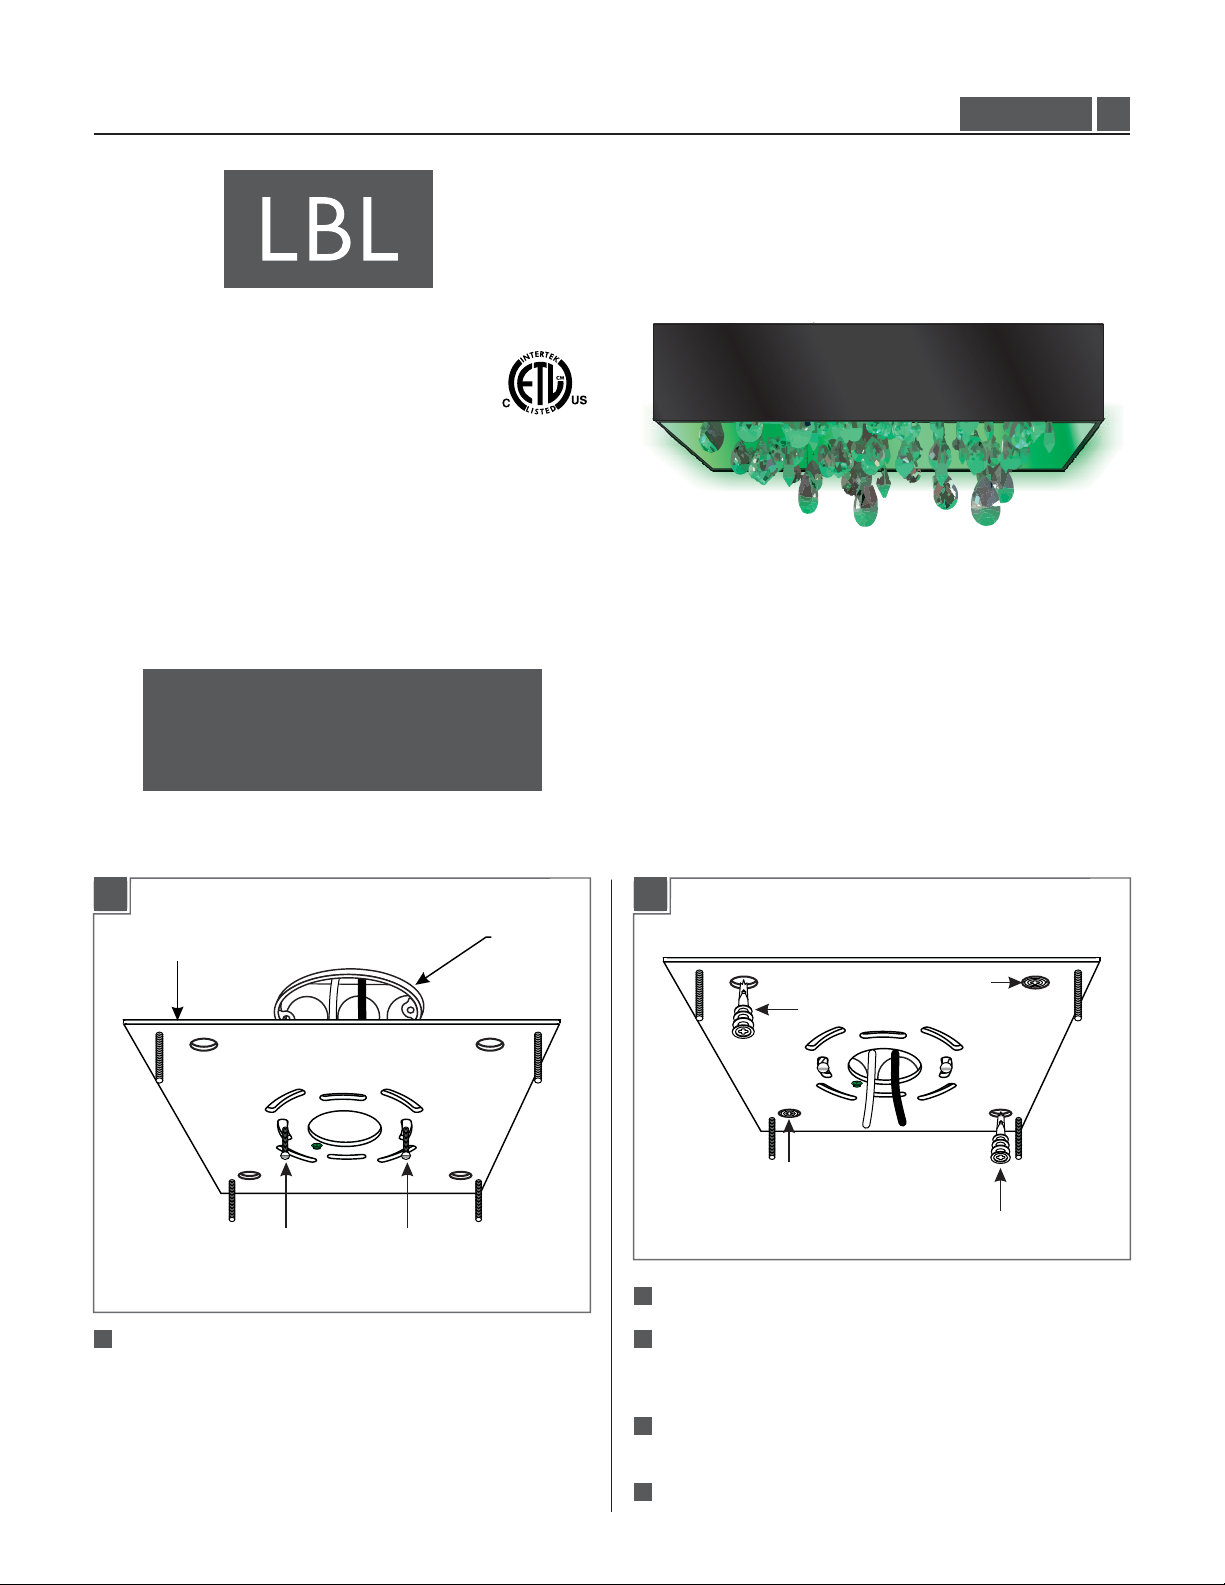
Install the Fixture
1A
MOUNTING PLATE
#8-32 SCREW #8-32 SCREW
1
Mount the mounting plate to the electrical box with
the two #8-32 screws.
ELECTRICAL
BOX
1B
ANCHOR
ANCHOR
ANCHOR
ANCHOR
2
Verify that the mounting plate is level before continuing.
3
Line up an anchor tip with the center a mounting plate
hole, and push the anchor into the wall up to the
threads.
6
4
Screw the anchors in the rest of the way with a Phillipshead screwdriver.
Repeat steps 3-4 for all four anchors.
65
1
Page 2

1C
1E
WASHER
SCREW
SCREW
WASHER
66
Slide a #8 screw through a washer and screw it into an
WASHER
SCREW
WASHER
SCREW
anchor.
67
Repeat for all four anchors to secure the mounting plate
to the wall.
1D
CAP NUTS
11
Mount the fixture base to the ceiling by installing it
onto the mounting plate and securing it tightly with
the four cap nuts.
Install the Crystals
8
9
8
Connect the mounting plate ground wire to a suitable
10
ground according to local electrical codes.
9
Connect the white (blue) fixture wire to the neutral
power line wire with a wire nut.
10
Connect the black (brown) fixture wire to the hot power
line wire with a wire nut.
Note: An installation guide of the crystals has been
provided by the designer on the next page for an
asymmetrical look. The crystals may be installed in
any configuration as desired.
2A
1
HOOK
CABLE LOOP
1
Install each crystal by placing the looped end of the
cable onto each individual hook.
2
Page 3
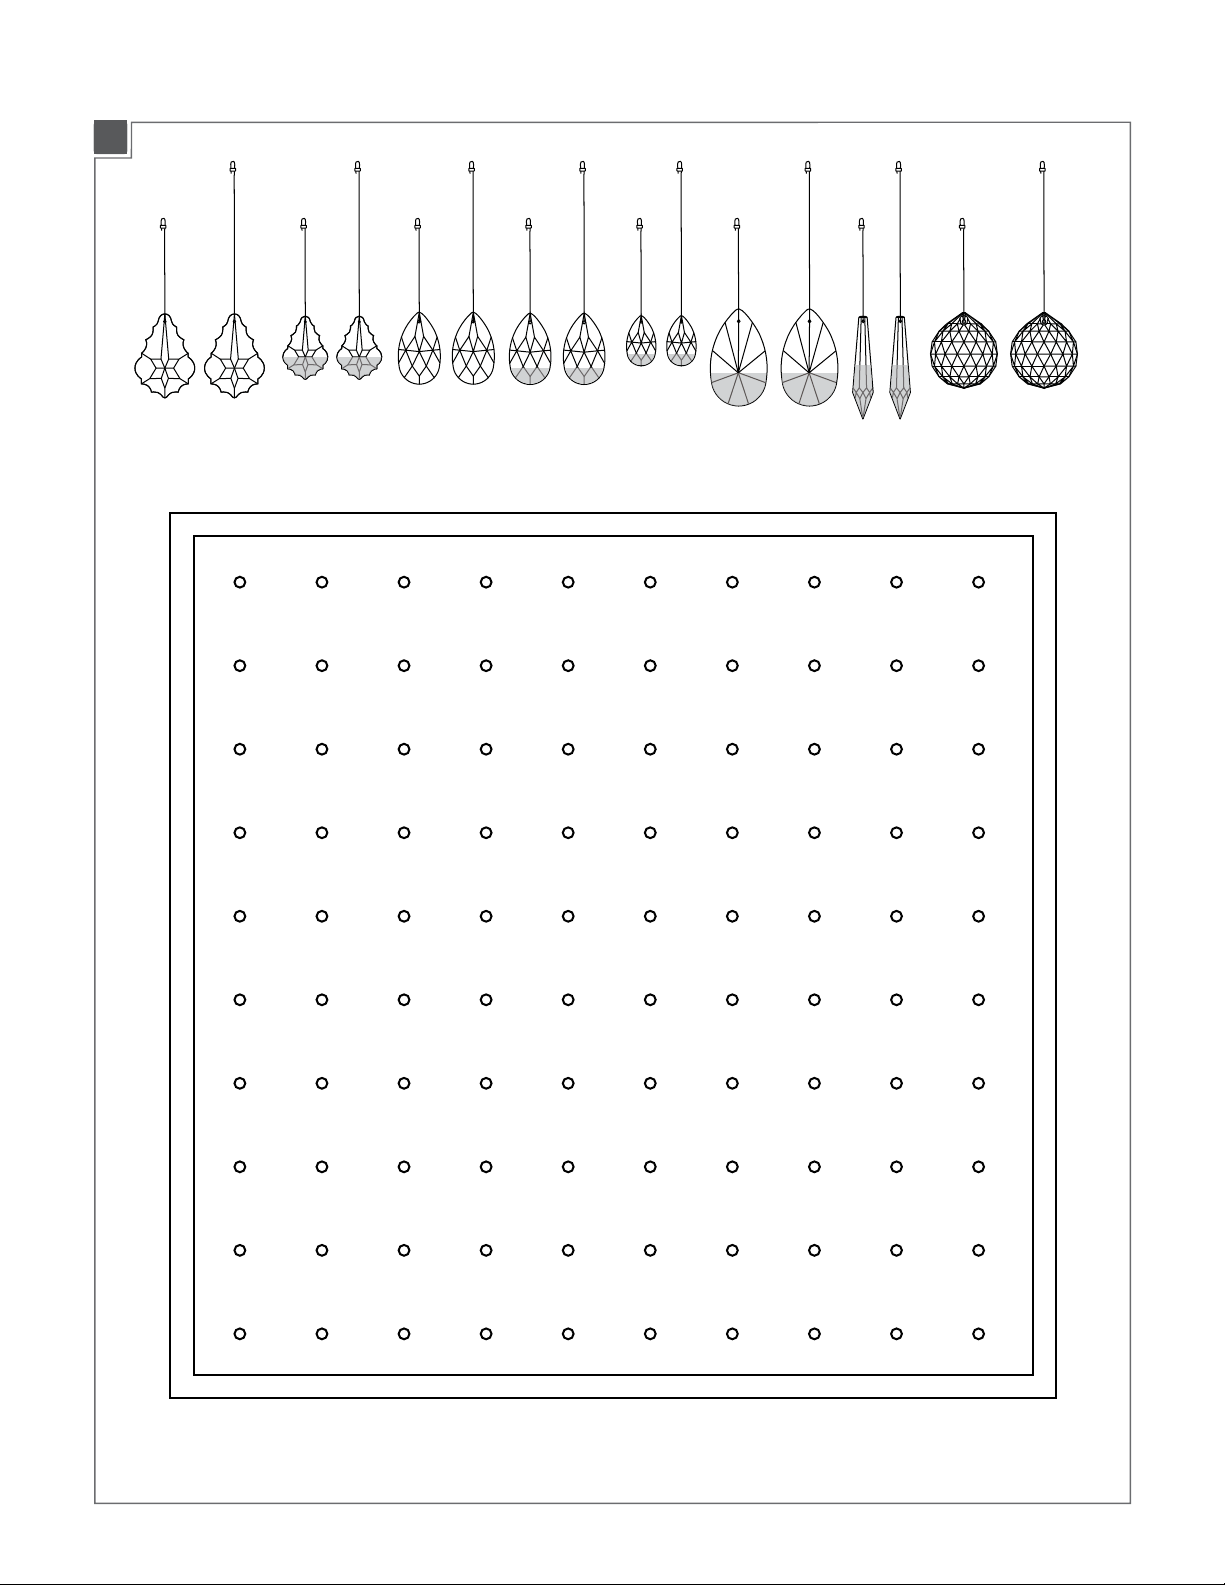
Crystal Configuration
2B
1S 1L
5L 2S
6S
4L
4S
1L
2S 2L
3S 3L 4S 4L
7L
1S
4L
6L 5S 7L 4S
8S
2L
6L 8L
1L 6L 8S 1S
5S 7L 2S 8S 3S
5S 5L
6S
2L
1L
2L
6S 6L
1L
6L
7S 7L
2L
7L 3L 5S
8S 8L
2S
4L
5L 6S 5L 3L
7L
1L
8L 1L 7S
6L
4L
7L
7L
5L
7S
1L
4L 3L 4S 6L 1S
6L 1S 8L 5S 8S 6L 8S 7S 6S
3S 4S
7L 2S 6L
4S 4L
7S
3S
4L
1L
7L 3S 8L
1L
7L 1S
1L
6S
4L
2L
4L
3L 5L 3S 7S 6L 5S 2S
3
8L
3L
4L
Page 4
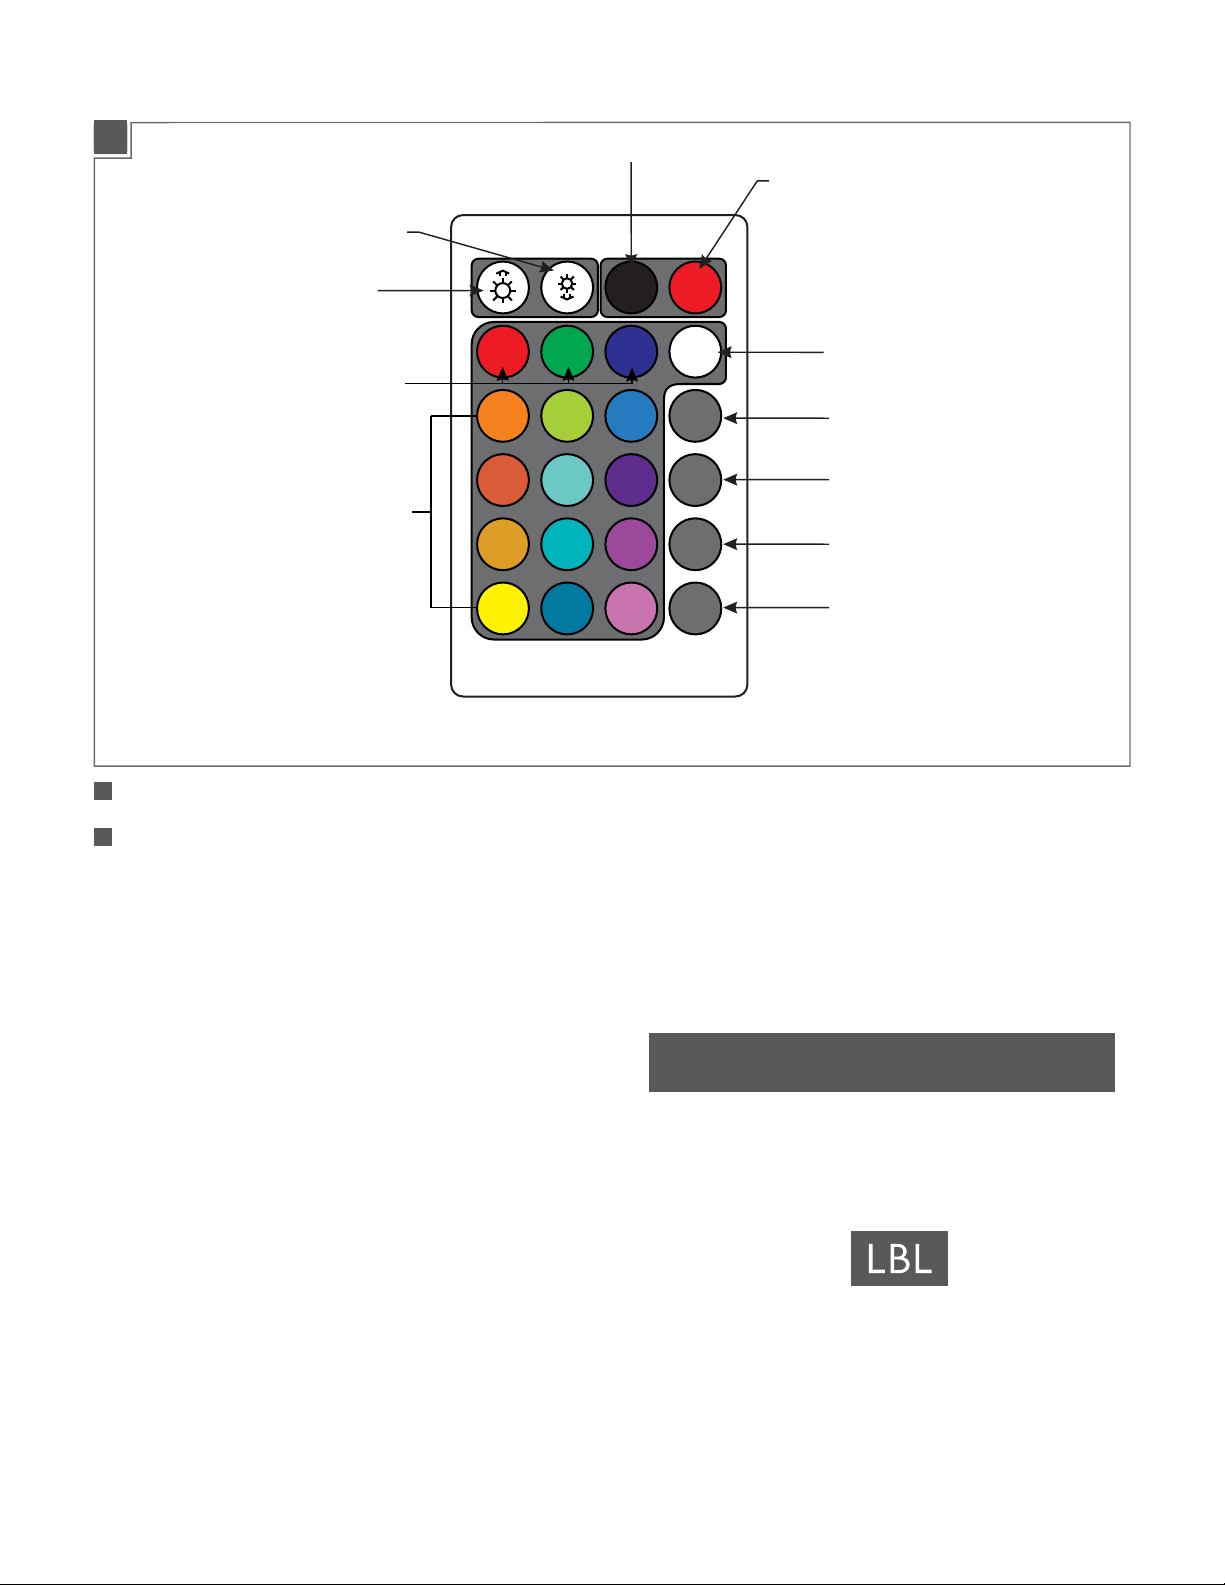
Remote Control
2B
SLOW DOWN TRANSITION
SPEED UP TRANSITION
PRIMARY COLORS
SECONDARY COLORS
POWER OFF FIXTURE
OFF ON
RGBW
FLASH
STROBE
FADE
SMOOTH
POWER ON FIXTURE
WHITE LIGHT
7 COLOR FAST TRANSITION
ALL COLORS FADE IN & OUT
7 COLORS FADE IN & OUT
PRIMARY COLORS FAST TRANSITION
1
Pressing the color buttons will maintain that particular selection with no transitions.
2
The Slow and Speed transitional buttons may be used for any of the four color transitions.
SAVE THESE INSTRUCTIONS!
7400 Linder Ave, Skokie, IL 60077
800.323.3226 - 847.626.6300
www.lbllighting.com
© 2012 LBL Lighting.All rights reserved. The "LBL Lighting" graphic is a
registered trademark of LBL Lighting. LBL Lighting reserves the right to
change specifications for product improvements without notification.
A Generation Brands Company
4
 Loading...